
Все способы:
- Способ 1: Отмена оптимизации доставки
- Способ 2: Отключение лимита трафика
- Способ 3: Замена DNS-сервера
- Способ 4: Настройка роутера
- Способ 5: Проверка на вирусы
- Способ 6: Работа с автозагрузкой
- Способ 7: Помощь стороннего софта
- Вопросы и ответы: 2
Обратите внимание! Поднять скорость передачи данных сверх той, что предусмотрена вашим тарифом, невозможно. Есть только способы выявить и устранить причины ее резкого снижения. Поэтому в первую очередь измерьте текущую пропускную способность любым из доступных для этого инструментов, и если она сильно отличается от обещанной провайдером, попробуйте выполнить предложенные нами действия.
Способ 1: Отмена оптимизации доставки
Microsoft придумала функцию, которая позволяет получать обновления для операционной системы из альтернативных источников – других компьютеров в интернете или локальной сети, загружающих те же самые файлы. А значит, однажды ваше устройство также может быть использовано в качестве сервера, что приведет к дополнительной нагрузке на сеть.
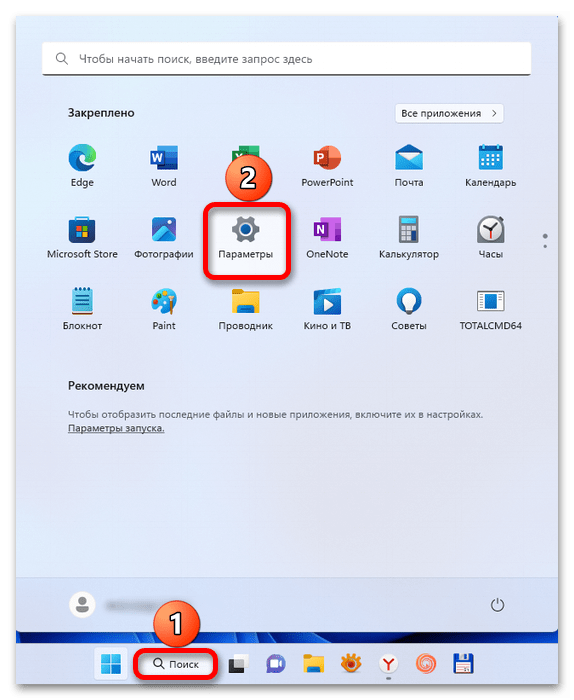
- Кликаем кнопку «Пуск» и открываем системные настройки.
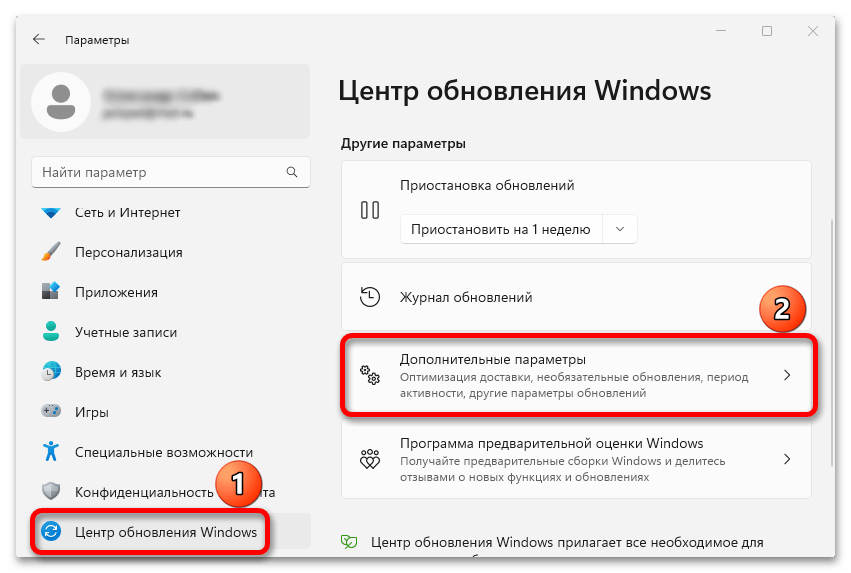
- Переходим в раздел обновления Windows, жмем «Дополнительные параметры»,

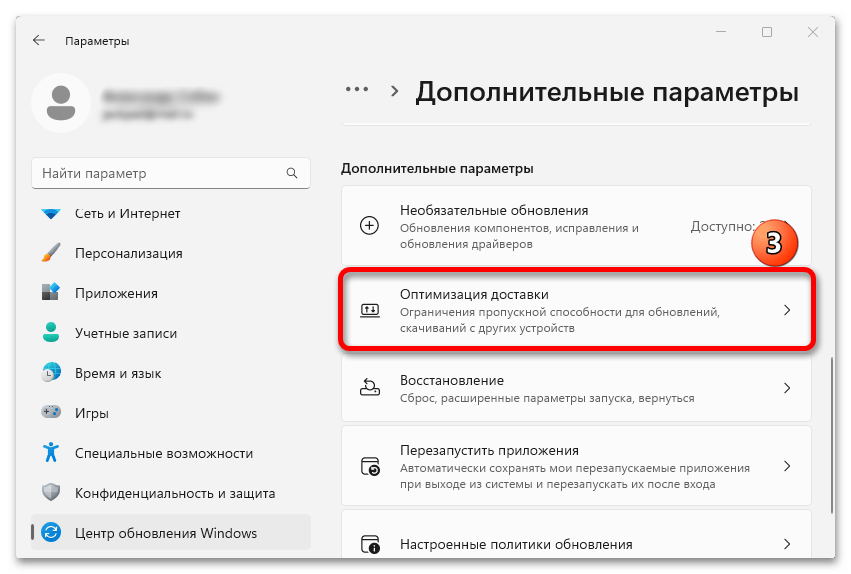
затем «Оптимизация доставки»

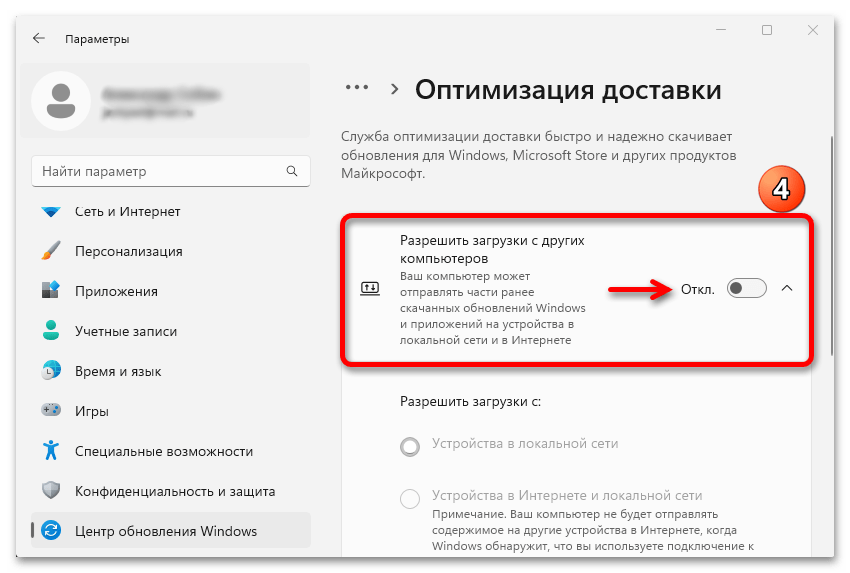
и, если опция включена, отключаем ее.
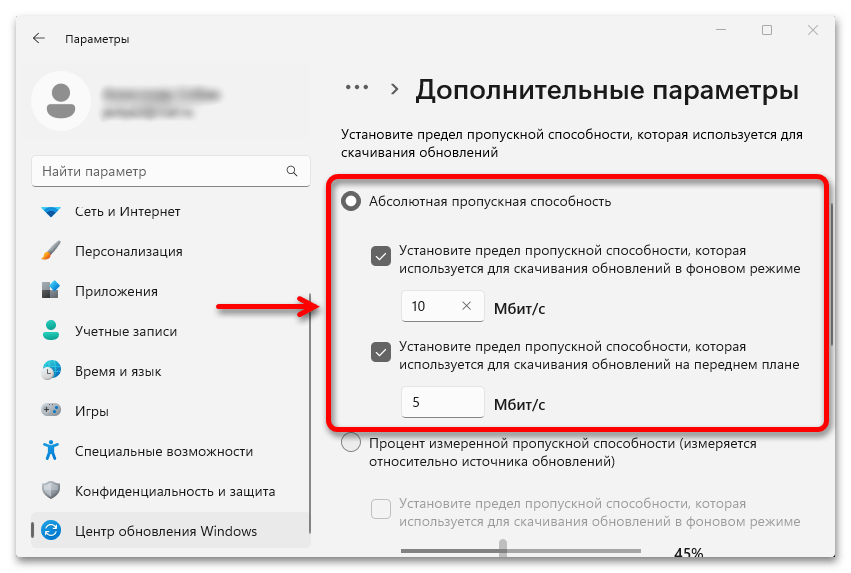
- Опускаемся ниже и открываем еще одни «Дополнительные параметры».
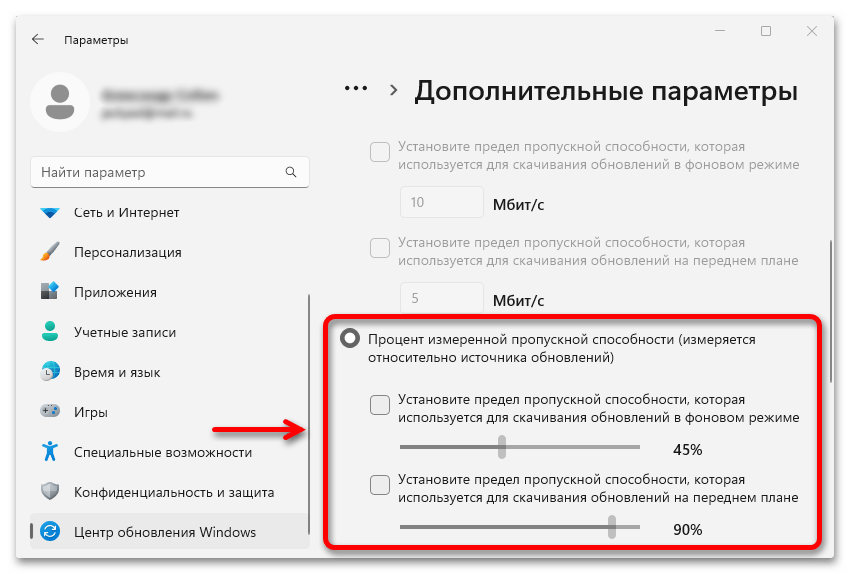
Здесь мы можем установить предельную скорость передачи данных для загрузки обновлений в фоновом или активном режиме путем указания ее абсолютных значений
или процента от измеренной пропускной способности.
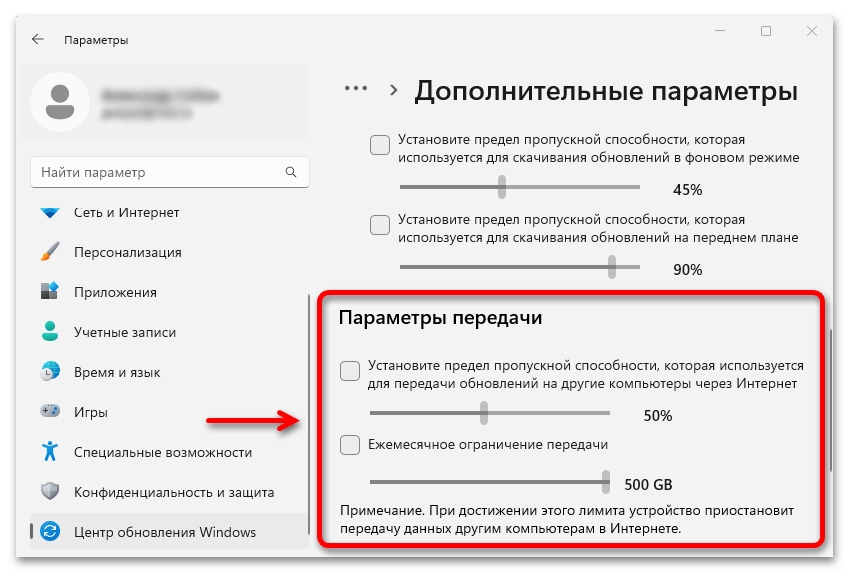
- Есть аналогичная возможность настроить передачу данных на другие компьютеры, но мы только что эту опцию отключили, поэтому сейчас нас эти параметры не интересуют.

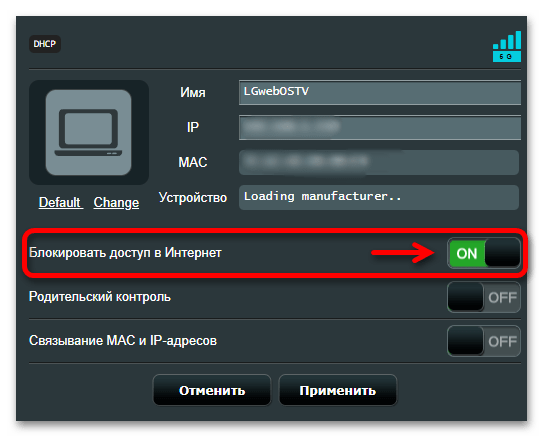
Способ 2: Отключение лимита трафика
Проверьте статус функции, предназначенной для более экономичного использования лимитных тарифов. Если она активна, подключение будет ограничивать трафик для некоторых приложений, а также запрашивать подтверждение на загрузку определенных обновлений.
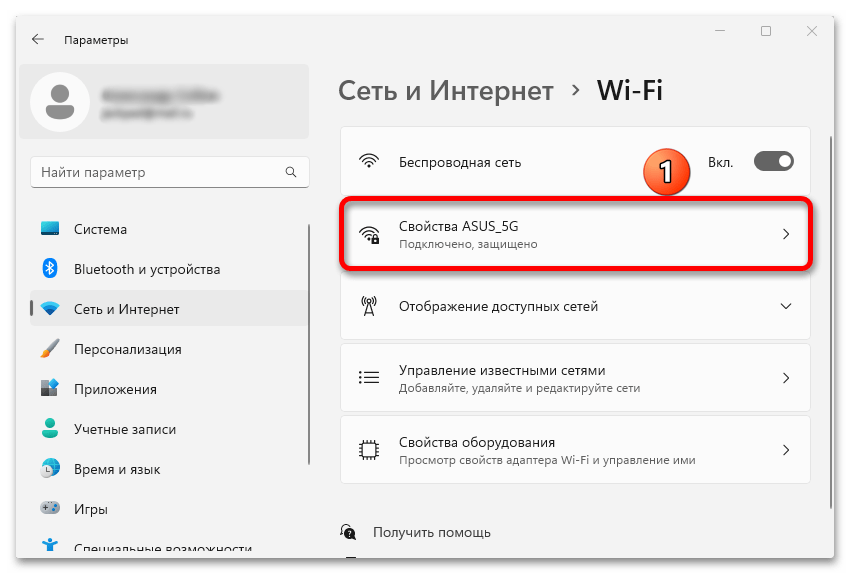
- Снова открываем «Параметры» Виндовс 11, переходим во вкладку «Сеть и Интернет», а далее при кабельном подключении жмем плитку «Ethernet», а при беспроводном, которое используется в нашем примере, «Wi-Fi».
- Вызываем свойства сети, к которой устройство в данный момент подключено,

прокручиваем страницу вниз и отключаем лимитное соединение.


Если эта опция у вас заблокирована, скорее всего, компьютер принадлежит организации, в которой все решает системный администратор, а значит, самостоятельно вы вряд ли что-то сможете сделать.
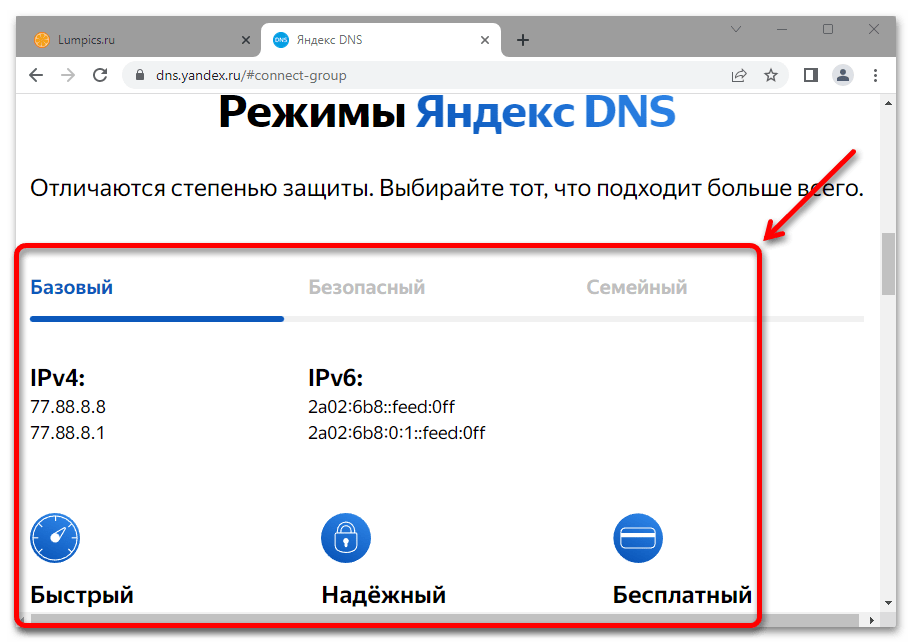
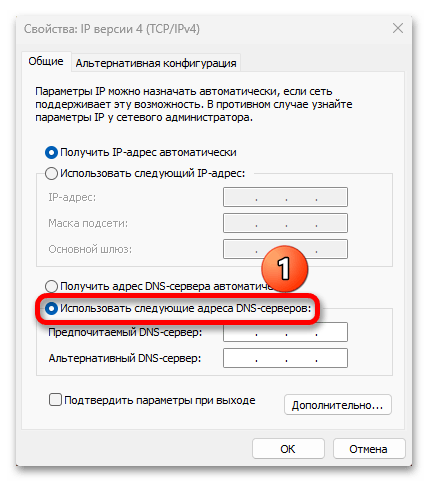
Способ 3: Замена DNS-сервера
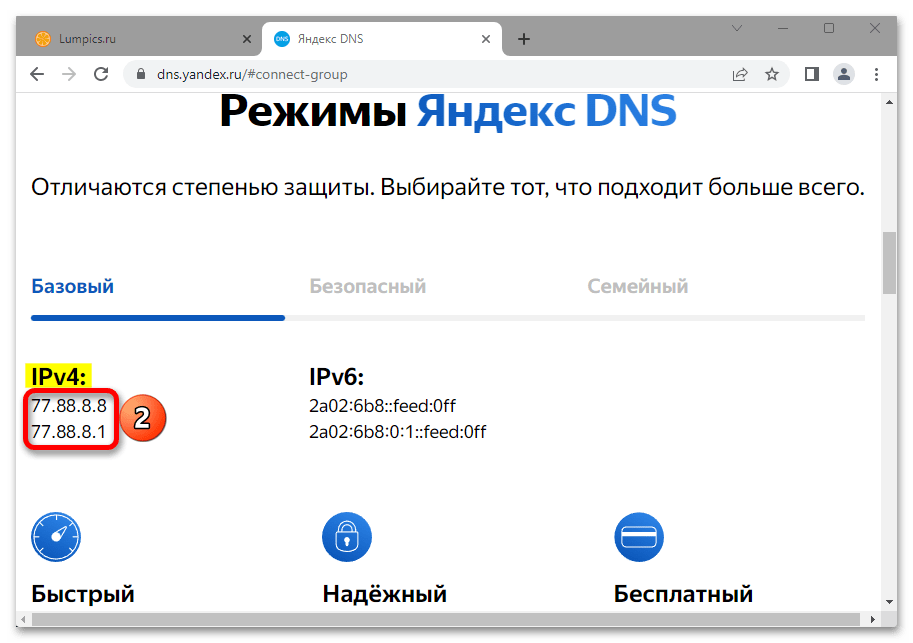
DNS-серверы, которые используются для преобразования доменных имен в IP-адреса, обычно назначаются провайдером, но не всегда работают быстро. Поэтому замена их на альтернативные публичные серверы довольно часто приводит к повышению скорости интернета. Что касается поставщиков, то их достаточно много, а мы покажем этот способ на примере бесплатного сервиса Яндекс DNS.
Перейти к сервису «Яндекс DNS»
- Переходим по ссылке выше. Здесь предусмотрено сразу три режима, которые отличаются степенью защиты. Вам следует изучить каждый из них и выбрать подходящий, а нам, чтобы показать, как все настроить, достаточно будет базового варианта.
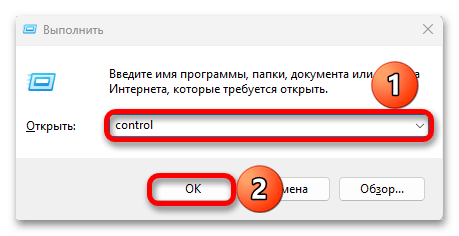
- Сочетанием клавиш «Windows+R» вызываем окно «Выполнить», вводим команду
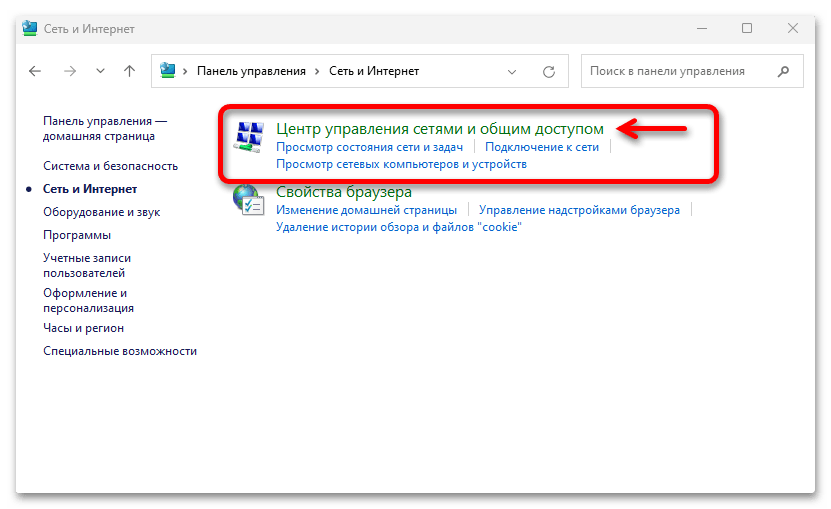
controlи нажимаем «OK». - В графе «Просмотр» устанавливаем «Категории» и открываем раздел «Сеть и Интернет».
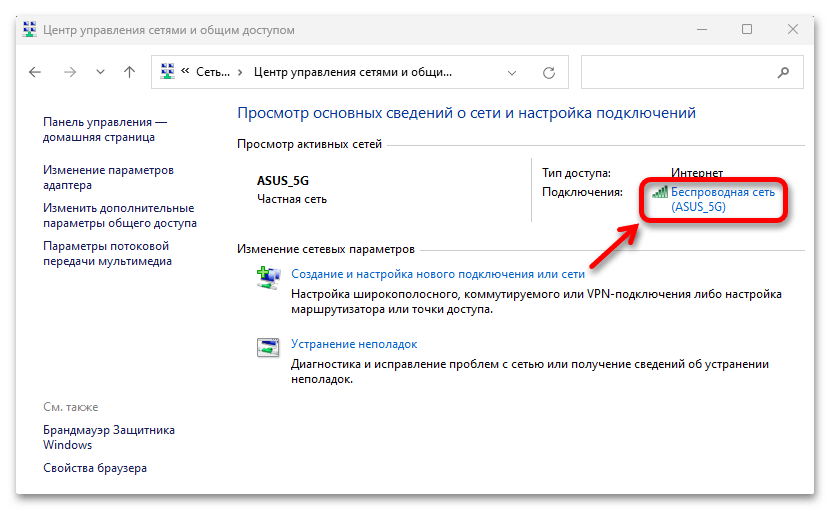
- Переходим в «Центр управления сетями и общим доступом».
- Кликаем по текущему подключению – «Ethernet» или «Беспроводная сеть».
- Открываем его свойства,
а затем свойства протокола TCP/IP версии 4.
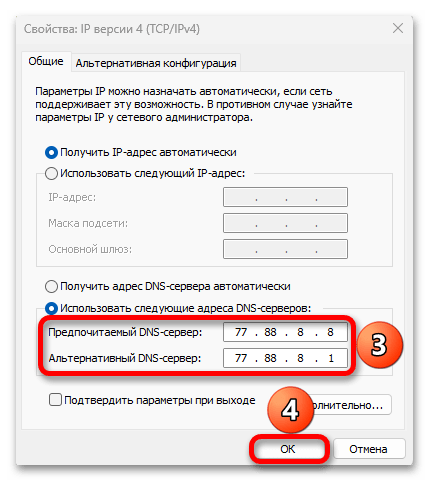
- Активируем ручной ввод адресов DNS-серверов,

переходим на страницу Яндекс DNS, копируем основной и альтернативный адреса,

вставляем их в соответствующие поля, нажимаем «OK», закрываем все настройки и проверяем скорость интернета.

Конечно, производительность будет зависеть от того, на каком расстоянии DNS-сервер находится от вас, но Яндекс поддерживает более 100 точек, поэтому что-то подходящее для вас скорее всего найдется. В противном случае попробуйте другие сервисы, например Google Public DNS.
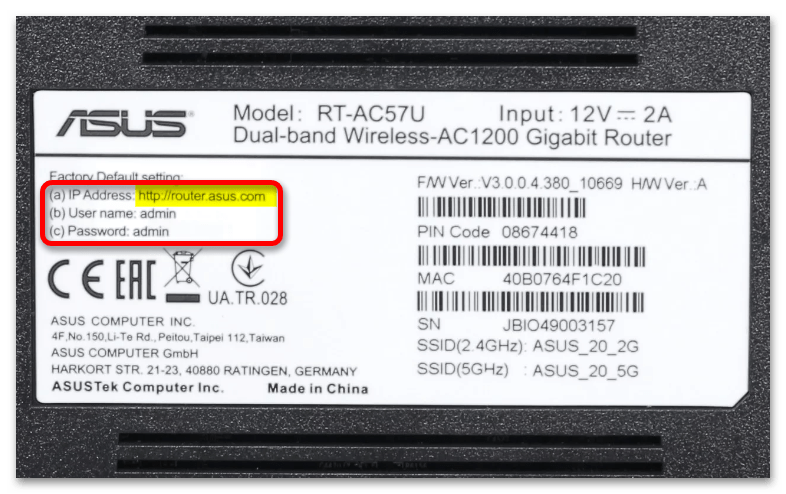
Способ 4: Настройка роутера
Если интернет работает, значит, в целом роутер настроен правильно. Но изменение некоторых параметров может сыграть в пользу увеличения скорости передачи данных. Дальнейшие рекомендации будут рассмотрены на примере маршрутизатора Asus, но они актуальны и для роутеров других брендов.
В первую очередь попробуйте перезагрузить устройство – отключите на несколько минут от электросети, а затем снова включите. Если маршрутизатор поддерживает две частоты — 2.4 и 5 ГГц, то по возможности подключайтесь к большему диапазону. Далее проверим следующие параметры:
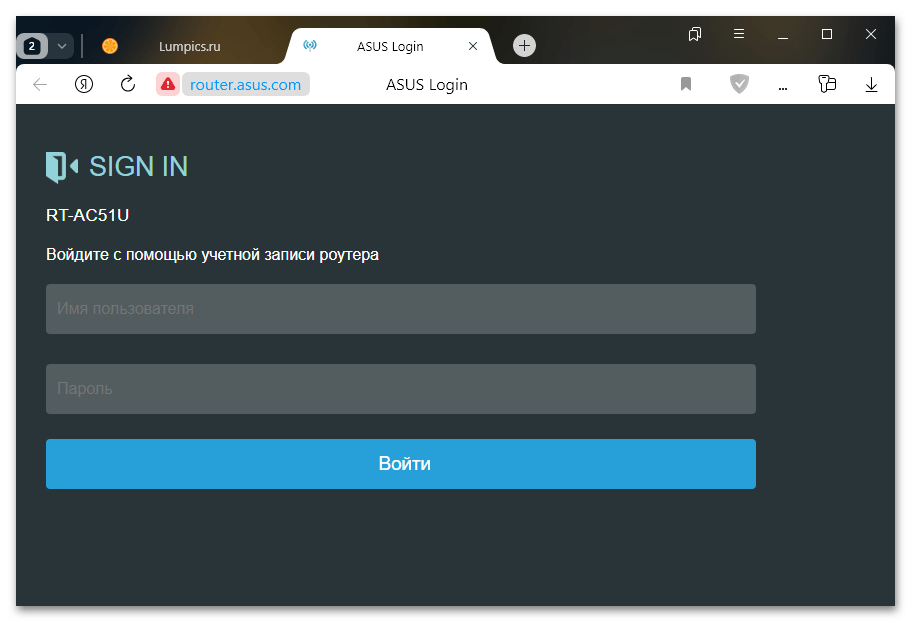
- Заходим в интерфейс маршрутизатора. Для этого в браузере нужно будет перейти по адресу, указанному на его корпусе.

Для авторизации потребуются имя пользователя и пароль, которые также есть на наклейке, если вы их не меняли.

При возникновении проблем со входом ознакомьтесь с нашей специальной статьей на эту тему.
Подробнее: Решение проблемы с входом в конфигурацию роутера
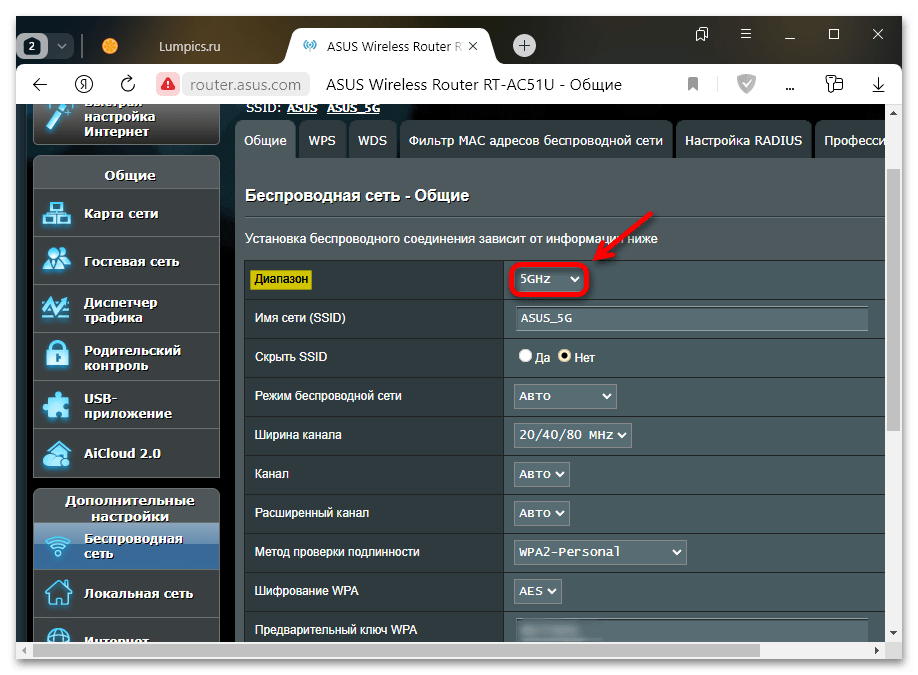
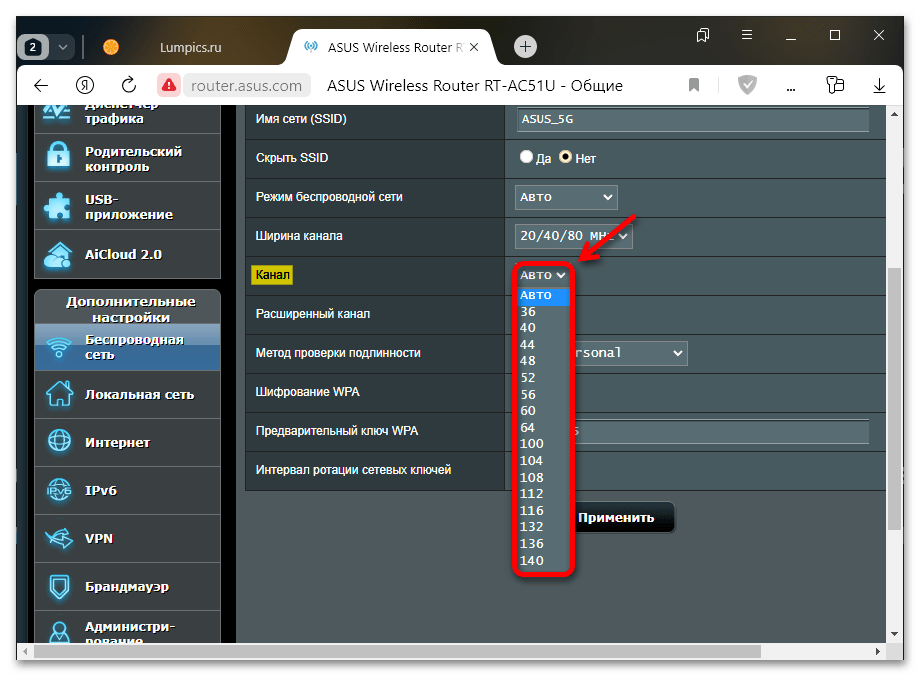
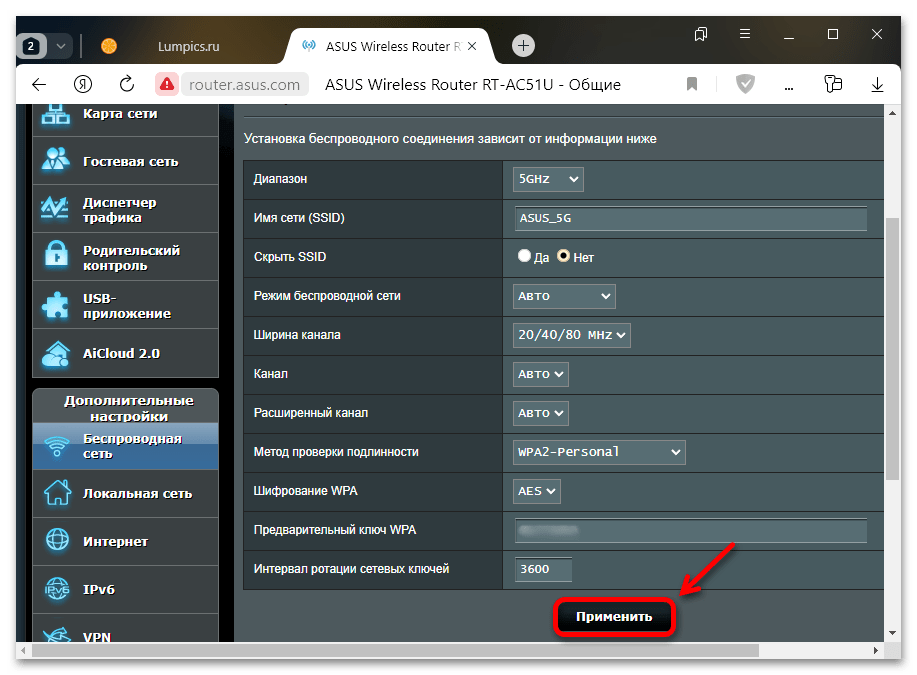
- Находим и открываем раздел с настройками беспроводной связи.
- Каждый диапазон может настраиваться отдельно. Просто выбираем нужный, чтобы открыть его параметры.
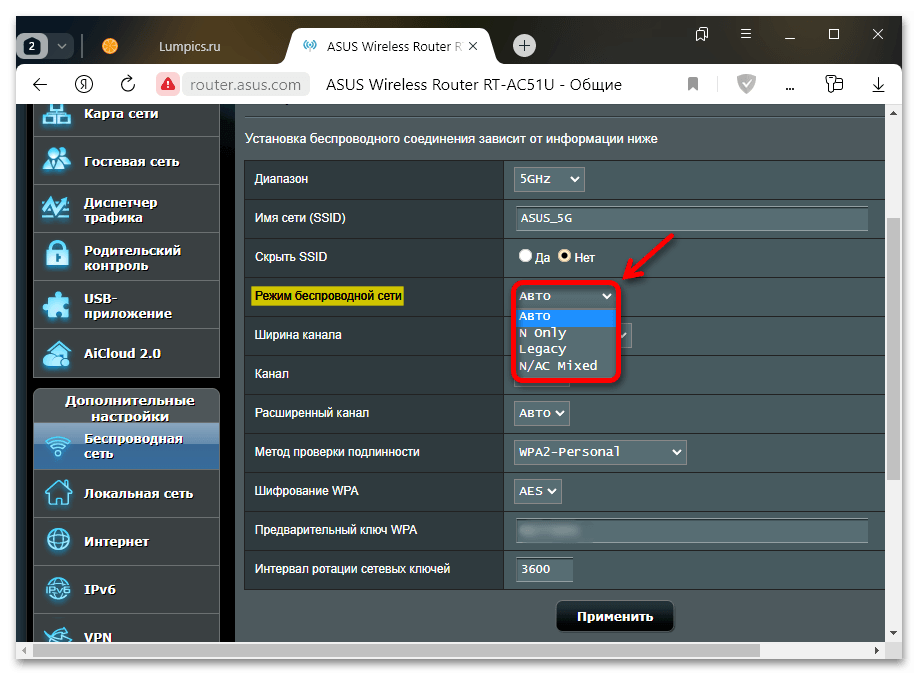
- Режим беспроводной сети здесь по умолчанию стоит «Авто», т.е. роутер будет самостоятельно подбирать подходящий стандарт. Но вы можете попробовать установить режим вручную, например «N Only» – для 2.4 ГГц, а «N/AC Mixed» – для 5 ГГц.
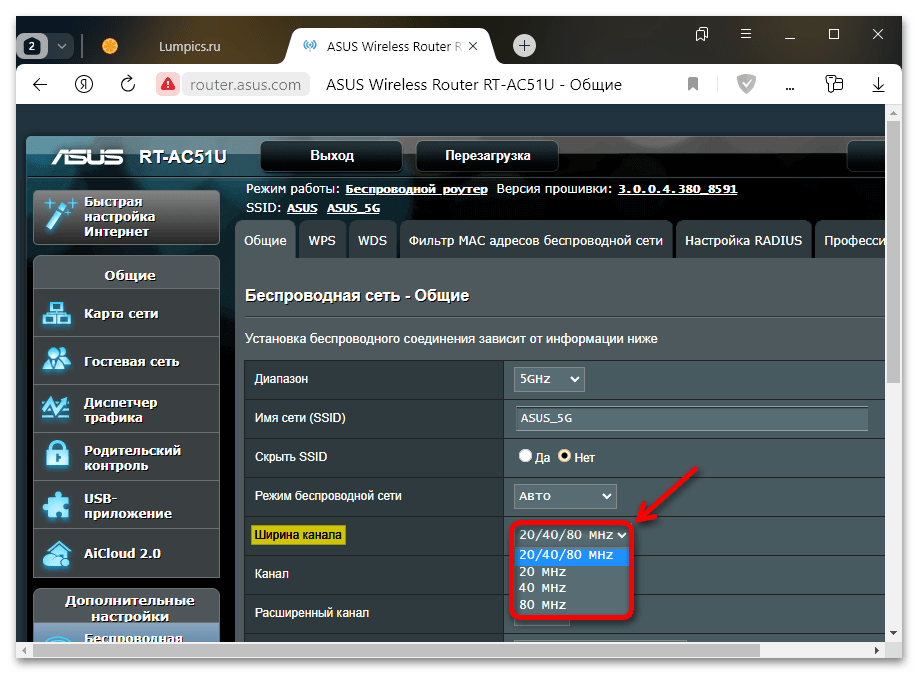
- В теории, чем шире канал, тем скорость выше, но на практике не все так однозначно, ведь и помех от пересечения с другими каналами может стать больше. Попробуйте протестировать отдельно каждое значение, а также общий вариант, при котором роутер по обстоятельствам будет использовать оптимальную ширину.
- В графе «Канал» желательно оставить «Авто», так как маршрутизатор способен определить, какой из них более свободный.
- Не забываем применить изменения, когда все будет настроено.
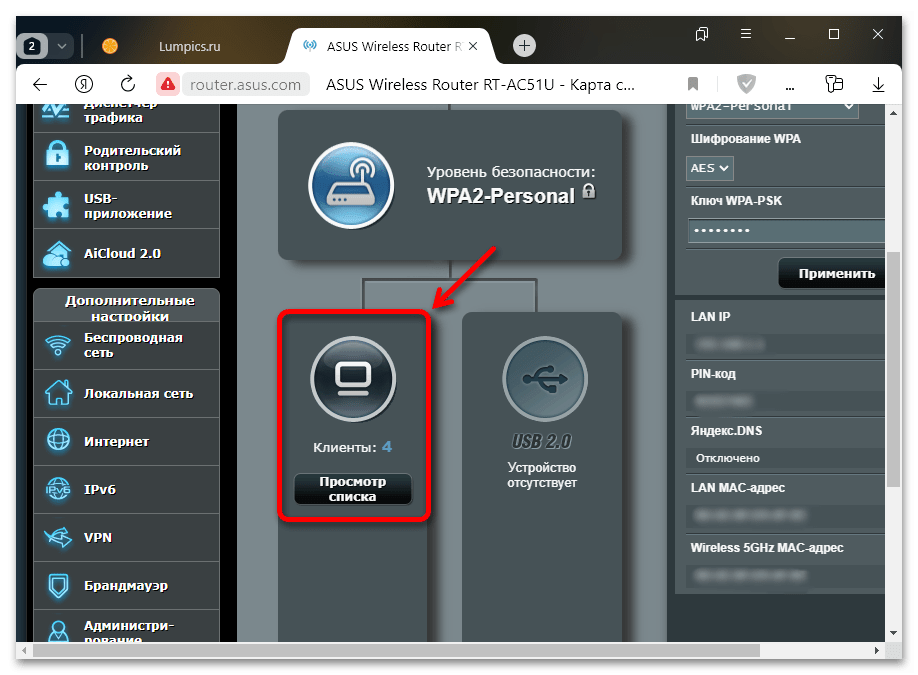
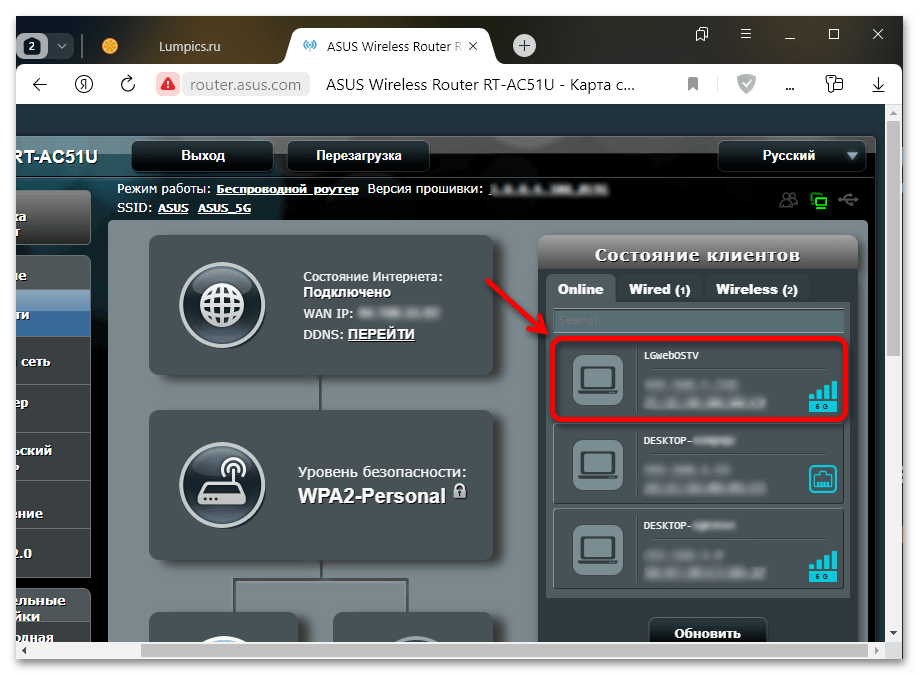
- На всякий случай поищите список устройств, которые сейчас подключены к сети через ваш роутер.

Вдруг вы когда-то на время давали пароль от Wi-Fi соседям, а они до сих пор им пользуются.

При обнаружении чужих устройств следует их заблокировать.

Обязательно посетите официальный сайт производителя и проверьте наличие обновленной прошивки. О том, как это сделать, на примере маршрутизатора TP-Link у нас подготовлена подробная инструкция. Кроме того, на нашем сайте есть целый раздел, посвященный настройке, обновлению и решению проблем с роутерами, в котором вы, возможно, найдете полезную информацию и о своей модели.
Подробнее:
Обновление прошивки роутера
Перейти к разделу «Роутер»

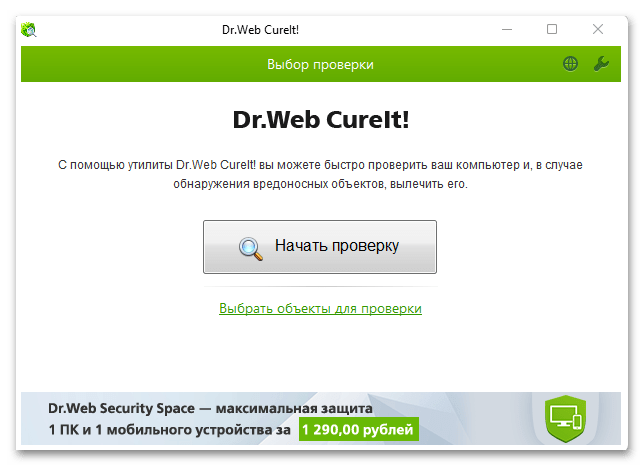
Способ 5: Проверка на вирусы
Microsoft проделала большую работу по развитию приложения безопасности Windows Defender, но в одиночку, наверное, ни одно программное обеспечение не может гарантировать абсолютную защиту. Поэтому если вы регулярно не сканируете свой компьютер с помощью дополнительных антивирусных средств, возможно, пришло время сделать это.
Подробнее: Как почистить компьютер от вирусов
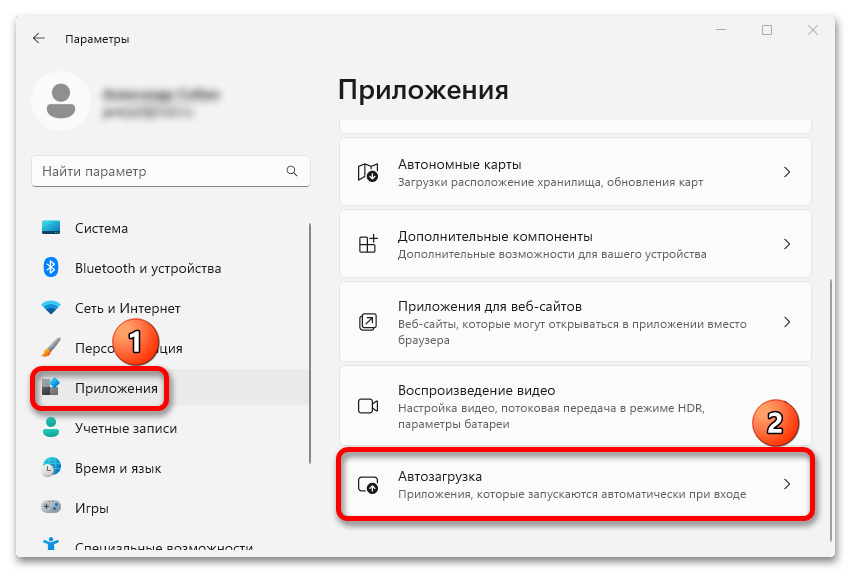
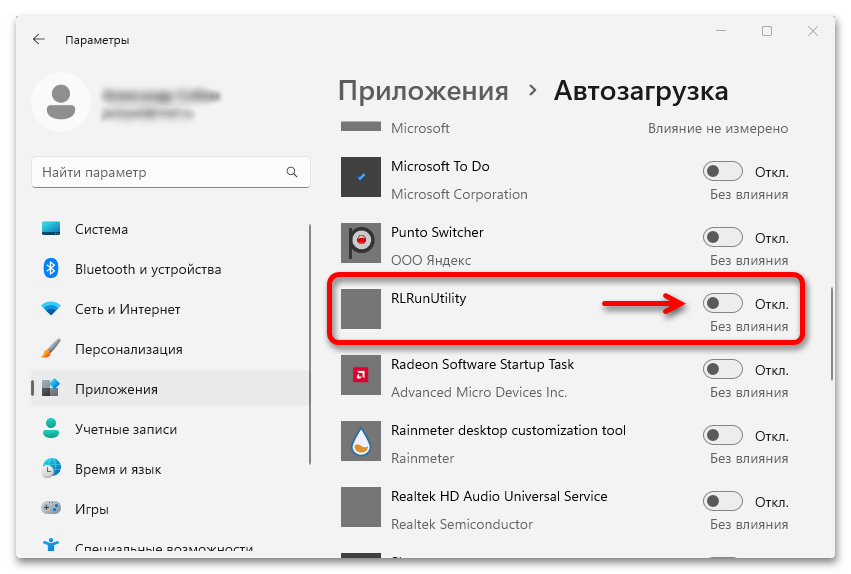
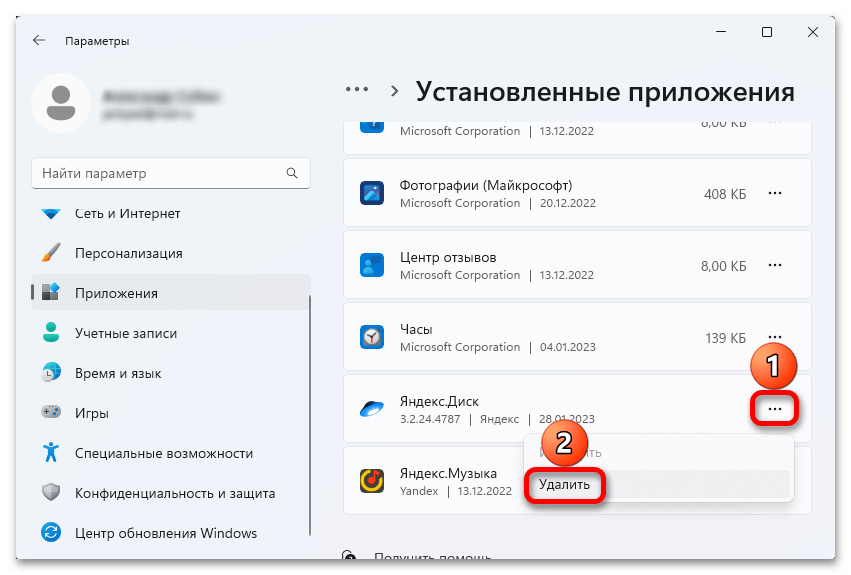
Способ 6: Работа с автозагрузкой
Многие программы после установки на компьютер начинают запускаться вместе с операционной системой, работают в фоновом режиме и могут использовать подключение к интернету. Наша задача сейчас – убрать их из автозагрузки хотя бы на время, чтобы проверить, являются ли они источником проблемы.
- Снова открываем системные параметры, как мы это делали в первом способе, и во вкладке «Приложения» переходим в раздел автозагрузки.
- Теперь отключаем сразу все программы. Если интернет-соединение стабилизировалось, по очереди включаем приложения, чтобы понять, какое из них ограничивает скорость передачи данных.
Кроме того, стоит просмотреть список установленного на компьютере программного обеспечения и удалить самое ненужное одним из способов, описанных в отдельной статье на нашем сайте.
Подробнее: Удаление ненужных программ в Windows 11
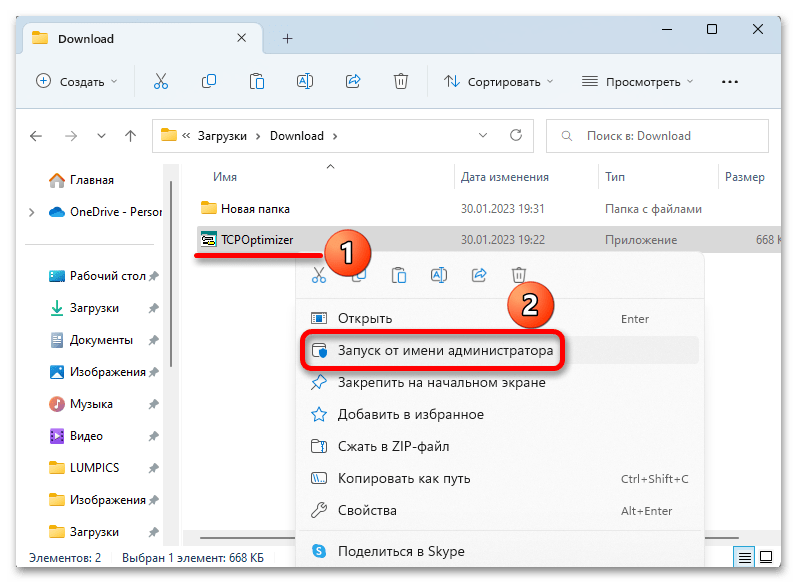
Способ 7: Помощь стороннего софта
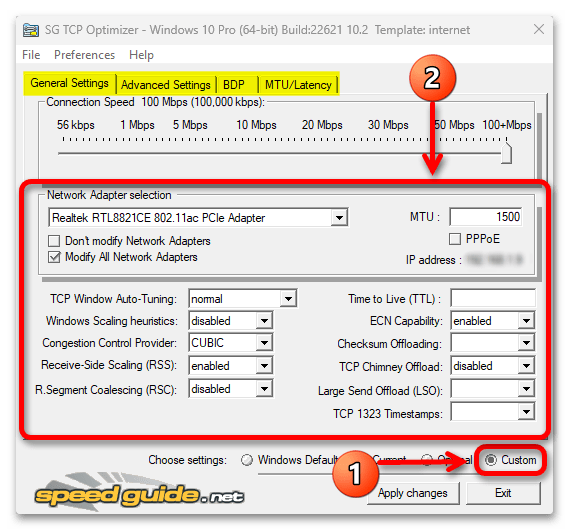
SG TCP Optimizer – бесплатная программа, предназначенная для настройки операционной системы под используемый на устройстве тип интернет-соединения.
Скачать SG TCP Optimizer с официального сайта
- SG TCP Optimizer не требует установки на компьютер или распаковки архива. Просто загружаем файл по ссылке выше, кликаем по нему правой кнопкой мышки и запускаем с правами администратора.
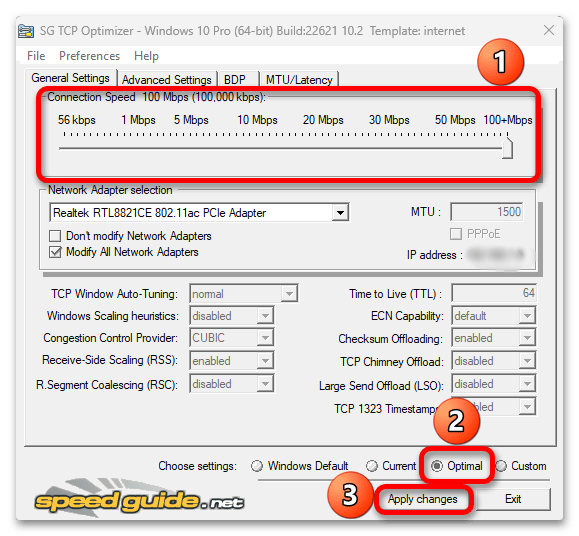
- Устанавливаем скорость интернета, которую предусматривает наш тариф, внизу выбираем «Optimal», нажимаем «Apply changes»,

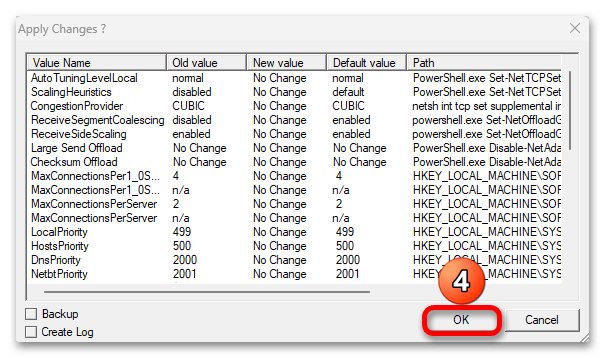
а когда программа подготовит список всех необходимых по ее мнению изменений,

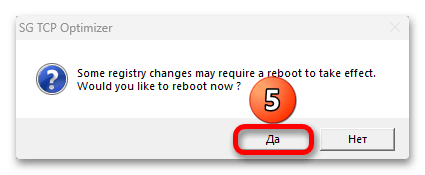
жмем «OK», ждем завершения настройки и перезагружаем компьютер.
- Если есть желание все настроить вручную, выбираем «Custom», а дальше работаем с параметрами во всех вкладках.
Читайте также: Программы для увеличения скорости интернета
Причины могут быть и на стороне провайдера, поэтому при отсутствии положительных изменений стоит набрать номер службы технической поддержки. Возможно, они уже работают над устранением неполадок и тогда вы хотя бы перестанете зря тратить время. Но даже если скорость «упала» только в вашей квартире, они попытаются помочь удаленно или пришлют специалиста.
Наша группа в TelegramПолезные советы и помощь
Sign in to your MUO account

Since the internet is the fastest way to connect with people, having the fastest possible connectivity is more important than ever. A fast internet ensures that you enjoy lag-free streaming and instant downloads.
As such, here are different changes you can make to increase your internet speed in Windows 11.
What Causes a Slow Internet Connection?
There can be multiple reasons why you’re experiencing low connectivity on Windows 11. But among all, some of the common culprits are listed below.
- One of the significant reasons behind slow connectivity is the bad router position.
- A slow internet connection can result from misconfigured bandwidth.
- Unnecessary tabs and applications open in the background can also cause the problem.
- VPNs are often the primary culprit behind a slow internet connection.
It’s pretty easy to boost the internet speed on Windows 11. Let’s check out how to do it.
1. Update to the Latest Windows Update
Before performing any of the below changes, ensure that you are using an updated system. Each Windows update comes with performance improvements and can affect the internet connectivity.
Here’s how to download the latest Windows 11 update.
- Open Settings using Win + I.
- Choose Windows Update from the left pane.
- Click on Check for updates.
- Windows will look for and download any available update.
After updating the system, check if there’s any improvement in the internet speed.
2. Change Router Position
A poor router position is another culprit for a slow internet connection. The range of the Wi-Fi signal depends on the specs and design of the router. But the further the signal has to travel, the weaker it will get. Additionally, the signal strength can get affected by physical objects like walls and floors.
So, make sure the system is near the router and no major physical obstruction exists between the source and the receiver.
3. Close Unnecessary Background Running Applications
A slow internet speed often results from unnecessary background running applications. As it turns out, these applications constantly keep consuming bandwidth, leaving the main application with limited resources. You will have to close all such applications to fix the problem.
Here’s how to do it.
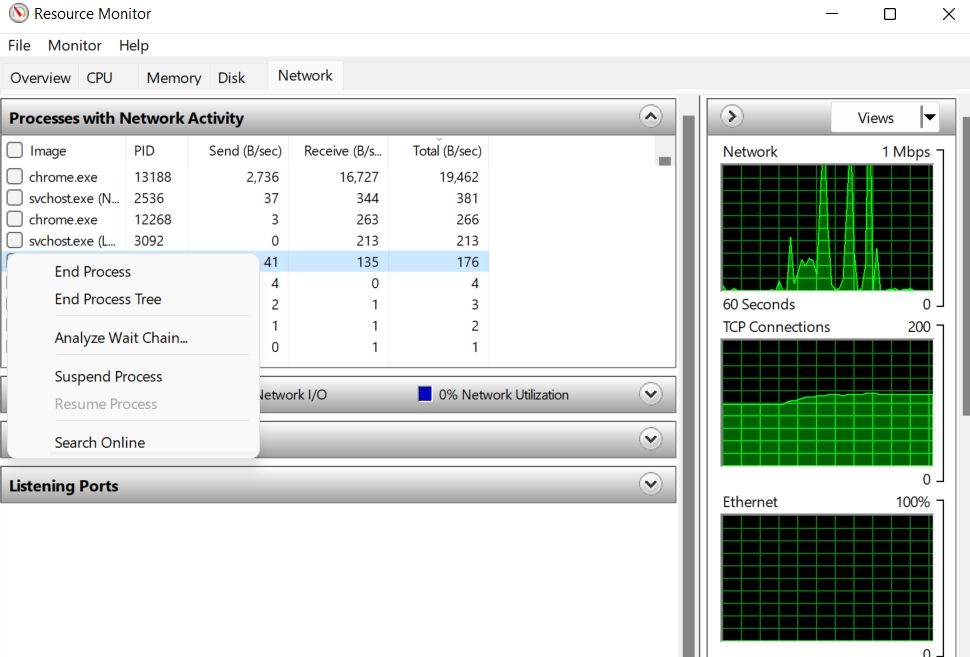
- Open the Task Manager using Ctrl + Shift + Esc.
- Switch to the Performance tab.
- Click on Open Resource Monitor.
- In the Resource Monitor window, switch to the Network tab.
- Look for the services that are consuming the maximum bandwidth/second.
-
Right-click on the services and choose End Process.

Check if there’s an improvement in the internet speed or not.
4. Disable the Metered Connection
Windows 11 comes with a metered connection functionality. It helps to save the internet data. But on the negative side, it can be a primary reason behind a slow internet connection. You will have to disable metered connection on Windows 11 to increase the speed.
Here’s how to do it.
- Open Settings on your system.
- Choose Network & Internet from the left panel.
- Click on Wi-Fi.
- Click on your Wi-Fi connection.
-
Disable the toggle next to the Metered connection.

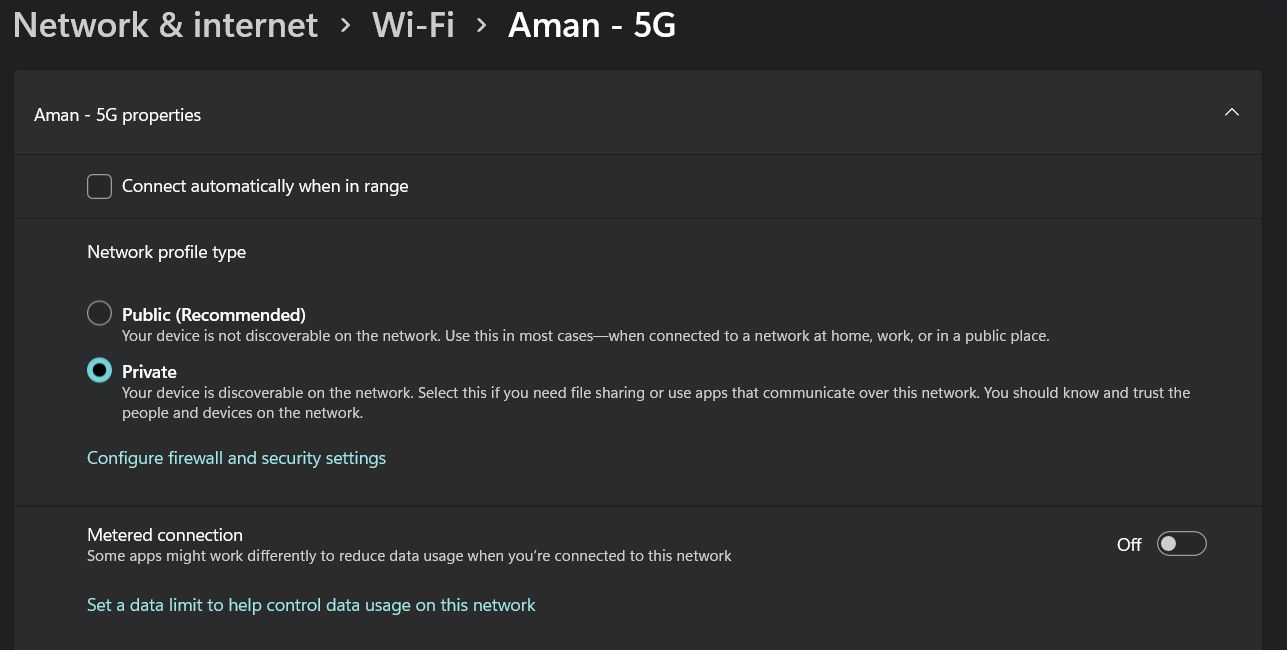
Restart the system and check if there’s any improvement in the internet speed.
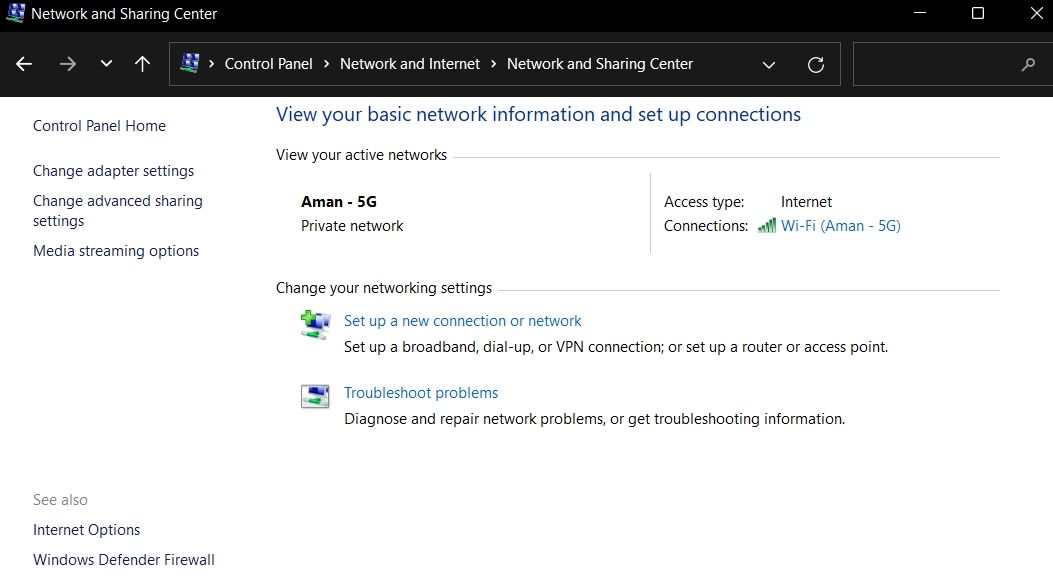
5. Change the DNS server
By default, the DNS Server is set to automatic, which can be the reason behind the slow internet connectivity. You will have to connect to an open-source DNS server to enjoy fast internet speed.
Here are the steps to change the DNS server on Windows 11.
- Open the Run dialogue box using Win + R hotkeys.
- Type Control Panel and click on OK.
- Choose Network and Internet.
- Click on Network and Sharing Center.
-
Click on Change adapter settings from the left pane.

- Right-click on the connected network and choose Properties.
- Double-click on Internet Protocol Version 4 (TCP/IPv4).
- Click on Use the following IP address bulletin.
-
Enter 8.8.8.8 in the Preferred DNS server and 8.8.4.4 in the Alternative DNS server.

- Click on OK to save the changes.
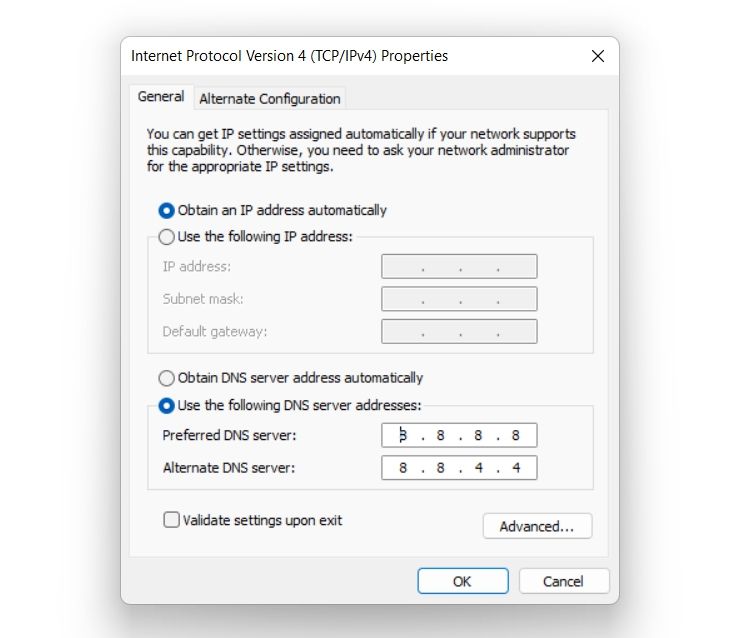
Reboot the system, and check the internet speed using an internet speed checking website.
6. Change the Limit Reservable Bandwidth
On Windows, 20% of the internet bandwidth is reserved for Windows-related services, whereas the rest, 80%, is used for general tasks. But you can change the bandwidth to increase internet speed.
Here’s how to do it.
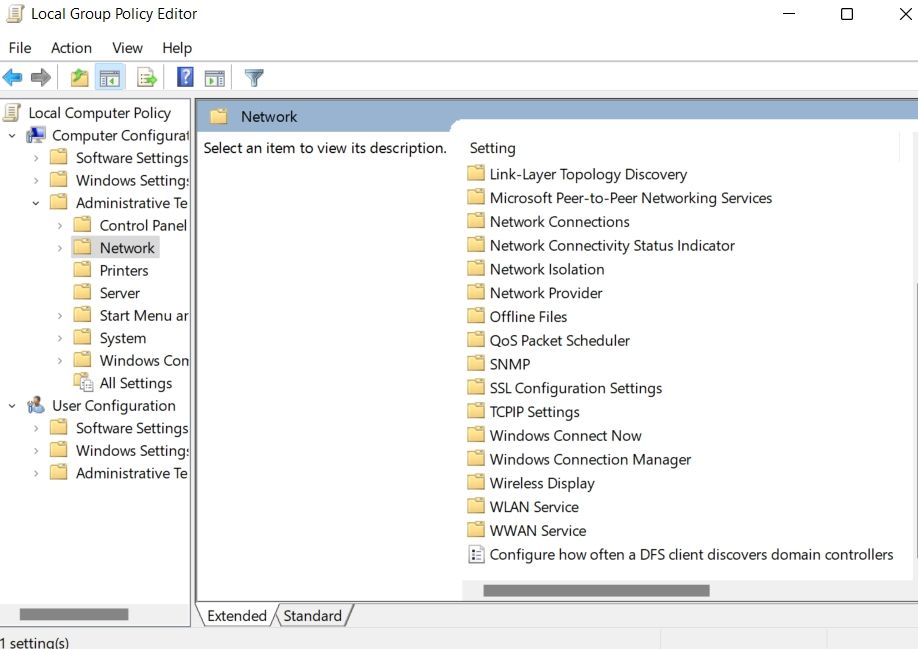
- Open the Run dialogue box.
- Type gpedit.msc and click on OK.
- Choose Administrative Templates under Local Computer Policy.
- Open the Network folder.
-
Double-click on QoS Packet Scheduler.

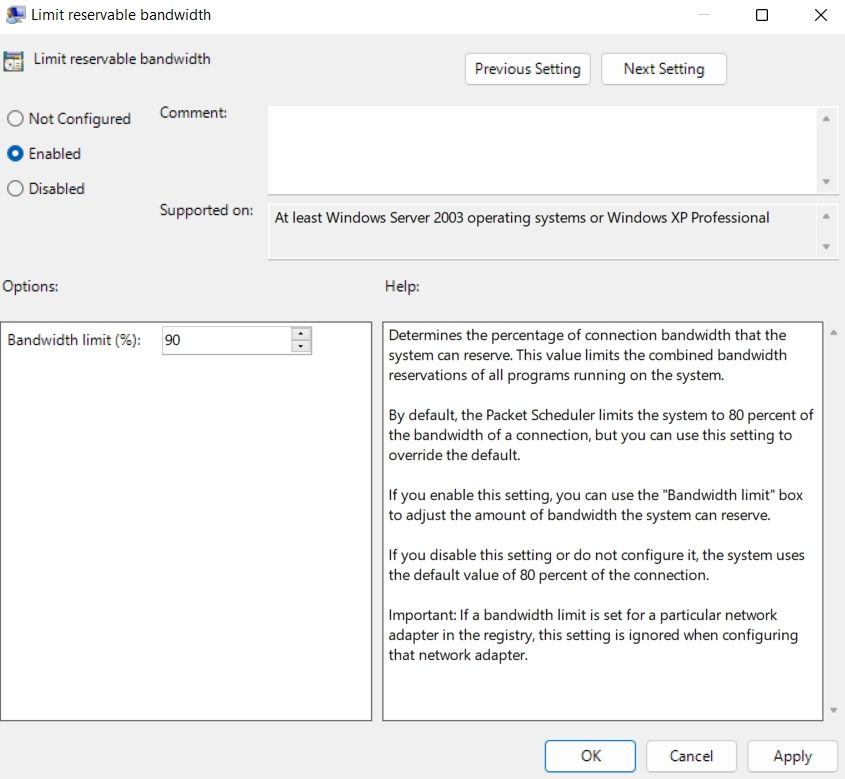
- Right-click on Limit reservable bandwidth and choose Edit from the context menu.
-
Click on Enabled.

- Change the Bandwidth limit as per your convenience. We recommend keeping the limit under 90%.
- Click on Apply > OK.
7. Disable the Windows Update Services
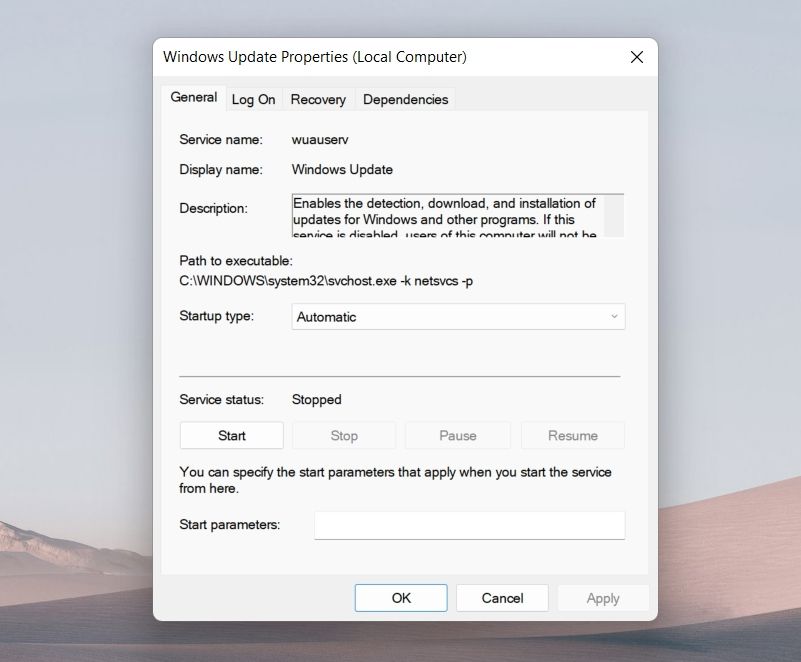
Windows constantly look for and download the new OS update. But while Windows Update is being downloaded in the background, it can directly affect the internet speed for general tasks. You’ll have to disable Windows Update services in this situation.
Below are the steps to disable Windows Update services.
- Open the Run dialogue box and type service.msc and press Enter.
- Locate Windows Update service.
- Right-click on the Windows Update service, and choose Properties from the context menu.
- Change the Startup type to Disabled.
- Click on Stop under the Service status.
- Click on Apply > OK to save the changes.
8. Flush the DNS Cache
A corrupt DNS cache can also result in weak internet connectivity. You’ll have to clear the DNS cache to fix the issue.
Here’s how to flush the DNS cache on Windows 11.
- Open Command Prompt in administrator mode.
- Type ipconfig /flushdns and press Enter.
- You’ll see the message – Windows IP Configuration. Successfully flushed the DNS Resolver Cache.
- Close the Command Prompt window.
Reboot the system and check the connectivity.
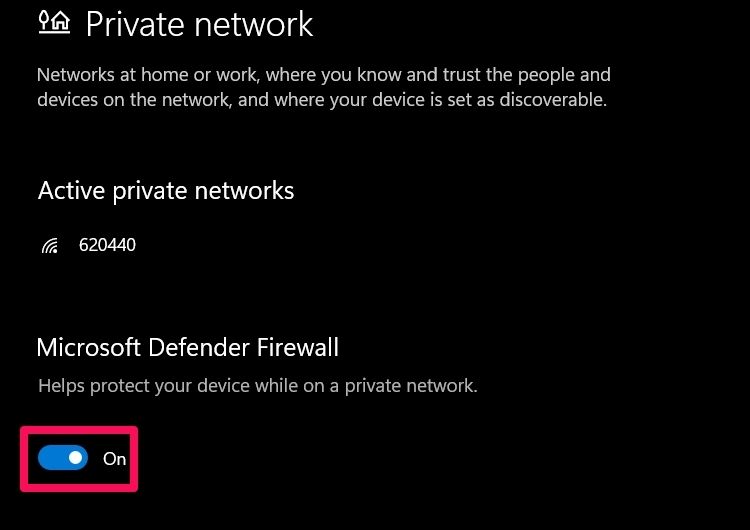
9. Temporarily Disable Windows Defender Firewall
Sometimes Windows Defender Firewall is also why you are experiencing slow internet connectivity. You will have to temporarily disable the Firewall to fix the issue.
Here’s how to do it.
- Open Start Menu, type Windows Security and press Enter.
- Choose Firewall & network protection from the left panel.
- Click on Private network.
-
Disable the toggle under Microsoft Defender Firewall.

Enjoy High Internet Speed On Windows 11
A high internet speed lets you download stuff within seconds and enjoy uninterrupted video calls. But if you are getting a lower internet speed, you can make the above-mentioned changes.
Everyone loves a fast or speed internet connection. If you have a slow internet connection you need to wait for some extra time when downloading something from the internet or uploading video or images. You can check your internet speed at fast.com or speedtest.net, if the internet not working you need to troubleshoot your internet connection. Well if you have slow internet it will interrupt streaming videos or playing online games. Here in this post, we have a few amazing tips apply to fix and Increase Internet Connection Speed on Windows 11
Contents
- 1 Why is my internet connection so slow?
- 2 How To Speed Up Internet On Windows 11
- 2.1 Restart windows 11
- 2.2 Disconnect VPN
- 2.3 Get closer to the Router
- 2.4 Check Computer’s Health
- 2.5 Switch to faster DNS
- 2.6 Update network driver
- 2.7 Turn Off the Metered Connection
- 2.8 End Background Tasks Using Too Much Data
- 2.9 Disable The Windows Update Service
Why is my internet connection so slow?
There are multiple Reasons Why Your Internet is Slow, it’s because you have chosen a slow internet plan or exceeded your data cap. Background programs are eating up bandwidth, the Laptop is too far from the router causing a weak Wi-Fi signal and slow internet or You have slow or outdated devices.
- Programs or devices hogging your bandwidth
- Too much distance (or a wall) between your device and the router
- Outdated drivers or router firmware
- Too much cache data
- A broken or faulty Ethernet cable
Well, you have chosen a good internet plan or have not exceeded your data cap but still, your internet download speed is very slow. Get closer to your router or move the router closer to your laptop help fix the problem. Again you need to Close unnecessary background programs and applications that might eat up your data and slow down the internet speed. Too much cache data also slow down the browser and result in websites not loading. Also, you need to update your computer, especially network drivers & router firmware to Increase Internet Connection Speed on Windows 11.
- Move your laptop closer to your router
- Use an ethernet cable to Connect your laptop to the router
- Don’t run many apps at once or download huge files
- Scan the system for malicious intrusion
- Update Windows 11 and update the wifi driver
- Switch to Google DNS
- Use an ad blocker
Restart windows 11
Let’s start with reboot your computer It not only refreshes the operating system but also clears temporary glitches that might slow down Windows performance include slow internet. At the same time, we recommend restart the router and other network devices as well to clear temporary problems with them.
Turning the router off and then back on again is a quick and easy way to help speed up my internet connection.
Disconnect VPN
Did you notice the internet speed slows down when using a VPN? Yes, VPN decreases internet speed because it encrypts your traffic and rerouts through an external server and this process takes a little time which can slow down your internet connection. We recommend disconnect from the VPN server and check your internet speed.
Usually, if you are using a free VPN that may cause more connection problems and slow down the internet speed because they trade something off in return for free access, including internet speed. Paid VPN options are generally faster, but they can still slow down your internet at peak times.
Get closer to the Router
If you are connected to a Wi-Fi network on your laptop check the Wi-Fi signal, if its weak you may experience slow internet speed even if you have a good internet plan. And you need to Get closer to your router or move the router closer to your Laptop. This is an easy and effective way to speed up your internet connection.
A weak WiFi signal is almost always the cause of a slow internet connection on one computer
Wireless connections are a little unreliable as compared to wired ones. If it’s possible connect your PC or laptop to your router using an Ethernet cable this will deliver the fastest possible speeds for your connection.
Also it is advised to update the software from time to time to keep the router performing well.
Check Computer’s Health
Viruses, spyware, or Malware infections can also result high bandwidth usage that not only slows down your computer performance but also you notice slow internet speed as well. Again if your system not been updated a long time or you are using older web browser on your computer that might impact internet speed.
Perform full system scan for virus malware infection
You can use Windows Defender to scan your PC for viruses. If you are using a third-party antivirus program, you can also scan your PC for the virus, and the slow internet issue should be solved by now.
Install the latest Windows updates
- Press Windows
- key + X and select settings,
- Navigate Windows Update and hit the check for updates button,
- If pending updates are there allow them to download and install on your computer,
- Once done reboot your PC to apply them
Update chrome browser
If you are using an older browser it not only creates security holes for attackers but also displays errors, the browser not responding or slow loading pages.
- Open the Chrome browser click on the menu then settings,
- Click on About Chrome or you can type chrome://settings/help on the address bar and press the enter key to check and update the browser automatically.
- If you are Microsoft Edge user then use edge://settings/help to update the browser automatically.
Use an ad blocker
In addition Using an ad-blocker or privacy-focused browser can cut out auto-playing video ads, and megabyte-hungry ads, freeing up valuable space for your internet connection.
Switch to faster DNS
Still, the internet speed is very slow on your device, try changing the DNS to increase the internet speed in Windows 11.
| Best Free and public DNS Servers | ||
|---|---|---|
| Provider | Primary DNS | Secondary DNS |
| 8.8.8.8 | 8.8.4.4 | |
| Control D | 76.76.2.0 | 76.76.10.0 |
| Quad9 | 9.9.9.9 | 149.112.112.112 |
| OpenDNS Home | 208.67.222.222 | 208.67.220.220 |
| Cloudflare | 1.1.1.1 | 1.0.0.1 |
| CleanBrowsing | 185.228.168.9 | 185.228.169.9 |
| Alternate DNS | 76.76.19.19 | 76.223.122.150 |
| AdGuard DNS | 94.140.14.14 | 94.140.15.15 |
- Press Windows key + R, type ncpa.cpl and click ok to open network connections
- Locate your wifi or ethernet adapter, right-click on it select properties,
- Select Internet Protocol Version 4 (TCP/IPv4) and then click on Properties.
- Select the radio button Use the following DNS Server address and set the Preferred DNS server as 8.8.8.8 and set the Alternate DNS server as 8.8.4.4
- Click ok to save changes, close all programs and reboot your PC
- Now check the internet speed, and it should be increased.
Update network driver
Device drivers are an essential part of your computer and you need to make sure its updated and the latest version installed to get the best performance from it. If you have an older or outdated wifi driver installed on your computer you need to update or reinstall the network driver to address bugs and improve performance.
Outdated or incorrect WiFi or network drivers can cause a slow internet connection, and updating them can solve the issue
- Press Windows key + X and select device manager,
- This will display all devices and peripherals connected to your computer
- Expand network adapters option, right-click on network driver select update driver
- Select Search automatically for the updated driver software option and follow on-screen instructions to get the latest driver update from the internet.
Turn Off the Metered Connection
If the metered connection is enabled on your computer, it may slow down the internet speed to save bandwidth. Let’s try turning off the metered connection and then check if you still face the issue or not-
- Press Windows key + X to open settings and navigate Network & internet,
- Head to the Wi-Fi section (if you are using a wired connection then click on ethernet),
- Now select your internet connection, and then turn off the Metered connection toggle.
In addition, open the command prompt as administrator and perform the following command to reset or reinstall TCP/IP and help fix internet connection problems including slow internet.
netsh int ip reset c:\resetlog.txt
netsh winsock reset
ipconfig /flushDNS
End Background Tasks Using Too Much Data
There are chances that background running tasks consume too much data which slows down the internet speed. Let’s check and End the background tasks using too much data, which not only increases your internet speed but also speeds up Windows 11 as well.
- From the start, menu search for Task Manager or you can press Ctrl + shift + Esc simultaneously to open Task Manager,
- Head to the Performance tab, click three doted menu then Open resource Monitor.
- Move to the network tab in Resource Monitor and Check which process is consuming too much of your data.
- Select the program that consumes a lot of data. Right-click on it, and then click on End process.
- Do this for all the programs/processes consuming a lot of your data.
Disable The Windows Update Service
- Press the Windows key + R, type services.msc and click ok to open the Windows service console,
- Scroll down to locate the Windows update service, right-click on it select properties,
- Now change the startup type to disabled and stop the service next to service status,
- Now click apply and ok then close the services window,
Also read:
- How to Speed up Laptop Running Windows 10 Version 22H2!!!
- 4 Ways to Update Device Drivers in Windows11 or Windows 10
- 4 Quick Ways to Flush DNS Cache in Windows 11
- Wi-Fi option disappeared after Windows 11 update (solved)
- Fix Critical Process Died Error in Windows 11 – 8 possible solutions
- Windows 11 search bar not working or fails to load (5 solutions)
If you ever run into the Windows 11 or 10 slow Internet problem, don’t worry. It’s often quite easy to fix…
6 fixes for Windows 11/10 Slow Internet
All the fixes below work in Windows 11/10; just work your way down the list until the Internet slowdown problem is resolved.
- Disable Peer-to-Peer Update
- Adjust the Internet Bandwidth Settings
- Update your WiFi drivers
- Repair system files
- Disable Windows Auto-Tuning
- Disable Large Send Offload
- Other modifications to try
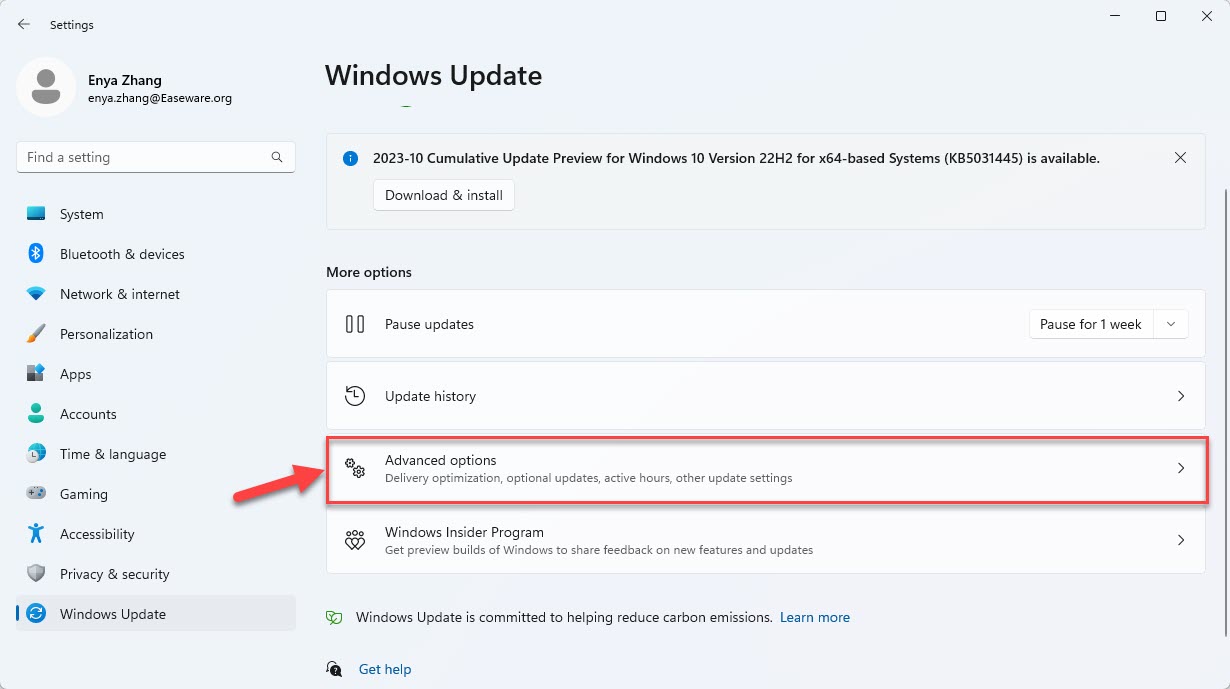
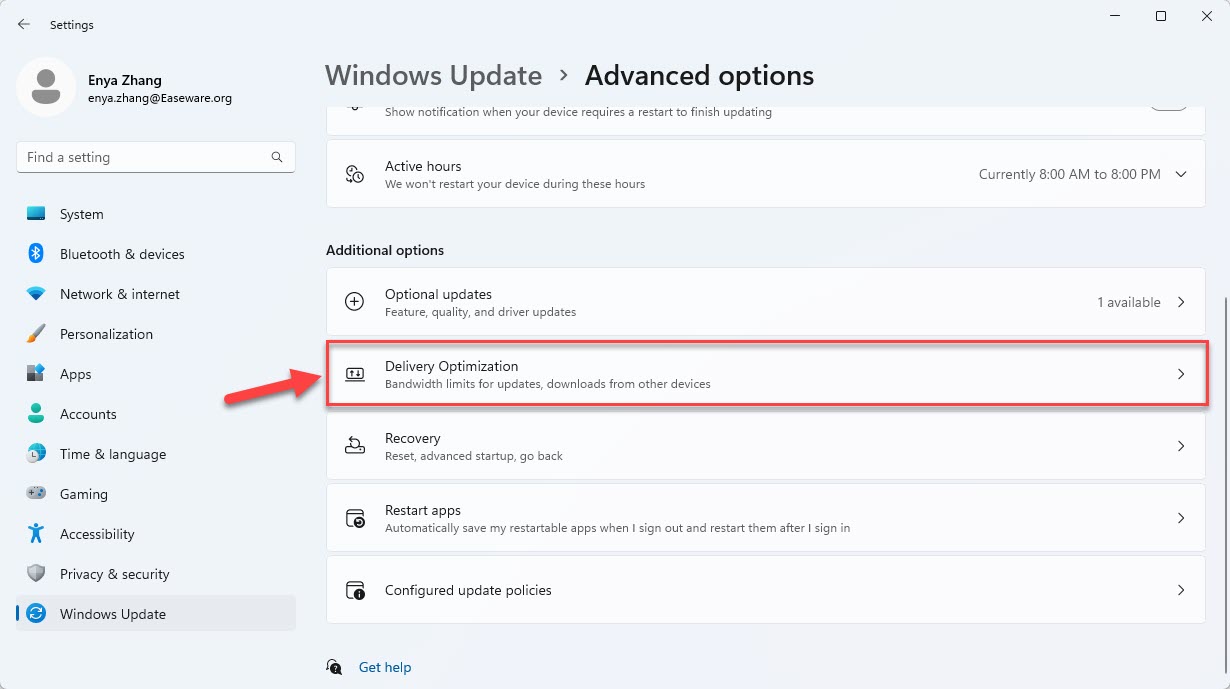
Fix 1: Disable Peer to Peer Update
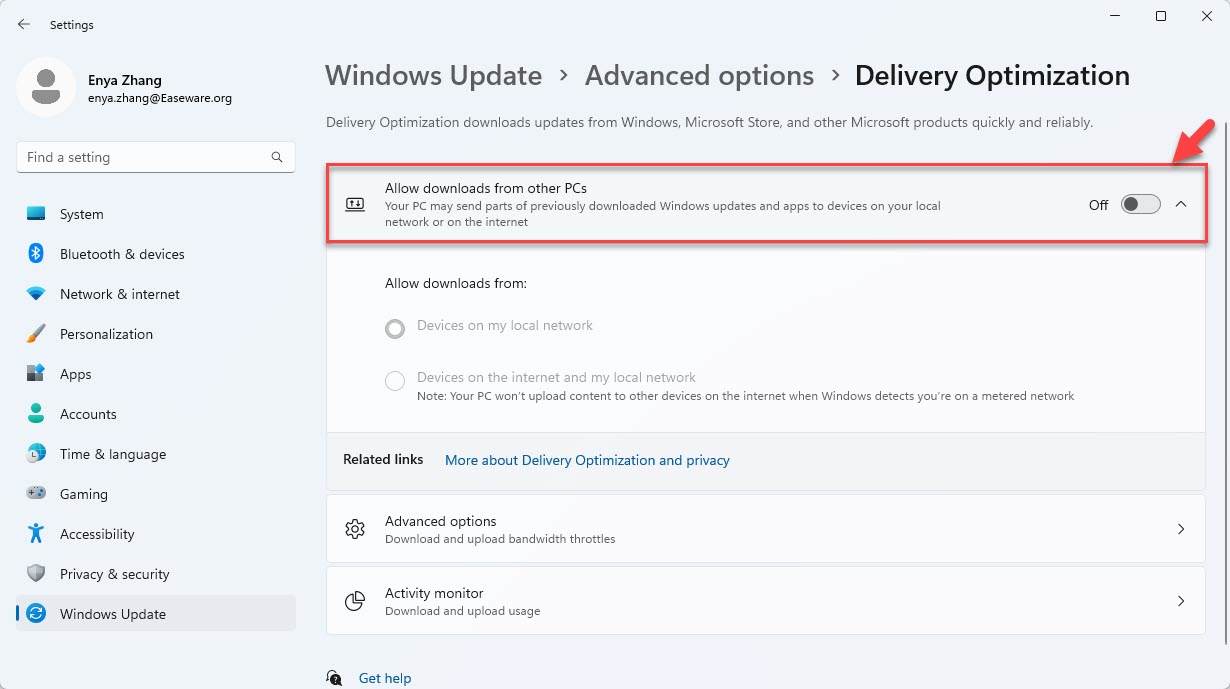
Peer to Peer Update is a feature in Windows that allows your computer to share Windows updates peer-to-peer with other computers over the Internet, which can compromise our Internet connection, hence the sluggish Internet issue.
To disable Peer to Peer Update:
- On your keyboard, press the Windows logo key and R at the same time, then type control update in the box and press Enter.
- Click Advanced options.

- Click Delivery Optimization(or Choose how updates are delivered depending on the build of your Windows 10).
- Turn the Allow downloads from other PCs (Or Update from more than one place) toggle Off.
- Check if the Windows 11/10 slow Internet issue has been fixed. If yes, then great! But if the problem persists, move on to Fix 2, below.
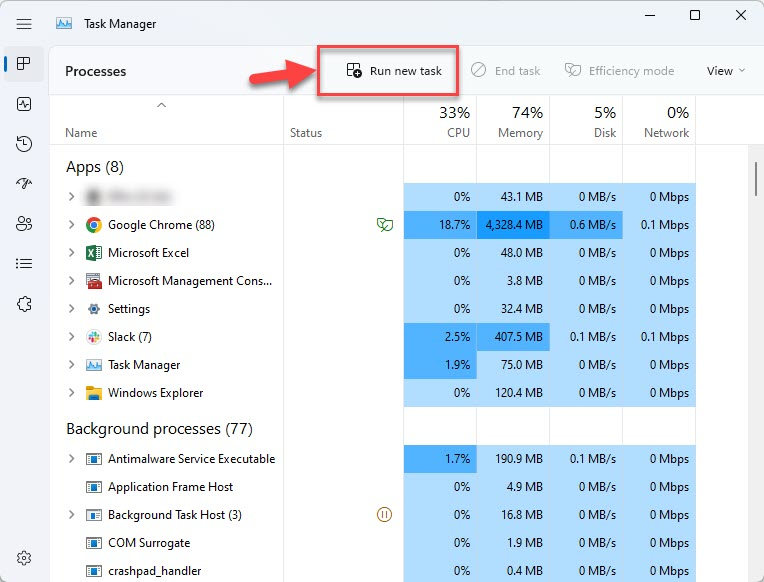
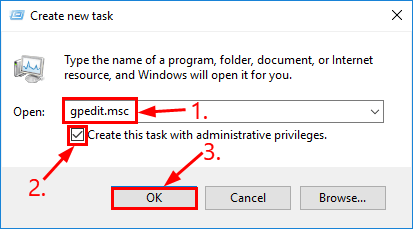
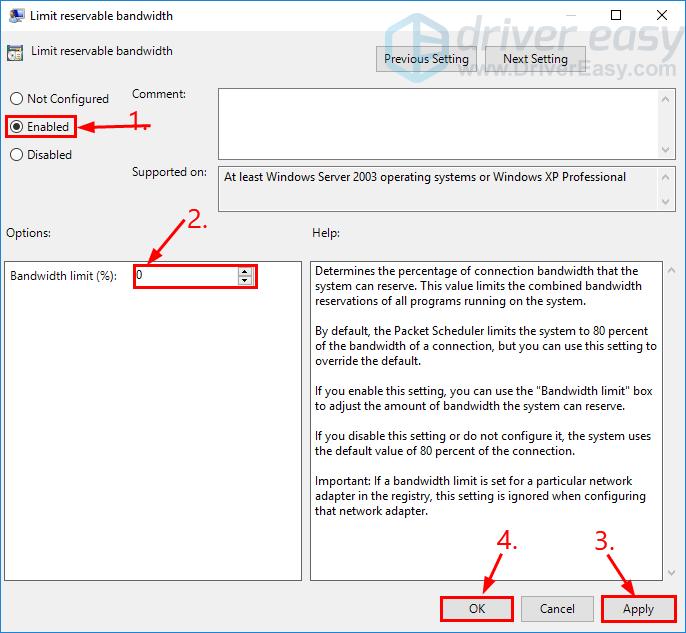
Fix 2: Adjust the Internet Bandwidth Settings
Please note that Group Policy Editor is not supported on Windows 10/11 Home Edition. So if you’re not using Windows Pro, or Enterprise, please move on to Fix3.
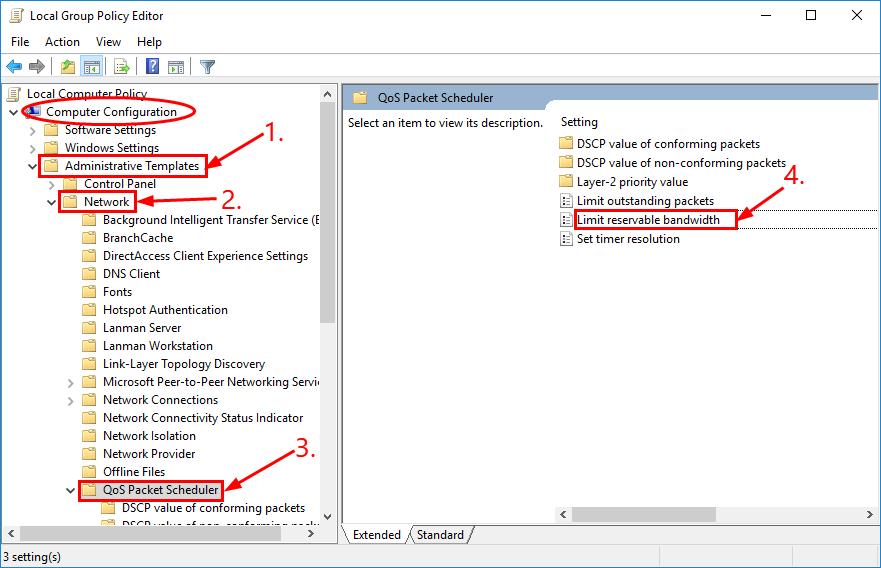
By default, Windows reserves 20% of your bandwidth for Windows Update, system apps, and other purposes, leaving you with 80% bandwidth of Internet connection. If you don’t use Windows Update on a daily basis and the reservation limit slows your Internet down, then you can remove the limit by setting the value to 0.
Here’s how to do it:
- On your keyboard, press Ctrl, Shift, and Esc at the same time to open Task Manager.
- Click Run new task.

- Copy & paste gpedit.msc into the box, tick the box before Create this task with administrative privileges, and click OK.

- Under Computer Configuration, double-click on Administrative Templates > Network > QoS Packet Scheduler. Then double-click on Limit reservable bandwidth.

- Click the Enabled option and set Bandwidth limit (%) value to 0. Then click Apply > OK.

- Is your Internet getting any faster? If it’s still grinding to a crawl, you should try Fix 3, below.
Fix 3: Update your WiFi drivers
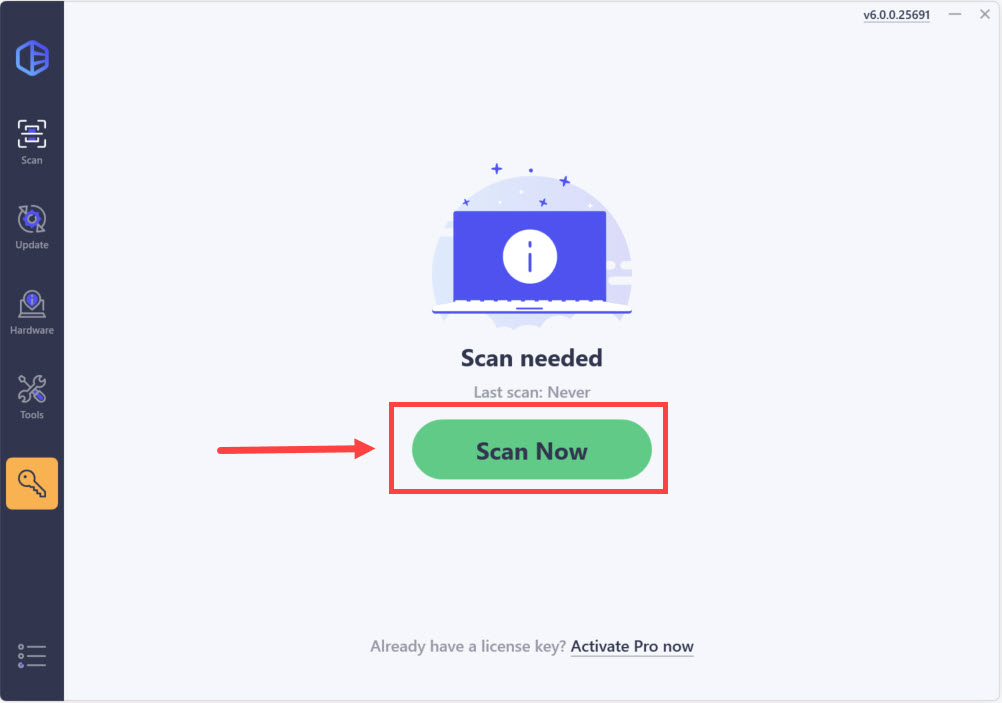
This problem may occur if you are using the wrong/outdated WiFi drivers. So you should update your WiFi/network adapter driver drivers to see if it fixes your problem. If you don’t have the time, patience, or computer skills to update your drivers manually, you can do it automatically with Driver Easy.
Driver Easy will automatically recognize your system and find the correct drivers for it. You don’t need to know exactly what system your computer is running, you don’t need to risk downloading and installing the wrong driver, and you don’t need to worry about making a mistake when installing. Driver Easy handles it all.
- Download and install Driver Easy.
- Run Driver Easy and click the Scan Now button. Driver Easy will then scan your computer and detect any problem drivers.

- Check if your Wifi driver is flagged in the scan results. If it is, click Activate & Update to start a 7-day free trial or upgrade to Driver Easy Pro. Either option will automatically download and install the latest Wifi driver for you.

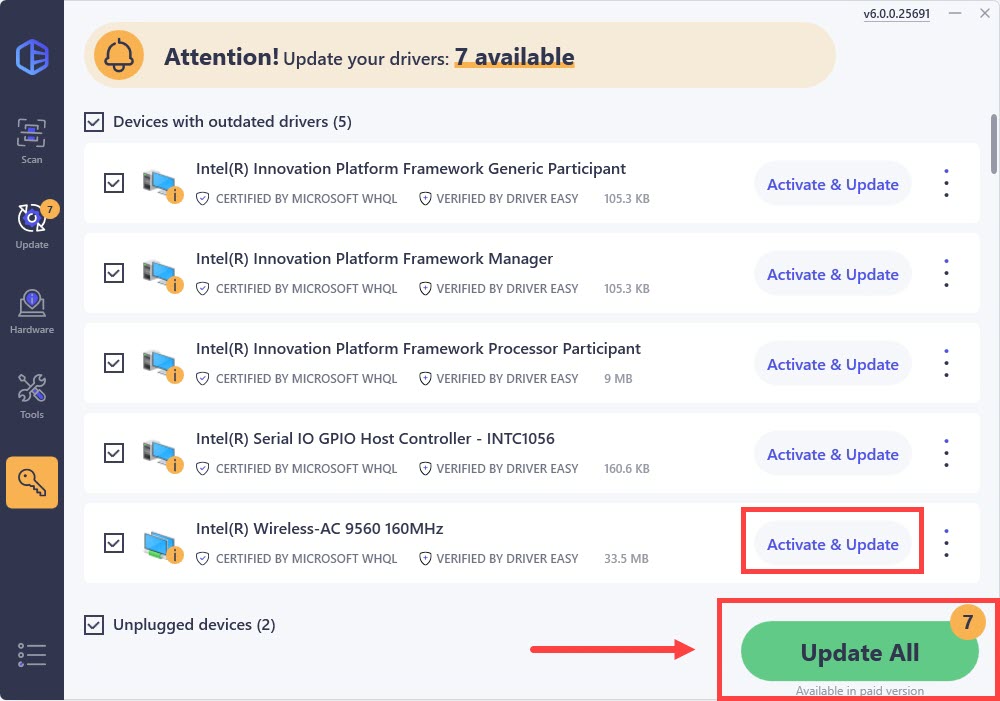
The Pro version of Driver Easy comes with full technical support. If you need assistance, please contact Driver Easy’s support team at support@drivereasy.com.
Restart your computer and see if the Windows 10 Slow Internet problem has been resolved. If yes, then congrats! If the issue still persists, please move on to Fix 4, below.
Fix 4: Repair system files
Missing, corrupt, or damaged system files may reduce your internet connection speeds. To eliminate this issue as a possible cause, you can try the way below to repair possible system file issues.
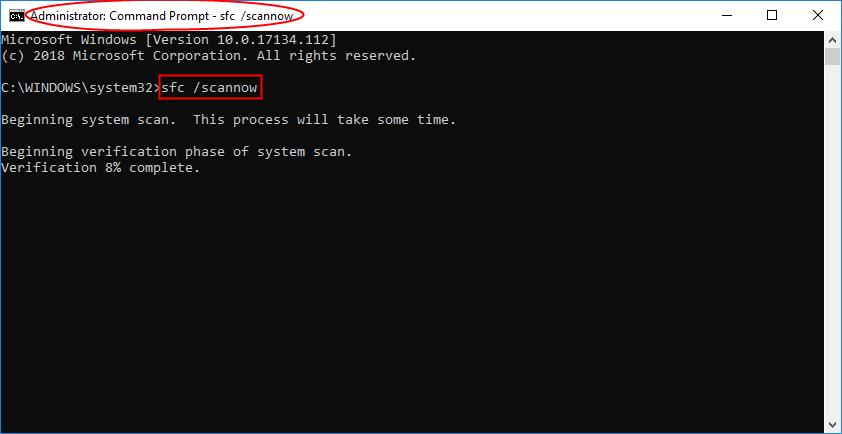
System File Checker (SFC) is a handy feature in Windows that helps scan your system files and repair missing or corrupted system files(including those related to BSOD). To run the SFC scan:
- On your keyboard, press the Windows logo key and type cmd. Then right-click on Command Prompt and click Run as administrator.
- Click Yes when prompted to confirm.
- In the command prompt window, type sfc /scannow and press Enter.

It’ll take some time for the SFC to replace the corrupted system files with new ones if it detects any, so please be patient.
- Restart your computer for the changes to take effect.
- Check your computer to see if the Windows 10 slow internet problem has been fixed. If yes, then congrats! If the issue still persists, please move on to Fix 5, below.
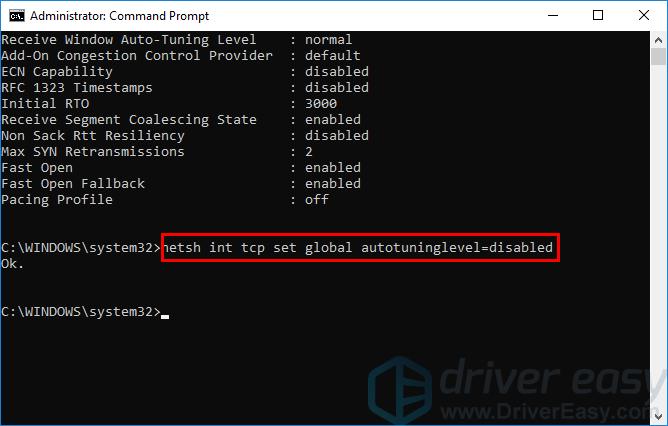
Fix 5: Disable Windows Auto-Tuning
Window Auto-Tuning is a feature in our Windows 10 to allow for more efficient data transfers. But it can also interfere with the network and cause loss of connectivity. So to disable the feature:
- On your keyboard, press the Windows logo key and type cmd. Then right click on Command Prompt and click Run as administrator.
Click Yes when prompted to confirm.
- Copy & paste netsh interface tcp show global into the window and press Enter. Then check if Receive Window Auto-Tuning Level is set to normal.

- If yes, you’ll have to copy & paste netsh int tcp set global autotuninglevel=disabled into the window and press Enter to disable it.
- Check to see if your Windows 10 slow Internet problem has been solved. If the issue still lingers on, don’t worry, here’s one more fix to try.

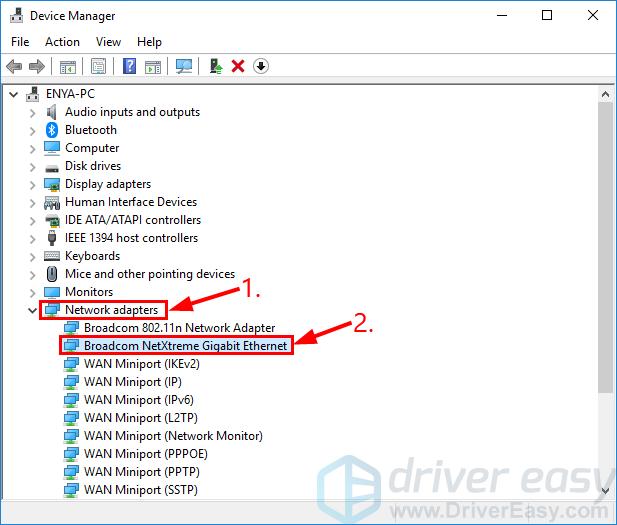
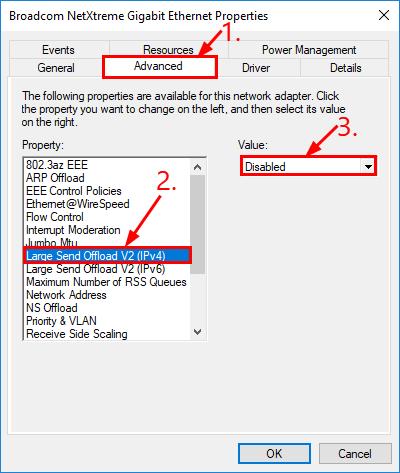
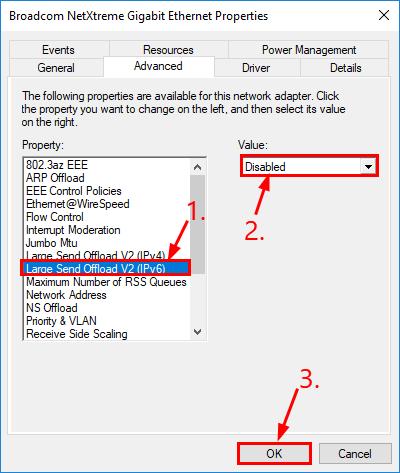
Fix 6: Disable Large Send Offload
Large Send Offload(LSO) is another feature in Windows designated for better network performance. Well-intended, but then the whole thing of allowing background apps to consume large amounts of network bandwidth is the reason why our Internet speed takes a hit. To disable LSO:
- On your keyboard, press the Windows logo key and R at the same time, then type devmgmt.msc into the box and press Enter.
- Double-click on Network adapters > your network adapter.

- Click the Advanced tab, then click Large Send Offload V2 (IPv4) and set the value to Disabled.

- Click Large Send Offload V2 (IPv6) and set the value to Disabled. Then click OK.
- Hopefully, your Windows 10/11 Slow Internet issue has been resolved successfully.
Some other modifications
If none of the above network-related changes prove effective, here are some other tweaks that you can do to improve your network connectivity situation, and thus help to improve the network speed on your computer. Check the following to see if you’ve done them all:
- Reduce the number of devices connected to the same router to make sure that your main computer gets the most speed.
- Use a wired network connection (with an Ethernet cable) instead of Wi-Fi. If this is not an option, move your computer closer to the router.
- Update your router firmware if you haven’t already.
- In your router settings, try to enable QoS to prioritize gaming traffic. If you’re not sure where to find it, please visit your router’s official website to find the manual or seek help from your ISP.
- Contact your ISP. If you’ve tried everything and your internet is still slow, it might be an issue with your ISP (Internet Service Provider). Contact them for support.
- Upgrade Your Plan: If your internet plan is outdated or doesn’t provide enough bandwidth for your needs, consider upgrading to a plan with higher speeds.
- Upgrade your hardware. If the network settings are set up all correctly, but the network speed is still slow, it’s possible that your hardware is throttling the network speed. In that case, you may need to consider a more advanced router or modem, network cables and network adapters.
There you have it – 6 useful fixes for your Windows 11/10 Slow Internet problem. Hope this helps and feel free to comment below if you have any further questions. 🙂
473
473 people found this helpful
Available in other languages
Funktioniert Ihr Internet nicht normal und läuft alles ganz langsam? Keine Sorge. Hier finden Sie 7 Tipps, um Ihr Internetgeschwindigkeit zu erhöhen.
Cet article vous présente 7 solutions utiles et simples pour résoudre Internet lent qui pourront vous aider.

In today’s fast-paced digital world, having a slow internet connection can be frustrating and time-consuming. Luckily, with Windows 11, there are several ways to improve your internet speed and enjoy faster browsing, downloading, and streaming. Whether you’re working from home, streaming movies, or gaming online, you need a speedy internet connection to stay productive and entertained. In this article, we will provide some easy-to-follow tips and tricks to speed up your internet connection on Windows 11. We will cover basic and advanced methods to help you optimize your network settings and maximize your internet connection.
Adjust the Network Delivery Optimization Settings
Search for Delivery Optimization in your start menu search to open up your Delivery Optimization system settings window. You can specify the bandwidth that Windows can use for core tasks, such as download limits, updates and overall network usage limits. Remove any limit on your connection bandwidth.

Network & Internet Settings > Delivery Optimization Advanced Options
Delete the Windows Temporary Files
Delete your temporary files if you haven’t done this in a while. In your start menu, search for %temp% and hit enter. This folder contains all of your temporary files, which should be deleted. You can safely delete everything in this folder; some files might remain, so leave them there.

Delete the content of your %temp% folder
Test your Internet Connection Speed & Latency
We suggest making sure that your connection issues are not hardware based. To test your connection, visit this page. A normal up & download speed, usually above three mb/s, is crucial for your OS and web browsing to work correctly. Make sure to use an ethernet cable to ensure the best possible connection. If you have to use a WiFi connection, then make sure to restart your router or modem if you haven’t done this in a while, and reduce the number of devices connected to the same network.

Test your up- & download speed to the closest server
Windows Command Prompt
Open up your command prompt by searching for CMD and hitting enter. Use the following commands:
ping google.com
This command will check your latency and packet loss to google’s servers. If your ping is higher than 100ms, or if you encounter any packet loss, make a few changes to your connection, and follow the subsequent tweaks.
Use the command:
ipconfig /flushdns
This will flush and reset the content of your DNS resolver cache. Using this command will improve your latency issues.

Command Prompt
End Network-Intensive Processes
Open up your task manager. In the performance section, access your Resource Monitor. In the network tab, open the Processes with network activity and after a few seconds, you will see every process using your network connection. This might be your browser running in the background, steam, or a download bottlenecking your connection. We suggest you only end the processes you know won’t break your operating system. Below, you can also preview your network utilization in percent.

Resource Monitor > Network > Processes with Network Activity
Change the DNS Server Address
Lastly, we will change your DNS server addresses if the issue is still caused by your network connection. Use the shortcut Windows Key + R, and in this dialogue box enter “Control” and hit enter. This will open up your control center.
Navigate to Network And Internet, Network & Sharing Center, and select your connection. This will open up a new window, containing some general information about your connection. Navigate to Properties and lastly, double-click the Internet Protocol Version 4. Select to use the following DNS server addresses option, and as your preferred DNS server, use: 8.8.8.8, and as your alternate DNS server, use: 8.8.4.4 These are the official public DNS server addresses from Google, which are safe to use. Using VPN services can worsen your network connection. Make sure to turn off your VPN when testing your network connection.

Use the following DNS server addresses