
При расследовании различных инцидентов администратору необходимо получить информацию кто и когда заходил на определенный компьютер Windows. Историю входов пользователя в доменной сети можно получить из журналов контроллеров домена. Но иногда проще получить информацию непосредсвенно из логов компьютера. В этой статье мы покажем, как получить и проанализировать историю входа пользователей на компьютер/сервер Windows. Такая статистика поможет вам ответить на вопрос “Как в Windows проверить кто и когда использовал этот компьютере”.
Содержание:
- Настройка политики аудита входа пользователей в Windows
- Поиск событий входа пользователей в журнале событий Windows
- Анализ событий входа пользователей в Windows с помощью PowerShell
Настройка политики аудита входа пользователей в Windows
Сначала нужно включить политик аудита входа пользователей. На отдельностоящем компьютере для настройки параметров локальной групповой политики используется оснастка gpedit.msc. Если вы хотите включить политику для компьютеров в домене Active Directorty, нужно использовать редактор доменных GPO (
gpmc.msc
).
- Запустите консоль GPMC, создайте новую GPO и назначьте ее на Organizational Units (OU) с компьютерами и / или серверами, для которых вы хотите включить политику аудита событий входа;
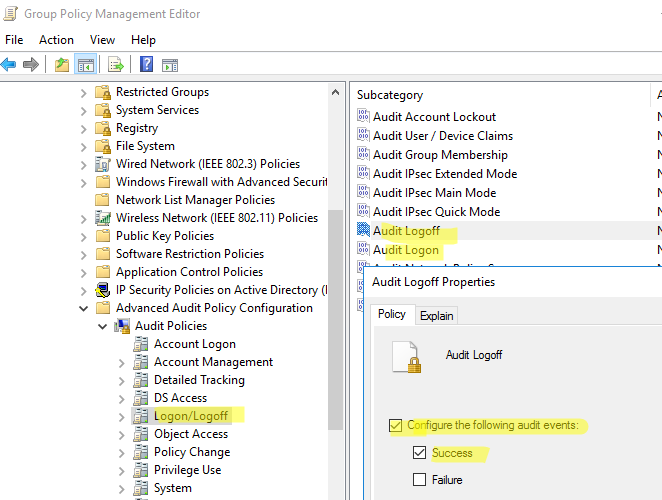
- Откройте объект GPO и перейдите в раздел Computer Configuration -> Policies -> Windows Settings -> Security Settings –> Advanced Audit Policy Configuration -> Audit Policies -> Logon/Logoff;
- Включите две политики аудита Audit Logon и Audit Logoff. Это позволит отслеживать как события входа, так и события выхода пользователей. Если вы хотите отслеживать только успешные события входа, включите в настройках политик только опцию Success;

- Закройте редактор GPO и обновите настройки политик на клиентах.
Поиск событий входа пользователей в журнале событий Windows
После того как вы включили политики аудита входа, при каждом входе пользователя в Windows в журнале Event Viewer будет появляться запись о входе. Посмотрим, как она выглядит.
- Откройте оснастку Event Viewer (
eventvwr.msc
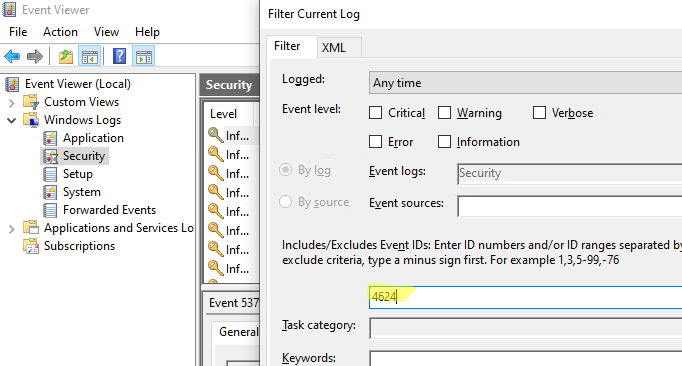
); - Разверните секцию Windows Logs и выберите журнал Security;
- Щелкните по нему правой клавишей и выберите пункт Filter Current Log;
- В поле укажите ID события 4624 и нажмите OK;
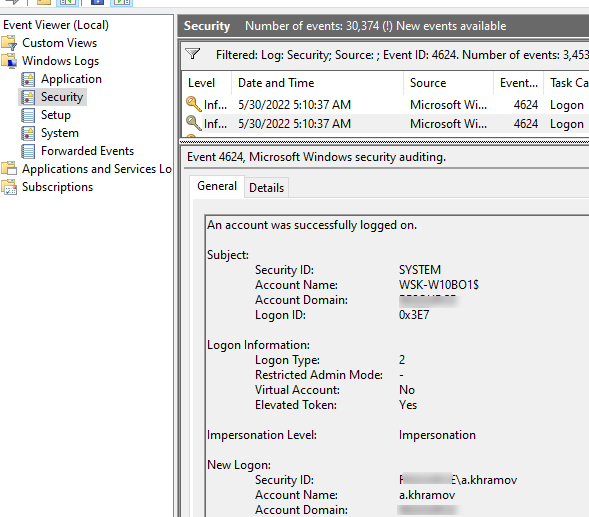
- В окне события останутся только события входа пользователей, системных служб с описанием
An account was successfully logged on
; - В описании события указано имя и домен пользователя, вошедшего в систему:
New Logon:
Security ID: WINITPRO\a.khramov
Account Name: a.khramov
Account Domain: WINITPRO
Ниже перечислены другие полезные EventID:
| Event ID | Описание |
| 4624 | A successful account logon event |
| 4625 | An account failed to log on |
| 4648 | A logon was attempted using explicit credentials |
| 4634 | An account was logged off |
| 4647 | User initiated logoff |
Если полистать журнал событий, можно заметить, что в нем присутствуют не только события входа пользователей на компьютер. Здесь также будут события сетевого доступа к этому компьютеру (при открытии по сети общих файлов или печати на сетевых принтерах), запуске различных служб и заданий планировщика и т.д. Т.е. очень много лишний событий, которые не относятся ко входу локального пользователя. Чтобы выбрать только события интерактивного входа пользователя на консоль компьютера, нужно дополнительно сделать выборку по значению параметра Logon Type. В таблице ниже перечислены коды Logon Type.
| Код Logon Type | Описание |
|---|---|
| 0 | System |
| 2 | Interactive |
| 3 | Network |
| 4 | Batch |
| 5 | Service |
| 6 | Proxy |
| 7 | Unlock |
| 8 | NetworkCleartext |
| 9 | NewCredentials |
| 10 | RemoteInteractive |
| 11 | CachedInteractive |
| 12 | CachedRemoteInteractive |
| 13 | CachedUnlock |
При удаленном подключении к рабочему столу компьютера по RDP, в журнале событий появится записи с Logon Type 10 или 3. Подробнее об анализе RDP логов в Windows.
В соответствии с этой таблицей событие локального входа пользователя на компьютер должно содержать Logon Type: 2.
Для фильтрации события входа по содержать Logon Type лучше использовать PowerShell.
Анализ событий входа пользователей в Windows с помощью PowerShell
Допустим, наша задача получить информацию о том, какие пользователи входили на этот компьютер за последнее время. Нам интересует именно события интерактивного входа (через консоль) с
LogonType =2
. Для выбора события из журналов Event Viewer мы воспользуемся командлетом Get-WinEvent.
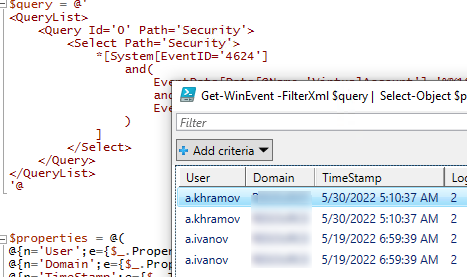
Следующий PowerShell скрипт выведет история входа пользователей на текущий компьютер и представит ее в виде графической таблицы Out-GridView.
$query = @'
<QueryList>
<Query Id='0' Path='Security'>
<Select Path='Security'>
*[System[EventID='4624']
and(
EventData[Data[@Name='VirtualAccount']='%%1843']
and
EventData[Data[@Name='LogonType']='2']
)
]
</Select>
</Query>
</QueryList>
'@
$properties = @(
@{n='User';e={$_.Properties[5].Value}},
@{n='Domain';e={$_.Properties[6].Value}},
@{n='TimeStamp';e={$_.TimeCreated}}
@{n='LogonType';e={$_.Properties[8].Value}}
)
Get-WinEvent -FilterXml $query | Select-Object $properties|Out-GridView
Если нужно выбрать события входа за последние несколько дней, можно добавить pipe с таким условием:
|Where-Object {$_.TimeStamp -gt '5/10/22'}
Командлет Get-WinEvent позволяет получить информацию с удаленных компьютеров. Например, чтобы получить историю входов с двух компьютеров, выполните следующий скрипт:
'msk-comp1', 'msk-comp2' |
ForEach-Object {
Get-WinEvent -ComputerName $_ -FilterXml $query | Select-Object $properties
}
Если протокол RPC закрыт между компьютерами, вы можете получить данные с удаленных компьютеров с помощью PowerShell Remoting командлета Invoke-Command:
Invoke-Command -ComputerName 'msk-comp1', 'msk-comp2' {Get-WinEvent -FilterXml $query | Select-Object $properties}
-
Home
-
News
- How to Check Computer Login History on Windows 10/11?
By Stella | Follow |
Last Updated
You may want to know who has logged into your computer and when. But do you know how to check it? To help you do this, MiniTool Software shows you a full guide on how to check computer login history on Windows 10/11. If you are running Windows 8/8.1 or Windows 7, this guide is also available.
Tip: If you are looking for a free file recovery tool, you can try MiniTool Power Data Recovery. This software can help you recover all kinds of files from hard drives, SD cards, memory cards, SSDs, and more, as long as the files are not overwritten by new data.
MiniTool Power Data Recovery TrialClick to Download100%Clean & Safe
Sometimes you may feel that someone is logged into your computer, but you are not sure. Well then, is it possible to check if someone logged into your Windows computer? Of course, yes. Windows 10/11 has an Audit logon events policy that allows you to view login history on Windows 10/11. However, this policy is not enabled by default on your device. So, you need to manually enable it. Then you can see the Windows login log to know which has logged into your PC.
How to Check Computer Login History on Windows 10/11?
Step 1: Enable Audit Logon Events on Windows 10/11
Tip: You need to enable Audit logon events using Local Group Policy, which is available in Windows 10/11 Pro or more advanced versions. If you are running Windows 10/11 Home, the thing is different because this feature is enabled by default on your computer. So, you can just skip to the next step to view login history on Windows 10/11.
The following guide is based on Windows 11. If you are running Windows 10, the steps are the same.
- Click the search bar from the taskbar and search for gpedit.msc.
- Click the first result to open Local Group Policy Editor.
- Go to this path: Computer Configuration > Windows Settings > Security Settings > Local Policies > Audit Policy.
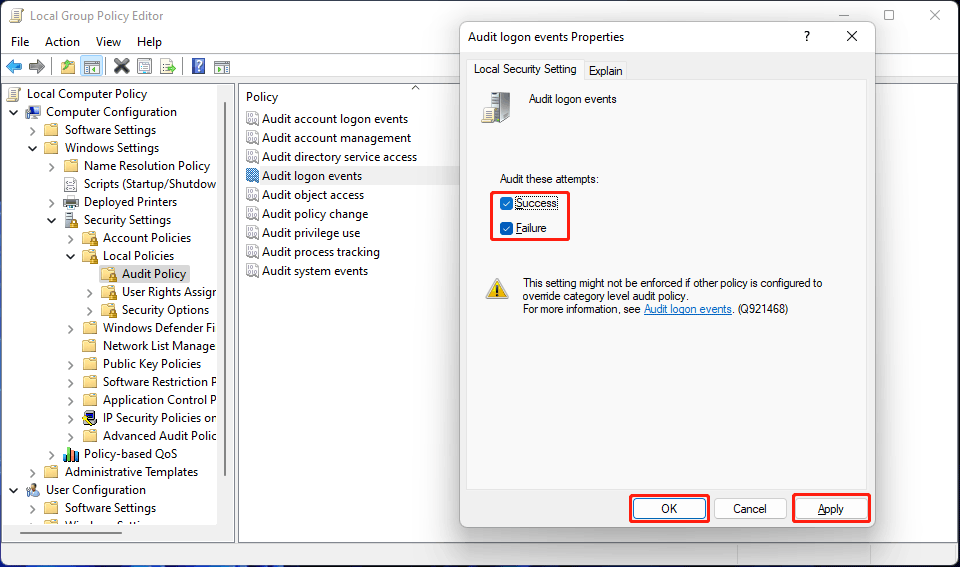
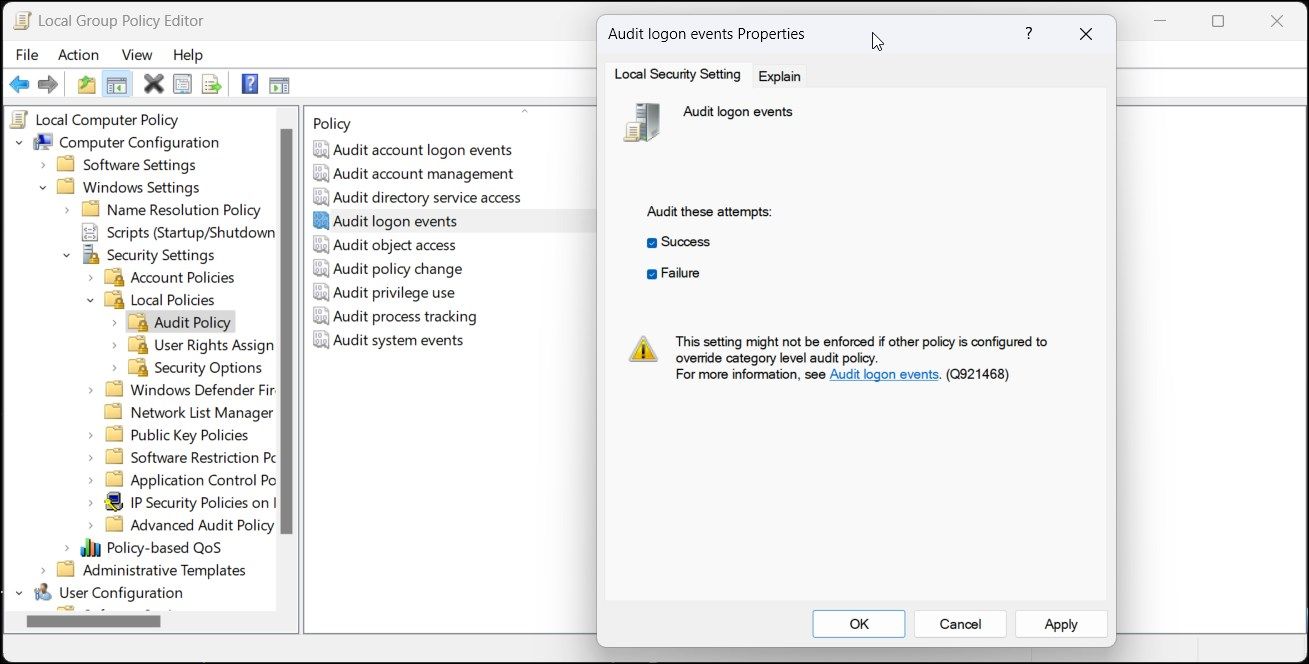
- Find Audit logon events from the right panel. Then, double-click it to open Properties.
- Check both Success and Failure under Local Security Setting.
- Click Apply.
- Click OK.
After these steps, your Windows computer will begin to track the login attempts no matter it is successful or not.
Tip: If you don’t want to track the login history, you can uncheck Success and Failure in step 5.
Step 2: Find out Who Is Logged into Your Computer
You can use the Event Viewer to check who is logged into your computer and when. Here is a guide on how to find out who is logged into your computer:
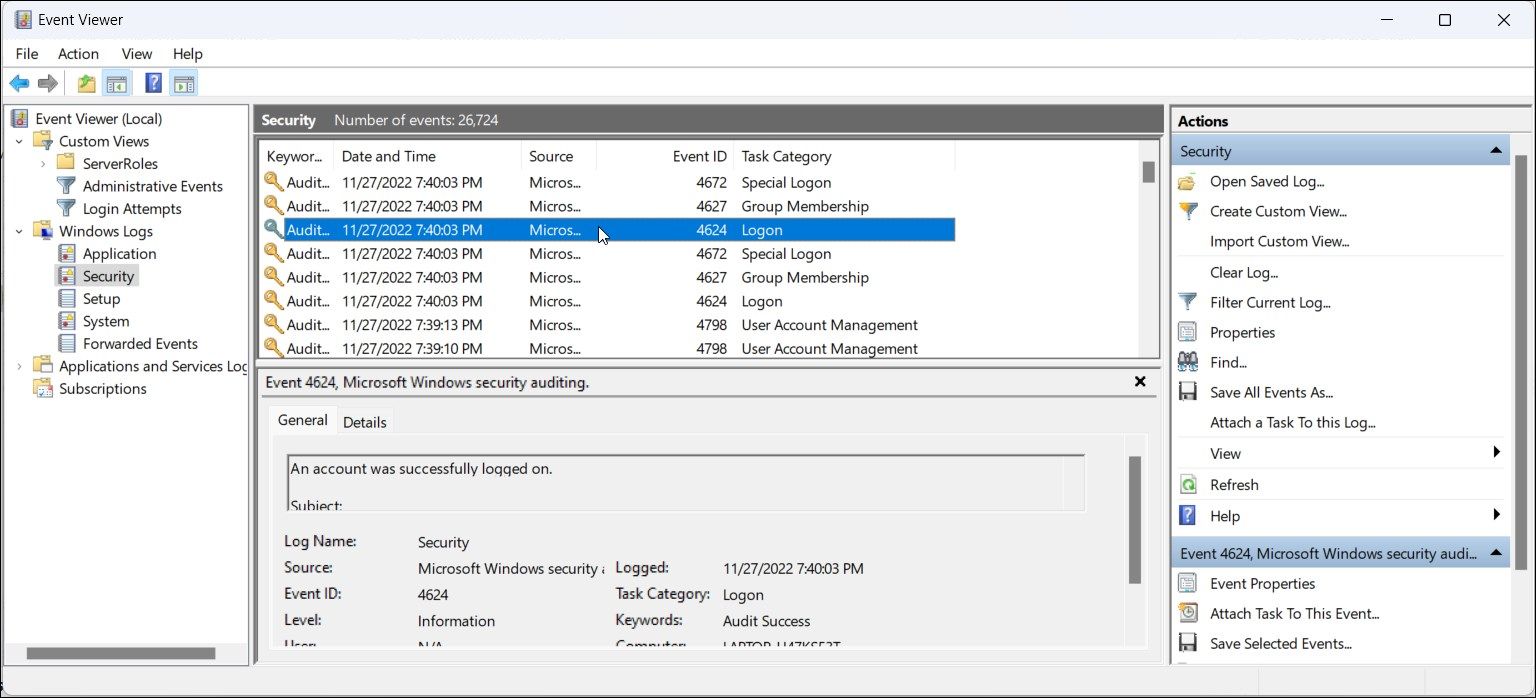
- Right-click Start and select Event Viewer.
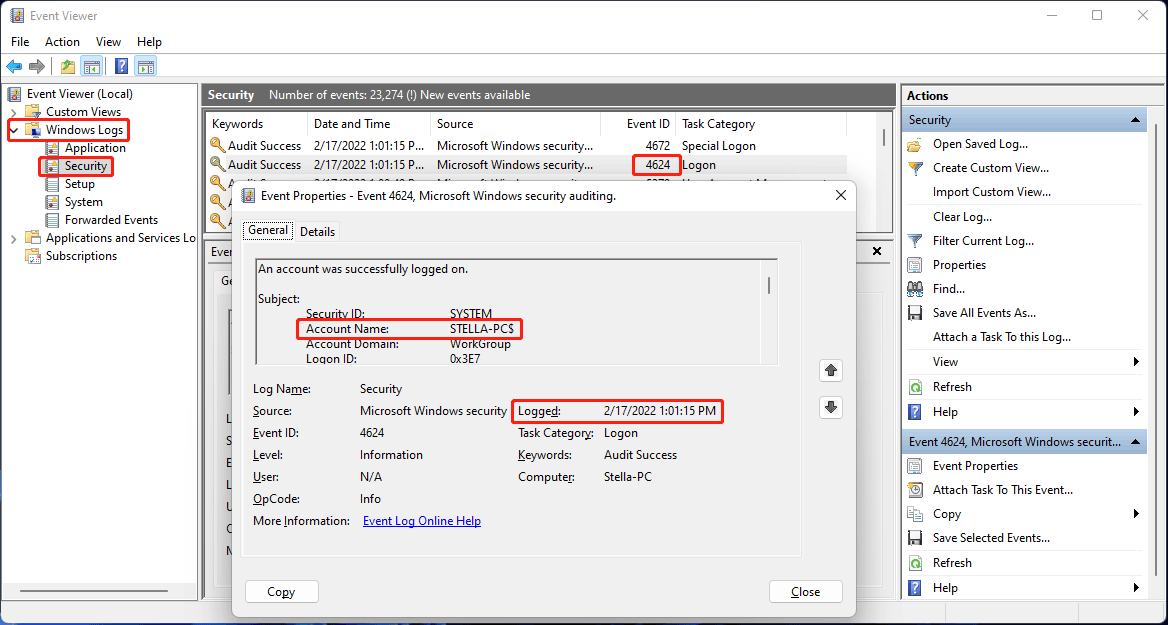
- Go to Windows Logs > Security.
- Find the 4624 event ID and double-click it to open it.
- Under the General section, check the Account Name. It is the account who have logged into your device. You can see when that account was logged in the computer under Logged.
After clicking Security, you can see that there are many logon reports. It may take some time to find your needed log. Fortunately, you can use the filter feature of Event Viewer to make the task easier.
1. Right-click Custom Views and click Create Custom View.
2. Under the Filter section, you need to:
- Select a time range for Logged.
- Select By log and then select Security under Windows logs for Event logs.
- Type 4624 in the All Event IDs box.
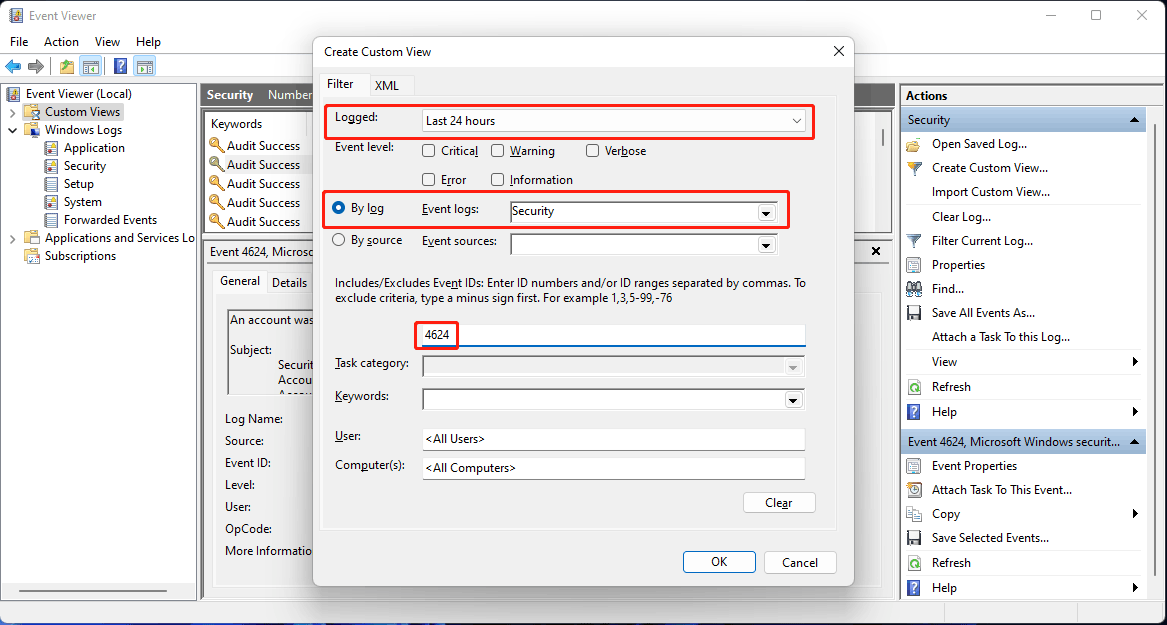
3. Click OK to save the changes.
Now, you can easily find the Windows 10/11 login history.
About The Author
Position: Columnist
Stella has been working in MiniTool Software as an English Editor for more than 8 years. Her articles mainly cover the fields of data recovery including storage media data recovery, phone data recovery, and photo recovery, videos download, partition management, and video & audio format conversions.
Windows lets you create multiple user accounts to let multiple users use a single computer. But what if you suspect someone to have accessed your PC or user account without your knowledge?
While physically monitoring your computer all the time is not feasible for most people, the built-in Windows log utility, Event Viewer, can reveal the recent activities on your computer, including login attempts. Here we show you how to audit failed and successful login attempts in Windows using Event Viewer and other methods.
How to Enable Logon Auditing via Group Policy Editor
You need to enable logon auditing in Group Policy Editor to be able to view login audit in Event Viewer. While this feature may be enabled by default on some computers, you can also enable logon auditing manually by following these steps.
Note that Group Policy Editor is only available on the Pro, Edu, and Enterprise edition of the Windows OS. If you are on the Home edition, follow our guide to enable gpedit in the Windows home edition.
Note that if you don’t configure your Group Policy for Logon Auditing, you can only view the successful login attempts in Event Viewer.
Once you have the Group Policy Editor enabled, follow these steps to enable logon auditing:
- Press Win + R to open Run.
- Type gpedit.msc and click OK to open the Group Policy Editor.
-
Next, navigate to the following location:
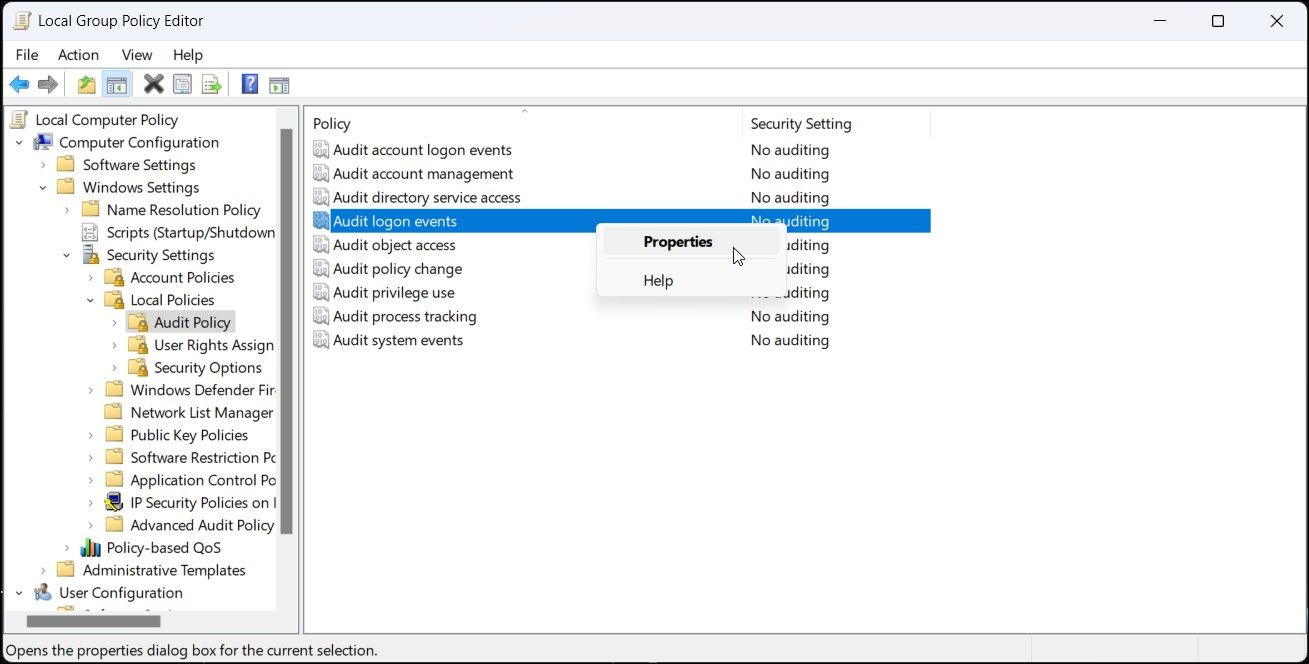
Computer Configuration > Windows Settings > Security Settings > Local Policies > Audit Policy -
In the right pane, right-click on Audit logon events and select Properties.

-
In the Properties dialog, select Success and Failure options under the Audit these attempts section.
- Click Apply and OK to save the changes.
Close Group Policy Editor and move to the next set of steps to view login attempts in Event Viewer.
How to View Failed and Successful Login Attempts in Event Viewer
The Event Viewer lets you view Windows logs for the application, security, system, and other events. While a useful application to troubleshoot system issues, you can use it to audit login events on your Windows PC.
Follow these steps to view failed and successful login attempts in Windows:
- Press the Win key and type event viewer. Alternatively, click on Search in the taskbar and type event viewer.
- Click on Event Viewer from the search result to open it.
-
In the left pane, expand the Windows Logs section.

- Next, select Security.
- In the right pane, locate the Event 4624 entry. It is a user logon event ID, and you may find multiple instances of this ID in the event log.
- To find failed login attempts, locate Event ID 2625 entries instead.
- Next, select the Event 4624 entry you want to view, and Event Viewer will display all the related information in the bottom section. Alternatively, right-click on the event entry and select Properties to view detailed information in a new window.
How to Decipher the Logon Entries in Event Viewer
While Event ID 4624 is associated with logon events, you will likely find multiple instances of this entry occurring every few minutes in the log. This is due to Event Viewer recording every logon event (whether from the local user account or system services such as Windows Security) with the same event ID (Event 4624).
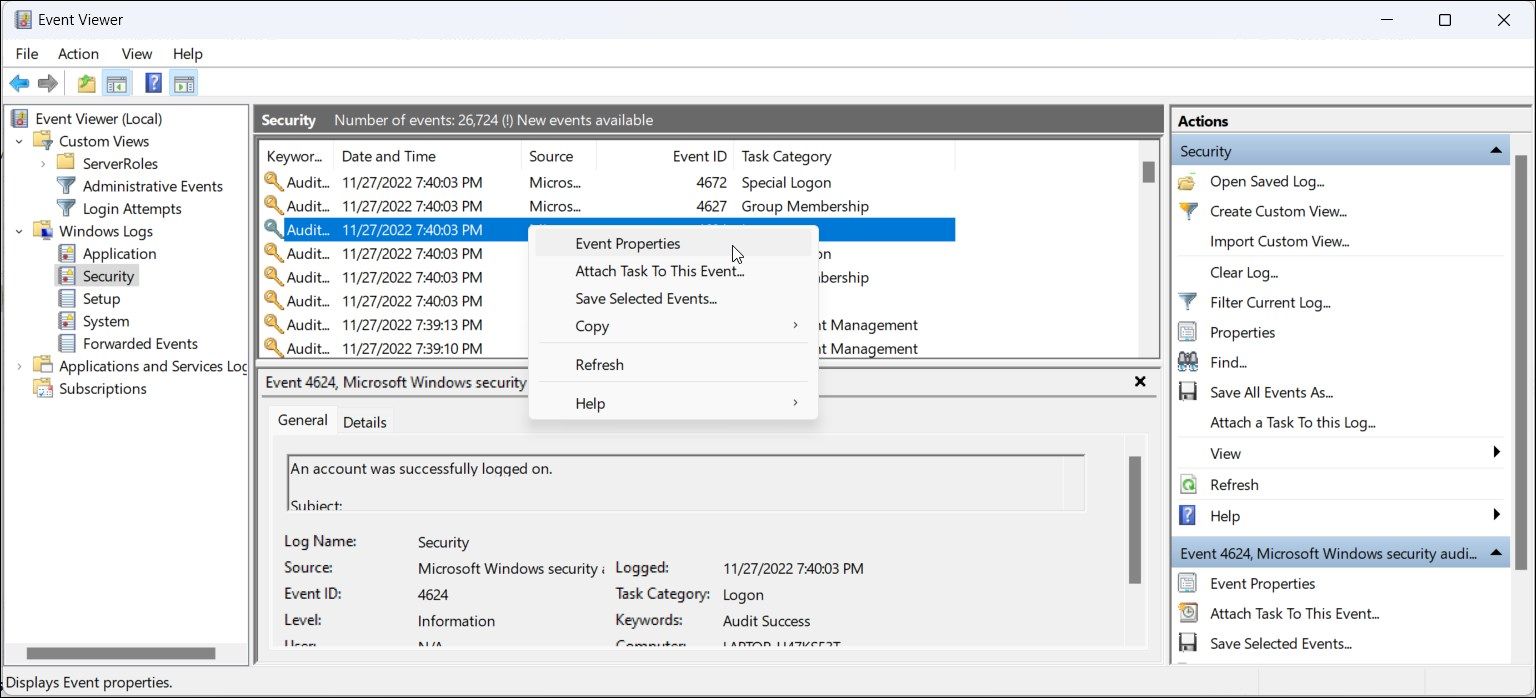
To identify the source of login, right-click on the event record and select Properties. In the General tab, scroll down and locate the Logon information section. Here, the Logon Type field indicates the kind of logon that occurred.
For example, Logon Type 5 indicates a service-based login, while Logon Type 2 indicates user-based login. Know more about the different logon types in the table below.
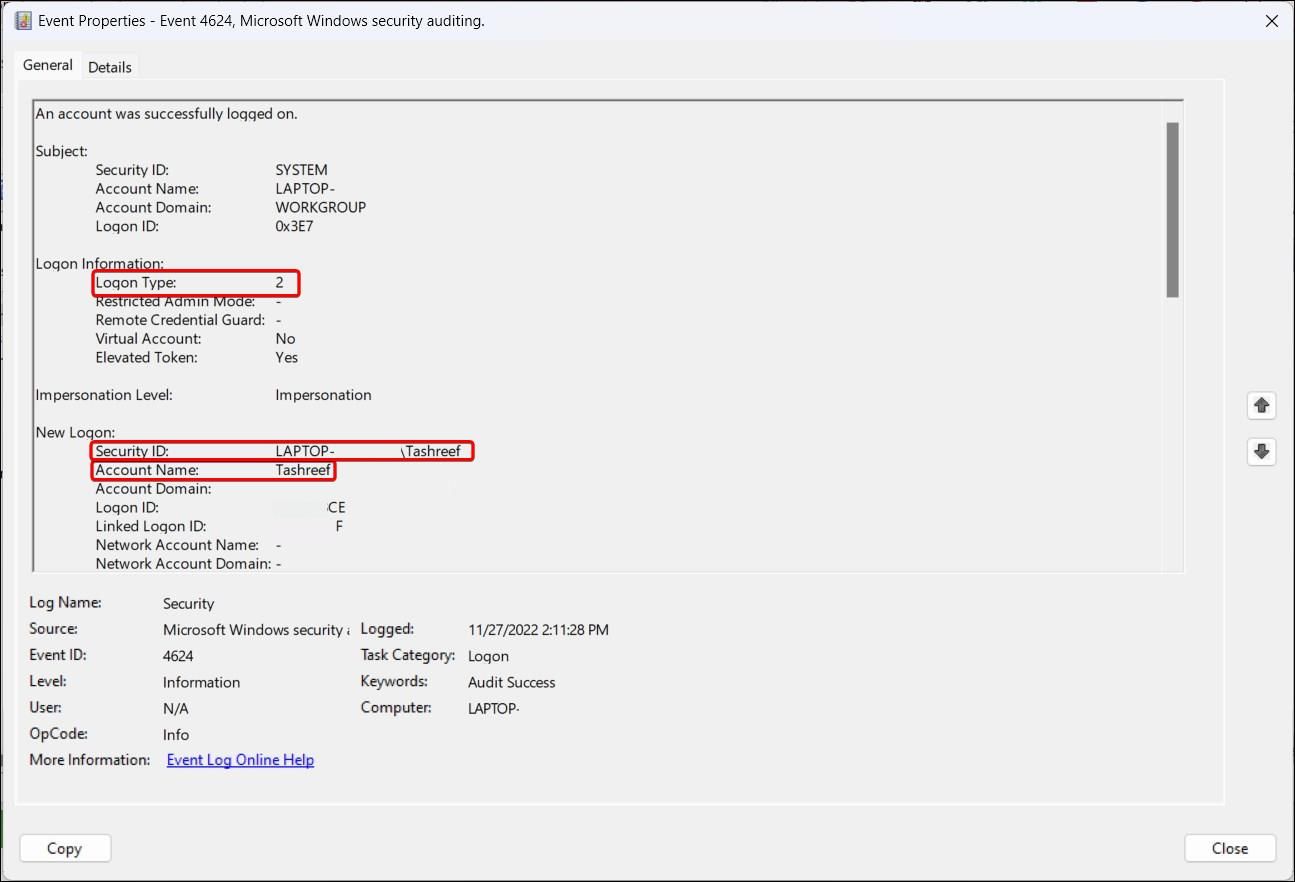
Next, scroll down to the New Logon section and locate the Security ID. This will show the user account that was affected by the logon.
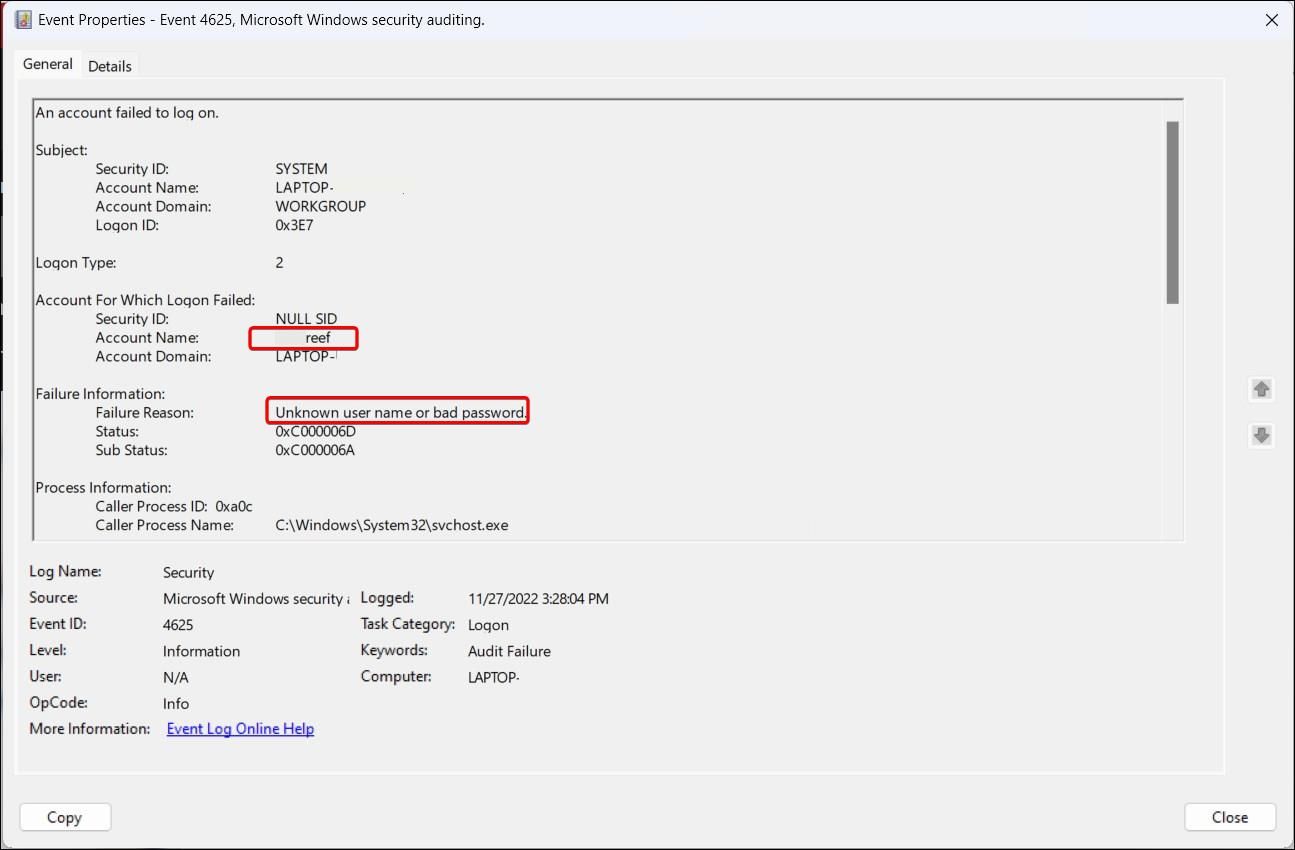
Similarly, for failed login attempts, review Event ID 4625. In the Properties dialog, you can find reasons for the failed login attempt and the affected user account. If you find multiple instances of unsuccessful attempts, consider learning how to limit the number of failed login attempts to protect your Windows PC.
Below is the list of all nine Logon Types for logon events that you may encounter reviewing login events in Event Viewer:
|
Logon Type |
Description |
|
Logon Type 2 |
A local user logged on to this computer. |
|
Logon Type 3 |
A user logged on to this computer from the network. |
|
Logon Type 4 |
Batch logon type without user intervention – Scheduled Tasks, etc. |
|
Logon Type 5 |
Logon by system service started by Service Control Manager – Most common type |
|
Logon Type 7 |
System unlocked by a local account user |
|
Logon Type 8 |
NetworkClearText — Logon attempted over the network where the password was sent as clear text. |
|
Logon Type 9 |
NewCredentials – triggered when a user uses the RunAs command with the /netonly option to start a program. |
|
Logon Type 10 |
RemoteInteractive – Generated when a computer is accessed via a remote access tool such as Remote Desktop Connection. |
|
Logon Type 11 |
CachedInteractive – When the user logged on to the computer via console using the cached credentials when the domain controller is not available. |
How to View the Last Logon History Using Command Prompt
You can use the Command Prompt to view the last login attempt. It is a handy way to find user-based login attempts without having to go through all the logon events in Event Viewer.
To view the login history of a specific user using Command Prompt:
- Press Win + R to open Run.
- Type cmd. While holding the Ctrl + Shift key, click OK. This will open the Command Prompt as administrator.
-
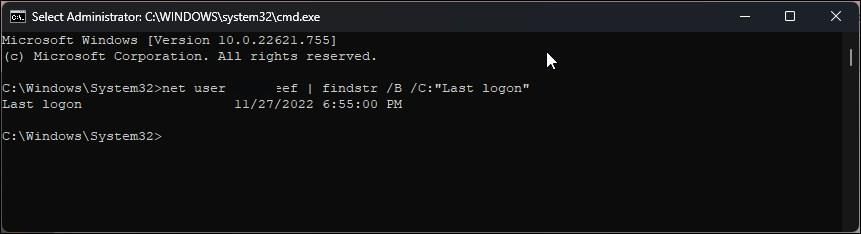
In the Command Prompt window, type the following command and press Enter:
net user administrator | findstr /B /C:"Last logon" - In the above command, replace «administrator» with the username to view their login history.
- The output will show the last login time and date for the specified user.
Viewing Failed and Successful Login Attempts in Windows
If you suspect someone to have logged in to your PC, the Event Viewer will likely catch and record the attempt. For this to work, you must enable the Logon Auditing policy in Group Policy Editor. You can also use Command Prompt to view a specific user’s login history.
That said, anyone who knows their way around Event Viewer can easily clear the logs. So, if anything, beefing up your Windows computer security is the best way to prevent unauthorized access. You can begin by limiting the number of failed login attempts on your Windows PC.
Login events play a crucial role in maintaining the security of a Windows Server. They provide valuable information about who accessed the server, when they accessed it, and whether any suspicious activity occurred. By reviewing login events, you can identify potential security threats, ensure that user accounts are being used appropriately, and maintain a secure server environment.
In this blog post, we will guide you through the steps of enabling logon event auditing, viewing and filtering login events, and interpreting and taking action on login events. By following these steps, you can strengthen your server’s security and protect your organization from cyber threats.
Enable Logon Event Auditing
Enabling logon event auditing is the first step in reviewing login events in a Windows Server. Windows Server includes a built-in feature called Event Auditing, which records security-related events, such as logon events, in a log file. However, by default, Windows Server does not audit logon events, so you need to enable it manually.
To enable logon event auditing, follow these simple steps:
- Open the Local Group Policy Editor by typing “gpedit.msc” in the search bar and pressing Enter.
- Navigate to Computer Configuration > Windows Settings > Security Settings > Local Policies > Audit Policy.
- Double-click the Audit logon events policy.
- Click OK after Selecting the Success and Failure check boxes.
- Close the Local Group Policy Editor.
Once you have enabled logon event auditing, Windows Server will start recording logon events in the Security log. You can access the Security log through the Windows Event Viewer. With this feature enabled, you can now review login events and identify potential security threats on your server.
Windows Event Viewer
The Windows Event Viewer is a powerful tool that enables you to view and manage event logs on your Windows Server. It is a built-in feature and can be accessed through the Control Panel or the Start menu.
To access the Windows Event Viewer, follow these simple steps:
- Click on the Start menu. In the search bar, type “Event Viewer”.
- In the search results, click on “Event Viewer”.
- Expand the “Windows Logs” folder.
- Click on the “Security” log.
By following these steps, you can access the Security log, which contains important information about login events on your Windows Server. The Windows Event Viewer provides an easy-to-use interface for reviewing login events, enabling you to quickly identify any suspicious activity and take action to prevent potential security threats.
Viewing Logon Events
Once you have enabled logon event auditing and accessed the Security log in the Windows Event Viewer, you can start reviewing the logon events that have been recorded. By default, the Security log displays all events, not just logon events. To filter the log and show only logon events, you need to follow these steps:
- In the Security log, click on the “Filter Current Log” button in the “Actions” pane on the right-hand side of the screen.
- In the “Filter Current Log” dialog box, click on the “Event sources” drop-down list, and choose “”.
- Select both the “Audit Success” and “Audit Failure” checkboxes in the “Keywords” field
- In the “User” field, enter the name of the user whose logon events you want to view, or leave it blank to view all users.
- Click “OK” to apply the filter.
Once you have applied the filter, the Security log will display only logon events that match your criteria. This makes it easier to review and analyze login activity on your Windows Server and identify any potential security threats. By regularly reviewing logon events and filtering the Security log, you can stay on top of your server’s security and prevent unauthorized access to your system.
Filter Only Logon Events
To filter the Security log to show only successful or failed logon events, you can use the Event IDs that are associated with these events. The Event ID for a successful logon event is 4624, and the Event ID for a failed logon event is 4625. Here are the steps to filter the log and view only successful logon events:
- Open the Security log in the Windows Event Viewer.
- Click the “Filter Current Log” button in the “Actions” pane on the right-hand side of the screen.
- Choose “Microsoft Windows security auditing” from the “Event sources” drop-down list in the “Filter Current Log” dialog box.
- In the “Keywords” field, select the “Audit Success” check box.
- In the “Event IDs” field, enter 4624.
- In the “User” field, enter the name of the user whose logon events you want to view, or leave it blank to view all users.
- Click “OK” to apply the filter.
To filter the log and view only failed logon events, follow the same steps as above, but in step 4, select the “Audit Failure” check box, and in step 5, enter 4625 in the “Event IDs” field. By filtering the log to show only successful or failed logon events, you can quickly identify any suspicious activity and take appropriate action.
Interpreting and Taking Action on Login Events
After filtering the log to show only the logon events that you want to investigate, you can interpret and take action on the information provided in the event log. There are several key pieces of information that are important to review when analyzing logon events:
- Event ID: The Event ID indicates whether the logon event was successful or failed. As noted earlier, Event ID 4624 is for a successful logon event, and Event ID 4625 is for a failed logon event.
- Date and Time: The date and time of the logon event can help you identify when the event occurred and whether it coincides with any other events or activities.
- User Account: The user account associated with the logon event can help you identify who accessed the server. This information can be used to determine whether the logon event is expected or not.
- Logon Type: The logon type indicates how the user logged on to the server. There are various logon types, such as interactive, remote, and service logons.
- Source Network Address: The source network address helps you identify where the user was when they accessed the server. This information can be used to determine whether the logon event is suspicious or not.
If you find a suspicious logon event, it’s essential to take immediate action. Depending on the severity of the event, you may need to disable the associated user account, change passwords, or investigate further. Additionally, it’s always a good idea to review your security policies and procedures to ensure that you’re taking all necessary precautions to prevent similar events in the future.
Conclusion
Monitoring login events in a Windows Server is crucial for maintaining a secure and protected server environment. By enabling logon event auditing, accessing the Security log in the Windows Event Viewer, filtering the log to show only logon events, and understanding and responding to the important information provided by these events, you can quickly identify potential security threats and take appropriate action. Additionally, it is important to regularly review and update your security policies and procedures to ensure that you are employing the best practices to safeguard your sensitive data and prevent cyberattacks.
IT administrators often need to know who logged on to their computers and when for security and compliance reasons. Although you can use the native auditing methods supplied through Windows to track user account logon and logoff events, you may end up having to sift through thousands of records to reach the required log. Once you’ve found the required log, getting the required information for compliance and security reports is not an easy process.
Below are the steps to check Active Directory user login history using logon Event IDs.
- Step 1- Enable Auditing for User Logon/Logoff Events
- Step 2- Search Relevant Event IDs such as 4624, 4648 etc. in Event Viewer
Step 1- Enable Auditing for User Logon/Logoff Events
You can do this through two GPO settings:
1. Audit Logon Events: This setting generates events for starting and ending logon sessions. These events happen on the machine where you log in.
2. Audit Account Logon Events: This setting generates events on the computer that validates logons. When a domain controller authenticates a domain user account, events are generated and stored on that domain controller.
Below are the steps to enable auditing of user Logon/Logoff events:
- Open the “Group Policy Management” console by running the “gpmc.msc” command.
- If you want to configure auditing for the entire domain, right-click on the domain and click “Create a GPO in this domain, and Link it here…”.
- Create a new GPO dialog box that appears on the screen. Enter a new GPO name.
- Go to the new GPO, right-click on it, and select “Edit” from the context menu.
- “Group Policy Management Editor” window appears on the screen.
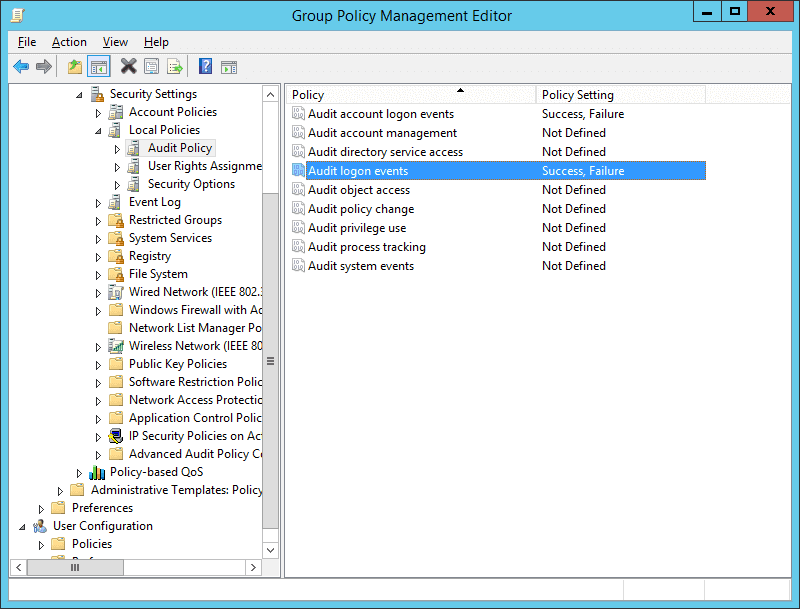
- In the navigation pane, go to “Computer Configuration” ➔ “Policies” ➔ “Windows Settings” ➔ “Security Settings” ➔ “Local Policies” ➔ “Audit Policy”.

Figure: Configuring audit logon events policy - In the right pane, double-click the “Audit logon events” policy to open its properties window.
- Select the “Success” and “Failure” checkboxes, and click “OK”.
- Similarly, you have to enable “Success” and “Failure” for “Audit Account Logon Events”.
- Close “Group Policy Management Editor”.
- Now, you have to configure this new Group Policy Object (containing this audit policy) on all Active Directory objects including all users and groups. Perform the following steps.
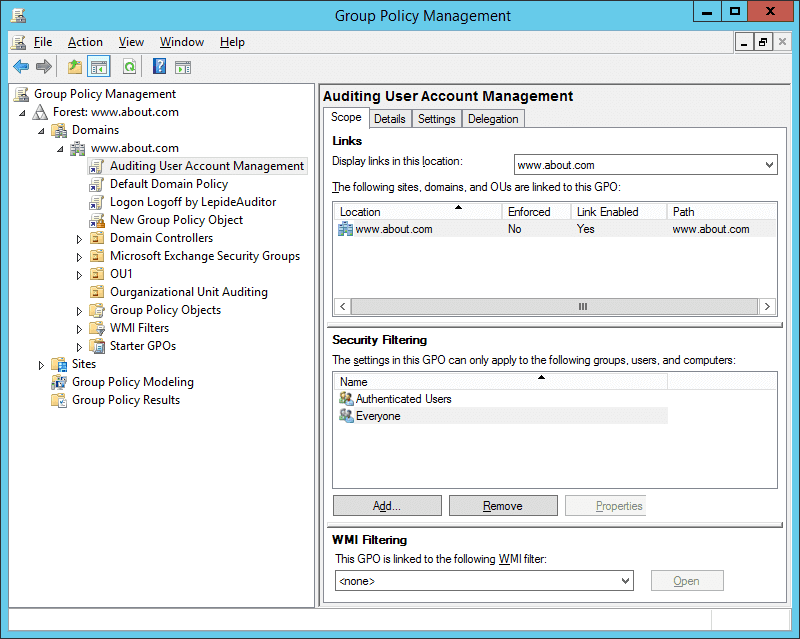
- In In “Group Policy Management Console”, select the new GPO (containing the above change).
- In the “Security Filtering” section in the right panel, click “Add” to access the “Select User, Computer or Group” dialog box.
- Type “Everyone”. Click “Check Names” to validate this entry. Click “OK” to add it and apply it to all objects.

Figure : Applied the Group Policy Object to everyone - Close “Group Policy Management Console”.
- Now, run the following command to update GPO.
- gpupdate /force
Don’t waste your time with Event Viewer. Track user login history easily with Lepide’s AD auditing free tool.
By submitting the form you agree to the terms in our privacy policy.
Step 2- Search Relevant Logon Event IDs in Windows Event Viewer
After you have configured log on auditing, whenever users logon into network systems, the event logs will be generated and stored. To find out the details, you have to use Windows Event Viewer. Follow the below steps to view logon audit events:
- Go to Start ➔ Type “Event Viewer” and click enter to open the “Event Viewer” window.
- In the left navigation pane of “Event Viewer”, open “Security” logs in “Windows Logs”.
- You will have to look for the following event IDs for the purposes mentioned herein below.
For user logon, you have to search for 4624 and 4648 logon event IDs. For failed logon, you have to search for 4625. For logoff events, you have to search for 4634 and 4647.
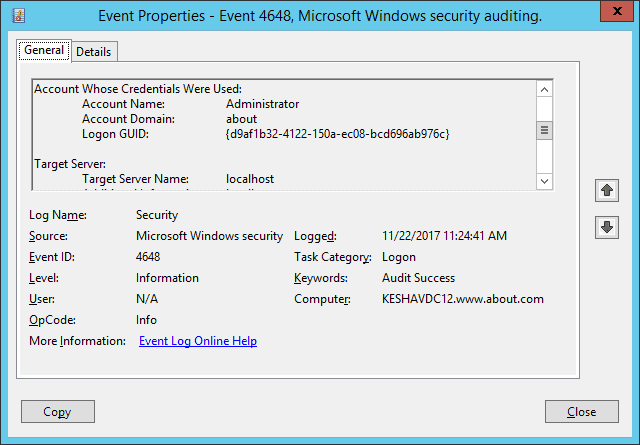
In this article, we are searching for logon event IDs 4624 and 4648. The following screenshot shows Windows Event ID 4648 for the user logon attempted using explicit credentials.
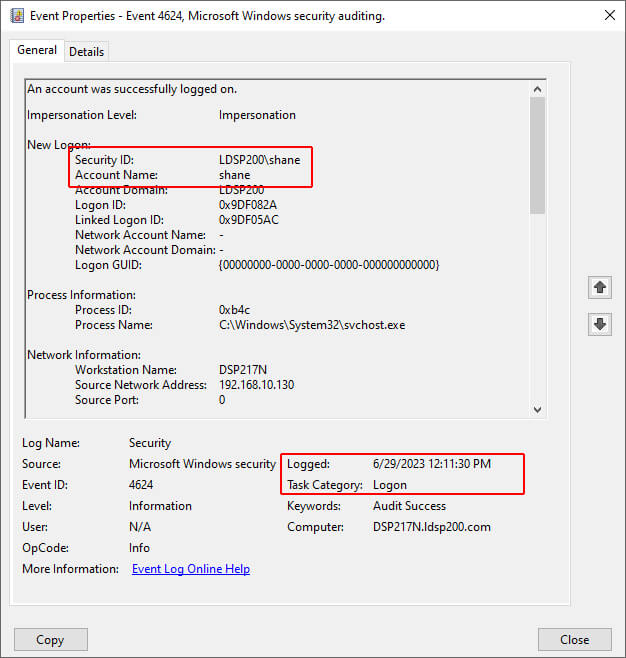
The following screenshot of Windows Event ID 4624 shows the session start time is displayed as Logged. In the Event Properties given below, a user, Shane, had logged in on 6/29/2023 at 12:11:30 PM.
Check User Login History with Lepide’s Free Tool for AD Auditing
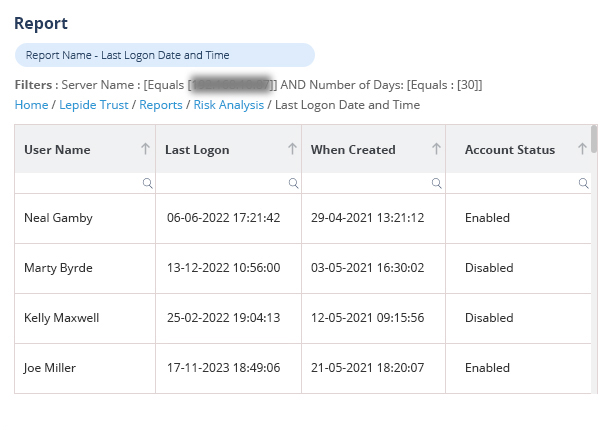
Using Lepide Change Reporter for AD, you can easily monitor AD users’ login history by tracking their logon and logoff activities in real-time. The solution collects log on information from all added domain controllers automatically. Its report contains details on logon or logoff events, including when users logged in, from which computer, and when. You get accurate and instant reports on the login details of users in the network. The following screenshot shows a successful user logon report event captured by Lepide’s free tool::
Lepide Change Reporter provides following reports related to logon/logoff:
Conclusion
In this article, the steps to audit the user logon and logoff events through native auditing are explained. However, much noise is generated for the logon or logoff events that make it complicated for the IT administrators to have a real-time view. The easiest and more efficient way to audit the same with Lepide’s Active Directory Auditing Free Tool has also been explained.