
Время непрерывной работы Windows с момента последней перезагрузки (uptime) можно узнать разными способами.
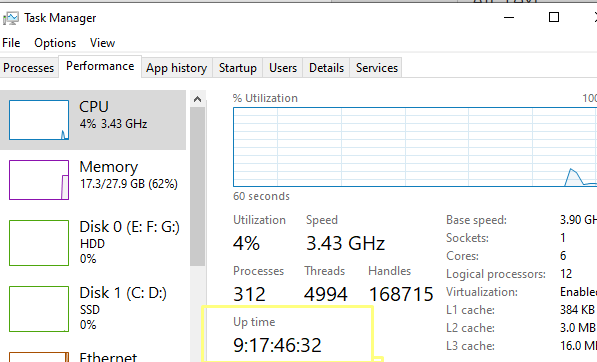
В графическом интерфейсе общее время работы Windows можно найти в диспетчере задач.
- Запустите Task Manager (выполните команды
taskmgr.exe
или нажмите сочетание клавиш
Ctrl+Shift+Esc
) - Перейдите на вкладку Производительность (Performance) -> вкладка ЦП (CPU)
- Время непрерывной работы компьютера содержится в поле Up time
-

Также можно получить текущий uptime из командной строки. Выполните команду:
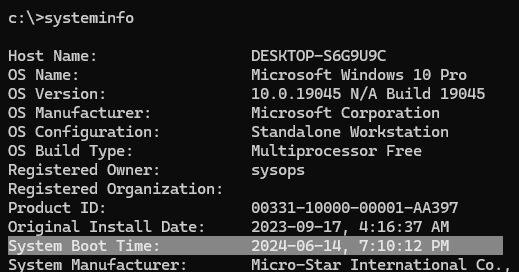
Systeminfo
Время последней загрузки (перезагрузки) Windows указано в значении System Boot Time.
В данном случае в командной строке отобразится только время последней загрузки. Чтобы вычислить значение uptime, как разницу между текущим временем и временем загрузки Windows, воспользуйтесь PowerShell командами:
$boot_time = Get-CimInstance Win32_OperatingSystem | select LastBootUpTime
(Get-Date) - $boot_time.LastBootUpTime | SELECT Days,Hours,Minutes,Seconds
Команда вернет значение аптайма компьютера в днях и часах.
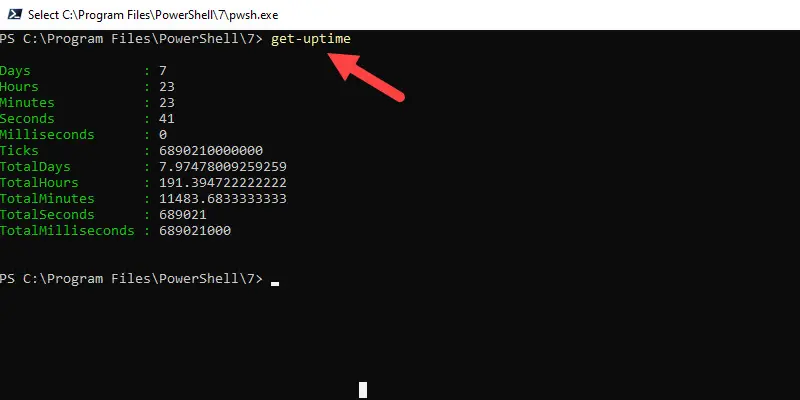
В новых версиях PowerShell Core 6.x и 7.x для получения времени работы системы можно использовать новый командлет Get-Uptime. Это командлет сразу выведет значение uptime в днях, часах, минутах (в формате TimeSpan). Или можно вывести время с последней загрузки компьютера:
Get-Uptime -Since
Можно получить значение аптайм с удаленного хоста:
$remotePC='pcbuh01'
(Get-Date) - (Get-CimInstance Win32_OperatingSystem -ComputerName $remotePC).LastBootupTime
Эту команду можно использовать для удаленного опроса uptime компьютеров в домене AD. Для получения списка компьютеров обычно используется командлет Get-ADComputer.
Обратите внимание, что на десктопных версиях Windows 10 и 11 по умолчанию включена функция гибридной загруки (Быстрый запуск, Fast Boot). В этом режиме, когда пользователь выключает компьютер, Windows фактически не выключается, а выгружает ядро и драйверы в файл гибернации. В этом случае (как и после пробуждения после режима сна и обычной гибернации) аптайм компьютера не сбрасывается при включении.
You can check the uptime of your Windows® Server® from the command line by running either the net statistics server
or the systeminfo command.
In addition to uptime, the net statistics server command also displays statistics for the system, such as the number of
files that are being accessed, systems errors, permission violations, password violations, and the total uptime since the last
time the server was restarted. Use the following steps to check server uptime by using the net statistics server command:
-
Connect to your cloud server on the command line.
-
Type
net statistics serverand press Enter.Note: You can also shorten this command to
net stats srv. -
Look for the line that starts with
Statistics since, which indicates the date and time when the uptime started.
The systeminfo command reports the following additional information about the operating system (OS)
that is installed on the server:
Host NameOS NameOS VersionOriginal Install dateSystem Boot TimeSystem TimeTimezoneTotal Physical MemoryVirtual Memory: Max SizeVirtual Memory: AvailableVirtual MemoryNetwork Card
Use the following steps to check server uptime by using the systeminfo command:
- Connect to your cloud server on the command line.
- Type
systeminfoand press Enter. - Look for the line that starts with
Statistics since, which indicates the date and time when the uptime started.
Updated 2 months ago
Like many things in the Microsoft Windows universe, there are several ways to check Up Time of your systems.
Fortunately, they are all easy and quick!
How to Check Windows Uptime via Command Line
There are several really simple ways to check uptime in Windows Server and Windows 10 or Windows 11 using Command Prompt or PowerShell.
Rather than bore you with the details lets jump into each of them starting with the easiest.
Check Windows Uptime with Net Statistics
This one is super simple. You just need to open command prompt or PowerShell and type either:
net statistics server
or
net statistics workstation
If you’re on a server OS such as Server 2019 or Server 2022 then use the command ending in Server. If you’re using a workstation OS such as Windows 10 or Windows 11 use the command ending in workstation.
The output will look like this:
C:\WINDOWS\system32>net statistics workstation
Workstation Statistics for \\DOMCON1


Statistics since 9/17/2018 4:40:11 PM


  Bytes received                               6094
  Server Message Blocks (SMBs) received        12
  Bytes transmitted                            5164
  Server Message Blocks (SMBs) transmitted     0
  Read operations                              0
  Write operations                             0
  Raw reads denied                             0
  Raw writes denied                            0

  Network errors                               0
  Connections made                             0
  Reconnections made                           0
  Server disconnects                           0

  Sessions started                             0
  Hung sessions                                0
  Failed sessions                              0
  Failed operations                            0
  Use count                                    8
  Failed use count                             0
The line starting with “Statistics since …” displays the last time your computer was booted up.
How to Check Uptime in Windows with SystemInfo
Another way to see the the last boot time of your machine using a simple command prompt command is to use:
systeminfo
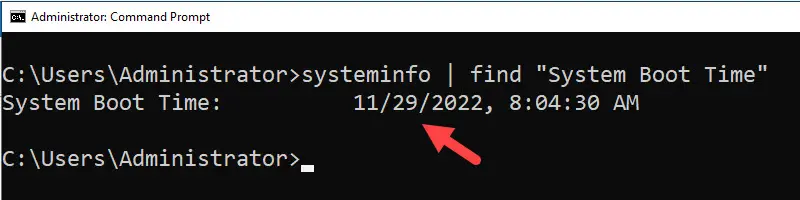
You can cut down the output to just the system boot time line by using a pipe and the find operator like so:
systeminfo | find “System Boot Time”
Which outputs:
C:\WINDOWS\system32>systeminfo | find "System Boot Time"
System Boot Time:          9/17/2018, 4:40:10 PM
If you want to check the boot time on a remote server you can either use the this command:
systeminfo /s remoteservername | find “System Boot Time”
or use a utility like PSExec from Microsoft PSTools to enter a remote command line.
Use the Windows Uptime Command (Uptime.exe)
The original Windows Server Uptime command was part of a program released by Microsoft called Uptime.exe. You used to be able to download it via KB232243. Now you have resort to downloading it from the Internet Archive URL or our website here.
Simply download the .exe and place inside your C:\Windows\System32 folder.
You can then run the following command to find the system uptime:
uptime
Or you can use this command to see the uptime on a remote server or workstation:
uptime remoteservername
Which results in:
C:\WINDOWS\system32>uptime
\\DOMCON1 has been up for: 1 day(s), 12 hour(s), 6 minutes(s), 58 seconds(s)
Now I did say original Uptime command earlier. That is because a new uptime.exe was developed under the open source project uptimeEXE which you can download here at Codeplex.
The command syntax is nearly identical to the original Uptime.exe as you can see here:
C:\WINDOWS\system32>uptime
 08:20:14 uptime 08:48:27
The only drawback to this updated version is that it doesn’t contain the extra options such as checking windows uptime on a remote computer.
Use Task Manager to Check Server Uptime
If you’re more of a GUI type person then you’ll be happy to know that you can use Task Manager to view system uptime.
All you have to do is open Task Manager (can search start menu for Task Manager, right click the task bar and click on Task Manager, or search for taskmgr.exe) and open the Performance tab.

Inside the CPU window, in the bottom left hand corner, you’ll find the Up time.
Recommended Tool: ManageEngine OpManager

- Multi-vendor Network Monitoring
- Simple Installation & Setup
- Intuitive UI
- Complete Visibility
- Intelligent Detections
- Easy Resolutions
Network Engineer III
I am a Senior Network Engineer who has spent the last decade elbow deep in enterprise System Administration and Networking in the local government and energy sectors. I can usually be found trying to warm up behind the storage arrays in the datacenter.
In this guide, I’ll show you how to check the uptime of a Windows Server and Windows client computers.
Checking the Windows uptime will show you how long the server has been running since it was last rebooted. This comes in useful when troubleshooting a Windows server for performance or application issues.
Windows Server Uptime Command
In this example, I’ll use a simple Windows command to check the server uptime.
-
Open the command prompt:
Copy and paste the command below:
systeminfo | find “System Boot Time” -
Check the system Boot Time:
The command will display the date of the last boot time.

Option#2 Windows Uptime GUI Tool
In this example, I’ll use the AD Pro Toolkit to check the update on all computers.
Step 1. Open the AD Pro Toolkit and click on Windows Uptime.
Step 2. Click “Run” to get the uptime on all servers and computers.

I don’t have many computers in my test environment but you can see how easy the toolkit makes it for generating a report on uptime and last boot.
You can also export the report to csv, xlsx, and PDF by clicking the export button.
Download Free Trial
How to Check Windows Server Uptime with PowerShell
This command will work on PowerShell 5.1 or later versions.
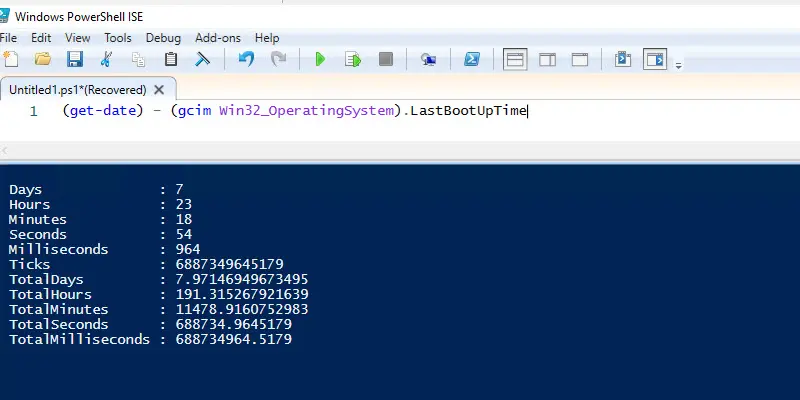
Open PowerShell and use the command below.
(get-date) – (gcim Win32_OperatingSystem).LastBootUpTimeThis command will show you how long it has been since the last reboot. It will display the uptime in days, hours, minutes, and seconds.
Another Powershell command that can be used to get the server uptime is the get-uptime cmdlet. The get-uptime cmdlet requires PowerShell version 6 or later.
Unfortunately, the get-uptime cmdlet has no parameter for checking the uptime on remote computers, it only works locally. See method 2 for a quick and easy way to get the uptime on remote and multiple computers.
Check Windows Uptime using Task Manager
You can easily check the uptime on a Windows system by using the task manager.
- Right click the taskbar and select task manaager
- Click on the Performance tab
- The up time will be displayed under the CPU graph.

Check Windows Uptime with Net Statistics
In this last example, I’ll use the net statistics command. This command will show various network statistics but also keeps track of the uptime.
- Open the command prompt
- Enter the command -> net statistics workstation
- The uptime will be at the top

Summary
As an administrator of Windows systems, you will often need to check the uptime on servers and client computers. If you need to manually a single computer there a several command line options to easily see the uptime. If you need to generate a report on multiple or all systems then I would recommend using the uptime utility from the AD Pro Toolkit.
I hope this article helped you find the uptime on your Windows server or workstations. If you liked this article, then please subscribe to our YouTube Channel for more Active Directory tutorials.
Even though there is still no built-in Windows uptime command, the actual uptime of the server/workstation or the system boot time can be checked from the command-line.
In this note i will show several methods of how to check Windows uptime from the command-line prompt and PowerShell.
PowerShell vs. CMD: Each of the commands below works both from the command-line prompt (CMD) and PowerShell.
Windows uptime can be checked using the wmic command:
C:\> wmic os get lastbootuptime
Another method to check Windows uptime from the command-line prompt is by getting the system boot time from the output of the systeminfo command:
C:\> systeminfo
- or -
C:\> systeminfo | find "System Boot Time:"
Also uptime of the Windows server/workstation can be checked using the net statistics command that returns the date and time since the statistics has been running, that approximately corresponds to the Windows boot time.
Windows server uptime:
C:\> net statistics server
- or -
C:\> net statistics server | find "Statistics since"
Windows workstation uptime:
C:\> net statistics workstation
- or -
C:\> net statistics workstation | find "Statistics since"
Was it useful? Share this post with the world!