
In today’s world, where privacy and security have become a major concern, it’s essential to have the right tools to protect yourself online. One such tool is a proxy server. A proxy server acts as an intermediary between your computer and the internet, allowing you to access the internet securely and anonymously. In this blog, we’ll be discussing 10 best proxy tools for windows server 2019.
10 Best Proxy Tools For Windows Server 2019:
NordVPN – NordVPN is a popular VPN service that comes with a built-in proxy feature. It offers over 5,500 servers in more than 60 countries, ensuring high-speed connections and strong encryption.
Tor – Tor is a free and open-source software that uses onion routing to encrypt and route your internet traffic through multiple servers, making it almost impossible to trace your online activity.
CCProxy – CCProxy is a Windows-based proxy server software that allows you to share your internet connection with multiple computers in your local network. It supports HTTP, HTTPS, FTP, SMTP, and SOCKS5 protocols.
Shadowsocks – Shadowsocks is an open-source proxy server software that encrypts your internet traffic and allows you to bypass internet censorship. It’s popular in countries like China and Iran, where internet restrictions are prevalent.
Proxifier – Proxifier is a Windows-based proxy client that allows you to redirect internet traffic through a proxy server. It supports HTTP, HTTPS, SOCKS4, and SOCKS5 protocols and allows you to configure rules for specific applications.
Psiphon – Psiphon is a free and open-source proxy tool that allows you to access censored websites and apps securely. It uses VPN, SSH, and HTTP Proxy technologies to encrypt your internet traffic.
Hide.me – Hide.me is a VPN service that comes with a built-in proxy feature. It offers high-speed connections and strong encryption, making it a popular choice for online privacy and security.
Charles Proxy – Charles Proxy is a debugging proxy server that allows you to inspect and debug HTTP and SSL traffic between your computer and the internet. It’s widely used by web developers and testers.
Fiddler – Fiddler is a web debugging proxy tool that allows you to inspect and modify HTTP and HTTPS traffic between your computer and the internet. It’s widely used by web developers and testers.
Wingate – Wingate is a Windows-based proxy server software that allows you to share your internet connection with multiple computers in your local network. It supports HTTP, HTTPS, FTP, SMTP, and SOCKS5 protocols and offers strong encryption for secure connections.
In conclusion, a proxy server is a useful tool that can help protect your online privacy and security. These are the 10 best proxy tools for windows server 2019. Finally you can find the right proxy tool for your needs and stay safe online.
Buy Residential Proxy RDP
If you’re curious about who is currently connected to a remote desktop connection, you’ve come to the right place. There are numerous methods for determining the number of remotely connected users.
RDP, which stands for Remote Desktop Protocol, is a protocol developed and owned by Microsoft that allows a user to connect to another computer via a network connection using a graphical interface. To connect to the server, the user uses RDP client software, whereas the server uses RDP server software, which is included with the Windows Server operating system. When a client connects to a server, Windows Servers keep track of the logged-in user’s information, which we can view.
So let’s get started.
Using Task Manager
Using Task Manager, we can see a list of active remote desktop users on a Windows server. This method of checking Active User works for every version of Windows Server.
Here are the steps:
- Goto Run and type taskmgr.exe and press the Ok button
This will open Task Manager. - Just navigate to the Users tab there you will get Users currently active.
It will display a list of users currently logged in. Here, I have only logged so it is showing one user information. Also, it contains information like what application the user is using, its current status, CPU usage, and memory usage.

Here you will only be able to determine which users are using Remote Connection. If you want to know which types of connections are used to connect to the remote, simply click on any column of the list, say «Status,» then right-click on it and select «Session.» The list will then show a session column with the types of connections to remote, such as console, terminal, services, or RDP, and so on. As shown below.
Using Query User Command
With the help of the query command, we can find various information about sessionId, the number of users, session state(active/inactive) etc on the Remote Desktop Session Host Server. This command can be used to determine whether a specific user is logged in to a specific Remote Desktop Session Host Server or not.
This command will work Windows Server 2022, Windows Server 2019, Windows Server 2016, Windows Server 2012 R2, Windows Server 2012, etc. So, this command will not work for Windows Server 2008.
Syntax:
query user [ | | ] [/server:]
Example:

It will return the following information:
- Username: Name of the User.
- sessionname: Name of the session on Remote Desktop Session Host Server. Here, I have rdp-tcp#45
- Id: This is the session ID
- STATE: This is the state of the session either active or disconnected.
- Idle Time: the number of minutes since the session’s last keystroke or mouse movement.
- LOGON Time: THis is the login time of the user at the server.
Note: You must have Full Control Authorization or special access permission to use this command.
query session
It displays information about not only active sessions but also other sessions that the server is running.

Using quser command
This is the same as the Query User command. This command will also work for Windows Server 2022, Windows Server 2019, Windows Server 2016, Windows Server 2012 R2, Windows Server 2012 only.
Syntax
quser [ | | ] [/server:]

Using qwinsta command
Query WINdows STAtion is abbreviated as qwinsta. It displays information about sessions on a Remote Desktop Session Host server. The list includes information not only about active sessions but also about other sessions that the server runs.
Syntax
qwinsta [ | | ] [/server:] [/mode] [/flow] [/connect] [/counter]
Example:

Look at the state column and you will see whether the user is active or not. You can see here User with ID 6 is active
Using Get-RDUserSession commandlet
The Get-RDUserSession cmdlet returns a list of all user sessions in a collection or in a Remote Desktop deployment. Note that this may not work in some servers like Windows R2 2012.
Import-Module RemoteDesktop
Get-RDUserSession
Output:

Using WMI
Windows Management Instrumentation (WMI) is a PowerShell subsystem that provides administrators with powerful system monitoring tools.
By simply typing the following command you will know a lot:
Get-WmiObject Win32_LoggedOnUser
If you just want to know the username just type the below command:
Get-WmiObject Win32_LoggedOnUser | Select Antecedent -Unique | %{"{0}\{1}" -f $_.Antecedent.ToString().Split('"')[1],$_.Antecedent.ToString().Split('"')[3]}
Using PsLoggedOn Tools
PsTools is a small Sysinternals command-line tool that can help in the administration of local and remote systems. It aids to determine currently logged-in users in local as well as remote systems.
Because PsLoggedOn requires a logon to access the Registry of a remote system, it will show you as logged on via resource share to remote computers that you query.
Note that this tool’s command will only work for Windows Server 2008 and above.
Syntax:
psloggedon [- ] [-l] [-x] [\\computername | username]
Here,
| Parameter | Description |
| — | Displays the supported options as well as the units of measurement for output values. |
| -l | Displays only local logins rather than both local and network resource logons. |
| -x | Don’t Show Logon times. |
| computername | Specifies the name of the compute for which logon information is to be displayed. |
| username | PsLoggedOn searches the network for computers where that user is logged in if you specify a user name. This is useful if you don’t want a specific user to be logged in when you’re about to change their user profile configuration. |
Download
Steps to use PsLogged.
- Download PsLogged from the above link
- Extract the files
- Goto extracted links and an open the command prompt on the same location.
- Then use the syntax mentioned above.
PSLoggedOn requires the Remote Registry Service to be running on the target computer. This service is not enabled by default.
Using Remote Event Viewer
Event Viewer is a powerful Windows tool that allows you to obtain log information from both your local and remote computers.
1 Connect successfully to a remote computer
2 Press Ctrl + R and type eventvwr and press Enter. This will open eventvwr.
3 Just click on the ‘Create Custom View‘ label located at the right corner.
4 Then under Popup, select Security under ‘Event Logs‘ and type Id in as 4624 ,4647, 4779,4800 and then press Ok.

5 In the next screen give the Name of the log like ‘Remote Login History‘ and click on Ok.

6 You will get the ‘Remote Login History‘ Label under Custom Views. Click on the label ‘Remote Login History‘ you will get all login, logout, locked, unlocked event information of the remote users.
7 Click on the row of the event and detail related to that event will get displayed just below it.

How to Enable Remote Registry Service in Remote Server?
Steps for enabling remote registry service in a remote server are as follows:
- Goto the services manager.
- Look for the «Remote Registry» service.
- Double-click on the service.
- Set the «Start Type» to «Automatic,» then press the «Start» button.
- Click OK to save your settings.
Or you can simply run the following line by line in Powershell.
Set-Service RemoteRegistry –startuptype automatic –passthru
Start-Service RemoteRegistry
Set-Service is the cmdlet that can modify the StartupType, Status, Description, and Displayname properties of a service. You can start, stop, and suspend service with the help of the Set-Service cmdlet.
Here, Set-Service is looking for RemoteRegistry Service and set this service to start automatically. And -passthru indicates that if you are already running this service then ignore it else run it automatically.
Powershell Script File which displays a List of all User RDP connection
The below script will list all users’ RDP Connections History.
Steps:
- Open Text File and paste the below code.
- Save the file as .ps1
- Open Powershell and type: Powershell.exe -File file_location_path and press Enter
where file_location_path is the actual location of the file
Scripts:
$AllUser = Get-WmiObject -Class Win32_UserAccount
foreach($User in $AllUser)
{
$RegPath = «Registry::HKEY_USERS\»+$User.SID+»\Software\Microsoft\Terminal Server Client\Servers\»
Write-Host «User:»$User.Name
Write-Host «SID:»$User.SID
Write-Host «Status:»$User.Status
$QueryPath = dir $RegPath -Name -ErrorAction SilentlyContinue
If(!$?)
{
Write-Host «[!]Not logged in»
Write-Host «[*]Try to load Hive»
$File = «C:\Documents and Settings\»+$User.Name+»\NTUSER.DAT»
$Path = «HKEY_USERS\»+$User.SID
Write-Host «[+]Path:»$Path
Write-Host «[+]File:»$File
Reg load $Path $File
If(!$?)
{
Write-Host «[!]Fail to load Hive»
Write-Host «[!]No RDP Connections History»
}
Else
{
$QueryPath = dir $RegPath -Name -ErrorAction SilentlyContinue
If(!$?)
{
Write-Host «[!]No RDP Connections History»
}
Else
{
foreach($Name in $QueryPath)
{
$User = (Get-ItemProperty -Path $RegPath$Name -ErrorAction Stop).UsernameHint
Write-Host «Server:»$Name
Write-Host «User:»$User
}
}
Write-Host «[*]Try to unload Hive»
Start-Process powershell.exe -WindowStyle Hidden -ArgumentList «Reg unload $Path»
}
}
foreach($Name in $QueryPath)
{
Try
{
$User = (Get-ItemProperty -Path $RegPath$Name -ErrorAction Stop).UsernameHint
Write-Host «Server:»$Name
Write-Host «User:»$User
}
Catch
{
Write-Host «[!]No RDP Connections History»
}
}
Write-Host «———————————-»
}
Script Credits go to gstudent@3gstudent
What is happening in the above script?
Ans: To begin, use «reg load» to load the hive. Then, from «HKEY_USERS\»+$User.SID+»\Software\Microsoft\Terminal Server Client\Servers\«, read the RDP Connections History. Finally, use «reg unload» to unload the hive. To get the history of login users, data are read from the NTUSER.DAT file.
Differentiate between local and remote desktop users in the Task Manager
Here are some differences:
-
Remote users require Remote Desktop to log in, while local users are logged in directly on the computer.
-
To observe the difference, open the Task Manager and locate the Session ID column.
-
When you open the Task Manager for both local and remote users, you will find that local users have a Session ID of 0, whereas remote users have a Session ID greater than 0.
First published on TECHNET on Oct 03, 2018
Don’t forget to
#LEDBAT
and
@Win10Transports
Windows TCP parameters can be configured using templates. However, Windows TCP template tuning is one of the deepest darkest mysteries throughout the land. There is only one solution to this problem. Simplicitas ad redigendum (according to Bing) this is Latin for “Reduce to simplicity”. Good thing that TCP templates are simpler than Latin!
Ready? Set! Let’s get started! First, we need to understand the Powershell cmdlets that we will use. There are two of them:
Get-NetTCPSetting
and
Set-NetTCPsetting
. Let’s start with
Get-NetTCPSetting
. Go ahead. Open a powershell window, type the cmdlet and pipe it through the Select command as shown in the example. You should see something like this:
PS C:\WINDOWS\system32> Get-NetTCPSetting | Select SettingName
SettingName
————
Automatic
InternetCustom
DatacenterCustom
Compat
Datacenter
Internet
Why are those two templates in strikethrough font? Because those are two templates that you don’t have to worry about! The Automatic template is used for (automatically) switching between Internet and Datacenter templates. The Compat template is only for legacy applications and is not recommended for use with modern apps. Now we are down to four templates and this is getting closer to simplicity 😉!
Figure 1 — TCP Template SettingNames
Referring to Figure 1 we see that there are really only 2 templates that can be customizable or not. The Internet template is used for connections with an RTT of more than 10 ms and the Datacenter template is used for connections with an RTT of 10 ms or less. Remember that Automatic template that I said you don’t need to worry about? Well you still don’t need to worry about it. But, just for information sake the Automatic template is taking the initial RTT as measured by the TCP connection handshake and applying the appropriate template to the TCP connection.
What’s the difference between the two? The Datacenter template is designed for low-latency LAN environments and the Internet template is designed for higher latency WAN environments. Now let’s have a look at all the settings that you can tune!
PS C:\Users\dahavey> Get-NetTCPSetting -SettingName InternetCustomSettingName : InternetCustom
MinRto(ms) : 300
InitialCongestionWindow(MSS) : 10
CongestionProvider : CUBIC
CwndRestart : False
DelayedAckTimeout(ms) : 40
DelayedAckFrequency : 2
MemoryPressureProtection : Disabled
AutoTuningLevelLocal : Normal
AutoTuningLevelGroupPolicy : NotConfigured
AutoTuningLevelEffective : Local
EcnCapability : Disabled
Timestamps : Disabled
InitialRto(ms) : 3000
ScalingHeuristics : Disabled
DynamicPortRangeStartPort : 49152
DynamicPortRangeNumberOfPorts : 16384
AutomaticUseCustom : Disabled
NonSackRttResiliency : Disabled
ForceWS : Enabled
MaxSynRetransmissions : 2
AutoReusePortRangeStartPort : 0
AutoReusePortRangeNumberOfPorts : 0
WoW! Look at all those settings you can tune! That is enough to make an uber geek giggle with joy! Use
Set-NetTCPSetting
to change things. Like this:
### Change the congestion provider to LEDBAT
PS C:\Users\dahavey> Set-NetTCPSetting -SettingName InternetCustom -CongestionProvider LEDBAT
PS C:\Users\dahavey> Get-NetTCPSetting -SettingName InternetCustomSettingName : InternetCustom
MinRto(ms) : 300
InitialCongestionWindow(MSS) : 10
CongestionProvider : LEDBAT ###
<
——- Changed
CwndRestart : False
DelayedAckTimeout(ms) : 40
DelayedAckFrequency : 2
MemoryPressureProtection : Enabled
AutoTuningLevelLocal : Normal
AutoTuningLevelGroupPolicy : NotConfigured
AutoTuningLevelEffective : Local
EcnCapability : Enabled
Timestamps : Disabled
InitialRto(ms) : 3000
ScalingHeuristics : Disabled
DynamicPortRangeStartPort : 49152
DynamicPortRangeNumberOfPorts : 16384
AutomaticUseCustom : Disabled
NonSackRttResiliency : Disabled
ForceWS : Enabled
MaxSynRetransmissions : 2
AutoReusePortRangeStartPort : 0
AutoReusePortRangeNumberOfPorts : 0
Fair warning! If you do not know what a setting means you it’s probably best to leave it alone. If you get into trouble and want to reset to default:
### Reset tcp parameters to default
PS C:\Users\dahavey> netsh int tcp reset
Reset of all TCP parameters OK!
Ok.PS C:\Users\dahavey> Get-NetTCPSetting -SettingName InternetCustom
SettingName : InternetCustom
MinRto(ms) : 300
InitialCongestionWindow(MSS) : 10
CongestionProvider : CUBIC ###
<
——- Reset to default
CwndRestart : False
DelayedAckTimeout(ms) : 40
DelayedAckFrequency : 2
MemoryPressureProtection : Enabled
AutoTuningLevelLocal : Normal
AutoTuningLevelGroupPolicy : NotConfigured
AutoTuningLevelEffective : Local
EcnCapability : Enabled
Timestamps : Disabled
InitialRto(ms) : 3000
ScalingHeuristics : Disabled
DynamicPortRangeStartPort : 49152
DynamicPortRangeNumberOfPorts : 16384
AutomaticUseCustom : Disabled
NonSackRttResiliency : Disabled
ForceWS : Enabled
MaxSynRetransmissions : 2
AutoReusePortRangeStartPort : 0
AutoReusePortRangeNumberOfPorts : 0
Please see the links to
Set/Get-NetTCPSettings
for descriptions of the individual settings and what they do. Have fun and happy TCP tuning!
These instructions explain how to establish administrative accesses for a Windows Virtual Machine using Identity-Aware TCP forwarding. It’s important to do this if your VM lacks an external IP address and cannot connect to the web.
IAP TCP forwarding is a secure method for sending RDP, SSH and other types of traffic to virtual machines without the need for an unique IP address. It gives a user more power to decide which machines their server connects to and accepts connections from.
Step 1. To set up IAP TCP forwarding, your Windows VM needs to be operational and ready for use. Make sure its settings are configured correctly on Google Compute Engine.
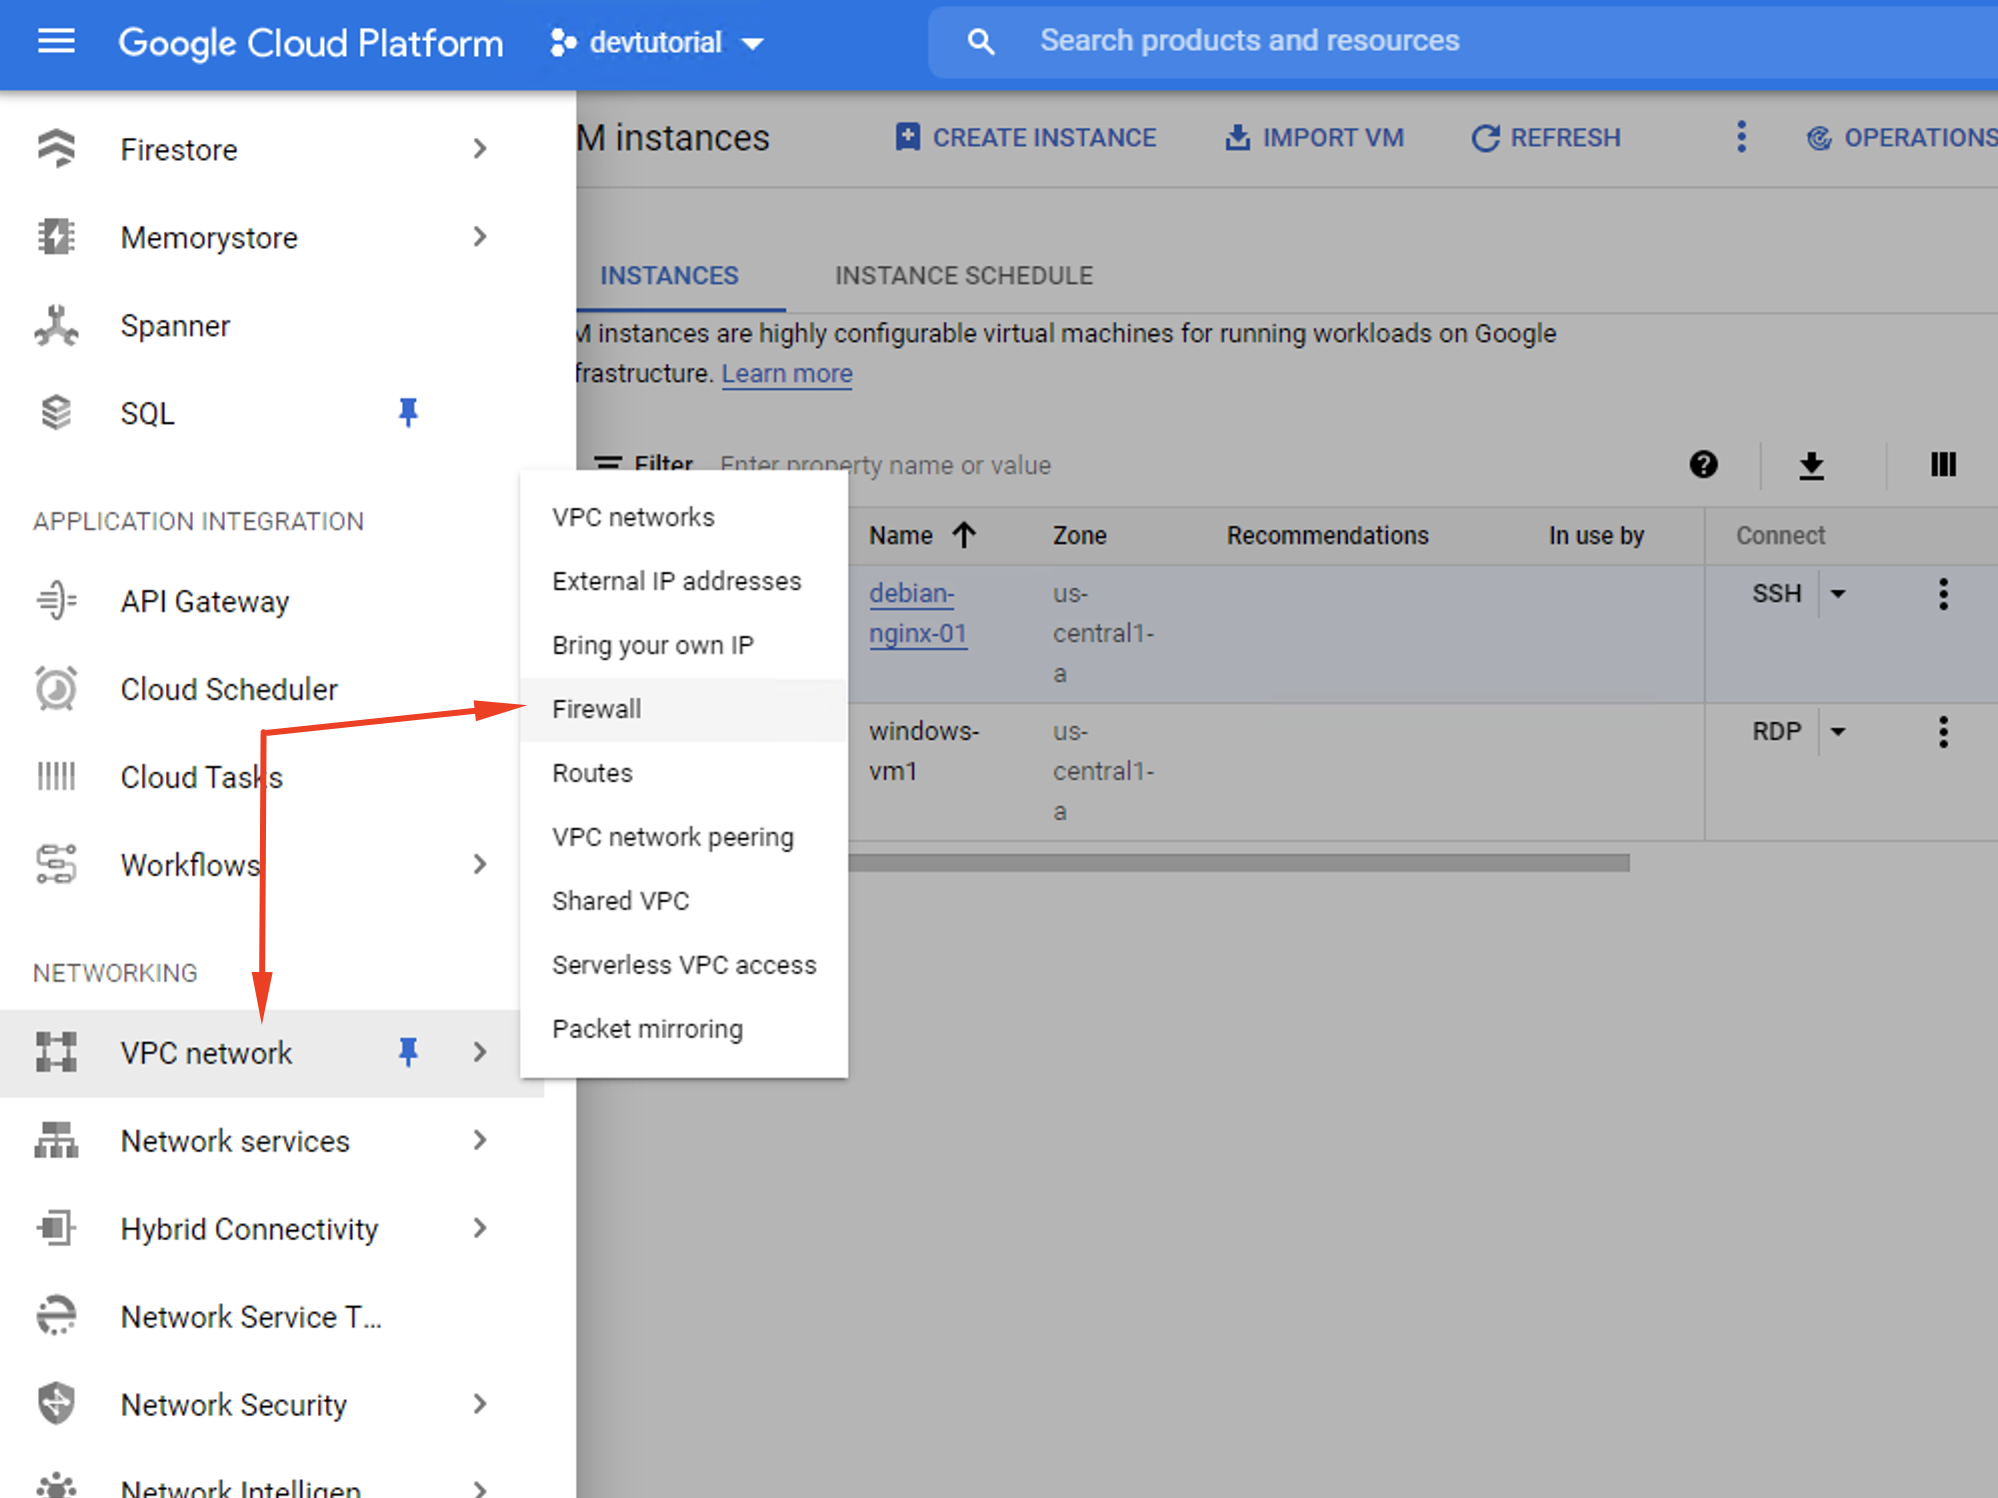
Step 2. Launch the Google Cloud Console. On the primary menu, click Networking, then VPC network.
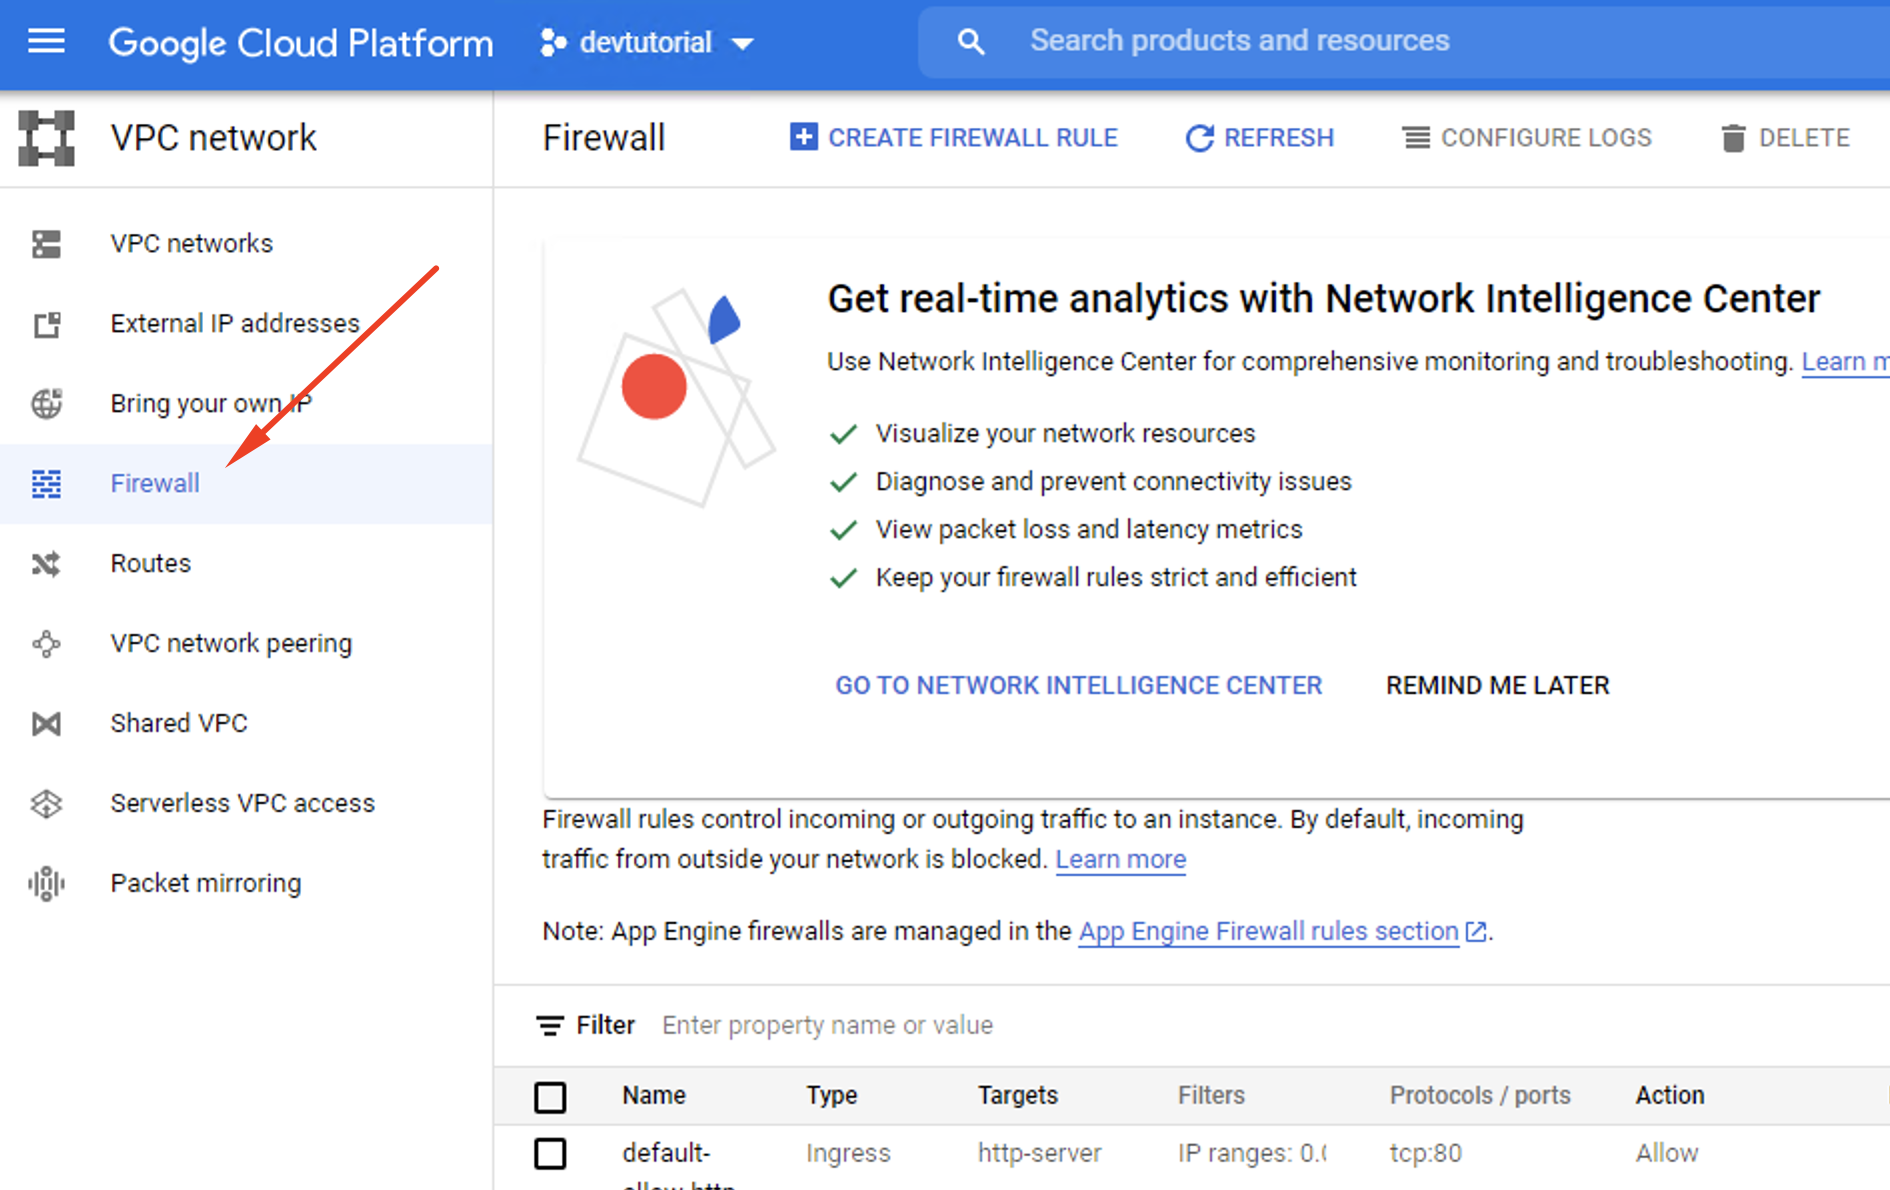
Step 3. Select Firewall on the next menu. Then, click Create a Firewall Rule.
Step 4. Type the following into the box: allow-remote-iap.

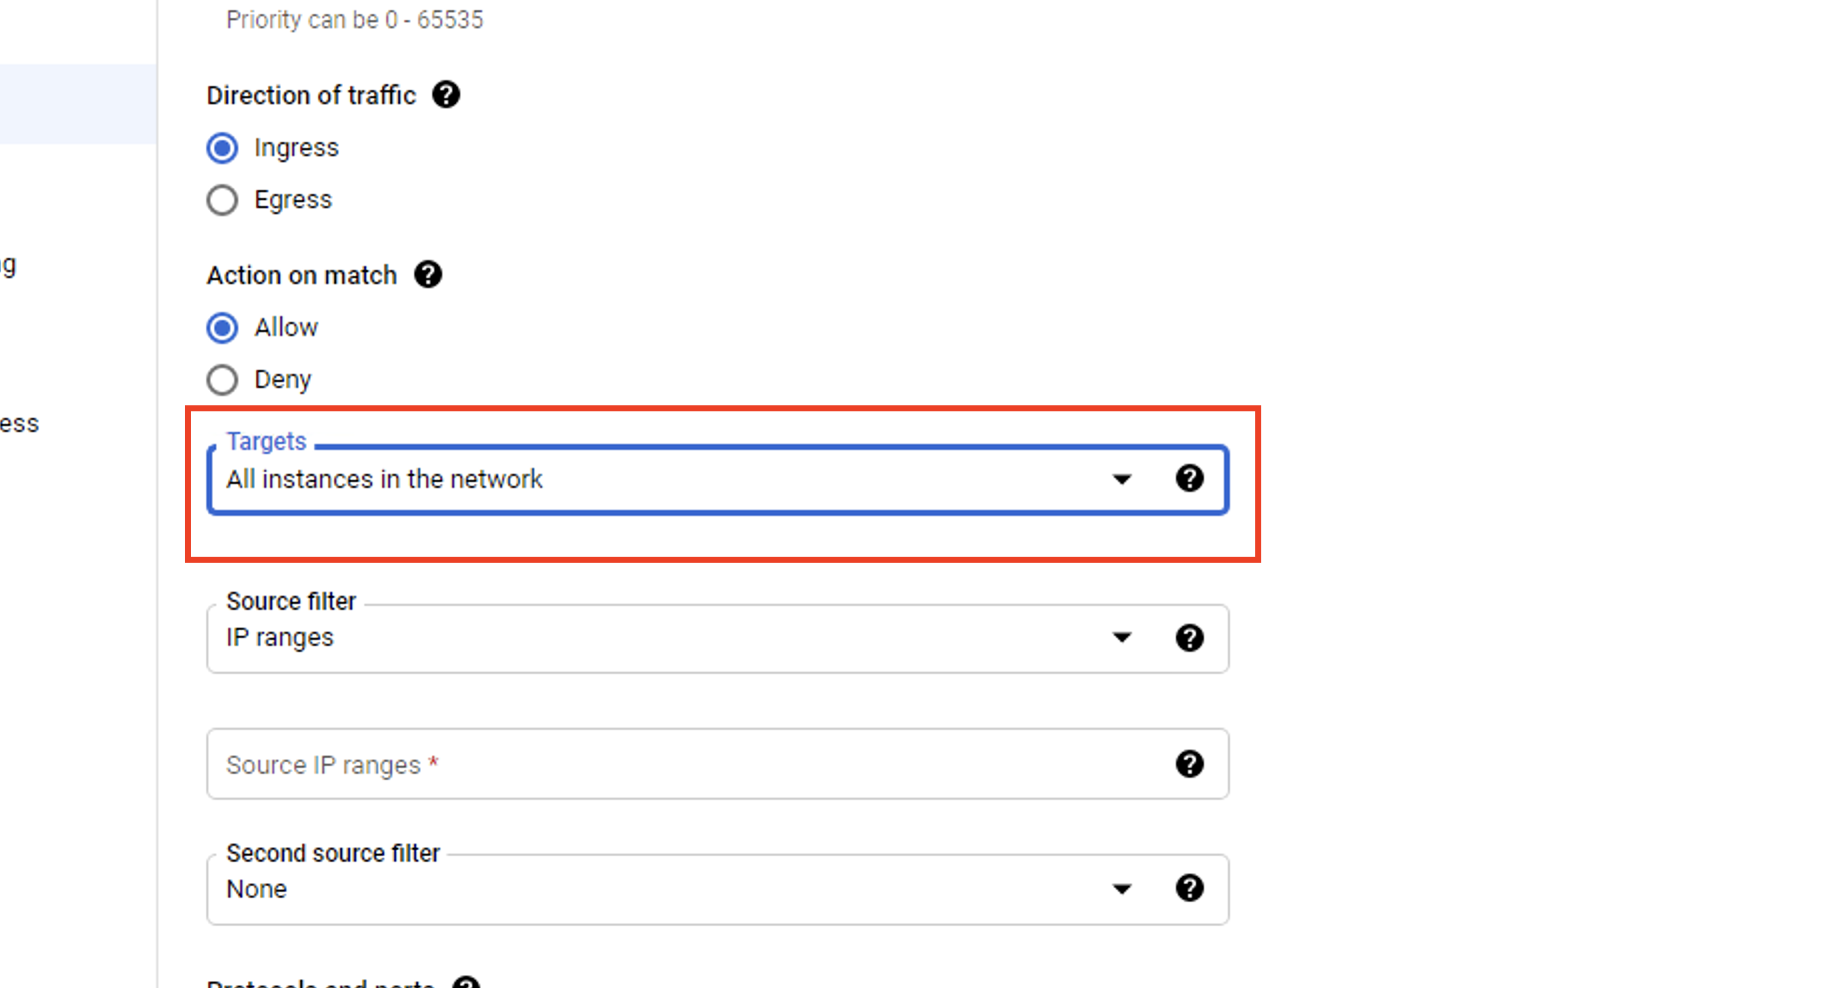
Step 5. Choose All instances in the network when asked to pick a target for the new firewall rule.
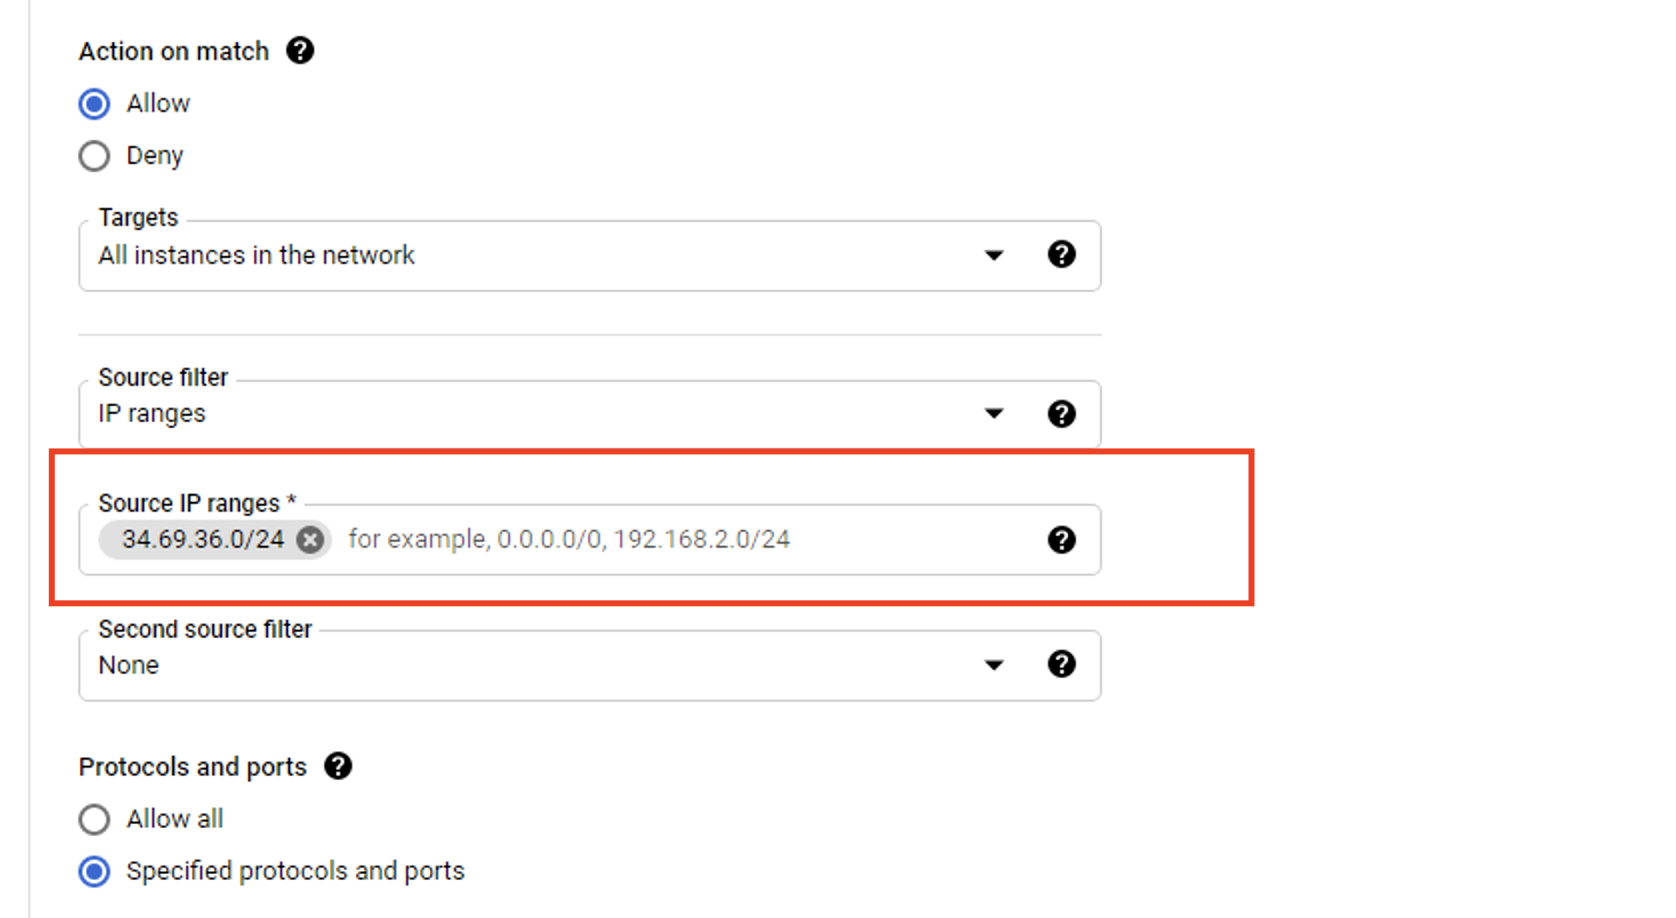
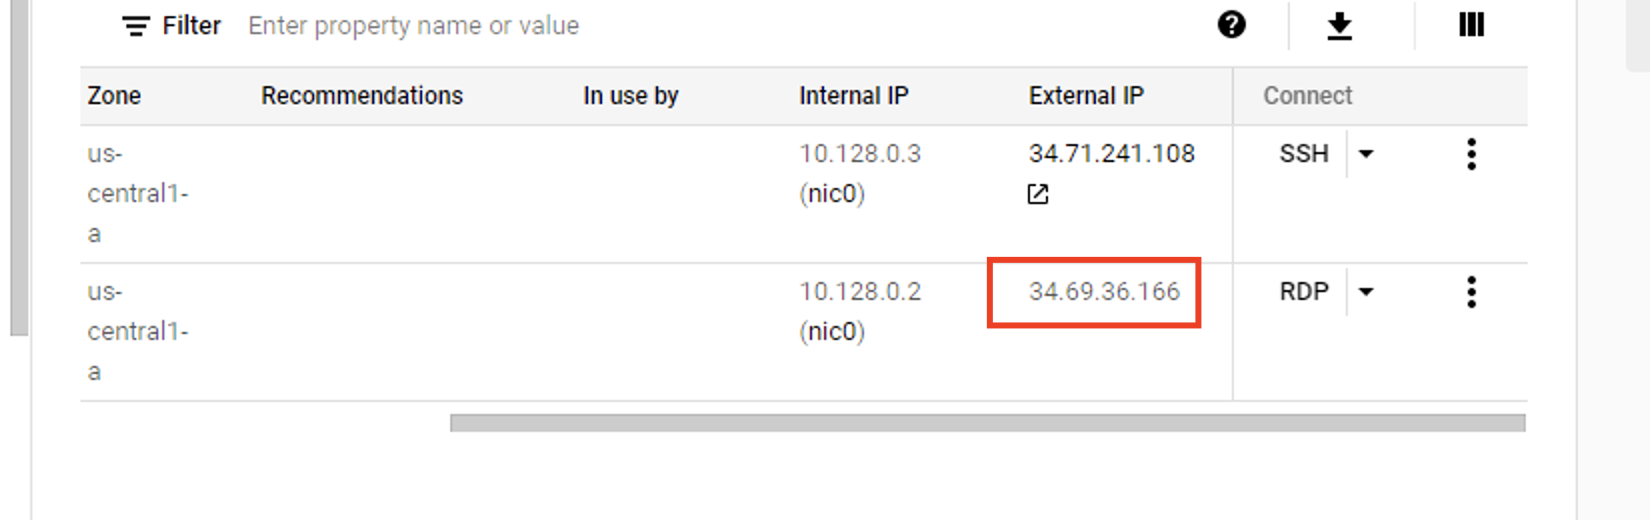
Step 6. Type the following into the box: 34.69.36.0/24 when asked to pick a source IP range for the new firewall rule.
Step 7. In the Protocols and Ports menu, click TCP and type 3389 to enable RDP.
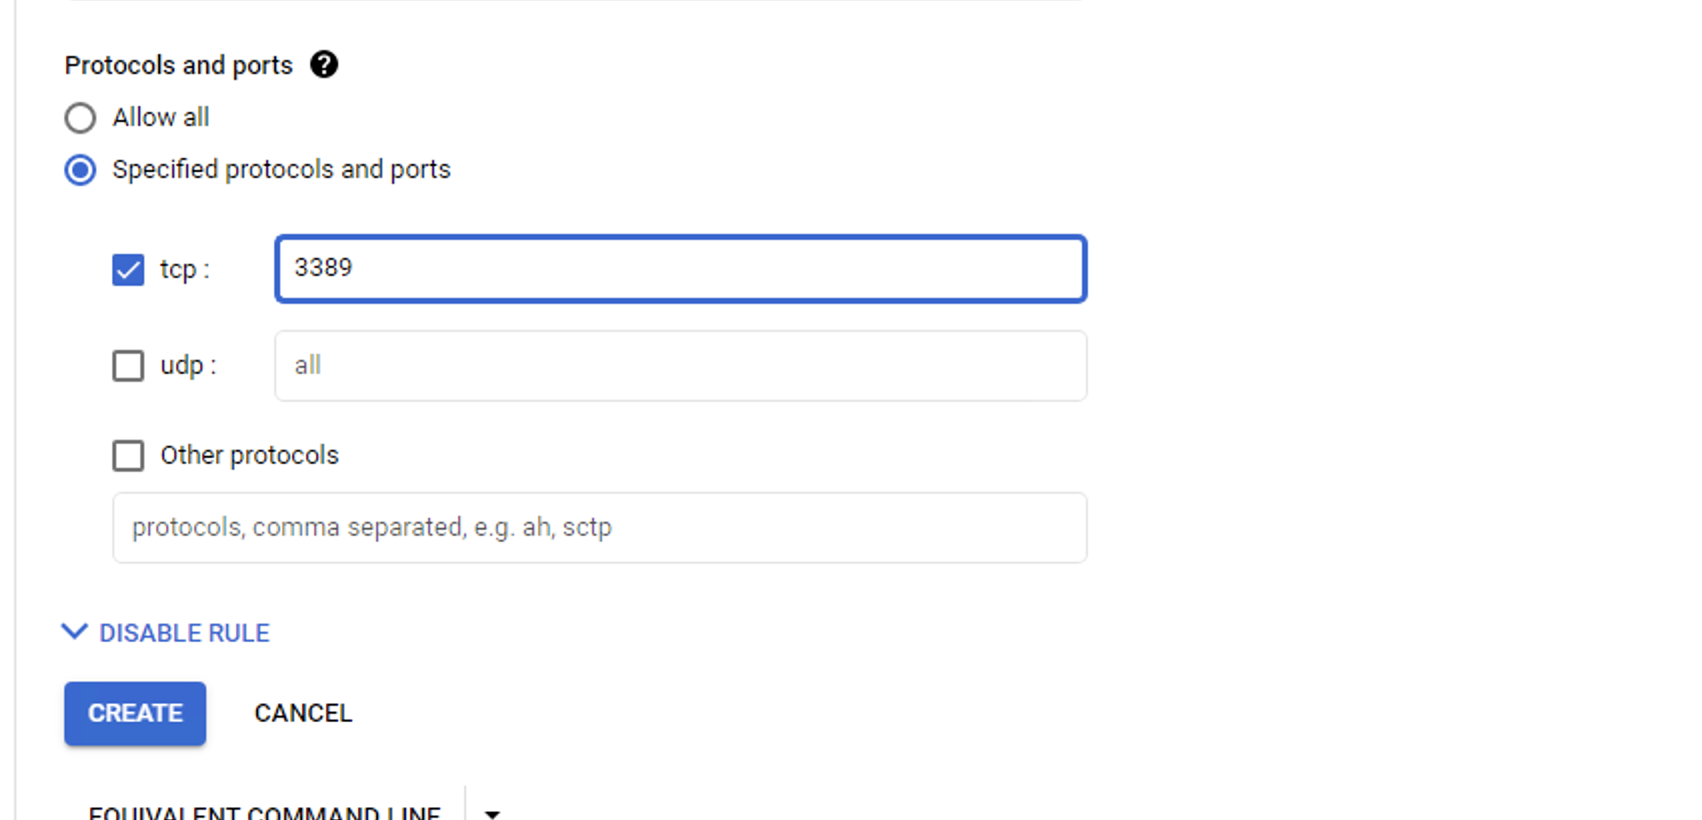
Step 8. Hit the Create button to save these new settings.
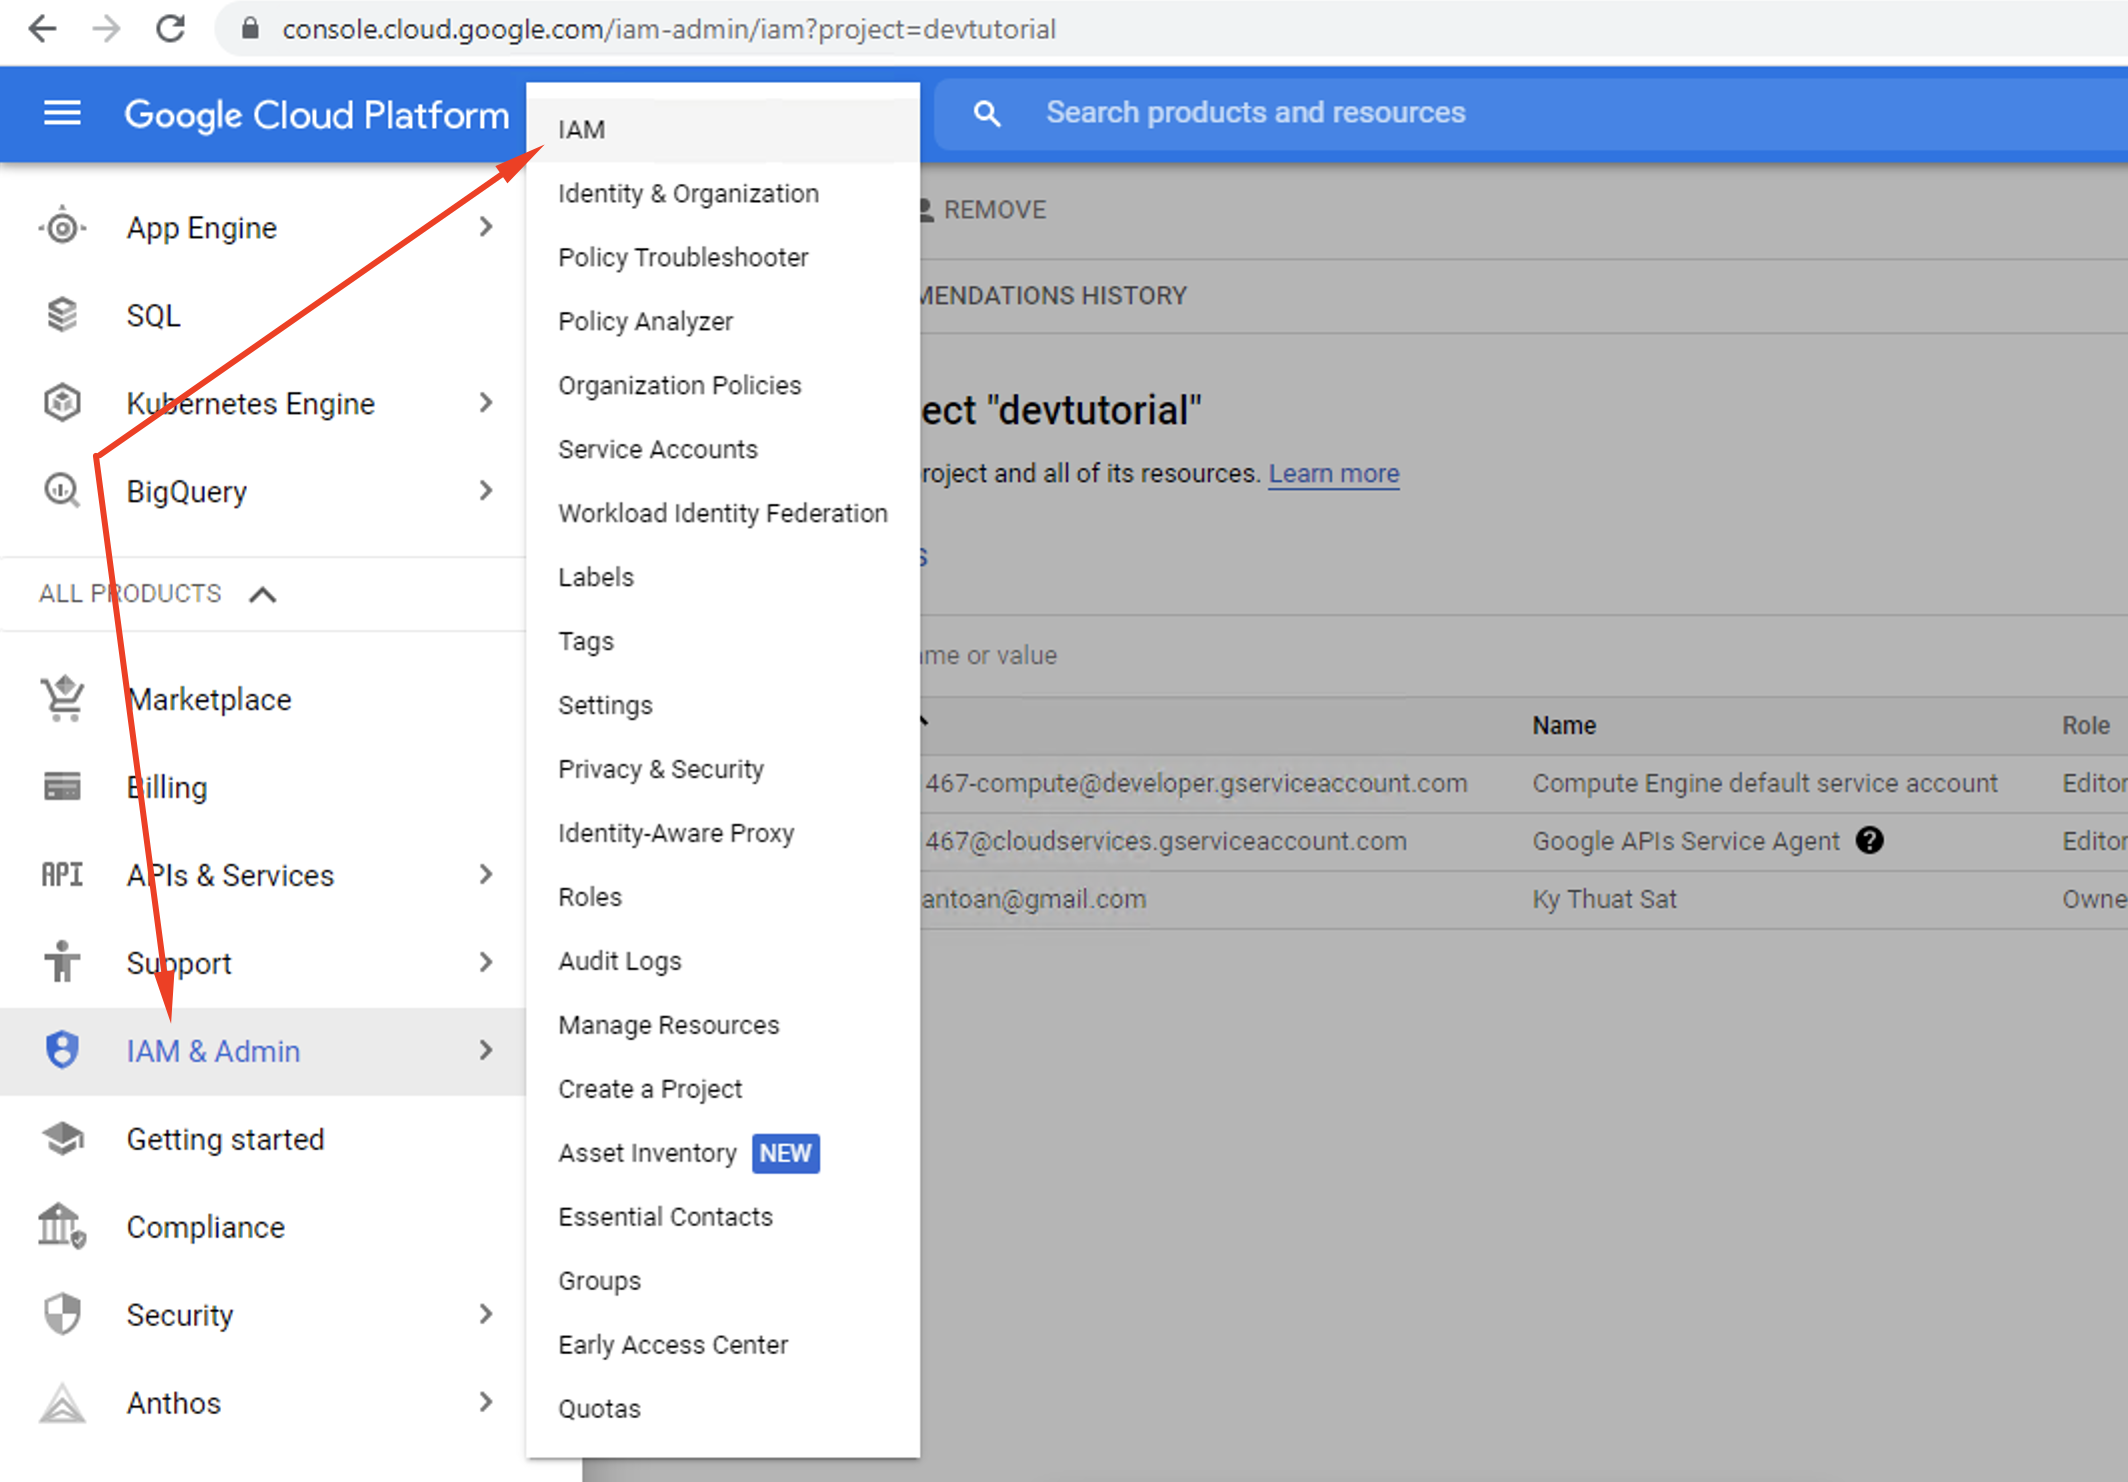
Step 9. Now, return to Google Cloud Console’s primary menu and select IAM & Admin.
Step 10. Select Add new permission to set up new access rights to the IAP TCP forwarding for additional users. Users added to this list are allowed to connect to your Virtual Machines.
Step 11. For the members, select IAP-Secured Tunnel User as the designated role.
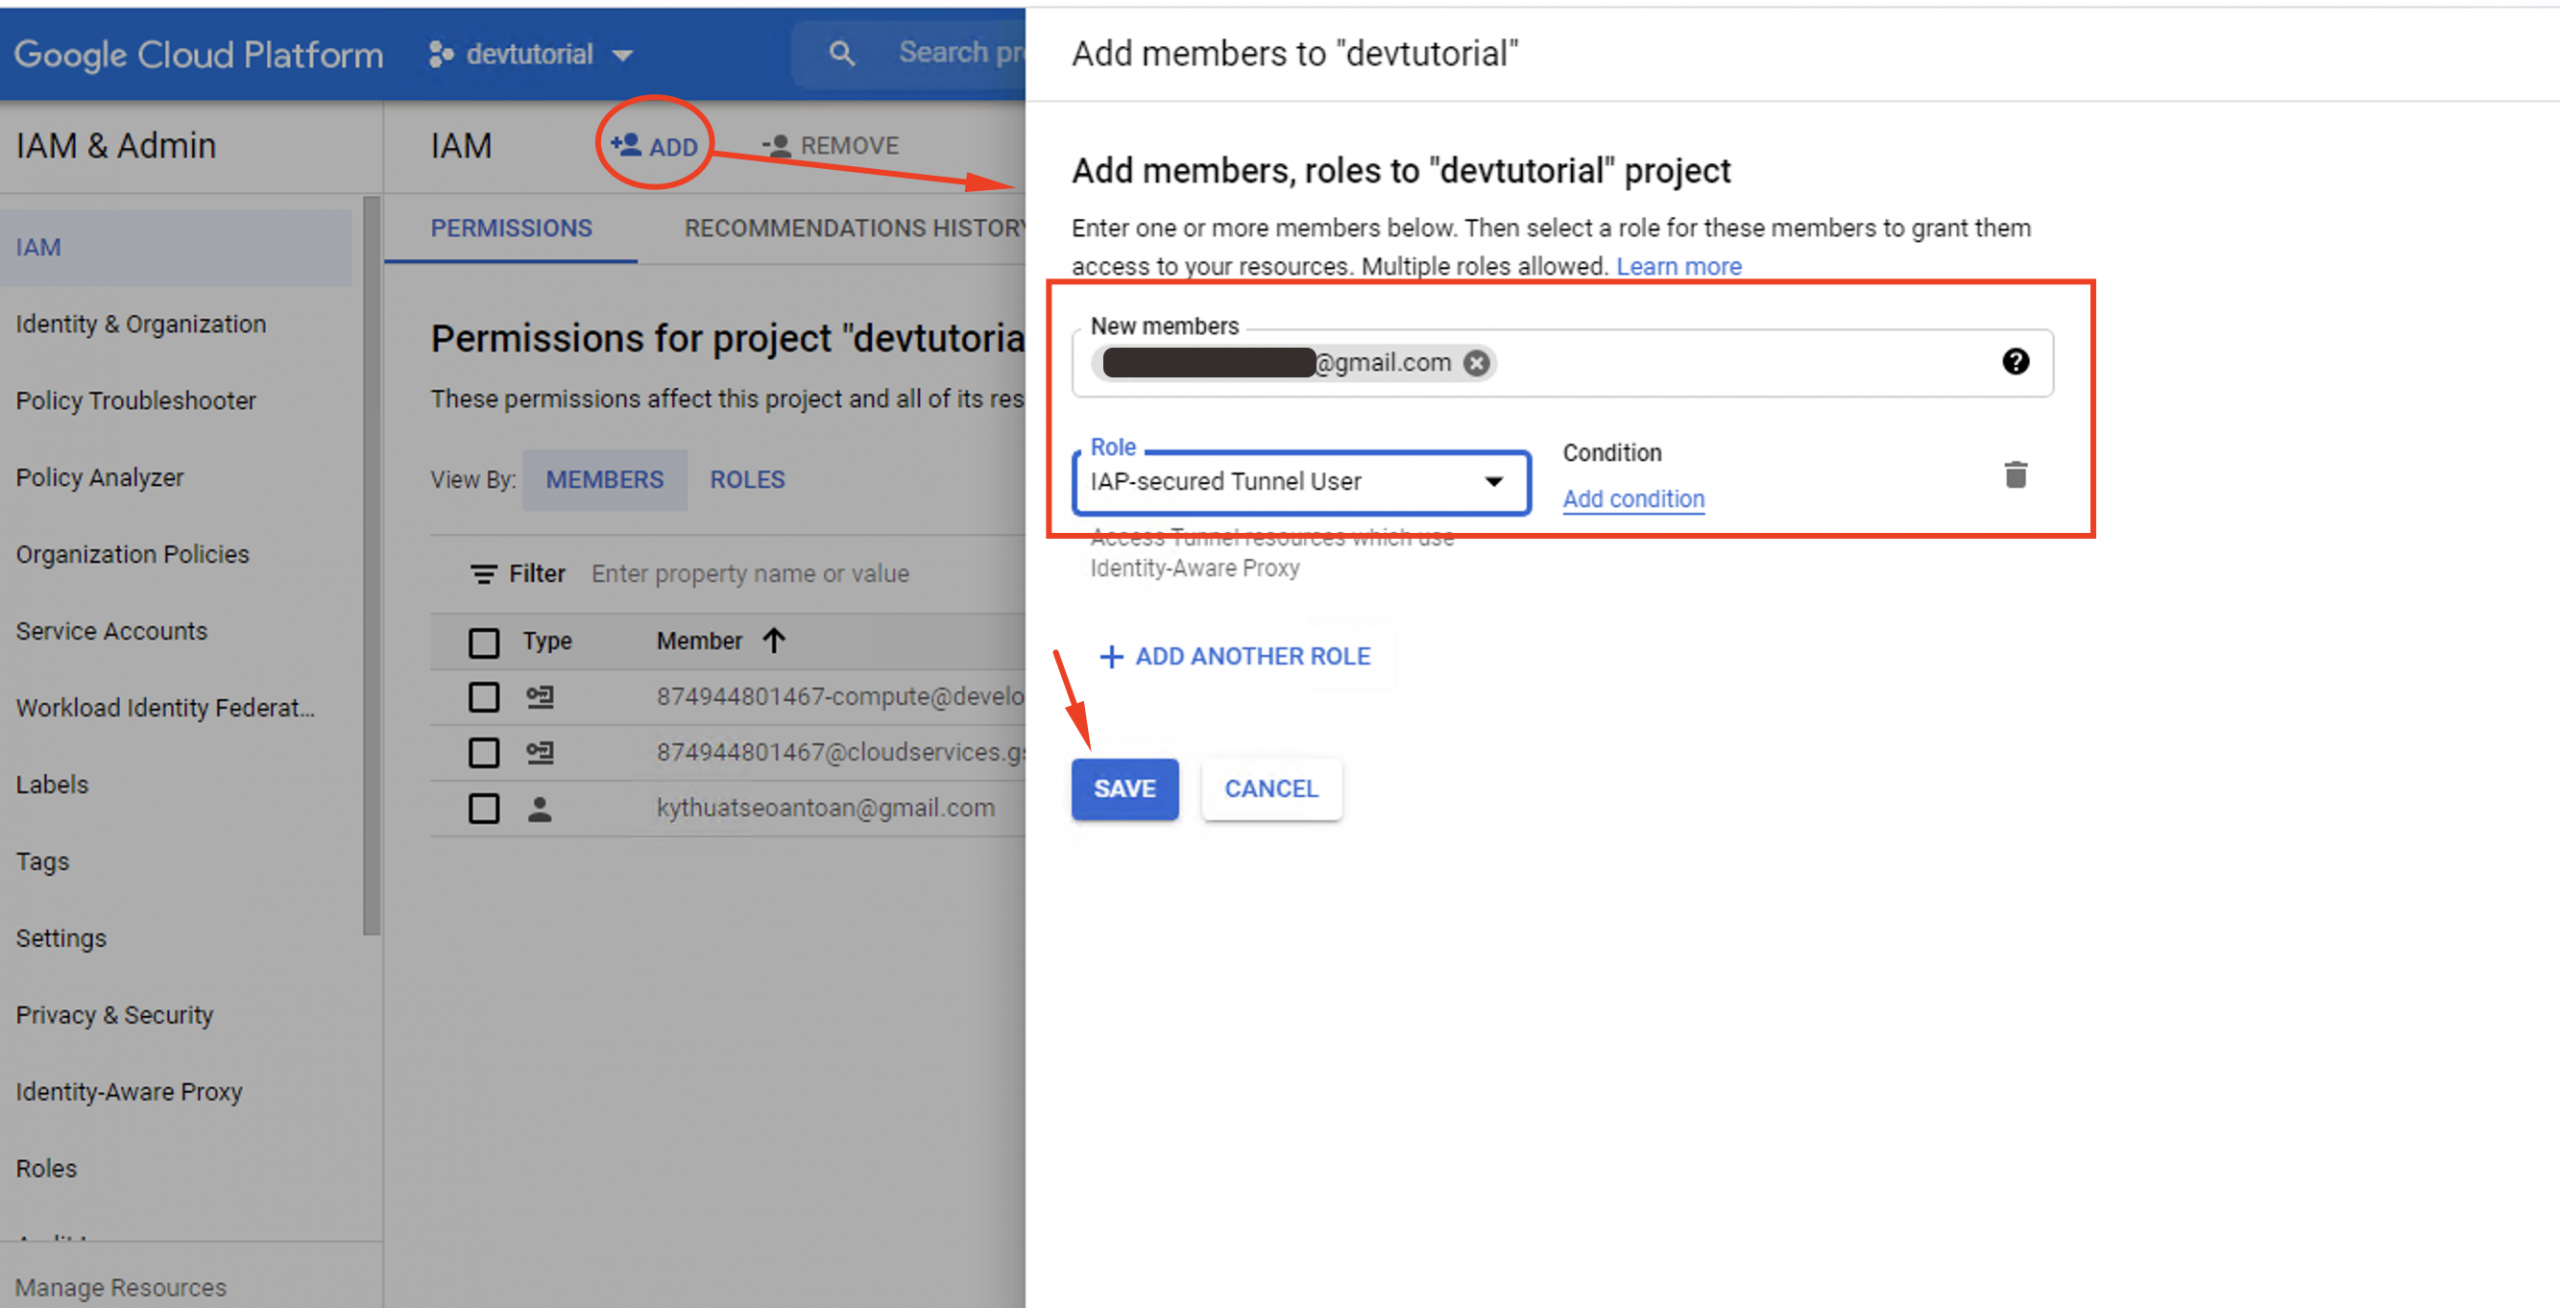
Step 12. Don’t forget to hit the Save button before you exit the menu.
Step 13. Finally, use the link below to install a secure version of IAP Desktop https://github.com/Google Cloud Platform/iap-desktop

Step 14. Once downloaded, open IAP Desktop and log in with your user authorised account (see steps 10 and 11)

Step 15. Locate the relevant Google Cloud Project from the options presented.
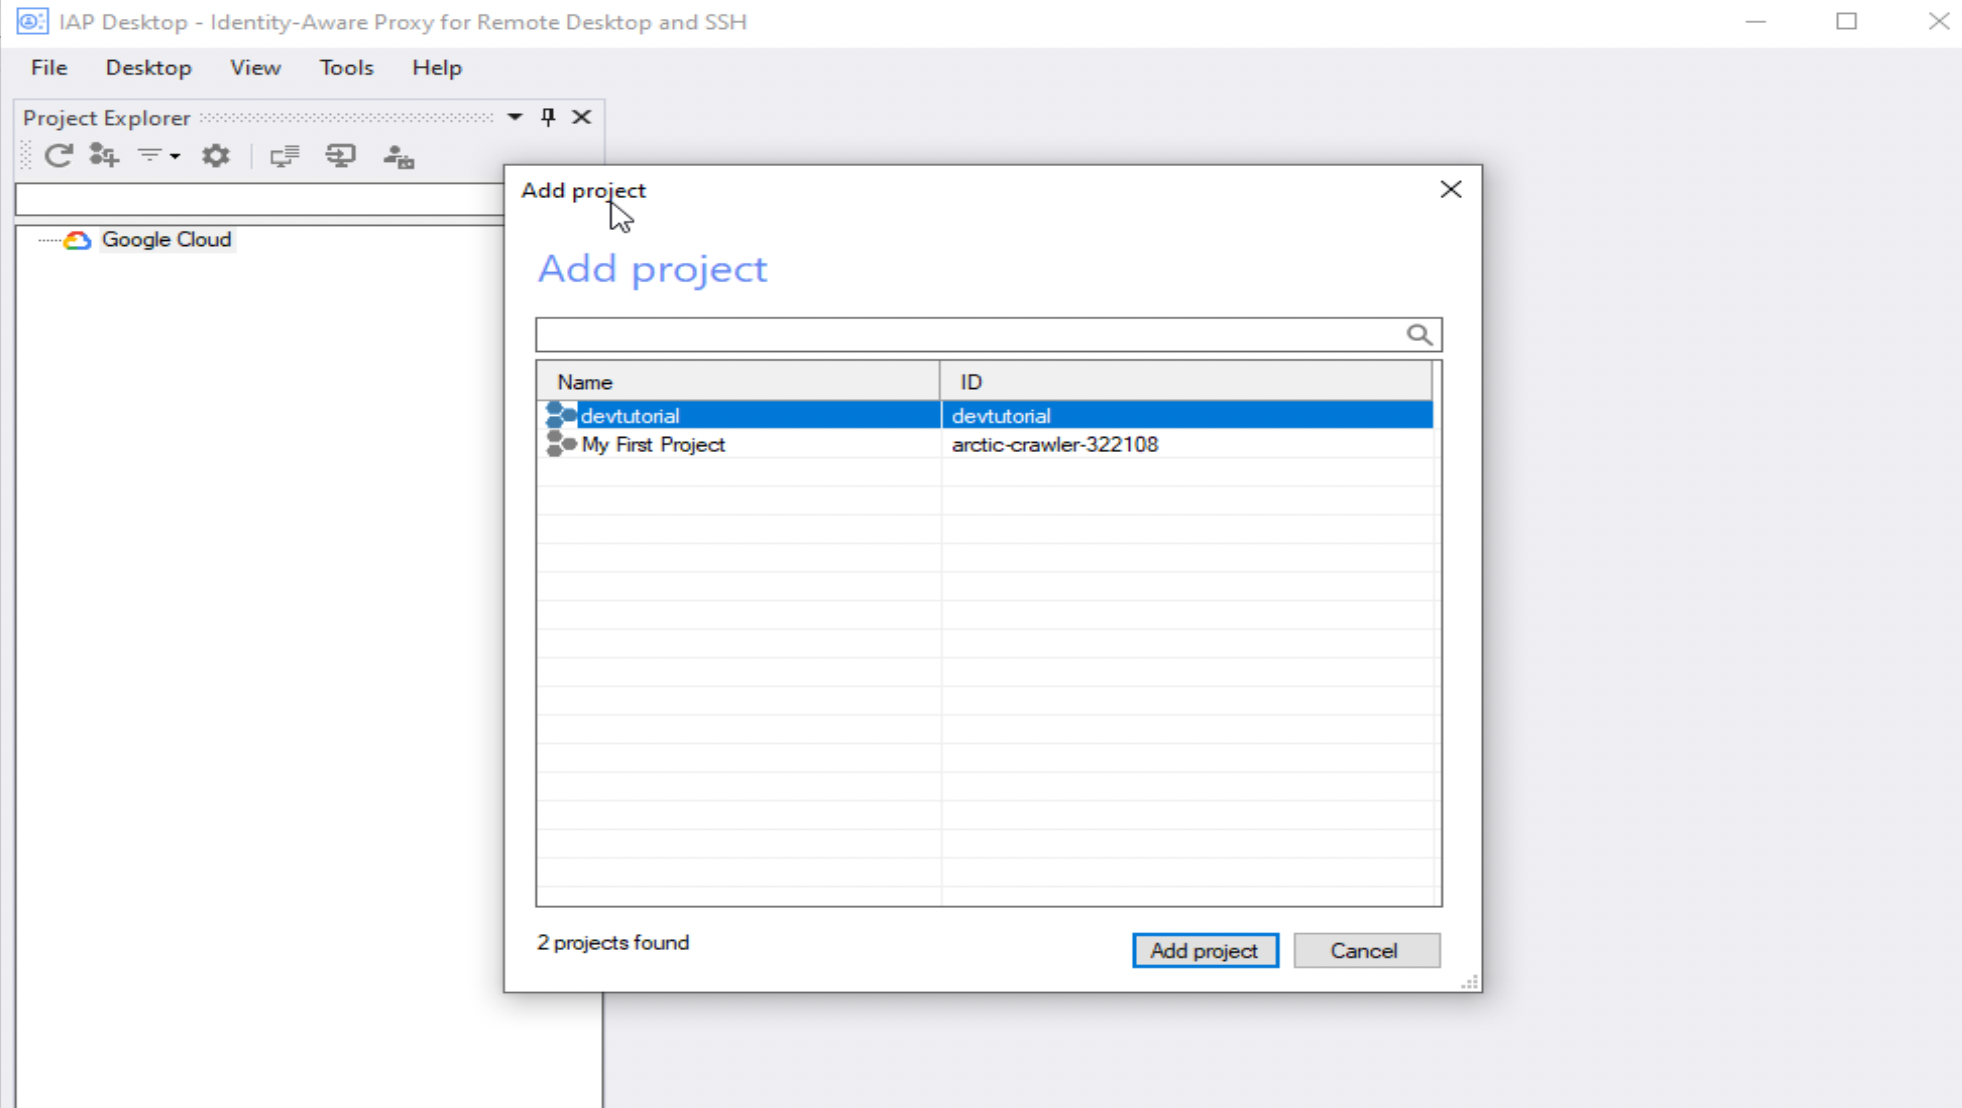
Step 16. If your user account has been pre-authenticated, the name of your Windows VM should appear.

Step 17. Right click on the VM. Click Connect.

IAP TCP forwarding is a great way to establish a comprehensive permissions ‘gate’ for VM applications. Follow the steps outlined above to use an Identity-Aware Proxy for securely directing RDP traffic to and from a Windows VM.
If you use the IAP desktop client to authenticate your user connect on Google Cloud Compute engine, you shouldn’t have to repeat these steps again. Your user profile will be recognised as secure and permitted.
win-tcp-proxy
Async, single threaded TCP proxy for forwarding ports. Runs as a CLI or as a Windows Service.
Usage
Simple TCP Proxy Service

Usage: tcp-proxy.exe <COMMAND>

Commands:
  proxy      Start a TCP proxy
  install    Install a TCP proxy service
  uninstall  Uninstall a TCP proxy service
  service    Should only be executed by a service
  help       Print this message or the help of the given subcommand(s)

Options:
  -h, --help     Print help
  -V, --version  Print version
Proxy
Proxy targets are provided as ([bind IP]:)[bind port]:[target hostname]:[target port]. If a bind IP is not provided, it will use 0.0.0.0. IPv6 addresses must be wrapped in [] (e.g., [::1]).
tcp-proxy.exe proxy 8080:example.com:80
Service
The proxy may be installed as a Windows Service. Targets use the same format as proxy.
tcp-proxy.exe install --name my-proxy 8080:example.com:80
Installing and uninstalling requires Administrator permissions. The service will be started immediately when installing and stopped when uninstalling.
tcp-proxy.exe uninstall --name my-proxy
Note: The service subcommand is only intended to be used by a Windows Service.