При подключении USB-флешки, внешнего жесткого диска или SSD и других USB-устройств, а иногда — и без подключенных по этому интерфейсу устройств, вы можете увидеть сообщение «USB-устройство не опознано. Последнее USB-устройство, подключенное к этому компьютеру, работает неправильно, и Windows не удается опознать его».
В этой инструкции подробно о возможных причинах сбоя и о способах исправить ошибку «USB-устройство не опознано» в Windows 11, Windows 10 и предыдущих версиях системы. На близкую тему: Как исправить ошибку Сбой запроса дескриптора устройства (код 43) в Windows.
Первые действия при появлении ошибки «USB-устройство не опознано»

Ошибки «USB-устройство не опознано» в Windows 11, 10 и других версиях ОС обычно вызваны теми или иными аппаратными проблемами: иногда с самим подключаемым устройством, иногда — со стороны вашего ПК или ноутбука. Суть проблемы в том, что по какой-то причине устройство не может передать сведения о себе операционной системе, либо ОС не может получить их.
Прежде всего рекомендую следующие варианты действий, чтобы быстро определить и в некоторых случаях — исправить возникшую проблему:
- Проверьте, появляется ли ошибка, если отключить устройство, перезагрузить компьютер (при этом использовать пункт «Перезагрузка», а не «Завершение работы» с последующим включением) и снова подключить устройство. Если в этом варианте ошибка исчезает и устройство работает, а при последующих выключениях вы вновь сталкиваетесь со сбоем — попробуйте отключить быстрый запуск Windows 11 или 10.
- При наличии такой возможности, проверьте: а работает ли это же USB-устройство, если подключить его к другому компьютеру: если в этом случае проблемы не наблюдаются, можно заключить, что само устройство исправно. Иначе — есть основания предполагать, что причина проблемы в его аппаратной неисправности или повреждении контактов.
- Проверьте, появляется ли ошибка при подключении к другим USB-разъемам: USB 2.0 вместо 3.0 (или наоборот), на задней панели ПК вместо передней. Не используйте USB-хабы (в том числе на мониторе), удлинители, разветвители при подключении: предпочтите прямое подключение.
- В случае, если вы столкнулись с ошибкой при подключении устройства отдельным USB-кабелем, попробуйте использовать другой совместимый кабель, при этом учитывайте: некоторые кабели USB поддерживают только зарядку, без передачи данных.
- Если к вашему компьютеру подключено большое количество USB-устройств, попробуйте отключить те из них, которые не нужны прямо сейчас, а также устройство с ошибкой. Перезагрузите компьютер и вновь подключите устройство, с которым возникли проблемы.
- При необходимости внешнего питания для подключаемого устройства, убедитесь, что соответствующий блок питания исправен.
И ещё один вариант, который следует попробовать, особенно если раньше это же устройство работало исправно, а возможность проверки работы устройства на другом компьютере отсутствует:
- Отключите USB устройство, которое не опознается и выключите компьютер (удерживайте Shift, нажимая «Завершение работы»). Вытащите вилку из розетки, после чего нажмите и удерживайте кнопку включения на компьютере несколько секунд — это уберет остатки зарядов с материнской платы и комплектующих.
- Включите компьютер и подключите проблемное устройство снова после загрузки Windows. Есть вероятность, что оно заработает.
Диспетчер устройств и драйверы USB
Следующая по распространенности причина — неправильная работа драйверов USB-контроллеров и других драйверов чипсета на вашем ПК или ноутбуке. В этой ситуации то же самое USB-устройство будет исправно работать на других компьютерах.
Основное решение:
- Зайдите на официальный поддержки вашей модели материнской платы или ноутбука, вручную скачайте драйверы из раздела «Чипсет» а при наличии — отдельные драйверы USB-контроллеров и управления электропитанием.
- Установите скачанные драйверы.
- Перезагрузите компьютер и проверьте, решило ли это проблему.
Отсутствие важных системных драйверов чипсета может, в том числе, влиять и на работу USB-контроллеров, поэтому их установка в некоторых случаях оказывается результативной.
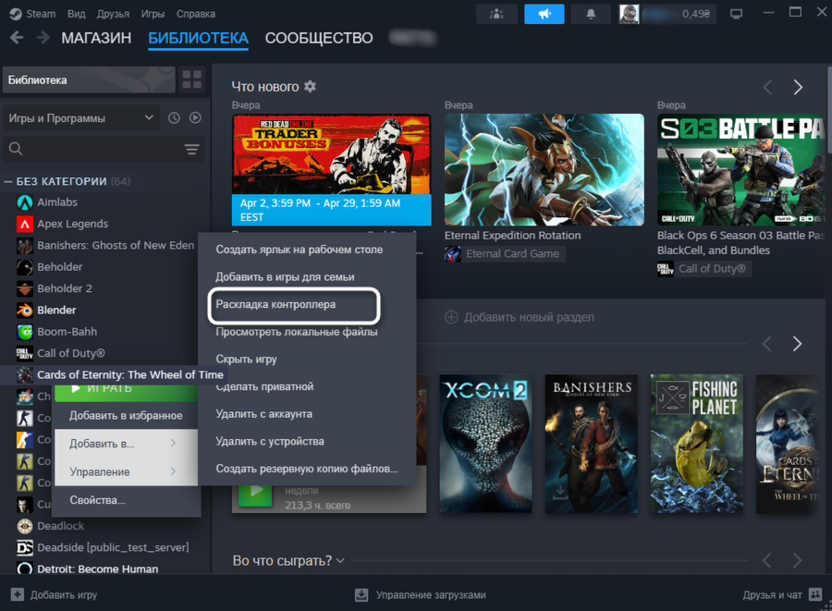
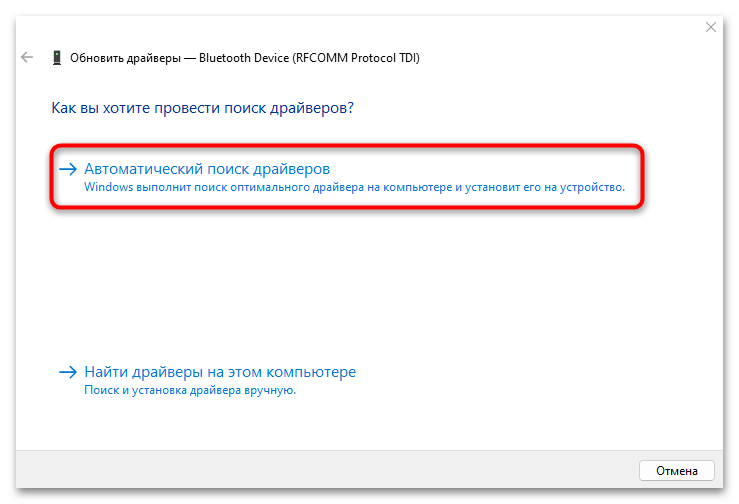
Следующая возможность — исправление работы USB-устройств (контроллеров USB) в диспетчере устройств:
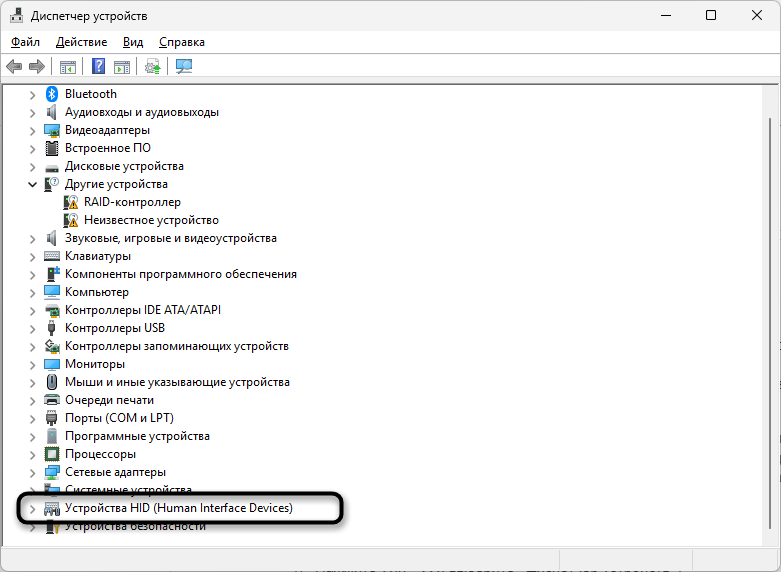
- Зайдите в диспетчер устройств: для этого можно нажать клавиши Win+R на клавиатуре, ввести devmgmt.msc и нажать Enter, а в случае Windows 11 и Windows 10 — нажать правой кнопкой мыши по кнопке Пуск и выбрать соответствующий пункт контекстного меню.
- Ваше неопознанное устройство скорее всего будет находиться в следующих разделах диспетчера: Контроллеры USB или Другие устройства.

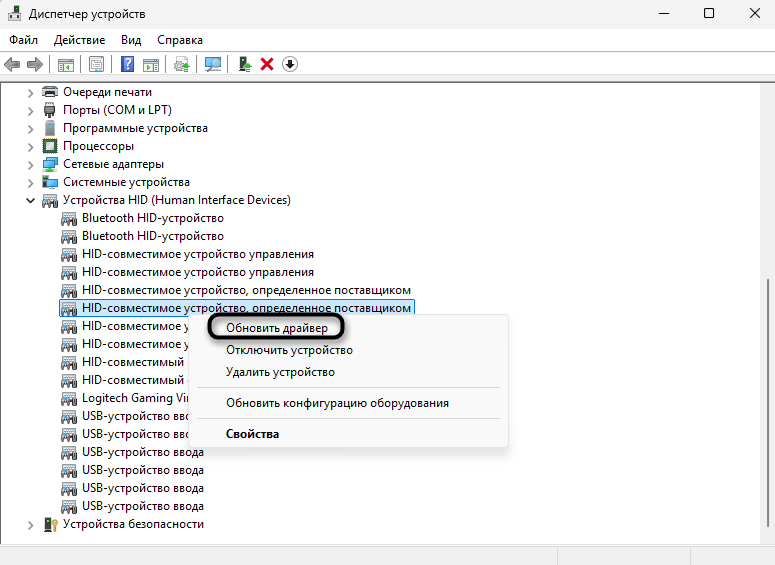
- Установить драйвер этого устройства не получится, до тех пор, пока оно опознается как «Неизвестное USB-устройство», а в его свойствах в качестве ИД Оборудования указано: USB\DEVICE_DESCRIPTOR_FAILURE Однако, иногда может сработать следующий подход: нажмите правой кнопкой мыши по устройству и выберите пункт «Удалить устройство». Подтвердите удаление, а после него в меню диспетчера устройств выберите «Действие» — «Обновить конфигурацию оборудования».
- Проверьте диспетчер устройств на наличие других пунктов с ошибками или без установленных драйверов: при наличии таковых, попробуйте установить драйверы для них (может пригодиться: Как установить драйвер неизвестного устройства): иногда это приводит к восстановлению работы и других устройств компьютера.
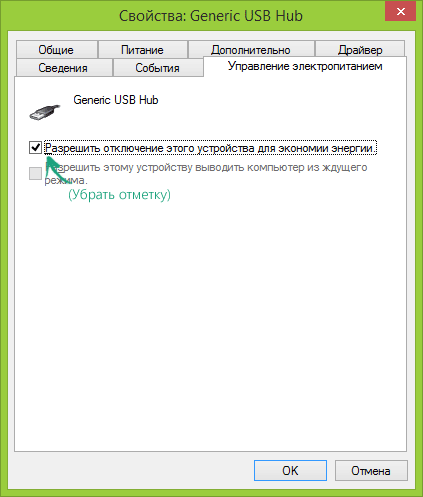
- В разделе «Контроллеры USB» для всех устройств с именами: Расширяемый хост-контроллер USB, Generic USB Hub, Корневой USB-концентратор, USB Root Controller и аналогичными, в свойствах на вкладке «Управление электропитанием» снимите отметку «Разрешить отключение этого устройства для экономии питания», примените параметры и перезагрузите компьютер.


Если предыдущие способы не сработали или ваша ситуация отличается от описываемой в каких-то деталях, ниже — дополнительные варианты решения и нюансы, которые могут быть полезными:
- В некоторых случаях вы можете видеть сообщение «USB-устройство не опознано» даже при отсутствии подключенных USB-устройств (кроме, например, клавиатуры и мыши, которые работают исправно). Это может говорить о том, что неправильно работает какое-то из внутренних устройств, подключенных по интерфейсу USB: на ПК это часто кард-ридер, на ноутбуках это может быть веб-камера или тачпад. Причиной же могут быть быть проблемы с их подключением (в случае ПК легко проверить и переподключить) или выход из строя.
- В Windows 11 и Windows 10 при работе с внешними жесткими дисками и другими накопителями, подключаемыми к высокоскоростным разъемам USB Type-C, USB 3.0 — 3.2 может сработать запрет на выключение USB-портов: зайдите в панель управления Windows — Электропитание (или нажмите клавиши Win+R и введите powercfg.cpl), выберите используемую схему электропитания, нажмите «Изменить дополнительные параметры питания». Затем в параметрах USB запретите временное отключение USB портов.

- При наличии обновлений БИОС для вашей материнской платы или ноутбука, попробуйте установить соответствующие обновления — иногда это решает проблему.
- Проверьте наличие настроек быстрой инициализации USB, параметры быстрой загрузки Fast Boot и экономии энергии USB-портов в БИОС/UEFI. При наличии этих настроек: отключите их все. Также можно попробовать использовать автоматическую установку безопасных параметров БИОС (пункт Load Optimized Defaults или Load Fail-Safe Defaults на вкладке Exit).
- В случае, если вы столкнулись с проблемой после неудачной прошивки флешки или другого устройства, поищите в Интернете: есть ли какая-то возможность перевода этого устройства в тестовый режим (для флешки) или какой-либо режим восстановления. Это может помочь определить её в соответствующей программе и установить прошивку повторно.

Надеюсь, что-то из перечисленного вам поможет, и вы не увидите сообщений о том, что одно из подключенных к этому компьютеру USB-устройств работает неправильно. Будет отлично, если в комментариях ниже вы сможете описать в деталях ваш случай и результат восстановления работоспособности устройства. Также в контексте рассматриваемой темы может быть полезным отдельный материал: Компьютер не видит флешку — что делать?
Table of contents
- Why Gamepad is Not Recognized in Windows 10 and 11
- How to Fix Gamepad Not Recognized in Windows 10 and 11
- Fix 1: Restart the gamepad and Windows
- Fix 2: Update your drivers
- Fix 3: Confirm gamepad compatibility
- Fix 4: Assign the gamepad as a gaming device
- Fix 5: Rebuild configuration file data from APPDATA folder
- Fix 6: Change power settings from the device manager page
- Conclusion
- FAQ
Maybe you just downloaded a new game and cannot wait to start playing it. You install it and get your gamepad ready to smash game characters, but then nothing happens.
You plug in the connector to a different port on your Windows PC and find that it does not register, indicating that your gamepad is not recognized on your device.
Gamepad Not Recognized is not a big issue. Once you know the origin of the issue, you can easily resolve it.
So, if you are like other Windows 10/11 users who are typing “How can I fix my gamepad if it’s not recognized on Windows” on their search engines, this article is for you.
Why Gamepad is Not Recognized in Windows 10 and 11
Your Windows 10/11 PC may be unable to recognize the gamepad you plugged into the ports for a number of reasons.
Some of these reasons are:
- Too many Windows processes are already in operation. Excessive Windows processes can interrupt the normal operation of gamepads on Windows. These processes are usually unnecessary, with some of them breaking the startup process of some apps and system components. When such processes are running in the background, they could terminate the default gamepad controller processes that ordinarily enable Windows to recognize gamepads and use them.
- The drivers needed for gamepad operation are outdated. Another common reason your Windows 10/11 PC cannot recognize your gamepad is that the drivers running on your system are outdated. Software drivers, as you probably know, enable you to use computer components efficiently. So, when they are outdated, problems like Gamepad Not Recognized crop up.
- The gamepad is not compatible with the game or the Windows version. Also, the reason you are unable to connect your gamepad to your Windows PC may be that they are incompatible. This incompatibility may result from the fact that you just updated your Windows from 10 to 11, or that you just installed a Windows 10 OS, or that the video game that necessitated your using a gamepad requires a special driver.
- The gamepad is not the assigned controller for games on Windows 10/11. You may also be unable to use your gamepad on Windows 10/11 simply because gamepads are not assigned as the default controllers for games.
- Existing controller data in the game folder prevents Windows from recognizing gamepads. Similar to the problem of excessive Windows processes, it is also possible that your Windows PC does not recognize your gamepad because there is an existing gamepad controller data file/folder that interrupts it. The existence of such files is common, but their interruption of Windows processes is rare. Only by clearing such files from the Windows application data folders can you get Windows to recognize the gamepad you keep plugging in.
How to Fix Gamepad Not Recognized in Windows 10 and 11
Now that you know why Windows is unable to recognize your gamepad, here are ways to fix the problem.
Note that the majority of online articles on how to fix Gamepad Not Recognized in Windows 11 are the same as articles about fixing the problem on Windows 10.
In other words, you can use the following solutions whether you have Windows 10 or Windows 11 installed on your PC.
Fix 1: Restart the gamepad and Windows
When your Windows PC is unable to recognize your gamepad, the first thing you must do is restart the gamepad.
This is the same as turning the gamepad off if it has an on/off button and turning it back on.
If that does not work, you can plug it into a different port. If that is also ineffective, you should restart your Windows computer.
The restart option lets the OS shut down and boot up, terminating and reinitiating every Windows process.
So, if a particular Windows process is responsible for your PC’s inability to recognize your gamepad, the restart procedure will fix it.
Fix 2: Update your drivers
Against the noted problem of outdated drivers, the obvious solution to fixing the Gamepad Not Recognized problem is to update your drivers.
There are three ways you can go about this:
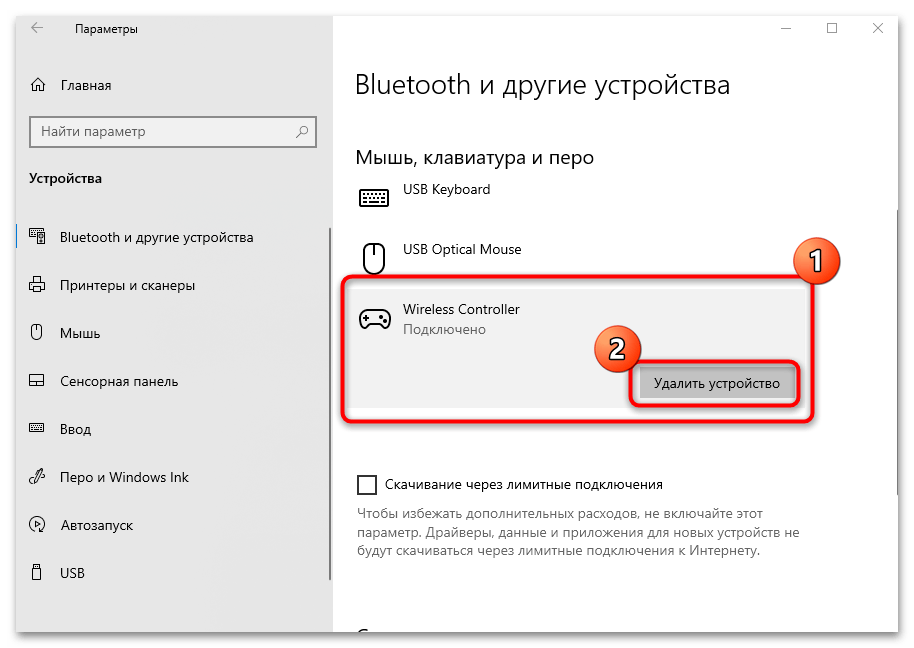
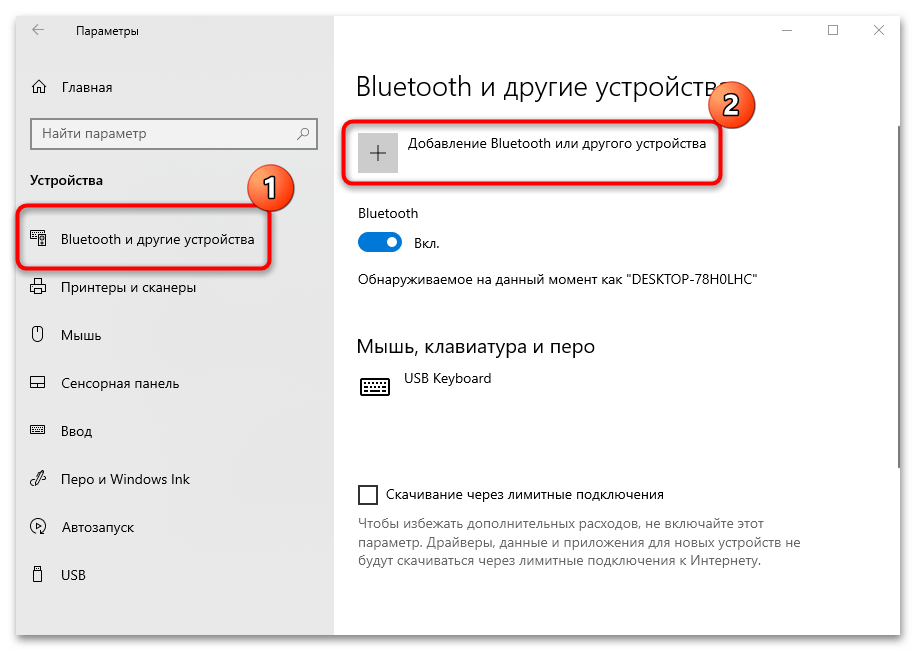
Use the device manager
- Hold down the
Windows key + Xto load the Power User Menu. - Select Device Manager.
- Navigate to the location of the gamepad device. This depends on the specific gamepad you’re using. For example, when an Xbox 360 controller is plugged in, the device will appear as “Xbox 360 Controller for Windows” under “Xbox 360 Peripherals.”
- Right-click the device and select Update Driver.
- On the next window, choose Search automatically for drivers.
Windows will search for the latest official driver on the web and install it. After this, reboot your PC to complete the procedure.
However, this is an inefficient method because you may not know which driver is outdated or responsible for the Gamepad Not Recognized problem.
Use the Windows Update
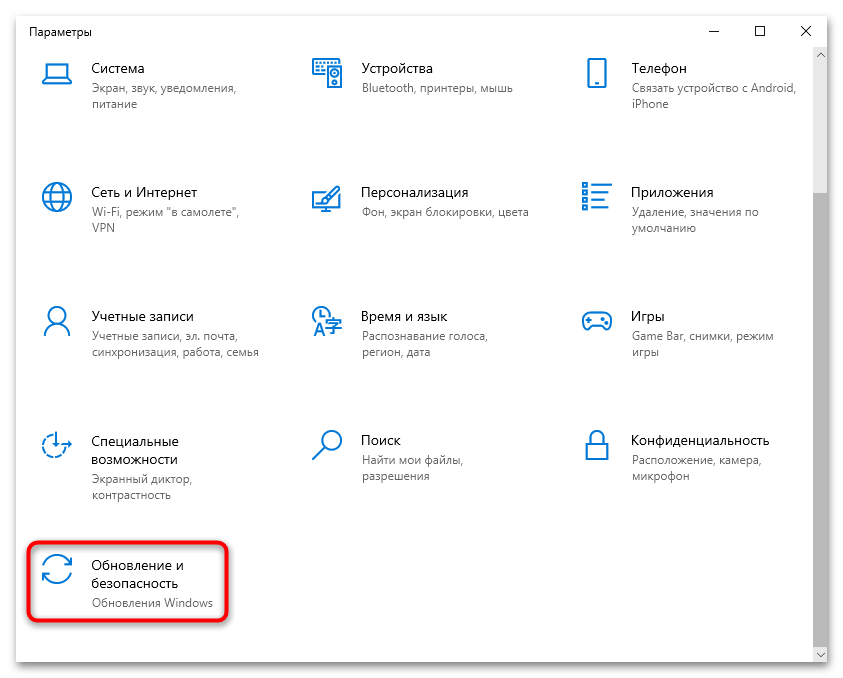
On Windows 10:
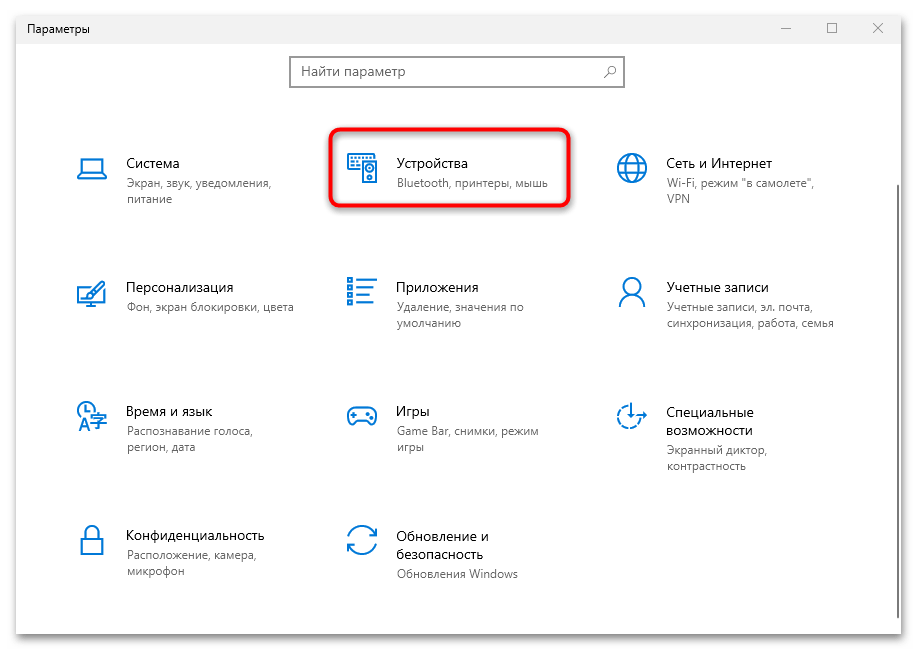
- Open Settings with Windows key + I.
- Navigate to Update & Security > Windows Update.
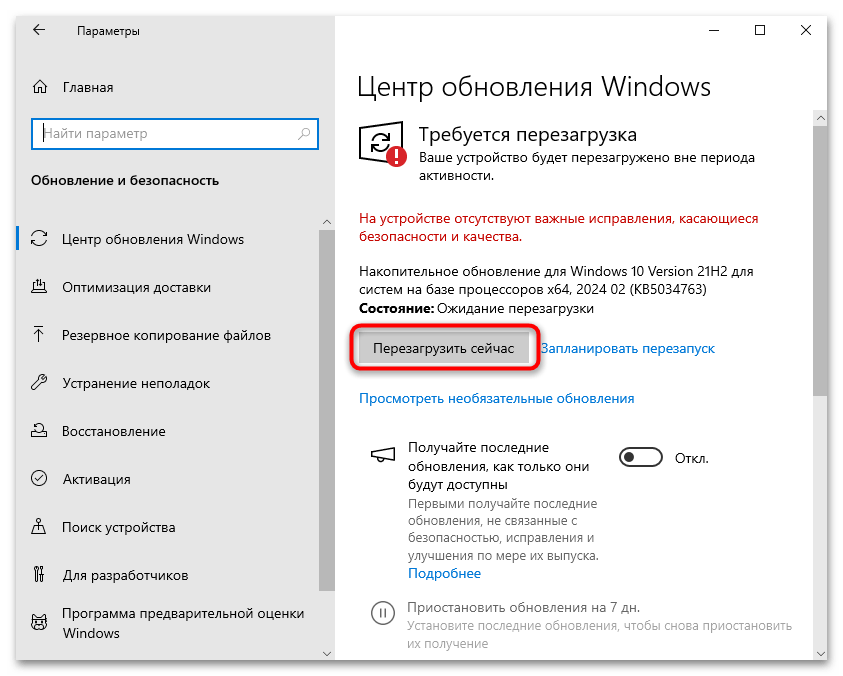
- Click Search for Updates.
On Windows 11:
- Use Windows key + I to open Settings.
- Select Windows Update from the left navigation pane.
- Click on Check for Updates.
Some Windows updates include official driver updates from Nvidia, Intel, and Realtek. So, this is a quick way to install missing driver updates.
Use Auslogics Driver Updater
The third and most efficient method of updating drivers is to use third-party software.
The Auslogics Driver Updater, for example, helps you update all needed drivers at once.
Whichever way you choose, updating your Windows drivers should fix the Gamepad Not Recognized problem.
Download Auslogics Driver Updater
Prevent hardware errors and ensure problem-free device operation with this advanced tool that detects outdated drivers and safely gets them updated.
Related:Auslogics Driver Updater: Update Your Drivers in One Click!
Fix 3: Confirm gamepad compatibility
If updating your drivers does not work, the Gamepad Not Recognized issue may not be as serious as you imagine. It could be a problem of compatibility, as we earlier pointed out.
So, either the gamepad you are using is incompatible with the video game or with your current version of Windows.
In the rare case where this is true, you can simply do the following:
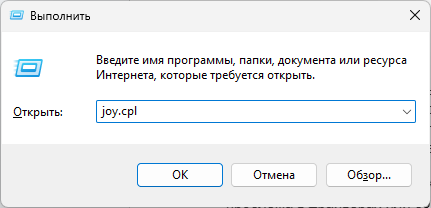
- Search for set up USB game controllers from the Start screen or use the Run Command (
Windows key + R) and entercpl.Both of these methods take you to the Game Controllers mini page. - If you see your gamepad indicated on the mini page, click on the Properties option.
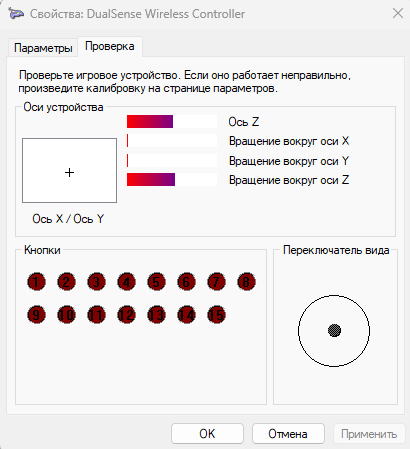
- Use the Test tab to confirm that your gamepad is functional.
This tells you whether your gamepad is still working and useful.
Fix 4: Assign the gamepad as a gaming device
Beyond the issue of compatibility, it is possible that you are unable to use a gamepad on Windows because you have not assigned gamepads as the default game controller.
Put differently, your Windows PC only recognizes keyboards and mice as the input device for gaming. Therefore, you need to get Windows to recognize gamepads as the preferred device for gaming.
To assign gamepads as Windows default game controller devices:
- Use
Windows + Rto open the Run Command and then entercpl. - On the Game Controllers mini page that pops up, click the option that says Advanced.
- Click on the drop-down option and select your gamepad, and then OK. (Also click OK, not esc, on the Game Controllers mini page to implement your changes.)
You should also check the settings of the game you are playing to effect similar changes.
Note
Although it is very unlikely that Windows does not recognize your gamepad because the keyboard is selected as the controller in the video game settings, it will not hurt to check.
So, start up the game and navigate to the settings. Once you find the tab for the game controller, make sure that the gamepad option is selected.
Fix 5: Rebuild configuration file data from APPDATA folder
As noted earlier, there may be existing game data that is preventing Windows from recognizing your gamepad.
When this is the case, you have to get Windows to rebuild the configuration file (often with the .CFG extension) from your APPDATA folder.
To do this,
- Close the video game and check the Task Manager to ensure that no related process is running in the background.
- Use
Windows + Rto open the Run Command and then enter%appdata%\microsoft. - Select the folder of the game you are trying to play and enter.
- Locate any file with the .CFG extension and delete it.
- Start the game.
Once you ask Windows to start the game again, it will rebuild a new configuration file. So, if this is the root of the problem, your Windows 10/11 should now recognize gamepads and allow you to use them.
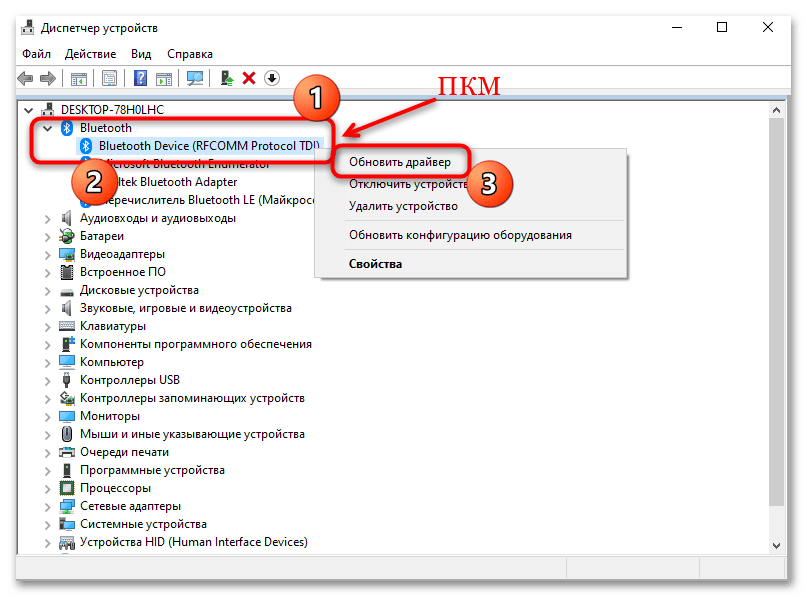
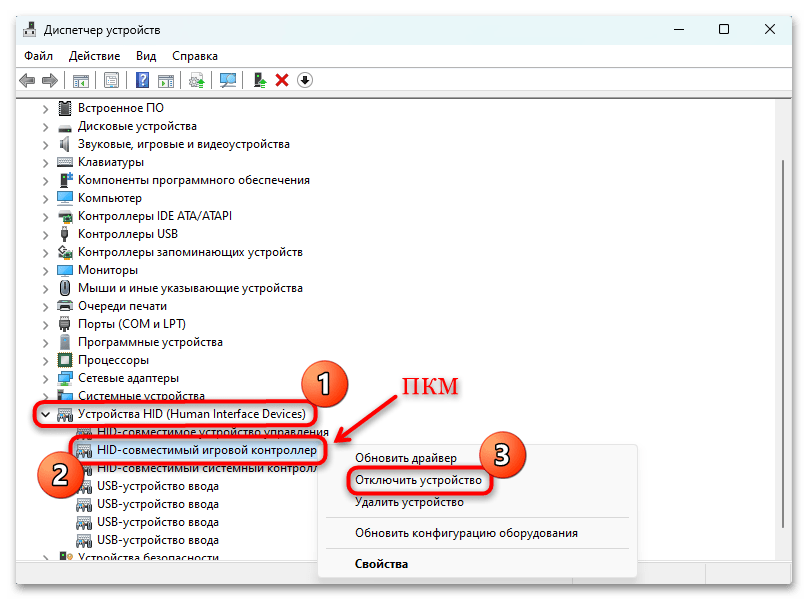
Fix 6: Change power settings from the device manager page
One other way to fix the Gamepad Not Recognized problem on Windows 10/11 is to prevent Windows from turning off (or refusing to recognize) gamepad devices to save power.
To do this, you have to change the power settings from the USB driver tab on the Device Manager page in Windows 10/11. So, to change these settings,
- Click the Windows key + X on your keyboard and select Device Manager.
- On the Device Manager page, move your cursor to the Universal Serial Bus controllers option and double-click.
- From the options that emerge, select USB Root Hub and double-click to get to the Properties page.
- On the USB Root Hub Properties page, select the Power Management tab and deselect the Allow the computer to turn off this device to save power
- Click OK and close Device Manager. Then, plug in the gamepad to see if the problem is fixed.
Conclusion
These solutions are effective for fixing the Gamepad Not Recognized problem on Windows 10/11. Using any one of them could save you from buying a new gamepad or reinstalling the video game.
Share this article with your friends, and feel free to comment below with any additional tips or thoughts!
FAQ
Why is my computer not detecting my controller?
Check to see if the controller is correctly paired wirelessly or connected to your computer using a USB connection, depending on the model. If the controller is wireless, ensure the batteries are charged; low battery levels might occasionally result in problems connecting. To rule out any port-related problems, you can also try connecting the controller to a different USB port on your computer. Also, see whether driver updates are available and whether the controller is compatible with your operating system. Reinstalling or updating the drivers may fix the problem if the computer is unable to recognize the controller due to outdated or corrupted drivers.
How do I set up my gamepad on Windows 11?
Connect your gamepad to your PC using a USB cable or wireless connection. If the controller is connected, connect it to a USB port on your computer. To link a wireless controller with your PC using Bluetooth or a wireless receiver, follow the manufacturer’s directions. Once the controller is connected, Windows 11 should recognize it and automatically install any required drivers. In case the controller is not detected, it could be necessary for you to update the drivers manually.
Why is my controller not connecting to my PC on Windows 11?
There are various reasons why your controller might be unable to connect to your Windows 11 computer. First, depending on the controller you’re using, ensure it’s correctly linked to your computer via a USB cable or wirelessly. Verify that the wireless controller is correctly paired with your computer if it is one. Second, see if Windows 11 is compatible with the controller. It’s possible that certain older controllers require compatibility patches or driver updates since the newest operating system doesn’t support them. If the controller is wireless, make sure the batteries are charged as well, as low battery levels occasionally hinder a good connection.