
Updated on Apr 28, 2025
Secure Boot, a security feature embedded in modern PCs, ensures that only signed and authenticated operating system bootloaders are executed during startup. While this adds a layer of protection against unauthorized code execution, it occasionally manifests into an unexpected hurdle for users, preventing their system from booting successfully.
Consider the following scenario extracted from a user’s experience on a Microsoft Community forum:
Help! My Windows PC refuses to start after I enabled Secure Boot. I’m stuck with a black screen and have no idea how to fix it. What went wrong, and how can I get my system back on track?
If you, too, are grappling with the Windows PC won’t boot after enabling Secure Boot, fear not. This article from EaseUS is your compass through the labyrinth of startup troubles. By the end of this guide, you’ll possess the knowledge and tools needed to navigate through the Secure Boot conundrum and revive your system.
Here, we listed the 9 solutions that can resolve PC won’t boot after enabling Secure Boot. Continue reading to learn the details.
- Method 1: Disconnect External Drives
- Method 2: Remove CMOS Battery
- Method 3: Convert MBR Disk to GPT
- Method 4. Update BIOS Version
- Method 5. Update SSD Driver
- Method 6. Repair with Third-party Software
- Method 7. Boot from Bootx64.efi or Bootia32.efi Manually
- Method 8. Check for Windows Updates
- Method 9: Perform Clean Install
Method 1: Disconnect External Drives
While additional storage or backups are convenient, external drives can sometimes pose an issue during the boot process. When connected, these drives might inadvertently interfere with the system’s startup sequence, causing the Windows PC to falter after enabling Secure Boot.
To troubleshoot this issue, disconnect all external drives from your PC. This will eliminate the potential interference and allow the system to boot without external requirements.
Try it and see if this straightforward action resolves your boot problem. Often, a quick disconnect can be the key to getting your Windows PC back on track. Proceed to the next section once you’ve given this a shot.
Method 2: Remove CMOS Battery
Now, let’s explore another avenue to tackle the Windows PC boot hiccup after enabling Secure Boot. Sometimes, the motherboard’s CMOS battery can cause issues by misjudging the state of Secure Boot, leading to startup troubles.
To proceed, locate the CMOS battery on your motherboard. It’s typically a coin-cell battery. Before you begin, ensure your PC is powered off and unplugged. Gently remove the CMOS battery, wait a minute or two, and reinsert it. This brief removal allows the motherboard to reset its settings. Power on your PC and observe if the boot issue persists.
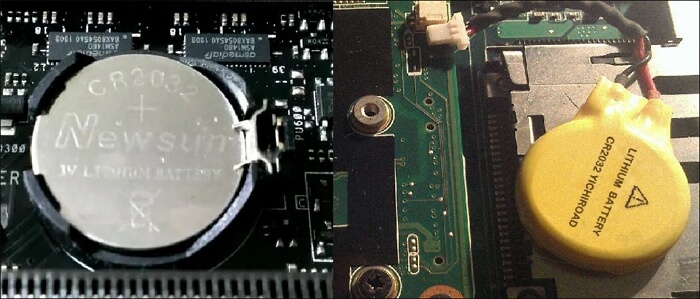
This technique can help ensure a smooth boot process and offers a non-intrusive means of addressing possible misconfigurations. Don’t worry if the issue continues; we’ll look at other solutions in the parts that follow.
Method 3: Convert MBR Disk to GPT
The partition style of your disk plays a pivotal role in how your system boots. MBR (Master Boot Record) is associated with Legacy BIOS, while GPT (GUID Partition Table) is linked to UEFI, the modern firmware interface. Secure Boot often requires a UEFI environment, and compatibility issues may arise if your disk uses the older MBR style.
This technique can help ensure a smooth boot process and offers a non-intrusive means of addressing possible misconfiguration. Start by examining the partition style of your disk. This could be the source of the issue if it’s MBR and you’ve enabled Secure Boot. Booting from an MBR device can be made easier and more compatible by switching to a GPT.
If you don’t want to reinstall the Windows system after converting MBR to GPT, you’ll need a reliable partition management tool. EaseUS Partition Master Professional is an easy-to-use tool that makes the converting procedure simpler. You can save time and effort by switching to this software instead of reinstalling Windows.
EaseUS Partition Master Professional comes equipped with features tailored for disk management, ensuring a smooth transition from MBR to GPT.
Step 1. Download and launch EaseUS Partition Master on your computer.
Step 2. Go to Disk Converter, select «MBR => GPT» and click «Next» to continue.

Step 3. Select the target MBR disk that you tend to convert to GPT, and click «Convert» to start the conversion.

You can share this professional software with your friends who need a reliable tool to manage disks and partitions.
Method 4. Update BIOS Version
The BIOS acts as the fundamental bridge between your hardware and operating system. An outdated BIOS may lack the necessary support for Secure Boot, causing compatibility issues.
So, if you are experiencing complexity with boot, it’s time to consider a BIOS update.
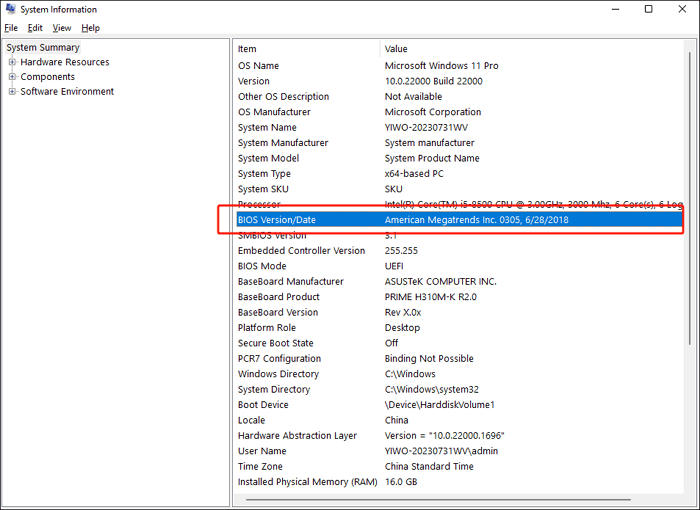
Step 1. In the search box, search for and open «System Information.» Then, you can see the BIOS version of your PC. You can also access the information during the initial boot process or within the BIOS/UEFI settings.
Step 2. Head to the official website of your PC’s manufacturer. Look for the support or downloads section.
Step 3. Find the right BIOS update for your respective PC model and download it.
Step 4. Ensure a stable power source for your PC.
Step 5. Run the utility for BIOS updates and follow the on-screen instructions.
Step 6. Restart your PC. Once the update is complete, recheck the BIOS version to confirm the successful update.
Remember, updating the BIOS requires careful attention and adherence to manufacturer guidelines.
Read also:
Method 5. Update SSD Driver
In the intricacy of Windows PC’s functionality, even the seemingly small players, like your SSD (Solid State Drive) driver, can play a crucial role. If your PC has boot issues post-Secure Boot activation, an outdated SSD driver might be the problem. An outdated SSD driver can lead to compatibility issues, especially when Secure Boot is in play.
To ensure a smooth and secure boot, it is crucial for the SSD driver to stay updated.
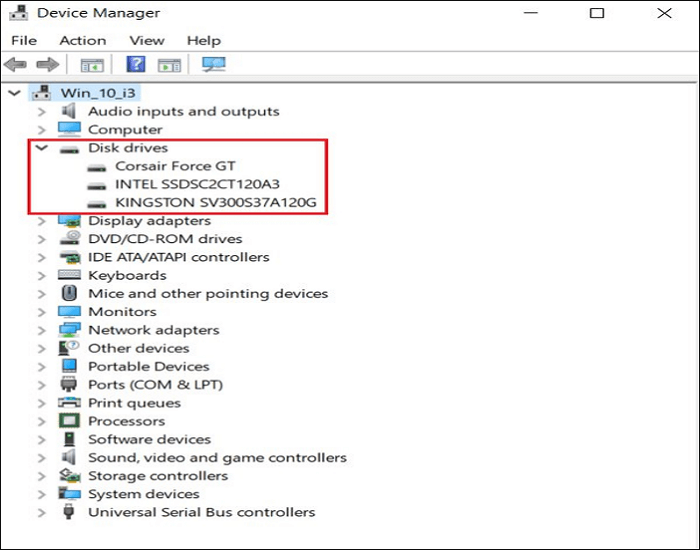
Step 1. In the search box, search for and open «Device Manager.» Then, locate Disk drivers and identify the model of your SSD. You can also find it by checking your PC’s specifications.
Step 2. Find and download the latest SSD driver compatible with your model from the official website of your SSD manufacturer.
Step 3. Before proceeding, back up any crucial data on your SSD.
Step 4. Run the downloaded driver file and follow the on-screen instructions to install the new driver. This might involve extracting files or going through a setup wizard.
Step 5. Restart your PC once the installation is complete.
Updating your SSD driver is a proactive step that addresses the immediate boot issue and contributes to your system’s overall health and performance.
Method 6. Repair with Third-party Software
Corrupted or damaged system files can cause hindrences on system’s ability to boot. These files are the backbone of your operating system, and any irregularities can lead to a breakdown in the boot process.
In such times, EaseUS Partition Master Professional for a solution. This versatile software not only aids in disk management but also comes equipped with a Boot Repair feature. This feature is designed to mend corrupted system files and get your PC working again.
Step 1. Start EaseUS Partition Master after connecting the external drive/USB to your computer, go to «Bootable Media,» and click «Create bootable media.»

Step 2. Select an available USB Drive or CD/DVD and click «Create.» You can also burn the Windows ISO file to the storage media.

Step 3. Connect the created bootable drive to the new computer and reboot the computer by pressing and holding F2/Del to enter the BIOS. Then, set the WinPE bootable drive as the boot disk and press F10 to exit.
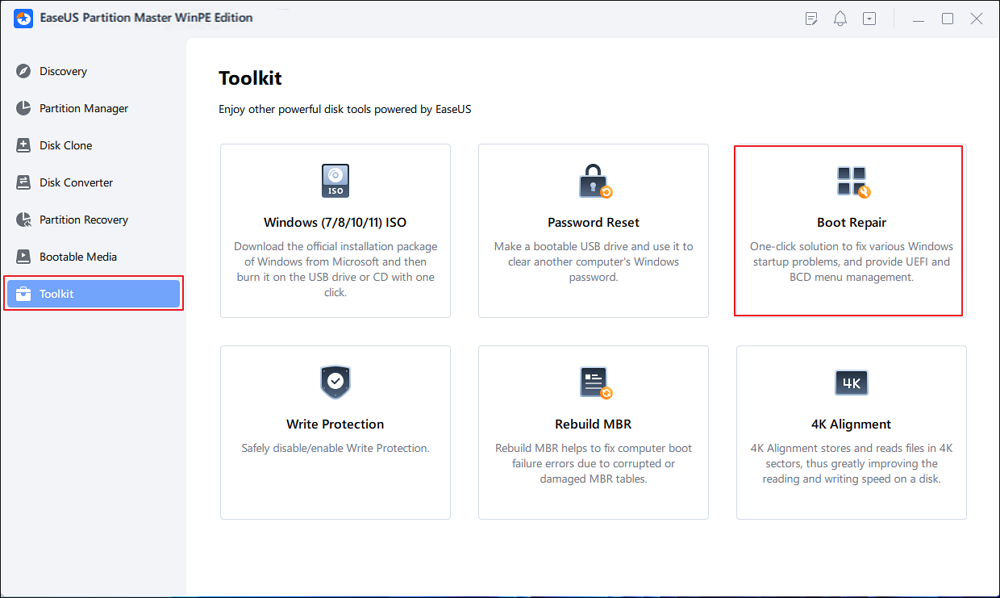
Step 4. Boot the computer again and enter the WinPE interface. Then, open EaseUS Partition Master and click «Boot Repair» under the «Toolkit» option.
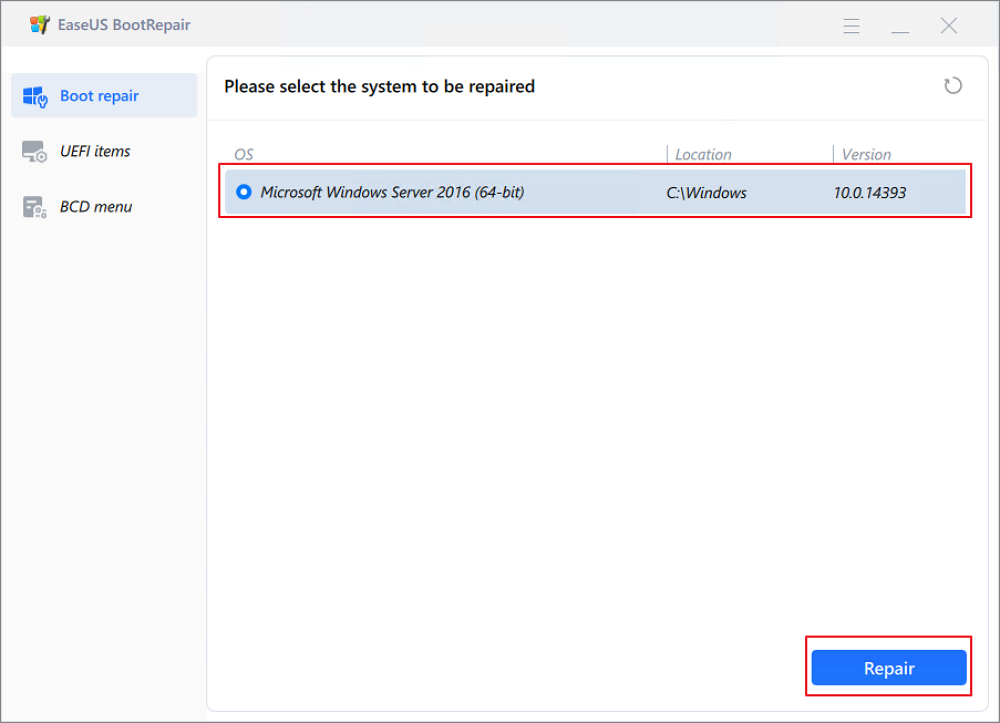
Step 5: Select the system you want to repair and click «Repair.»
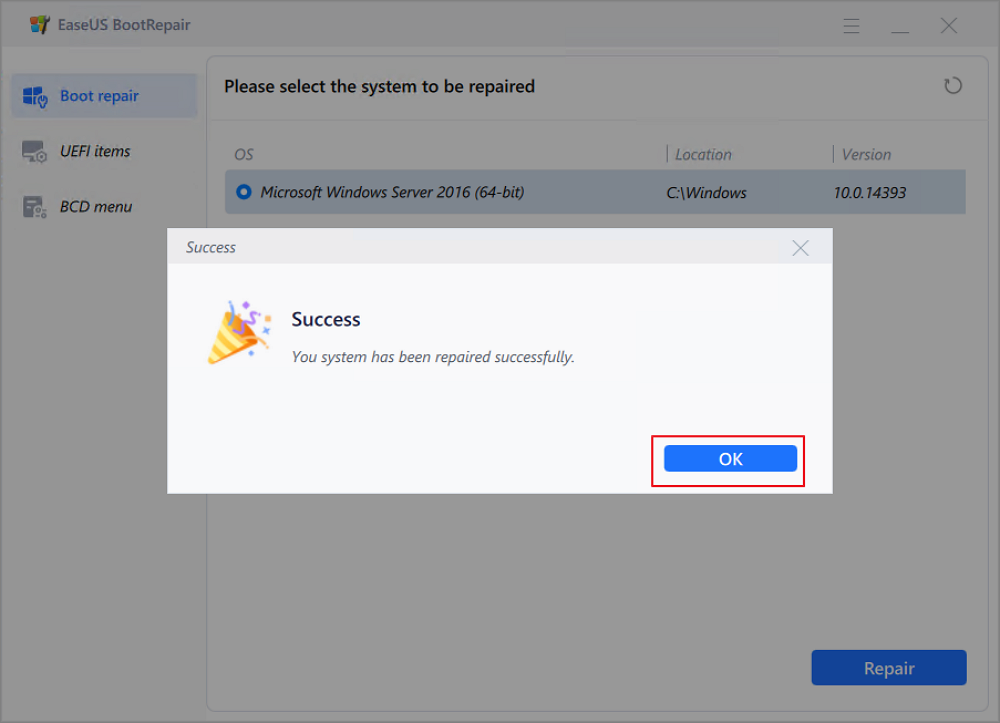
Step 6. Wait a moment, and you will receive an alert that the system has been successfully repaired. Click «OK» to complete the boot repair process.
⭐Additional Guidance
Feeling stuck or need more details? Our expert consultants are ready to provide tailored guidance to address your specific concerns:
EaseUS experts are available to provide you with 1-on-1 manual services (24*7) and help fix Windows boot error, BSOD or computer boot loop issues. Our experts will offer you FREE evaluation services and efficiently diagnose and resolve system boot failure, Windows stop codes and OS lagging issues using their decades of experiences.
- 1. Fix BSOD — blue/black screen of death error due to Windows update or other reasons.
- 2. Get rid of Windows boot error such as no bootable device found, or BCD file corruption.
- 3. Serve to fix 0X000_error codes on Windows system or OS boot loop issues.
Read also:
Method 7. Boot from Bootx64.efi or Bootia32.efi Manually
EFI files, denoted by their .efi extension, are pivotal to the UEFI boot process. These files contain executable code necessary for booting the operating system. When dealing with Secure Boot-related boot issues, manually selecting the appropriate EFI file can pose potential hiccups in the automatic boot process.
Step 1. Access your PC’s UEFI or BIOS settings by hitting the BIOS hotkeys while booting up. (F1, F2, F10, F12, Del, or Esc.)
Step 2. Navigate to the boot options section of the UEFI/BIOS settings. To boot, manually pick an EFI file. You may find them here:
- \EFI\boot\bootx64.efi
- \EFI\boot\bootia32.efi
Step 3. Select either bootx64.efi or bootia32.efi, depending on your system. Usually, the EFI sector of your system has these files.
Step 4. Save your changes and exit the UEFI/BIOS settings after selecting the proper EFI file. Your system should attempt to boot using the manually chosen EFI file.
By manually invoking the bootx64.efi or bootia32.efi files, you’re taking control of the boot process and sidestepping potential Secure Boot-related obstacles.
You can check this article to learn more details about the difference between UEFI and BIOS.
UEFI vs. BIOS: What’s the Difference and How to Choose
What is UEFI/BIOS? Do you know the difference between them? This article will present comprehensive information to help you understand UEFI vs. BIOS. Read more >>
Method 8. Check for Windows Updates
Windows updates serve as the first defense against various system errors and compatibility issues. These patches are intended to enhance security features and address problems and malfunctions that may interfere with your PC’s smooth performance. In the case of Secure Boot-related boot troubles, updating your Windows system could be the answer.
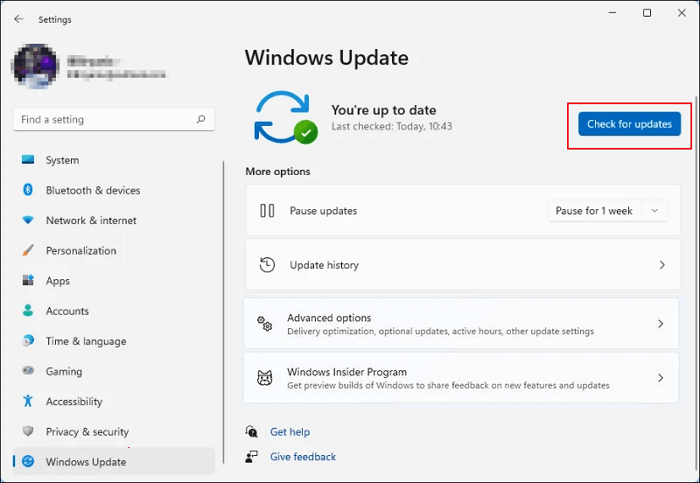
Step 1. Open Settings and navigate to «Windows Update.»
Step 2. Select «Check for updates» from the Windows Update section.
Step 3. Select «Download» and «Install» to initiate the update procedure if any updates are available.
Step 4. Restart your computer following the effective installation of the updates. This is a necessary step for the modifications to take effect.
By keeping your Windows system up to date, you can prevent compatibility difficulties with Secure Boot while fortifying your PC against numerous security threats.
Method 9: Perform Clean Install
A clean install wipes your system clean of any accumulated clutter, corrupted files, or misconfigurations. It’s akin to hitting the reset button on your entire operating system, offering a clean slate for a seamless, optimized experience. If you’ve exhausted other avenues and the boot problem persists, a clean install could be the definitive solution.
From the official Microsoft website, download Windows installation media. Make bootable installation media using a USB drive.
Step 1. Boot the computer after inserting the USB drive and restarting the system. In the launch device menu, select the USB drive.
Step 2. Follow on-screen instructions for a clean install.
Step 3. Delete existing partitions, create a new one, and format the drive during installation.

Step 4. Finish the installation, restart your PC, and enter a fresh Windows environment.
Step 5. Install necessary hardware drivers and check for Windows updates to keep your system current.
Performing a clean install might take a bit of time, but it often provides a definitive solution to persistent boot issues.
Why Your PC Won’t Boot After Enabling Secure Boot
Understanding the root causes is crucial. Let’s explore why your PC might be having problems booting in the Secure Boot era.
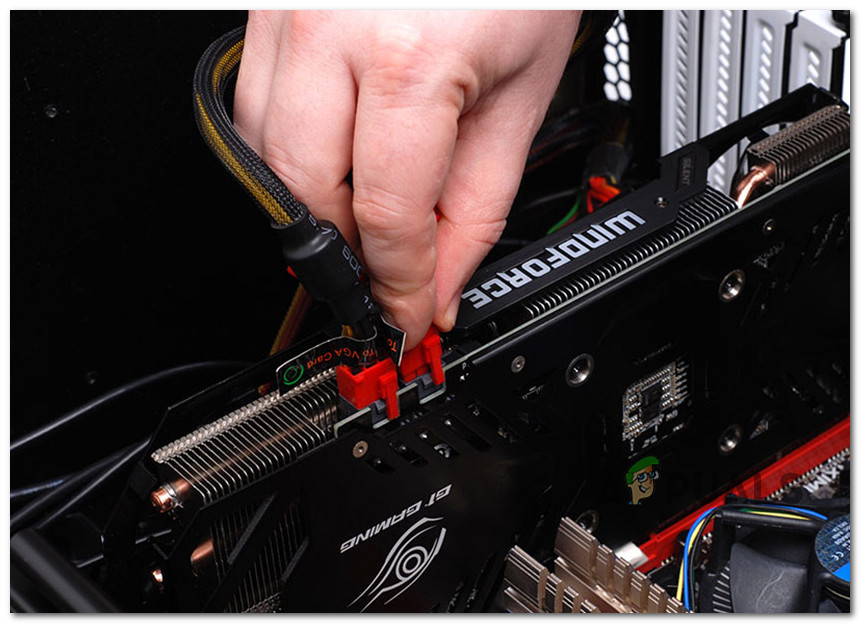
- Peripherals Failure: Incompatible external storage devices, GPU issues, or a CMOS battery misjudging Secure Boot status. These peripheral failures can disrupt the boot sequence, causing your PC to stumble in its startup dance.
- Incorrect Partition Style: Your disk’s partition style (MBR vs. GPT) may clash with Secure Boot requirements. Ensuring the right partition style is like tuning your PC’s instruments for a harmonious performance.
- Outdated BIOS: Your BIOS lacks the necessary updates for Secure Boot compatibility. Think of BIOS updates as the choreography that aligns perfectly with the Secure Boot symphony.
- Outdated SSD Drivers: Your SSD driver may not be fluent in Secure Boot’s language. Updating SSD drivers is akin to giving your PC’s translator the latest dialect for seamless communication.
- Corrupted System Files: System files are damaged, disrupting the balletic movements of the boot process. Corrupted files create dissonance; a clean slate might be the key to restoring harmony.
Feel free to share the post on your social media to help more struggling users with the above useful information.
Conclusion
Figuring out how to fix Windows PC won’t boot problems after Secure Boot activation takes both technical knowledge and hands-on experience. This complete guide gives users the confidence to repair, covering everything from fixing broken peripherals to updating important parts like SSD drivers and BIOS. Each of the methods shown is an important part of the system’s recovery. We recommend you use EaseUS Partition Master as its advanced features will help you streamline the process.
Remember that you’re not alone as you work through these answers. Share this post with others who are having the same problems, and together, we can make Secure Boot troubleshooting easier.
FAQs on PC Won’t Boot After Enabling Secure Boot
Here are the answers to the common queries that might help mitigate the issue you are having:
1. Why is my PC not compatible with Secure Boot?
Inadequate hardware or lack of support for UEFI firmware, which is a prerequisite for Secure Boot, may render your computer incompatible.
2. What will happen if I enable Secure Boot?
Secure Boot enhances system security by allowing only signed and authenticated bootloaders to execute during startup, mitigating the risk of unauthorized code execution.
3. What to do if Secure Boot says enabled but not active?
If your system indicates that Secure Boot is enabled but not active, it’s crucial to troubleshoot and ensure that your PC is fully utilizing this security feature. Follow these steps to address the «enabled but not active» status:
- Ensure the PC supports UEFI firmware.
- Install the latest BIOS/UEFI firmware.
- Confirm signed and unmodified OS bootloader.
- Restart and check the Secure Boot status.
- Reset keys in UEFI/BIOS settings.
As it turns out, there’s an entire category of Windows 11 that are finding their PC unable to boot after they enabled secure boot. Most users are reporting that whenever they face this problem, they see their computer going back to the UEFI or BIOS screen with no error messages or logs. On the other hand, if Secure Boot is kept disabled, they get an error message saying that ‘This PC can’t run Windows 11‘.
After investigating this particular issue, it turns out that there are several different underlying causes why you might expect to deal with this issue on Windows 11. Here’s a shortlist of potential culprits that you should be aware of:
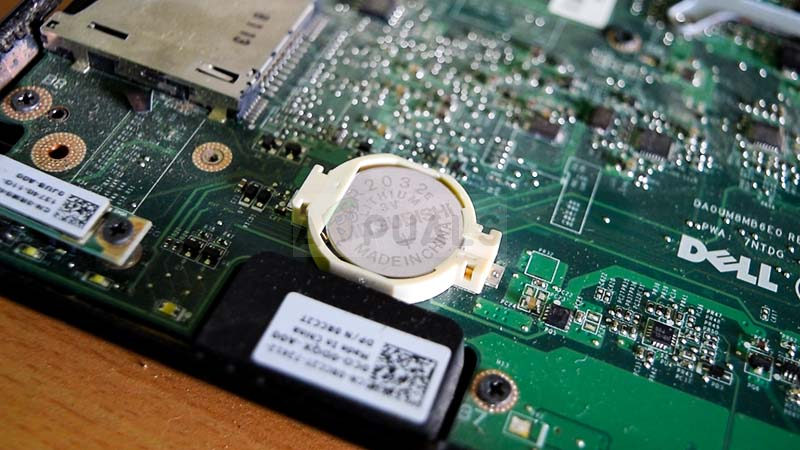
- Remnant boot data is perpetuated by motherboard battery – As it turns out, one of the most common causes that will prevent your PC from booting Windows 11 even after enabling Secure Boot is a scenario in which your motherboard battery (CMOS) is actually perpetuating a state in which your computer thinks that secure boot is not enabled (despite being enabled). In this case, you can fix the issue by taking out the motherboard battery and leaving it out for 10 minutes or so in order to clear the power capacitors. Some motherboards might have a dedicated switch to do this.
- Outdated BIOS version – There are documented scenarios where the main reason that was causing this type of issue was an outdated BIOS version that was not fully compatible with the new security protocols on Windows 11. To ensure that this is not the cause of the issue, you should be able to fix the problem by flashing your BIOS with the latest version available.
- Failing GPU – According to several affected users, this type of behavior can also be indicative of a dedicated GPU that is beginning to fail. In order to eliminate this scenario of your culprit’s list, simply disconnect your dedicated GPU and see if your PC boots successfully from the integrated GPU alternative.
- Outdated SSD drivers – If you’re experiencing this issue only when secure boot is enabled but you can boot normally when it’s not, one potential culprit is your SSD drivers fleet. In order to fix it, simply boot your computer and update your SSD driver fleet to the latest.
- Hotfix for boot glitch is not installed – Microsoft recently patched a booting defect caused by a bad Windows update that ended up corrupting the BMR data on certain computers running Windows 11. In order to fix this issue, you’ll need to install every pending Windows Update in order to apply the hotfix that resolves this issue.
- The partition style is incompatible – Windows can use the GUID Partition Table (GPT) partition style with Secure Boot. The drive is still in an unbootable MBR partition table when Secure Boot is enabled. The system boots up without any issues if Secure Boot is disabled. You must change your data or disks from MBR to GPT in order to support Secure Boot and make your computer bootable with that feature activated.
- Boot data inconsistency – Some claim that the issue was fixed by manually booting their computer from the bootx64.efi file. The files with the EFI extension are boot loaders. This system partition is typically hidden and lacks a drive letter. However, by following a set of instructions, you can usually boot from it.
- MBR data is mismanaged due to an external drive – As it turns out, you might experience this type of behavior if you have an external HDD (slave) connected to your Windows 11 PC via a USB port. In this case, you can get the issue resolved by temporarily disconnecting it (until after the booting procedure is complete).
- System file corruption – According to some affected users, this problem can also be caused by some kind of inconsistency produced by some type of system file corruption. In order to rectify this problem, you should consider performing SFC and DISM scans, and even going for a repair install or a clean install procedure if the issue persists.
1. Reset BIOS by removing the CMOS Battery
It turns out that one of the most frequent reasons why Windows 11 won’t start on your PC even after Secure Boot is enabled is a situation where your motherboard battery (CMOS) is actually maintaining a condition in which your computer believes that secure boot isn’t enabled (despite being enabled).
In this situation, you can resolve the problem by removing the motherboard battery and letting it sit outside for around 10 minutes to clean the power capacitors. There may be a switch specifically for this purpose on some motherboards.
Note: The CMOS (Complementary Metal Oxide Semiconductor) battery, also referred to as the RTC or the NVRAM, is in charge of storing data ranging from the time and date to the hardware configurations of the system. The computer’s inability to maintain the date and time between startup typically indicates an issue with this component.
If you are dealing with a replaceable CMOS battery, you should be able to resolve the problem by clearing the CMOS battery or replacing it entirely in case the problem reappears if this scenario applies to your current situation and you suspect that you’re dealing with a malfunctioning CMOS battery.
Here is a little guide on how to accomplish it:
Important: No matter what version of Windows you are using or how your computer is set up, the procedures below should work.
- Make sure your PC is totally unplugged from any power sources and turned off.
- Next, take off the side cover and put a static wristband on your dominant hand (if you have one).
Note: This grounds you to the computer’s frame and balances the electrical energy, ensuring that you don’t cause any harm to the PC’s internal parts. - Locate the CMOS battery on your motherboard by taking a look at it. It shouldn’t be challenging to find. Once you spot it, pry it out of the slot with your fingernail or a non-conductive screwdriver.

Removing the CMOS Battery Note: To be sure you’re not working with a bad battery, replace the present one with a spare CMOS battery if you have one available. If you don’t, make sure to properly clean it to make sure no debris is preventing connectivity with the motherboard.
- Before putting everything back together and turning on your computer again, wait a few minutes to give the power capacitors enough time to clear themselves.
- Boot your PC up once again and see if the issue is now fixed.
If the same kind of issue is still occurring, move down to the next potential fix below.
2. Disconnect external hard disks
It turns out that if you have an external HDD (slave) linked to your Windows 11 PC through a USB port, you might encounter this kind of behavior. In this situation, momentarily disconnecting it will solve the problem (until after the booting procedure is complete).
As strange as it may sound, this kind of error might be caused by an external hard disk.
Although we are unable to provide you with a comprehensive list of circumstances in which this issue can arise, you can try disconnecting all auxiliary devices in order to isolate the issue’s root cause. It turns out that a power draw issue can also cause this specific problem.
You may encounter this secure boot-related inconsistency if your power supply unit (PSU) is insufficient to support all of your USB-connected devices because your system is unable to supply the necessary power.
Specific configurations with external hard drives connected through USB have been observed to experience this.
If this scenario describes your current circumstance, try taking off the external hard drive (if necessary), and observe if you still get erratic disconnections.
You have two options moving forward if the error stops happening after you disconnect external devices and you want to solve it without sacrificing any functionality at all:
- Purchase a higher PSU that can supply your USB-connected devices with additional power. Naturally, desktop arrangements are the only ones where this is applicable.
- Purchase a USB hub that has an external power source. If you’re having trouble with a laptop or ultrabook, this should be the solution. The demand on your PSU will be reduced by USB hubs with built-in power adapters.
If the investigations you’ve just performed aren’t pointing towards a PSU-related issue, continue to the next way below if this one isn’t appropriate for your situation or didn’t change anything.
3. Update your BIOS version
There are cases when this type of problem was primarily brought on by an out-of-date BIOS version that was insufficiently compliant with Windows 11’s new security procedures. You should be able to resolve the issue by flashing your BIOS with the most recent version available to be sure that this isn’t the root of the problem.
You should also investigate your BIOS as another potential offender. Several affected customers claim that after updating their BIOS firmware to the most recent version, the issue was completely fixed. This method has largely been shown to work well with ASUS PCs.
Particularly on older motherboards, it’s uncommon for an outdated BIOS version to result in system instability.
Remember that updating your motherboard’s BIOS isn’t as challenging as it once was because all of the main motherboard manufacturers now offer flashing software that enables you to do so without needing to be particularly tech-savvy.
The best course of action is to visit the website of the company that makes your motherboard and browses the Drivers Download section for a BIOS upgrading program. ASUS has E-Z Flash, MSI has MFlash, Gigabyte has @BIOS Live Update, and so on.
Note: Regardless of the manufacturer of your BIOS, read the official documentation in its entirety before starting the update process. If you carry out this process incorrectly, you run the risk of bricking the hardware, which calls for the help of a trained professional.
Upgrade your BIOS to the most recent version by following the on-screen instructions, and then restart your machine to see if you are able to boot while the secure boot feature is enabled.
Try the next technique below if you don’t already have the most recent BIOS for your motherboard or if the previous one didn’t work for you.
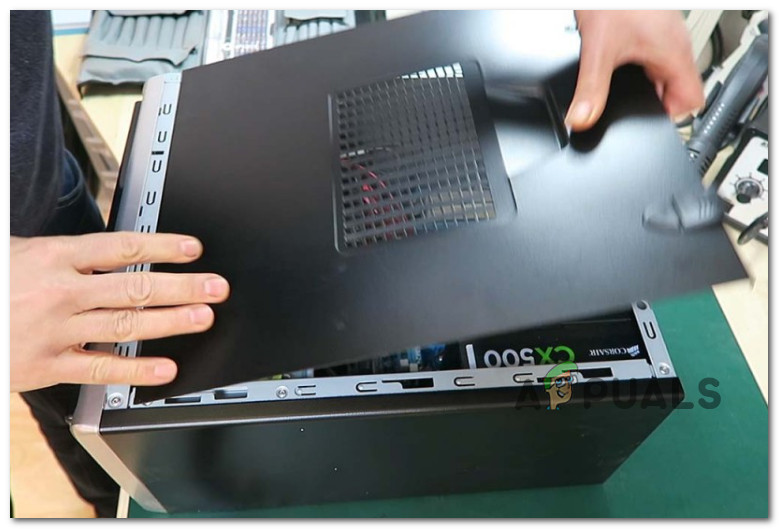
4. Booting with the integrated GPU
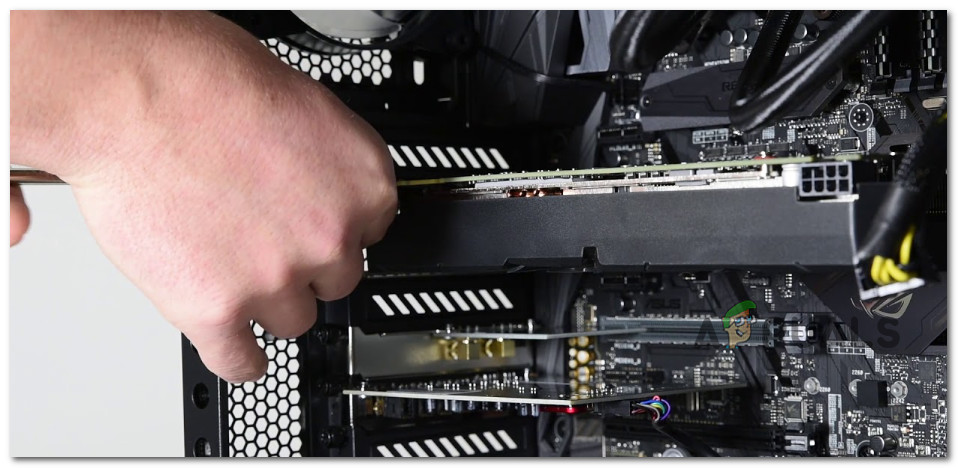
This kind of behavior, according to multiple impacted customers, may also be a sign that a dedicated GPU is starting to malfunction. Simply unplug your dedicated GPU and check to see whether your computer boots correctly using the integrated GPU alternative to exclude this possibility from your list of possible culprits.
There is no universal way of forcing your PC to boot directly from the integrated component, but you can do this easily by physically taking out your dedicated GPU and booting without it.
Although replacing a GPU is a straightforward process, it is crucial to use caution before handling your computer to prevent any harm.
IMPORTANT: When using a computer, it is advised to wear an anti-static band around your wrist or ankle. Usually, an alligator clip is on the other end of the anti-static band. Make sure the alligator clip is attached to something, perhaps an unpainted area of your computer case. Using one of these bands is an easy method to assure that you won’t damage anything while working on your PC because static electricity can harm or even destroy computer components.
To force your computer to boot using the integrated GPU component, follow these steps to remove your dedicated GPU:
- Ensure that your computer is completely off and disconnected.
- To access the internal components of your desktop, remove the side panel.

Remove the side panel Note: Typically, you may do this by using a screwdriver or your hands to loosen the screws holding the side panel in place.
- A six- or eight-pin PCIe cable is generally used to connect graphics cards to power supplies, providing the necessary electricity for the graphics card to function.
- To disconnect the PCIe cable from the graphics card, push the cable’s clip down and carefully pull the cable away.

Disconnect the power cable - In addition to being held in place by the motherboard, the graphics card will also be kept firmly in place in the computer since it will be bolted into the case’s rear.
- Remove the screws holding the GPU to the case’s back.
- The graphics card will still be inserted into a PCIe slot after being unplugged from the enclosure. You can see a tiny clip holding the card to the motherboard if you look down at the area where the card is inserted into the motherboard.
- To release the card, depress the clip.

Remove the GPU - Gently remove the graphics card from the slot after depressing the clip.
- Put your PC case back on and boot it normally. At this point, your PC will be forced to boot from the integrated GPU component.
If this method was not applicable or you’re looking for a different fix, move down to the next method below.
5. Update SSD Drivers
Your SSD driver’s fleet may be the root of the problem if you only encounter it when secure boot is enabled but can boot normally otherwise. Simply reboot your computer to fix it, then install the most recent SSD drivers.
Check to see if there is an updated driver available if you are using a more recent SSD model. Go to Device Manager and take note of the SSD model number. As soon as you have that, check the internet to see if there is a new firmware update that you can install.
Important: Be cautious to back up your data before updating the firmware on your SSD. All data on your disk will be deleted if the firmware is updated.
Many users reporting this kind of error have confirmed that after following the methods below to determine their SSD model number and using it to find a newer driver version, they were eventually able to boot with secure boot enabled.
Note: You can also try updating the SSD firmware through Device Manager, but don’t get your hopes up as there is very little chance you’ll discover a newer version.
To update the SSD firmware to the most recent version, follow these steps:
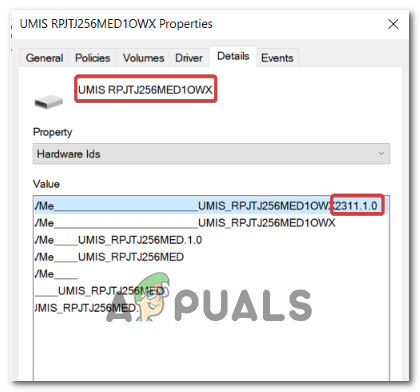
- To bring up the Run dialog box, press the Windows key + R. Then, to launch Device Manager, type “devmgmt.msc” into the text box and click Ctrl + Shift + Enter.

Accessing Device Manager - Select Yes to give admin access at the User Account Control.
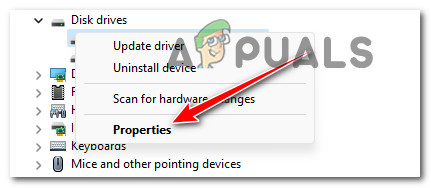
- After entering Device Manager, expand the Disk Drives drop-down box.
- After that, from the context menu, right-click the SSD disk in the Disk Drives section and select Properties.

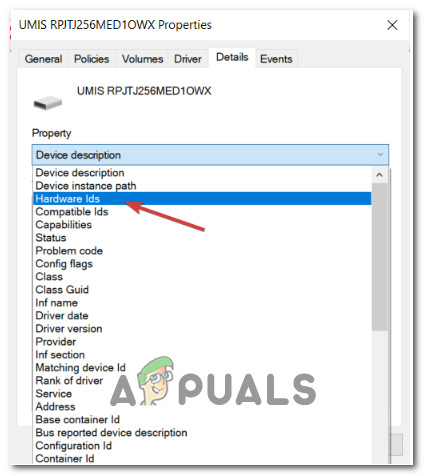
Accessing the Properties screen of your SSD entry - Click on the Details tab at the top of the Properties screen after you’ve arrived there.
- Select Hardware IDs from the Property menu on the Details tab.

Accessing the Hardware ID property - The model number of the drive you’re now using and the firmware version displayed beneath its name can both be found in the upper part of the drive.

Take note of the model and firmware model - Check to see if there is a new firmware version available for your SSD by searching online (or on the SSD manufacturer’s or PC manufacturer’s website).
- Download the new version if it’s available, then install it by following the on-screen directions.
- Restart your computer after installing the latest SSD firmware to determine if the problem has been resolved.
- Make sure that Secure Boot is turned on, then boot your PC once again and see if the procedure completes successfully.

If the same kind of issue is still occurring, move down to the next method below.
6. Install Pending Windows Updates
Microsoft recently fixed a booting issue brought on by a problematic Windows update that resulted in the BMR data being corrupted on some Windows 11-powered devices. You’ll need to install every pending Windows Update before you can apply the patch that fixes this problem.
If you own a high-end PC, you should ensure that you have the most recent Windows infrastructure updates installed. If you frequently see this problem when using your PC for resource-intensive tasks, you should take this action.
Bringing Windows 11 up to date may allow you to finally boot in secure mode if your Windows installation is missing any crucial infrastructure updates.
Read on for detailed instructions on how to accomplish this on Windows 10 or Windows 11:
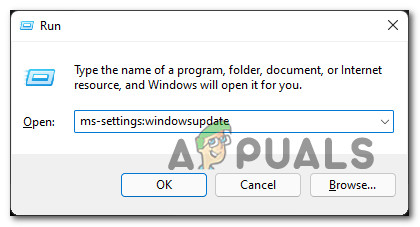
- Using the Run dialog box is one approach to launching Windows Update. To do this, press the Windows key + R on your keyboard. The Run dialog box will appear as a result.
- Next, type “ms-settings:windowsupdate” in the text field and hit Enter. This will direct you to the Settings app’s Windows Update tab.

Accessing the Windows Update screen Note: You could see a prompt requesting your consent to proceed if you haven’t adjusted the UAC settings. To give your consent in this instance, click Yes.
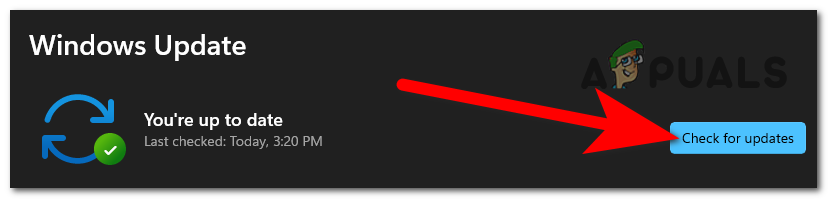
- After opening the Windows Update tab, select Check for Updates from the menu on the right.

Check for Updates - After the update has finished downloading, select Install Now to begin a local installation.
- Restart your computer to see if the issue has been resolved.
If Secure Boot is still preventing you from starting your computer, continue to the method after that.
7. Convert Disk from MBR to GPT
It turns out that if you have an external HDD (slave) linked to your Windows 11 PC through a USB port, you might encounter this kind of behavior. In this situation, momentarily disconnecting it will solve the problem (until after the booting procedure is complete).
You are prepared to change your drive to the new GPT format if you have already determined that your current partition is an MBR type and your system can boot from UEFI.
But bear in mind that there is no turning back once you’ve taken this action. Without losing any of your data, you cannot convert a GPT format back to MBR.
Important: The drive has occasionally sustained damage during the conversion procedure. Even though there is a very small risk that this will happen, if you have any important files that you are concerned about losing, we encourage you to make a comprehensive system backup.
If you want to go for this conversion in order to resolve the secure boot issue, follow this article here to do it without any data loss.
If you want to go for a different approach or this method was not applicable, follow the remaining instructions below.
8. Boot from bootx64.efi file or bootia32.efi
Some claim that manually starting their PC from the bootx64.efi file resolved the problem. Boot loaders are the files having the EFI extension. Usually hidden and without a drive letter, this system partition. You can typically boot from it, though, by according to a set of instructions.
The EFI file may be found in the following place under the Windows Boot Manager if your computer is UEFI-based:
\EFI\boot\bootx64.efi
\EFI\boot\bootia32.efi
Note: The bootx64.efi file is present on your firmware if your operating system is a 64-bit version of Windows. Users of the 32-bit Windows OS, on the other hand, will discover the bootia32.efi file on their firmware.
See whether your computer will start up manually using the bootx64.efi or bootia32.efi files. You must access the BIOS boot settings in order to manually boot your machine from EFI files.
All of your computer’s boot choices are available there. For each type of computer, a distinct key is required to access the boot options menu. As a result, you must consult your user manual. Check to see if the bootx64.efi or bootia32.efi file is present. If so, use that file to start your machine.
If this method was not helpful in your particular case and you’re still unable to boot while the secure boot feature is enabled, try the next method below.
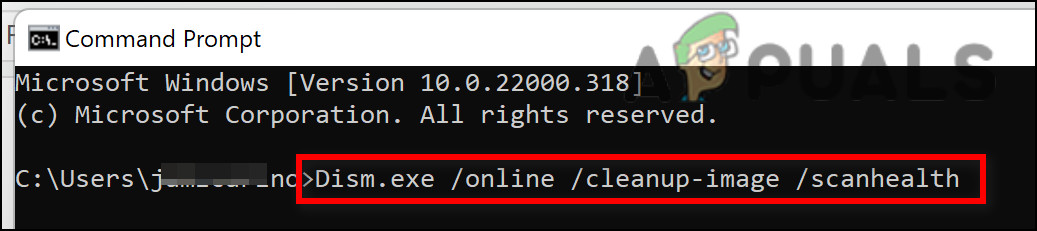
9. Deploy SFC and DISM Scans
According to some users, this issue can happen as a result of system file corruption, which is a high resource-consuming feature of Windows.
You can resolve this problem by utilizing SFC (System File Checker) and DISM (Deployment Image Servicing and Management) to identify the damaged files that are the root of the problem and swap them out with working copies.
Even while these two utilities have many things in common, they approach removing corruption in distinct ways. SFC downloads clean files using a locally stored archive, whereas DISM uses a Windows Update add-on
Start by initiating an SFC scan if you want to try this approach.
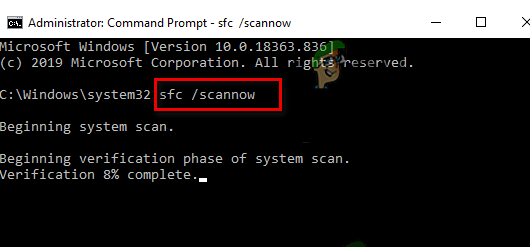
Run a DISM scan after restarting your computer when the first SFC scan is finished.
Note: Make sure your Internet connection is steady before starting the DISM operation.
If any of these tools end up identifying and resolving an underlying corrupt issue, replace corrupted files by following the on-screen instructions.
Restart your computer when the DISM scan has successfully finished checking if the issue has been resolved.
10. Clean install or repair install
If you’ve attempted every possible workaround and your computer still won’t boot up with Secure Boot enabled, there’s a good possibility that a system file dependency utilized by the backup sequence has been damaged.
The following step would be to perform a clean install or repair install in order to reset every Windows component (in-place repair).
Although a clean install is a simple option, you should be aware that it will erase all personal data from your OS drive. For this procedure, you won’t require suitable installation media.
Repair install (also known as “in-place repair”) is more time-consuming but has the advantage of updating every component that can be corrupted without wiping away the data from any apps, games, documents, or private media that are saved on your OS disk. You will require appropriate installation discs for this procedure.
Как использовать OAuth2 со Spring Security в Java
Javaican 14.05.2025
Протокол OAuth2 часто путают с механизмами аутентификации, хотя по сути это протокол авторизации. Представьте, что вместо передачи ключей от всего дома вашему другу, который пришёл полить цветы, вы. . .
Анализ текста на Python с NLTK и Spacy
AI_Generated 14.05.2025
NLTK, старожил в мире обработки естественного языка на Python, содержит богатейшую коллекцию алгоритмов и готовых моделей. Эта библиотека отлично подходит для образовательных целей и. . .
Реализация DI в PHP
Jason-Webb 13.05.2025
Когда я начинал писать свой первый крупный PHP-проект, моя архитектура напоминала запутаный клубок спагетти. Классы создавали другие классы внутри себя, зависимости жостко прописывались в коде, а о. . .
Обработка изображений в реальном времени на C# с OpenCV
stackOverflow 13.05.2025
Объединение библиотеки компьютерного зрения OpenCV с современным языком программирования C# создаёт симбиоз, который открывает доступ к впечатляющему набору возможностей. Ключевое преимущество этого. . .
POCO, ACE, Loki и другие продвинутые C++ библиотеки
NullReferenced 13.05.2025
В C++ разработки существует такое обилие библиотек, что порой кажется, будто ты заблудился в дремучем лесу. И среди этого многообразия POCO (Portable Components) – как маяк для тех, кто ищет. . .
Паттерны проектирования GoF на C#
UnmanagedCoder 13.05.2025
Вы наверняка сталкивались с ситуациями, когда код разрастается до неприличных размеров, а его поддержка становится настоящим испытанием. Именно в такие моменты на помощь приходят паттерны Gang of. . .
Создаем CLI приложение на Python с Prompt Toolkit
py-thonny 13.05.2025
Современные командные интерфейсы давно перестали быть черно-белыми текстовыми программами, которые многие помнят по старым операционным системам. CLI сегодня – это мощные, интуитивные и даже. . .
Конвейеры ETL с Apache Airflow и Python
AI_Generated 13.05.2025
ETL-конвейеры – это набор процессов, отвечающих за извлечение данных из различных источников (Extract), их преобразование в нужный формат (Transform) и загрузку в целевое хранилище (Load). . . .
Выполнение асинхронных задач в Python с asyncio
py-thonny 12.05.2025
Современный мир программирования похож на оживлённый мегаполис – тысячи процессов одновременно требуют внимания, ресурсов и времени. В этих джунглях операций возникают ситуации, когда программа. . .
Работа с gRPC сервисами на C#
UnmanagedCoder 12.05.2025
gRPC (Google Remote Procedure Call) — открытый высокопроизводительный RPC-фреймворк, изначально разработанный компанией Google. Он отличается от традиционых REST-сервисов как минимум тем, что. . .
-
Home
-
News
- [Solved] Secure Boot Is Enabled But Not Active in Windows 11
By Vega | Follow |
Last Updated
Have you encountered the Secure Boot enabled but not active Windows 11 problem? If yes, you come to the right place. This post from MiniTool Partition Wizard will tell you the possible causes and provides 5 effective ways to fix Secure Boot enabled but not active. You can have a try.
Many users have reported seeing the “Secure Boot” option enabled in the BIOS but showing “Not Activated” on the system information page. It prevents them from updating on Windows 11.
Why is Secure Boot enabled but not active? How to fix it? Please keep reading to know the answers.
Why Is Secure Boot Enabled but Not Active
There could be several reasons why Secure Boot is enabled but not active on your computer. Listed below.
- Secure Boot disabled
- CSM enabled
- BIOS is outdated
- Virus Interface
How to Fix Secure Boot Enabled but Not Active
Here, we summarize several methods for the Secure Boot enabled but not active Windows 11 issue. You can try them one by one until the issue gets fixed.
Solution 1: Update BIOS
If the BIOS is not up to date, it may not support the Secure Boot feature. Therefore, you should check your motherboard manufacturer’s website for any available BIOS updates.
How to Update BIOS Windows 10 | How to Check BIOS Version
Solution 2: Disable CSM
If you have CSM (Compatibility Support Module) enabled in your UEFI settings, you may find that Secure Boot is not an active issue. It’s best to disable it for secure boot options. Here take the Asus motherboard as an example.
Step 1: Start your computer, and then hold the F2 and Delete hotkey before the computer is booted. By doing so, you will enter BIOS.
Note:
The BIOS hotkeys may vary from different PC manufacturers. Most modern motherboards use the Delete key. Usually, you can see a message on the Windows startup screen telling you to press which key to enter BIOS.
Step 2: Navigate to the Boot tab using the left or right arrow key.
Step 3: Scroll down to the CSM (Compatibility Support Module) category.
Step 4: Now, set the Launch CSM option to Disabled.
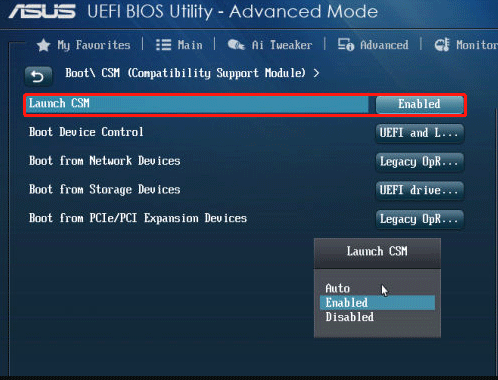
–image from the Asus.com
Step 5: Scroll down to the last and select Save and Exit. Then your computer will reboot.
Solution 3: Change the Platform
You can try to change the platform and check if the error gets fixed.
Step 1: Enter the BIOS mode using the method explained in the above method.
Step 2: Go to System Mode, and select User instead of Setup.
Step 3: Locate Secure Boot Mode, and choose Custom if Standard is selected. Then change it back to Standard.
Step 4: Select Save and Exit.
Solution 4: Enable Secure Boot Properly
You should enable Secure Boot properly and the issue may be solved.
Step 1: Press the Win + I key to open Settings. Then go to Update & Security > Recovery > Advanced Startup > Restart now.
Step 2: Once your computer restarts, select Troubleshoot > Advanced options > UEFI Firmware Settings.
Step 3: This will take you to your computer’s BIOS setup. Make sure Secure Boot is enabled here.
Solution 5: Scan Your Computer for Malware
Antivirus software, system optimization utilities, and some other programs can interfere with Secure Boot. Therefore, you can try temporarily disabling any such software and see if that fixes the problem. After fixing the problem, you should turn on your antivirus software right away.
Further reading: If you are in the process of solving the problem, you find that some files are missing. Then you can use MiniTool Partition Wizard to recover lost/deleted data in the disk.
Additionally, as a multifunctional partition manager, it allows you to perform various operations related to hard disks and partitions. Specifically, it allows you to create/format/resize/move/extend/delete/copy partitions.
MiniTool Partition Wizard FreeClick to Download100%Clean & Safe
Bottom Line
This post describes 5 solutions for the Secure Boot enabled but not active Windows 11 issue. Hope these ways can help you.
About The Author
Position: Columnist
Vega joined MiniTool as an editor after graduation. She enjoys helping people with computer problems, including disk management, data recovery, and more. She is constantly expanding her knowledge in related fields. And she will continue to bring more easy-to-understand professional articles to help people solve various problems on the PC. In her daily life, Vega enjoys hanging out with friends, shopping online and listening to music. She is someone who knows how to enjoy life.
Secure Boot is a suite of applications that checks if your operating system is safe to operate on a computer and ensures that the computer starts up with just the OS that the manufacturer trusts.
It is suggested that you install Windows using the newer UEFI mode, which includes more extraordinary security measures like Secure Boot, TPM 2.0, and more.
While checking system information, some users reported that the Secure Boot is disabled, though the feature is enabled on Windows 11 devices.
If you are concerned and looking for the solutions to this particular issue, you have landed in the right place. In this post, I will show you some proven and tested methods to fix the problem on your Windows 11 device.
So, let’s get started without further ado.
Follow our guide on how to Fix Secure Boot Error to Update to Windows 11
Some Windows 11 users reported that after installing the Windows 11, the Secure Boot feature state shows disabled on their device, but the Secure Boot is already enabled from BIOS.
Sometimes, it might happen on a Windows device where Secure Boot is automatically disabled for some missed configuration. So, you don’t need to worry about that. By enabling the Secure Boot feature correctly, it’s possible to solve the issue.
So, to fix the problem, follow some steps that I mentioned below.
Here are the steps to fix the Secure Boot enabled, but Windows 11 says it’s not:
-
Enable Secure Boot
If your secure boot settings are on User Mode, you can simply enable the Secure Boot feature on Windows 10.
On the other hand, if the secure boot settings are on Setup Mode, follow the steps below:
- Disable Secure Boot if it is Enabled.
- Set Standard to Custom if it is Standard.
- Set Custom to Standard accepting Factory Defaults.
- Enable the Secure Boot.
- Check to see whether your problem is solved. If not, follow the next solution.
Read more on how to Boot to Safe Mode in Windows 11
-
Restore Factory keys
By restoring the Factory Keys on your BIOS, you can fix the issue on your system. So, follow the steps below to restore the factory keys.
Here are the steps to reset the keys:
- Open BIOS on your computer.
- Select the Security tab.
- Navigate to the Secure Boot > Restore Factory keys.
- Hit the Enter to reset factory defaults.
- Save the changes and exit the window.
- Check to see whether your problem is solved.
Follow our guide to Upgrade to Windows 11 on Mac Using Boot Camp
How to fix This PC can’t run Windows 11 Error
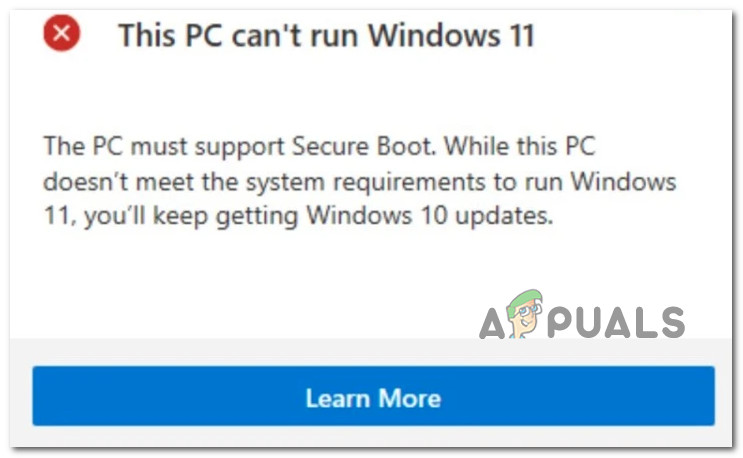
In October 2021, Microsoft released the new operating system, Windows 11. In Windows 11, Microsoft declared some system requirements to run the OS smoothly on a PC.
Secure Boot and TPM 2.0 is one of the core requirements of Windows 11, which is a must to run Windows 11 on your device.
The error This PC can’t run Windows 11 appears on your screen when you try to install Windows 11 on your PC, but your device doesn’t meet the minimum system requirements to run Windows 11.
Your device must meet the Secure Boot and TPM 2.0 and the other system requirements to run the Windows 11 on your PC. If your PC meets other system requirements, but the Secure Boot and TPM 2.0 is disabled, you can’t install Windows 11.
So, first, make sure the Secure Boot and TPM 2.0 is enabled on your PC. To enable the Secure Boot and TPM 2.0, follow the below-mentioned steps.
Here are the steps to fix This PC can’t run Windows 11 issue:
-
Enable UEFI Secure Boot
The first effective and tested method to fix This PC can’t run Windows 11 error is enabling the UEFI Secure Boot on your Windows 10 device.
Here are the steps to enable the UEFI Secure Boot on Windows 10 PC:
-
Enable TPM 2.0
Enabling the TPM 2.0 on your Windows 10 device is another proven and tested method to fix the This PC can’t run Windows 11 error.
By enabling the TPM 2.0, your PC meets the Windows 11 system requirements, and the system allows you to install Windows 11.
Here are the steps to enable the TPM 2.0 on Windows 10 PC:
How to Fix This PC must support Secure Boot Error
Secure Boot is one of the significant requirements to install and run Windows 11 on your device.
If the Secure Boot feature is disabled on your PC, you may encounter the This PC must support Secure Boot error, which means you cannot run the Windows 11 OS without enabling the Secure Boot.
However, to run Windows 11, first, enable the Secure Boot on your device and then try to install the Windows 11.
Here are the steps to enable the UEFI Secure Boot on Windows 10 PC:
Read more on how to Enable or Disable UAC on Windows 11
How to Check Secure Boot and TPM State on Windows10
Secure Boot and TPM 2.0 are necessary to run Windows 11 on your device. So, first, you need to ensure whether the TPM and Secure Boot are enabled. You also need to know the TPM-supported version of your device because without TPM 2.0; you can’t install Windows 11.
Are you confused about whether the Secure Boot and TPM are enabled or not on your Windows 11/10 PC?
Follow the steps below to check the Secure Boot and TPM state. You can effortlessly check your device’s Secure Boot and TPM status by following the methods below.
Note: The following methods to check the Secure Boot and TPM state also work on Windows 11.
Here are the steps to check the Secure Boot state on Windows 10:
- Open the Windows Search panel by pressing the Win+S keys or clicking on the Search icon on the taskbar.
- Type System Information on the search bar, click on the search result or hit the Enter key to open the System Information window.
Under the Item column, you will find the Secure Boot State on your PC. If the state shows On, then the Secure Boot is enabled. If the state shows Off, the Secure Boot is disabled.
Here are the steps to check the TPM version on Windows 10:
- Open the Windows Search panel by pressing the Win+S keys or clicking on the Search icon on the taskbar.
- Type tpm.msc on the search bar.
- Click on the search result or hit the Enter key to open the Trusted Module Platform (TPM) Management window. Under the Status section, you will find the current TPM status on your PC.
Under the TPM Manufacturer Information section, you will find the TPM version next to the Specification Version.
Check out the easiest way to Fix Computer won’t Boot to BIOS on Windows 11
Final Thoughts
Though Secure Boot and TPM 2.0 are mandatory for Windows 11, there are also some essential requirements, such as 1 gigahertz (GHz) or faster with 2 or more cores processors, minimum 4 gigabytes of RAM, 64 GB or larger storage device, and more.
Sometimes, the Secure Boot is enabled, but the system shows it is disabled. Though it’s not a big issue, you need to fix it. By applying the steps I mentioned earlier in this post, you can easily solve the problem within a few minutes.
Here, I described two different errors that Windows users encounter while they try to install Windows 11 on their device. I also described some proven and tested solutions to solve the issues.
That’s all, buddy. If you find this post helpful, share it with your friends to resolve their problems.
Good Bye. See you in the next one.