
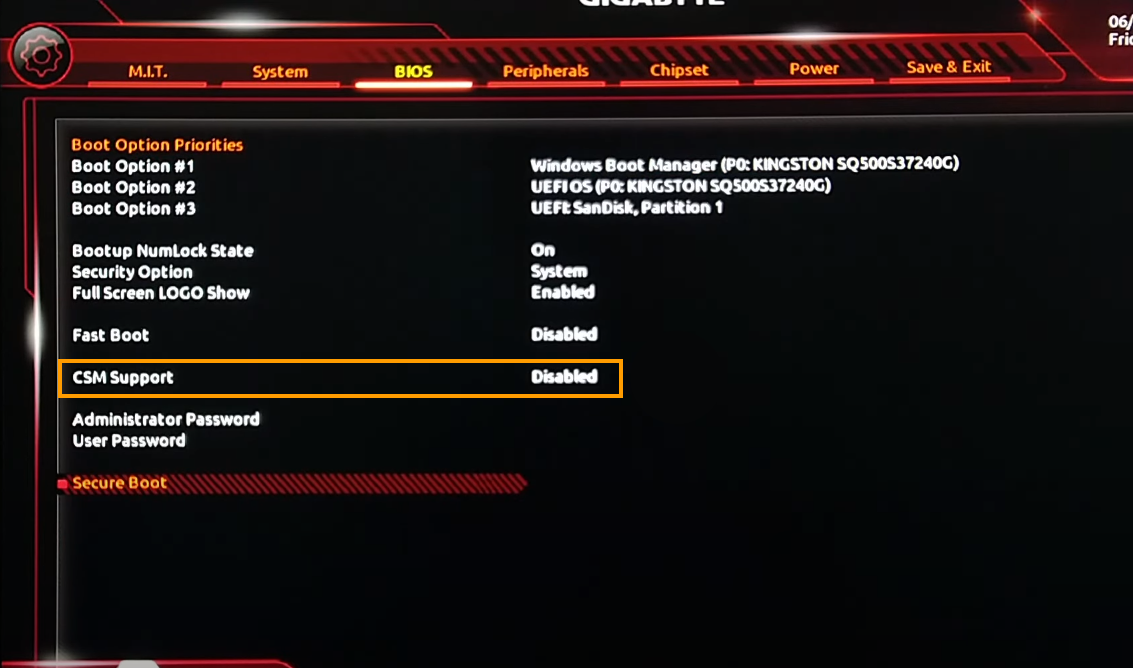
One of the minimum requirement to install Windows 11 is to enable secure boot which won’t be possible without disabling Compatibility Support Module (CMS).
According to reports from various users, as soon as they disable CMS their PC show no boot drives and doesn’t boot or boot into BIOS.
If you made upto this blog post then we presume that you also facing the same issue, right? To help you out we decided to cover this blog post in which you will find out why its happening and how to fix it.
So why this happening? On Intel motherboards, CSM (Compatibility Support Module) should only be disabled if your GPU is UEFI compatible. If not, you’ll run into the issue you’re reporting. If you had CSM enabled on your UEFI bios it’s entirely possible that you have a MBR disk and not a GPT disk
So if you’re facing this issue, then its highly possible that partition style is MBR. To fix this issue, you need to covert partition style from MBR to GPT and then change boot mode to UEFI
Converting Partition Style
First of all, you need to check the partition style on your PC. For that, press the Windows + X key combo, and then from the menu select Disk Management.

Now right click on the Disk (Windows installation drive c:) and then click on Properties.

In the Properties window, head to the Volume tab, and then see the Partition Style.

If the partition style is GPT, then you can skip this part, and move to the second. However, if the partition style here shows MBR, then you will have to convert it to GPT first. To do so, follow the steps given below-
Press the Windows key on your keyboard and search for CMD. Now select Command Prompt and then click on Run as Administrator.

In the Command Prompt, type the command DISKPART and hit Enter.

Next, in the Command Prompt, type in the command list disk and hit Enter to execute it.

Now, type the command select disk 1 and hit Enter. Do note, that we have taken 1 as the reference here. You will have to replace 1 with the disk number that you want to convert from MBR to GPT.

Next, execute the command convert gpt in the Command Prompt to convert the partition style from MBR to GPT.

Once the partition style has been converted, you can confirm it using the Disk Management application by following the steps mentioned above.
Changing Boot Mode To UEFI
Now continuing to the second part, you will have to convert changing boot mode to UEFI. You can do so by following the steps given below-
Restart your PC and boot into BIOS menu. Generally, the key to access the BIOS menu is F1, F2, F10, F12, or DEL. If you are unsure about the BIOS key for your PC then you can search for it on the internet.
After heading to the BIOS menu, head to the Boot tab.

Here, select UEFI/BIOS boot mode option and hit Enter to change it. From the list select UEFI and hit enter to change the boot mode to UEFI.

Once done, press F10 to save the changes and exit the BIOS.
By doing so, you will be able to fix the issue you are facing, and your PC will boot normally.
Viney Dhiman, the mind behind GeekerMag, is a seasoned content writer with over 12 years of experience. Specializing in simplifying complex tech concepts, he covers Windows OS, Android, iOS, web apps, and product reviews. His work can be found on popular tech websites like Gizmodo and The Verge, and he has been interviewed by the Microsoft Edge team.
Как перейти от Waterfall к Agile
EggHead 06.05.2025
Каскадная модель разработки Waterfall — классический пример того, как благие намерения превращаются в организационный кошмар. Изначально созданная для упорядочивания хаоса и внесения предсказуемости. . .
Оптимизация SQL запросов — Продвинутые техники
Codd 06.05.2025
Интересно наблюдать эволюцию подходов к оптимизации. Двадцать лет назад всё сводилось к нескольким простым правилам: «Избегайте SELECT *», «Используйте индексы», «Не джойните слишком много таблиц». . . .
Создание микросервисов с gRPC и Protobuf в C++
bytestream 06.05.2025
Монолитные приложения, которые ещё недавно считались стандартом индустрии, уступают место микросервисной архитектуре — подходу, при котором система разбивается на небольшие автономные сервисы, каждый. . .
Многопоточность и параллелизм в Python: потоки, процессы и гринлеты
py-thonny 06.05.2025
Параллелизм и конкурентность — две стороны многопоточной медали, которые постоянно путают даже бывалые разработчики.
Конкурентность (concurrency) — это когда ваша программа умеет жонглировать. . .
Распределенное обучение с TensorFlow и Python
AI_Generated 05.05.2025
В машинном обучении размер имеет значение. С ростом сложности моделей и объема данных одиночный процессор или даже мощная видеокарта уже не справляются с задачей обучения за разумное время. Когда. . .
CRUD API на C# и GraphQL
stackOverflow 05.05.2025
В бэкенд-разработке постоянно возникают новые технологии, призванные решить актуальные проблемы и упростить жизнь программистам. Одной из таких технологий стал GraphQL — язык запросов для API,. . .
Распознавание голоса и речи на C#
UnmanagedCoder 05.05.2025
Интеграция голосового управления в приложения на C# стала намного доступнее благодаря развитию специализированных библиотек и API. При этом многие разработчики до сих пор считают голосовое управление. . .
Реализация своих итераторов в C++
NullReferenced 05.05.2025
Итераторы в C++ — это абстракция, которая связывает весь экосистему Стандартной Библиотеки Шаблонов (STL) в единое целое, позволяя алгоритмам работать с разнородными структурами данных без знания их. . .
Разработка собственного фреймворка для тестирования в C#
UnmanagedCoder 04.05.2025
C# довольно богат готовыми решениями – NUnit, xUnit, MSTest уже давно стали своеобразными динозаврами индустрии. Однако, как и любой динозавр, они не всегда могут протиснуться в узкие коридоры. . .
Распределенная трассировка в Java с помощью OpenTelemetry
Javaican 04.05.2025
Микросервисная архитектура стала краеугольным камнем современной разработки, но вместе с ней пришла и головная боль, знакомая многим — отслеживание прохождения запросов через лабиринт взаимосвязанных. . .
If you are trying to install Windows 11 but can’t finish making the required changes in the BIOS because disabling CSM Support no longer lets the BIOS appear for you to complete the changes. This article will show you the steps you are going to have to take to fix the BIOS not appearing after disabling CSM Support on Gigabyte and other branded motherboards.
Table of Contents
Related: How to Fix NZXT Kraken X61, X62, X72, X52, X42, M22 Water Pump Stopped/Not Working.
If you have recently purchased a new motherboard perhaps a Gigabyte B550 AORUS ELITE V2 or something else and have disabled CSM Support but now can’t see or access the BIOS because of a black screen you’ve got a fair bit of work ahead of you! Don’t worry though, the issue of a black screen after disabling CSM Support is easily solved, however, the process is a super annoying one with quite a lot of variables.
The issue of the BIOS screen not appearing after disabling CSM support on some motherboards has been around for quite some time now which is ridiculous considering it is a major issue. It seems to affect Gigabyte motherboards more than others but there are also some other brands that also have the same issue.
Thankfully your motherboard isn’t bricked or dead, it’s just in an annoying state of confusion that you will need to solve using a variety of primitive fixes. From my experience solving this issue several times now, you will probably have to try a few different things before you get the BIOS screen back after disabling CSM support.
How do you get the BIOS screen back after Disabling CSM support on Gigabyte and other motherboards? Try using a HDMI cable instead of Display Port.
So the first thing you can try is to switch from using a Display Port cable for your monitor to a standard HDMI port. Yes! That is correct replace any Display Port cables with a HDMI cable. This will usually bring back the BIOS screen and allow you to complete the rest of the process for a Windows 11 installation.
If this doesn’t work straight away don’t change anything just yet you may need to follow a few more steps.
Remove the CMOS battery from your motherboard to reset your BIOS to default.
Now that you have switched to a HDMI cable the next thing you need to do is turn your computer off at the power source, then remove the CMOS battery from your motherboard. On Gigabyte B550 AORUS ELITE boards it’s behind the GPU so you will need to take that out first.
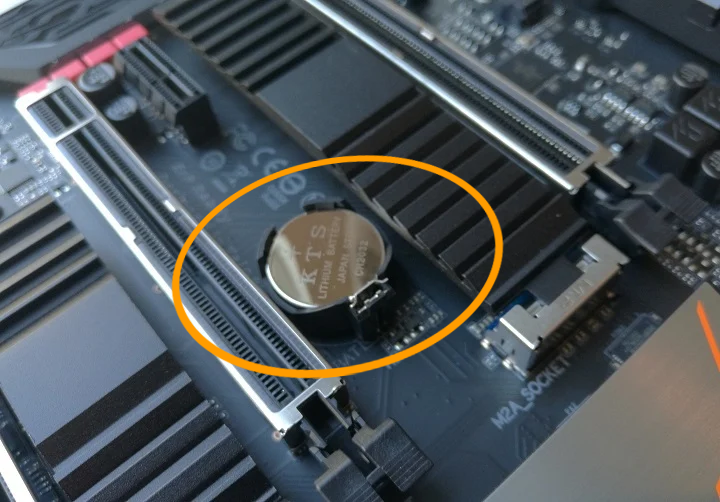
Now leave the battery out of your computer for at least one minute then replace it, and try to boot into your BIOS again. Usually, that is enough to solve the problem, however, it may not work for everyone, so keep on following the steps below.
Try using the HDMI port on your motherboard instead of your GPU.
If nothing so far has worked try using the HDMI port on your motherboard along with the CMOS battery removal step. By now you should be back in action however if you aren’t there’s one more thing you can try which depends a little bit on your hardware configuration.
Change PCIe Settings in the BIOS from Auto.
This solution comes from @arunprince143 over on Youtube who solved the problem completely by going into the BIOS and changing PCIe from Auto to X16 Gen2 (or higher if available). How you do this might vary a little bit depending on your hardware but it seems to work really well and solve the problem for older GPUS. Cards from the NVIDIA 10 series etc.
Remove your GPU and CMOS battery at the same time.
While most people will have to do this anyway just to get to their CMOS battery some hardware configurations won’t require it. So first remove your GPU, then remove your CMOS battery and wait for about 1 minute.
Next, place the CMOS battery back into your motherboard, install your GPU again and connect your display to it using a HMDI cable. Once you have done all that turn on your computer again and it will allow you to boot into the BIOS again.
Ok, so you’ve got the BIOS working again how do you finish the changes you need to make without it happening again?
Now that you can access the BIOS again disable CSM support again but don’t save and restart just yet, Go and enable TPM support and change your Secure Boot options. For Gigabyte B550 AORUS ELITE boards change it to Standard. After you have done all of these steps Save and Exit the BIOS. You should now be able to continue the process of a clean Windows 11 installation.
Also getting the — “Windows could not assign a drive letter to a partition on disk 3” error?
Now that you’ve passed the first hurdle you may also be getting another installation error.
“Windows could not assign a drive letter to a partition on Disk. The target disk, partition or volume does not support the specified operation. The error occurred while preparing the compter’s system volume. Error code 0x80300024”
If so check out our full guide on solving the issue here.
Ilya_Kiselev, Процессор Ryzen 5 2600, к сожалению встроенного видео нет.
Материнка у меня ASRock Fatal1ty X470 Gaming K4, написано, что есть поддержка ASRock Instant Flash, но я там посмотрел, там пункты придется выбирать, значит нужен работающий экран. Аварийной перепрошивки вроде нет.
В инструкции материнки для моего кода ошибки d6, решение проблемы описано так: «Не удалось распознать VGA. Очистите CMOS и попробуйте переустановить карту VGA. Если проблема все еще существует, попробуйте установить карту VGA в другие слоты или использовать другие карты VGA.»
Я очищал CMOS через замыкание перемычки ClrCMOS. Но это не помогло. Тогда я вытащил видеокарту и снова сбросил биос через ClrCMOS, пробовал после этого вставить видеокарту во второй PCI слот, но это тоже не помогло, ну и пробовал после сброса вообще без видеокарты запускать, соответственно результат такой же.
Я думаю попробовать другую видеокарту вставить, но есть подозрения, что это ничего не даст. Биос то сброшен был, по логике моя видеокарта должна нормально заработать, но этого не происходит. Я вот не уверен, но сама видеокарта не может себе куда-нибудь в память что-то записать и из-за этого она уже в этом режиме не работает и помогла бы перепрошивка самой видеокарты? Или это невозможно? Просто сейчас стоит вопрос так, либо нести весь системник в ремонт, а машины сейчас под рукой нет, либо просто купить дешевую видеокарту и с нее зайти, тогда может заработает старая если перепрошить биос, например.