
Если вы видите это сообщение, значит, произошла проблема с загрузкой файлов в стилей (CSS) нашего сайта. Попробуйте сбросить кэш браузера (Ctrl+F5).
Если это не поможет, а вы находитесь в регионе, где возможны ограничения интернет-трафика с российских серверов — воспользуйтесь VPN.
|
[пользователь заблокирован] 5 лет назад
Драйвер блютуса, который установлен и блютус с ним работает. Но после установки обновления этого драйвера с «Майкрософт» этот драйвер не подходит и блютус с ним не работает. Подробнее: по лицензионному соглашению пользователь не имеет права отключить автоматические обновления, хотя технически это возможно. Опции выбора установки нужных обновлений у лицензионной 10-ки нет. Отложение установки обновлений проблему не решит. Техподдержка «Майкрософта» тупо шлёт в ответ сообщения: «Изложите свою проблему подробнее». Как лучше поступить в данном случае? Отключил блютус в диспетчере устройств, но это ничего не дало. GenTo 5 лет назад Жалко что не указаны модель ноутбука и блютуса (обычно, в ноутбуках блютус идёт на WiFi-карте). Стоит проверить наличие драйверов под Windows 10 на сайте производителя ноутбука или сетевой карты. Было замечено, что «совместимые» драйвера, предлагаемые Windows 10, не всегда предоставляют полный функционал устройства (из-за отсутствия полной поддержки видеокарты 10-кой, пришлось на своём ноутбуке вернуться на 7-ку). Не исключено, что производитель не «допиливал» драйвера под новую ОС. Тогда варианта три:

система выбрала этот ответ лучшим комментировать
в избранное
ссылка
отблагодарить alexm 5 лет назад Проще всего заменить устройство, к которому нет совместимых с новой Виндой драйверов. Другой вариант. Заменить всю операционную систему на более «сговорчивую». У самого накопилось куча устройств, производители которых бросили обновлять виндовые драйвера. Лежат пылятся. Для БТ, если это usb-«свисток», можно поискать драйвера не от производителя устройства, а референсные драйвера для чипа.
в избранное
ссылка
отблагодарить [пользователь заблокирован] К сожалению, устройство (в данном случае — блютус) встроено в ноутбук и заменить его не представляется возможным. Более «сговорчивой» ОС была Windows 7, которая через 3 дня поддерживаться перестанет.
alexm12 Вы не поверите! Но, » устройство (в данном случае — блютус) встроено в ноутбук» прекрасно заменяется и держится внутри ноутбука единственным винтиком. Даже в моем «убитом» нетбуке, не говоря о приличных машинах.
Знаете ответ? |
#1
Отправлено 11 Декабрь 2015 — 19:22
bbv51
- Участники
- 115 сообщений
Advanced Member
Сегодня включил обновления, и вот очередной привет. Слетели все драйвера USB.
Причем если раньше откатом или вручную кнопками клавиатуры их можно было восстановить, то теперь нет. При обновлении пишет следующее ( и не важно снес ты предварительно драйвера или нет), =
Система обнаружила драйвера этого устройства, но при установке произошла ошибка.
Драйвер был отключен. Возможно необходимые функции выполняет другой драйвер (код 32).
Всё касаемое USB система не видит, а это флэшки, мышки, принтер….
Откат ничего не дал.
Что предпринять, может в реестре что подправить, кто знает подскажите.
- Наверх
#2
bbv51
Отправлено 11 Декабрь 2015 — 22:32
bbv51
- Участники
- 115 сообщений
Advanced Member
Вот что я накопал в сети, — у меня сработало:
- Если постоянно слетают драйвера USB: Находим в реестре такую ветку:
HKEY_LOCAL_MACHINE\SYSTEM\CurrentControlSet\Control\Class\{36FC9E60-C465-11CF-8056-444553540000}
и смотрим в правой части в параметрах значения данного ключа. Если там есть значения LowerFilters и UpperFilters, то удаляем их и перезагружаемся.
- Если постоянно слетают драйвера DVD привода:
HKEY_LOCAL_MACHINE\SYSTEM\CurrentControlSet\Control\Class\{4D36E965-E325-11CE-BFC1-08002BE10318}
Здесь также удаляем значение LowerFilters и UpperFilters.
- Если постоянно слетают драйвера Мышки:
HKEY_LOCAL_MACHINE\SYSTEM\CurrentControlSet\Control\Class\{4D36E96F-E325-11CE-BFC1-08002BE10318}
Значение UpperFilters должно быть mouclass. Если это не так, то исправляем.
- Если постоянно слетают драйвера клавиатуры:
HKEY_LOCAL_MACHINE\SYSTEM\CurrentControlSet\Control\Class\{4D36E96B-E325-11CE-BFC1-08002BE10318}
Значение UpperFilters должно быть kbdclass. Если это не так, то исправляем.
- ezhukov94 это нравится
- Наверх
#3
gps
Отправлено 15 Декабрь 2015 — 11:49
gps
- Участники
- 71 сообщений
Advanced Member
Не подскажите,как запретить обновления драйвера видеокарты с сети? У меня ноут глючит с такой обновкой (Тошиба)
- Наверх
#4
Maclife
Отправлено 15 Декабрь 2015 — 16:35
Maclife
- Участники
- 112 сообщений
Advanced Member
Не подскажите,как запретить обновления драйвера видеокарты с сети? У меня ноут глючит с такой обновкой (Тошиба)
Какая видеокарта?
- Наверх
#5
gps
Отправлено 15 Декабрь 2015 — 17:04
gps
- Участники
- 71 сообщений
Advanced Member
Radeon HD 2600…. Сам драйвер работает но на тошибе в момент старта системы постоянно через раз-синий экран смерти.
- Наверх
#6
Maclife
Отправлено 15 Декабрь 2015 — 17:10
Maclife
- Участники
- 112 сообщений
Advanced Member
Radeon HD 2600…. Сам драйвер работает но на тошибе в момент старта системы постоянно через раз-синий экран смерти.
А, с чего вы взяли,что это из-за драйвера видеокарты? Модель ноутбука в студию!
Сообщение отредактировал Maclife: 15 Декабрь 2015 — 17:10
- Наверх
#7
gps
Отправлено 16 Декабрь 2015 — 08:35
gps
- Участники
- 71 сообщений
Advanced Member
Да это известный факт! Тошиба а-200….Раньще был модификатор дров-теперь он не работает… На синем экране смерти пишется же- причина именно драйвер…Ставлю старый-все фурычит,но потом мягкотелые принудительно обновляют, Сейчас выход из ситуации-просто не выключаю ноут,он у меня ночью просто спит. Кстати когда эта карта поддерживалась АМД при выходе новых дров всегда была ремарка-подходят кроме таких то брендов,в том числе и тоша там был.
Сообщение отредактировал gps: 16 Декабрь 2015 — 08:37
- Наверх
#8
sergeu24
Отправлено 16 Декабрь 2015 — 09:48
sergeu24
- Участники
- 61 сообщений
Advanced Member
А у меня постоянно глючит вай фай,приходится включать режим исправления .Но после выключения потом включения не может подключится ни к одной сети. Леново модель
- Наверх
#9
geolog147
Отправлено 16 Декабрь 2015 — 13:58
geolog147
- Участники
- 283 сообщений
Advanced Member
Для запрета обновления драйверов ММ давно выпустили утилиту wuchowhide 46кб на сайте ММ можно найти. Эта утилита просто запускается без установки и далее по написанному… Правда, она, зараза, не всегда срабатывает. Надо запускать перед установкой обновлений и перезагрузиться. У меня Nvidia и работает только на старых драйверах прошлого года. Несколько раз запускал утилиту, а потом она , наверное, привыкает — до обновления оси у же не трогает драйвер.
- Наверх
#10
karolv54
Отправлено 16 Декабрь 2015 — 21:18
karolv54
- Участники
- 4 сообщений
Читатель
Что то расхотелось попадать в 10ку, не потяну с разборками, единственное заколебало своим предложением обновиться ,подскажите как отвязаться-W8.1или раз-у экран!
- Наверх
#11
Pusik
Отправлено 16 Декабрь 2015 — 21:49
Pusik
- МЕЦЕНАТ
- 90 сообщений
Почетный
Что то расхотелось попадать в 10ку, не потяну с разборками, единственное заколебало своим предложением обновиться ,подскажите как отвязаться-W8.1или раз-у экран!
Быстрое удаление:
1) Win+R
2) wusa /uninstall /kb:3035583
А потом проверить наличие новых обновлений в Центре обновления и запретить установку KB3035583 (ПКМ — скрыть)
- Наверх
#12
Bimba
Отправлено 16 Декабрь 2015 — 21:51
Bimba
- Участники
- 235 сообщений
Advanced Member
Что то расхотелось попадать в 10ку, не потяну с разборками, единственное заколебало своим предложением обновиться ,подскажите как отвязаться-W8.1или раз-у экран!
Нажми Win+ R на клавиатуре, введи команду Appwiz.cpl и нажми Enter. В окне «Программы и компоненты» нажми на ссылку «Просмотр установленных обновлений». В списке найди обновление KB3035583, щелкни на нем правой кнопкой мыши, нажми «Удалить», а затем перезагрузи компьютер.
Затем отключи автоматическую загрузку и установку обновлений.
Всё.
- Наверх
#13
Aikon1964
Отправлено 17 Декабрь 2015 — 01:06
Aikon1964
- Участники
- 807 сообщений
Gold Member
Нажми Win+ R на клавиатуре, введи команду Appwiz.cpl и нажми Enter. В окне «Программы и компоненты» нажми на ссылку «Просмотр установленных обновлений». В списке найди обновление KB3035583, щелкни на нем правой кнопкой мыши, нажми «Удалить», а затем перезагрузи компьютер.
Затем отключи автоматическую загрузку и установку обновлений.
Всё.
зачем отключать автообновление,если достаточно скрыть нежелательное обновление
- Наверх
#14
bbv51
Отправлено 17 Декабрь 2015 — 09:49
bbv51
- Участники
- 115 сообщений
Advanced Member
Вообще и меня достало уже. Все постоянно плывет. Вот сегодня захожу, а параметры экрана сами изменились. Все стало таким мелким, что даже очки не помогают. Опять, — лезь, меняй установки. Просто диверсия какая то, а не 10 ка.
Мучался, внуку , по его просьбе 10 устанавливал, комп, копия моего., одно различие видюха. Уже зная, но пару дней положил. А результат, = помучался он неделю и снес, вернулся к семерке. Крутые игры глючат, нужно море установок проделать.
Просто очень сыро, и я уже говорил, наверно наши программисты от мелкософтов слиняли, Падают на том, что уже давно прошли.
- Наверх
#15
Aikon1964
Отправлено 17 Декабрь 2015 — 12:45
Aikon1964
- Участники
- 807 сообщений
Gold Member
Вообще и меня достало уже. Все постоянно плывет. Вот сегодня захожу, а параметры экрана сами изменились. Все стало таким мелким, что даже очки не помогают. Опять, — лезь, меняй установки. Просто диверсия какая то, а не 10 ка.
Мучался, внуку , по его просьбе 10 устанавливал, комп, копия моего., одно различие видюха. Уже зная, но пару дней положил. А результат, = помучался он неделю и снес, вернулся к семерке. Крутые игры глючат, нужно море установок проделать.
Просто очень сыро, и я уже говорил, наверно наши программисты от мелкософтов слиняли, Падают на том, что уже давно прошли.
на десктопе у меня работает потрясающе.никаких проблем.а вот на ноутбуке просто катастрофа
Сообщение отредактировал Aikon1964: 17 Декабрь 2015 — 12:46
- Наверх
#16
Bimba
Отправлено 17 Декабрь 2015 — 18:25
Bimba
- Участники
- 235 сообщений
Advanced Member
на десктопе у меня работает потрясающе.никаких проблем.а вот на ноутбуке просто катастрофа
У меня на ноутбуке АСУС работает без особых проблем. Но то, что еще сыровата — это факт.
- Наверх
#17
_0_
Отправлено 17 Декабрь 2015 — 18:34
Дома десктоп + 2 ноута (ASUS, SONY) — пашут без запинки и нареканий., но как говорится «в семье не без урода».
У жены ноут (SONY) по началу имел проблемы с гибридной графикой, но это косяк производителя а не MS.
- Наверх
#18
Aikon1964
Отправлено 17 Декабрь 2015 — 23:33
Aikon1964
- Участники
- 807 сообщений
Gold Member
Дома десктоп + 2 ноута (ASUS, SONY) — пашут без запинки и нареканий., но как говорится «в семье не без урода».
У жены ноут (SONY) по началу имел проблемы с гибридной графикой, но это косяк производителя а не MS.
да мой асус x550ld тоже работает,только периодически выключаться наотрез отказывается,проблемы так же со входом в режим сна.периодически
самопроизвольно меняет разрешение экрана,не работает режим быстрой загрузки.т.е. грузится вроде как в быстром режиме,но времени уходит
столько же,как и при полной загрузке.пока откатился на 8.1
- Наверх
#19
bbv51
Отправлено 18 Декабрь 2015 — 02:43
bbv51
- Участники
- 115 сообщений
Advanced Member
не работает режим быстрой загрузки.
А что это за режим быстрой загрузки и где его активировать?
Вообще у меня и так быстро загружается, значительно быстрее чем 7ка.
- Наверх
#20
_0_
Отправлено 18 Декабрь 2015 — 02:52
А что это за режим быстрой загрузки и где его активировать?
Вообще у меня и так быстро загружается, значительно быстрее чем 7ка.
Данный режим находится и настраивается в UEFI (Bios)
да мой асус x550ld тоже работает,только периодически выключаться наотрез отказывается,проблемы так же со входом в режим сна.периодически
самопроизвольно меняет разрешение экрана,не работает режим быстрой загрузки.т.е. грузится вроде как в быстром режиме,но времени уходит
столько же,как и при полной загрузке.пока откатился на 8.1
Установка Win 10 чистая или после обновления?
- Наверх
Missing or accidentally deleted drivers can cause random errors to pop up on your computer. These errors could also cause unexpected system crashes. If you have accidentally deleted some drivers, you should not worry, as there are ways to recover them easily. In this post, we will be looking at ways to recover and restore deleted drivers.
The common reasons behind drivers going missing from the system are –
- Accidental deletion
- Device formatting
Methods to Recover Accidentally Deleted Driver Files
In this section, we will discuss some quick and simple methods you can use to easily restore deleted drivers from your Windows 11/10 computer.
Method 1: Download Drivers from the Official Website
This is the simplest method to restore the device driver missing from your computer. Identify the component that is malfunctioning, go to the manufacturer’s website and download the executable driver file. Here are the steps to do so –
- Press WINDOWS + R and type msinfo32. Press Enter.
- In the System Information window, expand all the entries and locate the problematic component.
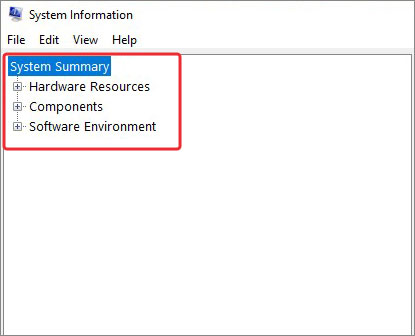
- Look for the device name in the right pane and note it down.

- Search for it in the web browser and download the driver from the manufacturer’s website.
- Once downloaded, install it and follow the steps as prompted by the installer.
Method 2: Restore the System to the Previous State
System restore is a Microsoft Windows utility that automatically creates a restore point every day by taking a snapshot of the system files and registry keys. It then saves these snapshots as restore points.
Sometimes, data corruption or malware infections could damage and corrupt system files including device drivers. This could cause random errors to pop up on your screen and can even crash your system, in some instances. In such a way, you can use a system restore to restore your PC to the previous state where everything was running smoothly.
Note – While the System Restore restores the previously saved settings, it can also remove apps that were installed after the restore point got created. It will not remove your personal data and files. However, if you are unsure about proceeding with it, you can take a complete backup of your data and files on an external storage drive or cloud.
Once you have taken a complete backup of your files and data, carefully follow the steps as mentioned below –
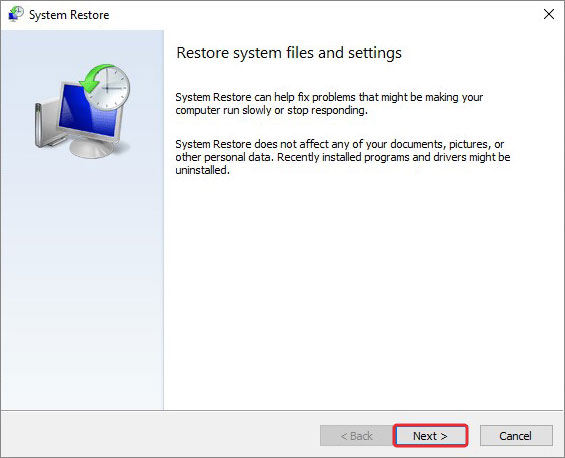
- Press WINDOWS + R, type rstrui.exe and hit Enter.
- In the System Restore window, click on Next.
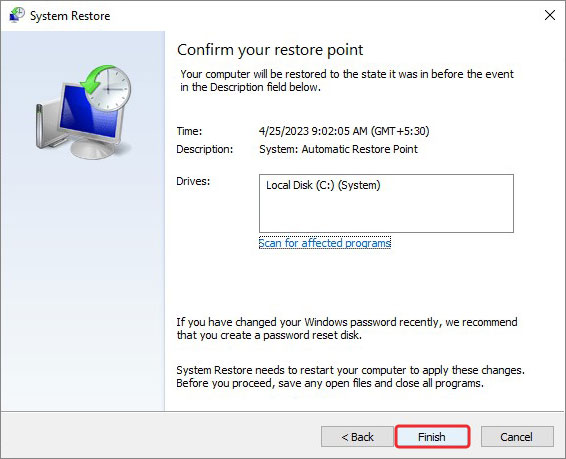
- In the next window, select the version you wish to restore and click on Next.

- Carefully, read all the details in the next window and then click on Finish.
Doing so will restart the system and Windows will load the selected restore point and restore itself to it. This process will take some time, so do not interrupt it. Always use a UPS to avoid unexpected power cuts. Any interruption during this process could corrupt the Windows, which could cause severe data loss.
Method 3: Use Data Recovery Software to get the Driver Executable Files Back
When you download a driver from its official website, it gets downloaded in the form of an executable or .exe file. You need to run this .exe file to install the driver. However, sometimes, in the midst of a file deletion spree, we can accidentally delete important driver .exe files.
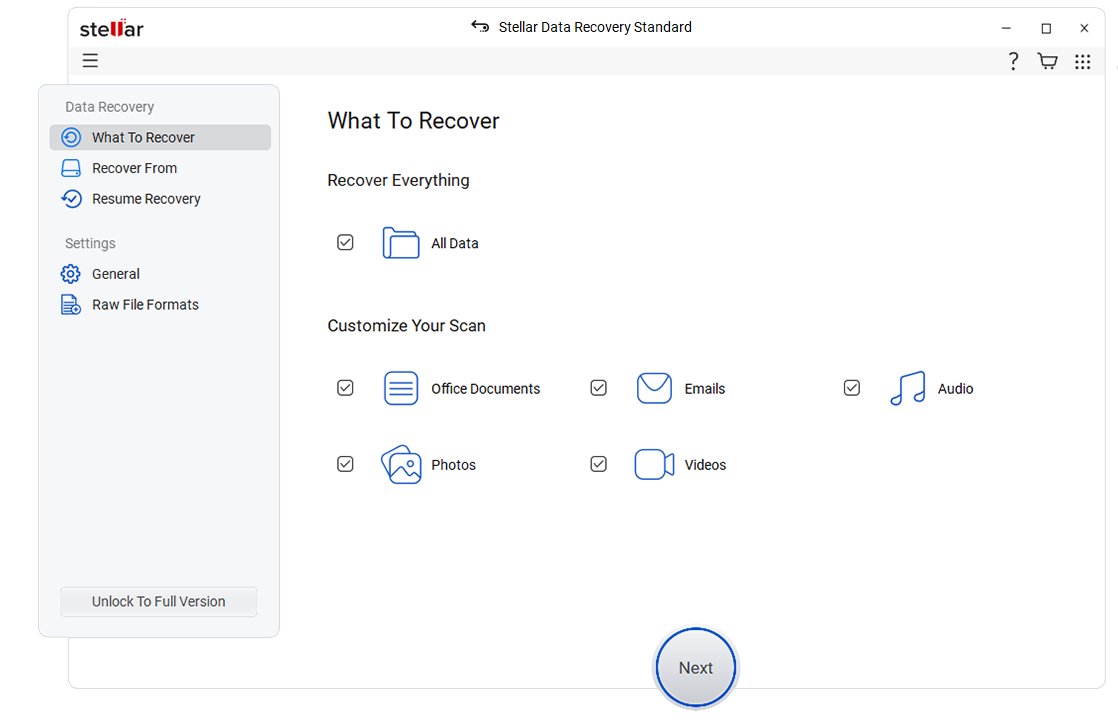
Deleting important files triggers an automatic response that makes us scan through every folder and backup copies. If even after scanning through all the folders, you are still not able to find your lost .exe files, only a powerful data recovery tool can bring them back. Try it yourself today!
Stellar Data Recovery is one such software that can easily restore important files, deleted drivers & much more, helping you get your system back on track. It can recover any type of data or file lost due to formatting, accidental deletion, corruption, etc.
The Bottom Line
Device drivers are vital to our computer for smooth and seamless functionality. However, missing or accidentally deleted drivers can cause random errors causing hindrance during our work.
From discussing various methods for recovering deleted drivers to using a powerful data recovery tool, we touched everything above that will help you recover your deleted drivers on Windows. Let us know your thought in the comment section below.
FAQs
Is there a way to recover deleted drivers on Windows 11?
If you accidentally deleted device drivers from your computer, you can recover them easily using the System Restore utility of Windows OS. Launch Run, type rstrui.exe, and follow the instructions as prompted by the wizard.
How do I reinstall malfunctioning drivers?
You can go to the Device Manager and uninstall malfunctioning drivers. Then restart your computer. Windows will attempt to reinstall updated drivers on the system. You can also download the latest driver from the device manufacturer’s website.
Was this article helpful?
YES1
NO
Quick Tips
- Installing drivers in a clean boot state can help you avoid any interference by third-party apps and services.
- If you are trying to install drivers for specialized hardware that lacks a digital signature, disable the driver signature enforcement feature.
- You can consider performing a system restore if nothing else works.
Try Basic Fixes
- Install Windows updates: The driver installation issue may be limited to your Windows build. If that’s the case, installing pending Windows updates should help.
- Scan for malware: Malware or viruses on your PC can also interfere with Windows operations and hinder the installation of drivers. To check for this, scan your system with Windows Defender.
Fix 1: Use the Driver Installation Package
Device Manager and the Settings app are two of the most preferred utilities for installing drivers on Windows. However, if you are having trouble with both, download the relevant driver package from the manufacturer’s website and install it manually.
For instance, if you can’t install display drivers on Windows 11, visit the manufacturer’s website (such as NVIDIA, AMD, or Intel), and fill in details like your PC’s model number and other relevant information to download the latest compatible driver.
Once downloaded, run the installer file and follow the on-screen instructions to install the drivers. If you encounter errors like “Cannot Complete the Device Driver Installation Wizard” during installation, continue with the fixes below.
Fix 2: Install Drivers in Clean Boot Mode
When you boot Windows in a clean boot state, it only runs essential programs and services. If the issue is caused by interference from a background app or service, installing the driver in a clean boot state should work.
Step 1: Press Windows + R to open the Run dialog box, type msconfig.msc, and press Enter.

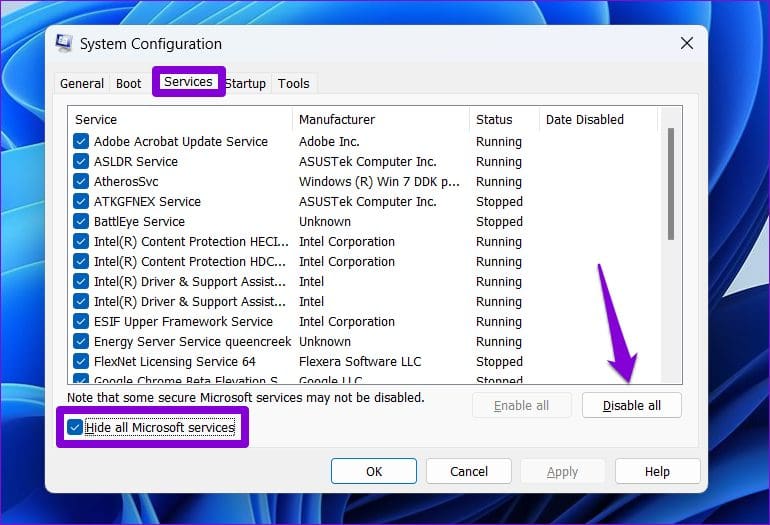
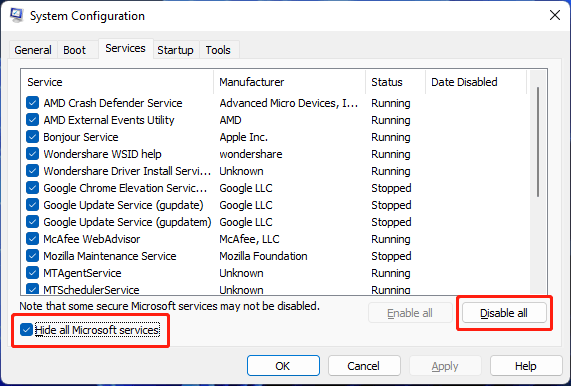
Step 2: Go to the Services tab, check the box for Hide all Microsoft services, and click Disable all.
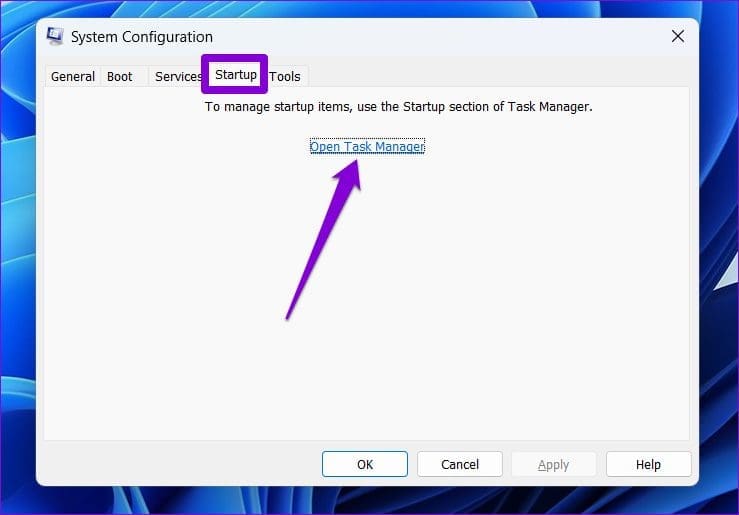
Step 3: Switch to the Startup tab and click on Open Task Manager.
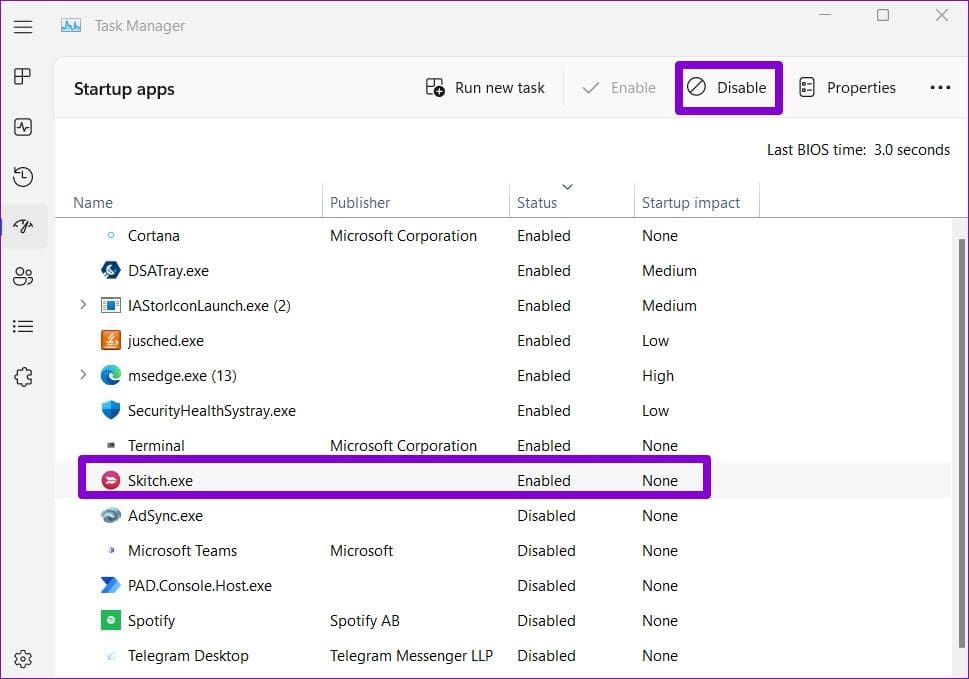
Step 4: In the Task Manager window, select a third-party app or program and click Disable at the top. Repeat this step to disable all startup apps and programs one by one.
Restart your PC to enter a clean boot state, and try to install the driver again. If this method works, it means one of the apps or programs you disabled was responsible for the problem. Hence, review the recently installed apps and programs to uninstall the troublesome ones.
Fix 3: Turn Off Driver Signature Enforcement
Driver Signature Enforcement is a security feature that allows Windows to verify the digital signature of drivers before installation. However, if you try to install drivers for specialized hardware that does not have a digital signature, turn off the driver signature enforcement feature.
Note: Turning this feature off can put your system at risk. Hence, you should only do so if you trust the source of the driver.
Step 1: Open the Start menu and click the power icon at the bottom. Then, hold the Shift key and select Restart.

Step 2: After your PC restarts, click on Troubleshoot to continue.

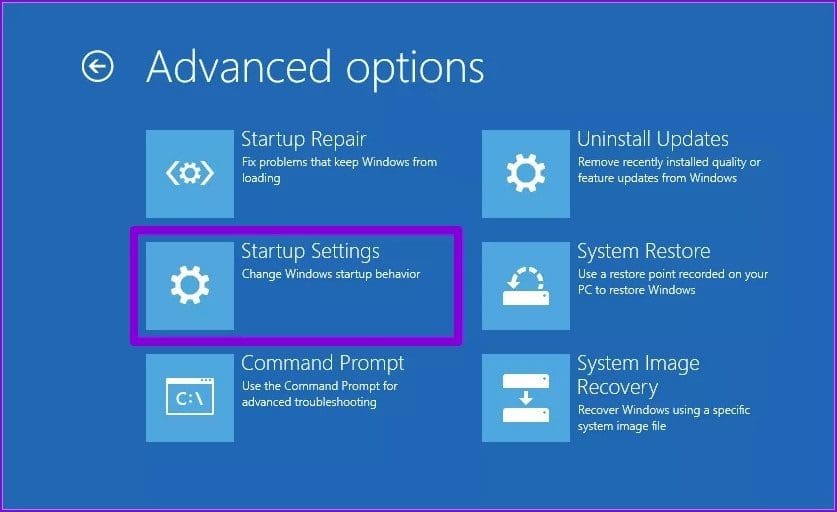
Step 3: Click on Advanced options.
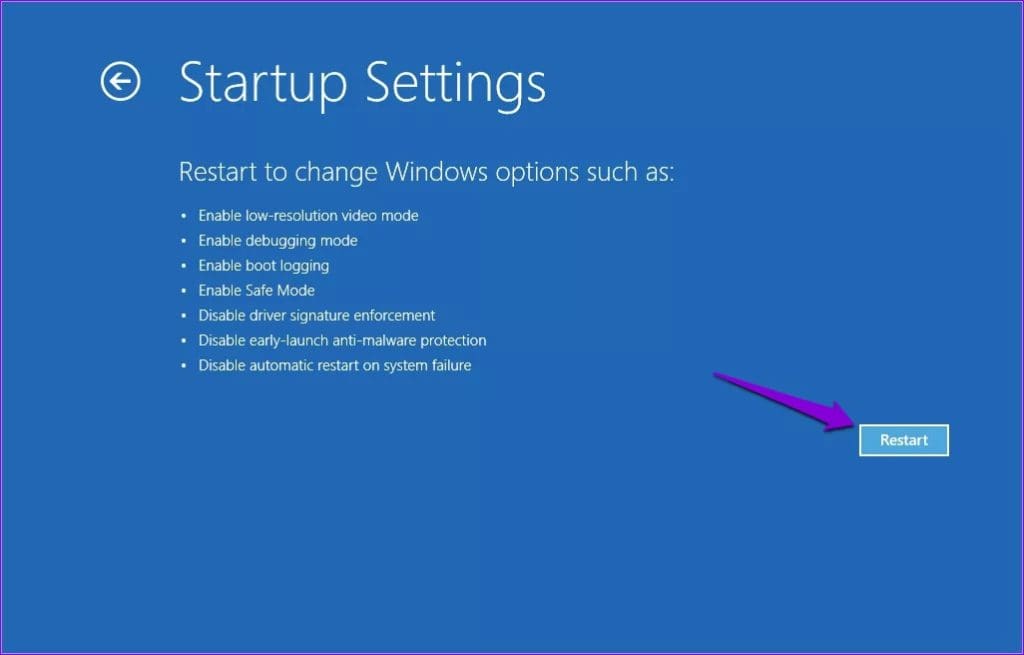
Step 4: Select Startup Settings.
Step 5: Click the Restart button to visit the Startup Settings menu.
Step 6: Press 7 or F7 on your keyboard to boot your PC with the driver signature enforcement feature disabled.
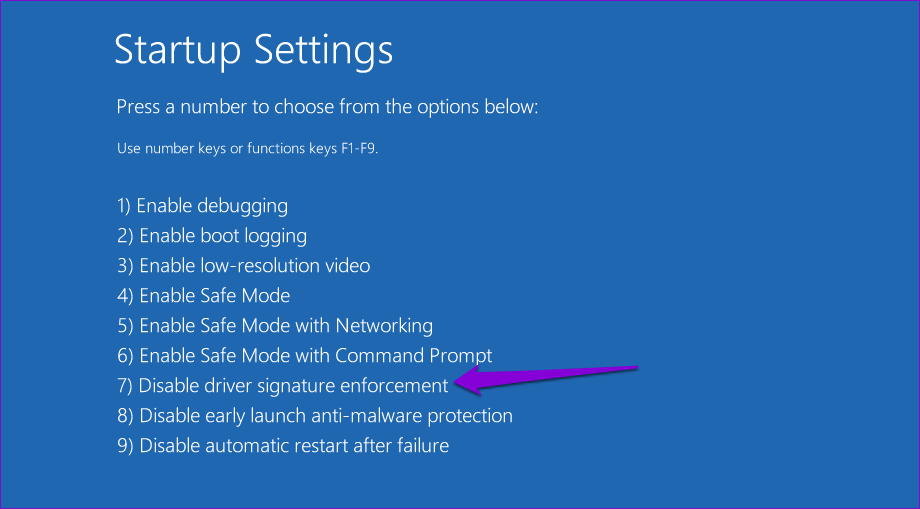
Try installing your driver again to check if it works. The driver signature enforcement feature will automatically be re-enabled the next time you restart the PC.
Fix 4: Perform a System Restore
If you still can’t install drivers, recent modifications made to your Windows 11 PC are causing the issue. You can try performing a system restore to undo those changes and restore your computer to its normal state.
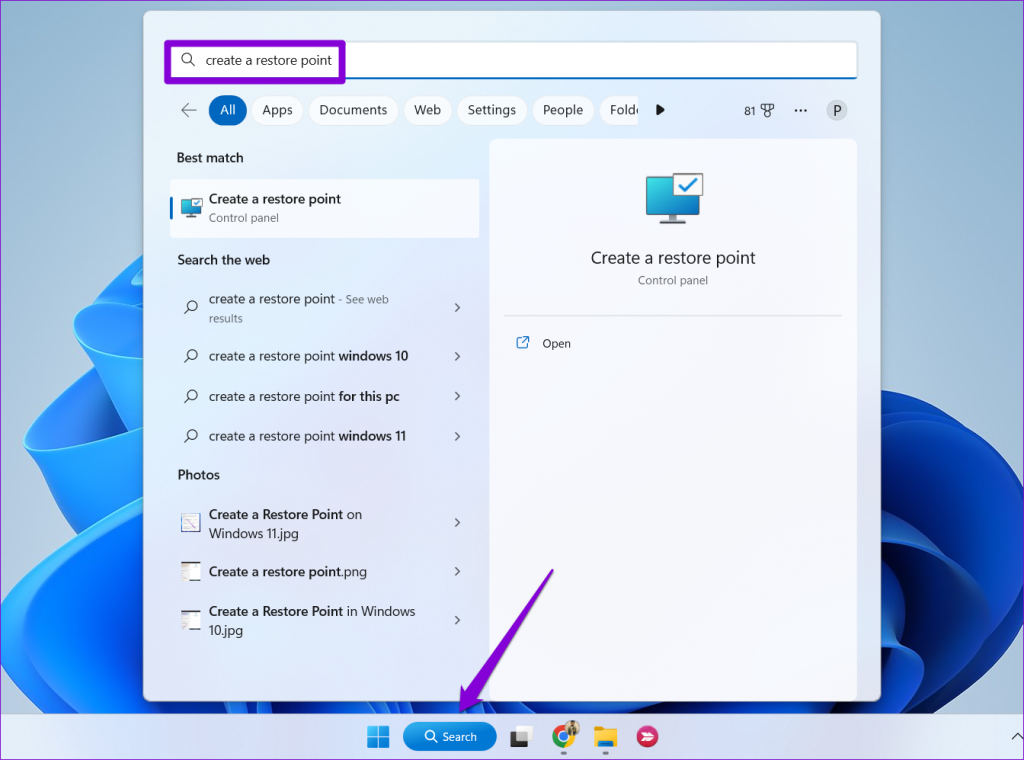
Step 1: Click the search icon on the taskbar, type create a restore point, and press Enter.
Step 2: Under the System Protection tab, click the System Restore button.

Step 3: Click Next to continue.

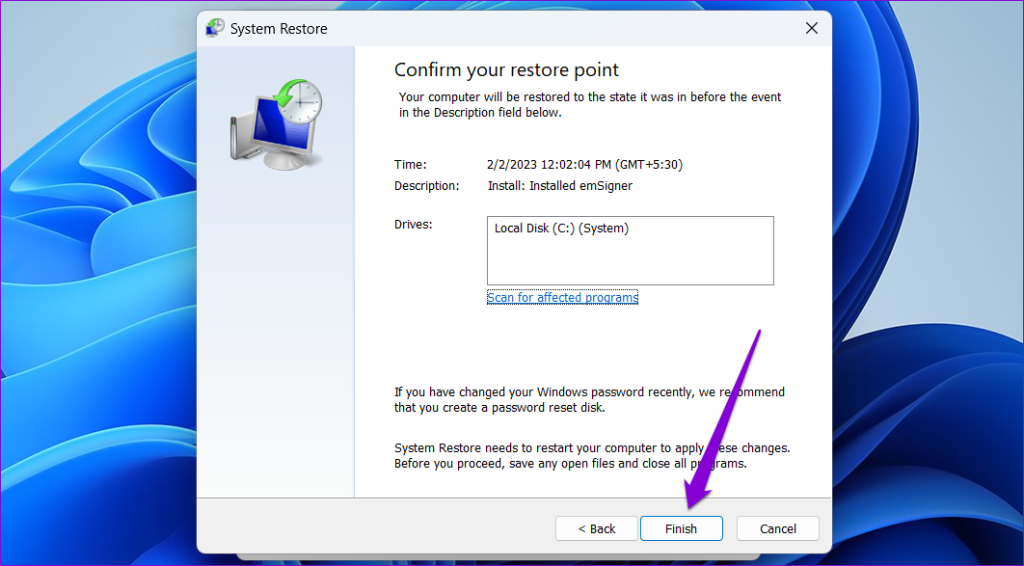
Step 4: Select a recent restore point and click Next.

Step 5: Click Finish to proceed.
After Windows restores your system to the specified state, you can install drivers as before.
Was this helpful?
Thanks for your feedback!
The article above may contain affiliate links which help support Guiding Tech. The content remains unbiased and authentic and will never affect our editorial integrity.
Windows 10/11 won’t install drivers is a common issue and many users are bothered by it. MiniTool Software collects some methods that are proved to be effective and shows them in this article. You can select a suitable method to help you solve the issue.
Windows 10/11 Won’t Install Drivers on PC
The device drivers are very important parts of a computer. When you want to use a device on your PC, you need to make sure the device driver is properly installed and you’d better keep it up-to-date. However, some users report that Windows 10/11 won’t install drivers on their computers. For example, they receive the error message saying cannot complete the device driver installation wizard during the installation process.
This problem will affect your normal use of the computer device. So, you need to take active measures to solve the issue.
Well then, what should you do when you are unable to install drivers on Windows 10/11? You can use the Windows built-in troubleshooter to find and fix errors. You can also run a DISM and SFC scan to fix the issue. Besides, you can update the device driver or clean boot your device to have a try. If all of the fixes don’t work for you, you will need to reset your computer.
In this article, we will show you how to use these methods to solve the issue. We will also show you how to use the best free data recovery software to help you recover your missing files on a Windows computer.
MiniTool Power Data Recovery FreeClick to Download100%Clean & Safe
How to Fix: Windows 10/11 Won’t Install Drivers
- Fix 1: Run the Hardware and Device Troubleshooter
- Fix 2: Update the Device Driver
- Fix 3: Run DISM and SFC
- Fix 4: Clean Boot Your Computer
- Fix 5: Reset Your PC
Fix 1: Run the Hardware and Device Troubleshooter
Windows has a built-in tool that can help you solve the device driver issue. It is a hardware and device troubleshooter. This tool is available on both Windows 11 and Windows 10. You can open it via Control Panel. Yes, Control Panel is still available on Windows 11.
Way 1: Run the Hardware and Device Troubleshooter via Control Panel
- Click the search icon from the taskbar and search for control panel.
- Select Control Panel from the search result to open it.
- Expand View by and select Large icons.
- Click Troubleshooting to continue.
- Click View all from the left panel.
- Click Hardware and Devices.
- Click Advanced.
- Click Run as Administrator.
- Click Next to run this tool.
This tool can automatically find and fix found errors on the devices. You should wait until the whole process ends.
Way 2: Run the Hardware and Device Troubleshooter via Command Prompt
If you can’t find the hardware and devices troubleshooter via Control Panel, you can use Command Prompt instead. Here is a guide:
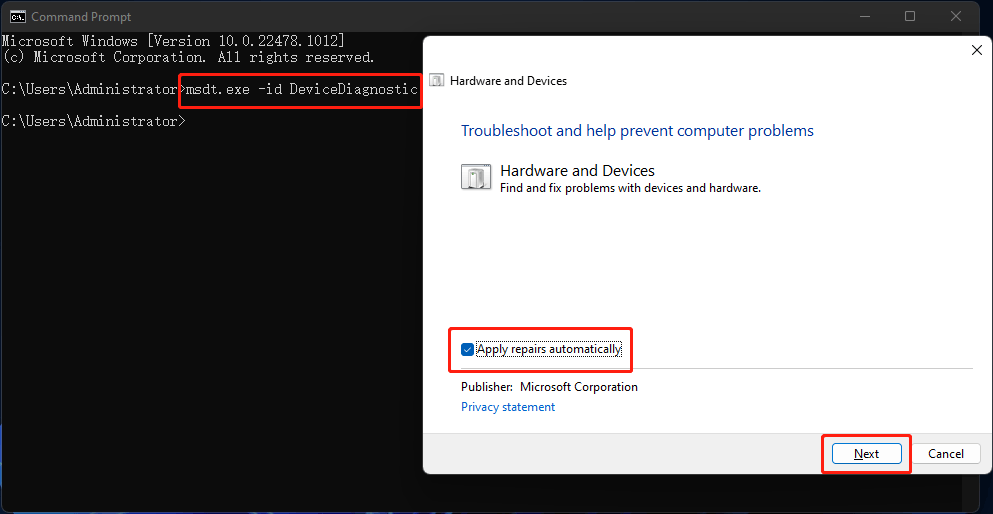
- Click the search icon from the taskbar and type cmd.
- Select Command Prompt from the search result to open it.
- Type exe -id DeviceDiagnostic into Command Prompt and press Enter.
- The Hardware and Devices troubleshooter will open. You can click Advanced to make sure Apply repairs automatically is selected.
- Click Next to run this tool. This tool will begin to detect problems. You should wait until the process ends. If necessary, you need to follow the on-screen guide to complete the fix. For example, you may need to restart your computer to finish installing drivers and updates.
After running this tool, you can go to check if your needed device drivers are installed successfully.
Fix 2: Update the Device Driver
If you can’t install the device driver on your computer, you can update it to have a try. This can also fix the missing, broken, or outdated device driver. It is easy to do this:
- Right-click on Start and select Device Manager.
- Find the target device and right-click it.
- Select Update driver.
- On the pop-up page, click Search automatically for drivers to search for the best available driver and install it on your computer.
Fix 3: Run DISM and SFC
At times, the issues of Windows 10/11 won’t install drivers are caused by missing or corrupted system files. You can run DISM (inbox Deployment Image Servicing and Management) and SFC (System File Checker) in Command Prompt to repair the system files.
Here is what you can do:
1. Click the search icon from the taskbar and search for cmd.
2. Right-click Command Prompt from the search result and select Run as administrator.
3. Type the following commands one by one and press Enter after each.
- DISM /Online /Cleanup-Image /ScanHealth
- DISM /Online /Cleanup-Image /CheckHealth
- DISM /Online /Cleanup-Image /RestoreHealth
4. After running DISM completely, you need to type sfc /scannow and press Enter to run SFC on your device. This tool can scan your Windows OS and then restore your missing & corrupted system files. You should wait until the process is 100% completed.
Fix 4: Clean Boot Your Computer
Software conflicts can also cause driver installation issues like Windows 10/11 won’t install drivers. It is impossible to uninstall all software from your computer. But this doesn’t mean that you can’t solve this issue. You can clean boot your computer and then find out if it is a software conflict issue. If yes, you can take further steps to find the culprit.
How to Clean Boot Your Windows 10/11 Computer?
1. Click the search icon from the taskbar.
2. Type msconfig into the search box.
3. Click System Configuration from the search result to open it.
4. On the System Configuration interface, you need to check the option of Hide all Microsoft services. This can make sure that all the Microsoft services are still running after you clean boot your Windows 10/11 computer.
5. Click the Disable all button to continue.
6. Switch to the Startup section.
7. Click the Open Task Manager link.
8. On Task Manager, you can select the startup program that may interface with your system and then click the Disable Then, repeat this step to disable all the suspected programs.
9. Close Task Manager.
10. Close System Configuration.
11. Restart your computer.
12. Check if you can install your needed device driver. If you can, it means that third-party software prevents you from installing device drivers. To find out which is the cause, you can repeat step 1 to step 5 but enable half of the listed services. The recently installed software should be considered. You can try this way until you find the culprit.
If Windows 10/11 still won’t install drivers, the next fix may help you.
Fix 5: Reset Your PC
If you can’t use the above methods to solve the device driver installation issue, you may need to reset your PC. To protect your files on the computer, you’d better back up your device before resetting your PC. In this part, we will show you a full guide on how to reset your PC.
Step 1: Back up Your Computer
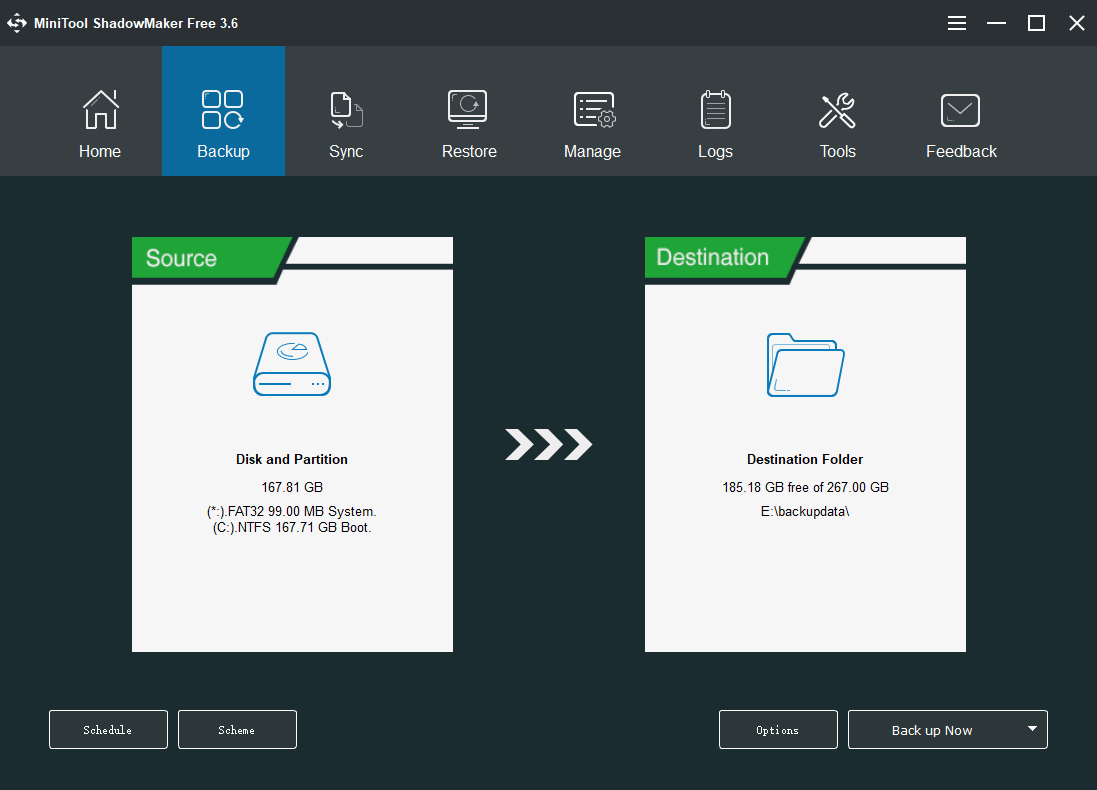
You can use MiniTool ShadowMaker, a professional Windows backup software, to back up your files, folders, partitions, disks, and systems. This software supports automatic backup, differential and incremental backup. With it, you can also schedule a backup based on your requirements.
This software has a trial edition. You can use it for free within 30 days. If you want to try it, you can click the following button to download and install it on your device. It works on all versions of Windows, including Windows 11, Windows 10, Windows 8.1/8, and Windows 7.
MiniTool ShadowMaker TrialClick to Download100%Clean & Safe
After the installation, you can open this software, switch to the Backup section, and select the disk or partition, files or folders to backup.
After backing up your computer, you can feel free to reset your PC.
Step 2: Reset Your Computer
- Click the Start button from the taskbar.
- Go to Settings > System > Recovery.
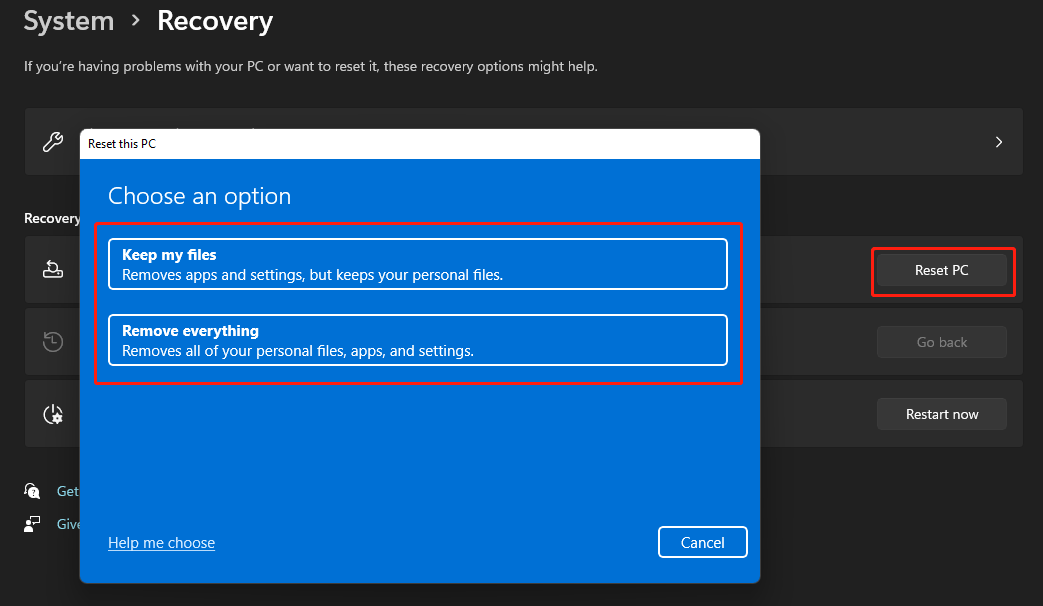
- Under the Recovery options section, you need to click the Reset PC button to continue.
- On the pop-up page, click Keep my files or Remove everything based on your situation to continue.
- On the next page, click Cloud download or Local reinstall based on your requirements to continue.
- Follow the on-screen instructions to reset your PC.
Step 3: Recover Your Lost Files if There Is No Available Backup
When you use your Windows computer, some of your files may get deleted or lost by mistake. For example, your files are removed accidentally after you reset your computer and you want to get them back. In this situation, you can use professional data recovery software to get them back.
MiniTool Power Data Recovery is a professional data recovery tool for Windows. It can be used to recover pictures, documents, videos, movies, music files, and more from all kinds of data storage devices like hard drives, SSDs, memory cards, SD cards, USB flash drives, etc.
Tip: No matter which data recovery software you are using, it can only recover deleted and lost files that are not overwritten by new data.
This software also has a trial edition. You can use it to scan the drive you want to recover data from. Then, you can see if it can find your needed files. If yes and you want to recover them, you can use a full edition to do this.
MiniTool Power Data Recovery TrialClick to Download100%Clean & Safe
After downloading and installing this software on your PC, you can follow this guide to rescue your files:
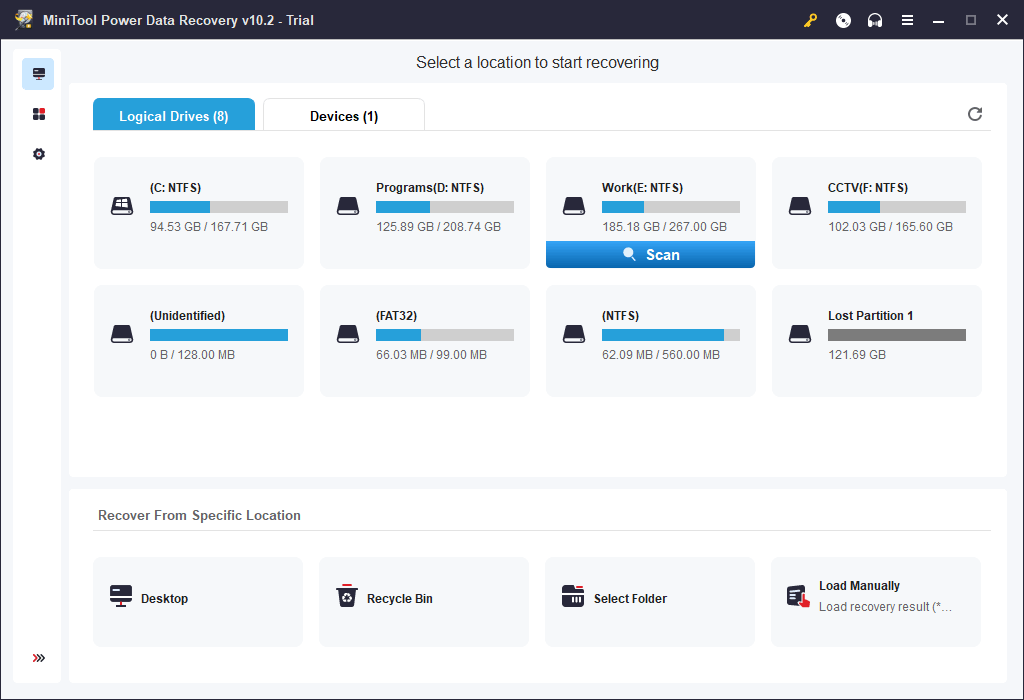
- Open the software to enter its main interface.
- This software shows you all the available partitions under Logical Drives. You can hover over the target partition and click the Scan button to start scanning it. If you want to directly scan the whole disk, you need to switch to the Devices section and select the target drive to scan.
- When the scanning process ends, you can see the scan results. You can check if your needed files are there. To recover them, you need to upgrade this software to a full edition. Then, you can select all your needed files and click the Save button to select a suitable location to save them. When selecting the destination folder, you should not select the original location. Otherwise, the deleted files might be overwritten and become unrecoverable.
Although there is a chance to recover your lost data, you’d better form a good habit of regularly backing up files in case the lost files are overwritten.
Unable to Install Drivers on Windows 10/11
If you can’t install drivers on your Windows 10/11 computer, you can just try the methods mentioned in this article to help you out. You should find a suitable method here. In addition, if you want to recover deleted files on your computer, you can try the software introduced in this blog.
Should you have any other related issues, you can let us know in the comments. You can also contact us via [email protected].