
Время на прочтение2 мин
Количество просмотров5.6K
Microsoft исправила баг, вызывающий проблемы с подключением к сети Wi-Fi в системах Windows 11, вызванный недавно выпущенными накопительными обновлениями KB5033375 и KB50532288.

«Microsoft получила сообщения о проблеме, из-за которой некоторые адаптеры Wi-Fi могут не подключаться к некоторым сетям после установки KB5032288. Мы подтвердили, что эта проблема была вызвана KB5032288 и KB5033375», — заявила компания.
Ранее сообщалось, что баг распространяется на подключения к корпоративной, образовательной или общедоступной сети Wi-Fi с использованием аутентификации 802.1x, но не наблюдается в домашних сетях.
Проблема затрагивает только клиентские платформы (Windows 11 23H2 и Windows 11 22H2), при этом устройства с Windows 10 ей не подвержены.
В настоящее время нет информации, позволяющей предположить, что баг связан с какой-либо конкретной моделью адаптера беспроводной сети.
Microsoft решила вопрос с помощью отката известных проблем (KIR), функции Windows, которая помогает отменить ошибочные обновления, не связанные с безопасностью и доставленные через Центр обновления Windows.
Для внедрения исправления на все затронутые потребительские и бизнес-устройства может потребоваться до 24 часов. Для более быстрого развёртывания пользователи могут перезагрузить затронутые устройства с Windows 11.
Компания предоставила групповую политику KIR для решения проблем с подключением к Wi-Fi на затронутых устройствах, управляемых предприятием.
Те, кому нужен временный обходной путь до тех пор, пока исправление не будет внедрено в их системы, могут удалить KB5033375 и KB50532288, выполнив следующие действия:
-
откройте меню «Пуск» Windows, найдите «Центр обновления Windows», затем перейдите в «История обновлений» > «Удалить обновления»;
-
в списке установленных обновлений выберите KB5033375 (или KB50532288), а затем нажмите кнопку «Удалить» рядом с ними;
-
используйте средство устранения неполадок «Показать или скрыть обновления», чтобы предотвратить повторное появление обновления в качестве доступного из Центра обновления Windows;
-
перезагрузите компьютер.
Ранее пользователи сообщили о нарушениях работы Wi-Fi в ряде университетов, предприятий малого и среднего бизнеса. Проблемы возникали при отправке запросов в Google. Половина из них не была обработана, а другая пострадала от потерь пакетов и задержек.
433269
Привет! В этой статье постараемся разобраться с новой, но уже очень популярной проблемой, когда после обновления к Windows 10 перестает работать интернет по Wi-Fi, или по сетевому кабелю. Я сам столкнулся с такой проблемой. У меня ноутбук на Windows 10 вообще никак не реагировал на подключение сетевого кабеля.
Рассмотрим возможные проблемы с интернетом, который могут возникнуть после обновления, или чистой установки Windows 10. Как показывает практика, проблемы могут быть самые разные:
- Интернет просто пропадает
- В диспетчере устройств нет беспроводного (Wireless) адаптера
- Нет проводного LAN адаптера
- Подключение по Wi-Fi, или по кабелю «Ограниченно»
- Нет кнопки включения Wi-Fi.
И ряд других проблем.
Если вы обновились к Windows 10, у вас перестал работать интернет, да и «десятка» вам не очень понравилась, то вы можете откатить систему к Windows 7, или 8 (которая была установлена до обновления). Сделать это можно на протяжении месяца в меню Пуск — Параметры — Восстановление. Ну а если новая операционная система вам понравилась, то можно попытаться исправить возникшие проблемы с подключением к интернету. Чем мы сейчас и займемся.
И для начала, общий совет: про любых проблемах с интернетом, попробуйте отключить антивирус. Отключите защиту на время, что бы проверить, не в нем ли проблема. Очень часто, виновен именно антивирус. Многие советуют перед обновлением вообще удалять антивирус.
Windows 10: проблемы с Wi-Fi после обновления
Давайте сначала рассмотрим возможные проблемы с беспроводной сетью.
1. Если, после установки «десятки», вы вообще не можете обнаружить Wi-Fi на своем ноутбуке (стационарном компьютере), то скорее всего, проблема в драйвере беспроводного адаптера. Вообще, проблема с драйверами — это самая популярная проблема.
Если вы не можете найти кнопки, что бы включить Wi-Fi сеть, не видите список доступных сетей, а в настройках, на вкладке Режим «в самолете» есть ошибка «Не удалось найти беспроводные устройства на этом компьютере», то скорее всего, выключен адаптер «Беспроводная сеть», не установлен драйвер на Wireless LAN адаптер, или драйвер установлен, но он работает неправильно (не подходит для новой системы).
О решении этой проблемы я писал в статье: как включить Wi-Fi в Windows 10, когда нет кнопки Wi-Fi и ошибка «Не удалось найти беспроводные устройства на этом компьютере». Как правило, все решается включением адаптера, а еще чаще — установкой, или обновлением драйвера беспроводного адаптера.
Вся проблема в том, что после обновления, Windows 10 не всегда устанавливает стабильный, работающий драйвер на Wi-Fi. Все зависит от вашего железа. Можете зайти в диспетчер устройств, и посмотреть, есть ли там на вкладке Сетевые адаптеры, Wireless адаптер (смотрите статью по ссылке выше). Он может быть с красным крестиком, или вообще отсутствовать.
Как правило, эта проблема решается загрузкой, и установочной драйвера с сайта производителя вашего ноутбука. Внимательно скачивайте драйвер. Нужно, что бы он был именно для вашей модели, и для Windows 10. Многие производители еще не выпустили драйвера для «десятки», поэтому, можно попробовать установить драйвер для Windows 8 (8.1). Снова же, все зависит от железа, встроенного беспроводного адаптера.
Если у вас стационарный компьютер, с USB/PCI адаптером, то скачивать драйвер нужно с сайта производителя адаптера.
После принудительной установки нового драйвера, Wi-Fi должен заработать.
2. Ошибка «Подключение ограниченно» и желтый треугольник с восклицательным знаком возле иконки Wi-Fi.
Еще одна популярная проблемка, которую можно встретить не только после обновления. Я не буду сейчас писать о всех возможных решениях, а просто дам ссылку на подробную статью по решению проблемы «Подключение ограниченно» в Windows 10.
Другие проблемы с интернетом в Windows 10
1. При подключении по сетевому кабелю от роутера, или интернет провайдера.
Как я уже писал в начале этой статьи, если при подключении сетевого кабеля, Windows 10 никак не реагирует, то обновляем драйвера на сетевую карту. И проверяем, включен ли адаптер «Ethernet».
Вот статья по решению этой проблемы: https://help-wifi.com/reshenie-problem-i-oshibok/ne-rabotaet-internet-v-windows-10-posle-podklyucheniya-setevogo-kabelya/
Ну а если вы наблюдаете статус «Ограничено» при при подключению по кабелю, то в первую очередь нужно проверить, установлена ли галочка напротив IP версии 4 (TCP/IPv4) в свойствах Ethernet адаптера. Открываем Центр управления сетям, и выбираем Изменение параметров адаптера.

Дальше, нажимаем правой кнопкой мыши на адаптер «Ethernet». И в новом окне, проверяем, установлена ли галочка возле «IP версии 4 (TCP/IPv4)».

Можете еще выделить пункт IP версии 4 (TCP/IPv4) нажать на кнопку свойства, и проверить, установлено ли автоматическое получение IP и DNS-адресов.
Убедитесь в том, что нет проблем с роутером, или провайдером (например, проверьте работу на других устройствах), а потом уже пробуйте обновить драйвер LAN адаптера.
2. Если после обновления нет подключения через 3G/4G модем.
В таком случае, проблем так же скорее всего в драйвере для вашего USB модема. Нужно искать, скачивать и устанавливать драйвер для модели вашего модема, и для Windows 10. Вот только проблема может быть в том, что такого драйвера производитель вашего модема еще не выпустил. Искать драйвер лучше всего на сайте производителя модема, или на сайте интернет-провайдера.
Возможно, вам еще пригодится статья по настройке разных подключений к интернету в Windows 10.
Запускаем Диагностику сетей Windows
Еще один способ, который нужно попробовать при любых проблемах с интернетом. Это запуск встроенной в Windows диагностики и исправления возможных проблем с сетями.
Нажмите правой кнопкой мыши на значок соединения с интернетом, и выберите Диагностика неполадок.
Система начнет искать неполадки, и возможно, если что-то найдет, предложит вам их исправить. Следуйте инструкциям в окне диагностики.
Возможно, в результатах диагностики вы увидите ошибку «Сетевой адаптер не имеет допустимых параметров настройки IP». О ее решении я писал в отдельной статье: https://help-wifi.com/reshenie-problem-i-oshibok/setevoj-adapter-ne-imeet-dopustimyx-parametrov-nastrojki-ip-windows-10-8-7/
Обновление
В комментариях написали один способ, который может помочь решить проблему с доступом к интернету в Windows 10. Нужно в свойствах нашего подключения к интернету прописать гугловские DNS.
Если у вас подключение через кабель, то открываем свойства подключения «Ethernet», а если по Wi-Fi, то «Беспроводная сеть». Выделяем пункт «IP версии 4 (TCP/IPv4)», нажимаем кнопку «Свойства».
В поле «Предпочитаемый DNS-сервер» прописываем 8.8.8.8. Во втором поле можете еще прописать 8.8.4.4.

Нажимаем «Ok», и перезагружаем компьютер.
Больше решений
Буду очень благодарен, если вы в комментариях поделитесь полезной информацией о проблемах с интернетом и их решении на компьютерах с Windows 10. С удовольствием дополню статью полезной информацией.
Так же, вы можете оставлять свои вопросы по этой статье.
Последнее Обновление Windows 10 может испортить ваше Wi-Fi соединение, вот пять способов устранить проблему, и вернуть Интернет на ваше устройство.
Хотя Windows 10 (версия 1809) улучшает функционал и возможности операционной системы, независимо от этого, у пользователей иногда возникают проблемы во время процесса обновления, которые влияют на подключение Wi-Fi — например, падение скорости Wi-Fi, невозможность подключиться к беспроводной сети, отсутствие нужных настроек или отказ сетевого адаптера.
Обычно эти проблемы возникают из-за несовместимости драйверов, ошибками или изменениями конфигурации, которые могут возникнуть в результате обновления системы, но иногда есть и другие факторы, которые так же, могут вызвать проблемы с подключением. Во время процесса обновления драйвер адаптера Wi-Fi может быть поврежден. Вероятно, драйвер, который работал с предыдущей версией системы, не работает в новой версии.
В этом руководстве рассмотрим несколько способов, которые помогут исправить проблемы с Wi-Fi после установки Октябрьского обновления Windows 10.
- Как исправить Wi-Fi с помощью средства устранения неполадок сетевого адаптера
- Как исправить Wi-Fi с помощью сброса сетевого адаптера
- Как исправить Wi-Fi обновив драйвер сетевого адаптера
- Устранение произвольного отключения Wi-Fi
- Как вернуться к предыдущей версии Windows 10
Исправить Wi-Fi с помощью средства устранения неполадок «Сетевой адаптер».
В Windows 10, существует инструмент устранения неполадок в приложении «Параметры», позволяющий автоматически устранять самые распространенные проблемы как беспроводных, так и других сетевых адаптеров.
Чтобы использовать средство устранения неполадок для сетевого адаптера, выполните следующие действия:
- Откройте «Параметры» нажав клавиши Win + I, или на значок шестеренки в меню «Пуск».
- Перейдите в раздел «Обновление и безопасность».
- Нажмите «Устранение неполадок».
- Выберите параметр «Сетевой адаптер».
- Нажмите кнопку «Запустить средство устранения неполадок».
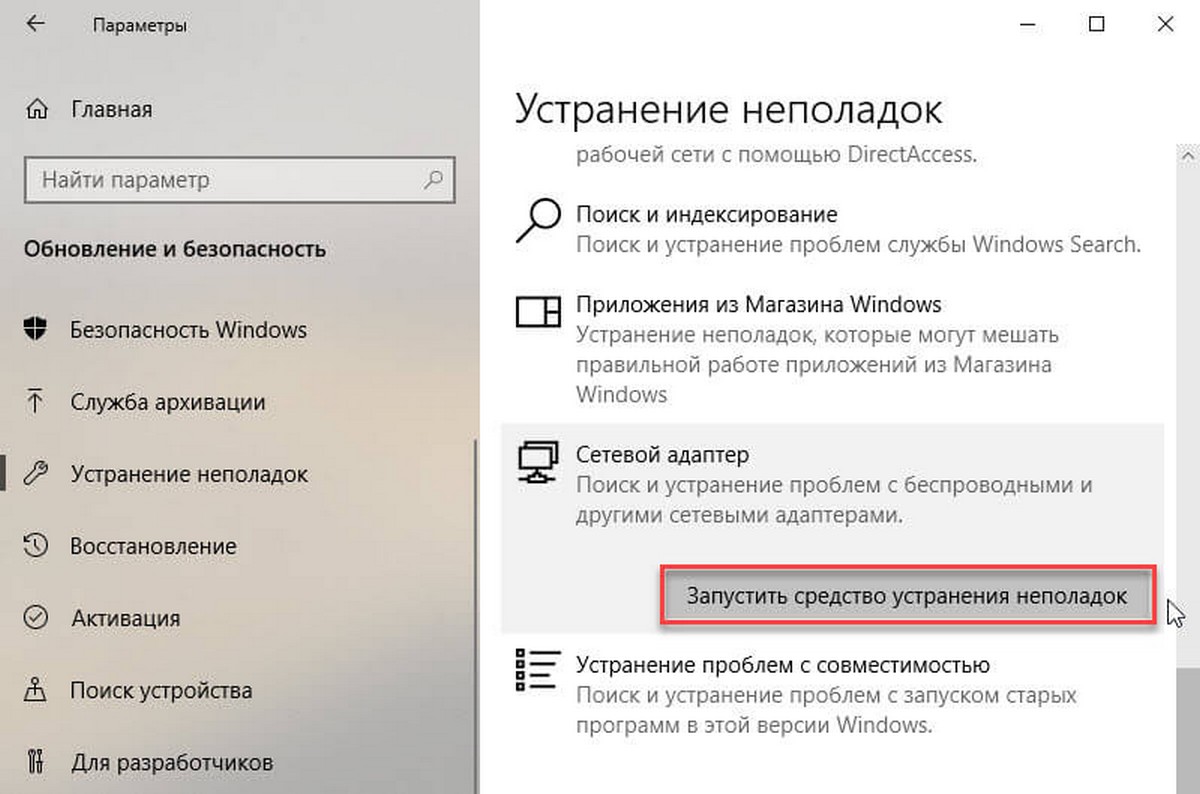
- Выберите сетевой адаптер, который вы хотите исправить, в данном случае Wi-Fi.
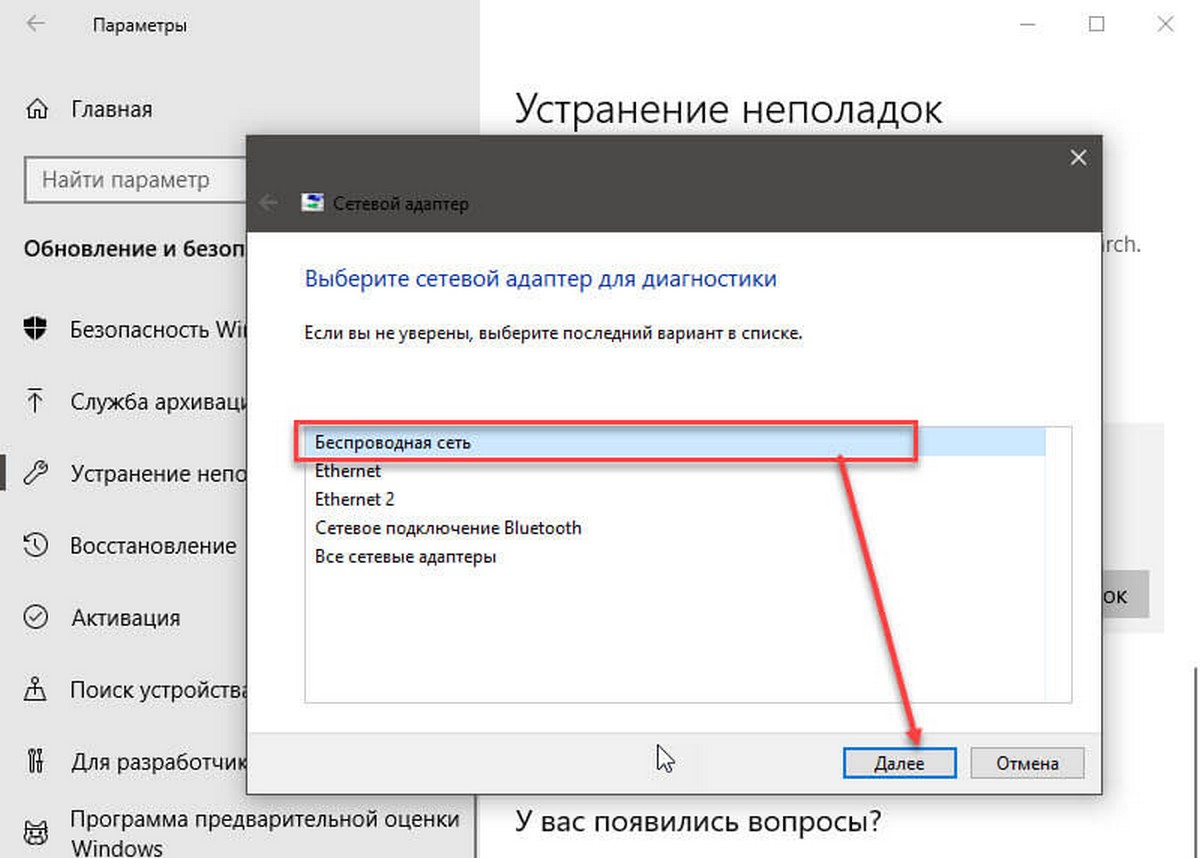
- Нажмите «Далее», чтобы начать процесс.
Устранение неполадок найдет и попытается исправить проблему Wi-Fi на вашем устройстве.
По завершении процесса откройте браузер и попробуйте подключиться к сети. Если все будет работать снова, вы справились. Если Wi-Fi все еще не работает, попробуйте следующий способ.
Как исправить Wi-Fi с помощью сброса сетевого адаптера.
Windows 10 также имеет инструмент для удаления и переустановки сетевого адаптера, который автоматически вернет для всех компонентов сети настройки по умолчанию, это может помочь исправить проблемы, связанные с подключением к сети или падением скорости.
Чтобы сбросить адаптер Wi-Fi, выполните следующие действия:
- Откройте «Параметры».
- Перейдите в раздел «Сеть и Интернет».
- Откройте подраздел «Состояние».
- Нажмите ссылку «Сброс сети».
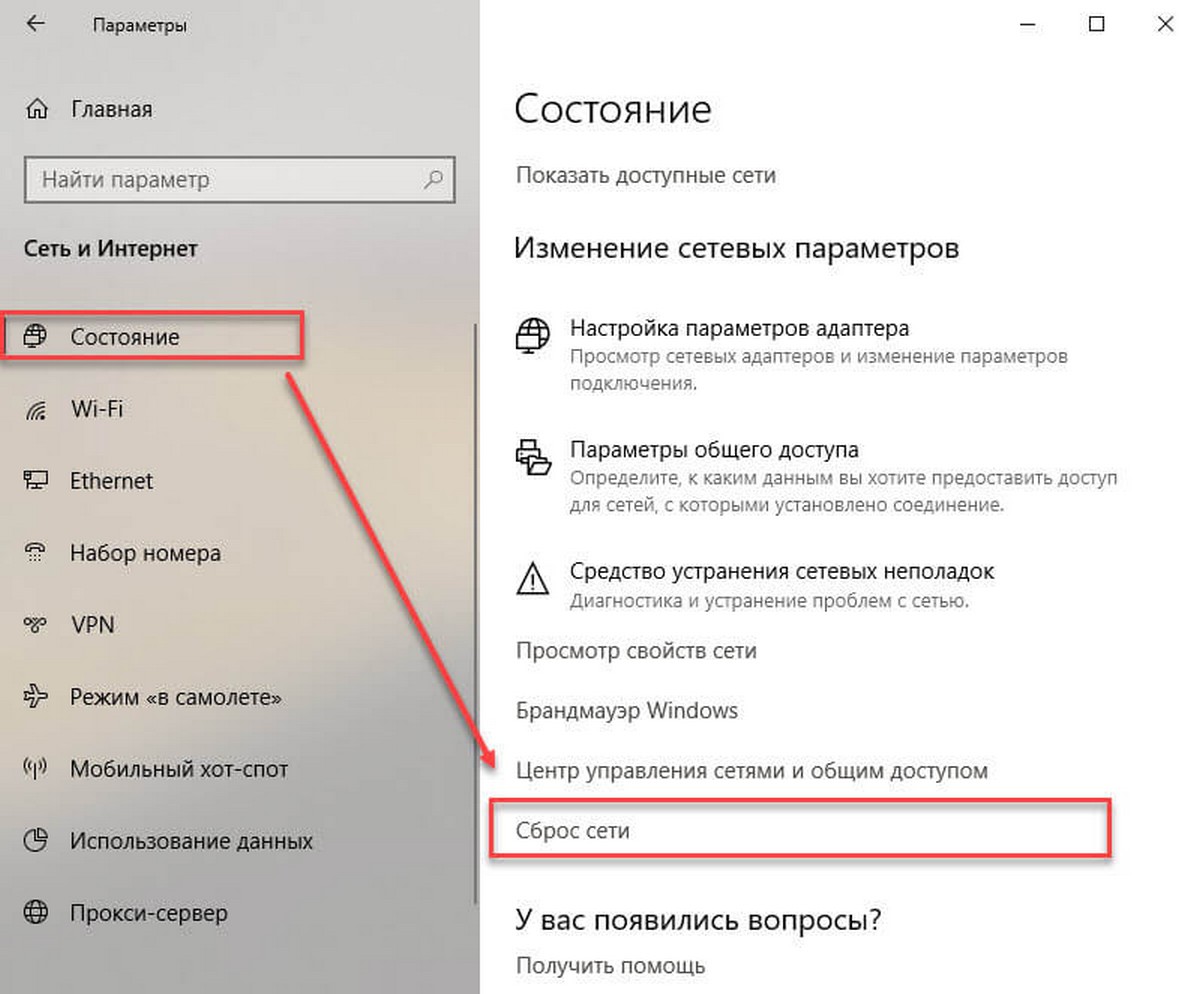
Опция сетевого сброса в Windows 10 Октябрь 2018 Обновление
- Нажмите кнопку «Сбросить сейчас».
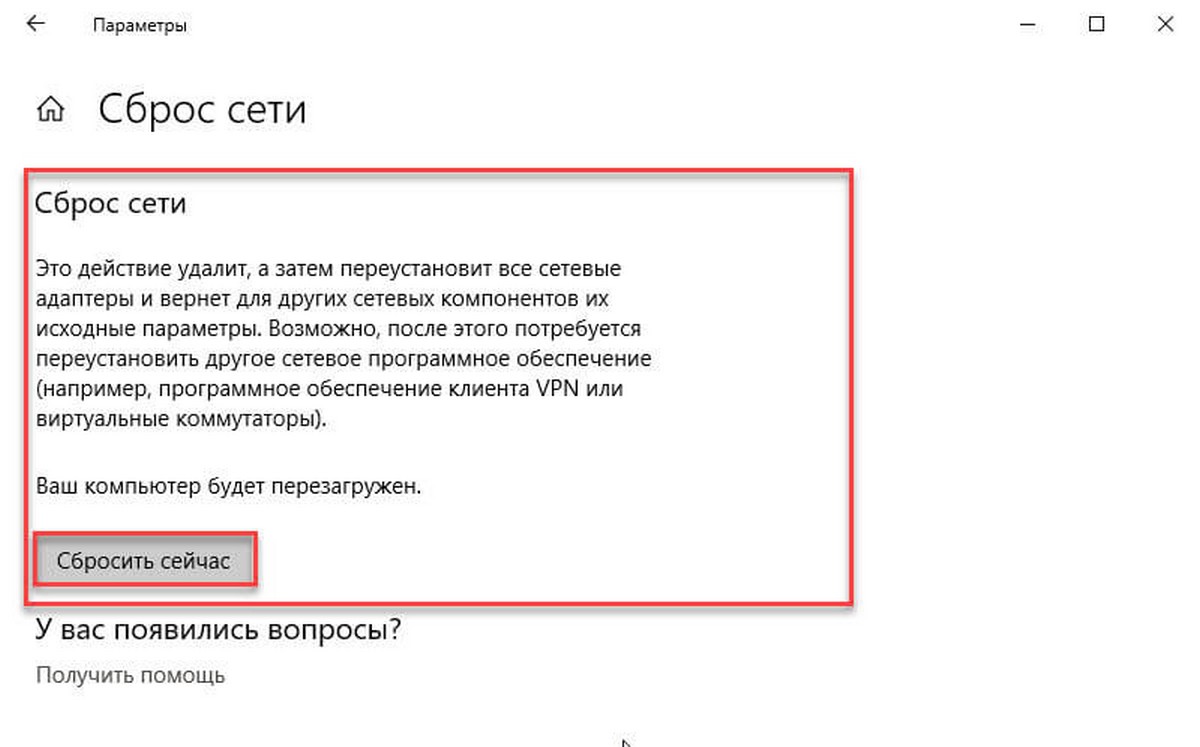
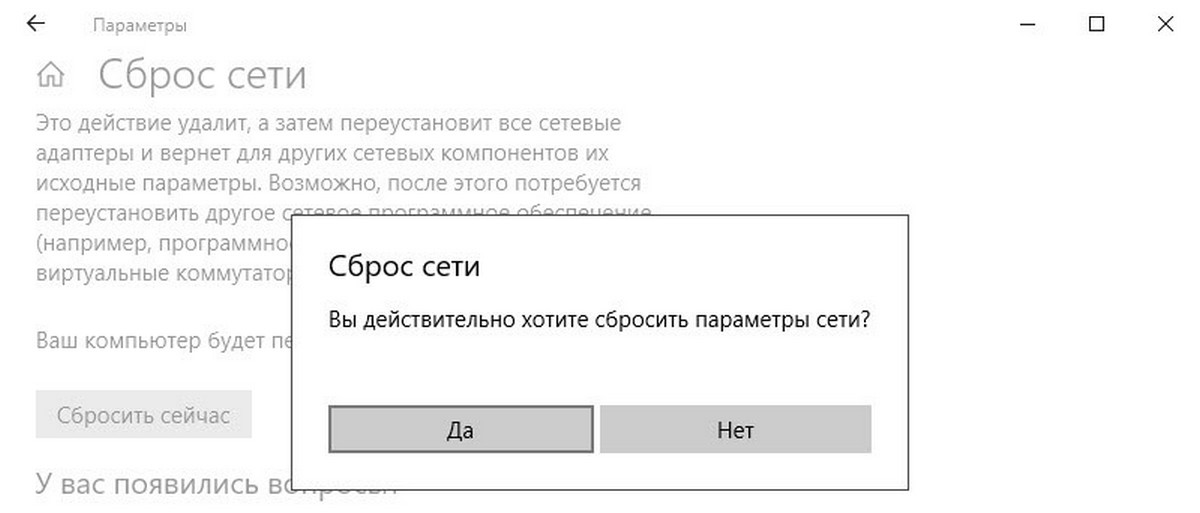
- Нажмите «Да» для подтверждения.
- Перезагрузите компьютер.
Используя этот метод, вам может потребоваться переустановить другое программное обеспечение сети, такое как VPN-клиент или виртуальный коммутатор. Кроме того, после перезагрузки, вам необходимо вручную подключиться к любой беспроводной сети, для чего может потребоваться ввести пароль.
Если беспроводная сеть работает, вы справились с проблемой. Если нет, попробуйте следующий способ.
Как исправить Wi-Fi обновив драйвер сетевого адаптера.
В случае, если вы по-прежнему испытываете заметное снижение скорости Wi-Fi или проблемы с подключением к Интернету, вероятно на вашем устройстве не установлена последняя версия драйвера.
Вы можете решить эту проблему, загрузив и установив последний доступный драйвер с веб-сайта производителя беспроводного сетевого адаптера.
Быстрый совет: Если обновление сетевого адаптера отсутствует, проверьте, есть ли бета-версия драйвера, так как она может работать хорошо с новой версией Windows 10.
Обычно вы можете использовать инструкции производителя для установки последней версии драйвера, но вы можете скачать драйвер на компьютер, а затем использовать следующие шаги:
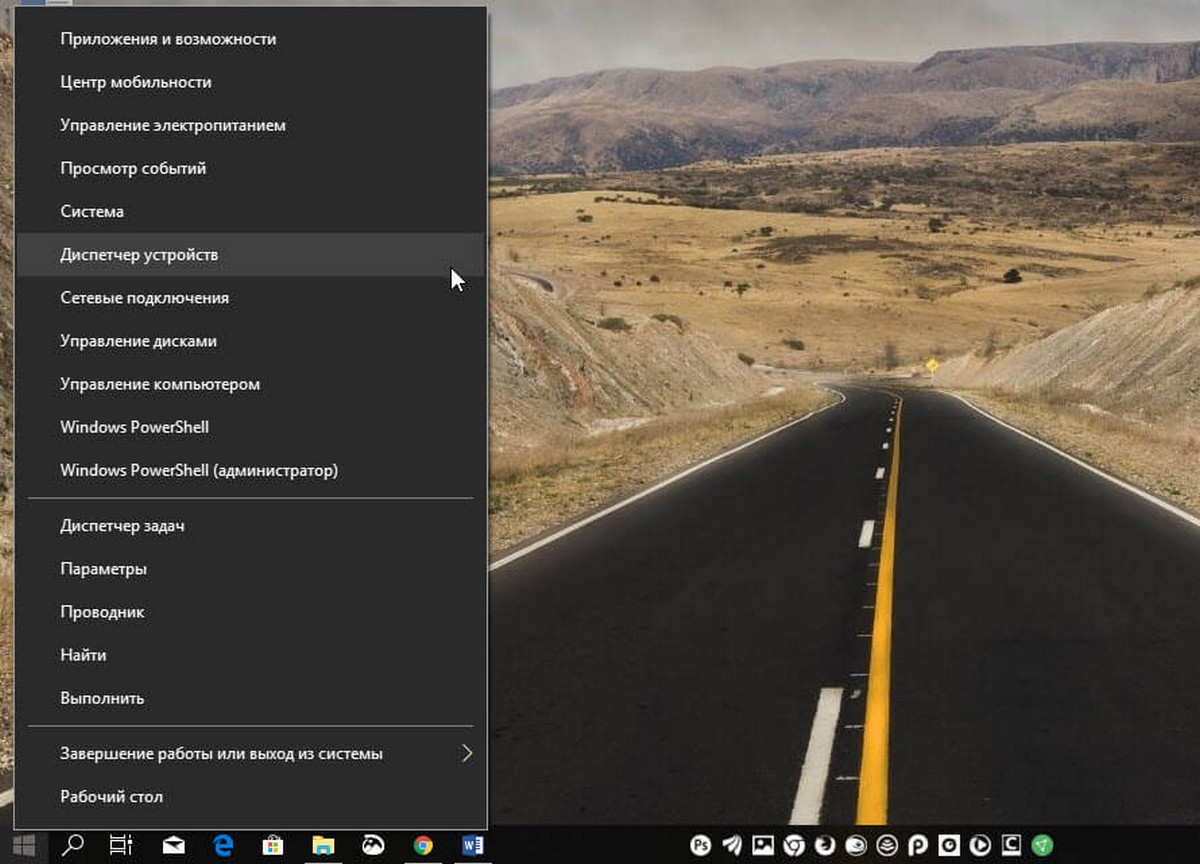
- Кликните правой кнопкой мыши на кнопку «Пуск».
- Найдите и выберите в меню «Диспетчер устройств», чтобы открыть его.
- Разверните в диспетчере группу «Сетевые адаптеры».
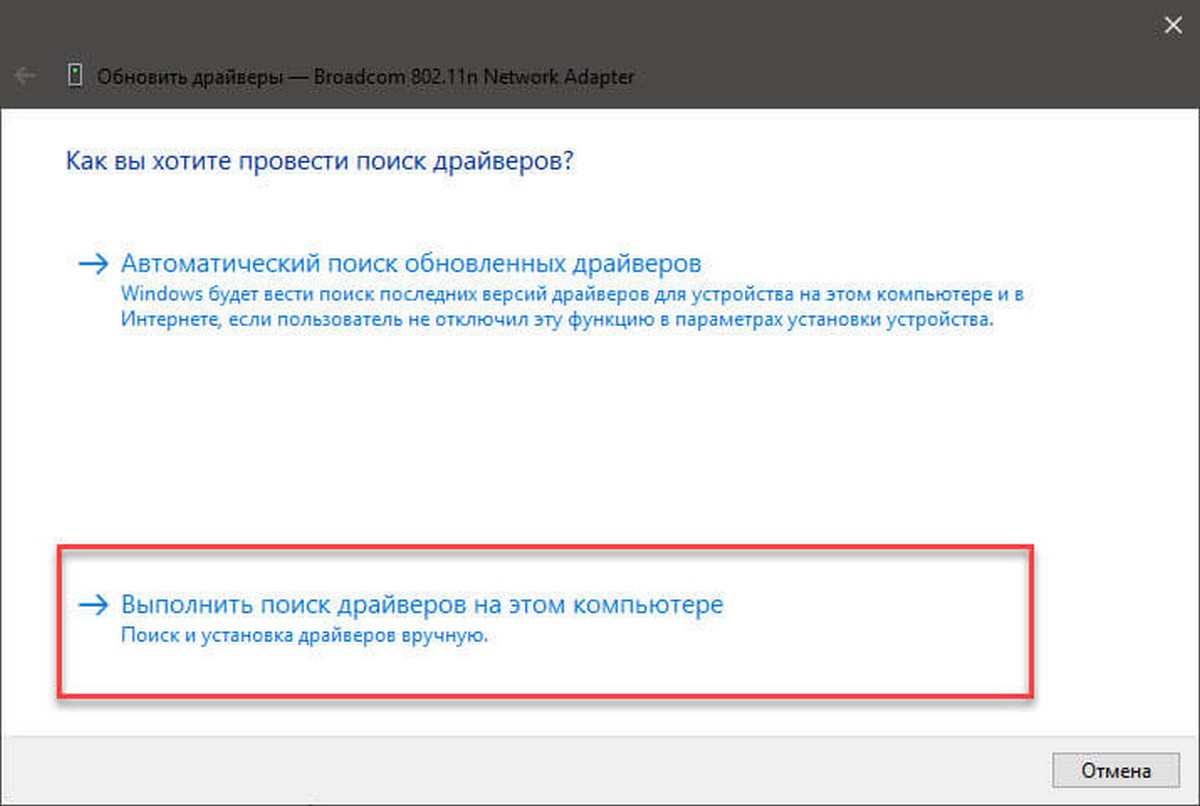
- Кликните правой кнопкой мыши на беспроводной адаптер (Wi-Fi) и выберите опцию «Обновить драйвер».
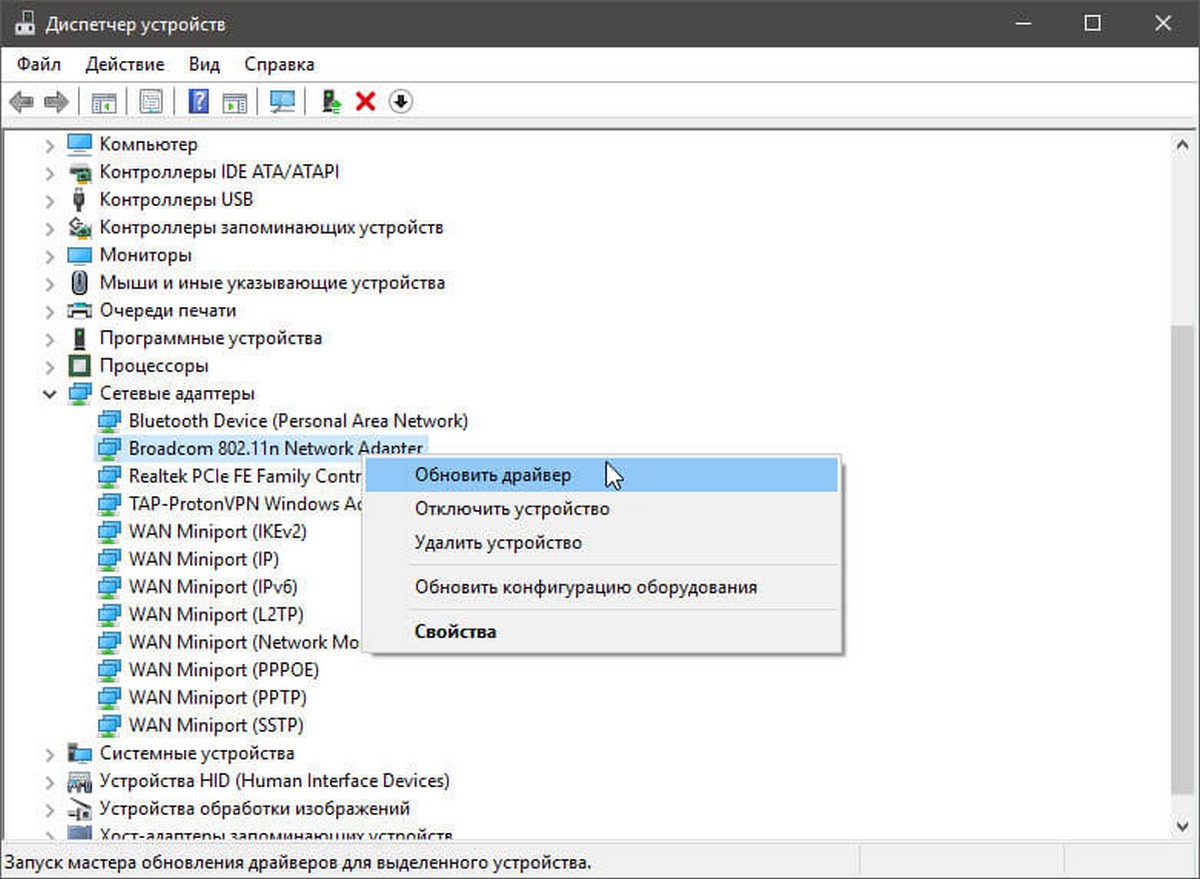
- Нажмите «Выполнить поиск драйверов на этом компьютере» для поиска и установки драйверов в ручную.
- В следующем диалоговом окне, нажмите «Обзор», чтобы указать папку с драйвером адаптера (драйвера загруженные с сайта производителя).
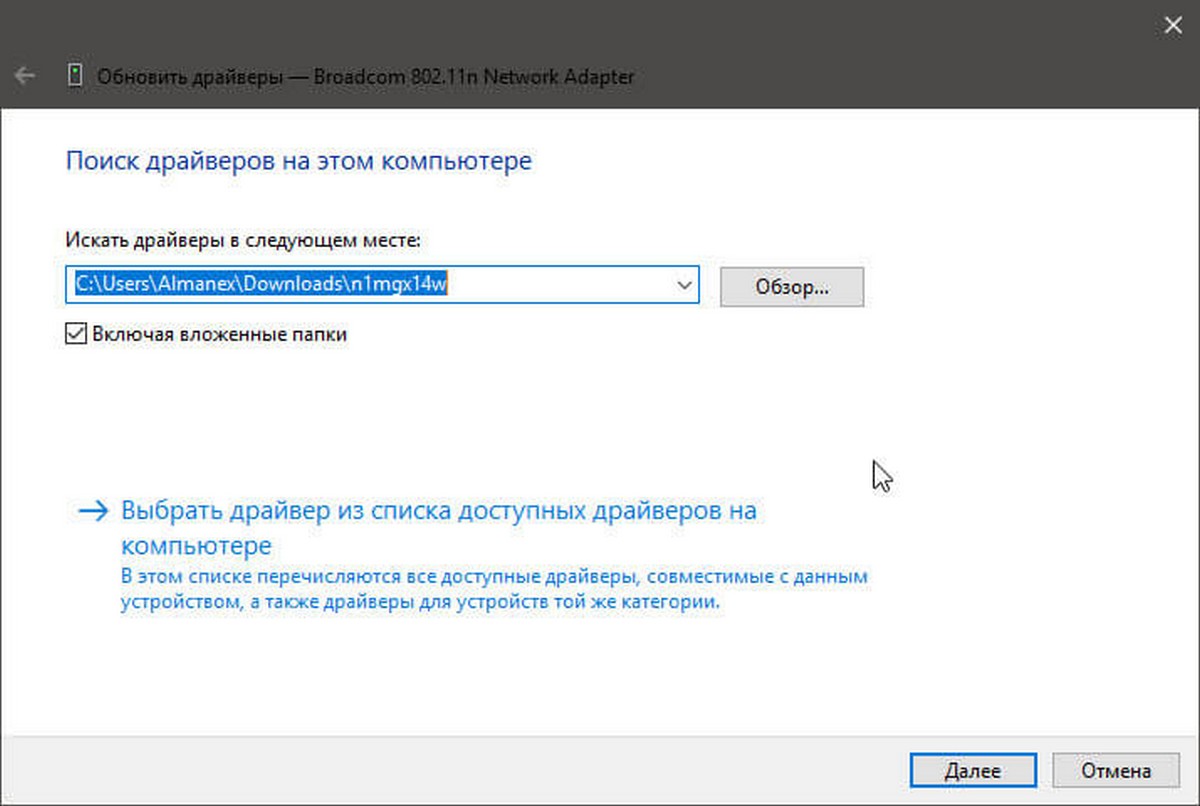
- Установите флажок «Включить вложенные папки».
- Нажмите кнопку «Далее».
Иногда, когда ничего не помогает, вы можете попробовать еще более старую версию драйвера адаптера Wi-Fi, например, разработанные для Windows 8.1 или Windows 7, которые могут временно устранить вашу проблему до тех пор, пока не будет выпущено постоянное исправление.
Устранение произвольного отключения Wi-Fi.
Проблема заключается в том, что некоторые сетевые карты Wi-Fi, несовместимы с последней версией драйвера виртуального адаптера Microsoft Wi-Fi Direct Virtual Adapter. Недостатком отключения этого драйвера является то, что вы не сможете создать точку доступа Wi-Fi. Если это не проблема для вас, тогда продолжайте.
Чтобы устранить проблему отключения Wi-Fi, выполните следующие действия.
- Нажимайте Win + X на клавиатуре и выберите «Диспетчер устройств».
- В диспетчере устройств Windows 10, нажмите на меню «Вид» в строке меню и выберите «Показать скрытые устройства».
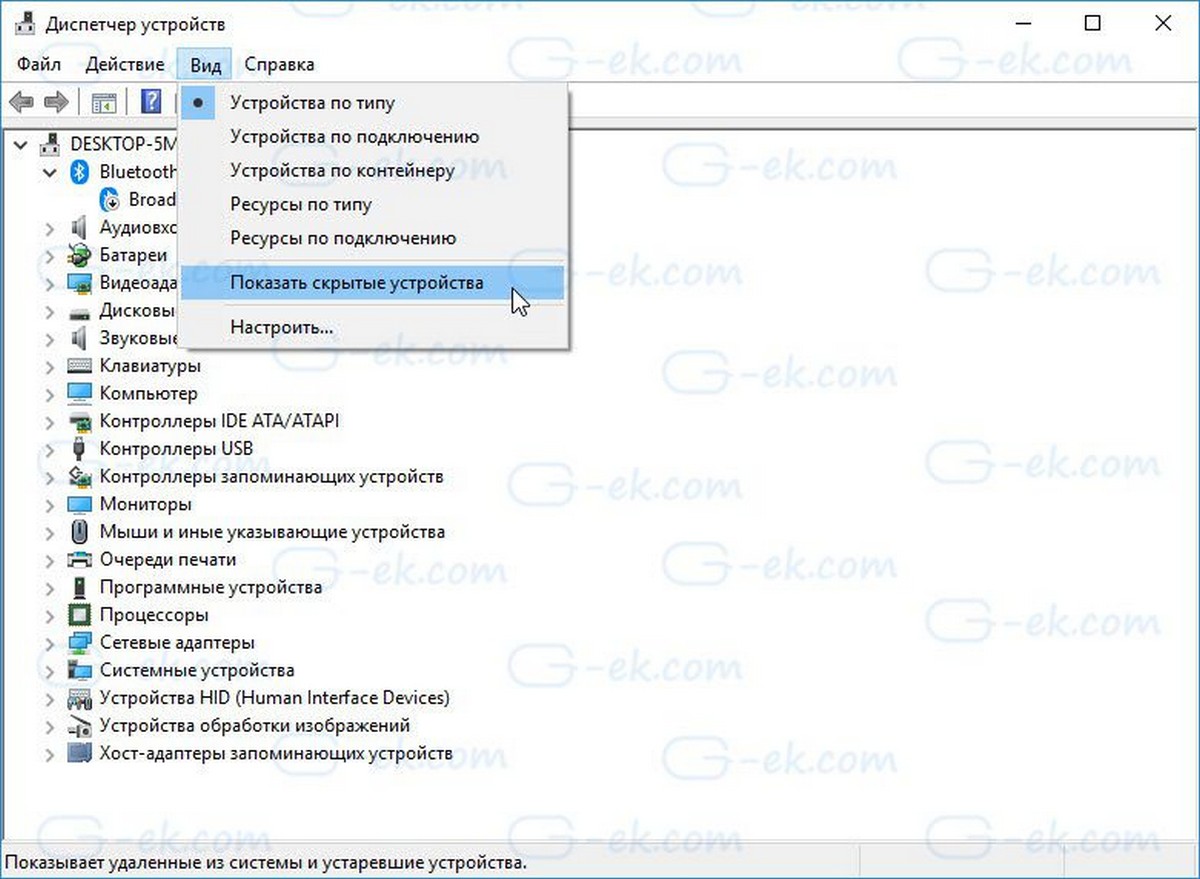
- В дереве устройств перейдите в раздел «Сетевые адаптеры».
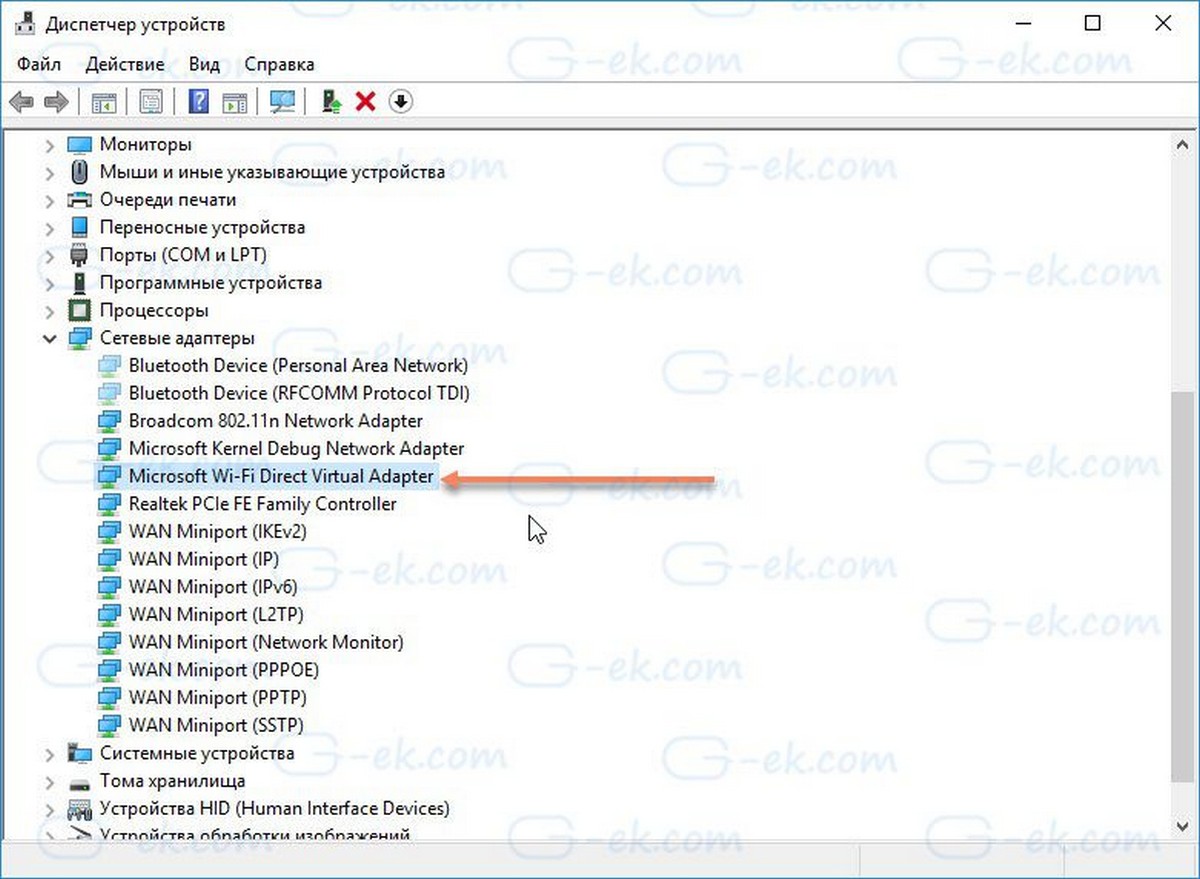
- Кликните правой кнопкой мыши на виртуальном адаптере Microsoft Wi-Fi и выберите в контекстном меню пункт «Отключить устройство».
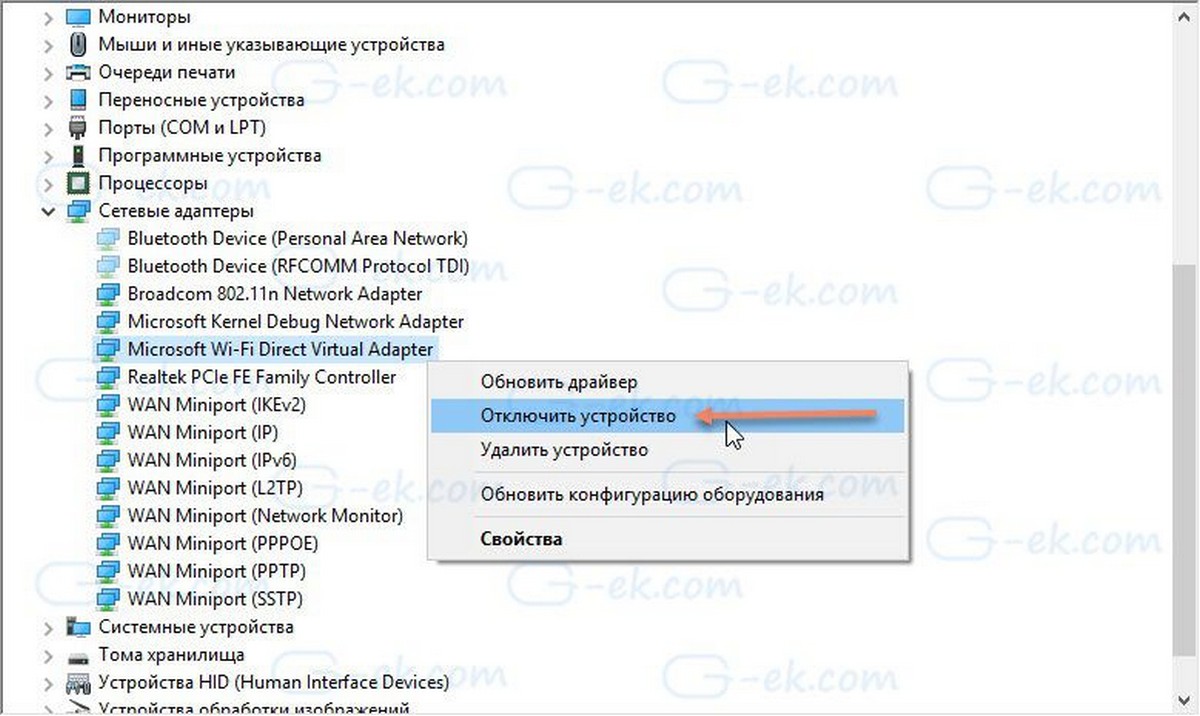
- Перезагрузите Windows 10 и проверьте работает ли Интернет.
Как вернуться к предыдущей версии Windows 10.
Если у вас по-прежнему возникают проблемы с подключением, возможно, возникает системная ошибка новой версии Windows 10 или сетевым адаптером, и вам может потребоваться дождаться обновления для адаптера или ОС.
В крайнем случае вы можете вернуться к предыдущей версии Windows 10, пока не будет решена проблема Wi-Fi.
Удалить Октябрьское обновление Windows 10 версии 1809 и вернутся к предыдущей сборке.
Дополнительно:
Кроме того, рекомендуется проверить настройки вашего адаптера — Панель управления\Сеть и Интернет\Сетевые подключения и открыв свойства адаптера. В прошлом пользователи сообщали о том, что после обновления, настройки TCP были отключены, а настройки DNS сброшены. Кроме того, вы всегда должны перезагружать свой маршрутизатор (роутер), чтобы узнать, помогает ли это решить проблемы с медленной скоростью или плохой связью Wi-Fi.
В качестве альтернативы вы также можете подключиться к сети с помощью проводного соединения используя сетевой адаптер Ethernet.
Вот и все. В комментариях, пожалуйста, сообщите нам, помогло вам одно из решений или нет.
Рекомендуем: Как посмотреть сохраненные пароли Wi-Fi в Windows 10
Windows 10 — Как поделиться с друзьями паролем от Wi-Fi с помощью QR-кода.
Как удалить ненужные сети WI-FI в списке подключений Windows 10.
Fix: Wi-Fi не работает после выхода из спящего режима в Windows 10
On Windows 10, problems with a Wi-Fi connection are common after installing a new feature update like version 20H2 (October 2020 Update). Some of these problems can include, slow wireless speeds, missing configuration, unable to connect to the internet, or the wireless adapter stops working.
Usually, issues like these can happen because of unwanted configuration changes, driver compatibility, or bugs as a result of system changes with the new version. Other times, there are many factors that can cause Wi-Fi problems. For instance, the network adapter driver may got damaged during the upgrade process. You didn’t have the latest driver installed, which happened to work with the previous version, but it does not with Windows 10 20H2 (in this case). It could also be a configuration problem blocking connectivity, and more.
If you cannot connect to a network, the device randomly disconnects from the Wi-Fi access point, or speeds are not adequate, there are some troubleshooting steps you can follow to fix most Wi-Fi issue on Windows 10 after an upgrade.
In this guide, you’ll learn several methods to troubleshoot and fix the Wi-Fi problems after installing the Windows 10 20H2.
- Fix Wi-Fi using Network Adapter troubleshooter
- Fix Wi-Fi using Network reset
- Fix Wi-Fi using updated network driver
- Fix Wi-Fi uninstalling Windows 10 20H2
Fix Wi-Fi using Network Adapter troubleshooter
Windows 10 comes with a troubleshooting tool to fix most common wireless and other network problems automatically.
To fix Wi-Fi issues after installing version 20H2 (October 2020 Update), use these steps:
-
Open Settings on Windows 10.
-
Click on Update & Security.
-
Click on Troubleshoot.
-
Click the Additional troubleshooters option.

Additional troubleshooters option -
Select the Network Adapter option.
-
Click the Run the troubleshooter button.
Network adapter troubleshooter -
Select the network adapter you’re intending to fix — for instance, Wi-Fi.

Network Adapter wizard -
Click the Next button.


Once you complete the steps, the troubleshooter should detect and resolve the Wi-Fi problem with Windows 10 October 2020 Update. You should be able to confirm the fix by opening the browser and testing the internet connection.
If the wireless is working again, you’re all done. If it’s still not working, try the following method.
Fix Wi-Fi using network adapter reset
If the troubleshooter didn’t help, Windows 10 also includes a network reset feature that removes and reinstalls all the network adapters. The process resets all the networking components and restores the defaults settings to fix virtually any problems, including slow speeds or other issues trying to connect to the internet.
To reset the Wi-Fi adapter after installing the Windows 10 version 20H2, use these steps:
-
Open Settings.
-
Click on Network & Internet.
-
Click on Status.
-
Click the Network reset option.
Network reset option -
Click the Reset now button.

Windows 10 network reset -
Click Yes to confirm.
-
Click the Close button.
-
Restart your computer.


After you complete the steps, you may need to reinstall some networking software, such as VPN client or virtual switch software as necessary. Also, you’ll need to reconnect to wireless network manually, which may require to enter the passcode again.
If everything is working again, you’re all done. In the case that the problem persists, try the following method.
Fix Wi-Fi updating network adapter driver
Alternatively, if you’re still dealing with slow Wi-Fi connectivity, the issue could be old network driver. You can resolve this issue by downloading and installing the latest driver from manufacturer’s support website.
Quick tip: If there isn’t a new update for the network adapter, check for a beta version, sometime, it might work with a new version of Windows 10. Also, it’s recommended to use your manufacturer’s instructions to install the latest version of the driver.
To update the wireless adapter driver, use these steps:
-
Open Start.
-
Search for Device Manager, and click the top result to open the app.
-
Expand the Network adapters branch.
-
Right-click your Wi-Fi adapter, and select the Update driver option.

Device Manager update Wi-Fi driver -
Click the Browse my computer for driver software option.

Browser computer for Wi-Fi driver -
Click the Browse option to locate the adapter driver.
-
Check the Include subfolders option.
Wi-Fi driver location -
Click the Next button.


Once you complete the steps, the laptop should be able to connect to the wireless network and internet.
If nothing seems to work, you can also try an older version of the Wi-Fi adapter driver (those designed for Windows 8.1 or Windows 7), which might fix the problem temporarily until there is a permanent fix.
Fix Wi-Fi uninstalling Windows 10 20H2
If you’re still having wireless connectivity problems, then there’s a good chance that the issue is a bug with the October 2020 Update, and you may need to wait until a cumulative update resolves the problem.
If you must connect to the internet, as a last resort, you can rollback to the previous version of Windows 10 until the Wi-Fi problem is resolved, which you can do referring to this video walkthrough:
In addition, it’s a recommended to check the adapter settings on Control Panel > Network and Internet > Network Connections, and opening the adapter’s properties. In the past, users have reported TCP/IP settings getting disabled and DNS settings getting reset after an upgrade. Also, you should always restart router (or access point) to see if it helps to resolve the Wi-Fi slow speed or connectivity problems.
We’re focusing this guide on Windows 10 version 20H2, but you can use these instructions on virtually any supported version of the operating system.
Alternatively, you can also connect online using a wired connection using an Ethernet adapter. If your laptop doesn’t include a port to plug a network cable, you can get an affordable adapter from Amazon.
- StarTech USB 3.0 to Gigabit Adapter | See at Amazon
- Cable Matters SuperSpeed USB 3.0 to Gigabit Adapter | See at Amazon
Did you update Windows 10 on your PC, and now the internet won’t work? Well, as frustrating it may sound, the issue is not very uncommon. Even Microsoft has agreed on specific instances that updating PC to the latest Windows 10 for a particular build could cause Wi-Fi connectivity issues. These updates may not only cause the internet not to work, in some cases, they also make the internet function at a slow speed, cause Wi-Fi to disconnect automatically, or some other connection problem. No matter what sort of Windows update Wi-Fi problem you may be facing, it can get annoying.
After complaints from several users facing internet connection problems after the Windows 10 update, we decided to create a list of solutions to help them out of this situation. If you are one of those users, there’s nothing you can do apart from trying to fix your way out of this situation.
In this article, we look at several troubleshooting options that you can try on your PC running Windows 10 to eliminate Wi-Fi connectivity problems that started bugging you after updating your PC. Let us begin.
Table of Contents
Solutions to Fix Wi-Fi Issues after Windows Update
Give these solutions a try to get rid of the Wireless connectivity problem on your computer. Begin with solution #1. If it doesn’t help or apply, keep trying the solutions till you find the one that works for you.
#1 – Disable Airplane Mode in Windows 10 to Fix WiFi problems
Airplane Mode in Windows 10 lets you disconnect your Windows 10 PC from all sorts of wireless networks. If the Wi-Fi on your computer is not working, the first thing that you must do is check whether the Airplane Mode is enabled. If yes, you will not be able to access or connect to wireless networks on your PC.
Make sure that the Airplane mode on your Microsoft Windows 10 PC is disabled. You can do that by going to the Action Center. To access the Action Center, press the Win + A buttons simultaneously. The Action Center menu will open on the right side of the screen. Here, you will see several tiles; one of them will be the Airplane Mode. If the Airplane Mode tile is highlighted, Airplane mode is enabled. Make a click on it to disable Airplane Mode.
Alternatively, you can also press the dedicated Airplane Mode key on your keyboard. Check the function keys available at the top row of your keyboard; one of them would be the Airplane Mode key with the Airplane logo. Press the key along with the Fn key once. This will disable Airplane Mode if it’s enabled.
#2 – Restart PC to Fix WiFi issues
This is a simple solution that works wonders for many Windows 10 users facing various PC problems. A quick restart can solve a bunch of Microsoft Windows 10 issues, including Wi-Fi connectivity problems. If you cannot connect to the internet on your PC, go ahead and restart your PC at least once. After the restart, let the PC connect to a WiFi network. Once the connection is established, go ahead and see if you can access the internet on your PC. If you were facing another WiFi-related problem on your PC, check if that was fixed after the restart.
#3 – Restart Router
It is also possible that the issue is somewhere with the wireless router you are using. To ensure that it has nothing to do with the router or the internet connection, we suggest you restart your wireless router once.
Be advised that this would not be a simple restart. Go to the router and unplug it. After removing its plug from the power source, wait for a little while (a minute or two). Now, insert the plug back into the power source and wait till the router powers on completely.
Now, let your Windows 10 PC connect to the internet. Are you able to access the internet on your Microsoft Windows 10 PC as usual now? If not, go through the next solution.
#4 – Check If the Problem is with the Internet
Before further troubleshooting, it is essential to know if the issue is with the internet itself. How do you find that out? Well, it is pretty simple. Connect any other device to the WiFi network; it could be a mobile device or another PC altogether. Now, check if you can access the internet on the other device. If yes, then the problem is with your Windows 10 PC; we will continue with the troubleshooting. If you cannot access the internet on those devices, too, then it’s time you contact your internet service provider and tell them about the internet connectivity issue. Wait till the issue is resolved on your Microsoft Windows 10 PC.
#5 – Reconnect to the Wi-Fi Network
If none of the above solutions were helpful, you could give its method a try to reconnect to the WiFi network on your Microsoft Windows 10 PC. The process is simple; check out the steps below:
Step 1: Launch the Settings app on your PC. For this, you can press the Win + I buttons together.
Step 2: In the Settings menu, select the Network & Internet option.
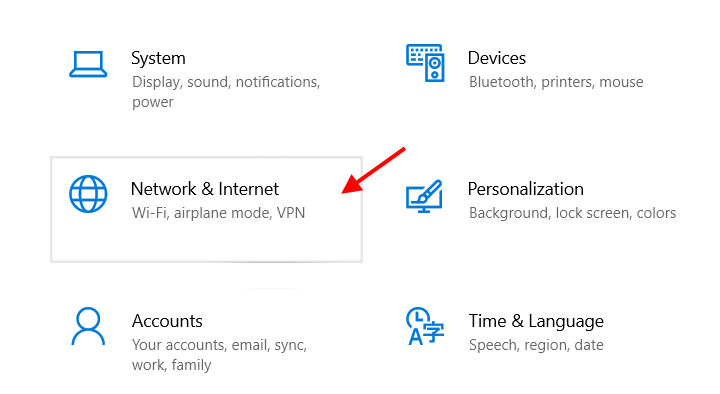
Step 3: When the following settings menu opens, go to the panel on the left and select the Wi-Fi option. A new set of options will appear on the right side of the window. Click on the toggle switch below the Wi-Fi option to turn the Wireless adapter off.
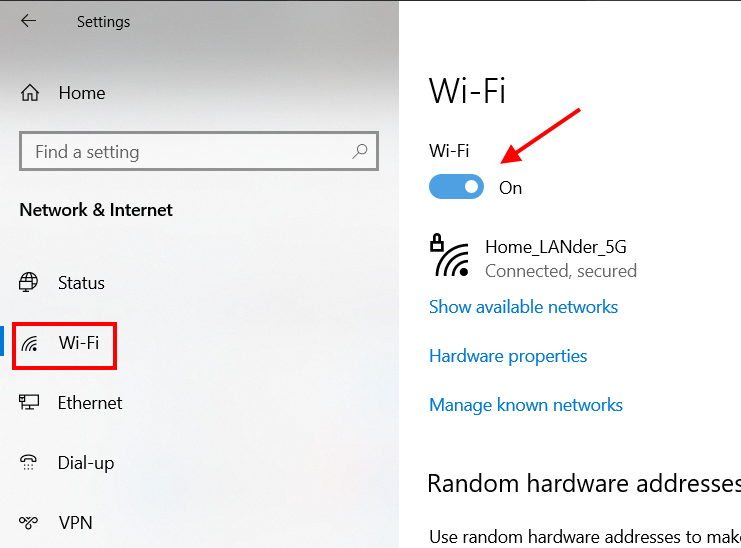
Step 4: After a few seconds have passed, click on the Wi-Fi toggle button again to enable Wi-Fi.
Now let your PC connect to the WiFi network automatically. After the connection has been established, check whether the internet is working again on your Microsoft Windows 10 computer. If not, go to the next solution.
#6 – Disable/Enable Wireless Network Adapter to Reset WiFi
Another solution that you can try is disabling the wireless adapter on your PC running Windows 10 and enable it back again. This again is a relatively simple procedure to follow, steps for which are mentioned below:
Step 1: Open the Run box by pressing Win + R keys together. In the Run box, enter ncpa.cpl and press Enter key. This will launch the Network Connections interface on your Windows 10 PC.
Step 2: In the Network Connections window, look for the wireless adapter. When you find it, make a right-click on it. When the context menu opens, select the Disable option.
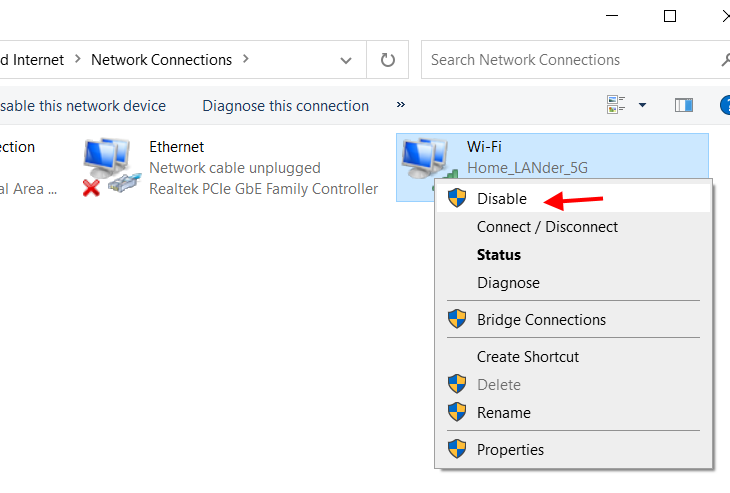
Step 3: Wait for a few seconds. Now, make a right-click on the Wi-Fi adapter again. Select the Enable option from the context menu.
The Wi-Fi adapter on your PC will be re-enabled. Now try to connect to a WiFi network, test for internet connectivity in Windows 10. If this did not work, try the next solution.
#7 – Forget the Wi-Fi Connection and Reconnect
You can also try to forget the wireless connection your Microsoft Windows 10 PC is connected to and reconnect to it. It has worked for quite many users and may work for you as well. Here are the steps:
Step 1: Go to the Taskbar on your PC. Click on the Wi-Fi icon. The internet access tray will open. Here, make a right-click on the WiFi network you are connected to. A small menu will open. Click on the Forget option.
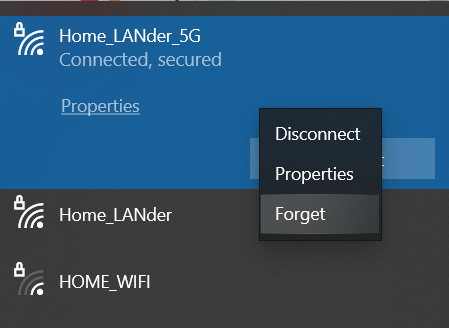
The wireless network your PC is connected to will be forgotten.
Step 2: Go back to the Taskbar and click on the Wi-Fi icon. Here, in the list of wireless connections that you will see, click on the connection that you disconnected from. Now, connect back to the same network by entering the respective password.
Check for an internet connection once you have connected back to the wireless network on your Windows 10 computer.
#8 – Run Internet Connections Troubleshooter
You can run the Internet Connections troubleshooter in Windows 10 to fix the internet-created problem. This has helped quite a lot of users to resolve Wi-Fi related problems after the Windows 10 update. Check out the steps below:
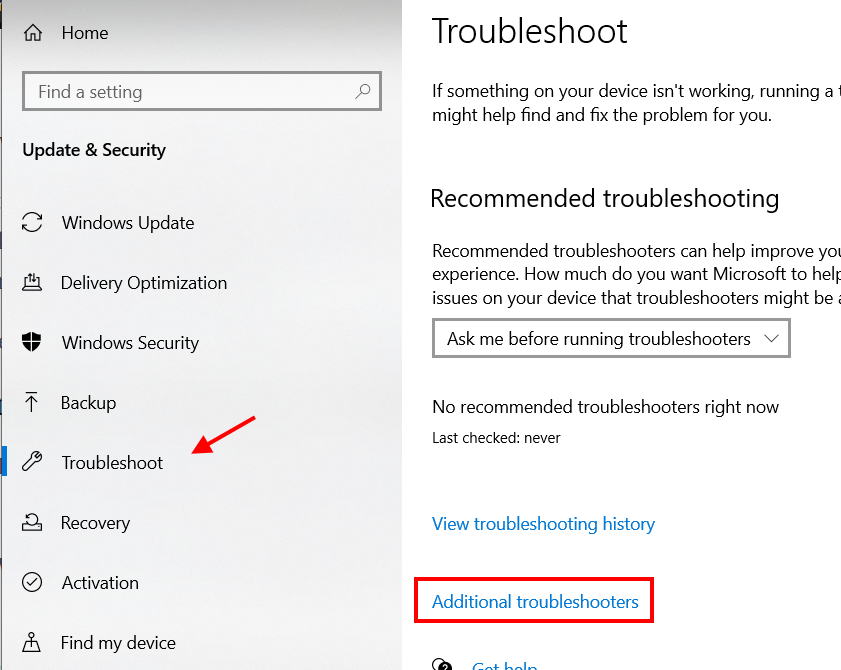
Step 1: Pressing Win + I keys will open the Settings app. Here, click on the option that says Update & Security.
Step 2: In the Update & Security settings menu, click on the Troubleshoot option available on the left pane. Go to the right pane and select the Additional troubleshooter’s option.
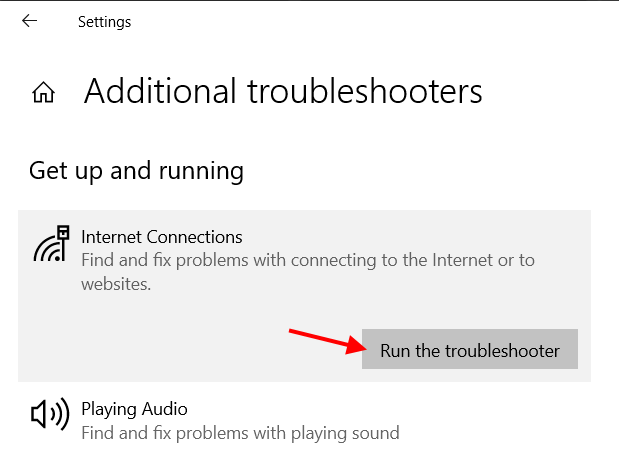
Step 3: On the new screen, click on the Internet Connections option, then click on the Run the troubleshooter button that appears.
Let the troubleshooter do its job of looking for problems related to an internet connection. The troubleshooter will fix any problem when found.
#9 – Run Network Adapter Troubleshooter
You can also run the Network Adapter troubleshooter if the internet connection troubleshooter did not work.
Follow the steps as you did in the final solution, but instead of selecting the Intenet Connections option, click on the Network Adapter option, then select the Run the troubleshooter option.
#10 – Renew IP and Flush DNS
You can renew the IP address of your Windows 10 computer and flush DNS to fix Wi-Fi not working after Windows 10 update issue. You need to follow these steps in the Command Prompt window.
Step 1: Press Win + R. In the Run box that opens, type cmd. Click on the Ok button.
Step 2: Command Prompt window will launch. Here, type the set of commands that follow. Press Enter key after typing each line:
ipconfig /release
ipconfig /renew
ipconfig /flushdns
Close the Command Prompt window after running these commands and restart your PC. Did this help?
#11 – Reset Network Connection in Command Prompt to Fix WiFi Issue
You can also try to reset the wireless network connection on your Windows 10 PC to get back internet connectivity. Just like the last solution, this process can be carried out in Command Prompt too. All you need to do is run the following command in the CMD window:
netsh winsock reset
netsh int ip reset
Again, close the CMD window and restart your computer and see if this worked.
#12 – Reset Network Connection in the Settings App to Fix WiFi Issue
You can also use the Windows 10 Settings app to reset the internet connection on your PC. Here are the steps:
Step 1: Open the Settings app by pressing Win + I keys.
Step 2: Here, click on the Network & Internet option.
Step 3: On the left pane, select the Status option. Now, go to the right panel and click on the Network reset text.
Step 4: On the next screen, click on the Reset now button.

After carrying out a successful network reset through the Settings app, your PC will reboot. After the reboot, check if the internet is working correctly now.
#13 – Roll Back Wireless Adapter Update to Fix WiFi Issue
You can roll back the Wi-Fi network adapter to its previous version through the Device Manager in Windows 10 and see if that helps.
Step 1: Press Win + X keys. A menu will open. Here, click on the Device Manager option.
Step 2: Click on the Network adapters option. A list of network adapters installed on your PC will open. Right-click on the Wi-Fi adapter and select the Properties option.
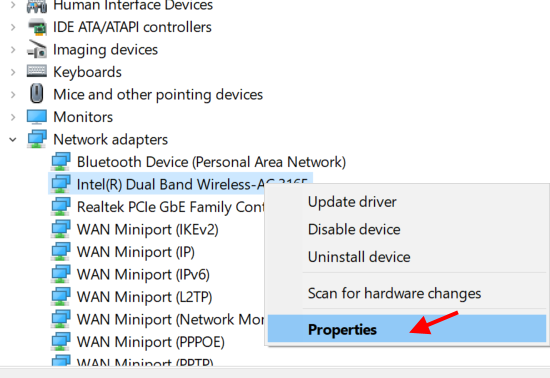
Step 3: The WiFi adapter’s properties window will open. Go to the Driver tab. Here, if the wireless adapter has been updated in the past, you will be able to click on the Roll Back Driver option. Click on it to roll back the driver.
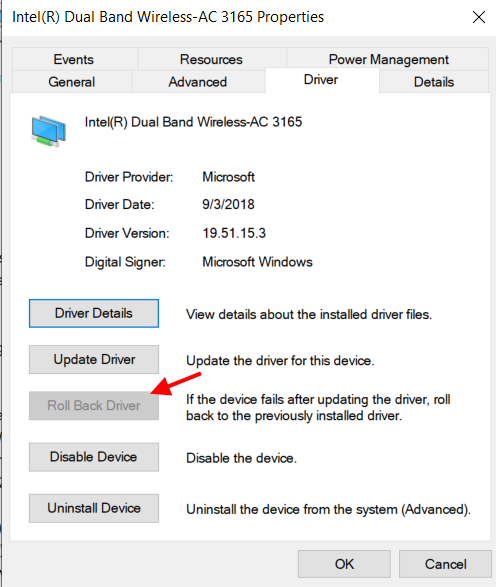
Once the wireless driver has been rolled back to its previous version, close the Device Manager and restart your Windows 10 PC to apply changes.
#14 – Disable Antivirus to Fix WiFi Issue
If you were not able to roll back the device driver or if performing a driver rollback did not help, you may need to disable the third-party antivirus installed on your PC and see if that works.
Antivirus software may conflict with Microsoft Windows 10 update security and make the internet on your PC inaccessible. Try to disable the antivirus to check if that is helpful temporarily. If not, you may need to uninstall the antivirus from your PC. For that, you should use a software uninstaller program.
Closing Words
We hope that the solutions provided above helped you fix the WiFi issue after updating to the latest Windows 10 version.