
Remote Desktop is a powerful Windows 10 feature that allows users to remotely access and control their computer from anywhere, providing they have an internet connection. However, it can be incredibly frustrating when you’re ready to work or access files remotely, and you find that the Remote Desktop feature won’t connect. This issue can stem from a variety of causes, including network problems, incorrect settings, or system permissions. In this article, we’ll explore the common reasons why Remote Desktop might not connect in Windows 10 and provide clear, step-by-step solutions to get you back up and running.

Table of Contents
Firstly, make sure your internet connection is working fine. Try running a speed test (Speedtest by Ookla) to verify the same. If you have an extremely slow connection, some issues are bound to happen.
Method 1: Allow Remote Connections to your Computer
By default, remote connections are disabled and therefore, if you are trying to set up a connection for the first time, you need to manually enable the feature. Allowing remote connections is as simple as toggling on a single switch in the settings.
1. Open Windows Settings by pressing the Windows Key + I simultaneously. Click on System.
2. Move to the Remote Desktop tab (second last) from the left-hand pane and toggle on the switch for Remote Desktop.

3. If you receive a pop-up requesting affirmation on your action, simply click on Confirm.

Also Read: Fix The L2TP Connection Attempt Failed Error on Windows 10
Method 2: Modify Firewall Settings
Remote Desktop while being an extremely handy feature can also act as a doorway for hackers and allow them unrestricted access to your personal computer. To keep a check on your computer’s security, a remote desktop connection isn’t allowed through the Windows Firewall. You will need to manually allow Remote Desktop through the defender firewall.
1. Type Control Panel in either the Run command box or the start search bar and press enter to open the application.
2. Now, click on Windows Defender Firewall.
3. In the following window, click on the Allow an app or feature through the Windows Defender Firewall hyperlink.

4. Click on the Change Settings button.
5. Scroll down the Allow apps and features list and check the box next to Remote Desktop.
6. Click on OK to save the modification and exit.

Along with the Defender Firewall, an antivirus program you have installed on your computer may be blocking a remote connection from being set up. Temporarily disable the antivirus or uninstall it and check if you are able to create a connection.
Also Read: Access Your Computer Remotely Using Chrome Remote Desktop
Method 3: Enable Remote Assistance
If you are having trouble setting up a remote connection, try enabling remote assistance and then sending an invitation to the other user.
1. Double-click on the Windows File Explorer shortcut icon on your desktop to launch the application and right-click on This PC.
2. Click on Properties in the ensuing context menu.

3. Open Remote Settings.

4. Check the box next to ‘Allow Remote Assistance connections to this computer’.

5. Remote Assistance also needs to be manually allowed through the firewall. So follow steps 1 through 4 of the previous method and tick the box next to Remote Assistance.
To Send an Assistance Invitation:
1. Open the Control Panel and click on the Troubleshooting item.
2. On the left pane, click on Get help from a friend.
3. Click on Invite someone to help you. in the following window.

4. Choose any of the three methods to invite your friend over. For the purpose of this tutorial, we will continue with the first option, i.e, Save this invitation as a file. You can also directly mail the invitation.

5. Save the invitation file in your preferred location.

6. Once the file is saved, another window displaying the file password will open up. Carefully copy the password and send that to your friend. Do not close the Remote Assistance window until the connection is established, otherwise, you will need to create and send a new invitation.

Also Read: Fix Remote Desktop Cannot Connect to the Remote Computer
Method 4: Disable Custom Scaling
An important setting that often gets overlooked when setting up a remote connection is custom scaling. To those unaware, Windows allows users to set a custom size for their text, apps, etc. using the Custom Scaling feature. However, if the feature (custom scale) isn’t compatible with the other device, issues will arise in remotely controlling the computer.
1. Launch Windows Settings once again and click on System.
2. On the Display settings page, click on Turn off custom scaling and sign out.
3. Sign back into your account and check if you are able to connect now.
Also Read: How to Enable Remote Desktop on Windows 10
Method 5: Modify the Registry Editor
Some users have been able to solve the remote desktop won’t connect problem by modifying the Terminal Server Client folder in the Registry editor. Be extremely careful in following the below steps and making changes to the registry as any accidental mistake can prompt additional issues.
1. Press Windows key + R to launch the Run command box, type Regedit, and hit the enter key to open the Registry Editor.
2. Using the navigation menu on the left panel, head down to the following location:
HKEY_CURRENT_USER\Software\Microsoft\Terminal Server Client
3. Right-click anywhere on the right panel and select New followed by DWORD (32-bit) Value.

4. Rename the value to RDGClientTransport.
5. Double-click on the newly created DWORD Value to open its Properties and set Value Data as 1.

Method 6: Delete existing Remote Desktop Credentials
If you had previously connected to a computer but are now facing issues in connecting again, try deleting the saved credentials and starting all over again. It is quite possible that some of the details were changed and thus, the computers fail to connect.
1. Perform a search for Remote Desktop Connection using the Cortana search bar and hit enter when the results arrive.
2. Click on the Show Options arrow to reveal all tabs.

3. Move to the Advanced tab and click on the ‘Settings…’ button under Connect from anywhere.

4. Delete the existing credentials for the computer you are having a hard time connecting to.
You can also manually enter the IP address of a remote computer and edit or delete the credentials from the General tab itself.
Also Read: How to Setup Remote Desktop Connection on Windows 10
Method 7: Change Network Settings
For the sake of our digital security, remote desktop connections are only allowed on private networks. So if you are connected to a public network, switch to a more secure private one or manually set the connection as private.
1. Open Windows Settings once again and click on Network & Internet.
2. On the Status page, click on the Properties button under your current network.
3. Set the Network Profile as Private.

Method 8: Add the IP Address to the Host’s file
Another manual solution to the remote desktop won’t connect issue is adding the remote computer’s IP address to the host’s file. To know a Computer’s IP address, open Settings > Network & Internet > Properties of the currently connected network, scroll down to the end of the page, and check the IPv4 value.
1. Search for Command Prompt in the Start Search bar and select Run as Administrator.
2. Type the following command and press enter
cd C:/Windows/System32/Drivers/etc
3. Next, execute notepad hosts to open the host’s file in the notepad application.

4. Add the remote computer’s IP address and press Ctrl + S to save the changes.
If issues with the remote desktop feature only started after performing the most recent Windows Update, uninstall the update or wait for another one to arrive with the bug hopefully fixed. Meanwhile, you can use one of the several third-party remote desktop programs available for Windows. As mentioned earlier, TeamViewer and Anydesk are crowd favorites, free, and very easy to use. RemotePC, ZoHo Assist, and LogMeIn are a few great paid alternatives.
Recommended:
- Change Remote Desktop Port (RDP) in Windows 10
- A Comprehensive Guide to Discord Text Formatting
- 5 Ways To Remove Chromium Malware From Windows 10
- How to Show CPU and GPU Temperature on Taskbar
We hope this guide was helpful and you were able to fix Remote Desktop Won’t Connect in Windows 10. Still, if you have any doubts then feel free to ask in the comment section below.
It’s common to meet the remote desktop black screen issue on Windows 11/10. You may want to find some solutions and you come to the right place. This post from MiniTool provides reasons and fixes for the black screen issue on the remote desktop.
Remote Desktop Connection (RDC) is a useful program of Windows 11/10 that allows you to connect remotely to another computer without additional software. However, one of the most common issues is that the remote desktop black screen.
Why Does Remote Desktop Have the Black Screen
Do you want to know the reasons for the Remote Desktop Connection black screen issue? The following lists the possible reasons:
- Windows Updates: One of the most possible reasons for remote desktop black screen issues is updating Windows. This issue may occur after updating Windows.
- Remote Desktop Settings: The changed Remote Desktop settings can cause the black screen issue.
- GPU Drivers: If the GPU driver settings have been changed, the issue can also appear.
- Windows Settings: If you change some Windows settings by accident, it may cause a black screen.
How to Fix Remote Desktop Black Screen on Windows 11/10
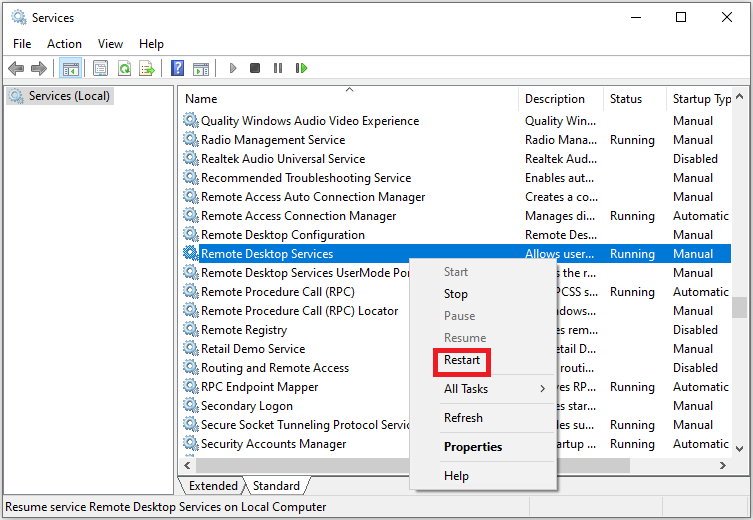
Fix 1: Restart Remote Desktop Services
Step 1: Press the Windows + R keys together to open the Run box. Type services.msc and click OK to open the Services application.
Step 2: Find Remote Desktop Services and right-click it to choose Restart.
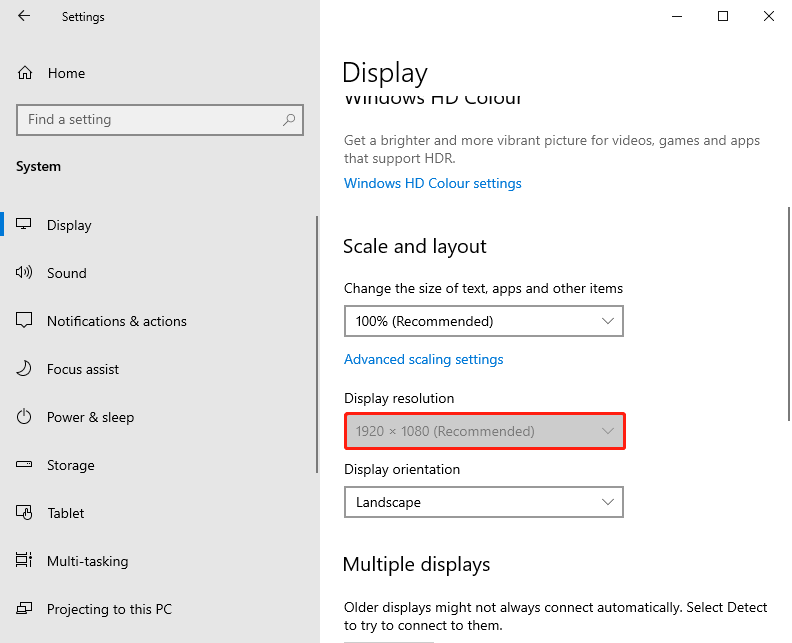
Fix 2: Change the Screen Resolution
Step 1: Press the Windows + I keys together to open the Settings application.
Step 2: Go to System > Display > Scale and layout. Click the drop-down menu under Display resolution and change it.
Fix 3: Change the Color Depth of the Remote Session
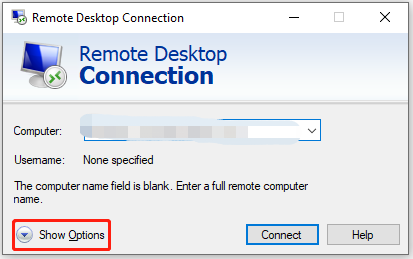
Step 1: Type Remote Desktop Connection in the Search box and click Open.
Step 2: Click the Show Options button.
Step 3: Go to Display > Colours. Click the drop-down menu to choose the True Colour (24-bit) mode and click Connect.

Fix 4: Disable the Bitmap Caching
Step 1: Type Remote Desktop Connection in the Search box and click Open.
Step 2: Click the Show Options button.
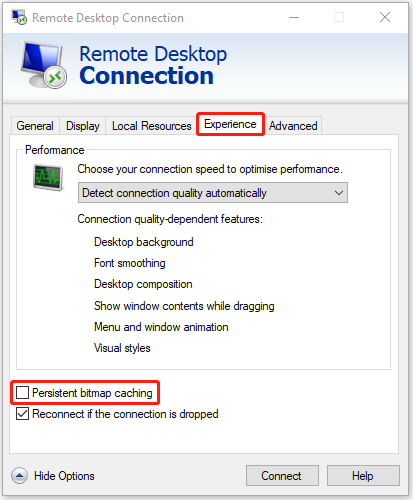
Step 3: Click the Experience tab, then uncheck the Persistent bitmap caching option.
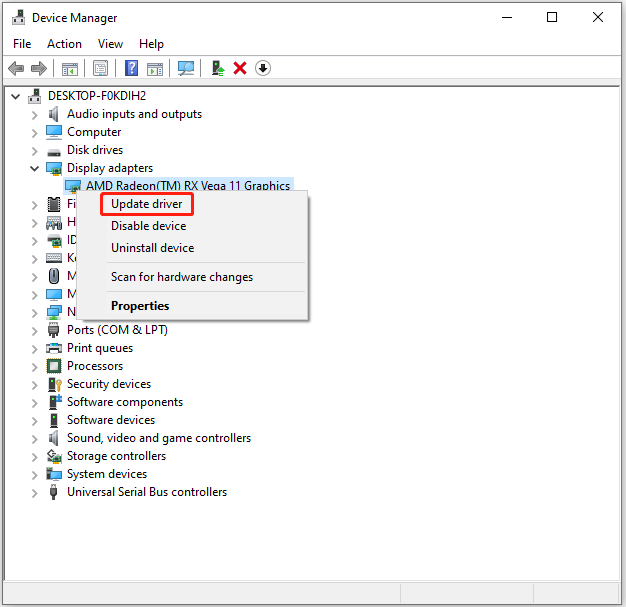
Fix 5: Update the GPU Driver
Step 1: Right-click the Start button and select Device Manager.
Step 2: Double-click the Display adapters category to view your device.
Step 3: Right-click your graphics card and choose Update driver.
Fix 6: Edit the Group Policy
Steps for the Client machine
Step 1: Press the Windows + R keys together to open Run. Then, type gpedit.msc and click OK to open Group Policy Editor.
Step 2: Go to the following path:
Computer Configuration > Administrative Templates > Windows Components > Remote Desktop Services > Remote Desktop Connection Client
Step 3: Find Turn Off UDP On Client on the right-hand side.
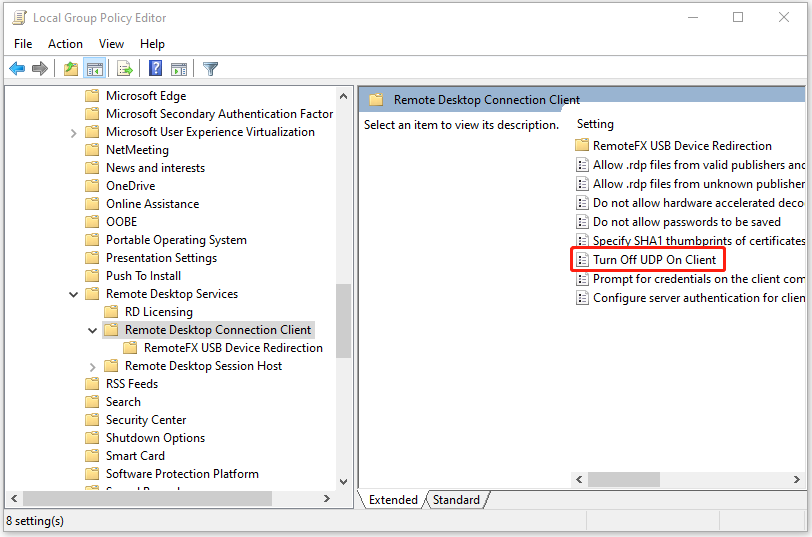
Step 4: Double-click it. Choose Enabled and click Apply and OK to apply the settings.
Step 5: Open an elevated command prompt window with administrative rights. Type the following command and press Enter.
gpupdate /force
Steps for the Remote machine
You have to alter the policy settings on the remote machine.
Step 1: Open Group Policy Editor on the remote machine and go to the following path:
Computer Configuration > Administrative Templates > Windows Components > Remote Desktop Services > Remote Desktop Session Host > Remote Session Environment
Step 2: Find Use WDDM graphics display driver for Remote Desktop Connections and double-click it.
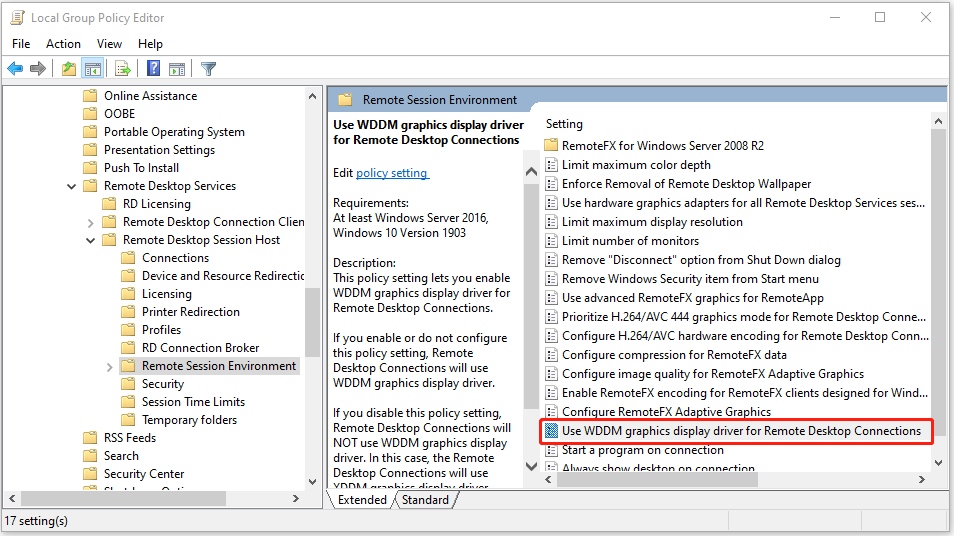
Step 3: Choose Disabled and click Apply and OK to save the settings.
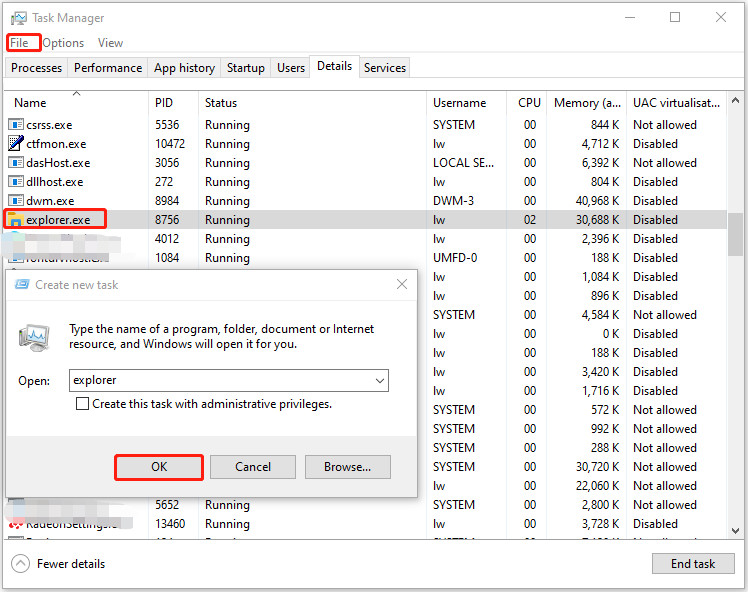
Fix 7: Relaunch Explorer.exe
Step 1: Open Task Manager and go to the Details tab.
Step 2: Find explorer.exe and right-click it to choose End task.
Step 3: Then go to File and click it to choose Run new task. Then type explorer and click OK.
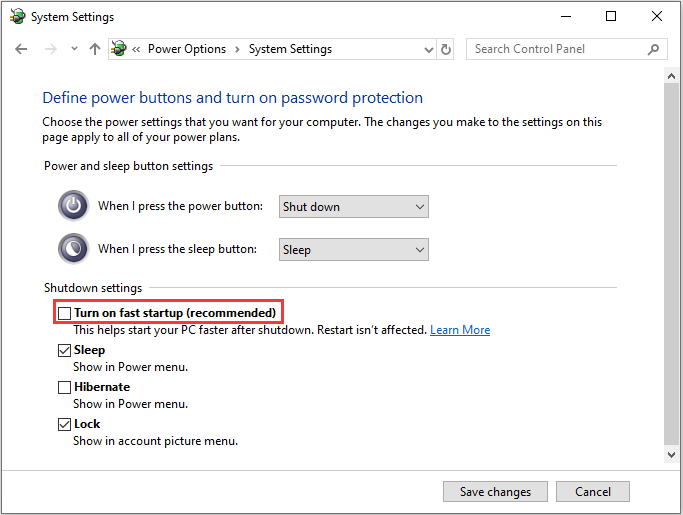
Fix 8: Turn off Fast Startup
Step 1: Press the Windows key and R key at the same time to open the Run dialog, type powercfg.cpl and click OK.
Step 2: Click Choose what the power button does from the left pane
Step 3: Then choose Change settings that are currently unavailable. When the User Account Control warning appears, you should click Yes.
Step 4: Uncheck Turn on fast startup (recommended) and click the Save changes button.
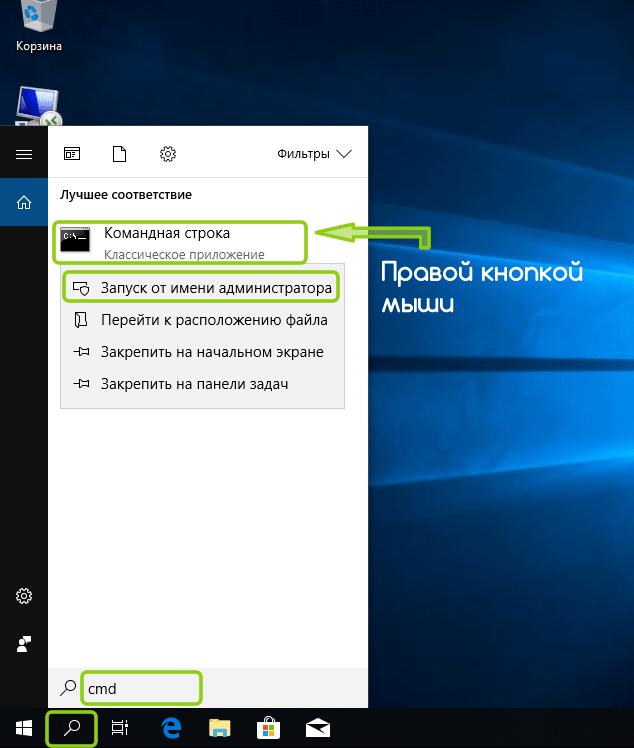
Fix 9: Run SFC scan
Step 1: Click the Start menu. Then type cmd in the Search box. Right-click Command Prompt and choose Run as administrator.
Step 2: When you get into Command Prompt, input sfc /scannow and press Enter.
Final Words
To sum up, here is how to fix the remote desktop black screen. If you come across the same error, try these solutions. If you have any different ideas to fix this problem, you can share them in the comment zone.
Windows Remote Desktop is a great feature provided by Microsoft in Windows 10 and almost all earlier versions of Windows. Remote Desktop can be used to access the computer over the network. It is also called RDP or Remote Desktop Protocol.
Sometimes RDP in Windows 10 stops working. There are various reasons for this. We will discuss some solutions that you might look for and will help you resolve the issue of RDP in Windows 10 not working.
Pro Tip: If you are in a hurry and don’t have time to troubleshoot, you can use Google Chrome Remote Desktop or TeamViewer 13 as Remote Desktop alternatives.
Otherwise, you can go through the list of possible solutions that may resolve Windows 10 remote desktop not working. Just follow the steps one by one and at the end of each step, see if the remote desktop starts working again.
1. Allow RDP in Windows Firewall
The first time you try to access the remote desktop the windows firewall will not allow you to do so because it is not active by default. It is because of security reasons as it gives security warnings if you try to access your computer from a different device. It may also happen if you are using any other antivirus software that does not let any other device access your computer. So in the case of antivirus the solution may be to uninstall it or stop it from running in the background.
In case of Windows firewall warnings, we have to turn it on
- Type “firewall” in the search and open the Windows Defender Firewall.
- From the left menu click on Allow an app or feature through Windows Firewall.


- Click on change settings
- Now find the Remote Desktop and turn it on


There you go, the Windows firewall will now allow you to connect to this PC remotely using remote desktop protocol.
2. Enable Remote Desktop in Windows Settings
Just like changing the firewall settings, it is necessary that you allow remote connection as well if you are using remote desktop for the very first time. So in order to do this:
- Search for remote settings and you will find Allow Remote connections to your computer, open it by clicking.
- Now in the settings that will open check Allow remote connections to this computer and click OK to save changes.


Remote connections are now enabled and now you can use it for the very first time. In order to use this feature, you have to make sure that your computer is not in hibernation mode or sleep mode, in that case, you won’t be able to connect your computer in remote desktop.
3. Turn off custom scaling
When you try using the remote desktop feature, the scaling feature of windows should be turn off as it might not be compatible with the device that will control your computer. This is a very recommended method as it has helped fix the error of the remote desktop. So in order to turn off the custom scaling follow the method:
- Open the settings You can do that simply by pressing Windows Key + I shortcut.
- Once the settings open, go to the System section.
- Click on Turn off custom scaling and sign out, if it is not already turned off.

Sign in again and try to use remote desktop, hopefully, it will start working.
4. Disable IPv6 protocol
Another option that has worked for many is to disable IPv6 (internet protocol version)on your network adapter. By default, Windows prefers IPv6 over IPv4. So if you are having problems using IPv6 to connect to the servers, you can force your computer to use IPv4 only.
- Open Settings ->Network and Internet -> Ethernet -> Change Adapter options
- Right click on the adapter for which you want to disable it, and select properties.
- Look for the checkbox which says Internet Protocol Version 6 (TCP/IPv6), uncheck it.
- Click on OK, and restart your computer.
There are times when Windows Update will also break the remote desktop connection and create problems for you. We have already written about one recent problem with the RDP authentication error function requested is not supported here.
These are some simple yet useful methods that can help you solve the issue of remote desktop connection. Please share your experiences in the comments below.
Очень часто после обновления Windows 10 возникают проблемы при подключении по RDP. Речь идет о невозможности подключиться по RDP потому, что возникает ошибка CredSSP. Это довольно распространенное явление, связанное с обновлением безопасности протокола RDP. Соответственно, возникает различие в протоколе между вашей обновленной версией Windows и той версией, которая установлена на удаленном сервере.
В данной статье мы детально покажем, что нужно сделать, чтобы решить проблему подключения к RDP CredSSP. Будут показаны пути решения для двух версий Windows: Windows 10 HOME и Windows 10 PRO.
- 1 Решение для Windows 10 HOME
- 2 Решение CredSSP для Windows 10 PRO
Решение для Windows 10 HOME
Запустите на компьютере (с которого хотите подключиться к серверу) командную строку от имени администратора:
REG ADD HKLM\SOFTWARE\Microsoft\Windows\CurrentVersion\Policies\System\CredSSP\Parameters /v AllowEncryptionOracle /t REG_DWORD /d 2Эта команда вносит изменения в реестр Windows, разрешая Вашему компьютеру подключаться с протоколом шифрования CredSSP к ещё не обновлённому серверу.
Если в результате выполнения возникает ошибка «Отказано в доступе», значит Вы запустили командную строку НЕ от имени администратора (см. на скриншоте выше как запускается командная строка корректно).
Решение CredSSP для Windows 10 PRO
Нажмите Win+R
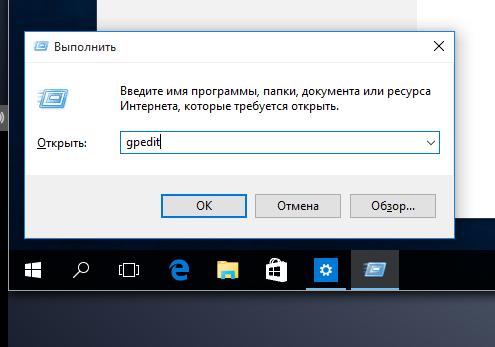
В появившемся окне наберите gpedit.msc. Если после нажатия Enter появляется ошибка, то скорее всего у Вас не Windows 10 PRO а HOME., в таком случае требуется смотреть инструкцию для конкретной версии.
Конфигурация компьютера -> Административные шаблоны -> Система -> Передача учетных данных
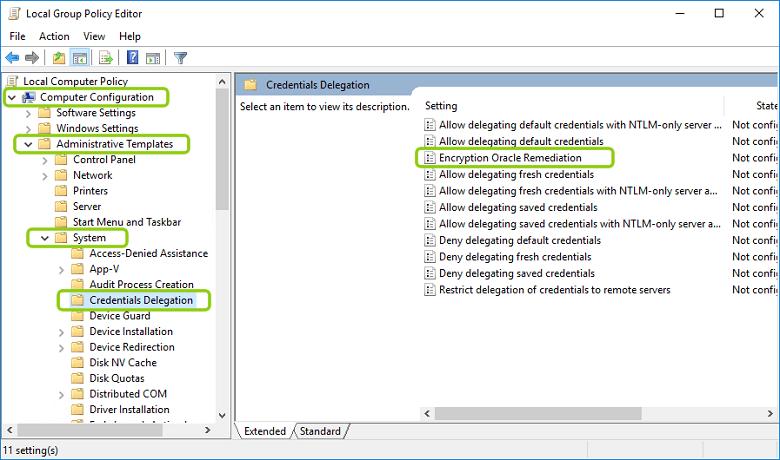
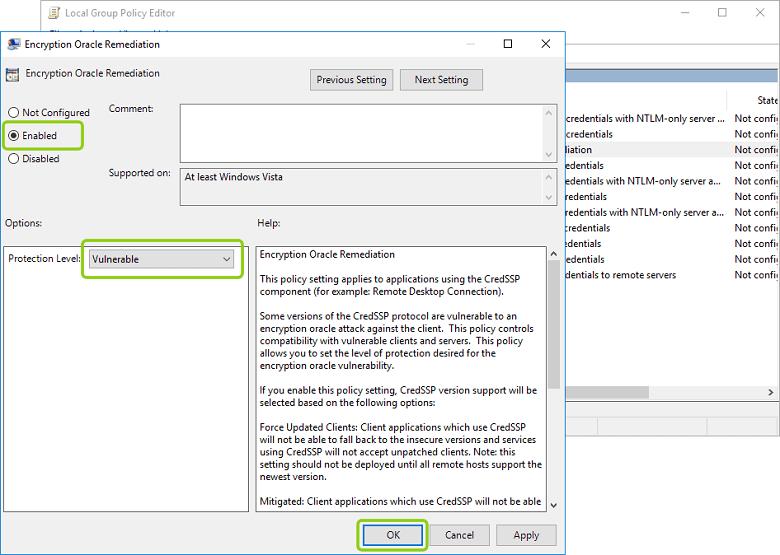
В папке «Credentials Delegation» («Передача учетных данных») найдите параметр «Encryption Oracle Remediation» («Исправление уязвимости шифрующего оракула»), откройте его, включите использование, выбрав «Enabled» («Включено»), и установите значение параметра в выпадающем списке на «Vulnerable» («Оставить уязвимость»)
После чего, вы сможете подключиться к серверу по RDP. Ошибка CredSSP при проверке подлинности больше не возникнет.