Remote Desktop Protocol (RDP) is a proprietary protocol developed by Microsoft to remotely connect to a Windows system using a graphical user interface. RDP is built into Windows by default. RDP listens on TCP port 3389 and udp port 3389. Previously, the RDP software was called Terminal Services client but now it’s called Remote Desktop Connection.
Windows comes with a remote desktop client that can be used to access the complete Windows Desktop environment remotely. It’s very useful for people who use multiple computers for work. One of our readers has asked about the RDP port and how to tweak it for security.
You can open the Remote Desktop Connection client by going to Run –> mstsc.
Simply put, the default port for using the Remote Desktop Protocol is 3389. This port should be open through Windows Firewall to make it RDP accessible within the local area network. If you want to make it accessible over the Internet (which is not safe), the RDP port should be forwarded through the main Internet router to work properly.
Let’s talk about how to open port 3389 in Windows Firewall and the router.
Table of Contents
Allow RDP port through Windows Firewall
- Go to Windows Settings (Windows key + i)
- Go to Update & Security –> Windows Security and click on Firewall & network protection from the right-hand listing. This will open a new window.
Windows Firewall and network protection - Click the link Allow an app through firewall
Allow an app through Firewall - Click on Change settings
Firewall change settings - Search for Remote Desktop from the list. It should be there by default. If it is not there, you should click on Allow another app button and navigate to the following:
C:\Windows\System32\mstsc.exeAllow Remote Desktop through firewall private or public - If you want to allow Remote Desktop on the local network only, check the checkbox labeled Private. If you want it publicly available, you should check the Public checkbox too.
- Press OK for the changes to take effect.
Allow RDP port through Router (using NAT Translation)
If you want to use Windows Remote Desktop over the Internet, you will need to do two steps:
- Allow RDP port through public network from Windows Firewall (or any other firewall) as we did in the previous step.
- Allow RDP port through the router which is giving you internet access and then translate the incoming port 3389 to the computer of our choice.
Please note that if you are connected to the Internet using a public IP, you don’t need the second step but normally people are connected to the Internet using routers, both home, and corporates.
The configuration for opening a port is different for each router. Since I’m using Kerio Control for my office network, I will walk you through the steps using Kerio Control. The terminology should be similar for most routers so it’ll be easy for you to follow the same steps for your specific router.
- Open your router’s configuration page. Normally it should be the same as your default gateway. For me, it is http://192.168.1.1
- After logging in, go to Traffic Rules –> Add a new rule
Kerio create a new traffic rule - Name your rules and keep them generic. Keep the action to Allow and press the Next button.
- Keep the source to Any. That means users will be able to connect to this specific port from anywhere.
Kerio Control source rule - Add Firewall to the Destination. You can keep it unchanged if you want.
- Under Services, select Port and specify 3389.
Kerio Control add port - Under NAT Translation, enable destination NAT, specify the IP address of your computer and also specify the port translation to 3389.
Kerio Control enable destination NAT
Change the default port of RDP
If you are opening RDP over the Internet, keeping the RDP port to 3389 is a security threat. It is recommended that you change the default port from 3389 to something above 10000. I, normally, keep it between 30000 and 40000 which is relatively safe as the port scanners will start scanning from port 1.
If you want to change the RDP port, follow the steps below:
- Go to Run –> regedit to open the Registry Editor.
- Locate the following key:
HKEY_LOCAL_MACHINE\System\CurrentControlSet\Control\Terminal Server\WinStations\RDP-Tcp\ - In the right-hand pane, double-click on PortNumber
- Change the value to Decimal and specify the port number between 1001 to 254535.
Steps to change default RDP port number
Check if port 3389 is open and listening
There are times when you successfully open the RDP port but you’re unable to connect to the computer remotely. In that case, make sure that you are able to access port 3389 (or any other port if you have changed it) remotely. Follow the steps below to check if port 3389 is open and listening.
- Open PowerShell by going to Run –> powershell
- Run the following command
tnc 192.168.1.2 -port 3389
Replace the IP address 192.168.1.2 with your computer’s IP. Replace it with your router’s public IP if you have allowed public access to your computer through the router. The value of TcpTestSucceeded should be True.

If you want to check the port using the command prompt, you can follow this guide.
I hope this guide is useful for you and now you can control your remote desktop the way you want. If you have any questions or if I have left any confusion in this article, let me know through the comments below. Your comments are highly appreciated!
Remote Desktop Protocol (RDP) is a widely used protocol developed by Microsoft to allow remote access to computers and servers. By default, RDP uses port 3389, but there are several reasons why you might want to change this port or use alternative ports. In this blog post, we will explore what ports can I use for RDP, the reasons for modifying the default port, and how to do so safely.
Default RDP Port: 3389
Port 3389 is the official and default port for RDP connections. When you connect to a remote machine using RDP, the client communicates with the remote server over TCP and UDP using this port. While it is convenient to use the default port, it also presents security risks, as cyber attackers frequently target it for brute-force attacks, exploits, and unauthorized access attempts.
Why Change the Default RDP Port?
1. Enhanced Security
One of the primary reasons for changing the default RDP port is security. Attackers often scan networks for open port 3389, looking for vulnerable systems. Changing the RDP port makes it harder for attackers to find your system, adding a layer of security by obscurity.
2. Compliance with Network Policies
Some organizations or ISPs block traffic on port 3389 for security reasons. In such cases, changing the port may be necessary to comply with network policies and enable remote access without violating security protocols.
3. Avoiding Port Conflicts
If multiple devices on a network require RDP access, and port forwarding is in use, changing the port allows different machines to be accessible remotely without interfering with each other.
4. Preventing Automated Attacks
Many automated bots and malware scripts are programmed to target port 3389. Changing the port can reduce the risk of automated attacks and unauthorized access attempts.
Alternative Ports for RDP
Although port 3389 is the standard, you can configure RDP to use other ports. Here are some considerations when selecting an alternative port:
1. Choosing a Non-Standard Port
When selecting an alternative port, consider using a port number above 1024 (e.g., between 1025 and 65535) to avoid conflicts with well-known ports. Examples of alternative ports include:
- 5000 – Often used for various services but can be repurposed for RDP.
- 6001 – Used in some networking applications but can be used for RDP.
- 12345 – A commonly chosen high-range port for custom applications.
- 40000-50000 – Less commonly used, reducing the risk of conflicts and automated attacks.
2. Using Custom Ports
When choosing a custom port, ensure that it does not conflict with other critical services. Check your system’s network usage to confirm that the chosen port is available and not being used by another application.
How to Change the RDP Port on Windows
If you decide to use an alternative port for RDP, follow these steps to modify the RDP port in Windows:
Step 1: Modify the Windows Registry
- Press Win + R, type regedit, & hit Enter to open the Windows Registry Editor.
- Navigate to the following key:
HKEY_LOCAL_MACHINE\SYSTEM\CurrentControlSet\Control\Terminal Server\WinStations\RDP-Tcp
- Locate the PortNumber entry.
- Right-click PortNumber, select Modify, choose Decimal, and enter your new port number (e.g., 5000).
- Click OK and close the Registry Editor.
Step 2: Configure Windows Firewall
To allow traffic on the new port:
- Open the Windows Defender Firewall.
- Click Advanced Settings.
- Select Inbound Rules > New Rule.
- Choose Port and click Next.
- Select TCP, enter the new port number, and click Next.
- Choose Allow the connection, then select the network profiles (Domain, Private, Public).
- Name the rule (e.g., “Customs RDP Port”) & click Finish.
Step 3: Restart the Remote Desktop Services
To apply the changes:
- Open Command Prompt as an administrator.
- Run the following command to restart the RDP service:
net stop termservice && net start termservice
- Restart your computer for changes to take effect.
Step 4: Update Router Port Forwarding (If Necessary)
If you’re accessing the RDP session over the internet, update the port forwarding settings on your router:
- Log in to your router’s web interface.
- Navigate to Port Forwarding.
- Create a new rule forwarding your chosen port to the local IP address of the RDP server.
- Save and apply the changes.
Testing the New RDP Port
To test whether RDP is using the new port, use the following command in Command Prompt:
netstat -an | find "LISTENING" | find "5000"
Replace 5000 with your chosen port number. If the output shows that the port is listening, RDP is now configured on the new port.
Security Considerations When Changing RDP Ports
1. Enable Network Level Authentication (NLA)
To enhance security, enable Network Level Authentication (NLA) by going to:
- Control Panel > System and Security > System.
- Click Remote Settings.
- Under Remote Desktop Protocol, select “Permit connections only from computers running Remote Desktop with Network Level Authentication.”
2. Use a VPN for Remote Access
Rather than exposing RDP directly to the internet, consider using a VPN to securely connect to your network before using RDP.
3. Implement Two-Factor Authentication (2FA)
Use tools like Duo Security to add an extra layer of authentication before allowing an RDP session to start.
4. Monitor and Limit RDP Access
- Restrict RDP access to specific IP addresses.
- Use intrusion detection tools to monitor login attempts.
- Regularly update your operating system to patch vulnerabilities.
Conclusion
While port 3389 is the standard for RDP, changing it can enhance security, prevent automated attacks, and comply with network policies. However, modifying the port is only one part of securing remote access—additional steps such as enabling NLA, using a VPN, and implementing 2FA should be considered.
By following best practices, you can safely use RDP with a customized port while minimizing security risks and ensuring a seamless remote access experience.
В Windows для подключения к рабочему столу удаленного компьютера по протоколу RDP (Remote Desktop) по-умолчанию используется порт TCP 3389. В этой статье мы рассмотрим, как изменить номер стандартного порта для службы RDP на другой (применимо как к дестопным версиям Windows, так и к Windows Server).
Содержание:
- Изменить номер RDP порта в Windows
- PowerShell скрипт для смены номера RDP порта в Windows
После того, как вы включили RDP доступ в Windows, служба TermService (Remote Desktop Services) начинает слушать на порту 3389.

В современных версиях Windows для подключений удаленного рабочего стола также используется протокол UDP с тем же номером порта 3389. При использовании VPN, транспортный UDP протокол может вызывать проблемы с зависанием RDP сессий.
Для чего может понадобиться замена стандартного RDP порта 3389 на другой?
- Чаще всего это используется, чтобы спрятать RDP/RDS хост от автоматических сканеров портов, которые ищут в Интернете хосты Windows с открытым дефолтным RDP портом 3389.
- Смена RDP порта позволит уменьшить вероятность эксплуатации RDP уязвимостей, уменьшить количество попыток удалённого подбора паролей по RDP (не забывайте периодически анализировать логи RDP подключений), SYN и других типов атак.
- Обычно смена RDP порт используется на компьютерах с прямым подключением к интернету (VPS/VDS), или в сетях, где пограничный маршрутизатор перенаправляет порт 3389/RDP в локальную сеть на компьютер/сервер с Windows.
Несмотря на смену порта, не рекомендуется выставлять открытый RDP порт в Интернет. Сканеры портов по сигнатуре ответа могут понять, что на новом порту находится RDP Listener. Если вы хотите открыть внешний RDP доступ к компьютеру в локальной сети, лучше использовать такие технологии подключения, как VPN, RD Web Access, шлюз RD Gateway и другие.
При смене номера RDP порта на нестандартный, нежелательно использовать номера портов в диапазоне от 1 до 1023 (известные порты). Выберите неиспользуемый порт в пользовательском диапазоне (1024 до 49151) или из RPC (49152 — 65535). Проверьте, что выбранный порт не слушается другими процессами (например, порт 1350).
netstat -aon | findstr ":1350" | findstr "LISTENING"
Изменить номер RDP порта в Windows
В нашем примере мы изменим номер порта, на котором ожидает подключения служба TermService на 1350.
Для быстрой замены номера RDP порта на указанный, достаточно выполнить следующие команды с правами администратора:
set p=1350
reg add "HKLM\SYSTEM\CurrentControlSet\Control\Terminal Server\WinStations\RDP-Tcp" /v PortNumber /t REG_DWORD /d %p% /f
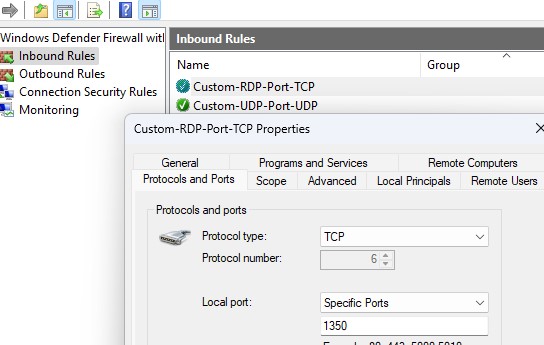
netsh advfirewall firewall add rule name="Custom-RDP-Port-TCP" protocol=TCP localport=%p% action=allow dir=IN
netsh advfirewall firewall add rule name="Custom-UDP-Port-UDP" protocol=UDP localport=%p% action=allow dir=IN
net stop TermService /y
net start TermService

Этот набор команд изменит номер RDP порта, создаст разрешающие правила для нового порта в файерволе и перезапустит службу TermService.
Рассмотрим, что делают эти команды и как изменить дефолтный номер RDP порта вручную.
- Откройте редактор реестра (
regedit.exe
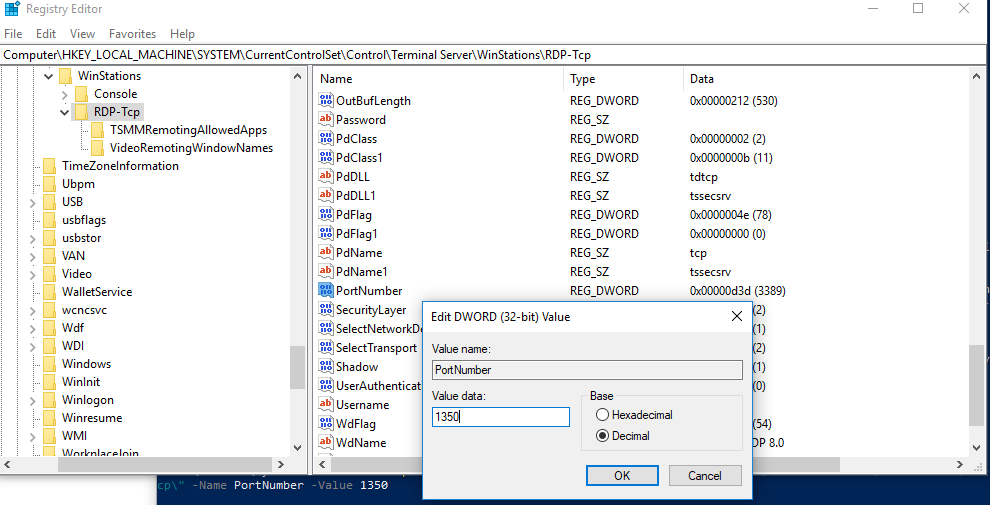
) и перейдите в ветку HKEY_LOCAL_MACHINE\System\CurrentControlSet\Control\Terminal Server\WinStations\RDP-Tcp - Найдите DWORD параметр реестра с именем PortNumber. В этом параметре указан порт, на котором ожидает подключения служба Remote Desktop. Значение по умолчанию 3389 (decimal)
- Измените значение этого порта. Я изменил RDP порт на 1350 в десятичном значении (Decimal);
хalert] Можно изменить значение параметра реестра с помощью PowerShell:
Set-ItemProperty -Path "HKLM:\System\CurrentControlSet\Control\Terminal Server\WinStations\RDP-Tcp\" -Name PortNumber -Value 1350
[/alert] - Создайте новые правила в Windows Firewall, разрешающие входящие подключения на новый номер RDP порта (если вы перенастраиваете удаленный сервер через RDP, создайте разрешающее правило в файерволе до перезапуска службы TermService, иначе вы потеряете доступ к хосту). Вы можете создать разрешающее входящее правило для нового TCP/UDP порта RDP вручную из консоли Windows Firewall with Advanced Security (
wf.msc
) или с помощью PowerShell команд:
New-NetFirewallRule -DisplayName "NewRDPPort-TCP-In" -Direction Inbound -LocalPort 1350 -Protocol TCP -Action allow
New-NetFirewallRule -DisplayName "NewRDPPort-UDP-In" -Direction Inbound -LocalPort 1350 -Protocol UDP -Action allow - Перезагрузите Windows или перезапустите службу удаленных рабочих столов командой:
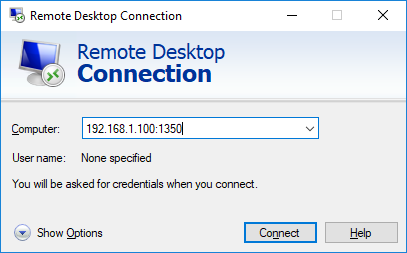
net stop termservice & net start termservice - Теперь для подключения к данному Windows компьютеру по RDP, в клиенте mstsc.exe нужно указывать порт RDP подключения через двоеточие следующим образом:
Your_Computer_Name:1350
или по IP адресу
192.168.1.100:1350
или из командной строки:
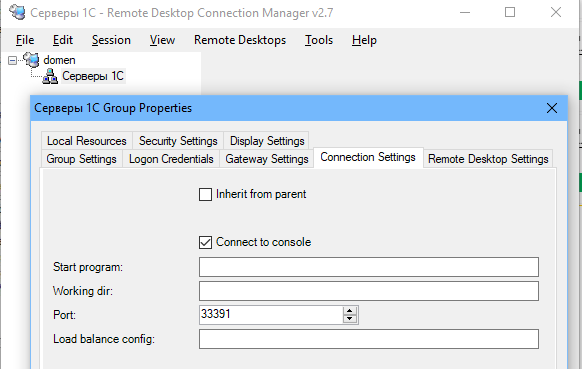
mstsc.exe /v 192.168.1.100:1350Если для управления RDP подключений вы используете менеджер RDCMan, новый номер RDP порта подключения указывается на вкладке “Connection Settings”.
- В результате вы должны успешно подключитесь к рабочему столу удаленного компьютера по новому номеру RDP порта (с помощью команды
netstat –na | Find "LIST"
убедитесь, что служба RDP теперь слушает на другом порту).
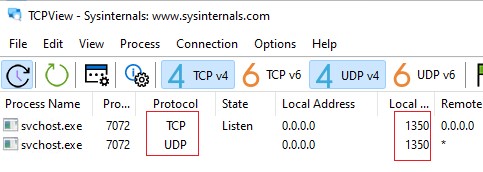
Обратите внимание, что номер UDP порта RDP также изменился на 1350 (проще всего проверить это с помощью утилиты TCPView).
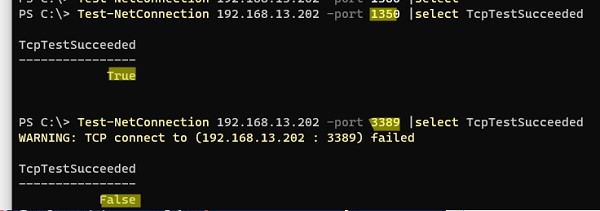
С помощью команды Test-NetConnection, проверьте что старый RDP порт теперь закрыт (
TcpTestSucceeded : False
):
Test-NetConnection 192.168.13.202 -port 3389 |select TcpTestSucceeded
Если вы хотите изменить номер RDP порта сразу на нескольких компьютерах в домене, можно воспользоваться групповыми политиками. Создайте новую GPO, которая распространит параметр реестра PortNumber с новым значением RDP порта на компьютеры домена.
PowerShell скрипт для смены номера RDP порта в Windows
Полный код PowerShell скрипта для смены номера RDP порта, создания правила в брандмауэре и перезапуска службы RDP может выглядеть так:
Write-host "Укажите номер нового RDP порта: " -ForegroundColor Yellow -NoNewline;$RDPPort = Read-Host
Set-ItemProperty -Path "HKLM:\SYSTEM\CurrentControlSet\Control\Terminal Server\WinStations\RDP-TCP\" -Name PortNumber -Value $RDPPort
New-NetFirewallRule -DisplayName "NewRDPPort-TCP-In-$RDPPort" -Direction Inbound –LocalPort $RDPPort -Protocol TCP -Action Allow
New-NetFirewallRule -DisplayName "NewRDPPort-UDP-In-$RDPPort" -Direction Inbound –LocalPort $RDPPort -Protocol UDP -Action Allow
Restart-Service termservice -force
Write-host "Номер RDP порта изменен на $RDPPort " -ForegroundColor Magenta
Если на удаленном компьютере включен WinRM, вы можно изменить номер порта RDP удаленно с помощью командлета Invoke-Command:
Invoke-Command -ComputerName PC1name -ScriptBlock {Set-ItemProperty -Path "HKLM:\SYSTEM\CurrentControlSet\Control\Terminal Server\WinStations\RDP-TCP\" -Name PortNumber -Value 1350}

Microsoft developed the proprietary Remote Desktop Protocol to offer customers a graphical interface for connecting to other computers through a network connection. For this, the user uses RDP client software, while the other machine has to be running RDP server software.
RDP port number is 3389 which provides network access for a remote user over an encrypted channel.
Before opening the RDP port, bear in mind the following.
- Strong Password Policies: Enforce strong password requirements for user accounts and discourage the use of default or easily guessable passwords.
- Two-Factor Authentication (2FA): Implement two-factor authentication, which adds an extra layer of security by requiring an additional verification step, such as a code sent to a mobile device, along with the password.
- Network Level Authentication (NLA): Enable NLA, a security feature that requires users to authenticate before establishing a remote desktop connection. It helps prevent unauthorized access attempts.
- Use SSL/TLS Encryption: Configure RDP to use SSL/TLS encryption for secure communication between the client and server. This helps protect data confidentiality during transit.
- Firewall Protection: Configure firewalls to allow RDP traffic only from trusted IP addresses or networks. Restricting access to RDP ports (default: TCP port 3389) helps minimize the risk of unauthorized access.
- Regular Updates and Patches: Keep the RDP client and server systems up to date with the latest security patches and updates. This helps address any known vulnerabilities.
- Account Lockout Policies: Implement account lockout policies to automatically lock out user accounts after a certain number of failed login attempts. This helps prevent brute-force attacks.
- Limit User Access: Grant RDP access only to authorized users who need it for their specific roles. Regularly review and revoke access for users who no longer require remote access.
- Session Timeouts: Configure session timeouts to automatically disconnect idle RDP sessions after a specific period of inactivity. This reduces the risk of unauthorized access if a session is left unattended.
- Monitor and Audit: Implement logging and monitoring mechanisms to track RDP connection attempts and activities. Regularly review logs for any suspicious or unauthorized access attempts.
Configure SSL/TLS encryption for RDP
Configuring SSL/TLS encryption for Remote Desktop Protocol (RDP) involves obtaining and installing an SSL certificate on the RDP server. Here’s a general overview of the steps involved:
- Obtain an SSL Certificate: Acquire an SSL certificate from a trusted certificate authority (CA). You can choose between a self-signed certificate or a certificate issued by a recognized CA. It is generally recommended to use a certificate from a trusted CA to ensure widespread client compatibility.
- Install the SSL Certificate: Install the SSL certificate on the RDP server. The exact steps may vary depending on the operating system and RDP server software being used. Typically, it involves importing the certificate into the server’s certificate store.
- Configure RDP to Use SSL/TLS: Enable SSL/TLS encryption in the RDP server settings. The process may differ depending on the specific RDP server software being used. Typically, you need to specify the SSL certificate to be used for encryption.
- Configure Firewall and Port Forwarding: Ensure that your firewall allows incoming connections on the SSL/TLS port (default: TCP port 3389) and forwards them to the RDP server.
- Test the SSL/TLS Connection: Verify the SSL/TLS configuration by connecting to the RDP server using an RDP client that supports SSL/TLS encryption. Ensure that the connection is established successfully.
It’s important to note that the specific steps for configuring SSL/TLS encryption for RDP may vary depending on the operating system and RDP server software being used. It is recommended to refer to the documentation or support resources provided by the specific RDP server software or consult with your system administrator for detailed instructions tailored to your environment.
Additionally, be sure to keep the SSL certificate up to date, renewing it as necessary, and regularly update the RDP server software to address any security vulnerabilities and take advantage of the latest security features.
You can check the current port by running the following PowerShell command:
Get-ItemProperty -Path 'HKLM:\SYSTEM\CurrentControlSet\Control\Terminal Server\WinStations\RDP-Tcp' -name "PortNumber"
For example:
PS C:\Users\controller> Get-ItemProperty -Path 'HKLM:\SYSTEM\CurrentControlSet\Control\Terminal Server\WinStations\RDP-Tcp' -name "PortNumber"PSPath : Microsoft.PowerShell.Core\Registry::HKEY_LOCAL_MACHINE\SYSTEM\CurrentControlSet\Control\Terminal Server\WinStations\RDP-Tcp
PSParentPath : Microsoft.PowerShell.Core\Registry::HKEY_LOCAL_MACHINE\SYSTEM\CurrentControlSet\Control\Terminal Server\WinStations
PSChildName : RDP-Tcp
PSDrive : HKLM
PSProvider : Microsoft.PowerShell.Core\Registry
PortNumber : 3389

What port need to open to allow remote desktop?
TCP port 3389 has to be open in order to use Remote Desktop. Moreover, with RDP 8.0, acceleration is enabled by opening UDP port 3389.
The port that the terminal server (or PC being connected) uses can be changed. It is not possible to modify the UDP port individually since it utilises the same port number as the TCP option.
Since RDP 8.0 (included with Windows 8 and Windows Server 2012, and accessible through an update for Windows 7 and Windows Server 2008 R2), UDP acceleration has been made available.
We can set custom RDP port numbers using following path.
HKEY_LOCAL_MACHINE\System\CurrentControlSet\Control\Terminal Server\WinStations\RDP-Tcp
How to Change the Remote Desktop Port on Windows?
- Open the Registry Editor (
regedit.exe) and go to the registry key HKEY_LOCAL_MACHINE\System\CurrentControlSet\Control\Terminal Server\WinStations\RDP-Tcp; - Find the DWORD parameter with the name PortNumber. This parameter shows the port, on which the Remote Desktop service is listening. The default is 3389 (decimal);
- Change the value of this parameter. I have changed the RDP port to 3390.
- If your machine has a Windows Firewall, you will need to create a new rule that enables inbound connections to your new RDP port.
- In the Windows Defender Firewall panel, you may manually create an allowed incoming rule for your new TCP/UDP RDP port.
- Reboot your computer.
- You must provide the new RDP connection port in your mstsc.exe client to connect to this Windows host using Remote Desktop.
You may also change the RDP port by running the PowerShell command below. The new RDP port will be 3390 in this command.
$portvalue = 3390Set-ItemProperty -Path 'HKLM:\SYSTEM\CurrentControlSet\Control\Terminal Server\WinStations\RDP-Tcp' -name "PortNumber" -Value $portvalue
New-NetFirewallRule -DisplayName 'RDPPORTLatest-TCP-In' -Profile 'Public' -Direction Inbound -Action Allow -Protocol TCP -LocalPort $portvalue
New-NetFirewallRule -DisplayName 'RDPPORTLatest-UDP-In' -Profile 'Public' -Direction Inbound -Action Allow -Protocol UDP -LocalPort $portvalue
So, that’s all in this blog. I will meet you soon with next stuff .Have a nice day !!!
Recommended contents
How to Check the Active Directory Database Integrity
Disabling and Enabling the Outbound Replication
DFS Replication Service Stopped Replication
What is Strict Replication Consistency
The replication operation failed because of a schema mismatch between the servers involved
Troubleshooting ad replication error 8418 the replication operation failed because of a schema mismatch between the servers
How to export replication information in txt file
Repadmin Replsummary
Enabling the outbound replication
Disabling and enabling replication on schema master domain controller
How to enable strict replication consistency
How to prevent lingering objects replication in active directory
AD replication process overview
How to force active directory replication
Change notification in replication process
How to check replication partner for a specific domain controller
dcdiag test replications
Guys please don’t forget to like and share the post.Also join our WindowsTechno Community and where you can post your queries/doubts and our experts will address them .
You can also share the feedback on below windows techno email id.
If you have any questions feel free to contact us on admin@windowstechno.com also follow us on facebook@windowstechno to get updates about new blog posts.
Was this article helpful?
YesNo
He is an Active Directory Engineer. He has been working in IT industry for more than 10 years. He is dedicated and enthusiastic information technology expert who always ready to resolve any technical problem. If you guys need any further help on subject matters, feel free to contact us on admin@windowstechno.com Please subscribe our Facebook page as well website for latest article. https://www.facebook.com/windowstechno
Windows Remote Desktop uses port 3389, which is the default port for establishing remote desktop connections. This port allows users to access and control their Windows computers remotely, from any location. It’s a crucial component of remote working and provides a convenient way to connect to your office computer from home or on the go.
Having remote desktop access on port 3389 simplifies the process of accessing files, running applications, and performing tasks on your remote Windows computer. It eliminates the need to physically be present at your office desk and allows you to work seamlessly from anywhere with an internet connection. With the increasing trend of remote work, Windows Remote Desktop on port 3389 has become an essential tool for many professionals and organizations, offering flexibility and productivity in a fast-paced world.
Windows Remote Desktop uses port 3389 for communication. This port is designated for Remote Desktop Protocol (RDP) and allows remote access to a computer or server. It is important to ensure that port 3389 is open on your firewall or router to establish a remote desktop connection. By default, Windows Remote Desktop uses this port for both internal and external connections.

Introduction: What Port Does Windows Remote Desktop Use?
Windows Remote Desktop is a feature in the Windows operating system that allows users to remotely access and control a computer from another device. It is commonly used for remote technical support, accessing files and software, and remote administration of servers. To establish a Remote Desktop session, the client device needs to connect to the correct port on the remote computer.
In this article, we will explore the specific port used by Windows Remote Desktop and delve into the technical aspects related to its configuration and security implications. Understanding the port used by Remote Desktop is crucial for network administrators, IT professionals, and anyone using the service to ensure a smooth and secure remote connection.
Remote Desktop Protocol (RDP)
Remote Desktop Protocol (RDP) is the underlying technology behind Windows Remote Desktop. It is a proprietary protocol developed by Microsoft that enables users to connect to a remote computer and interact with its desktop interface.
To establish a Remote Desktop session, the RDP client needs to connect to the RDP server running on the remote computer. This connection is established over a specific port that facilitates the communication between the client and the server.
The RDP protocol is designed to be secure and allows for encryption of data transmitted between the client and the server. It uses the Transmission Control Protocol (TCP) as the transport protocol for establishing reliable connections over IP networks.
Default Port for Windows Remote Desktop
By default, Windows Remote Desktop uses port 3389 for communication between the client and the server. This means that when initiating a Remote Desktop session, the client needs to connect to the IP address of the remote computer using port 3389.
When a client initiates a connection to the remote computer, it sends a request to the server on port 3389. The server then responds and establishes a connection with the client using the same port. Once the connection is established, the client can interact with the remote computer’s desktop as if they were physically present at the machine.
It’s important to note that port 3389 is the default port, and it can be changed by modifying the Remote Desktop settings on the computer hosting the RDP server. Changing the default port adds an additional layer of security, as it makes it more difficult for hackers to identify the correct port and attempt unauthorized access.
Port Forwarding for Remote Desktop
Port forwarding is a network configuration that allows external devices to connect to a specific port on a private network. For Windows Remote Desktop to work across different networks, port forwarding needs to be set up on the router or firewall.
If the remote computer is behind a router or firewall, port 3389 on the public IP address needs to be mapped to the internal IP address of the computer running the RDP server. This allows incoming RDP connections to reach the correct computer within the local network.
Configuring port forwarding involves accessing the router or firewall’s settings and creating a rule that redirects incoming traffic on port 3389 to the internal IP address of the remote computer. The exact steps vary depending on the router or firewall being used.
Security Considerations
While Windows Remote Desktop is a convenient feature, it is important to consider the security implications of opening port 3389 to the internet. Leaving port 3389 open without any security measures in place can make the remote computer vulnerable to brute-force attacks and unauthorized access attempts.
To enhance the security of a Remote Desktop connection, it is recommended to take the following measures:
- Enable Network Level Authentication (NLA), which adds an additional layer of authentication before the RDP session is established.
- Use strong, complex passwords for user accounts on the remote computer.
- Regularly update the Windows operating system and enable automatic security updates.
- Consider changing the default port for Remote Desktop to a non-standard port.
- Implement a firewall to restrict access to port 3389 only from trusted IP addresses.
- Use a virtual private network (VPN) for an additional layer of encryption and security.
Alternative Ports for Windows Remote Desktop
While port 3389 is the default port for Windows Remote Desktop, it is possible to configure the RDP server to use a different port. This can be useful in situations where port 3389 is already in use or to add an extra layer of security by obfuscating the port number.
Configuring the RDP server to use a different port involves modifying the Windows Registry. The specific steps may vary depending on the version of Windows being used, but generally, it requires creating or modifying a DWORD value in the Registry.
It’s important to note that when using a non-standard port, both the client and the server need to be aware of the change. The client needs to specify the custom port when initiating the Remote Desktop session, and the server needs to listen for incoming connections on that port.
Benefits and Drawbacks of Using Alternative Ports
Using an alternative port for Windows Remote Desktop can have both benefits and drawbacks:
Benefits:
- Enhanced security: Changing the default port adds an extra layer of security by making it more difficult for attackers to identify the correct RDP port.
- Bypassing port blocking: Some networks or internet service providers may block port 3389 for security reasons. Using a non-standard port can help bypass such restrictions.
Drawbacks:
- Inconvenience: Using a non-standard port requires manually specifying the port number during Remote Desktop connections, which can be less convenient.
- Compatibility issues: Some third-party applications or network setups may not support alternative RDP ports, potentially causing compatibility issues.
Conclusion
In conclusion, Windows Remote Desktop uses port 3389 by default for communication between the client and the server. This default port can be changed for added security, and port forwarding may be necessary for Remote Desktop to work across different networks. It is crucial to consider the security implications and implement measures such as enabling Network Level Authentication, using strong passwords, and restricting access to trusted IP addresses. While alternative ports can enhance security, they may also introduce compatibility and convenience challenges. By understanding the port used by Windows Remote Desktop and implementing appropriate security measures, users can enjoy secure and efficient remote access to their computers.

Port for Windows Remote Desktop
When it comes to using the Windows Remote Desktop feature, it is important to know which port it uses. The default port for Windows Remote Desktop Protocol (RDP) is TCP 3389. This port is used for the secure transmission of data between the client and the remote desktop server.
However, it is worth mentioning that the port number can be changed if necessary. It is a good security practice to modify the default port to a different number to prevent potential attacks from hackers who often target the default ports.
To change the port number for Windows Remote Desktop, you can modify the registry settings on the server. It is recommended to consult the official documentation or seek assistance from a professional IT expert to ensure proper configuration and security.
Key Takeaways
- Windows Remote Desktop uses port 3389 by default.
- Port 3389 needs to be open in the firewall for Remote Desktop to work.
- Changing the default port can enhance security by avoiding automated attacks.
- Port 3389 can be changed in the Windows Registry settings.
- When using a different port, it must be specified in the Remote Desktop client software.
Frequently Asked Questions
In this section, we’ll answer some common questions about the port used by Windows Remote Desktop.
1. How does Windows Remote Desktop work?
Windows Remote Desktop allows users to connect to and control a remote computer as if they were sitting in front of it. By establishing a connection, users can access files, software, and resources on the remote computer.
When you initiate a connection from your local computer, Windows Remote Desktop uses a communication protocol called Remote Desktop Protocol (RDP) to establish a secure connection between your local device and the remote computer.
2. Why do I need to know what port Windows Remote Desktop uses?
Knowing the port Windows Remote Desktop uses is essential for setting up firewalls, forwarding ports, or configuring network security. It allows you to ensure that the necessary ports are open and accessible for Remote Desktop connections.
If the port used by Windows Remote Desktop is blocked or not properly configured, you may encounter connectivity issues when trying to establish a remote connection to another computer.
3. What is the default port used by Windows Remote Desktop?
The default port used by Windows Remote Desktop is 3389. This means that by default, Remote Desktop connections will be established through port 3389.
However, it’s important to note that the port can be changed during system configuration and may vary depending on your specific setup.
4. Can I change the port used by Windows Remote Desktop?
Yes, you can change the port used by Windows Remote Desktop. Changing the port can add an additional layer of security to your remote connections by making it harder for potential attackers to find and exploit the default port.
To change the port, you’ll need to modify the Windows Registry and configure your router and firewall to allow the new port. However, it’s important to ensure that you choose a port that is not already in use by another service.
5. How can I check if the Windows Remote Desktop port is open?
You can check if the Windows Remote Desktop port (default: 3389) is open using various network scanning tools or port scanners available online. These tools can help you identify if the port is open, closed, or filtered by a firewall.
It’s important to regularly check the status of your port to ensure that it’s properly configured and accessible for Remote Desktop connections.
In conclusion, the Windows Remote Desktop uses port 3389 for communication between remote computers. It is the default port that Windows uses for Remote Desktop Protocol (RDP), which allows users to connect to and control remote systems.
By using port 3389, Windows Remote Desktop ensures a secure and encrypted connection between the local and remote computers. This port is commonly used by IT professionals and individuals who need to access their computers remotely for work or personal purposes.


