
Сообщения без ответов | Активные темы
| Автор | Сообщение |
|---|---|
|
Slalomist |
Заголовок сообщения: Проблема настройки сетевого принтера для DI-524UP Добавлено: Сб фев 24, 2007 12:22 |
|
|
Скачал с сайта инструкцию по настройке принтера ( http://www.dlink.ru/technical/pdf/print … I-624S.pdf ). Но на 8-9 шаге, после нажатия кнопки «Далее» он выдает: «Порт с таким именем уже существует. Выберите другое имя порта.» Принтер при этом пождключен и лампочка на роутере горит. Помогите пожалуйста решить проблему. Заранее спасибо. |
| Вернуться наверх |
|
|
Nuka |
Заголовок сообщения: У меня похуже проблема Добавлено: Вс фев 25, 2007 13:33 |
|
|
тебе надо войти настройку портов для принтера, и удалить порт с таким именем, вот и все! и потом все сделать заново |
| Вернуться наверх |
|
|
Slalomist |
Заголовок сообщения: Re: У меня похуже проблема Добавлено: Пн фев 26, 2007 09:37 |
|
|
Nuka писал(а): тебе надо войти настройку портов для принтера, и удалить порт с таким именем, вот и все! и потом все сделать заново Спасибо. Не подскажешь, где находится эти настройки…. |
| Вернуться наверх |
|
|
Alexandr Zaitsev |
Заголовок сообщения: Добавлено: Пн фев 26, 2007 10:25 |
|
|
|
| Вернуться наверх |
|
|
Slalomist |
Заголовок сообщения: Добавлено: Пн фев 26, 2007 14:54 |
|
|
|
| Вернуться наверх |
|
|
Alexandr Zaitsev |
Заголовок сообщения: Добавлено: Пн фев 26, 2007 15:44 |
|
|
Все нормально, нажимайте Далее |
| Вернуться наверх |
|
Кто сейчас на форуме |
|
Сейчас этот форум просматривают: нет зарегистрированных пользователей и гости: 40 |
| Вы не можете начинать темы Вы не можете отвечать на сообщения Вы не можете редактировать свои сообщения Вы не можете удалять свои сообщения Вы не можете добавлять вложения |
Adjusting Printer Ports in Windows 10/11: A Quick Guide
Published
5 min read
How to Check and Change Printer Port in Windows 11/10 [Guide]
As we progress into a digital age where the convenience of technology is paramount, printers remain an integral part of both personal and professional environments. Windows 10 and 11 have made printing easier than ever. However, sometimes understanding the technical aspects—like printer ports—can be challenging. This comprehensive guide will walk you through how to check and change printer ports in Windows 10 and 11.
Understanding Printer Ports
Before diving into the steps, it’s essential to understand what printer ports are. A printer port serves as the communication pathway between your computer and the printer. Each type of connection, whether USB, Wi-Fi, or ethernet, utilizes a different port.
Windows typically configures the port automatically when you install a printer. However, if you’re encountering issues, such as the printer not responding correctly, checking (and possibly changing) the printer port can resolve many common printing problems.
Why You Might Need to Change the Printer Port
Several scenarios might necessitate changing your printer port:
- Move to a New Connection Type: If you’ve switched connections from USB to Wi-Fi, you’ll need to change the port.
- Configure Network Printers: For shared or network printers, port settings can differ based on the network configuration.
- Resolve Printing Errors: If the printer is malfunctioning, changing the port may help reset its connection.
- Performance Improvement: Sometimes, certain ports are more reliable or faster than others.
Checking the Current Printer Port
Before making any changes, it’s essential to check which port your printer is currently using. Here’s how to do it in both Windows 10 and 11.
For Windows 10:
-
Open the Settings App: Click on the Start Menu, then select Settings (the gear icon).
-
Go to Devices: Click on «Devices,» which includes all your connected hardware.
-
Printers & Scanners: Click on «Printers & Scanners» from the left sidebar.
-
Select Your Printer: Find your printer in the list. Click on it to reveal additional options.
-
Manage: Click on the «Manage» button.
-
Printer Properties: In this window, locate and click on “Printer properties.”
-
Ports Tab: Once the properties window opens, click on the “Ports” tab. Here you will see a list of available ports with ticks indicating which one is currently being used.
For Windows 11:
-
Settings Menu: Open the Settings by pressing Windows + I or by searching for it in the Start Menu.
-
Devices Section: Click on “Devices” from the list of options.
-
Printers & Scanners: Navigate to “Printers & Scanners.”
-
Choose Your Printer: Click on your printer to open its settings.
-
Printer Properties: Select the «Printer properties» link available in the settings menu.
-
Ports Tab: Similar to Windows 10, click on the “Ports” tab to check which one is in use.
Changing the Printer Port
If you find that you’d like to change your printer port, doing so involves a few steps. The procedure remains the same for Windows 10 and 11.
-
Access Printer Properties: As outlined before, navigate to the “Printer properties” dialog box.
-
Ports Tab: Click on the “Ports” tab to access the current ports in use.
-
Select a Port: From the available port list, you can choose a different port. For example, if you want to switch your USB printer to a network port, look for an option that resembles your network configuration (like a TCP/IP port).
-
Add a New Port (if necessary): If the desired port is not listed, you may need to add a new one. To do this, click on “Add Port.”
-
Choose Port Type: A window will appear presenting several types of ports. Choose the desired type, usually “Standard TCP/IP Port” for network printers.
-
Follow the Wizard: Click “Next.” Enter the printer’s IP address or hostname as prompted, then follow the wizard to complete the process. Windows will test the port connection to verify it can communicate with the printer.
-
Apply and Close: After selecting the desired port and making the necessary adjustments, click on “Apply,” then “OK” to finalize your changes.
Troubleshooting
Changing printer ports might not always resolve the issue on the first try. Here are some troubleshooting steps.
-
Reboot Printer and Computer: Restart both the printer and the computer to ensure they recognize the new settings.
-
Check Network Connection: If using a network printer, verify that the printer is on the same network as your computer. Ensure Wi-Fi is enabled on both devices.
-
Update Printer Drivers: Accumulate the latest drivers from the manufacturer’s website. Sometimes outdated drivers can lead to connection issues, regardless of the port.
-
Firewall Settings: If you have a firewall running on your computer, check that it isn’t blocking the printer connection. Temporarily disable it for testing.
-
Check Print Spooler: Sometimes print jobs can get stuck. You may want to clear the print spooler. To do this, access the services (type «services» in the Windows search), find “Print Spooler,” right-click, and select “Restart.”
Additional Methods for Connecting Printers
Besides changing ports, there are alternatives to connect your printer, depending on its type.
-
USB Connection:
- Directly connect your printer using a USB cable.
- Windows will automatically install the appropriate driver.
-
Wi-Fi Direct:
- For supporting printers, use Wi-Fi Direct to establish a connection without requiring a network router.
- Check your printer’s manual for specific instructions.
-
Network Printer Setup:
- For printers connected to a router or network, ensure it’s set up correctly.
- You might want to configure the settings on the printer’s display panel.
-
Bluetooth Connection:
- If your printer supports Bluetooth, enable Bluetooth on your PC to search for and connect to the printer.
Conclusion
In an era where swift and efficient printing is essential, understanding how to manage your printer ports can significantly enhance your printing experience. By following the step-by-step guide outlined above, you’ll be well-equipped to check and change printer ports in Windows 10 and 11.
Whether for personal use or professional needs, properly configured printing settings ensure that you can work efficiently without frustrating interruptions. Remember, not every issue may be resolved by changing the port, but understanding how to navigate your printer’s settings can lead to more effective troubleshooting and improved functionality. Stay informed and proactive about your technology, and you can easily navigate any printing challenges you encounter.
Аннотация
При попытке создать принтер LPR в Windows NT появляется одно из следующих сообщений об ошибке:
Windows NT 3.5 x
Не удалось добавить порт: принтер уже существует.
Windows NT 4.0
Не удается добавить указанный порт. Принтер уже существует.
Windows 2000
Не удается добавить указанный порт. Порт уже существует.
Дополнительная информация
Адрес порта принтера TCP/IP, который вы пытаетесь создать, уже создан, возможно, из ранее созданного и потом удаленного принтера. IP-адрес остается в реестре, чтобы упростить добавление будущих принтеров.
Решение
Проверьте, не существует ли порт, прежде чем пытаться добавить порт LPR. В Windows NT 3.5 x существующие порты LPR будут указаны в верхней части окна списка «Печать в:» в диспетчере печати. В Windows NT 4,0 существующие порты LPR будут указаны в верхней части списка «доступные порты:» на вкладке » порты » в свойствах принтера. В Windows 2000 существующие порты LPR будут перечислены в нижней части списка «использовать следующий порт:» в мастере добавления принтеров .
Нужна дополнительная помощь?
Нужны дополнительные параметры?
Изучите преимущества подписки, просмотрите учебные курсы, узнайте, как защитить свое устройство и т. д.
Open Regedit (type in Run Box)
Hklm\system\Controlset001\Control\Print\Monitors\Standard Tcp/Ip Port\ Ports\
Highligh and Delete the Port That is Causing the Error “A port with that name already exists, Choose another port name.” When u installing a Network Printer.
Best Of Luck:- Deepak Kumar Verma “Computer Engineer” 9214012330
Comments
-
I think what you posted was very reasonable.But, consider this, what if you added a little information?I mean, I don’t want to tell you how to run your website, but suppose you added a post title that grabbed folk’s attention?I mean «A port with that name already exists, Choose another port name.» is kinda boring.You could look at Yahoo’s front page and watch how they create post headlines to grab viewers interested. You might add a related video or a pic or two to grab readers excited about everything’ve written.In my opinion, it could bring your posts a little livelier.Have a look at my web site … Ayurveda Hair Loss
-
Wow that was unusual. I just wrote an extremely long comment but after I clicked submit my comment didn’t show up. Grrrr… well I’m not writing all that over again. Anyways, just wanted to say great blog!Also visit my blog : usb
-
Hmm it appears like your website ate my first comment (it wassuper long) so I guess I’ll just sum it up what I had writtenand say, I’m thoroughly enjoying your blog. I too am an aspiring blog writer but I’m still new to the whole thing. Do you have any recommendations for inexperienced blog writers? I’d certainlyappreciate it.Feel free to surf my homepage Tampa Law Firms
-
in our extended family, we’ve been working on this in earnest over the last few years. One variation is the game called White Elephant. Favorite thing about the Holidays.My web blog … funny white elephant gift
-
One of the many points brought forward was that the company. Besides, the online stores will not pass the shipment, inventory and overhead expenses to you.When you purchase a watch, the last thing on your mind is the time.Here is my webpage ; Waltham pocket watch
-
Worn by Daniel Craig in Casino Royale in 2006 (Omega Seamaster Planet Ocean 2900. By having an experienced online watch buyer, you are guaranteed that your transaction will run smoothly and safely. And they will start showing it off to everyone you know.Take a look at my blog ; armaniexchangewatches.blog.com
-
Celebrities have shown throughout history that they can have unique tastes in wristwatches.There are some alternate venues through which 1 can also procure genuine watches such type of together with brand name pr luxury watches.Once you recognize simply what it’s you’re longing for in an exceedingly luxury watch, you’ll use our pointers for selecting your watch.Here is my page … Recommended Website
-
Useful information. Fortunate me I found your website by chance, and I’m stunned why this twist of fate didn’t happened earlier!I bookmarked it.Feel free to visit my webpage : contract cleaning
При подключении общего сетевого принтера с другого компьютера пользователи могут столкнуться с ошибкой
Windows не удается подключиться к принтеру
с кодами 0x0000011b или 0x00000002. В этой статье мы рассмотрим типовые средства исправления ошибки подключения сетевого принтера Windows.
Содержание:
- Ошибка 0x0000011b: Windows не может подключить сетевой принтер
- Ошибка 0x00000002 при установке сетевого принтера
- Подключение сетевого принтера через локальный порт
Ошибка 0x0000011b: Windows не может подключить сетевой принтер
В 2021 года Microsoft выпустило ряд обновлений безопасности для исправлений уязвимостей в службе Print Spooler под общим названием PrintNightmare. После установки этих обновлений при попытке подключения сетевого принтера пользователи стали массово сталкиваться с ошибкой 0x0000011b.
Connect to Printer
Windows cannot connect to the printer.
Operation failed with error 0x0000011b.

Microsoft рекомендует использовать на принт-сервере (компьютере, на котором открыт общий доступ к принтеру) только драйвера принтера типа Type 4, для установки которых не нужны права администратора на стороне клиента. Обновите драйвера ваших принтеров до Type 4.
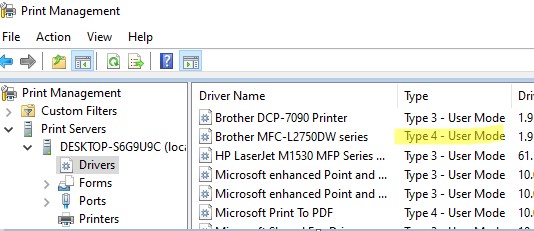
Если для принтера доступны только драйвера типа
Type 3
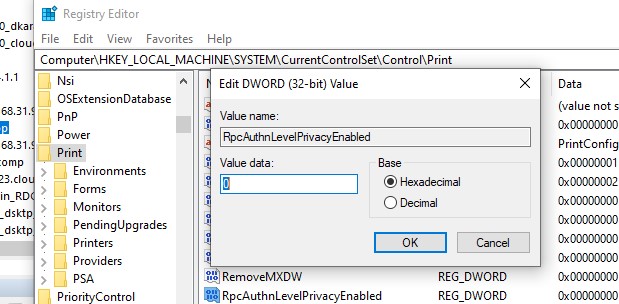
, можно снизить уровень безопасности на принт сервере, создав параметр реестра RpcAuthnLevelPrivacyEnabled со значением 0:
REG ADD "HKLM\System\CurrentControlSet\Control\Print" /v RpcAuthnLevelPrivacyEnabled /t REG_DWORD /d 0 /f
Перезапустите службу диспетчер печати:
Restart-Service Spooler -Force
После этого попробуйте еще раз подключить сетевой принтер на клиенте.
После подключения сетевого принтера клиенту, верните значение RpcAuthnLevelPrivacyEnabled =0 на сервере, чтобы закрыть уязвимость.
Обновлений безопасности PrintNightmare также блокирует установку драйверов сетевых принтеров под пользователями без прав администратора. Чтобы временно разрешить установку принтеров под пользователями, выполнив команду:
reg add "HKLM\Software\Policies\Microsoft\Windows NT\Printers\PointAndPrint" /v RestrictDriverInstallationToAdministrators /t REG_DWORD /d 0 /f
После подключения принтера верните значение RestrictDriverInstallationToAdministrators = 1.
Ошибка 0x00000002 при установке сетевого принтера
Другая распространенная ошибка подключения сетевого принтера — 0x00000002. Эта ошибка появляется при подключении сетевого принтера через UNC путь в формате
\\computername
, после того, как вы нажали Подключить:
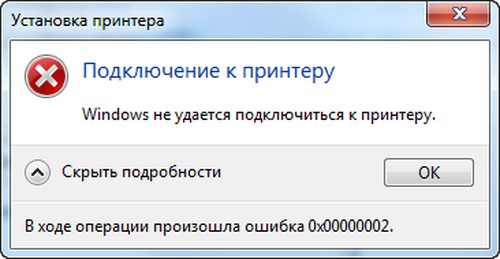
Connect to Printer
Windows cannot connect to the printer.
Operation failed with error 0x00000002.
Установка принтера
Windows не удается подключиться к принтеру
В ходе операции произошла ошибка 0x00000002
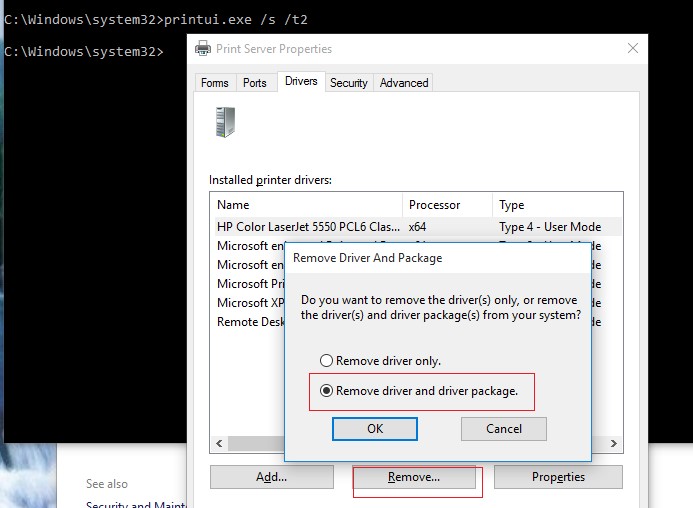
Ошибка 0x00000002 обычно указывает, что драйвер для данного принтера, установленный на компьютере поврежден. Удалите этот драйвер из хранилища драйверов:
printui.exe /s /t2
Найдите драйвера принтера, который вы пытались установить и удалите его (Remove -> Remove driver and driver package).
Для удаления драйвера принтера можно также использовать PowerShell команду:
Remove-PrinterDriver -Name "HP Universal Printing PCL 6"
Если есть принтера, который используют этот драйвер, их придется также предварительно удалить.
Перезапустите диспетчер печати (
net stop spooler & net start spooler
) и попытайтесь еще раз подключить принтер.
Если при подключении принтера опять появится ошибка, очистить записи старого драйвера в реестре:
- Запустите
regedit.exe
и удалите ветку реестра HKEY_LOCAL_MACHINE\SYSTEM\CurrentControlSet\Control\Session Manager\PendingFileRenameOperations - Если в папке c:\Windows\System32\spool\prtprocs\x64 есть подкаталоги с именами от 1 до 499, удалите все эти подкаталоги и файлы кроме winprint.dll
- Удалите все Print Processors и драйвера (за исключением winprint) из ветки HKLM\SYSTEM\CurrentControlSet\Control\Print\Environments
- Перезагрузите компьютер и установите принтер
Подключение сетевого принтера через локальный порт
В качестве простого обходного решения при ошибках подключения сетевого принтера можно попробовать подключить принтер через локальный порт с UNC путем.
Для этого вам нужно получить полное UNC имя сетевого принтера. Откройте командную строку и выполните следующую команду чтобы вывести список принтеров на удаленном компьютере:
net view \\192.168.13.200
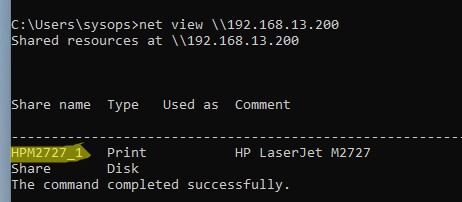
В этом примере полное UNC имя сетевого принтера выглядит так:
\\192.168.13.200\HPM2727_1
(можно использовать имя компьютера вместо IP).
Установите консоль управления принтерами с помощью команды:
dism /Online /add-Capability /CapabilityName:Print.Management.Console~~~~0.0.1.0
Запустите консоль
printmanagement.msc
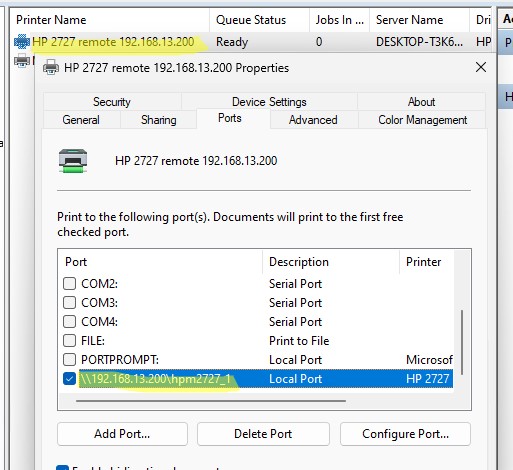
и перейдите в раздел Print Servers -> Printers. Создайте новый принтер.
Выберите тип порты Local port, а в качестве имени порта укажите UNC путь к сетевому принтеру.

Продолжите установку. Выберите (или установите) драйвер печати.
Задайте имя принтера.
Проверьте, работает ли сетевая печать.