
Why replacing XAMPP PHP version?
If you are using XAMPP for PHP development on Windows, there are high chances that you will need to change, upgrade, or even downgrade your XAMPP PHP version to satisfy the compatibility of the PHP package your are developing.
Some example cases requiring XAMPP PHP version replacement including:
- The PHP platform you are developing requires a newer OR older PHP version to run properly;
- The current PHP platform is outdated, or containing security vulnerabilities;
- You want to test for newer PHP features on a newer PHP version;
- You don’t want to download another XAMPP package again (with different PHP version) and have to reconfigure everything.
This tutorial will guide you on how to replace the PHP version of XAMPP on Windows.
*Note: This is for completely replacing the PHP version in XAMPP. To run XAMPP on multiple PHP versions, we will have another in-depth tutorial on how to do that.
Tutorial StartsChanging XAMP PHP version: Step by step
Here are the steps to change the primary PHP version in XAMPP on Windows.
*We assume that you already have XAMPP running properly.
1. Stop XAMPP Apache process
First, we need to stop the Apache process on XAMPP. To do that, you can locate the XAMPP icon under Windows notification area. Then, double click the icon:
On the XAMPP Control Panel dialog, click Stop at the Actions area on Apache to stop the process. The process is stopped when it doesn’t have the light green background anymore.
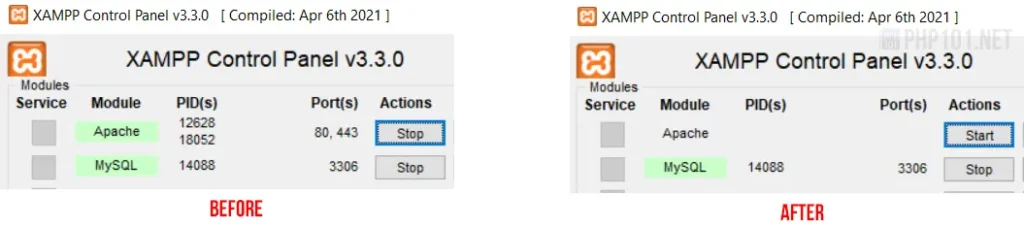
If for some reasons, the XAMPP icon doesn’t appear on the notification area, you can stop the Apache process using Windows taskkill command. Open Run dialog (Windows + R), type in this command and press Enter (or the OK button):
taskkill /IM httpd.exeLike this:
Then the Apache process will be stopped.
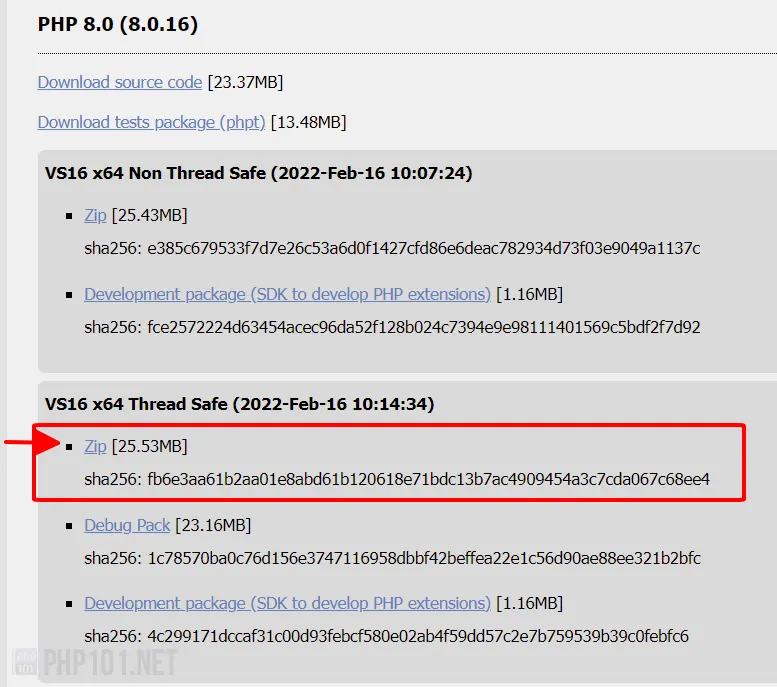
2. Download new PHP version
Navigate to this official PHP.net Windows download page:
https://windows.php.net/download/
On the right panel, pick the PHP version number + thread support type you want to download.
- For PHP version number, this page only list the latest stable versions (at the time of this article, 7.4.30, 8.0.23 and 8.1.10). If you want to download older versions (eg. PHP5), head to the PHP.net for Windows Archive page:
https://windows.php.net/downloads/releases/archives/
Here you will see the old PHP versions, by the format of either.msi(installation package),.zip(extractable package), a lot right? If you’re confused by this archive page, hang on, we’ll point the right package selection shortly, after the next section: - For PHP thread support type, in short, here is the quick guide on what to pick:
- If you use native Apache (with LoadModule, or Apache Handler) or IIS , choose the Thread Safe version.
- If you use Apache with FastCGI or IIS with FastCGI, choose the Non Thread Safe version.
It is recommended to use Apache with FastCGI (fcgi) for handling multiple PHP processes in Windows, however, by default, in XAMPP’s Apache configuration, it uses the native Apache Handler to serve PHP. So, to keep it quick and we assume that people will mostly use default Apache configuration in XAMPP, we will pick the thread safe version.
*If you are already using non thread safe version on your XAMPP, just continue to pick the non thread safe version.
Okay, so, what to download?
After picking the PHP version number and the thread support type that you want, follow this guide to choose what to download:
- If you use newer, stable versions (7.4, 8.0 and 8.1), just locate it on the right panel of the download page, and download the
Zippackage with the right thread support version.
For example, if we choose PHP 8.0.16 + thread safe version:
- If you use older, archived versions (mainly PHP 5), on the archive page, do a search on the page with this syntax:
php-[version]After seeing the highlighted results, here are the guides to pick the right version:
- Non thread safe version will have the
ntstext in the package name, while thread safe version does not have thentstext in the name. - 32-bit or 64-bit version will have the
x86orx64text in the package name - Don’t download the package with the
srcin the package name (it’s the source codes, we don’t need that)
For example, if we want to pick PHP 5.6.40, thread safe, 64-bit version, this is the one to download:

We could finally picked the right PHP package to download! Next, let’s get XAMPP PHP version to be updated.
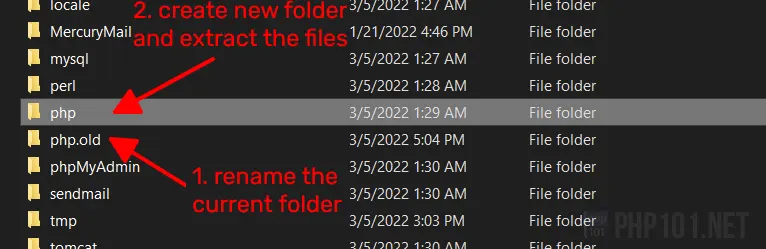
3. Extract new PHP version to XAMPP
After downloading the PHP package, extract the copy the files into the XAMPP’s php directory.
We recommend backing up the old php directory by renaming the old php directory (to, like php.old) and create a new one to extract the downloaded files into it, so we can quickly revert the version. For example:
4. Configure XAMPP to run with new PHP version
The most important step is to configure XAMPP, or more precisely, configure XAMPP’s Apache for it to work with the PHP version we downloaded. Depends on the major PHP version you want to replace, there are different ways to do that to make it work properly.
4.1. Replace the same major PHP version (eg. 7.4.24 to 7.4.25)
In most cases, changing PHP with the same major version will not require any Apache configuration. This assumes that the thread support version is still the same, and XAMPP has been running properly.
In this case, you can just replace the PHP package files (or backup the old directory and create a new one – like the previous step) into XAMPP’s php directory, and it will just work.
4.2. Upgrade/Downgrade major PHP version (eg. 7.4.24 to 8.0.1)
To switch major XAMPP PHP version, some Apache configuration of XAMPP has to be adjusted. Fortunately, this is very easy and straight forward to do.
*One more time, assuming that the PHP thread support version you are replacing is the same.
Open this file in any Windows text editor (Notepad, VSCode, etc. we preferred VSCode):
[XAMPP Directory]\apache\conf\extra\httpd-xampp.conf*Again, you should backup the file first by copying it to another location. Do not back it up by duplicate the file in the same directory and leave the same .conf file extension, it will cause error when Apache starts (duplicated configuration).
4.2.1. Edit LoadFile on php DLL file
Find this section:
#
# PHP-Module setup
#
In this section, you will see various LoadFile lines, but the main line to pay attention to is the file loading the php[version]ts.dll, for example, this line with PHP 7:
LoadFile "E:/xampp/php/php7ts.dll"*The path can be different depends on where XAMPP is installed on your computer.
Edit this line, change the DLL file name to the PHP version you already downloaded.
For example, upgrading from PHP 7 to PHP 8:
LoadFile "E:/xampp/php/php8ts.dll"-OR- Downgrading from PHP 7 to PHP 5:
LoadFile "E:/xampp/php/php5ts.dll"4.2.2. Edit LoadModule on Apache DLL file
Then, the next edit is the line nearby with LoadModule, this will be diffrent based on XAMPP version.
For XAMPP with different major PHP version bundled, the lines will be different:
// With XAMPP PHP 5
LoadModule php5_module "E:/xampp/php/php5apache2_4.dll"

// With XAMPP PHP 7
LoadModule php7_module "E:/xampp/php/php7apache2_4.dll"

// With XAMPP PHP 8
LoadModule php_module "E:/xampp/php/php8apache2_4.dll"
*The path will be different based on your system.
Edit this line, replace all php[version]_module into php_module. So with php5_module and php7_module, they will be edited to php_module as well. This is for making us easier to replace major PHP version by simply changing the DLL file name, rather than having to editing the php module name.
The later part is the DLL file to edit based on version, with the syntax of php[version]apache2_4.dll. You can simply change it to your version.
For example, downgrading from PHP 7 to 5:
LoadModule php_module "E:/xampp/php/php5apache2_4.dll"-OR- upgrading from PHP 7 to 8:
LoadModule php_module "E:/xampp/php/php8apache2_4.dll"4.2.3. Edit IfModule
Look up all the <IfModule php[version]_module> lines.
- With XAMPP having PHP 8, you don’t have to edit these lines because they are already correct.
- With XAMPP having PHP 5, the line to lookup is
<IfModule php5_module> - With PHP 7,
<IfModule php[version]_module>
Edit them all to:
<IfModule php_module>That’s all we need to edit on this file. Save the file and move on to the next step.
5. Verify that everything works
To check if the adjustments are fully working, start Apache in XAMPP.
Open the XAMPP Control Panel by the notification bar icon, or by the [XAMPP Directory]\xampp-control.exe file. Then, click Start on the Actions panel of the Apache line. If there are no errors showing, we are nearly done.
Next, create a PHP file inside XAMPP’s htdocs folder, put this content into it:
<?php
phpinfo();
Save the file, and open it on the browser using localhost URL. Check if the PHP version is updated properly. If yes, congratulation! You have done all of the steps properly to change XAMPP PHP version on Windows.
If there are errors showing, double check the steps and file adjustments to make sure everything is applied correctly. We are going to release an article on how to debug PHP errors on XAMPP soon.
This tutorial is now over. Thanks for reading and hopefully it’s helpful for you.
Also with the PHP on Windows series
- Tutorial – Install PHP on Windows using Standalone method
Are you facing compatibility issues with PHP 8 on your Windows system? Need to downgrade to PHP 7.4? We’ve got you covered. Downgrading PHP can be a complex task, but with the right guidance, you can easily switch back to a previous version and ensure smooth functioning of your applications.
Downgrading from PHP 8 to 7.4 on Windows involves a few essential steps. First, you’ll need to uninstall PHP 8 and remove any related extensions or configuration files. Then, you can proceed to download PHP 7.4 and install it on your system. Finally, you’ll have to configure your web server to use the downgraded version. By following these steps, you can seamlessly revert to PHP 7.4 and resolve any compatibility issues you may have encountered.
To downgrade PHP 8 to 7.4 on Windows, follow these steps:
- Download the PHP 7.4 zip file from the official PHP website.
- Extract the downloaded zip file and copy the contents to your PHP installation directory.
- Replace the existing PHP files when prompted.
- Open the «php.ini» file and make necessary configurations as per your requirements.
- Restart your web server to apply the changes.
By following these steps, you can successfully downgrade PHP 8 to 7.4 on your Windows system.

Understanding the Need to Downgrade PHP 8 to 7.4 on Windows
The release of PHP 8 brought significant improvements and new features to the programming language. However, there may be instances where developers and organizations need to downgrade from PHP 8 to the previous version, PHP 7.4, on a Windows operating system. This could be due to compatibility issues with existing applications, plugins, or frameworks that are not yet compatible with PHP 8. Fortunately, the process of downgrading is relatively straightforward and can be accomplished by following a few essential steps. This article will guide you through the process of downgrading PHP 8 to 7.4 on Windows and help you ensure a smooth transition.
Step 1: Removing PHP 8
The first step in downgrading PHP 8 to 7.4 is to remove the existing PHP 8 installation from your Windows machine. To do this, follow these steps:
- Open the Control Panel on your Windows system by typing «Control Panel» in the Start menu search bar and selecting it from the results.
- Click on «Programs» or «Programs and Features» (depending on your Control Panel view).
- Locate the entry for PHP 8 in the list of installed programs. The entry may be labeled as «PHP 8» or «PHP 8.x.x» (where «x.x» represents the version number).
- Click on the PHP 8 entry and then click on the «Uninstall» or «Uninstall/Change» option.
- Follow the on-screen prompts to complete the uninstallation process.
Once you have successfully uninstalled PHP 8, you can proceed to the next step of installing PHP 7.4.
Step 2: Installing PHP 7.4
After removing PHP 8 from your system, you are ready to install PHP 7.4. Here’s how:
- Visit the official PHP website at https://www.php.net/downloads.
- Scroll down to the «Windows downloads» section and locate the entry for PHP 7.4. Choose the appropriate version based on your system architecture (x86 or x64) and thread safety requirements (TS or NTS).
- Click on the download link for the desired PHP 7.4 version to start the download.
- Once the download is complete, run the installer to start the PHP 7.4 installation process. Follow the on-screen instructions to customize the installation according to your preferences.
- During the installation, make sure to select the options to add PHP to the system PATH and enable extensions as needed.
- Once the installation is complete, you should have PHP 7.4 successfully installed on your Windows system.
With PHP 7.4 installed, you are now ready to configure your web server to use the new version.
Step 3: Configuring the Web Server
In order for your web server to use PHP 7.4 instead of PHP 8, you need to update its configuration. The process may vary depending on the web server you are using. Here are the general steps:
Apache
If you are using Apache as your web server, follow these steps to configure it to use PHP 7.4:
- Locate the «httpd.conf» file in your Apache installation directory.
- Open the file in a text editor.
- Find the line that begins with «LoadModule php» or «AddHandler php» (depending on your Apache version) and comment it out by adding a «#» character at the beginning of the line.
- Add a new line with the following code:
# Load PHP 7.4 module
LoadModule php7_module "path/to/php7/bin/php7apache2_4.dll"

# Path to PHP 7.4 installation
PHPIniDir "path/to/php7"
Make sure to replace «path/to/php7» with the actual path to your PHP 7.4 installation directory.
Nginx
If you are using Nginx as your web server, follow these steps to configure it to use PHP 7.4:
- Locate the Nginx configuration file for your server. The file is usually named «nginx.conf» or «default.conf» and is located in the «conf» directory of your Nginx installation.
- Open the file in a text editor.
- Find the section that begins with «location ~ \.php$ {» and comment out the lines within that section by adding a «#» at the beginning of each line.
- Add a new section with the following code:
location ~ \.php$ {
    fastcgi_pass 127.0.0.1:9000;
    fastcgi_param SCRIPT_FILENAME $document_root$fastcgi_script_name;
    include fastcgi_params;
    fastcgi_param PHP_VALUE "auto_prepend_file=path/to/php7/php.ini";
}
Make sure to replace «path/to/php7» with the actual path to your PHP 7.4 installation directory.
IIS
If you are using IIS as your web server, follow these steps to configure it to use PHP 7.4:
- Open Internet Information Services (IIS) Manager on your Windows system.
- Click on your server name in the left-hand pane.
- Double-click on the «Handler Mappings» feature.
- Locate the entry for PHP or FastCGI in the list of handler mappings.
- Right-click on the entry and select «Edit».
- In the «Executable» field, enter the path to the PHP 7.4 CGI binary.
- Click «OK» to save the changes.
After configuring your web server, restart the web server to apply the changes and ensure that PHP 7.4 is now being used.
Step 4: Testing the Downgraded PHP Version
Once you have completed the steps above, it is important to test your downgraded PHP version to ensure everything is functioning as expected. Here are a few ways to test:
- Create a PHP file with the following content:
<?php
phpinfo();
?>
- Save the file with a «.php» extension (e.g., «test.php»).
- Place the file in your web server’s document root directory.
- Access the file in your web browser (e.g.,
http://localhost/test.php). - You should see the PHP information page, which displays the PHP version as 7.4.x.
If the PHP version displayed on the information page is 7.4.x, then congratulations, you have successfully downgraded PHP 8 to 7.4 on your Windows system. If not, double-check your configuration and ensure that you have followed all the steps correctly.
Remember to update any necessary configuration files and project dependencies that may be affected by the downgrade to PHP 7.4. Additionally, consult the documentation of the frameworks, plugins, or applications you are using to ensure compatibility with PHP 7.4.
By following these steps, you can safely and effectively downgrade PHP 8 to 7.4, allowing you to continue working with your existing codebase and resolve compatibility issues. Keep in mind that it is always advisable to regularly update your applications and plugins to ensure they are compatible with the latest versions of PHP and other dependencies.
Downgrading PHP 8 to 7.4 on Windows
If you need to downgrade PHP 8 to version 7.4 on Windows, you can follow these steps:
- First, make sure you have administrative access to your Windows system.
- Next, navigate to the official PHP website and download the Windows 7.4 ZIP package.
- Extract the downloaded ZIP package to a location of your choice.
- Open the extracted folder and locate the «php.ini» file.
- Edit the «php.ini» file and make the necessary changes to set the desired PHP version (7.4) as the default.
- Save the changes to the «php.ini» file.
- Open a Command Prompt window and navigate to the folder where PHP is installed.
- Run the command «php -v» to verify the PHP version.
- Finally, restart any necessary services or applications that rely on PHP.
By following these steps, you can successfully downgrade PHP 8 to version 7.4 on your Windows system. It is essential to ensure compatibility with existing applications or frameworks that may not be fully compatible with the latest PHP version.
Key Takeaways:
- Make sure to uninstall PHP 8 before downgrading to 7.4 on Windows.
- Download the PHP 7.4 installer from the official website.
- Backup your PHP configuration file before making any changes.
- Modify the system PATH environment variable to include the PHP 7.4 directory.
- Restart the web server to apply the changes and verify the downgrade.
Frequently Asked Questions
In this section, we will answer some common questions related to downgrading PHP 8 to 7.4 on Windows operating system.
1. How do I check my current PHP version on Windows?
To check your current PHP version on Windows, follow these steps:
Step 1: Open Command Prompt by pressing Windows key + R, and then type «cmd» followed by Enter.
Step 2: In the Command Prompt window, type «php -v» (without quotes) and press Enter.
This will display the current PHP version installed on your Windows system.
2. Why would I want to downgrade PHP 8 to 7.4 on Windows?
There are several reasons why you may want to downgrade PHP 8 to 7.4 on Windows:
1. Compatibility: Some applications or frameworks may not be fully compatible with PHP 8, so downgrading to a previous version can ensure compatibility.
2. Deprecated Features: PHP 8 introduces several deprecated features, and if your codebase relies on these features, it may break in PHP 8. Downgrading allows you to continue using those features.
3. Stability: PHP 8 is a relatively new release, and it may still have some stability issues. If you prefer a stable and well-tested version, downgrading to PHP 7.4 can be a good choice.
3. How to downgrade PHP 8 to 7.4 on Windows?
To downgrade PHP 8 to 7.4 on Windows, follow these steps:
Step 1: Uninstall PHP 8 by going to Control Panel > Programs > Programs and Features, and then select PHP 8 from the list and click Uninstall.
Step 2: Download PHP 7.4 from the official PHP website (https://windows.php.net/downloads/releases/) and extract the downloaded zip file to a specific location on your Windows system.
Step 3: Configure PHP 7.4 by copying the «php.ini-development» file and renaming it to «php.ini». Edit this file to set up the necessary configurations.
Step 4: Update your system’s Environment Variables to point to the directory where PHP 7.4 is installed. This can be done by adding the PHP directory to the «PATH» variable.
Step 5: Restart your computer to apply the changes.
4. Will downgrading PHP affect my existing websites or applications?
Downgrading PHP can potentially affect your existing websites or applications. Here are a few key points to consider:
1. Compatibility: Make sure to check the compatibility of your websites or applications with PHP 7.4 before downgrading. Some features or functions may be deprecated or removed, causing potential issues.
2. Testing: It’s recommended to thoroughly test your websites or applications on a local development environment running PHP 7.4 before implementing the downgrade on your production server.
3. Backup: Always make a backup of your websites or applications before performing any significant changes, including downgrading PHP versions.
5. Can I switch back to PHP 8 after downgrading to 7.4?
Yes, you can switch back to PHP 8 after downgrading to PHP 7.4. Simply follow the steps to install PHP 8 and configure it as per your requirements. Keep in mind any compatibility issues or deprecated features that may need to be addressed in your websites or applications before switching back to PHP 8.
✅ How to Upgrade or Downgrade PHP Version in XAMPP on Windows 11/10
In conclusion, downgrading PHP 8 to 7.4 on Windows can be done by following a few simple steps. Firstly, uninstall PHP 8 from your system by removing all its files and folders. Next, download the PHP 7.4 version that is compatible with your Windows operating system.
After downloading PHP 7.4, extract the files and configure the necessary settings. Make sure to update your PATH environment variable to include the path to the PHP 7.4 executable. Finally, test the installation by running a PHP file to ensure that it is working correctly.

Have you ever wondered how to upgrade or downgrade your PHP version in XAMPP without having to install another XAMPP software?, Well i have and from most answers i saw online, the best option was to download an updated version of XAMPP, but looking at it, i knew there had to be a better way so i made some research and was able to figure it out. In this article, i would show you how i changed my PHP version from 7.4.15 to 8.0.19.
This is a screenshot of my current PHP version

If you don’t know your current PHP version, you can use this link to check it.
STEP 1
Download the PHP version you want to use, you can find the PHP version you want to download from PHP’s download website for windows, but there is something you need to know before downloading any package, the download for a PHP version exists in 2 types — thread safe and non thread safe. Since you are using PHP with XAMPP, you are going to download the non-thread safe version because there is an apache file it has that would be used to configure XAMPP with PHP.
After locating it, download the zip file. If you are running on a 32-bit system, download the non-thread safe version labelled with x86.
Update
Depending on the PHP version you want to change to, you might need to download the Thread safe version instead if you downloaded the non thread safe version, and you didn’t see the Apache file there.
STEP 2
After you have downloaded it, extract the zip file and rename the extracted folder to «php», open the folder to find the apache file i mentioned in step 1 as shown in the image below. Once you have seen it, move the php folder to your xampp folder. Remember to make sure the current php folder in the XAMPP folder is either removed or renamed to something else so that the name won’t conflict with the one you are moving.

STEP 3
After moving the php folder into the XAMPP folder, open the folder and look for the php.ini config file. Whenever you download a PHP package, the php.ini file comes in two parts, php.ini-development and php.ini-production. These two config files represent the settings running on your development and production environments. Since you are using XAMPP, you would be using the development config file, so rename that config file to php.ini.
STEP 4
Open your XAMPP control panel. Under the actions option for Apache, look for the config button, click on it and select the Apache (httpd-xampp.conf) config file to open it. This is the file that XAMPP uses to configure PHP properly, look for the following:
LoadFile "C:/xampp/php/php7ts.dll"
LoadModule php7_module "C:/xampp/php/php7apache2_4.dll"
Enter fullscreen mode
Exit fullscreen mode
- Change php7ts.dll to php8ts.dll
- Change php7_module to php_module
- Change php7apache2_4.dll to php8apache2_4.dll
NOTE — Search everywhere in the file for «php7_module» and change it to «php_module» as you might need to change it in some places.
STEP 5
After you have done all this, save the changes and restart your server, go back to this url and confirm that your PHP version has changed. if everything was done correctly, you should see that you have successfully changed your PHP version!

Very easy and convenient. You can agree it is really not difficult to change your PHP version in XAMPP as it is quite simple to do. Connect with me on twitter and linkedin to find out more about me and my work.
This is how you upgrade (or downgrade) the PHP version on EasyPHP for Windows
Since August 2015, the EasyPHP developers have moved their modules into a called “Warehouse” in which they will host up to date modules for their famous WAMP server. This Warehouse is now subscription based, and if you want to download a module, say, the latest or an old PHP version, you will need to pay for it.
EasyPHP will remain free, is just the modules for customisation that are now under the subscription model. However, if you only want to update your PHP version to any in specific, just follow the steps below.
Note: this only works for the latest EasyPHP 14.1 VC11.
- Visit the PHP downloads section for Windows and grab the package you want to use. Make sure you download the VC11 x86 Thread Safe option for whatever version you require. For this guide lets assume you want PHP 5.6.15.
- Unzip the downloaded folder an rename it to: php_5.6.15
- Move the folder into your EasyPHP/binaries/php. It should end up like this: EasyPHP/binaries/php/php_5.6.15
- Tailor your php.ini inside this folder to match your development requirements. You can even copy the php.ini from php_runningversion if the versions are similar.
- Create a file inside this folder called easyphp.php and add the following contents to it by updating the commented values:
<?php
$phpversion = array(
	"status"	=> "0",
	"dirname"	=> "php5615x150928220137", // php version x random hash
	"name" 		=> "PHP",
	"version" 	=> "5.6.15", // the version you just installed. Make sure is correct
	"date" 		=> "2015-11-15 22:01:37", // version date
	"notes" 	=> "",
);
?>
- Restart EasyPHP.
- Go to the administration interface for EasyPHP (usually in http://127.0.0.1/home/), select PHP Settings > Change Version and the version you just installed should appear on the list.
- Select the desired version and wait a few seconds. You are now running a different version of PHP in EasyPHP.
Remember that you can add as many PHP versions as you want and switch between them as you like. Also notice that each version will have an independent php.ini which makes it very flexible.
Upgrade & Secure Your Future with DevOps, SRE, DevSecOps, MLOps!
We spend hours on Instagram and YouTube and waste money on coffee and fast food, but won’t spend 30 minutes a day learning skills to boost our careers.
Master in DevOps, SRE, DevSecOps & MLOps!
Learn from Guru Rajesh Kumar and double your salary in just one year.
Get Started Now!
Hey friends i am going to discuss with some common error with xampp. i installed xampp in my pc and working with Laravel version 5.8 and php version 7.1.3 so i face a lot issue when trying to run php artisan commands. so i googled and found so many solution but i solve it in a very simple way. so please look below steps to solve it.
Step 1 : download xampp version 7.1.32 from this url click here
Step 2 : after download extract it and you will see php and apache folder in it.
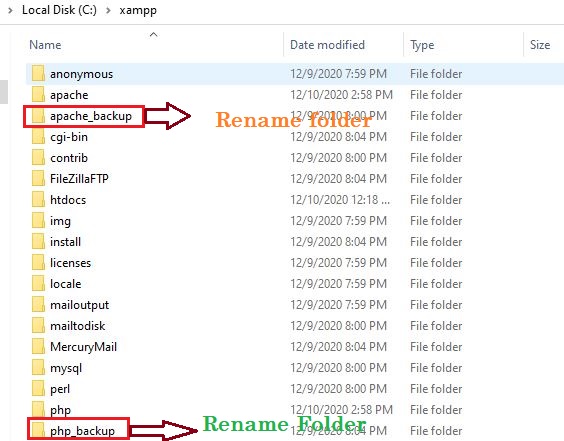
Step 3 : Rename php and apache folder present in C:\xampp
Step 4 : Copy php and apache folder from extract folder and paste it C:\xampp
Step 5 : Restart Apache and MySQL and check php version using command “php -v”

References:
Solution 1: Click Here
MotoShare.in provides the perfect two-wheeler for every occasion—daily commuting, weekend escapes, tourist exploration, or test-riding your dream bike. Simplify your mobility with us!
Certification Courses
DevOpsSchool has introduced a series of professional certification courses designed to enhance your skills and expertise in cutting-edge technologies and methodologies. Whether you are aiming to excel in development, security, or operations, these certifications provide a comprehensive learning experience. Explore the following programs:
- DevOps Certification — Learn the fundamentals and advanced concepts of DevOps practices and tools.
- DevSecOps Certification — Master the integration of security within the DevOps workflow.
- SRE Certification — Gain expertise in Site Reliability Engineering and ensure reliability at scale.
- MLOps Certification — Dive into Machine Learning Operations and streamline ML workflows.
- AiOps Certification — Discover AI-driven operations management for next-gen IT environments.

Explore our DevOps Certification, SRE Certification, and DevSecOps Certification programs at DevOpsSchool. Gain the expertise needed to excel in your career with hands-on training and globally recognized certifications.