
-
Home
-
News
- Windows Push Notification User Service High CPU/Memory Usage
By Aurelie | Follow |
Last Updated
What is Windows Push Notification User Service? How to fix Windows Push Notification User Service high CPU or memory usage? Read this post from MiniTool Website carefully, and you will be enlightened.
Windows Push Notifications User Service High CPU Usage
Windows Push Notifications User Service is a background system process that manages push notifications from different services and applications. Usually, it might consume some system resources and the impact is minimal.
However, what should you do if you find this process is using excessive resource usage on Windows 10/11? In this post, we will explore how to fix Windows Push Notification User Service high CPU, disk, or memory usage for you.
Tips:
High CPU issues like Windows Push Notification User Service high CPU usage might slow down your computer, even making your computer freezing and unresponsive. Therefore, it is strongly recommended to create a daily backup when you are using your computer. To do so, MiniTool ShadowMaker is worth trying. This free PC backup software is aimed to provide easy and professional data protection and disaster recovery solutions for individuals and companies. Get the free trial and have a whirl!
MiniTool ShadowMaker TrialClick to Download100%Clean & Safe
How to Fix Windows Push Notifications User Service High CPU Usage on Windows 10/11?
Fix 1: Terminate the Process Manually
Most of the time, a simple restart of this process might help to solve some problems like Windows Push Notification User Service high CPU usage. To do so:
Step 1. Press Ctrl + Shift + Esc to launch Task Manager.
Step 2. In the Details tab, locate Service Host: Windows Push Notification User Service and then right-click on it to choose End task.
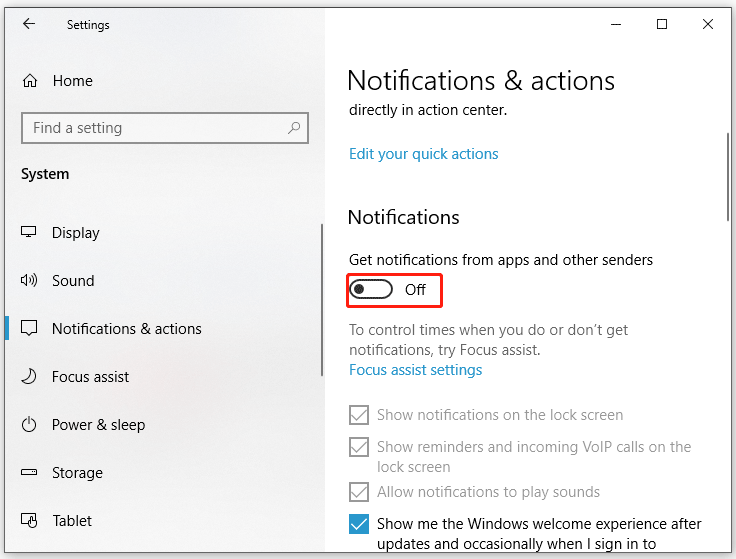
Fix 2: Disable All Notifications
If there are so many notifications from different apps, no wonder you will receive Windows Push Notification User Service high CPU usage. In this condition, you can choose to stop receiving all notifications to fix this issue.
Step 1. Press Win + I to open Windows Settings.
Step 2. Go to System > Notification & actions > toggle off all notifications.
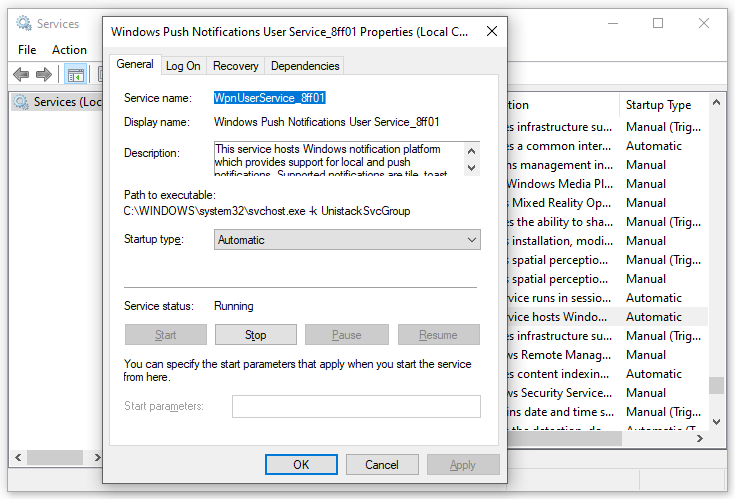
Fix 3: Restart Windows Push Notifications User Service
When certain background services or applications can not work properly, you can consider restarting them. Follow these steps:
Step 1. Press Win + R to open the Run box.
Step 2. Type services.msc and hit Enter to launch Services.
Step 3. In the services menu, find Windows Push Notification User Service and right-click on it to choose Properties.
Step 4. If this service is running, hit Stop and then restart it. If it is stopped, hit Start to run it.
Fix 4: Perform a Clean Boot
Third-party programs might be responsible for issues like Windows Push Notification User Service high CPU usage. If this is the case, you can perform a clean boot to exclude their interference. To do so:
Step 1. Type system configuration in the search bar and hit Enter.
Step 2. In the Services tab, tick Hide all Microsoft services and hit Disable all.
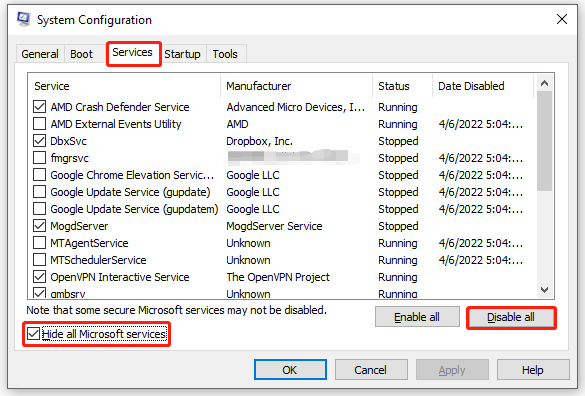
Step 3. Head to the Startup tab, click on Open Task Manager and then disable all third-party apps & programs.
Step 4. Go back to the Services tab and hit Apply & OK to save the changes.
Step 5. Restart your computer to enter the clean boot state to check if Windows Push Notification User Service high memory or CPU usage persists. If not, a third-party could be to blame. Then you need to uninstall all recently installed applications to see if it works.
Fix 5: Run SFC & DISM
Chances are that some system files are corrupted or missing. Therefore, you can run SFC and DISM in sequence to detect and repair these system files. Here’s how to do it:
Step 1. Launch Command Prompt with administrative privilege.
Step 2. In the command window, type sfc /scannow and hit Enter.
Step 3. After completion, restart your computer.
Step 4. Launch an administrative Command Prompt and run the following commands one by one.
DISM /Online /Cleanup-Image /CheckHealth
DISM /Online /Cleanup-Image /ScanHealth
DISM /Online /Cleanup-Image /RestoreHealth
Final Words
After reading through this post, Windows Push Notification User Service high resource consumption will not be a concerning problem and your operating system will run smoothly.
About The Author
Position: Columnist
Aurelie is a passionate soul who always enjoys researching & writing articles and solutions to help others. Her posts mainly cover topics related to games, data backup & recovery, file sync and so on. Apart from writing, her primary interests include reading novels and poems, travelling and listening to country music.
So the other day, my desktop suddenly started lagging for no apparent reason. I checked the task manager and saw that “Service Host: Windows Push Notifications User Service” had the highest RAM usage. The worst part was the memory usage was continuously increasing and it was using multiple gigabytes of memory.
I tried to end the service, but it started again after some time. First I thought it was malware, then I tried the malware removal guide to scan for malware and viruses, but no luck.
I tried almost every solution available on the internet but still no luck. I was almost going to reset my PC then I finally found a solution which actually worked.
Table of Contents
Why WpnUserService use high RAM?
Actually, the notification database in Windows gets corrupted that’s why it starts to use all the available RAM. This can be easily fixed by deleting the corrupt database. To do so follow the below guide.
- First, you need to boot Windows in safe mode.
- To do so search for msconfig in the start menu and launch it.
- Here switch to the boot tab, and select the safe boot option.

- In the safe boot option select Minimal and apply the settings.
- Now restart your PC and your PC will boot into safe mode.
- Once you’re in safe boot. Right-click the start menu and select Run.
- In the run Windows type %localappdata% and press enter.
- In App data folder navigate to Microsoft -> Windows.
- In the Windows folder, you will find a folder named notification.
- Just delete or rename and folder, don’t worry the notification database folder will regenerate after restarting.
- Now you need to exit safe boot. Again search for msconfig and open it.
- Switch to the boot tab and uncheck safe boot.
- Now restart your PC and windows push notifications user service high memory usage will be fixed.
Here are a few other methods using which you can fix this error.
Recommended – What is Service Host SuperFetch? Fix Its High Disk Usage
Disable Notification Services
You can disable the notification since you will disable the notification you won’t get important notifications about Windows Defender and Windows Update.
- Right-click the Start menu and select settings.
- In Settings search for notification and action.
- Here under notification turn off everything.

- Restart you’re PC and you won’t face high memory usages in windows push notifications user service.
Disable WpnUserService Service
You can also try to completely disable this service.
- Search for services.msc in the start menu and launch it.
- Here look for Windows Push Notification Service and double click it.

- Stop the service and from the startup type select disable.
- Apply the changes and reboot your PC.
I hope you have fixed Windows Push Notifications User Service High Memory Usage. If you face any problems then let me know in the comment section.
Home
How To
How To Turn Off Windows 10 Push Notification Pop-ups

Windows 10 is packed with new nifty changes, from the user interface down to the features! But not all of its features are well received by the users.
One of Window 10’s feature that some users want to turn off is notifications.
Yes, some end-users wanted to turn off Windows 10 push notification pop-ups. Why? One or two push notification pop-ups (with intervals) can have been fine.
But what if you’re starting to get let’s say five or more consecutively. And it is all happening while you are doing a business meeting presentation.
Or maybe concentrating on reviewing your codes. Isn’t it annoying?
Maybe some users care less about this. But there are people who want to stop Windows 10 notification pop-ups. Or at least minimize the instances.
Turning off or at least stopping Windows 10 notifications is what we will discuss and cover today.
Page Contents
How Do We Stop or Turn off Windows 10 Push Notification Pop-ups?
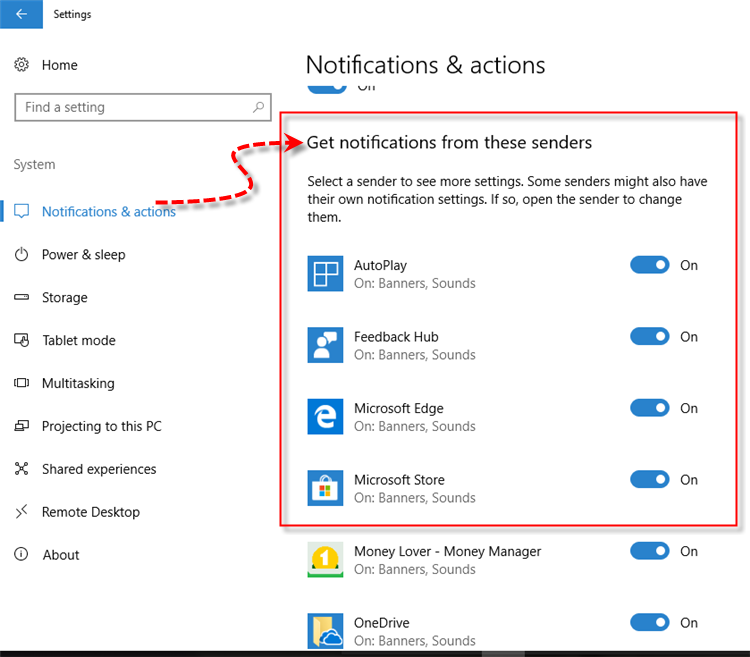
- First, we need to go to the Notifications & actions window. And there are 2 ways to go to that window.
- Hit the Start button, then select Settings > System > Notifications & actions.
- Or, you can click the Action Center icon located at the lower-right edge of your window. Then click All Settings.
- If you have chosen the second way, through Action Center, then you should be looking at the Windows Settings now. Click on System.

- On the left side of the System window pane, look for and click Notifications & actions.

- Then on the right-side pane of the window, under the Notifications subheading, you will see different Windows 10 push notification options. You can select and toggle any or all of the options.
- Under Notifications, here are your options:
- Get notifications from apps and other senders
- Show notifications on the lock screen
- Show reminders and incoming VoIP calls on the lock screen
- Hide notifications when I’m duplicating my screen
- Show me the Windows welcome experience after updates and occasionally when I sign in to highlight what’s new and suggested
- Get tips, tricks, and suggestions as you use Windows
- Under Notifications, here are your options:

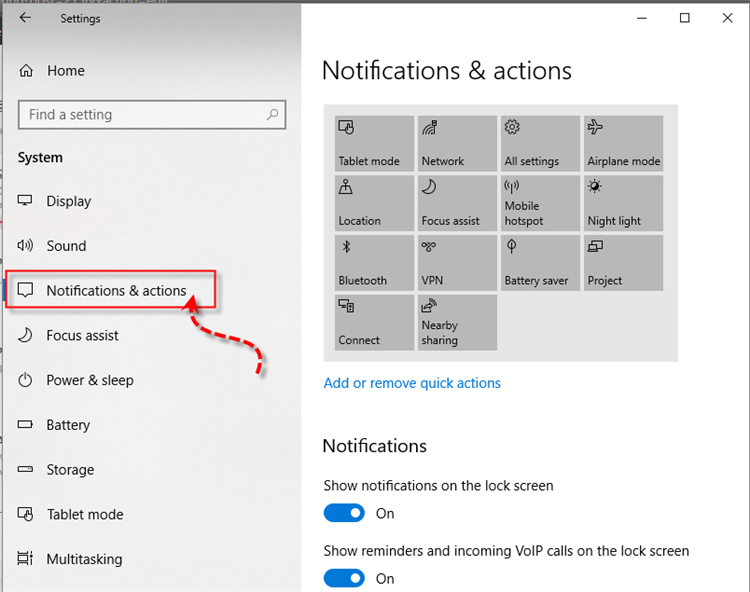

That’s it! You will have now the control to enable or turn off Windows 10 push notification pop-ups with the options above. There are also the options provided by Microsoft Support when changing the notification settings.
But Wait There are More Tweaks For Windows 10 Push Notifications.
How To Configure Windows 10 Push Notification Pop-ups For Apps
You can also configure Windows 10 push notification pop-ups for each app. The apps or software we’re talking about are those pre-installed Microsoft programs and others from Microsoft Store you have downloaded.
Although there are apps that have already integrated with Windows 10. Wherein even if you don’t download them from the Store will still have notification options.
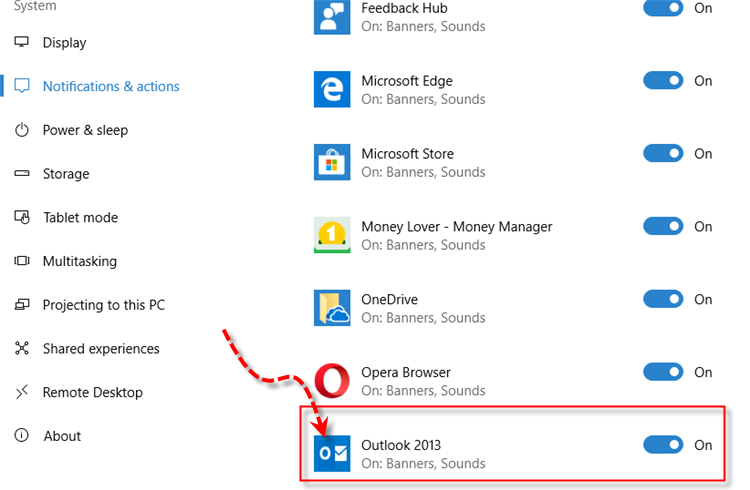
These apps are located on the same Notifications & actions window, below the Notifications subheading. Beneath, you will find Get notifications from these senders.
A little note though, this will not work if you have toggled off the Get notifications from apps and other senders from the Notifications option.
For each software or apps, it gives you total control over how you would like to manage the notifications. Let’s take Microsoft Outlook 2013 for example and here are the steps.
- Select the app you want to manage the notification, i.e. Microsoft Outlook 2013

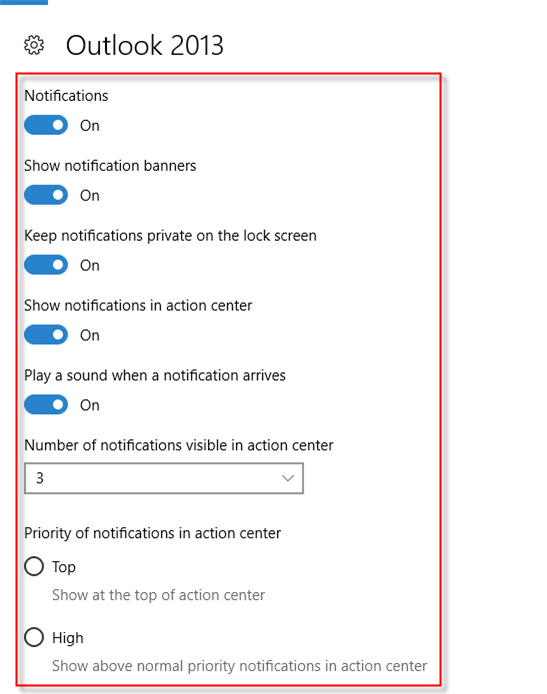
- If you want to “totally” opt-out notifications from this app – just toggle the switch off. Otherwise, click the app to see more options

- As you can see from the options above, you can toggle and configure your notifications
- Notifications – again, you can totally opt-out or in this option
- Show notification banners
- Keep notifications private on the lock screen
- Show notifications in the action center
- Play a sound when a notification arrives
- Number of notifications visible in action center – default is 3
- The priority of notification in action center – default is Normal
- As you can see from the options above, you can toggle and configure your notifications
That’s it! Those are the options how to enable or turn off Windows 10 push notification pop-ups. We leave to you the options on how you would like to manage your notifications.
Final Thought
Windows 10 push notification pop-ups or just the notifications from the Action Center isn’t bad, really. BUT excessive notifications can be so annoying.
Especially if you are not expecting anything for a certain app to notify you. The main purpose of these notifications is to keep you updated. However, we don’t think you want to be updated with all the apps you have.
It will be a nightmare. Just imagine if your computer keeps on beeping and all the banner notifications keep on flying from one side of your screen.
And while we’re talking about notifications, you might want also want to read and learn how to manage your Google Chrome notifications.
Manage your notifications, this is what we recommend for you to have a pleasant digital life. 🙂
Центр уведомлений — элемент интерфейса Windows 10, отображающий сообщения как от приложений магазина, так и от обычных программ, а также информацию об отдельных системных событиях. В этой инструкции подробно о том, как отключить уведомления в Windows 10 от программ и системы несколькими способами, а при необходимости — полностью убрать Центр уведомлений. Также может быть полезным: Как отключить уведомления брандмауэра и защиты от вирусов и угроз, Как отключить уведомления Фокусировки внимания Windows 10, Как отключить уведомления сайтов в Chrome, Яндекс браузере и других браузерах, Как отключить звуки уведомлений Windows 10, не отключая сами уведомления.
В некоторых случаях, когда вам не требуется полное отключение уведомлений, а нужно лишь сделать так, чтобы уведомления не появлялись во время игры, просмотра фильмов или в определенное время, разумнее будет использовать встроенную функцию Фокусировка внимания.
Отключение уведомлений в настройках
Первый способ — настроить центр уведомлений Windows 10 таким образом, чтобы ненужные (или все) уведомления в нем не отображались. Сделать это можно в параметрах ОС.
- Зайдите в Пуск — Параметры (или нажмите клавиши Win+I).
- Откройте пункт Система — Уведомления и действия.
- Здесь вы сможете отключить уведомления для различных событий.


Ниже на этом же экране параметров в разделе «Получать уведомления от этих приложений» вы можете отдельно отключить уведомления для некоторых приложений Windows 10 (но не для всех).
С помощью редактора реестра
Уведомления также можно отключить в редакторе реестра Windows 10, сделать это можно следующим образом.
- Запустите редактор реестра (Win+R, ввести regedit).
- Перейдите к разделу
HKEY_CURRENT_USER\Software\Microsoft\Windows\CurrentVersion\PushNotifications
- Кликните правой кнопкой мыши в правой части редактора и выберите создать — параметр DWORD 32 бита. Задайте ему имя ToastEnabled, а в качестве значения оставьте 0 (ноль).

- Перезапустите проводник или перезагрузите компьютер.

Готово, уведомления больше не должны вас побеспокоить.
Отключение уведомлений в редакторе локальной групповой политики
Для того, чтобы выключить уведомления Windows 10 в редакторе локальной групповой политики, выполните следующие шаги:
- Запустите редактор (клавиши Win+R, ввести gpedit.msc).
- Перейдите к разделу «Конфигурация пользователя» — «Административные шаблоны» — «Меню Пуск и панель задач» — «Уведомления».
- Найдите параметр «Отключить всплывающие уведомления» и дважды кликните по нему.

- Установите значение «Включено» для этого параметра.
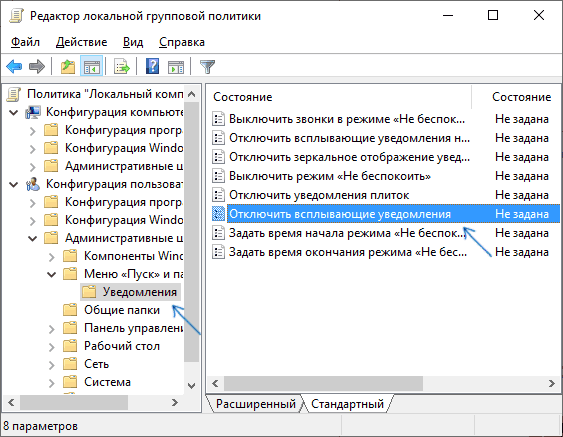
На этом всё — перезапустите проводник или перезагрузите компьютер и уведомления появляться не будут.
Кстати, в этом же разделе локальной групповой политики можно включить или отключить разные типы уведомлений, а также задать время действия режима «Не беспокоить», например, для того, чтобы уведомления не беспокоили вас в ночное время.
Как отключить Центр уведомлений Windows 10 целиком
Помимо описанных способов отключения уведомлений, вы можете полностью убрать Центр уведомлений, таким образом, чтобы его иконка не отображалась в панели задач и доступа к нему не было. Сделать это можно с помощью редактора реестра или редактора локальной групповой политики (последний пункт недоступен для домашней версии Windows 10).
В редакторе реестра для этой цели потребуется в разделе
HKEY_CURRENT_USER\Software\Policies\Microsoft\Windows\Explorer
Создать параметр DWORD32 с именем DisableNotificationCenter и значением 1 (как это сделать я подробно писал в предыдущем пункте). Если подраздел Explorer отсутствует, создайте его. Для того, чтобы снова включить Центр уведомлений либо удалите этот параметр, либо установите значение 0 для него.
Видео инструкция
В завершение — видео, в котором показаны основные способы отключить уведомления или центр уведомлений в Windows 10.
Надеюсь, всё получилось и сработало именно так, как ожидалось.
This service hosts Windows notification platform which provides support for local and push notifications. Supported notifications are tile, toast and raw.
The Windows Push Notifications User Service does not exist in:
- Windows 10 Home 1507
- Windows 10 Pro 1507
- Windows 10 Education 1507
- Windows 10 Enterprise 1507
- Windows 10 Home 1511
- Windows 10 Pro 1511
- Windows 10 Education 1511
- Windows 10 Enterprise 1511
Default Settings
| Startup type: |
|
||||||||||||||||||||||||||||||||||||||||||||||||||||||||||||||||||||||||||||||||||||||||
| Display name: | Windows Push Notifications User Service | ||||||||||||||||||||||||||||||||||||||||||||||||||||||||||||||||||||||||||||||||||||||||
| Service name: | WpnUserService | ||||||||||||||||||||||||||||||||||||||||||||||||||||||||||||||||||||||||||||||||||||||||
| Service type: | user share process template | ||||||||||||||||||||||||||||||||||||||||||||||||||||||||||||||||||||||||||||||||||||||||
| Error control: | ignore | ||||||||||||||||||||||||||||||||||||||||||||||||||||||||||||||||||||||||||||||||||||||||
| Object: | LocalSystem | ||||||||||||||||||||||||||||||||||||||||||||||||||||||||||||||||||||||||||||||||||||||||
| Path: | %SystemRoot%\system32\svchost.exe -k UnistackSvcGroup | ||||||||||||||||||||||||||||||||||||||||||||||||||||||||||||||||||||||||||||||||||||||||
| File: | %SystemRoot%\System32\WpnUserService.dll | ||||||||||||||||||||||||||||||||||||||||||||||||||||||||||||||||||||||||||||||||||||||||
| Registry key: | HKEY_LOCAL_MACHINE\SYSTEM\CurrentControlSet\Services\WpnUserService | ||||||||||||||||||||||||||||||||||||||||||||||||||||||||||||||||||||||||||||||||||||||||
| Privileges: |
|
Default Behavior
It is starting only if the user, an application or another service starts it in all editions of Windows 10 1607. This service is starting automatically when the operating system starts in all editions of Windows 10 1703, Windows 10 1709, Windows 10 1803, Windows 10 1809, Windows 10 1903, Windows 10 2004, Windows 10 20H2, Windows 10 21H1, Windows 10 21H2, Windows 10 22H2.
If Windows Push Notifications User Service fails to load or initialize, Windows 10 start up proceeds without warnings. However the error details are being logged.
Restore Default Startup Configuration of Windows Push Notifications User Service
1. Run the Command Prompt as an administrator.
2. Depending on the version of your operating system, copy the commands below, paste them into the command window and press ENTER.
For Windows 10 1607 Home, Windows 10 1607 Pro, Windows 10 1607 Education, Windows 10 1607 Enterprise:
sc config WpnUserService start= demand
For Windows 10 1703 Home, Windows 10 1703 Pro, Windows 10 1703 Education, Windows 10 1703 Enterprise, Windows 10 1709 Home, Windows 10 1709 Pro, Windows 10 1709 Education, Windows 10 1709 Enterprise, Windows 10 1803 Home, Windows 10 1803 Pro, Windows 10 1803 Education, Windows 10 1803 Enterprise, Windows 10 1809 Home, Windows 10 1809 Pro, Windows 10 1809 Education, Windows 10 1809 Enterprise, Windows 10 1903 Home, Windows 10 1903 Pro, Windows 10 1903 Education, Windows 10 1903 Enterprise, Windows 10 1909 Home, Windows 10 1909 Pro, Windows 10 1909 Education, Windows 10 1909 Enterprise, Windows 10 2004 Home, Windows 10 2004 Pro, Windows 10 2004 Education, Windows 10 2004 Enterprise, Windows 10 20H2 Home, Windows 10 20H2 Pro, Windows 10 20H2 Education, Windows 10 20H2 Enterprise, Windows 10 21H1 Home, Windows 10 21H1 Pro, Windows 10 21H1 Education, Windows 10 21H1 Enterprise, Windows 10 21H2 Home, Windows 10 21H2 Pro, Windows 10 21H2 Education, Windows 10 21H2 Enterprise, Windows 10 22H2 Home, Windows 10 22H2 Pro, Windows 10 22H2 Education, Windows 10 22H2 Enterprise:
sc config WpnUserService start= auto
sc start WpnUserService
3. Close the command window and restart the computer.
The WpnUserService service is using the WpnUserService.dll file that is located in the C:\Windows\System32 directory. If the file is removed or corrupted, read this article to restore its original version from Windows 10 installation media.