
Некоторые разделы реестра важны для правильной работы системы и поэтому защищены. При редактировании таких разделов и параметров в них вы можете получить ошибки: «Ошибка при записи нового значения параметра», «Не удается удалить все выделенные параметры», «Не удается удалить раздел. Ошибка при удалении раздела», «Ошибка при переименовании раздела».
Если вы столкнулись с таким ошибками и уверены, что вам необходимо изменить соответствующие параметры в реестре, вы можете стать владельцем раздела реестра и предоставить себе необходимые права для его редактирования. Учитывайте, что это потенциально может привести к проблемам и разумным будет создать точку восстановления системы перед редактированием.
Исправление «Ошибка при записи нового значения параметра», «Не удается удалить все выделенные параметры», «Не удается удалить раздел», «Ошибка при переименовании раздела» при редактировании реестра

Для того, чтобы изменить владельца раздела реестра и предоставить себе права на изменение параметров в этом разделе, выполните следующие шаги (напоминаю: нет гарантий, что это не повредит системе в дальнейшем):
- Нажмите правой кнопкой мыши по разделу в редакторе реестра и откройте пункт «Разрешения».

- В открывшемся окне нажмите кнопку «Дополнительно».
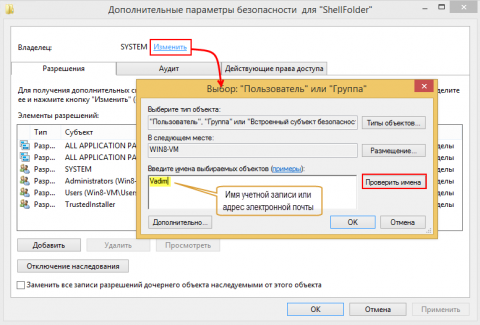
- В поле «Владелец» нажмите «Изменить».

- В следующем окне введите имя своего пользователя (того, под которым вы работаете в системе и из-под которого требуется редактирование реестра), при использовании учетной записи Майкрософт — введите адрес E-mail для этой учетной записи. Нажмите «Проверить имена», а затем — кнопку «Ок».

- Вместо 4-го шага можно нажать «Дополнительно», затем — «Поиск» и выбрать пользователя из списка, а затем также нажмите «Ок».
- Вверху окна параметров безопасности раздела, рядом с пунктом «Владелец» отметьте пункт «Заменить владельца подконтейнеров и объектов» и нажмите «Ок».
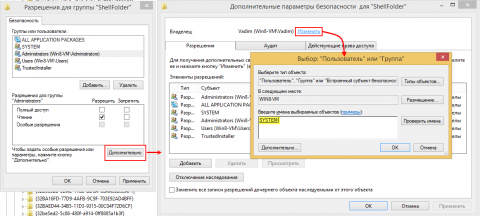
- Вы вернетесь в окно установки разрешений для раздела реестра. Если в списке групп и пользователей вверху присутствует ваш пользователь, выберите его, установите разрешения «Полный доступ» и примените настройки.
- Если пользователя нет, снова нажмите кнопку «Дополнительно», а в следующем окне — кнопку «Добавить» внизу списка «Элементы разрешений» и добавьте в список вашего пользователя (нажимаем «Выберите субъект» и действуем как в 4 или 5-м шаге). Отметьте пункты «Полный доступ» и «Применять эти разрешения к объектам и контейнерам только внутри этого контейнера». Нажмите «Ок».

- Вы вернетесь в окно дополнительных параметров безопасности раздела реестра. Отметьте пункт «Заменить все записи разрешений дочернего объекта наследуемыми от этого объекта» и нажмите «Ок».
- Подтвердите применение изменений.


После выполнения этих шагов вы сможете редактировать и удалять параметры и разделы реестра, находящиеся внутри раздела, для которого были изменены разрешения. Ошибки «Ошибка при записи нового значения параметра», «Не удается удалить все выделенные параметры», «Ошибка при удалении раздела», «Ошибка при переименовании раздела» появиться не должны.
Обратите внимание: если речь идет о разделах реестра, имеющих отношение к работе антивируса, они могут быть дополнительно защищены самим антивирусом. Например, чтобы появилась возможность менять параметры Microsoft Defender в реестре, предварительно потребуется отключить функцию «Защита от подделки» в параметрах защиты от вирусов и угроз.
Registry Editor allows you to manage Keys and DWORD Values stored for Settings in Windows 11. Regedit.exe is its shortcut command and it is a very useful function that helps in performing even the critical troubleshooting. So, here you will find How to open Registry Editor in Windows 11 using simple and best methods.
However, working with the Registry Editor is risky a bit because even small mistakes can damage the Windows in a serious manner. But when you are good with the tool this is super handy to change in Settings and policies. You can launch the Registry editor through multiple methods for example from Run, cmd command, Search, shortcut, and more. See a post about the same tool – How to create a new key in Registry Editor Windows 11.
Open Registry Editor in Windows 11
Here is how to open Registry Editor in Windows 11 –
Way-1: Via Windows search
- Press – Windows + S.
- Type in – regedit.
- Hit – Enter.
- A User account control dialog box will prompt, select – Yes.
Way-2: Using Run Dialog box
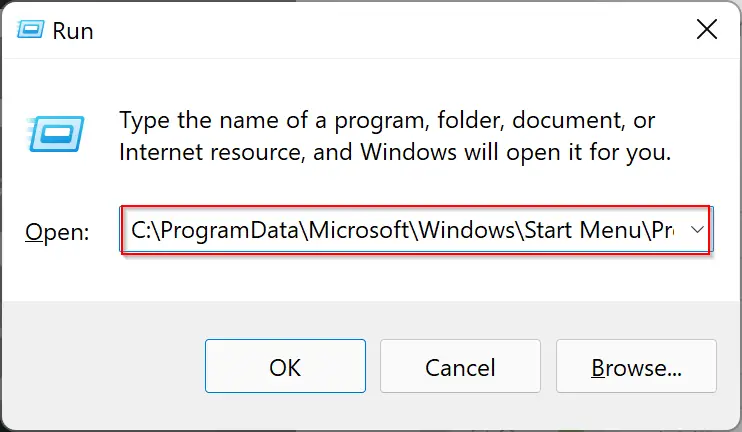
- Press – Win + R.
- This will open Run dialog box. Registry editor run command is regedit and regedit.exe.
- Type – regedit.exe or regedit in its empty text bar.
- Click – OK.
- Choose Yes on the UAC pop-up.
Way-3: Open Registry Editor from Start menu
- Press – Windows key.
- When Start menu shows up, click – All apps from the top right corner.
- Scroll down and find – Windows Tools.
- Once you get the same, click on it.
- A separate Window appears; double click on Registry Editor.
- Click Yes on the UAC pop-up to open Registry Editor in Windows 11.
Way-4: Use Task Manager to open Registry Editor
- Press – Ctrl + Shift + Esc. Alternatively, you can follow – How to open Task Manager in Windows 11 (15 Best ways).
- When Task Manager shows up, click – More details if the window is not expanded already.
- From menu bar, click on File and then choose – Run new task.
- On the Create a new task pop-up, type – regedit.
- Click – OK.
- Select Yes on User account control box.
Way-5: Via File Explorer
- Launch File Explorer by pressing – Win+E.
- Go to the following directory –
C:\ProgramData\Microsoft\Windows\Start Menu\Programs\Administrative Tools
- From here, double-click – Registry Editor.
- When UAC prompt appears, click on Yes.
Way-6: Through Control Panel
- Click on Start.
- Type – control.
- Click – OK. See – How to open Control Panel in Windows 11 (13 Best Ways).
- Once Control panel appears, Set the View by option to Large icons.
- Click – Windows Tools.
- From the folder that appears, double-click – Registry Editor.
- Once the UAC shows up, click on – Yes.
Way-7: How to open registry editor from command prompt
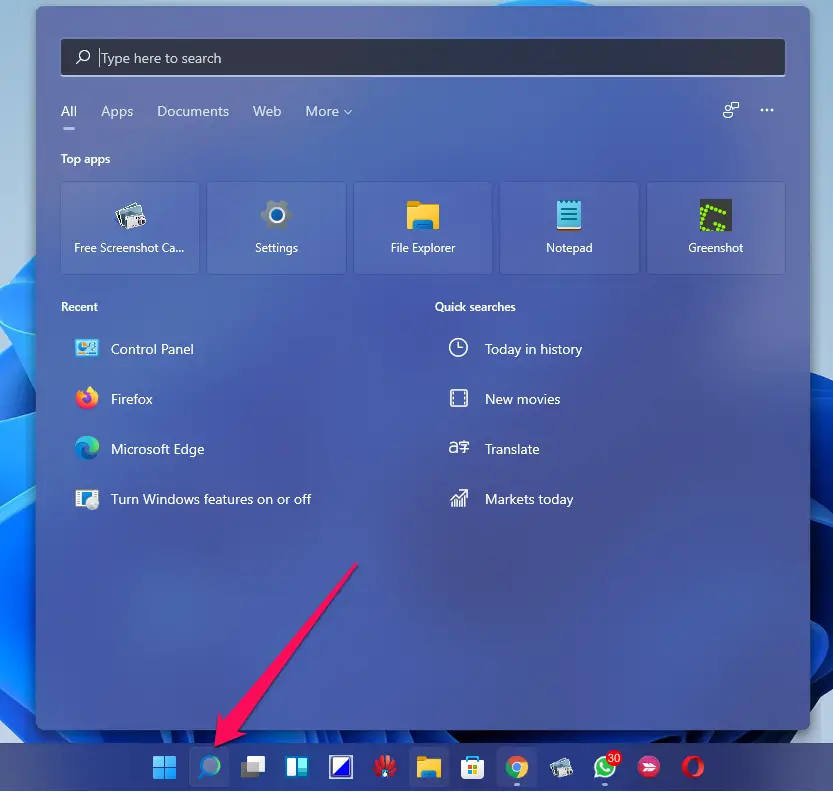
- Click the Search icon present on taskbar.
- Type the Registry Editor command – cmd.
- Hit – Enter.
- In the black pane, insert – regedit.
- Press – Enter to run the command.
Way-8: By executing cmdlet in PowerShell
- Press Windows key and type in – powershell.
- Hit – Enter.
- When PowerShell becomes ready, type – regedit.
- Press – Enter key.
Way-9: Using desktop shortcut
- Click the start button and type – regedit.
- From the right navigation pane, select – Open file location.
- After moving to next window, look for – Registry Editor.
- Right-click the same and choose – Show more options.
- Following that, select – Send to => Desktop (Create shortcut).
- A shortcut icon will be created on desktop. From now onwards, you just need to double-click the icon to open Registry Editor in Windows 11.
Way-10: Through hotkey
- First, make desktop shortcut for registry editor following the above method.
- Arrive at desktop screen.
- Right-click on Registry Editor and choose – Properties.
- After a new wizard appears, click the bar present next to Shortcut key.
- Press a key you prefer to use. For example – R.
- System will automatically add Ctrl + Alt before your selected key.
- Click – Apply and then OK.
- From now on, press Ctrl+Alt+R (or the one you selected) to open Registry Editor.
Way-11: By Pinning Registry Editor to Start or Taskbar
- Press – Win+S.
- In the search bar, type – regedit.
- When the result appears, choose – Pin to Start.
- To access the application, press Windows key and click Registry Editor from Pinned options.
- Similarly, you can also Pin Registry Editor to taskbar.
Methods list:
Way-1: Via Windows search
Way-2: Using Run Dialog box
Way-3: Open Registry Editor from Start menu
Way-4: Use Task Manager to open Registry Editor
Way-5: Via File Explorer
Way-6: Through Control Panel
Way-7: Via Command Prompt
Way-8: By executing cmdlet in PowerShell
Way-9: Using desktop shortcut
Way-10: Through hotkey
Way-11: By Pinning Registry Editor to Start or Taskbar
That’s all!!!
Вы тут: Главная → Windows → Как получить доступ к разделу реестра или папке и вернуть все на свои места
В некоторые разделы реестра Windows или папки изменения не может внести даже администратор, работающий в редакторе реестра или файловом менеджере, который запущен с полными правами.

Это происходит потому, что у группы «Администраторы» нет прав на запись в этот раздел реестра или папку. Причин для этого может быть две:
- Группа «Администраторы» является владельцем раздела или папки, но не имеет полных прав на объект. В этом случае достаточно просто выдать группе «Администраторы» полные права.
- Владельцем раздела реестра или папки являются системная учетная запись Система или TrustedInstaller (Вторая служит в рамках комплекса по укреплению безопасности операционной системы, но для любителей «поковырять» систему она представляет собой досадную помеху на пути к цели). В этом случае можно сначала стать владельцем раздела или папки, а затем выдать своей группе полные права. Но есть и более интересные альтернативы — утилиты для запуска исполняемых файлов от имени этих учетных записей.
Далее я покажу, как внести изменения в реестр при недостатке прав. Я также объясню, как восстановить исходные разрешения, и почему это нужно делать.
👉 Инструкции в этой статье одинаково применимы к разделам реестра и папкам файловой системы. Реестр используется в качестве примера.
На этой странице
- Как делать грамотно и быстро
- Внесение изменений в реестр от имени учетной записи «Система»
- Внесение изменений в реестр от имени учетной записи TrustedInstaller
- Как делать неграмотно и медленно
- Получение полных прав и смена владельца
- Возвращение исходных прав и восстановление владельца
Как делать грамотно и быстро
Быстрее всего запускать редактор реестра или командную строку с правами системы или TrustedInstaller и вносить изменения. Тогда не надо будет тратить время на смену прав и их восстановление.
Внесение изменений в реестр от имени учетной записи «Система»
Если владельцем раздела реестра является специальная учетная запись «Система», существует способ внести изменения в раздел, не изменяя владельца и разрешений. Для этого используется утилита PsExec, входящая в набор утилит Марка Руссиновича PsTools. Суть способа сводится к запуску редактора реестра от имени системы.
- Загрузите набор PsTools и распакуйте утилиту PsExec в папку Windows, чтобы не указывать к ней путь в командной строке.
- Откройте командную строку от имени администратора и выполните команду:
psexec64 -i -s regedit
Запустится редактор реестра, причем от имени системы, что задается параметром -s (параметр -i обеспечивает интерактивный запуск приложения).

В этом легко убедиться с помощью другой утилиты Марка Руссиновича – Process Explorer. В свойствах процесса видно, от чьего имени он запущен.

Теперь вы можете вносить изменения в разделы реестра, владельцем которых является учетная запись «Система».
Внесение изменений в реестр от имени учетной записи TrustedInstaller
Вы можете использовать скрипт PowerShell, т.е. обойтись без сторонних средств, коих великое множество:
- Trusted Shell (64-разрядная версия в архиве, пароль:
tshell). Достаточно запустить утилиту с правами администратора, затем в командной строке ввести regedit. Автор, Дмитрий Стариков, рассказывает о принципах работы в комментариях к этой записи. - DevxExec. Краткие инструкции в комментариях.
- ExecTI от Winaero.
- RunAsTI. Запуск от имени системы и/или TrustedInstaller. Принцип работы по ссылке. По информации участников форума, утилита работает из setupcomplete.cmd в отличие от tshell и devxexec.
- PowerRun. Запуск от имени системы и/или TrustedInstaller.
- Advanced Run от NirSoft
- SuperUser. Запуск от имени TrustedInstaller.
Как делать неграмотно и медленно
В Windows 8 слегка изменился графический интерфейс смены владельца, что стало непреодолимым препятствием для ряда читателей, судя по комментариям. Мне претит, когда на одной странице дублируются практически одинаковые инструкции, но другие варианты еще хуже. Поэтому выбирайте инструкции для своей ОС. Я полагаю, что в редакторе реестра у вас уже открыт нужный раздел реестра.
Получение полных прав и смена владельца
По ходу дела вы увидите, кто является владельцем раздела реестра. Если это Система или TrustedInstaller, можно воспользоваться подходящей утилитой ↓
Windows 8 и новее
- Щелкните правой кнопкой мыши на разделе реестра и выберите из меню пункт Разрешения.
- Выделите группу «Администраторы»:
- Если доступен флажок Полный доступ, установите его и нажмите кнопку ОК. Этого может оказаться достаточно, если группа является владельцем раздела.
- Если флажок недоступен или вы видите сообщение об ошибке, переходите к пункту 3.
- Нажмите кнопку Дополнительно, нажмите ссылку Изменить вверху окна, введите адрес электронной почты учетной записи Microsoft или имя локальной учетной записи, проверьте имя и нажмите кнопку ОК.

- Установите флажок Заменить владельца подконтейнеров и объектов вверху окна и нажмите кнопку ОК.
- Установите флажок «Полный доступ», как описано в пункте 2.
Windows 7
Посмотреть инструкции
Теперь ничто не препятствует записи в этот раздел реестра. Однако я рекомендую восстановить права, когда вы закончите редактирование раздела.
Возвращение исходных прав и восстановление владельца
После внесения изменений в реестр я советую вернуть исходные права и восстановить владельца, чтобы не снижать безопасность системы. Кроме того, на форум не раз обращались за помощью люди, у которых правильная работа системы нарушалась после того, как у системной учетной записи TrustedInstaller было отобрано владение.
Windows 8 и новее
- Щелкните правой кнопкой мыши на разделе реестра и выберите из меню пункт Разрешения.
- Нажмите кнопку Дополнительно, нажмите ссылку Изменить вверху окна и введите имя учетной записи:
- NT Service\TrustedInstaller, если владельцем являлась учетная запись TrustedInstaller
- система, если владельцем являлась учетная запись Система (в английской ОС нужно вводить System)
- Установите флажок Заменить владельца подконтейнеров и объектов вверху окна и нажмите кнопку ОК.
- Выделите группу «Администраторы», снимите флажок Полный доступ и нажмите кнопку Применить.
Windows 7
Посмотреть инструкции
Windows 11 comes with tons of settings, and Windows Registry manages all. Any parameter which you see on Windows that settings have been stored in the registry. That’s why unknowingly editing the registry may make your Windows machine unserviceable.

There are multiple ways to open Registry Editor or REGEDIT on Windows 11 PC. We will review them one by one.
How to Open Registry Editor in Windows 11 using Windows Search?
Follow these steps to launch Registry Editor in Windows 11 using Windows Search:-
Step 1. Click on the Search icon on the taskbar to open Windows Search.
Step 2. On the search box, type registry.
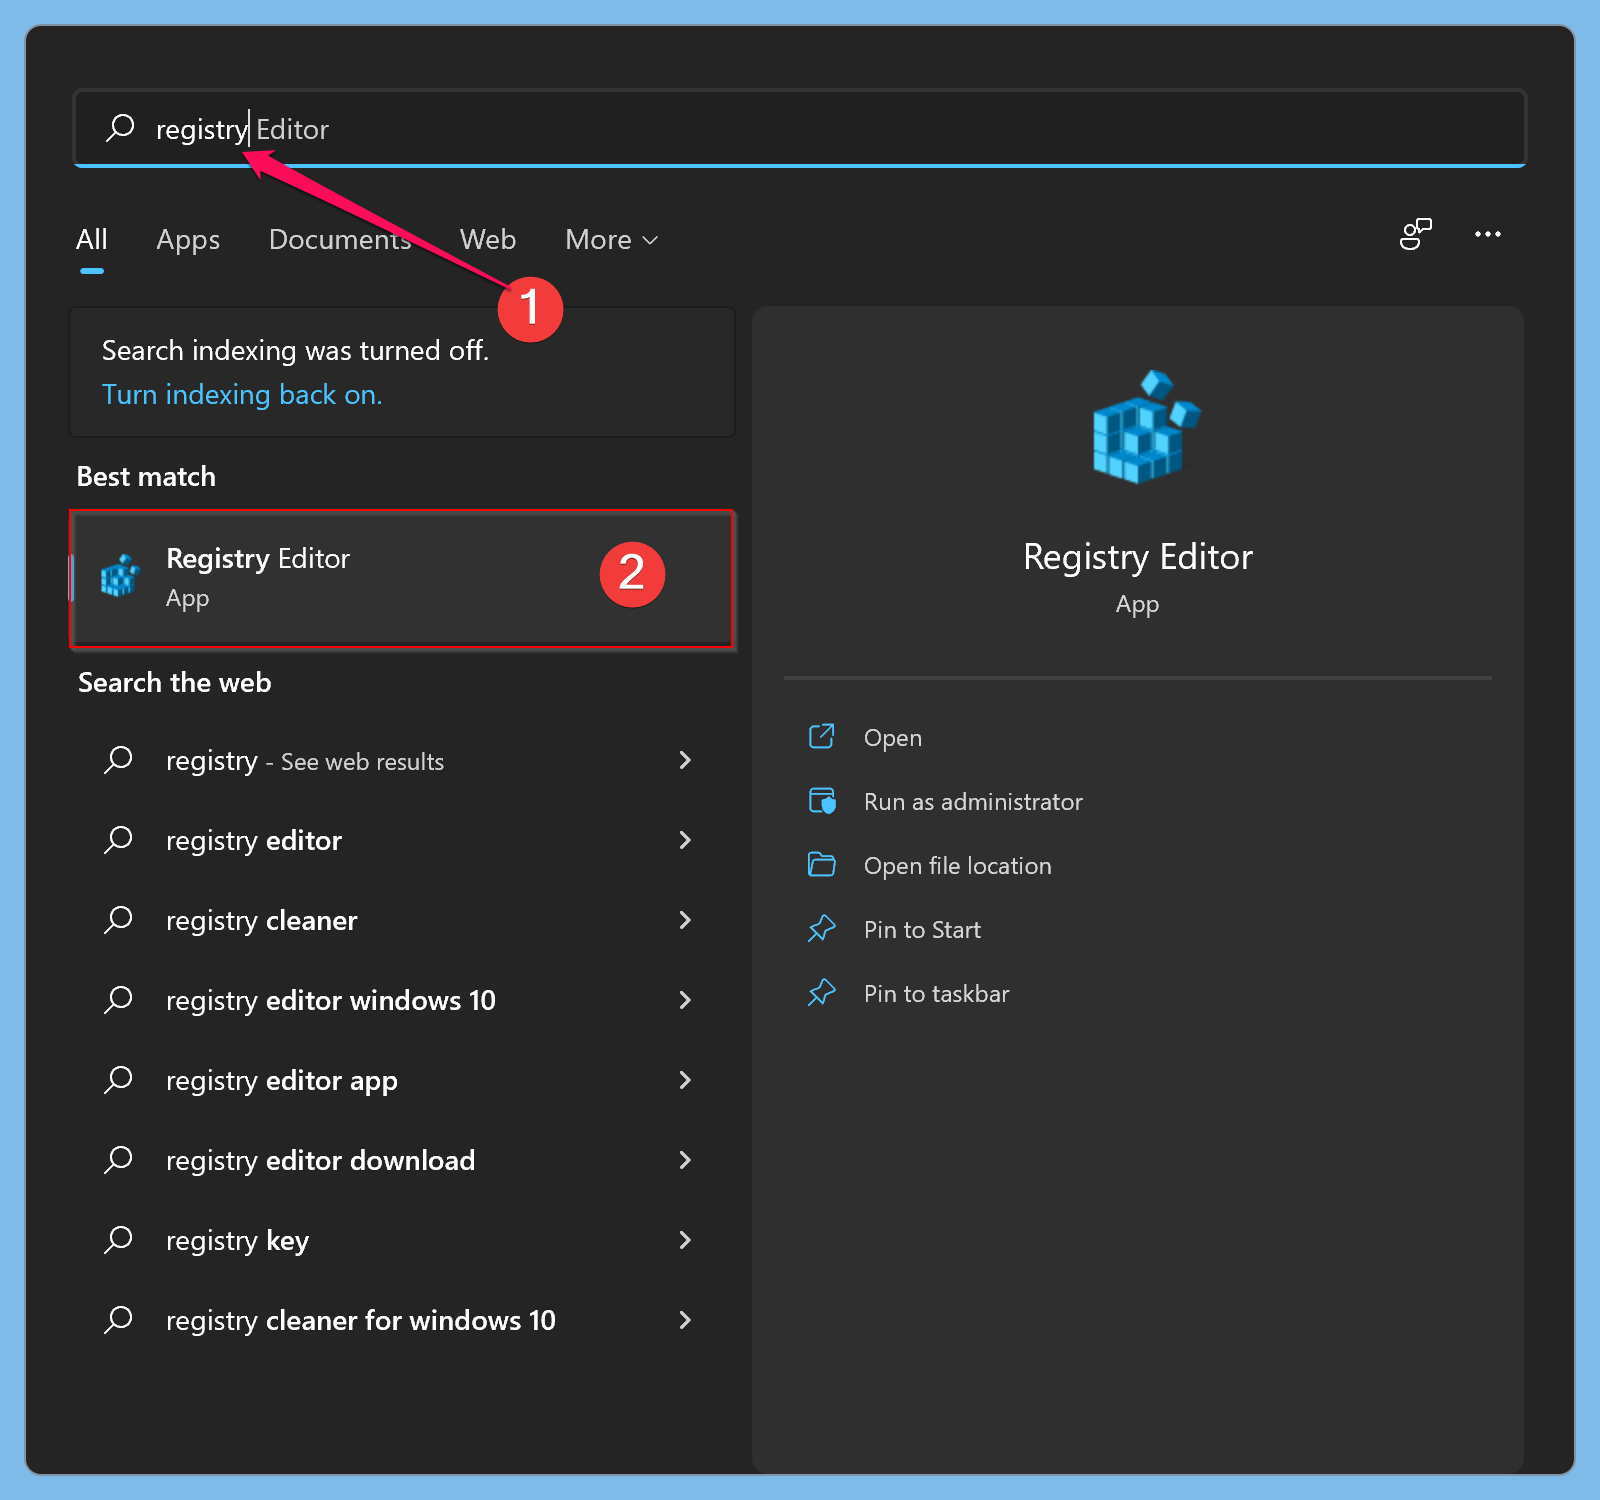
Step 3. Click on the Registry Editor app to open it from the available results.
How to Open Registry Editor in Windows 11 through Desktop Shortcut?
If you open the registry editor often, you can create a desktop shortcut for this program. Here is how to do it.
Step 1. Open the Run dialog box by pressing Windows + R keys from the keyboard.
Step 2. In the Run box, type the following and hit Enter from the keyboard:-
C:\ProgramData\Microsoft\Windows\Start Menu\Programs\Administrative Tools
Step 3. Now, look for the program name “Registry Editor.”
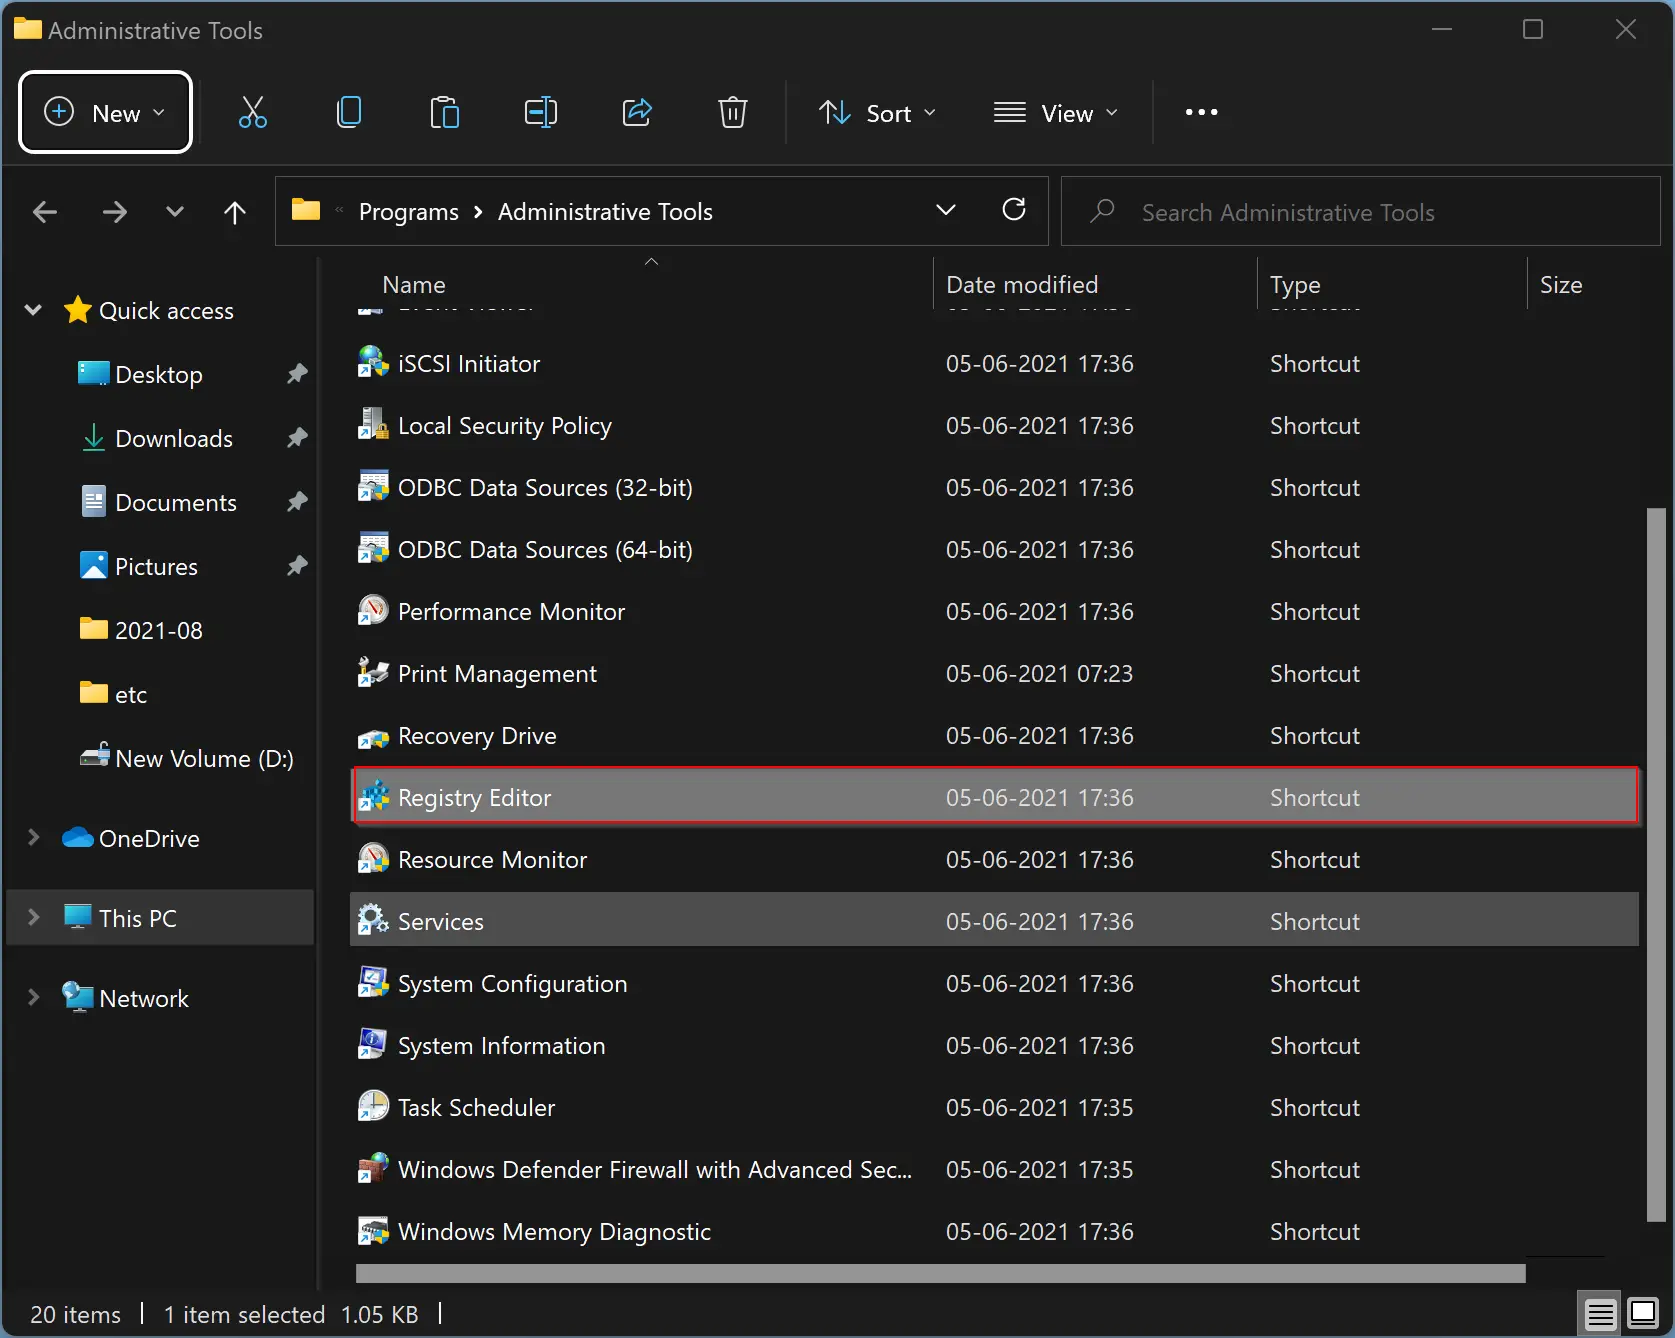
Step 4. Copy (Ctrl + C) and Paste (Ctrl + V) this shortcut to the desktop.
That’s it. Now you can open the Registry Editor from the Windows 11 desktop by clicking on its shortcut icon.
How to Launch Registry Editor in Windows 11 using Keyboard Shortcut?
First, you need to assign shortcut keys to Registry Editor, and then you can use those to open the Registry Editor. To do that, you need to perform the following steps:-
Step 1. Open the Run dialog box by pressing Windows + R keys from the keyboard.
Step 2. In the Run box, type the following and hit Enter from the keyboard:-
C:\ProgramData\Microsoft\Windows\Start Menu\Programs\Administrative Tools
Step 3. Now, look for the program name “Registry Editor.”
Step 4. Right-click on the Registry Editor shortcut icon and select the Properties option.
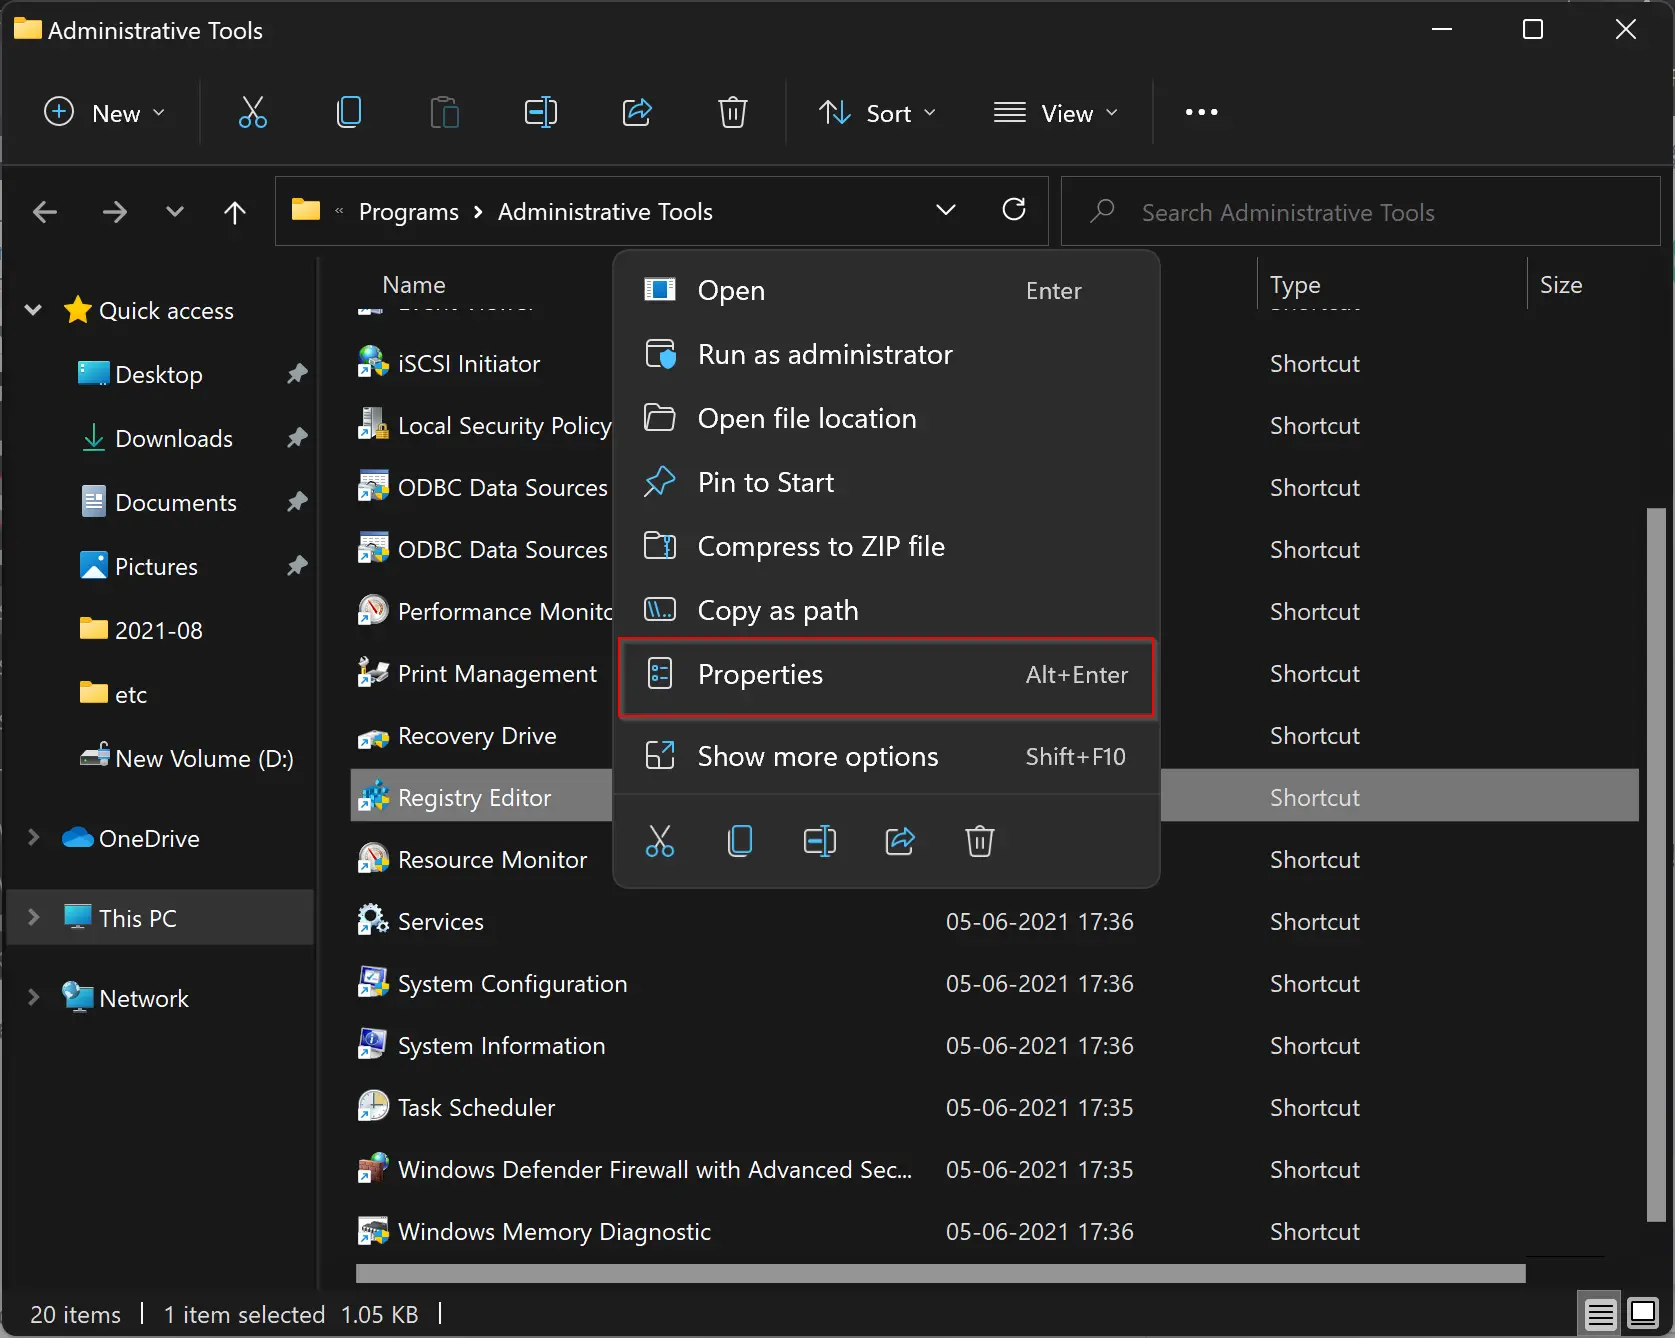
Step 5. Navigate to the Shortcut tab in the Registry Editor Properties window and click on the text field next to the Shortcut key.
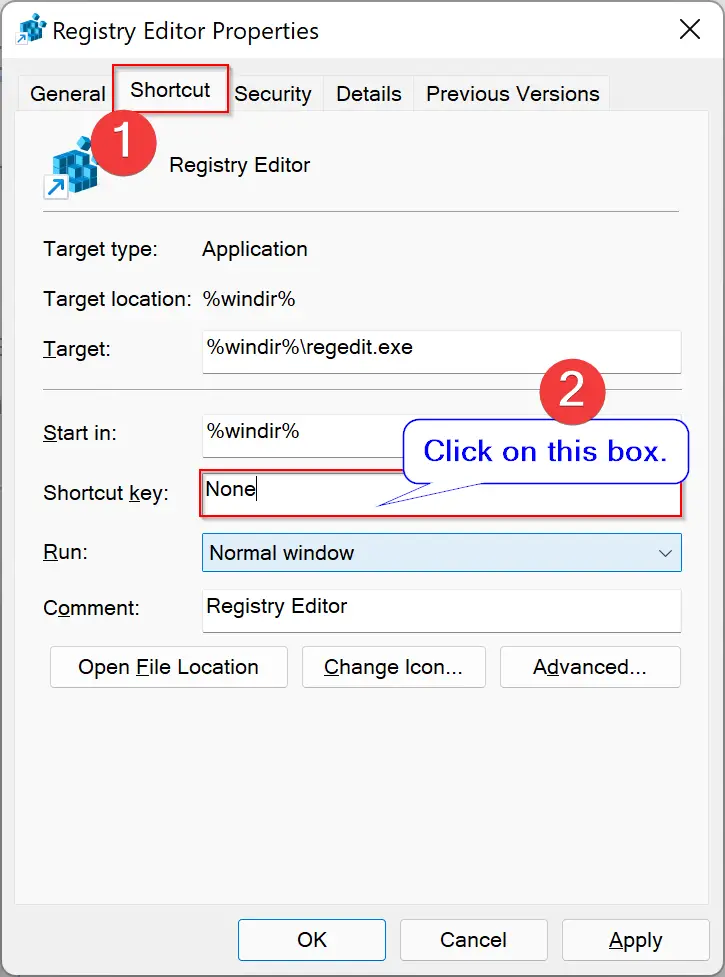
Step 6. Press any key to assign the sequence for this shortcut. Remember, whatever key you choose, CTRL + Alt will be automatically prefixed to it. For instance, if you press the key ‘F’ key, the shortcut key will be Ctrl + Alt + F to open the Registry Editor.
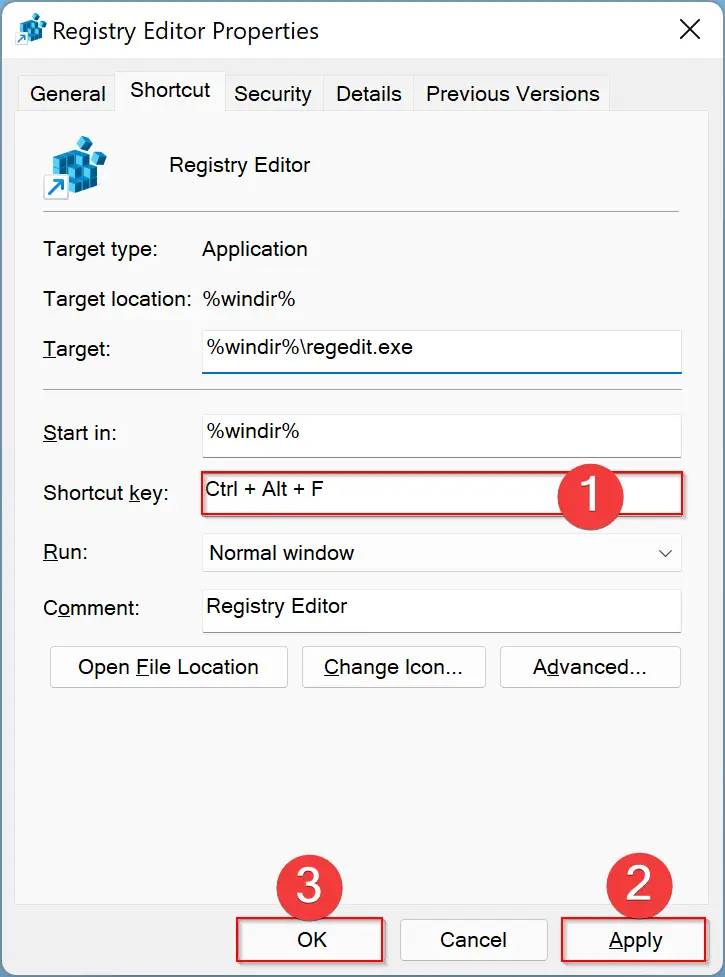
Step 7. After assigning the shortcut keys, click the Apply button.
Step 8. Finally, click OK.
That’s it. Now you can open Registry Editor with your own assigned keyboard shortcut.
How to Open Registry Editor in Windows 11 using Run Prompt?
To launch Registry Editor in Windows 11 using Run Prompt, do these steps:-
Step 1. Open the Run dialog box by pressing Windows + R keys from the keyboard.
Step 2. In the Run box, type the following and hit Enter from the keyboard:-
regedit
Now, the Registry Editor window will open.
How to Open Registry Editor in Windows 11 through Command Prompt, Power Shell, or Windows Terminal?
To access Registry Editor in Windows 11 through Command Prompt, Power Shell, or Windows Terminal, follow these steps:-
Step 1. Click on the Search button on the taskbar and search for the respective console by typing its name.
Step 2. Click on the respective app to open them.

Step 3. On the prompt, type regedit and hit Enter from the keyboard to open the Registry Editor.
Conclusion
In conclusion, the Windows Registry Editor is an essential tool for managing and configuring settings in Windows 11. However, editing the registry without proper knowledge can cause serious problems in your system. In this article, we have discussed various methods to open the Registry Editor in Windows 11, including using Windows Search, desktop shortcut, keyboard shortcut, Run prompt, Command Prompt, Power Shell, or Windows Terminal. You can choose any of these methods that suit your preference and convenience. Remember to be careful while editing the registry and always make a backup before making any changes.
Windows registry is a database that stores all settings for Windows in a hierarchical format, including the majority of apps installed on your machine. Many operations can be performed here such as repairing issues, modifying functionality, and improving processing speed of your computer. However, regedit is a tremendously powerful database that, if wrongly altered, may prove to be quite hazardous. As a result, updates to the registry keys are better left to specialists and advanced users. If you need to learn how to open, browse, edit or delete Registry Editor Keys in Windows 11, read below.

Table of Contents
Windows 11 offers various new features and settings which are managed by Windows Registry. Read our guide on What is Windows Registry & How it Works? here to learn more. All possible ways to open Registry Editor on Windows 11 are enlisted in this guide.
Method 1: Through Windows Search Bar
Follow the given steps to open Registry Editor in Windows 11 through Windows search menu:
1. Click on the Search icon and type Registry Editor.
2A. Then, click on Open as shown.

2B. Alternately, click on Run as administrator to make changes, if need be.
Method 2: Through Run Dialog Box
Follow below-mentioned steps to open Registry Editor in Windows 11 via Run dialog box:
1. Press Windows + R keys together to open Run dialog box.
2. Here, type regedit and click on OK, as depicted below.

Also Read: How to Disable Online Search from Start Menu in Windows 11
Method 3: Through Control Panel
Here’s how to open Registry Editor in Windows 11 through Control Panel:
1. Search and launch Control Panel, as illustrated below.

2. Here, click on Windows Tools.

Note: Make sure you are in Large icon viewing mode. If not, click on View by and select Large icons, as shown.
3. Double-click on Registry Editor.

4. Click on Yes in User Account Control, if and when prompted.
Method 4: Through Task Manager
Alternately, open Registry Editor in Windows 11 via Task Manager as follows:
1. Press Ctrl +Shift + Esc keys together to open Task Manager.
2. Click on File > Run new task, as depicted below.
3. Type regedit and click on OK.

4. Click on Yes in User Account Control, if and when prompted.
Also Read: How to Fix Windows 11 Taskbar Not Working
Method 5: Through File Explorer
You can also access registry editor through File Explorer, as explained below:
1. Press Windows + E keys together to open File Explorer.
2. In the Address bar of File Explorer, copy-paste the following address and hit Enter:
C:\ProgramData\Microsoft\Windows\Start Menu\Programs\Administrative Tools

3. Double-click on Registry Editor, as shown.

4. Click on Yes in the UAC prompt.
Method 6: Through Command Prompt
Alternatively, follow given steps to open regedit through CMD:
1. Click on the search icon and type command prompt. Then, click on Open.

2. Type the command: regedit and press Enter key.

How to Browse Registry Editor in Windows 11
After launching Registry Editor,
- You may go through each subkey or folder by using the Navigation/Address bar.
- Or, double-click on each subkey in the left pane to expand it and move forward the same way.
Method 1: Use Subkey Folders
The subkey folder on the left can be used to navigate to the desired location. For instance, double-click on Computer > HKEY_LOAL_MACHINE > SOFTWARE > Bit Defender folders to reach Bit Defender registry key, as illustrated.

Method 2: Use Address Bar
Alternatively, you can copy-paste a particular location in the address bar and hit Enter key to go to that respective location. For example, copy-paste the given address to reach the above key:
Computer\ HKEY_LOAL_MACHINE\SOFTWARE\Bit Defender
Also Read: How to Enable Group Policy Editor in Windows 11 Home Edition
How to Edit or Delete Registry Key in Windows 11
Once within a registry key or folder, you may change or remove the values displayed.
Option 1: Edit String Value Data
1. Double-click the Name of the key you want to alter. It will open Edit String window, as shown.
2. Here, type desired value in Value data: field and click on OK to update it.

Option 2: Delete Registry Key
1. To remove it, highlight the key in the registry, as shown.

2. Then, hit the Delete key on the Keyboard.
3. Finally, click on Yes in the Confirm Key Delete window, as depicted.

Recommended:
- How to Check Software Installation Date in Windows
- How to Use PowerToys on Windows 11
- How to Install XPS Viewer in Windows 11
- How to Change Country in Microsoft Store in Windows 11
We hope you found this article interesting and helpful about how to open Registry Editor in Windows 11. Drop your suggestions and queries in the comment section below.