
Most people prefer to use a laptop or notebook these days. These laptops use top-range processors and more vital graphics cards to handle complex applications. While these advanced devices help multitask, they come with overheating costs.
The overheating of laptops is the largest threat to the life of laptops. The heat generation is directly proportional to the use of the CPU. If your CPU is used 100% by any means, for example, while playing games or performing other complex tasks, the processor will suck more power and cause overheating.
Every time your laptop will overheat, it will slow down efficiency. An overheated laptop may seriously damage your device’s internal components and severely impact the laptop’s performance. It will reduce the battery life, damage the motherboard, and may cause severe internal system cooling problems.
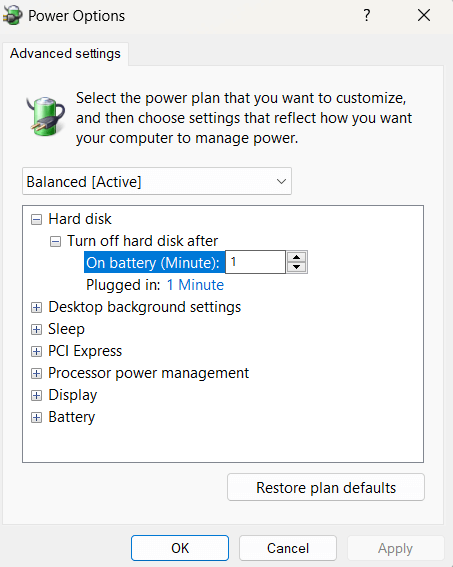
Windows offers a built-in option to prevent laptop overheating and helps you keep your PC cool. You can configure this setting in Windows 11 or 10 in the Power Options window. However, a few users reported that the “System cooling policy” is missing on their PCs.
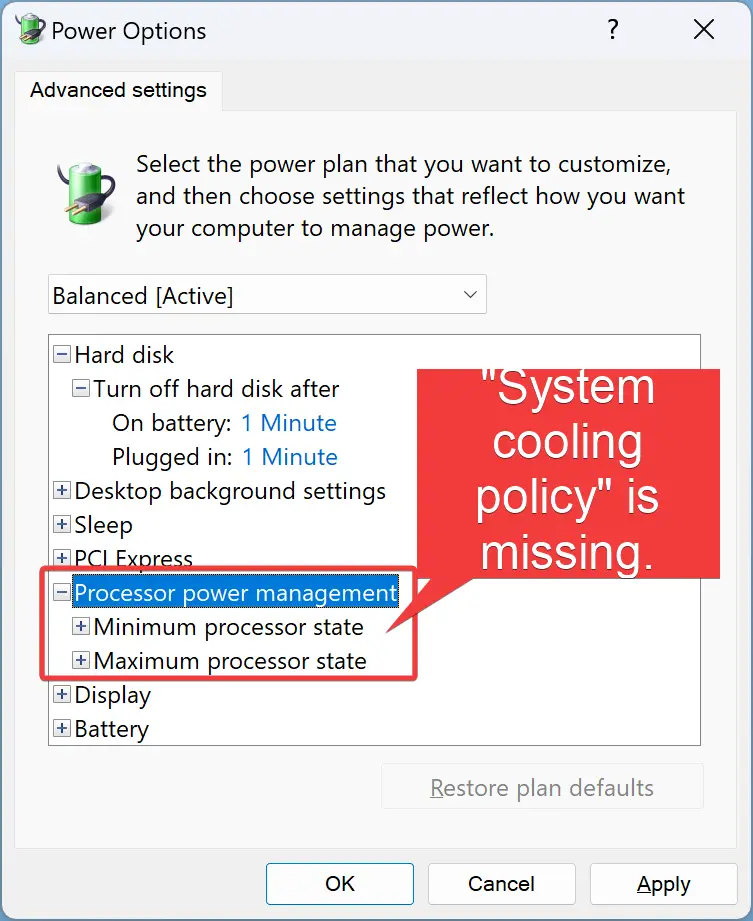
If on your Windows 11 or 10 PC also system cooling policy is missing then this gearupwindows article will help you to fix them.
Fix: “System cooling policy” Missing on Windows 11 or 10 Power Options
To restore the missing “System cooling policy” option on Windows 11 or 10 Power Options window, do these steps:-
Step 1. First, open an elevated Command Prompt window.
Step 2. Then, copy and paste the following in the Command Prompt window and hit the Enter key on the keyboard:-
REG ADD HKLM\SYSTEM\CurrentControlSet\Control\Power\PowerSettings\54533251-82be-4824-96c1-47b60b740d00\94D3A615-A899-4AC5-AE2B-E4D8F634367F /v Attributes /t REG_DWORD /d 2 /f
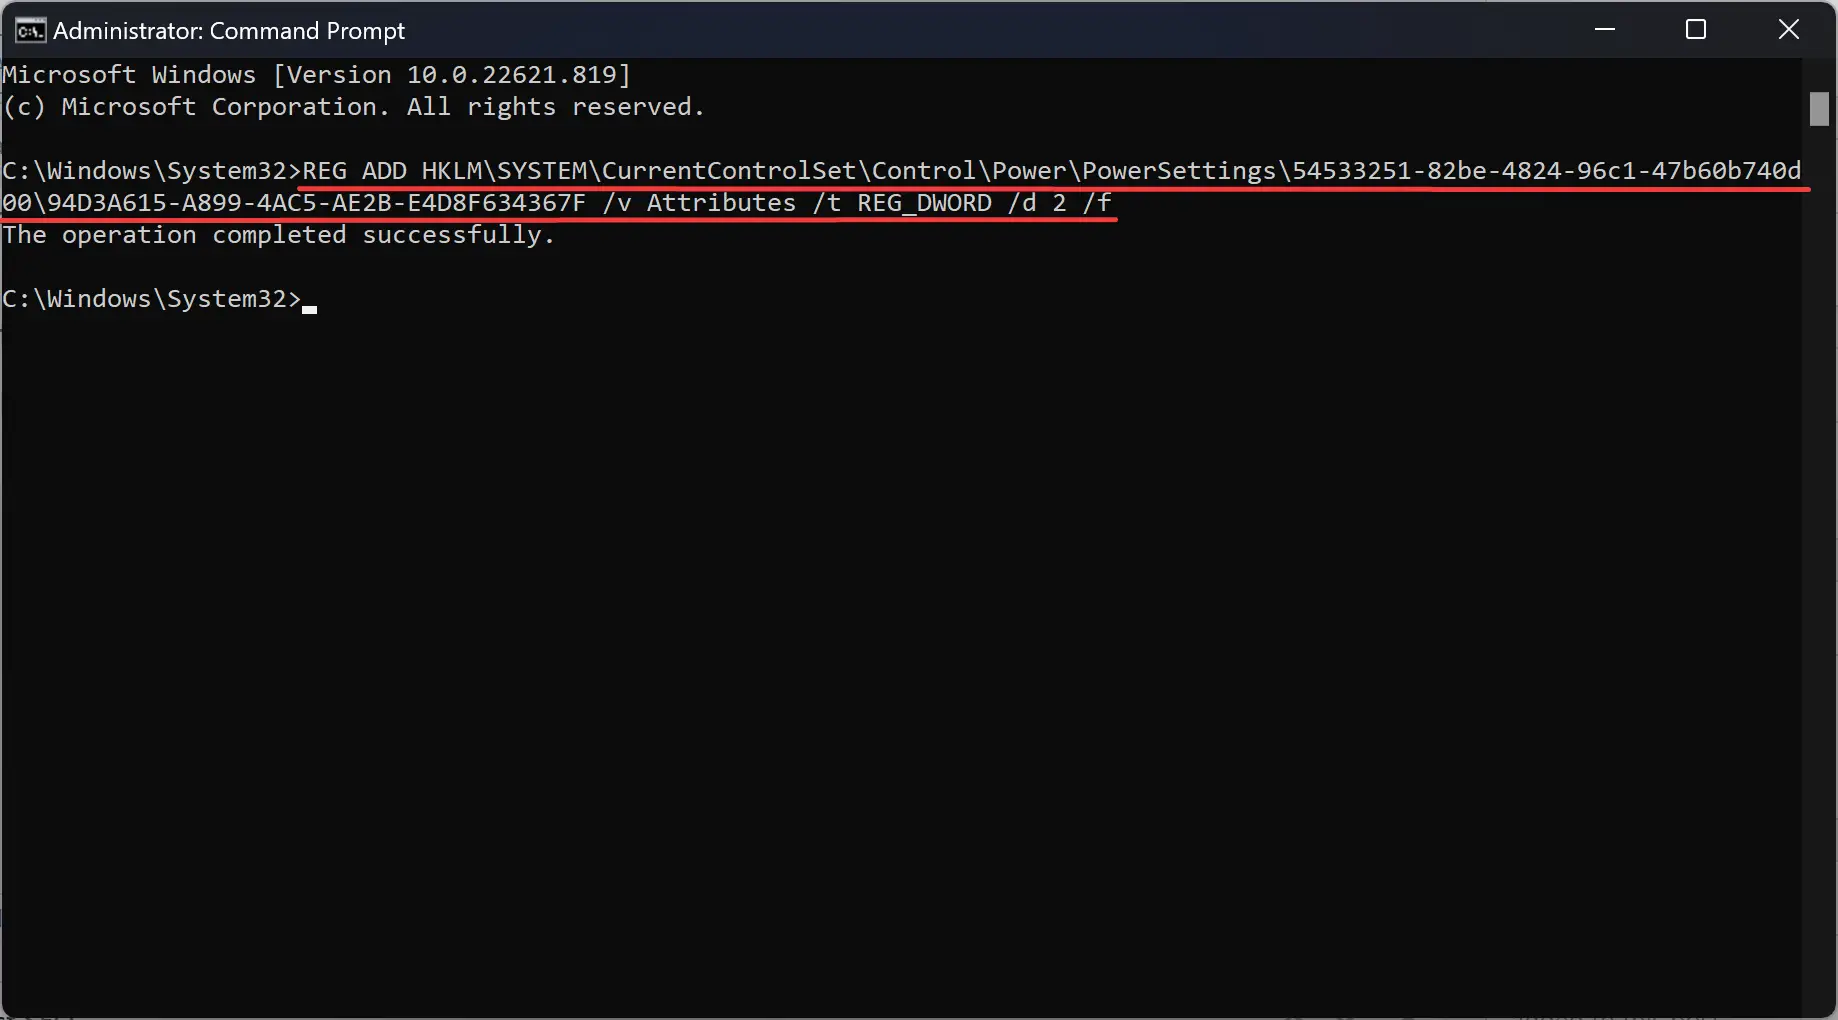
When you’re done, you will see the “The operation completed successfully” message on the screen.
That’s it.
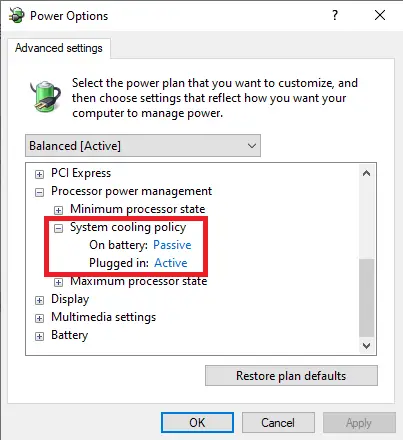
Now, open the Power Options window and you will see “System cooling policy” is restored.
Readers help support Windows Report. We may get a commission if you buy through our links.
Read our disclosure page to find out how can you help Windows Report sustain the editorial team. Read more
Many users have been asking to know how to fix overheating issues in Windows 11 since it does not have the built-in tools for monitoring the CPU fan speed.
Regardless, this article will teach you how to set a system cooling policy in Windows 11 as a more accessible alternative to fixing overheating.
How do I set the best system cooling policy to optimize PC performance?
Users should ensure they perform the following preparatory checks before engaging in any troubleshooting tweaks.
- Eliminate some of the multiple high-end applications running simultaneously that may overwork the CPU.
- Ensure that your computer is properly ventilated.
- Ensure that your Windows is updated. If Windows update fails to work, take a look at this guide for solutions.
- You can further research some of the required settings to control your computer fan speed for Windows 11.
If nothing changes after these checks, proceed to making the tweaks below.
1. Adjust Active/Passive cooling policy settings
- Press Windows + S to launch the Search menu, type Control Panel in the text field and select Open.
- Click on System and Security from the options that appear.

- Click on Power Options.

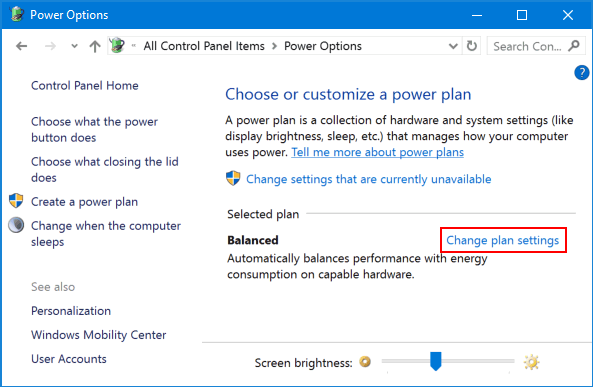
- Select Change plan settings next to the current power plan.

- Next, click on Change advanced power settings.

- Expand System Cooling Policy under Processor power management.
- Change the settings as follows: Plugged in as Active and On battery as Passive.


Since Windows 11 system cooling policy is missing, another effective way to fix your system’s overheating issue is by modifying the power plan settings.
- Recent Windows 11 update lets you disable profanity filter in voice typing
- Microsoft wants Windows 10 users to upgrade to Windows 11 or Copilot + PCs
- Windows 11 KB5055627 update makes File Explorer more fluid
2. Use the SpeedFan software to control your fan
- Press Windows + S to launch the Search menu, type System Information, and launch the app.
- Look for the System Manufacturer and System Model in the System Summary tab.

- Go to the SpeedFan’s official page and download the program.
- Once the download is complete, go to the folder where the downloaded file is stored and double-click on it to begin the installation.
- Follow the on-screen instructions to complete the installation process.

You can, right away (after installation), begin to control your computer fan speed with the SpeedFan software.
What do I do if the System Cooling policy is missing?
- Click the Start button, search cmd, and Run as administrator.

- Input the following command and press Enter:
REG ADD HKLM\SYSTEM\CurrentControlSet\Control\Power\PowerSettings\54533251-82be-4824-96c1-47b60b740d00\94D3A615-A899-4AC5-AE2B-E4D8F634367F /v Attributes /t REG_DWORD /d 2 /f
- Wait till you receive The operation completed successfully, and check Power Options on Control panel.


The System cooling policy will be accessible in the Power Options section in Control Panel.
However, should you ever have a reason to remove the System cooling policy, although it is not advisable, follow these steps:
- Click the Start button, search cmd, and Run as administrator.
- Input the following command and press Enter:
powercfg -attributes SUB_PROCESSOR 94D3A615-A899-4AC5-AE2B-E4D8F634367F +ATTRIB_HIDE
- Then check the Power Options to see if system cooling policy has been removed.


Should you encounter an issue with missing power plans on your Windows, check this guide to fix it.
What does the system cooling policy do?
The system cooling policy allows you to specify the cooling policy you wish to use for your Windows computer, for which there are two options: Active and Passive.
- Active cooling policy: The active cooling policy turns on and speeds up the system fan to reduce high system temperature without affecting the system’s performance. This then brings about an increase in the system’s power consumption.
- Passive cooling policy: The passive cooling mode reduces the power consumption of the system components, hence reducing the overall system performance. This reduces system performance but saves power consumption.
Both options above offer an excellent way to set your system cooling policy, depending on your preference.
These are the best ways to achieve the best system cooling policy in Windows 11. Ensure to follow the steps strictly for optimal results.
Meanwhile, some users also complain about Windows 11 overheating shutdown; you can explore the troubleshooting tweaks provided in this article.
If you have further queries or questions, kindly leave them in the comments section. Also, if you have a suggestion on a solution that has worked for you, apart from the ones provided, you can also drop them.
Loredana Harsana
Windows Software Expert
Loredana is a passionate writer with a keen interest in PC software and technology. She started off writing about mobile phones back when Samsung Galaxy S II was on top of the world and she fell in love with tech of all sorts.
Whenever she’s not at her work desk, you’ll find her enjoying refreshing tea flavors, spilling stories on paper, and listening to the radio.
Are you a Windows user who’s been struggling to keep your computer cool? Have you searched high and low for the system cooling policy option in your power settings, only to find that it’s missing? Well, fear not, because you’re not alone!
Many Windows users have reported this issue, and it can be a real headache, especially if you use your computer for high-performance tasks like gaming or video editing. In this post, we’ll explore why the system cooling policy option might be missing on your Windows device, and what you can do to work around it and keep your computer running cool and smooth.

But before we begin, let’s gain a little insight into Windows System Cooling Policy.
What is System Cooling Policy on Windows?
The system cooling policy is a feature in Windows that allows you to control how your computer’s cooling system operates. It determines how your computer’s fans and other cooling components respond to changes in the computer’s temperature.
There are two options available for the system cooling policy on Windows:
- Active Cooling Policy: The active cooling policy is designed to keep your computer’s components at a constant temperature, regardless of the workload. This means that the cooling system runs at full speed all the time, which can generate a lot of noise and consume more power.
- Passive Cooling Policy: The passive cooling policy, on the other hand, is designed to conserve power and reduce noise by running the cooling system only when necessary. When the computer’s temperature reaches a certain threshold, the cooling system will activate to reduce the temperature.
Also Read: How to Change System Cooling Policy in Windows 11/10
How to Access System Cooling Policy on Windows 11?
To access the system cooling policy settings in Windows, you can follow these steps:
Step 1: Open the Control Panel and select Power Options.

Step 2: Click on Change plan settings for the plan you want to modify.
Step 3: Tap on Change advanced power settings.

Step 4: Expand the Processor power management category.
Step 5: Expand the System cooling policy category.
Step 6: Select the cooling policy you want to use from the drop-down menu.
Step 7: Hit on Apply and then OK to save your changes.
System Cooling Option Missing on Windows? Try These Solutions!
Whether you’re a gamer, a video editor, or just a casual user, having control over your computer’s cooling system is essential for optimal performance and longevity. So let’s dive in and get your system cooling policy back on track!
Solution 1: Check Your Hardware Compatibility
Before trying any other solutions, make sure that your computer meets the hardware requirements for the system cooling policy option. The option is only available on computers with active cooling, which means they have fans or other cooling components that are controlled by the computer’s firmware or operating system. If your computer has passive cooling, such as a heat sink without fans, the system cooling policy option won’t be available.
Also Read: How To Fix An Overheating Windows 11 Computer
Solution 2: Use Windows PowerShell
Yes, you can use the Windows PowerShell app to get back the missing system cooling policy feature in the Power Options. Here’s what you need to do:
Step 1: To get started, tap on the search icon on the Taskbar and type “Windows PowerShell”. Select the “Run as administrator” option to launch the app in admin mode.

Step 2: In the PowerShell window, execute the following command:
powercfg -attributes SUB_PROCESSOR 94D3A615-A899-4AC5-AE2B-E4D8F634367F -ATTRIB_HIDE
And that’s it! Head back to Control Panel and check if the issue was resolved.
Also Read: 6 Best Tool To Stress Test GPU Of Your Windows PC
Solution 3: Edit the Registry
You can also restore the missing system cooling policy option in Power Options by making changes to the Windows Registry. Here are the steps to fix a missing system cooling policy using the Windows Registry:
Step 1: Press the Win + R key combination to open the Run dialog box. Type “regedit” in the textbox and hit Enter.

Step 2: In the Registry Editor window, navigate to the following folder location:
HKEY_LOCAL_MACHINE\SYSTEM\CurrentControlSet\Control\Power\PowerSettings\54533251-82be-4824-96c1-47b60b740d00\0cc5b647-c1df-4637-891a-dec35c318583
Step 3: Double-click the “Attributes” value on the right-hand side of the window and then change the value from “1” to “2” and click “OK”.

Step 4: Close the Registry Editor and open the Power Options menu from the Control Panel.
Step 5: Under “Choose or customize a power plan”, click “Change plan settings” next to the plan you want to modify.
Step 6: Click “Change advanced power settings”.
Step 7: Expand the “Processor power management” and “System cooling policy” categories.
Step 8: Change the “System cooling policy” option to “Active” or “Passive”, depending on your preference.
Once you’re done, tap “Apply” and then “OK” to save your changes.
Why is the System Cooling Policy Missing from Windows Power Options?
There are several reasons why the system cooling policy option might be missing from your Power Options:
- The system cooling policy option is only available on computers with certain hardware configurations, so if your computer doesn’t meet these requirements, the option won’t be available.
- Some laptop manufacturers disable the system cooling policy option in their customized Power Options settings, so you may need to use a third-party tool or modify the Windows Registry to regain access to the option.
- In some cases, Windows updates or other system changes can cause the system cooling policy option to disappear from your Power Options.
Also Read: 6 Ways to Fix Pink Screen of Death Error on Windows PC
Conclusion
The missing system cooling policy issue on Windows 11 can be a frustrating problem, but there are several solutions available to help you regain access to this important Power Option. Before making any changes, make sure your computer meets the hardware requirements for the system cooling policy option. If your computer is compatible but the option is still missing, you can try modifying the Windows Registry.
By following the solutions outlined in this post, you should be able to get your system cooling policy back on track and keep your computer running at optimal temperatures.
Was this post helpful? Which method did the trick for you? Feel free to share your troubleshooting. experience in the comments section! Follow us on social media – Facebook, Instagram and YouTube.
The system cooling policy in windows 11 is responsible for managing the CPU temperature by setting the throttling percentage and fan speed. This policy can be set to one of the following two options: Passive and Active.
The best cooling policy for your system depends on a number of factors, such as the ambient temperature, the number of CPU cores, and the CPU usage. In this guide, you will discover how to set the best system cooling policy in windows 11.

Understanding System Cooling Policy in Windows 11
System cooling is the process of keeping a computer’s internal temperature at a safe level, and there are two main types of system cooling: active and passive.
Active system cooling uses fans or other moving parts to actively circulate air and keep the temperature down without affecting the system’s performance. Passive system cooling on the other hand relies on heat conduction and convection to circulate air and dissolve heat.
Both active and passive system cooling have their advantages and disadvantages. Active system cooling is generally more effective than passive system cooling, but it can also be louder. Passive system cooling is quieter, but it may not be able to keep the temperature as low as active cooling.
So which type of system cooling is best for you? It depends on your needs. If you want the best possible cooling, go with active cooling. If you’re looking for a quiet system, passive cooling is the way to go.
How to Set the Best System Cooling Policy to Optimize PC Performance
To make sure that you are able to set the best cooling policy for your system, ensure that you carry out the following measures:
- Try eliminating some of the multiple high-end applications running at the same time to reduce strain on the CPU.
- Update your Windows.
- Allow proper ventilation for your system.
After carrying out the above measures and nothing seems to be working, try some of these troubleshooting techniques:
1. Adjust Active/Passive Cooling Policy Settings
- Press the Win+S keys to open the Search menu.
- Type Control Panel in the search box and select it when it pops up.
- Click on System and Security.
- Select Power Options.
- Select Change plan settings beside the current power plan.
- Click on Change advanced power settings.
- Under the Processor power management policy, expand the System Cooling policy.
- Set the following power plans;
- On battery – Passive
- Plugged in – Active
2. Control the fan using the SpeedFan software
- Press Win+S to open the Search menu.
- Type System Information in the search box and tap it when it shows up.
- From the System Summary tab, look for the System Manufacturer and the System Model.
- Navigate to the SpeedFan download page and download the software.
- Locate the downloaded file and double-click to begin the installation, following the on-screen installation process.
My System Cooling Policy is Missing, What do I do?
If your system is missing its cooling policy, troubleshoot it in the following manner:
- Click the Start button.
- Type cmd, and select it when it shows up.
- Select Run as administrator.
- Enter the following command:
REG ADD HKLM\SYSTEM\CurrentControlSet\Control\Power\PowerSettings\54533251-82be-4824-96c1-47b60b740d00\94D3A615-A899-4AC5-AE2B-E4D8F634367F /v Attributes /t REG_DWORD /d 2 /f
- After getting the “The operation completed successfully” message, check the Power Options in the Control panel.
The system cooling policy should now be accessible in the Power Options section in the Control Panel.
Is the System Cooling Policy in power options missing in Windows 11? In this blog post, I’m going to share how to bring it back.
The ‘System Cooling Policy’ allows users to change the (Active or Passive) cooling mode on the PC. Active cooling mode increases the speed of the fan before slowing the processor, while Passive cooling mode, increases fan speed before slowing the processor.
Most of the time users manage this setting to “Reduce Loud Laptop Fan Noise Windows” or to achieve other things. It will be annoying if the System Cooling Policy is missing in the Power options, right? If you landed on this blog post, then you’re one out of them for sure.
In this blog post, we will share how to add a System Cooling Policy in Power options or restore the same option. Here’s what you need to do:
Click on the Search icon available on the Taskbar, type CMD, when Command Prompt appears in the search results, and ‘Run as administrator.
When the UAC dialog box appears, click on Yes to continue.
Here, you need to execute this command: REG ADD HKLM\SYSTEM\CurrentControlSet\Control\Power\PowerSettings\54533251-82be-4824-96c1-47b60b740d00\94D3A615-A899-4AC5-AE2B-E4D8F634367F /v Attributes /t REG_DWORD /d 2 /f
Once you receive a message “The operation completed successfully”, confirm that you’ve added an option.

Now close that Command Prompt.
After doing that, if you open the Power Options dialog box, this time you will find “System Cooling Policy”. You can use this setting depending on your requirements.

Although, there’s no reason to remove the System cooling policy option. In case due to any reason you want to do that, then you need to execute this command: Command to remove - powercfg -attributes SUB_PROCESSOR 94D3A615-A899-4AC5-AE2B-E4D8F634367F +ATTRIB_HIDE
That’s all about this blog post. This is how you can add or fix the ‘System Cooling Policy’ missing in Power Options Windows 11/10
Viney Dhiman, the mind behind GeekerMag, is a seasoned content writer with over 12 years of experience. Specializing in simplifying complex tech concepts, he covers Windows OS, Android, iOS, web apps, and product reviews. His work can be found on popular tech websites like Gizmodo and The Verge, and he has been interviewed by the Microsoft Edge team.