
Most modern PCs have a feature called Secure Boot. The purpose of this feature is to prevent your computer from booting with unsigned firmware like drivers and even operating systems. This feature protects your computer from getting malware and other such threats.
However, there are times when you may wish to disable Secure Boot. It’s easy to do on most computers.

What Exactly Is Secure Boot on Windows 10?
Secure Boot is a feature on your Windows 10 PC that prevents your computer from booting with non-trusted devices. These devices are the ones that Microsoft hasn’t yet approved and digitally signed.
For example, if you create a bootable Linux drive, that drive isn’t signed by Microsoft. Secure Boot will prevent your computer from booting that drive, hence keeping your PC safe and secure.
You would need to disable Secure Boot if you want to boot your computer from non-trusted devices. For example, if you wish to install Linux on your PC, and you need to boot from a bootable Linux drive, you’ll need to disable Secure Boot first.

Other reasons for disabling Secure Boot include the need to install certain graphics cards or other hardware devices.
How to Disable Secure Boot on Windows 10
On Windows 10, you can disable Secure Boot from the UEFI firmware settings menu (BIOS).
Before you turn this feature off, know that re-activating it might require you to reset your PC.
With that said, let’s start the Secure Boot disable process:
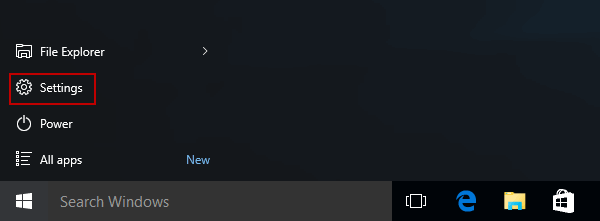
- Open the Start menu on your Windows 10 PC.
- At the lower-left corner of the Start menu, select the power icon.
- Press and hold down the Shift key on your keyboard and select Restart in the power icon menu.

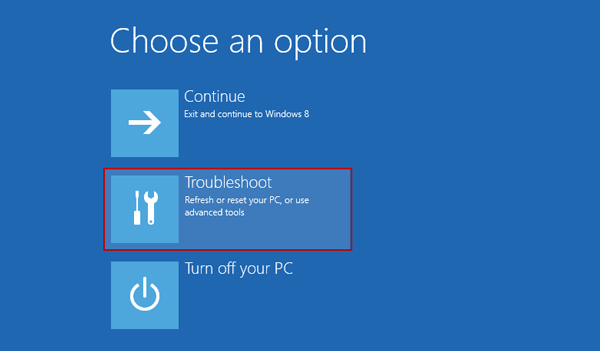
- Wait for a menu to appear on your screen. When it does, select Troubleshoot from it.

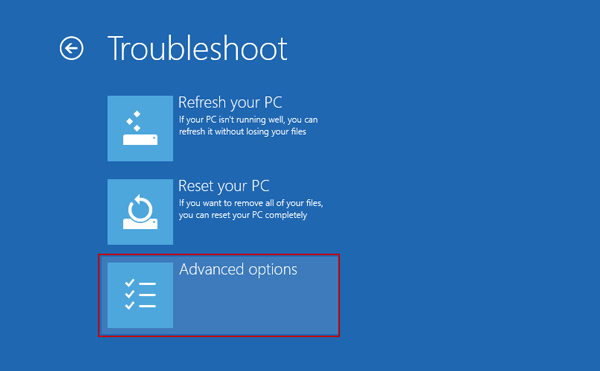
- On the following screen, select Advanced options.

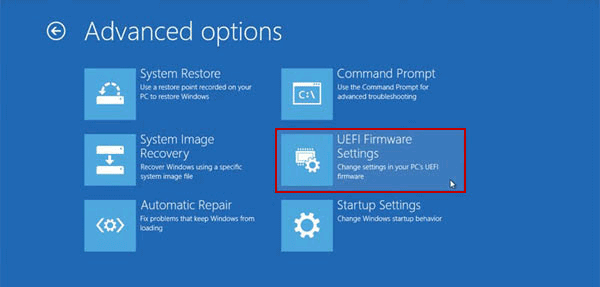
- From the Advanced options screen, select the UEFI Firmware Settings option.

- Confirm your action by selecting Restart on the following screen.

- Your PC should boot into BIOS.
- On the BIOS screen, select the Security tab at the top. This tab might have a different name depending on your PC’s manufacturer. It might say Boot, Authentication, or something similar, but you get the idea.

- Under the Security (or a similar) tab, select the Secure Boot option.

- On the Secure Boot screen, the Secure Boot status should say Active. This means the option is currently enabled on your PC.

- To disable Secure Boot, select the Secure Boot Control option and then choose Disabled from the menu.

- You now need to save your settings and exit BIOS. To do this, find the F10 key next to Save and Exit on the right pane. Press this key to save your changes and exit BIOS.

- A Save & Exit Setup prompt appears. Select Yes in this prompt to continue.

- Your PC should reboot.
And that’s all there is to it. Secure Boot should now be disabled, and you can proceed to boot your PC from various bootable drives.
How to Enable Secure Boot on Windows 10
If you’ve finished your tasks and you want to re-enable Secure Boot, visit the same BIOS screen to turn the feature off.
A few things to know before you attempt to re-enable Secure Boot:
- If you have installed any graphics cards, hardware devices, or operating systems that are incompatible with Secure Boot, remove them before disabling Secure Boot.
- If Secure boot doesn’t reactivate for some reason, follow the troubleshooting procedure below.
To re-enable Secure Boot:
- Open the Start menu and select the power icon.
- Hold down the Shift key and select Restart from the power icon menu.
- On the screens that follow, navigate to Troubleshoot > Advanced options > UEFI Firmware Settings > Restart.
- Your PC should be in BIOS mode.
- In BIOS, select the Security tab at the top.
- Select Secure Boot and then choose Secure Boot Control.
- Choose Enabled from the prompt.

- Press the F10 or any other key (shown on the right pane) to save your BIOS settings.
- Your PC should reboot.
Secure Boot should now be enabled.
What to Do When Secure Boot Won’t Turn On?
If Secure Boot refuses to turn back on despite removing the incompatible items from your PC, you might need to reset your PC.
Resetting your PC will remove all your files as well as any custom settings. If you wish to keep certain files, back them up to an external drive or cloud.
Then, follow these steps to reset your PC:
- Open the Settings app by pressing Windows + I keys at the same time.
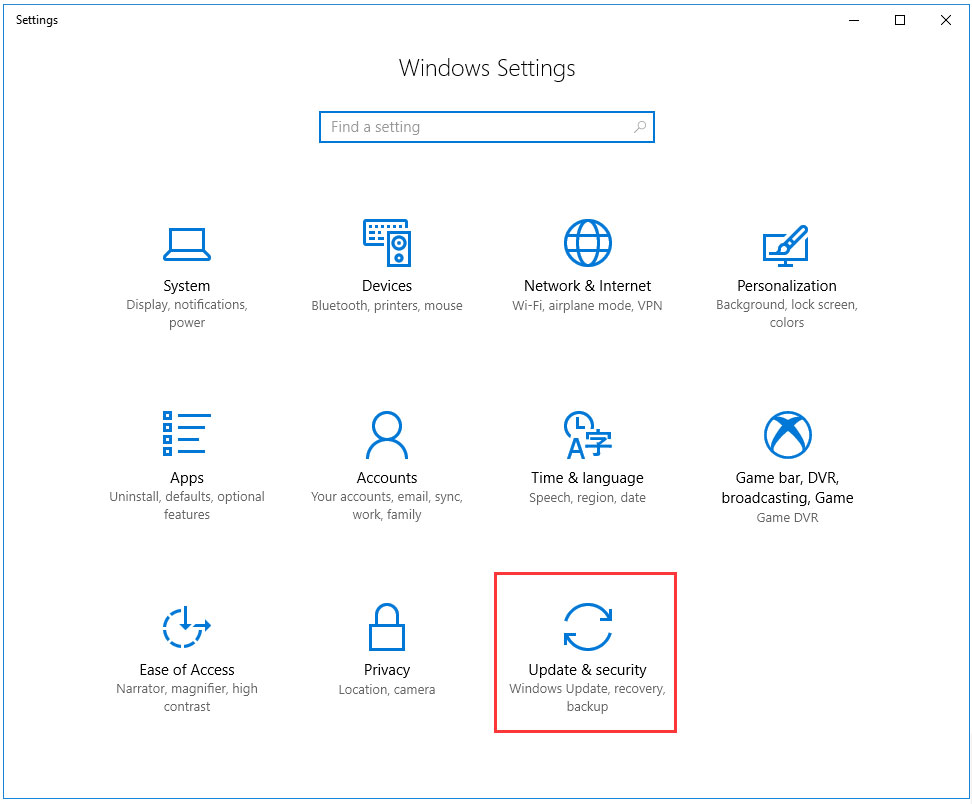
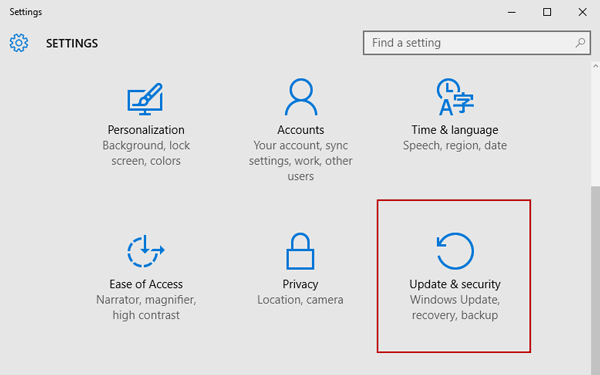
- In Settings, select Update & Security at the bottom.

- From the sidebar on the left, select Recovery.
- On the right pane, under the Reset this PC section, select the Get started button.

- In the window that opens, choose Remove everything.

- Your PC should begin to reset.
Once your PC is reset, follow the procedure above to reactivate Secure Boot on your PC.
We hope this guide helped you disable Secure Boot on your Windows 10 PC. Let us know what made you turn this feature off in the comments below.
Related Posts
- How to Fix a “This file does not have an app associated with it” Error on Windows
- How to Fix an Update Error 0x800705b4 on Windows
- How to Resolve “A JavaScript error occured in the main process” Error on Windows
- How to Fix the Network Discovery Is Turned Off Error on Windows
- How to Change Folder Icons in Windows

These days, if you buy a computer pre-installed with Windows, it comes with UEFI boot system. UEFI is not something that Microsoft invented, instead it is a protocol existing even before Windows 8. Some Mac devices have been using UEFI for a longer time.
With UEFI comes the feature of “secure boot” which boots only those bootloaders that are signed in to UEFI firmware. This security feature prevents rootkit malware and provides an additional layer of security.
The downside of secure boot is that if you want to boot from a Linux USB or if you want to use a bootable Windows USB, it won’t allow that. Sometimes, it may also create problems in dual booting with Linux.
The good thing is that you can easily disable the secure boot. All you have to do is to access the UEFI firmware settings, go to the Boot option and disbale it.
Don’t worry. I won’t leave you hanging like that. Let me show the steps in detail.
Disabling UEFI secure boot in Windows 10
Some systems don’t let you change the secure boot option without setting an admin password. I’ll discuss the issue in later steps.
Step 1: Access the UEFI settings
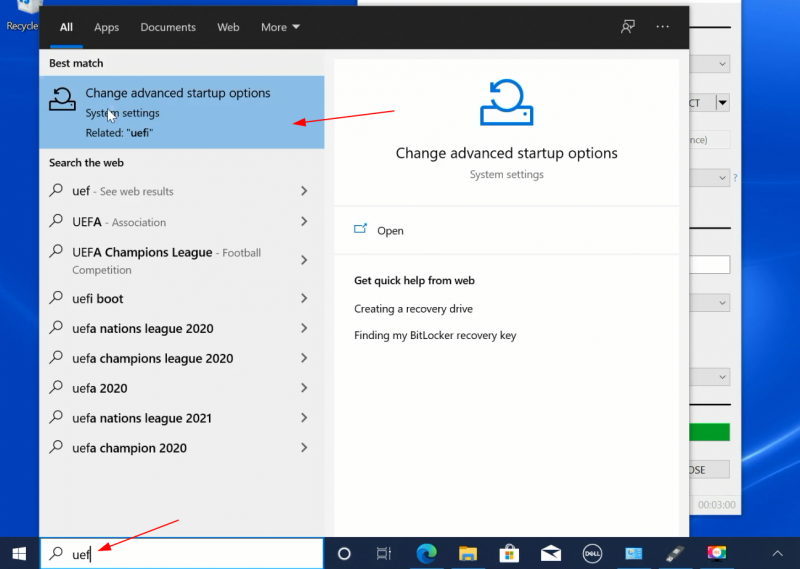
You may access the UEFI settings by powering on your system and using the F2/F10 or F12 keys at the boot time. If that doesn’t work, don’t worry. You can go to the firmware settings from within Windows as well. Here’s how.
Search for UEFI and go to Change advanced startup options in Windows menu.
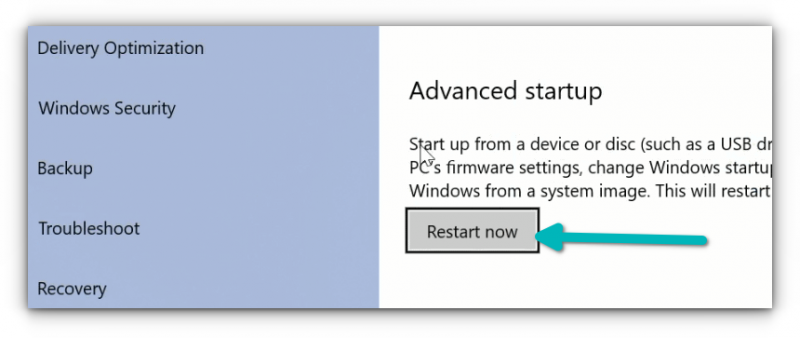
Now, click on the Restart now button under Advanced startup option.
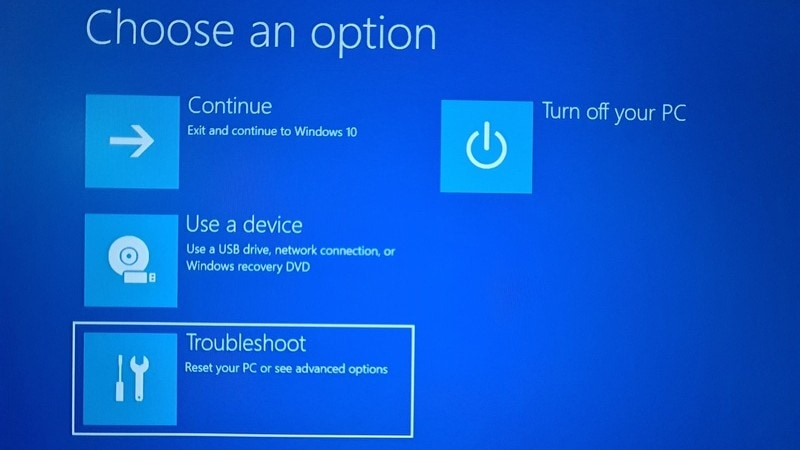
After a few seconds, you should see a blue screen with a few options to choose from. You have to click on Troubleshoot option.
Now, some systems will give you the UEFI Firmware Settings on this screen. Some system may require you to choose an Advanced options.
If you see the UEFI Firmware Settings option, well, click on it. Otherwise, click the Advanced options.
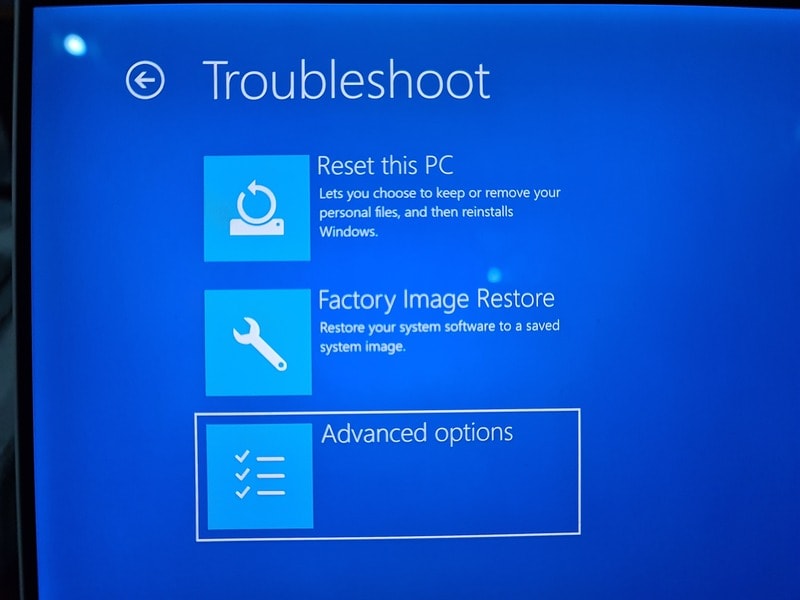
When you see the UEFI Firmware Settings, click on it.

It will notify that you’ll have to restart in order to change any UEFI firmware settings (or UEFI settings in short). Click on the Restart button.

Your system will restart now and when it boots again, you’ll find yourself in the BIOS/UEFI settings interface.

Step 2: Disable secure boot in UEFI
By this time you must have been booted in to UEFI utility. You can change various settings here but all we want to do right now is to disable secure boot option here.
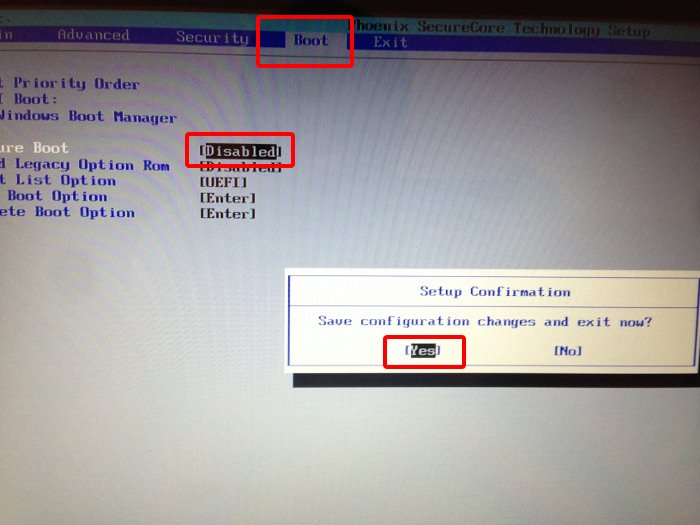
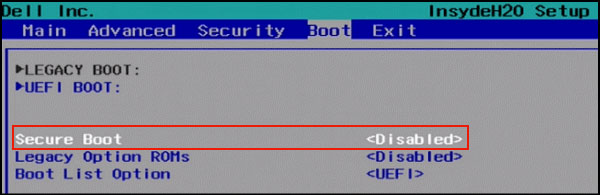
Move to Boot tab. Here, you’ll find Secure Boot option which is set to enabled.
Use the arrow key to go to Secure Boot option and then press enter to select it. Use + or – to change its value. Confirm it when prompted.
Press F10 to save the changes and exit the UEFI settings.
Troubleshooting tip: Disable secure boot option disabled?
As mentioned by some readers in the comments, if you are using an Acer laptop, you might see that option to disable secure boot has been greyed out. If that is the case, no need to panic just yet. There is a way around it.
Using arrow keys, move to Security tab. Look for Set Supervisor Password here.
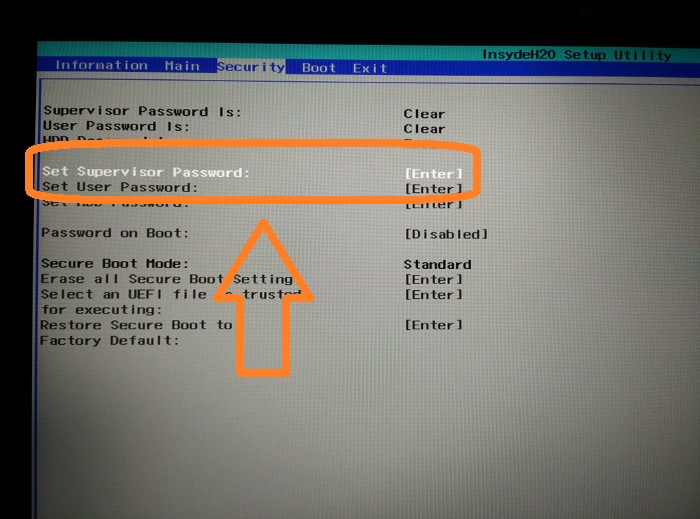
Set a Supervisor password by double-clicking on it.
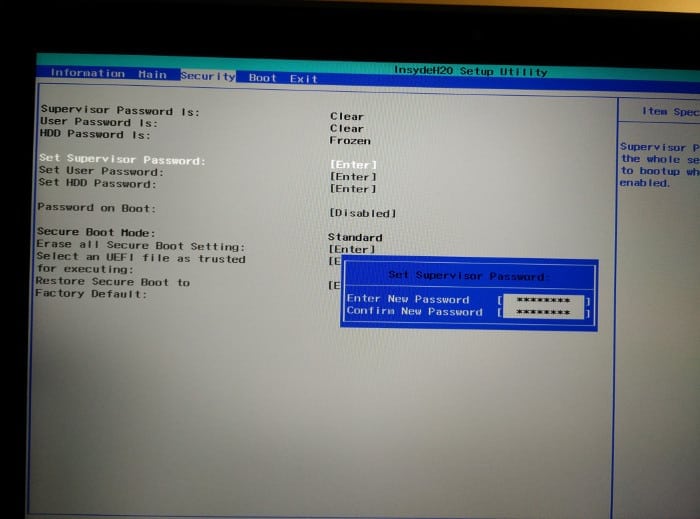
🚧
Either save this password somewhere safe where you can access it years later as well. Use a password manager or a cloud service or a draft in your email. Basically, you should not lose this password. You may also clear the supervisor password after disabling the secure boot.
Once you have set the supervisor password, move to Boot tab now. This time you’ll see that you can actually access the Secure Boot option and change its value. Press the Enter key and change its value to Disabled.
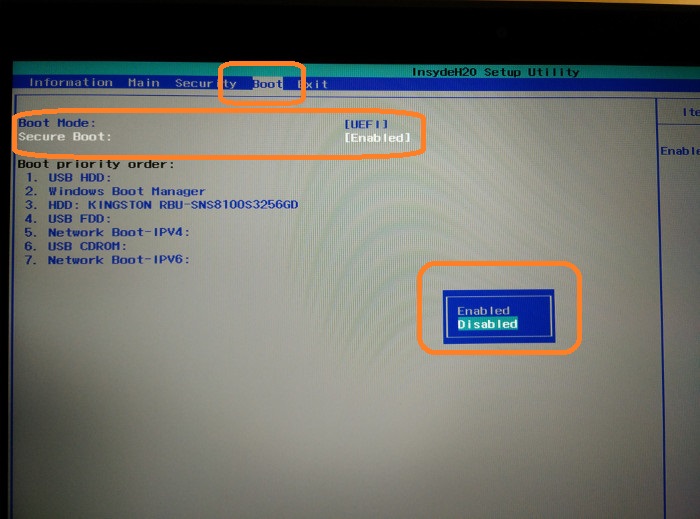
Press F10 to save and exit the UEFI settings.

Next you’ll be booted into Windows normally. That’s it. You can use similar steps to re-enable secure boot later as well.
I hope you find this tutorial helpful. Do let me know if you have confusion and I’ll try to help you out.
About the author
Abhishek Prakash
Created It’s FOSS 11 years ago to share my Linux adventures. Have a Master’s degree in Engineering and years of IT industry experience. Huge fan of Agatha Christie detective mysteries 🕵️♂️
Secure Boot или Безопасная загрузка — функция UEFI, использующаяся для предотвращения загрузки компьютера или ноутбука с неавторизованными или модифицированными загрузчиками, использующаяся в Windows 11 и Windows 10. В некоторых случаях, например, когда вам требуется использование накопителя с альтернативным загрузчиком, либо старой версией Windows, функцию может потребоваться отключить.
В этой инструкции подробно о способах отключить Secure Boot (Безопасную загрузку): как общие принципы отключения, так и примеры для конкретных производителей материнских плат: даже если ваш БИОС/UEFI отличается, по аналогии с приведёнными примерами вы, с большой вероятностью, успешно сможете отключить функцию и у себя.
Отключение Безопасной загрузки или Secure Boot
Отключение функции Secure Boot выполняется в БИОС/UEFI. Для того, чтобы зайти в необходимые настройки обычно используется выделенная клавиша, которую следует нажимать (можно несколько раз, пока не попадёте в интерфейс настроек) при включении:
- Delete (Del) — на большинстве настольных компьютеров.
- F2 (или Fn+F2) — самая часто используемая клавиша для входа в БИОС/UEFI на ноутбуках, однако на некоторых марках и моделях ноутбуков клавиша может отличаться: например, могут использоваться Esc, F1, F10.
- Вход в UEFI возможен и из Windows 11/10 через особые варианты загрузки, подробно об этом — в отдельной инструкции.
Прежде чем приступать к отключению, некоторые дополнительные нюансы, которые могут пригодиться, если вы столкнётесь с проблемами, например неактивностью нужного пункта или его отсутствием:
- Опция отключения Secure Boot может быть доступна только в Advanced Mode (Расширенном режиме) настроек UEFI — на большинстве ПК для перехода в него требуется нажать клавишу F7.
- В некоторых случаях отключение опции невозможно без предварительной установки пароля администратора (Administrator Password, Supervisor Password) для доступа к настройкам БИОС, сохранения и повторного входа уже с этим паролем.
- В случае включенного шифрования устройства (можно проверить в Параметрах Windows 11/10: Конфиденциальность и защита — Шифрование устройства), прежде чем отключать Secure Boot отключите также шифрование устройства, либо убедитесь, что у вас есть ключи восстановления BitLocker.
- Если у вас включен Legacy (CSM) режим загрузки, отключение Secure Boot не требуется — в этом режиме безопасная загрузка не работает.
Далее — примеры отключения Secure Boot на различных материнских платах и ноутбуках:
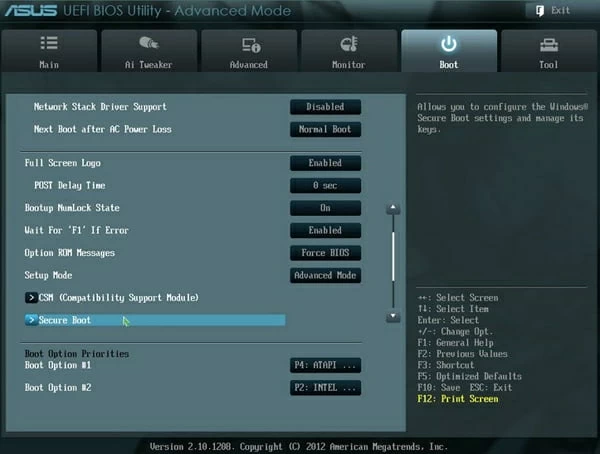
ASUS
В зависимости от конкретной материнской платы (или ноутбука) ASUS, отключение Secure Boot может быть реализовано по-разному. Некоторые общие принципы:
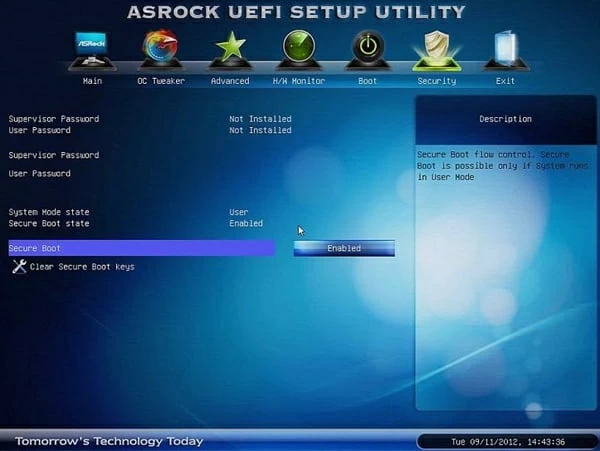
AsRock
Опции настройки безопасной загрузки на материнских платах AsRock можно найти на вкладке Security:

Обычно достаточно установить значение Disabled для параметра Secure Boot и сохранить настройки:

Также к отключению Secure Boot приведёт очистка ключей в разделе Key Management.
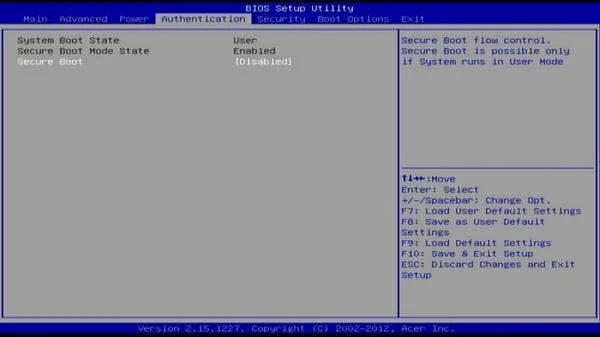
Acer
В случае ноутбуков Acer найти опцию отключения безопасной загрузки обычно можно на вкладке Boot (но может располагаться и в Security или Advanced — System Configuration, либо в Authentication):

Для отключения функции, установите её значение в Disabled и сохраните настройки.
Gigabyte
На материнских платах Gigabyte возможны следующие варианты расположения настройки:
- Вкладка Boot в Advanced Mode, где присутствует опция Secure Boot (при условии включенной UEFI загрузки).
- Вкладка Bios Features с аналогичной опцией на старых материнских платах.

HP
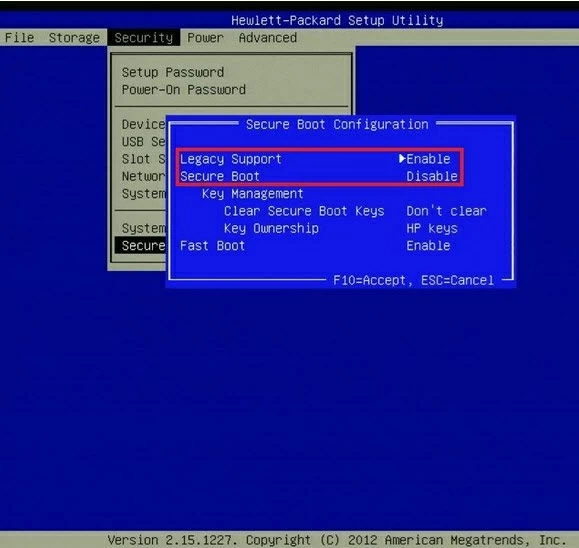
Опции безопасной загрузки на ноутбуках и компьютерах HP могут располагаться в различных разделах, в зависимости от конкретной модели ноутбука. Обычно это:
- System Configuration — Boot Options (опция может не отображаться и отключена, если включена опция Legacy Support).
- Вкладка Security раздел Secure Boot Configuration.

Lenovo
Опции Secure Boot на компьютерах и ноутбуках Lenovo могут находиться в различных расположениях, но обычно это — раздел настроек или вкладка Security:

MSI
На материнских платах и ноутбуках MSI настройку Secure Boot вы можете найти в разделе Security в EZ Mode (А7) или в разделе Settings — Advanced — Windows OS Configuration — Secure Boot.

С учетом того, что интерфейсы и расположение настроек в БИОС/UEFI даже одного производителя часто отличаются, может оказаться, что нужный пункт будет сложно найти. Например, ниже — один из таких примеров, где опция Secure Boot находится в разделе «UEFI» на вкладке Boot:

В этом случае может быть полезной следующая информация:
- В некоторых БИОС/UEFI присутствует поиск по параметрам, можно использовать его.
- Очистка ключей в параметрах Key Management обычно отключает Secure Boot.
- Для компьютеров и ноутбуков с процессорами AMD безопасную загрузку также может отключаться при отключении AMD Platform Security Processor
- Может оказаться, что безопасная загрузка уже отключена: проверьте в Windows — нажмите клавиши Win+R на клавиатуре, введите msinfo32 и нажмите Enter, обратите внимание на значение параметра «Состояние безопасной загрузки»:


В случае, если вы не можете найти нужную опцию в своём БИОС, напишите в комментариях точную модель материнской платы или ноутбука. Возможно, я смогу подсказать решение.
-
Home
-
Knowledge Base
- What Is Secure Boot? How to Enable and Disable It in Windows?
By Vicky |
Last Updated
This article introduces what secure boot is and how it works for your Windows operating system. And it also shows how to enable and disable Secure Boot in Windows.
What Is Secure Boot?
Nowadays, the modern computers come in a feature named Secure Boot. Do you have any idea about it? Secure Boot is a part of Microsoft’s Windows 8 and the above versions of Microsoft Windows operating system.
As we know, a traditional BIOS will boot form anywhere, while Secure Boot which is working on the top of UEFI is used to make sure that Windows operating system remains safe from Malware. To put it more clearly, Secure Boot ensures that a device boots using only the software that is trusted by the Original Equipment Manufacturer.
How Does Secure Boot Work?
Once you power on a PC, it starts the process of executing code that configures the processor, memory, and hardware peripherals to make a preparation for the operating system to boot.
During the preparation, Secure Boot checks the signature of firmware code that exists on hardware peripherals like storage deices.
During the boot process, secure Boot will check for an embedded signature inside of the fireware module. If the signature match against a database of signature in Secure Boot, the nodule is allowed to execute.
It can be said that Secure Boot works like a security gate. Code with valid credentials can get through the security gate and execute. Surely, code with bad credentials or no credential will be refused.
Enable Secure Boot
Seeing the function of Secure Boot, you may want to enable it. In order to use it, your PC must meet the following requirements.
- Secure Boot must be enabled after an operating system has been installed.
- Secure Boot requires a recent version of UEFI. Update the firmware with Device Manager if you are in doubt.
- Secure Boot requires Windows 8 or higher versions like Windows 10.
- A system password on some devices should be set to turn on the necessary system firmware options.
Now, lets see how to enable Secure Boot. Please following the steps below.
Step 1: Boot into the system settings by powering on the system and using the manufacture’s method to access the system settings.
Step 2: Look through the menu and select UEFI as the boot mode.
Note: Many menus show UEFI and Legacy as the choices, while others may display UEFI and BIOS (click here to learn about their differences).
Step 3: Navigate to the Secure Boot option and turn it on.
Note: On some devices, you should first boot once after enabling UEFI and go back to the settings menu to enable Secure Boot.
Step 4: Save the changes and exit the menu. You can now boot to media that supports Secure Boot and install an operating system. Please pay attention that Windows will partition storage with GPT partitions instead of MBR (click here to learn about how to convert MBR to GPT).
Step 5: After the operating system is installed, you can verify that Secure Boot is enabled by opening msinfo32.exe (type the command in the open box) and checking that the value for Secure Boot State is “on”.
Disable Secure Boot in Windows 10
Let’s see how to disable Secure Boot in Windows 10.
Note: Before disabling Secure Boot, you should make sure that your PC has Secure Boot and it has been turned on.
Step 1: Please click the following terms in order: Settings, Update & security, Recovery, Restart now, Troubleshoot, Advanced options, UEFI Firmware Settings, and Restart.
Step 2: When you access the UEFI utility screen, please move to the Boot tab on the top menu. According to the information on the screen, use the arrow key to go to the Secure Boot option. (The Secure Boot option can be found on the Boot, Security, or Authentication tab.)
Step 3: Use + or –to change its value to Disable.
Warning:
After disabling Secure Boot and installing other software and hardware, it may be difficult to re-active Secure Boot unless you restore your PC to the factory state. Please be careful when you make some changes on your BIOS settings, and be sure to follow the manufacturer’s instructions exactly.
About The Author
Position: Columnist
Vicky is a website editor who has been writing tech articles since she was graduated from university. Most of her articles talk about Windows PC and hard disk issues. Some of her articles also touch on YouTube usage and issues.
During her spare time, she likes to spend time reading, watching videos, and sitting on her Yoga mat to relax.
Rob Parsons Updated on Apr 15, 2022 4:59 PM
UEFI (Unified Extensible Firmware Interface) is a standard firmware interface for new PCs pre-installed with Windows 8/10, which is designed to replace BIOS (basic input/output system).
Basic steps: Access UEFI BIOS settings and disable «Secure Boot» option, then change «Boot List option» as «Legacy», and enable «Load Legacy Option Rom», then follow a traditional method to boot computer from USB device or CD-ROM.
- How to boot from a USB drive in Windows
- How to boot from CD/DVD-ROM in Windows
Part 1: Access «UEFI BIOS» by PC Settings
Navigate to Settings. You can get there by clicking the gear icon on the Start menu.
Then in Settings window, choose Update & security.
Nest, select Recovery from the left menu and you can see Advanced startup at the right side.
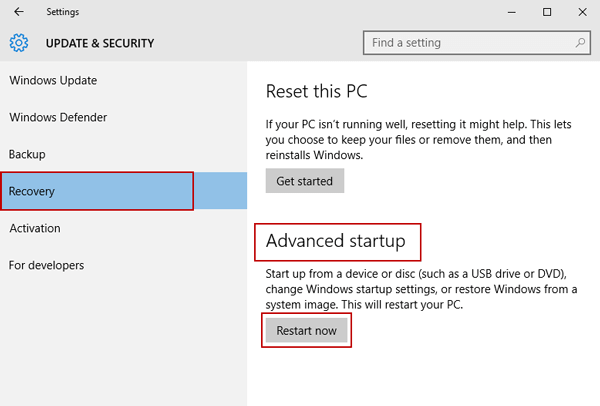
Click Restart Now under Advanced startup option. The comptuer will reboot to a special menu.
Now you will be presented with the Choose an option screen, simply select Troubleshoot.
Next select Advanced options.
Next you select UEFI Firmware Settings.
Click the Restart button. Your system will restart and take you to the UEFI BIOS.
Part 2: Disable «Secure Boot»
Once you’re on the UEFI utility screen, move to Boot tab on the top menu. Use the arrow key to go to Secure Boot option and then Use + or – to change its value to Disable.
Note: Depending on the motherboard’s BIOS/ UEFI firmware, the Secure Boot option will be found on the «Boot», «Security», or «Authentication» tab.
HP Secure Boot
ASUS Secure Boot
Acer Secure Boot
ASRock Secure Boot
Next, press F10 to save the changes and exit the UEFI settings.
That’s for how to disable secure boot in Windows 10. Note that if you’re on an Arm-based Windows RT PC, you can’t disable secure boot because these devices have a locked boot loader.