
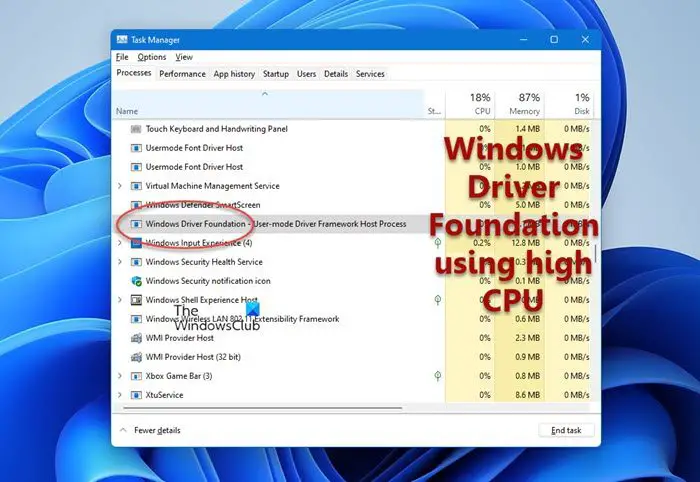
Windows Driver Foundation is one of the system files that consists of libraries that developers use when writing code for the driver that runs on Windows OS. When these system files get corrupted due to malware or some issue with the update, it shows irregular behavior like high CPU usage.
Your system will reach extreme CPU temperatures and will start to thermal throttle when the CPU has high usage. This will drastically decrease your overall system performance.
In this article, we have discussed a few details about Windows Driver Foundation, why it causes high CPU usage, and some solutions to fix the problem.
What is Windows Driver Foundation?
Windows Driver Foundation is a set of libraries that reduce complexity when writing code for Windows Driver. It enables users to develop Windows drivers that execute in both kernel and user mode.
There are a few names the Windows Driver Foundation can run as a background process.
- WUDFHost.exe
- Windows Driver Foundation – User-mode Driver Framework (UMDF)
- Windows Driver Foundation – Kernel-mode Driver Framework (KMDF)
Why Does My Windows Driver Foundation Have High CPU Usage?
Windows System files may get corrupted when a Windows update suffers from interruptions, stopping the system from updating. These corrupted system files may stop the entire OS from loading correctly. And in some cases, these files may use high CPU resources.
Besides this, here are a few reasons Windows Driver Foundation has high CPU usage.
- Corrupted System Files
- Malware affected WUDFHost.exe.
- Outdated Windows or its Drivers
- Compatibility issues with Windows driver
Is WUDFHost a Virus?
The WUDGHost.exe is a system file, and its process is a system process. So if you see it running in the background, you can rest assured that it is not a virus.
If you want to check the file’s integrity, you can look at its location.
- Open Task Manager.
- Go to the Processes tab.
- Search for
WUDFHost.exeor Windows Driver Foundation. - Right-click on it and select Open file location.
If the file explorer opens the pathC:\Windows\System32 with the files in it, the process is not malware. Most of the time during a malware infection, it is noted that a different folder along with shortcuts is opened while trying to access the folder.
Perform necessary measures if the file explorer opens with a different file location.
How to Fix Windows Driver Foundation High CPU Usage?
Whenever you see any Windows process take high CPU resources, it is most likely that the process is running some important tasks. So, before performing any of the solutions mentioned below, wait a few minutes for the process to complete.
If Windows Driver Foundation constantly has high CPU Usage and you see the CPU reaching high temperature, perform the solutions mentioned below.
Disable Service
The Windows Driver Foundation service runs in the background as a system process. This means that even if you end its process using the task manager, it may run again. Disabling the process from the Services may stop Windows Driver Foundation from starting automatically.
- Press the Windows + R key to open Run.
- Type
services.mscand press enters to open Services. - Locate Windows Driver Foundation – User-mode Driver Framework or Windows Driver Foundation – Kernel-mode Driver Framework.
- Double-click on it, change the Startup type to Manual and stop the Service status.


If you cannot change the Startup type and the Service status, follow the steps mentioned below.
- Press the Windows + R key to open Run.
- Type cmd and press Ctrl + Alt + Enter to run the command as Admin.
- Type
sc config “wudfsvc” start=disabledand press Enter to disable the service.
System maintenance troubleshooter
The system maintenance troubleshooter detects and tries to fix any problem with the OS. These problems include complications with disk volume errors, desktop icons, system time, or high CPU usage because of system files. Besides this, it also performs some OS maintenance tasks.
- Press the Window + R key to open Run
- Type
msdt.exe -id MaintenanceDiagnosticto open System Maintenance Troubleshooter. - Click on Advanced.
- Make sure that you check Apply repairs automatically and click Next

- Select Try troubleshooting as an administrator.
- If the troubleshooter finds any issues, it will automatically fix them.
- Restart your computer and check the CPU usage

Perform Clean Boot
It can also be that some application in the OS that’s triggering the Window Driver Foundation to start. To check this, you need to perform a Clean Boot. When you perform a Clean Boot, the OS stops any startup application or process.
- Press the Windows + R key to open Run.
- Type
msconfigto open System Configuration. - Go to the Services tab.
- Check Hide all Microsoft’s services and select Disable all.
- Click on Apply.

- Now, go to the Startup tab and click on Open Task Manager.
- Make sure you are in the Startup tab.
- Here, disable all the Startup applications.


Run SFC And DISM
If the issue is with corrupted system files or the Window Image, you can run the SFC and the DISM command to see if it fixes the high CPU usage issue. The SFC (System File Checker) repairs any corrupted system files located inside C:\Windows\System32.
On the other hand, the DISM (Deployment Image Servicing and Management) checks/scans, and restores the system image.
- Press the Window + R key to open Run.
- Type cmd and press Ctrl + Shift + Enter to run Command Prompt as Administrator.
- Now type
sfc /scannowto run System File Checker.
- Wait for the verification process to complete.
- Once the process completes, type
DISM /Online /Cleanup-Image /RestoreHealthand press enter to run the DISM.
- Once the process completes, restart your computer and check its CPU usage.


Disable HID SensorCollection V2
You may also see High CPU usage from Windows Driver Foundation due to HID sensor on your laptop.
If you are using a device with a type cover and you see high CPU usage every time you remove or re-attach the cover, there’s a high chance that these Human Interface Device (HID) sensors are causing the issue.
For this exact case, you need to disable the HID Sensor Collection V2.
- Press the Windows + X key and select Device Manager.
- Expand Sensors. Here you will see all the sensor devices on your system.
- Disable HID Sensor Collection V2.


Restart your PC and check if the CPU usage is still high
Reinstall Network Adapters
The corrupted drivers also have compatibility issues with the WUDFHost.exe process. Reinstalling these corrupted drivers may fix the issue regarding high CPU usage. One specified driver that is known to cause Windows Driver Foundation high CPU is the Network adapter driver.
Reinstall all its drivers to see if it fixes the issue.
- Press the Window + X key and open Task Manager.
- Expand Network adapters. Here, you will see all the network devices.
- Right-click on any one of the devices and select Uninstall device.
- Repeat this step for all the devices inside the Network adapter.
- Restart your PC to reinstall these drivers automatically.

Update Windows
Since you are facing high CPU usage because of a system file, it can be that the outdated system files are causing the issue. To fix this, update your Windows to its latest version. Updating Windows will update all the necessary system files and may improve the system’s overall performance.
- Press the Window + I key to open Settings.
- Go to Windows Update (Privacy & Security > Windows update).
- Click on Check for updates or Install updates to install any pending updates.

- Restart your PC to install the updates.

Reconnect Peripheral Devices
When you connect any peripheral device to your computer, the OS automatically installs its respective driver. However, this installed driver may cause compatibility issues, resulting in Window Driver Foundation using high CPU resources.
Remove all connected peripheral devices and check if the CPU usage decreases. If it does, connect the device one at a time to determine the device whose driver is causing the issue.
Perform System Restore
If the system still has Windows Driver Foundation high CPU usage, you can perform a system restore. The System Restore reverts all the Windows Settings to a Restore Point.
Before performing a System Restore, you need to have set a restore point that stores settings when the system did not have any high CPU usage issue.
If you have previously set a system restore point, follow the steps mentioned below to perform a system restore.
- Press the Window + R key to open Run
- Type
rstruito open System Restore. - Click on Next.

- Set a restore point.

- Select Finish.
- The OS will ask for confirmation. Select Yes.
- The system should restart, reverting to the restore point.


Is it Okay if I Remove WUDFHost Executable File?
WUDFHost.exe is a system file (files inside C:\Windows\System32). Removing any of the system files may cause the entire Operating System to malfunction, and the OS may not load the next time you start the PC.
You may need to reinstall the operating system if you delete the system files.
Windows Driver Foundation – User-mode Driver Framework (WUDFHost.exe) is a set of libraries and tools by Microsoft which helps reduce the complexity while writing Windows drivers. It pushes drivers to user mode. This service is necessary for the overall stability of the system.
What is Windows Driver Foundation (WUDFHost.exe) process?
Windows Driver Foundation is a set of libraries and tools that reduce complexity while using drivers on your Windows PC. In other words, this process helps you continue using a stable system all the time. At times, users may face issues with the system, where the Windows Driver Foundation occupies a major chunk of the CPU usage. While it does not exactly restrict the functionalities of the CPU for most users, it certainly drains the battery and might cause system freezing at times, especially if the usage shoots up to 100%. Attempting to kill the process in the Task Manager doesn’t help because it is a system process.
To find if the strain on the CPU usage is because of Windows Driver Foundation – User-mode Driver Framework (WUDFHost.exe) or its constituent wudfsvc.dll file, open the Task Manager by right-clicking on the Taskbar and selecting Task Manager.
Here, check for the process consuming high CPU usage. Is it Windows Driver Foundation? In the Windows 11 or Windows 10 Task Manager, you may see the entry Windows Driver Foundation prefixed with any one of these:
- WUDFHost.exe, or
- User-mode Driver Framework Host process, or
- Kernel-mode Driver Framework Host process.
The WUDFHost.exe process is located at:
C:\Windows\System32
If it indeed consumes high resources, try some of these troubleshooting suggestions:
- Run Windows Update
- Run Troubleshooters
- Troubleshoot in Clean Boot State
- Try removing peripherals from the system
- Update and re-install WiFi drivers
- Suggestions for the Pro’s
Let’s check out these steps in detail.
1] Run Windows Update
Make sure that your Windows operating system is up to date with the latest patches and fixes. If not, it is recommended to install all the available updates.
2] Run Troubleshooters
Run System Maintenance Troubleshooter. To run the System Maintenance Troubleshooter. Open Run, type the following and hit Enter:
msdt.exe -id MaintenanceDiagnostic
Does it help?
Next, run the System Performance Troubleshooter. To do so, open an elevated Command Prompt, type the following and hit Enter to run the Performance Troubleshooter.
msdt.exe /id PerformanceDiagnostic
This troubleshooter helps the user adjust settings to improve operating system speed and performance.
Read: How to fix 100% Disk, High CPU, High Memory usage0.
3] Troubleshoot in Clean Boot State
A Clean Boot will help you troubleshoot the issue. Log on to the system as an administrator. Press Windows + R to open the Run window. Enter the command ‘msconfig’ and press Enter.
Click the General tab, and then click Selective Startup. Clear the Load Startup Items check box, and ensure that Load System Services and Use Original boot configuration are checked.
Now under Services tab, select the option which says ‘Hide all Microsoft services‘ and then click on Disable all.

Click Apply and restart the system.
The reason for performing a Clean Boot is to isolate any software that was causing the issue. If a Clean Boot resolves the high CPU usage issue, then try to find out the exact software which was interfering. You will have to do this manually by enabling/disabling each process or startup.
4] Try removing peripherals from the system
Remove peripherals from the system one by one and check if it resolves the issue. If it does, that particular peripheral might need to be replaced or maybe its Driver updated.
5] Update and re-install WiFi drivers
Many users have reported that reinstalling the WiFi drivers helped them resolve the issue. The process to update Device Drivers is as follows:
Press Win+X and click on Device Manager to open it. In the list, which is in alphabetical order, find ‘Network Adapters’ and click the forward-pointing arrow in front of it.
Find the wireless drivers in the list, right-click on them one by one and update them.

Restart the system and check if the issue is resolved. If not, proceed to re-install the drivers.
Open the Device Manager once again and right-click on the wireless drivers. Then click on ‘Properties’. Open the Drivers tab and click on Uninstall to uninstall the drivers. While keeping the system connected to the Wi-Fi, reboot the system. It should detect the drivers automatically.
Related: Windows Driver Foundation missing, failed to load or not working
6] Suggestions for the Pro’s
The Performance Monitor is a good built-in tool that lets you monitor and study how applications you run affect your computer’s performance, both in real-time and by collecting log data for later analysis. It is quite useful in identifying and troubleshooting high resource utilization by processes and in generating a System Health Report of your Windows. But at times, you may feel the need to use a third-party freeware tool for controlling such processes which may use a high CPU. Process Tamer is a freeware tool that will help you manage high or 100% CPU utilization in Windows.
Is Windows Driver Foundation necessary?
Yes, Windows Driver Foundation is necessary to have on your computer running Windows 11/10. It helps you use the drivers smoothly on your computer. As drivers help you connect your hardware to software, you must have the Windows Driver Foundation enabled on your computer.
What is Windows Driver Frameworks (WDF)?
Windows Driver Frameworks (WDF) is a wrapper around Microsoft Windows Driver Model (WDM) interfaces. It is a set of libraries for writing device drivers that run on the Windows operating system. WDF defines a single driver model supported by two frameworks: Kernel-Mode Driver Framework (KMDF) and User-Mode Driver Framework (UMDF).
Posts about processes using high resources:
- WMI Provider Host High CPU Usage issues
- Windows Modules Installer Worker High CPU & Disk Usage
- Desktop Window Manager dwm.exe consumes high CPU
- Ntoskrnl.exe high CPU & Disk usage
- OneDrive high CPU usage problem
- Windows Shell Experience Host uses high CPU
- Wuauserv high CPU usage.
По умолчанию в Microsoft Windows разных версий есть приложение «Ваш телефон», которое используется в момент подключения смартфона к ПК. Процесс YourPhone.exe не является вирусом, даже несмотря на то, что он может потреблять довольно много ресурсов компьютера без видимых причин. Сервис выполняет роль своеобразного моста между устройствами.
Вариантов здесь несколько. Первый — полностью отключить сервис, если он тянет сильно много ЦП и ОЗУ или он просто не нужен. Можно даже полностью удалить его с ПК. Второй – пытаться исправить службу, если она повреждена. Для этого нужно запускать средство исправления неполадок и сканирование системы через sfc. Поломки процесса встречаются нечасто, преимущественно пользователи просто хотят его отключить для экономии ресурсов ПК. На этом и сконцентрируемся в инструкции.
Отключаем YourPhone.exe
Если сейчас нет потребности в подключении смартфона к компьютеру, можно выключить процесс. Его в любой момент можно будет запустить повторно, но до тех пор, сэкономим немного ОЗУ и ЦП, так как штатно он работает в фоновом режиме.
Для отключения нужно:
- Перейти в «Параметры» сочетанием клавиш Ctrl + I и выбрать пункт «Конфиденциальность».
- Открываем вкладку «Фоновые приложения» и отключаем службу «Ваш телефон».

Удаляем Yourphone.exe
Метод подразумевает полное удаление приложения «Ваш телефон», но для этого нужно использовать командую строку или PowerShell. Просто так встроенную утилиту не удалить.
Пошаговая инструкция:
- Вводим в поисковую строку PowerShell и открываем консоль с правами администратора.
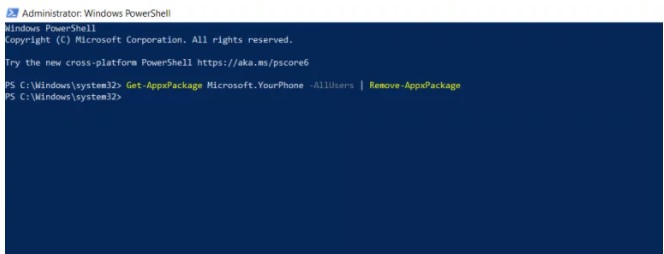
- Вставляем команду Get-AppxPackage Microsoft.YourPhone -AllUsers | Remove-AppxPackage и жмем Enter.
- После непродолжительного ожидания высветится сообщение об успешном завершении процедуры.
Если в будущем снова потребуется программа «Ваш телефон», ее можно установить из магазина Microsoft Store. Поэтому ничего страшного в удалении нет, все действия легко обратимы.

По умолчанию в Microsoft Windows разных версий есть приложение «Ваш телефон», которое используется в момент подключения смартфона к ПК. Процесс YourPhone.exe не является вирусом, даже несмотря на то, что он может потреблять довольно много ресурсов компьютера без видимых причин. Сервис выполняет роль своеобразного моста между устройствами.
Вариантов здесь несколько. Первый – полностью отключить сервис, если он тянет сильно много ЦП и ОЗУ или он просто не нужен. Можно даже полностью удалить его с ПК. Второй – пытаться исправить службу, если она повреждена. Для этого нужно запускать средство исправления неполадок и сканирование системы через sfc. Поломки процесса встречаются нечасто, преимущественно пользователи просто хотят его отключить для экономии ресурсов ПК. На этом и сконцентрируемся в инструкции.
Если сейчас нет потребности в подключении смартфона к компьютеру, можно выключить процесс. Его в любой момент можно будет запустить повторно, но до тех пор, сэкономим немного ОЗУ и ЦП, так как штатно он работает в фоновом режиме.
Для отключения нужно:
- Перейти в «Параметры» сочетанием клавиш Ctrl + I и выбрать пункт «Конфиденциальность».
- Открываем вкладку «Фоновые приложения» и отключаем службу «Ваш телефон».
Удаляем Yourphone.exe
Метод подразумевает полное удаление приложения «Ваш телефон», но для этого нужно использовать командую строку или PowerShell. Просто так встроенную утилиту не удалить.
Пошаговая инструкция:
- Вводим в поисковую строку PowerShell и открываем консоль с правами администратора.
- Вставляем команду Get-AppxPackage Microsoft.YourPhone -AllUsers | Remove-AppxPackage и жмем Enter.
- После непродолжительного ожидания высветится сообщение об успешном завершении процедуры.
Если в будущем снова потребуется программа «Ваш телефон», ее можно установить из магазина Microsoft Store. Поэтому ничего страшного в удалении нет, все действия легко обратимы.
Поделиться в ВК
Поделиться в ОК
Поделиться на Facebook
Поделиться в Twitter
Что такое Microsoft Compatibility Telemetry (CompatTelRunner.exe) Высокая нагрузка ЦП и диска
Также известный под названием Microsoft Compatibility Telemetry, CompatTelRunner.exe — это название встроенной службы Windows, которая помогает разработчикам собирать отчеты о производительности вашей системы. Эта информация обычно собирается Microsoft в фоновом режиме для формирования списка логов, ошибок и других вещей, которые могут быть полезны для работы над будущими исправлениями. Первоначально эта служба была добавлена в Windows 7 и 8.1 в обновлении KB2977759. К сожалению, несмотря на то, что CompatTelRunner.exe на самом деле осуществляет полезную функцию, иногда она может работать неправильно, что приводит к высокому потреблению ресурсов. В результате большинство систем начинают зависать и давать сбой из-за высокой загрузки ЦП и диска. Чтобы это исправить, следует отключить эту службу. Не волнуйтесь, это можно сделать без вреда система. Некоторые советуют удалить ее, однако в этом нет никакого смысла, поскольку она переустановится сама через какое-то время. Microsoft Compatibility Telemetry была создана исключительно для информационных целей, поэтому вы можете отключить ее без проблем. Ниже мы представили полное руководство на эту тему:

Скачать средство восстановления Windows
Существуют специальные утилиты для восстановления Windows, которые могут решить проблемы, связанные с повреждением реестра, неисправностью файловой системы, нестабильностью драйверов Windows. Мы рекомендуем вам использовать Advanced System Repair Pro, чтобы исправить проблему «Телеметрия совместимости Microsoft (CompatTelRunner.exe) с высокой загрузкой ЦП и диска» в Windows 10.
1. Убедитесь, что в Windows загружены все обновления.
Перед отключением самой службы Телеметрии стоит сначала установить свежие обновления. Есть вероятность, что Microsoft Compatibility Telemetry работает неправильно. Если вы не обновляли свою систему долгое время, то загрузка новых обновлений может решить проблему. Чтобы проверить, есть ли у вас новые обновления, сделайте следующее:
- Нажмите Windows Key + I одновременно, чтобы открыть Настройки. Выберите Обновление и безопасность.
- На правой панели нажмите Проверка наличия обновлений. Подождите, пока Windows найдет новые обновления, и установите их. Иногда пользователи увидят кнопку Установить сразу, так как Windows уже нашел обновления заранее.
- После завершения процесса обновления перезагрузите компьютер и проверьте, изменилось ли что-нибудь.
2. Проверьте целостность системных файлов.
Мало вероятно, но Microsoft Compatibility Telemetry может работать некорректно из-за отсутствия или повреждения некоторых файлов. Такие файлы обычно связаны между многими службами Windows, которые обеспечивают надлежащую связь. Если некоторые из этих файлов отсутствуют, тогда это может вызывать проблемы, связанные с данной службой. Ниже мы воспользуемся, как SFC (средство проверки системных файлов), так и DISM (обслуживание образов развертывания и управление ими), которые помогут обнаружить и восстановить отсутствующие компоненты. Вот как:
С помощью SFC
- Открытые Командная строка , введя
cmdв поле поиска рядом с Меню Пуск кнопку. - Щелкните правой кнопкой мыши по Командная строка , а затем выбрать Запуск от имени администратора.
- После открытия консоли введите
sfc /scannowкоманду и нажмите Enter. - Когда процесс восстановления будет завершен, перезагрузите компьютер.
С помощью DISM
- Открытые Командная строка как мы это делали на предыдущем шаге.
- Скопируйте и вставьте эту команду
DISM.exe /Online /Cleanup-image /Restorehealth. - Нажмите Enter и подождите, пока Windows закончит сканирование и исправление.
- После этого перезагрузите компьютер и снова установите обновление.
После выполнения этих сканирований перезагрузите компьютер и проверьте, изменилось ли потребление ресурсов ЦП и Диска. Если это не помогло, переходите к другим шагам, перечисленным ниже.
3. Измените настройки в разделе «Диагностика и отзывы».
Следующая часть шагов будет посвящена настройке или отключению параметров, связанных со службой Microsoft Compatibility Telemetry. Для начала, давайте начнем с изменения объема диагностических данных, отправляемых на серверы Microsoft. Иногда в настройках может быть выбрана отправка более широких журналов данных, включая приложения и функции и расширенные отчеты об ошибках, которые могут вызвать более высокое потребление ресурсов. Поэтому изменение этой опции на базовый план сбора данных может облегчить работу вашей системы. Это вряд ли поможет решить проблему полностью, но все же поможет улучшить производительность немного.
- Открытые Настройки как мы это делали в самом первом способе выше. Затем выберите Конфиденциальность , а затем перейдите в Диагностика и отзывы на левой панели.
- Удостоверьтесь, что опция Обязательные диагностические данные выбрана. Если нет, просто нажмите на нее, чтобы включить.
Теперь вы можете закрыть все окна и посмотреть результат. Если ничего не изменилось, можете переходить к полному отключению службы CompatTelRunner.exe.
4. Полностью отключите работу Microsoft Compatibility Telemetry
После того, как все вышеперечисленные шаги были опробованы, можно пойти на крайние меры и отключить саму службу. Это можно сделать тремя способами — через Диспетчер задач, Редактор локальной групповой политики или Редактор реестра. Вы можете выбрать любой из них внизу. Если вы не уверены, отключилась ли служба Телеметрии, выполните все три решения.
С помощью Диспетчера задач
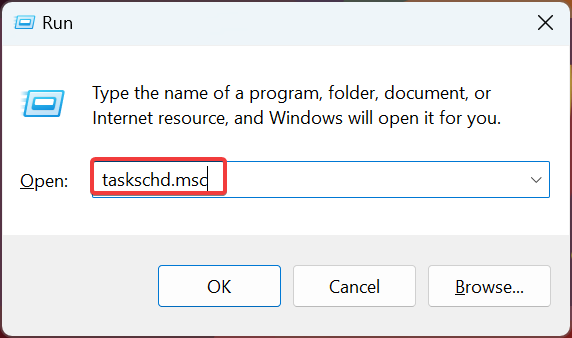
- Нажмите Windows + R сочетание клавиш, чтобы открыть строку «Выполнить», затем вставьте
taskschd.mscи нажмите OK. - Перейдите в Библиотека > Microsoft > Windows > Application Experience.
- После этого вы увидите список задач, отображаемый на правой панели.
- Найдите и щелкните правой кнопкой мыши на Microsoft Compatibility Appraiser. Выберите Отключить и перезагрузите вашу систему.
С помощью Редактора локальной групповой политики
- Нажмите Windows + R одновременно, как мы делали выше, и впишите
gpedit.msc, чтобы открыть редактор. - Перейдите в Конфигурация компьютера > Административные шаблоны > Компоненты Windows > Сборки для сбора данных и предварительные сборки.
- Среди списка на правой панели щелкните правой кнопкой мыши на Разрешить телеметрию , а затем выбрать Редактировать.
- Выберите Отключена, нажмите Применить, и OK для сохранения изменений.
- Перезагрузите компьютер и посмотрите, решило ли это проблему.
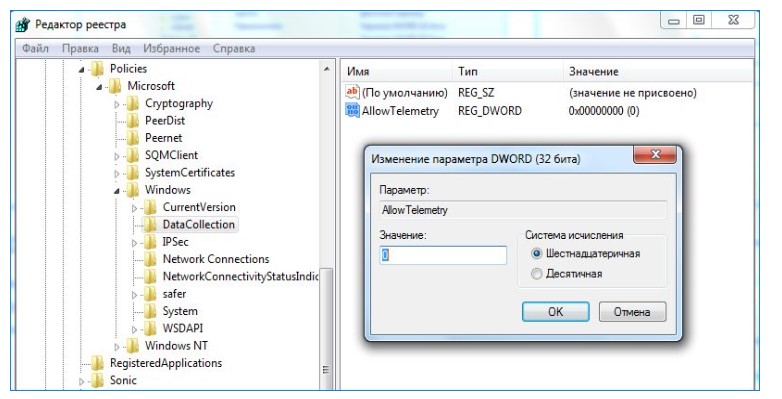
С помощью Редактора реестра
- Нажмите Windows + R снова, но вставьте
regeditв этот раз. - Нажмите Да если будет появиться окно Контроль учетных записей.
- Как только вы окажетесь в Редактор реестра, перейдите в
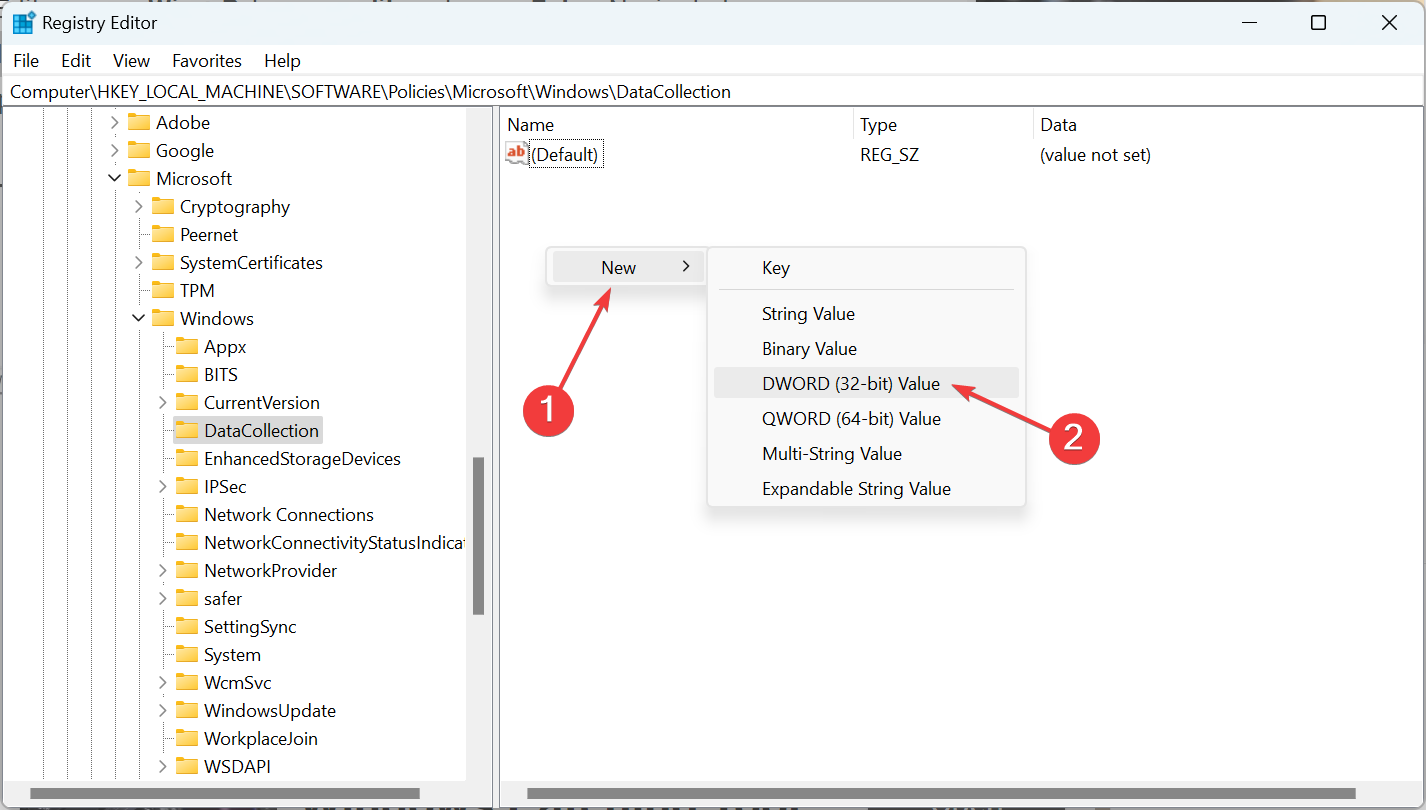
HKEY_LOCAL_MACHINE\SOFTWARE\Policies\Microsoft\Windows\DataCollection. - Затем щелкните правой кнопкой мыши на DataCollection, наведите на Новая курсором и выберите Параметр DWORD (32-бита) в конце.
- Назовите только что созданную запись как AllowTelemetry, затем щелкните на нее правой кнопкой мыши и выберите Изменить.
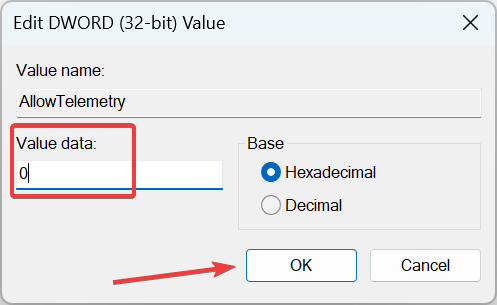
- Вы увидите новое окно. Обязательно измените значение с 1 на 0 под Значение пунктом.
- Нажмите OK и перезагрузите компьютер.
- Откройте строку «Выполнить», нажав Windows + R комбинацию клавиш, как мы сделали выше. Скопируйте и вставьте эту команду
services.msc. - Прокрутите список всех служб, пока не найдете службу с именем Connected User Experiences and Telemetry.
- Щелкните правой кнопкой мыши и выберите Объекты.
- In Общие , нажмите Stop кнопку. Затем убедитесь, что Тип запуска изменен с Автоматически в Отключена.
- По завершении нажмите Применить и OK для сохранения назначенных изменений.
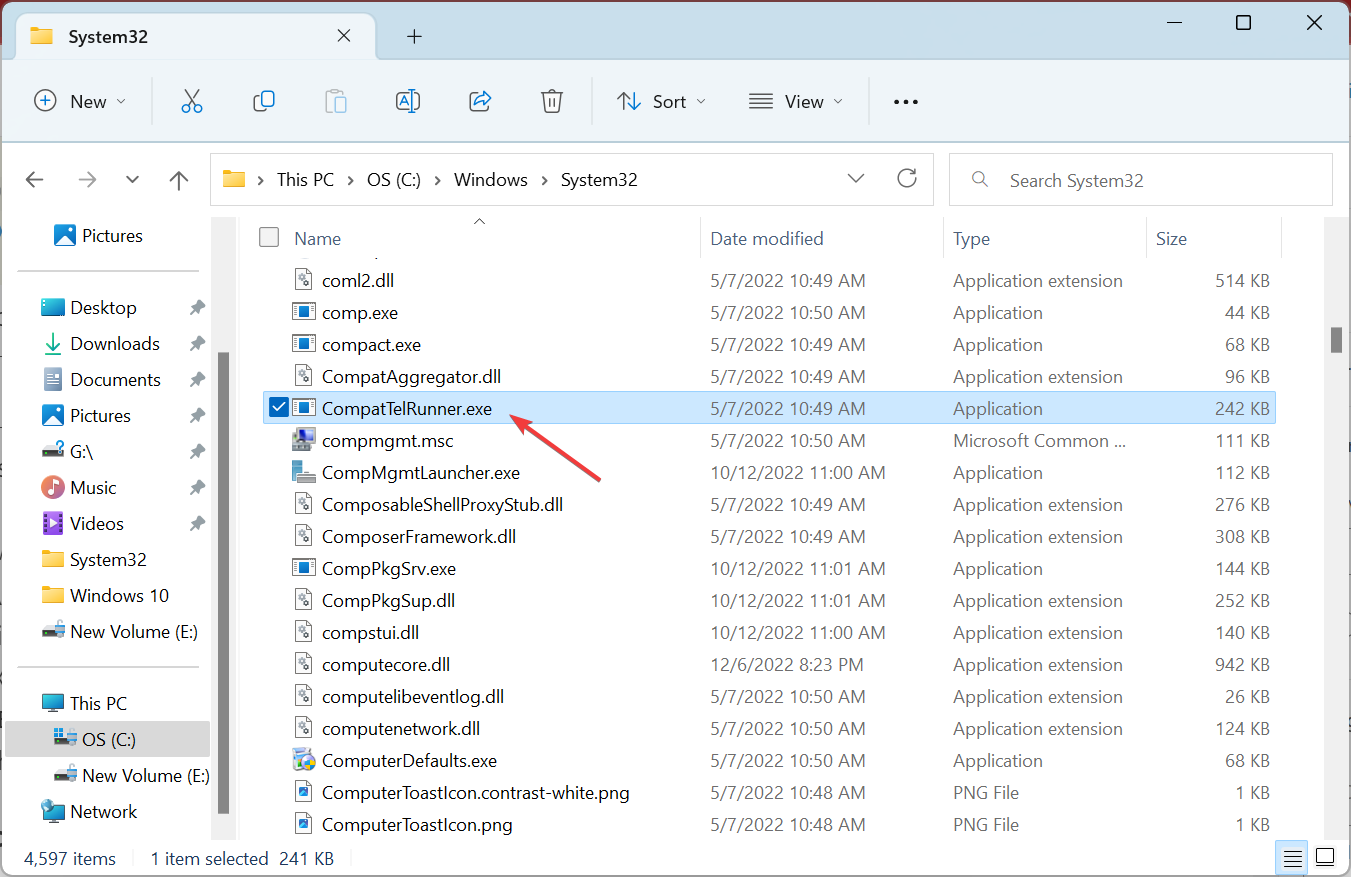
- Тип CompatTelRunner в поле поиска рядом с Меню Пуск.
- Щелкните правой кнопкой мыши и выберите Открыть папку с файлом. Вы также можете найти этот файл, перейдя в
C:\Windows\System32. - После нахождения файла CompatTelRunner, снова щелкните на него правой кнопкой мыши и выберите Объекты.
- Вы сразу увидите новое окно. Перейдите в Безопасность и нажмите Фильтр кнопку.
- Рядом с Владелец вверху нажмите Изменить и Фильтр снова.
- После этого выберите Поиск и выберите имя текущей учетной записи. Не забудьте нажать OK в конце.
- Также нажмите OK в ранее открытых окнах. В частности, нажмите Применить и OK в Дополнительные параметры безопасности меню.
- Закройте все окна и щелкните правой кнопкой мыши на CompatTelRunner еще раз. Выберите Объекты > Безопасность вкладки и Фильтр как и выше.
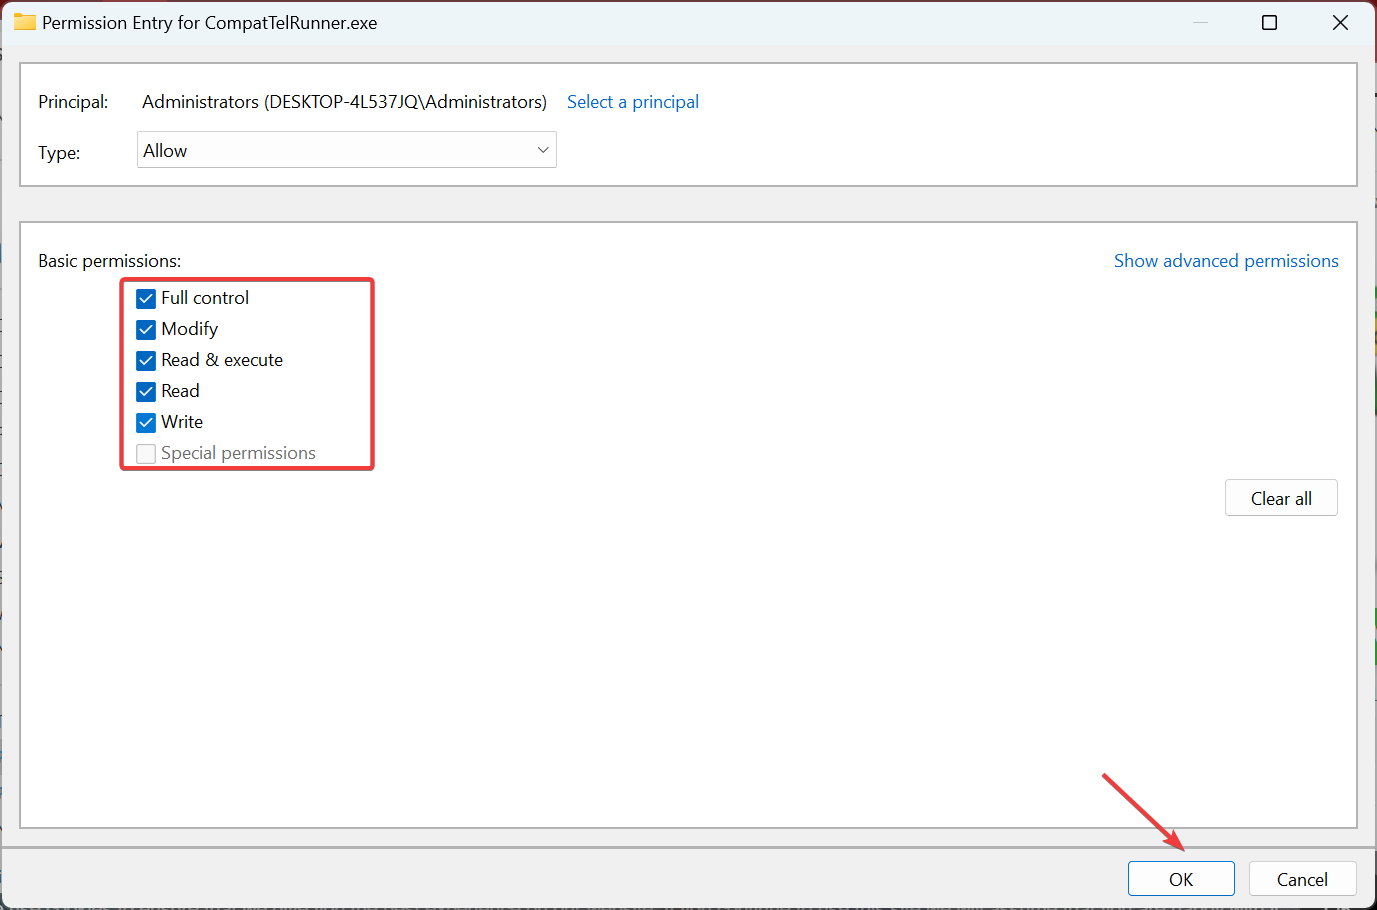
- Затем выберите пользователя из списка и выберите Редактировать прямо внизу.
- Наконец, вы можете настроить, какое разрешение должно быть предоставлено. Выберите Разрешить и Полный доступ , чтобы вносить любые изменения файлу. Примените изменения и закройте вкладку, чтобы наконец можно было удалить CompatTelRunner.exe.
Независимо от того, какой вариант вы выбрали, CompatTelRunner.exe теперь должен быть отключен и больше не нагружать вашу систему.
5. Отключите подключенный пользовательский интерфейс и службу Телеметрии.
Предпоследний шаг в нашем списке — это отключение службы Connected Users Experiences and Telemetry. Фактически, это имя одной службы, предназначенной для выполнения все той же цели — отправки данных об использовании на серверы Microsoft. Поскольку служба Connected User Experiences and Telemetry запускается каждый раз при загрузке вашей системы, мы просто изменим это значение в настройках этой служб. Если предыдущие шаги не помогли решить проблему, попробуйте этот способ ниже.
6. Полностью удалите CompatTelRunnner.exe.
Хотя удаление службы Телеметрии в большинстве случаев бесполезно, мы все же покажем как это сделать в образовательных целях. Конечно, данная мера скорее всего поможет вам избежать чрезмерно высокой нагрузки ЦП, но только на некоторое время. В Windows есть список основных служб, которые устанавливаются по умолчанию в каждой операционной системе. Если чего-то не хватает, Windows с большей вероятностью обнаружит отсутствующую службу и загрузит ее через какое-то время. Следовательно, высокая загрузка ЦП и диска будет временно решена, но вернется, как только Windows установит удаленную службу обратно (если только служба Телеметрии не заработает сама по себе). В любом случае, обычно бессмысленно удалять CompatTelRunnder.exe из вашей системы, но вот шаги, чтобы сделать это:
Перед началом процесса, важно получить права администратора, иначе вы не сможете удалить CompatTelRunnder.exe. Кроме того, если на вашем компьютере созданы две учетные записи, обязательно войдите в ту, которая имеет права администратора. Как только все будет готово, выполните следующие действия:
Эти инструкции помогут нам сменить права администратора. Затем мы должны предоставить необходимые разрешения для удаления файла:
Итоги
Высокая нагрузка ЦП может быть вызвана м многими другими службами Windows. SysMain — еще одна такая служба, приводящая к высокому потреблению ресурсов. По неизвестным причинам, но эти проблемы часто возникают у обычных пользователей. Надеемся вы больше вы больше не испытываете проблемы с температурами и снижением производительности из-за чрезмерно высокого потребления ресурсов. Если когда-нибудь в будущем вы столкнетесь с другими проблемами, можете использовать наш блог, где ежедневно публикуются самые разные решения по мере возникновения новых проблем.
Check the best fixes on the web!
by Kazim Ali Alvi
Kazim has always been fond of technology, be it scrolling through the settings on his iPhone, Android device, or Windows. And at times, unscrewing the device to take… read more
Updated on
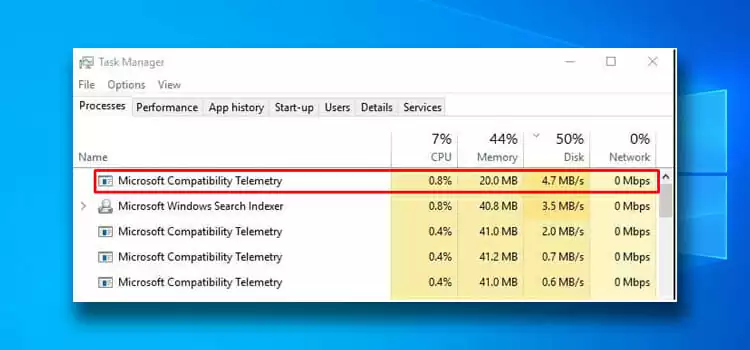
- Many users reported that a Microsoft Compatibility Telemetry process consumes a high CPU in the Task Manager.
- The process comes built-in, though not critical, and there are a few ways to fix things.
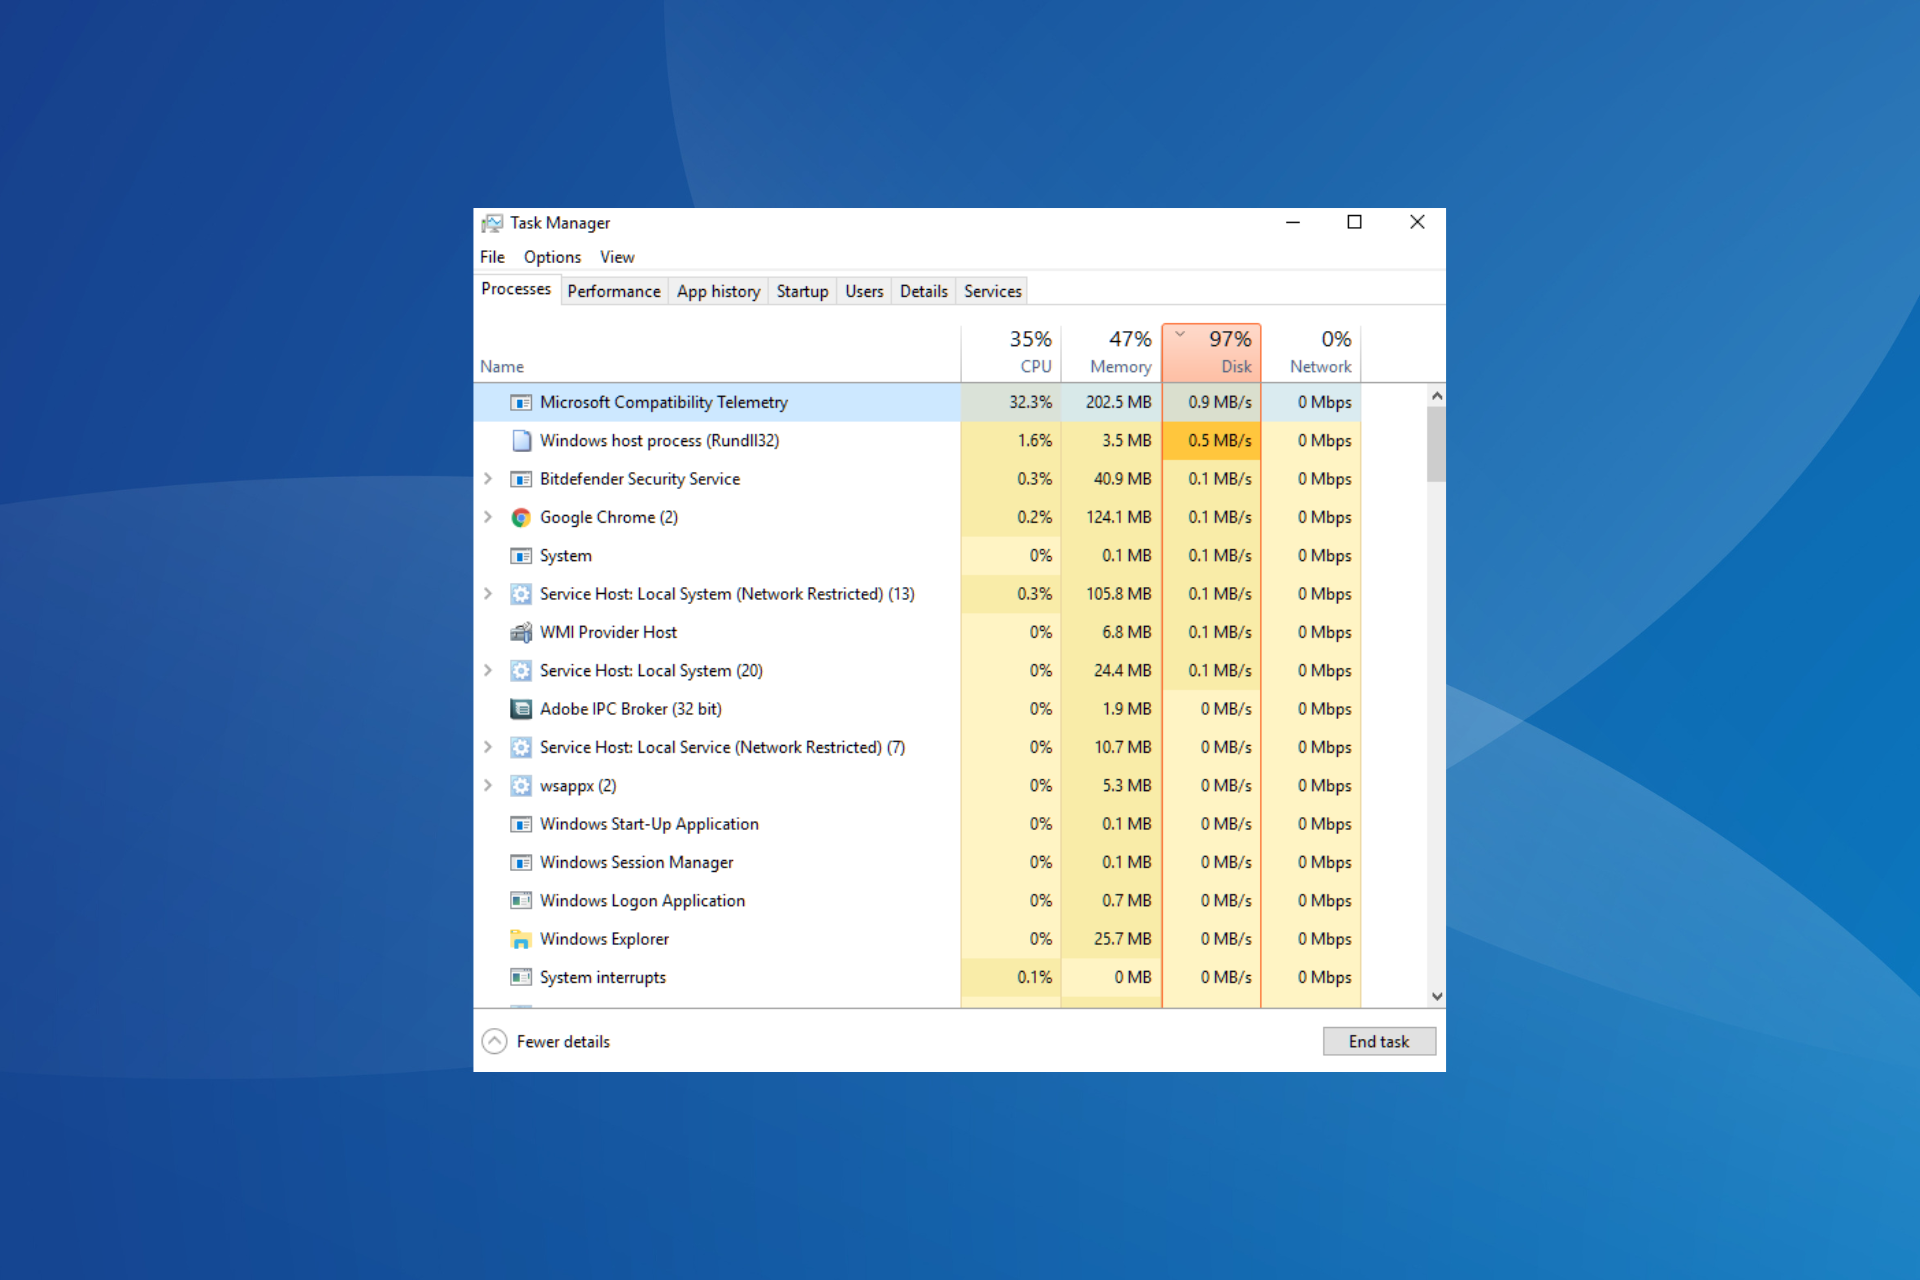
Microsoft Compatibility Telemetry, a service meant to share the PC’s performance feedback with Microsoft, is often found to be using high CPU in Windows.
How do I fix Microsoft Compatibility Telemetry high CPU usage?
1. Disable from Task Scheduler
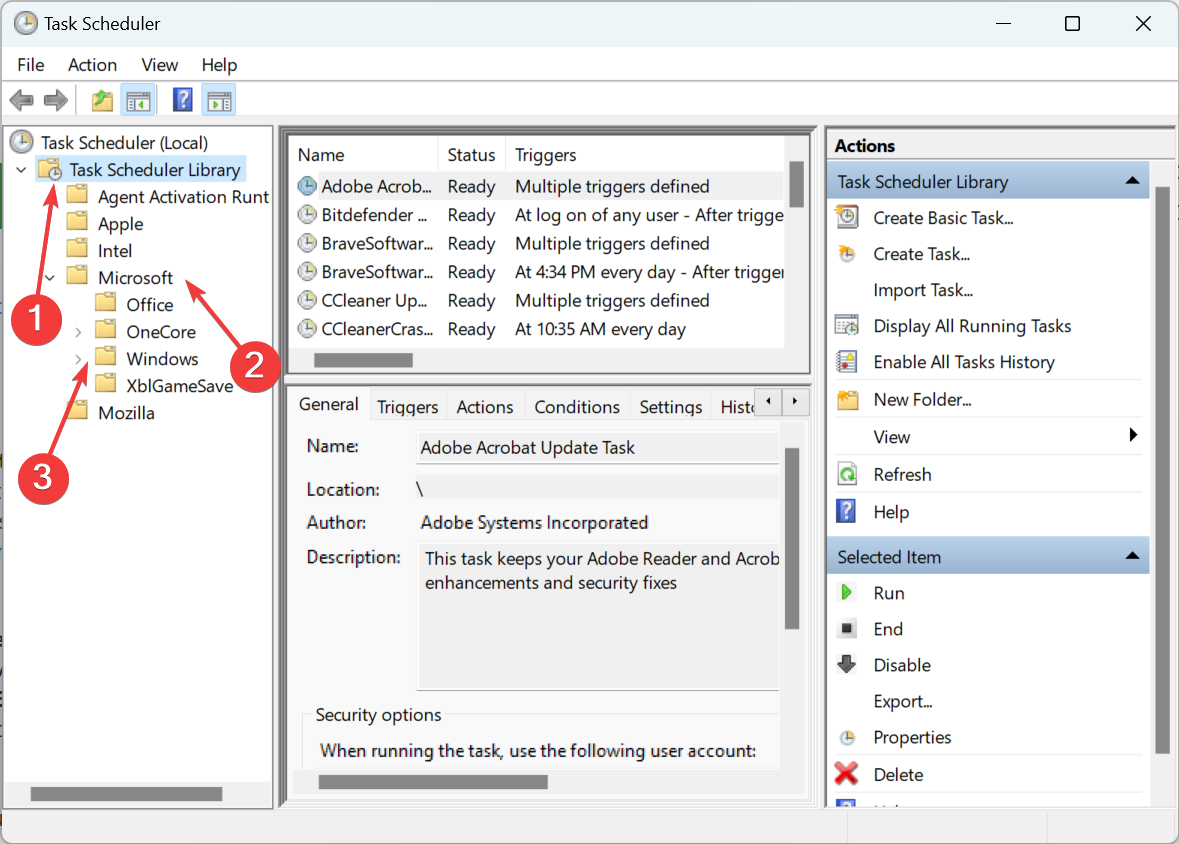
- Press Windows + R to open Run, type taskschd.msc, and then hit Enter.

- Now, expand Task Scheduler Library, choose Microsoft, and double-click on Windows.

- Select Application Experience, right-click on Microsoft Compatibility Appraiser and choose Disable from the context menu.

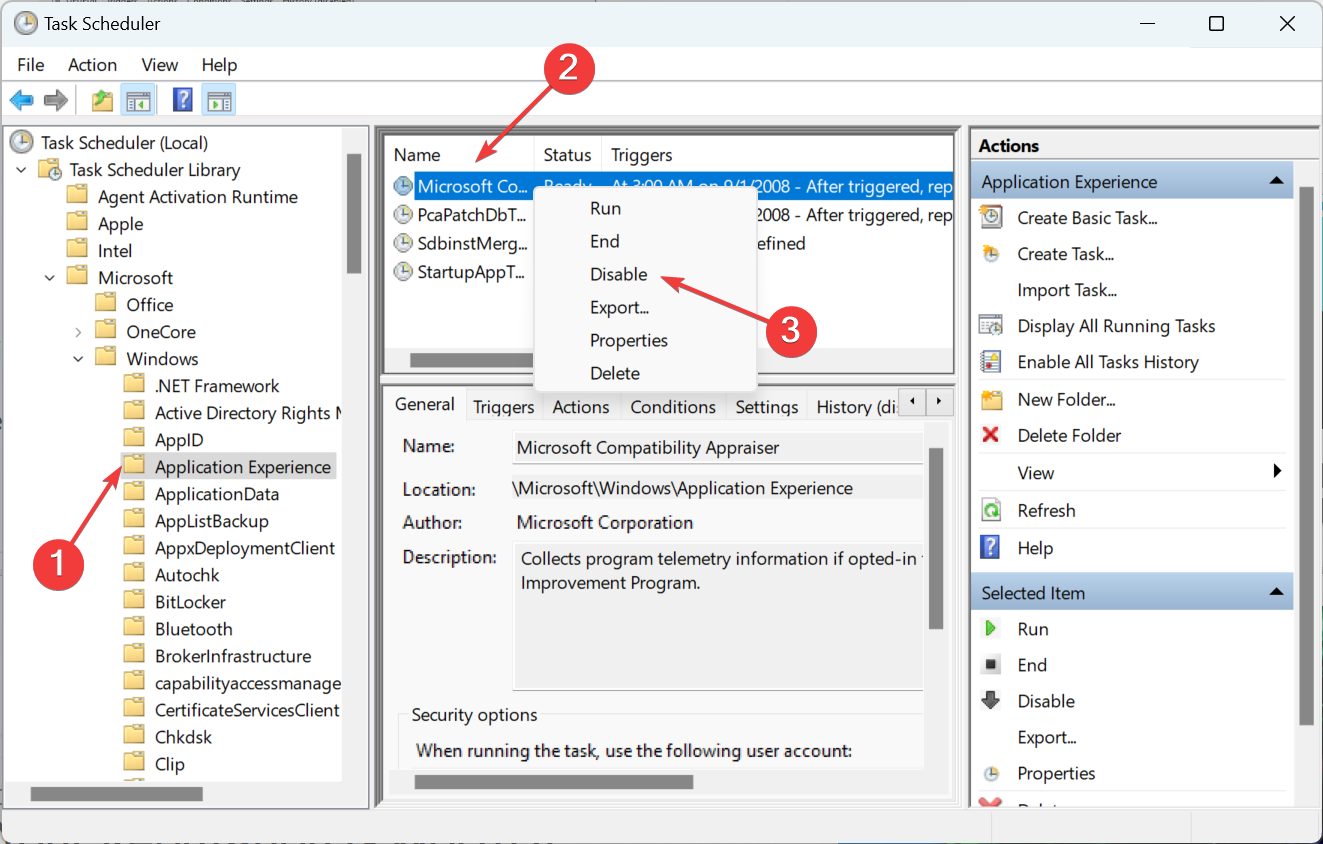
That’s it! Once done, restart the computer for the changes to effect, and the Microsoft Compatibility Telemetry high CPU in Windows 11 should be fixed.
Remember that the task may be recreated after a while, so you must repeat the same steps. A more straightforward option would be to make more substantial changes, and Registry Editor helps do just that.
How we test, review and rate?
We have worked for the past 6 months on building a new review system on how we produce content. Using it, we have subsequently redone most of our articles to provide actual hands-on expertise on the guides we made.
For more details you can read how we test, review, and rate at WindowsReport.
2. Edit the registry
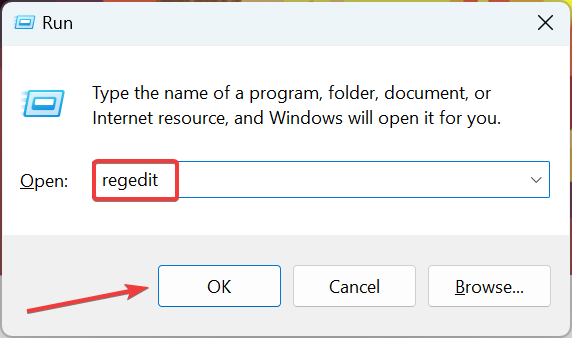
- Press Windows + R to open the Run command, type regedit in the text field, and click OK.
- Click Yes in the UAC prompt.
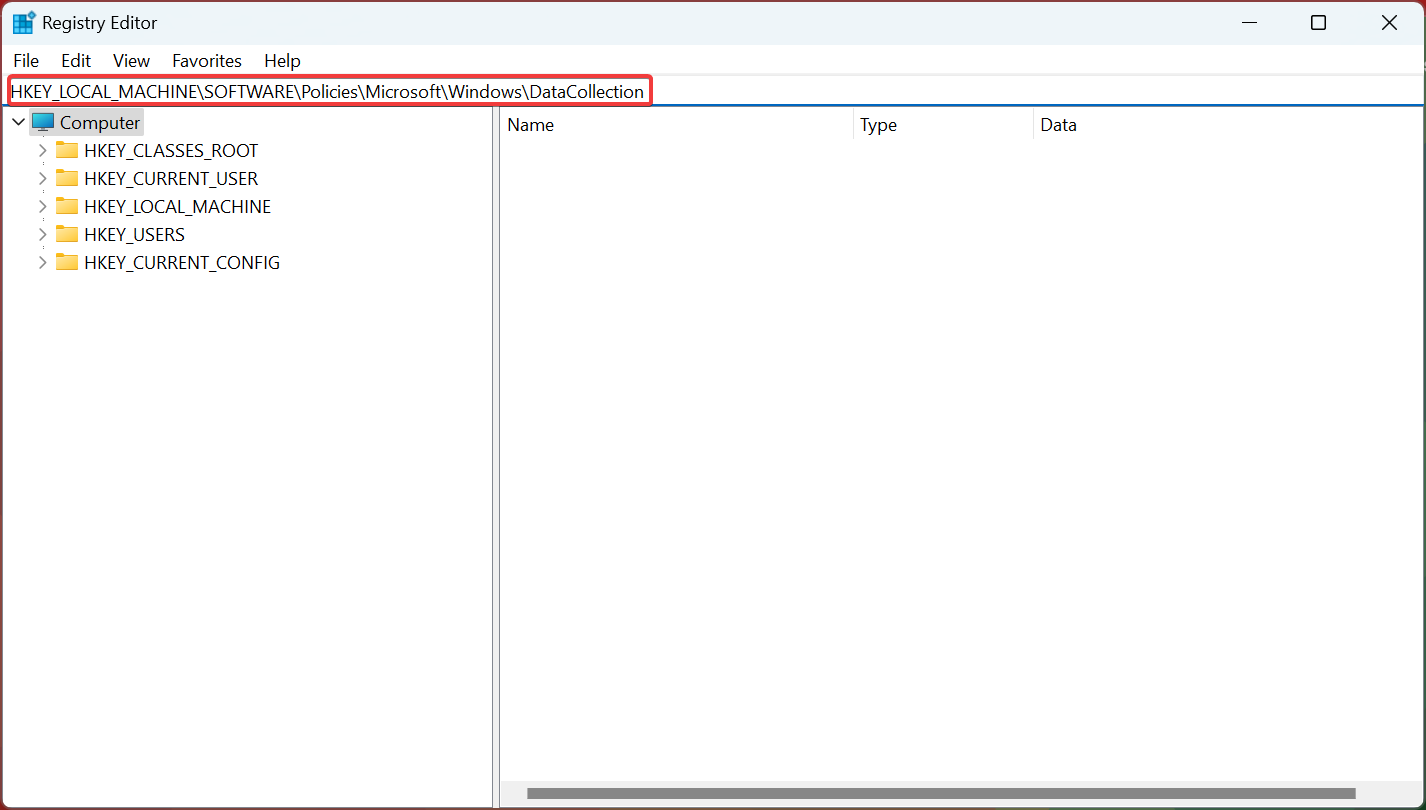
- Paste the following path in the address bar and hit Enter:
HKEY_LOCAL_MACHINE\SOFTWARE\Policies\Microsoft\Windows\DataCollection
- Right-click on the empty portion, hover the cursor over New, and then choose DWORD (32-bit) Value, and name it AllowTelemetry.
- Once done, double-click on the entry, enter 0 under Value data, and click OK to save the changes.

- Finally, restart the computer for the changes to come into effect.
After making the changes, the task shouldn’t be created again, and the high CPU usage issue would be resolved for good. However, in case it persists, it heads to the next solution.
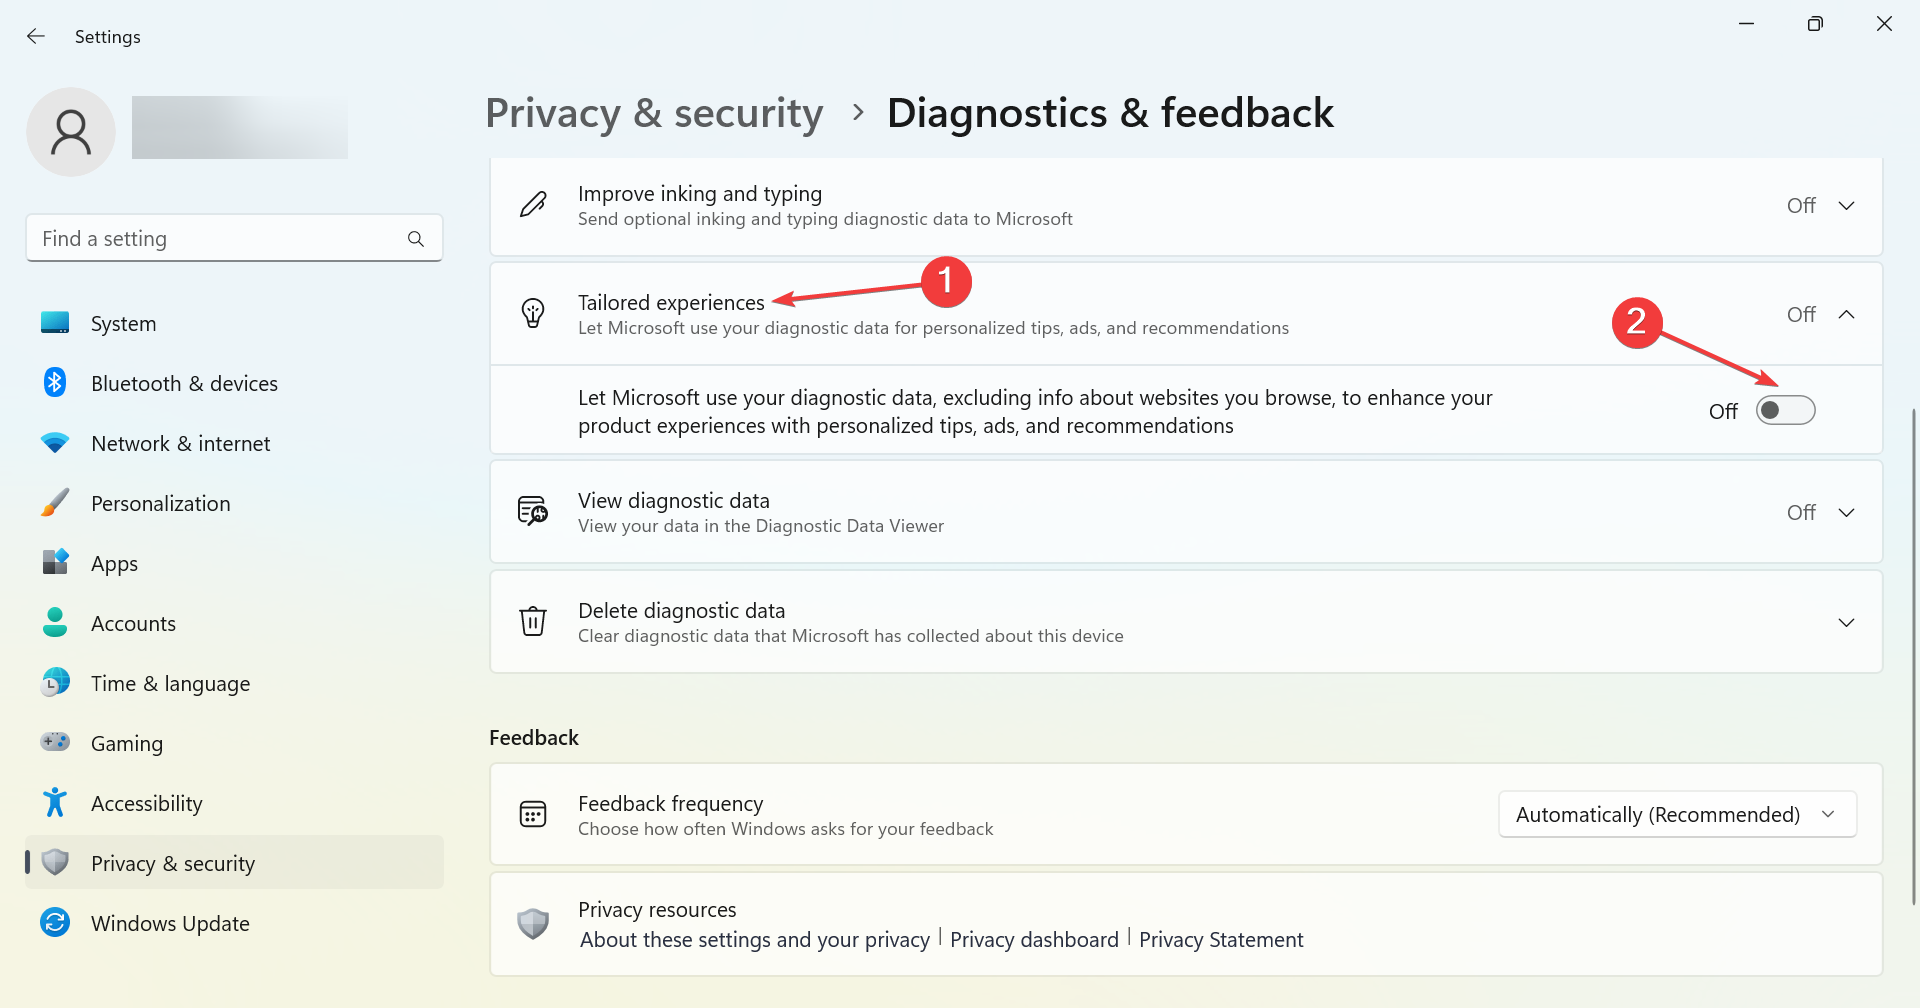
3. Modify settings
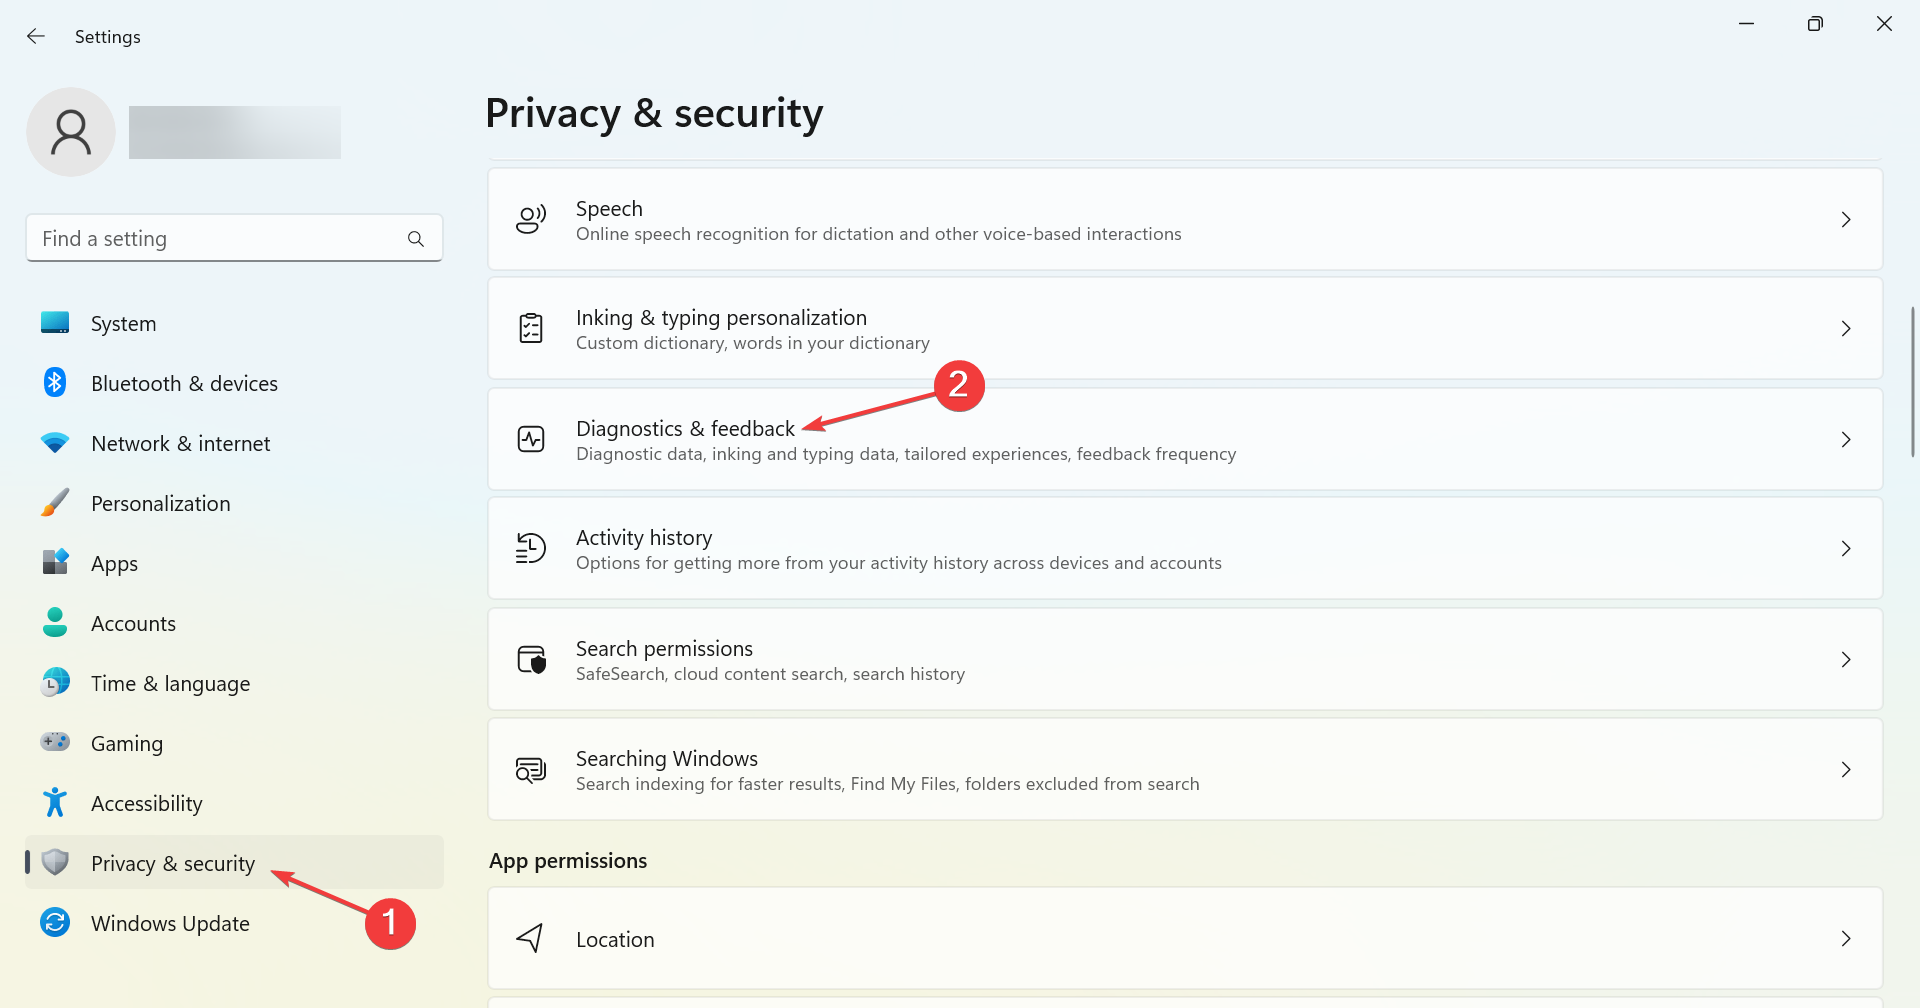
- Press Windows + I to open Settings, choose Privacy & Security from the navigation pane, and then click on Diagnostics & feedback.

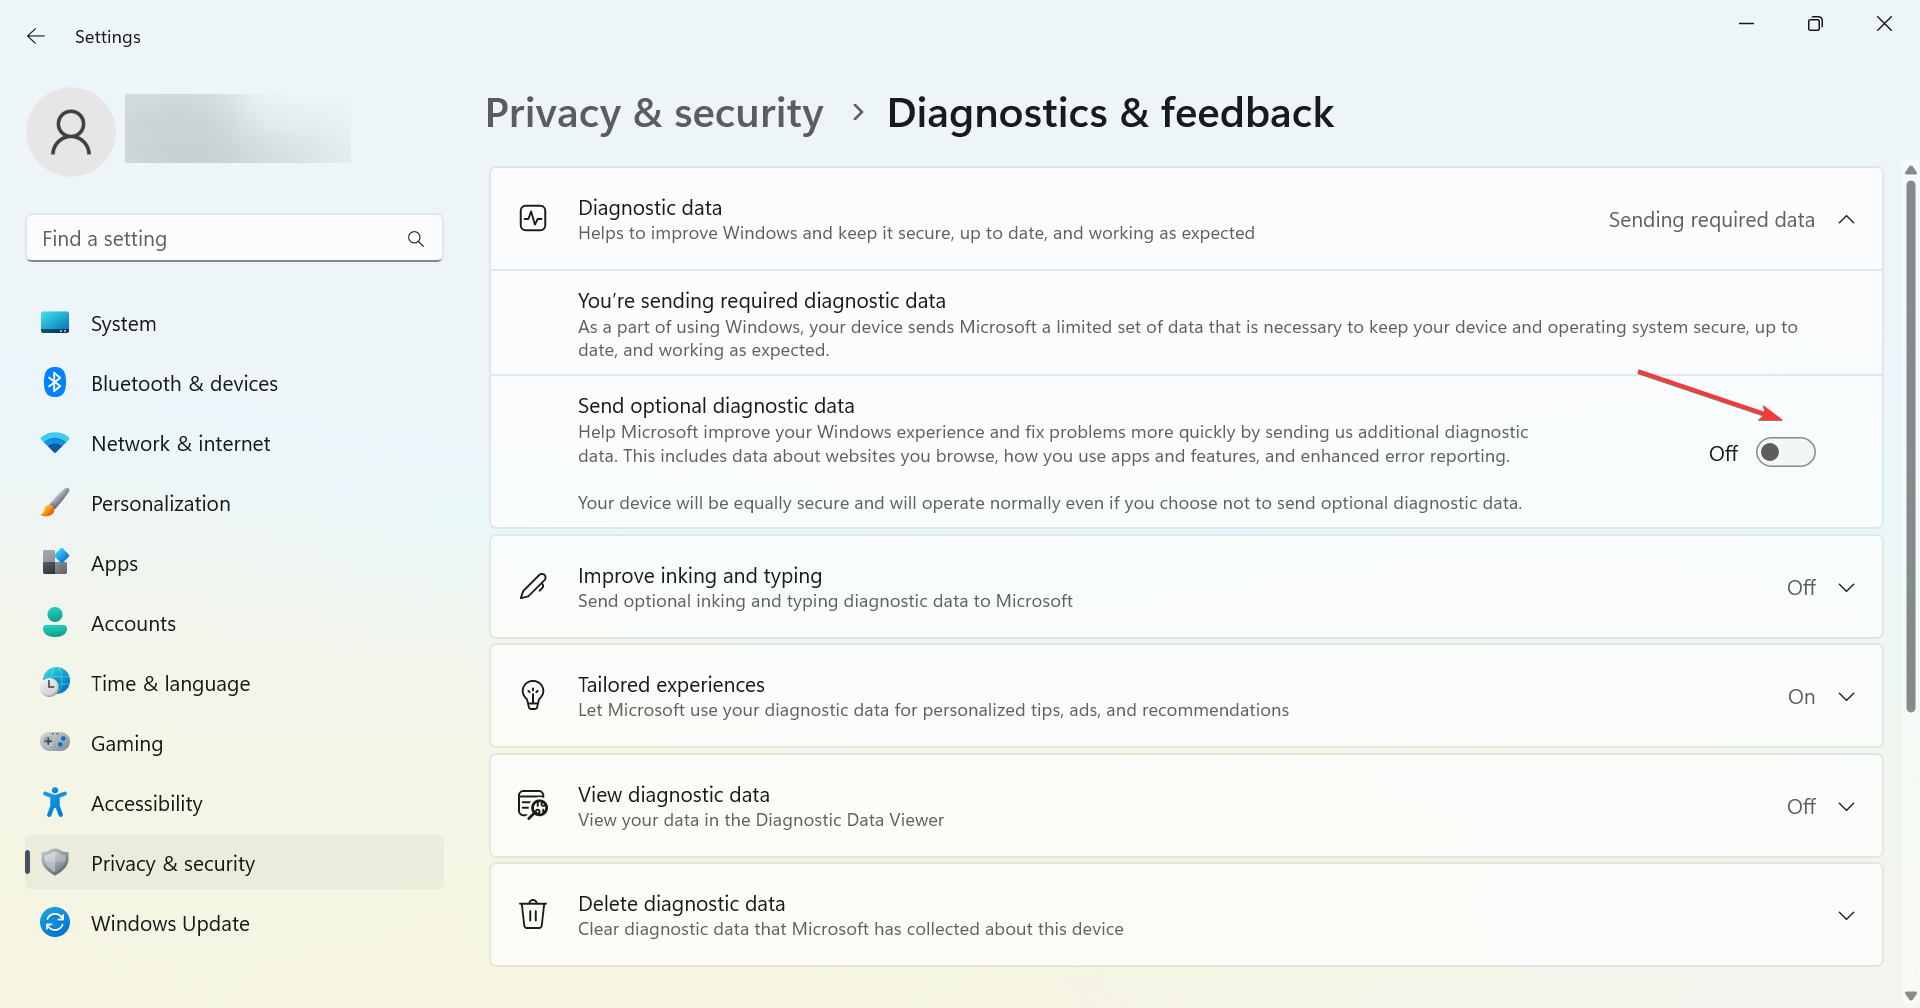
- Now, disable the toggle for Send optional diagnostic data.
- Next, expand Tailored experiences and then disable the toggle under it.
- Once done, verify whether the problem is resolved.
If the Microsoft Compatibility Telemetry continues to use a high CPU level, head to the following method.
- Freevee Error Code ITV-101: How to Fix it
- Surface Go 3 Black Screen: How to Fix it
- High GPU Usage but Low FPS: 9 Ways to Fix This Issue
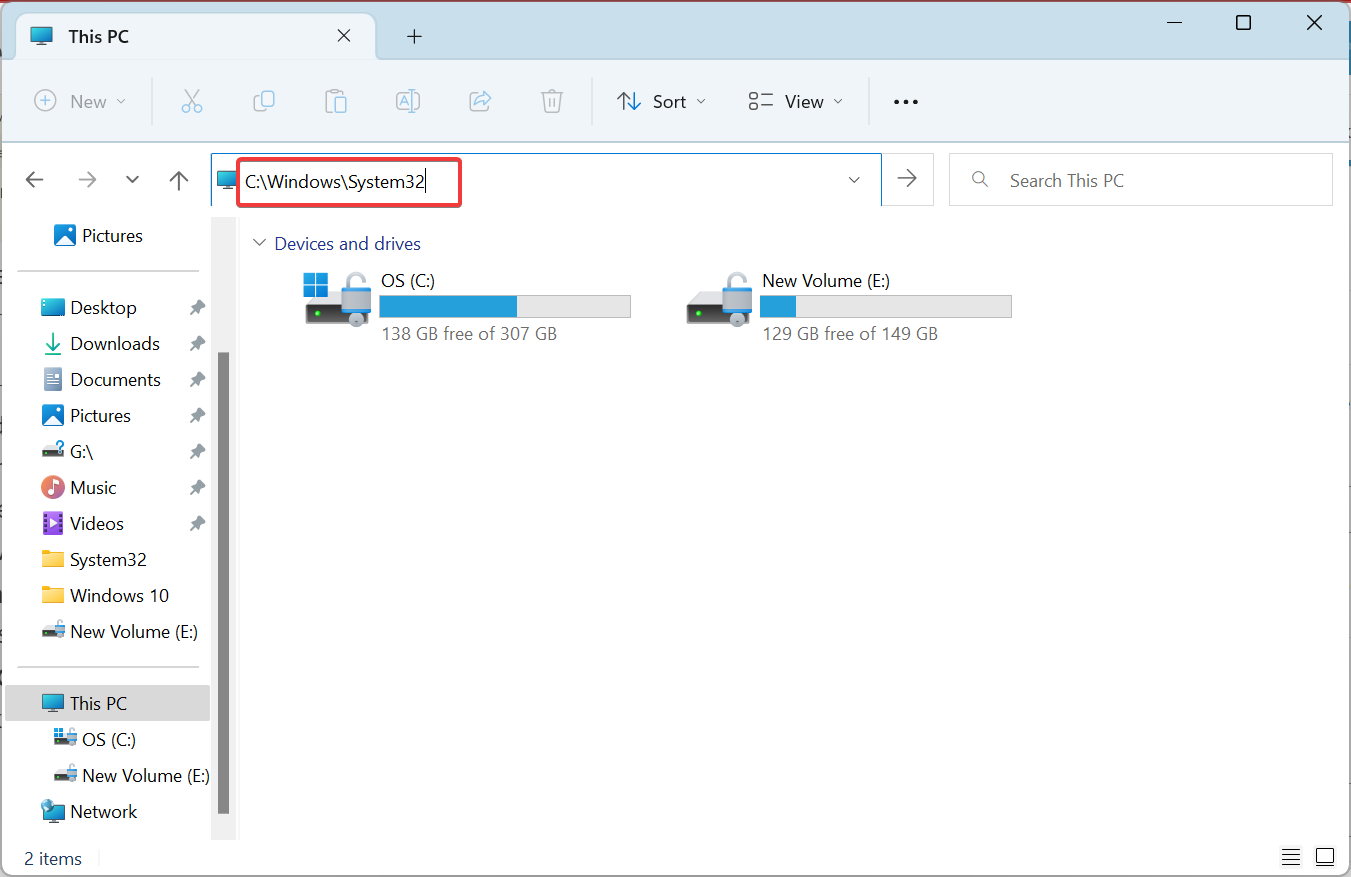
4. Delete the file
- Press Windows + E to open File Explorer, paste the following path in the address bar, and then hit Enter:
C:\Windows\System32
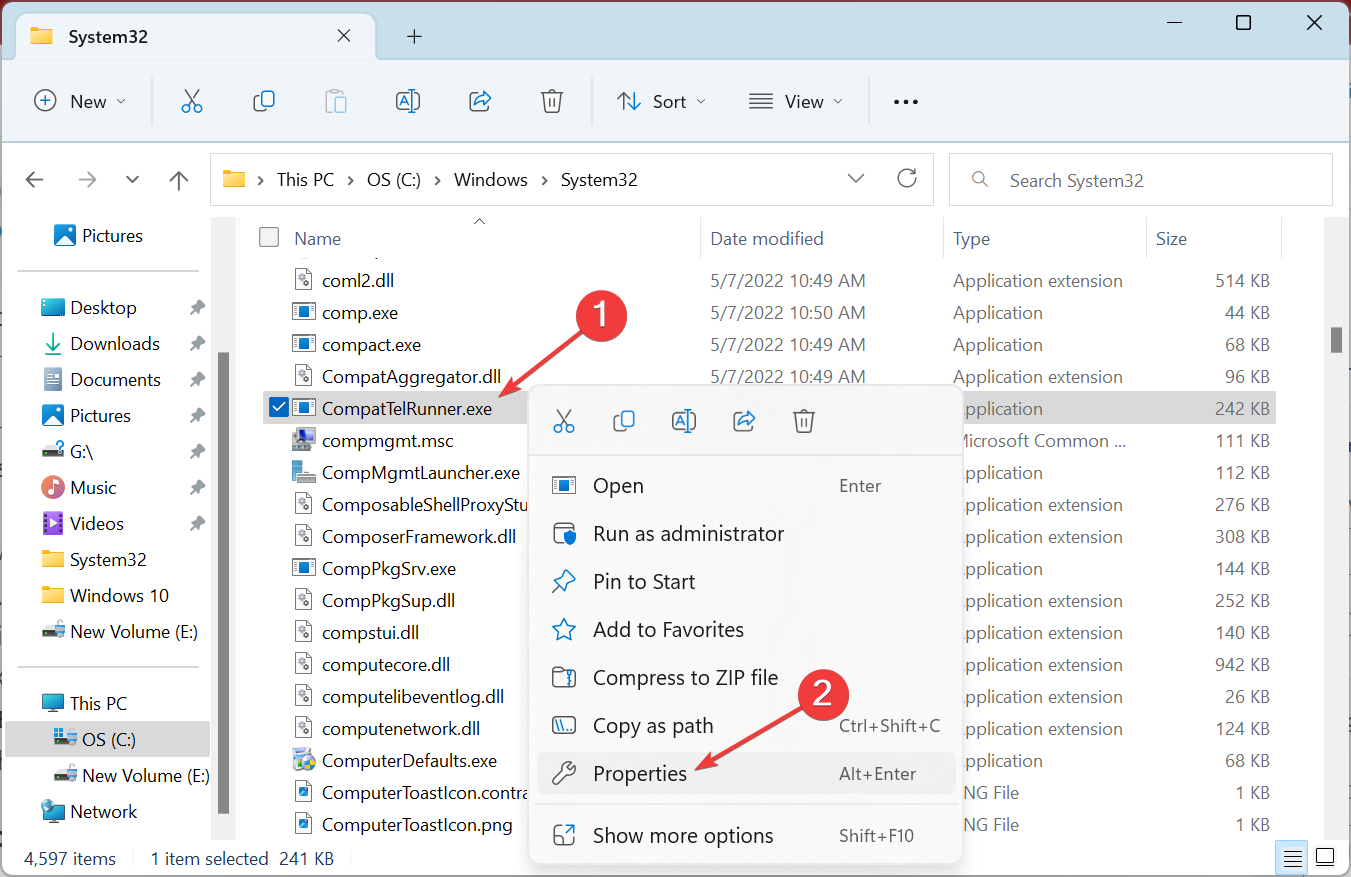
- Right-click on the CompatTelRunner.exe file and select Properties.
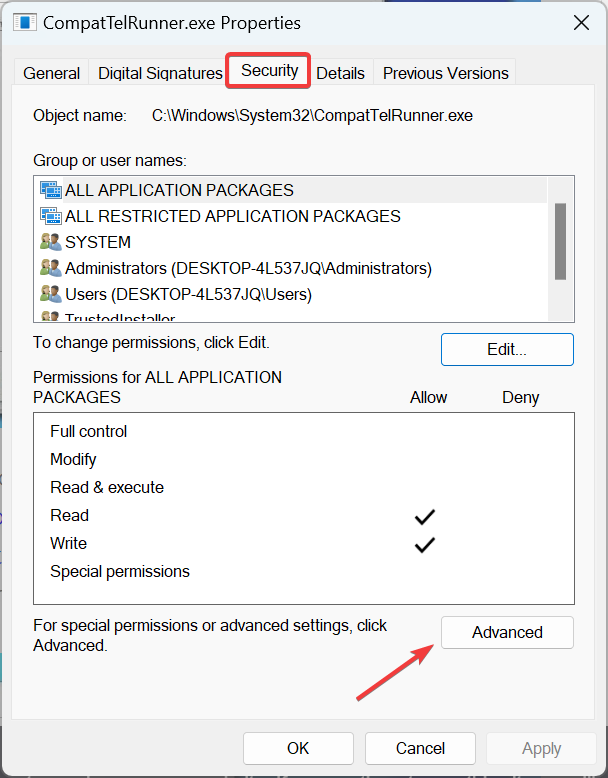
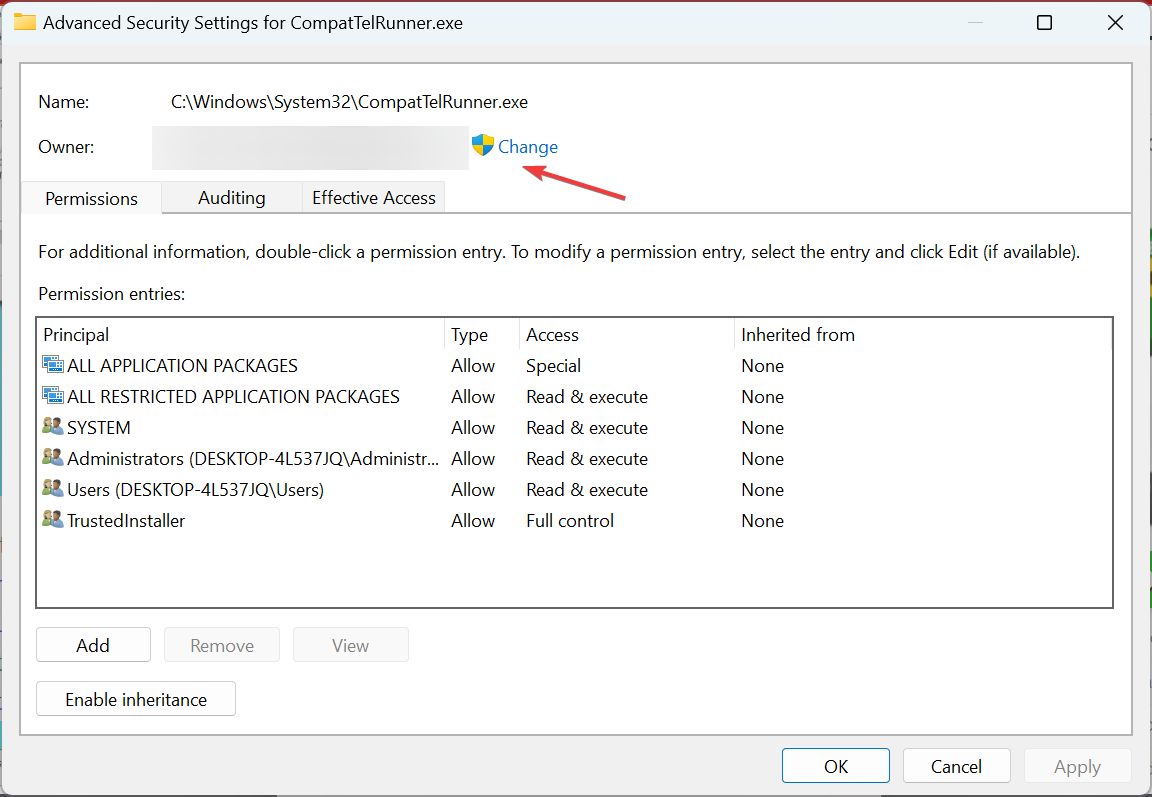
- Navigate to the Security tab, and click Advanced.

- Now, click on Change.

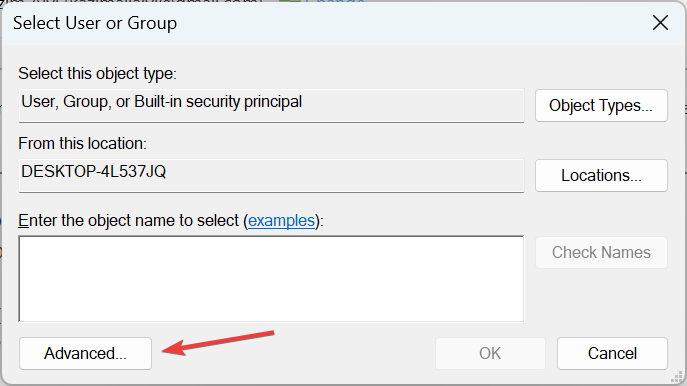
- Click on Advanced.

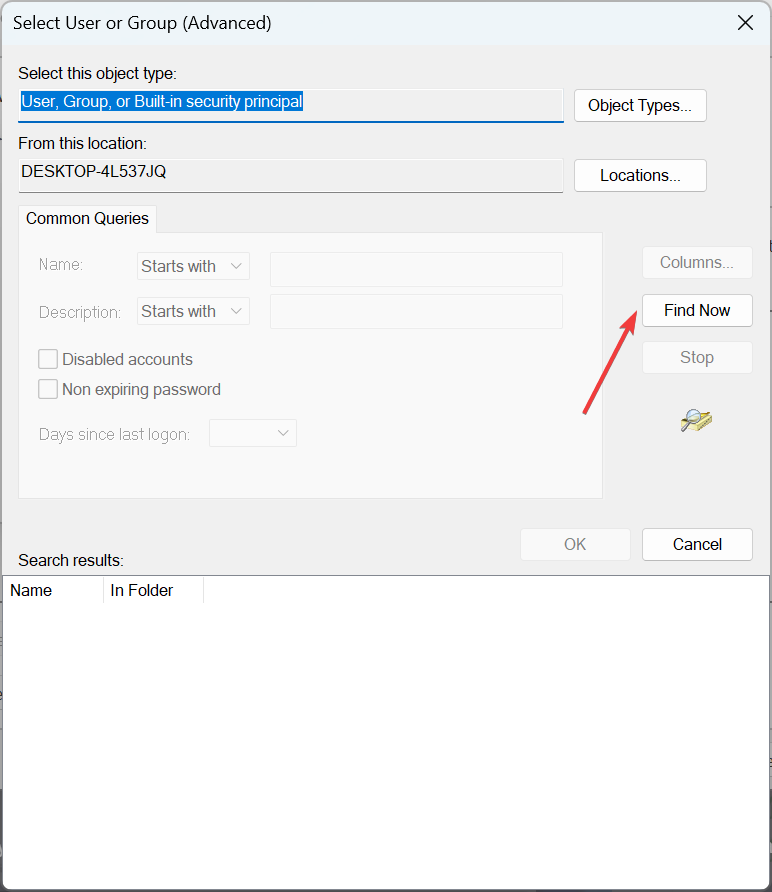
- Choose the Find now button.

- Select the current user account from the list, and click on OK.
- Click OK on all subsequent windows to save the changes.
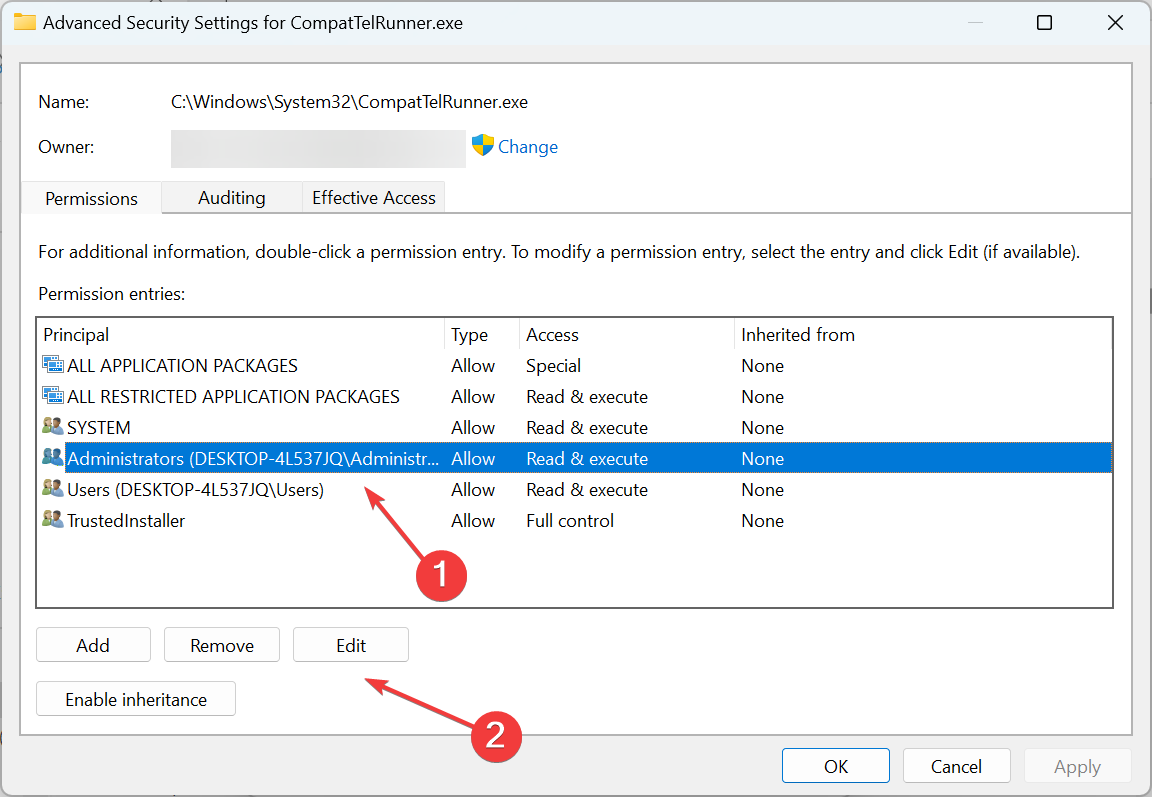
- Again, head to Advanced security properties for CompatTelRunner, choose the administrator account from the list and click Edit.
- Make sure all the available checkboxes are ticked and click OK to save the changes.

- Finally, click OK on all the previously opened Windows.
- Once done, select the file, and hit the Del key.
- After CompatTelRunner.exe is deleted, restart the computer for the changes to effect.

That’s it! If Microsoft Compatibility Telemetry used high CPU no matter what, deleting the file should do the trick.
Also, if you ever want to get the file back, locate it on another PC running the same iteration, edition, and version of the OS, and transfer the file.
5. Check for other issues
If nothing worked, it could be another issue with the PC causing Microsoft Compatibility Telemetry high CPU usage in Windows 11. So first, we recommend you check for corrupt system files—many fixed things by running the DISM tool.
As a last resort, you can always factory reset Windows 11 or reinstall the OS, the latter being a far more effective troubleshooting technique, fixing many issues with the PC.
Once you have resolved the Microsoft Compatibility Telemetry high CPU usage problem, find out how to make Windows 11 faster than ever. If you have any queries or know of a solution not listed here, drop a comment below.
Приветствую вас на портале WiFiGid! Одна из распространенных проблем Windows – процесс Microsoft Compatibility Telemetry (далее просто телеметрия, ибо устану набирать это) очень сильно грузит процессор и диск. Неоднократно сталкивался сам, начиная с Windows 10 и до самой современной Windows 11. Болезнь проявляется одинаково, и лечится тоже аналогичными способами. Но болезнь ли это и надо ли ее лечить?
Содержание
- Коротко про телеметрию
- Решение для ленивых
- Плохое и быстрое решение
- Способы отключения телеметрии
- Способ 1 – Службы
- Способ 2 – Параметры
- Способ 3 – Реестр
- Способ 4 – Управление компьютером
- Способ 5 – Сторонние программы
- Видео по теме
- Задать вопрос автору статьи
Коротко про телеметрию

Когда вы устанавливаете Windows, обычно подписываетесь под сбор данных со своего компьютеру и отправку их на сервера Microsoft. Что там собирается и отправляется на самом деле – известно одному Биллу Гейтсу и рептилоидам. Когда слышишь про сбор данных, думаешь, что это будут какие-то микроскопические объемы информации (например, адрес вашей электронной почты или кредитные карты), но нет – когда запускается сбор этой телеметрии, компьютер может изрядно нагрузиться.
Сам ловил такое событие много раз – компьютер просто начинает бесконечно напрягать процессор и диски. А так как у меня ноутбук, все это начинает еще очень сильно греться и жужжать. Открываем диспетчер устройств и быстро вычисляем виновника:
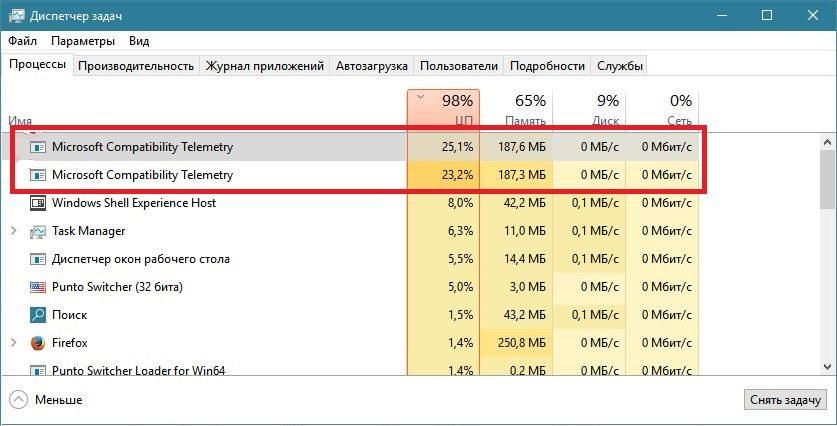
На новых системах это еще хоть как-то переживается, но вот был у меня старый ноутбук… И работать в такой системе вообще невозможно. И самое обидное – телеметрия включается сама по себе, как ей вздумается, и, разумеется, этот момент совпадает с временем, когда вам нужно что-то делать на компьютере.
Решение для ленивых
Переходим к списку возможных решений. Самое первое – для ленивых людей, которые ничего не хотят делать:
НИЧЕГО НЕ ДЕЛАЙТЕ!!!
Пусть компьютер постоит около часа, а вы тем временем сходите и выпейте пару кружек чего-нибудь чайносодежащего. Рано или поздно сбор телеметрии проходит и не проявляет себя долгое время.
А еще помню как на Windows 10 была заморочка с обновлением, что телеметрия не выключалась очень долго, но это уже зафиксили свежими обновлениями. Поэтому если у вас система давно не обновлялась, а нагрузка процесса Microsoft Compatibility Telemetry дает о себе знать – обновите Windows.
Плохое и быстрое решение
Если все совсем плохо, а работать нужно прямо сейчас, делаем так:
- Открываем диспетчер устройств и находим процесс телеметрии (раз вы нашли эту статью, значит уже знаете как попасть туда).
- Щелкаем правой кнопкой мыши по ней и нажимаем «Снять задачу».
На некоторое время это поможет, но скорее всего проявится в ближайшее время снова. Но когда нужно что-то сделать очень быстро – самое то. А дальше уже переходим к следующим способам отключения самой телеметрии.
Способы отключения телеметрии
Раз вы нашли, какой процесс грузит систему, значит вы, многоуважаемый читатель, точно не чайник. Поэтому инструкции ниже могут быть даны в упрощенном виде – но если что-то вдруг будет не понятно, пишите об этом в комментариях.
Лично я такого у себя не делал – после крайних обновлений (тьфу-тьфу-тьфу) Microsoft Compatibility Telemetry меня более не беспокоит. Конечно, есть случаи беспредельного запуска того же индексатора, но это уже немного другая история. Так о чем я – сейчас у меня все собирается, и это меня не особо волнует. Но можно попытаться отключить сбор телеметрии – для старых машин это может быть очень актуально.
Способ 1 – Службы
- Открываем «Службы» (проще всего через встроенный поиск Windows).
- Ищем следующие службы (что есть):
Служба диагностического отслеживания
Функциональные возможности для подключённых пользователей и телеметрия
Connected User Experience and Telemetry
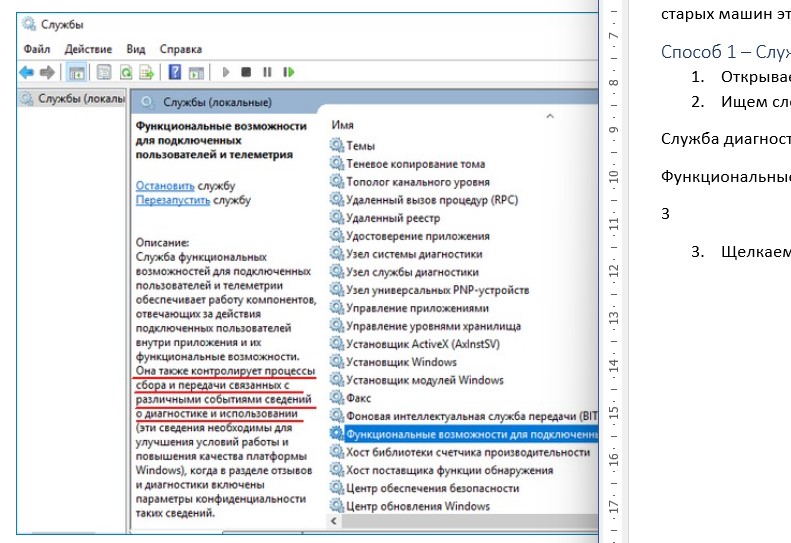
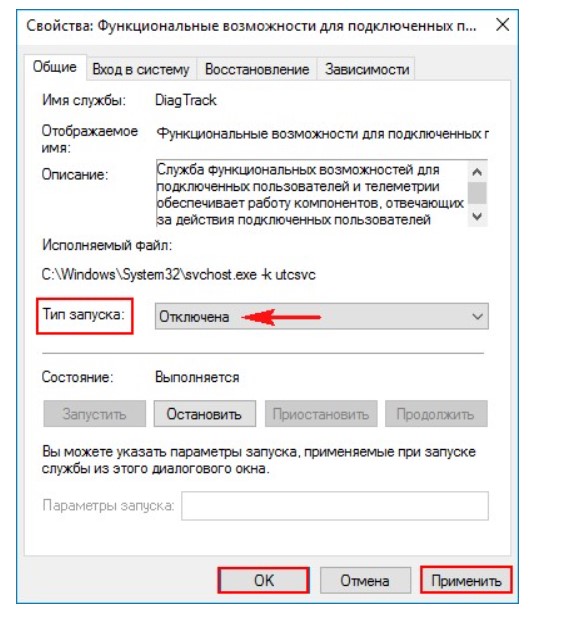
- Щелкаем правой кнопкой по нужной службе, переходим в ее настройки и напротив «Тип запуска» выставляем «Отключена».
Способ 2 – Параметры
В Windows 10 и Windows 11 присутствует новое меню настроек – «Параметры».
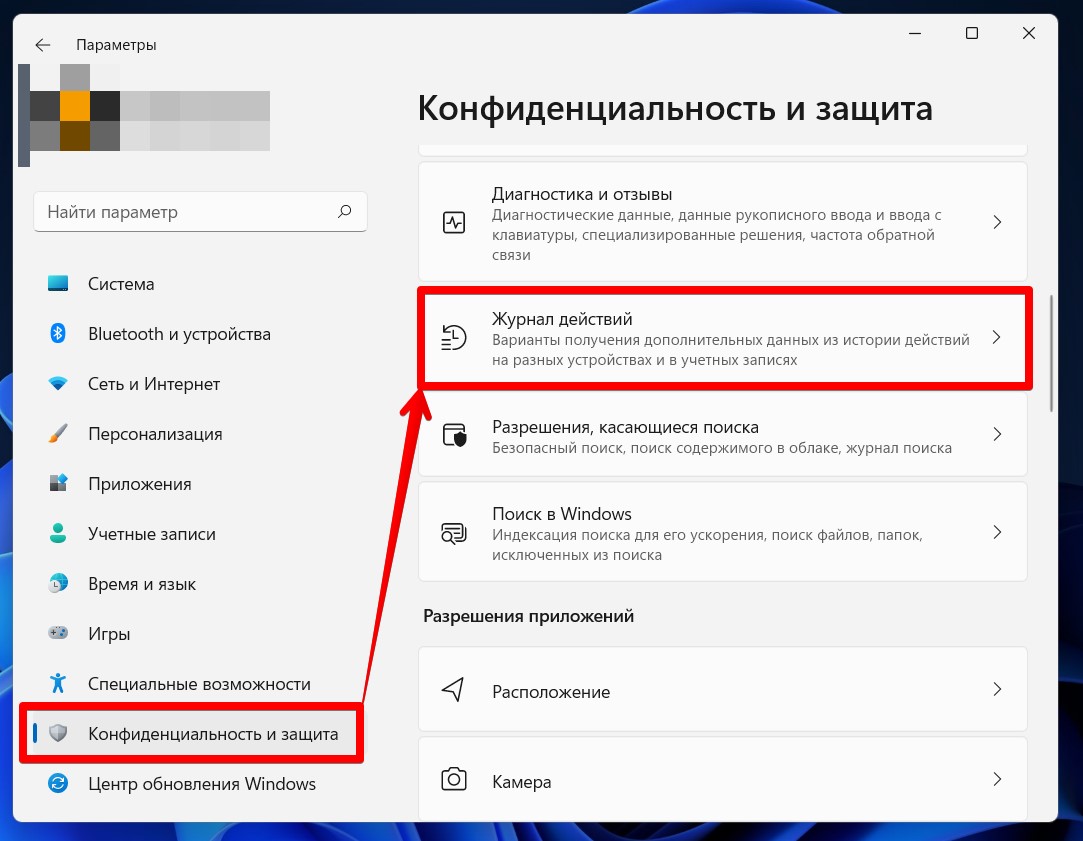
- Запускаем «Параметры» ( + I) и переходим в настройки конфиденциальности («Конфиденциальность» на Windows 10 или «Конфиденциальность и защита» на Windows 11).
- Переходим в пункт «Журнал действий».
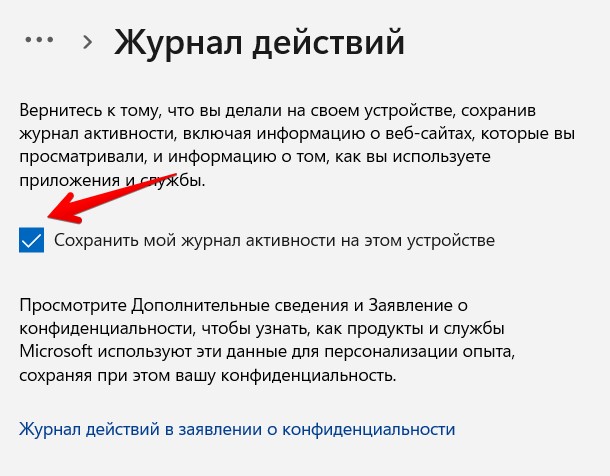
- Отключаем здесь все возможные галочки (зависит от версии Windows):
Разрешить Windows сбирать мои действия с этого компьютера
Разрешить Windows синхронизировать мои действия с этого компьютера в облако
Сохранить мой журнал активности на этом компьютере
Способ 3 – Реестр
- Открываем реестр ( + R и вводим команду regedit или используем тот же поиск Windows).
- В реестре переходим по следующему пути:
HKEY_LOCAL_MACHINE\SOFTWARE\Policies\Microsoft\Windows\DataCollection
- В этой папке создаем параметр с названием «AllowTelemetry» (DWORD 32) и задаем ему значение 0.
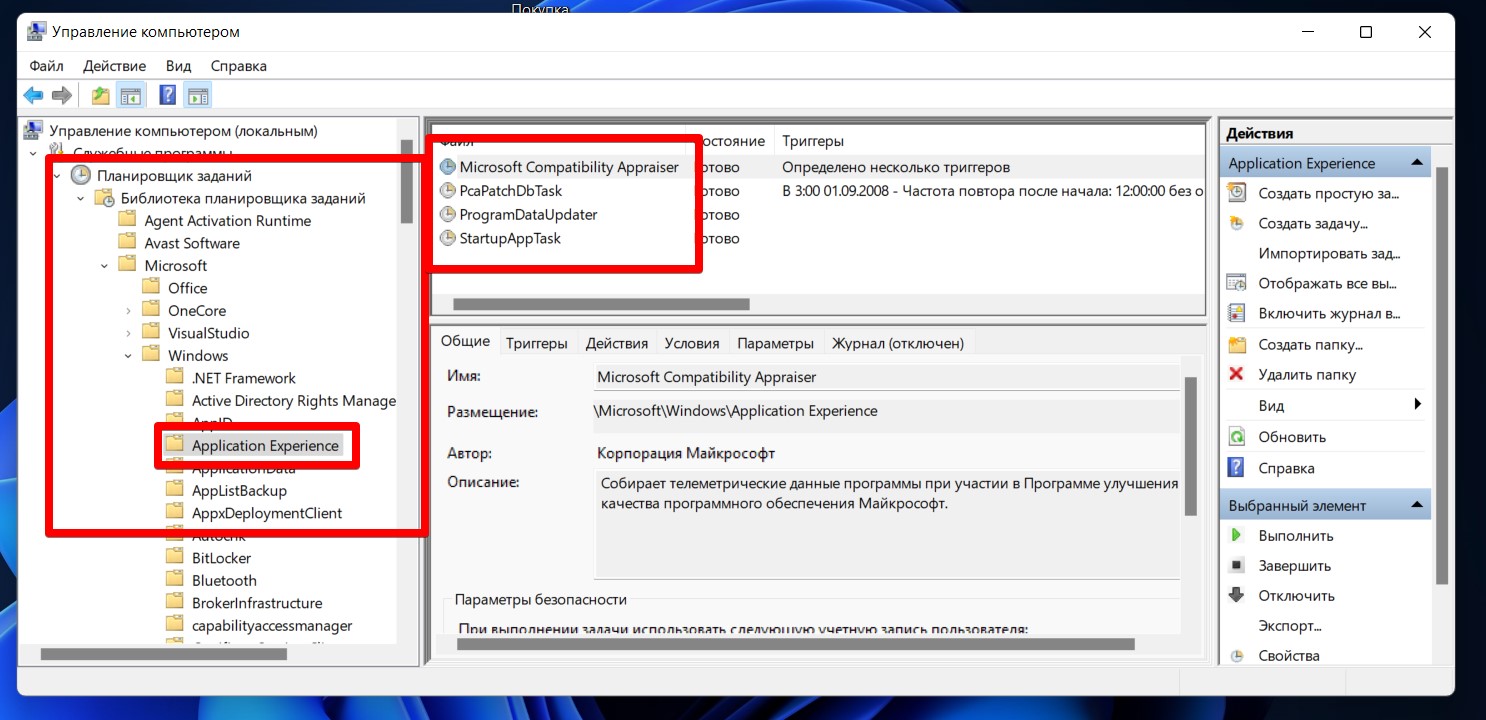
Способ 4 – Управление компьютером
- Запускаем «Управление компьютером» (ищем в поиске Windows).
- Переходим по следующему пути:
Планировщик заданий
Библиотека планировщика заданий
Microsoft
Windows
ApplicationExperience
- В этой папке последовательно щелкаем правой кнопкой мыши по каждой из найденных задач и выбираем «Отключить».
Способ 5 – Сторонние программы
Этот способ, пожалуй, самый удобный для отключения телеметрии, потому что способов ее отключения много, а с обновлениями ее расположение постоянно меняется – следить за этим сложно. Поэтому вполне можно использовать сторонние программы под эту узкую задачу.
Лично я не сторонник использования сторонних программ под узкие задачи – мало ли какая там гадость может быть встроена. Да и с проблемой сбора телеметрии я уже для себя все решил. Но если нужно – возможно, это будет самый удобный способ. Но все на свой страх и риск!
Вот список программ (используем любую):
- Destroy Windows 10 Spying. Открытый исходный код. Сейчас на гитхабе нет ее поддержки, поэтому ссылка на форк – GitHub Форк. А скачать, например, можно здесь.
- O&O ShutUp10. Пожалуй, самая популярная программа. Официальный сайт.
- Ashampoo AntiSpy. Еще один вариант, официальный сайт.
Видео по теме
По умолчанию в Microsoft Windows разных версий есть приложение «Ваш телефон», которое используется в момент подключения смартфона к ПК. Процесс YourPhone.exe не является вирусом, даже несмотря на то, что он может потреблять довольно много ресурсов компьютера без видимых причин. Сервис выполняет роль своеобразного моста между устройствами.
Вариантов здесь несколько. Первый — полностью отключить сервис, если он тянет сильно много ЦП и ОЗУ или он просто не нужен. Можно даже полностью удалить его с ПК. Второй – пытаться исправить службу, если она повреждена. Для этого нужно запускать средство исправления неполадок и сканирование системы через sfc. Поломки процесса встречаются нечасто, преимущественно пользователи просто хотят его отключить для экономии ресурсов ПК. На этом и сконцентрируемся в инструкции.
Отключаем YourPhone.exe
Если сейчас нет потребности в подключении смартфона к компьютеру, можно выключить процесс. Его в любой момент можно будет запустить повторно, но до тех пор, сэкономим немного ОЗУ и ЦП, так как штатно он работает в фоновом режиме.
Для отключения нужно:
- Перейти в «Параметры» сочетанием клавиш Ctrl + I и выбрать пункт «Конфиденциальность».
- Открываем вкладку «Фоновые приложения» и отключаем службу «Ваш телефон».
Удаляем Yourphone.exe
Метод подразумевает полное удаление приложения «Ваш телефон», но для этого нужно использовать командую строку или PowerShell. Просто так встроенную утилиту не удалить.
Пошаговая инструкция:
- Вводим в поисковую строку PowerShell и открываем консоль с правами администратора.
- Вставляем команду Get-AppxPackage Microsoft.YourPhone -AllUsers | Remove-AppxPackage и жмем Enter.
- После непродолжительного ожидания высветится сообщение об успешном завершении процедуры.
Если в будущем снова потребуется программа «Ваш телефон», ее можно установить из магазина Microsoft Store. Поэтому ничего страшного в удалении нет, все действия легко обратимы.
-
Home
-
Partition Manager
- How to Fix Microsoft Windows Search Filter Host High CPU Issue
By Linda | Follow |
Last Updated
What is Microsoft Windows Search Filter Host? Is it safe and how to fix Microsoft Windows Search Filter Host high CPU issue? In this post, MiniTool Partition Wizard offers you 3 ways to solve the problem.
What Is Microsoft Windows Search Filter Host?
Microsoft Windows Search Filter Host is a software component of Microsoft Windows. It is a component of Windows Search Indexer, which is a service that is designed to search and index files on Windows PCs.
Search Indexer is a Windows program for indexing and caching files on Windows PC’s. It allows users to locate files easily and quickly, and its settings can be configured from the Control Panel. Search Filter Host can help users filter the results rendered by the Search Indexer.
SearchFilterHost.exe, the executable file of Microsoft Windows Search Filter Host, is located in the C:WindowsSystem32 folder.
In general, Microsoft Windows Search Filter Host is a legitimate Windows file that does not cause any harm to your PC. However, many users complain that Microsoft Windows Search Filter Host is burning the CPU usage of their computers. If you encounter this problem, too, you can try the following ways to fix it.
8 Useful Solutions to Fix Your CPU 100% in Windows 10
How to Fix Microsoft Windows Search Filter Host High CPU
1. Close Process and Disable Windows Search Service
If Microsoft Windows Search Filter Host is eating a lot of CPU usage when you search something, it’s OK, because this indicates that at this moment the indexing service is working intensively on gathering information and rebuilding the search index.
But if Microsoft Windows Search Filter Host high CPU problem occurs without reasons, you can try closing this process and disabling the Windows Search service.
Here is the tutorial on how to close this process:
- Right-click on the blank area of the taskbar.
- From the menu, choose Task Manager.
- Under the Processes tab, find this process, right-click on it, and choose End task.
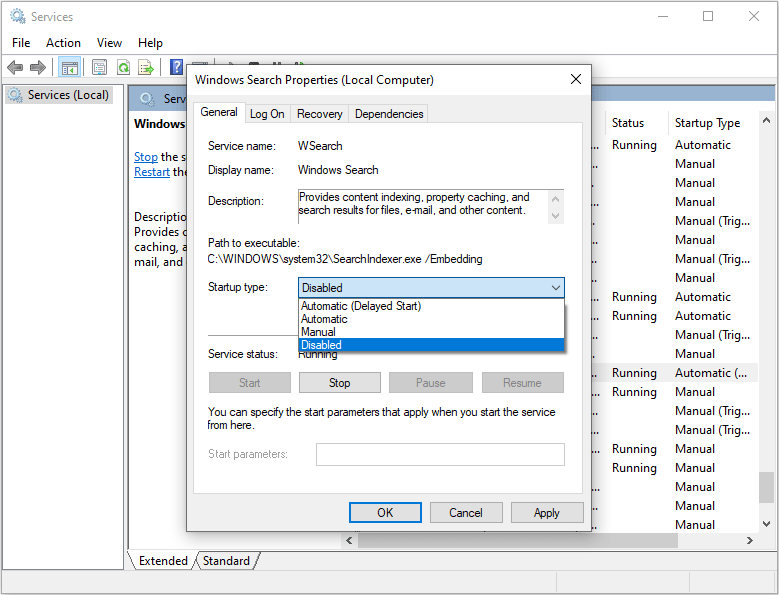
Here is the tutorial on how to disable Windows Search service:
- Press “Windows + R” keys to call out Run
- In the box, type “msc” and then press Enter.
- In the Services window, scroll down to find Windows search service and then right-click on it.
- Choose Properties.
- On the new window, expand Startup type and choose Disabled.
- Click OK
[FIXED] Windows Search Not Working | 6 Reliable Solutions
2. Use Indexer Troubleshooter
Microsoft Windows Search Filter Host is a part of Windows search and indexer. Therefore, you can run indexer troubleshooter to fix issues related to Microsoft Windows Search Filter Host. Here is the tutorial:
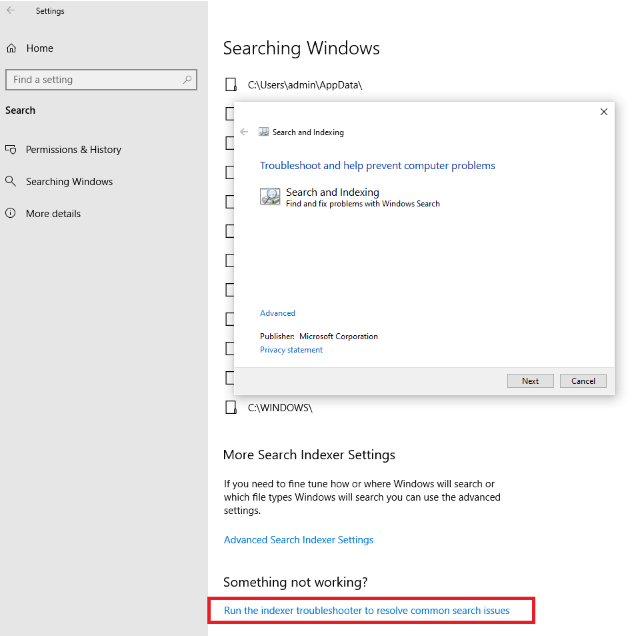
- Press “Windows + X” keys to open Settings
- Navigate to Search > Searching Windows and then scroll to the down of the page to click “Run the indexer troubleshooter to resolve common search issues”.
- Click Next, select the option “Search or indexing is slowing down the computer” and then click Next After that, wait until the Troubleshooter finds and fixes the problems and reboots your computer.
Tip: In some builds, you may not find the Search button in Settings. In this case, you can navigate to Update & Security > Troubleshoot >scroll down to find Search and Indexing. Run this troubleshooter and check “Search or indexing is slowing down the computer” to continue.
3. Rebuild Search Index
If you don’t want to disable Windows Search service, you can try rebuilding it. Here is the tutorial:
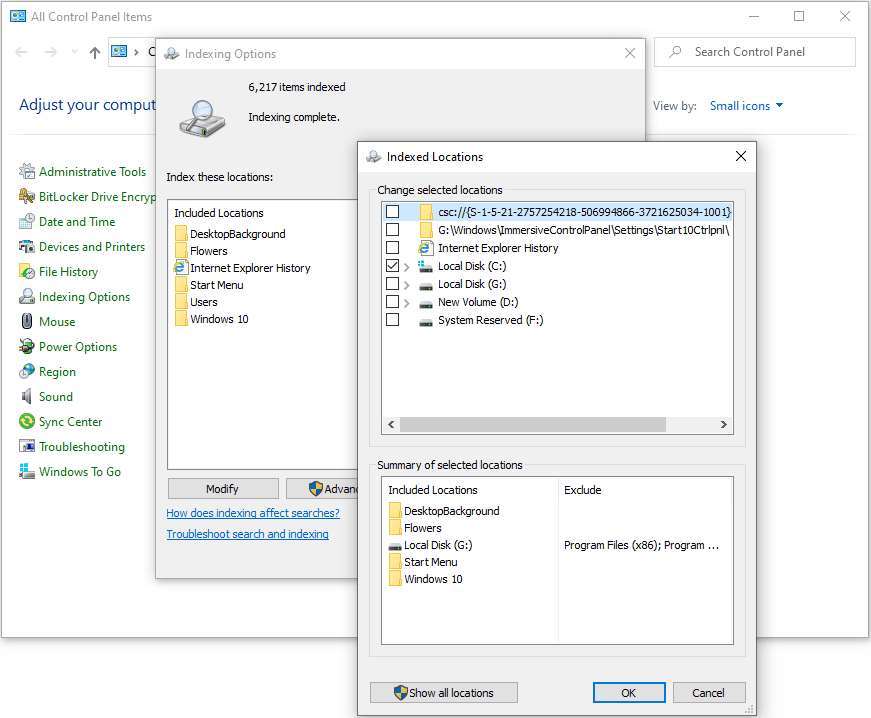
- Open Control Panel and make sure you are in Icons
- Click Indexing options.
- Click Modify
- Remove all the check marks except OS (C:) drive and click OK.
- Click Advanced button and then click Rebuild button under Troubleshooting
- You will see message “Rebuilding the index might take a long time to complete. Some view and search results might be incomplete until rebuilding is finished. “
- Click OK and wait until it completes the rebuilding process.
About The Author
Position: Columnist
Linda has been working as an editor at MiniTool for 5 years. She is always curious about computer knowledge and learns it crazily. Her articles are simple and easy to understand. Even people who do not understand computer can gain something. By the way, her special focuses are disk management, data recovery and PDF editing.