
Найдите файлы в Windows 11 с помощью одного из этих методов.
-
Выполните поиск на панели задач: Введите имя документа (или ключевое слово из него) в поле поиска на панели задач. Появятся результаты для документов на компьютере и в службе OneDrive. Чтобы отфильтровать поиск, перейдите на вкладку Документы , и в результатах поиска будут отображаться только документы.

-
Поиск через проводник. Откройте проводник на панели задач или выберите и удерживайте меню Пуск (или щелкните правой кнопкой мыши), выберите проводник , а затем выберите расположение поиска:
-
Чтобы быстро найти нужные файлы с компьютера и облака, выполните поиск на главной странице.

-
Чтобы найти файлы, хранящиеся в папке, выполните поиск из папки , например Загрузки.
-
Чтобы выполнить медленный, но глубокий поиск, выполните поиск на этом компьютере , а не в разделе Главная.
-
-
Начиная с Windows 11 версии 22H2, файлы можно найти из Office.com в проводник Главная. Чтобы изменить этот параметр, выберите Дополнительные > параметры. На вкладке Общие в разделе Конфиденциальность выберите параметры для параметра Показать файлы из Office.com.
Существуют ли какие-либо улучшения для поиска на компьютерах Copilot+?
Для улучшения результатов поиска Copilot+ PC выполняют семантическую индексацию наряду с традиционной индексацией. Поддерживаемые форматы файлов включают .txt, .pdf, .docx, .doc, .rtf, .pptx, .ppt, .xls, .xlsx для документов и .jpg/.jpeg, .png, .gif, .bmp, .ico для изображений. Семантическое индексирование делает поиск более эффективным, поскольку элементы, которые близки и связаны с поисковыми терминами, также будут включены в результаты поиска. Например, если вы искали паста, вы также можете получить результаты по запросу лазанья, включая изображения, содержащие пасту или лазанью.
Все данные, собранные в результате семантического индексирования, хранятся локально на компьютере. Ничто из этого не отправляется в Майкрософт и не используется для обучения моделей ИИ. Семантическое индексирование включено по умолчанию на Copilot+ PC. Если вы хотите отключить индексацию и поиск определенных местоположений или типов файлов, вы можете сделать это, выбрав соответствующие параметры в разделе Настройки > Конфиденциальность и безопасность > Поиск в Windows > Расширенные возможности индексации.
Примечания:
-
Улучшенный поиск Windows теперь доступен в предварительной версии для Copilot+ PC через Программу предварительной оценки Windows. Дополнительные сведения см. в статье Предварительный просмотр улучшенного Windows Search на Copilot+ PC с участниками программы предварительной оценки Windows на канале Dev.
-
Для улучшения Windows Search на Copilot+ PC рекомендуется подключить Copilot+ PC для завершения начальной индексации поиска. Проверить состояние индексации поиска можно в разделе Настройки > Конфиденциальность и безопасность > Поиск в Windows.
Приверженность корпорации Майкрософт ответственному использованию ИИ
Майкрософт работает над ответственным развитием ИИ с 2017 года, когда мы впервые определили наши принципы в области ИИ, а затем ввели в действие наш подход с помощью Стандарта ответственного применения ИИ. Конфиденциальность и безопасность — главные принципы для нас при разработке и развертывании систем ИИ. Мы работаем над тем, чтобы помочь нашим клиентам ответственно использовать наши продукты ИИ, делимся накопленным опытом и строим доверительные партнерские отношения. Дополнительные сведения о наших усилиях в области ответственного применения ИИ, принципах, которыми мы руководствуемся, а также об инструментах и возможностях, которые мы создали для обеспечения ответственной разработки технологий ИИ, см. в разделе Ответственное применение ИИ.
Все способы:
- Поиск файлов по содержимому в Виндовс 10
- Способ 1: Сторонние программы
- Способ 2: Поиск через «Пуск»
- Вопросы и ответы: 18
Для многих пользователей основным местом хранения практически любой электронной информации является жесткий диск в компьютере или флешка. Со временем данных может накапливаться большое количество и даже качественная сортировка и структуризация могут не помочь — без дополнительной помощи отыскивать нужное станет сложно, особенно когда помнишь содержимое, но не помнишь имя файла. В Windows 10 есть сразу два варианта того, как искать файлы по их отрывку.
Поиск файлов по содержимому в Виндовс 10
В первую очередь с данной задачей ассоциируются обычные текстовые файлы: мы сохраняем на компьютере различные заметки, интересные сведения из интернета, рабочие/учебные данные, таблицы, презентации, книги, письма из почтового клиента и многое другое, что можно выразить текстом. Помимо этого по содержимому можно искать и узконаправленные файлы — сохраненные страницы сайтов, код, хранящийся к примеру, в расширении JS и др.
Способ 1: Сторонние программы
Обычно функциональности встроенного поисковика Windows достаточно (о нем мы рассказали в Способе 2), но сторонние программы в ряде случаев будут приоритетнее. К примеру, настройка параметров расширенного поиска в Виндовс устроена таким образом, что вы делаете ее один раз и надолго. Вы также можете выставить поиск по всему накопителю, но при большом количестве файлов и объемном жестком диске процесс иногда замедляется. То есть гибкости системой не предусмотрено, сторонние же программы позволяют каждый раз искать по новому адресу, сужая критерии и используя дополнительные фильтры. К тому же такие программы часто выступают небольшими файловыми помощниками и имеют расширенные возможности.
В этот раз мы рассмотрим работу простой программы Everything, поддерживающей поиск на русском языке локально, на внешних девайсах (HDD, флешка, карта памяти) и на серверах FTP.
Скачать Everything
- Скачайте, установите и запустите программу обычным способом.
- Для обычного поиска по названию файла достаточно воспользоваться соответствующим полем. При параллельной работе с другим ПО результаты будут обновляться в режиме реального времени, то есть если вы сохранили какой-то файл, соответствующий введенному имени, он тут же добавится в выдачу.
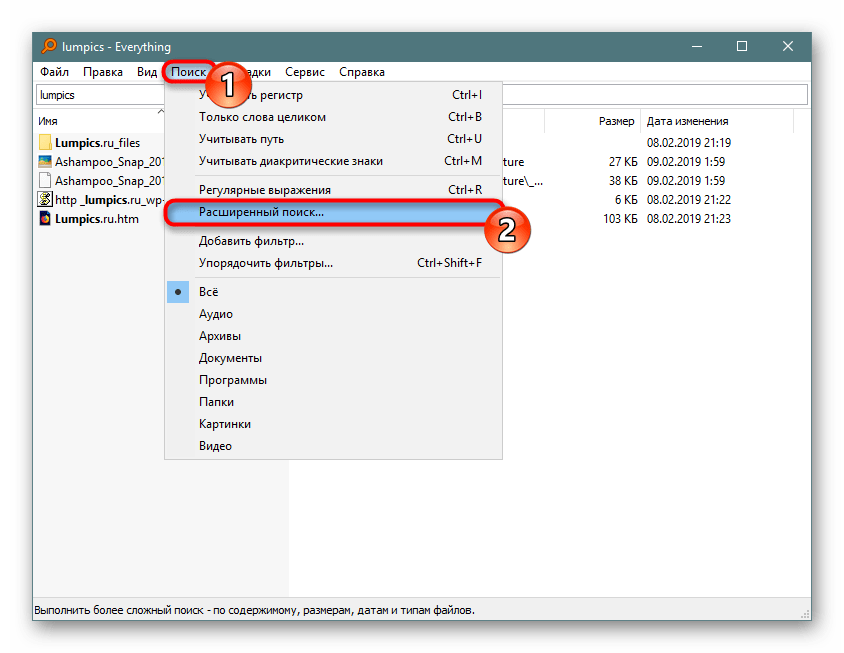
- Для поиска по содержимому переходим в «Поиск» > «Расширенный поиск».
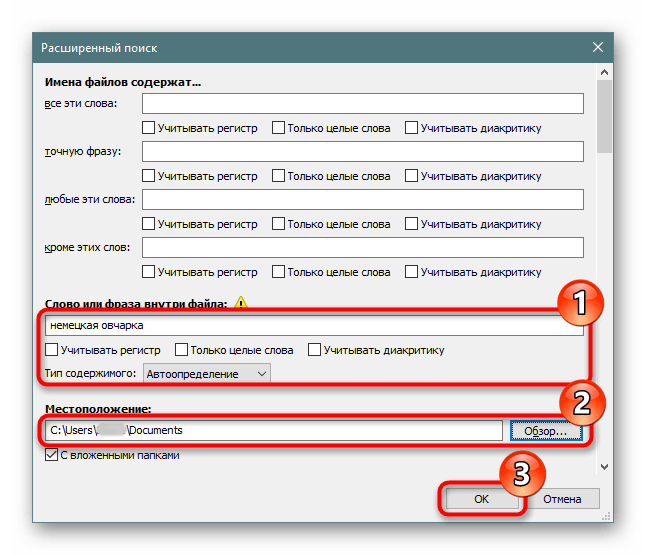
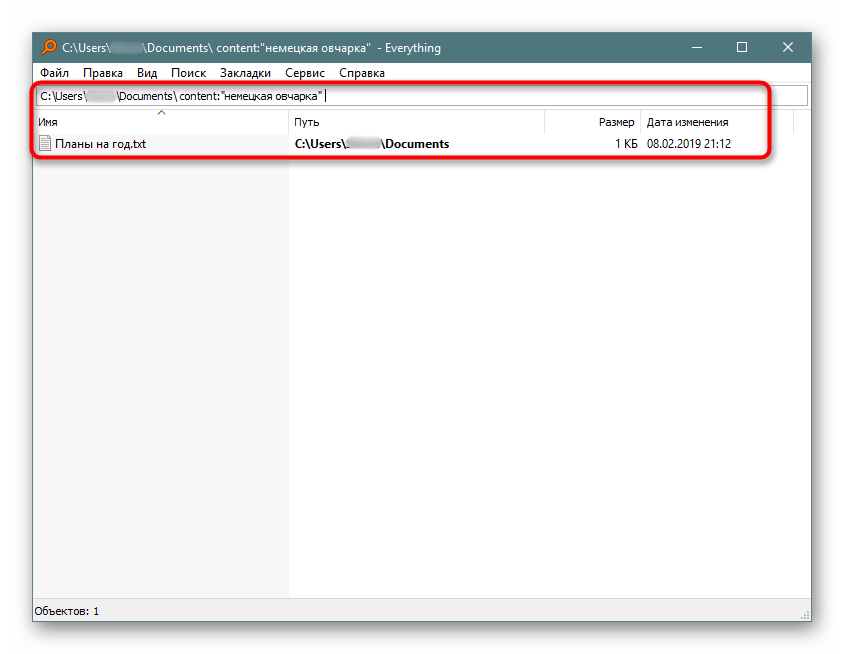
- В поле «Слово или фраза внутри файла» вписываем искомое выражение, при необходимости настроив дополнительные параметры типа фильтра по регистру. Чтобы ускорить процесс поиска, можете также сузить область проверок, выбрав конкретную папку или приблизительную область. Этот пункт желателен, но необязателен.
- Появится результат, соответствующий заданному вопросу. Вы можете открыть каждый найденный файл двойным кликом ЛКМ или вызвать его стандартное контекстное меню Windows, нажав ПКМ.
- Кроме того, Everything справляет с поиском специфического контента, как, например, скрипта по строчке его кода.

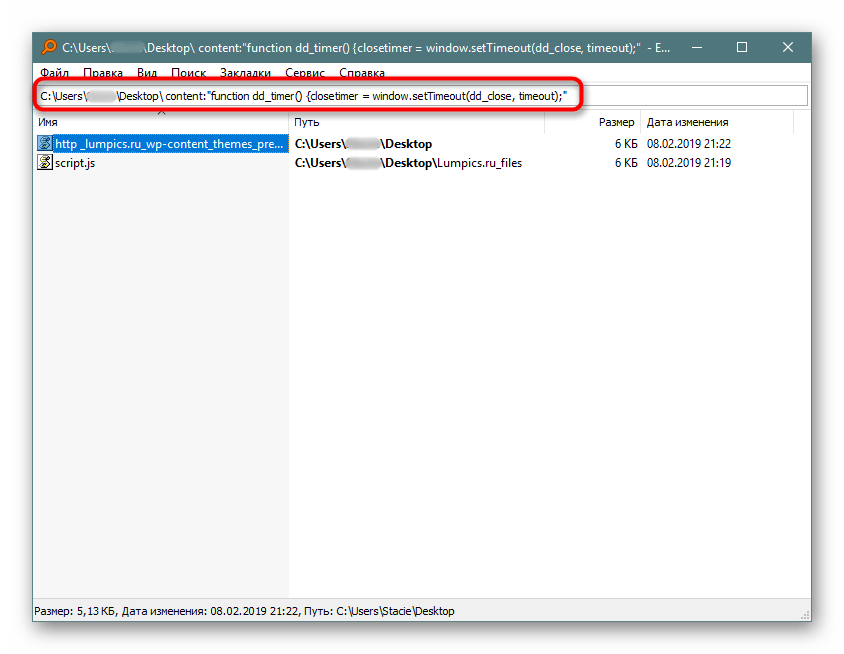
Остальные возможности программы вы можете узнать из нашего обзора программы по ссылке выше или самостоятельно. В целом это очень удобный инструмент, когда требуется быстро искать файлы по их содержимому, будь то встроенный накопитель, внешний диск/флешка или FTP-сервер.
Если работа с Everything не подходит, ознакомьтесь со списком других похожих программ по ссылке ниже.
Читайте также: Программы для поиска файлов на компьютере
Способ 2: Поиск через «Пуск»
Меню «Пуск» в десятке было улучшено, и сейчас оно не такое ограниченное, как было в прошлых версиях этой операционной системы. Используя его, можно отыскать нужный файл в компьютере по его содержимому.
Для того чтобы этот способ был рабочим, необходима включенная расширенная индексация на компьютере. Поэтому первым делом разберем, как ее активировать.
Включение службы
У вас должна быть запущена служба, отвечающая за поиск в Виндовс.
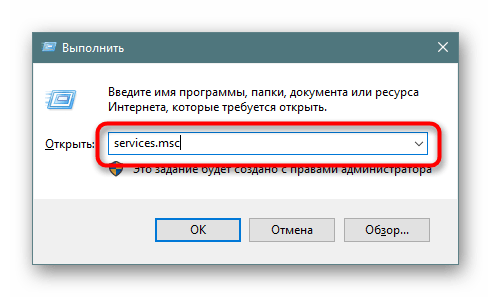
- Чтобы это проверить и при необходимости изменить ее статус, нажмите Win + R и в поисковое поле впишите
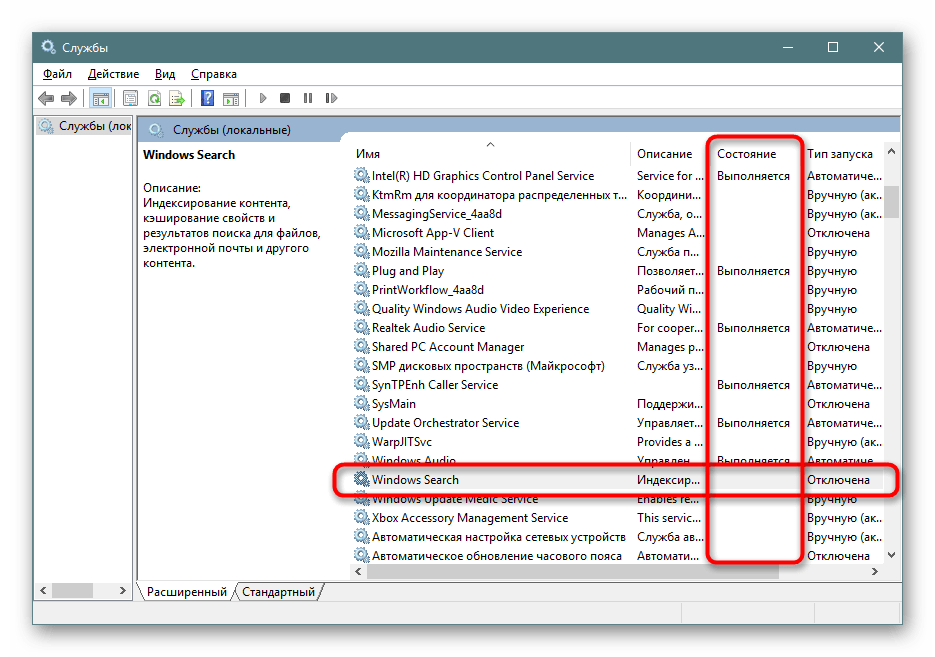
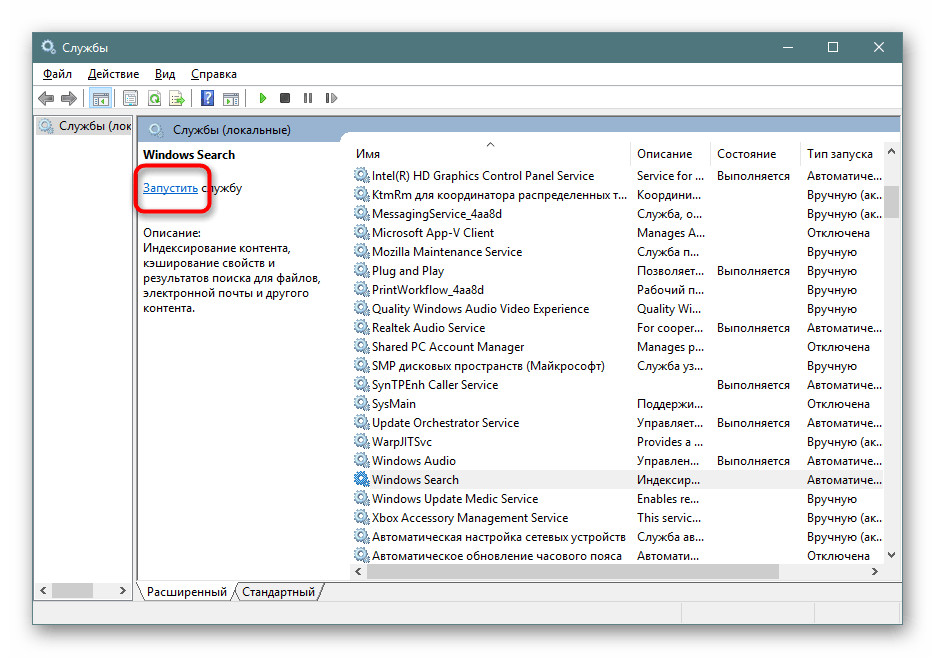
services.msc, затем нажмите Enter. - В списке служб отыщите «Windows Search». Если в колонке «Состояние» статус «Выполняется», значит она включена и дальнейшие действия не требуются, окно можно закрыть и переходить к следующему этапу. Тем, у кого она отключена, нужно ее запустить вручную. Для этого нажмите два раза по службе левой кнопкой мыши.
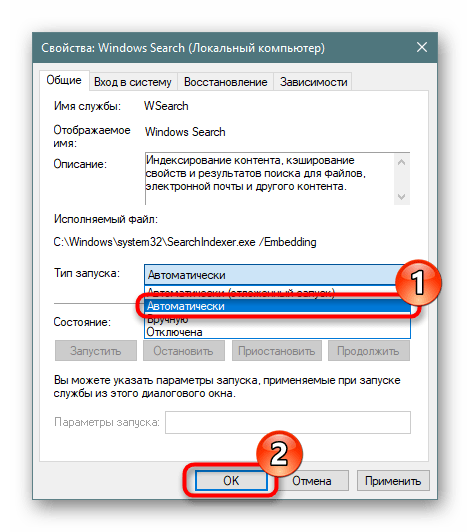
- Вы попадете в ее свойства, где «Тип запуска» смените на «Автоматически» и нажмите «ОК».
- Вы можете «Запустить» службу. Статус в столбце «Состояние» не сменится, однако если вместо слова «Запустить» вы увидите ссылки «Остановить» и «Перезапустить», значит включение произошло успешно.
Включение разрешения индексации на жестком диске
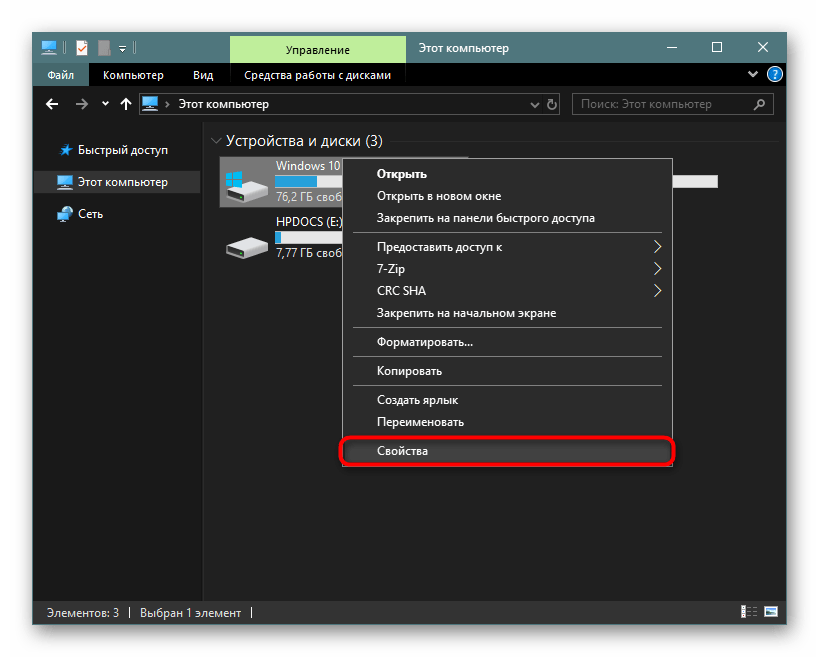
Жесткий диск должен иметь разрешение на индексацию файлов. Для этого открываем «Проводник» и переходим в «Этот компьютер». Выбираем тот раздел диска, на котором планируется совершать поиск сейчас и в будущем. Если таких разделов несколько, выполните дальнейшую настройку поочередно со всеми ними. При отсутствии дополнительных разделов работать будем с одним — «Локальный диск (С:)». Жмем правой кнопкой мыши по иконке и выбираем «Свойства».
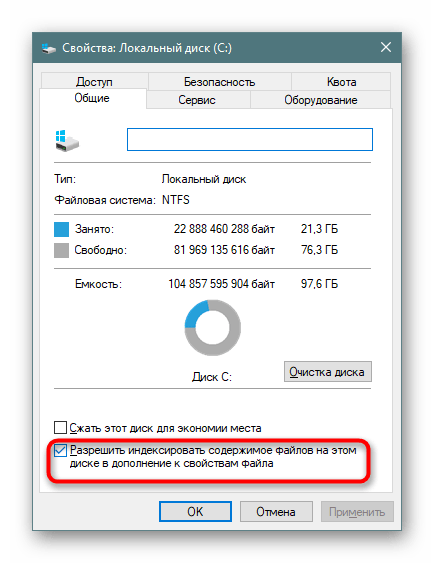
Убедитесь, что галочка рядом с пунктом «Разрешить индексирование…» установлена или поставьте ее самостоятельно, сохранив изменения.
Настройка индексации
Теперь остается включить расширенную индексацию.
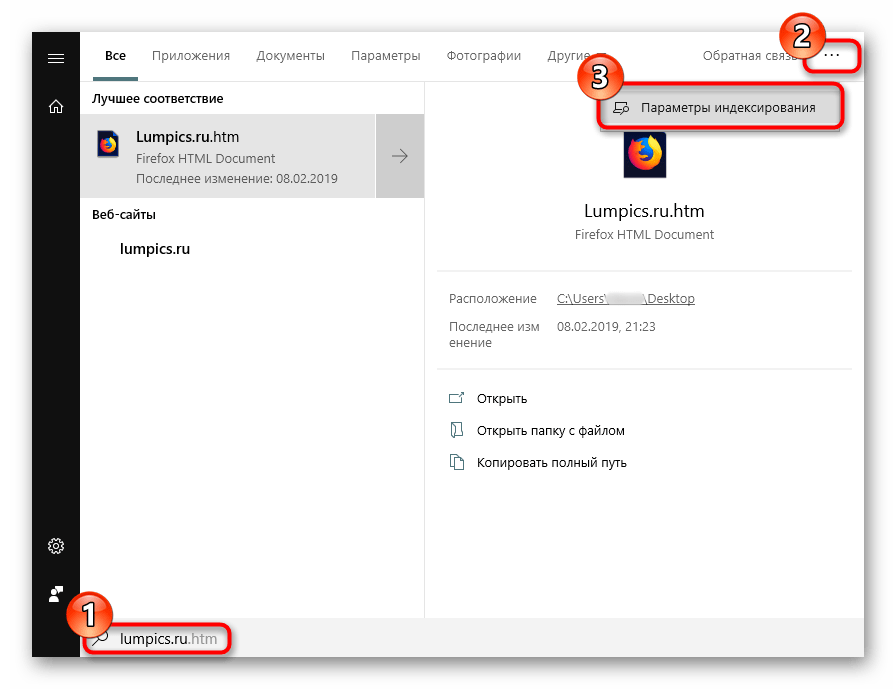
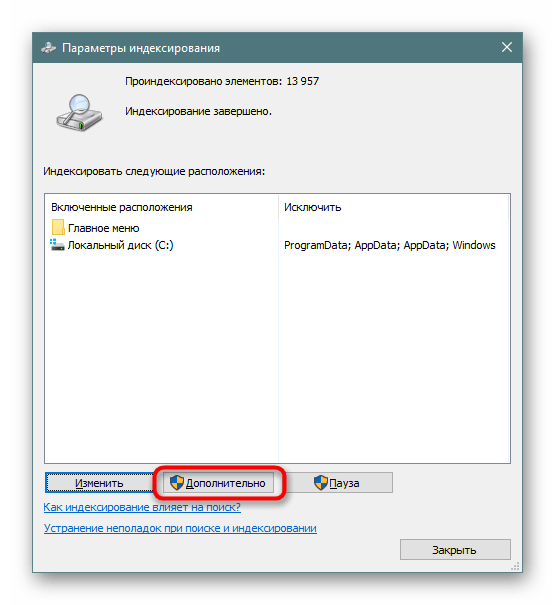
- Открываем «Пуск», в поисковом поле пишем что угодно, чтобы запустить меню поиска. В правом верхнем углу жмем по троеточию и из выпавшего меню кликаем на единственный доступный вариант «Параметры индексирования».
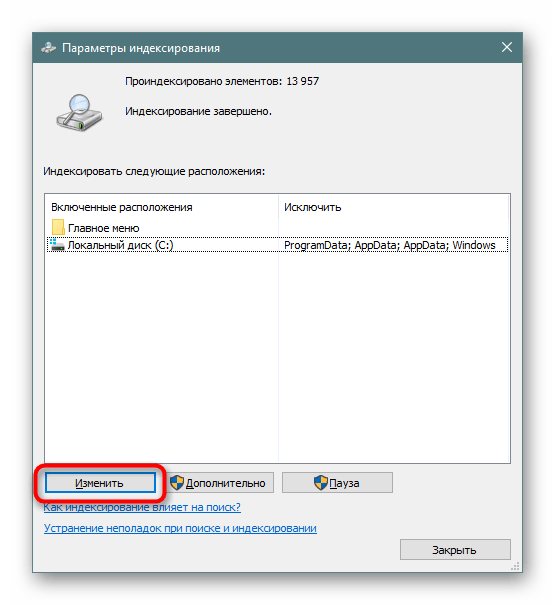
- В окне с параметрами первым делом добавим место, которое будем индексировать. Их может быть несколько (например, если вы хотите индексировать папки выборочно или несколько разделов жесткого диска).
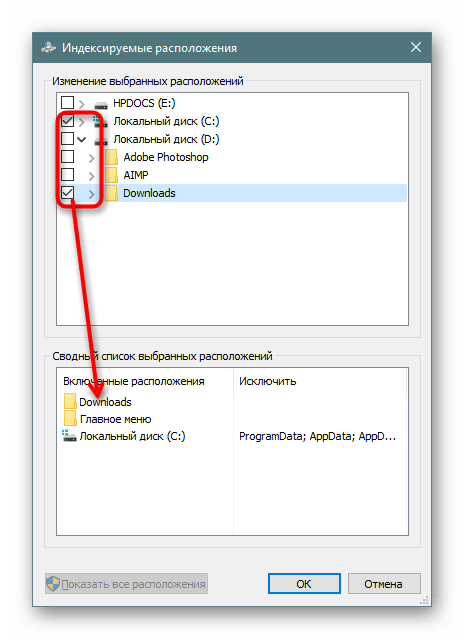
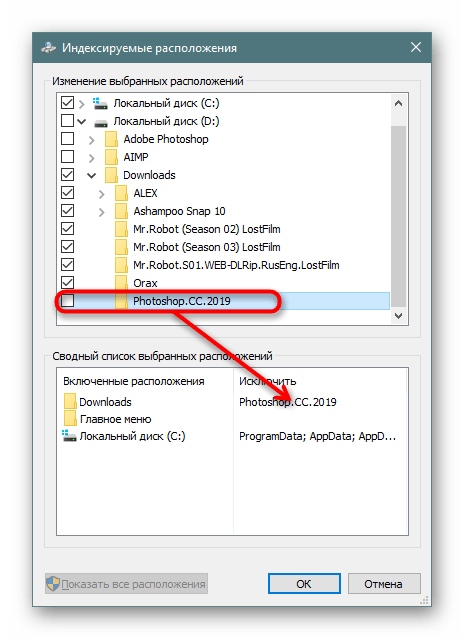
- На скриншоте ниже видно, что для индексирования добавлена одна лишь папка «Downloads», которая находится на разделе (D:). Все те папки, что не были отмечены галочками, индексироваться не будут. По аналогии с этим вы можете настроить раздел (C:) и другие, если таковые имеются.
- В колонку «Исключения» попадают папки внутри папок. Например, в папке «Downloads» снятая галочка с подпапки «Photoshop» добавила ее в список исключений.
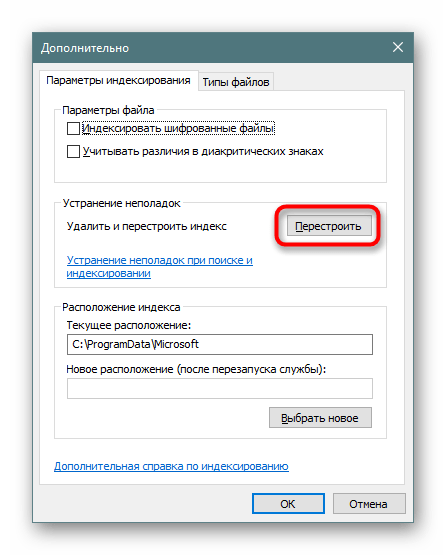
- Когда вы детально настроили все места индексирования и сохранили результаты, в прежнем окне нажмите кнопку «Дополнительно».
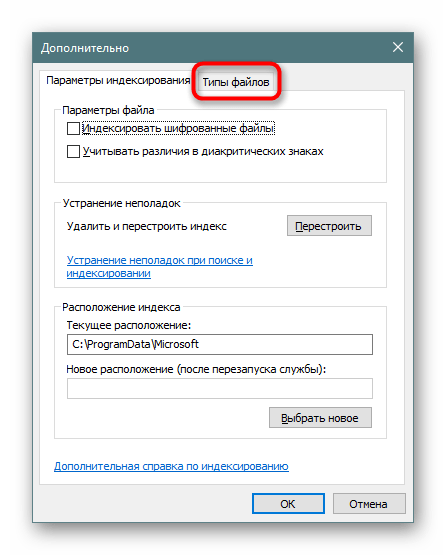
- Переходим на вкладку «Типы файлов».
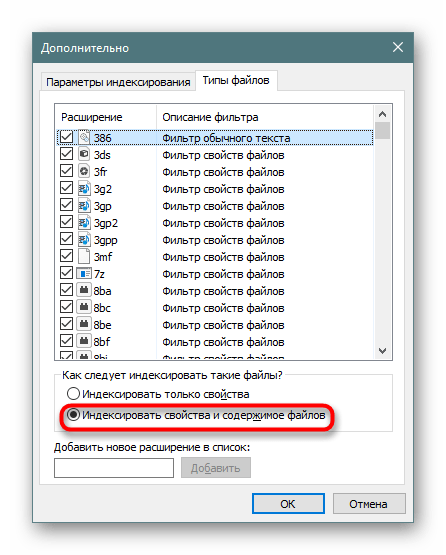
- В блоке «Как следует индексировать такие файлы?» переставляем маркер на пункт «Индексировать свойства и содержимое файлов», жмем «ОК».
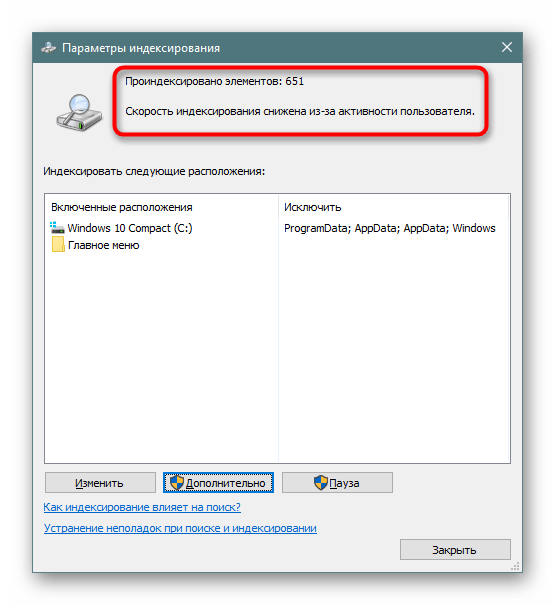
- Будет начато индексирование. Цифра обработанных файлов обновляется где-то раз в 1-3 секунды, а общая продолжительность зависит лишь от того, какой объем информации предстоит проиндексировать.
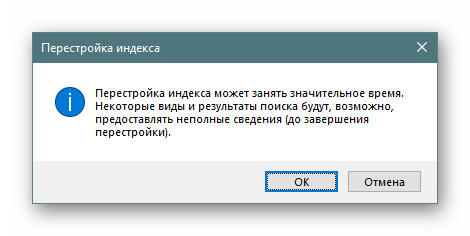
- Если по какой-то причине процесс не запускается, снова зайдите в «Дополнительно» и в блоке «Устранение неполадок» щелкните на «Перестроить».
- Согласитесь с предупреждением и дождитесь, когда в окне будет написано «Индексирование завершено».
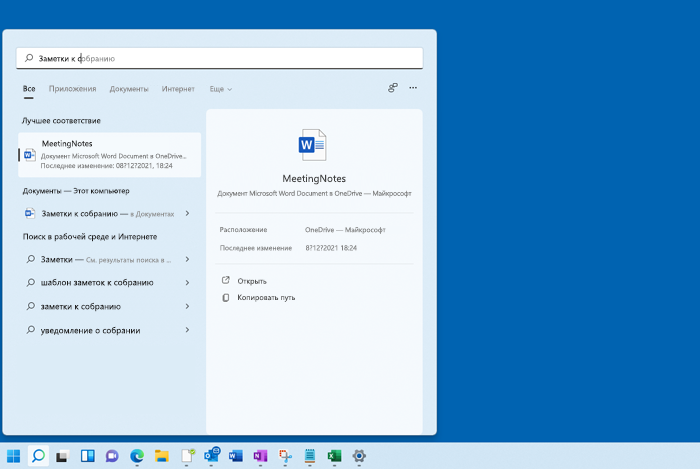
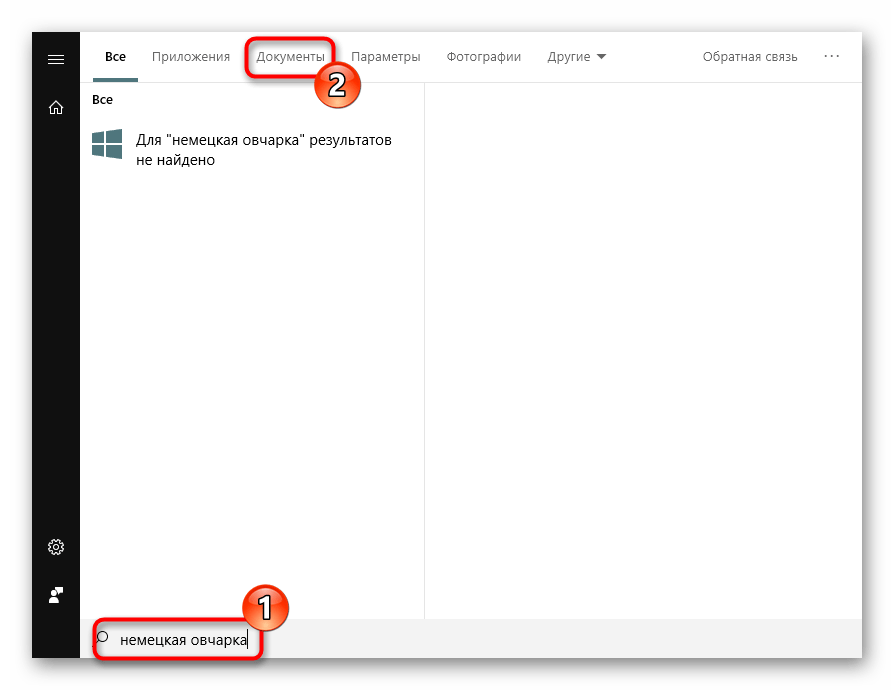
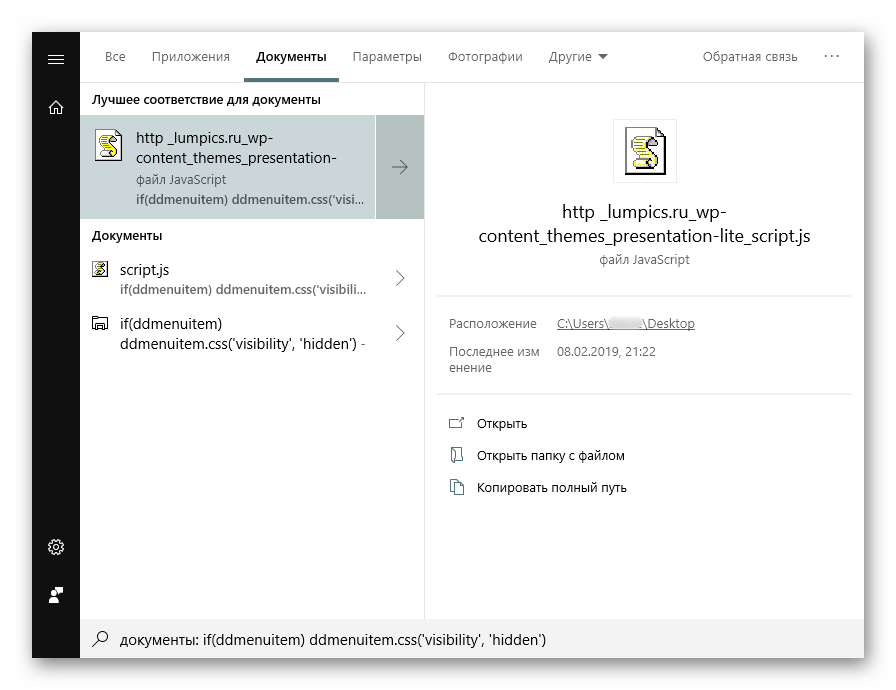
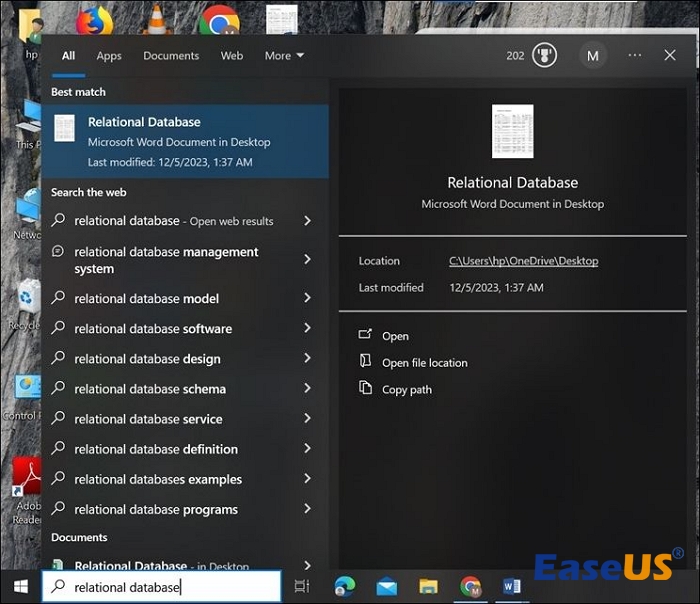
- Все лишнее можно закрыть и попробовать работу поиска в деле. Открываем «Пуск» и пишем фразу из какого-нибудь документа. После этого на верхней панели переключаем тип поиска с «Все» на подходящий, в нашем примере на «Документы».
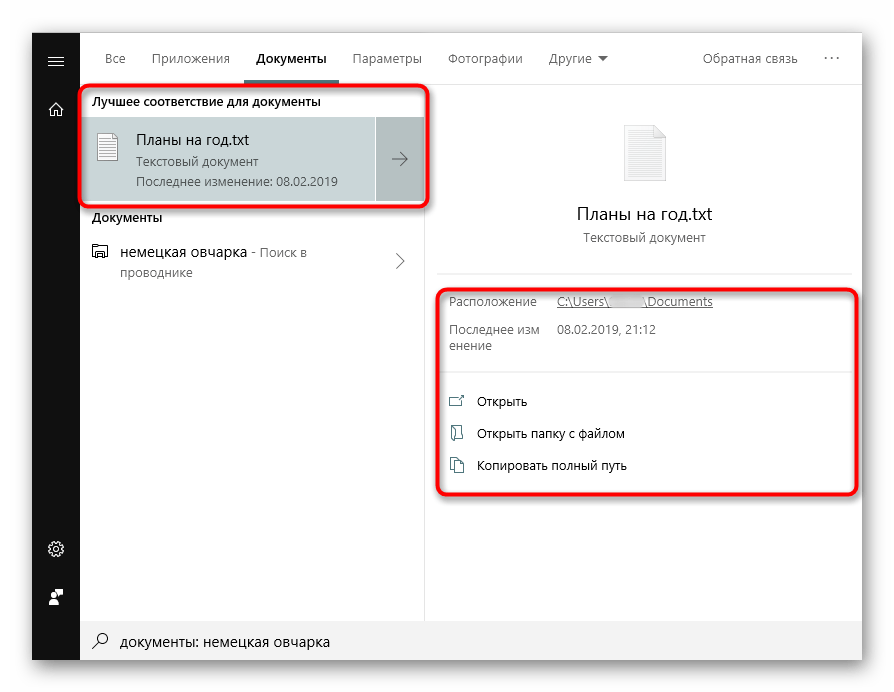
- Результат на скриншоте ниже. Поисковик отыскал вырванную из текстового документа фразу и нашел ее, предоставив возможность открыть файл, отобразив его расположение, дату изменения и другие функции.
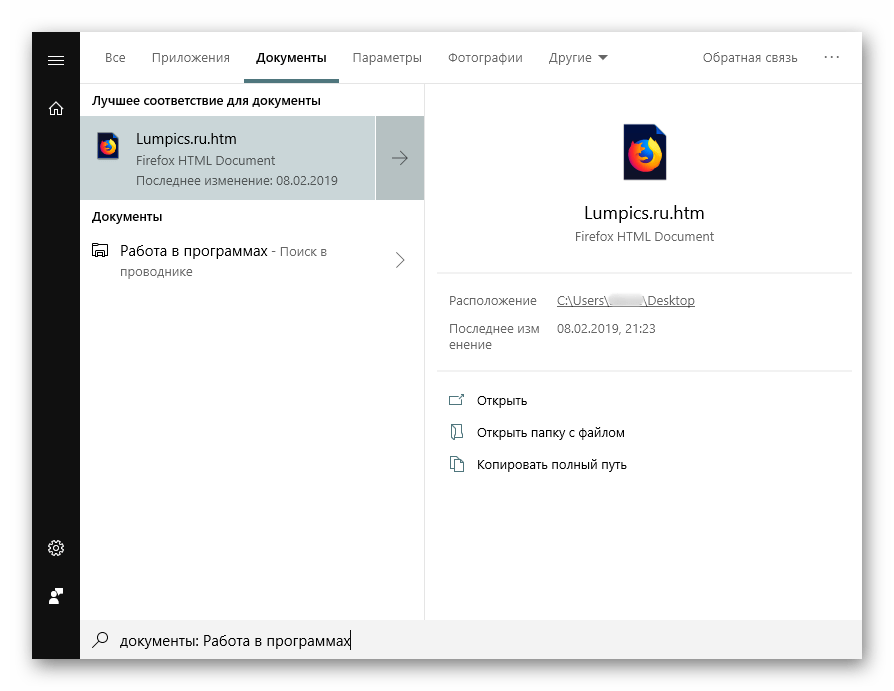
- Помимо стандартных офисных документов Windows умеет искать и по более специфическим файлам, например, в JS-скрипте по строчке кода.

Или в HTM-файлах (обычно это сохраненные страницы сайтов).
Напоминаем, что здесь надо выбирать те места, в которых вы планируете совершать поиск в дальнейшем. Если выбирать сразу весь раздел, в случае с системным будут исключены самые важные его папки. Это сделано и в целях безопасности, и для сокращения времени ожидания поиска. Все остальные настройки касательно индексируемых мест и исключений при желании настройте самостоятельно.
Конечно, полный список файлов, которые поддерживает поисковик десятки, куда больше, и показывать все примеры не имеет смысла.
Теперь вы знаете, как оптимизировать поиск по содержимому в Windows 10. Это позволит сохранять больше полезной информации и не теряться в ней, как прежде.
Наша группа в TelegramПолезные советы и помощь
Эти трюки помогут найти любые файлы и папки, отфильтровать результаты поиска и добраться до нужных настроек.
Windows 10 обладает неплохим встроенным поиском, которым почему-то мало кто пользуется. Между тем это действительно крутой инструмент, который пригодится, если вы не очень аккуратно сортируете свои файлы по папкам. Да и вообще зачастую открывать документы поиском просто быстрее, чем проходить полный путь к файлу.
Есть два способа начать искать файлы. Вы можете щёлкнуть значок поиска (лупа) на панели задач. Либо просто откройте меню «Пуск» и начните вводить поисковой запрос.
Вот несколько трюков, которые помогут искать быстро и эффективно.
Фильтрация результатов поиска

Начните искать файлы, приложения и настройки как обычно. Затем нажмите на один из трёх значков в верхней части меню «Пуск», которые отфильтровывают приложения, документы и веб-страницы соответственно.
Ещё вы можете нажать на кнопку «Фильтры» сверху, чтобы указать, что искать: папки, музыку, фотографии, настройки или видео.
Простой поиск настроек

Один из недостатков Windows 10 — неочевидность настройки. Будучи смесью Windows 7 и Windows 8, «десятка» с момента релиза запутала многих пользователей наличием сразу двух панелей управления. Настройки в них разбросаны не особо логично, и в них легко потеряться.
Но поиск Windows 10 облегчает навигацию в настройках. Если вам нужен какой-то отдельный пункт, просто начните вводить его в меню «Пуск», и соответствующая опция найдётся. Неважно, в какой из двух панелей управления она расположена.
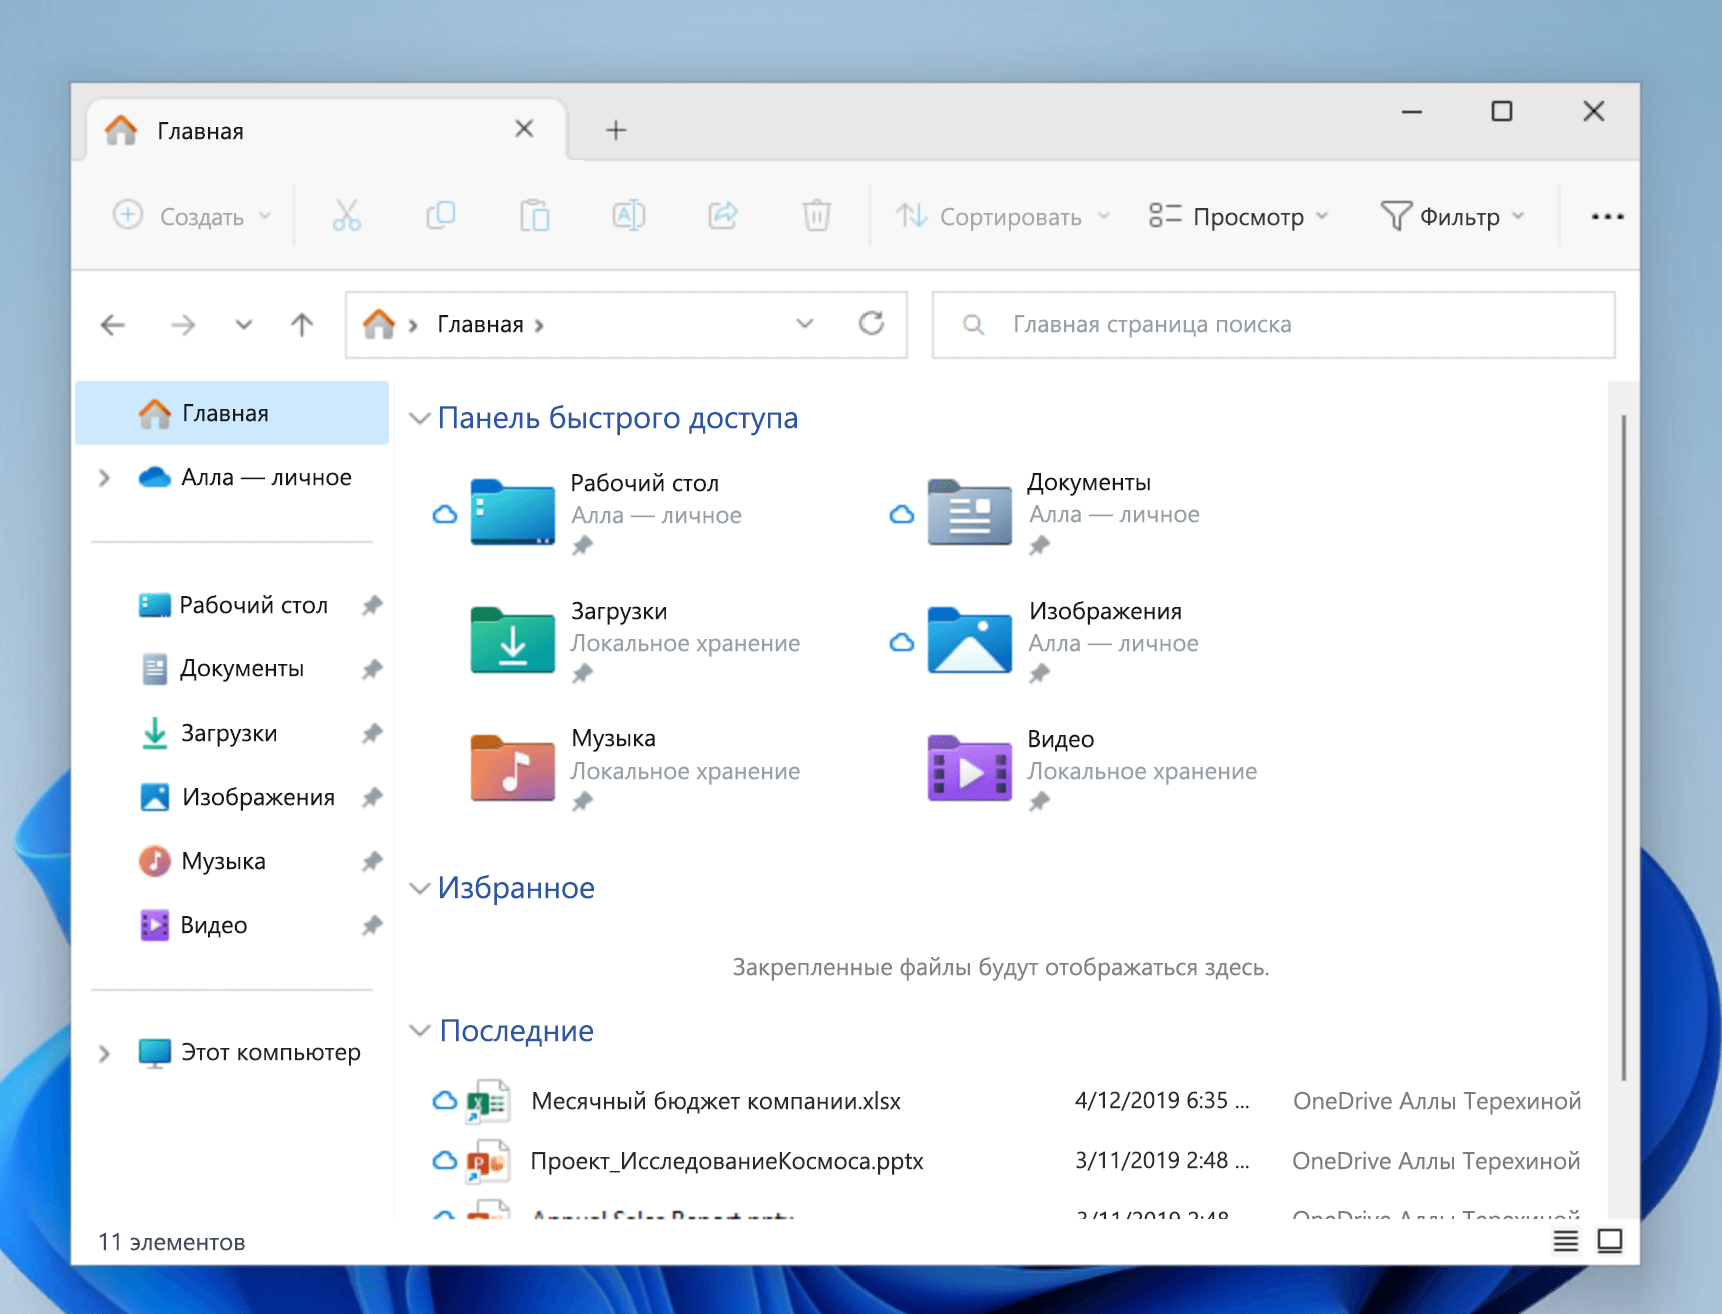
Поиск в «Проводнике»

В «Проводнике» Windows 10, как и в прошлых версиях, есть панель для быстрого поиска файлов и папок. Введите имя файла или папки, и Windows 10 найдёт их. Панель поиска также позволяет отсортировать найденные файлы по типу, размеру, времени изменения и другим параметрам. И в «Проводнике» есть ещё крутая возможность — сохранить поисковой запрос на будущее, как умную папку. Для этого просто нажмите «Сохранить условие поиска».
Нечёткий поиск

Если вы хотите найти что-то, но не знаете, что именно, вам поможет способность поиска Windows 10 угадывать слова в поиске. Для этого используются специальные подстановочные символы.
- * — подстановочный знак, который заменяет один или несколько символов в поисковом выражении на любые возможные. Предположим, что вы вводите кот*. Windows 10 найдёт файлы, содержащие слова коты, который, котёл и так далее.
- ? — позволяет искать только один пропущенный символ. Например, по запросу к?т система найдёт и кот, и кит.
- # — используется для поиска любого числа. Например, 5#3 найдёт файлы, содержащие числа 513, 573 и так далее.
Поиск файла по его свойствам
Предположим, вы хотите найти файл, имя которого не знаете, но помните его формат, размер или время, когда вы создали или в последний раз изменяли этот файл. Начните поиск любых файлов запросом *, а затем в настройках фильтрации поиска укажите формат или временной диапазон, примерно соответствующий искомому файлу. Вы можете выполнять поиск по таким свойствам, как дата, тип файла, автор и так далее.
Заметьте, что когда вы меняете условия поисковых фильтров на панели, в строке поиска появляются непонятные слова. Вот что они значат:
- kind — тип файла. Можете ввести kind:document или kind:video, чтобы искать документы и видео соответственно.
- tags — теги, которыми пометили файл. Вы не пользуетесь тегами в Windows 10? Зря. Пометьте нужные файлы тегами, а затем отыскивайте их запросами вроде tags:работа или tags:прочитать.
- author — имя пользователя, создавшего файл. Например, вы уверены, что ваша жена по имени Офелия, с которой вы пользуетесь одним компьютером, создала какой-то файл, который вам нужен. Введите author: Ophelia, и вы увидите все созданные ею файлы, к которым у вас есть доступ. Главное, напишите правильно имя её учётной записи.
Выражения «и», «или», «нет»
Эти выражения позволят вам использовать несколько условий поиска одновременно.
- AND (и) — ищет несколько слов или фраз, которые присутствуют в одном файле. Например, запрос коты AND собаки найдёт для вас файлы, в которых говорится и о котах, и о собаках.
- OR (или) — ищет файлы, в которых присутствуют хотя бы некоторые слова и выражения. Запрос коты OR собаки OR хомячки найдёт все файлы, в которых упомянуты или коты, или собаки, или хомячки.
- NOT (нет) — ищет файлы, в которых нет упомянутого выражения. Например, запрос Heavy Metal NOT Justin Bieber найдет для вас документы или музыку, относящихся к хеви-металлу и не содержащих даже малейших намёков на Джастина Бибера.
- «» — ищут файлы, содержащие некую точную фразу. Например, поиск «коты и собаки» найдёт именно файл коты и собаки, а не бешеные коты и терпеливые собаки.
- () — ищут слова, которые могут располагаться в файле в любой последовательности. То есть запрос (коты собаки хомячки) найдёт и хомячки коты собаки, и собаки коты хомячки.
- > и < — ищут файлы с неточно указанными величинами. Например, date:>01/01/2018 найдёт все файлы, созданные после первого числа января этого года. size:<10MB найдёт файлы меньше 10 МБ.
Теперь, когда вы знаете о поиске Windows 10 всё, можете быть уверены, что никогда не потеряете свои файлы.
When using Windows 10, users may encounter the issue of not being able to locate important files. Navigating through each folder to find files in Windows 10 might be difficult at times. Thus, understanding the numerous techniques on how to search for files in Windows 10 is important.
In this article, we’ll look at the causes of files suddenly disappearing in Windows 10, give thorough lessons on utilizing Windows 10’s search tools, present users with recovery software like EaseUS Data Recovery Wizard, and provide extra suggestions for Windows 11 users about effective file searches. Let’s delve into further details!
Imagine that your important files go missing, and you cannot find them even after navigating through each folder. This section will walk you through three efficient ways on how to search for files in Windows 10:
Fix 1. Search for Lost Files with Recovery Software
EaseUS Data Recovery Wizard is a dependable and powerful tool for recovering lost information on Windows 10. Get the free trial by clicking the following buttons now!
This program comes in handy in various scenarios, especially in recovering deleted files in Windows 10. It can deal with the files missing in Windows 10 problem easily with its powerful scan technology. What distinguishes EaseUS is its user-friendly design combined with solid recovery mechanisms, which ensures a trouble-free experience for users of all levels to fix files missing in Windows 10.
EaseUS can recover deleted folders and supports various file formats, from images and documents to movies and more, providing a complete solution for various recovery requirements. Check the following guide to search for files in Windows 10 with EaseUS.
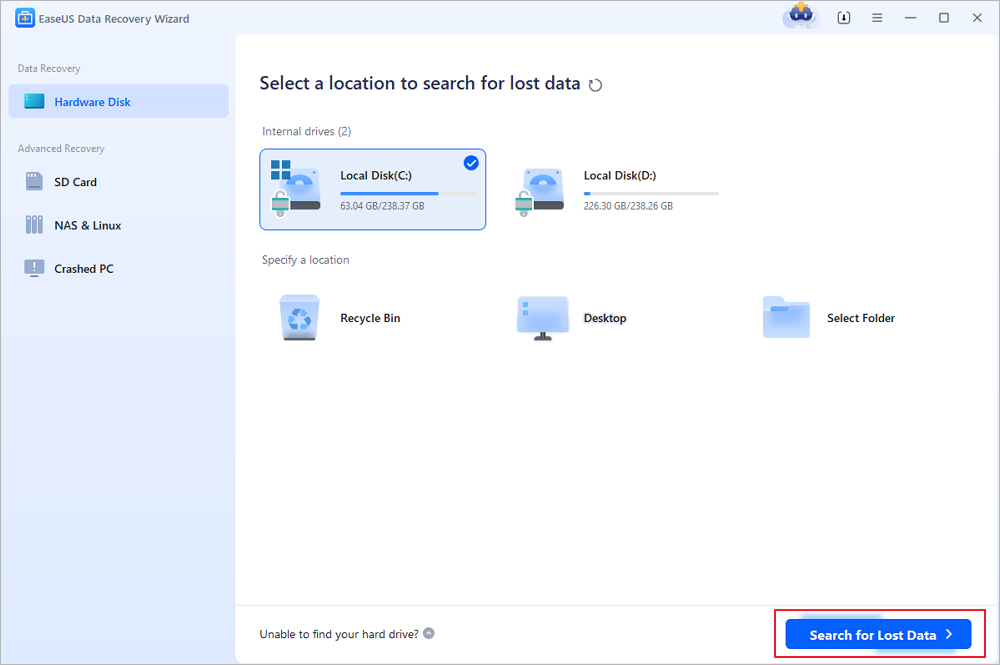
Step 1. Download and launch this useful tool and select a disk to scan for files. You can also choose a folder to scan for missing files in Windows 10.
Step 2. If you think searching for files in the path is too hard, you can click «Type» to locate a specific file type quickly. For example, you can choose «Pictures», and all the photos will appear and be organized in file formats.

Step 3. You can preview the file to confirm. Finally, click «Recover» to restore these selected files to Windows 10 again.

Consider leveraging the tremendous powers of EaseUS Data Recovery Wizard as you begin on the path to recovering your lost files in Windows 10. Share this guide on social media to assist others in easily overcoming their data recovery issues.
Fix 2. Use the Search Bar to Search for Files
The search bar in Windows 10 is a useful feature for swiftly finding files. Mastering its functions will considerably increase your efficiency in searching for documents, programs, and other file formats.
Follow the steps below to locate files in Windows 10 using the search bar feature:
Step 1. Click the Search Bar box located in the taskbar at the bottom-left of the screen.
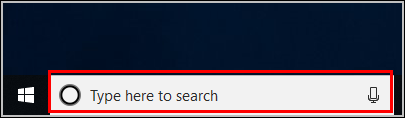
Step 2. Type the program, document, or file name into the search field.
Step 3. As you enter, search results refresh dynamically. Click your selected file in the results to open and access it easily.
Find solutions from the following passage if the Windows 10 search box is not working:
[FIXED] Windows 10 Search Bar Not Working
If you’re looking for how to fix the search bar that’s not working in Windows 11/10, you’ve come to the right place. Read more >>
Fix 3. Find Files in the File Explorer
File Explorer is a sophisticated file management application, and knowing its search capabilities may change how you navigate through your system. Dive into File Explorer’s depths to discover its strong search tools and save your time while locating files.
Learn how to browse, organize, and find files using File Explorers — follow the steps below:
Step 1. Open the folder you want to investigate or use the taskbar search bar to find File Explorer.
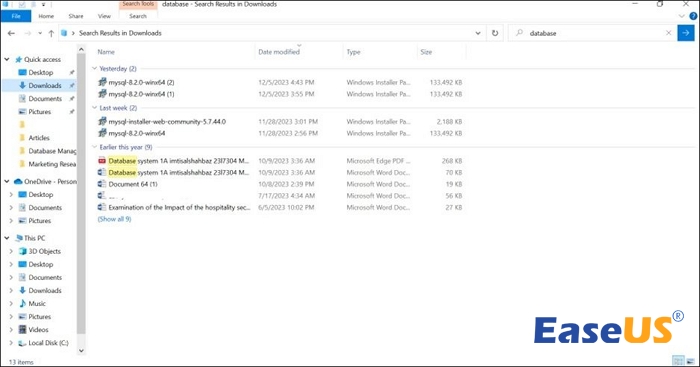
Step 2. Once the folder is visible, find the search box in File Explorer’s top-right corner. Enter the file’s search keyword here.
Step 3. Enter the search word and press Enter to have File Explorer quickly find and display the file in the folder.
Give people the ability to simplify their file searches. Share this useful information on social media to assist your friends in making the most of their Windows 10 experience.
How to Search Files in Windows 10 Faster
Users may limit results based on variables such as modification date, creation date, file type, size, and more by using these advanced search options. Filtering files edited in the recent month or generated each year, for example, gives for a more tailored search experience. Users may generate complicated search queries by combining various parameters and narrowing their search for files. You can utilize the following terms to filter search results:
- Kind: picture
- Size:>20 MB
- Date created: 2023
Sorting options improve file exploration even further. Users may categorize files based on numerous criteria by clicking on the headers above the list. This is especially useful when working with huge collections, as shown by the ease with which the largest file in a music folder may be found.
Why Files Are Missing in Windows 10
Files in Windows 10 may go missing for various causes, including accidental deletion, file hiding, or disordered arrangement inside certain folders.
- 🗑️When files are accidentally destroyed, users often confront difficulties in recovering them.
- 💻Hidden files may also add to the complexity by making it harder for users to find the necessary documents. You can recover hidden files in Windows 10 by unhiding them.
- ❌Simultaneously, a lack of structure inside individual folders might also result in missing or lost files. It is critical to comprehend these conditions to successfully handle the problem of missing files.
Anyway, after knowing the reasons that may cause files to be missing in Windows 10, you’ll know how to find them or avoid losing them.
Summary
If you want your digital life to run smoothly and efficiently, you must learn how to search files on Windows 10. Understanding the causes of lost files, experimenting with different search techniques inside the Windows 10 operating system, and using sophisticated Windows 11 tips ensure that users can easily explore and recover their data.
This article allows users to take charge of their digital workspace, whether using recovery tools to restore lost files or File Explorer’s search bar and sorting options. As Find Files Windows 10 FAQs
Following are some common user queries about searching for files in Windows 10; let’s have a look below:
1. Can I search for hidden files in Windows 10?
Some important system files in Windows 10 are hidden by default. The hidden files can be viewed in the Control Panel. Locate «Control Panel» and then «File Explorer «. Select «View «. Scroll down and uncheck «Hide protected operating system files (Recommended)» and select «Show hidden files, folders, and drives.»
2. Can I find deleted files with the Search bar?
Click the Windows 10 Search Bar and enter Restore your files with File History. Look at the folder where your deleted file was placed in the File History pane. Locate the deleted file and choose Restore. Your file should now be restored to its original place.
3. What is the fastest way to locate a specific file in Windows 10?
The search bar feature is the fastest way to locate a specific file in Windows 10. Type the file’s name, and the Windows search bar will list the folder the file is in.
4. How do I search for files when the Search bar is not working?
If the search bar is not working and you need to locate a specific file in Windows 10, try using the File Explorer’s search feature. Open the File Explorer window and find the search section in the window’s top right corner. Type the file name you are searching for, and press Enter. The results will automatically show.
There must be a lot of files on your computer. At times, you may forget the exact location of a file. When you want to use that file, things will be messy. How to search for files in Windows 10? MiniTool will show you some methods focusing on different situations. You can select a suitable method accordingly.
Where Are My Files in Windows 10?
Physically, you can save your files on your computer hard drive or some other type of digital data storage device like an SD card, memory card, pen drive, and more. Additionally, you can also store your files using OneDrive (if you are running Windows 10, OneDrive is already installed on your computer).
As time goes on, your files become more and more. Unless you have a good memory, it is really hard to remember the exact location of one specified file, folder, or program on your computer. For example, you have saved one item on the computer and you don’t use it for a long time. Suddenly one day, you need to use it, but, you forget where you have saved it.
Here comes the question: how to search in Windows 10?
Here are some different situations:
- If your needed files are still kept on the computer and you still remember the files’ names or part of the names, you can perform a Windows file search to find these files one by one.
- If you forget the names of the files, you should still remember the text content in the file. In a situation like this, you can search for file contents in Windows 10 and then find your needed file. But, this Windows 10 file search method is always limited to some certain files’ types that contain text contents.
- If the above two methods can’t help you find your needed files, these items should be missing from your computer. To find the lost files, you can try professional data recovery software. We recommend using MiniTool Power Data Recovery.
We have proposed different problem-solving ideas for different situations. Next, we will show you how to carry out these ideas in the following contents.
How to Search for Files in Windows 10?
How to Search for Files in Windows 10?
- Search for files using the taskbar
- Search for files using File Explorer
- Search for files using Everything
There are three methods that can be used to search for files in Windows 10. You can select one according to your actual situation. Additionally, you can use these three methods to search for files from computer hard drives, One Drive, SD cards, memory cards, and more.
Method 1: Search for Files Using Taskbar (by Name)
This method is very simple. You can follow these steps to search for files by the name or a keyword.
- Press Win + X and select Search from the WinX Menu to open the Windows 10 search box. Or, you can directly click Cortana to open it.
- Type the name or a keyword of the file you want to find into the search box and you will see the search results across your computer and OneDrive under Best match.
You can select the file to open it and check whether it is the file you want to find.
If you think this method can’t help you find the needed files or you need to search for file contents in Windows 10, you can use File Explorer instead.
Method 2: Search for Files Using File Explorer (by Name/File Contents/Type…)
Performing a Windows 10 file search with File Explorer is a commonly-used method to find your needed files.
Here is a step-by-step guide:
Note: If your File Explorer is set to start from Quick Access, when you open File Explorer, you will enter Quick Access directly. You should not perform a Windows 10 file search in Quick Access. You need to switch to This PC before searching. Or, you can refer to this post to make File Explorer start from This PC: How to Use Windows 10 Quick Access: A Full Introduction.
- Go to File Explorer and access the drive that should contain the files you want to find. If you are not sure the file location, you can just select This PC from the left list to make File Explorer show all drives in This PC.
- The search box is on the upper right corner of File Explorer. You need to input the file name or a keyword. Then the Windows 10 file search process will automatically start.
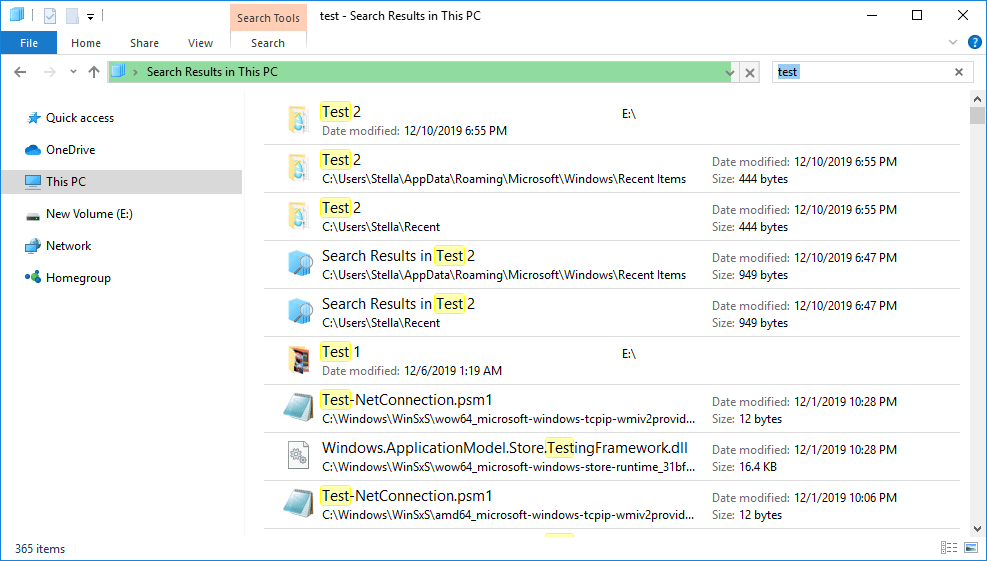
When the search process ends, you can see the search results. It is quite possible that you see more than one choice. Then, you need to find the target one from the results.
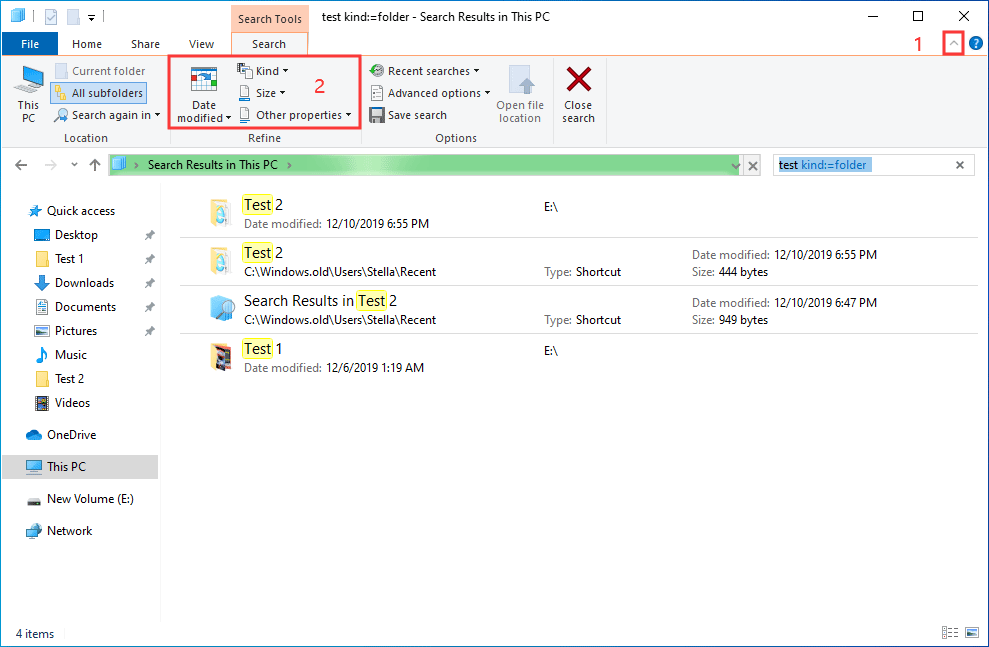
Perform an Advanced Search in File Explorer:
If there are so many files, you can then perform an advanced search in File Explorer. You can click the arrow next to the question mark on the upper right corner and then make a further selection like file size, kind, date modified, etc. You can use these features according to your actual situations.
Tip: You can also use File Explorer to search for files in external drive: If you want to search for files in an external drive, you need to select that drive in File Explorer and then use the universal Windows file search approach to do the job.
How to Search File Contents in Windows 10?
The above guide is just the universal usage of searching for files using File Explorer. Maybe, you are also interested in another search approach: searching file contents in Windows 10
Perhaps, you want to find a Word, Excel, or a text file. But, you forget the name of the file. Take it easy. You can try to remember some text contents that are especially exist in that file and then search files content via File Explorer.
To do this work, you need to do some preparation beforehand: enabling the File contents feature of Windows 10 file search in File Explorer. You can follow these steps to enable the File contents feature:
- Open File Explorer.
- Click the Search mark (the magnifying glass mark) on the upper right corner.
- Click Search on the top toolbar.
- Click the Arrow Down button of the Advanced options.
- Select File contents from the drop-down menu.
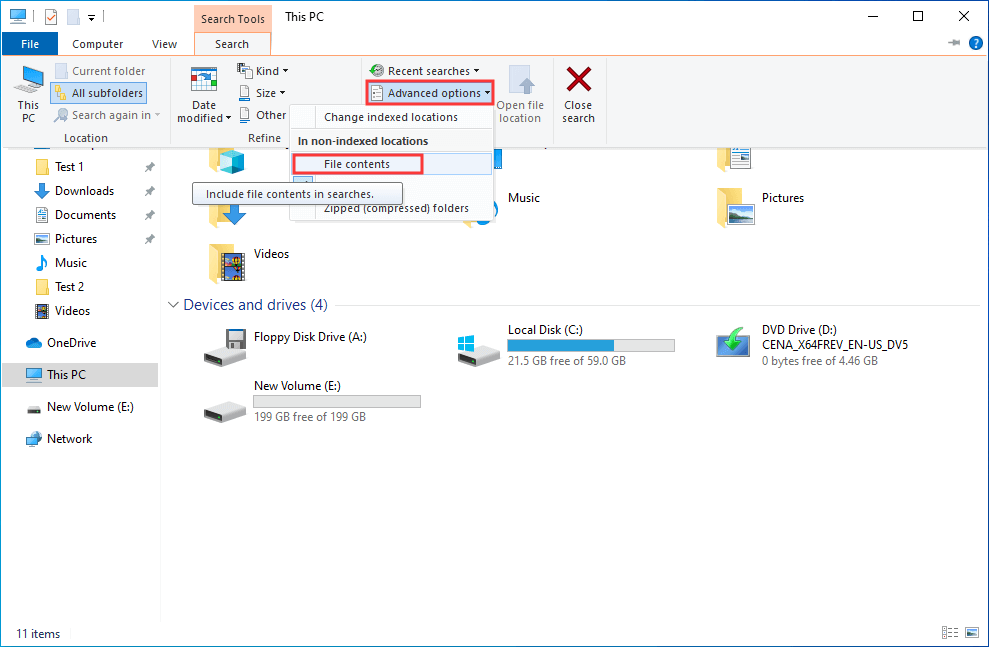
Now, the File contents feature is enabled. You can type the content text into the search box to search for your needed files.
Click to Tweet
Method 3: Search for Files Using Everything (by Name/Type)
Besides using the Windows snap-in tool to search for files in Windows 10, you can also use a third-party utility to do the work. Everything is just such a tool.
Everything is a desktop search utility for Windows. You can use it to search for your needed files and folders by name. In addition, this utility can also show you all the computer files by type (limited to some certain types). If you only remember the type of file you want to find, you can set this tool to only show the target file type.
It is a totally free tool. You can go to the https://www.voidtools.com/ to free download it on your computer for further use.
Tip: You can only use this tool to search for files in computer hard drives.
Search for Files in Windows 10 by Name:
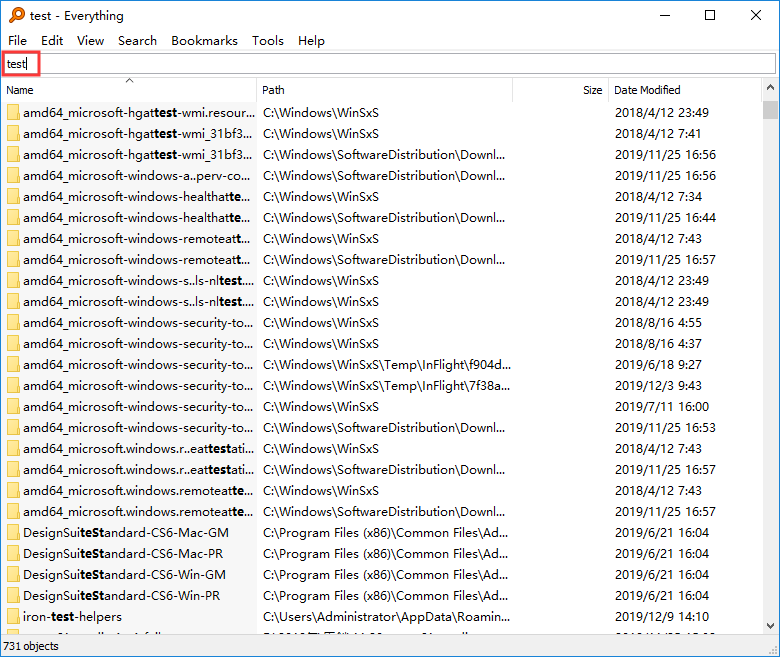
- Open Everything.
- Input the file name to make the tool show the related items.
- Go to find your needed files from the list of the search results.
If there are so many search results, you can click Search from the toolbar and select the target file type to narrow down the search range.
After finding the needed file, you can click on it to open it immediately. Or you can go to File > Open path to access the storage location.
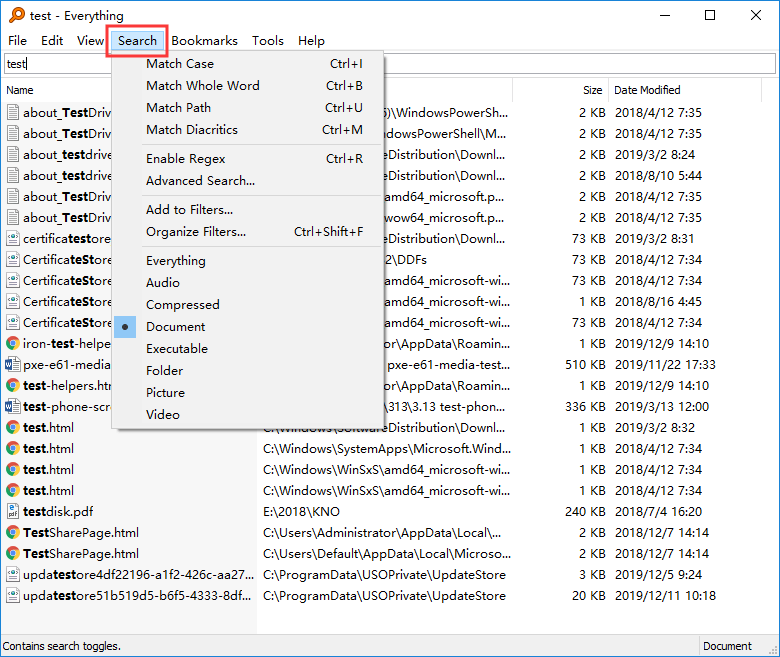
Search for Files in Windows 10 by Type:
If you really forget the name of the file, you can use the Search feature of Everything to select the data type of your needed file. This can shorten the search time relatively.
For example, if you want to search for all video files on Windows 10, you can press Search and then select Video from the drop-down menu. Everything will show you all the video files.
Other types of files you can search by category are audio files, compressed files, documents, executable files, folders, and pictures.
Everything also has other useful features like copy the selected file to another folder, move the select file to another folder, and more. You can discover more features by yourself.
Click to Tweet
If you have lost the files you want to use, the methods mentioned in the above parts are unavailable. You need to use data recovery software to get your lost data back. We suggest using MiniTool Power Data Recovery.
This is a free file recovery tool. As long as the deleted files are not overwritten by new data, you can use this software to restore files from computer hard drives, memory cards, SD cards, and more.
With the trial edition of this software, you can check whether it can find the files you want to use. Now, you can press the following button to get this freeware.
MiniTool Power Data Recovery TrialClick to Download100%Clean & Safe
After downloading and installing this software on your computer, you can follow this guide to rescue your lost data:
1. Open MiniTool Power Data Recovery.
2. Select the target drive and press the Scan button to start the scanning process.
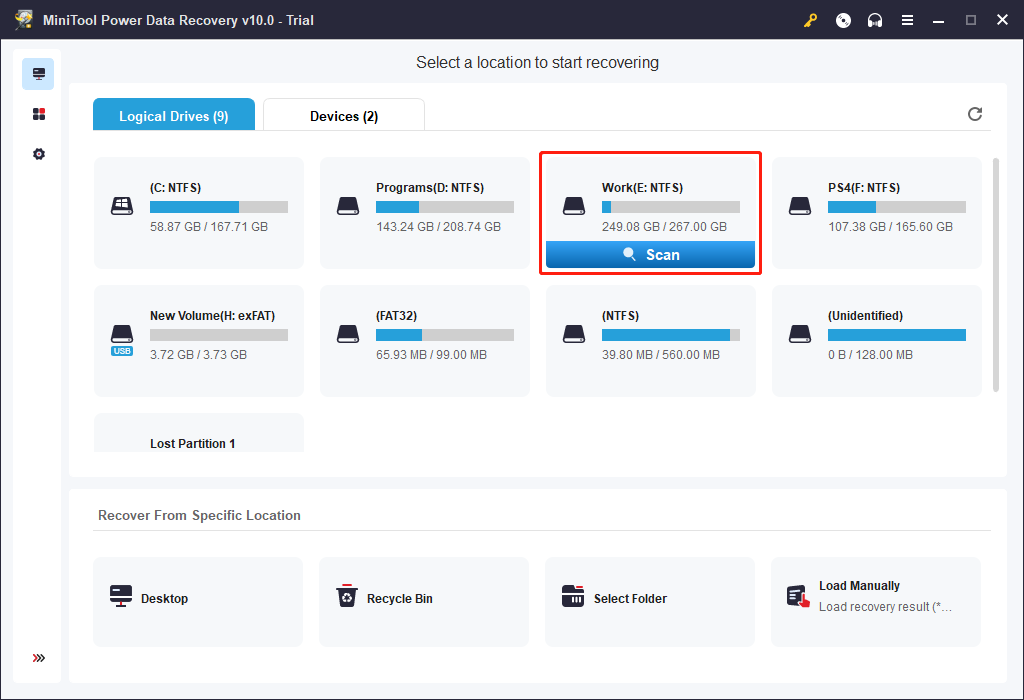
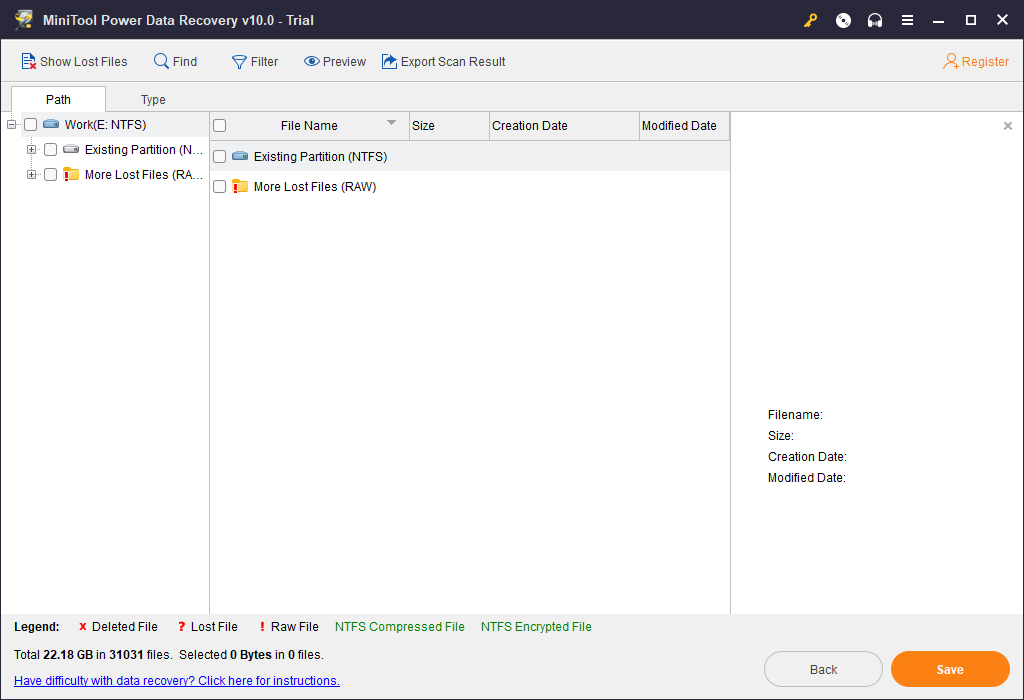
3. You need to wait until the whole scanning process ends. Then, this software will show you the scan results by path. You can open each path to find your needed data.
At the same time, you can also use the Type feature to search for files by type or use the Find feature to search for files by name. You can select these two features based on your actual situation.
4. If you discover that this software can find your desired files, you can update this software to a full edition to recover all of them without limits. If you are a personal user, the Personal Ultimate edition can fully meet your requirements.
5. When you get a full edition, you can select the needed files and click on the Save button to choose a suitable location to store these files. The recovered files can be used directly.
After reading this part, you must know how to find your lost files in Windows 10. Just use this MiniTool software to help you out.
Click to Tweet
Bottom Line
When you can’t find a file in Windows 10, you can read this article to learn how to search for files in Windows 10. Whether you want to search for your files by name, by type, or by file contents, you can always find a good solution here.
Should you have any questions when performing a Windows 10 file search or using MiniTool software, you can just contact us via [email protected], or let us know in the comment.
How to Search for Files in Windows 10 FAQ
How do I find the search box in Windows 10?
- You can click Cortana to open the Windows 10 search box.
- You can press Win + X and then select Search from the WinX menu.
How do I Search for Files in Windows 10?
- You open Windows search and then type the file name to search for files in Windows 10.
- You can go to File Explorer > This PC and then type the file name to the search box (upper right corner in File Explorer) to search for files in Windows 10.
- You can use the third-party toll Everything to search for files by name and type in Windows 10.
How do I find a lost file in Windows 10?
If your needed file is missing from the computer, you can use MiniTool Power Data Recovery to find it back:
- Download and install this software on your computer.
- Select the target drive to scan.
- Find the target file from the scan results.
- Select the target file to restore.
How do I see hidden files?
To make the hidden files to be shown on your computer, you need to go to Control Panel > Appearance and Personalization > Folder Options > View. Under Advanced settings, you need to select Show hidden files, folders, and drives, and then press OK to keep the change. After that, you can see the hidden files on your computer.