
Да, мы понимаем, что это может быть крайне раздражающим, если вы столкнулись с проблемой «У вас нет разрешения на просмотр этого файла» в Windows 11. Эта проблема возникает в основном из-за проблем с разрешениями, которые почти всегда переплетены с проблемами совместимости или ограничениями в самих приложениях. Необходимо устранить эту ошибку, чтобы восстановить контроль над файлами и сделать так, чтобы работа шла гладко.
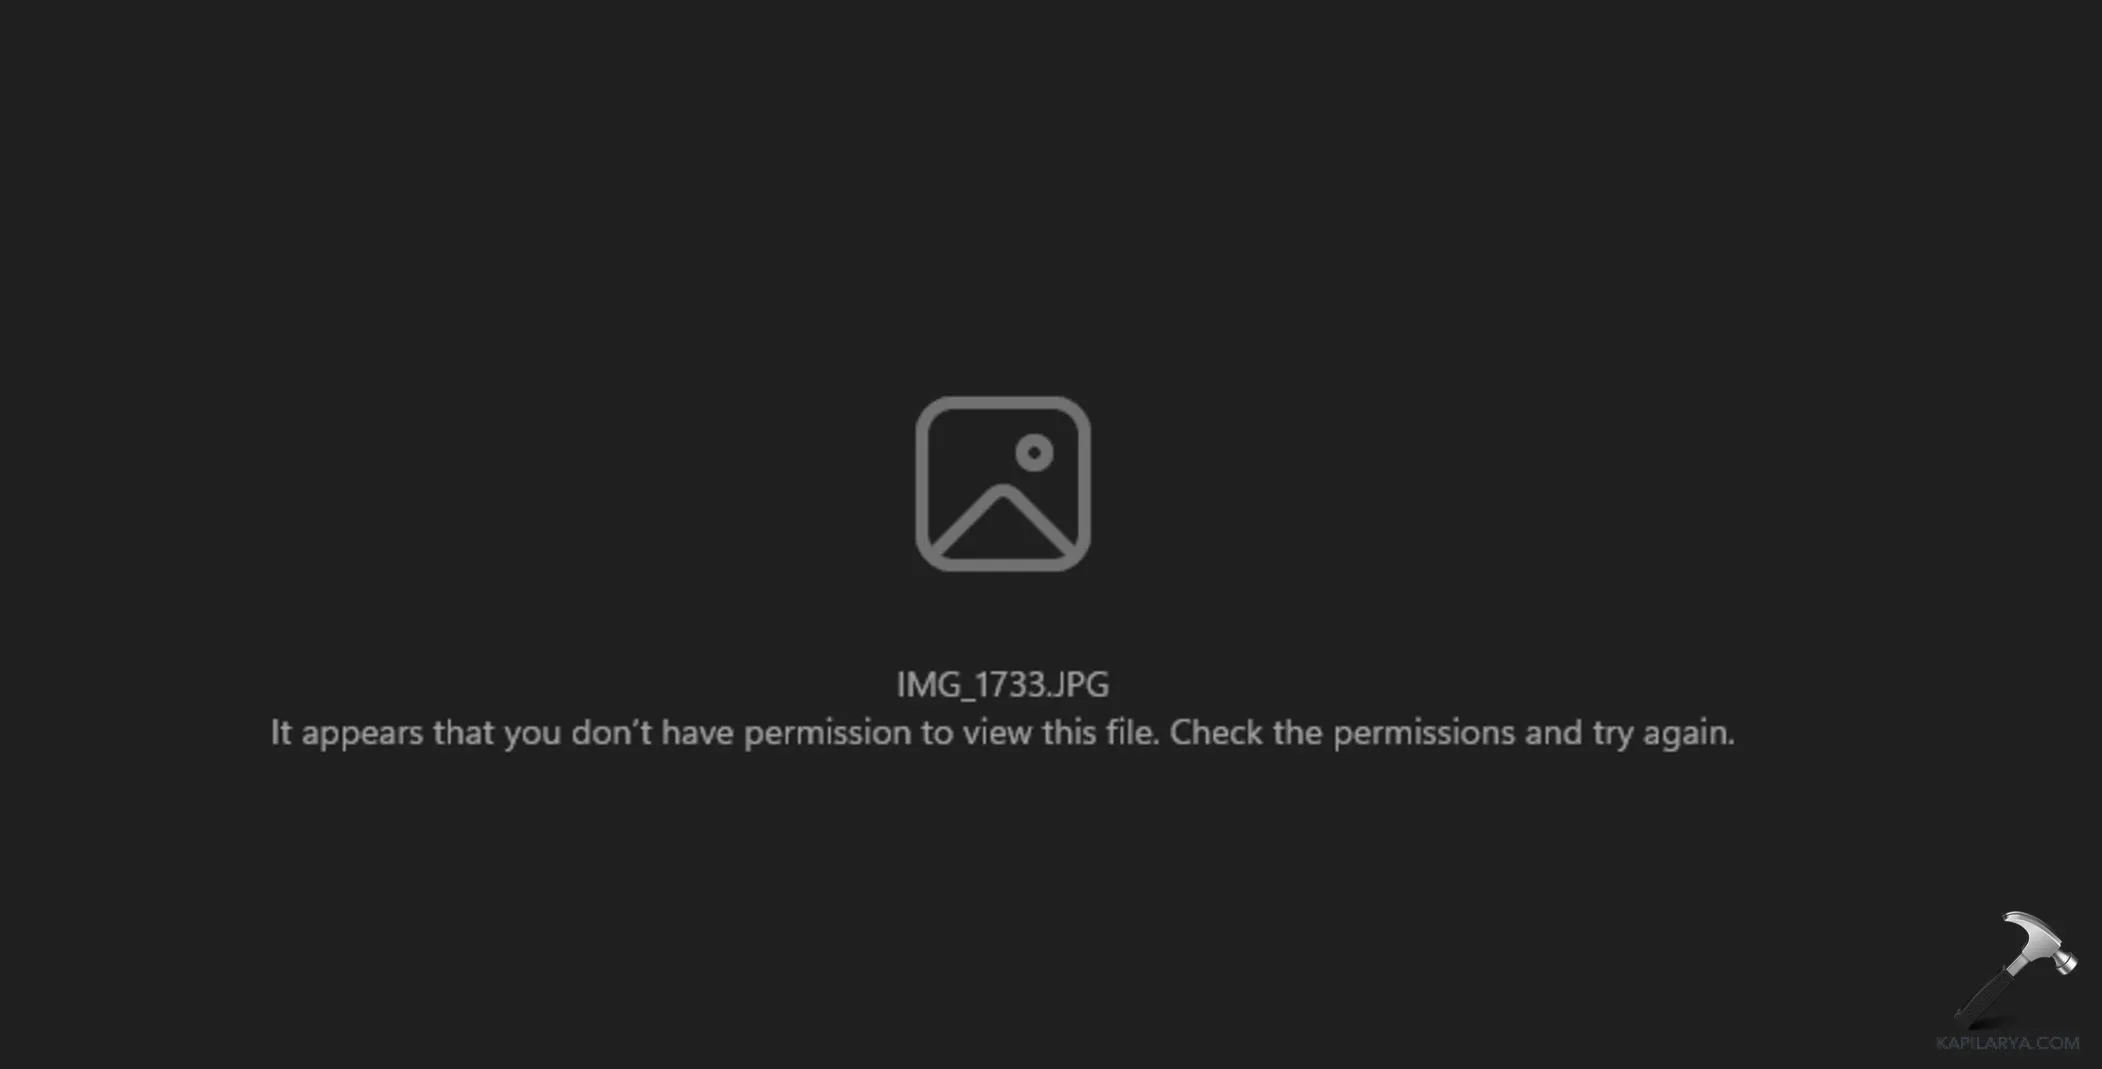
Пример ошибки «У вас нет прав на просмотр этого файла».
Чтобы сэкономить ваше время, эта платформа идеально подходит для поиска самых простых решений, которые не проверяют ваше терпение. В этом руководстве вы найдете пять рабочих решений о том, как справиться с сообщением «У вас нет разрешения на просмотр этого файла».
Исправление ошибки «У вас нет разрешения на просмотр этого файла»
Исправление 1: Станьте владельцем файла или папки
На самом деле получение полного контроля над файлом или папкой позволяет обойти опцию запрета доступа. Вот как это сделать-
1. Перейдите к файлу или папке, вызвавшим проблему, щелкните по нему правой кнопкой мыши и выберите «Свойства».
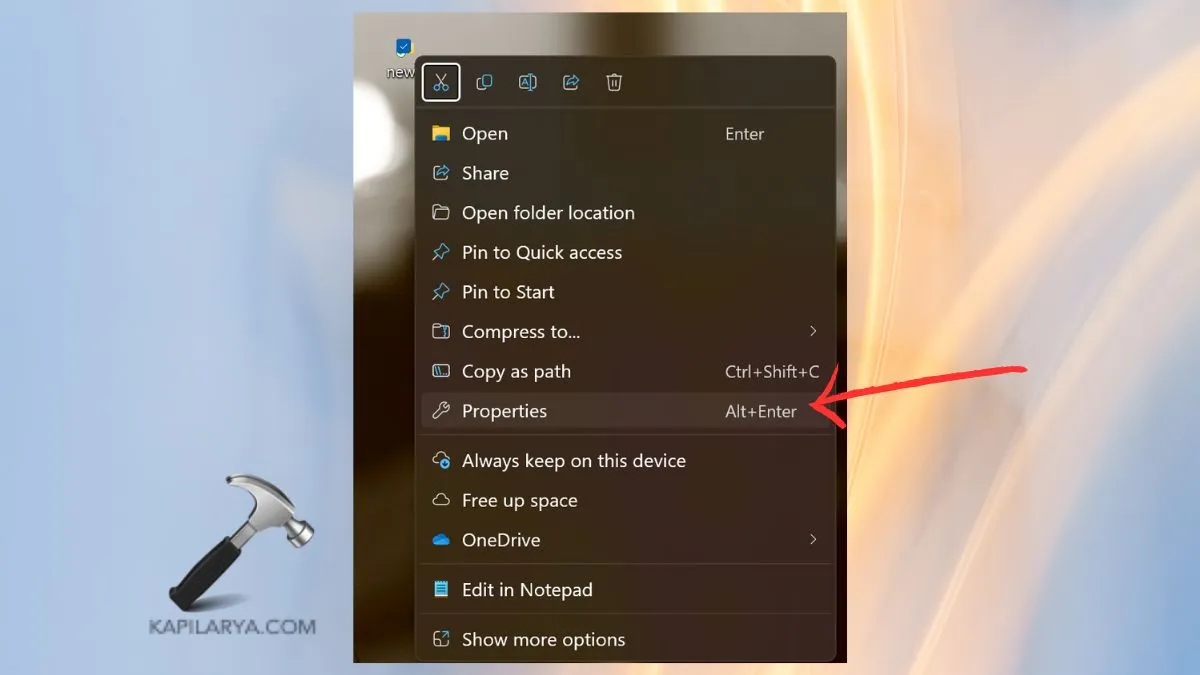
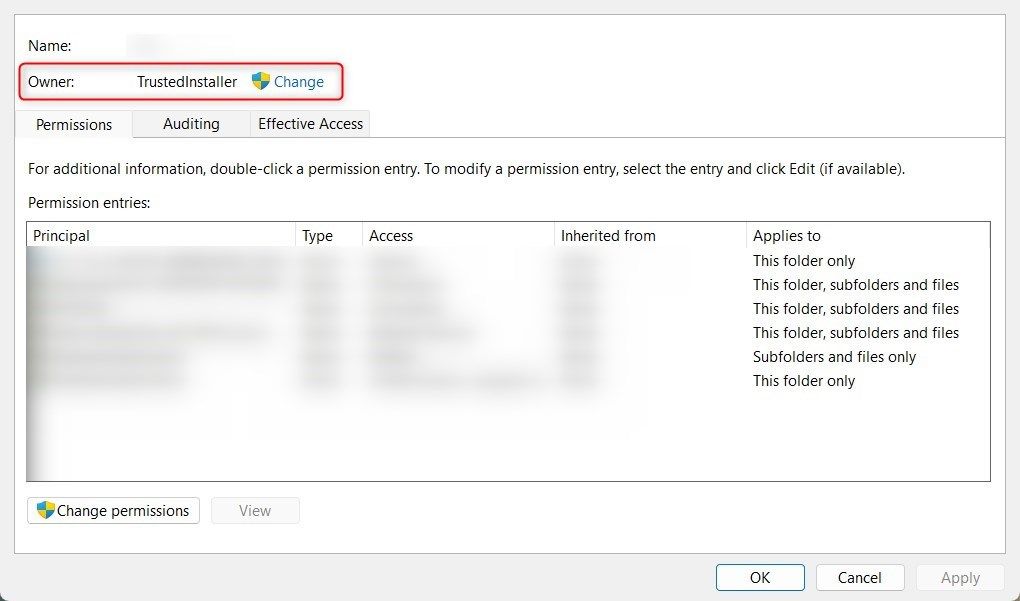
2. Следующий шаг — перейти в окно «Свойства», выбрать вкладку «Безопасность» и в верхней части нажать «Дополнительно».
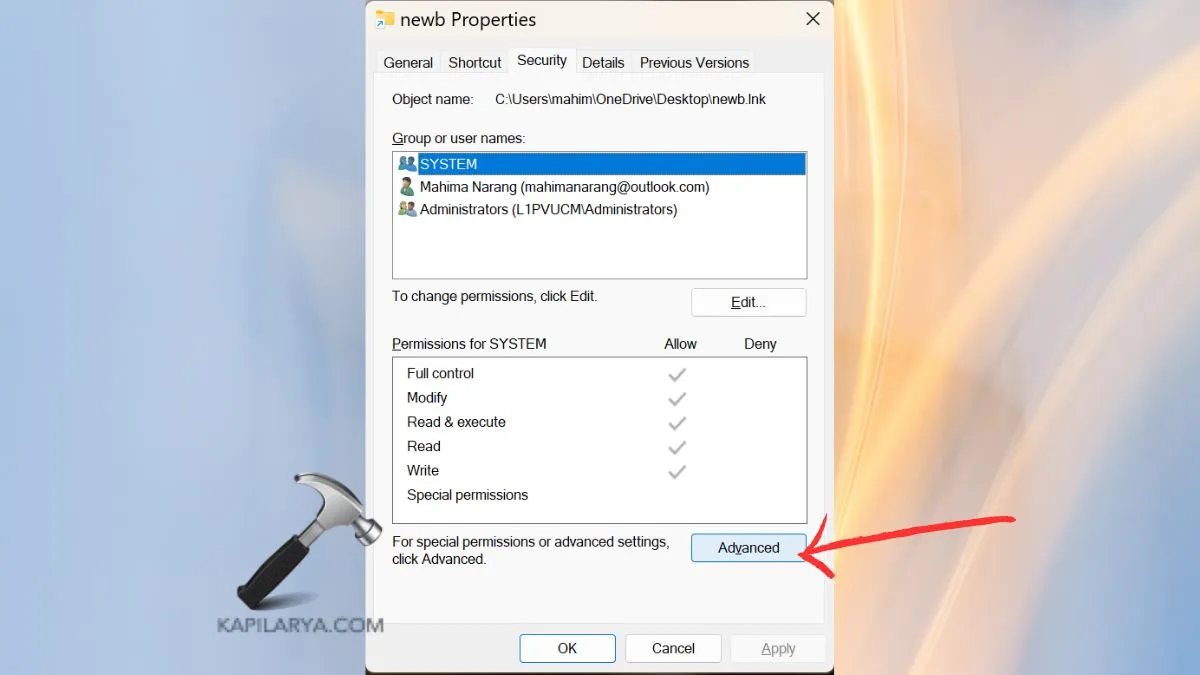
3. В правой панели дополнительных параметров безопасности щелкните правой кнопкой мыши имя владельца и выберите «Изменить».
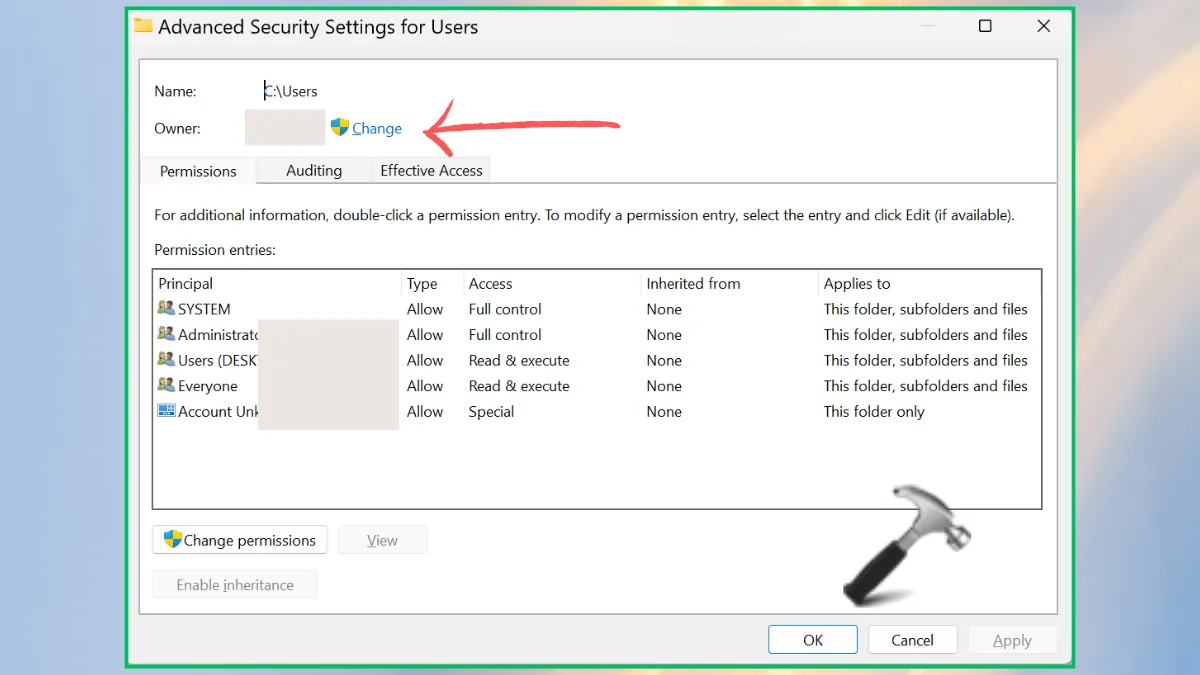
4. Введите свое имя пользователя в поле, нажмите «Проверить имена», чтобы проверить, существует ли такое имя пользователя, и нажмите «ОК».
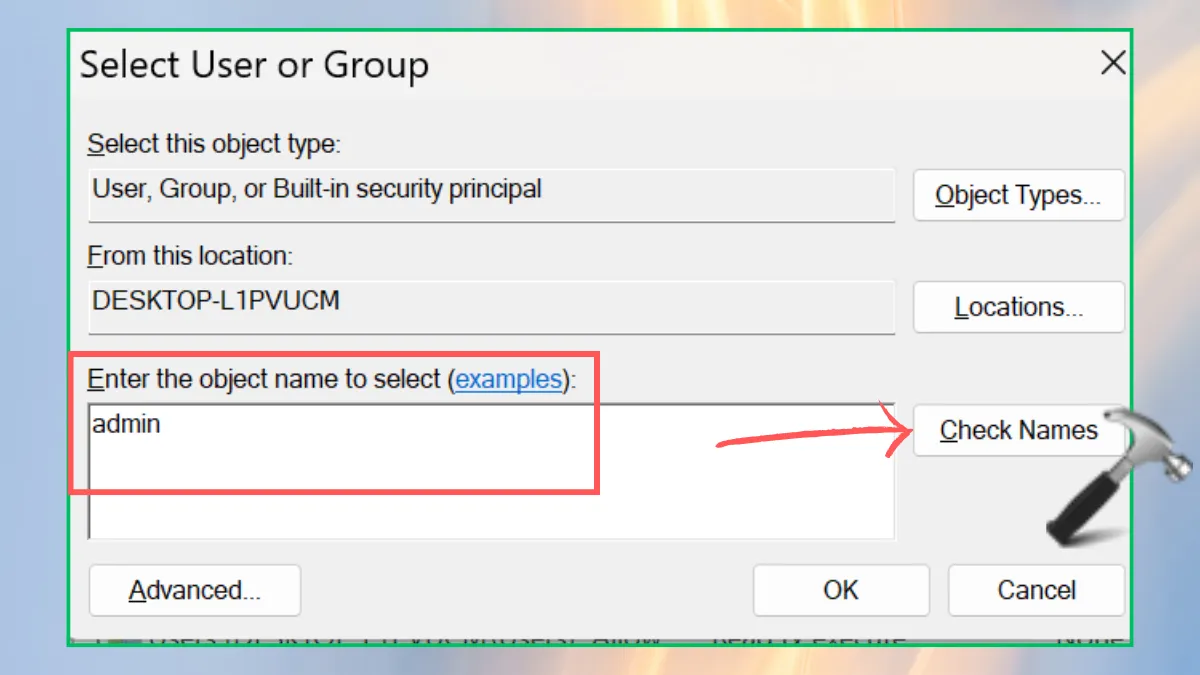
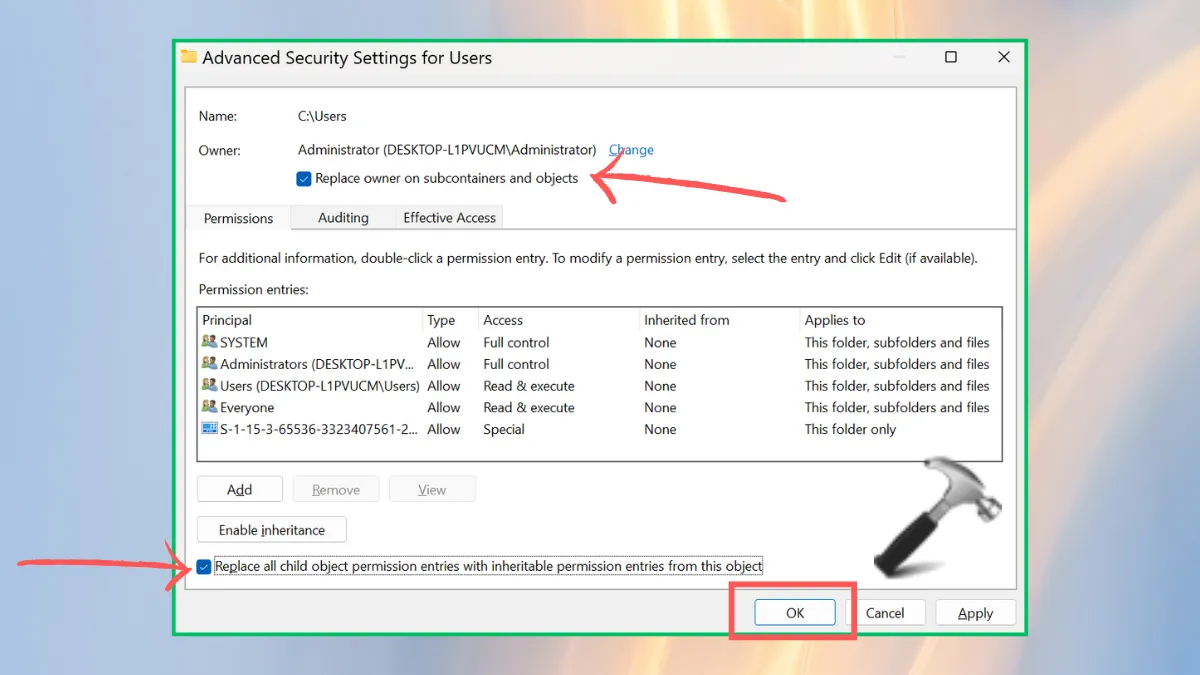
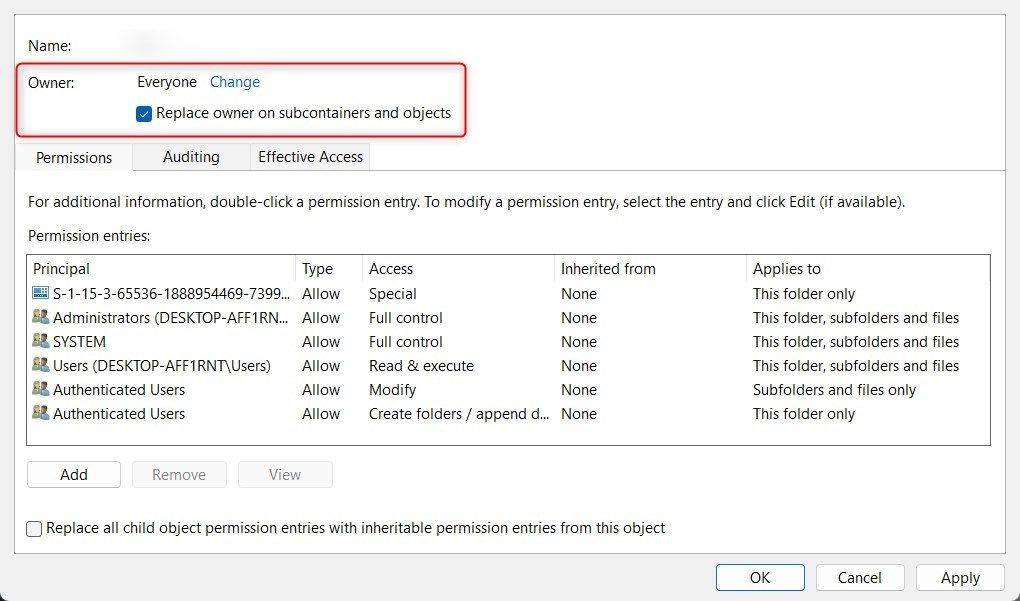
5. Выберите опцию «Заменить владельца вложенных контейнеров и объектов» и «Заменить всех дочерних…», а затем нажмите «ОК».
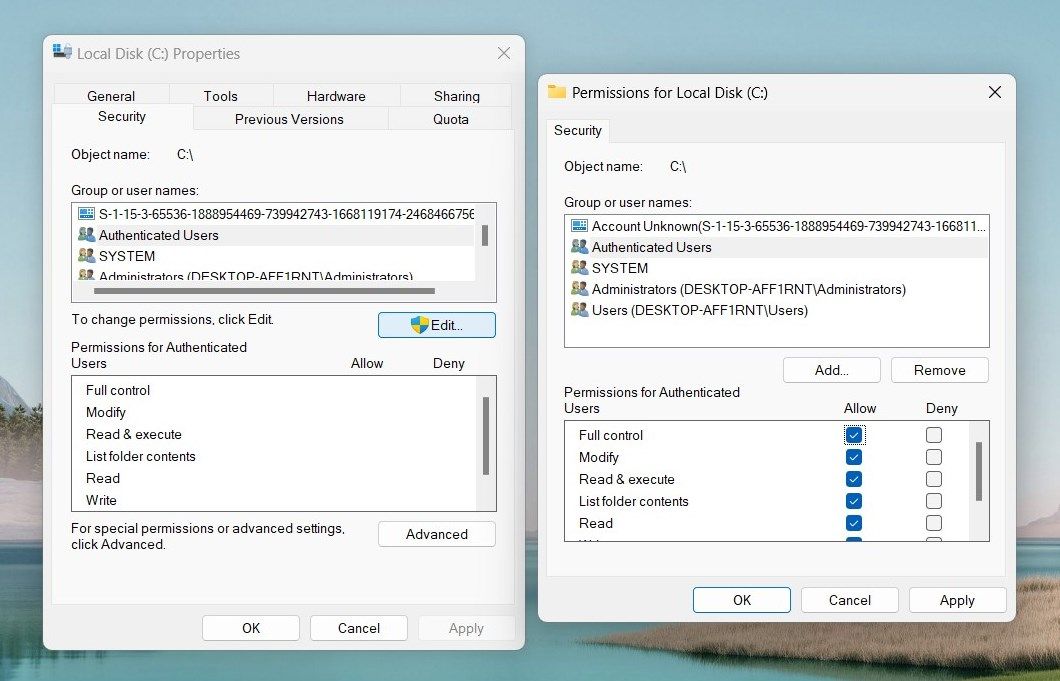
Исправление 2: Предоставьте разрешения на полный контроль
Еще одним чрезвычайно полезным решением проблемы, при которой отображается сообщение «У вас нет прав на просмотр этого файла», является изменение разрешений на доступ к папке.
1. Снова откройте контекстное меню файла или папки и выберите пункт «Свойства».
2. На вкладке «Безопасность» есть кнопка «Изменить», с помощью которой можно изменить разрешения. В столбце «Разрешить» щелкните по полю и выберите «Полный доступ».
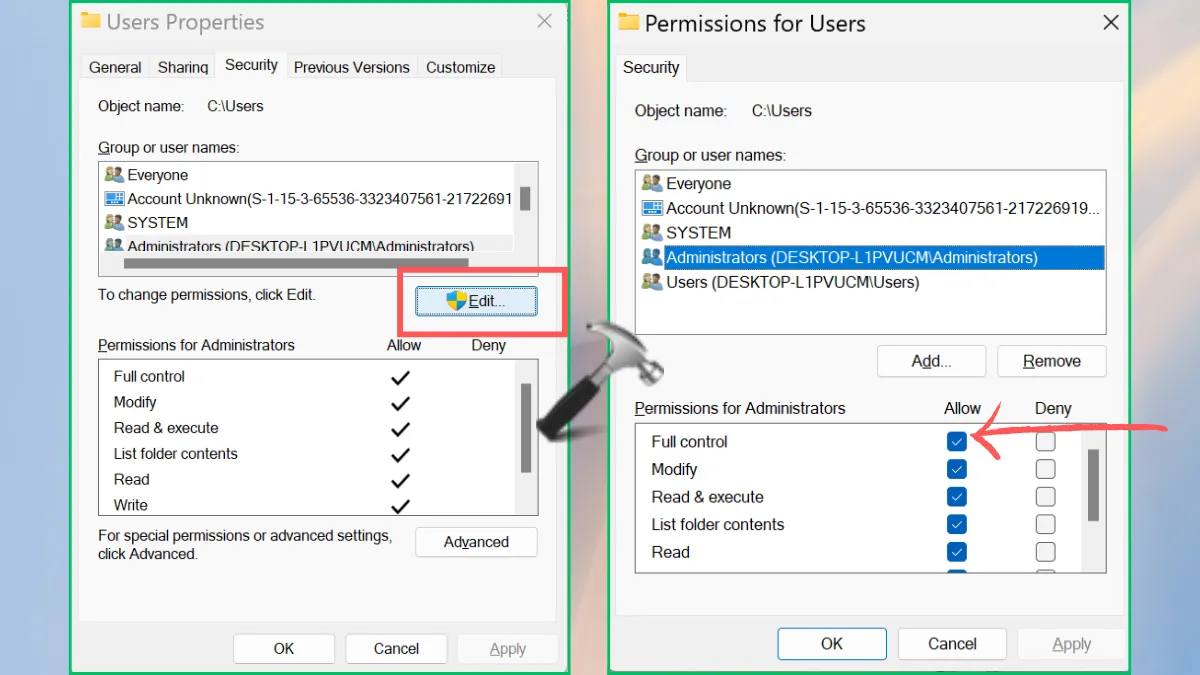
Теперь вы можете нажать «Применить», а затем «ОК», чтобы убедиться, что вы применяете изменения, указанные в почте Windows.
Исправление 3: Запустите средство устранения неполадок совместимости программ
Иногда проблема может возникнуть из-за проблем с совместимостью с другими предыдущими приложениями. Это можно сделать, запустив средство устранения неполадок совместимости.
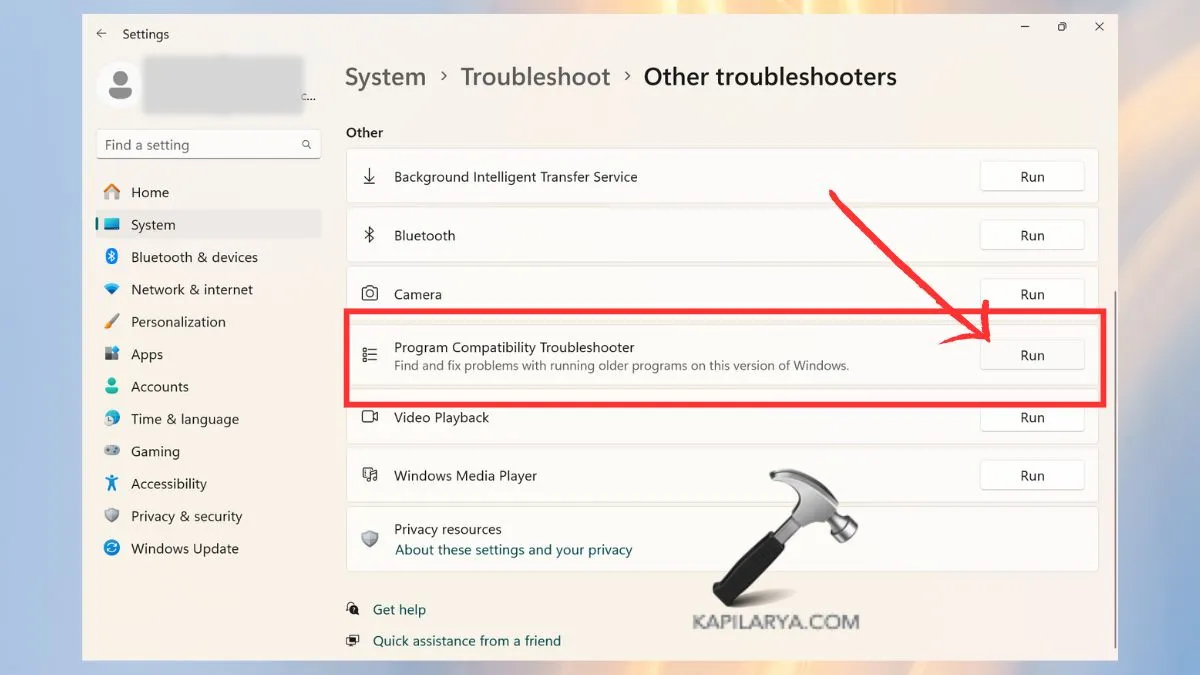
1. Откройте Параметры Windows с помощью клавиш «Win+I». Перейдите в Система > Устранение неполадок > Другие средства устранения неполадок.
2. Выберите «Запустить средство устранения неполадок совместимости программ» и следуйте дальнейшим инструкциям, указанным на экране.
Используйте предложенные настройки и выберите или настройте свой пользовательский режим, затем запустите файл/программу.
Исправление 4: временное отключение контроля учетных записей (UAC)
В результате настройки контроля учетных записей пользователей (UAC) могут иногда ограничивать доступ к некоторым файлам. Вот почему временное отключение UAC может помочь решить проблему.
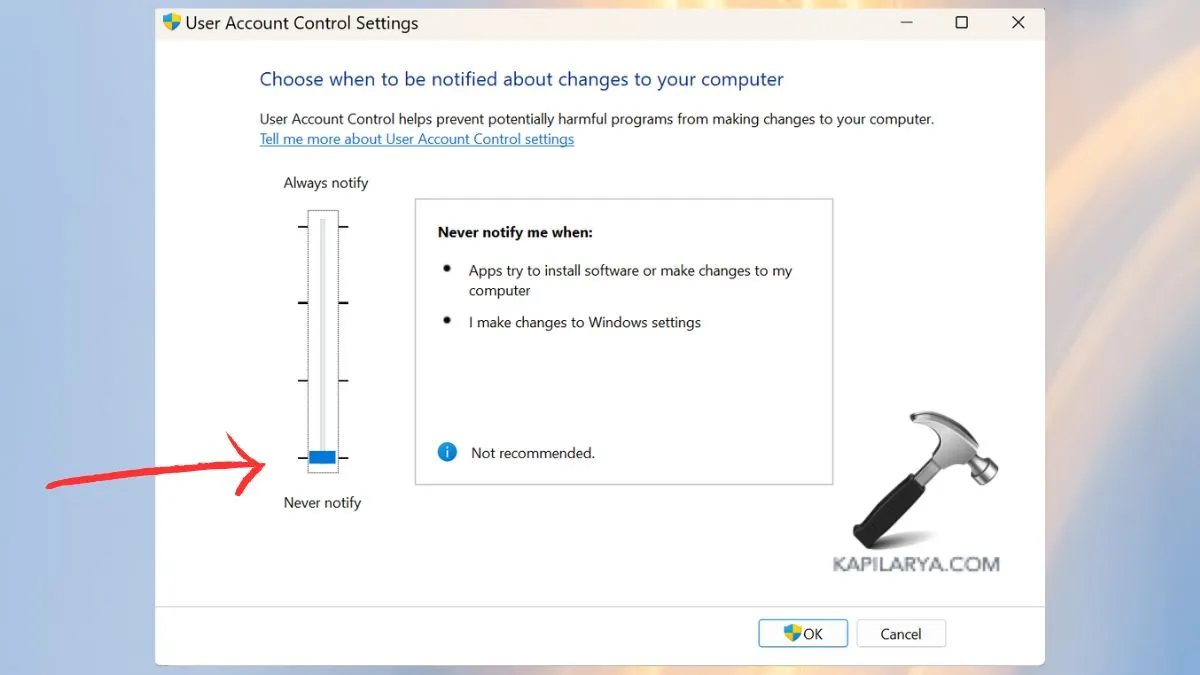
1. Откройте меню «Пуск», введите «Параметры управления учетными записями пользователей» и откройте лучшее соответствие из консоли поиска Windows.
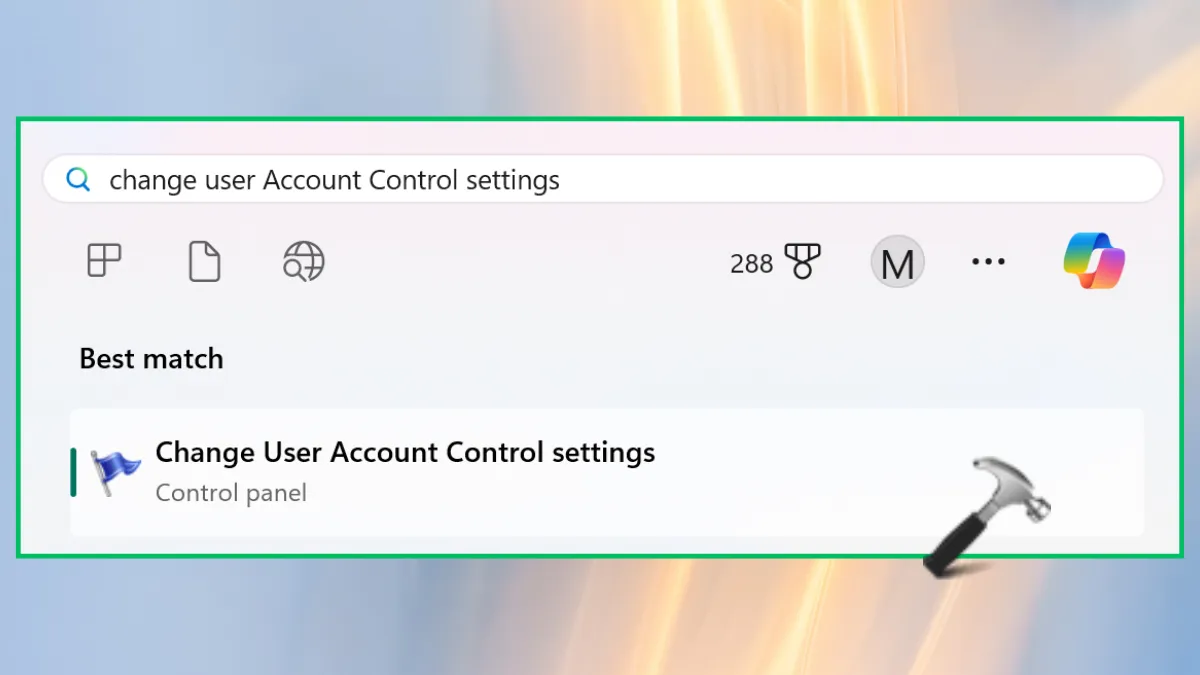
2. Нажмите на ползунок «Никогда не уведомлять», а затем на «ОК».
Возможно, нажмите Ctrl+Alt+Delete и попробуйте открыть файл еще раз.
Исправление 5: сбросьте настройки приложения «Фотографии» (при просмотре изображений)
Глядя на изображения, вы сталкиваетесь с проблемой сбоя приложения? Сбросьте настройки приложения «Фотографии» в качестве решения проблемы.
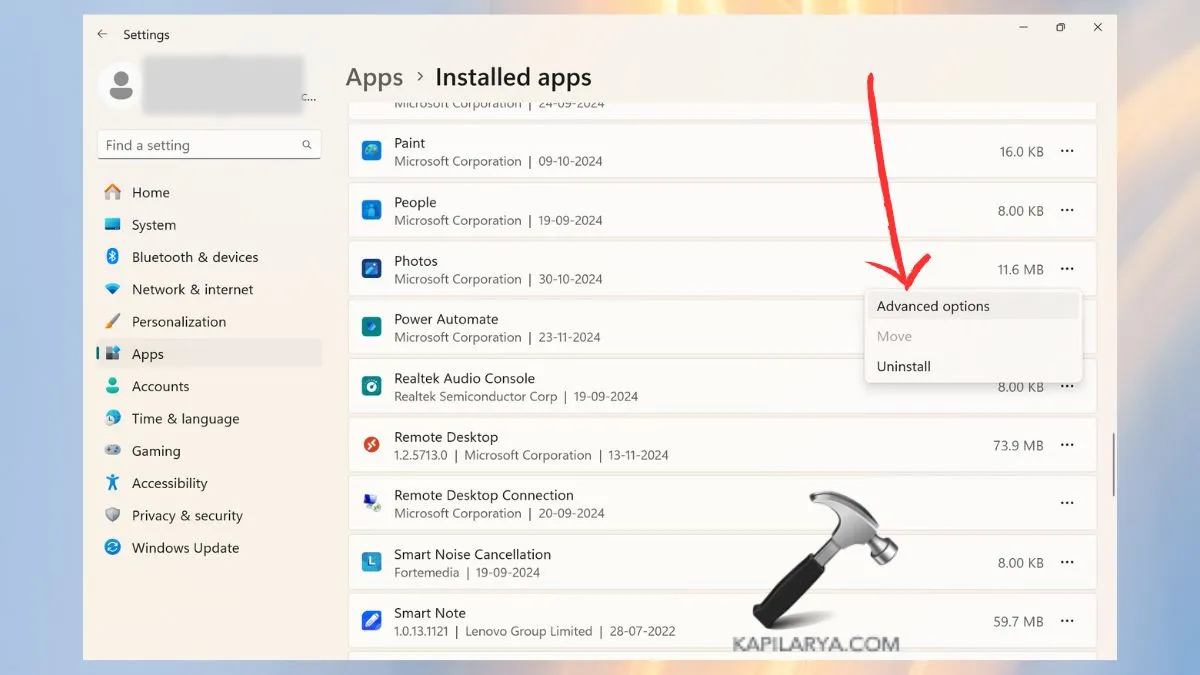
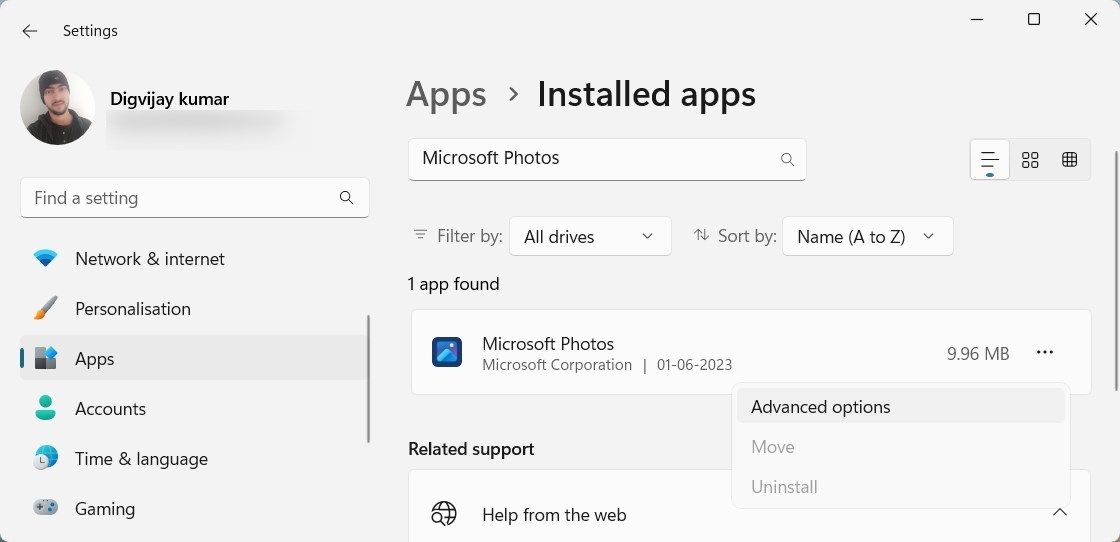
1. Чтобы открыть Настройки, нажмите клавиши Windows+I, затем выберите «Приложения». На левой панели нажмите «Фотографии». После этого на правой панели нажмите «Дополнительные параметры».
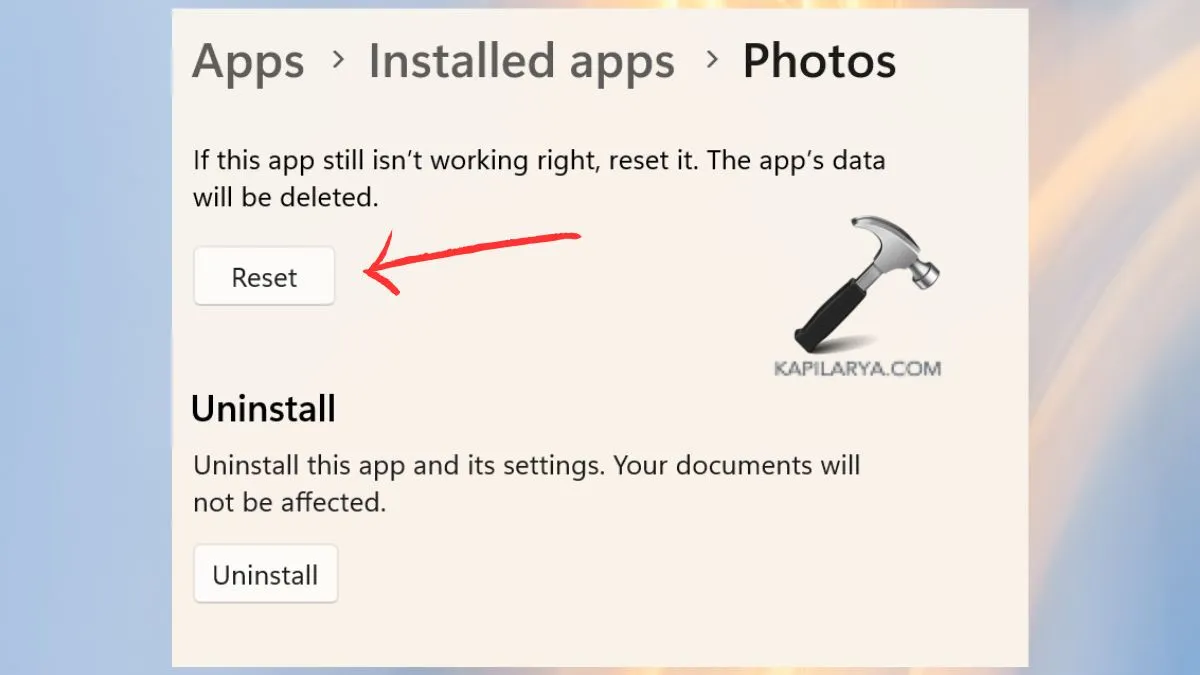
2. Нажмите «Сброс». Одобрите действие и дождитесь завершения процесса.
Однако, если у вас возникли какие-либо ошибки при выполнении любого из этих методов исправления ошибки «У вас нет прав на просмотр этого файла» в Windows 11, оставьте комментарий ниже, чтобы мы могли вам помочь.
Вот и все!
Просмотров: 90
Sign in to your MUO account

Did you encounter an error message when opening photos on an external hard drive? The message says «It looks like you don’t have permission to view this file. Check the permissions and try again.» The error implies that Windows Photos or File Explorer is not authorized to access this file.
In this article, we explain how to fix this error, so you can view your photos again.
Why Can’t You View the File?
You may encounter this error if your external hard drive is connected to a device without the right permissions settings. Other possible causes include user account control settings which restrict access to external drives, or a corrupted Windows Photos app.
Now you know what causes this error, let’s explore the solution.
1. Grant Full Control Permissions
It looks like the main issue causing this error is that Windows doesn’t have sufficient permissions to access the file. To fix this, you must grant full control permissions to the account or user accessing the file. Here are the steps to follow:
- Right-click on the folder and choose Properties.
- In the Properties window, go to the Security tab.
- Select the user account or group from the list and click Edit.
-
Under the Permissions section, check the box next to Full Control.

- Click Apply and OK to save the changes.
After making these changes, try viewing the photos again and checking if the error has been resolved.
2. Take Ownership of the Folder
If granting full control permissions does not work, take ownership of the folder to get more control. Taking ownership means you can manage, access, and delete files within it. Here’s how to do it:
- Right-click on the folder and select Properties from the context menu.
- Switch to the Security tab, then click Advanced at the bottom.
- In the Advanced Security Settings window, make sure you’re on the Permissions tab.
-
Click on Change next to Owner in the top section.

-
In the dialog box, type Everyone and click Check Names.

- If it seems correct, click OK.
-
Check the box next to Replace owner on subcontainers and objects.
- Now click Apply. A pop-up appears and asks you to confirm the ownership change.
- Click Yes and wait for the process to finish.
- Once done, click OK and close the window.

After that, restart your computer and try accessing the folder.
3. Reset the Photos App
Another way to fix this error is to reset the Photos app. Resetting the app will delete all settings and cached data and restore it to its default state. Here’s how to reset the Photos app:
- Press Win + I to open the Settings menu.
- From the left pane, click Apps > Installed apps.
-
Scroll down to find the Microsoft Photos app. You can also use the search bar to find it.

- Click on the three dots and select Advanced options.
-
Under the Reset section, click the Reset button.

- If a pop-up appears, click Reset again to confirm your action.
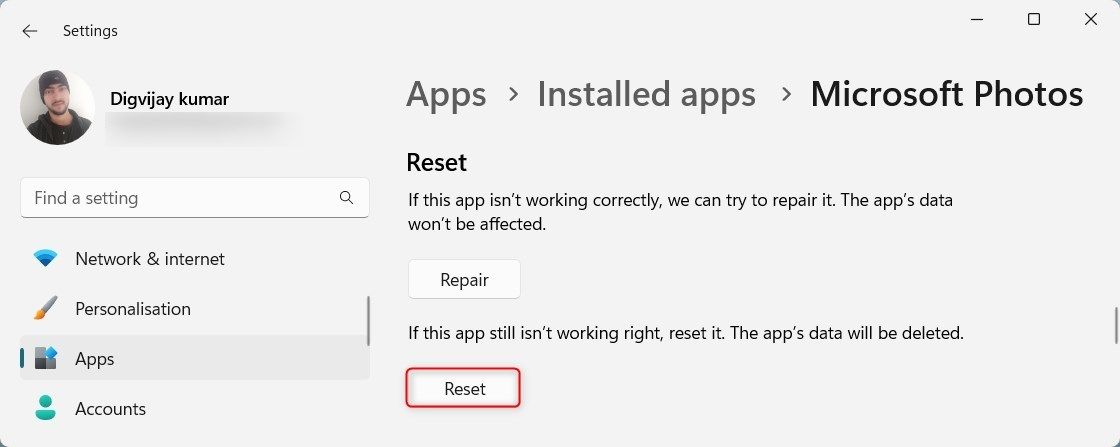
After that, try to open photos on your external hard drive.
4. Disable UAC Temporarily
You may often find that you don’t have enough permissions to perform specific tasks. In such cases, disabling UAC may do the trick. So, disable it temporarily and see if it works.
5. Run the Program Compatibility Troubleshooter
If you’re still encountering the error, try running the Program Compatibility Troubleshooter. This tool scans for compatibility issues with installed programs and solves them automatically.
Open Files Without a Problem Again on Windows
If you have the proper permissions, you should not encounter the «you don’t have permission to view this file” message. However, if you run into this issue, read this guide to resolve it quickly. Make sure you grant all permissions and take ownership of the folder.
Добавлено: 07.06.2024 |
Обновлено: 07.06.2024
***
…Намедни, при попытке после » экрана смерти» , появилось окно Open Crash Dump с сообщением «….dmp. У вас нет разрешения на открытие этого файла. Обратитесь к владельцу файла или к администратору сети, чтобы получить разрешение».
Если при запуске программ (при открытии файлов) вы получаете сообщение, что у вас нет на это разрешения:
– нажмите файл правой кнопкой ;
– из выберите Свойства;
– в окне Свойства: <Имя_файла> откройте вкладку Безопасность;
– в разделе Группы или выберите (например, СОЗДАТЕЛЬ-ВЛАДЕЛЕЦ);
– нажмите кнопку Изменить…;
– в окне Разрешения для группы «<Имя_файла>» установите флажки (столбец Разрешить) Полный доступ, Изменение, Чтение и выполнение, Чтение, Запись;
– нажмите кнопку OK;
– в окне Безопасность Windows с сообщением «Вы собираетесь изменить параметры разрешений для системных папок, что может привести к непредвиденным проблемам доступа и нарушить безопасность. Хотите продолжить?» нажмите кнопку Да –> OK.
Сидоров
***
•
•
•
•
•
•
Похожие аббревиатуры
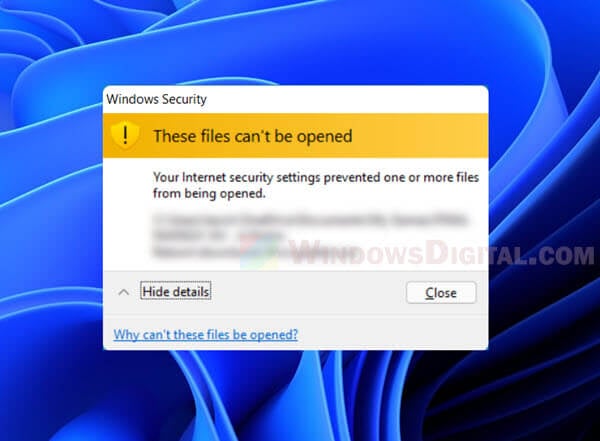
If you receive a warning message that says “These files can’t be opened – Your Internet security prevented one or more files from being opened” whenever you try to run an executable file (.exe file) in Windows 11, especially for installer files downloaded from the Internet, this guide will show you how to resolve the issue.
When the warning prompt appears, you will only have the “Close” button to click and the executable file will not be run. The warning message indicates that Windows Security has blocked the file from being opened due to the Internet security settings.
This problem usually occurs when the downloaded executable file does not have a valid certificate or is flagged as suspicious, causing the file to be blocked by Windows Security and prompt the user the “Your Internet security settings prevented one or more files” warning message.
Your Internet security settings prevented one or more files from being opened
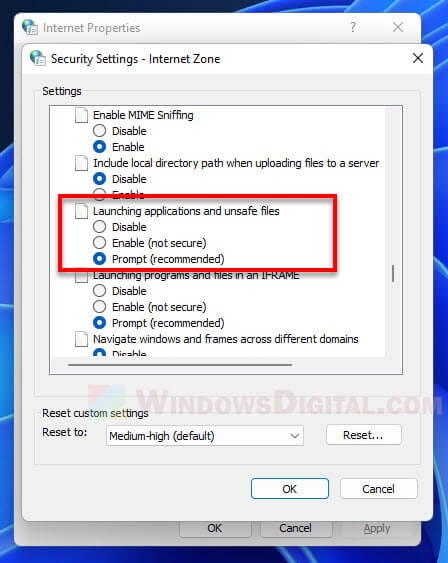
Enable prompt when launching apps and unsafe files
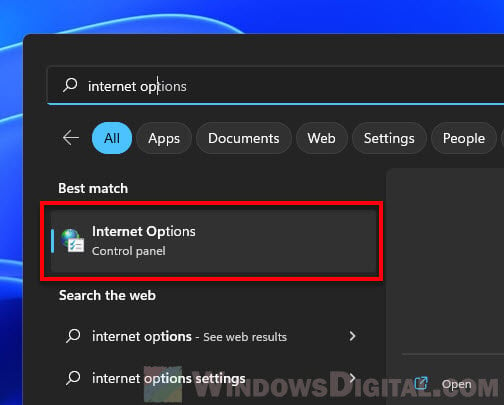
The first thing you should try is to change the option of what Windows should do when you launch applications and unsafe files. You can access this option by following the steps below.
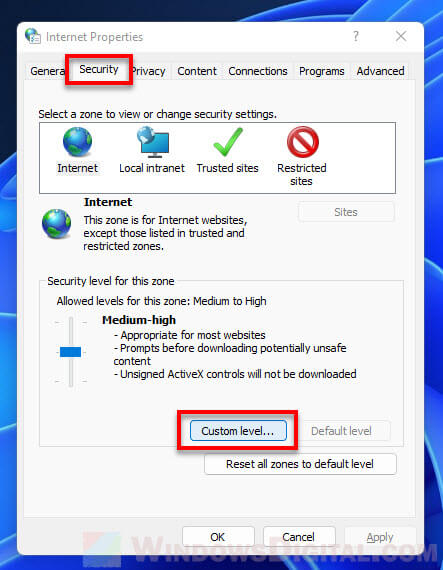
- Go to Start, search for and open “Internet Options“.

- In the Internet Properties window, select the Security tab and click Custom level.

- Next, scroll down and look for an option called “Launching applications and unsafe files“.
- Select “Prompt (recommended)” for this option so that Windows will prompt you for confirmation whenever you run an unsafe app or file.

- Click OK to save the changes and retry running the executable file again.
Unblock the exe file
Make sure the executable file is not blocked by the Security. You can check this by right-clicking the executable file and select Properties. Then, in the General tab, look at the “Security” section under “Attributes”. If there is a checkbox that says “Unblock“, enable the checkbox to unblock the file.
Learn more here: How to Allow App From Unknown Publisher to Run in Windows 11
In addition, try to run the exe file as administrator if you haven’t already done so. This will make sure you have all the rights and permissions you need to run the file.
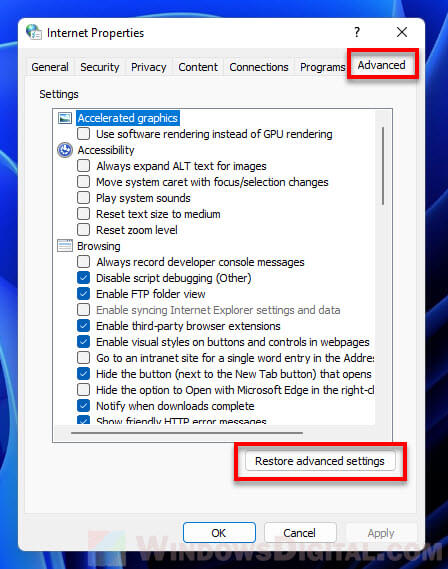
Reset Internet Options and Microsoft Edge
Try to also reset the Internet options as well as the Microsoft Edge settings. Doing so may help to resolve issues caused by incorrect security settings.
To reset Internet options, search for and open “Internet Options” via Start. Then, select “Advanced” tab and click “Restore advanced settings“. Click OK to save the changes.
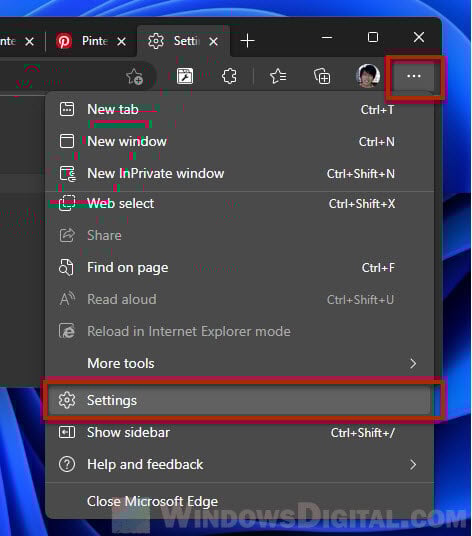
To reset Microsoft Edge, follow the steps below.
- Open Edge browser.
- Click the triple dotted “More options” icon at the upper right corner of Edge’s window, and then select Settings.

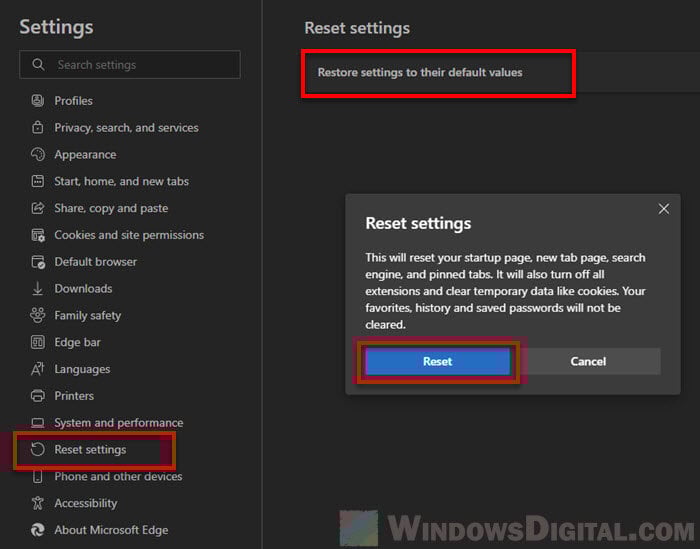
- Next, select Reset settings from the left pane.
- On the right, select Restore settings to their default values.
- When prompted to reset the settings, click Reset.

Move and rename the file
Some users have reported that if the exe file is in the OneDrive folder, running it may prompt the “Your Internet security settings prevented one or more files” warning. Try moving the executable file to a different folder or drive, and try renaming the file to a different name. After doing so, retry opening the exe file again and see if the issue persists.
Related: How to Disable or Remove OneDrive From Windows 11
Temporary disable firewall and antivirus program (not recommended)
Since it’s a security issue, you might want to try disabling your firewall and antivirus program before running the exe file. Alternatively, you can allow only the exe file through your firewall and add the file to the exclusion list in your antivirus software, if you don’t want to disable them.
Read: How to Disable Firewall or Allow an App Through Firewall in Windows 11
You should ONLY do this if you fully trust the source of the executable file. Disabling firewall or antivirus shield may put your PC at risk of being infected by malware or viruses if the file you run is in fact malicious.
Also, if you do try to disable any of the firewall, antivirus or other security software or program, be sure to re-enable them right after you’ve done what’s needed.
Use another user account or create a new one
Another method would be to try using another user account in the same Windows to open the executable file. If you do not have a secondary account, you can create a new one by following the steps in this post: How to Create Local Admin Account Without Password on Windows 11.
Restore Windows to a system restore point
If every executable file you run results in the same “Your Internet security prevented one or more files” warning message and nothing works to resolve the issue, you may want to try restoring Windows to a system restore point. Read: How to System Restore Windows 11 to a Previous Date.
Reset or reinstall Windows 11
If even doing a system restore doesn’t solve the problem, you may want to consider backing up all your important data and resetting or reinstalling Windows 11 (as a final resort). Read more: How to Reset Windows 11 to Factory Default.