
Многие пользователи сталкиваются с тем, что мышь зависает, а точнее замирает указатель мыши на одну или две секунды при работе или в других ситуациях в Windows 10. Часто это происходит после некоторого периода не использования мыши, например, при наборе текста, но возможны и другие варианты, в том числе остановка указателя мыши во время игры.
В этой инструкции подробно о том, что может вызвать зависание указателя мыши и что делать, чтобы исправить ситуацию. В статье пойдет речь о беспроводных и Bluetooth, а также о проводных мышках.
- Простые причины замирания указателя мыши
- Почему зависает мышь в Windows 10 и как это исправить
- Энергосбережение для Bluetooth и беспроводной мыши
- Высокая нагрузка на процессор
- Другие причины
- Видео инструкция
Простые причины замирания указателя мыши на экране
Сначала о некоторых вариантах причин зависания указателя мыши, которые следует исключить прежде, чем приступать к методам решения проблемы из следующего раздела. Эти причины нельзя назвать очень распространенными, но помнить о них нужно.
Замирание указателя мыши может быть вызвано:
- Для беспроводной или Bluetooth мыши причиной может оказаться почти севшая батарея.
- Для беспроводной мыши с USB-приемником случается следующее: если приемник подключен к задней панели ПК, а сам ПК находится где-то под столом, прием может быть нестабильным. Характерно не для любой мыши (характеристики приема-передачи отличаются от модели к модели), но возможно.
- В случае обычной проводной мыши причиной спонтанных остановок указателя может быть износ кабеля, причем визуально это не всегда можно определить. Если другая мышь на том же разъеме не зависает, возможно, дело именно в этом.
- Загрязненная линза на мышке, работа на стеклянной или зеркальной поверхности тоже может приводить к рассматриваемой проблеме.
Если все указанные варианты были исключены, переходим к следующим причинам и соответствующим методам решения проблемы.
Почему зависает мышь в Windows 10 и как это исправить
Теперь о тех случаях, когда для исправления проблемы потребуется разобраться с ситуацией и произвести те или иные настройки Windows 10. Примечание: первый вариант в некоторых случаях срабатывает и для проводной мыши.
Параметры энергосбережения Bluetooth или беспроводной мыши
Одна из самых частых причин того, что мышь зависает на секунду-другую, особенно в случае Bluetooth и беспроводной мыши, если это происходит после какого-либо непродолжительного периода её неиспользования — параметры энергосбережения устройства, причем не обязательно самой мыши, но и контроллера, к которому она подключена.
Чтобы исправить проблему или убедиться, что причина не в этом, проделайте следующее:
- Откройте диспетчер устройств. Для этого можно нажать правой кнопкой мыши по кнопке «Пуск» и выбрать соответствующий пункт контекстного меню. В диспетчере устройств потребуется проверить параметры не только мыши, но и ряда других устройств (не только отмеченных на скриншоте), о чем далее в тексте и видео.
- Проверьте параметры энергосбережения устройств, которые будут указаны далее, нажав правой кнопкой мыши по нужному устройству, выбрав пункт «Свойства» и открыв вкладку «Управление электропитанием». Вкладка для некоторых устройств может отсутствовать (это нормально). Также, если вкладка отсутствует, но на вкладке «Общие» есть кнопка «Изменить параметры», нажмите её и проверьте, появится ли соответствующая вкладка. Если на указанной вкладке включен параметр «Разрешить отключение этого устройства для экономии энергии», снимите отметку и нажмите «Ок», а затем проверьте остальные указанные устройства.
- Для Bluetooth мыши проверьте возможность отключения экономии энергии для Bluetooth-адаптера и самой мыши в разделе «Bluetooth». Но этого может оказаться недостаточно, ознакомьтесь и с остальными пунктами ниже.
- Проверьте мыши в разделе «Мыши и иные указывающие устройства» и отключите энергосбережение для них при наличии соответствующего пункта. Если в разделе несколько устройств и вы не можете определить, какое из них — ваша мышь, можно отключить экономию энергии для всех устройств.

- Для всех типов мышей (Bluetooth, радио, проводная) зайдите в раздел «Устройства HID» и попробуйте найти вашу мышь, а затем отключить экономию энергии для него. К сожалению, в этом разделе поиск нужного устройства сложен из-за множества одинаковых или неоднозначных названий. Например, в моем случае с зависанием Bluetooth мыши от Microsoft помог только этот раздел, после отключения экономии энергии для устройства «HID-устройство, соответствующее GATT Bluetooth с низким энергопотреблением», которое я нашел почти наугад.

- Для USB и беспроводной мыши с приемником, подключаемым по USB, в разделе «Контроллеры USB» отключите экономию энергии для USB-концентраторов и устройств Generic USB Hub.

- Выполненные таким методом настройки начинают действовать без перезагрузки компьютера.


В случае, если проблема появляется на ноутбуке, дополнительно рекомендую проверить: появляется ли проблема если переключить режим питания в «Максимальная производительность» — сделать это можно, нажав по значку батареи.
А нажав правой кнопкой мыши по значку батареи и выбрав пункт «Электропитание» вы можете посмотреть и выбрать одну из доступных схем электропитания — некоторые производители ноутбуков добавляют туда собственные схемы, возможно на одной из них (с высокой производительностью) проблема будет решена.
Высокая нагрузка на процессор как причина периодического зависания мыши на 1-2 секунды
И на производительных и на слабых ПК и ноутбуках вы можете столкнуться с тем, что при высокой нагрузке на процессор, мышь начинает дергаться. К сожалению, это «нормальное» поведение Windows и его часто можно наблюдать, когда в фоновом режиме Windows 10 производит распаковку загруженных обновлений, выполняется архивация и разархивация файлов и в других случаях. Рекомендую заглянуть в диспетчер задач (запустить можно через контекстное меню кнопку «Пуск») и проверить, есть ли что-то, вызывающее высокую нагрузку на процессор.
Если окажется, что источник 100% нагрузки являются системные прерывания, ознакомьтесь с инструкцией Что делать, если системные прерывания грузят процессор в Windows 10.
Другие причины
Среди прочих встречающихся причин рассматриваемого поведения указателя мыши можно выделить:
- Подключение мыши, в том числе беспроводной с USB-приемником) через USB-хаб (разветвитель) или док-станцию, к которой подключены и другие устройства. Замирания указателя могут в этом случае могут быть постоянными, а могут возникать только при активном обмене данными с другими подключенными к этому же USB-хабу устройствами.
- Подключение проводной или радио мыши (с USB-приемником) к USB разъему на контроллере, к которому подключено другое устройство или устройства, активно использующих шину USB. Например, если подключить мышь к передней панели ПК, затем в соседний разъем подключить флешку и начать копировать с неё данные, часто можно получить эффект «зависания» указателя мыши. То же касается одной группы USB разъемов на задней панели компьютера (рядом расположенные разъемы обычно имеют общую шину данных) или портов с одной стороны ноутбука. Проверьте: если проблема исчезает, когда мышь или её приемник является единственным подключенным устройством на одной группе разъемов USB, то, похоже, причина именно в этом.
- Проблемы с жесткими дисками и накопителями (когда не удается прочитать/записать данные из-за повреждений, проблем с подключением или питанием) могут приводить к временной остановке всей системы, включая указатель мыши. Неправильная работа другого оборудования тоже может вызывать такое, но чаще всего речь именно о HDD, SSD, флешках и внешних дисках.
- Встречаются мыши, где энергосбережение не очень удачно реализовано со стороны самой мыши — в этом случае она после короткого времени отсутствия взаимодействий «засыпает», а затем, пока просыпается, указатель мыши не двигается. Если у вас есть предположение, что причина в этом, рекомендую проверить мышь на другом компьютере или ноутбуке: если там поведение такое же, а другие мыши исправно работают, похоже, дело обстоит именно так.
Видео инструкция
Надеюсь, статья помогла разобраться с причинами остановки, замирания и зависания указателя мыши в Windows 10 и устранить их.
Minimal PC setups with no visible wires are all the rage right now. Wireless accessories such as Bluetooth mouse and Bluetooth keyboard is used for this. Bluetooth devices are easy to set up, last several months etc. but the regular mouse has faster response times and they never lag. Windows 10 Bluetooth mouse lag can be annoying. In this article, we bring to you a helpful guide that will teach you how to fix Bluetooth mouse lagging Windows 10 especially logitech wireless mouse lagging Windows 10.

Table of Contents
Here are some reasons that cause a wireless mouse to lag
- Distance between mouse and PC is beyond the specified range
- Low battery levels
- Incorrect ports being used
- Corrupt drivers
After understanding the reasons behind Windows 10 Bluetooth mouse lag, let us move to the methods which will fix this issue for you. We will start with some hardware checks first.
Method 1: Replace Battery
Whenever a Bluetooth mouse (or any Bluetooth device) starts misbehaving, the first thing to check is the battery condition and the amount of charge left.
- If you are unable to check the charge left, try replacing the batteries with another pair and check if the issue persists.
- Bluetooth devices tend to lag when battery charge drops below a certain value. To fix this, simply replace them with a fresh set of batteries.
Note: If you wish to prolong the life of your batteries, remove and keep them aside when not in use.
Method 2: Use Faster USB port
Most modern systems have multiple different USB ports. You can use our guide to identify USB port in which Bluetooth receiver is connected and then plug it to a faster port.
- USB 3.1 ports are faster than USB 3.0 ports which in turn are faster than USB 2.0 ports.
- If the receiver is already connected to the 3.1 port, try connecting to USB-C or Thunderbolt 3 port and check if it fixes Windows 10 Bluetooth mouse lag issue.
Method 3: Change DPI Settings
If your Bluetooth mouse supports variable DPI, make sure DPI value is set correctly. DPI stands for Dots Per Inch and is a measure of mouse sensitivity. A higher DPI setting would result in a sensitive mouse while a lower DPI setting may give the impression of lag as the mouse pointer moves slowly. Here is how you can change it –
1. Press Windows + I keys simultaneously to launch Settings.
2. Click on Devices tile.

3. Click on Mouse in the left pane. After that, click on Additional mouse options.

4. Go to Pointer Option tab in Mouse Properties window.
5. Under Motion, shift the slider to the right side towards Fast to increase DPI of your mouse.

6. Click Apply and OK to save changes.
Generally, there is an added DPI button present in wireless mouse to adjust mouse sensitivity. Some have a dedicated application for it. Find the available option that suits you and try altering DPI.
Also Read: How to Install Bluetooth on Windows 10
Method 4: Disable Pointer Shadow
Many users have suggested that disabling Pointer Shadow feature helped them in eliminating mouse lag. When the feature is enabled, a faint dark shadow appears below mouse pointer that helps in locating it on light backgrounds. You can disable it by following the steps below.
1. Navigate to Settings > Devices > Mouse > Additional Mouse options as shown in Method 3.
2. Go to the Pointers tab in the Mouse Properties window.
3. Uncheck the box marked Enable Pointer Shadow and click on Apply.

4. Then, go to the Pointer Options tab, uncheck the box marked Display pointer trails.

5. Click Apply > OK to save changes.
Note: If you are still facing the issue try disabling Scroll Inactive Windows feature, go to mouse settings as shown in Step 3 above, and turn Off toggle for Scroll inactive windows when I hover over them.

Also Read: How to Rename Bluetooth Devices on Windows 10
Method 5: Update Device Drivers
With hardware and connectivity concerns out of the way, it is time to look at the software side of things if you continue to encounter mouse lag. While Windows 10 automatically updates device drivers, compatibility issues can still arrive. Corrupt mouse drivers can cause Windows 10 Bluetooth mouse lag. You can fix it by updating mouse drivers as shown below.
1. Press the Windows key, type device manager, and click on Open.

2. Double-click on Mice and other pointing devices label to expand it.
3. Right-click on your Bluetooth mouse and select Properties.

4. Go to Driver tab and click on Update Driver.

5. In the following pop-up, select Search automatically for drivers. Windows will search and install any updated driver files automatically.

Note: You can also download the latest driver files from the manufacturer website and install them manually by selecting Browse my computer for drivers and opening them.
If this doesn’t resolve the issue then try uninstalling mouse drivers altogether. To uninstall, right-click on your Bluetooth mouse as shown in Step 3 above and select Uninstall device.

Confirm your action and then restart the PC. Windows will automatically install the required mouse drivers.
Method 6: Disable USB Power Saving
Sometimes Windows can disable USB ports to save power when they are not in use. If your mouse is left ideal for some time, Windows might disable the port to which its receiver is plugged. It will get automatically enabled again with a slight movement of the mouse but you will encounter lag. Follow the steps below to prevent Windows from disabling USB ports.
1. Follow Steps 1 to 3 from Method 5.
2. Go to Power Management tab and uncheck the box marked Allow the computer to turn off this device to save power.

3. Click on OK.
Also Read: How to Connect a Bluetooth Device on Windows 10
Method 7: Disable WiFi Bluetooth Collaboration
Wi-Fi Bluetooth Collaboration feature prevents the transmissions of Wi-Fi adapter and Bluetooth adapter from interfering with each other. It can disrupt transmissions from both adapters and can cause Windows 10 Bluetooth mouse lag. You can disable this feature by following the steps below.
1. Type Control Panel in Windows Search bar and click on Open.

2. Click on Networking and Sharing Center option. If you can’t locate click on View by > Large icons.

3. Click on your Wi-Fi connection to open Wi-Fi status window.

4. Under Activity section, click on Properties button.

5. Under Networking click on Configure…

6. Go to Advanced tab in next window and select Bluetooth Collaboration.
7. Select Disabled by opening drop down list of Value.
8. Click OK to save changes.
Also Read: Fix Bluetooth won’t turn ON in Windows 10
Method 8: Reinstall Audio Drivers
Sometimes device drivers can interfere with each other and lead to errors like Bluetooth mouse lagging Windows 10. Drivers like Realtek HD, Realtek AC97 and NVIDIA HD can disrupt functionality of Bluetooth drivers. Uninstalling these audio drivers can fix the problem and you can do that by following the steps below.
1. Open Device Manager from Windows search bar.
2. Double-click on the Sound, video, and game controllers option to expand it.

3. Right-click on Realtek High Defintion Audio or NVIDIA High Definition Audio whichever your audio driver is. Select Uninstall Device.

4. In the following pop-up, check the box marked Delete the driver software for this device and click on Uninstall button to confirm.

5. Reboot your PC after uninstalling the driver.
6. Download your audio driver from the official website.

Although if you continue to experience lag, it possible that your Bluetooth mouse has incurred some damage and needs to be replaced. To help you choose a new mouse, here is a list of 10 Best Mouse Under 500 Rs. in India.
Recommended:
- Top 14 Best Alternative for Windows
- How to Screen Share Netflix on Discord
- Fix Taskbar Right Click Not Working
- Fix Bluetooth Driver Error in Windows 10
We hope that this guide was helpful and you were able to fix Windows 10 Bluetooth mouse lag issue and Logitech wireless mouse lagging Windows 10. Let us know which method worked for you the best. If you have any queries or suggestions then feel free to drop them in the comments section.
Experiencing mouse lag after upgrading to Windows 10 is common and not a cause for alarm. There are solutions available to fix this issue.
Below, we’ve put together possible solutions to wireless mouse lag problems. Start with one solution and work your way down the other options. Find out which works for you best.
10 Ways to Resolve Windows 10 Mouse Stutter and Lag Issues
In this blog post, we will share possible fixes to the following mouse-related problems in Windows 10/11 devices:
- Mouse lags in games – Some Windows 10 users reported that their mouse lags while they’re playing games. This is a major challenge to gamers because game performance is likely to be affected.
- Mouse stutters – According to some users, their mouse stutters randomly, making it hard for them to complete daily tasks.
- Mouse freezes – This is another common mouse problem in Windows 10/11 computers, one that occurs frequently when using a wireless mouse.
- Wireless mouse lag – Although this issue can affect wired devices, it is more common while using a wireless mouse.
- Mouse pointer lag – Another rather common problem that can occur in Windows 10/11 is mouse pointer lag, which can be easily resolved with our solutions below.
- Mouse no longer moving – Some Windows 10 users reported that their wireless mouse does not move at all, likely due to a corrupted driver or wrong mouse configuration.
If you have the same problems as those above, then consider trying the solutions below:
Disable and enable Scroll Inactive Windows
- Go to Settings -> Devices -> Mouse & Touchpad.
- Navigate to the Scroll Inactive Windows option.
- Disable and enable it.
- Do it a few times and see if the problem is resolved.
Adjust your Palm Check Threshold
- Go to Settings -> Devices -> Mouse & Touchpad.
- Select Additional Mouse Options.
- Navigate to the Touchpad tab.
- Go to Settings -> Advanced tab.
- Search for the Palm Check Threshold. Adjust it to the left.
Change the Touchpad settings
- Go to Settings -> Devices -> Mouse & Touchpad.
- Select Additional Mouse Options.
- Navigate to the Touchpad tab.
- Change the settings for the Delay Before Click section to No Delay (Always on).
Turn off Cortana
This may seem like an odd solution to the problem, but many Windows 10/11 users reported that after they switched off Cortana, their mouse problems disappeared. To do this, follow the steps below:
- Launch Cortana and open Settings.
- Look for the Cortana can give you suggestions, ideas, reminders, alerts and more option.
- Turn it off.
Switch off NVIDIA High Definition Audio
Sometimes, the cause of mouse lag issues in Windows 10 computers is the NVIDIA High Definition Audio or another related audio driver. If you are using NVIDIA GPU, follow these steps to disable it:
- First, uninstall the GeForce Experience app.
- Open Device Manager and search for NVIDIA High Definition Audio.
- Right-click on it and then select Disable.
The same steps apply to other audio drivers. If disabling them does not help, try to uninstall them.
Adjust the mouse frequency
Mouse lag issues, which are common among wireless mouse devices, may have something to do with frequency.
If your wireless mouse is lagging, try resolving the issue by adjusting the frequency. To adjust it, open the configuration software of your mouse. Change the frequency to 250Hz. After that, check if your now mouse works fine.
Disable the Fast Startup feature
One possible fix to mouse lagging problems is to disable the Fast Startup feature. While it is a handy feature, some Windows 10 users are not happy with this feature because it causes their mouse to lag.
To disable this feature, do these:
- Go to Control Panel.
- Select Power Options.
- Click on the Choose what the power button does option.
- Select Change settings that are currently unavailable.
- Uncheck the box beside Turn on fast startup (recommended) option.
- Click the Save changes button.
Once you disabled the Fast Startup feature, your mouse lagging problem is likely to be resolved and your mouse should start working normally again.
Adjust your Clickpad settings
To resolve mouse stutter issues on your Windows 10 computer, you can make adjustments in your Clickpad settings. Here’s how to do it:
- Open Control Panel.
- Scroll down to the Mouse section.
- Navigate to Clickpad settings.
- Go to Advanced -> Smart Sense.
- Set the value of Filter to 0.
Once you make all these changes, there should be no more mouse lag problems.
Install the correct mouse driver
A few Windows 10/11 users said that they were able to fix mouse lag problems by simply installing the correct and official mouse driver. By default, Windows 10/11 will install its built-in mouse driver, which generally works but can sometimes trigger issues.
If you are using a mouse from a popular brand, check the website of the manufacturer and download the most recent driver for your mouse. Better yet, download Auslogics Driver Updater and let it download the correct version of your mouse driver.
Optimize your Windows 10 computer for optimal performance
In some cases, the reason why your mouse lags on your Windows 10 device is that your computer is not performing as a whole. It might be filled with so many junk files that are causing your system to slow down.
To make sure your Windows 10 computer is performing at its best all the time, download and install Outbyte PC Repair. This tool diagnoses your system, locating speed-reducing problems and unnecessary files, for a smooth and stable computer performance.
Mouse lag and stutter problems are a headache for many Windows 10 users, so we are hoping that these 10 fixes may come handy to you.
Do you know other ways to resolve mouse lag problems on a Windows 10 computer? We’d love to hear them. Share them in the comments section below.
Give us some love and rate our post!
A wireless mouse provides excellent ease and adaptability, yet it can become extremely vexing when it unexpectedly halts or ceases to function. Whether you’re engaged in a critical activity or casually exploring the internet, a non-responsive mouse can interrupt your work and efficiency. Grasping the usual reasons and fixes for wireless mouse malfunctioning can aid in swiftly diagnosing and rectifying the issue.
These are the top 12 fixing solutions to help you resolve the freezing or lagging wireless mouse problem.
Table of Content
- How to Fix Mouse Freezing or Hanging Issue?
- 5 Quick Methods to Fix When Wireless Mouse Freezes
- Method 1: Check USB Connection
- Method 2: Maintain Medium Distance
- Method 3: Check for the Battery Usage
- Method 4: Switch On the Touchpad
- Method 5: Try Different Ports
- 7 Advanced Fixing Methods When Wireless Mouse Freezes
- Method 6: Disable Scroll Inactive Windows
- Method 7: Check Mouse Settings
- Method 8: Disable Pointer Trails
- Method 9: Check for Malware and Viruses
- Method 10: Reset Mouse Settings
- Method 11: Update the Mouse Driver
- Method 12: Uninstall the Mouse Driver
How to Fix Mouse Freezing or Hanging Issue?
We will first try five quick-fixing tips to unfreeze your mouse pointer. thereafter we will learn seven advanced troubleshooting methods to fix the hanging mouse cursor.
5 Quick Methods to Fix When Wireless Mouse Freezes
Method 1: Check USB Connection
Ensure the wireless receiver is securely attached to the USB port. Try different USB ports to rule out connection issues that may cause mouse freezing.
Method 2: Maintain Medium Distance
Maintain an adequate distance between the mouse and the PC. If it’s too close, signal interference can occur, causing freezing. Similarly, if it’s too far, the signal may weaken, resulting in freezing or lag. Keep your wireless mouse at a moderate distance, neither too far nor too close.
Method 3: Check for the Battery Usage
If your wireless mouse repeatedly freezes, it could be due to a lack of battery power. In this case, replace the battery or use a wired mouse.
Method 4: Switch On the Touchpad
When the cursor is frozen on the laptop touchpad, the first thing to do is to check whether the keyboard touchpad switch button is on. Usually, the button is Fn + (F7 / F5 / F9).
Method 5: Try Different Ports
Some USB ports on a computer may be defective or have compatibility issues with certain devices. If the mouse freezes, try connecting the receiver to a different USB port, as the problem may lie with the port itself.
7 Advanced Fixing Methods When Wireless Mouse Freezes
If the above fixing tips don’t help you, then you need to change a few mouse settings to root out your mouse-hanging cursor.
Method 6: Disable Scroll Inactive Windows
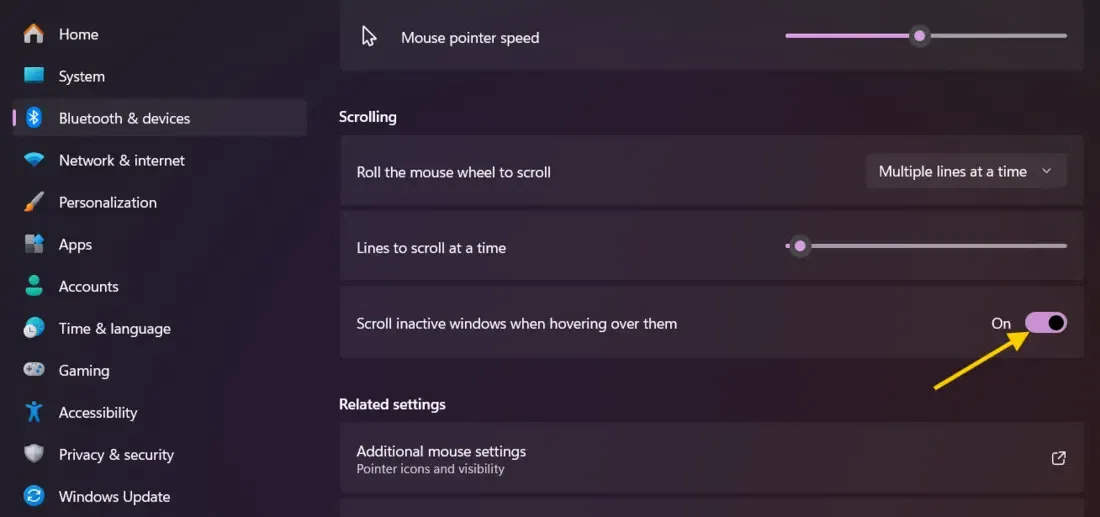
If your mouse is lagging and stuttering in a Windows 11 computer, then Turn off the ‘Scroll inactive Windows when hovering over them’ setting to fix the mouse freezing. Follow these steps to turn it off.
Step 1: Press Win+i to open settings
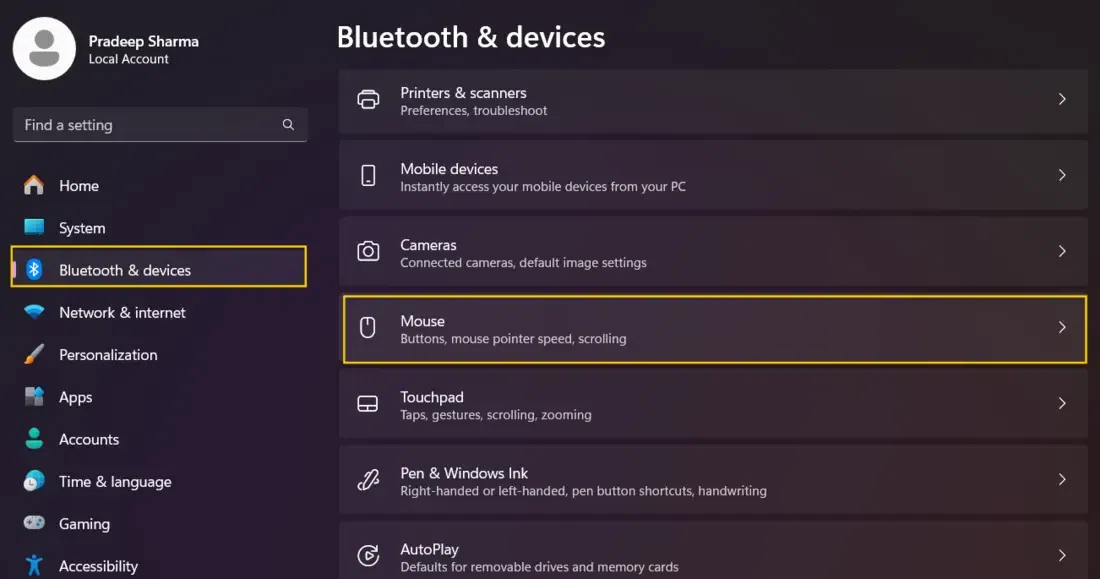
Step 2: Use the Arrows key Click Bluetooth and Device from the left, and select Mouse on the right side.
Step 3: Turn off this option ‘Scroll inactive Windows when hovering over them’
that’s it — your problem will be fixed. Check the mouse again, Try the next method if the mouse is still hanging.
Method 7: Check Mouse Settings
Disabling and re-enabling the touchpad driver in Windows PC can resolve mouse freezing by refreshing its functionality and settings. To check whether the touchpad has been disabled in Windows PC.
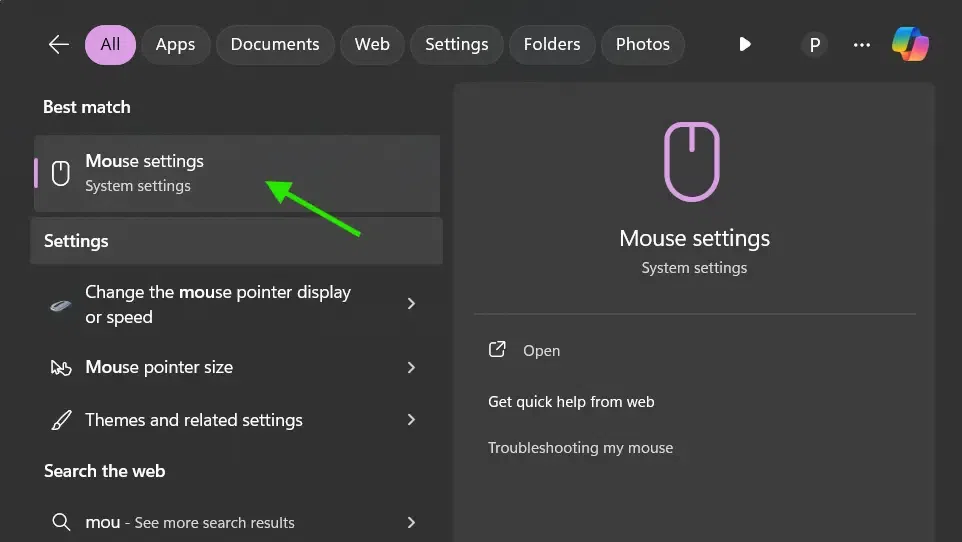
Step 1: Press the Window key and type ‘mouse setting’ in the search bar, and hit the Enter key to open it.
Step 2: Scroll down and select Additional mouse settings options

Step 3: Go to the Hardware tab and click the Properties button.
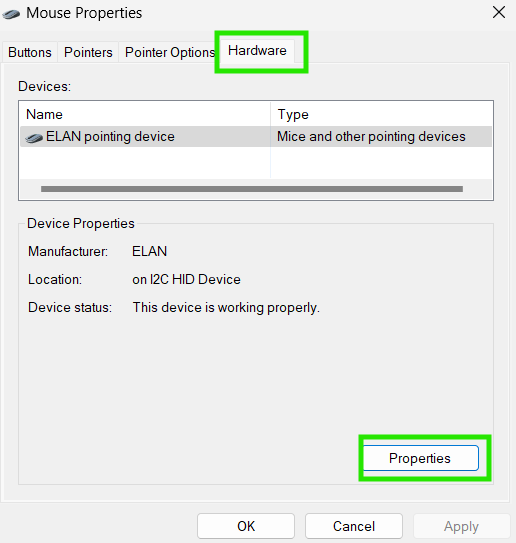
Step 4: Now click the Change settings button.

Step 5: Click on the option ‘Disable Device’.
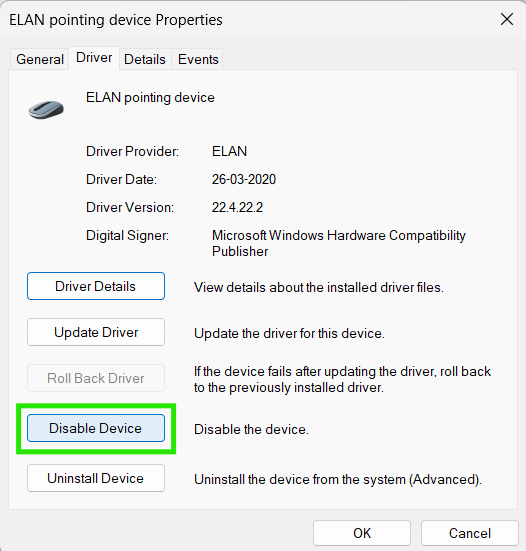
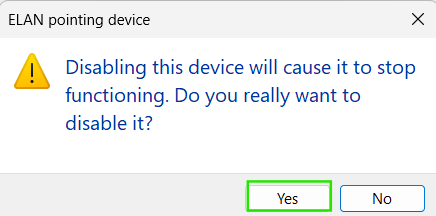
Step 6: Click the Yes button to disable it. You will notice that your mouse pointer has been disabled!
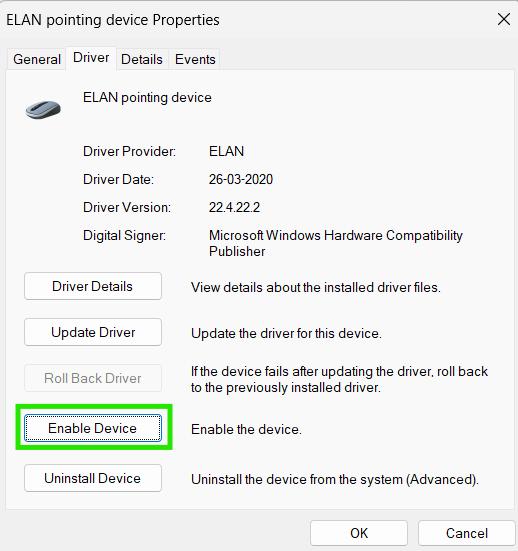
Step 7: Wait for a few minutes. Your mouse pointer will be resting on the ‘Enable Device’ button. Simply click the Enter button to re-enable it.
We hope that your mouse should work fine now! Still not? then go for the next method.
Method 8: Disable Pointer Trails
Step 1: Press the Win+R keys to open the run dialogue box.
Step 2: Now type ‘main.cpl’ and click OK.

Step 3: Go to the Pointer Options, and uncheck ‘Display pointer Trail.’
Step 4: Click on Apply, and click the OK button.

If the mouse still does not get fixed, there are more methods to try. But before, make sure to scan for malware and virus. Why? check out Fix 9.
Method 9: Check for Malware and Viruses
If your laptop is targeted by malicious software or viruses, you might also encounter the issue of a frozen cursor. Luckily, Windows Defender comes as a pre-installed antivirus software. It can rapidly and efficiently detect and eliminate viruses on your device.
Method 10: Reset Mouse Settings
Step 1: Press the Window key and type ‘mouse setting’ in the search bar, and hit the Enter key to open it.

Step 2: Scroll down and select Additional mouse settings options

Step 3: Go to the Pointer tab, and click Use Default.
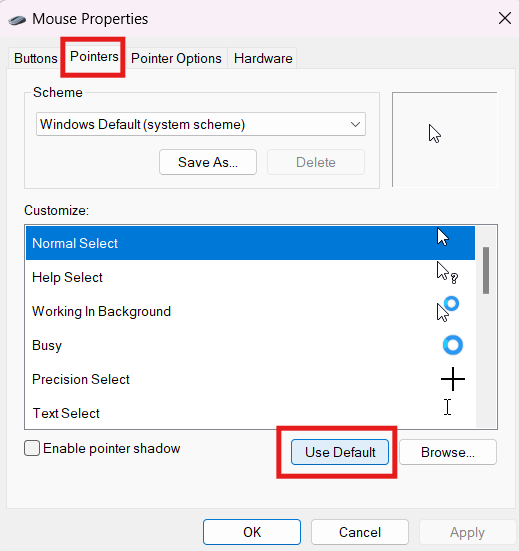
Step 4: Click Apply and then the and OK button.
Till now you have tried ten fixing methods. Great! But don’t be sad if none of the methods works for you. The last two methods will show their magic!
Method 11: Update the Mouse Driver
In case, your mouse driver is outdated. Then updating the mouse driver can help to fix the mouse freezing issue. So update the mouse driver to the latest version of the driver.
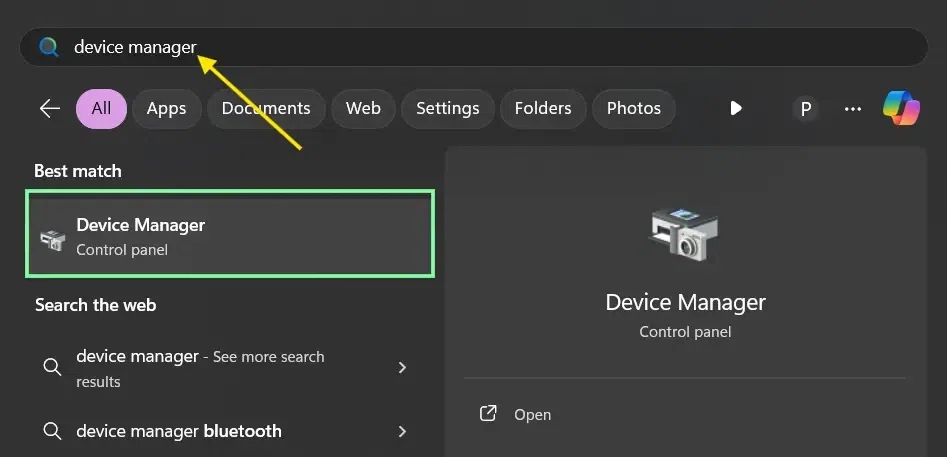
Step 1: Press Win+key and Type ‘Device manager’ in the search bar, and click to open it.
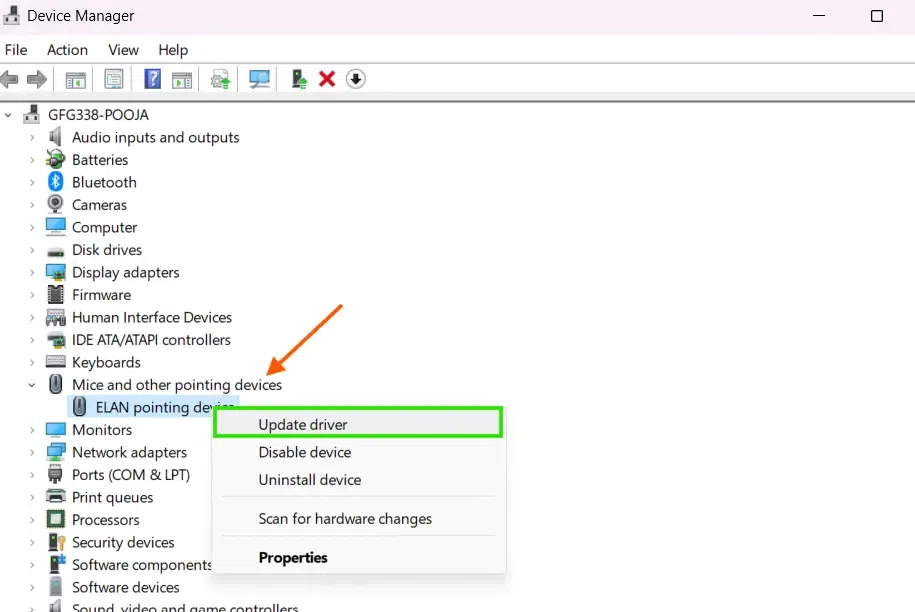
Step 2: Now expand the Mice and other pointer option, right click on the mouse driver and select ‘update driver’.
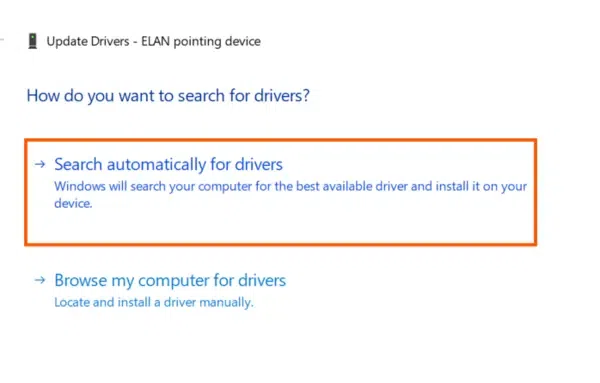
Step 3: Click search automatically for the it’sdrivers option.
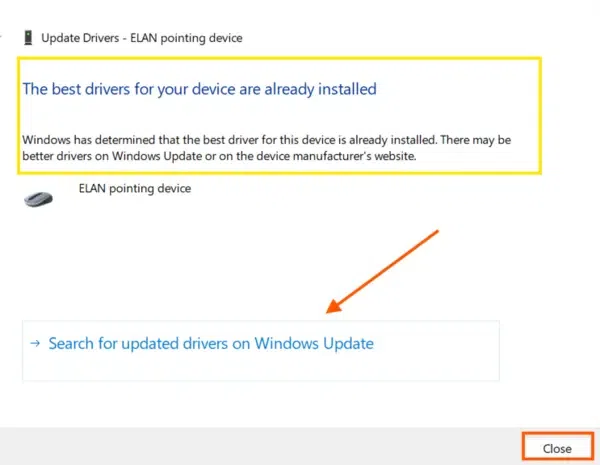
It will start scanning for the best driver. In our case, it’s showing, ‘The best drivers for your device are already installed’. But it will recommend you the best driver for your device if not selected already.
Step 4: After updating the driver, click the Close button.
If updating the driver doesn’t fix the problem then you should try to uninstall it. Try out the last method and unfreeze your mouse cursor.
Method 12: Uninstall the Mouse Driver
Step 1: Open Device Manager using the above step and expand the ‘Mice and other pointer option’.
Step 2: Right-click on the mouse driver and select ‘uninstall driver’.
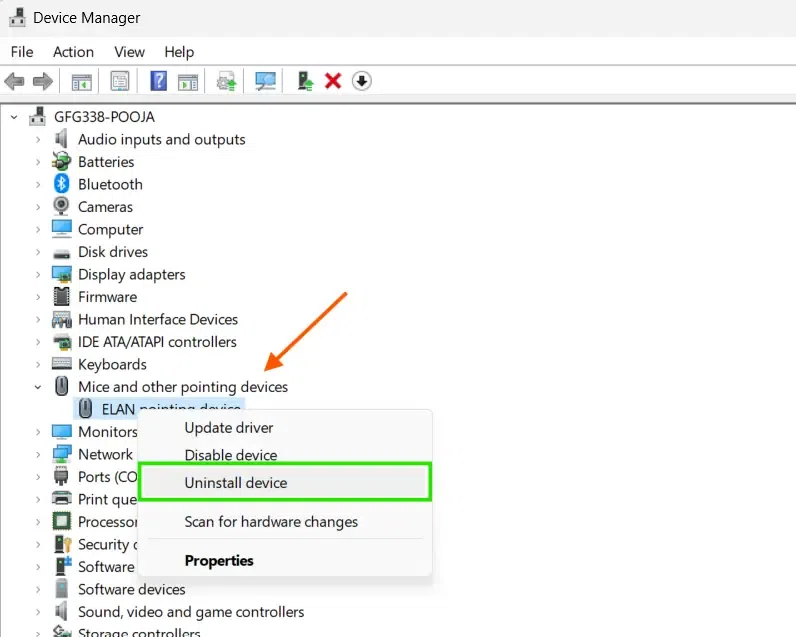
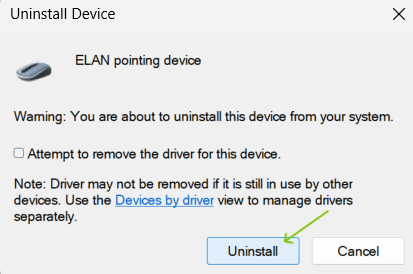
Step 3: Please confirm Uninstall this device from your system and restart your computer.
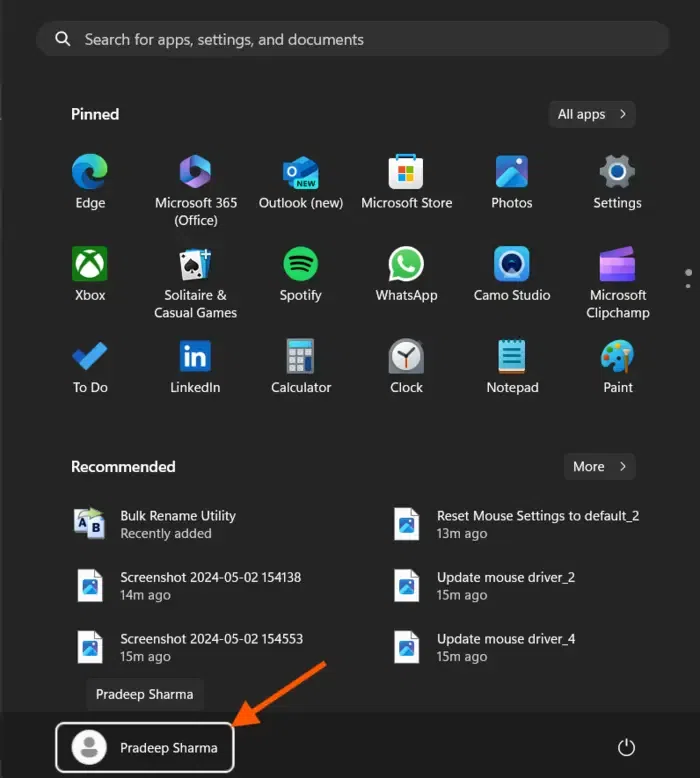
Step 4: Since you have uninstalled the mouse driver, you will be unable to use the mouse. Follow these steps to restart your computer without a working mouse
4.1. Press the Windows key to open the Start menu.
4.2. Use the ↑ arrow keys to navigate to the user account and press Enter.
4.3. Now, press the → arrow keys to select the the power menu and use ↓ the the arrow key to go down to the ‘Restart’ option. Press Enter to restart the computer.
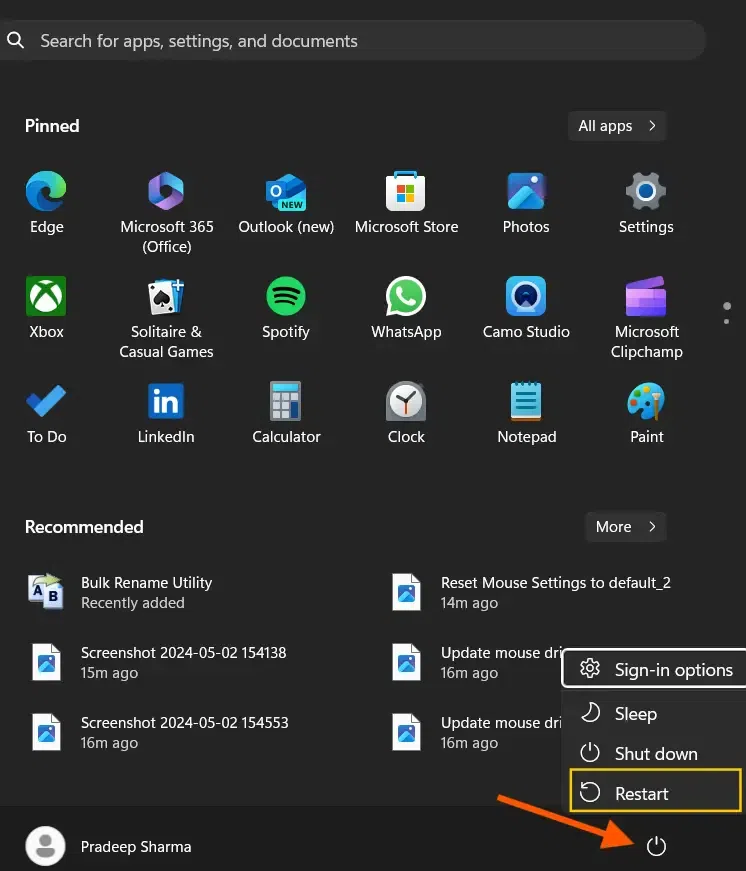
4.4. Press Enter again to select the Restart anyways option.
This process will allow you to reboot your computer without needing a mouse, and it may help fix the issue you are facing.
Conclusion
A wireless mouse that freezes can cause a lot of trouble, but by following the correct steps to fix it, you can quickly get it working properly again. Knowing the usual reasons for wireless mouse problems and using the fixes suggested can keep your work going smoothly and efficiently. Making sure to regularly clean your mouse and receiver, and keeping your drivers current, can also stop problems from happening later.