
Microsoft has lately released the much-awaited Windows 11, which is the successor to Windows 10. It is still under test. However, its Windows Insider program is now available for developers. Though Windows 11 brings a whole new design haul along with some improved features, some users are experiencing Windows 11 slow performance after installing it.
Windows 11 has grown into a mature operating system since October 5, 2021 and it takes over 26.52% of Windows market share worldwide (by StatCounter). While enjoying a new digital life in this operating system, some users also came across Windows 11 performance issues, including Windows 11 slow boot, Windows 11 slow startup or after update, fast battery consumption, overheating of the computer, and many others.
So, if you are also facing Windows 11 slow performance, as in the two cases here, follow this article, and we’ll walk you around effective ways to fix the issue of how to solve the Windows 11 slow issue:
Case 1: My pc became extremely slow out of a sudden and now it’s pretty much not working…-from Microsoft
Case 2: Windows 11 suddenly became (very) slow…-from Reddit
So, let’s begin!
Possible Reasons for Windows 11 Performing Slow
Windows 11 is indeed a major release of the Windows operating system developed by Microsoft. But if you are bothered by windows 11 slow performance, there could be multiple reasons behind it. It is worth mentioning here that even if the PC or laptop that you own can support the latest Windows 11 version, the system may still require some extra hardware or resources to boost the performance. Why is Windows 11 so slow? Here are some common issues listed which can lead to windows 11 slow performance on your PC or laptop:
- Issues with the hard disk
- Issues with the background running startup tasks
- System drive having low disk space
- Usage of HDD instead of SSD
- Outdated operating system
- Outdated graphics card drivers
- Conflicts in security programs
- Wrongly installed or corrupted Windows software
- Insufficient RAM
- PC or laptop with lower specification
8 Effective Ways to Fix Windows 11 Running Slow
Now that you already know what could be the reason for your windows 11 slow boot, it is essential for you to know about some effective methods which can help you in speeding up Windows 11. So, let’s discuss the troubleshooting guide for getting rid of windows 11 slow performance. All the methods shown below have instructions, so to achieve effective results, make sure to follow them in a particular order.
1. Disable Startup Programs
2. Turn off Fast Startup
3. Increase C drive space
4. Update Graphics Drivers
5. Delete Temporary Files
6. Run Windows Update Troubleshooter
7. Migrate Windows 11 to SSD
8. Go Back to Windows 10 and Wait for the Next Stable Windows 11
Video Guide
If you think these methods are helpful for you to fix Windows 11 running slow, you can share the guide to help more people in need!
1. Disable Startup Programs to Speed Up Windows 11 Slow Performance
Often it is tested that several unnecessary programs or applications can happen to reduce the load time in your Windows PC or laptop while booting it up. So, in order to get away with the issue of windows 11 slow boot, ensure to disable all the unwanted applications and programs from the Startup tab. Here is how you can do:
Step 1: Press the «Ctrl + Shift + Esc» keys together and open the «Task Manager».
Step 2: Tap on the «Startup» tab and click on the applications or services that you want to disable.
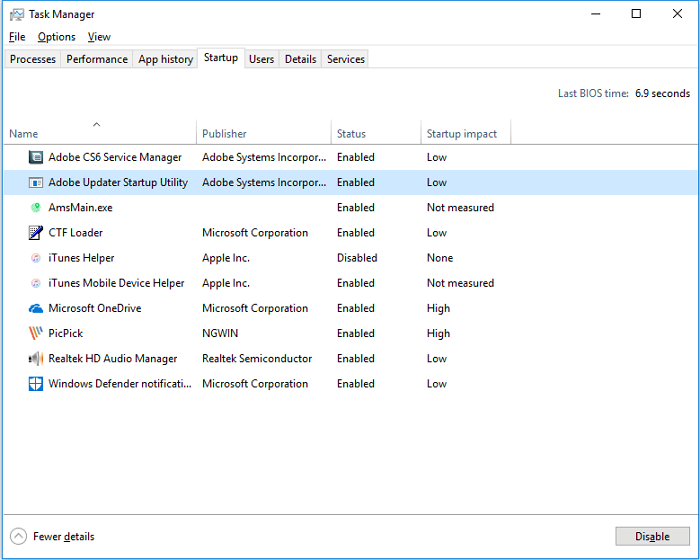
Step 3: Finally, click on the «Disable» button.
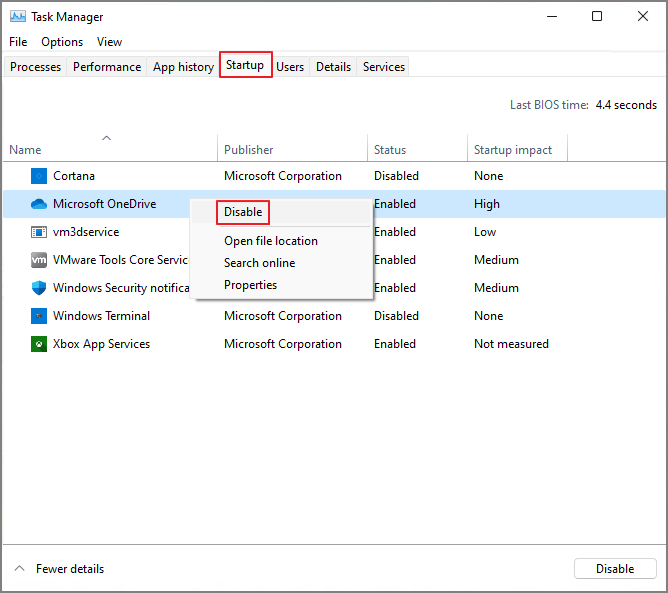
You can repeat the same steps for all the applications and programs to disable them. After you are done disabling them, restart your computer and check if the problem of windows 11 slow boot is solved.
2. Turn off Fast Startup to Fix Windows 11 Slow
Windows 11 operating system comes with a built-in Turn on Fast Startup function. You can use it to enhance the boot-up timing of your system. However, oftentimes you can experience the problem of windows 11 slow boot if you have this option enabled. Thus you can consider turning off the Fast Startup option to order to improve the performance of your system. To turn off the Fast Startup option, do the following:
Step 1: On the search icon, write «Control Panel» and click on it.
Step 2: Tap on the «Hardware and Sound» option and choose the «Power Option.» Alternatively, if you can’t find the power option directly, then type «Power Options» from the Control Panel search bar.
Step 3: Select the «Choose what the power button does» option. If the «Turn on fast startup» is enabled, uncheck the box to turn it off.
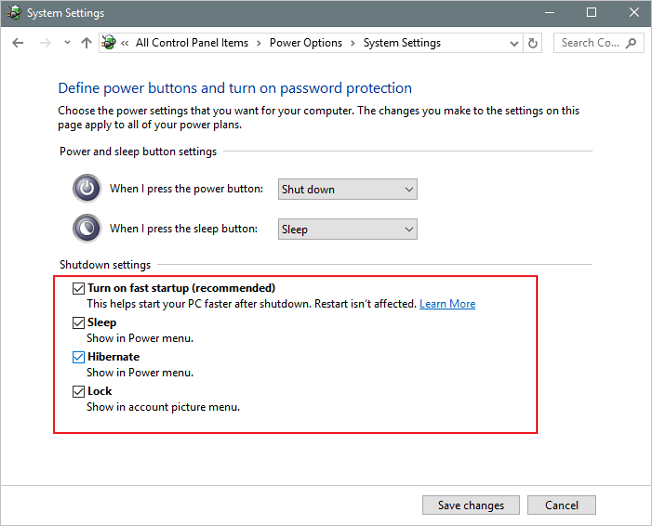
Step 4: Tap on the «Save Changes» option.
Restart your computer and see if you’re able to fix the windows 11 slow performance problem.
3. Increase C Drive Space — Use EaseUS Partition Master «Allocate space» or «Resize/move.»
If none of the above-mentioned ways helped you in solving the issue of windows 11 slow boot, then try to increase C drive space. To do this, you can completely rely on the EaseUS Partition Master. You can use its «Allocate space» or «Resize/move» option to increase the space in the C drive.
Here is what you need to follow:
Extend System C drive with unallocated space
- 1. Right-click on the System C: drive and select «Resize/Move».
- 2. Drag the system partition end into the unallocated space so to add it to the C: drive. And click «OK».
- 3. Click «Execute Task» and «Apply» to execute the operations and extend the C drive.
Bonus Features You May Also Like in EaseUS Partition Master:
— EaseUS Partition Master —
Your Smart Windows 11 Update Disk Manager
- MBR to GPT Converter, Make Disk Ready for Windows 11.
- Migrate Windows 11 to New SSD in 1-Click.
- Handy to Extend or Combine Partitions in Windows 11.
- Clone and Upgrade Disks without Data Loss.
4. Windows 11 Very Slow? Update Graphics Drivers
When it is about the slow performance of Windows 11, an old graphics card driver on your PC or laptop can also lead to the issue of windows 11 slow performance. To avoid such issues, it is advised to keep the graphics driver updated. To do it, follow these steps:
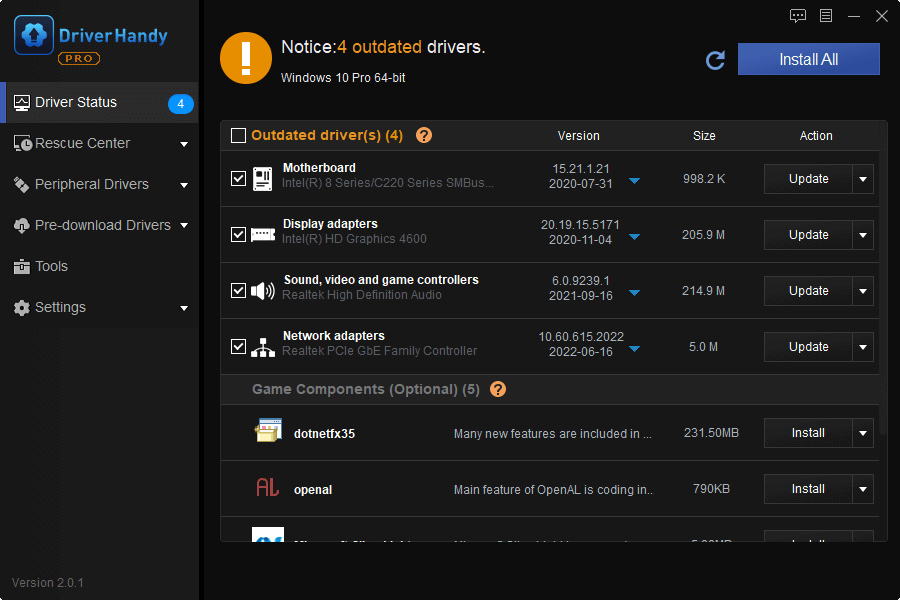
Automated Way: Update Graphics Driver with Software:
EaseUS DriverHandy is one such tool any levels of worldwide users can apply this software to update the drivers of their computers with the latest drivers in simple clicks. EaseUS DriverHandy is an all-in-one Windows driver manager, and it detects if there are any outdated or corrupted drivers and then updates them.
Download and install EaseUS DriverHandy and update your drivers with a single click.
Step 1. Open EaseUS DriverHandy and click «Scan.»
Step 2. Click «Update» to keep all drivers updated.
Update Graphics Driver Manually:
Step 1: By pressing the «Windows + X» keys, open the «Quick Start Menu».
Step 2: Tap on the «Device Manager» option and double-click on the «Display adapters» option.
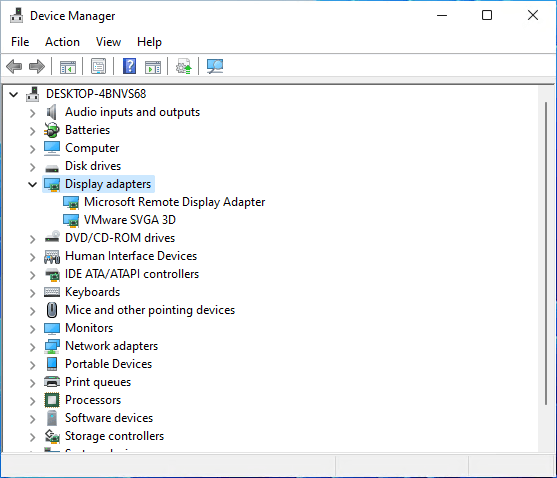
Step 3: Right-click on the graphics card you are running on your PC or laptop.
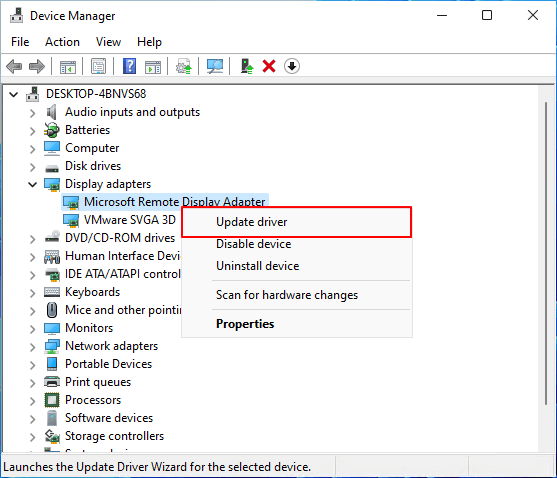
Step 4: Choose the «Update driver» option and select the «Search automatically for drivers» option.
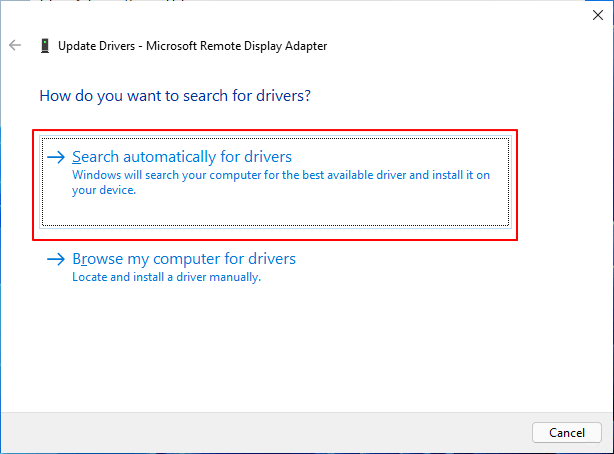
Step 5: If there’s any update available for the graphics card, it will automatically download and install its updated version.
After this, make sure to restart your computer in order to apply changes.
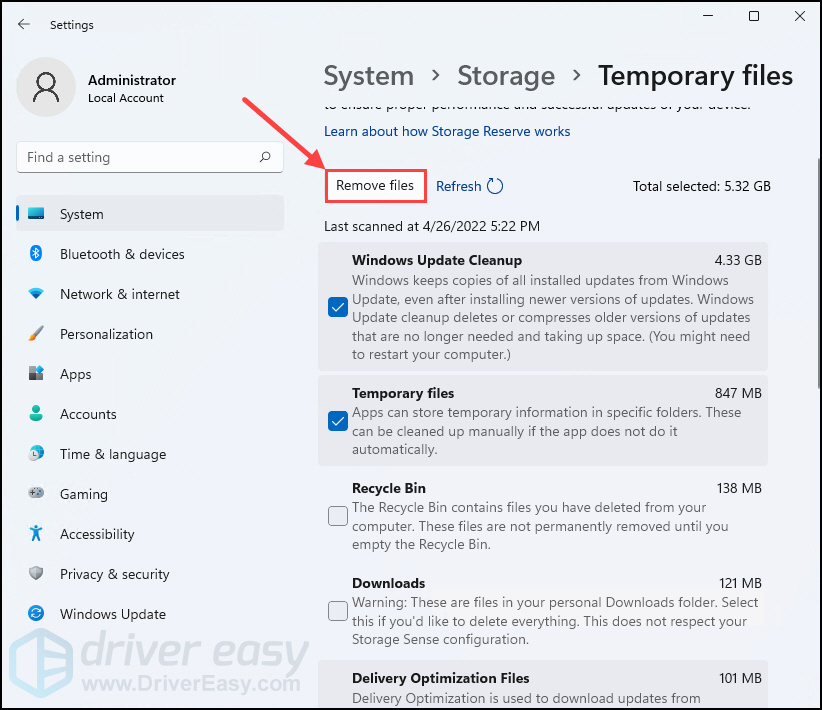
5. Delete Temporary Files to Check Windows 11 Performance Issue
As the name goes, temporary files are developed by the Windows operating system in the memory whenever a task is being performed. It allows the computer to keep things smooth and quick for the users when they try to perform the same task again. Corrupted or old temporary files can lead to the issue of windows 11 slow performance. To delete the temporary files from your laptop or computer, do the following:
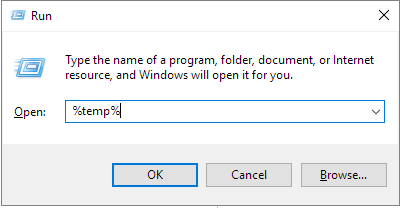
Step 1: By pressing the «Windows + R» keys together, open the «Run» dialog box.
Step 2: Here, type «%temp%» and press the Enter button to access the «Temp folder» from C: drive.
Step 3: By pressing the «Ctrl + A» keys to select the temp files. Press the «Delete» key to remove the temporary files.
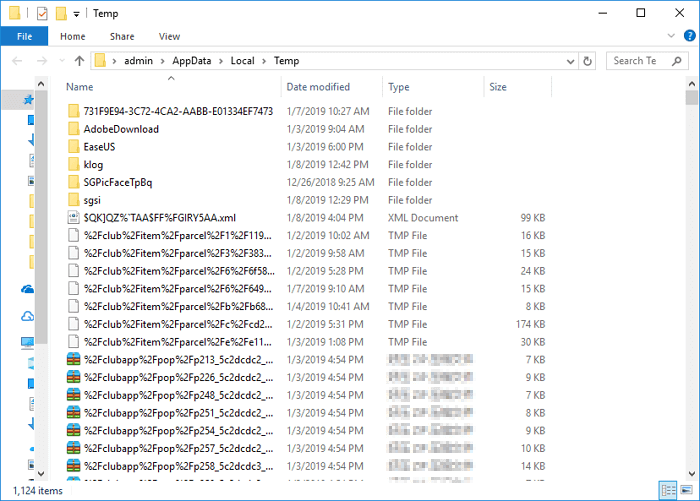
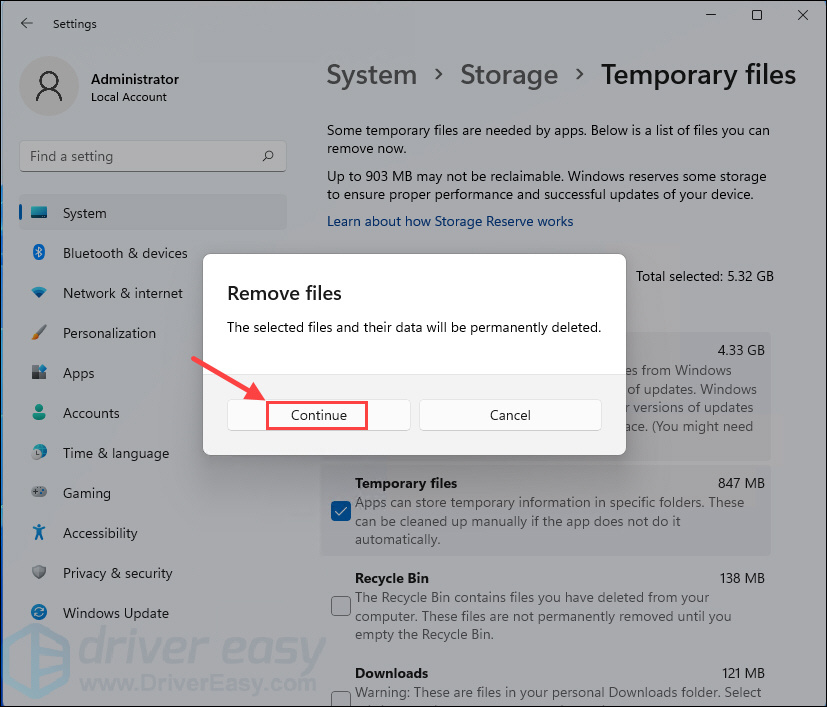
Step 4: If a dialog box appears, click on the «Do this for all current items» option and tap the «Continue» button.
Note: Wait for the deletion process, and if some temporary files are not getting deleted, then skip those files.
After you are done removing the temporary files, restart your PC or laptop to check if the problem of windows 11 slow performance is solved.
6. Run Windows Update Troubleshooter
If you are still facing issues like windows 11 slow boot, then you can consider running the Windows Update Troubleshooter in order to see if there is anything wrong with the update or not. To run Windows Update Troubleshooter, follow the below-listed instructions:
Step 1: Press the «Windows + I» keys together to access the «Windows Settings».
Step 2: Click on the «Update and Security» option.
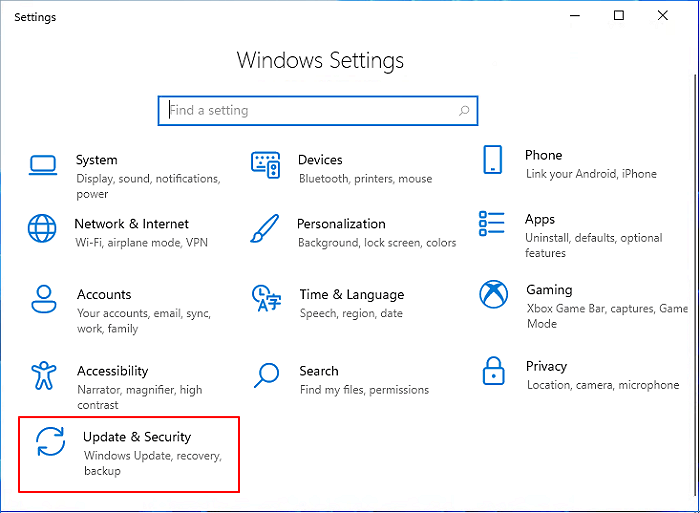
Step 3: Click on the «Troubleshoot» option from the right pane, then choose the «Other troubleshooter» option.
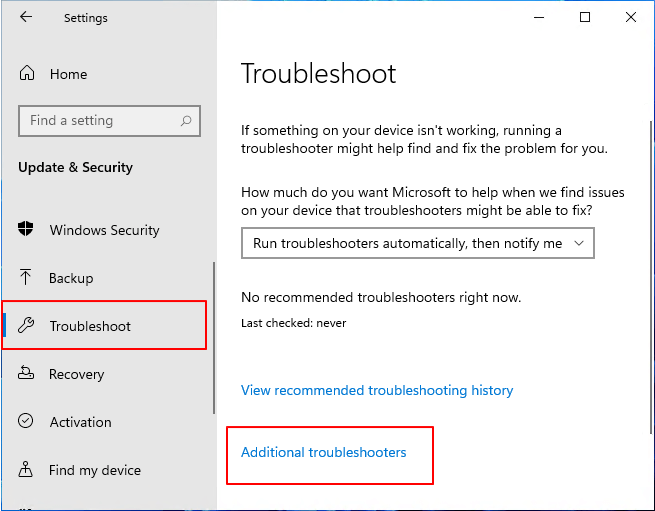
Step 4: And click on the «Run» option right by «Windows Update».

Wait for the system to begin diagnosis automatically and check certain things on the PC. If there’s an issue, look for its troubleshooting method on the web to fix it.
7. Migrate Windows 11 to SSD — use EaseUS Partition Master «migrate OS.»
If the windows 11 slow performance persists, try to migrate the Windows 11 operating system to SSD. It will improve the performance and boot timing of your PC. For this, you can use the «Migrate OS» feature of the EaseUS Partition Master tool. It is a brilliant tool that will help you in making the migration of the operating system easy.
To migrate OS to SSD:
Steps to migrate OS to HDD/SSD:
- Run EaseUS Partition Master, and select «Clone» from the left menu.
- Check «Migrate OS» and click «Next».
- Select the SSD or HDD as the destination disk and click «Next».
- Check Warning: the data and partitions on the target disk will be deleted. Make sure that you’ve backed up important data in advance. If not, do it now.
- Then click «Yes».
- Preview the layout of your target disk. Then click «Start» to start migrating your OS to a new disk.
- After this, click «Reboot Now» or «Done» to determine if you want to reboot the computer from the new disk immediately.
«Reboot Now» means to keep the changes instantly, while «Done» means you need to restart the computer later manually.

Note: The operation of migrating OS to SSD or HDD will delete and remove existing partitions and data on your target disk when there is not enough unallocated space on the target disk. If you saved important data there, back up them to an external hard drive in advance.
8. Go Back to Windows 10 and Wait for the Next Stable Windows 11
Finally, if you are still struggling with the Windows 11 slow boot problem, then it will be beneficial for you to go back to the previous version of the Windows OS.
Microsoft has officially notified that Windows 11 will finally come on October 5th. It will be your last resort, and do execute it, follow these steps:
Note: Returning to Windows 10 may not an one-size-for-all method. Some users are experienced Windows 10 running slow issue.
Other Windows 10 slow issue:
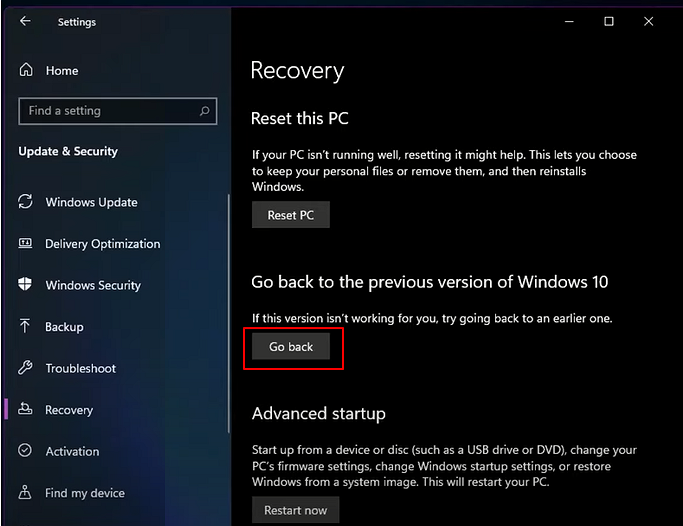
Step 1. Go to Settings, click System and Recovery.
Step 2. Click Go back next to the Previous version of Windows.
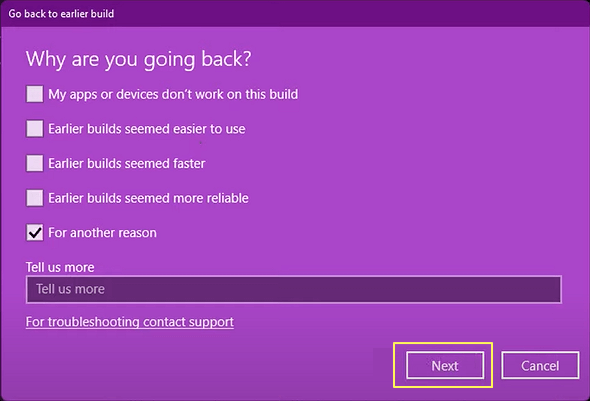
Step 3. Check the reasons why you want to uninstall when prompted.
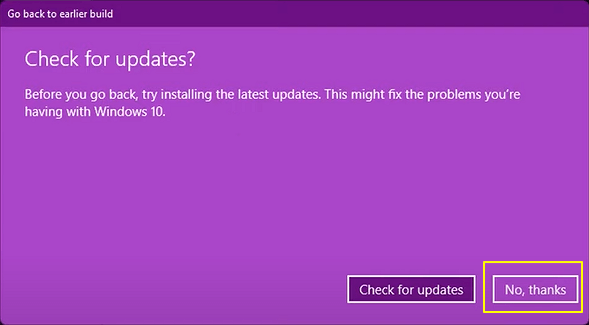
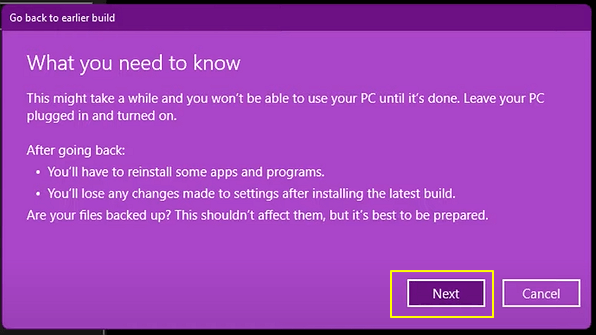
Step 4. Click No, thanks when asked to check for updates instead of rolling back.
Step 5. When a «What you need to know» window pops up, click Next to continue.
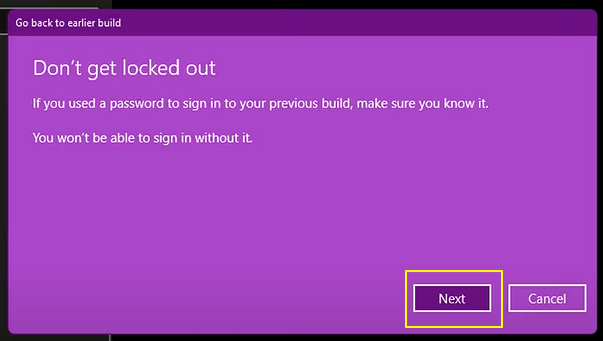
Step 6. Click Next again when it warns you to remember your password from Windows 10. (Keep your password remembered.)
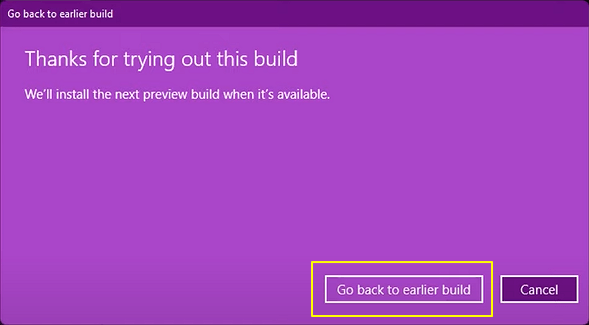
Step 7. Click Go back to an earlier build.
As soon as you finish the procedure, restart your PC or laptop to find out if the windows 11 slow performance issue is fixed or not.
Video Guide — How to Fix Windows 11 Slow and Lagging Problem [FAST]
Here is a great video that shows you how to quickly fix Windows 11 running slow.
Conclusion
That’s it for how you can improve the Windows 11 slow performance. This guide is also suitable for Dell laptop running slow error. You can go ahead and try any of the methods listed above to enhance the performance and boot timing of your system. However, if you are hunting for a quick-fix and an effective method, try and use EaseUS Partition Master as a daily disk partition management tool for achieving the best user experience on Windows 11.
1. Why Is Windows 11 So Laggy?
If you feel Windows 11 running slow or freezing, the reasons could come from low system storage or running too many programs at the same time.
2. Will Windows 11 Slow Down My PC?
Windows 11 is faster than Windows 10. However, some users is experiencing slow performance issue due to low disk storage or outdated drivers. Don’t worry. It can be fixed easily.
3. How Can I Make Windows 11 Faster?
To fast fix Windows laggy problem, a useful disk manager, EaseUS Partition Master, works to increase c drive space or migrate OS to another drive. Other quick fixes: disable startup programs, turn off fast startup, and delete temporary files.

Whenever you feel it lagging or freezing on the Windows 11, problems could possibly come from anywhere from low system storage to outdated drivers or from too many running programs to 100% disk usage. If you would like some tips to solve these issues without too much effort, this tutorial is exactly what you need.
Below are 8 easy solutions to boost your computer performance on Windows 11 without having to play around too many critical settings.
Try these solutions:
You might not need to try them all, just walk your way down the list until you find the laggy problem getting better.
Before trying the below methods, you should simply restart your computer first (maybe you have) to see if it helps, which is always the first thing to do when something goes wrong with the PC.
- Update Windows 11
- Update drivers
- Have a check on the Task Manager
- Adjust startup Apps
- Uninstall rarely-used apps
- Disable visual effects
- Delete temporary files
- Run Disk Cleanup
Method 1: Update Windows 11
Keeping the Windows 11 up-to-date can let you avoid some bugs and glitches existing in the older version that might cause your computer lag.
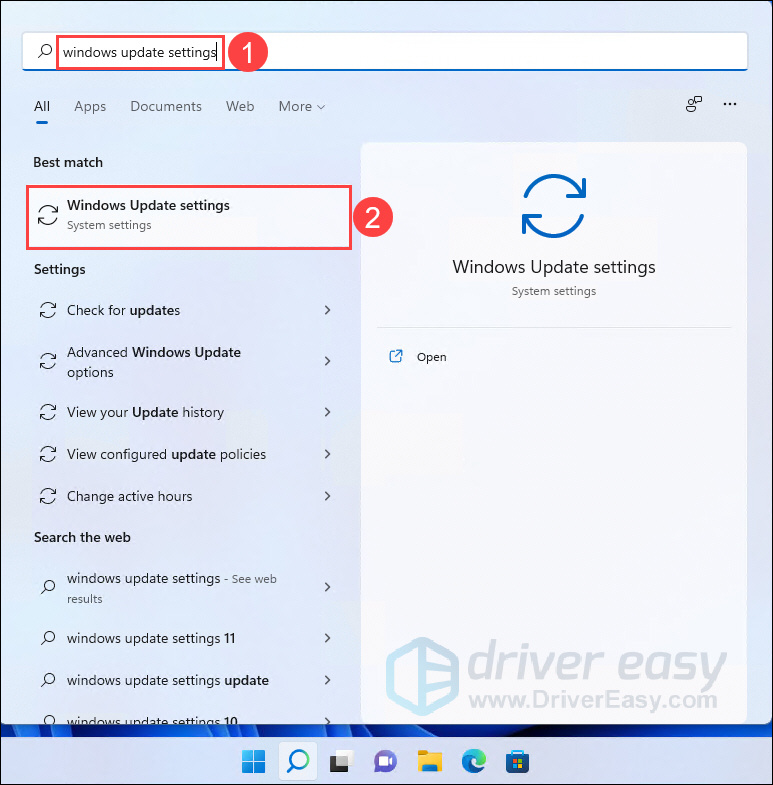
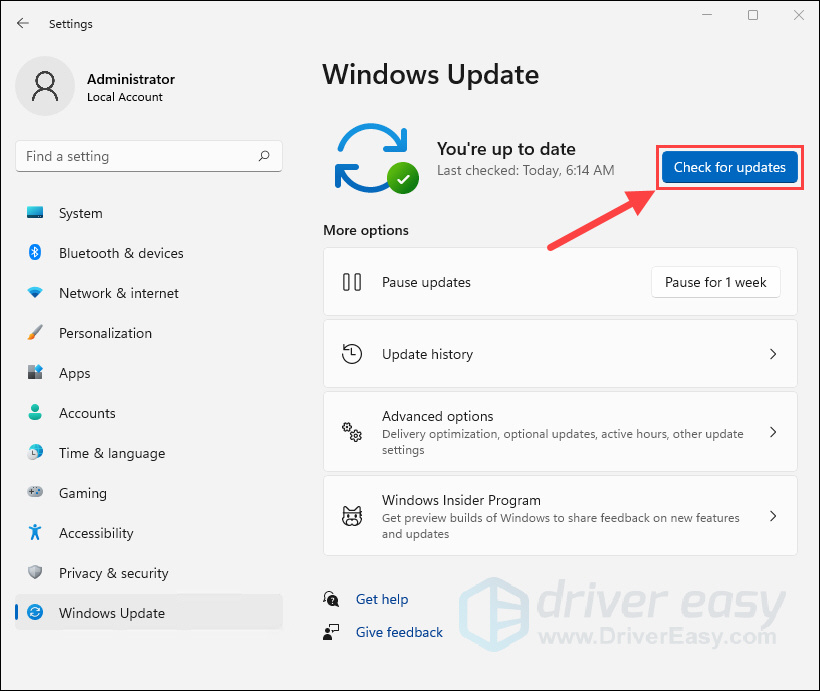
- Press the Windows key to open the Start menu, type Windows Update settings in the search box and select it from the result that appears.

- Click Check for updates and wait for a while.

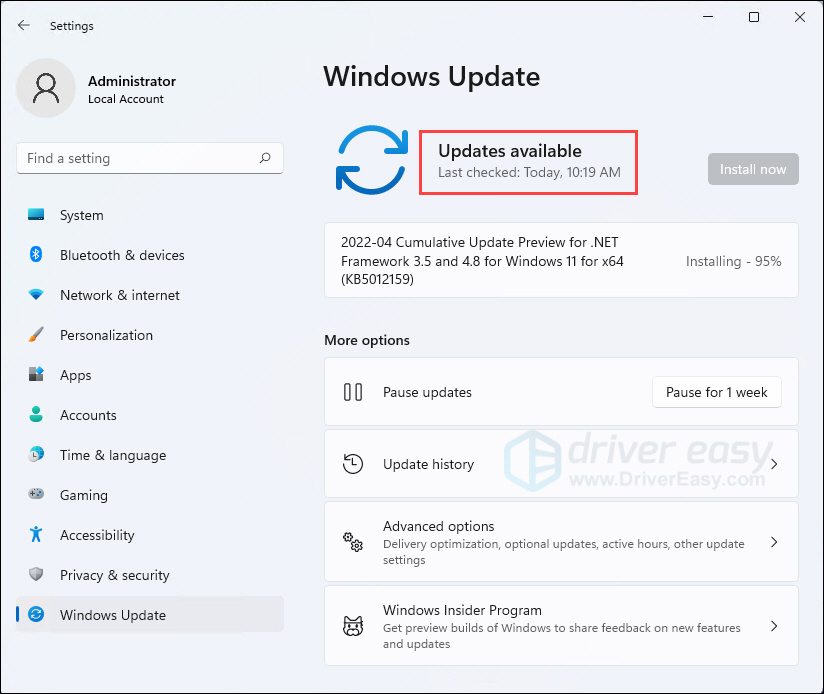
- If the checking result is updates available, the system will automatically download and install it for you.

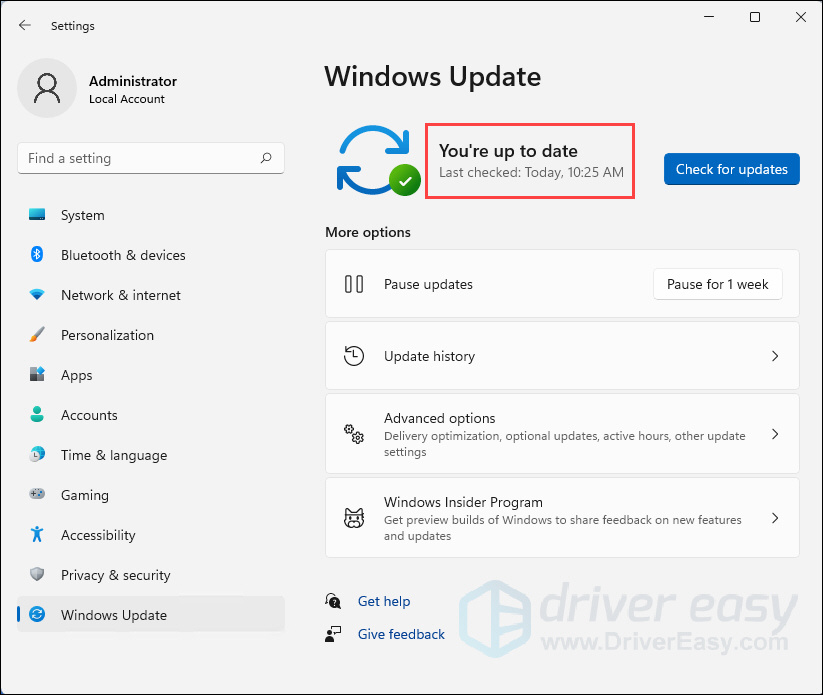
Or if the checking result is You’re up to date, then you can just close the Setting windows.

If this method doesn’t work for you, try the following below.
Method 2: Update drivers
Updating drivers should always be your go-to option when your computer or system doesn’t work as smoothly as you expected. Drivers are the interpreters between a computer and all its devices. With faulty and outdated drivers, your computer may bring you troubles. Therefore, it’s essential that you have the latest correct device drivers for your operating system at all times.
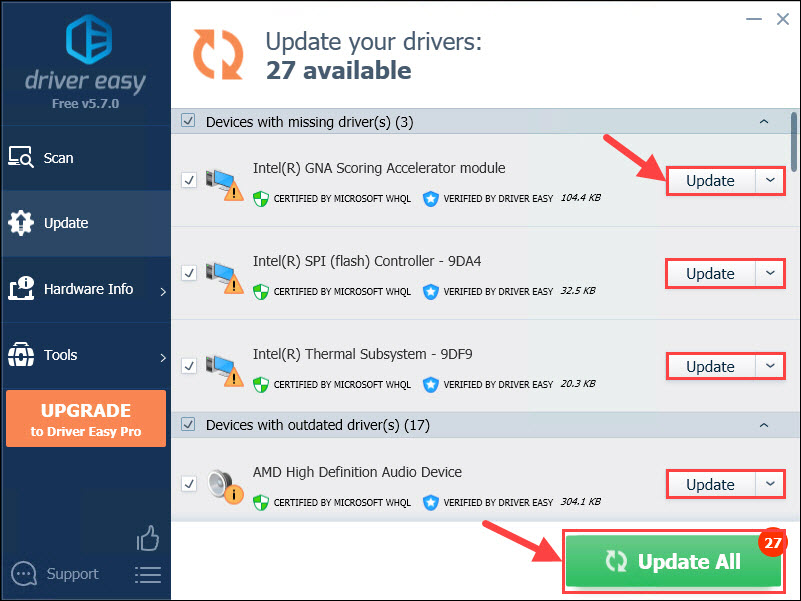
If you’re not comfortable playing with device drivers, we recommend using Driver Easy. It’s a tool that detects, downloads and installs any driver updates your computer needs. Here’s how to update drivers with Driver Easy:
- Download and install Driver Easy.
- Run Driver Easy and click the Scan Now button. Driver Easy will then scan your computer and detect any problem drivers.

- Click the Update button next to a device to automatically download the correct version of their driver, then you can manually install the driver (you can do this with the FREE version).
Or click Update All to automatically download and install the correct version of all the drivers that are missing or out of date on your system (this requires the Pro version which comes with full support and a 30-day money back guarantee. You’ll be prompted to upgrade when you click Update All).

- Restart your PC to see if your computer still stutters after updating the drivers. If the problem still persists, you should try other methods in this post.

The Pro version of Driver Easy comes with full technical support. If you need assistance, please contact Driver Easy’s support team at support@drivereasy.com.
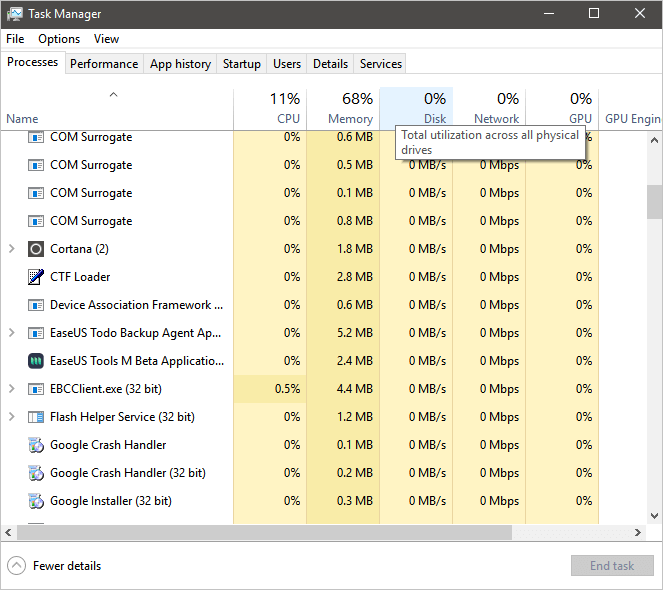
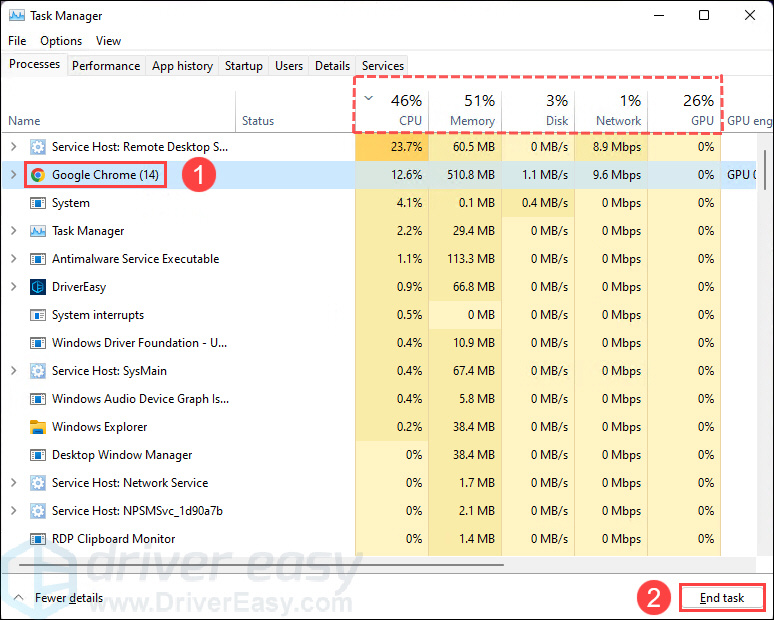
Method 3: Have a check on the Task Manager
Task Manager is a tool in Windows system that enables you to monitor the CPU, Memory or Disk usage. If some of the processes are over-utilizing resources, that might make your OS run slow.
- Right-click the Windows icon on the task bar and select Task Manager from the pop-up list.
- Under the Processes tab, you will have detailed information on the right and the name of each process on the left. Select some processes using up most of the available resources and click End task.

If this method doesn’t work for you, try the following below.
Method 4: Adjust startup Apps
Usually Windows 11 would run faster when you start your computer with less startup Apps. Disable some of the unnecessary startup Apps is a way to help with the lagging problem in Windows 11.
- Press the Windows key to open the Start menu, type startup apps in the search box and select it from the result that appears.

- Click the toggles to Off for those Apps you want to keep them from automatically opening (especially those with High impact).

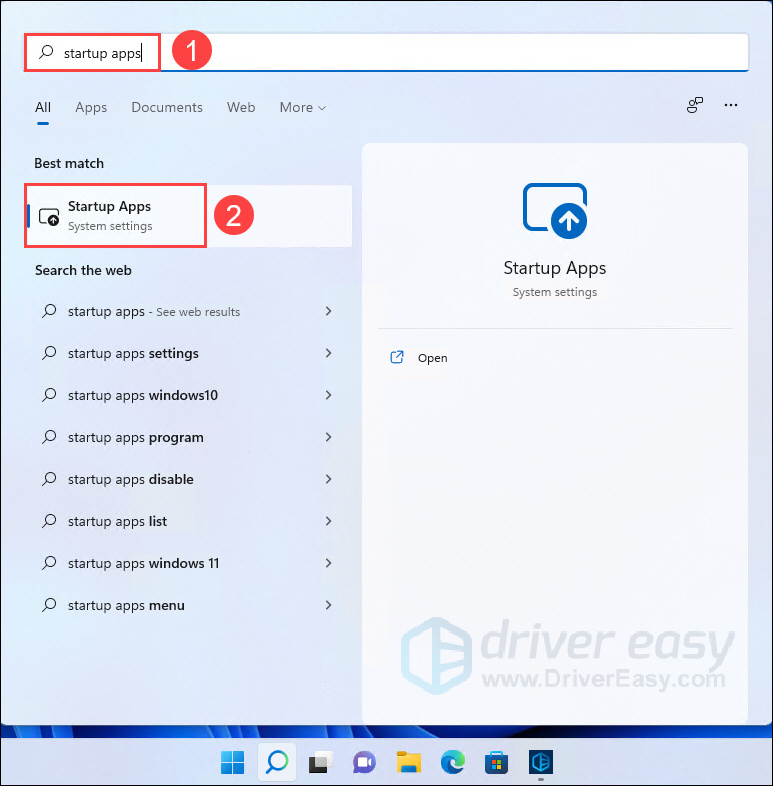

After applying these settings, have a check to see if it works for you. If not, try next one below.
Method 5: Uninstall rarely-used apps
- Press the Windows key to open the Start menu, type apps & features in the search box and select it from the result.

- Next, you will see a list of apps installed in your system. Click the 3-dots button on the apps you rarely use and then select Uninstall.

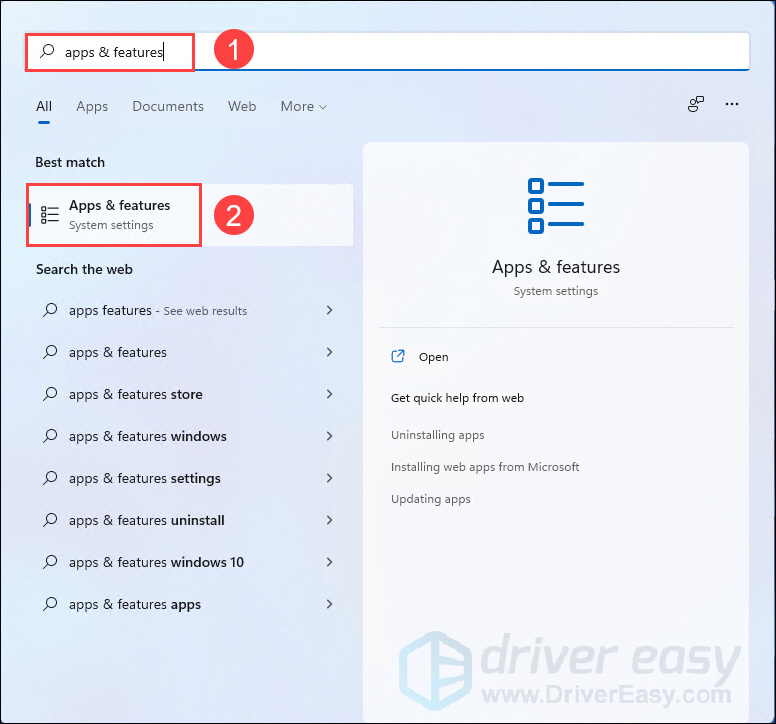
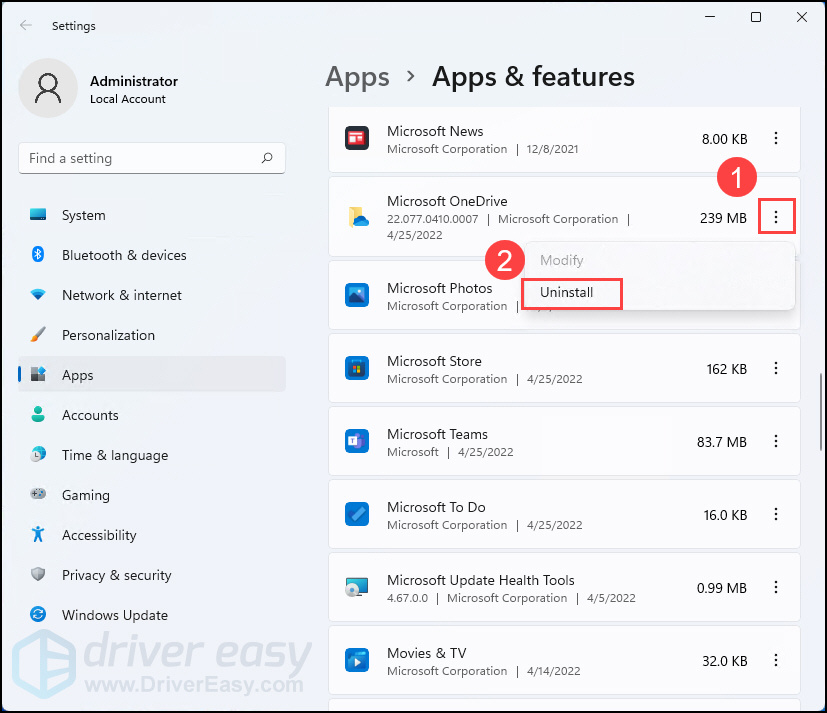
Some of the apps can not be uninstalled because they are critical built-in features of Windows 11.
Method 6: Disable visual effects
Windows 11’s visual effects are new features in Microsoft OS. They perform flashy visuals to meet users’ aesthetic needs, but in some situations, they also make the OS sluggish.
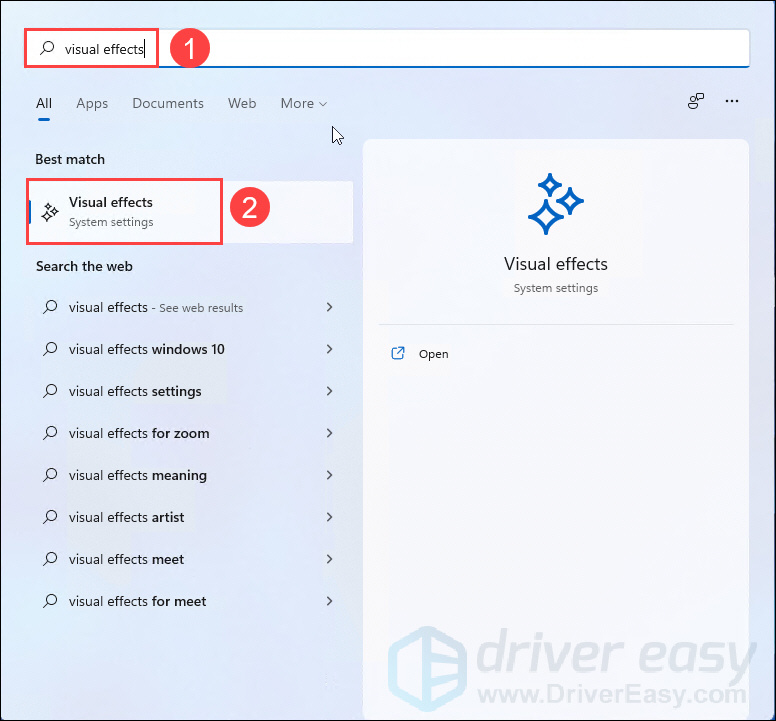
- Press the Windows key to open the Start menu, type visual effects in the search box and select it from the result.

- If the Transparency effects and Animation effects are on in the list, click on the toggles to turn them off.

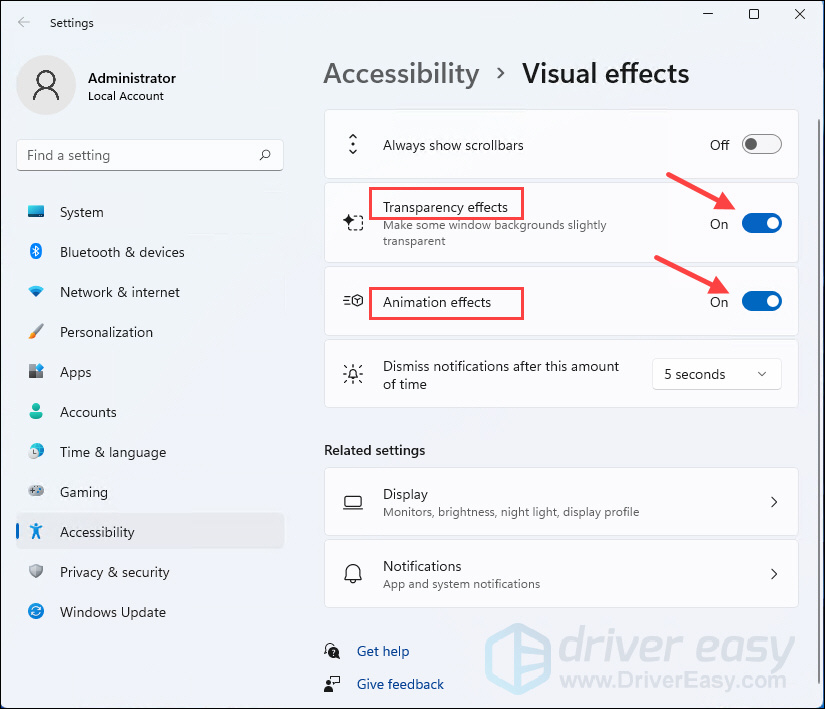
After applying these settings, have a check to see if it works for you. If not, try the following below.
Method 7: Delete temporary files
Temporary files are created by programs for temporary purposes. They can take up an amount of storage space over the time, so deleting temp files would be a wise choice to fix the lagging problem.
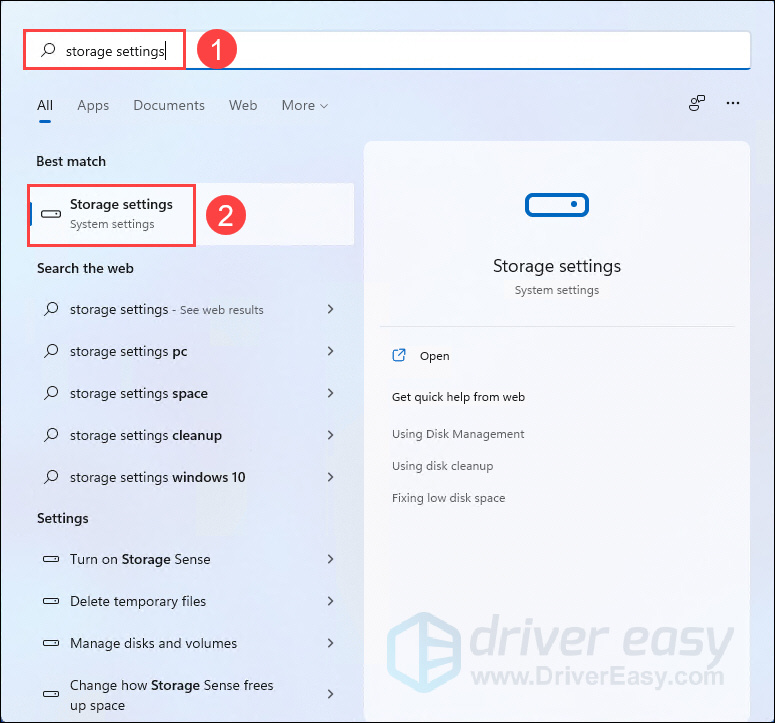
- Press the Windows key to open the Start menu, type storage settings in the search box and select it from the result.

- Click Temporary files in the right section.

- Click Remove files.
Note: The system will autumnally select the files that can be safely deleted. If you also want to clear the Recycle bin which wouldn’t be autumnally selected, tick the check box before you make sure that there is nothing important in the Recycle bin.
- Click Continue.

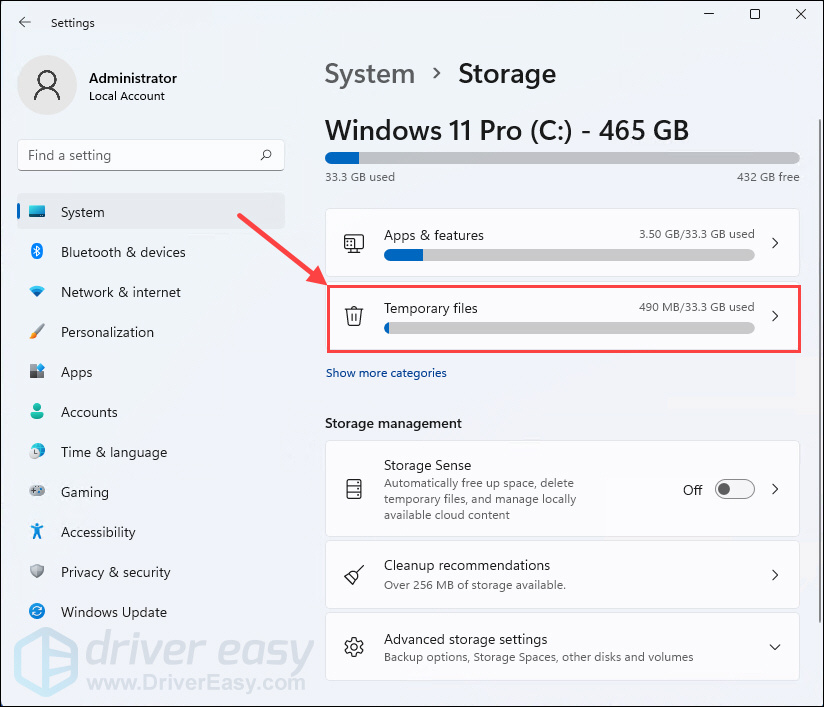
If this method doesn’t work for you, try the following below.
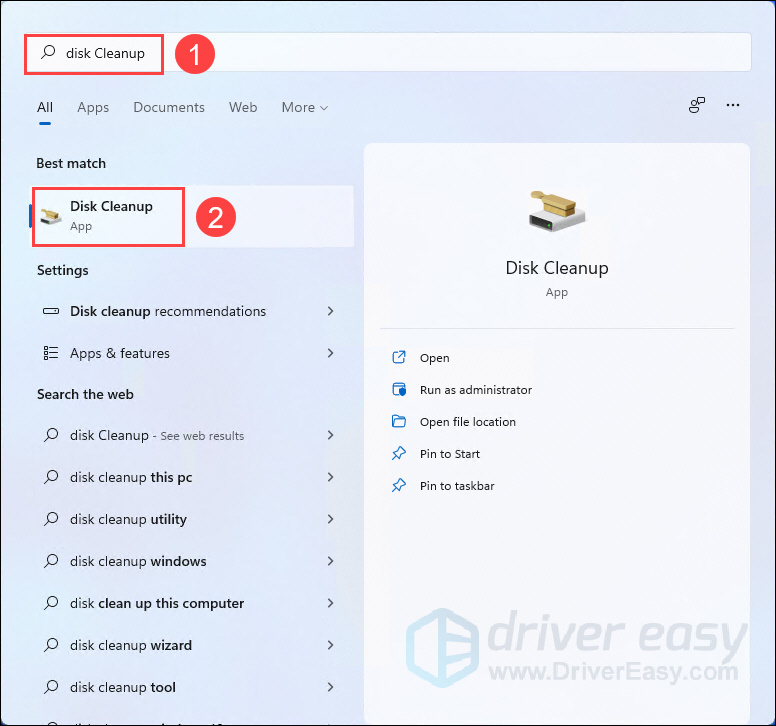
Method 8: Run Disk Cleanup
Disk Cleanup is a built-in tool in Windows to assist users remove useless files and free up disk space.
- Press the Windows key to open the Start menu, type disk cleanup in the search box and select it from the result.

- Wait a while for the calculating.
- Under the Disk Cleanup tab, tick the check box from the list of Files to delete and click OK.
- Click Delete Files.
That’s it – 8 easy ways to deal with lagging Windows 11 and to refresh your computer at the same time! Don’t forget to restart your PC after trying the above tricks to see if they help.
If you have any idea, question or suggestion, please feel free to leave us a comment below.
48
48 people found this helpful
While Windows 11 is a welcome change with the start menu, taskbar, and other design improvements, the upgrade didn’t go well with some users. There have been issues with Bluetooth and Wi-Fi, and at times, many have noticed lag after Windows 11 update. If you notice your computer slowing down, here are the ways to fix the issue.

Microsoft releases Windows 11 updates to improve reliability and fix bugs in the software. Sometimes, things can go south, and you might experience lag everywhere in the system. Before ditching your perfect setup, use the troubleshooting tricks below and enjoy speed improvements.
1. Disable Startup Apps
After Windows 11 update, Microsoft might have enabled system apps to start at login. You might notice Microsoft Edge or OneDrive starting at launch, even when you don’t prefer them. You need to check and disable irrelevant startup apps from settings.
Step 1: Open Windows 11 Settings menu (use Windows + I keys) and select Apps from the left sidebar.

Step 2: Select the Startup menu.

Step 3: Check Startup apps and their impact on the system.
Step 4: Disable unnecessary apps and services at login.

From now on, Windows will start without any services or apps bogging it down in the background.
2. Remove Unwanted Apps
Some third-party apps might develop incompatibility with the shiny new OS on your computer. These apps might stop responding or start crashing on your PC. You need to update these apps or remove them (if no longer needed).
Step 1: Launch Windows 11 Settings menu and go to Apps section from the left section.
Step 2: Select Apps & features.

Step 3: Find an app you don’t need and select a three-dot menu beside it.

Step 4: Click on Uninstall and confirm your decision.
3. Free Up Storage
When dealing with little to no storage on your PC, you will notice a lag in day-to-day tasks. Windows 11 comes with a dedicated storage manager to use. Here’s how you can use it and get back some precious storage.
Step 1: Press Windows key + I to launch the Settings. On the System tab on the left column, select Storage from the right pane.

Step 2: Check temporary files and remove them from the following menu.

You can enable the Storage sense toggle to automatically free up space, delete temporary files, and manage locally available cloud content from the same Storage menu.

Note: Always keep a decent amount of storage free before downloading any major OS update.
4. Download Optional Updates
When you install a Windows 11 update on your computer, it will skip optional updates. If you notice lag after the successful update, you’ll need to install those optional updates.
Step 1: Press the Windows key + I to open the Settings and go to Windows Update.

Step 2: Select Advanced options.

Step 3: Check Optional updates in the Additional options menu.

Step 4: Checkmark all pending driver updates and hit the Download & install button.

Start using your Windows computer, and you shouldn’t notice the lag in daily use.
5. Run System Diagnostics
If there is a hardware failure on your computer after Windows 11 update, you will notice lag and the computer experience will feel like a drag. Your PC does come with built-in software to diagnose the system. At least a select laptop and desktop makers pack dedicated hardware diagnostics apps. If your computer doesn’t have it, you may skip this solution.
Note: We will use steps for an HP laptop. The same might differ on your PC.
Step 1: Open HP Support Assistant app.

Step 2: Select Run hardware diagnostics from the home menu.

Step 3: Click on Component Tests from the left sidebar.
Step 4: Enable the checkmark beside all components and select the Run once button.

Similarly, you can run system tests to ensure that the main components are functioning properly.
6. Check PC Temperature
If your computer is running at a high temperature after Windows 11 update, you will see system lag here and there. Refer our dedicated on how to reduce CPU temperature on a PC. You can check it out, take the required steps to bring down the heat, and try using the computer again.
7. Go Back to the Previous OS Version
Do you still notice lag after performing all the steps above? Microsoft may have released a buggy Windows 11 update. You have an option to roll back the Windows version on your computer.
Step 1: Press Windows key + I to open Settings app and select System from the left sidebar.

Step 2: Scroll down and select Recovery.

Step 3: Select the Go back button under the Recovery options menu.

Follow the on-screen instructions and start using a stable and fluid Windows build on your computer.
8. Run Windows Security Scan
Malicious or corrupt files can be the major reason behind system slowdown. You don’t need to rely on third-party antivirus apps to find and remove such files. Microsoft’s Windows Security tool should get the work done.
Step 1: Press the Windows key, search for Windows Security, and press Enter to open the app.
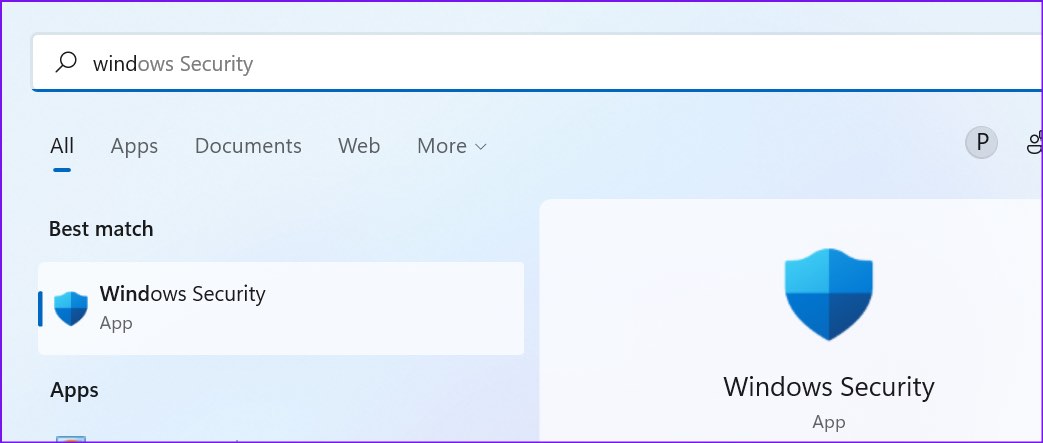
Step 2: Select Virus & threat protection from the left sidebar.

Step 3: Click on the Quick scan button and run the complete scan on your computer.

Once Windows Security finds and removes such files, restart the PC.
Keep Your Windows 11 PC Updated
Windows Updates arrive to improve your computing experience. However, when Windows 11 lags after an update, it is still fixable before you decide to install it all over again. Use the solutions mentioned above to speed up your Windows 11 PC in no time. And if you have found another trick, mention it in the comments below.
Was this helpful?
Thanks for your feedback!
The article above may contain affiliate links which help support Guiding Tech. The content remains unbiased and authentic and will never affect our editorial integrity.
Со временем быстродействие ОС может снизиться по ряду причин. Многие советуют переустанавливать Windows раз в год, но есть и более «щадящие» способы ускорения работы. О них мы расскажем в данном материале.
В идеале нужно выполнить все нижеперечисленные действия.
Чаще перезагружайте ОС
Это банальные и самые распространенные рекомендации, но это не делает их менее полезными. Многие пользователи стационарных компьютеров часто не выключают их неделями или даже месяцами, просто переводя устройства в режим сна, когда они заканчивают работу. Так действительно можно делать, однако это ускоряет износ компонентов и лучше все же давать устройству отдохнуть, если вы не планируете его использовать более двух часов. Выключение или перезагрузка освобождают оперативную память от всех приложений и процессов, которые могли влиять на быстродействие.
Обновление операционной системы, в свою очередь, также помогает ускорить работу устройства, поскольку инженеры той же Microsoft регулярно находят способы лучше оптимизировать исполнение различных процессов, что сделает компьютер более стабильным.
Как обновить Windows 11:
- Перейдите в «Параметры»;
- Выберите «Центр обновления Windows»;
- Нажмите на «Проверить наличие обновлений».
Даже если у вас установлена последняя версия операционной системы, простая перезагрузка никогда не повредит.

Источник изображения: CQ
Отключите автоматическую загрузку малоиспользуемых программ
Чем дольше вы пользуетесь своим компьютером, тем больше различных программ вы на него устанавливаете. Нередко бывает так, что определенные приложения остаются на вашем ПК даже после того, как надобность в них отпала. Или же вы просто стали ими реже пользоваться, но они все равно продолжают запускаться вместе со стартом Windows, удлиняя время загрузки и расходуя вычислительные ресурсы.
Чтобы проверить, какие из приложений работают в фоновом режиме и загружаются вместе с операционной системой, вам нужно:
- Запустите диспетчер задач комбинацией «CTRL+Shift+Esc»
- Выберите пункт «Автозагрузка приложений»
- В появившемся меню вы увидите все приложения и то, насколько высокое влияние они оказывают на быстродействие устройства и скорость загрузки
В этом же меню вы можете вручную отключить неиспользуемые приложения, кликнув по ним правой кнопкой мыши.

Источник изображения: CQ
Вы также можете отключить автоматическую загрузку через основные настройки:
- Перейдите в «Параметры»
- Выберите «Приложения»
- Откройте «Автозагрузка»
В данном разделе вам будет представлен список всех приложений, который можно также отсортировать по текущему состоянию и влиянию на запуск.

Источник изображения: CQ
Измените режим производительности
Ноутбуки и стационарные компьютеры позволяют выбрать режим питания, позволяющий оптимизировать быстродействие устройства в зависимости от потребностей пользователя. Чтобы изменить режим, вам нужно:
- Перейдите в «Параметры»
- Выберите «Питание и батарея»
- В появившемся меню кликните на «Режим питания»
На ноутбуках режим производительности помогает не только повлиять на быстродействие операционной системы, но также увеличить время работы между зарядками.

Источник изображения: CQ
Выполните дефрагментацию накопителя с ОС
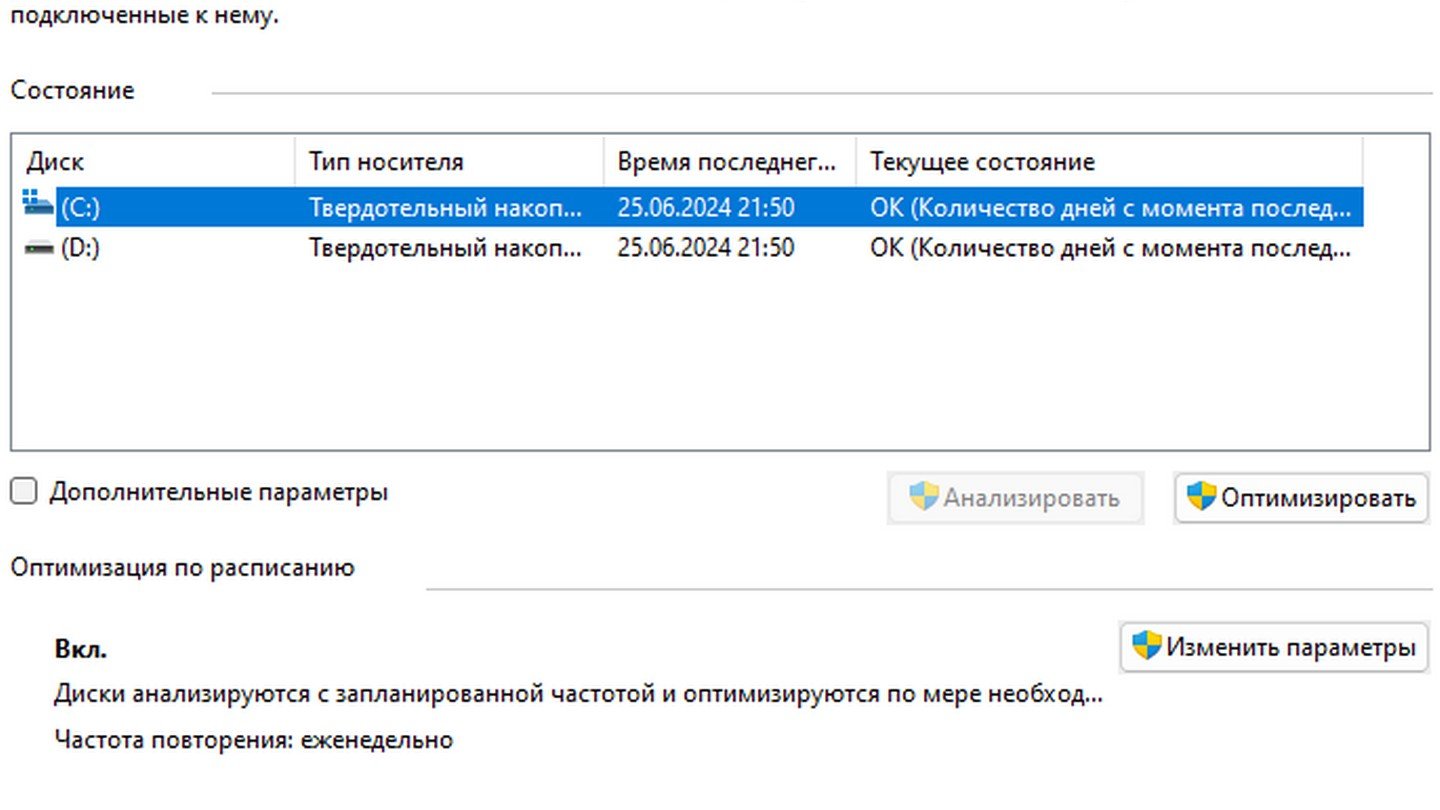
Со временем различные файлы на жестком диске могут оказаться разбросанными, что приведет к замедлению работы системы. Этого можно избежать, если время от времени проводить дефрагментацию накопителя. Для этого нужно:
- Кликните по иконке Windows
- Вбейте в поисковой строке «Дефрагментация»
- Выбрав накопитель, нажмите на «Оптимизировать»
Следует отметить, что хотя использование дефрагментации помогает ускорить работу системы, ее нежелательно делать, если вы используете твердотельный (SSD) накопитель, поскольку она сокращает срок его службы.
Источник изображения: CQ
Увеличьте объем ОЗУ или перейдите на SSD
Добавление оперативной памяти может серьезно ускорить работу системы, как и переход на твердотельный накопитель. Для сравнения, скорость чтения/записи среднестатистического жесткого диска составляет порядка 100 мб/с, когда твердотельный накопитель может работать на скорости до 500 мб/с. Пятикратный прирост скорости будет сразу заметен в том, как быстро запускается не только сама операционная система, но и то, насколько резво работают приложения.
Отключите автоматический перезапуск фоновых приложений
Windows 11 обычно самостоятельно перезапускает некоторые фоновые приложения, когда вы заходите в систему под своим профилем. На производительных системах работа этой функции практически незаметна, когда на более старых компьютерах ее отключение может повысить скорость работы Windows 11.
- Перейдите в «Параметры»;
- Выберите «Учетные записи»;
- В появившемся меню выключите опцию «Автоматически сохранять мои перезапускаемые приложения из системы и перезапускать их при повторном входе».

Источник изображения: CQ
Удалите неиспользуемые приложения
Удаление неиспользуемых приложений – так называемого Bloatware – может повысить производительность системы и освободить место на накопителе. Процесс довольно простой:
- Перейдите в «Параметры»;
- Выберите «Приложения»;
- В появившемся меню вы можете посмотреть все установленные на компьютере приложения и удалить их.

Источник изображения: CQ
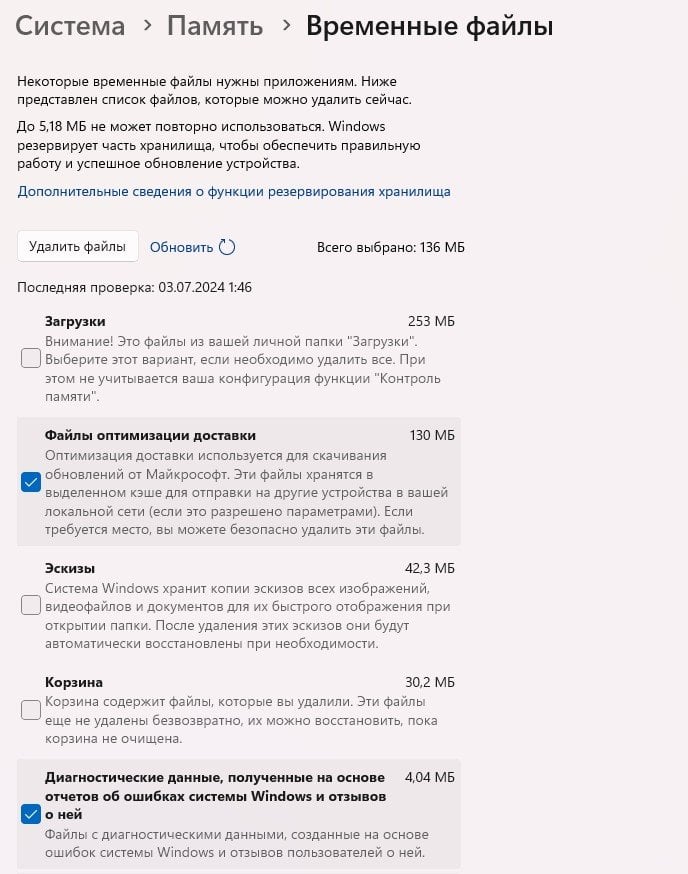
Удалите временные файлы
Временные файлы создаются приложениями в процессе работы, позволяя им быстрее выполнять определенные задачи. Даже если вы перестанете пользоваться определенными приложениями, созданные ими файлы останутся в памяти системы.
- Откройте окно «Выполнить» комбинацией «Win+R»;
- Вбейте «%temp%» и нажмите «Ok».
Команда отправит вас в папку с временными файлами, которую вы затем сможете отчистить вручную.
Воспользуйтесь функцией «Контроль памяти»
Windows 11 умеет самостоятельно следить за состоянием памяти и удалять временные файлы, освобождая тем самым память и увеличивая быстродействие. Функция обычно включается автоматически после установки операционной системы. Вы также можете проверить ее статус следующим образом:
- Перейдите в «Параметры»;
- Выберите «Система»;
- Нажмите на «Память».
Переключатель функции «Контроль памяти» должен быть переведен в положение «Вкл.»

Источник изображения: CQ
Освободите пространство на диске
Тоже довольно распространенный совет, которым все же не стоит пренебрегать. Неиспользуемые системой файлы занимают место, которое могло бы ускорить работу устройства.
Очень часто дисковое пространство оказывается занято файлами от Windows 10, оставшимися после обновления до Windows 11. Чтобы их удалить, необходимо:
- Перейдите в «Параметры»;
- Выберите «Система»;
- Нажмите на «Память».
В появившемся меню выберите опцию «Временные файлы», а затем удалите «Загрузки».
Источник изображения: CQ
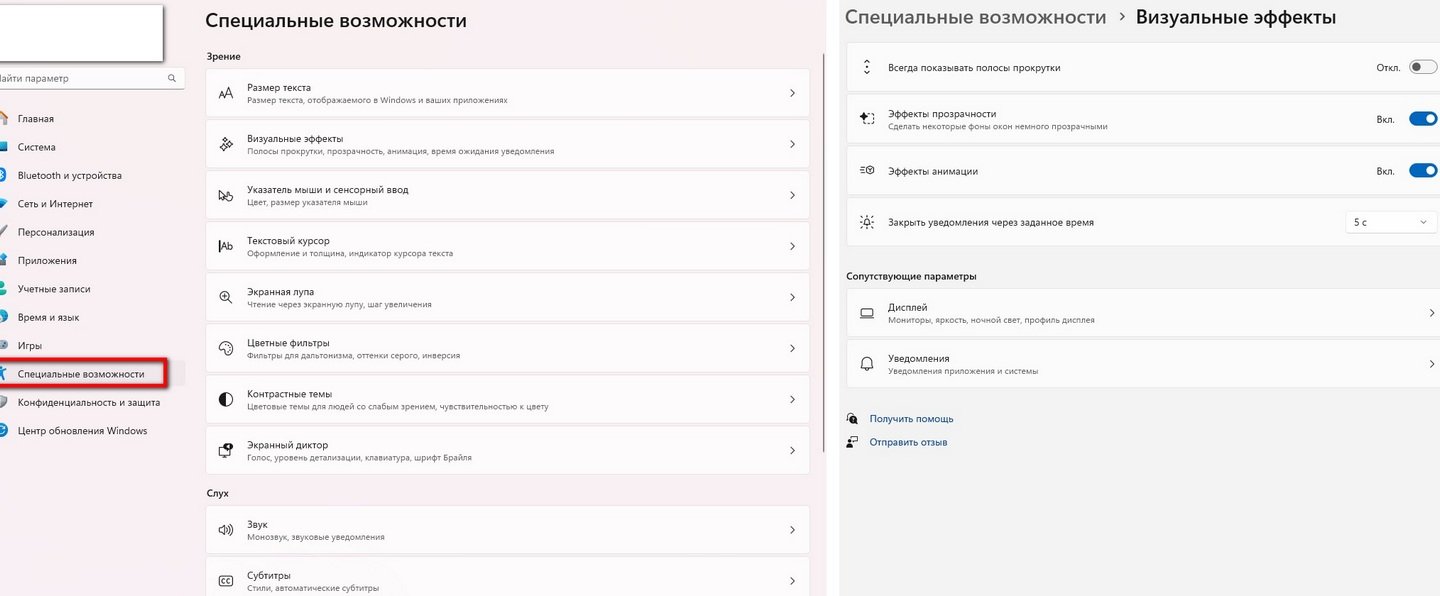
Отключите анимации и визуальные эффекты
Вполне закономерно, что всякие красивые визуальные эффекты и яркие анимации загружают систему. Если на производительных устройствах с мощными видеокартами и процессорами это практически незаметно, то на более слабых ПК можно пожертвовать плавными переходами между опциями и папками ради производительности. Для отключения анимации нужно:
- Перейдите в «Параметры»;
- Выберите «Специальные возможности»;
- Нажмите на «Визуальные эффекты».
В данном меню можно выключить некоторые эффекты, а заодно настроить сопутствующие параметры дисплея.
Источник изображения: CQ
Вы также можете перейти в расширенные параметры, нажав на иконку Windows и вбив в поисковой строке «Просмотр расширенных параметров системы».

Источник изображения: CQ
Отключите уведомления и подсказки
Пользуясь различными мессенджерами и офисными приложениями вы будете часто получать всевозможные уведомления. Они, как правило, не только отвлекают от рабочего процесса, но и влияют на производительность, поэтому их можно частично отключить. Для отключения уведомлений нужно:
- Перейдите в «Параметры»;
- Выберите «Система»;
- Нажмите на «Уведомления».
В появившемся меню можно настроить режим различных параметров уведомлений или вовсе отключить их для отдельных приложений.

Источник изображения: CQ
Отключить приложения, работающие в фоновом режиме
Если вдаваться в технические подробности, то на вашем ПК в фоновом режиме стабильно работают сразу несколько приложений, однако далеко не всегда они исполняют какие-то действительно важные процессы, хотя и расходуют вычислительные ресурсы. Чтобы их отключить:
- Нажмите правой кнопкой мыши по иконке Windows;
- Выберите пункт «Установленные приложения».
В появившемся меню будут представлены все установленные на устройстве приложения. Выберите то, которое считаете лишним и нажмите на три точки в углу. Перейдя в меню приложения, вы можете задать разрешение для его работы в фоновом режиме.

Источник изображения: CQ
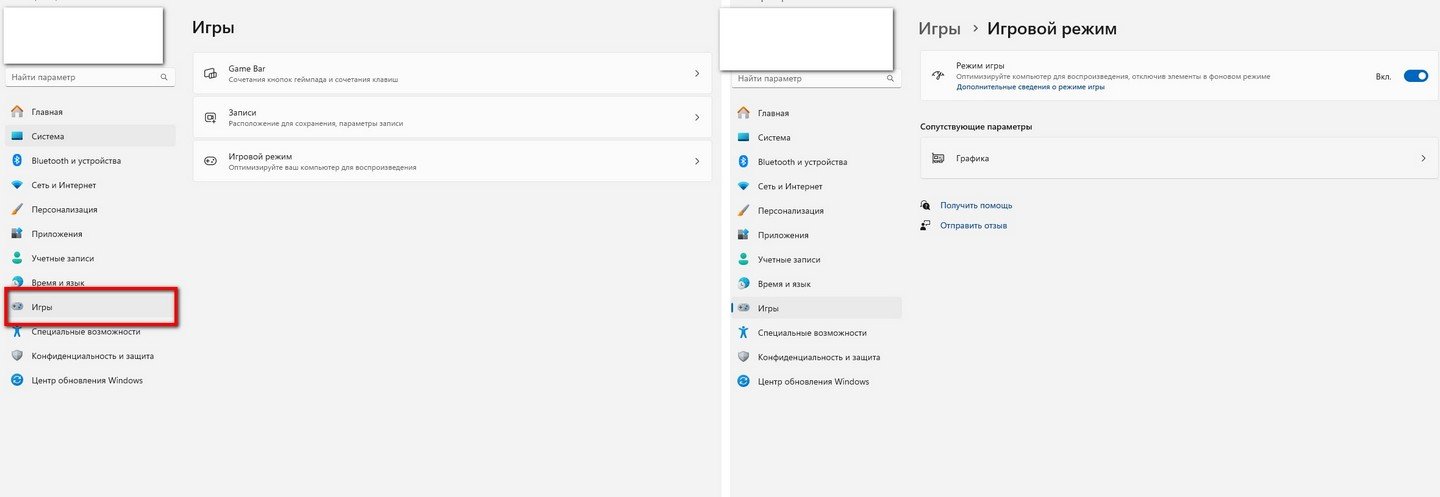
Отключите игровой режим
Используемым для работы с офисными документами и просмотра фильмов компьютерам не очень то и нужен включенный игровой режим, ведь он держит включенными в фоне различные приложения Xbox и функцию DVR. Чтобы его отключить:
- Перейдите в «Параметры»;
- Выберите «Игры»;
- Нажмите на «Игровой режим».
Переведите переключатель в положение «Выкл.»
Источник изображения: CQ
Откажитесь от установки ПО из сомнительных источников
Устанавливайте программы только от надежных источников и посещайте сайты только с действительными сертификатами безопасности. Это, возможно, самый простой совет в данной подборке.
Заглавное фото: Windows Blog
Три года назад, начиная свою карьеру IT блогера, я чаще всего писал статьи об операционных системах, их настройке и решении проблем, возникающих у многих пользователей при их использовании. Вспоминая то время, я удивляюсь, как быстро только что установленная Windows на моем ПК начинала глючить, тормозить или вовсе ломаться полностью, требуя экстренной переустановки. В то время для блогов я устанавливал не только актуальные версии Windows 10, но и Windows 8.1 и Windows 7 и именно Windows 10 по сравнению со старыми ОС вызывала больше всего проблем.

Но спустя три года все изменилось и Windows на моих домашних ПК и ноутбуках (а их количество уже разрослось до четырех штук) работает стабильно и надежно, не теряя скорости и быстрого отклика месяцами. Даже на основном ПК, который постоянно используется для экспериментов при написании блогов, Windows 10 выдерживает и полгода и даже год, а на ПК, который используется только для серфинга интернета, просмотра фильмов и простых игр, Windows 10 работает без переустановки уже два года.
И в этом блоге я расскажу, как мне удалось добиться стабильной и надежной работы Windows на основе как собственного опыта, так и используя опыт специалистов, изучающих операционные системы на профессиональном уровне, например, блогов Вадима Стеркина, получающего награду Microsoft MVP (наиболее ценный специалист) уже на протяжении 15 лет.
Откладываем обновления на пару недель

Думаю, вы встречали новости о том, что новое обновление Windows 10 или Windows 11 опять сломало периферийные устройства или вызвало сбои сторонних программ. Это произошло, например, в апреле 2022 года, когда обновления KB5012592 и KB5012599 для Windows 10 или Windows 11 сломали браузеры Firefox, Chrome и Microsoft Edge, вызывая ошибку «0xc0000022» при их запуске. Конечно, эта проблема затронула не всех пользователей, но рано или поздно практически каждый пользователь сталкивается с проблемами после обновлений.

Избежать этих проблем стало намного легче после того, как Microsoft добавила в Windows 10 средство для откладывания обновлений на определенное время. Вы можете отложить обновления на несколько недель и за это время проблемные обновления будут исправлены и вам на ПК прилетят стабильные и нормально работающие.
Не торопимся переходить на новую версию Windows

Несколько лет назад среди опытных пользователей ходила шутка, что пользоваться новой Windows нужно начинать только после того, как к ней вышел второй сервис пак. И эта шутка была актуальна во времена Windows XP и Windows 7, которые являлись завершенным решением и в целом работали заметно стабильнее, чем Windows 10 и Windows 11. А вот Windows 10 уже превратилась в постоянно изменяющуюся систему, все в которой переделывается, старое выкидывается и добавляется новое, а привычные настройки меняют свои места.
Вдобавок эта гонка новых версий была ускорена до того, что новая версия Windows 10 выходила каждые полгода. Сейчас уже даже трудно вспомнить сколько их было и какие из них оставили самые приятные воспоминания: Anniversary Update (1607), April 2018 Update (1803), November 2019 Update (1909), 20H2 и многие другие.

Но после выхода каждой новой версии в новостях появлялись сообщения о многочисленных проблемах, на решения которых иногда уходило по нескольку месяцев. Из недавних проблем достаточно вспомнить заметные падения скорости L3 кэша у процессоров AMD Ryzen на системах с Windows 11. Поэтому для себя я вывел правило не спешить обновляться на новую версию Windows и дать время разработчикам на исправление большей части ошибок.
Чем меньше твиков — тем лучше

Долгое время, еще со времен Windows 95, среди опытных пользователей бытовало устойчивое мнение, что в Microsoft работают настолько плохие программисты, что заставить Windows нормально работать можно только после применения многочисленных твиков, изменив параметры и настройки в тех местах ОС, которые почему-то предусмотрели эти самые плохие программисты. Причем большая часть пользователей делала твики без понимания того, что именно произойдет в системе после того, как они поставят галочку в популярном твикере.

Даже сейчас, в 2022 году, вы найдете сотни гайдов, как отключить «вредную» службу SysMain (Superfetch), а в добавок включить ядра процессора в msconfig и прочие мифические твики, имеющие свои корни во времена популярности Windows XP. Windows 10 и Windows 11 представляют из себя нечто другое, чем Windows XP и Windows 7 и имеют десятки взаимозависимых служб, процессов и гипервизоров. И попытки твикать эту сложную систему приводят к обратному результату — ее разбалансировке и нестабильной работе.

Простой пример — я использую сторонний фаервол simplewall, в котором легко ограничить доступ в интернет как обычным утилитам, так и компонентам Windows, например, отправке телеметрии. Но сделав это, можно увидеть, как система «ломится» в интернет снова и снова, запуская процесс и даже вызывая значок ожидания у курсора мыши. Поэтому для себя я вывел правило — как можно меньше вмешиваться в работу системы и не мешать ей обслуживать себя.
Используем встроенный антивирус Microsoft Defender

Точно так же как использование твиков, модным у пользователей стало отключение антивируса Microsoft Defender вместе с самоуверенными заявлениями «антивирус — в голове». В 2022 году Microsoft Defender мало напоминает бесполезный Защитник Windows 7 и превратился в удобный антивирус, не уступающий большинству бесплатных антивирусов, при этом не показывая вам рекламу, не досаждая бесконечными уведомлениями и будучи органично интегрированным в систему.
Используем проверенный набор программ и драйверов

Огромная часть степени стабильности работы Windows зависит от используемых нами программ и драйверов и кривая утилита или драйвер чипсета могут вызывать глюки и проблемы, за которые мы будем винить Windows. Поэтому стоит собрать набор проверенных утилит и драйверов и устанавливать их вручную, не доверяя установку драйверов в автоматическом режиме Windows 10 или Windows 11.
Используем минимум программ и предпочитаем портабельные версии

Чем больше программ мы установим в Windows, тем выше будет шанс их конфликтов и сбоев, а система перегружается их «хвостами» в реестре и системных папках, не говоря уже об автозагрузке, дополнительных службах и правилах в планировщике задач. Поэтому стоит устанавливать минимум нужных программ, предпочитая проверенные портабельные версии.
Не забываем про актуальность комплектующих

Думаю, многие из вас видели, в какой кошмар превращается попытка работать на компьютере с Windows 10, которая установлена на жесткий диск, а вдобавок имеющая недостаток оперативной памяти. Нужно признать очевидное, Windows 10, а еще более — Windows 11, уже не предназначены для работы на жестком диске. Несмотря на то, что в системных требованиях Windows 11 не уточняется использование именно SSD-накопителя, Microsoft косвенно подтвердила это, призвав OEM-производителей ПК и ноутбуков в 2023 году отказаться от использования обычных жёстких дисков в качестве основных системных носителей.

Бюджетный SSD объемом 120 ГБ, которого пока еще достаточно по объему для установки Windows 10 и 11, можно купить дешевле 1500 рублей. Например, в Ситилинке популярны вот такие SSD объемом 120 ГБ с интерфейсом SATA III, которые можно установить практически в любой ПК, ускорив его работу.
Patriot Burst Elite.

A-Data Ultimate SU650.

И Silicon Power Slim S55.

Ну а если вы все-таки хотите использовать жесткий диск как системный накопитель, то стоит попробовать ОС Windows 8.1, которая еще поддерживается Microsoft и при этом предъявляет более скромные требования к скорости накопителя.
Пишите в комментарии, а как долго работает без переустановки ваша Windows?
Более 450 блогов автора Zystax обо всем, что связано с компьютерами и играми.
Telegram-канал @overclockers_news — теперь в новом формате. Подписывайся, чтобы быть в курсе всех новостей!