
Настройка системы для удобной работы с мышью
Управление мышью с помощью цифровой клавиатуры
-
Чтобы перейти к настройкам на компьютере, нажмите клавиши Windows+U или нажмите кнопку Пуск > Параметры>.

-
В области Взаимодействиевыберите Мышь .
-
Включив переключатель «Ключи мыши».
Изменение основной кнопки мыши, настройка параметров прокрутки или следы указателя отображения
-
Чтобы открыть Параметры на компьютере, нажмите клавишу с Windows+I или нажмите кнопку Начните > Параметры .
-
Выберите Bluetooth & устройств>мыши.
-
Чтобы изменить главную кнопку мыши, раз развернуть меню Основная кнопка мыши и выбрать нужный параметр.
-
Чтобы настроить параметры прокрутки, выберите подходящие параметры в области Прокрутка.
-
Если вы хотите, чтобы указатель отображал след по экрану при его перемещение, выберите Дополнительные параметры мыши ,переходить на вкладку Параметры указателя и устанавливать параметры отображения следов указателя.
-
Параметры мыши
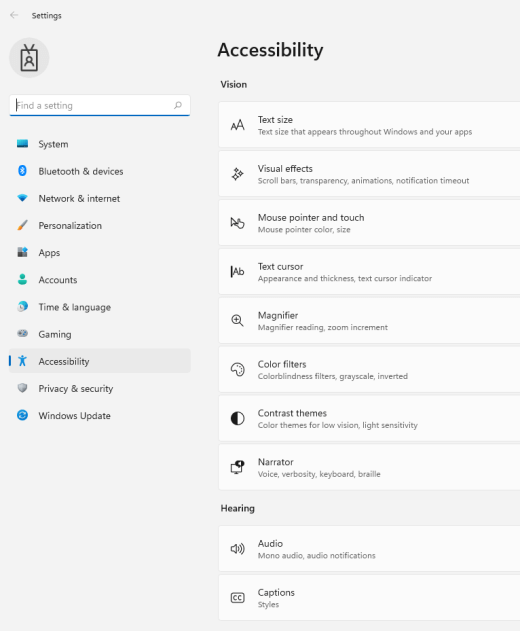
Улучшение видимости указателя мыши
Чтобы сделать указатель мыши более удобным для восприятия, измените его размеры или цвет.
-
Чтобы перейти к настройкам на компьютере, нажмите клавиши Windows+U или нажмите кнопку Пуск > Параметры>.
-
Выберите Указатель мыши и коснитесь .
-
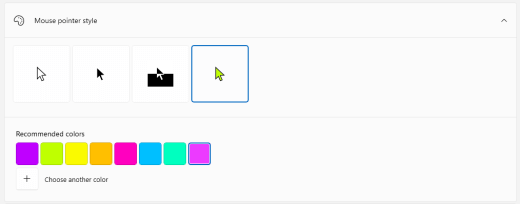
В области Указатель мышинастройте ползунок Размер до тех пор, пока указатель мыши не дойдет до нужного размера.
-
В списке Стиль указателямыши выберите параметр, чтобы изменить цвет указателя мыши на белый, черный, инвертировали или любой из ярко рекомендуемых цветов. Чтобы настроить цвет указателя, выберите Выбрать другой цвет.
Улучшение видимости текстового курсора
Windows 11 позволяет изменить толщину текстового курсора и добавить цветной индикатор, чтобы сделать его более заметным.
Изменение толщины текстового курсора
-
Чтобы перейти к настройкам на компьютере, нажмите клавиши Windows+U или нажмите кнопку Пуск > Параметры>.
-
Выберите текстовый курсор.
-
В области Толщина курсоратекста настройте ползунок Толщина курсора текста до нужной толщины в области предварительного просмотра.
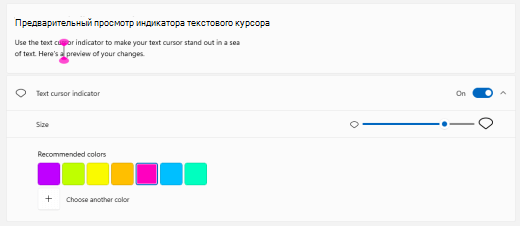
Использование индикатора текстового курсора.
-
Чтобы перейти к настройкам на компьютере, нажмите клавиши Windows+U или нажмите кнопку Пуск > Параметры>.
-
Выберите текстовый курсор.
-
Включит переключатель указателя текста.
-
Отрегулировать ползунок Размер до тех пор, пока не будет выглядеть нужный размер в режиме предварительного просмотра.
-
Чтобы изменить цвет индикатора, выберите его в меню Рекомендуемые цвета или выберите Другой цвет, чтобы выбрать другой цвет.
Параметры курсора текста
Настройка системы для удобной работы с клавиатурой
-
Чтобы перейти к настройкам на компьютере, нажмите клавиши Windows+U или нажмите кнопку Пуск > Параметры>.
-
Выберите Клавиатура и попробуйте следующие варианты:
-
Включив переключатель экранной клавиатуры для выбора клавиш с помощью мыши или другого указывателя (например, с помощью joystick), или используйте один переключатель для циклиального перехода между клавишами на экране.
-
Если при одновременном нажатии двух клавиш возникли проблемы, включим переключатель «Залипка клавиш». Залипая клавиша может одновременно нажимать команды, которые используют несколько клавиш (например, CTRL+S).
-
Включите переключатель Выключатель для воспроизведения звука при нажатии клавиш CAPS LOCK, NUM LOCK или SCROLL LOCK.
-
Чтобы настроить чувствительность клавиатуры, включив переключатель Фильтр, можно игнорировать краткие или повторяные нажатия клавиш.
-
Включив клавиши подчеркнутного доступа, переключение на подчеркнутую клавишу доступа, когда они доступны.
-
Включите переключатель «Использовать кнопку «Печать экрана», чтобы открыть его с помощью кнопки «Prt Scr».
Совет: Вы также можете управлять компьютером только голосом, используя Windows распознавание речи. Дополнительные информации см. в этойWindows.
Параметры клавиатуры
Ещё со времён Windows 7 (а то и раньше) существуют различные сторонние надстройки, всячески улучшающие или дополняющие те или иные элементы системы. Одной из самых популярных целей для кастомизации всегда был курсор — модеры то и дело меняли его внешность, цвет выделения прочее. Но если многие из этих надстроек применяются в основном для красоты, то существуют и те, что действительно полезны на практике. О многих из таких, которых не хватает в самой Windows даже сейчас, знает и сама Microsoft — одни из самых востребованных «суперспособностей» для курсора она добавила в PowerToys.
💡 PowerToys — это официальная бесплатная программа для Windows 10 и 11, выпускаемая Microsoft для продвинутых пользователей и распространяющаяся через GitHub или Microsoft Store. Она содержит много действительно интересных и полезных возможностей, которых почему-то нет в самой Windows. Эта статья выходит в рамках цикла материалов про PowerToys, в котором читатели знакомятся с занятными функциями утилиты, пригождающимися в ежедневном использовании.
В тему:
- Как в Windows 10 и 11 закреплять окно поверх других. Очень удобно с калькулятором
- Как в 2 клика запретить Windows засыпать (можно временно). Полезно при загрузке файлов
- Эта утилита показывает, где используется выбранный файл в Windows и что мешает удалить его
Подсветка курсора на экране
Первая «суперсила» именуется как Find My Mouse — это дополнение позволяет быстро находить курсор на экране путём затемнения всего вокруг по двойному нажатию левой клавиши CTRL или встряхиванию курсора (можно выбрать один из этих вариантов активации).
При этом Microsoft предусмотрела все нюансы, в том числе запрет на реагирование Find My Mouse при включённом режиме игры или в выбранных пользователем приложениях. Также доступна тонкая настройка эффекта этого дополнения: можно выбрать цвет фона и цвет подсветки, настроить прозрачность наложения, указать радиус подсветки и коэффициент масштабирования, а также выбрать длительность анимации.
Выделение кликов мыши
Функция называется Mouse Highlighter — она оставляет на экране точки при клике левой и правой кнопок мыши. Эта опция может быть полезна при трансляции экрана, поскольку наблюдающим будет отчётливо видно, когда, куда и какой кнопкой кликнул ведущий. Она активируется и деактивируется нажатием горячей комбинации клавиш, которая подлежит настройке.
По умолчанию левый клик мыши оставляет на экране жёлтую точку, а правый — синюю. Но цвета можно изменить, как и отрегулировать непрозрачность, настроить радиус и указать задержку с длительностью анимации исчезания.
Мгновенное перемещение
Опция Mouse Jumper пригодится обладателям сверхшироких экранов и систем из нескольких мониторов — по нажатию горячей комбинации клавиш, на экране под курсором появляется «мини-карта» всего рабочего пространства Windows. Пользователю достаточно кликнуть мышкой в той области, куда нужно переместить курсор, и он там окажется.
У автора этой статьи воспользоваться данным дополнением не вышло — курсор не перемещается после клика на «мини-карту». Возможно, причина в тестовой сборке Windows, полной багов и недоработок.
Отображение пересечения курсора
Mouse Pointer Crosshairs отображает вертикальную и горизонтальную линии, пересекающиеся на указателе курсора, — опция может быть полезна дизайнерам, которым необходимо размещать элементы на определённых вертикалях и горизонталях (это быстрее, чем вызывать направляющие или что-то подобное).

Функция полностью настраиваемая: можно изменить горячую комбинацию клавиш, цвет линий и их толщину, непрозрачность и прочие параметры.
Пипетка для определения цвета
«Цветоподборщик» — ещё одна утилита, нужная преимущественно дизайнерам. Она превращает курсор в «пипетку», которая работает по всей системе и может определить цвет любого пикселя, отображающегося на экране.

По желанию пользователь может отказаться от открытия редактора цветов при определении цвета. Также он может убирать или добавлять стандартные форматы цветов либо же и вовсе создать свой собственный.
Как активировать все эти «суперсилы»
- Скачайте PowerToys со страницы релизов на GitHub (самый верхний файл с разрешением .exe) и установите его.
- Запустите PowerToys от имени администратора (нажав правую кнопку мыши и выбрав соответствующую опцию).
- В программе слева вверху нажмите на кнопку «≡» и выберите пункт «Служебные программы мыши», а затем активируйте нужные переключатели. Стоит отметить, что «Цветоподборщик» вынесен отдельным пунктом в меню PowerToys.
Highlighting the mouse cursor can enhance recorded Windows video tutorials or live presentations. Applying a highlight effect to a small mouse cursor will make the pointer somewhat clearer to follow for those watching any kind of Windows tutorial video or viewing your desktop while screen sharing.
So, most users who show their Windows desktop areas to others will recognize the appeal of highlighting their mouse pointers. You can highlight a mouse pointer in different ways with some third-party apps and extensions. This is how to highlight the mouse cursor in Windows 11/10 with PowerToys, Mouse Pointer Highlight, and Cursor Highlight.
How to Highlight the Cursor by Selecting the Show Location of Pointer Setting
Windows doesn’t include much in the way of cursor-highlighting features. However, it does have a Show location of pointer setting that enables you to briefly highlight the cursor’s position with a ring by pressing an activation key. That’s not the kind of color highlighting third-party apps offer, but it still shows where the cursor is. You can select the Show location of pointer setting like this:
- Use Win + I to open up Settings (see how to open Windows Settings for more ways).
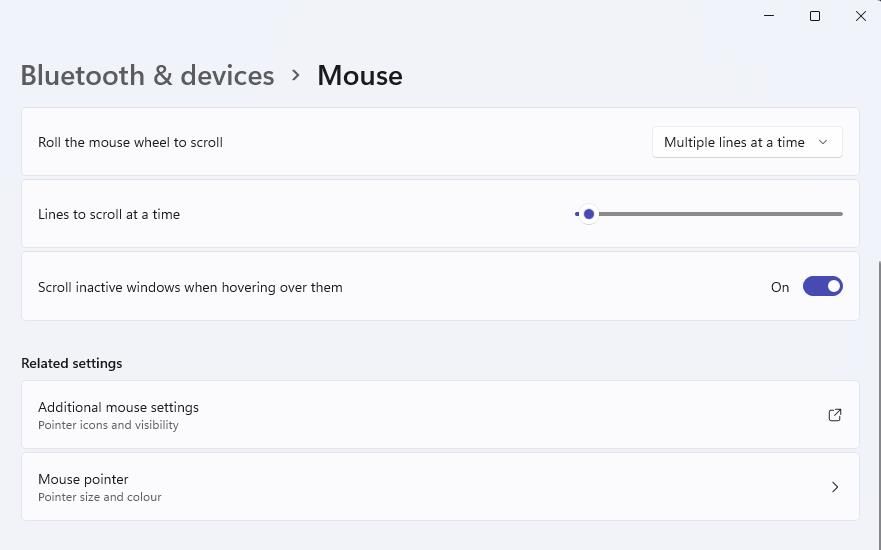
- Select Bluetooth & devices in Windows 11’s Settings app. You’ll need to select the Devices category in Windows 10.
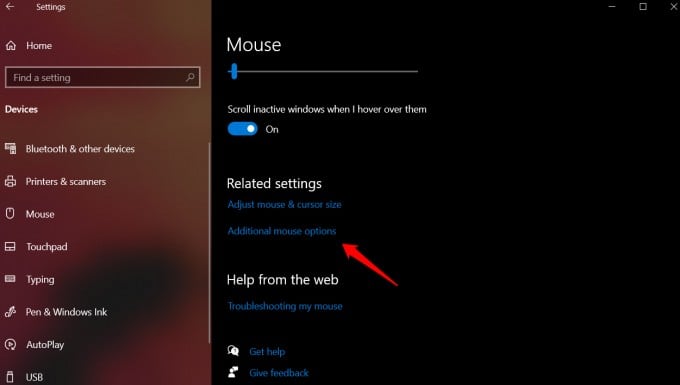
- Click Mouse to view settings for that device type.
-
Select Additional mouse settings (or Additional mouse options) in the Windows Settings app.

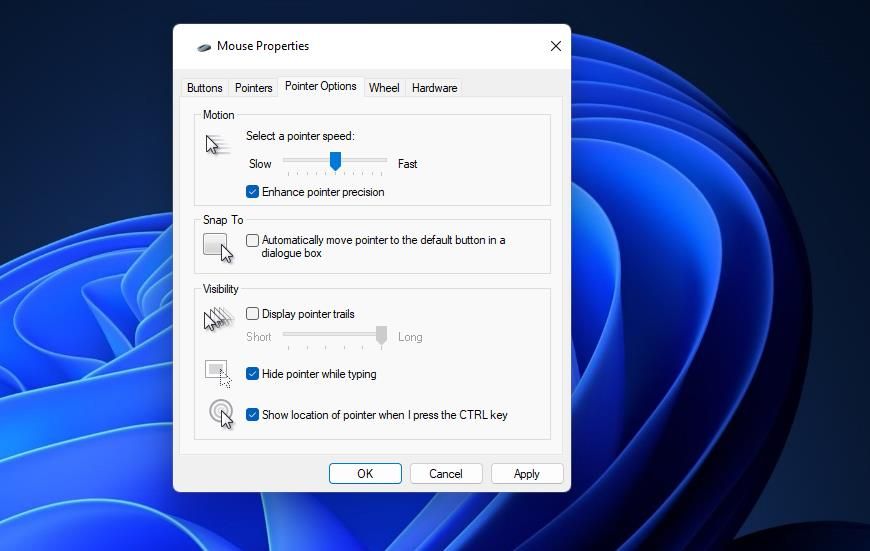
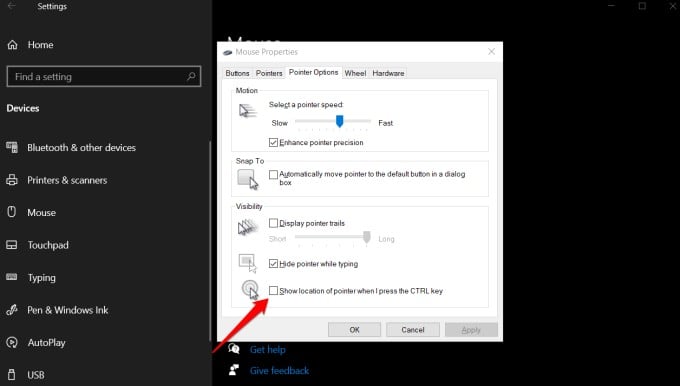
- Then click the Pointer Options tab in the Mouse Properties window that opens.
-
Select the Show location of pointer when I press the Ctrl key checkbox.

- Click Apply in the Mouse Properties window.
Now try out the new pointer highlighting by pressing the Ctrl key. You’ll see a circle expand and quickly shrink around the cursor whenever you press that key. That’s supposed to help users find their mouse pointers. However, it’s a somewhat unnecessary feature for that purpose since moving the mouse around is usually the best way to find the cursor.
That feature can come in handy for Windows video tutorials though. Activating the circle animation will draw viewers’ attention to a cursor’s position. You can use it to briefly highlight settings by moving the cursor next to any option that needs selecting.
How to Highlight the Cursor With Mouse Pointer Highlight
If you would prefer to add a permanent color highlight to the cursor, check out the Mouse Pointer Highlight app. That freely available adds a transparent color circle to the cursor. This is how you can highlight the cursor with Mouse Pointer Highlight:
- Open the Mouse Pointer Highlight Microsoft Store page.
- Then click Get in Store app to bring up a dialog for opening Microsoft Store.
- Press that dialog’s Open Microsoft Store option.
- Then click Mouse Pointer Highlight’s Install button.
- Open the Mouse Highlight app window.
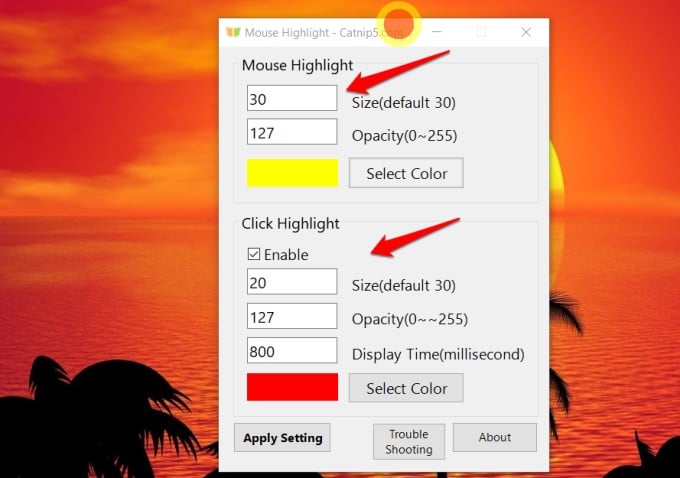
The app’s window will open with a default yellow circle highlight automatically applied to your mouse’s cursor. You can change the color of the circle by clicking Select Color. Then choose a different color on the palette and click OK.
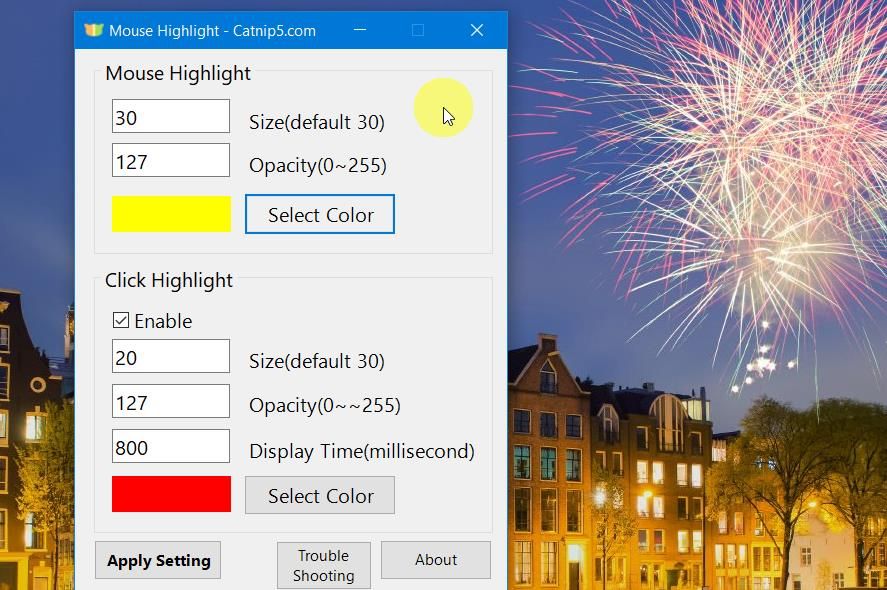
The default size for the circle highlight is 30, but you can make it bigger or smaller. Enter a value less than 30 in the Size box. Or input a number higher than 30 to increase the circle’s size.
You can adjust the circle’s transparency by changing the value in the Opacity box. Entering a lower value there will increase transparency. Inputting 0 makes the circle invisible, and entering the max 255 value removes the transparency.
This app also has a click highlight effect you can enable. When enabled, you’ll see a second circle with a different color briefly appear around the cursor whenever you click the mouse. Select the Enable checkbox to turn on that feature.
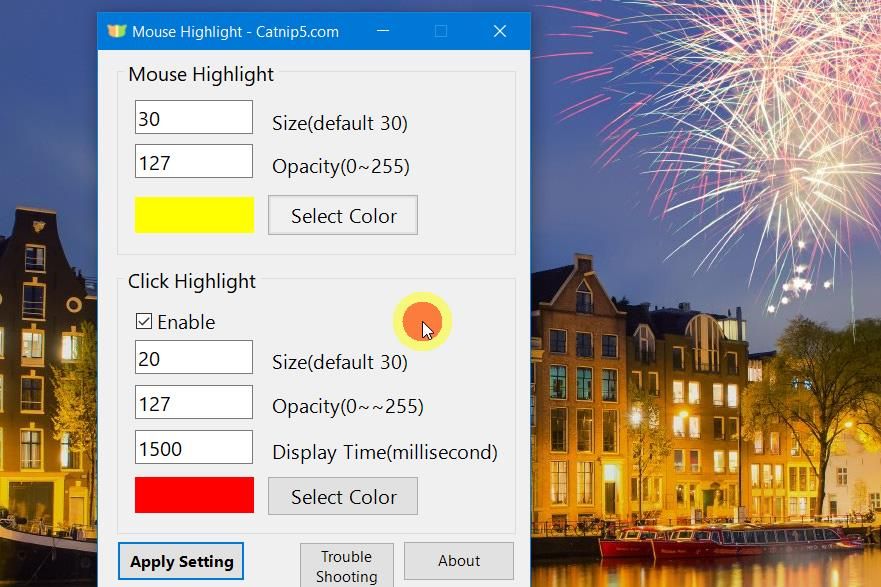
Then you can configure that secondary click highlight circle by entering alternative values in the Size and Opacity boxes much the same. There’s also a Display Time box for click highlight. Enter an alternative millisecond value there to change how long the circle appears. The default display time of 800 milliseconds is close to a second.
When you’re done configuring your cursor highlighting, click the Apply Setting button. The app must be running for its cursor highlighting to work, but it doesn’t run in the background with a system tray icon. Minimize the app’s window to the taskbar when you’re utilizing it.
How to Highlight the Cursor With PowerToys
PowerToys is an app with which you can enable a variety of handy new tools and features in Windows 11.10. Our best things to do in PowerToys guide tells you about some of the tools you can activate with that software.
PowerToys includes a Mouse utilities tab from which you can enable a color highlight circle for your cursor. You can set mouse cursor highlighting with PowerToys like this:
- Open the Microsoft PowerToys app page on the Microsoft Store.
- Click Get in Store and the Open Microsoft Store options.
- Select Install to add PowerToys to your app library.
- Now open PowerToys, which you’ll find on your Start menu’s app list.
- Click the Mouse utilities tab.
-
Scroll down and turn on the Enable Mouse Highlighter option.

- Then press the Windows logo key + Shift + H hotkey to activate the highlighter.
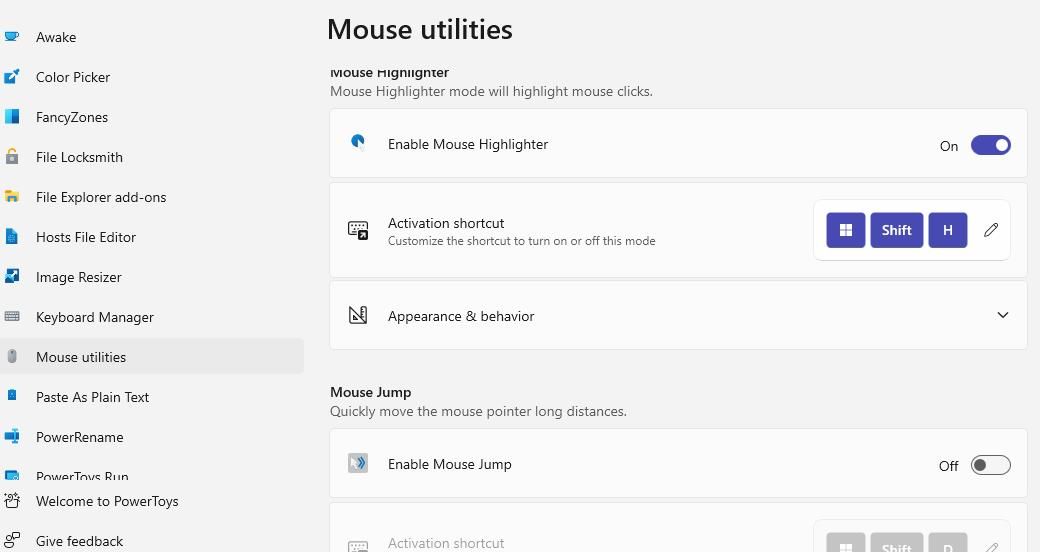
PowerToy’s cursor highlighting only applies to mouse clicking. You’ll see different color circles whenever you right or left-click the mouse. Those circles are set to yellow and blue colors by default.
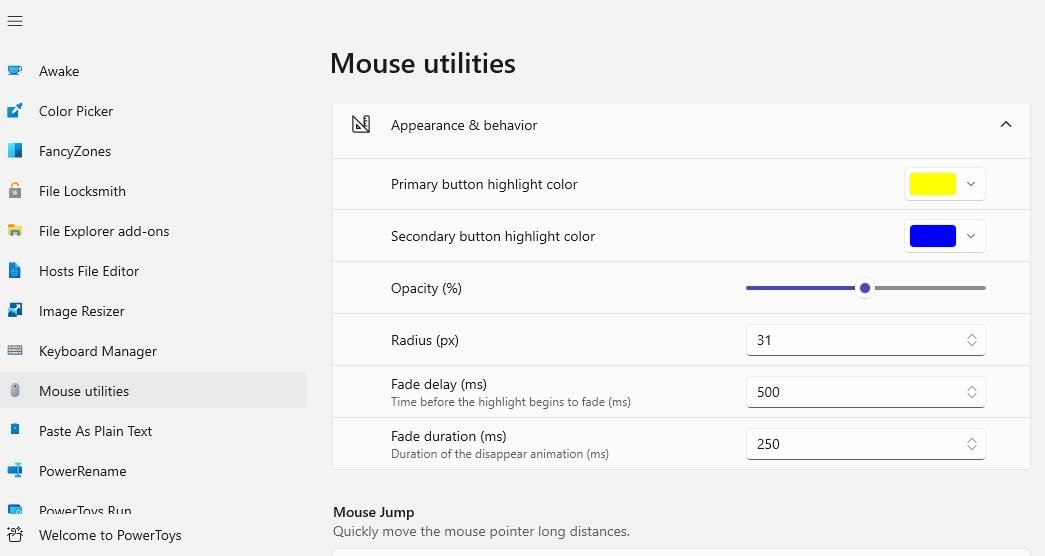
To customize PowerToy’s cursor highlighting, click Appearance and Behavior to view further options. Then you can click the Primary or Secondary button boxes to bring up palettes from which to select different colors. Drag the Opacity bar’s slider lift and right to adjust the highlighting’s transparency level. Click the Radius option to select a different size value for the circle.
How to Highlight the Cursor in Edge and Chrome With the Cursor Highlighter Extension
If you only need to highlight your cursor in Edge or Chrome, check out the Cursor Highlight extension for those browsers. That extension adds a color circle to the mouse pointer in those browsers. It also highlights the cursor with a nice animation effect you don’t get with PowerToys or Mouse Pointer Highlighter. You can highlight your cursor with that add-on like this:
- Open the Cursor Highlighter page in Edge or Chrome.
- Click the Add button to install the extension.
-
Then press the Extensions button in Chrome or Edge.

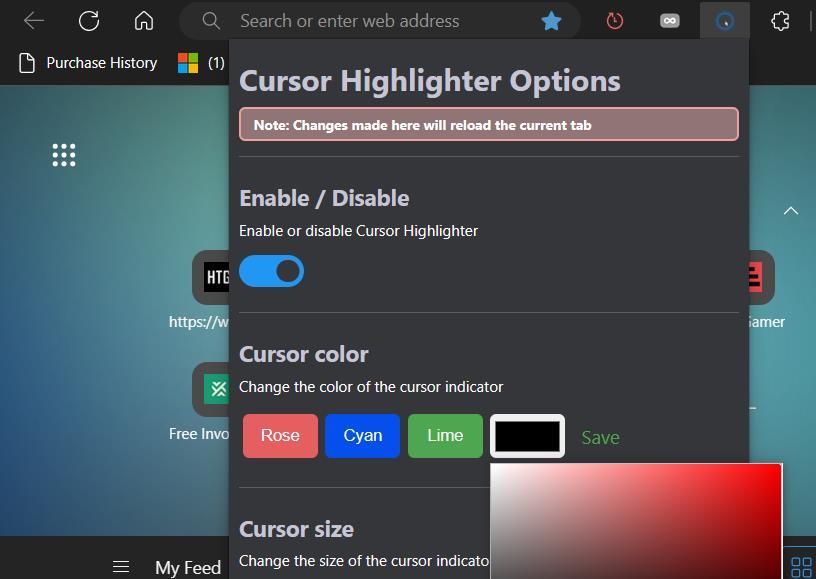
- Click Cursor Highlighter to view the extension’s options.
-
Turn on the Enable/Disable option.

- Click the color palette box to choose a color for the highlight and select save.
- Now open a new website page in your browser to see your highlighted cursor.
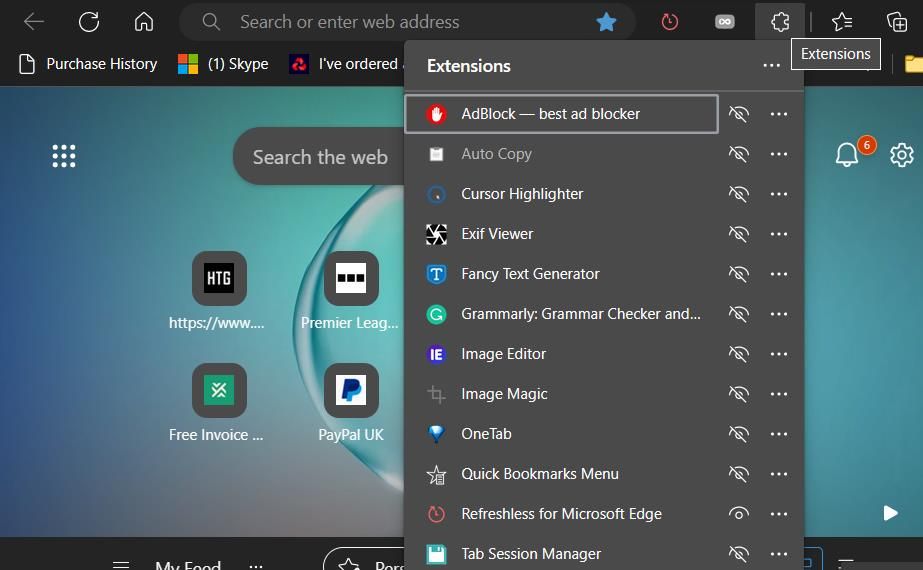
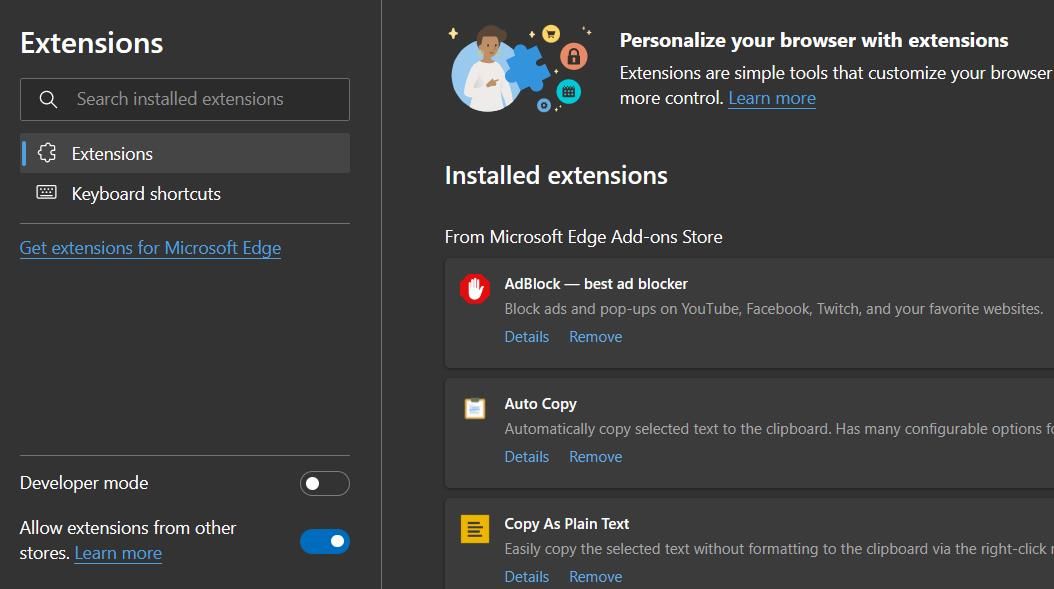
Note that extensions from other stores need to be enabled for Edge users to highlight their cursors with this Chrome add-on. You can access that option in Edge by pressing Alt + F and selecting Extensions > Manage Extensions. Then turn on the Allow extensions from other stores setting.
Make the Mouse Cursor Stand Out by Highlighting It in Windows
You can make your cursor shine by highlighting it in Windows 11/10. The highlighting options in PowerToys and Mouse Pointer Highlight apps will come in handy for numerous presentation and tutorial purposes in Windows 11/10. Windows’ show pointer feature and the Cursor Highlighter extension also provide useful visual cursor indicators, albeit with slightly less functionality.
Sometimes, it is difficult to follow the movements of the mouse cursor. Highlighting mouse cursor and clicks is super useful when you are giving presentations or sharing your screen via a video conferencing app like Zoom. A highlighted mouse cursor and subsequent clicks can help viewers follow you and better understand what you are doing and how. So, how do you highlight mouse pointer and clicks in Windows?
While Microsoft has baked this feature right inside Windows 10 and 11, it is limited in many ways. That’s why we will also be sharing some 3rd-party apps that offer more functionality and control over how the cursor looks and behaves on-screen.
Let’s begin.
Content
- Using Windows Settings
- Mouse Pointer Highlighter Chrome Extension
- Mouse Pointer Highlight Windows App
- Pointer Focus Windows App
- Presentation Pointer
- Wrap Up: Highlight Mouse Pointer and Clicks
1. Using Windows Settings
Let us first look at the native way. If it fits the bill then why bother installing another app?
Press Windows key + I to open Settings and go to Devices > Mouse. Scroll a little and click on Additional mouse options.
You will be greeted with a pop-up. Under the Pointer Options tab, select ‘Show location of pointer when I press the CTRL key‘. Click on Apply and OK.
Useful when you are using a two-monitor setup or on a big screen where it can be difficult to locate the mouse pointer sometimes.
While this is useful for personal use, it won’t help during presentations or while sharing screens. In those cases, you need to highlight the mouse pointer constantly and clicks should be highlighted in a different color so viewers can differentiate between the two.
Fortunately, there are 3rd-party apps available that help with that.
2. Mouse Pointer Highlighter Chrome Extension
Most of us Chrome or other Chromium browsers like Edge or Brave to use Meet or Zoom. If you prefer web apps more than desktop apps then this extension is for you.
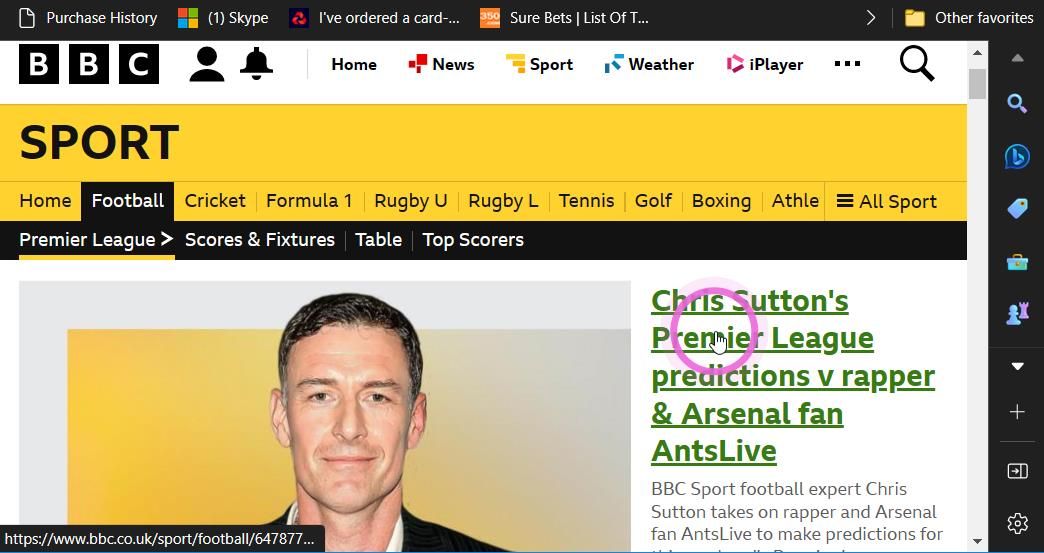
Download the Mouse Pointer Highlighter extension from the Chrome Web Store and install it. If you are worried about privacy and security, don’t be as the project is open-sourced and available on GitHub.
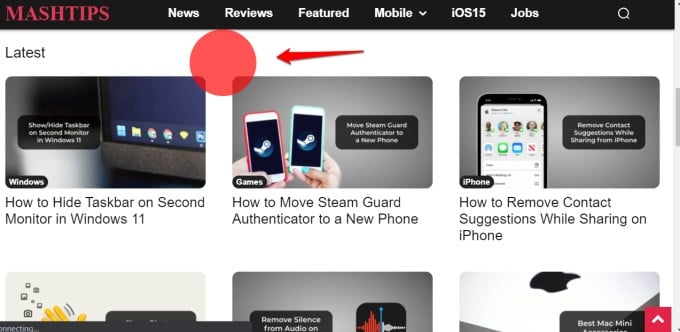
See that red circle in the screenshot above? That’s where my pointer was and every time I clicked on a link, I saw another, smaller blue circle, appear right at the center of the red one. A circle within a circle!
There are two problems with the extension but it may work for you. One is that it only works within the browser. And the other is that you can’t customize the appearance and color of the highlight.
Note that the extension would need permission for every site you visit but only once. Just click on the extension icon once to give the necessary permissions. Otherwise, it won’t work.
Related: How to Control Mouse Pointer with Keyboard on Windows 10
3. Mouse Pointer Highlight Windows App
Similar name and function but with few notable changes. One is that this is a desktop app and hence would work in all apps and browsers. The second is that you can customize the color and other details.
Download Mouse Pointer Highlight from the Microsoft Store and install the app.
The app will work the moment you launch it and stop working when you close the app. It is a lightweight app with a little footprint and won’t tax your system resources.
As you can see in the screenshot above, it is easy to change the display and highlight the color of the mouse pointer with just a few clicks. You also control the size of the highlighted area which can be useful if you are on a smaller or bigger screen. Finally, there is an option to disable ‘click highlights’ and enable only the mouse cursor highlight.
4. Pointer Focus Windows App
This is a powerful app that can do so much more than just highlight mouse pointers and clicks. You can draw arrows, circles, and other shapes on-screen, control the shape, size, and appearance of the pointer highlight, magnifier, annotate, use spotlight, and do so much more. It’s a powerful tool.
The only caveat is that the site is not secured and so I was a little hesitant about downloading the utility tool. If you trust the source then go right ahead. It is possible that the developer is no longer active which is why they forgot to renew the SSL certificate resulting in the lack of HTTPS in the URL.
Related: How to Change Mouse Cursor Size and Speed on Windows 10
5. Presentation Pointer Windows App
Not happy with Pointer Focus? Presentation Pointer is another cool app that will let you annotate, highlight mouse cursor and clicks, and use the spotlight feature on Windows.

Although not as powerful as Pointer Focus, Presentation Pointer is an amazing utility app that you must have if you regularly give presentations, share screens, or create videos.
Wrap Up: Highlight Mouse Pointer and Clicks
There is so much more you can do than just highlight the mouse pointer and clicks on Windows computer. You can customize the size and color of the pointer’s highlight, annotate and draw on-screen, magnify, or use the spotlight feature. There could be a number of situations where you would find these features helpful, and so will your audience.
Disclosure: Mashtips is supported by its audience. As an Amazon Associate I earn from qualifying purchases.
Все современные компьютеры управляются при помощи клавиатуры и мыши, которая позволяет передвигать курсор ОС. В операционной системе Windows 10 имеется специальная настройка, которая позволяет включить вечернюю тему оформления. Эта функция делает белые цвета желтыми, в результате чего снижается нагрузка на глаза, причем очень ощутимо. Активировать данную опцию и настроить ее автоматическую активацию в определенное время суток можно в настройках, однако иногда в ее работе случается баг, то есть она работает некорректно.
Многие владельцы Windows 10 жалуются на то, что после включения теплых цветов в ночное время курсор мыши по-прежнему остается белым, то есть визуально не вписывающимся в общий внешний вид. К счастью, исправить этот недочет очень просто, потому как для этого достаточно в поиске системы ввести слово regedit, либо иным способом открыть приложение «Редактор реестра».
В этом приложении необходимо перейти по пути HKEY_CURRENT_USER\Control Panel\Mouse, после чего изменить значение в поле параметра MouseTrails на -1. Если это не решит проблему, то данной число следует заменить на 99, после чего вновь применить изменения. Чтобы новшества вступили в силу, то есть курсор перестал быть ярко-белым, следует перезагрузить компьютер, предварительно сохранив изменения реестра.
Если все было сделано правильно, курсов окрасится в такой цвет, благодаря которому он не будет очень сильно выделяться на фоне все операционной системы. Такая возможность есть только в Windows 10. Не исключено, что компания Microsoft исправит этот баг уже в ближайших обновлениях, однако это довольно маловероятно, потому как на решение данной проблемы у нее было несколько месяцев, но она ее так и не решила. Скорее всего, это «особенности» систему, однако ее крайне легко исправить.
Ранее AKKet.com писал о том, как всего за 300 рублей получить лицензионный ключ для Windows 10 Pro, хотя в официальном магазине Microsoft Store он стоит в 40 раз больше – порядка 14 000 рублей.
Источник изображений: «Яндекс Картинки»
Присоединяйтесь к нам в Google News, Twitter, Facebook*, Instagram*, ВКонтакте, YouTube и RSS чтобы следить за новостями и оперативно получать интересные материалы.
* Сервисы признаны судом экстремистскими и запрещены в России.