
В этой статье расскажем, как подключить сетевой диск или папку в Windows. Сетевые диски позволяют пользователям получать удобный доступ к общим ресурсам, таким как файлы на файловом сервере или NAS хранилище, напрямую через проводник Windows, как к обычному диску.
Приобрести оригинальные ключи активации Windows всегда можно у нас в каталоге от 1099 ₽
Способы подключения сетевого диска:
1. Из проводника Windows
2. Из командной строки или PowerShell
3. С помощью групповых политик
Подключение сетевого диска через проводник Windows 11
1. Откройте проводник Windows.
2. Нажмите на три точки в верхнем меню и выберите Map network drive (Подключить сетевой диск).
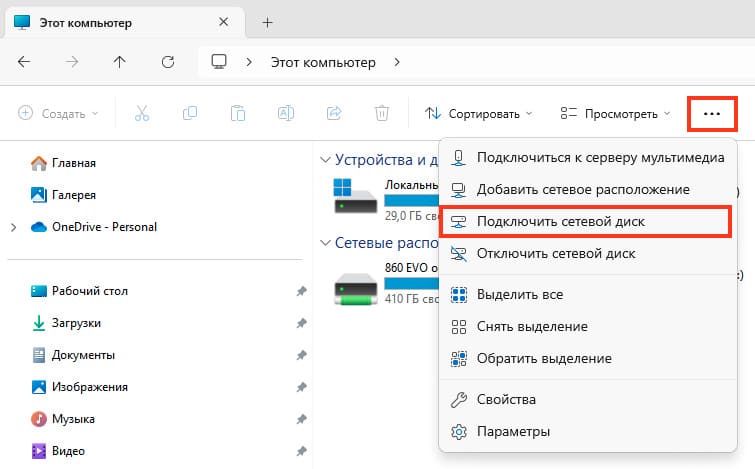
3. Выберите букву диска, которую хотите назначить сетевой папке.
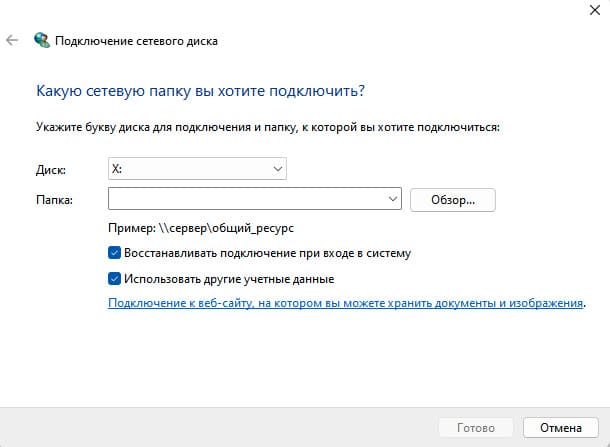
4. Укажите путь к папке на файловом сервере в формате UNC (например, \\fs01\Docs\IT). Если вы не знаете путь, можно воспользоваться кнопкой Browse, чтобы выбрать папку вручную.
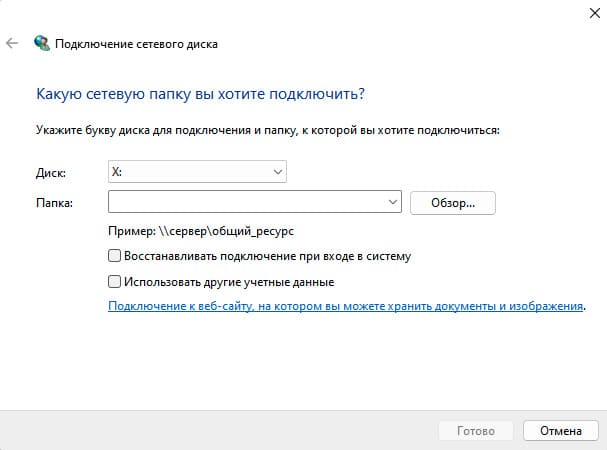
5. Если необходимо автоматически подключать диск при входе в систему, включите эту опцию.
6. Если нужно использовать другие учетные данные для подключения, включите эту опцию, после чего введите логин и пароль.
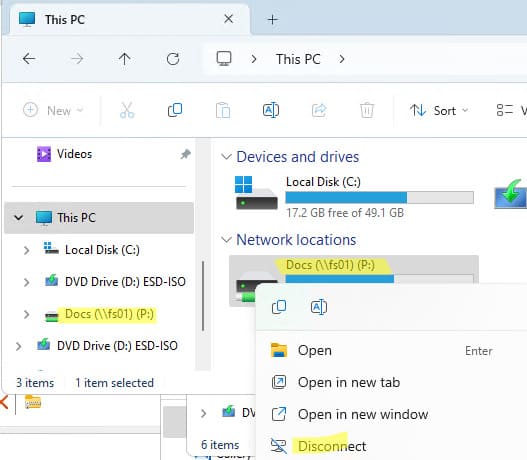
После этого сетевой диск появится в проводнике Windows и будет доступен для использования.
Чтобы отключить сетевой диск, щелкните правой кнопкой мыши по диску и выберите Отключить (Disconnect).
Подключение сетевого диска через командную строку
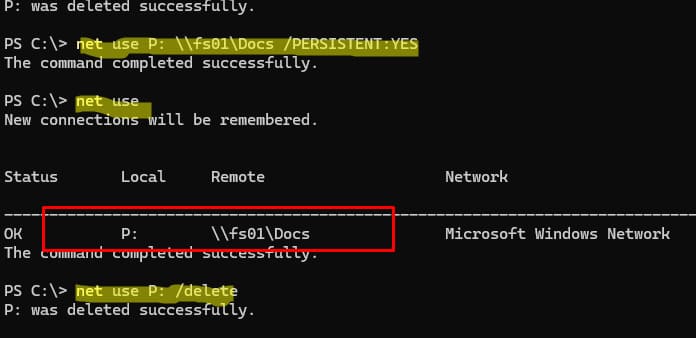
Подключить сетевой диск можно с помощью команды net use. Пример:
net use P: \\fs01\Docs /PERSISTENT:YES
Где:
— P: — буква диска для сетевой папки.
— \\fs01\Docs — UNC путь к папке на сервере.
— /PERSISTENT:YES — делает подключение постоянным, сетевой диск не будет удален при перезагрузке.
Чтобы использовать учетную запись для подключения:
net use P: \\fs01\Docs /USER:WINITPRO\kbuldogov *
Где:
— /USER — указывает учетную запись.
— Звездочка (*) означает, что система запросит пароль интерактивно.
Удалить сетевой диск:
net use P: /delete
Подключение сетевого диска через PowerShell
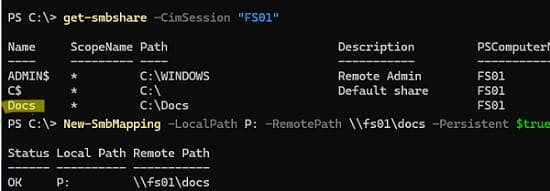
Для подключения сетевого диска через PowerShell используйте команду New-SmbMapping. Пример:
New-SmbMapping -LocalPath P: -RemotePath \\fs01\docs -Persistent $true
Чтобы удалить сетевую папку:
Remove-SmbMapping P: -UpdateProfile
Вывести список сетевых папок на удаленном компьютере можно командой:
Get-SmbShare -CimSession "FS01"
Подключение сетевого диска с помощью групповых политик
Администраторы домена могут использовать групповые политики для автоматического подключения сетевых дисков всем пользователям сети. Это особенно полезно для централизованного управления общими ресурсами и упрощения доступа к ним для пользователей.
Теперь вы знаете, как подключить сетевой диск в Windows несколькими способами, будь то через проводник, командную строку или PowerShell. Выбирайте тот метод, который подходит вам больше всего.
Лицензионный ключ активации Windows от
One of the most ubiquitous commands in a senior Windows admin’s arsenal is probably the Windows net command. This command has a lot of functionality. In this article, you’re going to learn about net use.
Not a reader? Watch this related video tutorial!
Not seeing the video? Make sure your ad blocker is disabled.
The net use command is a legacy, yet still completely functional command to create, remove and manage SMB Windows mapped connections and drives.
Let’s dig into the net use command and cover what it’s capable of and how to use it in this tutorial.
Prerequisites
To follow along with any examples in this tutorial, ensure you have at least:
- A Windows client computer (any version will work) in an Active Directory domain. This tutorial will use Windows 10.
The
net usecommand will work in non-domain environments. If not though, you’ll always need to pass a username and password to authenticate to the remote file share.
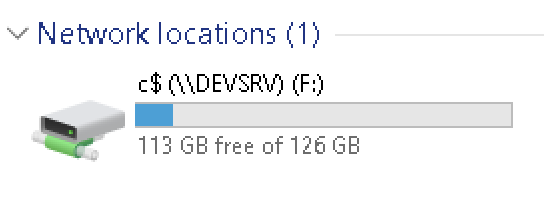
- One or more available file shares on an accessible server part of an Active Directory domain. This tutorial will be connecting to an administrative file share called C$ on a server called DEVSRV.
- A user account with read access to the file share and NTFS read permissions to the folder the share is pointing to
Getting Started with Net Use
The net use command enables you to work with files on network file shares. It does this using various parameters and switches as shown below.
The net use command can view device connections, create new connections and remove them. Throughout this tutorial, you’re going to learn about each parameter and see in what use case each parameter fits.
Much of the content you’ll see around
net userefers to the endpoints it works with as ‘connections’ instead of ‘drives’. This command is capable of connecting to printers and other devices but for this tutorial, you’re going to focus on remote file shares.
Creating Remote Connections
Creating new connections is one of the most common reasons to use the net use command. This command allows you to connect to remote file shares to copy files to, remove from, etc just like if the folder you’re connecting to was local.
To create a new remote file share connection, you have two options with net use. You can either create what Microsoft calls a “deviceless” connection which is simply a file share connection without a drive letter or a mapped drive.
Mapping Network Drives Using Logged-In Credentials
Mapping network drives is one of the most common uses of the net use command. This command allows you to map a network drive on the command line much like you would via File Explorer.
Assuming you’re on a Windows 10 PC in a domain environment with a Windows server hosting a file share:
1. Open a command prompt or PowerShell console as administrator.
2. Let’s map the drive letter F: to the DEVSRV server file share C$. To do so, specify the drive letter to map the network drive to followed by the UNC path of the remote file share.
You can use any letter to map the network drive to if it’s not already in use.
If the file share has spaces in it, always be sure to surround it in quotes e.g.
\\DEVSRV\"My File Share".

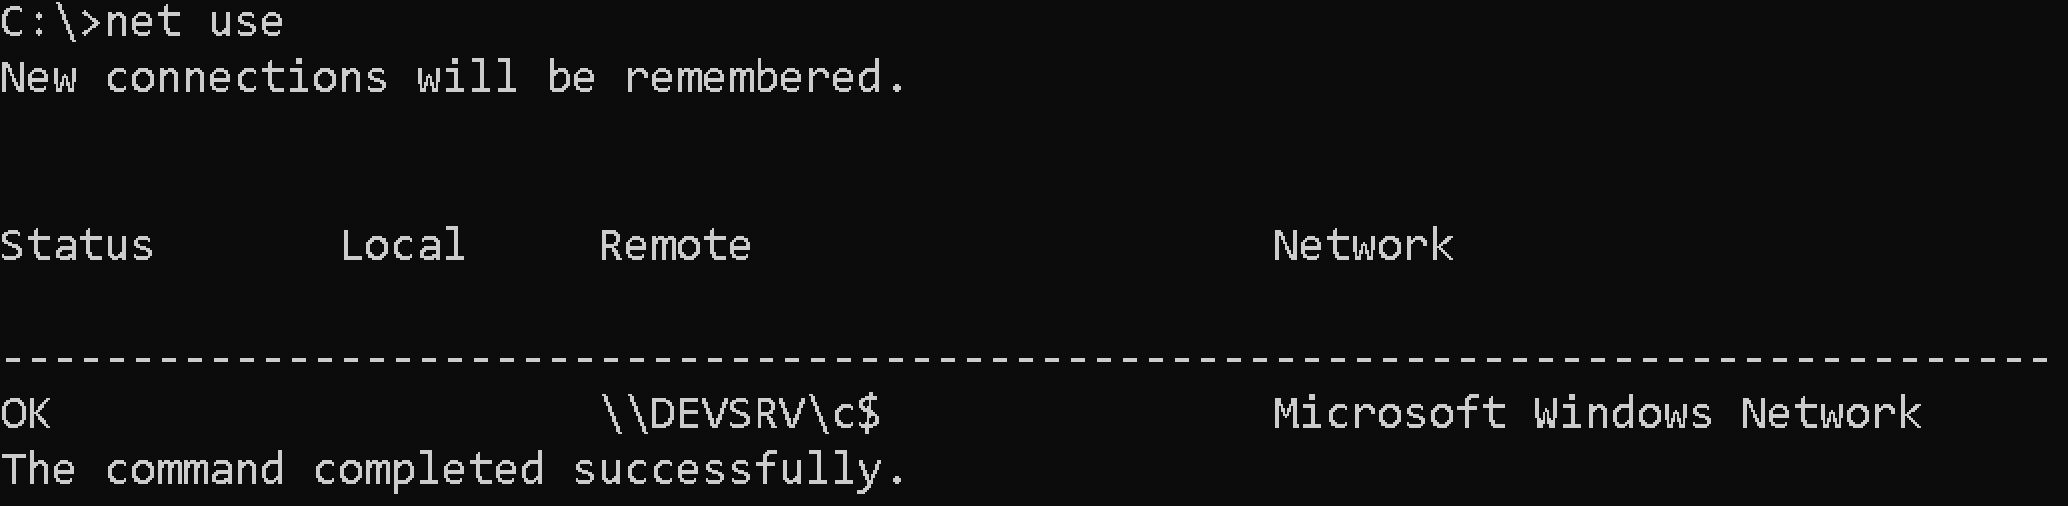
3. Now run net use with no parameters to confirm Windows mapped the drive correctly.
4. Open File Explorer and you’ll also now notice a new network location.
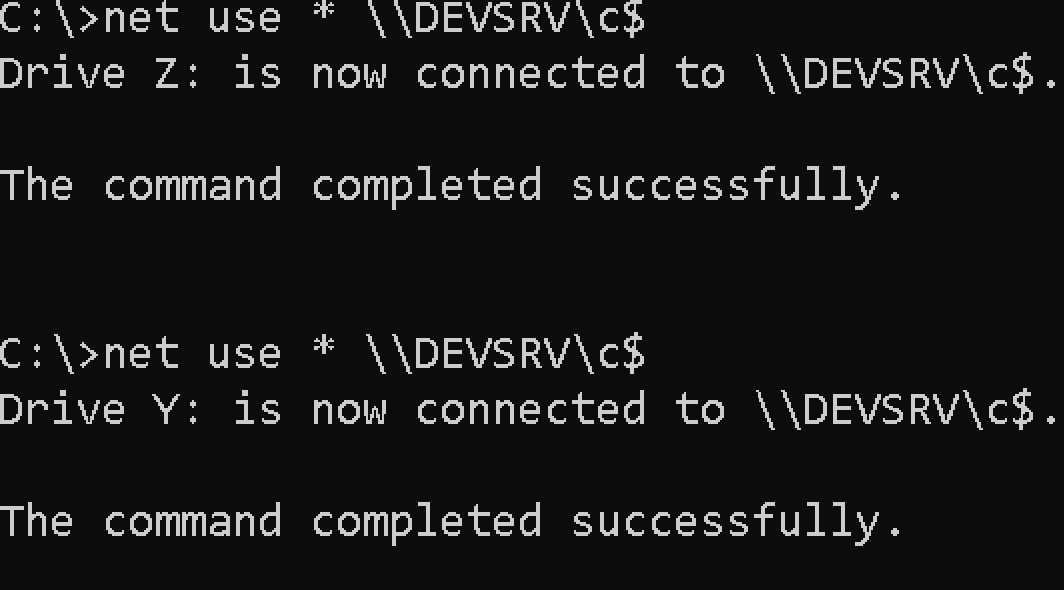
If you don’t care what device (drive letter) to map the drive to, you can also use an asterisk (*) for the drive letter. Doing so will tell Windows to find the next available drive letter.
Mapping Network Drives Using Alternate Credentials
If you went through the demo above and mapped a network drive, you did so authenticating as the logged on user. But what if you need to authenticate to the remote file share using alternate credentials?
Mapping a network drive authenticating as a non-logged-in user account is nearly the same as with a logged-in account. The only difference is using a couple more parameters.
To map a network drive with alternate credentials, open a command prompt or PowerShell console as an administrator.
Run net use providing:
- The drive letter to map to
- The UNC path of the file share
- The username to authenticate with (
/u) - The password
In the below example, Windows will map the F: drive to the \\DEVSRV\c$ file share authenticating as the test_user account in the domain domain using the password of passwordhere.
net use f: \\DEVSRV\c$ /u:domain\\test_user passwordhereSpecify a local user account on the remote computer by removing the domain from the username parameter e.g.
/u:test_user.
Use the
/savecredparameter to save the credentials to prevent being prompted the password later.
Create “Deviceless” Connections (No Drive Letter)
Perhaps you need to use a remote file share but you don’t want to map a drive letter to it. In that case, simply remove the drive letter.
Let’s create a file share connection without a drive letter known as a “deviceless” connection. Assuming you’re on a Windows 10 PC in a domain environment with a Windows server hosting a file share:
1. Open a command prompt or PowerShell console as administrator.
2. Create the “deviceless” connection by specifying the UNC path to the remote file share a username and password to authenticate and hitting Enter.
net use \DEVSRV\c$ /u:domain\test_user passwordhereIf your client computer and remote Windows server are in an Active Directory domain and you’re logged into your client computer with a domain user account, it doesn’t typically make sense to use
net usein this situation. You can already access these resources with no extra steps. But when you need to authenticate with an alternate user account, that’s where it comes in handy.
The connection has been made but if you look in File Explorer, you’ll see no connection. This connection is “deviceless”.
3. Now, confirm the connection has been made by running net use with no parameters. You can see below that Windows knows a connection is there.
At this point you can now navigate and work with the file share just as if it was local to you using the alternate user account credentials.

Persistent Connections
Whenever you establish new connections, Windows can keep those connections around after a reboot or not called persistence. The net use command has a parameter called /persistent that defines whether or not a connection remains after a reboot.
To ensure a connection stays around, add the /persistent parameter to any attempt to create a new connection like:
net use \\DEVSRV\c$ /persistent:yesMapped drives are not persistent, by default.
Windows will remember the last created connection’s persistence setting. If you set
/persistenttoyesfor a connection, all subsequent connections will be persistent if you do not explicitly set/persistenttono. To ensure all connections are persistent in the current session, usenet use /persistent:yes.
Advanced Connection Parameters
Most of the time, you’ll only need the parameters discussed earlier to create a connection. But, you may run into situations where you’ll need to perform some advanced connection tasks
Mapping Drives with Write Through (Forced Unit Access)
Added in Windows 10 build 1809, you can use the /writethrough parameter to map a drive bypassing all OS caches and forcing I/Os through to disk.
Increasing Security
The net use command also has two advanced parameters that increase security; /reguireintegrity and /requireprivacy through a feature called UNC Hardened Access. This feature “tags” information on these shares to inform Multiple UNC Provide (MUP) and UNC providers of additional security requirements
Using the /requireintegrity parameter ensures additional integrity checks to block tampering attacks.
The /requireprivacy parameter instructs net use to use encryption to prevent third parties from seeing any sensitive information in the file share communication.
Removing Network Connections
Finally, if you’ve set up some connection and need to get rid of them, the /delete parameter is your friend. To remove a non-persistent connection, provide the /delete parameter and the UNC path to the network share as shown below.
net use /delete \\devsrv\c$
To remove a mapped drive, provide the drive letter and the mapped drive
net use f: \\devsrv\c$ /delete Conclusion
You should now have a good idea of just about everything you can do with the net use command. This old-school yet handy command is still in use today and can still help you map network drives in Windows.
How are you going to use net use?
The Net Use command is a pretty old command that is still commonly used to connect network drives in Windows. The advantage of the Net Use command is that it allows you to quickly add, view, and delete network resources from your computer.
The command is capable of connecting to all kinds of network resources. But most of the time it’s used to connect to network shares.
In this article
In this article, we are going to take a closer look at the Net Use command. I will explain how you can view, add, and delete network shares from the cmd line.
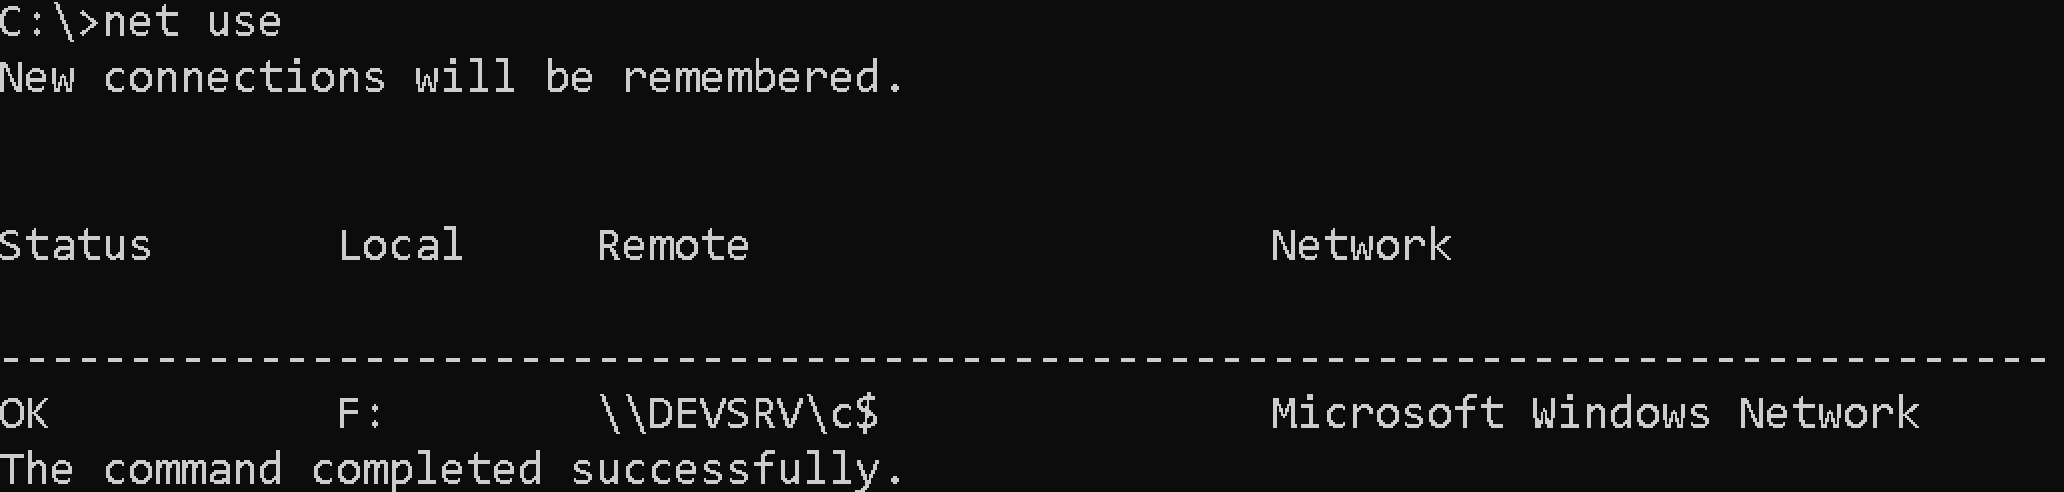
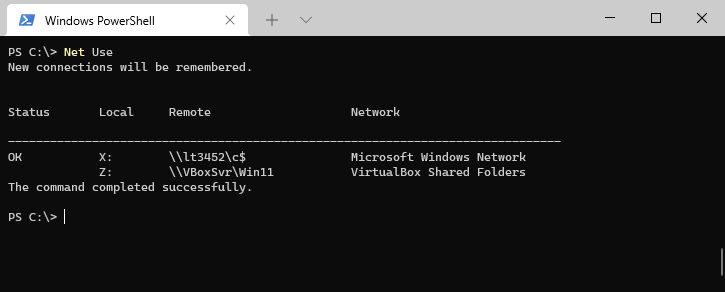
Before we are going to take a look at how to add a network drive, we first going to list the existing connections. If you simply type the command Net Use you will get an overview of all existing network connections and their status.
Now you could also open explorer to see all network drivers. But the advantage of Net Use is that it will also list any hidden network connections that are created with a group policy.
Open the command prompt or PowerShell and type:
Net Use
This will show a list of all connections and the status of the connection:
We can also view the details of each connection with net use <driveletter>. This is really handy if you want to check if a particular network drive is currently used or if you want to know more about the resource type.
# Type Net use followed by the drive letter
Net Use X:

Add Network Connection with Net Use
The Net Use command is commonly used to add or remove network connections from a computer. One of the advantages of using a command for this is that you can add a drive letter after somebody logs in. Or easily create a script that will add the network connection on multiple computers.
Let’s start with simply adding a network drive to the computer. We are going to make a connection to the \\VBoxSvr\Win11\Documents and assign the drive letter H: to it. \\VBoxSvr is the name of the computer or server. Win11 is the shared folder and Documents is a subfolder.
Net use h: \\VBoxSvr\Win11\Documents
After you have run the command you will see the drive mapping in the explorer.
You can choose any available drive letter from A to Z (c is often taken for your system drive) for shared folders and LTP1: to LTP3: for printers. It’s also possible to automatically assign a drive letter by using * . This way the Net Use command will automatically select the highest available drive letter, starting with Z:
# Pick the first available drive letter:
Net use * \\VBoxSvr\Win11\Documents
Net Use Persistent
By default, the network resources that you add with Net Use are only temporary. After you log off or reboot the mapping will be gone. However, most of the time you want the drive mapping to be persistent.
To make a drive mapping persistent we will need to add the parameter /persistent:yes to the command:
Net use h: \\VBoxSvr\Win11\Documents /persistent:yes

# or in short:
Net use h: \\VBoxSvr\Win11\Documents /p:yes
Note
All other drive mappings that you add in the same session after you have used
/persistent:yeswill also be persistent. So to make a temporarily drive mapping after a persisitent one, you will need to use/persistent:no
Mapping Network Drive with different credentials
Your computer will use your current credentials when mapping a shared network folder. But often you will need to supply different credentials for the network resource. With Net Use we can supply the username and password that needs to be used to open the network resource.
It’s possible to enter the password as plain text in the command:
# Authenticate with the username VboxSrv\user1 and password Passwrd123
Net use h: \\VBoxSvr\Win11\Documents /user:VboxSrv\user1 Passwrd123 /p:yes
But another option is to use a * symbol, after which you will be prompted to enter the password:
Net use h: \\VBoxSvr\Win11\Documents /user:VboxSrv\user1 * /p:yes
The only problem with this is that the password is forgotten after a reboot. So you will need to reenter the password every time you open the network connection. We can solve this by using the parameter /savecred.
There is one catch, however, to use /savecred you must not supply the username and password. Otherwise, you get the error “A command was used with conflicting switches”. The /savecred parameter will use the stored credentials on your computer. If it doesn’t find credentials for the connection it will ask for it:
PS C:\> net use * \\VBoxSvr\Win11 /savecred /p:yes
Enter the user name for 'VBoxSvr': lazyadmin\user01
Enter the password for VBoxSvr:
Drive Y: is now connected to \\VBoxSvr\Win11.

The command completed successfully.
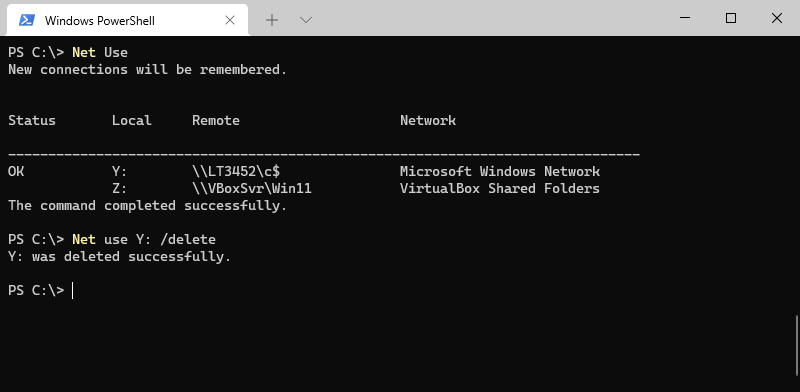
Unmap Network Drive
We can also use the Net Use command to unmap a network drive in Windows. The first step is to list the existing connections by simply typing net use in the command prompt or PowerShell window.
Next, we can type net use followed by the drive letter that we want to remove. Instead of a drive letter, you can also supply the remote target path:
Net use Y: /delete

# Or
Net use \\VboxSvr\Win11 /delete
Mapping users home directory
When the user’s home directories are stored on a network share then you can easily map their home folder with the net use command. For this, you will need to have a domain with the home directory path configured in the Active Directory.
To map the user’s home folder you use the following command:
Net Use h: /home
Wrapping Up
The Net Use command is an old but useful command. I still use it often to get a quick overview of the mapped (hidden) network drives on computers or in local home networks to map a NAS for example.
When using the command, make sure that you use the /persistent:yes parameter so the mapping stays in place after a reboot.
If you have any questions, just drop a comment below.
What to Know
- Enter net use into Command Prompt for a list of mapped drives and other devices.
- Lots of switches work with the net use command, including two that let you define a username and password.
- Net use can connect to, remove, and configure connections to shared resources.
This article explains how to use the net use command on a Windows computer. You’ll find all the different switches that work with net use and a few examples that show how it’s useful.
Net Use Command Syntax
This command uses the following general syntax:
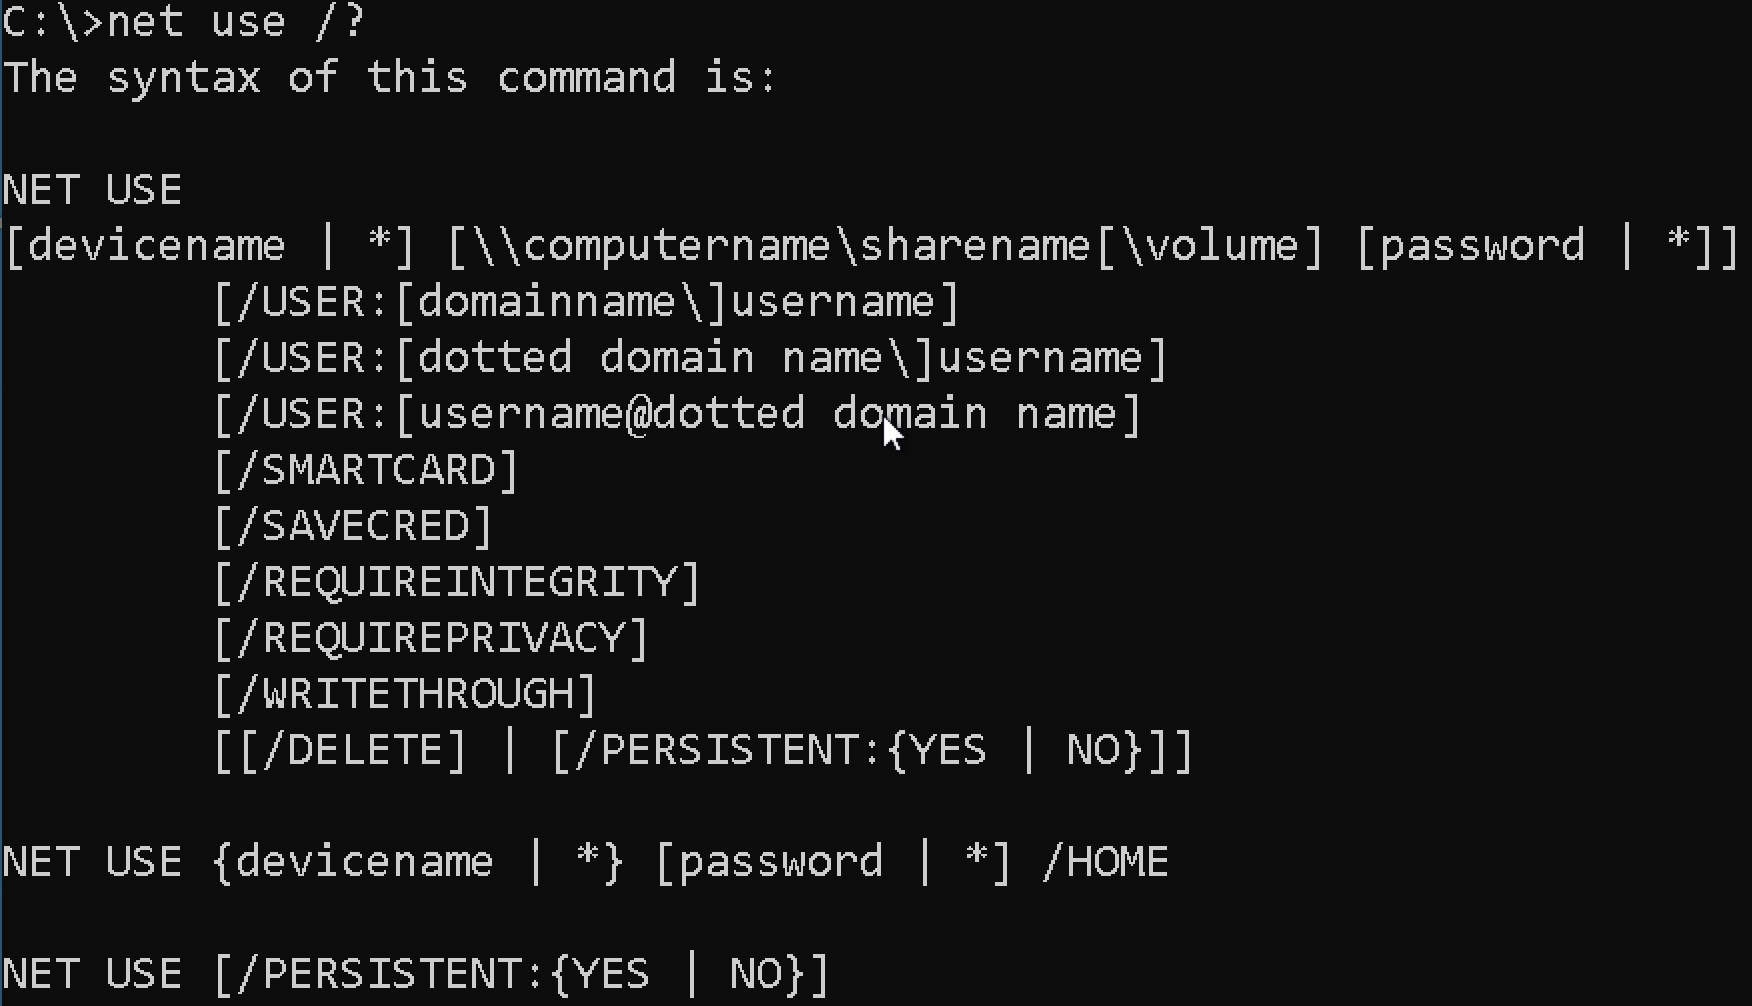
net use [{devicename | *}] [\\computername\sharename[\volume] [{password | *}]] [/user:[domainname\]username] [/user:[dotteddomainname\]username] [/user:[username@dotteddomainname] [/home {devicename | *} [{password | *}]] [/persistent:{yes | no}] [/smartcard] [/savecred] [/delete] [/help] [/?]
Review how to read command syntax if you’re not sure how to interpret the net use command syntax as it’s shown above or described in the table below. The availability of certain command switches and other command syntax may differ from operating system to operating system.
Net Use Command (Windows 11).
| Net Use Command Options | |
|---|---|
| Option | Explanation |
| net use | Execute the net use command alone to show detailed information about currently mapped drives and devices. |
| devicename | Use this option to specify the drive letter or printer port you want to map the network resource to. For a shared folder on the network, specify a drive letter from D: through Z:, and for a shared printer, LPT1: through LPT3:. Use * instead of specifying devicename to automatically assign the next available drive letter, starting with Z: and moving backward, for a mapped drive. |
| \\computername\sharename | This specifies the name of the computer, computername, and the shared resource, sharename, like a shared folder or a shared printer connected to computername. If there are spaces anywhere here, be sure to put the entire path, slashes included, in quotes. |
| volume | Use this option to specify the volume when connecting to a NetWare server. Client Service for NetWare or Gateway Service for Netware must be installed. |
| password | This is the password needed to access the shared resource on computername. You can choose to enter the password during the execution of the net use command by typing * instead of the actual password. |
| /user | Use this net command option to specify a username to connect to the resource with. If you don’t use /user, net use will attempt to connect to the network share or printer with your current username. |
| domainname | Specify a different domain than the one you’re on, assuming you’re on one, with this option. Skip domainname if you’re not on a domain or you want net use to use the one you’re already on. |
| username | Use this option with /user to specify the username to use to connect to the shared resource. |
| dotteddomainname | This option specifies the fully qualified domain name where username exists. |
| /home | This net use command option maps the current user’s home directory to either the devicename drive letter or the next available drive letter with *. |
| /persistent:{yes | no} | Use this option to control the persistence of connections created with the net use command. Choose yes to automatically restore created connections at the next login or choose no to limit the life of this connection to this session. You can shorten this switch to /p if you like. |
| /smartcard | This switch tells the net use command to use the credentials present on the available smart card. |
| /savecred | This option stores the password and user information for use next time you connect in this session or in all future sessions when used with /persistent:yes. |
| /delete | This net use command is used to cancel a network connection. Use /delete with devicename to remove a specified connection or with * to remove all mapped drives and devices. This option can be shortened to /d. |
| /help | Use this option, or the shortened /h, to display detailed help information for the net use command. Using this switch is the same as using the net help command with net use: net help use. |
| /? | The standard help switch also works with the net use command but only displays the command syntax, not any detailed information about the command’s options. |
Net Use Command Examples
Following are a few different ways you might use this command:
Temporary Mapped Drive
net use * "\\server\my media" /persistent:no
In this example, we used the net use command to connect to the my media shared folder on a computer named server. The my media folder will be mapped to the highest available drive letter [*], which in our example happens to be y:, but we don’t want to continue mapping this drive every time we log onto the computer [/persistent:no].
Permanent Mapped Drive
net use e: \\usrsvr002\smithmark Ue345Ii /user:pdc01\msmith2 /savecred /p:yes
The above is a slightly more complicated example that you might see in a business setting.
In this net use example, we want to map our e: drive to the smithmark shared folder on usrsvr002. We want to connect as another user account we have [/user] by the name of msmith2 that’s stored on the pdc01 domain with a password of Ue345Ii. We don’t want to map this drive manually every time we start the computer [/p:yes], nor do we want to enter the username and password each time [/savecred].
List All Shared Resources
net use
In this simple example of the net use command, we get a list of all the shared resources currently in use under the user account that’s currently logged in. In our example, the result in Command Prompt shows «Z: \\server\shared folder\» since z: is the drive letter that’s connecting to shared folder on server.
The message «There are no entries in this list.» will show if there aren’t any connections currently set up.
Unmap a Drive
net use p: /delete
An appropriate final example of net use is the removal [/delete] of a currently mapped drive, in this case, p:.
Net Use Command Availability
This command is available from within the Command Prompt in Windows 11, Windows 10, Windows 8, Windows 7, Windows Vista, and Windows XP, and in older versions of Windows and Windows Server operating systems.
Recovery Console, the offline repair utility in Windows XP, also includes the net use command, but it’s not possible to use it within the tool.
Net use is one of many net commands like net send, net time, net user, net view, etc.
Thanks for letting us know!
Get the Latest Tech News Delivered Every Day
Subscribe
on September 26, 2011
Net use is one of the important Windows commands that’s useful to manage network drives from CMD. Do you want to map a drive to a shared folder? or delete mapped drives? ‘Net use’ is the command you would need.
Below you can find the syntax of this command with some examples.
Map network drive from command prompt
Let’s say you have a network share \\RemotePC\Share which you want to map to a local drive. You can do that with the below command.
Net use * \\RemotePC\Share
The above command would map the share to the first available drive starting from Z: We can also specify the drive name in the place of ‘*’.
System error 85 has occurred
If you try to map to a network drive that’s not available(already mapped to another share), it throws this error.
c:\>net use Z: \\remptepc\share
System error 85 has occurred.
The local device name is already in use.
See Map network drive from command line for advanced options for net use and for specifying user name and passwords in the command line.
Delete/Disconnect a mapped drive
You can disconnect a mapped drive using ‘net use /delete’ command. For example, to disconnect the drive Z: the command is
net use Z: /delete
Delete all mapped network drives
You can delete all mapped drives using the below command.
net use * /delete
List all network drives and mapped shares
c:\>net use
New connections will be remembered.

Status       Local     Remote                    Network

-------------------------------------------------------------------------------
             Z:        \\remotepc\share
                                                Microsoft Windows Network
The command completed successfully.