

Сначала, мне казалось, что я просто не вижу заветных иконок и пунктов. И как оказалось — их там и не было. А вот где я их нашел, раскрою секрет.
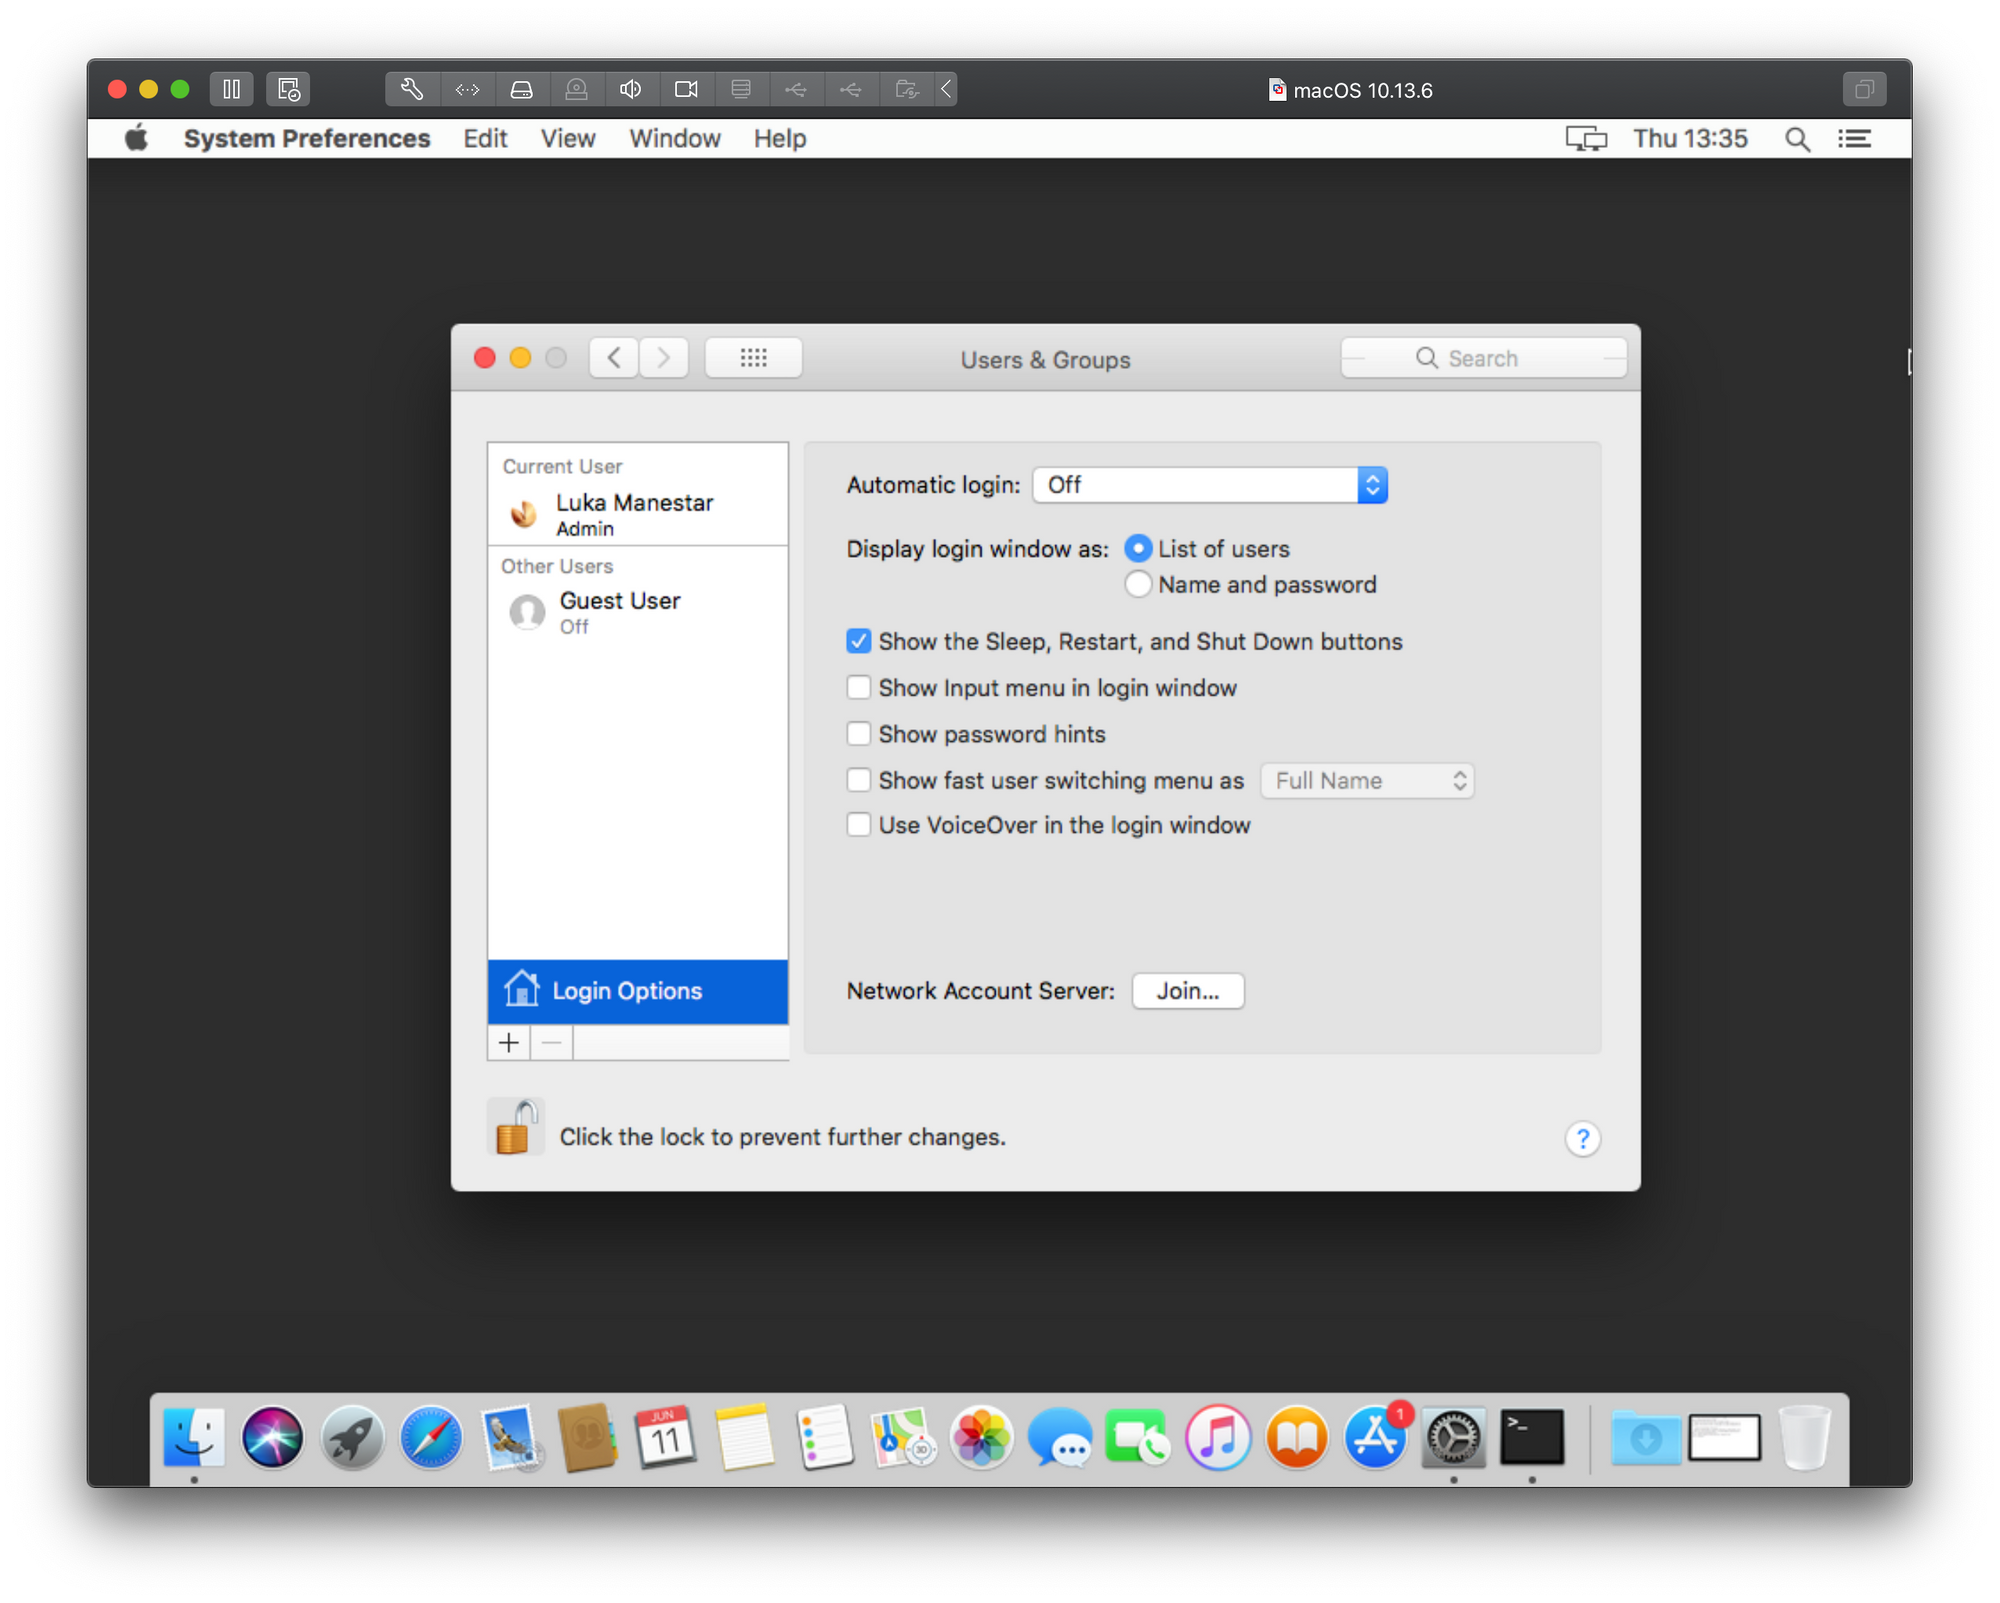
Для начала открываем меню “Системные настройки”. Нас интересует категория “Система” и в ней пункт “Пользователи и группы”.
Тут для нас припасен пункт “Параметры входа” — это именно то, что нам нужно и не нашлось в меню “Сеть”.
Снимаем замочек вводом пароля и выбираем заветную вкладку. Видите, в самом низу пункт “Сетевой сервер учетных записей”? Да, как раз его нам и нужно подключить одноименной кнопкой.

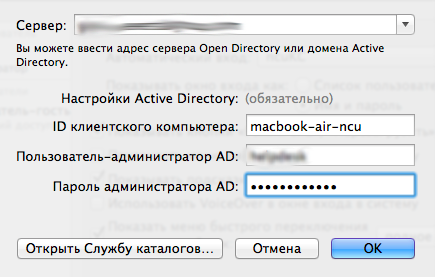
В появившемся окне вводим всю необходимую информацию: имя сервера (можно и ip), ID компьютера и связку логин-пароль для добавления машины в домен. Конечно же, у вас должны быть права в домене для такой операции.
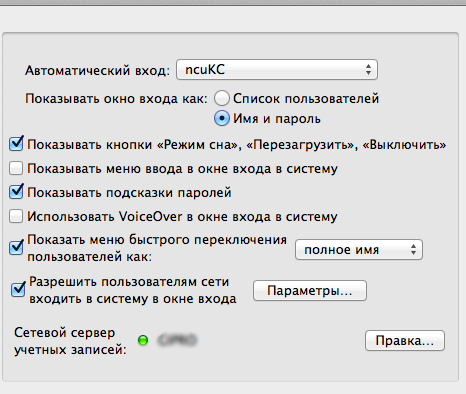
Возвращаемся на предыдущее окно и обращаем внимание на пункт “Автоматический вход”. Если ваш Mac используется в личных целях дома, а на работе вы используете учетную запись из Active Directory, то советую выставить значение “Выкл.” этого параметра. Таким образом, при старте системы вы будете попадать на форму ввода логина с паролем, где сможете использовать данные доменной учетки. Также, на всякий случай, поставьте галочку напротив пункта “Показывать меню ввода в окне входа в систему”.
Остальные пункты, кроме подсказок VoiceOver можете оставить по умолчанию.
На этом все. Даже перезагружаться не нужно (как это раздражает на Windows). Закрываем замочек, чтобы никто не смог поменять настройки без аутентификации.
Остается только только зайти в систему используя свои данные. В правом верхнем углу, рядом с часами, появилось новое меню с активной в данный момент учетной записью. Если вы решите зайти под доменной учеткой, достаточно нажать на имя пользователя и выбрать пункт “Окно входа”. Перед вами появится стандартная форма в которую нужно ввести данные вида domainnameuser и пароль (Не забывайте про имя домена!).
Переключаться между учетными записями можно в любой момент, вводя для каждой свой пароль. Переключение происходит очень быстро, а сеанс завершать не обязательно.
Все, настройка закончена. Добавлена ли наша машина, можно посмотреть в Acive Directory.
If you want to share files or peripheral devices between Windows and Mac computers, you can bind your Mac to a Windows domain. This is not a difficult procedure if you approach it systematically.
💡 Essentially, you need to configure your system so Active Directory accepts the IP address of your Mac. We have put together this guide to help you get this done with a minimum of stress.
What Do You Mean by a Windows Domain or an Active Directory Domain?
Windows Domain
Windows domains generally consist of a large number of PCs that are connected to the same local network. The domain controllers, made up of one or more servers, are responsible for controlling the authentication that allows access to the other computers on the same domain.
Even when the domain controllers are connected through a local network, they can also communicate with the domain controller via a VPN or an Internet connection. This makes Windows domains a great solution for large networks such as those found in schools, offices, or businesses.
The domain controllers handle all user accounts and passwords. The local user account is not used when logging into the domain. This feature allows you to log into any computer connected to the domain with the same credentials.
Active Directory Domain
An Active Directory domain is both a logical and a physical construct. It consists of either a single user, group of users, or a hardware component such as a printer or a computer within the Microsoft Active Directory Network.
The logical form of an Active Directory domain is based on a tree-like hierarchy. A group of Active Directory trees is known as a forest. This is the highest level of the hierarchy, with each Active Directory tree potentially having multiple branches that consist of child domains. Each child can have additional branches resulting in a complex hierarchical network topology.
Active Directory domains can be seen in the processes and services area of the Windows Server OS. The server running the Active Directory domain is known as the domain controller and its role is to control user access to the computers that comprise the domain.
The benefits of an Active Directory environment is that a single login enables an administrator to access all domain resources like servers, storage volumes, printers, and computer accounts.
When you connect a Mac to a Windows domain, the machine binds to an Active Directory domain. The Windows computers you want to access from the Mac also need to join the given domain.
Requirements for Binding a Mac to an Active Directory Domain
Some prerequisites need to be addressed before you can join a Mac to an Active Directory.
- The hardware selected must be compatible with Windows Server 2000-2012.
- Active Directory Domain Services (ADDS) needs to be configured on all computers connected to the domain to manage authentication.
- The Mac that is to be connected needs to be running Mac OS X 10.5 or a newer version of the operating system.
- A Domain Administrator-level account is required to join the Mac to Active Directory. This account can also be used to create other user accounts or modify permissions.
Steps Required to Join a Mac to a Windows Domain
Conclusion
Connecting a Mac to a Windows domain is not a trivial task and you may come across several issues such as joining the Mac to the local domain. As long as you follow the steps outlined above, you should be able to connect your Mac to the Windows domain.
Once that is accomplished, you can access files on your Windows machine from the Mac without the need to authenticate every time you log in.
Last week I received a Mac laptop and before I could install SCCM client on it, I wanted to join or bind Mac to a Windows Domain or AD Domain. To bind a Mac to active directory, you can use the steps covered in this post.
After a long time I was using Mac and honestly, I found it bit difficult to use it. Coming from Windows OS, it takes some time to understand the Mac OS but once you start exploring it, you will find it easy.
Let’s consider an example where your boss calls you into his office and says he got a new laptop. You notice that it’s a Mac and now you have to join this Mac to a Windows domain.

So what do you do now ?. Not to worry, you can join a Mac to your AD domain and I will show you how it’s done. I am currently using Mac OS 10.14 and using this article you can find out your macOS.
Before you Bind or Join a Mac to Active Directory Domain, ensure the Mac is connected to the network. You can either set a static IP address on your Mac or let DHCP assign the IP address to Mac. If your Mac is unable to communicate with domain controller, the domain join will fail.
Steps to Join or Bind a Mac to a Windows Domain
Let me now cover the steps to join or bind a Mac to a Windows or Active Directory Domain. On you Mac, click System Preferences in the Dock, and then select Users & Groups in the System section on your Mac.

Click the Lock icon and enter an administrator username and password.

When you enter the right credentials, the lock icon now shows unlocked. You can make the changes now.

Click Login Options and then click the Join button next to Network Account Server option.

Click the Open Directory Utility… button.

You see two options under Service – Active Directory and LDAPv3. However both of them are greyed out. Click the Lock icon and enter an administrator username and password again.

Select Active Directory, and then click the Pencil icon.

Enter the Active Directory domain name. You can specify a new computer ID if required. Click Bind.

Specify an account and password that will add this Mac to the domain. Click OK.

We have successfully joined the Mac to Active Directory domain. Click OK.

Finally we got the Mac added to the domain. We can now see the domain name next to Network Account Server. Reboot your system to apply the changes.

Still Need Help?
If you need further assistance on the above article or want to discuss other technical issues, check out some of these options.
If you came here wondering the same questions, I have some bad news. I haven’t been able to join my test Mac into my MS ADDS. Yet.
The reason for this article is to cover all the steps that were taken so far regarding testing and Kerberos configuration, etc, in an effort to bind a macOS based device into a working Microsoft ADDS.
Now, this is a valid question. All in all, joining any directory service such as ADDS by Microsoft will not benefit as much as a full-blown Windows PC. Reasons? I will not get into it now in this article but there are many. Keep in mind that accessing network resources in a Microsoft domain can be archived without the need to be a member of the domain. Of course, if you need domain credentials to access those resources you will have to join, so there, that is one reason to do it. As much as there are pros and cons this depends on your company policy and it is best to leave it up to you and your needs.
So what are my needs? Why am I so determined to make this happen? Short version, Office 365. Long version? Keep reading.
So our company, as many others as well, has decided to move part of our services off-premise and into the cloud. Office and email to start. To make this work, of course, we had to sync our Active Directory into the could as well, and now that that is all done, we can start using our O365 (so all Office apps (Teams included) and email) in the cloud. Simple. The problem now is that we are a 99,9% Windows-based company and with only 10 or so macOS based devices. So, if you want to run O365 version you can run it only on devices that are members of the domain (this is true for your scenario just to be clear). What this means is that any device that is not a current, active, member of the domain, will not be able to use any of O365 services.
Finally, we come to the point of this article. How to join a macOS based device into a Microsoft AD? Considering that there are a ton of articles, videos, and tutorials on how to do this why am I posting this one then? And on top of it, it is not a success story. The reason is simple. I want to document all the steps that I have tried and tested to make this happen so that If you run into some problems you might save yourself a few hours/days of trying different options and configurations.
Prerequisites
Before you try and go down this path some things need to be in place for this bond to happen.
- Running and functional ADDS setup
- Functional DNS (forward and reverse lookup zones)
- Time sync has to on both your domain controller and your mac clients
- Network “visibility” on ports 389, 88, 53
- No firewalls in place that might cause any problems
I will skip the part of setting up a domain but be sure that you can add and authenticate into that domain with a windows based device before going forward. This way you will know that there are no major or minor problems with the domain itself as well as your ADDS and DNS.
Adding a mac to your domain will require some modifications and configuration upfront before you start clicking away.
Mac settings and configuration prerequisites
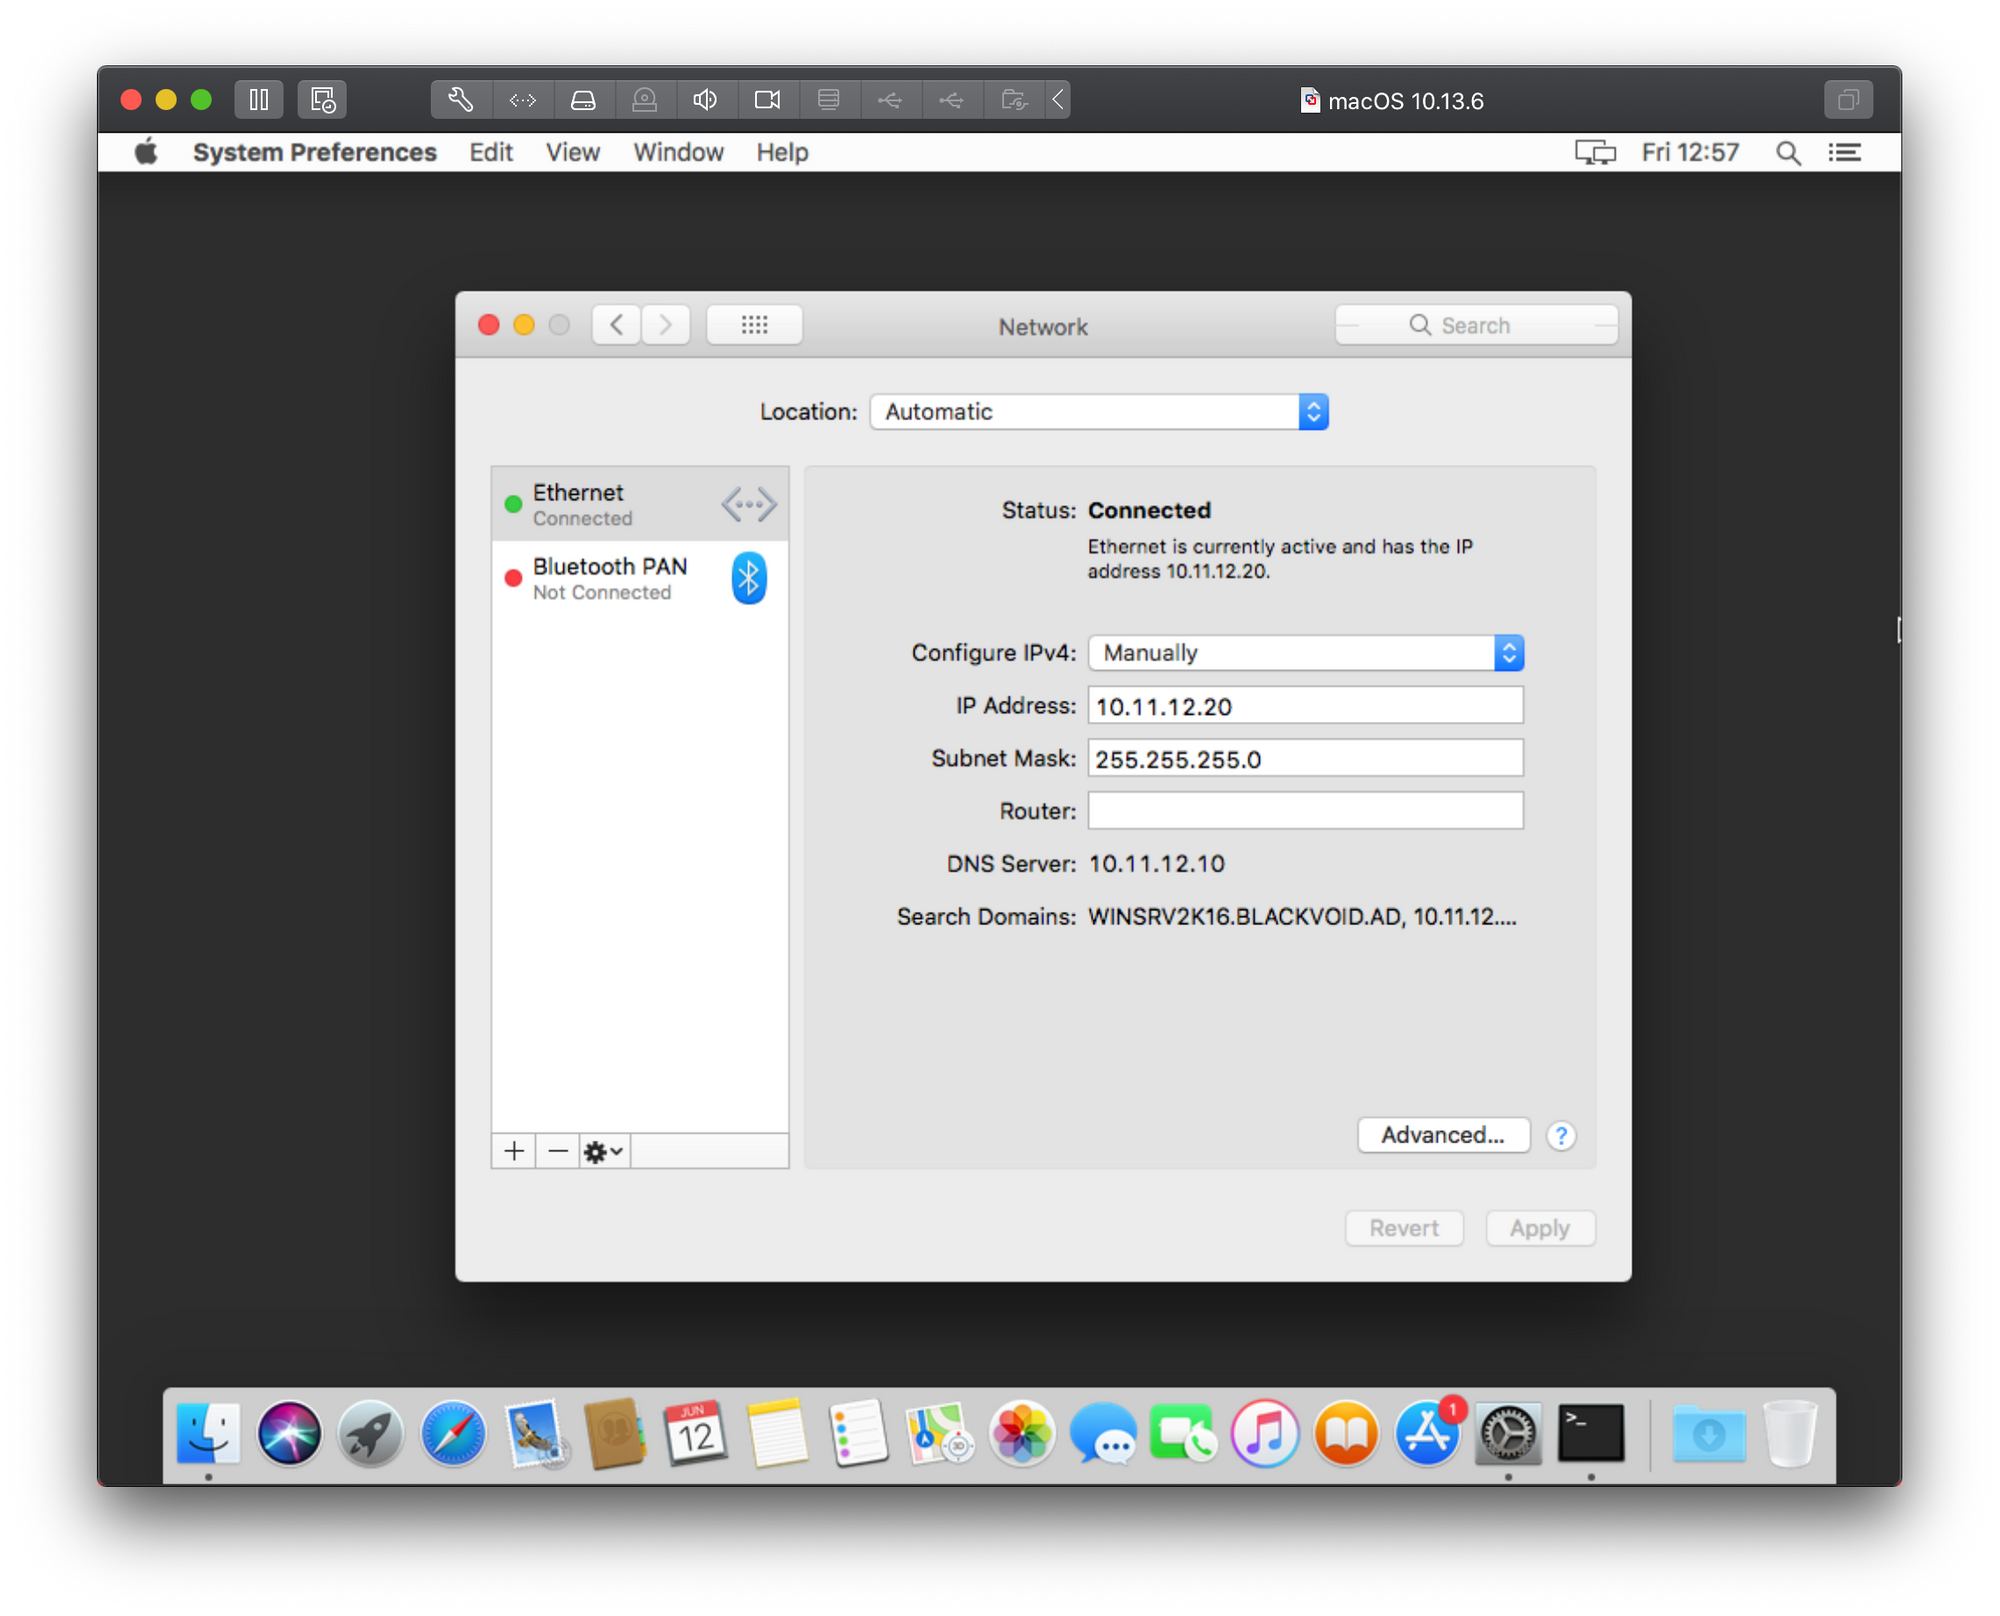
Be sure to have network visibility with your domain and DNS server (if its a single server then both roles are there). Change your network IP address to match your Active Directory subnet so that your Mac and your server that talk to each other without any problems. To do this open System Preferences > Network.
Here you can change your IP, subnet mask, and move into advanced settings as needed.
Now that we have configured a static IP address for your mac client, be sure that you can talk to your server. Open up Terminal application and simply use
ping yourServerIPAddress
to see if there is any communication going. If there is, great, if not, be sure that you have entered a correct IP address and that your mac and server are actually on the same network, to begin with.
NOTE: Also take down all Windows firewalls on the server-side as they can be the reason that you are unable to communicate with your server
Time to join
To join your mac into a domain you can do it via terminal or via System Preferences. Let’s see how this will look via user interface first.
Again, open up System Preferences and go to Users & Groups. Click the lock icon in the bottom left, authenticate with your mac local account and now click the “Login Option” button.
As you can see there is a the “Join” button on the right side. Click that and let’s move forward. In the Server parameter field, enter your domain controller IP address or its FQDN (myserver.mydomain.something for example). In the picture below I have decided to use its IP address.
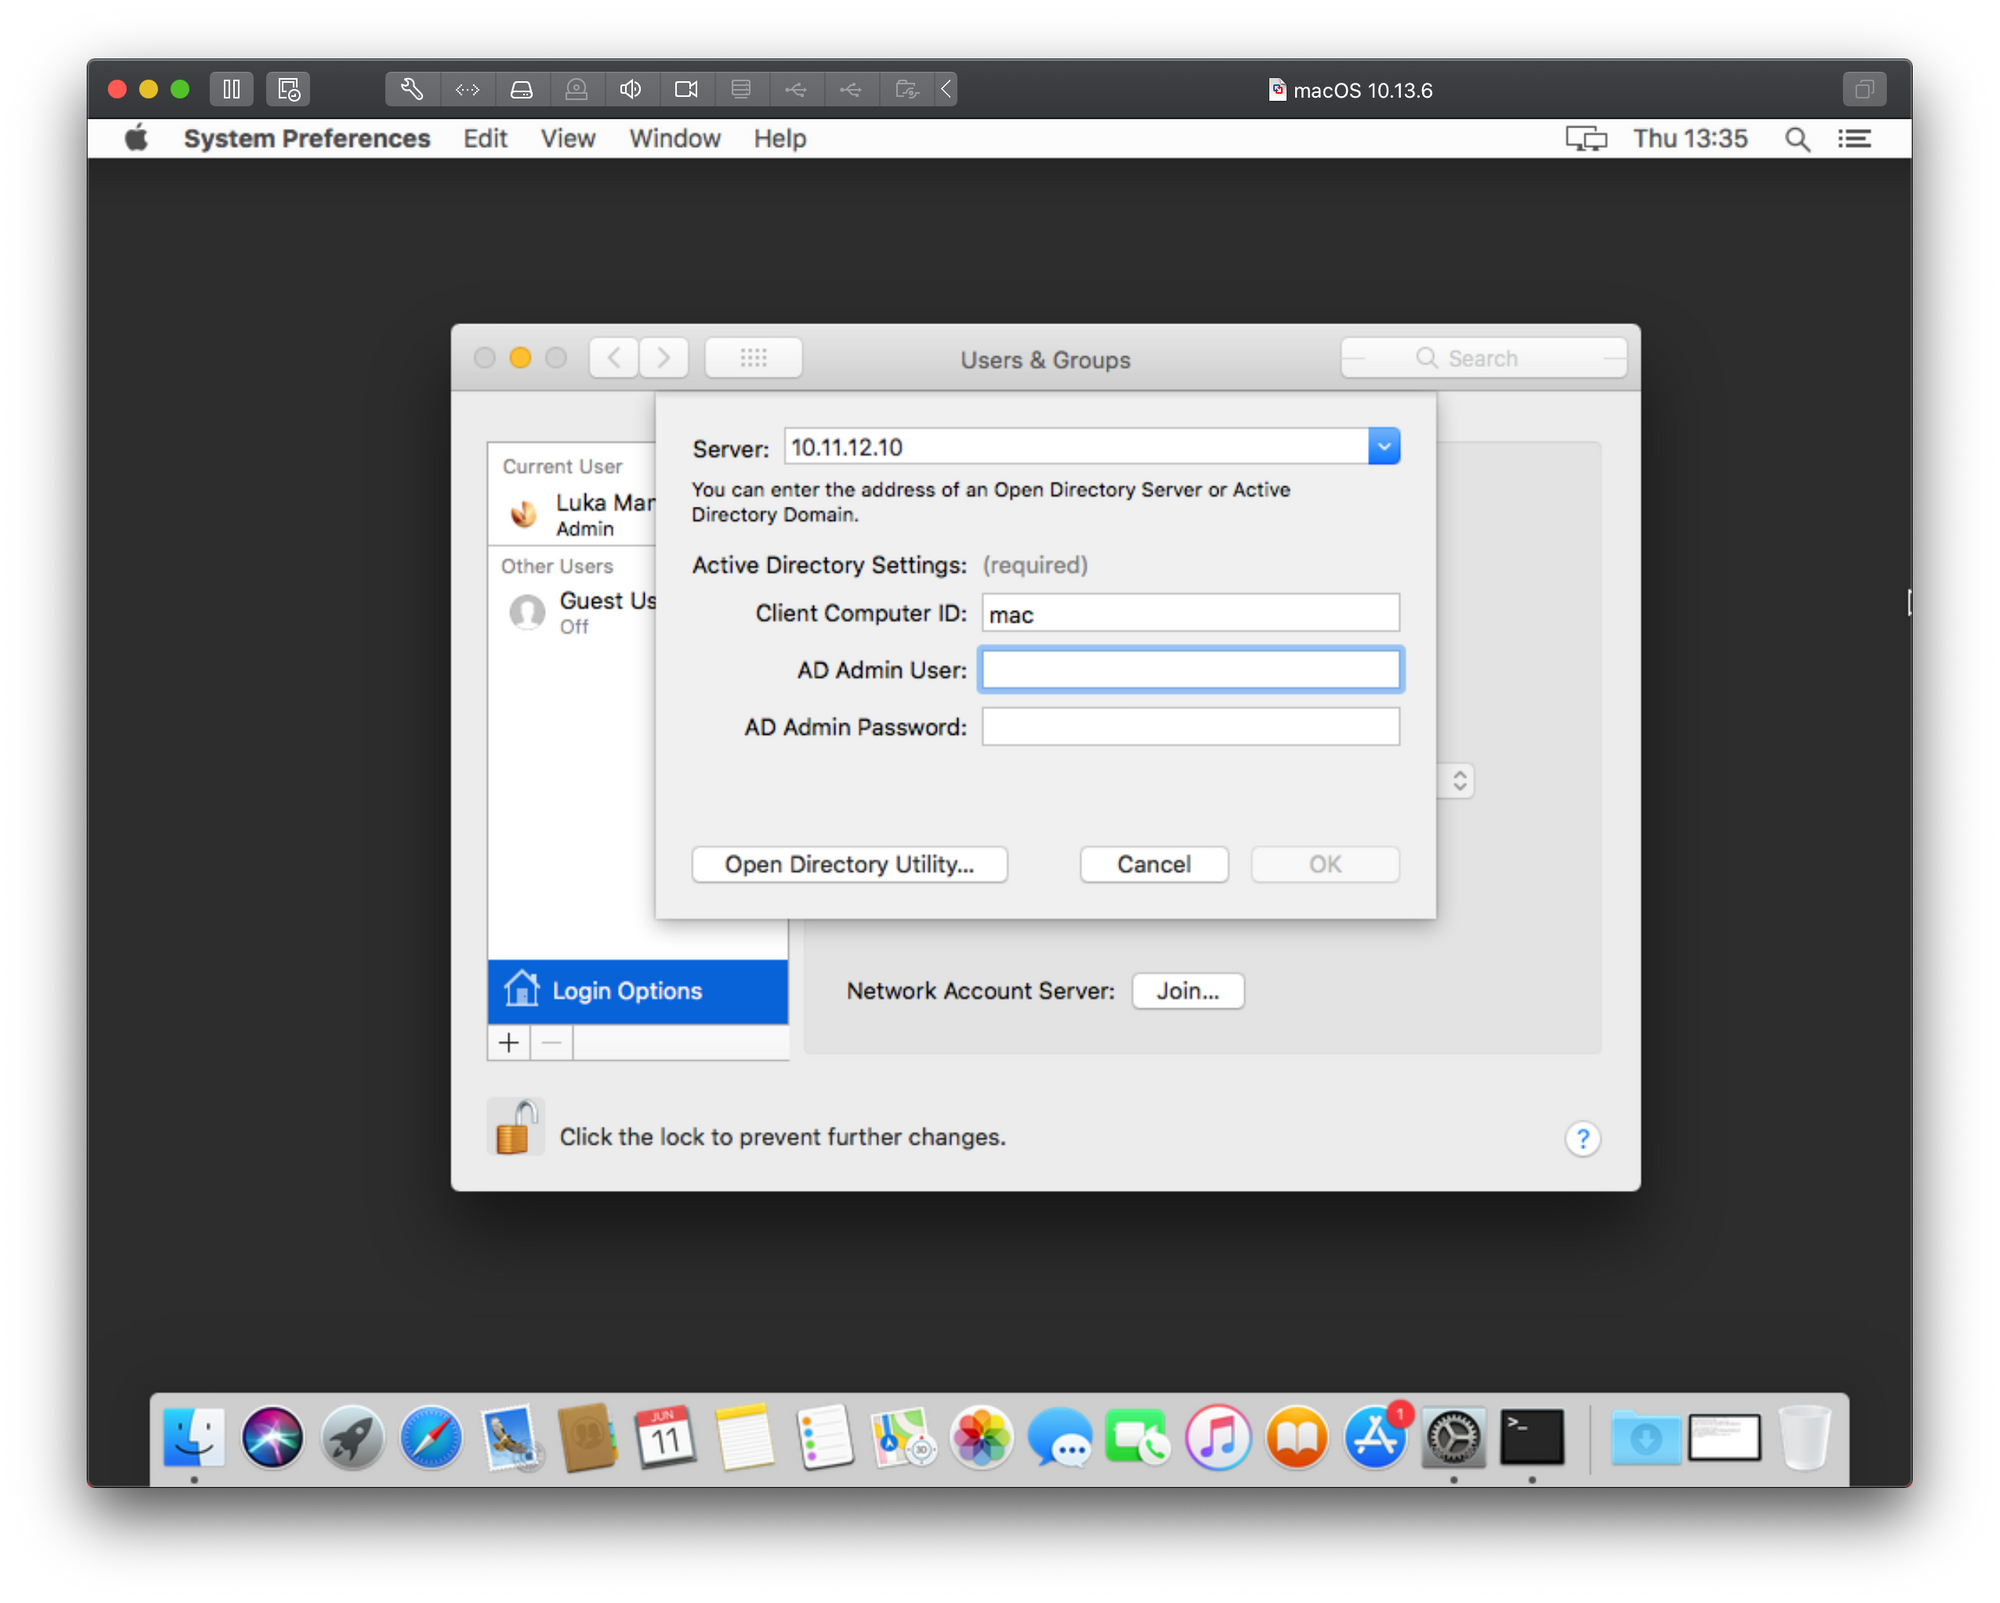
As soon as you finish typing its name or IP, it will expand to offer your 3 things. Your computer domain name (populated), your domain user account that has sufficient permissions to add objects to the domain (main administrator account can be used here for example) and that users password.
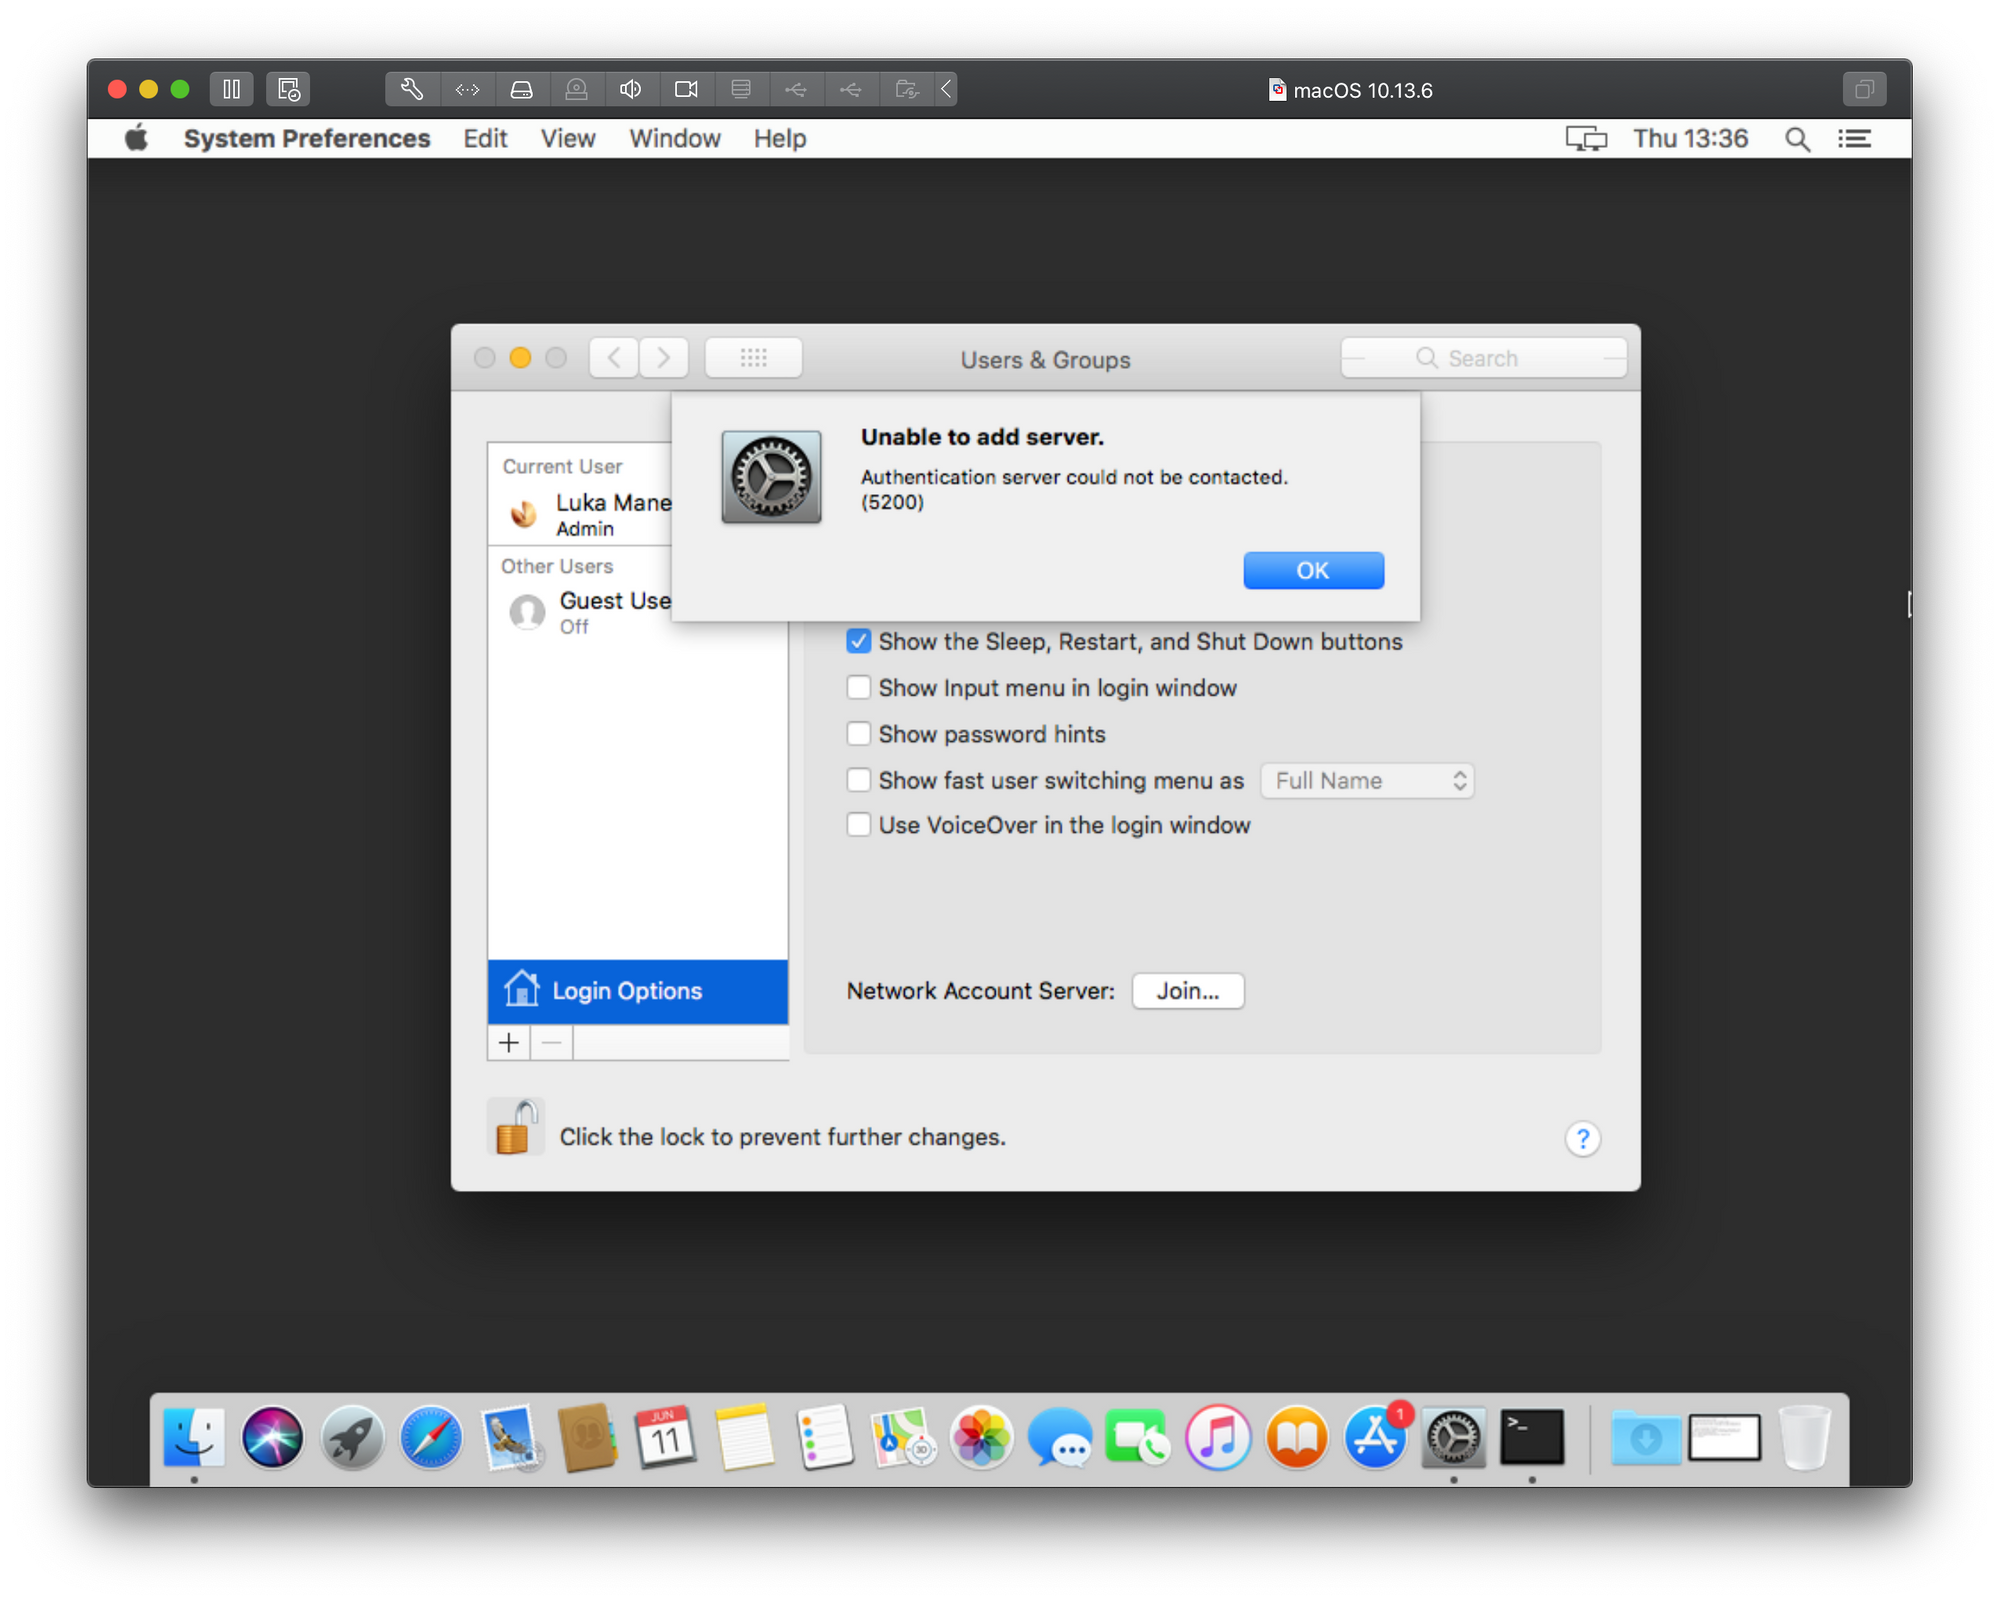
If all is well and configured clicking OK button will complete the procedure in matter of seconds and you will get a confirmation that your Mac has joined the domain. But if it doesn’t work you will get any number of errors, so let’s see those.
Unable to add server — Authentication server could not be contacted (Error 5200)
This is the probably the top searched error on the Internet when it comes to adding your macs into a domain.
Considering that the image does not offer too many useful details, You might think that adding your Mac using the Directory Utility app will help. It won’t. Before we provoke the same error from a different angle lets see how to actually add a Mac using the long way around that will also offer some additional options.
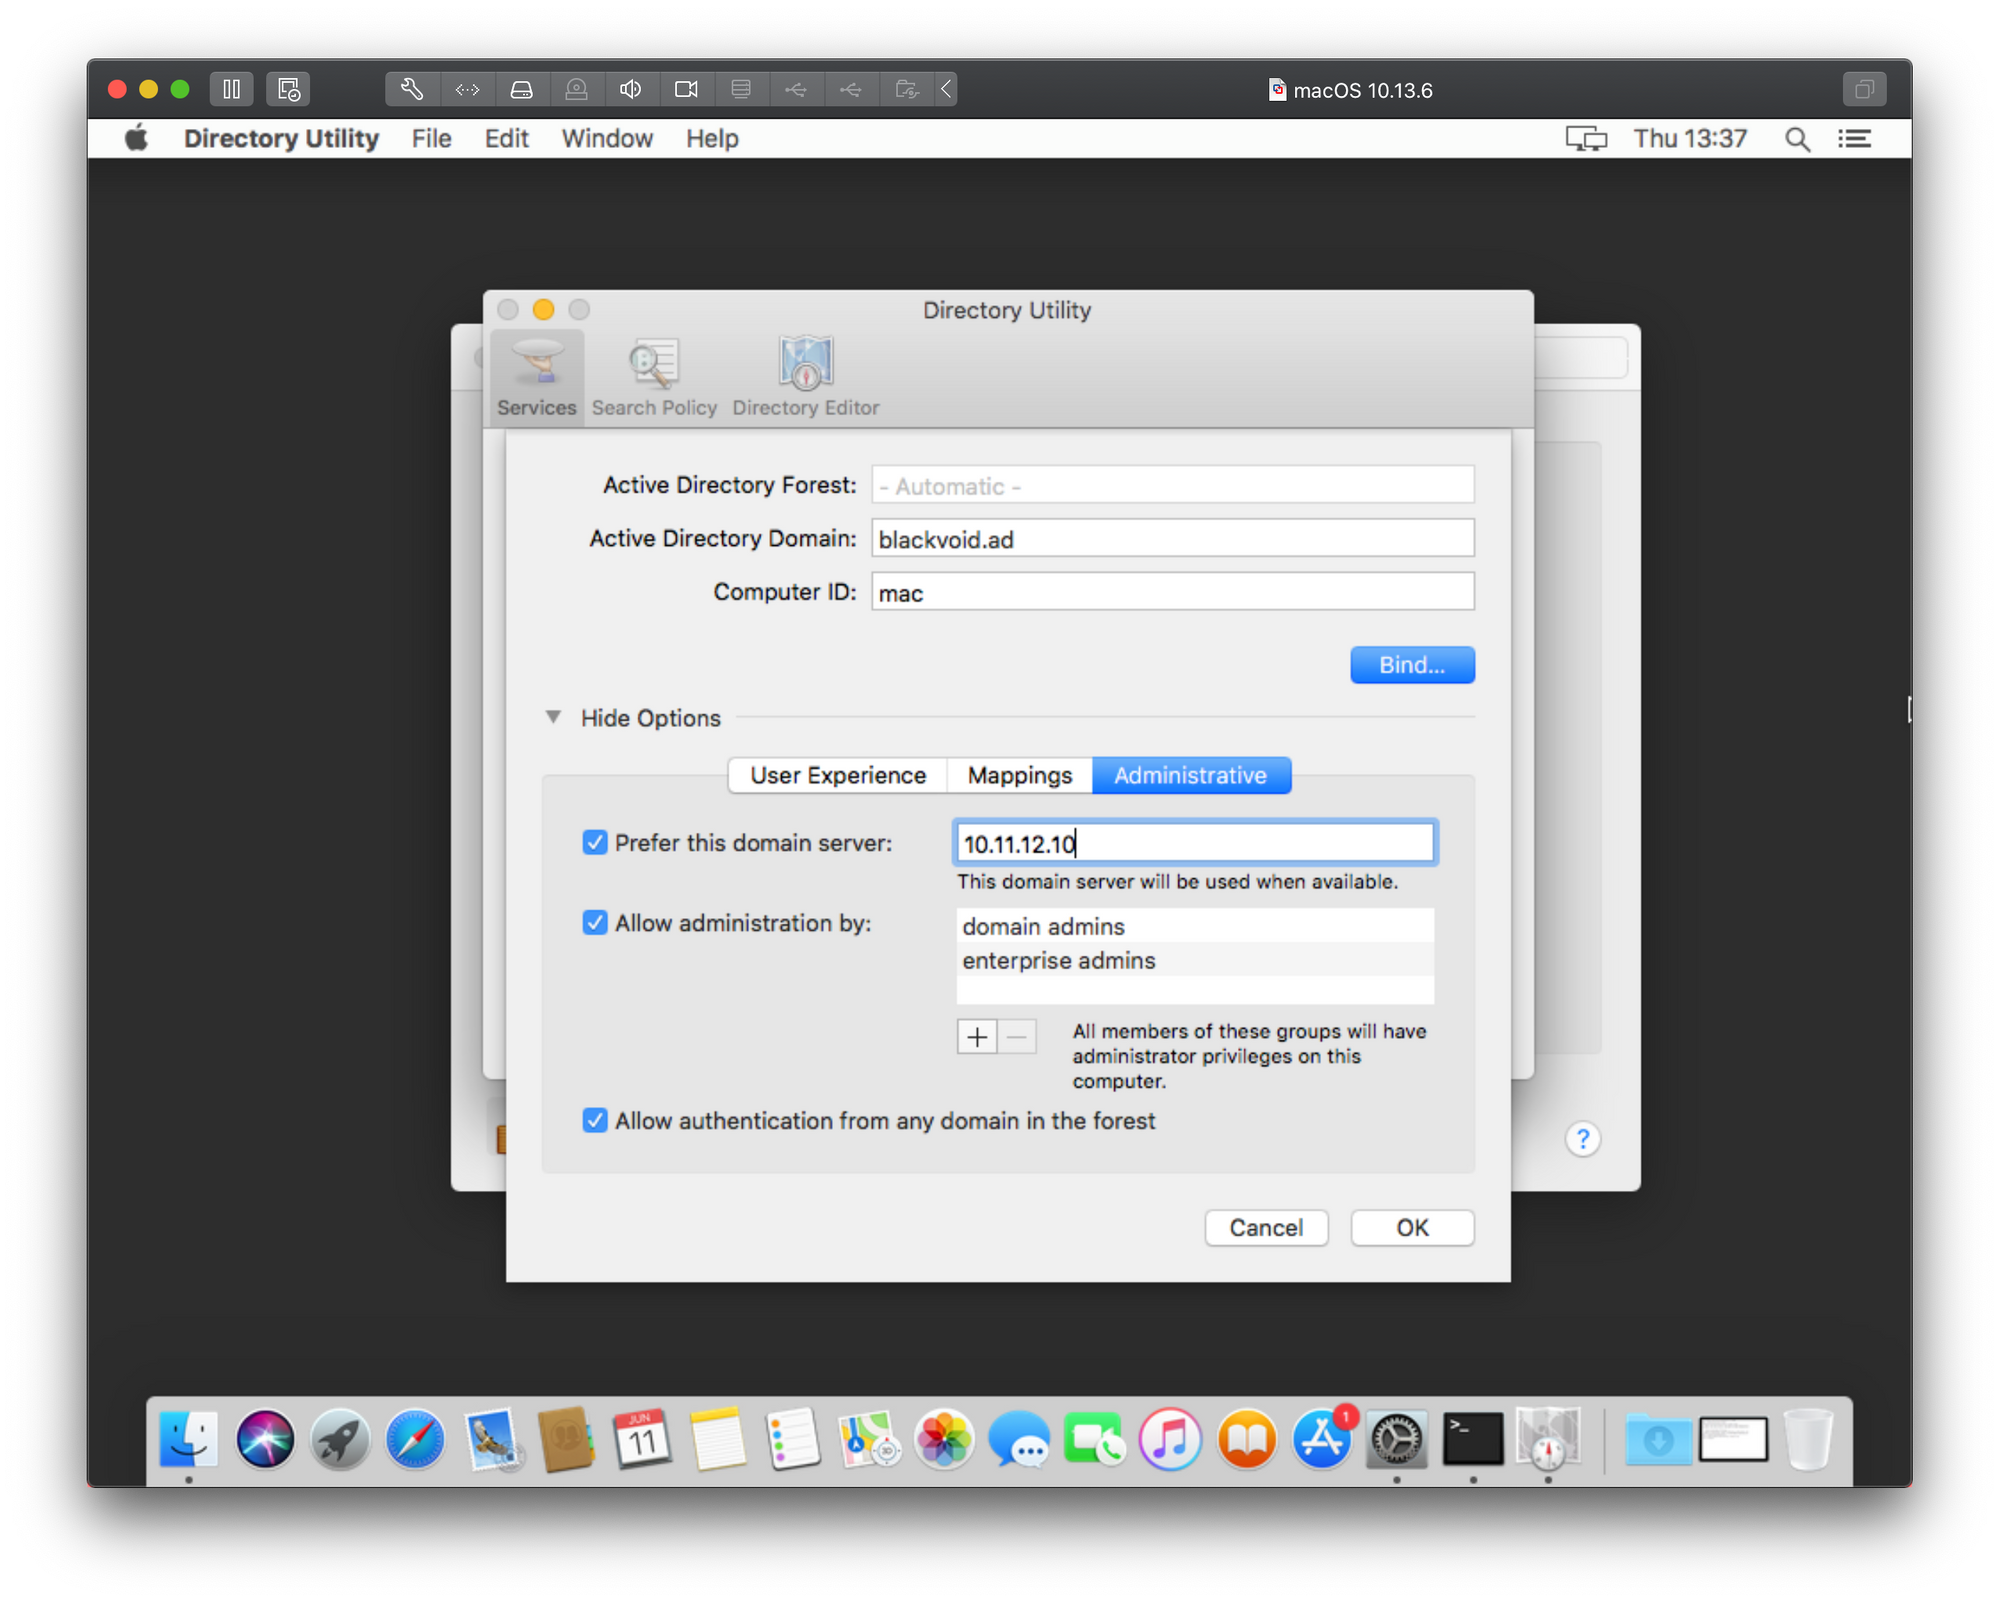
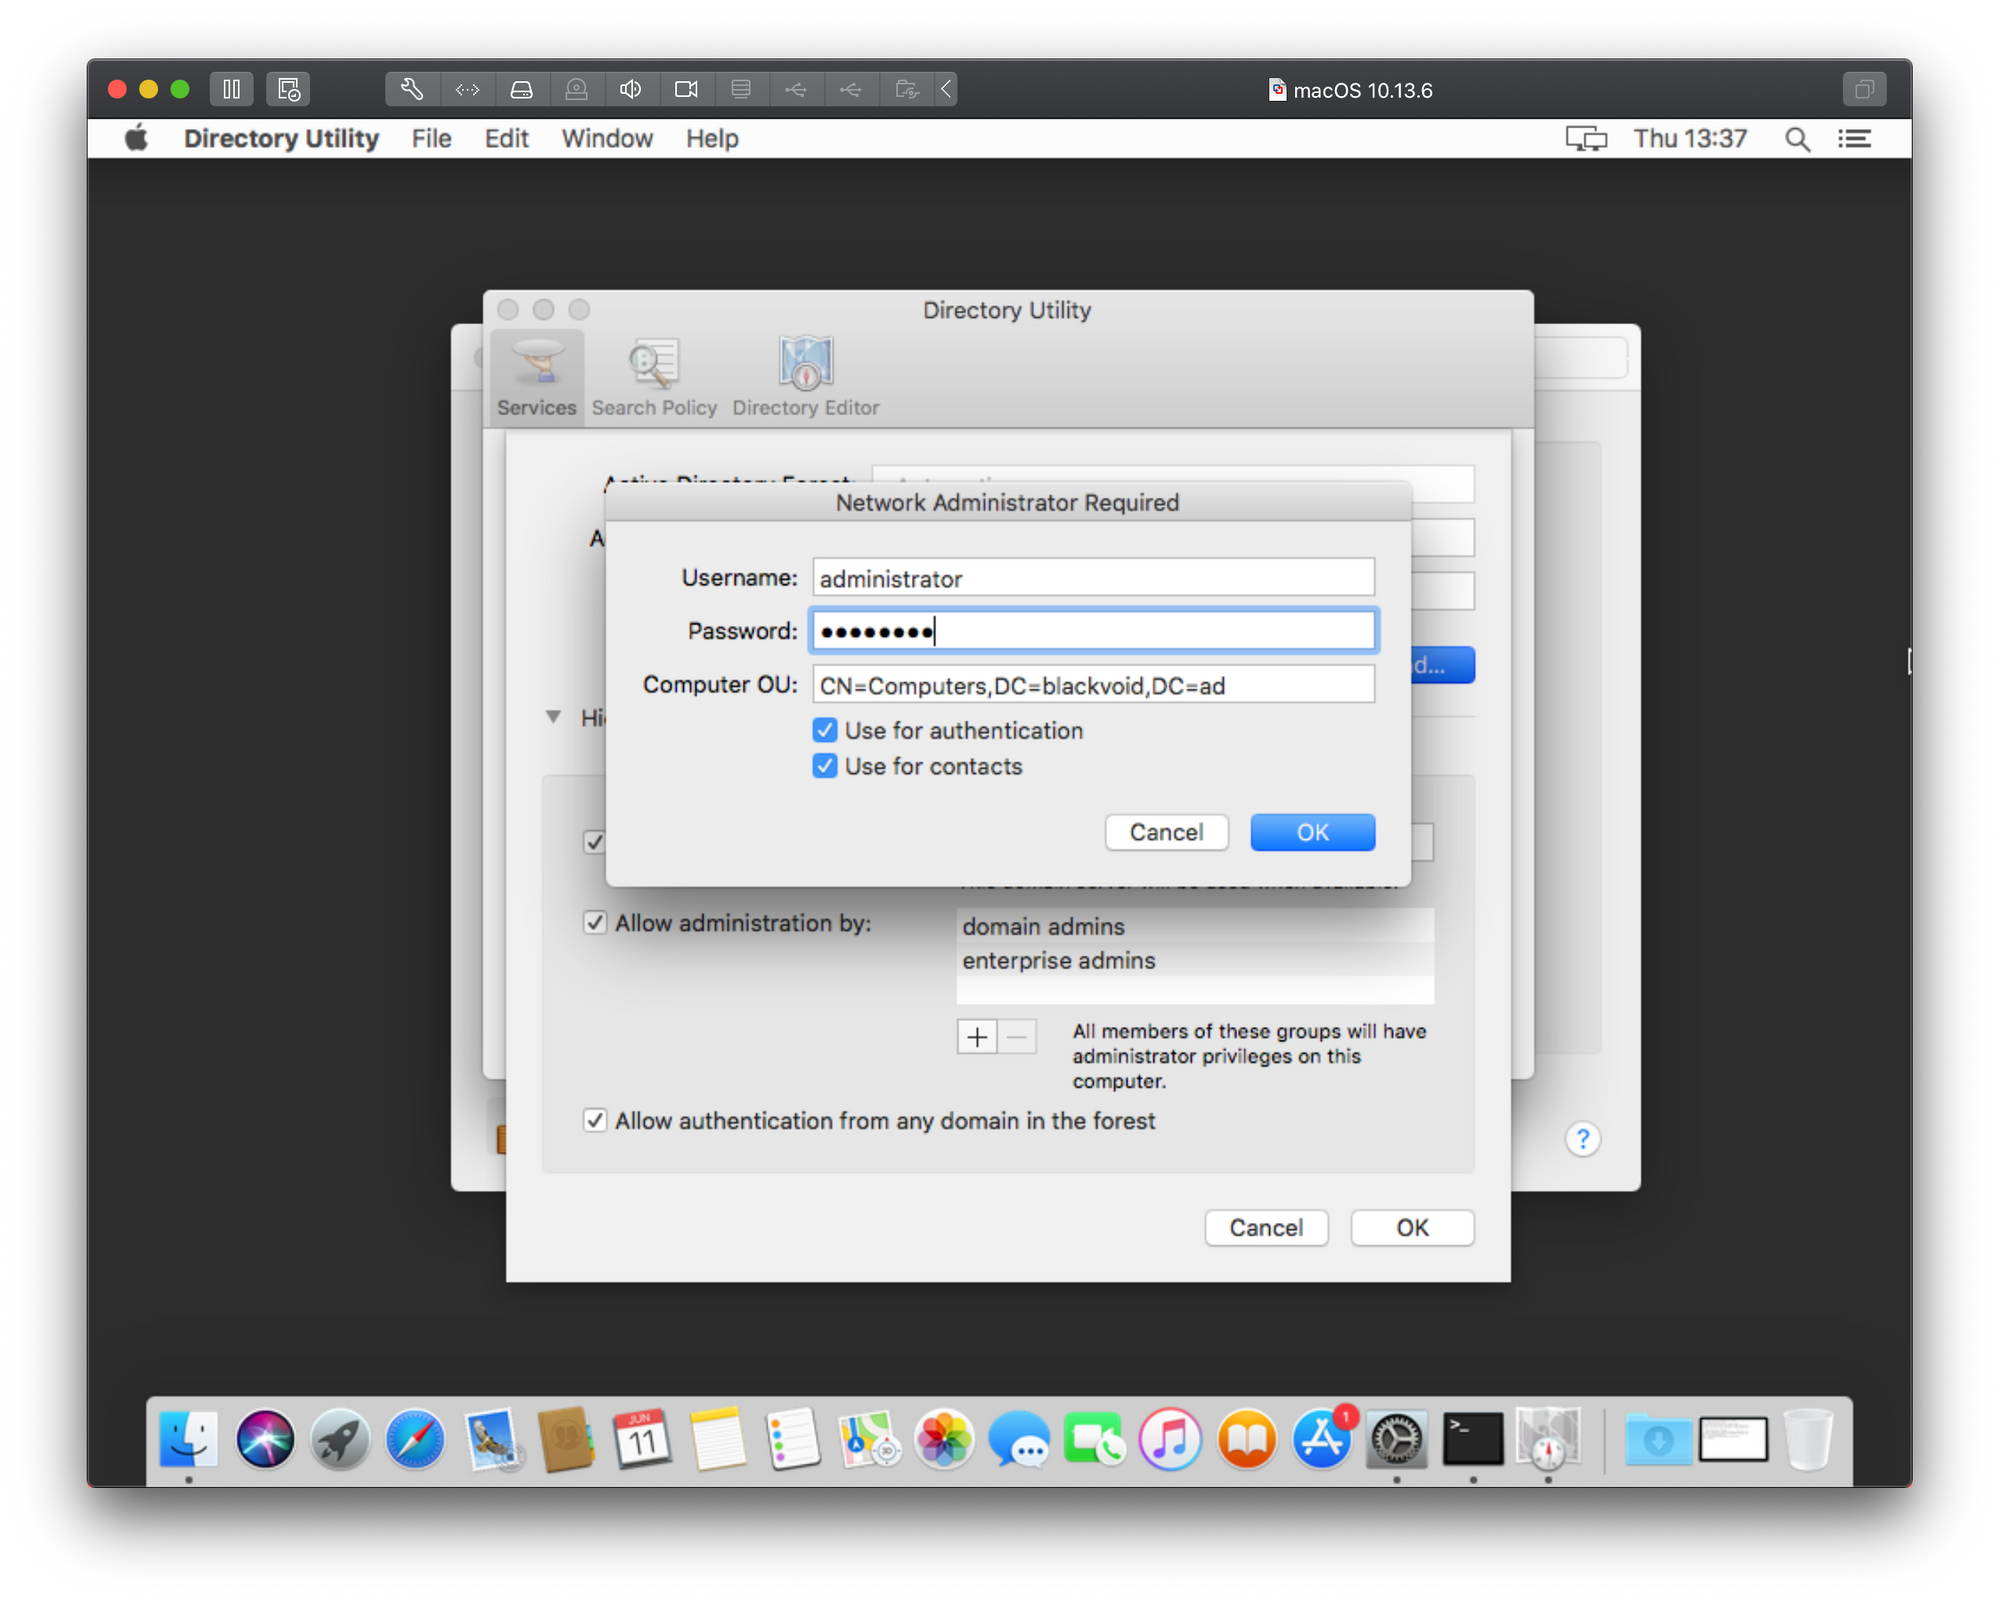
If we go back to the point of clicking the Join button under Users & Groups and instead of typing in the IP address in the server field we open Directory Utility using its button, we will have a number of options. In the next 4 images, I will type in the description what needs to be done in order to add your mac to the domain.
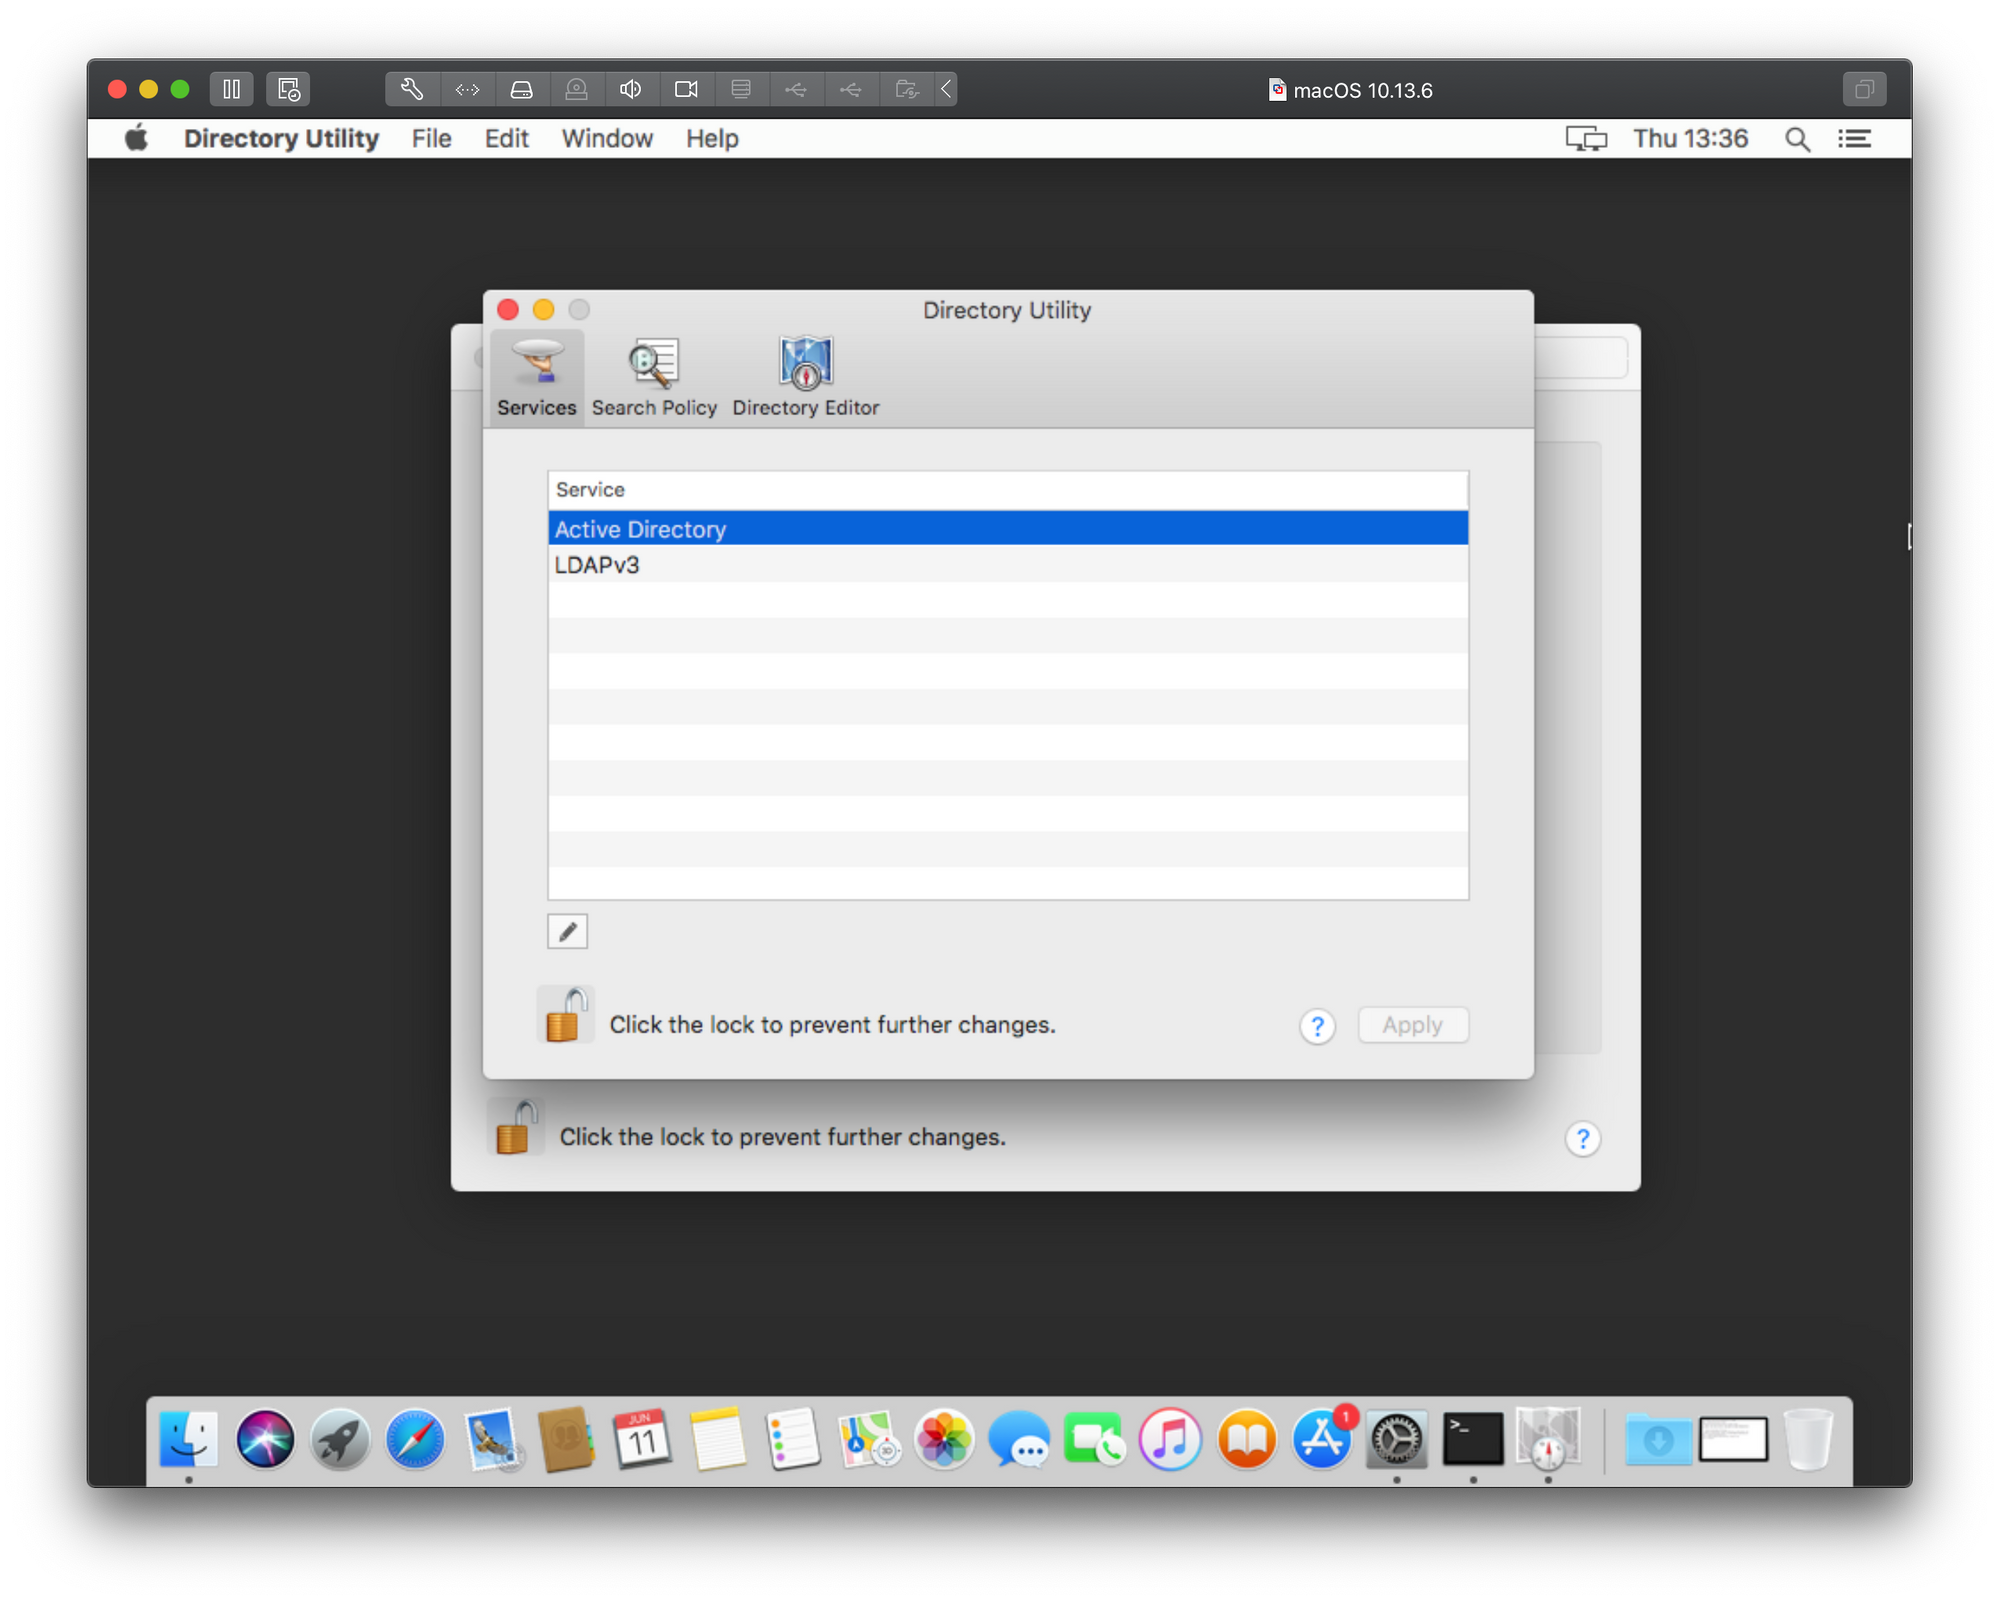
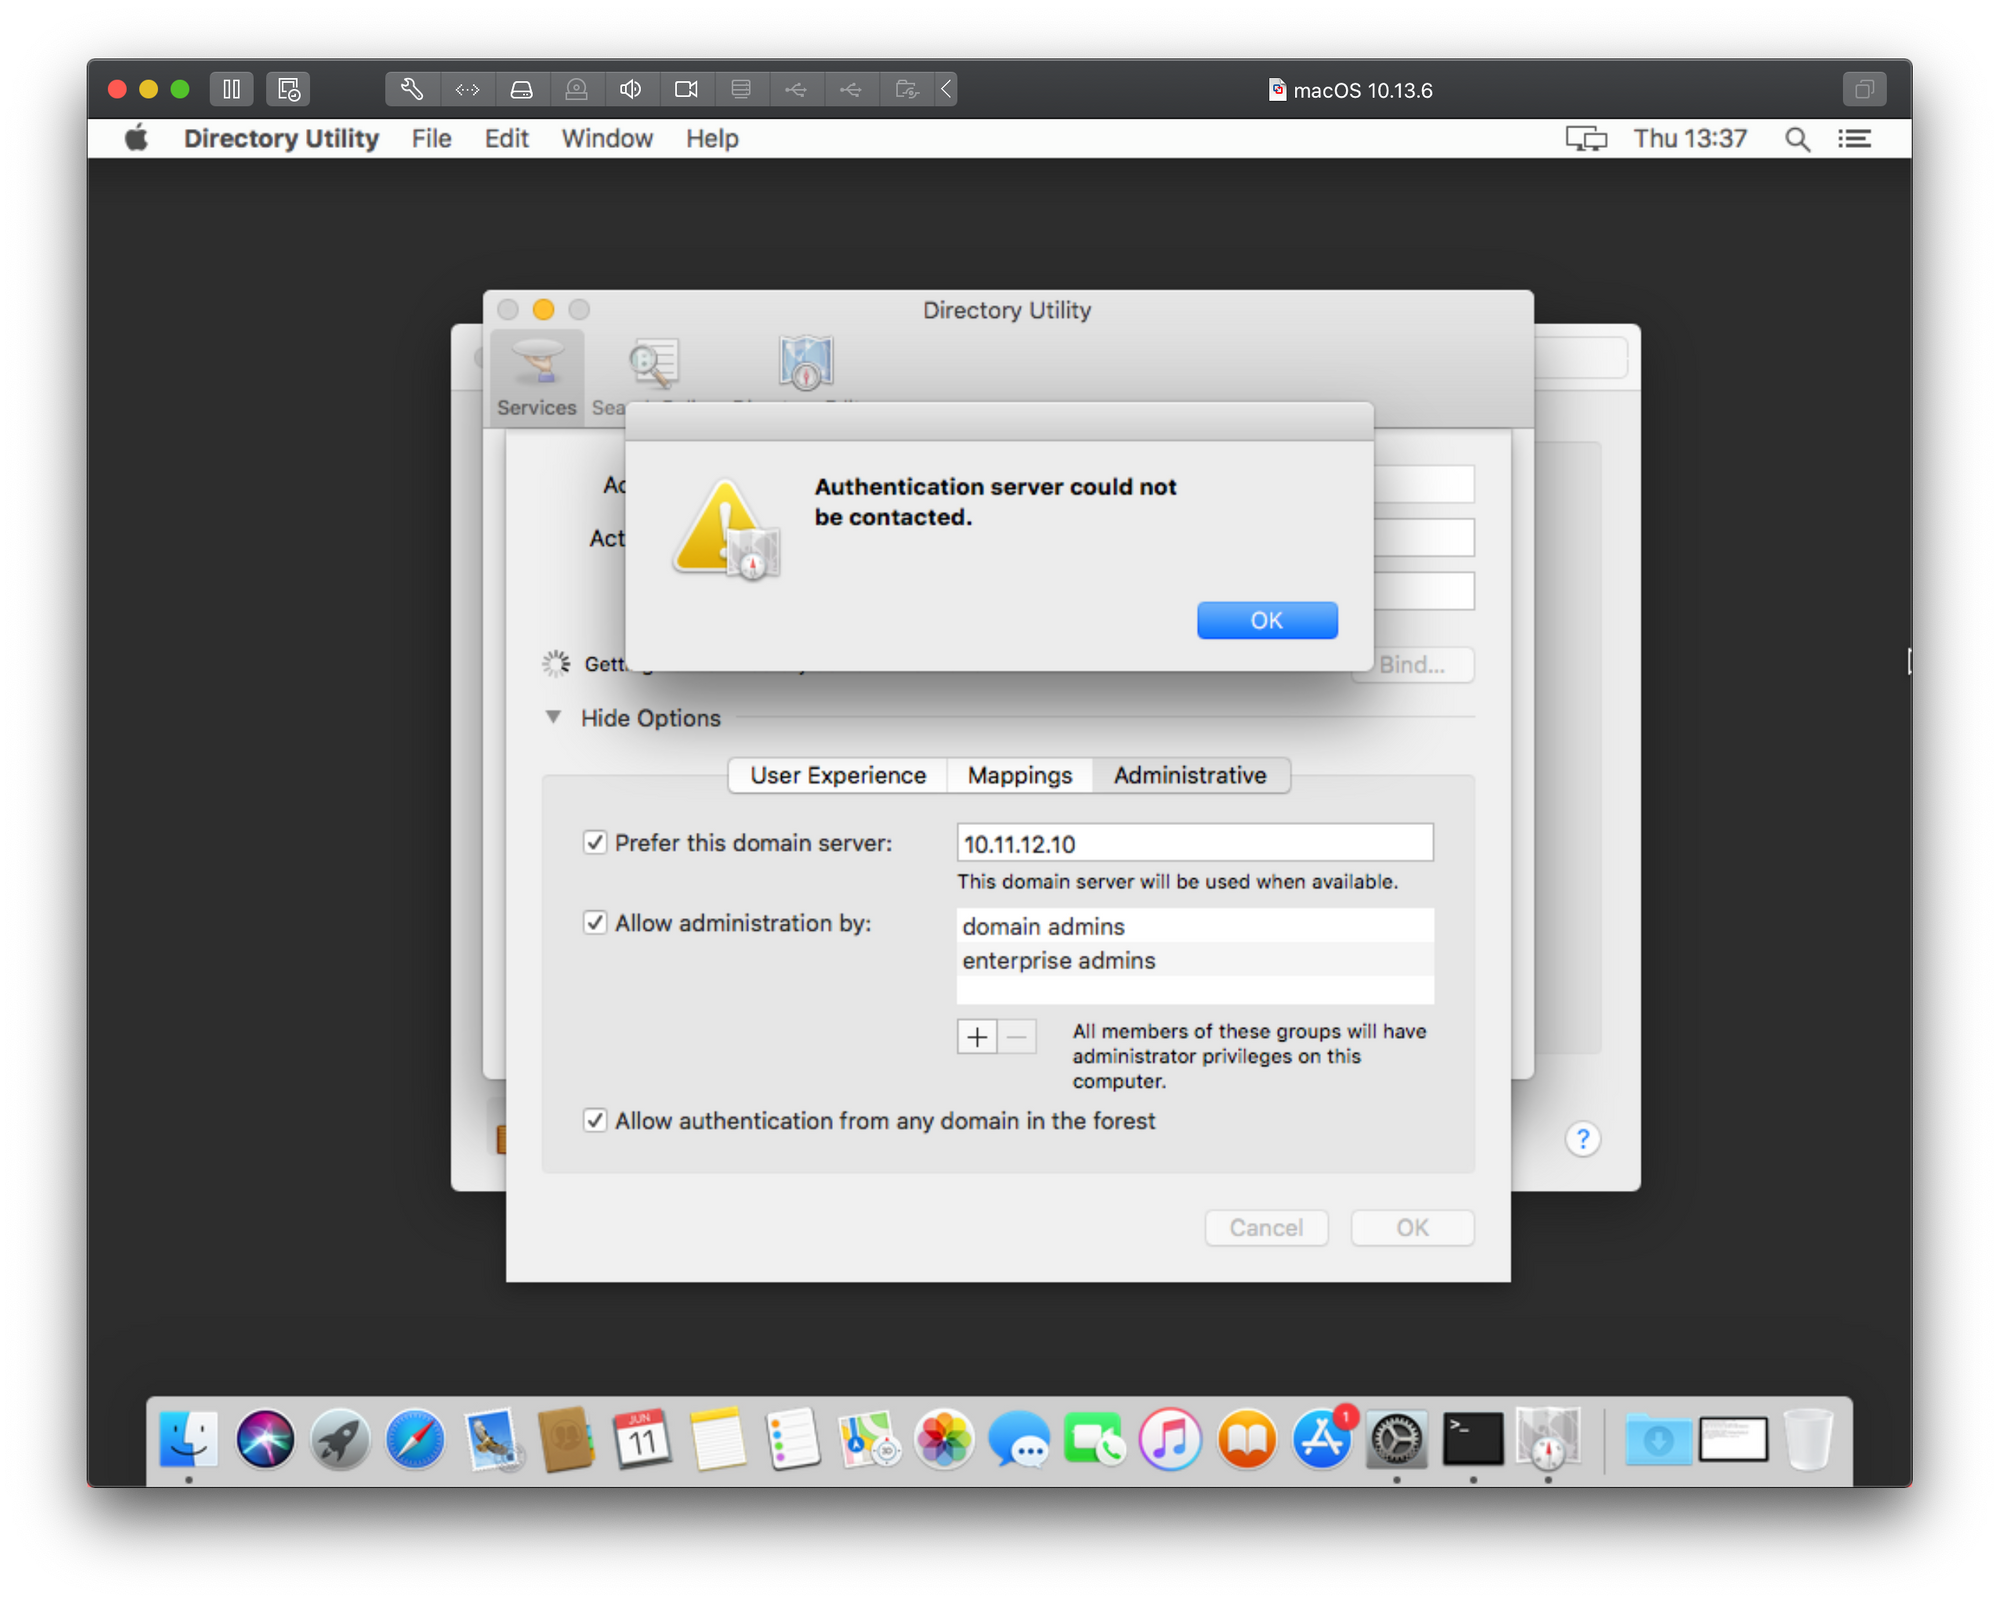
As we can see there is the same result only in a different popup window and with even less information on top of that. Just great right? Well to get around this and actually get some more information we will need to consult the Console. Before you start the bind process again using the steps above, open the Console app on your Mac. This is a real-time console that will register anything happening on your Mac at any given time, including errors.
Now repeat the steps and as soon as you get an error switch to the Console and scroll back until you find opendirectory in the Process column.
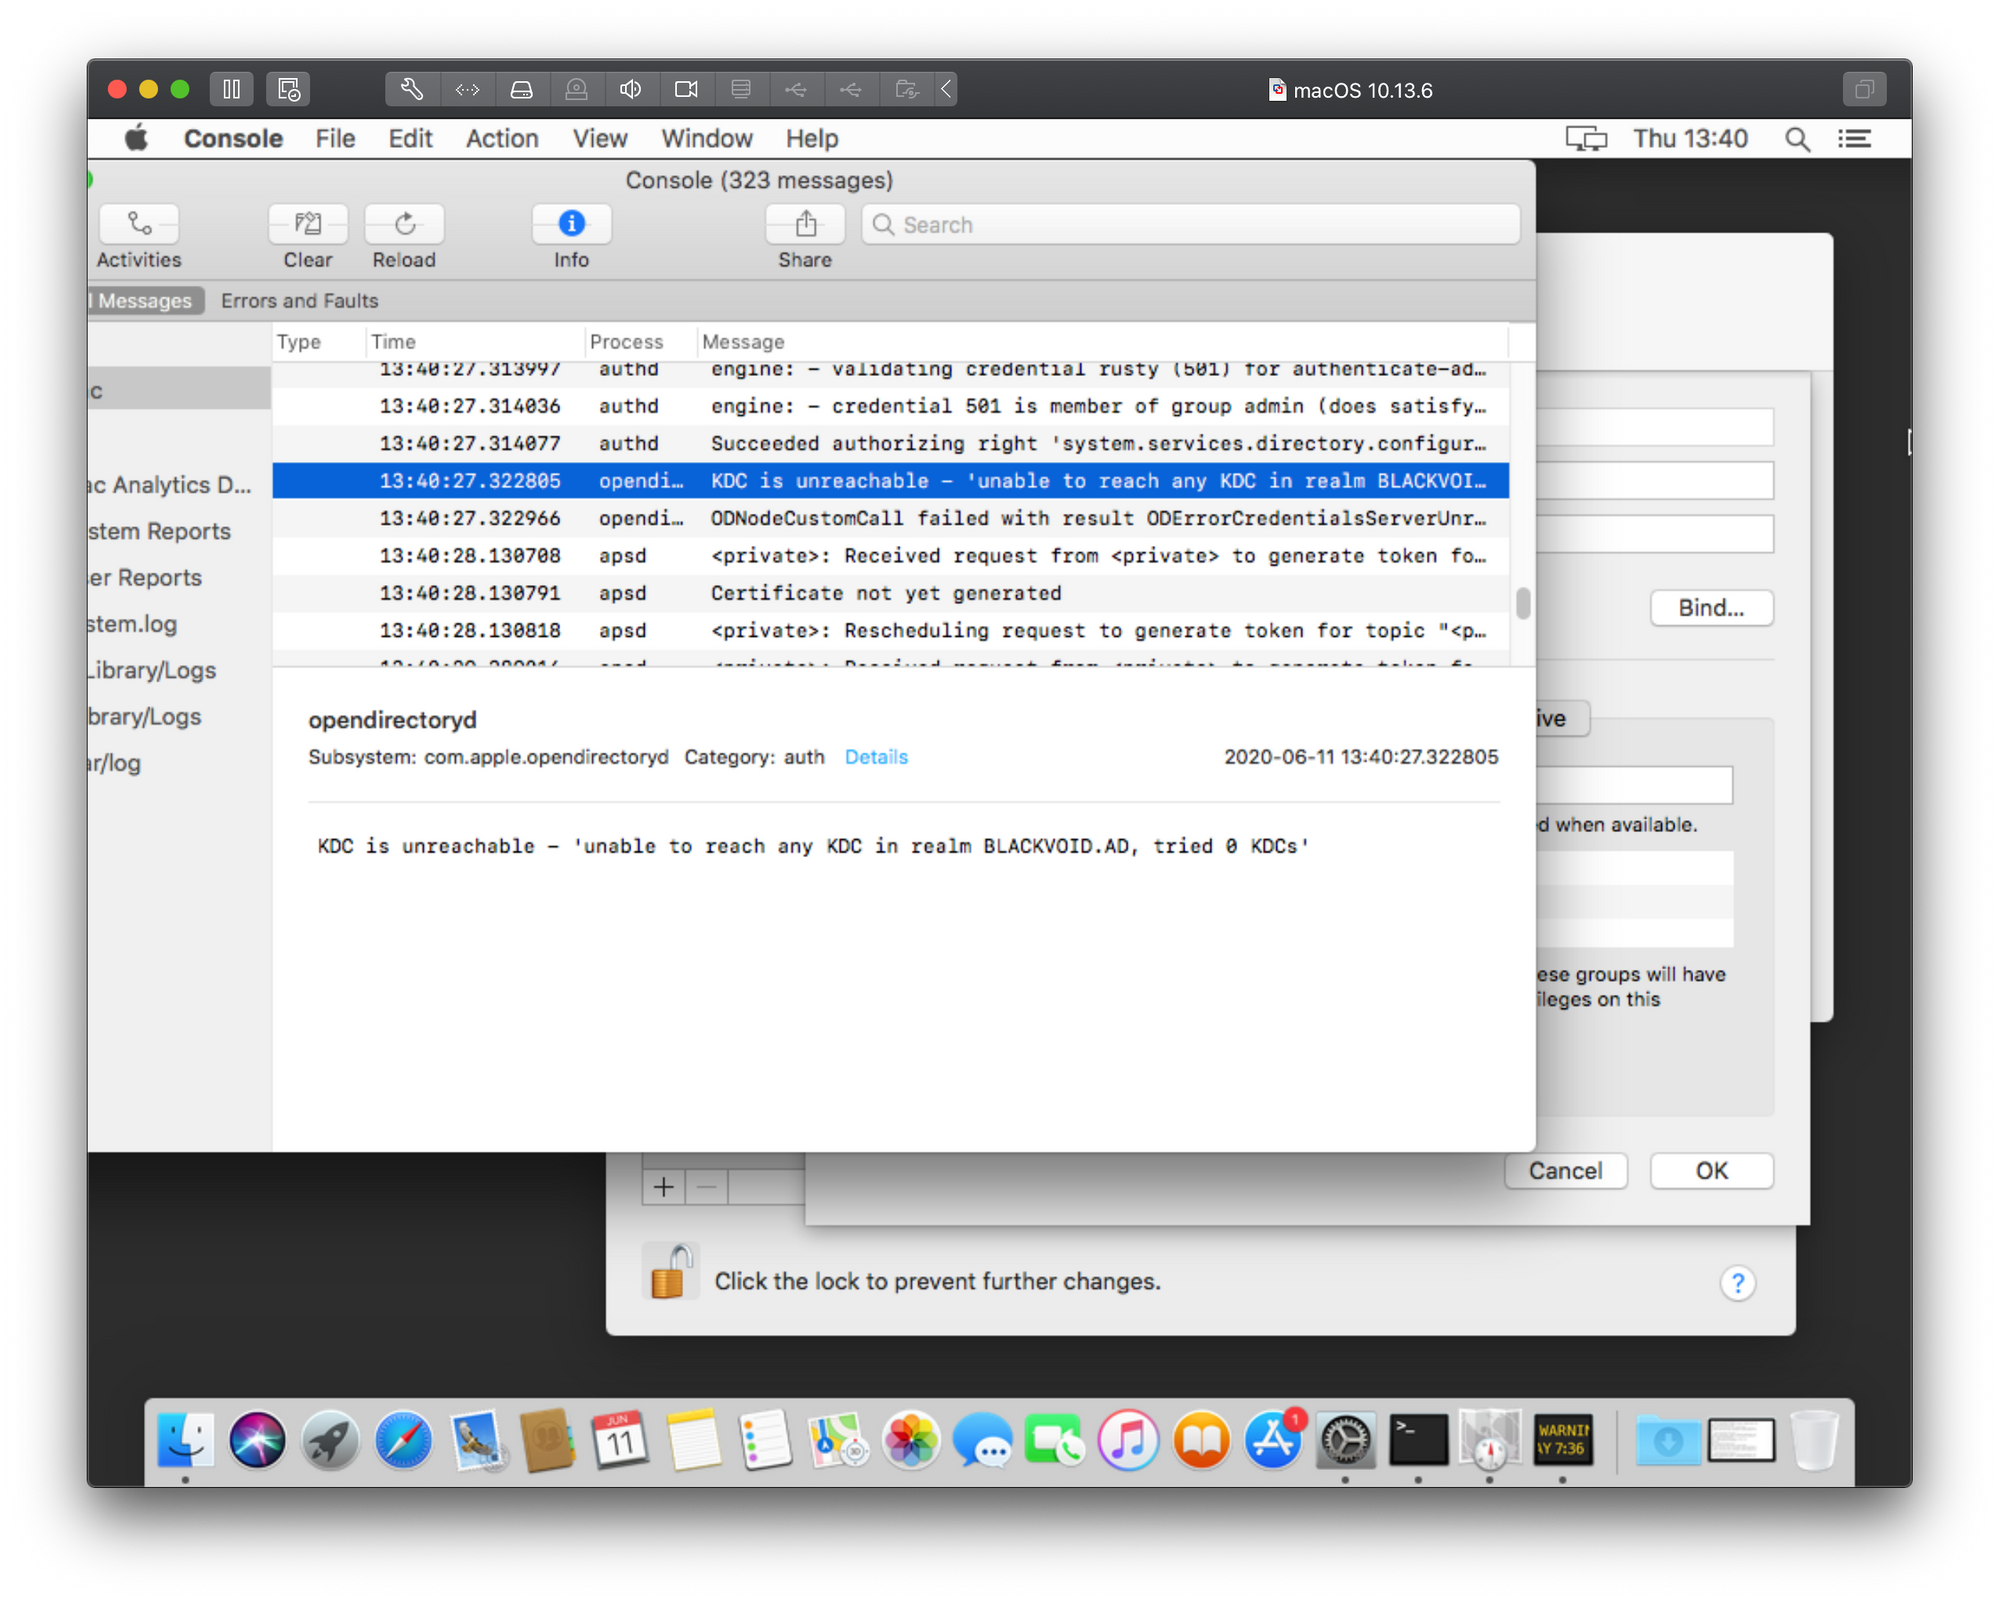
As the image shows, our 5200 error is actually translated to this:
KDC is unreachable — unable to reach any KDC in realm YOURDOMAIN, tried 0 KDC.
Well, now at least we have something to go on. What this error means is that your mac is missing a Kerberos config file that it is trying to read to locate valid domain realms to authenticate against. Why it needs that is beyond me, but unlike a full blow windows pc, this is something that needs to in place.
The location of the file is /etc/krb5.conf. More info on this here: https://github.com/Microsoft/vscode-mssql/wiki/How-to-enable-Integrated-Authentication-on-macOS-and-Linux-using-Kerberos
What needs to be done is create a file in /etc (if its missing) or edit it.
sudo vi /etc/krb5.conf

[libdefaults]
  default_realm = DOMAIN.COMPANY.COM

[realms]
DOMAIN.COMPANY.COM = {
   kdc = dc-33.domain.company.com
}
NOTE: Domain must be in ALL CAPS!
If we try to add our machine to the domain we will see that there is no longer a 5200 error! Great. Hopefully your journey ends here. If not, keep reading.
Unable to connect to server — Make sure that this computer is setting date and time automatically using the same network time server as the AD server
This error can pop up also using the Directory Utility panel and as much as its pointing us in the direction of an error it is still not clear if this is correct or not. In my case, the server and Mac device are in sync regarding time so the problem is not there. Just to point out, if at any point, your Mac ends up being over 5 min our of sync regarding time with your domain controller, you will not be able to join at all, or if your device is already a member of the domain your users will not be able to log on until you fix the time gap.
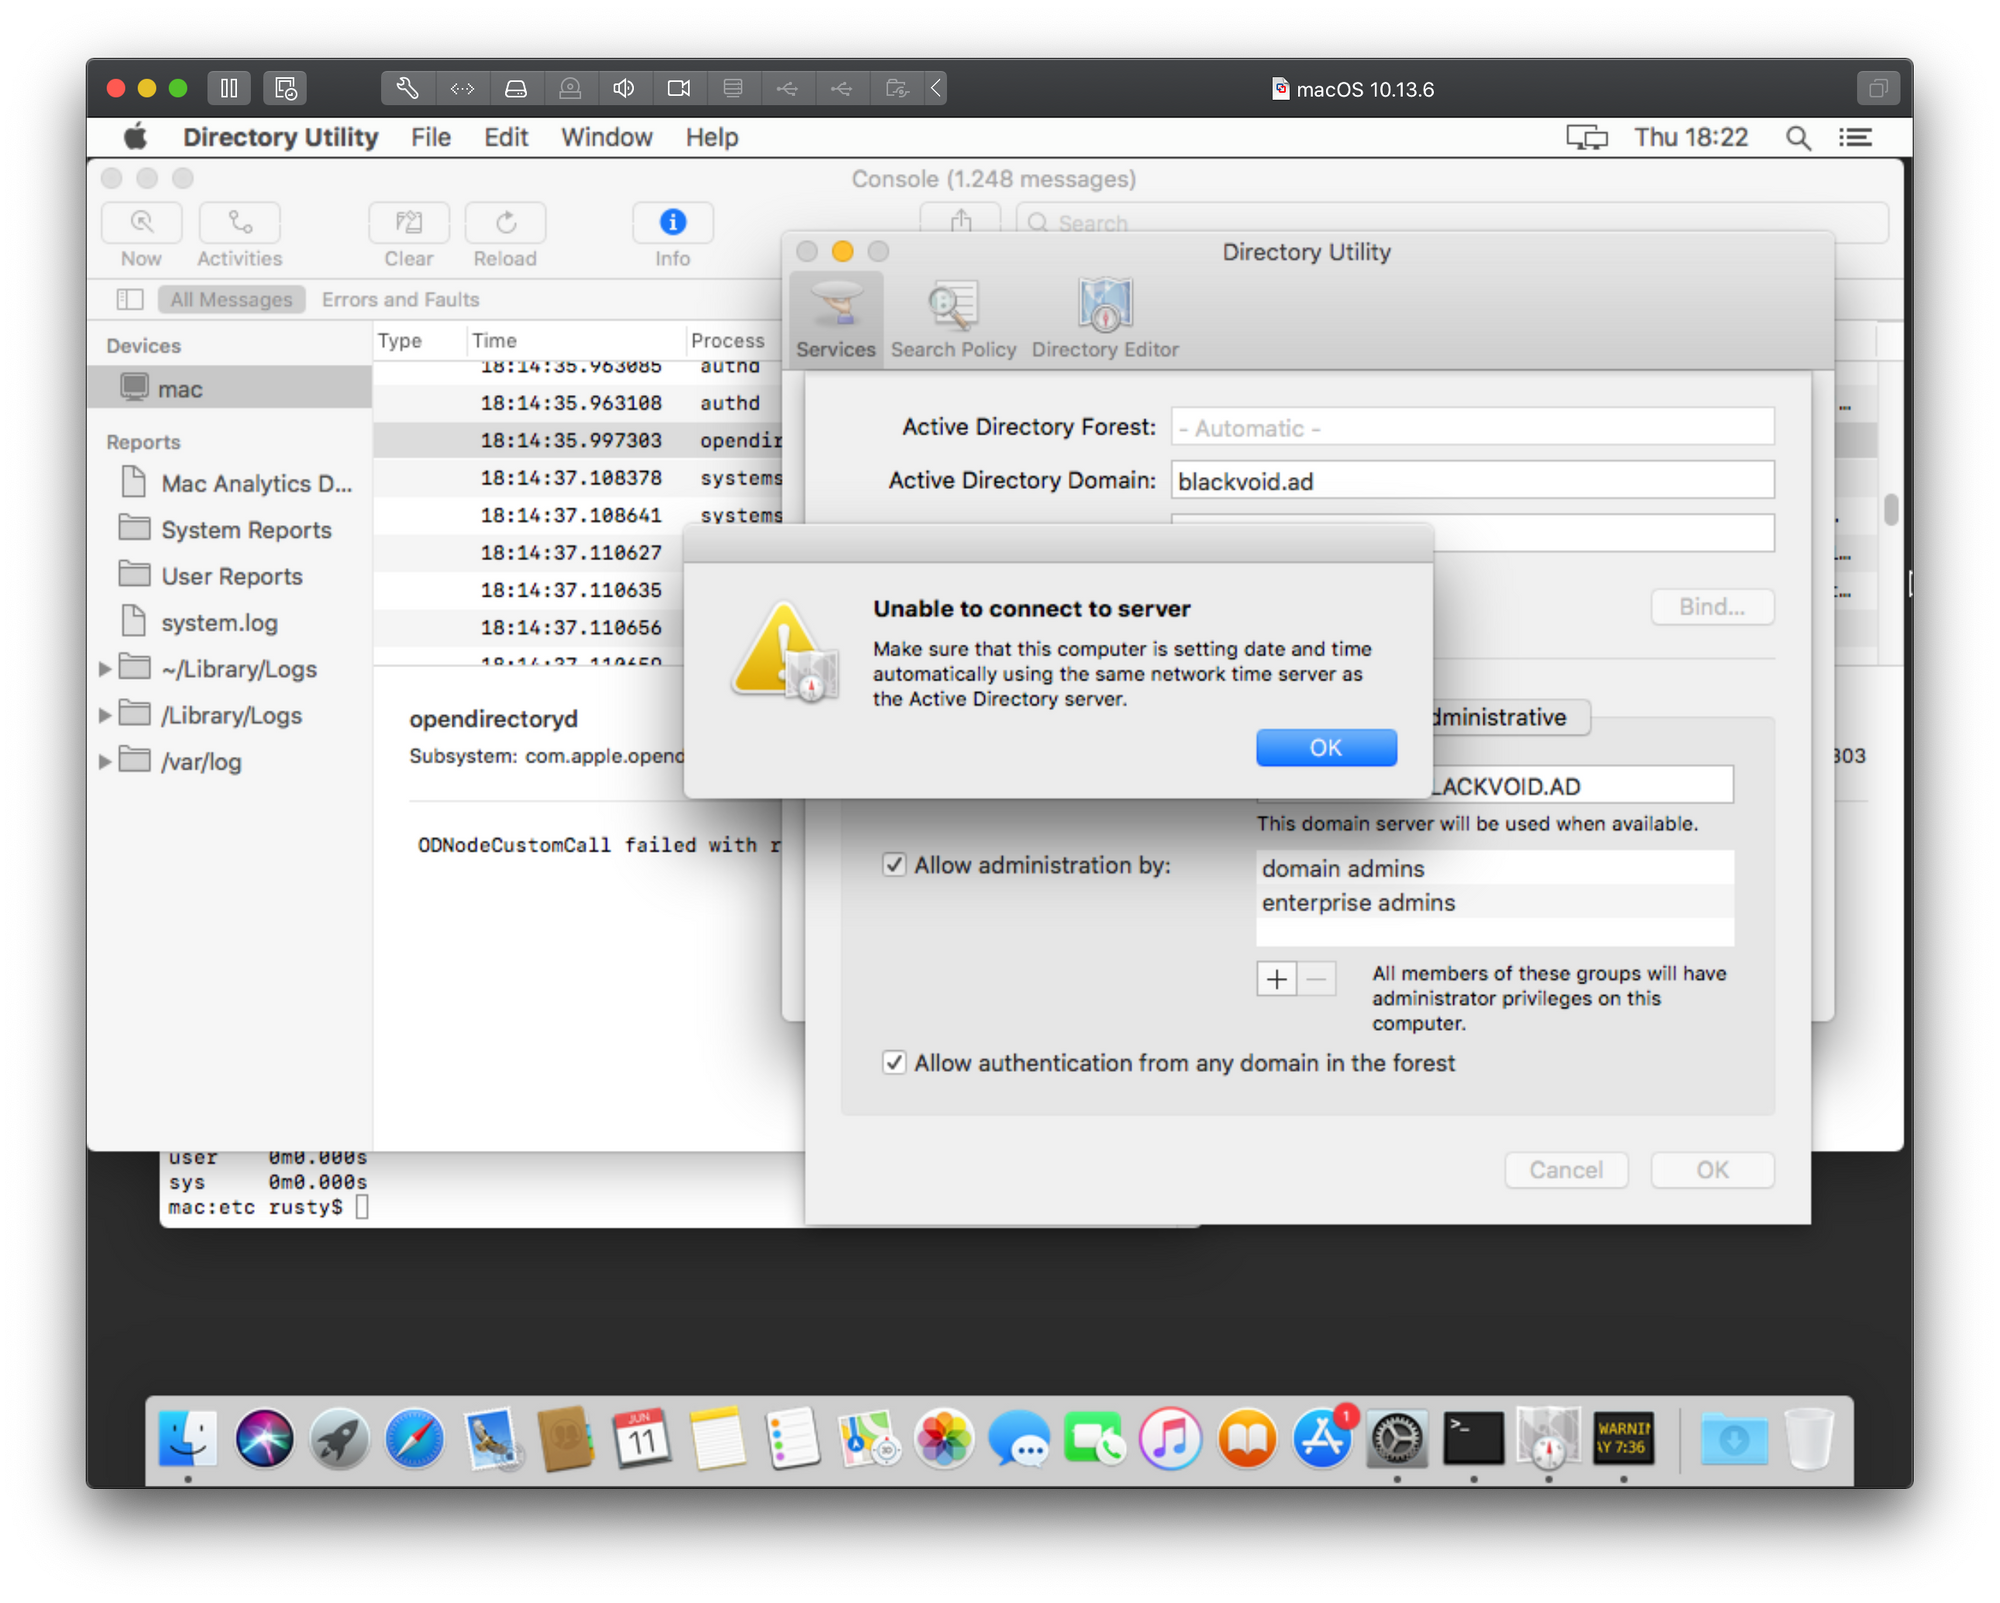
So at the moment, this is where I am. Stuck in time. Just to finish up with a terminal-based bind example and how this particular error reports in the same.
Bind via Terminal
In order to add a Mac via terminal you can use dsconfigad command. Start Terminal and type the following:
dsconfigad -prefered yourserver.YOURDOMAIN.SOMETHING -a nameOfYourDevice -domain YOURDOMAIN.SOMETHING -u administrator -p 'yourDomainPassword'
In the case of this Unable to connect to server error, you will get this message in the Terminal app: “Node name wasn’t found. (2000)”. Now, this is something that just like error 5200 is in a million places and for the most part, time difference is the main problem and solution for this error. However, in my case, this is still an open investigation. I will keep looking into this and write back any more errors or hopefully a solution to this little endeavor.

Binding Apple Mac computers to a Windows Active Directory (AD) domain is a crucial step in creating a unified and seamless IT environment. As organizations increasingly adopt a mixed-platform approach, integrating macOS devices with a Windows AD domain becomes essential for efficient user management, centralized authentication, and streamlined access to shared resources.
In this step-by-step guide, we will explore the process of binding macOS to a Windows AD domain. Whether you are an IT professional tasked with managing a diverse device ecosystem or a macOS user seeking to leverage the benefits of AD integration, this guide will provide you with the necessary knowledge and instructions to accomplish this integration.
Prerequisites
Before you begin the process of binding macOS to a Windows Active Directory (AD) domain, there are several prerequisites that you need to ensure are in place.
-
Requirements for binding macOS to AD domain
- AD domain version: Determine the version of your Windows AD domain.
- macOS version: Verify that your macOS device is running a supported version for AD integration. Check the compatibility requirements for your specific macOS version.
It’s advisable to consult the official documentation provided by Apple and Microsoft for the specific macOS and Windows Server versions you are using. These resources will provide detailed information on compatibility, requirements, and any additional considerations for binding macOS to an AD domain.
-
Necessary permissions and credentials
- Administrative access: Ensure you have administrative access to both the macOS device and the Windows AD domain. Administrative privileges are required to make system-level changes and perform the necessary configurations.
- Service account creation: If needed, create a dedicated service account in the AD domain specifically for the macOS integration. This account should have the necessary permissions to join devices to the domain and perform the required tasks.
Preparing the Active Directory
To successfully bind macOS to a Windows AD domain, certain preparations must be made within the AD environment. By following these steps, you can ensure a seamless integration process.
-
Configure necessary group policies in AD
- Configure policies for user management: Determine if any additional group policies are needed to manage user accounts, such as password policies or access control settings. Adjust policies as necessary to align with your organization’s requirements.
-
Check DNS and network settings for AD integration
- DNS configuration: Ensure that the DNS servers used by the AD domain controllers are correctly configured on the network. Verify that forward and reverse DNS lookups are functional for the AD domain.
- Network connectivity: Confirm that the AD domain controllers have proper network connectivity and can be accessed by the macOS devices.
Configuring macOS System Preferences
Configuring the system preferences on your macOS device is the next crucial step to enable it to communicate with the AD domain controllers and establish the necessary trust relationship.
Accessing System Preferences on macOS
- Click on the Apple menu in the top-left corner of the screen.
- Select «System Preferences» from the drop-down menu.
- The System Preferences window will open, providing access to various settings and configurations.
Navigating to Network settings and configuring network connections
- Locate and click on the «Network» icon in the System Preferences window.
- In the Network settings, ensure that the appropriate network interface (Wi-Fi or Ethernet) is selected on the left-hand side.
- Click on the «Advanced» button to access advanced network settings.
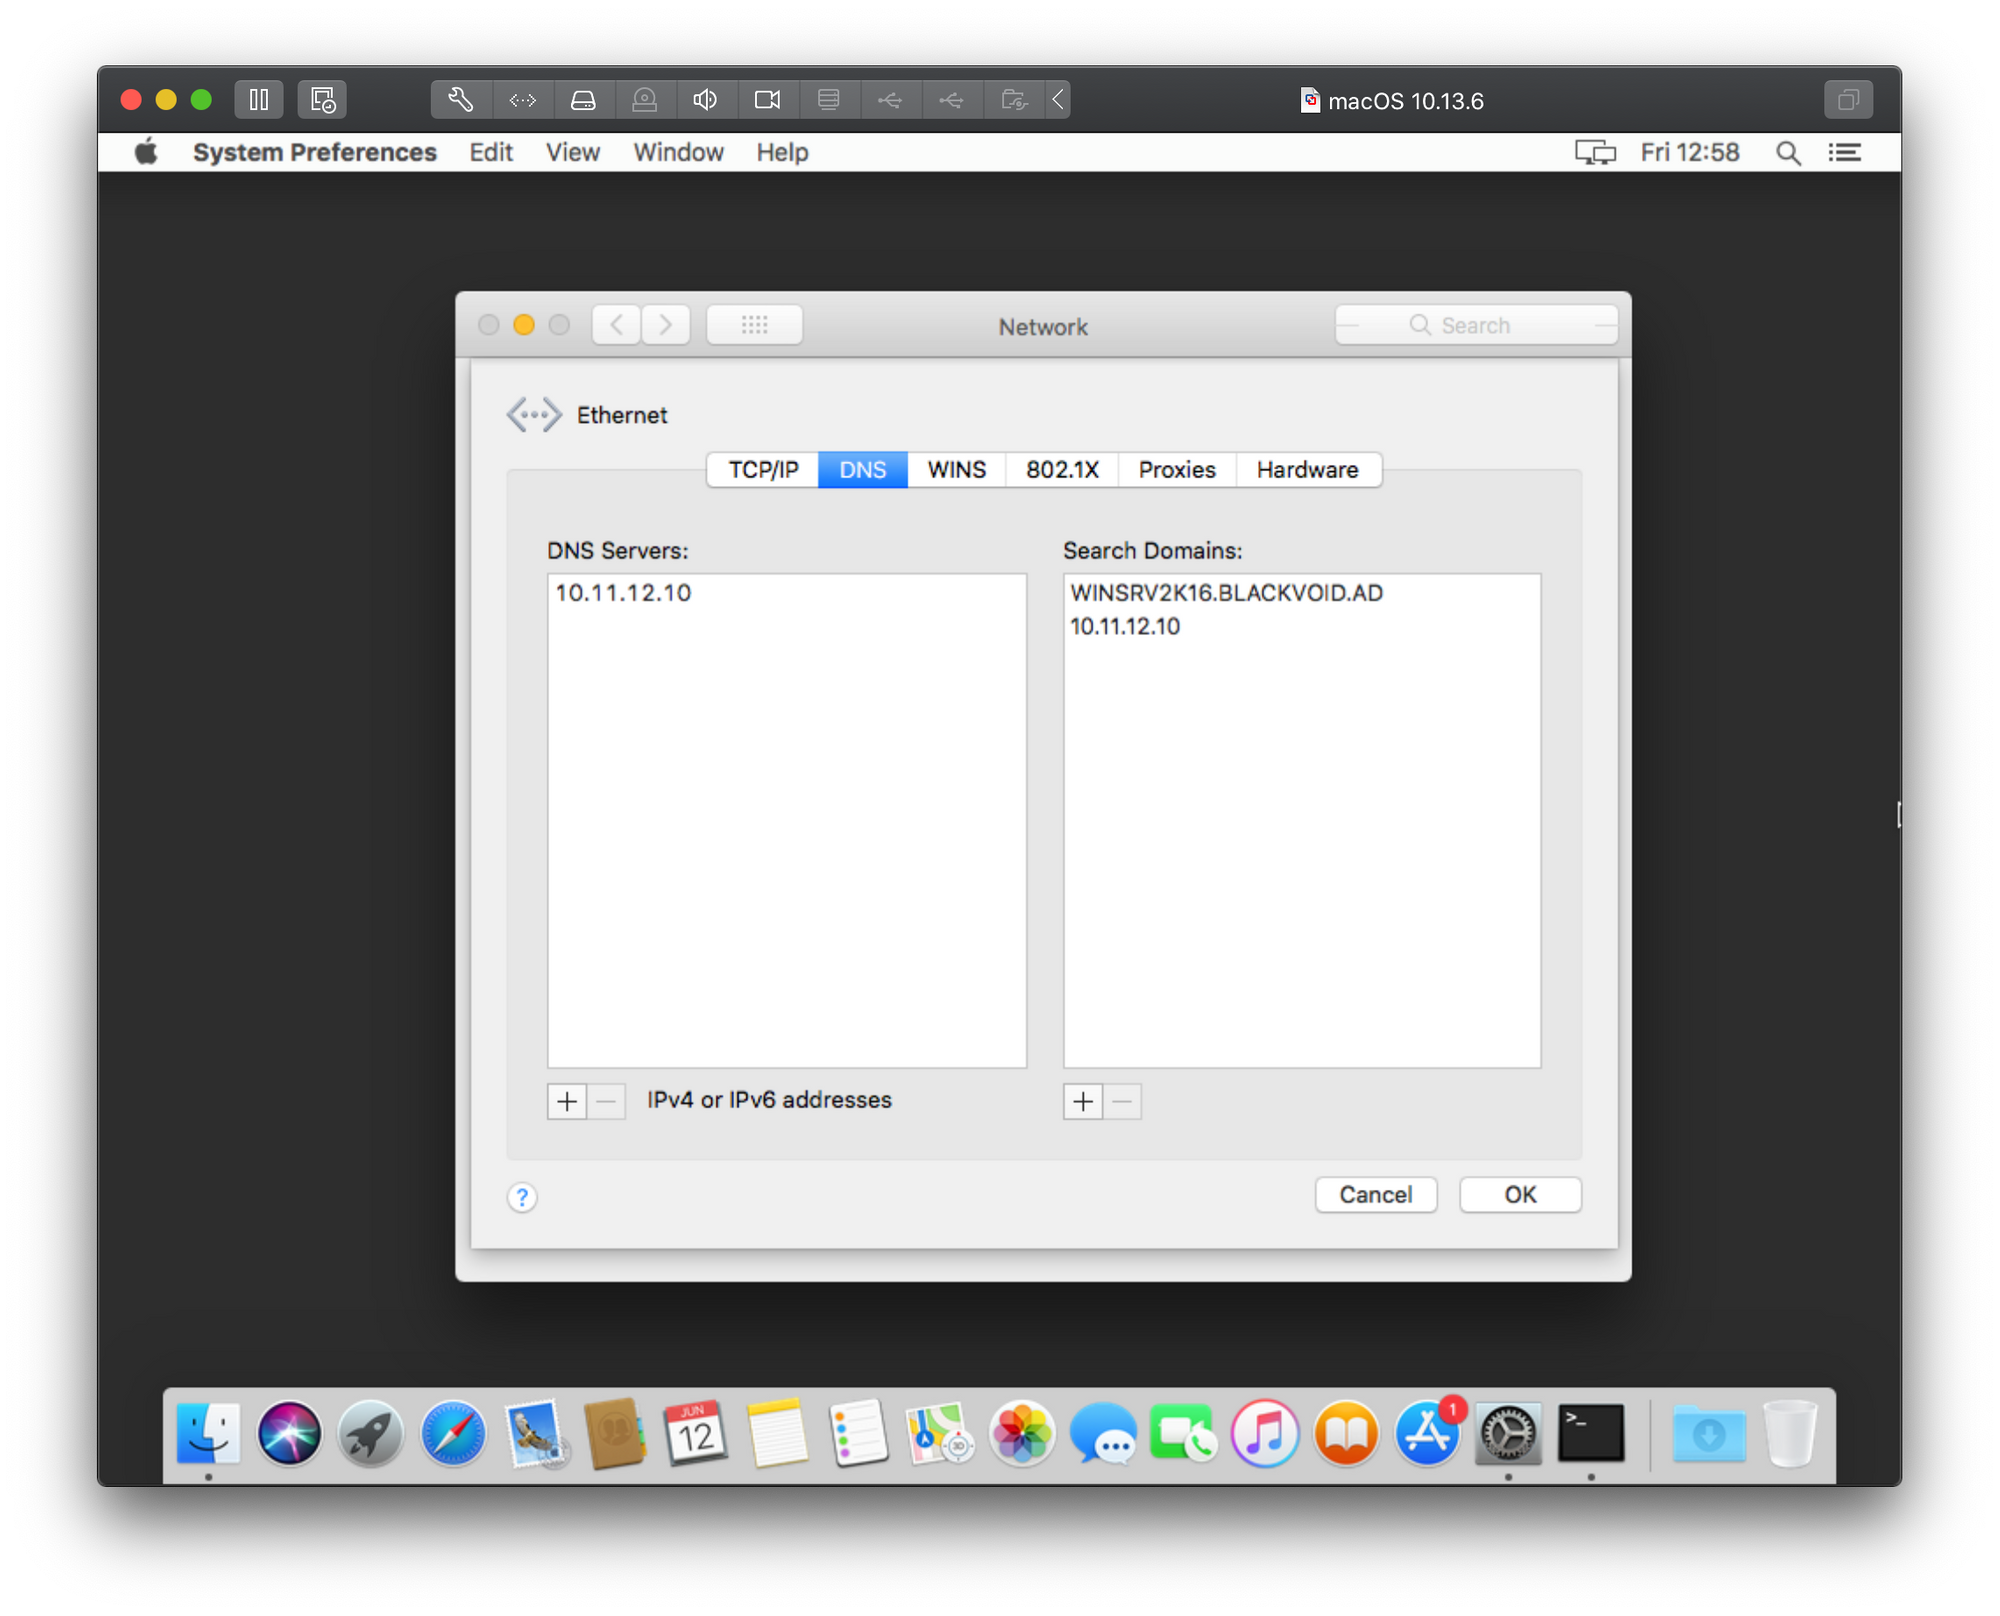
- In the Advanced settings, navigate to the «DNS» tab.
- Add the IP addresses of the AD domain controllers to the DNS server list by clicking the «+» button and entering the IP addresses.
- Arrange the DNS server order by dragging the entries to ensure the AD domain controllers are prioritized.
- Click «OK» to save the DNS changes and close the Advanced settings.
Adding the AD domain and configuring advanced settings
- In the Network settings, click on the «Open Directory Utility» button. This will launch the Directory Utility application.
- In the Directory Utility window, click the lock icon in the bottom-left corner and enter your macOS administrator password to make changes.
- Once unlocked, click on the «+» button to add a new directory service.
- Select «Active Directory» from the list of available directory services and click «OK».
- Enter the DNS hostname of the AD domain in the «Domain» field.
- The administrator of the Active Directory domain can tell you the DNS hostname.
- Configure additional details such as the AD domain controller’s IP address or hostname, computer ID, and organizational unit (OU) if necessary.
- Click «OK» to save the AD domain configuration.
Joining macOS to the Active Directory Domain
Now that you have configured the system preferences on your macOS device, it’s time to join it to the Windows Active Directory (AD) domain. This process establishes a trust relationship between the macOS device and the AD domain controllers, enabling seamless integration and authentication.
Follow these steps to join your macOS device to the AD domain:
- Open the «System Preferences» by clicking on the Apple menu in the top-left corner of the screen and selecting «System Preferences».
- In the System Preferences window, click on the «Users & Groups» icon.
- Click the lock icon in the bottom-left corner of the Users & Groups window and enter your macOS administrator password to make changes.
- Once unlocked, click on the «Login Options» tab on the left-hand side.
- Click the «Join…» button next to «Network Account Server» or «Network Account Server Options». This will open the «Network Account Server» window.
- In the Network Account Server window, click on the «+» button to add a new network account server.
- Enter the fully qualified domain name (FQDN) of the AD domain controller in the «Server Address» field (e.g., ad.example.com).
- Click on the «Open Directory Utility» button to access the Directory Utility application.
- In the Directory Utility window, click the lock icon in the bottom-left corner and enter your macOS administrator password to make changes.
- Once unlocked, click on the «+» button to add a new directory service.
- Select «Active Directory» from the list of available directory services and click «OK».
- In the Active Directory settings, enter the following information:
- Active Directory Domain: Enter the name of the AD domain (e.g., example.com).
- Computer ID: Assign a unique name for the macOS device within the AD domain.
- Administrative Account: Enter the username and password of an AD account with sufficient privileges to join devices to the domain.
- Optionally, you can click on the «Show Advanced Options» button to configure additional settings, such as the preferred domain controller, authentication settings, or mapping of AD groups to macOS administrative roles.
- Click «OK» to save the Active Directory settings and close the Directory Utility.
- Back in the Network Account Server window, click «Bind» to initiate the process of joining the macOS device to the AD domain.
- macOS will attempt to establish a connection with the AD domain controllers and authenticate the device. If successful, you will see a confirmation message indicating that the binding process was successful.
- Optionally, you can click on the «Open Directory Utility» button again to verify the AD integration settings and make further adjustments if needed.
Modifying Directory Services Settings
To modify Directory Services settings in macOS, you can follow these general steps:
- Open «System Preferences» by clicking on the Apple menu and selecting «System Preferences.»
- Click on the «Users & Groups» icon.
- Click the lock icon in the bottom-left corner and enter your macOS administrator password to make changes.
- Once unlocked, click on the «Login Options» tab on the left-hand side.
- Click the «Edit» button next to «Network Account Server» or «Network Account Server Options.»
- In the Network Account Server settings, you may find options such as «Force Local home directory on startup» and «Use UNC path from Active Directory to derive network home location.» These options control where the user’s home directory is located and how it is accessed.
- Select the «Mapping» option to specify unique IDs for certain attributes that serve to identify a computer account.
- Depending on your specific Active Directory environment, you may have additional optional settings available, such as «Prefer this domain server,» «Allow administration by,» and «Allow authentication from any domain in the forest.» These settings allow you to customize the domain server preference and specify administrative and authentication permissions.
- Make the desired changes and click «OK» to save the settings.
Please note that the availability and specific wording of these options may differ based on the macOS version and the Active Directory environment. It’s always recommended to refer to the official documentation or consult with your organization’s system administrator for the most accurate and up-to-date instructions when modifying Directory Services settings in macOS.
Best Practices and Additional Considerations
While integrating macOS devices with a Windows AD domain, it is essential to follow best practices and consider additional factors to ensure a smooth and secure integration process. By implementing these practices and taking into account specific considerations, you can optimize the AD integration and enhance the overall management and security of your macOS environment.
-
Regularly review and update AD integration settings
- Periodically revisit the AD integration settings in macOS system preferences to ensure they align with any changes or updates in your AD environment.
- Stay informed about macOS updates and patches that may impact the AD integration and test them in a controlled environment before deploying them.
-
Consider implementing multi-factor authentication for AD logins on macOS devices
PortalGuard Desktop is a comprehensive solution provided by BIO-key that offers secure multi-factor authentication (MFA) for macOS and Windows devices. This solution is designed to enhance the security of logins to desktops and workstations, providing organizations with advanced authentication capabilities.
Key features and benefits:
- MFA Enforcement: PortalGuard Desktop enforces multi-factor authentication when unlocking macOS devices, ensuring an additional layer of security beyond traditional passwords. This helps prevent unauthorized access and mitigates the risk of workstation takeover.
- Wide Range of Authentication Options: PortalGuard Desktop supports a variety of authentication methods, allowing users to choose the most convenient and secure option for their needs. These options may include fingerprint scanners, FIDO security keys, mobile authenticator apps, push notifications, and more.
- Customizable Branding: PortalGuard Desktop offers customer branding capabilities, allowing organizations to customize the design and visuals of the interactive MFA dialog boxes. This helps create a consistent user experience and reinforces brand identity.
- Compliance and Cybersecurity Insurance: By enforcing MFA for macOS logins, PortalGuard Desktop helps organizations meet cybersecurity insurance requirements. This can be particularly valuable for companies that utilize Apple workstations and need to demonstrate robust security measures.
PortalGuard Desktop for macOS is suitable for organizations of all sizes and industries. Whether you are in banking and finance, retail, healthcare, government, or any other sector, this solution can help protect your macOS devices and enhance overall cybersecurity.
-
Monitor and audit AD integration
- Implement logging and auditing mechanisms to track AD integration events and monitor user activities on macOS devices.
- Regularly review AD integration logs to detect any anomalies or suspicious activities that may indicate security breaches or configuration issues.
-
Train and educate users
- Provide training and education to users on the proper usage of AD-integrated macOS devices.
- Educate users about AD authentication, password security, and best practices to ensure they understand their role in maintaining a secure AD integration.
Conclusion
By following the outlined steps, you have successfully integrated macOS devices with your Windows Active Directory (AD) domain. This integration allows your users to log in with their AD credentials, access network resources, and leverage the centralized management capabilities offered by AD. Remember to stay vigilant and keep up with updates and patches for both macOS and AD, as security vulnerabilities may arise over time. Regularly review and update your configurations and monitor AD integration events to maintain a robust and secure environment.