
In the realm of IT management, knowing how to enable RDP Remote Registry on Windows 10 and 11 can prove highly valuable. This feature allows IT professionals and administrators to efficiently manage registry settings on remote systems. In this article, you can read up on what Registry is, its significance and its purpose, what it being accessible remotely implies and the security considerations involved. If you still want to go ahead, now is the time to test
TSplus Advanced Security
to make sure you system risks nothing from outside while you work on this. Finally, before wrapping up, you will find the necessary steps to activate Remote Registry and RDP.
What is the Windows Registry?
In Windows, the Registry is a database of configuration settings and options, stored hierarchically. These are applicable to the Windows operating system, but also to the hardware and to installed software. Therefore, the Registry is crucial for Windows and to its applications functioning correctly. This makes it all the more important that it be only accessible by persons who are both authorised and well versed in what to modify (or not) and how.
-
Block Malicious IP Addresses:
Keep your system protected by automatically blocking recognised threats, bolstering your defences against cyberattacks. -
Community-Powered Security:
Hacker IP Protection relies on the vigilance of the Advanced Security user community to ensure that all blacklisted IPs are genuine threats, minimising false positives. -
Automated Updates:
The feature updates daily, providing you with real-time protection against emerging threats.
Understanding the Role of the Windows Registry
So, the Windows registry serves as a centralized database housing critical configuration settings for the operating system, hardware and software. Consequently, this database plays a pivotal role in maintaining system functionality. Within the Registry, IT administrators can remotely access and modify registry entries on target systems. For example, the Remote Registry service is essential for running certain tools which would be disabled in the event of a faulty modification.
The Importance of «Remote» for the Registry and IT Pros Everywhere
As we now know, the Registry service is vital to the Windows OS. But it is also an asset for IT experts, especially the fact it is Remote. When an authorised user is able to access the registry remotely for particular tasks rather than need to attend to the machine in person, it either simplifies certain tasks or just making them possible.
It grants the capability to remotely control and modify registry settings on remote Windows servers and client computers. This capability is key in implementing fixes and carrying out maintenance. Additionally, it streamlines administrative tasks such as configuration management and software deployment. What more do you need for enabling RDP Remote Registry to be a must-know for IT professionals.
Measured Actions when Remoting into Windows 10 or 11 Registry
To enable RDP Remote Registry on Windows 10 and 11, you must navigate through specific steps. It is important to note that this feature is disabled by default for security reasons. Therefore, enabling it requires careful consideration and adherence to best practice.
-
Permission to access the Remote Registry Service:
To initiate the process, ensure you have the necessary permissions to modify registry settings on the target system. Essentially you will need your administrator credentials for both machines, including the hostname of the remote PC. -
Default Access:
By default, only members of the groups “administrators” and “backup operators” have access to the registry remotely. This restricts unauthorized access.TSplus
adds extra protection to these restrictions.
-
Administrator Rights:
Remember that reserving certain actions to administrators is never an empty process. Modifications to the Windows registry should not bedone lightly since they can break the system. At one point or another of any of the following paths to Remote Registry, there will be a question of administrator rights, passwords etc. -
Know-how:
Before you begin, ensure you know what you are about to do, why, how to go about it safely for the system, etc. It seems sensible to back up first too.
Final Security Considerations with Remote Registry on Windows
While RDP Remote Registry offers valuable administrative capabilities, as described, it poses potential security concerns. That is why it is available but inactive by default. For this additional reason, it is often recommended to disable network access to the registry, especially in high-security environments. Unauthorized changes to the registry are indeed likely to disrupt system operations. Hence why it is essential to weigh the benefits against the risk when going about activation and any changes. It is also paramount to monitor such services so you can pick up at the earliest possible stage any untoward Registry activity.
Securing Devices with TSplus Advanced Security in the Remote Registry Context
TSplus Advanced Security provides essential security for your devices in this context. Indeed, enabling remote access is a necessity for efficient system management and preventing external attacks while you work in remote registry is paramount. However, remotely intervening in Windows registry simultaneously increases the exposure to external tampering. This potential security risk is where
TSplus Advanced Security steps in
, without breaking the bank.
By leveraging the capabilities of TSplus Advanced Security, IT professionals can implement a multi-layered defense strategy that mitigates the risk of external attacks. Our advanced security solution employs various mechanisms to ensure the integrity and confidentiality of critical system data, such as the Windows registry.
Activation and Configuration of RDP and Remote Registry – Windows 10 or 11
Option 1, Registry Editor:
If Windows registry services and RDP are enabled, you can remote in and perform these actions via remote access.
Windows 11 and 10 have a preinstalled registry editor which you can find as you normally would on a PC. You might reach the tool:
-
using the
Search
; -
browsing from the
control panel
(It should be accessible from the Windows tool under System and Security.); -
and alternately you can use
Run
(Simultaneously press the Windows key and R then enter regedit and validate.); -
Windows Terminal
or -
the
Task Manager
. - There are more paths to follow including creating a hotkey or shortcut. These last two make it a little too easy in my mind, unless this really is an action you need to carry out very frequently.
Once you are in the Registry Editor tool, you can carry out the needed verifications or modifications.
NB:
It is worth noting that certain changes that you implement directly into the registry will not configure related actions or apps which would be modified by a “standard” set-up of the item. Think of it as a domino trail: certain actions push more than one button but working up the trail will not press those downstream, just as the domino will not knock over those in its back.
Option 2, Command Lines for Enabling RDP Remote Registry access — Windows 10 and 11:
However, it is possible to use command lines to implement a series of changes, step by step, to activate RDP directly from the registry. Therefore, you can choose to do the background work there.
One thing to remember, is how this may trigger anti-virus reactions. Indeed, PsExec is the tool you need for this option, but… Since it has often been used by malware, it will likely cause your guards to raise their shield at you. And, if you are not a programmer at heart, with precision down to the hilt, then beware that dash you forgot and the consequences it may have.
That said, PsExec has its uses since it makes the impossible possible: activating a de-activated protocol, from afar.
To begin with, these steps imply you working within your LAN. You need to log into the registry of the remote computer, therefore have admin rights to both devices you are using.
- Here, your first action will be disabling the firewall, preferably only on the ports used by RDP.
- The next action will be to enable Remote Desktop. For that, you can continue using PsExec or move on to opening the Registry Editor. Either way, you need to change the DenyTS connections command value from 1 to 0.
- Now RDP is enabled, you can proceed to launch RDS and use your admin credentials to connect.
Option 3, Enabling RDP Remote Registry access — Windows 10 and 11 with PowerShell:
It is also possible to go down the PowerShell route. For today, I will leave it to your favourite research engine for the information and steps for this option. Nevertheless, I wanted to include it to complete the range of choices.
Key TSplus Security Features for Windows Remote Registry
-
Ransomware Protection:
TSplus Advanced Security includes a powerful firewall that acts as the first line of defense. It monitors incoming and outgoing network traffic and can be configured to block unauthorized access to sensitive registry settings. This helps in preventing unauthorized modifications to the Windows registry. -
Hacker IP Protection, Brute Force Defender, Ransomware Protection:
The tool offers intrusion detection and prevention mechanisms to detect and counteract suspicious activities, such as those which may target the registry. It can identify and respond to potential threats in real-time, reducing the risk of registry tampering. -
Permissions, EndPoint Protection, Secure Desktop:
TSplus Advanced Security allows administrators to define granular access controls. With thesefeatures
, specify who has the privilege to access and modify the registry remotely. This ensures that only authorized individuals can make changes to the system configuration.
-
Event Logs and System Audit:
Real-time monitoring and reporting capabilities keep you informed about the health and security of your systems. It provides a proactive approach to identify and address security threats or anomalies in the registry.
Conclusion on Enabling RDP Remote Registry access — Windows 10 and 11
This better understanding of the pivotal role of Windows registry, of the care to be taken when making modifications there, and the ensuing security considerations should be good reminders to protect your IT devices.
I hope you feel more confident to reliably harness the full potential of registry as a tool for effective system administration and troubleshooting.
Especially since TSplus Advanced Security is a robust cybersecurity tool designed to provide all-in-one protection for Windows servers.
Its protection makes it an indispensable companion to guard any IT professional’s toolkit, especially if tasks in their IT infrastructure includes enabling RDP Remote Registry access in Windows 10 and 11.
The comprehensive security features of TSplus Advanced Security provides peace of mind for every business, big or small. It can also free IT administrators, IT teams, MSPs, support agents to effectively harness the benefits of remote registry access without compromising on security.
Download TSplus Advanced Security
now and wait no longer to provide peace of mind to your company, whatever your field of work.
Time and time again you may have the need to access something in a remote computer’s registry. This recently was the case for me so I decided to script it up and put it in a function. If you need to Remotely Enable RemoteRegistry Service than take a few minutes to copy this script and save it to the location of your choice. This script uses the CimInstance to see if the service is auto started, running or disabled and needs to be enabled.
I should note that since this script is using CIM cmdlets you need to enable PSRemoting on client Operating Systems such as Windows 10 and Windows 8.1. This will not work on a Windows 7 machine with Powershell 2.0 since CIM cmdlets were introduced with Version 3.0. If you want to use it on client computers and older operating systems, switch Get-CimInstance with Get-WmiObject…
#requires -RunAsAdministrator
#requires -Version 3.0

Function Enable-RemoteRegistry {
<#
.Synopsis
    This will enable the remote registry service on local or remote computers.
    For updated help and examples refer to -Online version.


.DESCRIPTION
    This will enable the remote registry service on local or remote computers.
    For updated help and examples refer to -Online version.


.NOTES
    Name: Enable-RemoteRegistry
    Author: The Sysadmin Channel
    Version: 1.0
    DateCreated: 2018-Jun-21
    DateUpdated: 2018-Jun-21

.LINK
    https://thesysadminchannel.com/remotely-enable-remoteregistry-service-powershell -


.EXAMPLE
    For updated help and examples refer to -Online version.

#>

    [CmdletBinding()]
    param(
        [Parameter(
            ValueFromPipeline=$true,
            ValueFromPipelineByPropertyName=$true,
            Position=0)]

        [string[]]  $ComputerName = $env:COMPUTERNAME
    )


    BEGIN {}

    PROCESS {
        Foreach ($Computer in $ComputerName) {
            try {
                $RemoteRegistry = Get-CimInstance -Class Win32_Service -ComputerName $Computer -Filter 'Name = "RemoteRegistry"' -ErrorAction Stop
                if ($RemoteRegistry.State -eq 'Running') {
                    Write-Output "$Computer is already Enabled"
                }

                if ($RemoteRegistry.StartMode -eq 'Disabled') {
                    Set-Service -Name RemoteRegistry -ComputerName $Computer -StartupType Manual -ErrorAction Stop
                    Write-Output "$Computer : Remote Registry has been Enabled"
                }

                if ($RemoteRegistry.State -eq 'Stopped') {
                    Start-Service -InputObject (Get-Service -Name RemoteRegistry -ComputerName $Computer) -ErrorAction Stop
                    Write-Output "$Computer : Remote Registry has been Started"
                }

            } catch {
                $ErrorMessage = $Computer + " Error: " + $_.Exception.Message

            }
        }
    }

    END {}

}
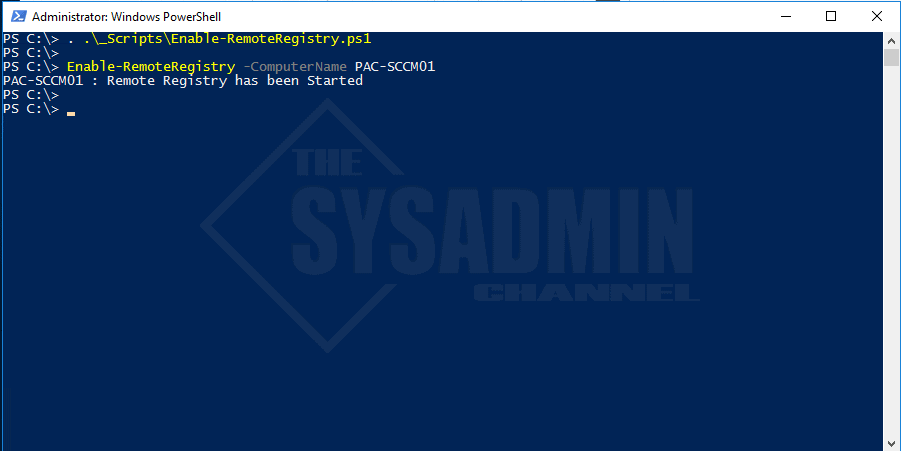
Once you dot source the function and run the command with a specified computer name it will respond with either, the service is already running, the service has been enabled and/or the service has been started.
If you liked this post be sure to check out TheSysadminChannel on Youtube. And if you’re looking to further your Powershell or SCCM knowledge, be sure to check out Learn Powershell In a Month Of Lunches Book for Powershell and Learn SCCM in a Month of Lunches Book for System Center Configuration Manager.
Prerequisites
In order to connect to a remote registry, there are a few prerequisites that you need to have in place. These prerequisites will ensure that you have the necessary access and permissions to perform the task successfully. Here are the key prerequisites you should keep in mind:
- Administrator Access: You must have administrative access to both the local and remote machines. This is important as it allows you to make changes to the registry and perform administrative tasks.
- Network Connectivity: You need to ensure that there is network connectivity between your local machine and the remote machine. This can be achieved by establishing a secure connection, such as a Virtual Private Network (VPN) or a direct network connection.
- Firewall Permissions: Make sure that the necessary firewall permissions are set up on both the local and remote machines. The firewall should allow incoming and outgoing connections on the required ports for remote registry access.
- Remote Registry Service: The Remote Registry service should be enabled and running on the remote machine. This service allows access to the registry from other machines on the network.
- Proper Credentials: You need to have the correct credentials, such as a username and password, to access the remote machine. These credentials should have sufficient privileges to make changes in the remote registry.
Ensure that you have met these prerequisites before attempting to connect to a remote registry. By fulfilling these requirements, you will have the necessary tools and permissions to access and modify the registry settings on the remote machine.
Method 1: Using Regedit
One of the most common and straightforward methods to connect to a remote registry is by using the built-in Windows Registry Editor (Regedit) tool. Regedit allows you to access and modify registry settings on both local and remote machines. Here’s how you can use Regedit to connect to a remote registry:
- Open Regedit: Press the Windows key + R on your keyboard to open the Run dialog box. Type “regedit” and press Enter to open Regedit.
- Connect to Remote Registry: In the Registry Editor window, click on File in the top menu and select Connect Network Registry. Alternatively, you can press Ctrl + Shift + N.
- Enter Remote Computer Name: In the Connect Network Registry dialog box, enter the name or IP address of the remote machine you wish to connect to, and click OK.
- Authenticate as Administrator: You will be prompted to enter the credentials of an account with administrative privileges on the remote machine. Enter the username and password, and click OK.
- Access Remote Registry: Once the connection is established, you will see the remote machine’s registry hierarchy listed under the HKEY_LOCAL_MACHINE key. You can now navigate through the registry and modify the required settings.
- Close Connection: When you are done making changes to the remote registry, make sure to close the connection by right-clicking on the connected machine’s name and selecting Disconnect Network Registry.
Using Regedit provides a user-friendly interface to connect to a remote registry and modify its settings. However, it is important to note that using Regedit requires administrative access and proper credentials for the remote machine. Ensure that you have met the necessary prerequisites before attempting to connect and modify the remote registry using Regedit.
Method 2: Using PowerShell
PowerShell is a powerful scripting language built by Microsoft that enables administrators to automate various tasks, including connecting to and managing remote registries. With PowerShell, you can easily connect to a remote registry and perform operations using cmdlets specific to registry management. Here’s how you can use PowerShell to connect to a remote registry:
- Open PowerShell: Press the Windows key + X on your keyboard, then select Windows PowerShell (Admin) from the menu.
- Enable Remote Registry: Before connecting to a remote registry, you need to ensure that the Remote Registry service is running on the remote machine. You can do this by executing the command
Set-Service -Name RemoteRegistry -StartupType Automatic. - Connect to Remote Registry: To connect to a remote registry, use the
Enter-PSSessioncmdlet along with the-ComputerNameparameter and specify the name or IP address of the remote machine. For example,Enter-PSSession -ComputerName RemoteMachine. - Authenticate as Administrator: You will be prompted to enter the credentials of an account with administrative privileges on the remote machine. Enter the username and password, and press Enter.
- Access Remote Registry: Once the connection is established, you can use various PowerShell cmdlets, such as
Get-ItemandSet-Item, to navigate through the remote registry and modify the required settings. For example,Get-Item -Path "HKLM:\Software\Microsoft"retrieves information about the specified registry key. - Close Connection: When you are done working with the remote registry, you can close the PowerShell session by executing the
Exit-PSSessioncmdlet.
PowerShell provides a more script-centric approach to connect and manage remote registries. It offers extensive functionality and flexibility for performing registry operations, making it a preferred choice for system administrators. Keep in mind that you need administrative access and proper credentials to connect and make changes to the remote registry using PowerShell.
Method 3: Using Command Prompt
Command Prompt is another command-line tool in Windows that can be utilized to connect to a remote registry and perform registry-related operations. While it may not offer as much flexibility as PowerShell, it provides a lightweight and easy-to-use method for connecting to a remote registry. Here’s how you can use Command Prompt to connect to a remote registry:
- Open Command Prompt: Press the Windows key + R on your keyboard to open the Run dialog box. Type “cmd” and press Enter to open Command Prompt.
- Enable Remote Registry: Before connecting to a remote registry, you need to ensure that the Remote Registry service is running on the remote machine. You can do this using the following command:
sc \\RemoteMachine start RemoteRegistry. - Connect to Remote Registry: To connect to a remote registry, use the
regcommand with theconnectoption followed by the remote machine’s name or IP address. For example,reg connect \\RemoteMachine. - Authenticate as Administrator: If prompted, enter the credentials of an account with administrative privileges on the remote machine. Provide the username and password, and press Enter.
- Access Remote Registry: Once the connection is established, you can use the
regcommand with various options, such asqueryandadd, to navigate the remote registry and modify settings. For example,reg query HKEY_LOCAL_MACHINE\Software\Microsoftretrieves information about the specified registry key. - Close Connection: When you are done working with the remote registry, close the Command Prompt window by typing
exitand pressing Enter.
Command Prompt offers a simple and straightforward method to connect and manage remote registries. It is particularly useful when you require a quick and lightweight solution for performing registry operations. Remember to have administrative access and proper credentials to connect and make changes to the remote registry using Command Prompt.
Method 4: Using Remote Registry Editor
The Remote Registry Editor is a third-party application that provides an intuitive graphical interface to connect and manage remote registries. This tool simplifies the process of connecting to a remote registry by eliminating the need for command-line commands. Here’s how you can use the Remote Registry Editor to connect to a remote registry:
- Download and Install Remote Registry Editor: Start by downloading and installing a reputable Remote Registry Editor software on your computer. There are several options available online, so choose one that suits your needs and requirements.
- Launch Remote Registry Editor: Once installed, open the Remote Registry Editor application on your computer.
- Connect to Remote Registry: Within the Remote Registry Editor application, select the option to connect to a remote registry. Enter the name or IP address of the remote machine and choose the appropriate credentials to authenticate as an administrator.
- Establish Connection: Click on the “Connect” or “OK” button to establish a connection to the remote registry. The Remote Registry Editor application will establish a secure connection to the remote registry and display the registry’s hierarchy on your screen.
- Navigate and Modify Registry Settings: With the connection established, you can easily navigate through the remote registry’s keys and values. You can make changes to the registry settings by selecting the desired keys or values and using the available options provided by the Remote Registry Editor.
- Disconnect from Remote Registry: Once you have completed your tasks, make sure to disconnect from the remote registry by selecting the appropriate option within the Remote Registry Editor application. This will close the connection and ensure the security of both your computer and the remote machine.
Using a Remote Registry Editor provides a user-friendly and intuitive method to connect and manage remote registries. It eliminates the need for complex command-line commands and allows you to navigate and modify registry settings easily. However, ensure that you use a trusted and secure Remote Registry Editor application from a reputable source to protect the security and integrity of your computer and the remote machine.
Method 5: Using Group Policy Editor
Group Policy Editor is a Windows management tool that allows administrators to configure and enforce various settings across multiple computers in a network. It can also be used to connect to a remote registry and manage its settings. Here’s how you can use Group Policy Editor to connect to a remote registry:
- Open Group Policy Editor: Press the Windows key + R on your keyboard to open the Run dialog box. Type “gpedit.msc” and press Enter to open Group Policy Editor.
- Connect to the Remote Registry Snap-in: In the Group Policy Editor window, go to “Computer Configuration” and select “Administrative Templates”. From there, click on “System” and locate the “Remote Registry” option.
- Enable Remote Registry Snap-in: Double-click on the “Remote Registry” option to open its settings. Select the “Enabled” option and click on “Apply” and “OK”. This enables the Remote Registry snap-in.
- Connect to Remote Registry: Now, go to “File” in the top menu of Group Policy Editor and select “Add/Remove Snap-in”. In the “Add or Remove Snap-ins” window, select “Remote Registry” and click on “Add”. Fill in the name or IP address of the remote machine and click “OK”.
- Authenticate as Administrator: You may be prompted to enter the credentials of an account with administrative privileges on the remote machine. Provide the necessary username and password, and click “OK”.
- Access Remote Registry: Once the connection is established, you will see the remote machine’s registry hierarchy listed in the “Remote Registry” snap-in. You can now navigate through the registry and modify the settings as needed.
- Close Connection: When you are done working with the remote registry, make sure to close the connection by right-clicking on the connected machine’s name in the “Remote Registry” snap-in and selecting “Disconnect”.
Utilizing the Group Policy Editor to connect to a remote registry provides a centralized and efficient way to manage registry settings across multiple machines in a network. It eliminates the need for manual connections and allows you to enforce registry-related configurations easily. Ensure you have administrative access and proper credentials to successfully connect and modify the remote registry via Group Policy Editor.
Method 6: Using VBScript
VBScript (Visual Basic Scripting Edition) is a lightweight scripting language developed by Microsoft that enables you to create scripts for automating tasks in Windows. It can also be utilized to connect to a remote registry and perform various registry-related operations. Here’s how you can use VBScript to connect to a remote registry:
- Create a VBScript File: Open any text editor and create a new file. Save it with a .vbs extension, such as “remote_registry.vbs”.
- Write VBScript Code: In the newly created VBScript file, write the necessary code to connect to the remote registry. Here’s an example of the code required to connect to a remote registry:
    strComputer = "RemoteMachine" ' Replace with the name or IP address of the remote machine
    strKeyPath = "SOFTWARE\Microsoft\Windows"

    Set objRegistry = GetObject("winmgmts:\\" & strComputer & "\root\default:StdRegProv")

    objRegistry.EnumKey HKEY_LOCAL_MACHINE, strKeyPath, arrSubKeys

    For Each strSubKey In arrSubKeys
        WScript.Echo strSubKey
    Next
Modify the values of strComputer and strKeyPath variables according to your requirements. This code will connect to the specified remote machine and enumerate the subkeys under the specified registry path.
- Execute the VBScript: Save the VBScript file and double-click on it to execute the script. The VBScript will connect to the remote registry and perform the specified operations.
Using VBScript provides a lightweight and flexible approach to connect to a remote registry. It allows you to customize the script according to your specific needs and automate registry-related tasks. Keep in mind that administrative access and proper credentials are necessary to establish a connection and perform operations on the remote registry using VBScript.
Method 7: Using C# Code
C# is a versatile programming language developed by Microsoft that provides powerful capabilities for developing Windows applications. It can also be utilized to connect to a remote registry and perform registry-related operations. Here’s how you can use C# code to connect to a remote registry:
- Create a New C# Project: Open your preferred Integrated Development Environment (IDE) and create a new C# project.
- Add Required Namespace: In your C# project, add the System and Microsoft.Win32 namespaces to access the necessary classes and methods for registry management:
using System; using Microsoft.Win32; - Write C# Code: Write the C# code required to connect to the remote registry and perform the desired operations. Here’s an example of the code to connect to a remote registry and retrieve the value of a specific registry key:
    string remoteComputer = "RemoteMachine"; // Replace with the name or IP address of the remote machine
    string registryPath = @"SOFTWARE\Microsoft\Windows";
    string keyName = "Version";

    RegistryKey remoteKey = RegistryKey.OpenRemoteBaseKey(RegistryHive.LocalMachine, remoteComputer);
    RegistryKey registrySubKey = remoteKey.OpenSubKey(registryPath);

    if (registrySubKey != null)
    {
        object value = registrySubKey.GetValue(keyName);
        Console.WriteLine("Value of {0} in {1}: {2}", keyName, remoteComputer, value);
        registrySubKey.Close();
    }
    remoteKey.Close();
Customize the values of remoteComputer, registryPath, and keyName variables based on your requirements. This code will connect to the specified remote machine, open the specified registry path, and retrieve the value of the specified key.
- Execute the C# Code: Build and run your C# project to execute the code. The C# code will establish a connection to the remote registry and perform the requested operations.
Using C# code provides a robust and scalable approach to connect to a remote registry. It offers extensive functionality and flexibility for performing registry operations, making it an ideal choice for advanced registry management tasks. Ensure administrative access and proper credentials are available to establish a connection and perform operations on the remote registry using C# code.
-
Home
-
News
- How Can You Connect to a Remote Registry Easily?
By Stella | Follow |
Last Updated
At times, you might want to remotely edit your computer registry value or key to fix some issues. But, you can don’t know how to connect to a remote registry. In this post, MiniTool will show you how to enable the Remote Registry service on Windows and how to connect to a remote registry.
Do you know what remote registry is? It is remotely connecting to another computer’s Registry and then modifying the registry.
Remote registry is not a common work that is needed for ordinary users. Tech support and the IT group will need to use remote reg more frequently. But, at times, you may need to remotely edit a registry key or value in another computer. In a situation like, you will need to perform a remote registry editing.
In this article, we will walk you through on how to connect to a remote registry. We hope this guide is useful for you.
How to Connect to a Remote Registry?
How much time it will take to complete a remote registry? You may ask this question before performing a remote registry editing. As long as the remote computer is working, the network is connected and the necessary services are enabled, the entire process just takes only a minute or two. And of course, these are the preparations you should make in advance.
Here is a guide on how to connect to a remote registry:
1. Press Win + R to open Run.
2. Type regedit into the Run box and press Enter.
3. Go to File > Connect Network Registry.
4. You will see a large empty space. You need to enter the name (here means the host name) of the computer you need to remotely edit registry into that empty space.
5. Click the Check Names button. After a while, you will see the full path of the specified remote computer that is shown as LOCATION\NAME.
However, if you receive an error message saying “An object (Computer) with the following name cannot be found: “NAME”.”, you will need to check whether the remote computer is connected to the network successfully and whether you typed the correct computer hostname.
At the same time, you may also need to enter credentials for a user on the remote computer to verify that you are allowed to connect to the registry.
6. Select OK. Then, the Registry Editor will connect to your specified remote computer’s registry. You can see your computer under hostname.
After these steps, the remote connection is established. You can feel free to edit the registry value according to your needs. Besides, to keep the registry safe, you’d better back up your registry beforehand.
However, if you get an error message saying “Unable to connect to [name]“, the Remote Registry service may be disabled. In a situation like this, you need to enable the remote Registry service before doing the above steps.
How to Enable the Remote Registry Service on Your Windows Computer?
In general, the remote Registry service is disabled by the Windows installation by default. When necessary, you can enable the service like this:
- Open Control Panel.
- Go to Administrative Tools > Services.
- You will see a service names’ list. Then, you need to find the Remote Registry option from the list and the double-click it to continue.
- Select Manual from the Startup type drop-down menu. If you want the RemoteRegistry service to run all the time, you will need to select Automatic instead.
- Select Apply.
- Select Start.
- Select OK.
- Close the Services window and Control Panel.
Now, the RemoteRegistry service on your computer is successfully enabled.
About The Author
Position: Columnist
Stella has been working in MiniTool Software as an English Editor for more than 8 years. Her articles mainly cover the fields of data recovery including storage media data recovery, phone data recovery, and photo recovery, videos download, partition management, and video & audio format conversions.
Enables remote users to modify registry settings on your computer. If this service is stopped, the registry can be modified only by users on your computer. If this service is disabled, any services that explicitly depend on it will fail to start.
This service also exists in Windows 11, 8, Vista and XP.
Startup Type
| Windows 10 version | Home | Pro | Education | Enterprise |
|---|---|---|---|---|
| 1507 | Disabled | Disabled | Disabled | Disabled |
| 1511 | Disabled | Disabled | Disabled | Disabled |
| 1607 | Disabled | Disabled | Disabled | Disabled |
| 1703 | Disabled | Disabled | Disabled | Disabled |
| 1709 | Disabled | Disabled | Disabled | Disabled |
| 1803 | Disabled | Disabled | Disabled | Disabled |
| 1809 | Disabled | Disabled | Disabled | Disabled |
| 1903 | Disabled | Disabled | Disabled | Disabled |
| 1909 | Disabled | Disabled | Disabled | Disabled |
| 2004 | Disabled | Disabled | Disabled | Disabled |
| 20H2 | Disabled | Disabled | Disabled | Disabled |
| 21H1 | Disabled | Disabled | Disabled | Disabled |
| 21H2 | Disabled | Disabled | Disabled | Disabled |
| 22H2 | Disabled | Disabled | Disabled | Disabled |
Default Properties
| Display name: | Remote Registry |
| Service name: | RemoteRegistry |
| Type: | share |
| Path: | %WinDir%\system32\svchost.exe -k localService -p |
| File: | %WinDir%\system32\regsvc.dll |
| Error control: | normal |
| Object: | NT AUTHORITY\LocalService |
| Privileges: |
|
Default Behavior
The Remote Registry service is running as NT AUTHORITY\LocalService in a shared process of svchost.exe. Other services might run in the same process. If Remote Registry fails to start, the error is logged. Windows 10 startup proceeds, but a message box is displayed informing you that the RemoteRegistry service has failed to start.
Dependencies
Remote Registry is unable to start, if the Remote Procedure Call (RPC) service is stopped or disabled.
Restore Default Startup Type of Remote Registry
Automated Restore
1. Select your Windows 10 edition and release, and then click on the Download button below.
2. Save the RestoreRemoteRegistryWindows10.bat file to any folder on your hard drive.
3. Right-click the downloaded batch file and select Run as administrator.
4. Restart the computer to save changes.
Note. Make sure that the regsvc.dll file exists in the %WinDir%\system32 folder. If this file is missing you can try to restore it from your Windows 10 installation media.
Yea, though I walk through the valley of the shadow of death, I will fear no evil: for thou art with me; thy rod and thy staff they comfort me.