
I’ve brought up this ARM64 AIO ISO of Windows 10 20H1 for use in both flashing Raspberry Pi’s and usage for Parallels in M1 Macs, or whatever fits your need.
This was built using UUP files, and it has no pre-activation.
- Addeddate
- 2021-08-19 00:28:04
- Identifier
- 19041.1.191206-1406.-vb-release-clientmulti-a-64-fre-en-us
- Reviews allowed
- none
- Scanner
- Internet Archive HTML5 Uploader 1.6.4
- Year
-
2021
comment
Reviews
Reviews have been disabled for this item.
118,874
Views
29
Favorites
DOWNLOAD OPTIONS
Uploaded by
angryman03
on
В данной статье рассмотрим версию Windows 10 для ARM — процессоров. Что это такое, где скачать и как установить, читайте далее.
ARM — Это тип архитектуры процессора, она отличается от обычной архитектуры Intel x86 и 64 бит, которые используются в наше время в компьютерах и большинстве ноутбуках. ARM — процессоры используются в мобильных телефонах (iPhone, iPad и Android), а так же в различных устройствах, к примеру в «Умных часах», либо в мини-компьютерах на одноплатной основе, многим известным Raspberry Pi и Arduino.
Компьютеры на процессорах ARM обладают своими существенными преимуществами, по сравнению с обычными x86 процессорами, например более высокая автономность, т.е ноутбук на ARM процессоре позволит работать без подзаряда намного дольше, чем с x86 процессором с одинаковым объемом заряда. Помимо всего ARM дешевле в производстве.
Особенности Windows 10 на ARM
Windows 10 на ARM со времен Windows 8 к 2020 году научилась запускать обычные x86 приложения, т.е все обычные приложения написанные под десктопную Windows, но только посредством эмуляции, что может отражаться на производительности работы приложения.
Приложения из Windows Strore наоборот, в среднем работают лучше на ARM, чем на x86 процессоре, т.е большинство приложений из магазина поддерживает ARM без эмуляции.
Какие минусы Windows 10 на ARM?
1. Только x32 (x86) приложения могут быть эмулированы, приложения, которые имеют только x64 разрядность на данный момент не работают.
2. Драйвера работают только для периферийных устройств с plug-and-play технологией, т.е с универсальными драйверами Windows. Драйвера x32 (x86) типа не поддерживаются, как альтернативу возможно использовать нативные драйвера ARM 64.
3. Не работают игры на OpenGL с версией выше 1.1. Игры, которые используют технологию античит так же не работают. Так же не работает Hyper-V.
4. Из-за ограничений технологии ARM не поддерживаются так же многие тесты, такие как: PCMark 8, Work, Cinebench R15, Premiere, Blender, OpenGL 2.1. MATLAB.
5. Не работают — опции и приложения для людей с ограниченными возможностями, редакторы метода ввода, приложения для облачных хранения данных.
Скачать и установить Windows 10 ARM
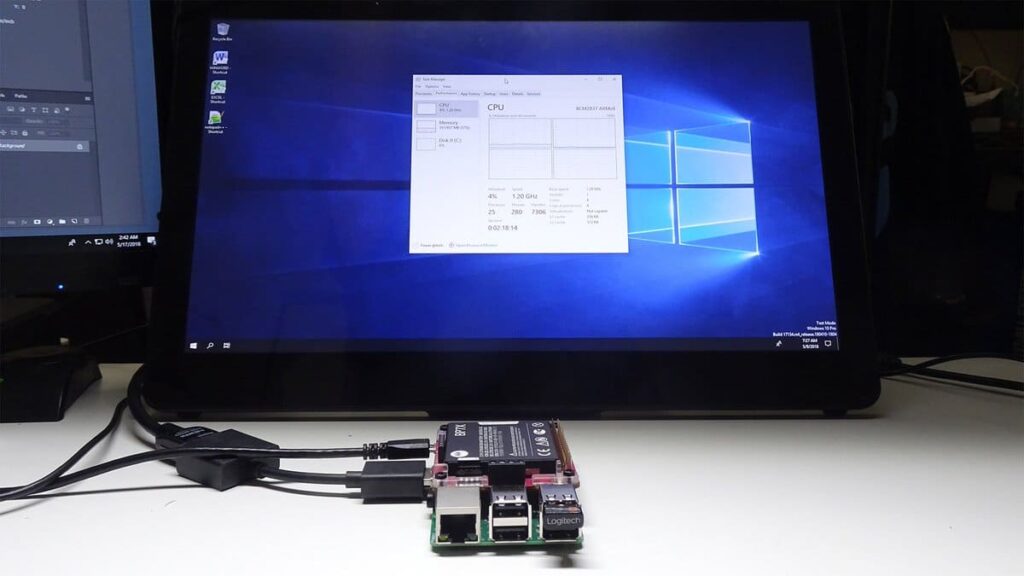
Для начала, чтобы использовать Windows 10 для ARM — Вам необходимо само устройство на ARM системе. Самым распространенным на данный момент — это одноплатный мини-комьютер Raspberry Pi, на китайских площадках их продают в среднем за 4-5 тысяч рублей.
Скачать Windows 10 for ARM Вы можете на следующей странице.
С процессом установки, Вы можете ознакомиться в пошаговом видео:
Активация Windows 10 ARM
Активация системы ничем не отличается от обычной «десктопной» Windows. Для Windows 10 на ARM так же работают версии Windows 10 Pro и Windows 10 Home, приобрести ключи активации для данных систем Вы можете в нашем каталоге по самым низким ценам! Доставка ключей моментальная в автоматическом режиме на Вашу электронную почту.
Лицензионный ключ активации Windows 10 от
In 2020, Apple introduced Mac computers with Apple silicon, with the first chip being the Apple M1.
This was a major change, and it affected many third party applications to the point where they simply don’t run on the M1 Mac.
One application that doesn’t run on M1 Macs is VirtualBox. Prior to the M1 Mac, we could use VirtualBox to install Windows on our Mac. VirtualBox is a free virtualisation application that enables you to install virtual machines (with other operating systems) on your Mac.
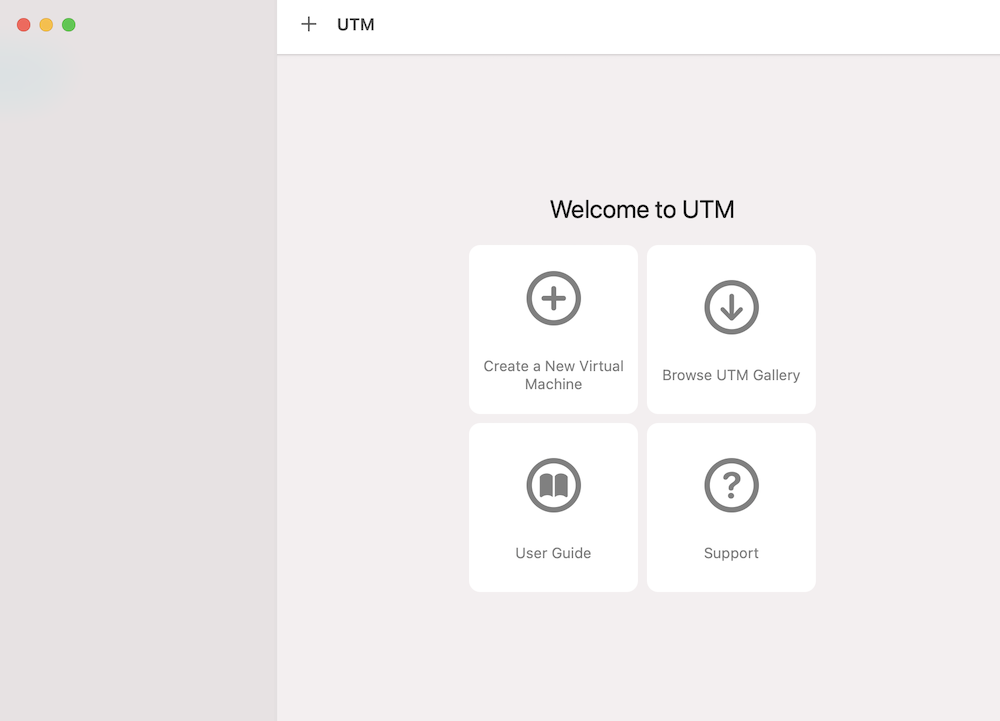
Fortunately, there’s a free alternative to VirtualBox – UTM.
In this article, I install Windows 10 on an M1 Mac. The key to doing this is to use the UTM virtualisation application instead of VirtualBox.
It also involves installing the Windows 10 on ARM Insider Preview. This requires an account with the Windows Insider Program (you can register for free).
Install UTM
First step is to install UTM (it’s free). UTM employs Apple’s Hypervisor virtualization framework to run ARM64 operating systems on Apple Silicon at near native speeds.
Basically, it enables us to create virtual machines on our M1 Mac. We can use UTM to install other operating systems (such as Windows) on our M1 Mac.
So to install UTM:
- Go to the UTM website and click
Download. - Once downloaded, double click the
UTM.dmgfile to launch it. - Drag the
UTM.appicon to yourApplicationsfolder.
The program is now installed. You can open it just as you can open other applications (e.g. by double clicking on its icon).
Download Windows
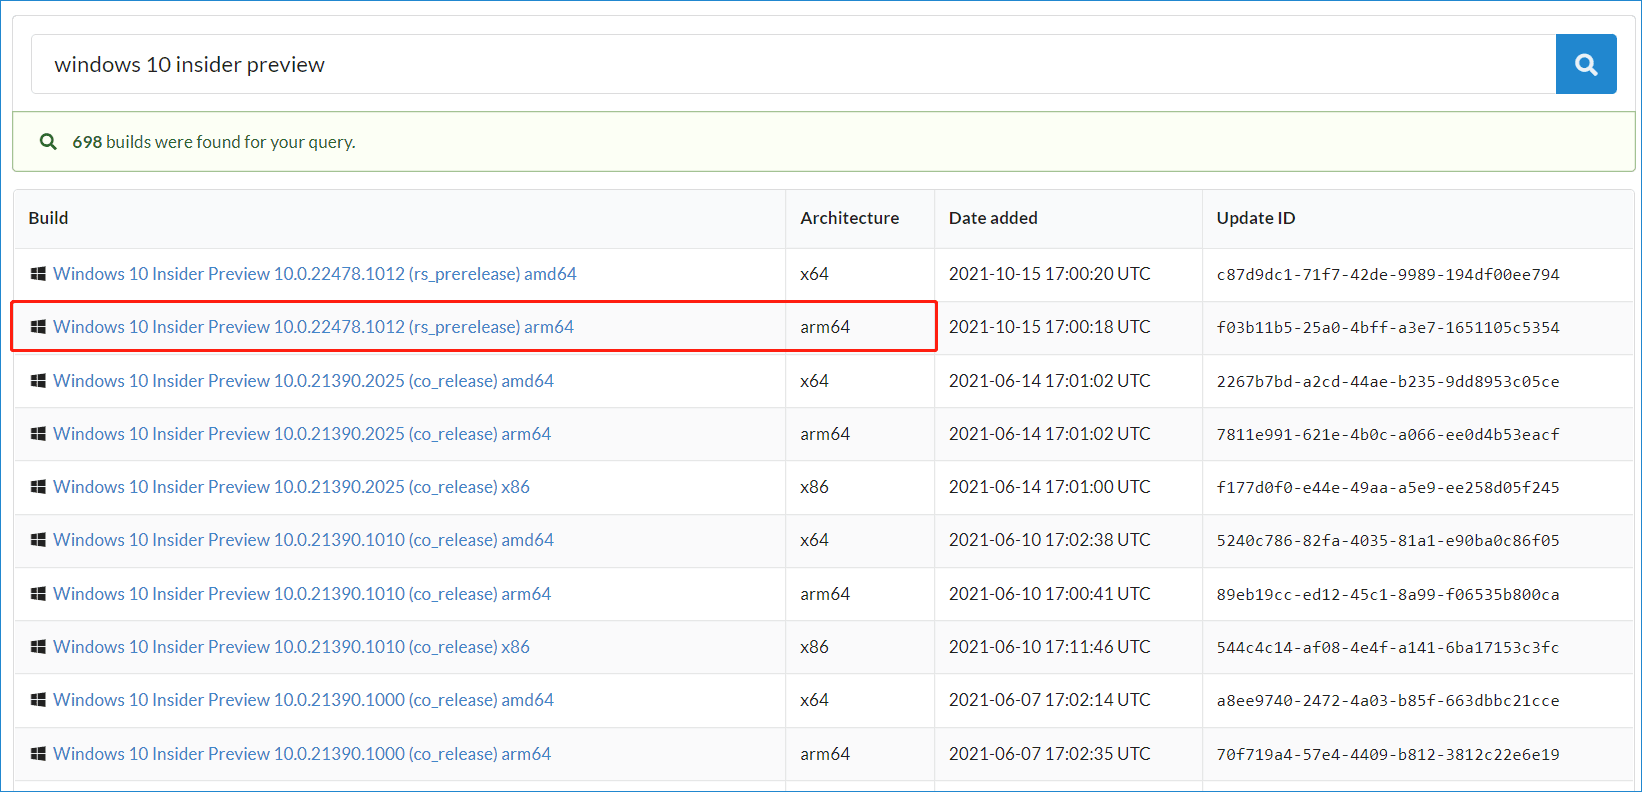
- Go to the Windows Insider Preview Downloads page.
- The instructions on the page depend on whether you’re logged in, and whether you’re part of the Windows Insider Program. If you are already logged in and you’re part of the Windows Insider Program, you’re good to go. If you’re not logged in or part of the program, follow the instructions on the page to log in and/or join the Windows Insider Program. Once done, the page will display the download link for the installation file.
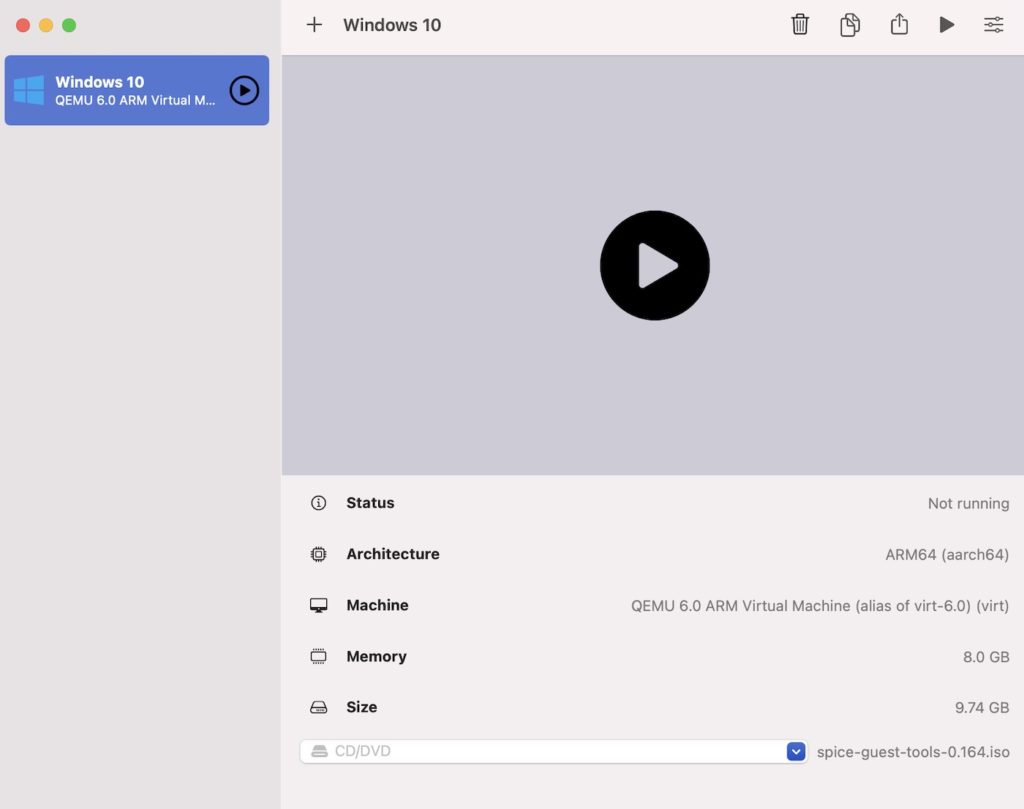
- Click the button to download the installation file. In my case this blue button reads Windows 10 Client ARM64 Insider Preview – Build 21354.
It’s quite a large file (mine is 9.74 GB), so it might take a while to download.
Download the SPICE Guest Tools
- Go to the UTM Support page.
- Under the SPICE Guest Tools and QEMU Drivers (Windows) heading, click Download.
We will use this later, when we install Windows.
Convert the VHDX Image to a QCOW2 Image
According to the UTM documentation, sometimes the QEMU handling of VHDX images will result in Windows becoming corrupted. To prevent this, we’re advised to convert the VHDX file to a QCOW2 file, as follows.
The following steps require that Homebrew is installed. You can install it with the command on the Homebrew website.
With Homebrew installed, open a Terminal window and run the following:
brew install qemuIf you get an error that reads “Cannot install in Homebrew on ARM processor in Intel default prefix”, your Homebrew might not be configured for your M1 Mac. In this case, try this fix.
With QEMU now installed, run the following to convert the VHDX file to QCOW2:
qemu-img convert -p -O qcow2 ~/UTM_VM/Windows10_InsiderPreview_Client_ARM64_en-us_21354.VHDX ~/UTM_VM/Windows10_InsiderPreview_Client_ARM64_en-us_21354.qcow2In my case, I’d placed both the Windows file and the SPICE guest tools into a folder called ~/UTM_VM. You can put them elsewhere if you prefer, but be sure to replace ~/UTM_VM with your own path to the file.
Also, you may need to rename the Windows file (for example, replace 21354 with the applicable number on your file).
We can now use the QCOW2 image when creating the virtual machine below. It is recommended you do this with a fresh VHDX from Microsoft in case your image was already corrupted.
Create a Virtual Machine
Now we can go ahead and use UTM to create a virtual machine with which we will install Windows 10.
Open UTM and click Create a New Virtual Machine:
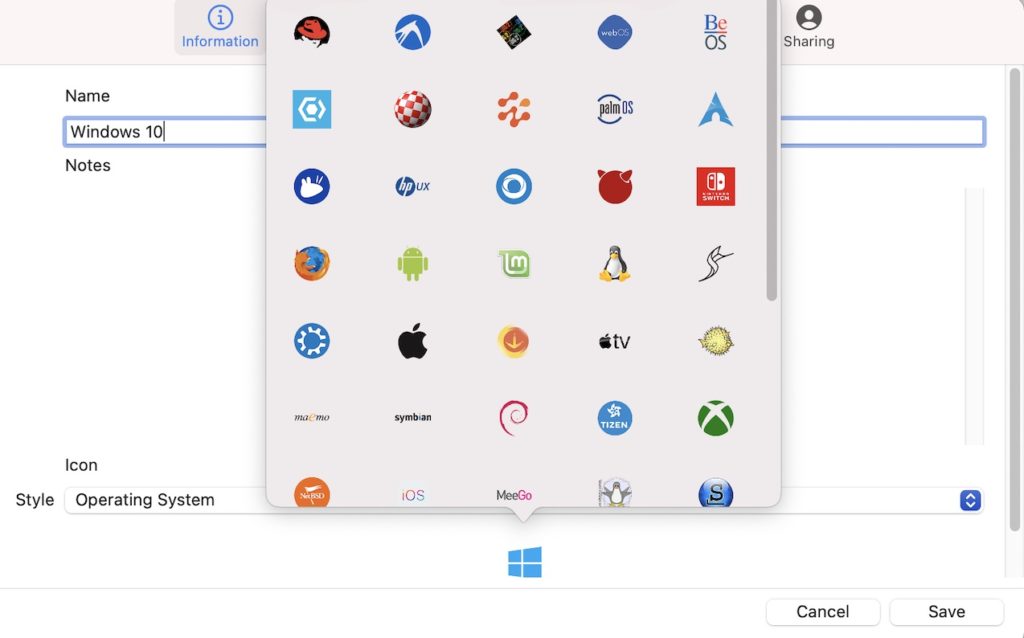
Enter a name for the VM. You can optionally choose an icon by selecting Operating System in the bottom drop down menu. This makes an icon appear below it. If its not the right icon, click it (which brings up a menu of other icons), and select the Windows icon:
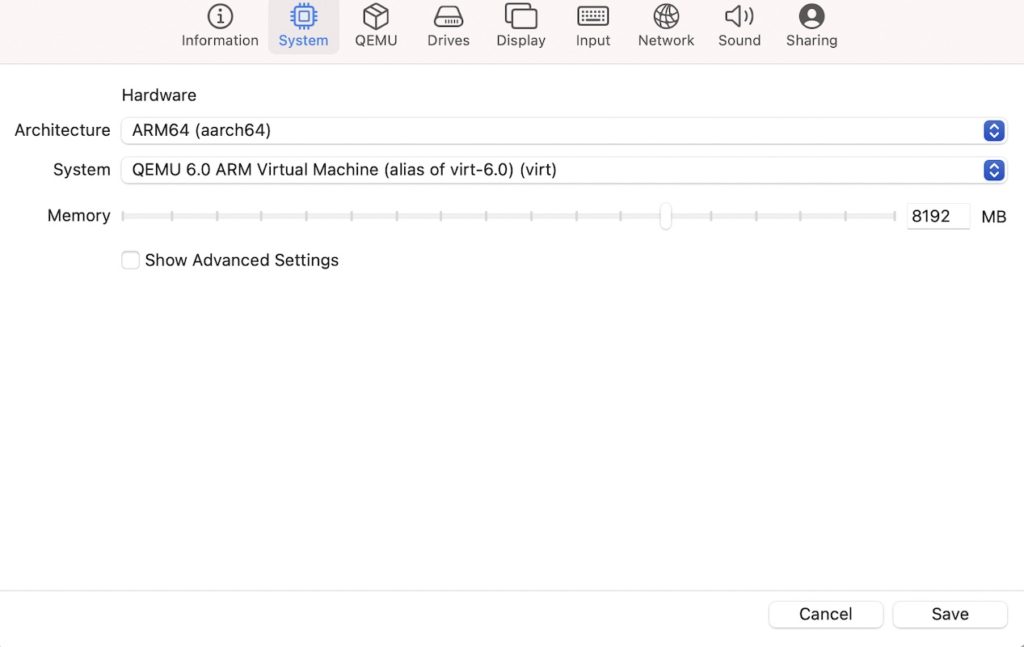
Now click the System button in the top menu and select ARM64 (aarch64) architecture. Also specify the amount of memory. At least half of your computer’s total memory is recommended for performance:
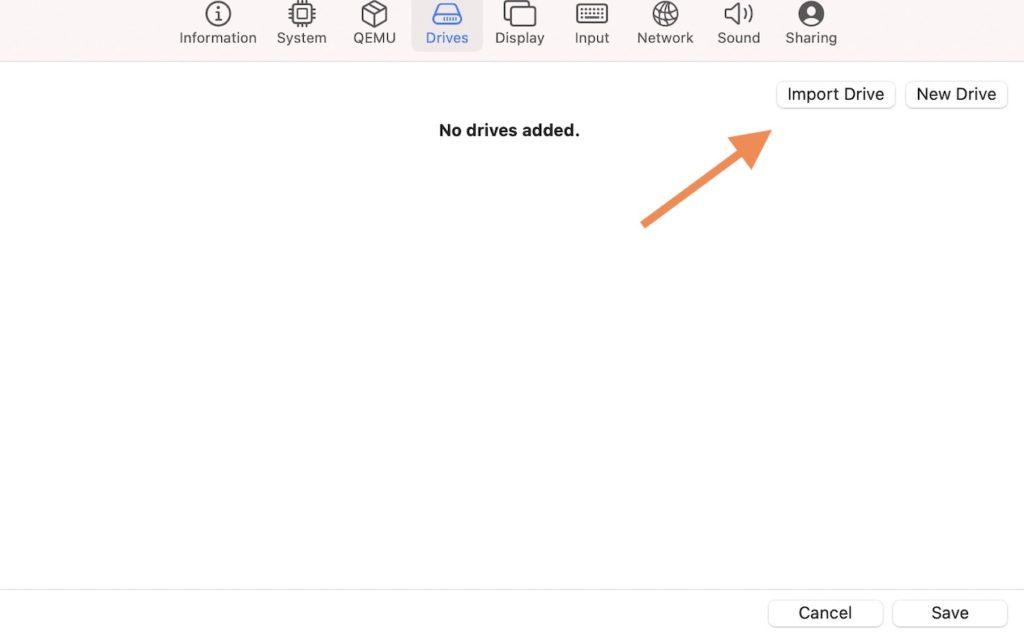
Click Drives from the top and then click Import Drive:
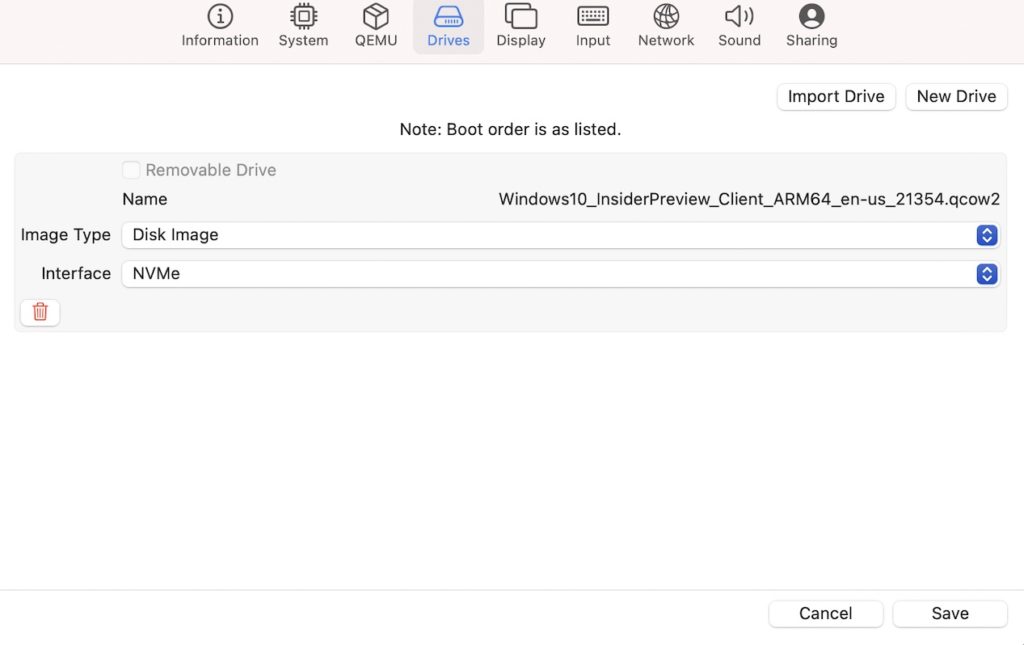
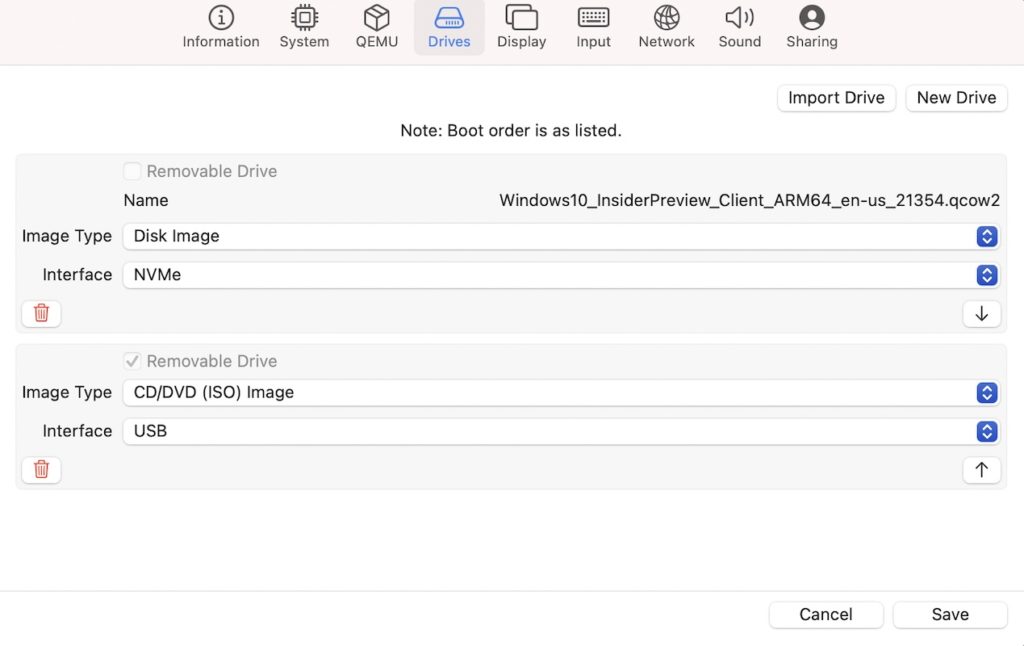
Browse to, and select the Windows 10 QCOW2 that you converted from the VHDX file previously. Once selected, set the interface to NVMe:
Now click New Drive and check Removable and click Create to add a CD drive:
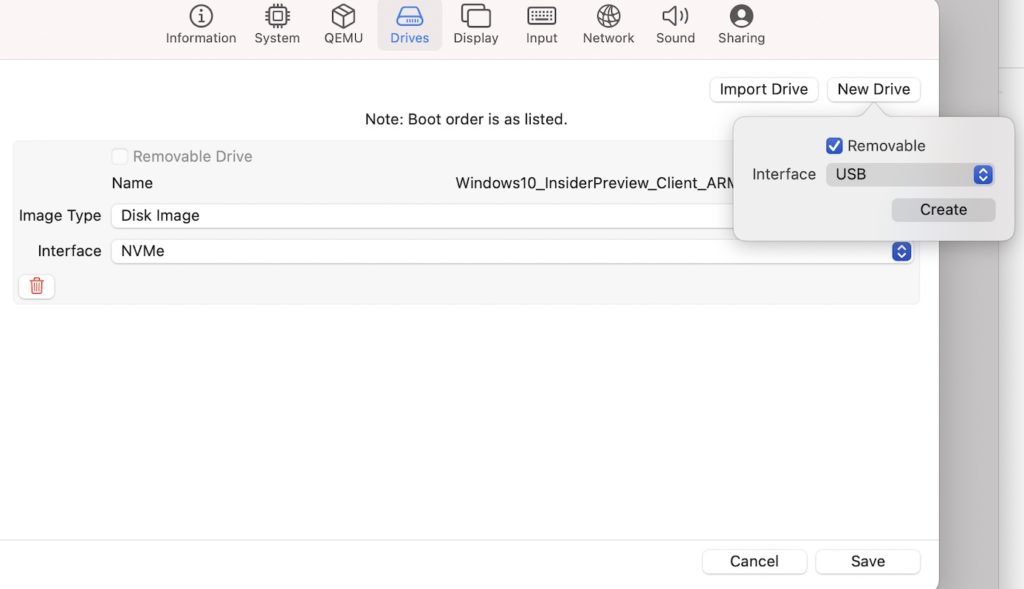
It should now look like the following screenshot. Click Save:
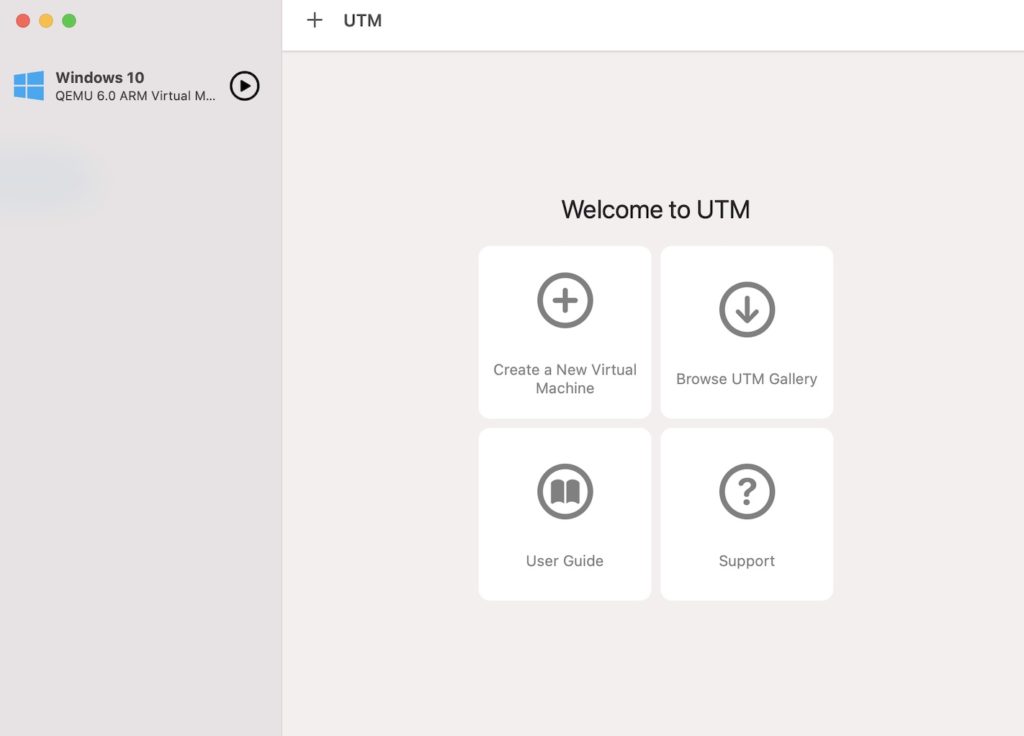
The VM now appears in the sidebar:
Click on the Windows 10 option in the left menu, and then select Browse (at the bottom of the right pane):
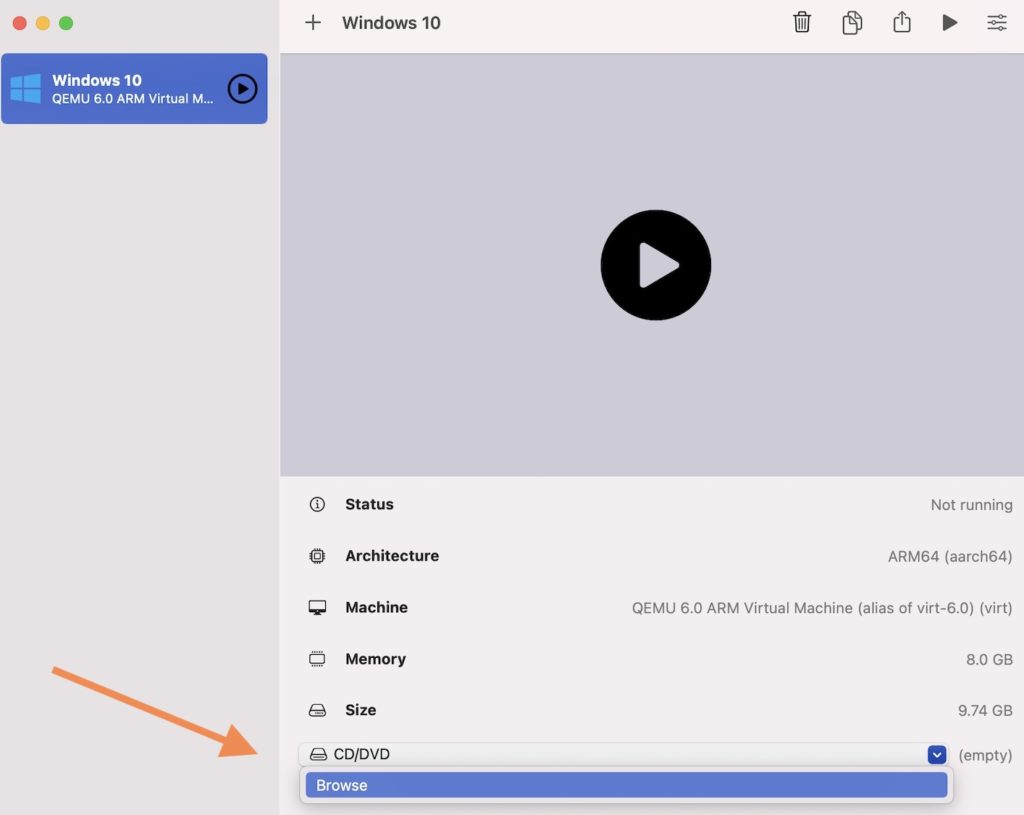
Browse to the SPICE guest tools ISO and click Open:
The name of the file now appears at the bottom of the screen, to the right of the dropdown.
The virtual machine is ready to use. If you need to change/check any of the settings, you can right click on the machine and select Edit.
We’re now all set to install Windows.
Click the big “Play” button in the middle of the screen to start the installation:
This launches a new window that boots up the Windows installation wizard:

Follow the prompts to install Windows.
If you get a “no bootable device” error, check that you selected ARM64 (aarch64) architecture on your virtual machine. From the UTM main screen, right click on the the virtual machine in the left and select Edit and select the System tab.
If your cursor suddenly seems to disappear, click the mouse capture button in the toolbar to send mouse input directly. Press Control+Option together to exit mouse capture mode.

When asked to connect to the internet, select I don’t have internet. This is because we won’t have internet until we install the SPICE guest tools (next).
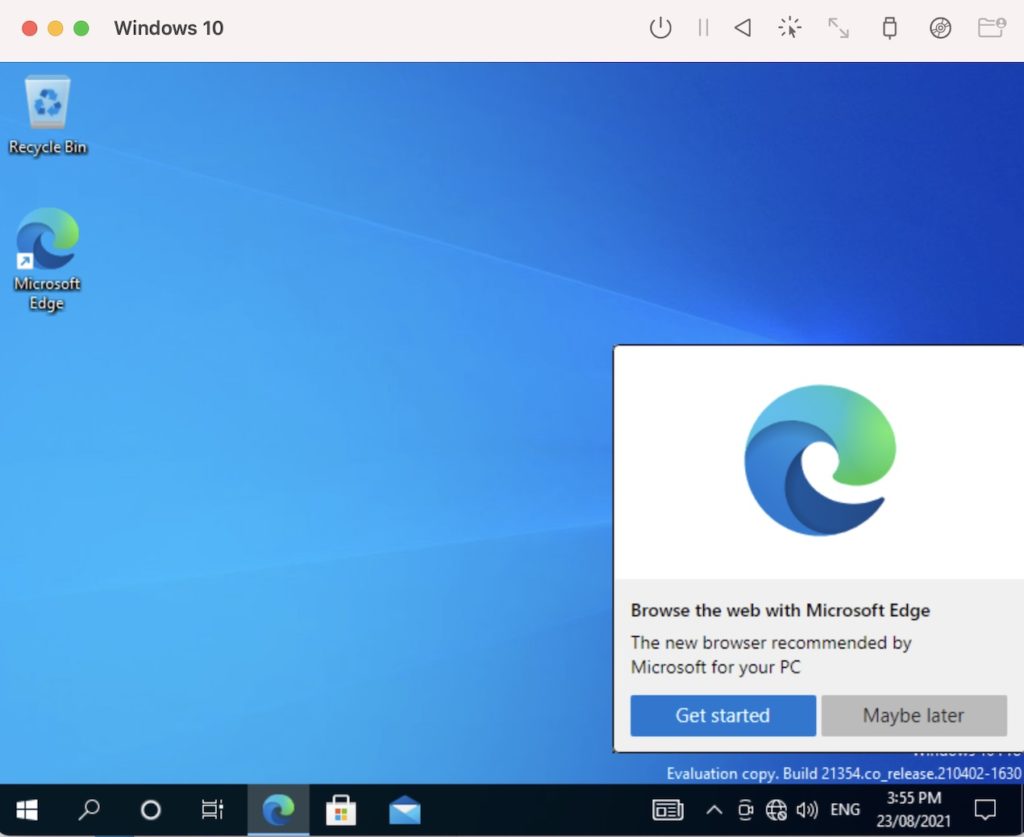
Once the installation is complete, the Windows desktop appears:
Install SPICE Guest Tools
There’s one more thing we need to do – install the SPICE guest tools.
From within our freshly installed Windows machine (i.e. in the guest machine), open the File Explorer and select the D drive. From there, double click the SPICE guest tools executable file (in my case, this is called spice-guest-tools-0.164.exe):
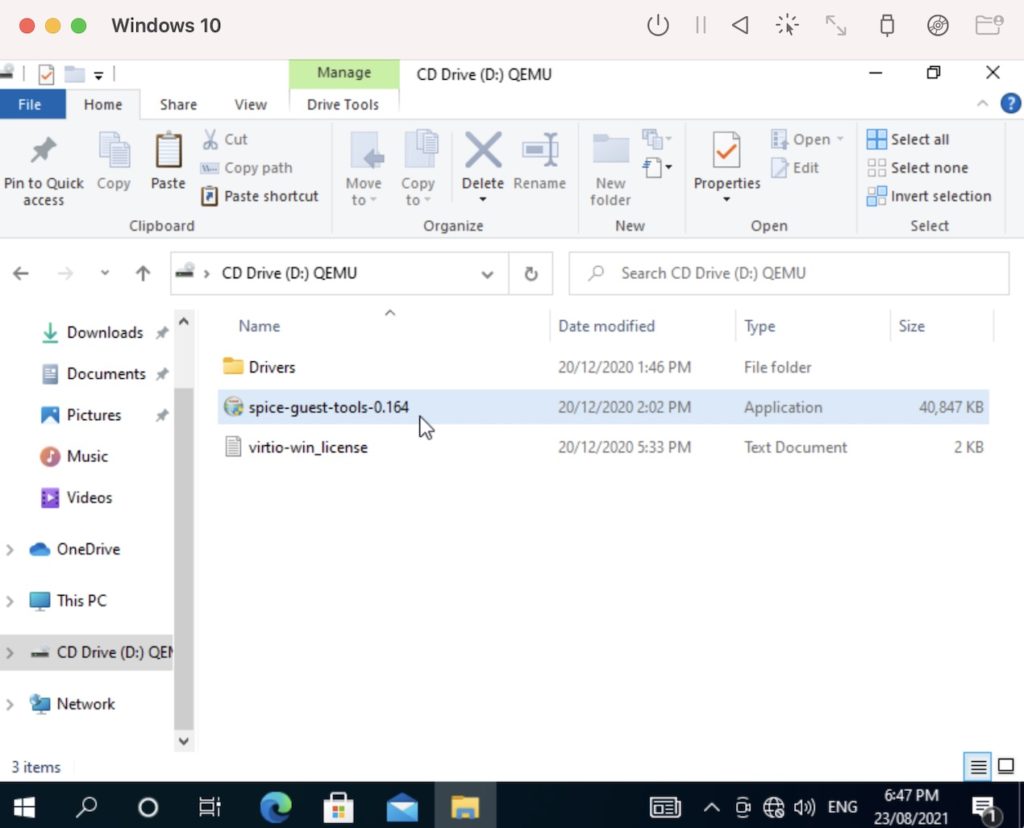
This launches the installation wizard. Follow the prompts to install the SPICE guest tools. This installs various drivers, including one that enables an internet connection.
Windows 10 is now installed on our M1 Mac and ready to use.
Here is easy steps to try Windows 10 on ARM or Ubuntu for ARM64
on your Apple Silicon Mac. Enjoy!
NOTE: that this is current, 10/1/2021 state.
Running Windows 10 on ARM
-
Install Xcode from App Store or install Command Line Tools on your Mac
running on Apple Silicon.xcode-select --install -
Install ARM64 Homebrew and QEMU dependencies.
If you already installed x86_64 Homebrew in
/usr/local,
please uninstall it.
It’s not possible to build QEMU with x86_64 Homebrew/bin/bash -c "$(curl -fsSL https://raw.githubusercontent.com/Homebrew/install/HEAD/install.sh)" brew install ninja pkgconfig glib pixman -
Clone the latest QEMU source code
The latest
masterat 10/1/2021 has Apple Silicon support.git clone --depth 1 https://git.qemu.org/git/qemu.git -
Build QEMU.
In
qemudirectory, run following commands.mkdir build cd build ../configure --target-list=aarch64-softmmu --enable-cocoa make -jIt creates
qemu-img,qemu-system-aarch64etc, which we use later. -
Download pre-build EDK II OVMF EFI image for QEMU.
This EFI image is built from
stable202011tag with additional resolutions
inQemuRamfb.c.https://gist.github.com/niw/4f1f9bb572f40d406866f23b3127919b/raw/f546faea68f4149c06cca88fa67ace07a3758268/QEMU_EFI-cb438b9-edk2-stable202011-with-extra-resolutions.tar.gz
To build it from the source code for adding more resolutions,
see the following section. -
Prepare pflash for non-volatile variable store, such as screen resolution.
Create a working directory and run following command.
tar xzvf QEMU_EFI-*.tar.gz dd if=/dev/zero of=pflash0.img bs=1m count=64 dd if=/dev/zero of=pflash1.img bs=1m count=64 dd if=QEMU_EFI.fd of=pflash0.img conv=notrunc dd if=QEMU_VARS.fd of=pflash1.img conv=notrunc- Please use each path to where you download it.
- This step is optional, you can use
-bios QEMU_EFI.fd
instead of-drive ...if=pflashlines in the next step,
but in that case, any changes in EFI will not be persistent.
-
Download Windows 10 on ARM Insider Preview
https://www.microsoft.com/en-us/software-download/windowsinsiderpreviewARM64
-
Convert VHDX downloaded Windows image to raw format
It seems that VHDX often gets broken while it is being used,
so probably it is better to convert it to raw format before using it.
Using raw format makes the disk image file a sparse file on APFS disk.
See «Compact raw disk image» section below for the details.qemu-img convert -p -O raw Windows10_InsiderPreview_Client_ARM64_en-us_21354.VHDX Windows10.raw- Please use each path to where you download it.
-
Run Windows 10
qemu-system-aarch64 \ -monitor stdio \ -M virt,highmem=off,virtualization=on \ -accel hvf \ -cpu host \ -smp 4 \ -m 4096 \ -drive file=pflash0.img,format=raw,if=pflash,readonly=on \ -drive file=pflash1.img,format=raw,if=pflash \ -device ramfb \ -device qemu-xhci \ -device usb-kbd \ -device usb-tablet \ -device intel-hda \ -device hda-duplex \ -nic user,model=virtio \ -drive file=Windows10.raw,format=raw,if=none,id=boot \ -device nvme,drive=boot,serial=boot- Please modify each path to the image depends on your environment.
- Hit
ESCwhile you see TianoCore, thenDevice Manager,
OVMF Platform Configuration,Change Preferred Resolution for Next Boot
to change screen resolution. - To add more resolutions, follow «Build EDK II OVMF EFI image from
the source code» below and modifyOvmfPkg/QemuRamfbDxe/QemuRamfb.c
then build newQEMU_EFI.fd. - Use
-device usb-tabletinstead of-device usb-mouseallows
transparently moving mouse cursor. -device intel-hda -device hda-duplexto enable audio.-nic user,model=virtiois the network interface.
To enable it, see the following section.
Enable the internet
VirtIO NIC is not enabled by default. To make it works,
you need to install a device driver.
-
Download VirtIO device drivers ISO from Fedora Project.
https://fedorapeople.org/groups/virt/virtio-win/direct-downloads/archive-virtio/virtio-win-0.1.190-1/virtio-win-0.1.190.iso
-
Mount device drivers ISO
Add next options to
qemu-system-aarch64.-drive file=virtio-win-0.1.190.iso,media=cdrom,if=none,id=drivers \ -device usb-storage,drive=driversPlease modify each path to the image depends on your environment.
-
Disable device driver signature enforcement
Boot Windows, then right click Windows Start button,
then select Command Prompt (Admin).Use bcdedit to enable test-signed device drivers.
bcdedit.exe -set TESTSIGNING ONThen reboot Windows.
See here for the details.
-
Install driver
Once Windows booted again, then right click Windows Start button,
then select Device Manager.In Device Manager, select View menu then Devices by Connection.
Navigate in the device tree, select
ACPU ARM64-based PC,
Microsoft ACPI-Compliant System,PCI Express Root Complex,
then you will see oneUnknown devicethere.
(There are manyUnknown devicein tree but the one under
PCI Express Root Complexis the VirtIO NIC.)Right click
Unknown devicethen select Update Drivers,
then Browse my computer for drivers, then selectD:\NetKVM\w10\ARM64.Click Next to install
Red Hat VertIO Ethernet Adapter.
Compact raw disk image
If you use ls or similar tool, you will notice that Windows10.raw is using
large like 64GB disk space, however, it is not actually using that space.
By using Finder, you will see in info panel of that file, that shows the actual
disk usage is much lower than that, like 10GB. Or, you can see actual size on
disk by using the following command.
$ du -h Windows10.raw
 10G	Windows10.raw
This is because APFS is using a sparse file format automatically and doesn’t
actually allocate the space until it is used.
However, even though, the actual size on disk can be getting bigger as using
Windows, especially after Windows Update, even if you delete files.
If the disk image is too big, you may want to compact it to release free space
by using Defragment and Optimize Drives coming with Windows 10 and optimize C:
drive, then use my HolePunch tool
to reduce the actual disk usage.
$ git clone https://github.com/niw/HolePunch.git
$ ce HolePunch
$ swift build -c release
$ .build/release/holepunch --show-progress /path/to/Windows10.raw
Running Ubuntu Server for ARM64
Follow the same steps for Windows 10 to prepare QEMU,
then download Ubuntu Server for ARM64 and install it.
-
Follow previous steps from 1. to 6. to prepare QEMU.
-
Create an empty disk image.
qemu-img create -f raw ubuntu.raw 40G -
Download Ubuntu Server for ARM64
https://ubuntu.com/download/server/arm
-
Install Ubuntu Server for ARM
qemu-system-aarch64 \ -monitor stdio \ -M virt,highmem=off,virtualization=on \ -accel hvf \ -cpu host \ -smp 4 \ -m 4096 \ -drive file=pflash0.img,format=raw,if=pflash,readonly=on \ -drive file=pflash1.img,format=raw,if=pflash \ -device virtio-gpu-pci \ -display default,show-cursor=on \ -device qemu-xhci \ -device usb-kbd \ -device usb-tablet \ -device intel-hda \ -device hda-duplex \ -drive file=ubuntu.raw,format=raw,if=virtio,cache=writethrough \ -cdrom ubuntu-20.04.1-live-server-arm64.iso- Follow instruction to install Ubuntu Server. Once it’s installed,
-cdrom
argument is not needed.
- Follow instruction to install Ubuntu Server. Once it’s installed,
Build EDK II OVMF EFI image from the source code
Follow the previous instructions to run Ubuntu Server for ARM64.
-
Checkout EDK II source code.
git clone --depth 1 --branch edk2-stable202011 https://github.com/tianocore/edk2.git
cd edk2
git submodule update --init --recursive
You may want to disable xHCI due to current Hypervisor.framework
patch limitation.
Comment outMdeModulePkg/Bus/Pci/XhciDxe/XhciDxe.infin
/ArmVirtPkg/ArmVirtQemu.dscand/ArmVirtPkg/ArmVirtQemuFvMain.fdf.inc.
Probably this is no longer needed. -
Build it.
sudo apt install iasl python3 python3-distutils uuid-dev make g++
source edksetup.sh
make -C BaseTools
build -a AARCH64 -t GCC5 -p ArmVirtPkg/ArmVirtQemu.dsc
Then, you will get
QEMU_EFI.fdandQEMU_VARS.fdin
Build/ArmVirtQemu-AARCH64/DEBUG_GCC5/FV.-
The easiest way to take these files to the host macOS,
run Remote Login on macOS thenscpthese to10.0.2.2. -
To build these on x86_64 environment, use following toolchain
to cross compile.sudo apt install gcc-aarch64-linux-gnu env GCC5_AARCH64_PREFIX=aarch64-linux-gnu- build -a AARCH64 -t GCC5 -p ArmVirtPkg/ArmVirtQemu.dsc
-
ARM 版 Windows 10 や Ubuntu for ARM64 を Apple Silicon な Mac で動かす
ARM 版 Windows 10 や Ubuntu を Apple Silicon な Mac で動かす簡単な方法です。
メモ: 2021年10月1日現時点での方法で、今後まだ改善されていくと思います。
ARM 版 Windows 10 を動かす
-
Xcode を App Store で、あるいは Command Line Tools を Apple Silicon な Mac
にインストールxcode-select --install -
ARM64 対応の Homebrew で QEMU の依存ライブラリをインストール
すでに x86_64 の Homebrew が
/usr/localにインストールされている場合は
削除するなどしてください。
x86_64 の Homebrew では QEMU がビルドできません/bin/bash -c "$(curl -fsSL https://raw.githubusercontent.com/Homebrew/install/HEAD/install.sh)" brew install ninja pkgconfig glib pixman -
最新の QEMU のソースを取得
2021年10月1日現時点での最新の
masterは Apple Silicon の対応がなされています。git clone --depth 1 https://git.qemu.org/git/qemu.git -
QEMU をビルドする
qemuディレクトリで以下を実行。mkdir build cd build ../configure --target-list=aarch64-softmmu --enable-cocoa make -jqemu-img,qemu-system-aarch64などが作成されますので、これらを使用します。 -
QEMU 用の EDK II OVMF EFI イメージをダウンロードする
このイメージは
stable202011タグに、QemuRamfb.cに追加の解像度を足したものです。https://gist.github.com/niw/4f1f9bb572f40d406866f23b3127919b/raw/f546faea68f4149c06cca88fa67ace07a3758268/QEMU_EFI-cb438b9-edk2-stable202011-with-extra-resolutions.tar.gz
さらに解像度を追加するなど、ソースコードからビルドする場合は以下を参照のこと。
-
pflash イメージを作って、画面サイズなどを設定する不揮発なストレージを準備する
作業用のディレクトを作成して、以下を実行。
tar xzvf QEMU_EFI-*.tar.gz dd if=/dev/zero of=pflash0.img bs=1m count=64 dd if=/dev/zero of=pflash1.img bs=1m count=64 dd if=QEMU_EFI.fd of=pflash0.img conv=notrunc dd if=QEMU_VARS.fd of=pflash1.img conv=notrunc- 各パスはダウンロードした場所などに適宜修正してください。
- このステップは省略可能。その場合は次のステップで
-drive ...,if=pflash,...
のかわりに-bios QEMU_EFI.fdを指定すること。
ただし、EFI での変更が保存されなくなります。
-
Windows 10 on ARM Insider Preview をダウンロードする
https://www.microsoft.com/en-us/software-download/windowsinsiderpreviewARM64
-
VHDX から raw に変換する
VHDX フォーマットのままだとかなりの頻度でイメージが壊れる印象があるので raw フォーマットに
変換しておく。
raw フォーマットを使うことで APFS ではスパースファイルとして扱うことができるので、
実際に使用するまで実際のファイルサイズを抑えることができる。
詳しくは以下の「raw フォーマットのディスクイメージを縮小する」を参照のこと。qemu-img convert -p -O raw Windows10_InsiderPreview_Client_ARM64_en-us_21354.VHDX Windows10.raw- 各パスはダウンロードした場所などに適宜修正してください。
-
Windows 10 を起動する
qemu-system-aarch64 \ -monitor stdio \ -M virt,highmem=off,virtualization=on \ -accel hvf \ -cpu host \ -smp 4 \ -m 4096 \ -drive file=pflash0.img,format=raw,if=pflash,readonly=on \ -drive file=pflash1.img,format=raw,if=pflash \ -device ramfb \ -device qemu-xhci \ -device usb-kbd \ -device usb-tablet \ -device intel-hda \ -device hda-duplex \ -nic user,model=virtio \ -drive file=Windows10.raw,format=raw,if=none,id=boot \ -device nvme,drive=boot,serial=boot- イメージへのパスなどは適宜修正してください。
- TianoCore のロゴが出ている時に
ESCを押して、Device Manager、
OVMF Platform Configuration、Change Preferred Resolution for Next Boot
と進めて解像度を変更できます。 - 解像度を追加するには、下記の「EDK II の OVMF EFI イメージをビルドする」に従って
OvmfPkg/QemuRamfbDxe/QemuRamfb.cを変更し、新しいQEMU_EFI.fd
を作ってください。 -device usb-mouseより-device usb-tabletを使うことでマウスカーソルがロック
されなくなり使いやすくなります。-device intel-hda -device hda-duplexでオーディオが使えるようになります。-nic user,model=virtioがネットワークインターフェイスです。有効にするには
以下を参照してください。
インターネットに接続する
VirtIO NIC は標準では有効にならないので、デバイスドライバを入れる必要がある。
-
VirtIO デバイスドライバの ISO を Fedora Project
からダウンロード。https://fedorapeople.org/groups/virt/virtio-win/direct-downloads/archive-virtio/virtio-win-0.1.190-1/virtio-win-0.1.190.iso
-
デバイスドライバの ISO をマウント
qemu-system-aarch64のオプションに以下を追加する。-drive file=virtio-win-0.1.190.iso,media=cdrom,if=none,id=drivers \ -device usb-storage,drive=driversイメージへのパスなどは適宜修正してください。
-
デバイスドライバの署名検証を無効にする
Windows を起動して Windows スタートボタン を右クリック、Command Prompt (Admin)
を選択。bcdedit を使ってテスト署名されたデバイスドライバを有効にする。
bcdedit.exe -set TESTSIGNING ONこのあと Windows を再起動すること。
詳細はこちらを参照のこと。
-
デバイスドライバのインストール
Windows が再度起動したら Windows スタートボタン を右クリック、Device Manager を選択。
Device Manager のウィンドウで、View メニューの Devices by Connection を選択。
デバイスのツリーから、
ACPU ARM64-based PC、Microsoft ACPI-Compliant System
PCI Express Root Complexと選択してその中にあるUnknown deviceを探す。
(Unknown deviceはデバイスのツリーに沢山あるけれど、PCI Express Root Complex
の下にあるのが、VirtIO NIC。)該当の
Unknown deviceを右クリックして、Update Drivers を選択、
Browse my computer for drivers を選んで、D:\NetKVM\w10\ARM64を指定。Next をクリックして
Red Hat VertIO Ethernet Adapterをインストール。
raw フォーマットのディスクイメージを縮小する
ls や似たようなツールを使うと、Windows10.raw ファイルが実際より多くの、
例えば64GBのディスクを使っているように表示されることがあります。
しかし、実際には利用している容量しか使っていません。
Finder を使うことで、ファイルの情報を見ると実際のディスクの使用量を表示できます。
もしくは、以下のコマンドでも同じことができます。
$ du -h Windows10.raw
10G Windows10.raw
これは APFS がスパースファイルを自動で使うためで、実際にファイルの領域が使われるまでディスクの
領域を割り当てないからです。
しかしながら、ファイルは Windows Update などをすると容量まで大きくなる可能性があり、
たとえファイルを削除してもディスクイメージのサイズは減らないことがあります。
そのため、ディスクサイズが大きくなりすぎた場合などは Windows 10 に付属の
Defragment and Optimize Drives で、C: ドライブを Optimize して使用していない領域を
開放したあと、以下の拙作のHolePunchツールを使って
Windows10.raw を縮小してください。
$ git clone https://github.com/niw/HolePunch.git
$ ce HolePunch
$ swift build -c release
$ .build/release/holepunch --show-progress /path/to/Windows10.raw
Ubuntu Server for ARM64 を動かす
ARM 版 Windows 10 を動かす手順に従って QEMU を準備して、Ubuntu Server for ARM64
をダウンロードしてインストールします。
-
上記の手順 1. から 6. までに従って QEMU を準備する。
-
空のディスクイメージを作成する。
qemu-img create -f raw ubuntu.raw 40G -
Ubuntu Server for ARM64 をダウンロードする。
https://ubuntu.com/download/server/arm
-
Ubuntu Server for ARM をインストールする。
qemu-system-aarch64 \ -monitor stdio \ -M virt,highmem=off,virtualization=on \ -accel hvf \ -cpu host \ -smp 4 \ -m 4096 \ -drive file=pflash0.img,format=raw,if=pflash,readonly=on \ -drive file=pflash1.img,format=raw,if=pflash \ -device virtio-gpu-pci \ -display default,show-cursor=on \ -device qemu-xhci \ -device usb-kbd \ -device usb-tablet \ -device intel-hda \ -device hda-duplex \ -drive file=ubuntu.raw,format=raw,if=virtio,cache=writethrough \ -cdrom ubuntu-20.04.1-live-server-arm64.iso- 指示に従ってインストールしたあとは
-cdromは不要です。
- 指示に従ってインストールしたあとは
EDK II の OVMF EFI イメージをビルドする
上記の手順に従って Ubuntu Server for ARM64 を動かします。
-
EDK II のソースコードを取ってくる
git clone --depth 1 --branch edk2-stable202011 https://github.com/tianocore/edk2.git cd edk2 git submodule update --init --recursiveHypervisor.framework パッチの制限で xHCI を無効にする必要があれば
/ArmVirtPkg/ArmVirtQemu.dscと/ArmVirtPkg/ArmVirtQemuFvMain.fdf.incにある
MdeModulePkg/Bus/Pci/XhciDxe/XhciDxe.infの行をコメントアウト。
たぶん現状は問題ない。 -
ビルドする
sudo apt install iasl python3 python3-distutils uuid-dev make g++ source edksetup.sh make -C BaseTools build -a AARCH64 -t GCC5 -p ArmVirtPkg/ArmVirtQemu.dscBuild/ArmVirtQemu-AARCH64/DEBUG_GCC5/FVにQEMU_EFI.fdとQEMU_VARS.fd
ができるはず。-
これらのファイルを簡単に macOS ホストに取り出すには macOS でリモートアクセスを
有効にしてscpで10.0.2.2にコピー。 -
x86_64 の環境でビルドする場合は以下のツールチェーンでクロスコンパイル。
sudo apt install gcc-aarch64-linux-gnu
env GCC5_AARCH64_PREFIX=aarch64-linux-gnu- build -a AARCH64 -t GCC5 -p ArmVirtPkg/ArmVirtQemu.dsc
-
-
Home
-
News
- How to Download Windows 10 ARM ISO for ARM Processors
How to Download Windows 10 ARM ISO for ARM Processors
By Vera | Follow |
Last Updated
Where to download Windows 10 ARM ISO? How to download Windows 10 ARM ISO? In this post, MiniTool will show you two ways to get Windows 10 ARM download ISO file for a PC with an ARM processor or Mac M1. Go to look through the guide now.
Necessity – Windows 10 ARM Download for a PC with ARM CPU
When installing Windows 10 on your PC, the common ISO files are for 32-bit and 64-bit processors. Thus, you can easily download a standard ISO file. However, things change since devices with ARM processors arrive. The ARM CPU is low-powered, which can offer longer battery life and great performance to devices.
If you want to install Windows 10 for the PC with an ARM CPU, you need to download Windows 10 ARM ISO. Besides, some of you may want to load Windows 10 on Parallel for a Mac with an M1 chip, the ARM version is necessary.
Well then, where to download Windows 10 ARM ISO or how to download Windows 10 ARM ISO? Find the ways from the following part.
Tips:
If you want to install WIndows 11 ARM, go to download the ISO file for the setup. Just follow the guide — How to Download and Install Windows 11 on Arm with ISO.
There is no official way to download Windows 10 ARM. When you check the Microsoft website, you find only Windows 11 is available. But don’t feel anxious, you can find some websites offer the download links. Just search for “Windows 10 ARM ISO” in Google and click the result to find one. Besides, according to some users on the forum from Microsoft, another way is recommended.
Windows 10 ARM ISO Download via UUP Dump
Step 1: In the page, type Windows 10 Insider Preview in the search box and press Enter.
Step 2: Then, you can see the results for architecture – x64, x86, and arm64. Select a build and click the link for arm64 to continue.
Step 3: Select a language and click Next.
Step 4: After choosing an edition, choose a download option and here we recommend checking the boxes of Download and convert to ISO and Include updates. Then, click the Create download package button to get a .zip file.

Step 5: Unzip this file and then open the uup_download_windows.cmd file. The required files will be downloaded by this script and an ISO file of Windows 10 ARM will be created.
After getting the Windows 10 ARM ISO file, now you can use Rufus to create a bootable USB drive to install the system on your PC with an ARM processor, use the ISO image to create a virtual machine or use it via Parallels on Mac M1.
Final Words
That’s all the information about Windows 10 ARM ISO download for a Mac M1, VMware or PC with ARM CPU. Just choose one way to get the ISO file. If you find any other useful ways, let us know via leaving a comment below. Thanks a lot.
About The Author
Position: Columnist
Vera is an editor of the MiniTool Team since 2016 who has more than 7 years’ writing experiences in the field of technical articles. Her articles mainly focus on disk & partition management, PC data recovery, video conversion, as well as PC backup & restore, helping users to solve some errors and issues when using their computers. In her spare times, she likes shopping, playing games and reading some articles.