
Одна из проблем, с которыми часто сталкиваются пользователи Windows 10 — уведомление о том, что стандартное приложение сброшено — «Приложение вызвало проблему с настройкой стандартного приложения для файлов, поэтому оно сброшено» с соответствующим сбросом приложения по умолчанию для определенных типов файлов на стандартные приложения ОС — Фотографии, Кино и ТВ, Музыка Groove и подобные. Иногда проблема проявляется при перезагрузке или после завершения работы, иногда — прямо во время работы системы.
В этой инструкции подробно о том, почему так происходит и как исправить проблему «Стандартное приложение сброшено» в Windows 10 несколькими способами.
Причины ошибки и сброса приложений по умолчанию
Чаще всего причиной ошибки является то, что какая-то из установленных вами программ (особенно старых версий, до выхода Windows 10) установила себя в качестве программы по умолчанию для типов файлов, которые открываются встроенными приложениями ОС, при этом сделала это «неправильно» с точки зрения новой системы (изменив соответствующие значения в реестре, как это делалось в предыдущих версиях ОС).
Однако, не всегда причина в этом, иногда это просто некий баг Windows 10, который, впрочем, можно исправить.
Как исправить «Стандартное приложение сброшено»
Существует несколько методов, позволяющих убрать уведомление о том, что стандартное приложение было сброшено (и оставить вашу программу по умолчанию).
Прежде чем приступать к использованию далее описанных способов убедитесь, что программа, которая сбрасывается, обновлена — иногда достаточно просто установить последнюю версию программы (с поддержкой Windows 10) вместо старой, чтобы проблема не проявлялась.
1. Задание приложений по умолчанию по приложению
Первый способ — вручную задать программу, ассоциации с которой сбрасываются в качестве программы, используемой по умолчанию. Причем сделать это следующим образом:
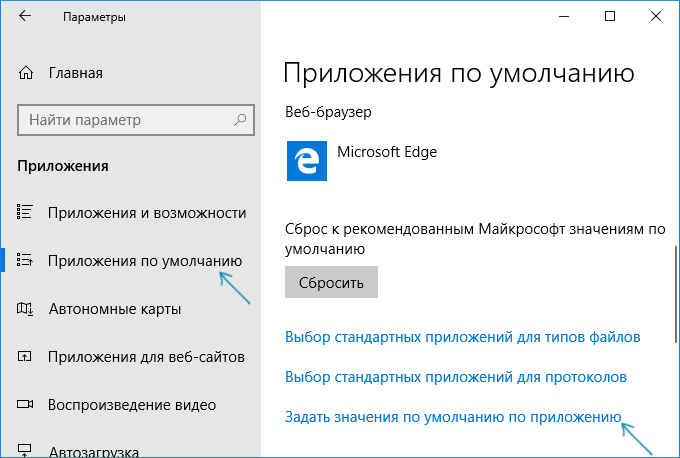
- Зайти в Параметры (клавиши Win+I) — Приложения — Приложения по умолчанию и внизу списка нажать по «Задать значения по умолчанию по приложению».

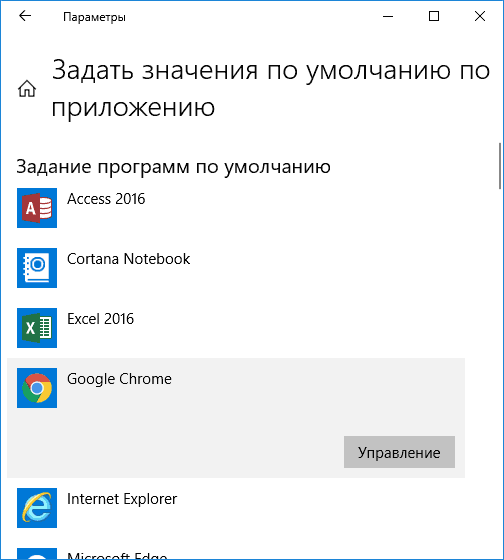
- В списке выбрать программу, для которой производится действие и нажать кнопку «Управление».

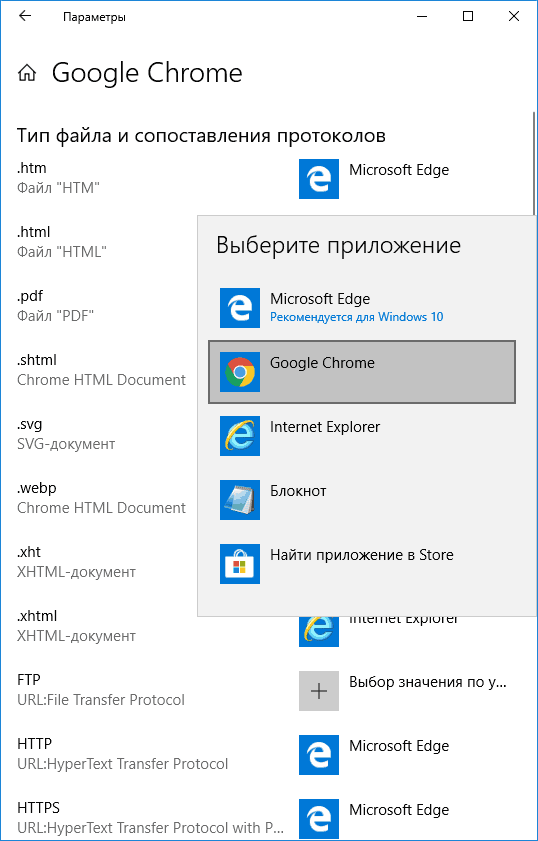
- Для всех нужных типов файлов и протоколов указать эту программу.

Обычно такой метод срабатывает. Дополнительная информация на тему: Программы по умолчанию Windows 10.
2. Использование REG-файла для исправления «Стандартное приложение сброшено» в Windows 10
Вы можете использовать следующий reg-файл (скопируйте код и вставьте в текстовый файл, задайте расширение reg для него) для того, чтобы программы по умолчанию не сбрасывались на встроенные приложения Windows 10. После запуска файла, задайте вручную нужные приложения по умолчанию и сброс больше происходить не будет.
Windows Registry Editor Version 5.00

; .3g2,.3gp, .3gp2, .3gpp, .asf, .avi, .m2t, .m2ts, .m4v, .mkv .mov, .mp4, mp4v, .mts, .tif, .tiff, .wmv
[HKEY_CURRENT_USER\SOFTWARE\Classes\AppXk0g4vb8gvt7b93tg50ybcy892pge6jmt]
"NoOpenWith"=""
"NoStaticDefaultVerb"=""

; .aac, .adt, .adts ,.amr, .flac, .m3u, .m4a, .m4r, .mp3, .mpa .wav, .wma, .wpl, .zpl
[HKEY_CURRENT_USER\SOFTWARE\Classes\AppXqj98qxeaynz6dv4459ayz6bnqxbyaqcs]
"NoOpenWith"=""
"NoStaticDefaultVerb"=""

;.htm, .html
[HKEY_CURRENT_USER\SOFTWARE\Classes\AppX4hxtad77fbk3jkkeerkrm0ze94wjf3s9]
"NoOpenWith"=""
"NoStaticDefaultVerb"=""

; .pdf
[HKEY_CURRENT_USER\SOFTWARE\Classes\AppXd4nrz8ff68srnhf9t5a8sbjyar1cr723]
"NoOpenWith"=""
"NoStaticDefaultVerb"=""

;.stl, .3mf, .obj, .wrl, .ply, .fbx, .3ds, .dae, .dxf, .bmp .jpg, .png, .tga
[HKEY_CURRENT_USER\SOFTWARE\Classes\AppXvhc4p7vz4b485xfp46hhk3fq3grkdgjg]
"NoOpenWith"=""
"NoStaticDefaultVerb"=""

; .svg
[HKEY_CURRENT_USER\SOFTWARE\Classes\AppXde74bfzw9j31bzhcvsrxsyjnhhbq66cs]
"NoOpenWith"=""
"NoStaticDefaultVerb"=""

; .xml
[HKEY_CURRENT_USER\SOFTWARE\Classes\AppXcc58vyzkbjbs4ky0mxrmxf8278rk9b3t]
"NoOpenWith"=""
"NoStaticDefaultVerb"=""

[HKEY_CURRENT_USER\SOFTWARE\Classes\AppX43hnxtbyyps62jhe9sqpdzxn1790zetc]
"NoOpenWith"=""
"NoStaticDefaultVerb"=""

; .raw, .rwl, .rw2
[HKEY_CURRENT_USER\SOFTWARE\Classes\AppX9rkaq77s0jzh1tyccadx9ghba15r6t3h]
"NoOpenWith"=""
"NoStaticDefaultVerb"=""

; .mp4,.3gp, .3gpp, .avi, .divx, .m2t, .m2ts, .m4v, .mkv, .mod etc.
[HKEY_CURRENT_USER\SOFTWARE\Classes\AppX6eg8h5sxqq90pv53845wmnbewywdqq5h]
"NoOpenWith"=""
"NoStaticDefaultVerb"=""
Учитывайте, что при этом приложения Фото, Кино и ТВ, Музыка Groove и другие встроенные приложения Windows 10 исчезнут из меню «Открыть с помощью».
Дополнительная информация
- В ранних версиях Windows 10 проблема иногда проявлялась при использовании локальной учетной записи и исчезала при включении учетной записи Майкрософт.
- В последних версиях системы, судя по официальной информации Майкрософт, проблема должна проявляться реже (но может возникнуть, как упоминалось в начале статьи, со старыми программами, изменяющими ассоциации файлов не в соответствии с правилами для новой ОС).
- Для опытных пользователей: вы можете экспортировать, изменить и импортировать ассоциации файлов в виде XML с помощью DISM (при этом они не будут сбрасываться, в отличие от тех, что вносятся в реестр). Подробнее (на английском) на сайте Майкрософт.
Если же проблема не исчезает, а приложения по умолчанию продолжают сбрасываться, попробуйте описать ситуацию подробно в комментариях, возможно, решение удастся найти.
I can’t open Thunderbird so tried re-downloading it. A message comes to close the current version. I tried to close it but it won’t download. I was going to uninstall it but was afraid I’d lose my address book and saved emails. I went on line but couldn’t find a fix for this when using Windows 10. The answers suggest that the answer is in a hidden folder but nowhere could I find how to get to the correct folder. PLEASE HELP !!
I can’t open Thunderbird so tried re-downloading it. A message comes to close the current version. I tried to close it but it won’t download. I was going to uninstall it but was afraid I’d lose my address book and saved emails. I went on line but couldn’t find a fix for this when using Windows 10. The answers suggest that the answer is in a hidden folder but nowhere could I find how to get to the correct folder. PLEASE HELP !!
Chosen solution
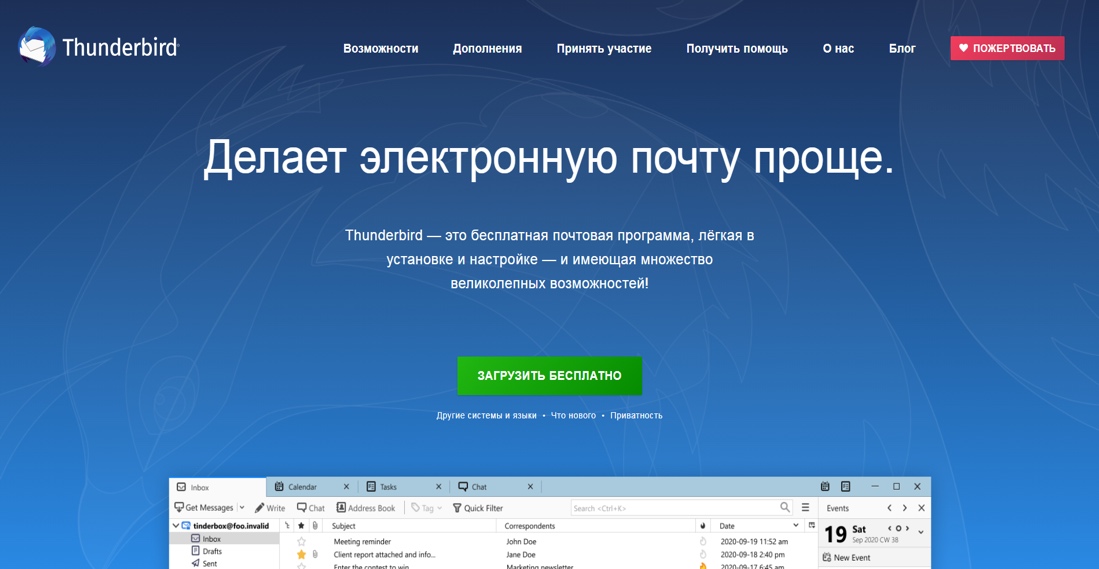
Mozilla Thunderbird (в переводе с англ. – «буревестник») – бесплатная и кроссплатформенная почтовая программа с открытым исходным кодом, разработанная сообществом Mozilla в далеком 2003 году. С тех пор данный почтовый клиент завоевал большую популярность и претерпел значительные изменения, но суть осталась та же: обмен личными сообщениями с друзьями и родственниками, деловая корреспонденция, интегрированный календарь и список задач, с помощью которых вы можете следить за событиями и организовать свой день.
Thunderbird обладает обширными возможностями кастомизации, которые должны удовлетворить даже самого привередливого пользователя.
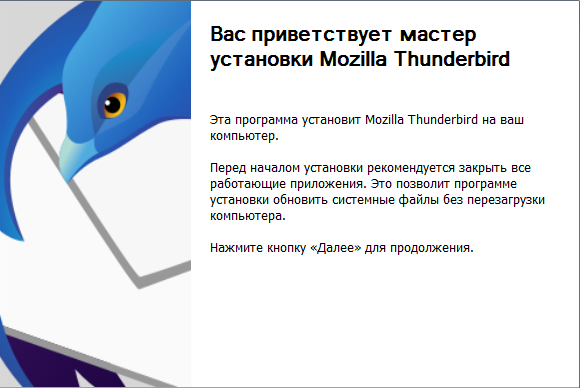
Установка Thunderbird
Первым делом нужно скачать и установить программу. Установщик лучше всего взять на официальном сайте проекта.
Сама установка – дело нехитрое. Укажите путь к установке в Program Files на системном диске. В установленном виде клиент будет занимать чуть больше 200 Мб, что не является сколько-нибудь значимым размером для современных жестких дисков или твердотельных накопителей.
Комьюнити теперь в Телеграм
Подпишитесь и будьте в курсе последних IT-новостей
Подписаться
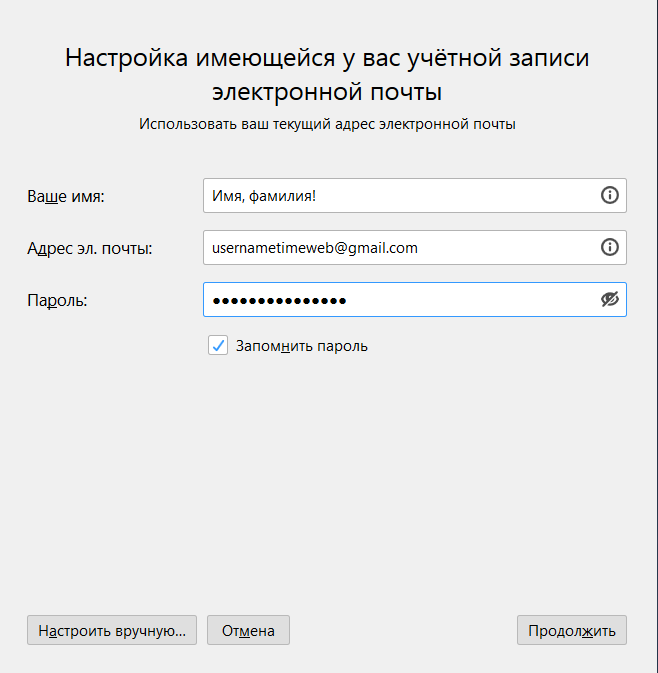
Настройка Mozilla Thunderbird
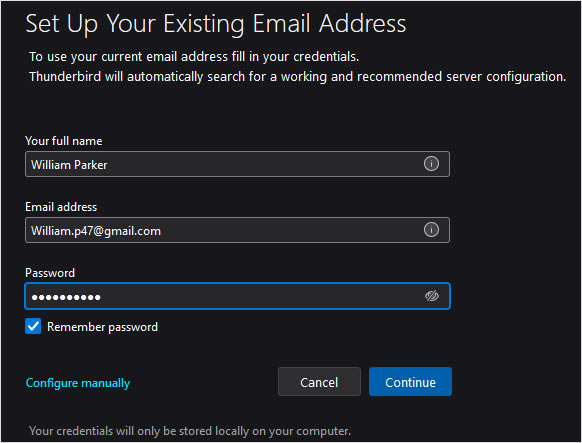
После установки и первого запуска программа автоматически покажет окно, в котором нужно указать данные для входа в электронную почту. Заполните все строки, затем нажмите на кнопку «Продолжить».
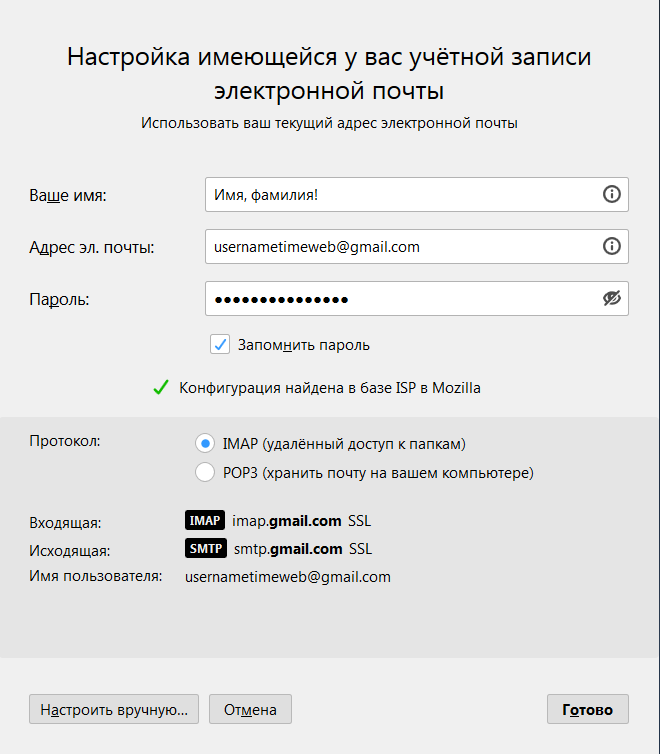
Теперь вы можете выбрать протокол доступа к электронной почте.
Если совсем кратко, то IMAP обеспечивает доступ с нескольких устройств одновременно, сообщения синхронизируются в реальном времени, а взаимодействие с почтой происходит непосредственно на сервере, тогда как POP3 дает доступ лишь с одного устройства, синхронизации сообщений не происходит, а данные скачиваются в почтовую программу. Так что рекомендую выбрать IMAP.
Более подробно о почтовых протоколах можно почитать в следующей статье.
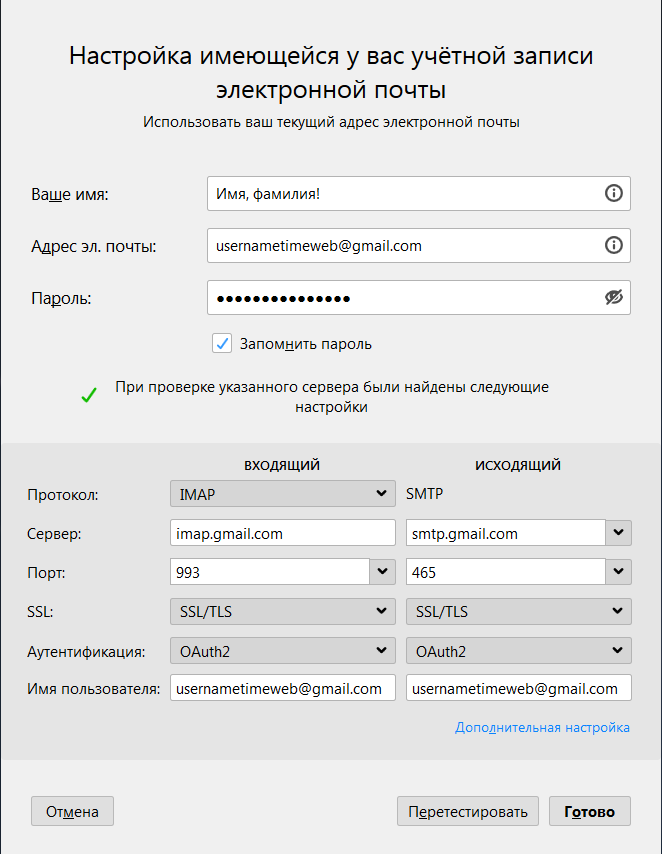
Если не доверяете автоматике, нажимайте «Настроить вручную».
Вам нужно ввести доменное имя сервера, имя пользователя и протокол шифрования. Зашифрованные по SSL/TLS-подключения имеют порты IMAP 993 и SMTP 465, незашифрованные – 143 и 587. Используйте кнопку «Перетестировать» для проверки и «Готово» для завершения настройки.
Дальше будет необходимо произвести вход в свой аккаунт…
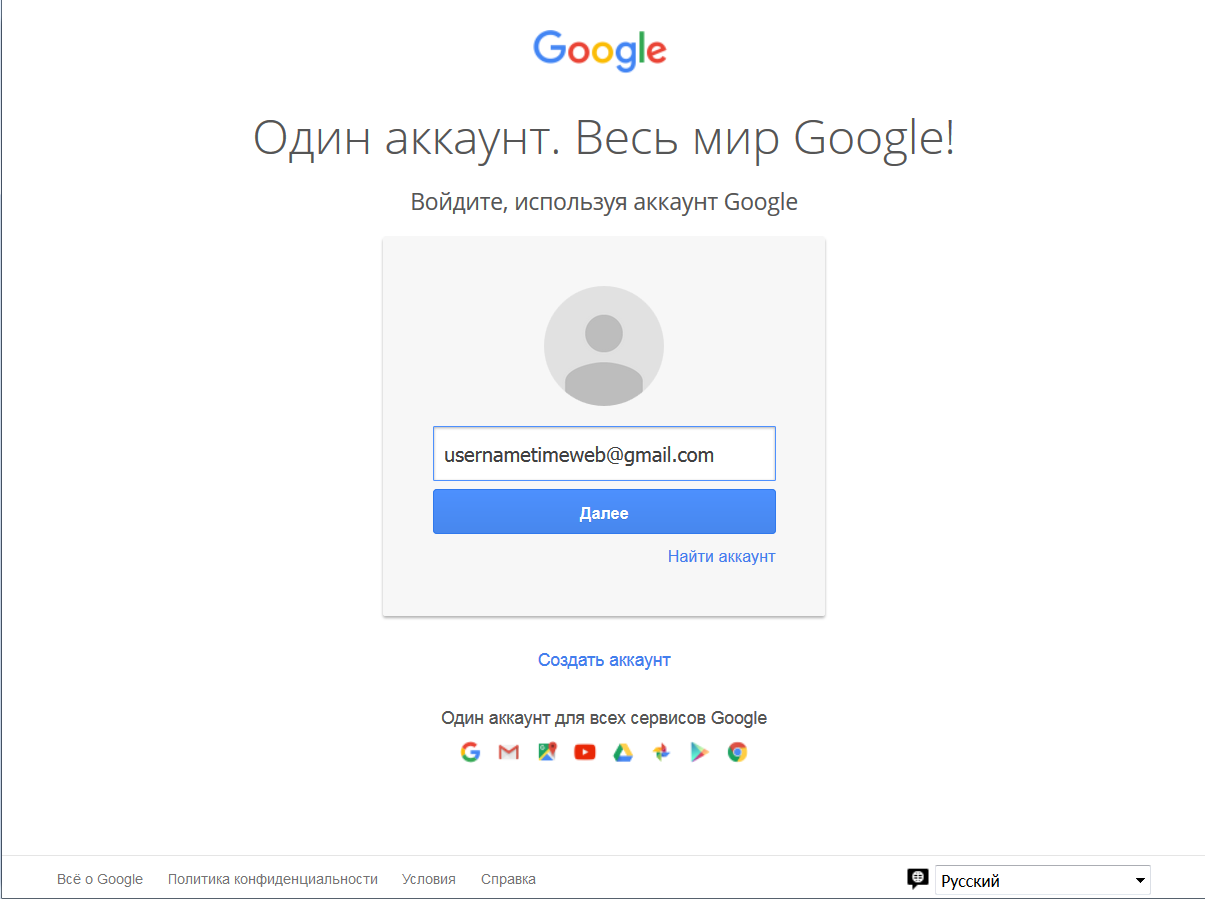
… и разрешить приложению доступ.
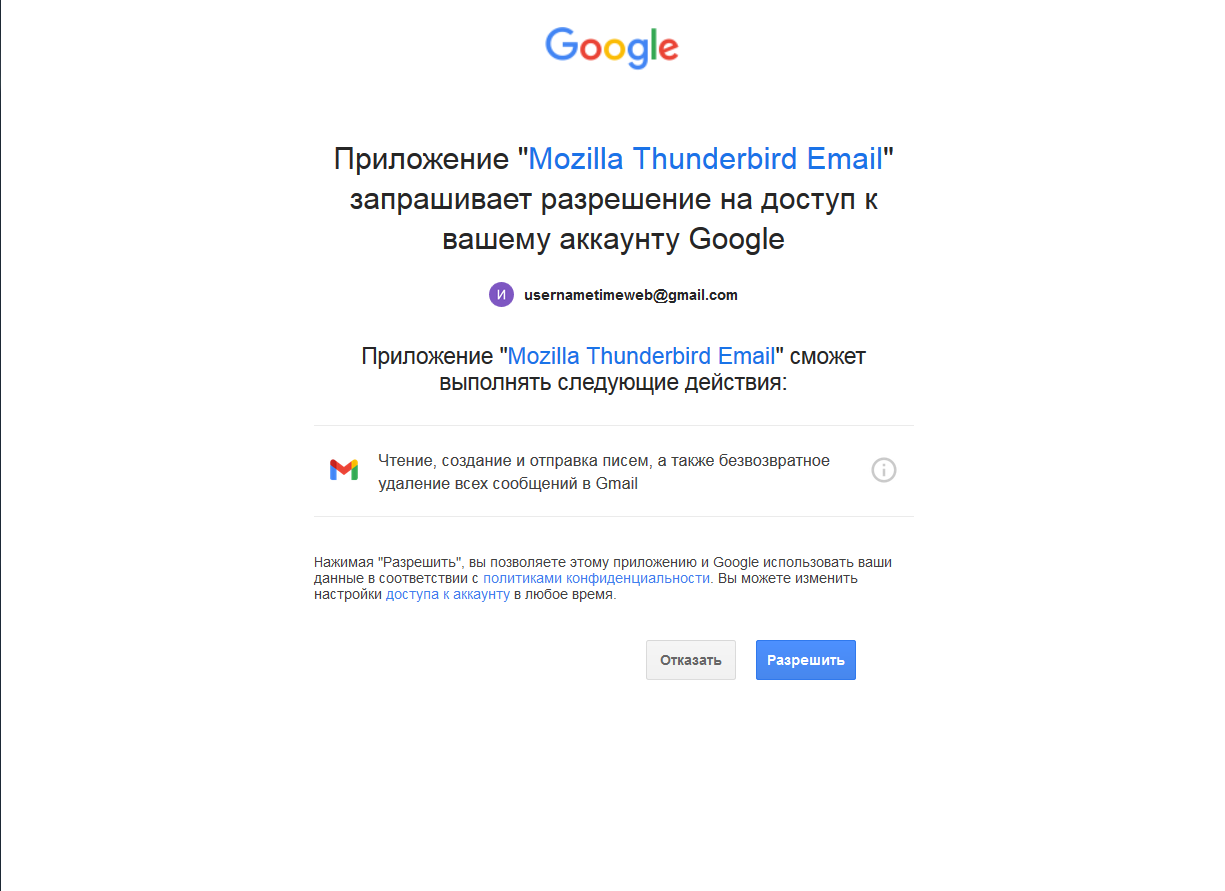
Если у вас подключена двухфакторная аутентификация, нужно будет пройти и ее.
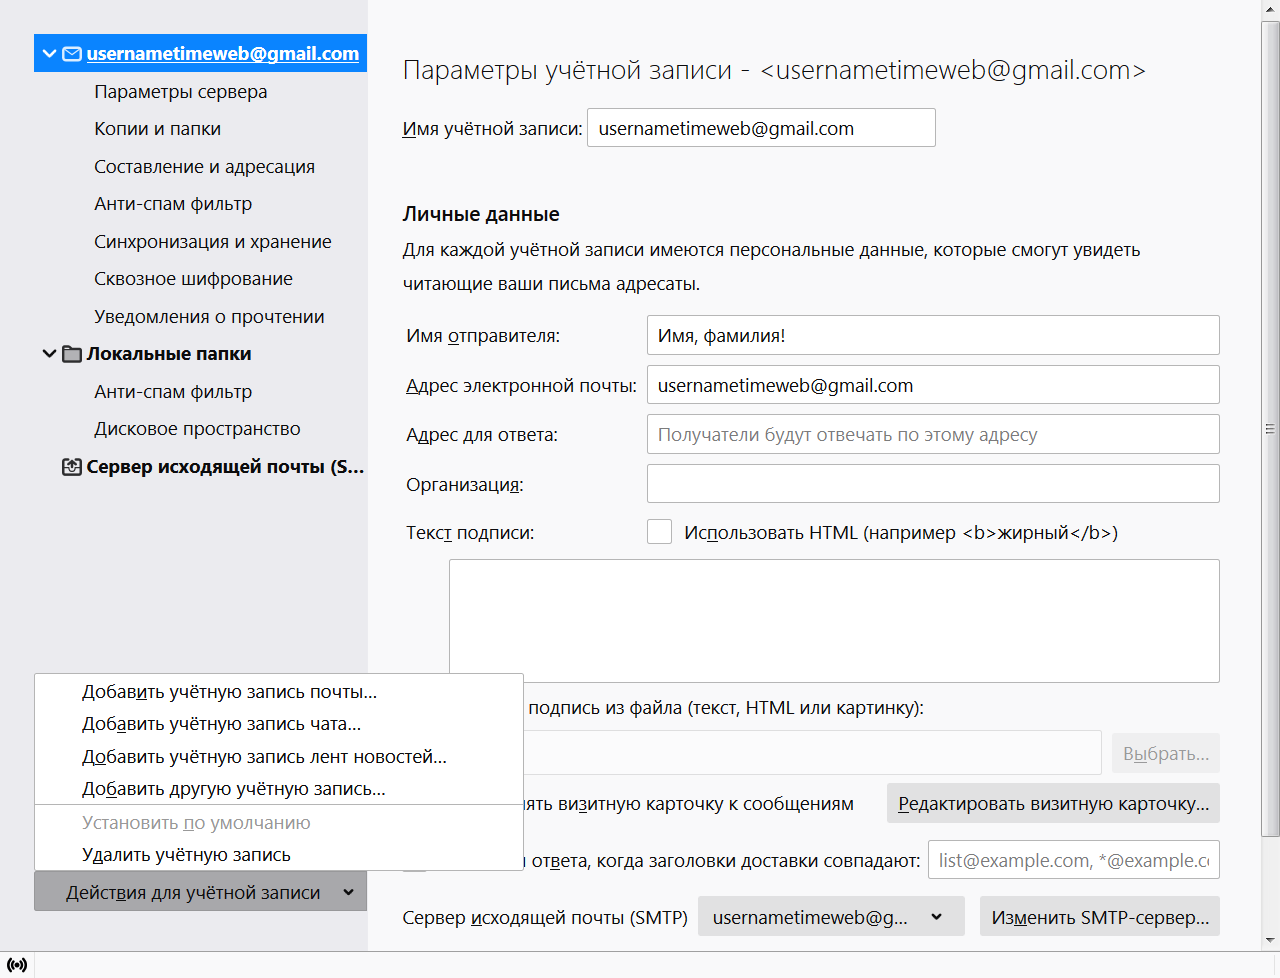
Если вы планируете пользоваться сразу несколькими почтовыми адресами, то пройдите в «Параметры учетной записи – Действия для учетной записи – Добавить учетную запись почты» и добавьте дополнительные адреса. В том же контекстном меню можно удалить уже существующие учетные записи.
Обзор интерфейса и возможностей почтового клиента
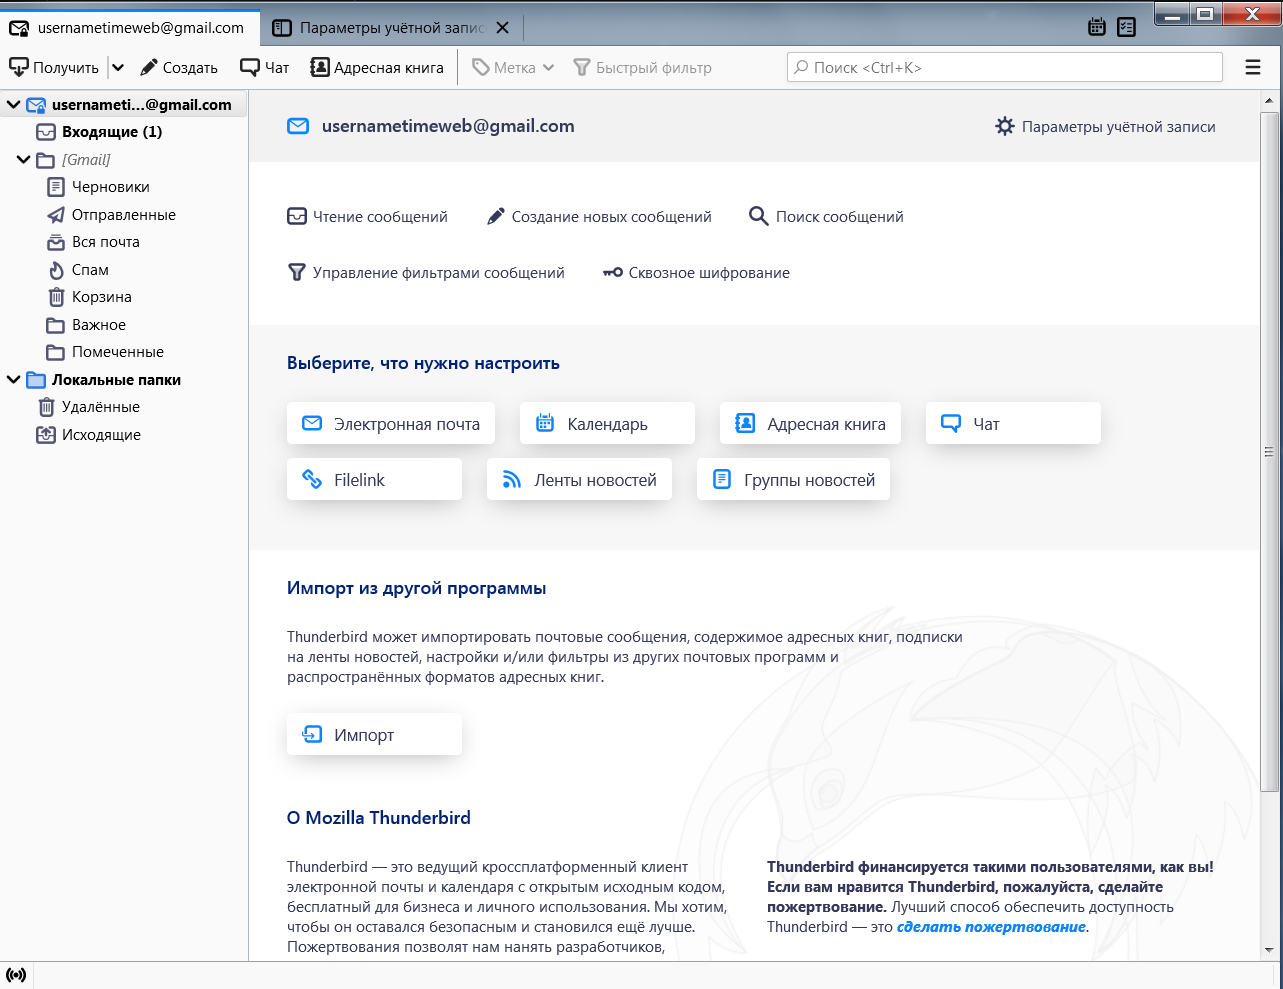
В Mozilla Thunderbird простой, интуитивно понятный интерфейс. Слева располагаются папки с письмами, вверху панель задач с часто используемыми функциями и контекстное меню настроек программы. Удобная панель навигации с основными возможностями Thunderbird находится в основном окне на главной странице.
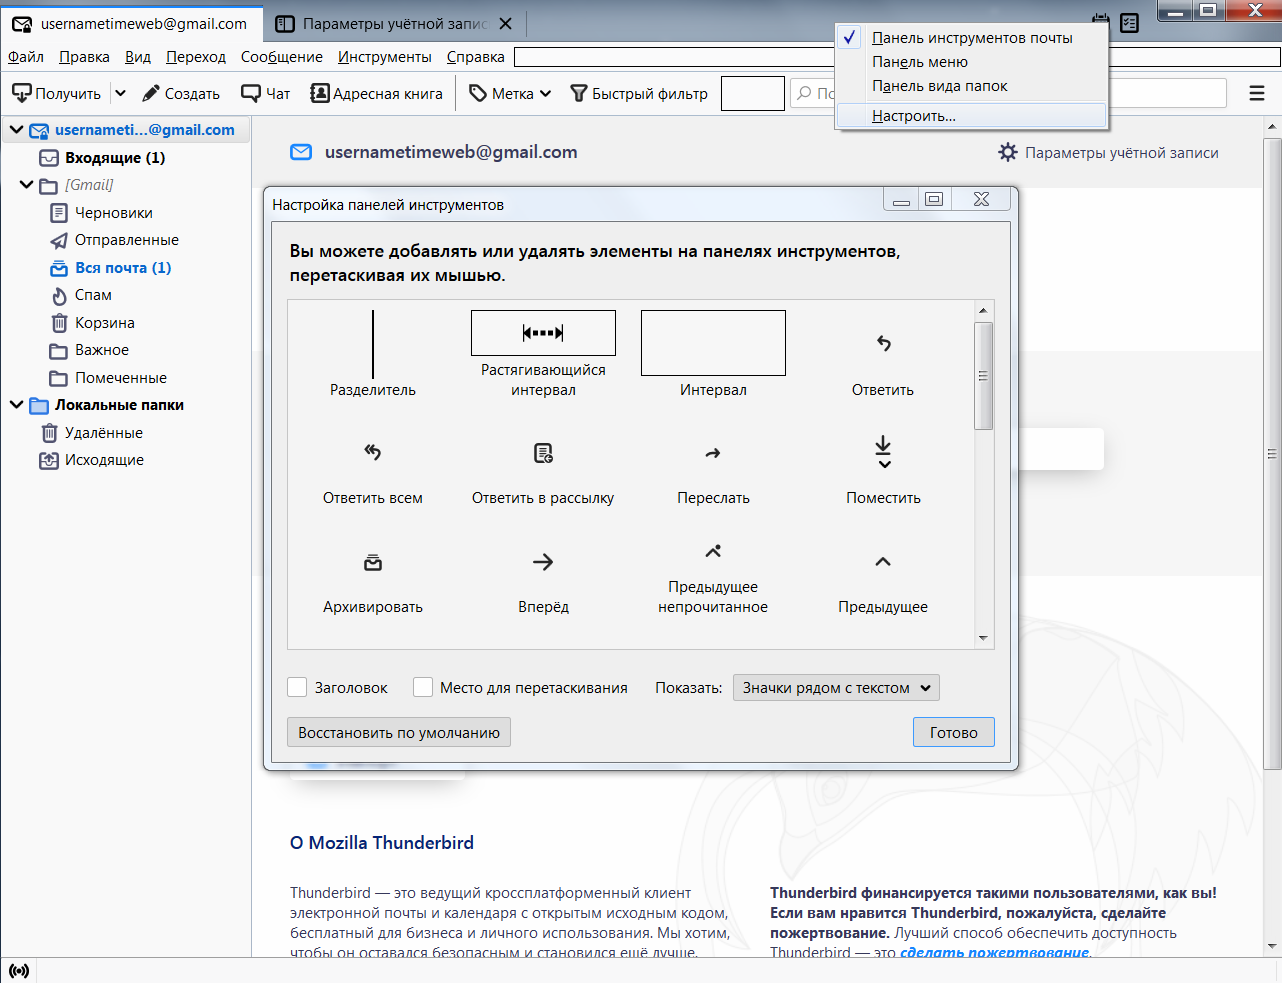
Вы можете закрепить на панели задач необходимые действия: для этого нужно нажать по ней правой кнопкой мыши и выбрать пункт «Настроить». Затем перетащите необходимое действие на панель задач. Точно так же, только в обратном порядке, действия можно убирать.
Создание сообщений
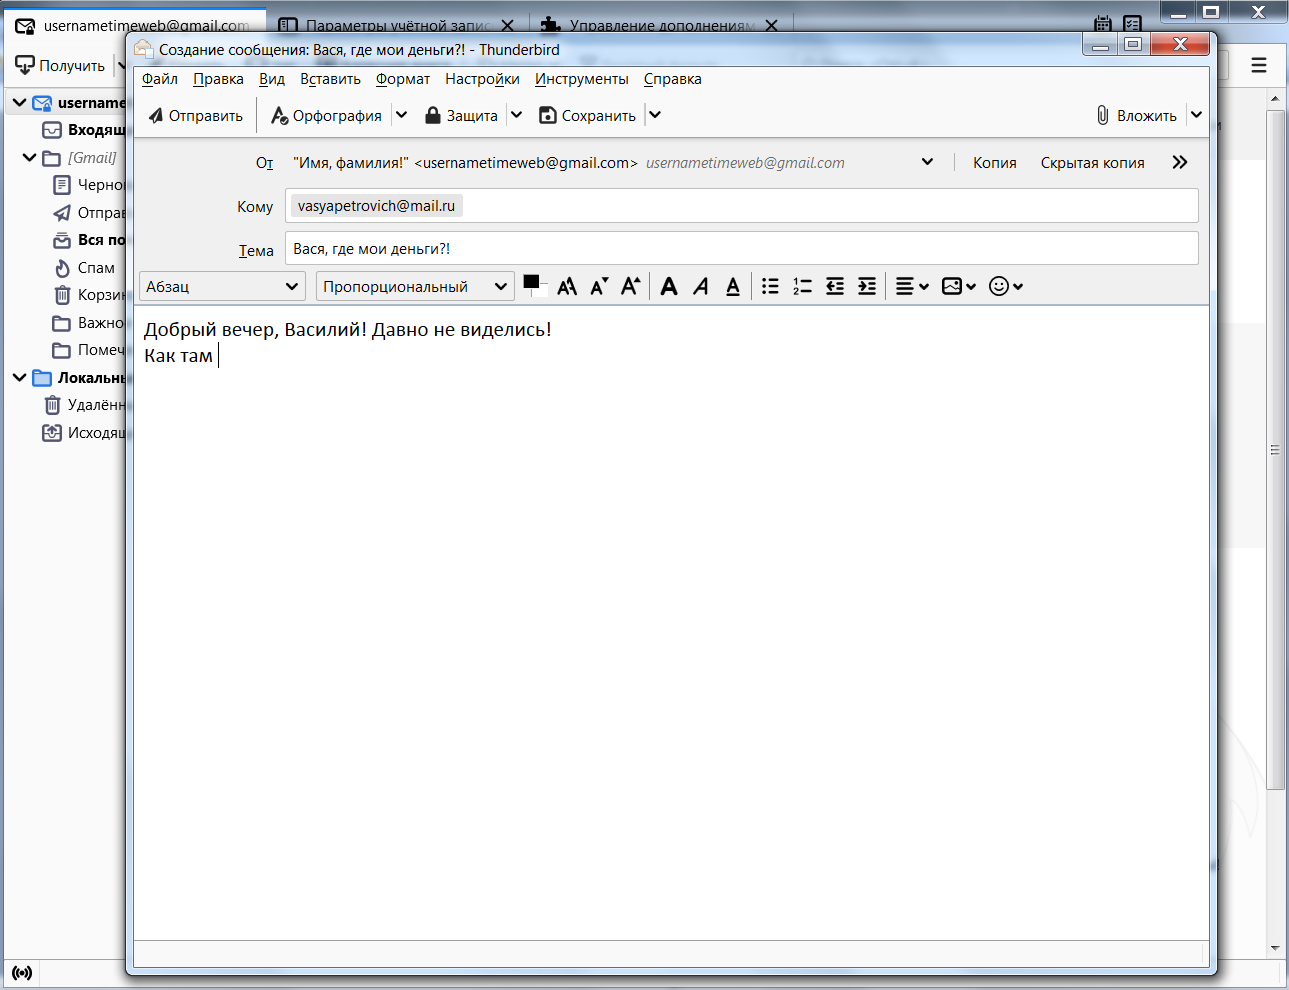
Электронная почта, в первую очередь, нужна для обмена сообщениями. Для создания письма вам придется кликнуть по пиктограмме «Создать» на панели задач или «Создание новых сообщений» на главной странице. В появившемся окне укажите e-mail адресата и тему беседы, напишите текст письма. В окне также присутствуют все необходимые инструменты для редактирования, вставки изображений, ссылок и даже смайлов.
Синхронизация писем и их хранение
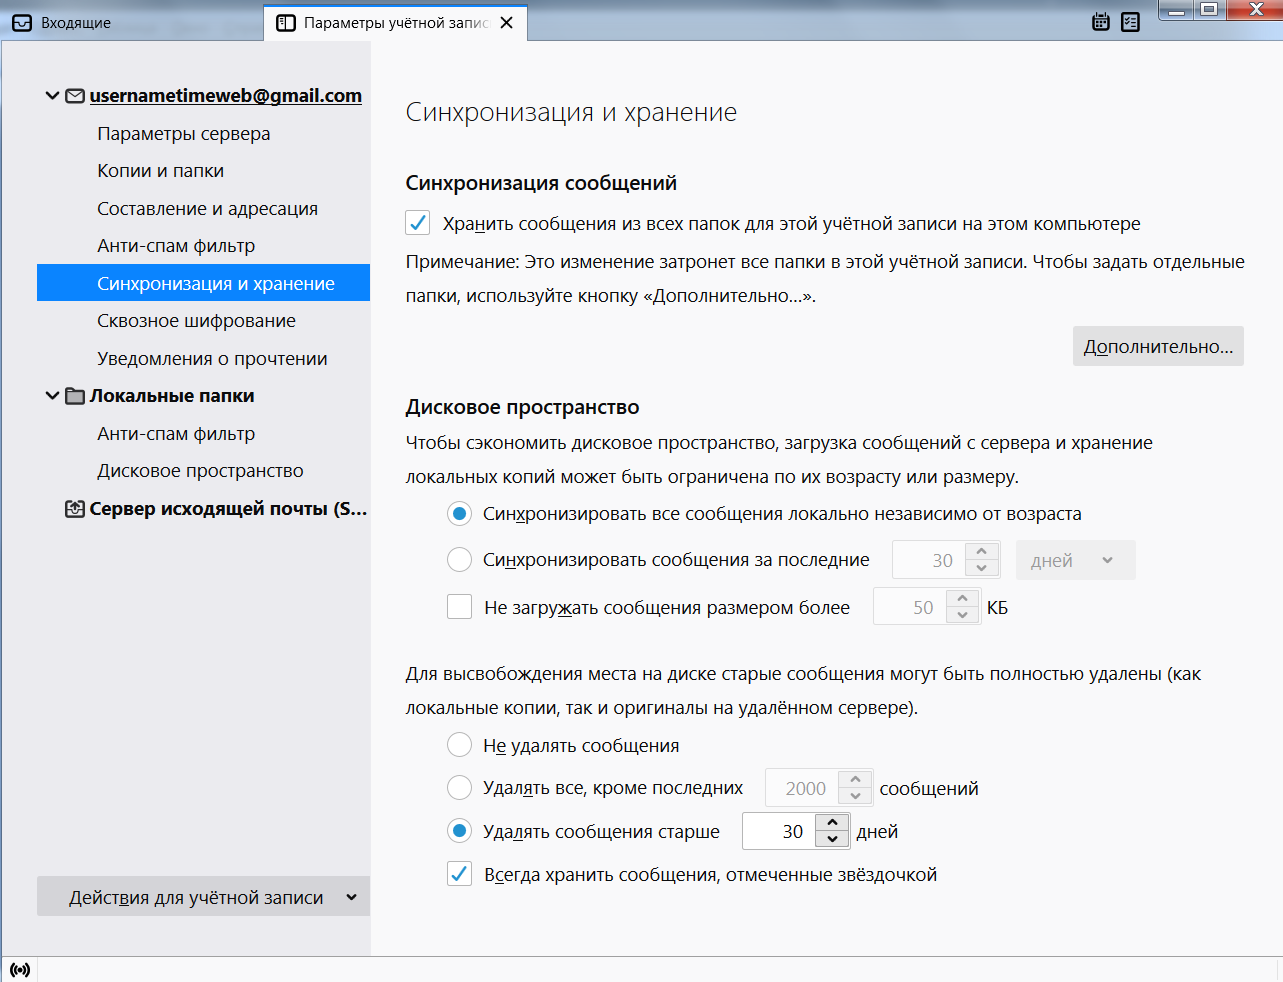
По умолчанию почтовый клиент Thunderbird синхронизирует сообщения из всех папок. Но если вам нужно отключить синхронизацию каких-то разделов, то заходите в «Параметры учетной записи», затем в «Синхронизация и хранение». Именно там, во вкладке «Дополнительно», настраиваются нужные параметры, а также указывается политика синхронизации: например, можно синхронизировать сообщения только определенного возраста или размера.
Сквозное шифрование
Чтобы максимально обезопасить переписку, имеет смысл настроить сквозное шифрование сообщений.
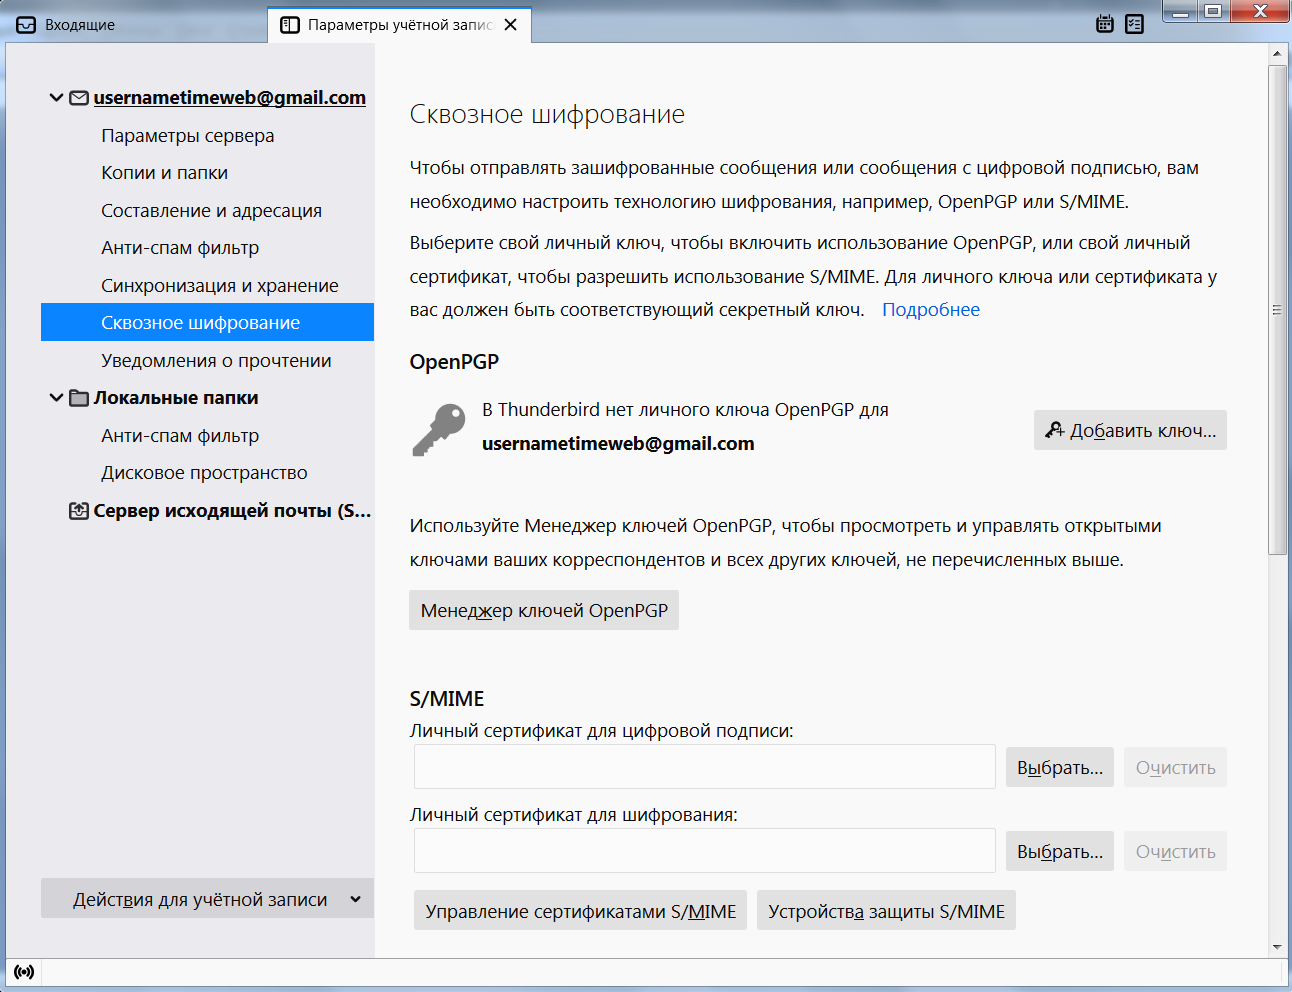
- Для этого в «Параметрах учетной записи» находим раздел «Сквозное шифрование».

- Кликаем «Добавить ключ».
- Создаем новый ключ OpenPGP или используем существующий. При создании нового указываем срок действия, тип и размер ключа.
- Жмем на «Создать ключ» => «Подтвердить». Готово!


Теперь нужно передать ключ шифрования нужному собеседнику: для этого при написании письма используйте вкладку «Защита» => «Прикрепить мой открытый ключ». Осталось лишь получить ключ собеседника и сравнить контрольные суммы. Вы только что усложнили жизнь специальным службам, масонам и иллюминатам, поздравляю!
Более подробно о сквозном шифровании можно почитать в справке Mozilla Thunderbird, перейдя из вкладки «Сквозное шифрование» в «Подробнее» (откроется статья «Введение в сквозное шифрование»).
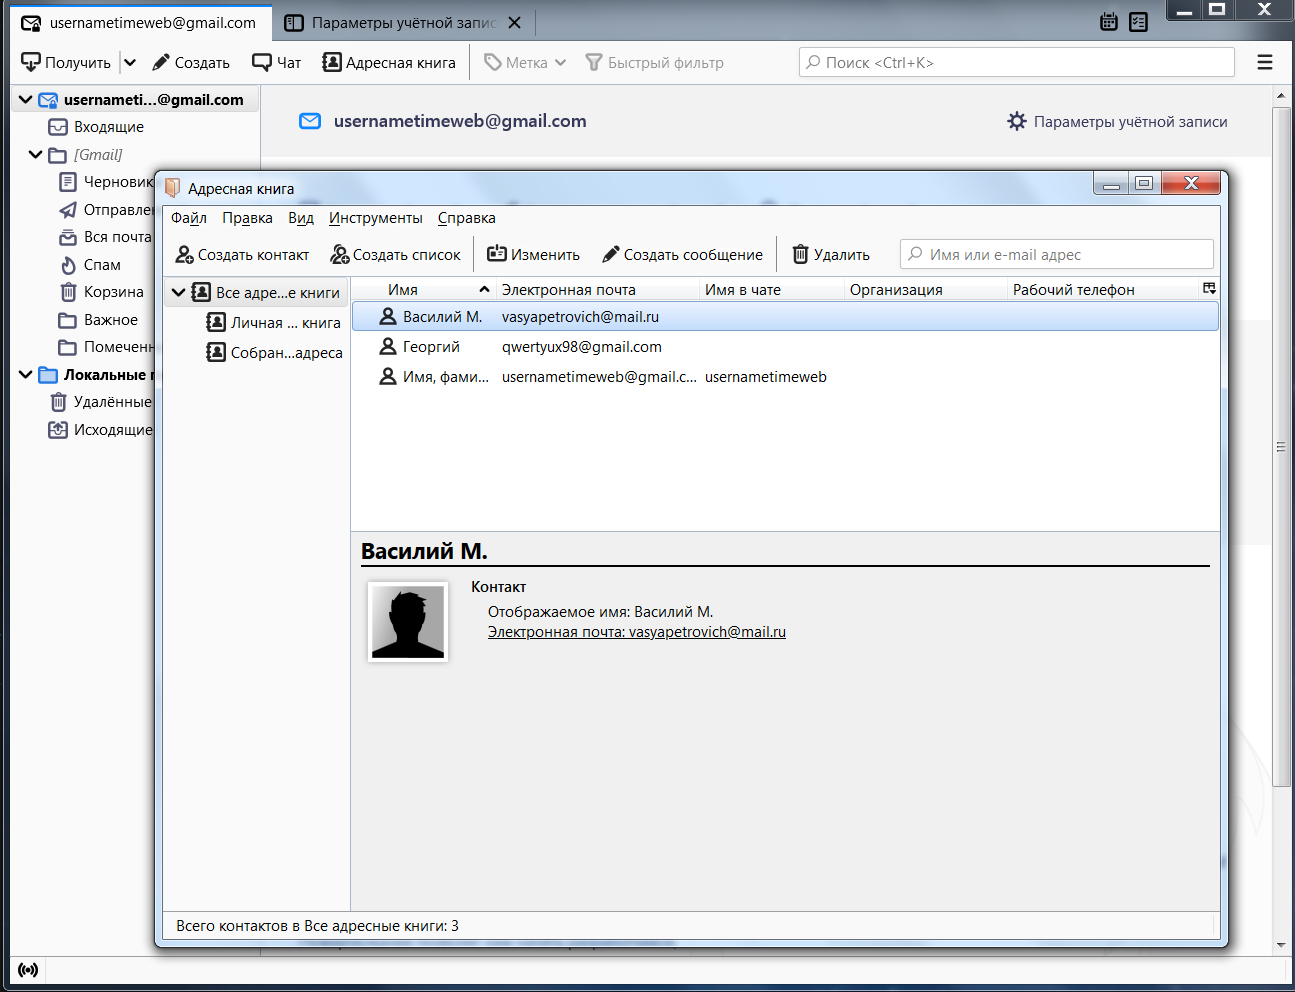
Адресная книга
Во вкладке «Адресная книга» удобно и легко вести список контактов. Помимо почтового адреса, можно заполнить подробные данные.
Календарь и задачи
В календаре, помимо слежения за датами, можно создавать события и задачи. Для этого выберите соответствующие пиктограммы во вкладке «Календарь».

Быстрый доступ в календарь закреплен в правом верхнем углу программы.
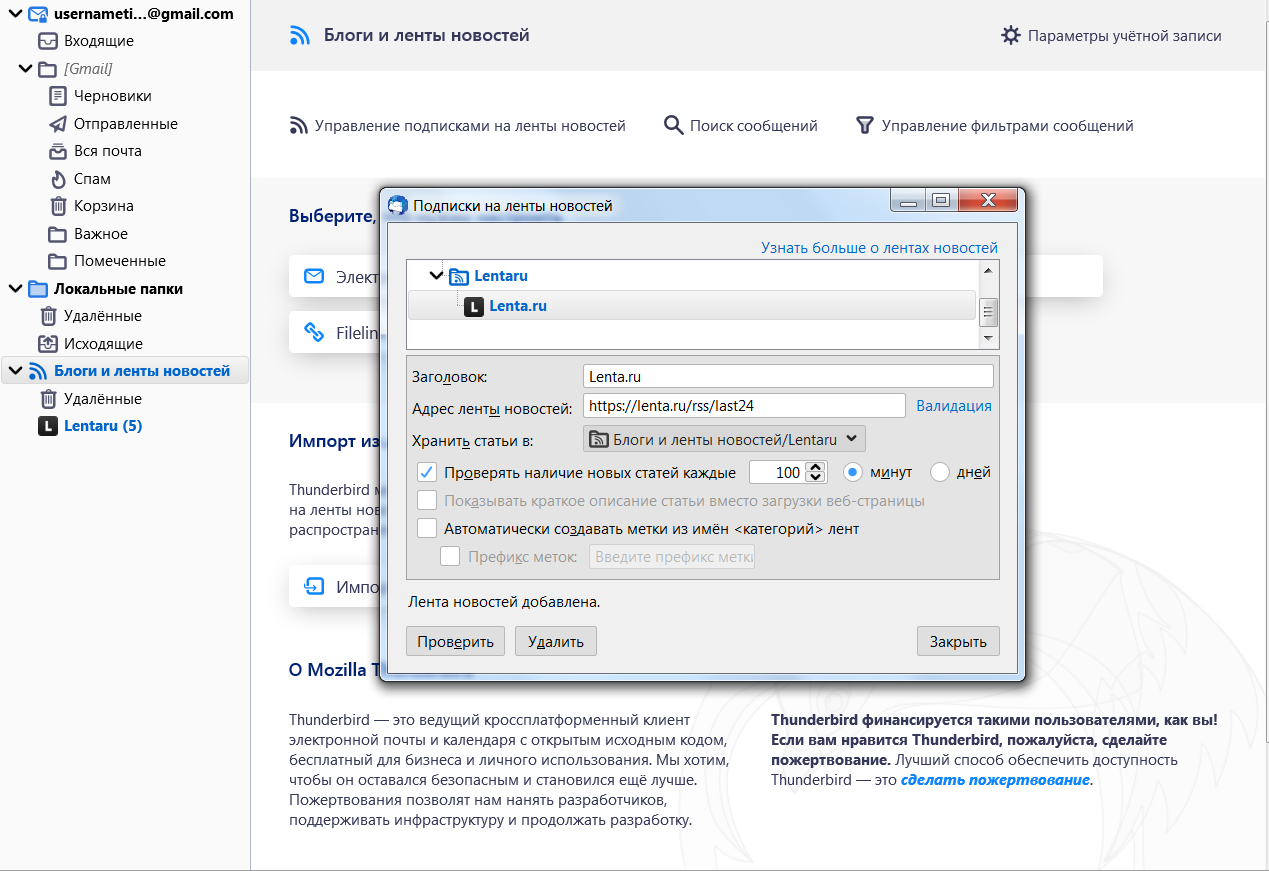
Лента новостей
Mozilla Thunderbird поддерживает функцию подписки на RSS-ленту. Найдите в сети RSS-адрес нужного новостного портала, после чего зайдите на главной странице приложения во вкладку «Ленты новостей». Будет предложено ввести имя для дополнительной учетной записи, на которую будут приходить новости. После создания зайдите в «Управление подписками», введите адрес RSS в строку и настройте периодичность проверки ленты.
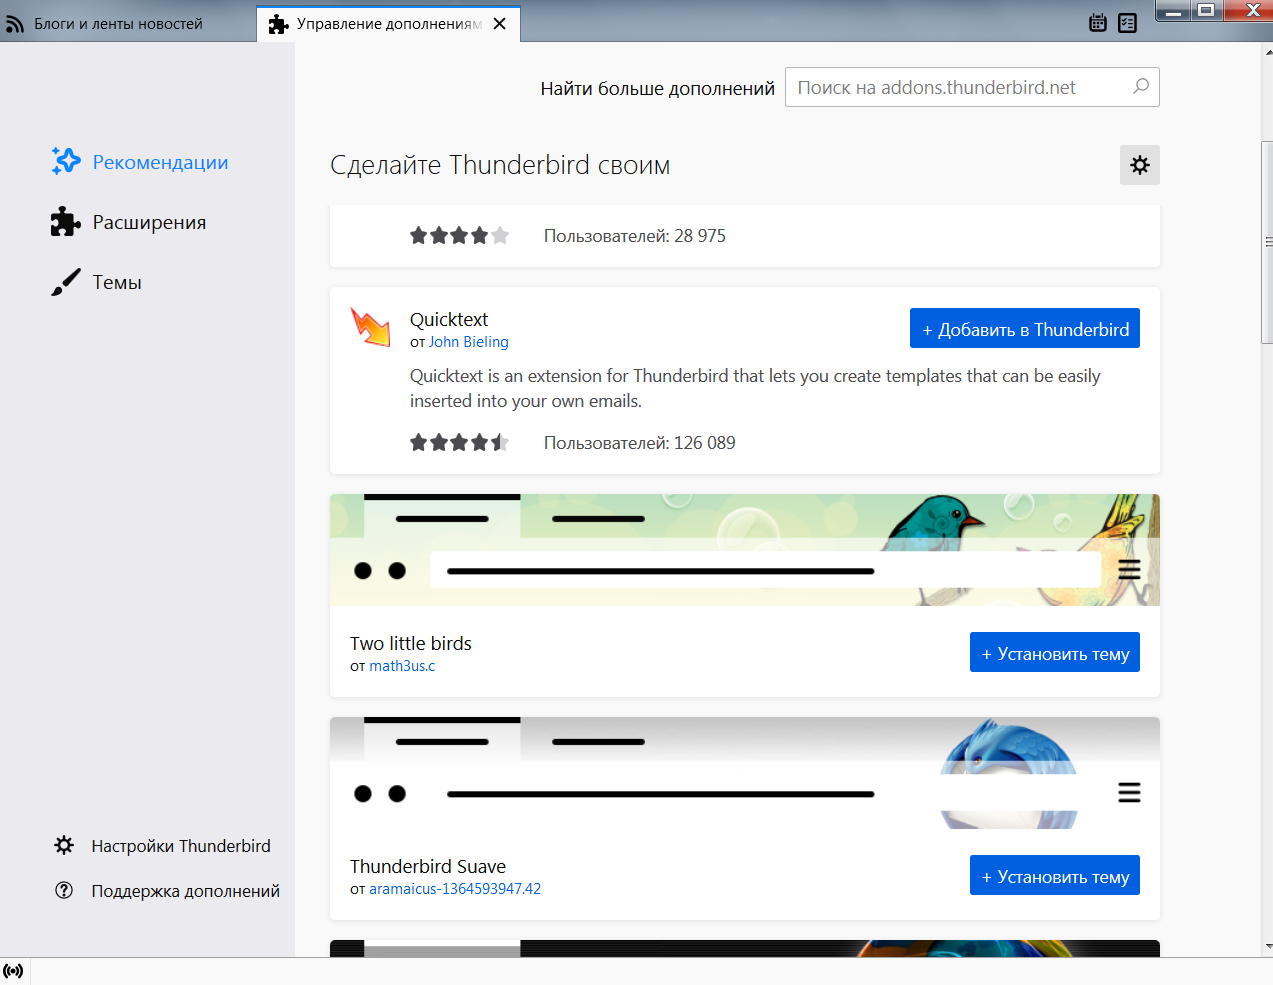
Кастомизация Mozilla Thunderbird
Вы можете заняться кастомизацией и настроить дизайн программы так, как душа пожелает. В контекстном меню нужно выбрать «Дополнительно», где будут отображены самые популярные темы и плагины, призванные преобразить ваше взаимодействие с приложением.
Заключение
Mozilla Thunderbird – минималистичный и интуитивно понятный почтовый клиент, позволяющий следить за входящей почтой, планировать задачи с помощью календаря и оставаться в курсе общественной и культурной жизни благодаря поддержке RSS-ленты.
Developed by Mozilla Corporation, Thunderbird is one of the most trusted email clients available in the market right now. This desktop-based application gives you complete ownership over your email messages and even manages your chats, news feeds, and newsgroups at a single place.
Sometimes, you face a situation where Mozilla Thunderbird won’t open when you try to launch it. This can happen due to a variety of reasons. Read this article to know why Thunderbird is not opening on a Windows PC and how to resolve this issue.
Reasons why Thunderbird won’t Open on Windows 10/11
Listed below are some reasons why Mozilla Thunderbird is not responding or opening on a Windows 10/11 PC:
- Insufficient system resources
- Corrupted user profile
- Firewall is blocking or interfering with Thunderbird functionality
- Corrupted Thunderbird application files
- User profile is in use
- Thunderbird is running in the background
Methods to Resolve the Thunderbird won’t Open on Windows Issue
Below, we’ll be sharing some simple yet effective methods to resolve the Mozilla Thunderbird won’t open issue.
Method 1: Delete the ‘parent.lock’ File
When you launch Mozilla Thunderbird on your Windows PC it creates a parent.lock file. It creates this file every time it starts. Once you close Thunderbird, it is automatically deleted. If the file is not deleted automatically you may face the Thunderbird won’t open issue. To resolve the issue you can delete the parent.lock file manually. Here are the steps:
- Press Windows + R to open the Run utility.
- Type %appdata% and press Enter.
- Open the Thunderbird profile folder.
- Search and delete the parent.lock file.

- Now launch Thunderbird and see if the issue is resolved.
Method 2: Launch Mozilla Thunderbird in Troubleshoot Mode (Safe Mode)
Though Mozilla Thunderbird supports many add-ons and customizations to enhance functionality, some add-ons may interfere with the application, which may prevent you from opening it. To fix this issue with Thunderbird open it in the Troubleshoot Mode (Safe Mode). In this mode, Thunderbird will start with limited features and customizations, which will help you check if any add-ons are causing the issue. Follow these steps:
- Press Windows + R to open the Run utility.
- Type thunderbird -safe-mode and click the OK button.
- The Thunderbird Troubleshoot Mode window will appear. Click Continue in Troubleshoot Mode option to restart the application. If Thunderbird opens, it means that some add-ons or toolbars are causing the issue.
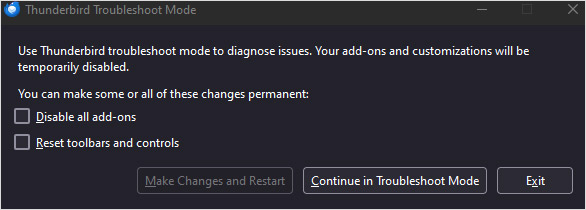
- Now, repeat the above steps. Select Disable all add-ons and/or Reset toolbars and controls option and click on Make Changes and Restart.
Method 3: Clear Thunderbird Cache
Sometimes, when you launch Thunderbird, it takes a longer time to open. In such a case you can clear the Thunderbird cache files. Here is what to do:
- Launch Thunderbird (if it is opening).
- Once it opens, click on the hamburger icon at the top-right corner.
- Click on Settings.
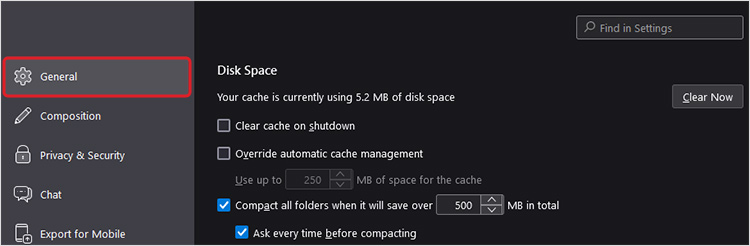
- In the Settings window, click on the General tab and scroll down to the Disk Space section. You will see settings related to Cache.
- Click on Clear Now to clear Thunderbird cache. You can also automate this process by selecting the Clear cache on shutdown option.
Method 4: Reinstall Mozilla Thunderbird
At times, Thunderbird won’t open if there are some issues with the application files. In such a case, you can reinstall the Thunderbird application. To do this:
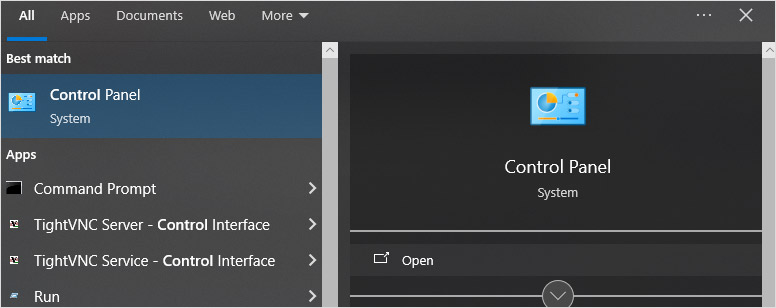
- Press Windows + Q and search for Control Panel. Open it.
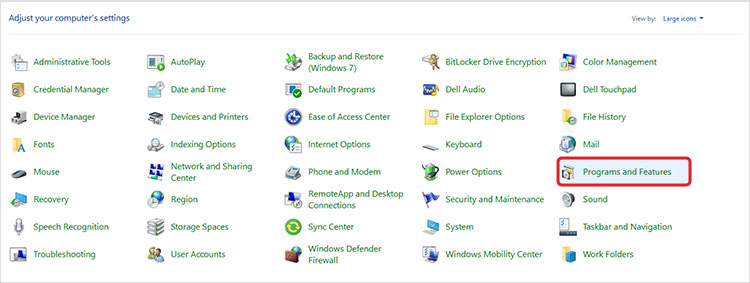
- Click on Programs and Features.
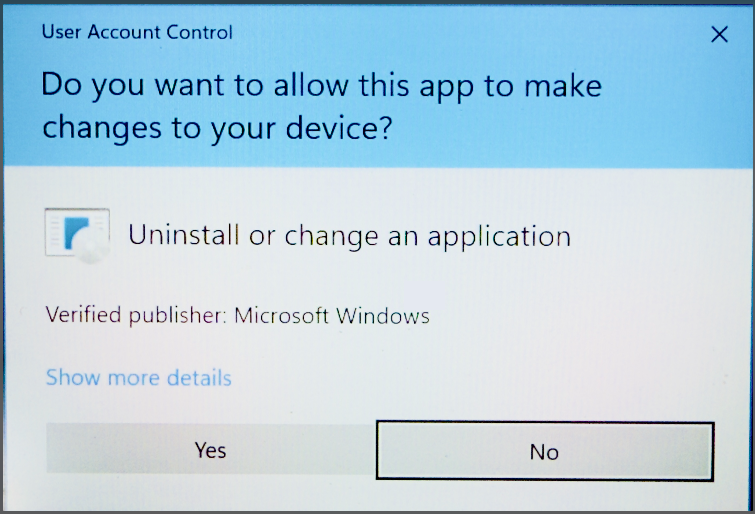
- Locate Mozilla Thunderbird and right-click on it. Click Uninstall.

- Click Yes in the User Account Control (UAC) dialog box. It will launch the Mozilla Thunderbird uninstall wizard.
- Follow the on-screen instructions to uninstall Thunderbird.

- Now, go to the Mozilla Thunderbird website and download the Thunderbird installer.

- Double-click the installer and click Run to start installing the application.
- Follow the on-screen instructions to install the application.
Once you have installed Mozilla Thunderbird on your system, launch it and configure your user profile. To configure the profile in Thunderbird,
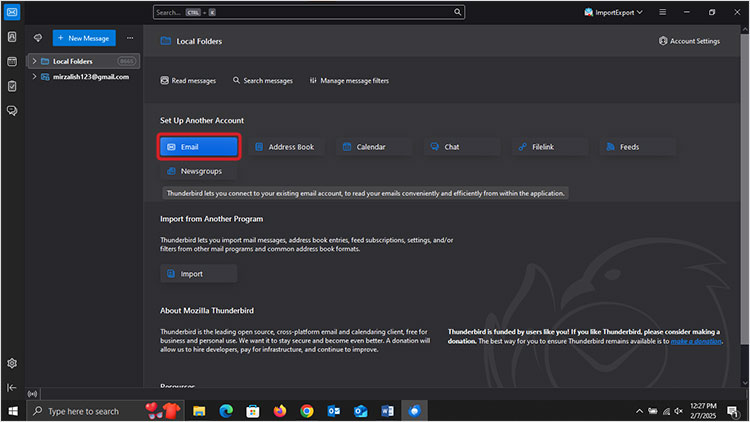
- Click on Email on the first screen.
- Add your account credentials and click Continue. Follow the on-screen instructions to complete the process.
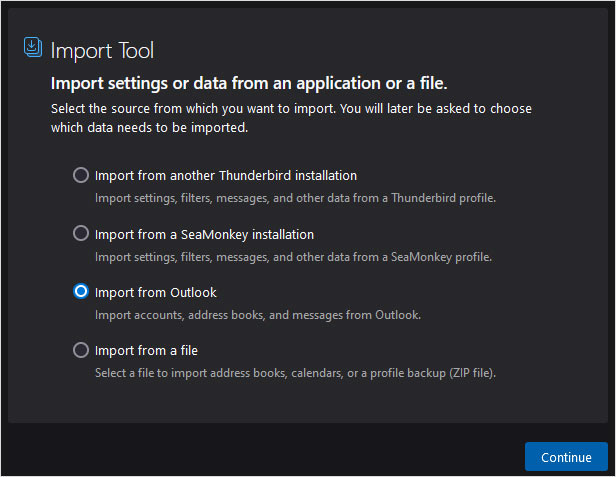
Note: You can also import a user profile/mailbox data from other email clients, such as SeaMonkey, Outlook, etc. Simply click on Import on the Home screen and choose the source of your import.
End Note
If your Thunderbird is not opening you can follow the methods explained above to resolve the issue. In case the issue re-occurs, you might opt for a different email client. You can go for Outlook, as it is among the leading and trusted email clients today. If you want to transfer your Thunderbird mailbox data to an Outlook profile, you’ll need an MBOX converter to convert your Thunderbird MBOX file into PST format. For this, you can use Stellar Converter for MBOX — A software that lets you convert your Thunderbird MBOX file into PST format while preserving the data integrity. It also supports the conversion of MBOX files of other email clients, like Apple Mail, SeaMonkey, Entourage, Eudora, Mozilla Mail, etc.
Mozilla Thunderbird is a free popular cross-platform email-client used by plenty of people. However, recent versions of Windows 10 don’t seem to run very well alongside it as plenty of its users have reported that the program simply freezes on certain commands and in certain parts.
The problem has been resolved in numerous ways and we have decided to incorporate the most successful methods in this article in order to help people who are struggling with this problem. Make sure you follow the instructions below and carefully and you will hopefully resolve the problem.
What Causes the ‘Thunderbird not Responding’ Error?
There is a short list of possible causes for this problem. The list can be quite useful in order to correctly troubleshoot the problem and perform the right method. Check it out below:
- Your antivirus may be interfering with Thunderbird and it may prevent it from connecting to the Internet properly.
- There are several problematic settings which can be turned off in Mozilla Thunderbird. Consider doing so!
- Some program or service may be interfering with Thunderbird and the only way to test this is via clean boot.
- If you are using McAfee Internet Security, it doesn’t play alongside Thunderbird very well and you might want to replace either of these programs.
Solution 1: Add Thunderbird to Exceptions in Your Antivirus
If you are using a free antivirus, chances are that it may be blocking Mozilla Thunderbird from connecting to the Internet properly or from accessing certain files on your computer. Either way, the problem can be solved by adding the program’s executable to the exclusions list in your antivirus.
The process will differ from one antivirus to another but we have decided to list out the paths to this option in the most popular antivirus tools.
- Open the antivirus UI by double-clicking its icon at the system tray (right part of the taskbar at the bottom of the window) or by searching for it in the Start menu (Cortana).
- The Exceptions or Exclusions setting is located in different spots with respect to different antivirus tools. It can often be found simply without much trouble but here are some quick instructions on how to find it in the most popular antivirus tools:
Kaspersky Internet Security: Home >> Settings >> Additional >> Threats and Exclusions >> Exclusions >> Specify Trusted Applications >> Add.
AVG: Home >> Settings >> Components >> Web Shield >> Exceptions.
Avast: Home >> Settings >> General >> Exclusions.
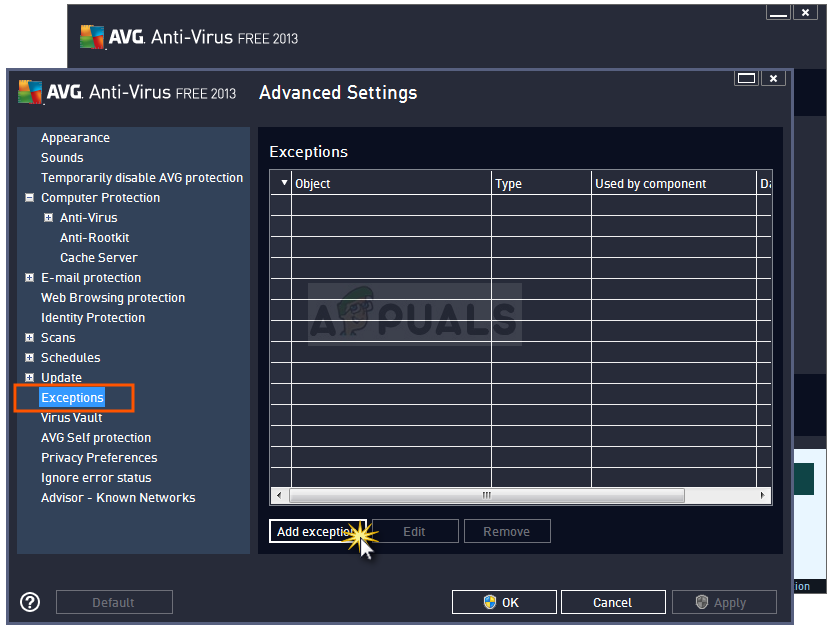
- You will need to add the executable file the box which will appear prompting you to navigate to the required file. The best way to locate it is by right-clicking its shortcut on the Desktop and choosing the Open file location option from the context menu. This is the address to navigate to. Sometimes you might have to add the path to the folder where the program is installed and sometimes to the executable.
- Check to see if you are now able to use the program without receiving the ‘Not responding’ message after running Thunderbird. If the error still appears, you might consider using a different antivirus or firewall tool, especially if the one giving you the problems is free!
Solution 2: Disabling Windows Search to search messages
There is a problematic feature Mozilla Thunderbird uses and users have reported that disabling this feature helped them resolve their problem. The cause may have something to do with the overall integration of Windows Search into the program which needs to be disabled.
- Launch Mozilla Thunderbird by double-clicking its icon on the Desktop or by searching for it in the Start menu and clicking the first option.
- Click the Tools button on the menu bar and choose Options.
Opening Thunderbird options - After the Options window opens, navigate to the Advanced Inside it, stay in the General sub tab and check under System Integration for the Allow Windows Search to search messages option. Uncheck the box next to it and click the OK button at the bottom in order to accept the changes.
Enabling the “Allow Windows Search to search messages” option - Check to see if Mozilla Thunderbird still displays the ‘not responding’ message.
Note: It might be useful to navigate to Advanced >> Network & Disc Space and uncheck the Automatic Compact option.
Solution 3: Use Clean Boot to Find the Cause
Clean booting in order to successfully detect a service or a process which starts up with your computer is definitely the number one solution. Some other services simply bother the media player because of permissions and you will need to deduce which one it is by simple elimination.
- Use the Windows + R key combination on your keyboard. In the Run dialog box type MSCONFIG and click OK.
- Click on the Boot tab and uncheck the Safe Boot option (if checked).
- Under the General tab in the same window, click to select the Selective startup option, and then click to clear the Load startup items check box to make sure it’s not checked.
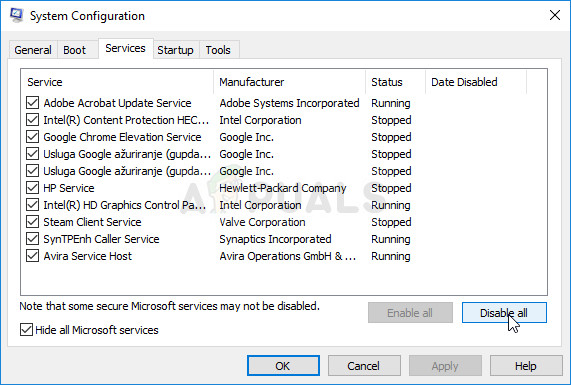
- Under the Services tab, click to select the Hide all Microsoft services check box, and then click Disable all.
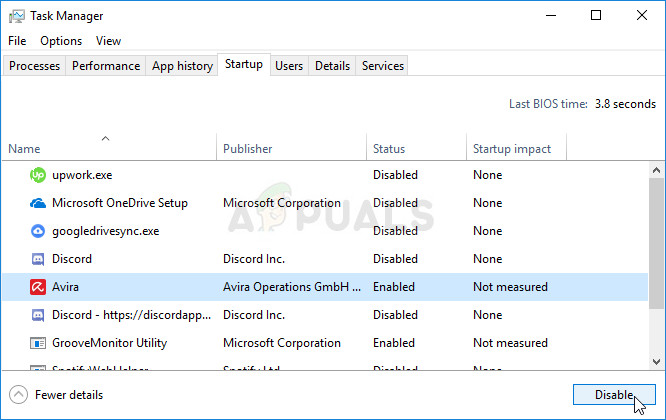
- On the Startup tab, click Open Task Manager. In the Task Manager window under the Startup tab, right click on each startup item which are enabled and select Disable.
- After this, you will need to perform some of the most boring processes and that is enabling the Startup items one by one and restarting your computer. After that, you need to check whether the problem appears again. You will need to repeat the same process even for the Services which you have disabled in Step 4.
- Once you locate the problematic startup item or service, you can undertake action in order to solve the problem. If it is a program, you can reinstall it or repair it. If it is a service, you can disable it, etc.
Solution 4: Uninstall McAfee Internet Security
There are some antivirus tools which can really mess up some of your programs and slow down your computer. McAfee antivirus tools are a great example of antivirus tools which can sometimes do more damage than good on your PC so consider finding a better alternative!
The problem can also be worked around by disabling antivirus shields and real-time protection while you are using Mozilla Thunderbird but that solution leaves your computer open to malware attacks and you can often forget to turn the shields back on.
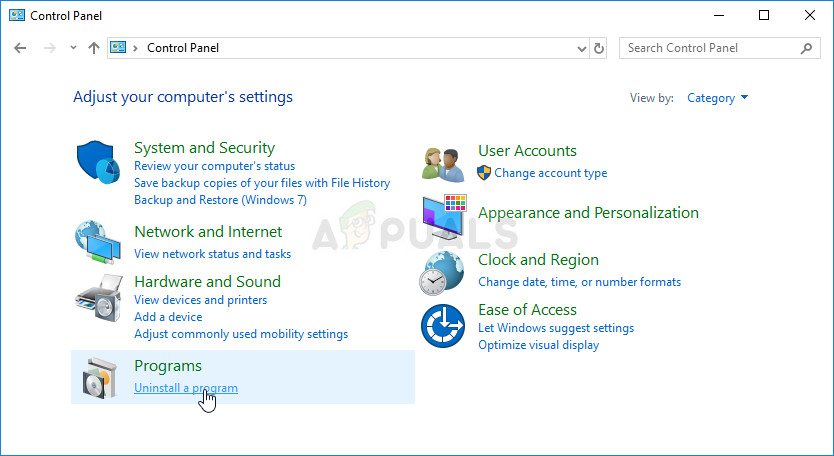
- Click on the Start menu button and open Control Panel by searching for it. Alternatively, you can click on the gear-like icon in order to open the Settings tool if you are a Windows 10 user.
- In Control Panel, set the View as setting to Category at the top right corner and click on Uninstall a Program under the Programs section.
- If you are using the Settings app on Windows 10, clicking on Apps should immediately open a list of all installed programs and tools on your PC.
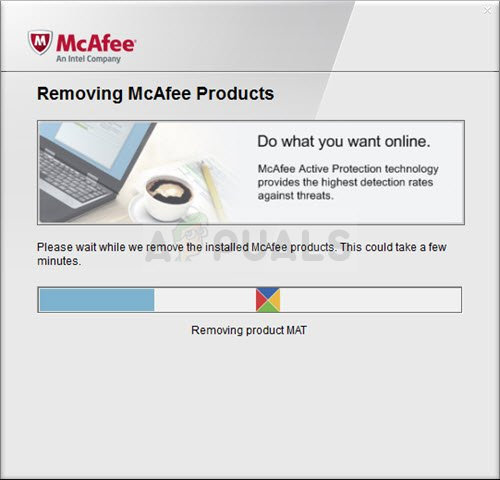
- Locate McAfee Internet Security in Control Panel or Settings and click on Uninstall or Remove.
- You should confirm any dialog boxes which may appear asking you to really uninstall McAfee Antivirus and follow the instructions which will appear in the uninstallation wizard.
- Click Finish when the uninstalled completes the process and restart your computer in order to apply the changes. Check to see if the problem persists!
Kevin Arrows
Kevin Arrows is a highly experienced and knowledgeable technology specialist with over a decade of industry experience. He holds a Microsoft Certified Technology Specialist (MCTS) certification and has a deep passion for staying up-to-date on the latest tech developments. Kevin has written extensively on a wide range of tech-related topics, showcasing his expertise and knowledge in areas such as software development, cybersecurity, and cloud computing. His contributions to the tech field have been widely recognized and respected by his peers, and he is highly regarded for his ability to explain complex technical concepts in a clear and concise manner.