
Loading…
Zoom is one of the most popular video meeting services in the world. Millions of users rely on this tool to host or join video meetings with family, friends, colleagues, or work collaborators.
But Zoom may sometimes fail to detect your camera, and that can be really annoying. Of course, you can still participate in your meetings using just your microphone. However, if you want to convince others to accept your ideas or business strategy, you really need to fix that camera issue. You’ll be more convincing if people can actually see you.
Contents
- 1 How to Fix Zoom Camera Not Working
- 1.1 If You’re Using an External Webcam
- 1.2 Update Everything
- 1.2.1 Manually Install Your Camera Driver
- 1.3 Check Your Privacy Settings
- 1.4 Register Your Camera Again
- 1.5 Close Other Apps That Could Access Your Camera
- 1.6 Zoom Camera Not Working in Browser
- 1.7 Zoom Camera Not Working with Lenovo Devices
- 1.8 Conclusion
How to Fix Zoom Camera Not Working
If You’re Using an External Webcam
Ensure your camera is properly plugged in. Gently press the edges of the camera. Unplug the webcam cable and make sure there are to specks of dust inside the computer port.
Before plugging the webcam back in, disconnect all the other peripherals. Maybe some of them might be interfering with your camera.
Additionally, if your laptop has a dedicated physical switch to enable or disable the camera, switch the button off and on several times. Check if this quick workaround did the trick.
Update Everything
And by that, we mean your Zoom app, Windows 10 OS, and camera drivers.
To update Zoom, click on your profile picture and select Check for Updates.

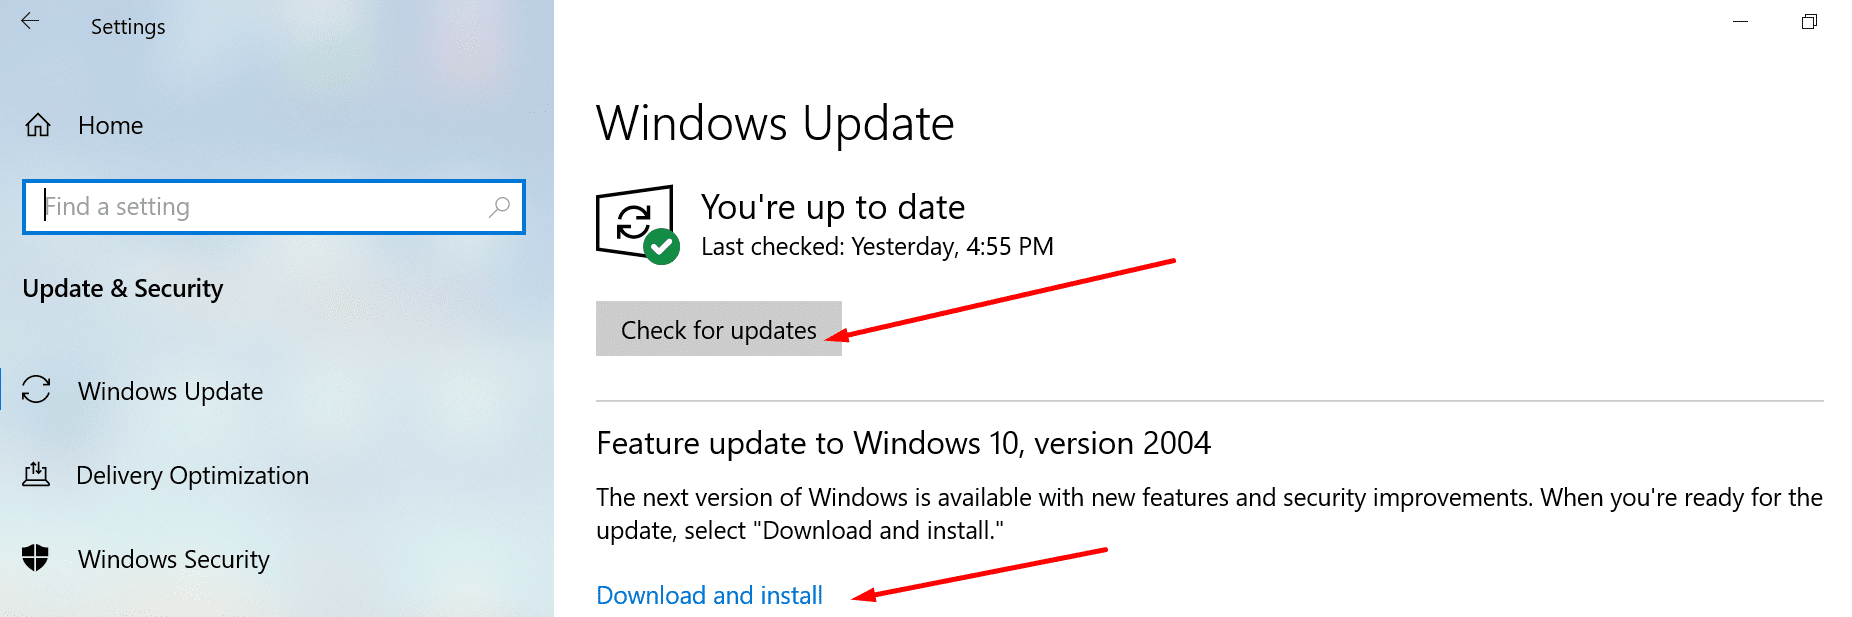
If you want to install the latest Windows 10 OS version, navigate to Settings → Update & Security → Windows Update and hit the Check for updates button.
Last but not least, ensure your camera drivers are up-to-date. Launch the Device Manager, right-click on Camera, and select Update Driver.
If the issue persists, repeat the same steps but this time, select Uninstall device to remove your camera drivers. Then restart your computer. Your machine will automatically install the latest driver version.
Manually Install Your Camera Driver
Alternatively, you can manually download and install your camera driver from your camera manufacturer’s website.
- ASUS
- Dell
- Lenovo
- Logitech
- HP
- Samsung
Check Your Privacy Settings
Windows 10 has specific privacy settings that prevent software and hardware from accessing your camera. That could be one of the reasons why your camera is not working on Zoom.
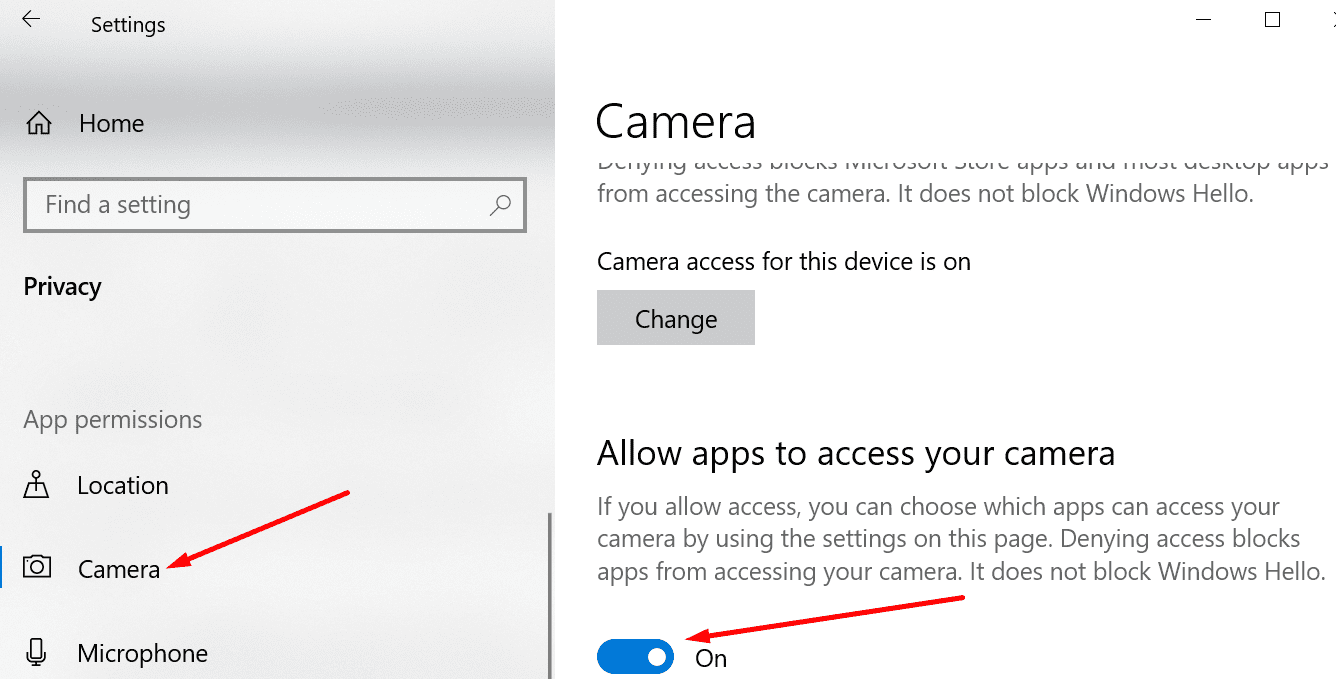
- Launch the Settings app and navigate to Privacy.
- Then, under App Permissions, click on Camera.
- There’s an option there that says Allow apps to access your camera. Toggle it on.

- Navigate to Allow desktop apps to access your camera.
- Then turn this option on to allow Zoom to access and use your camera.

Register Your Camera Again
To do this, we’re going to use PowerShell.
- Press the Windows +X keys and select Windows PowerShell (Admin). This allows you to launch PowerShell with admin rights and permissions.
- To register your Camera app, enter this command:
Get-AppxPackage -allusers Microsoft.WindowsCamera | Foreach {Add-AppxPackage -DisableDevelopmentMode -Register “$($_.InstallLocation)\AppXManifest.xml”}re-register camera app powershell - Then close Windows PowerShell and relaunch Zoom. Check if the camera issue is gone.
Close Other Apps That Could Access Your Camera
Close all the other apps and programs that could be using your camera. They could be blocking Zoom from detecting and accessing your camera. Even if these programs are not visible on the screen, they could be running in the background.
For example, if you previously used Microsoft Teams but did not close all the related processes, the app could still be lingering around.
- Launch the Task Manager and go to the Processes tab.
- Then locate the apps that could be using your camera.
- Right-click on each app and select End Task.
Zoom Camera Not Working in Browser
If Zoom’s web version does not recognize your laptop’s camera, it is most likely due to your current browser settings.
The instructions below apply to Google Chrome. But you can easily adapt them to any Chromium-based browser.
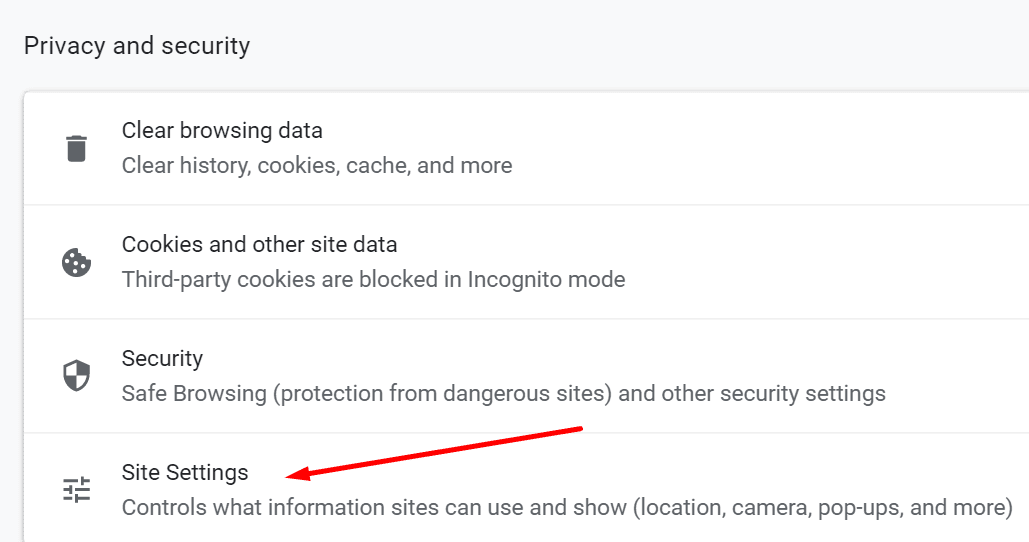
- Go to Settings → Privacy and Security → Site Settings.

- Then select View permissions and data stored across sites.
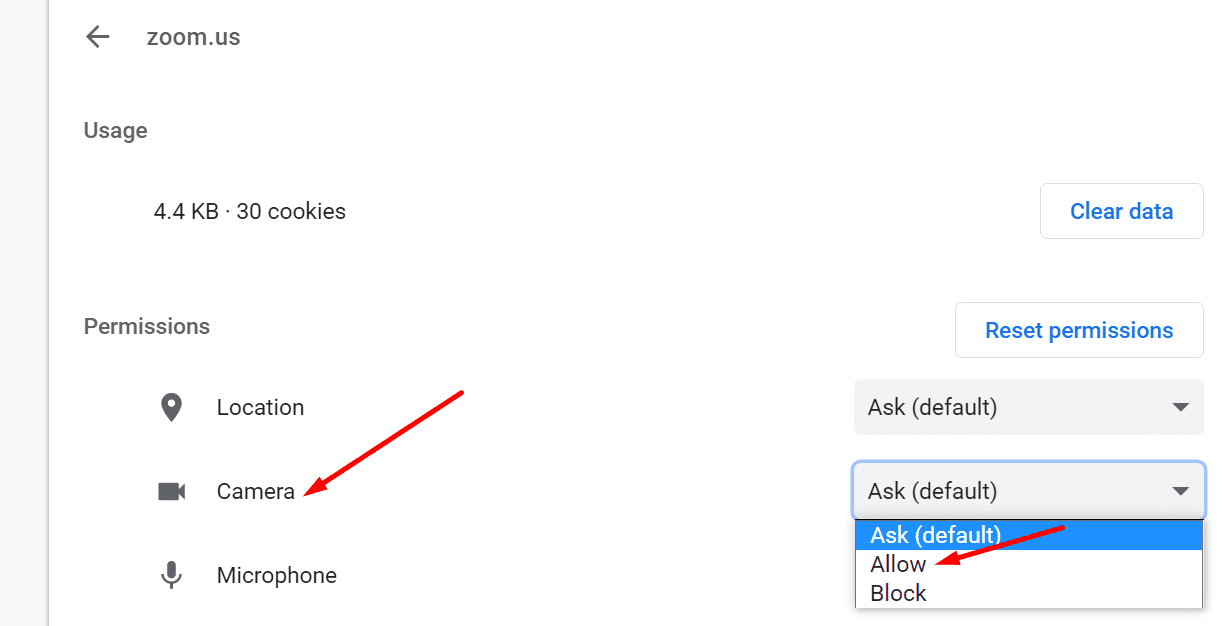
- Enter zoom.us in the search bar and hit Enter.
- Select zoom.us and click on the small arrow icon to access the permission settings.

- Allow Zoom to access your camera.

- Click on the refresh button of your browser. Check the results.

Additionally, you may also want to clear the cache and disable your extensions.
Zoom Camera Not Working with Lenovo Devices
If you’re experiencing this Zoom camera problem on a Lenovo device, turn off the camera privacy option in Lenovo Vantage.
- Go to the Windows Search bar and type ‘lenovo.’
- Select Lenovo Vantage. Install Lenovo Vantage from the Microsoft Store if the app is not available on your device.
- Then go to Hardware Settings and select Audio/Visual.
- Scroll down to Camera Privacy Mode. Disable this option.

Conclusion
To sum up, if Zoom cannot use your laptop camera, your privacy settings might be blocking the app from accessing your camera. Check your settings, update Zoom and your camera driver, and then restart your laptop.
Do let us how the troubleshooting process went for you. Share your thoughts in the comments below.
Using Zoom to hold remote online meetings is already commonplace, and for many individuals, it is one of the trade-offs that come with working from home. Zoom meetings may be inconvenient, but they become considerably more so when your camera is not working on Zoom.
Zoom calls are becoming essential to many people’s lives, whether used for daily team meetings, pitching to customers, or teaching online classes. Because this form of a session depends on technology, some participants may unavoidably experience technical issues, such as Zoom being unable to detect a camera during one of their calls.
Don’t get too worked up if your Zoom is unable to detect a camera. This might happen for various reasons. So, to assist you, we have listed many solutions to this problem so that you may get on with your busy day.
Why is My Camera Not Working on Zoom?
Various underlying factors might cause the problem of the camera not working on Zoom. When you experience pain, you should suspect any of the following.
- Zoom does not recognize the camera.
- Your computer setting does not allow Zoom access to the camera.
- Another app is operating in the background or using the device’s camera.
- You’re using an old version of the Zoom app.
- Hardware problems with your webcam or camera.
- The internet connection is unstable.
- Zoom device compatibility difficulties may show up as the Lenovo camera not working in Zoom (common in Lenovo PCs).

So, now that you know the reasons that may lead to camera issues on Zoom, here are the quick steps you can take to troubleshoot the «Zoom camera not working» issue.
Method 1. Check Camera’s Connection
If you are using an external camera, the first step to fix the zoom camera not working is to make sure the camera is connected correctly. If your Zoom cannot detect the camera, please follow the below steps:
- Please open the computer’s camera.
- Replugging the webcam into another USB port to check if that changes anything.
- Change another cable or USB port to connect again.
- If you’re using a wireless webcam, verify that Bluetooth is enabled and that your webcam has an adequate charge.
Method 2. Check Zoom Meeting Camera Settings
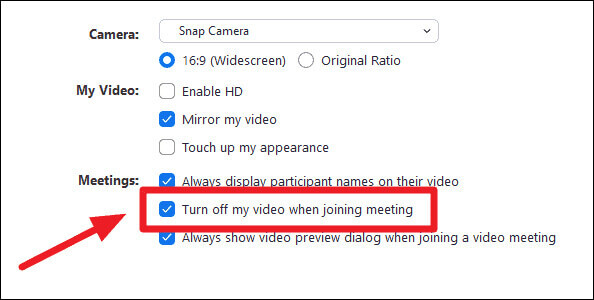
Ensure that the camera is active in the Zoom settings. On a computer, you can check this in the «Video» tab under «Settings.» Make sure you have unchecked and turn off my video when joining the meeting. On a mobile device, you can check this in the «Video» tab under «Meeting Settings».
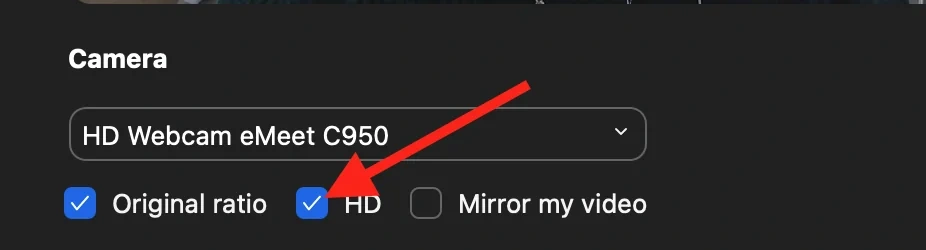
Method 3: Make Sure You Have Enabled HD
Zoom now only supports HD resolution, so please check on HD when you set the video resolution.
Tip: We recommend OBSBOT Tiny 2 as the first choice when a new webcam is needed. OBSBOT Tiny 2 is a compact and portable external camera that you can use to capture 4K video. It works on various devices and platforms, including Windows and Mac.
Some features of the OBSBOT Tiny 2 include:
-
1/1.5» CMOS: This sensor allows for superior light capture, resulting in sharper, clearer visuals even in challenging lighting conditions.
- 4K video quality: The camera can capture high-resolution video up to 4K.
- Automatic Framing and Tracking: The camera has a built-in auto-tracking feature that can automatically frame and follow a subject as it moves.
- Low-light enhancement: The camera has a wide dynamic range and can capture clear and detailed images in low-light conditions.
- Compact size: The camera is small and light, making it effortless to take with you wherever you go.
The OBSBOT Tiny 2 is a good option if you are looking for a high-quality external camera that is easy to use and portable. However, before making a purchase, reading reviews and comparing them to other options is always a good idea.
Method 4: Check If Zoom has Permission to Access Camera
Follow the below steps to check if Zoom has permission to access the camera:
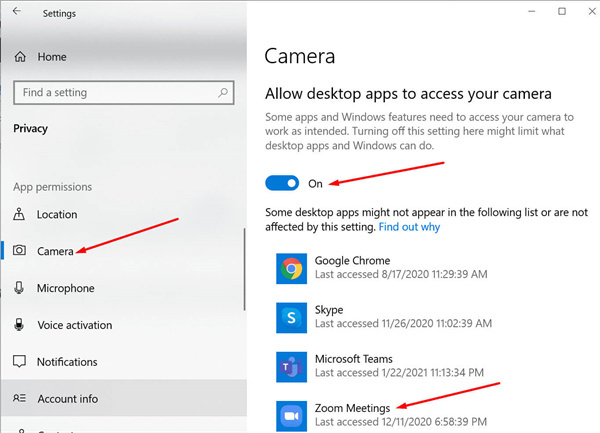
For Windows:
- Go to «Settings» (you can usually find it in the Start menu).
- Select «Privacy.»
- In the left sidebar, click on «Camera.»
- Scroll down to find «Zoom» in the list of apps and make sure it is turned on.
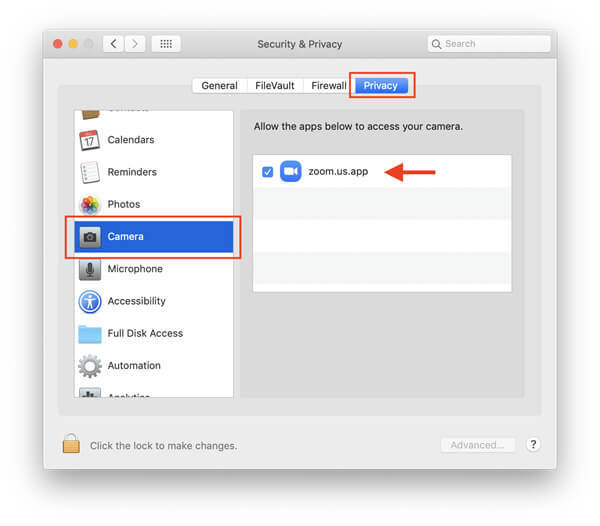
For macOS:
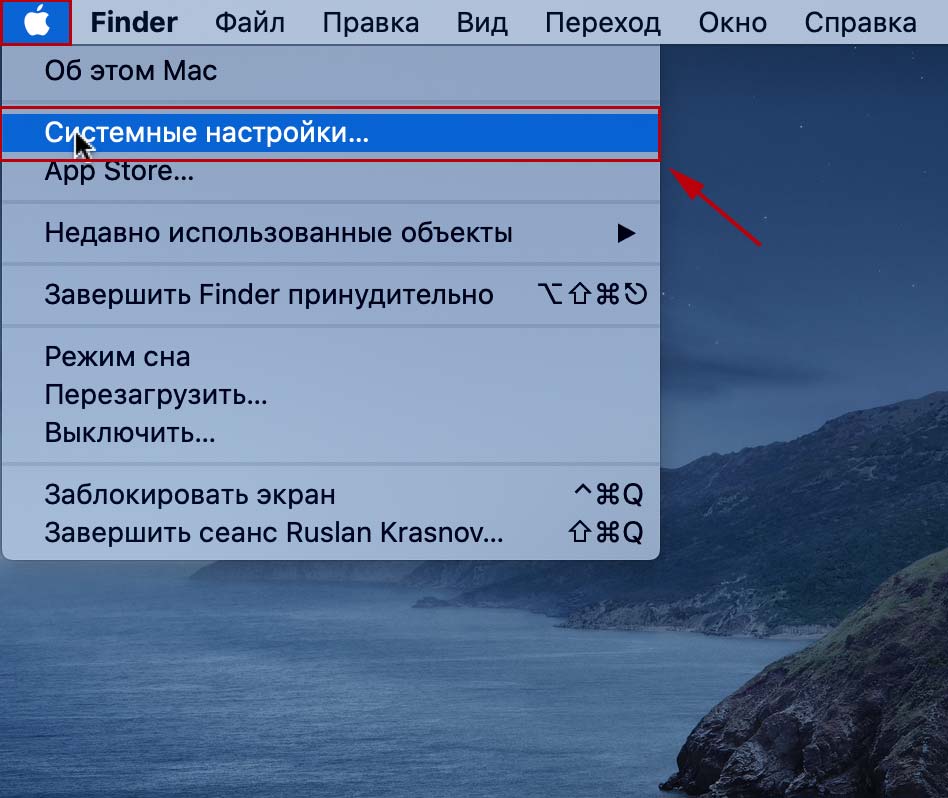
- Click on the Apple logo in the top left corner and select «System Preferences.»
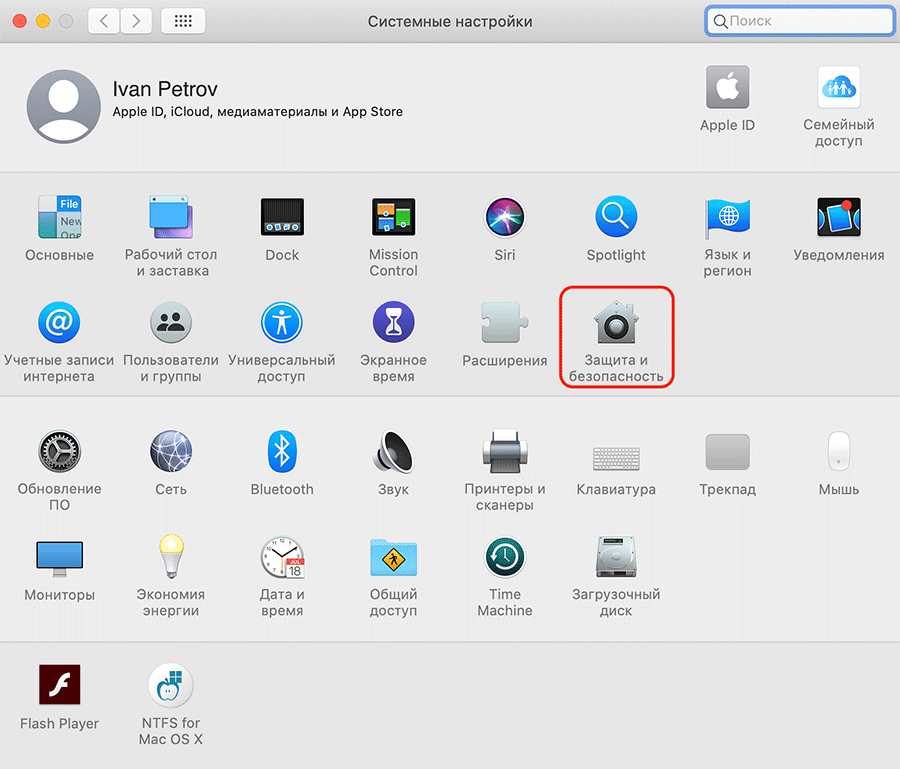
- Click on «Security & Privacy.»
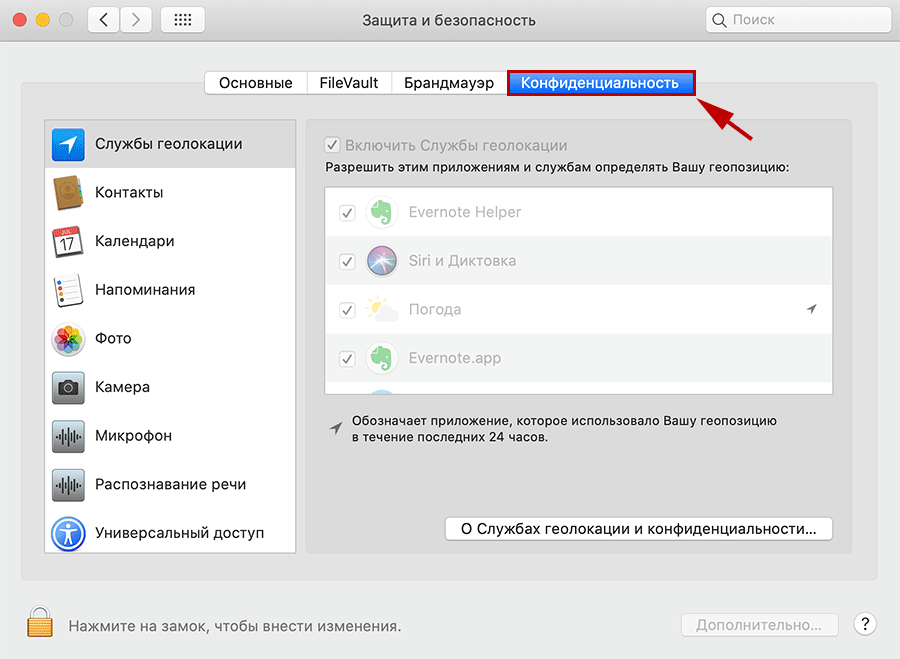
- Go to the «Privacy» tab.
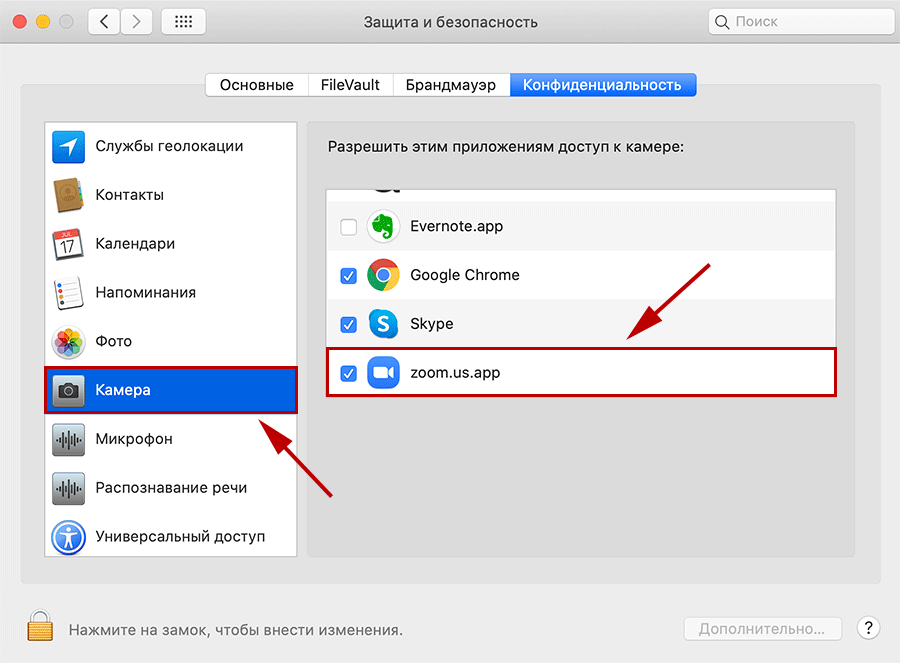
- Select «Camera» from the list on the left.
- Check if Zoom is listed on the right and ensure the box next to it is checked.
For Android Users:
Go to Settings > Apps on your device and find the Zoom app. Then tap on Permissions.
For iPhone User:
Search Zoom in the Settings search bar, Locate Zoom, and make sure the camera permission is turned on.
Method 5. Restart the Computer and Try Again
If you have tried all the above steps and the camera is still not working, try restarting your device. This can often resolve issues with the camera.
Method 6. Check for Updates to Camera Drivers
Updating your camera drivers can help resolve issues with the camera not working on Zoom or other video conferencing software. Make sure that you have the latest camera drivers installed on your device. Outdated or corrupt drivers can cause issues with the camera. Here’s how to check for updates to your camera drivers.
- Determine the brand and model of your camera: You will need to know the brand and model of your camera to find the latest drivers. You can usually find this information in the device’s documentation or by looking for a label or logo on the device itself.
- Visit the manufacturer’s website: Go to the camera manufacturer’s website and search for the latest drivers for your specific camera model.
- Download and install the latest drivers: Follow the instructions on the manufacturer’s website to download and install the latest drivers for your camera.
- Restart your device: After installing the updates, restart your device to apply the changes.
- Test the camera: Once your device has restarted, try using the camera on Zoom or other video conferencing software to see if the issue has been resolved.
Method 7. Check for Conflicts with Other Software or Devices Using the Camera
If you are experiencing issues with the camera on Zoom is not working or other video conferencing software, there may be a conflict with other software or devices using the camera.
Here are a few actions you can take to check for conflicts:
- Close any other software or apps that may be using the camera: Some software, such as video editing or security apps, may be using the camera in the background. Close these apps and try using the camera on Zoom again.
- Disconnect any other devices that may be using the camera: If you have other devices, such as smartphones or tablets, connected to your computer via USB or Bluetooth, they may be using the camera. Disconnect these devices and try using the camera on Zoom again.
- Check for hardware conflicts: If you have multiple cameras or other hardware connected to your device, there may be a hardware conflict causing issues with the camera. Try disconnecting other hardware and see if the issue persists.
Method 8. Test the Camera on Another Device or with a Different App
After the above steps, if you are still unable to fix Zoom, or unable to detect the camera, see if the issue is with the camera itself. Test the camera on another device or use some other app.
Here are the steps to test an external camera:
- Connect the external camera to your device: Follow the manufacturer’s instructions for connecting the camera to your device. This may involve using a USB cable or connecting wirelessly via Bluetooth or Wi-Fi.
- Configure the video conferencing software: In the video conferencing software’s settings, select the external camera as the video source. On Zoom, for example, you can do this by going to the «Video» tab under «Settings» and selecting the external camera from the «Camera» drop-down menu.
- Test the camera: Once you have configured the video conferencing software to use the external camera, you can test it by starting a test call or joining a meeting. Ensure you position the camera correctly, and the video and audio quality are satisfactory.
Method 9. Uninstall and Reinstall the Zoom App
If you are experiencing issues with the Zoom app, like Zoom not detecting the camera, you can try uninstalling and reinstalling the app. After reinstalling the app, try using the camera on Zoom again.
Method 10. Check for Updates to the Computer’s Operating System
Updating the computer’s operating system can sometimes help resolve issues with Zoom’s inability to detect cameras or other video conferencing software. If updates are available, follow the prompts to install them. Once the updates are installed, run, restart your PC, and try using the camera on Zoom again.
Method 11. Contact Zoom Support
If you’ve tried all the above steps and the camera still isn’t working, contact Zoom Support for further assistance.
Conclusion
If you’re facing problems with your video camera on Zoom or other video conferencing software, you can try the above troubleshooting methods to resolve the issue.
If none of these methods work, it’s recommended to reach out to Zoom support for further assistance on why the camera is not being recognized. Having a functional camera is crucial for a seamless and successful video conference, so it’s important to resolve any issues with your camera on Zoom.
У пользователей клиента видеоконференций камера в Zoom не работает из-за неверных настроек доступа к видеооборудованию. На компьютерах с Windows 10 откройте меню «Пуск», щелкните по шестеренке, перейдите в раздел «Конфиденциальность» и выберите пункт меню «Камера» слева. Убедитесь в том, что переключатель «Разрешить приложениям доступ к камере» включен и программе Зум предоставлен доступ к видеооборудованию. На ПК с mac OS кликните по яблоку вверху слева, выберите пункт «Системные настройки», откройте раздел «Защита и безопасность», перейдите во вкладку «Конфиденциальность» и выберите камеру в левом меню. Удостоверьтесь в том, что флажок слева от иконки Зум проставлен.
Как включить камеру в Zoom
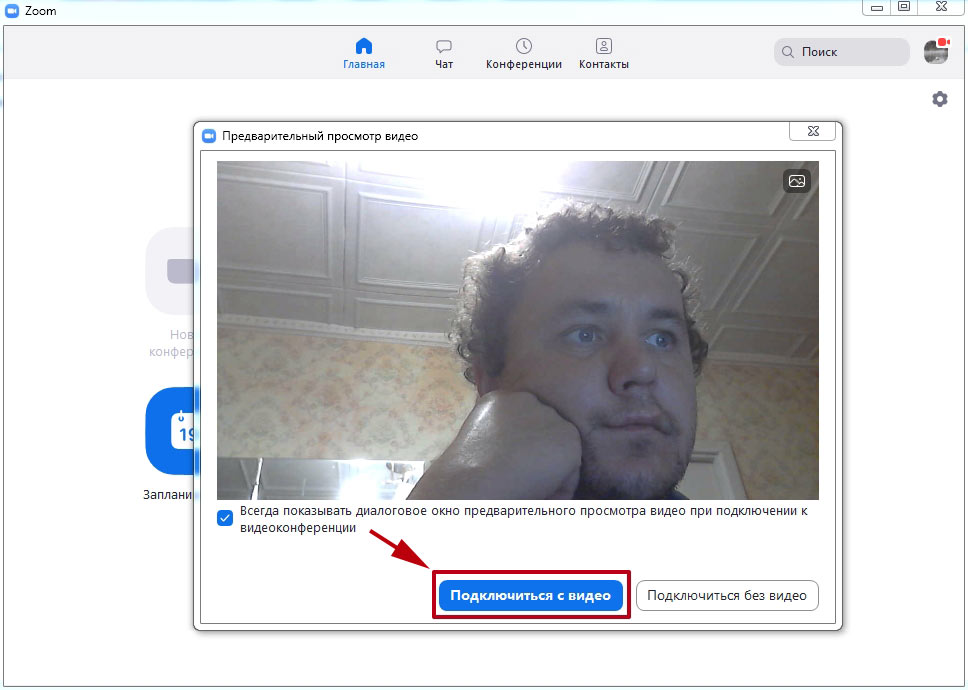
Участник удаленной встречи может включить камеру в Зуме во время подключения к конференции. Чтобы подключиться с видео, щелкните по голубой кнопке. Если достаточно аудиоконференции, кликните «Подключиться без видео».
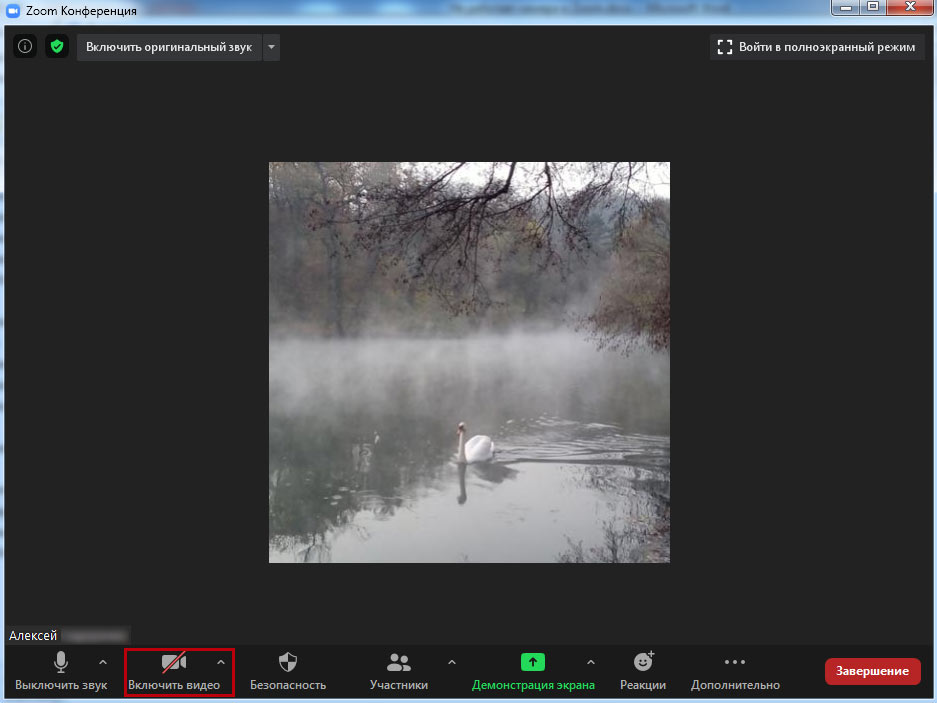
Управляйте видеооборудованием во время удаленного собрания. Чтобы отключить камеру в Zoom, нажмите на вторую слева иконку «Остановить видео». Система заменит изображение пользователя на аватарку и переименует пиктограмму на «Включить видео». Повторный клик по иконке возобновит трансляцию потокового видео.

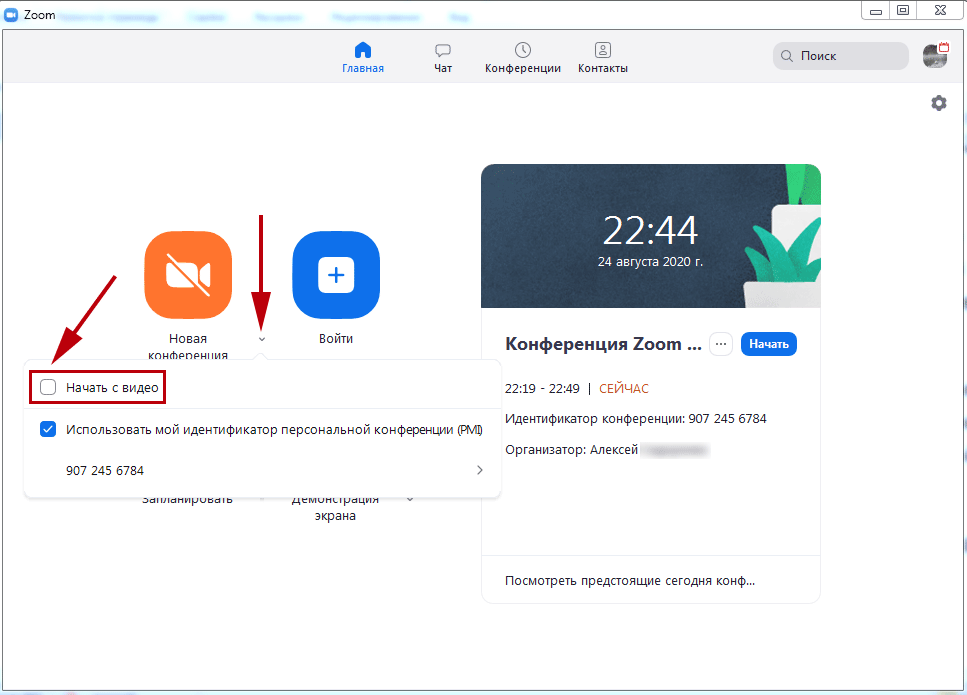
Если организуете конференцию на компьютере и не хотите транслировать видео, сбросьте флажок «Начать с видео» у оранжевой иконки «Новая конференция».
Для запуска удаленной встречи с выключенным видео организатора на телефоне нажмите на иконку «Новая конференция» и передвиньте ползунок «Видео вкл.» в неактивное положение.
Для управления видеооборудованием в настройках Зум веб-камеры на компьютере проставьте флажок «Всегда показывать диалоговое окно предварительного просмотра видео при подключении к видеоконференции». Аналогичным образом активируйте переключатель «Всегда показывать предварительный просмотр видео» в параметрах конференции на смартфоне.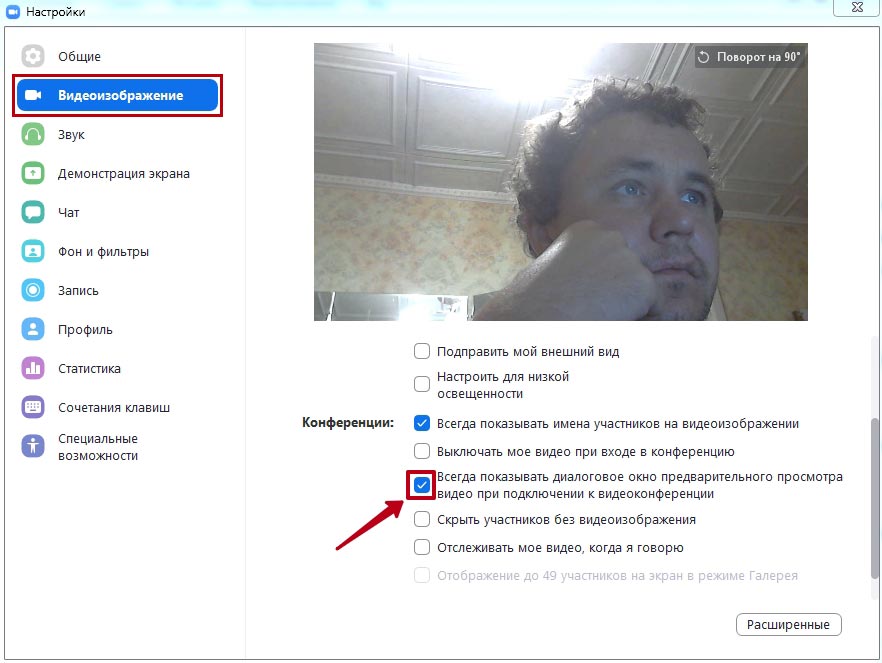
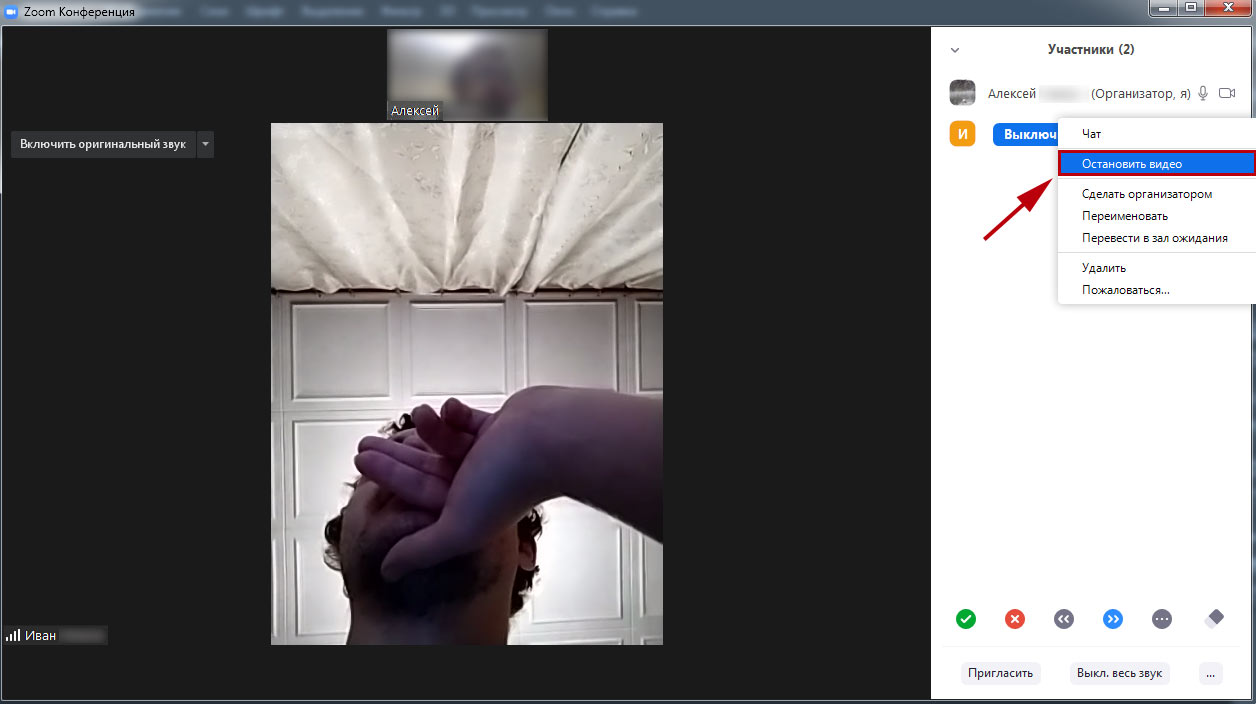
Организуете конференцию и не знаете, как отключить камеру в Zoom у участников встречи?
1. Кликните по иконке «Участники».
2. Наведите курсор мышки на имя участника в правой части экрана.
3. Нажмите на кнопку «Дополнительно».

4. В контекстном меню выберите «Остановить видео».
Зум не видит камеру в Windows 10
Сначала убедитесь в том, что операционная система «видит» встроенную в ноутбук или внешнюю подключенную к компьютеру камеру. Нажмите «Пуск» и запустите приложение «Камера». Если перед глазами появилась надпись «We can’t find your camera» на черном фоне, следует настроить оборудование в диспетчере устройств. Если видите серый экран с кнопками управления устройством, камера в Zoom не работает из-за проблем с доступом: нужно настроить параметры конфиденциальности операционной системы.
Если операционная система не разрешает приложениям доступ к камере, выполните шесть простых шагов.
1. Щелкните по меню «Пуск» в левом нижнем углу экрана.
2. Нажмите на плитку «Параметры» или на иконку с шестеренкой.
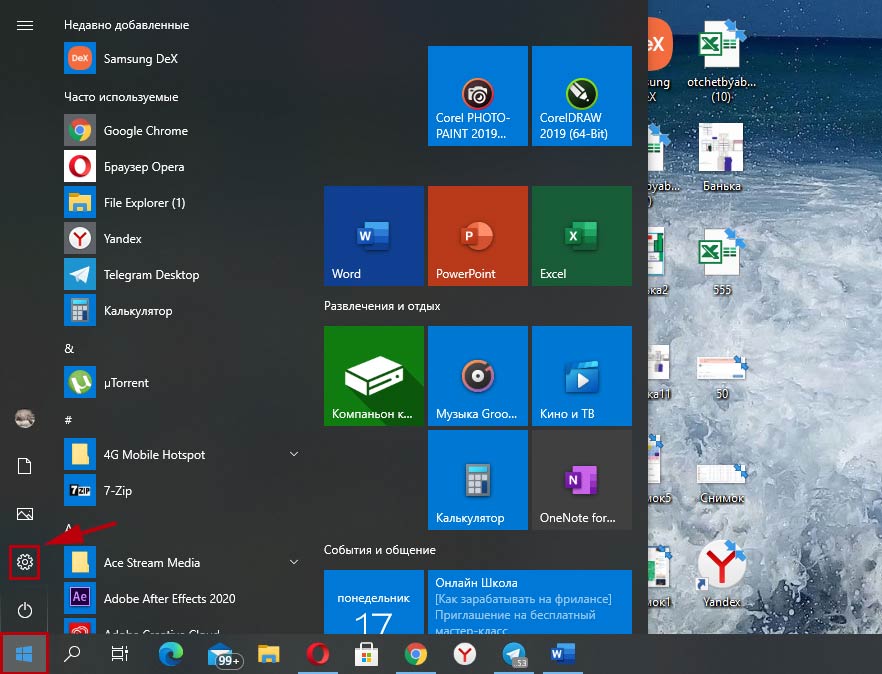
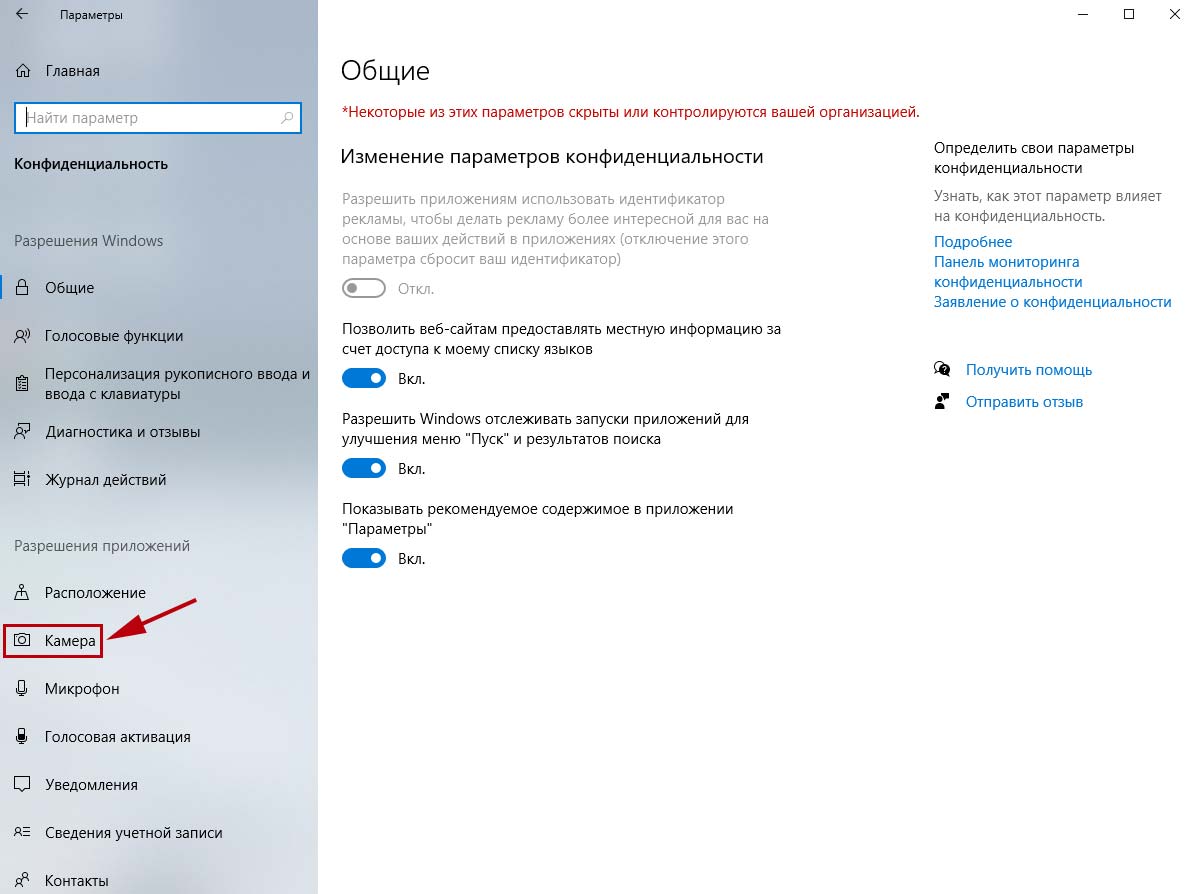
3. В параметрах Windows перейдите в раздел «Конфиденциальность» с замочком слева.
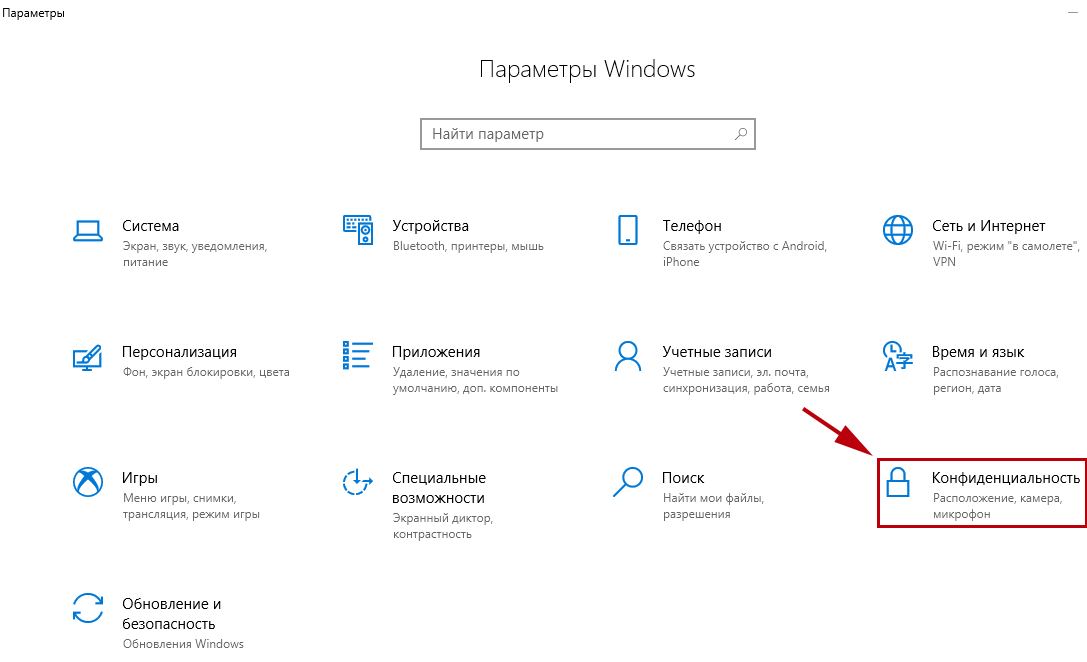
4. В левом меню кликните «Камера».
5. Убедитесь в том, что под заголовком страницы выводится «Доступ к камере для этого устройства включен». В противном случае щелкните по кнопке «Изменить» и предоставьте доступ.
6. Переведите во включенное положение ползунок «Разрешить приложениям доступ к камере».
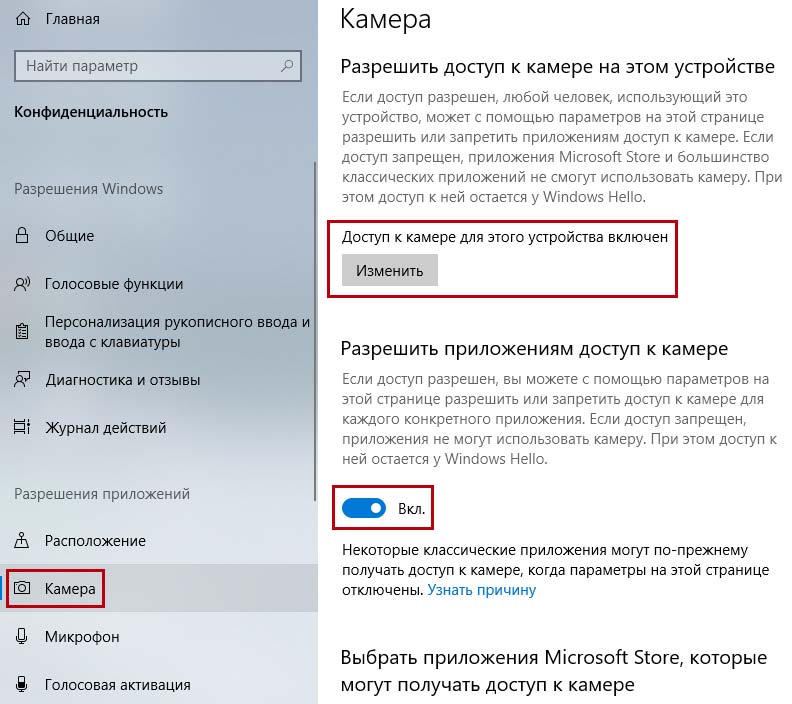
Если приложениям предоставлен доступ к камере или активация настойки не помогла, промотайте экран вниз и выясните, какие программы работают с камерой. Убедитесь, что тумблер справа от Зум включен. Чтобы избежать конфликта приложений, последовательно отключайте другие программы. Начните со Skype.
Если у клиента конференций нет проблем с доступом, конфликт приложений исключен, но Zoom не видит камеру, проверьте вебку с помощью диспетчера устройств.
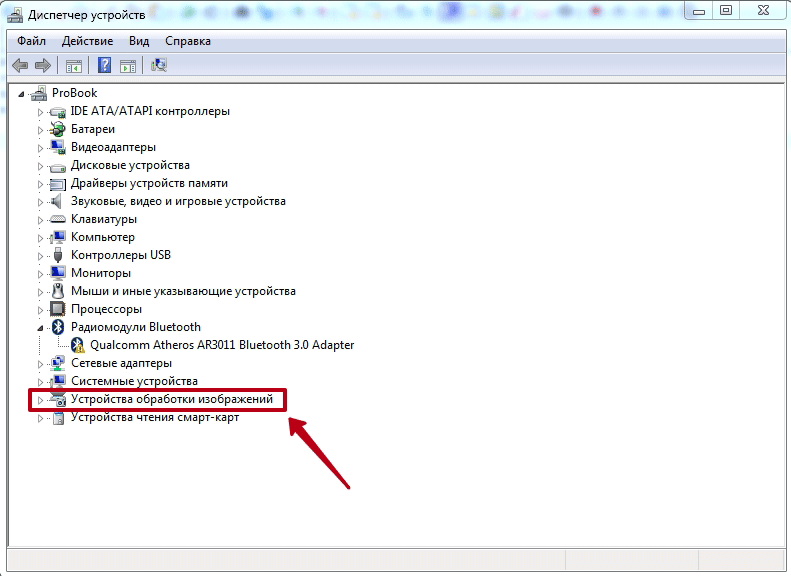
1. На рабочем столе кликните по иконке с компьютером.
2. В открывшемся окне правой кнопкой мыши вызовите контекстное меню и выберите пункт «Свойства».
3. Перейдите в раздел «Диспетчер устройств» вверху слева.
4. Кликните левой кнопкой мышки по иконке «Камеры» в списке оборудования.
5. Если камер несколько, выберите нужную, щелкните правой кнопкой и вызовите контекстное меню.
6. Кликните «Свойства».
7. Удостоверьтесь, что во вкладке «Общие» в поле «Состояние устройства» указано «Устройство работает нормально».
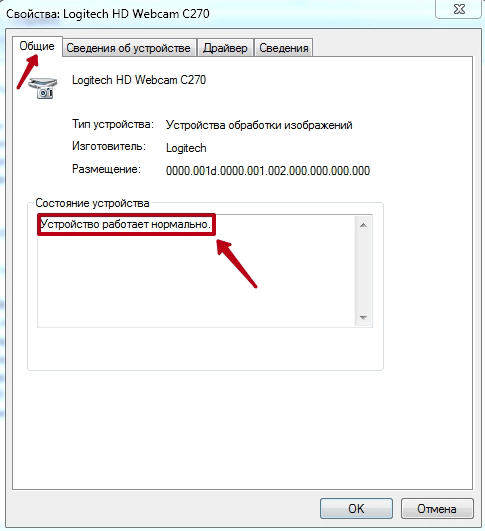
8. Если в поле «Состояние устройства» выводится ошибка, перейдите во вкладку «Драйвер».
9. Удостоверьтесь в том, что камера включена. Если слева от строчки «Разрешение выбранного устройства» размещена кнопка «Задействовать», веб-камеры выключена. Щелкните «Задействовать», затем «Ok» в нижней правой части окна со свойствами.
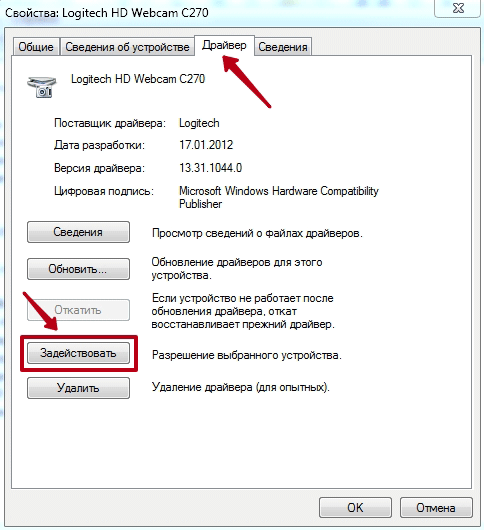
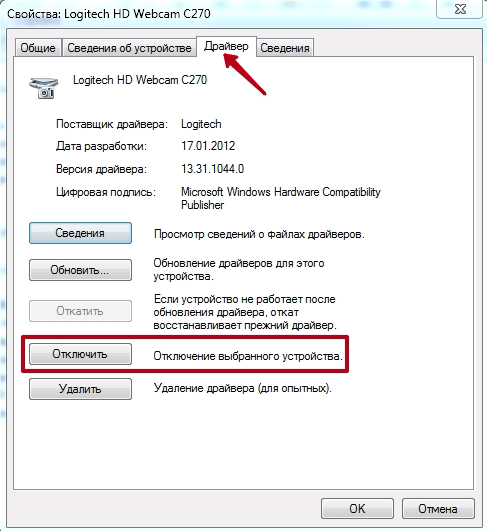
10. Перезагрузите компьютер, чтобы изменения вступили в силу.
Если в диспетчере устройств камера включена, ошибки не выводятся, но вебка не работает в Зуме, установите «свежие» драйвера. Щелкните по кнопке «Обновить» слева от «Обновление драйверов для этого устройства».Не работает видеотрансляция в Windows 7
Пользователям Windows 7 доступен только диспетчер устройств, потому что в операционной системе нет встроенного приложения Camera и настроек доступа оборудования к установленным на компьютер программам.
Чтобы попасть в диспетчер устройств, выполните описанную для Windows 10 последовательность действий или перейдите к настройкам через меню «Пуск».
1. Щелкните «Пуск».
2. Кликните «Панель управления».
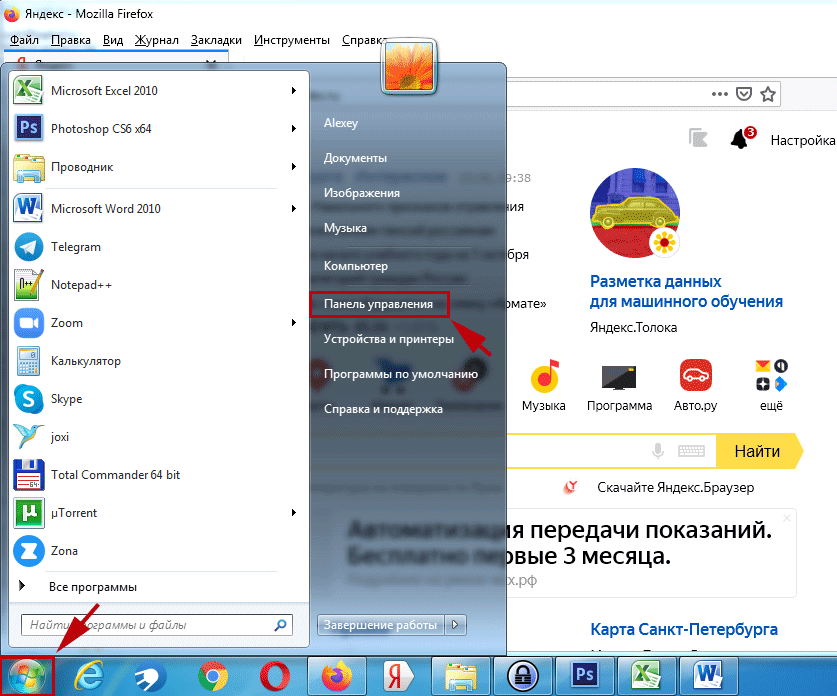
3. Перейдите в раздел «Система и безопасность».
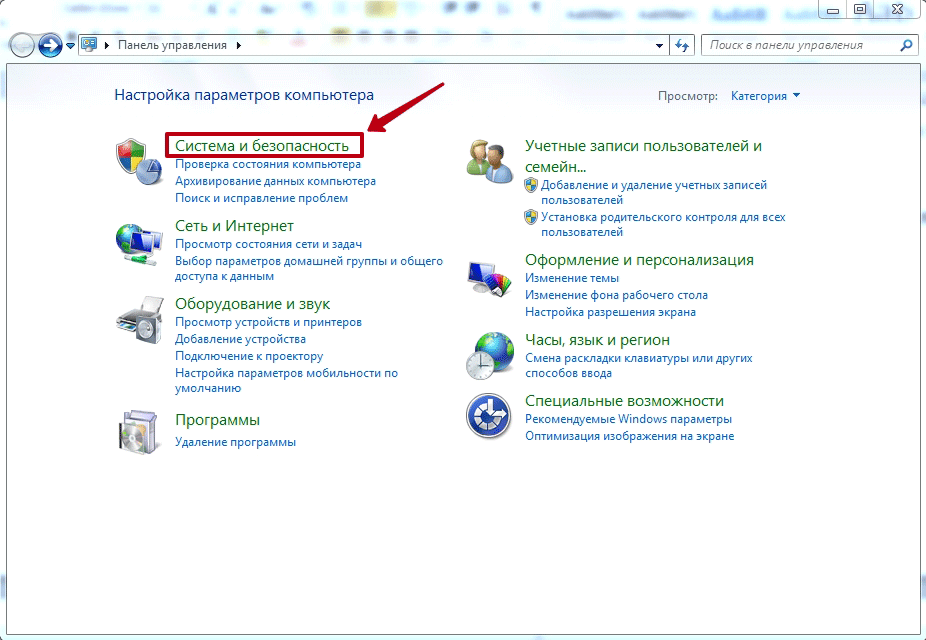
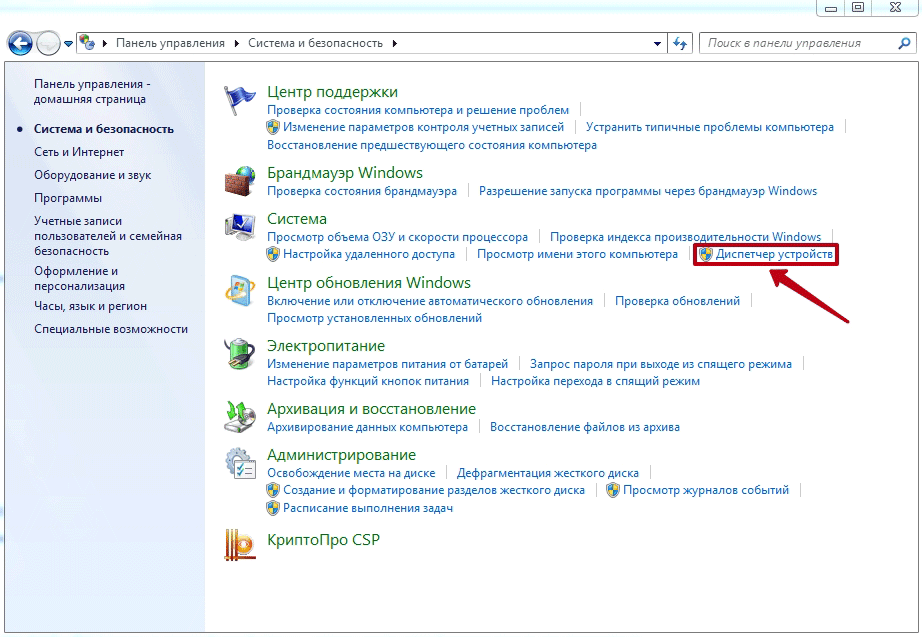
4. Под заголовком «Система» щелкните «Диспетчер устройств».
Настроить камеру в Windows 7 помогает конкурирующий клиент конференций Skype. Чтобы перейти к настройкам вебки, выполните семь простых действий.
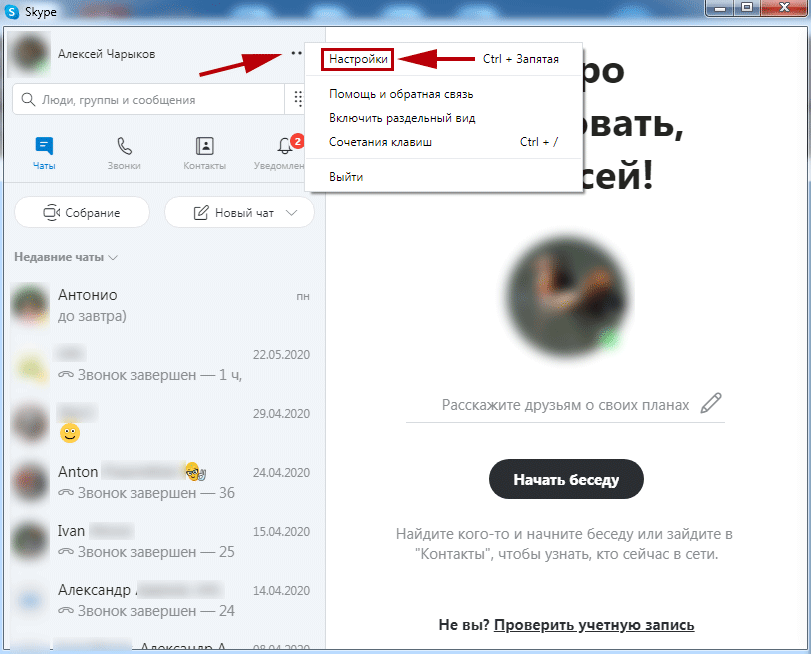
1. Запустите Скайп.
2. Щелкните по трем точкам справа от аватарки.
3. Выберите верхний пункт «Настройки».
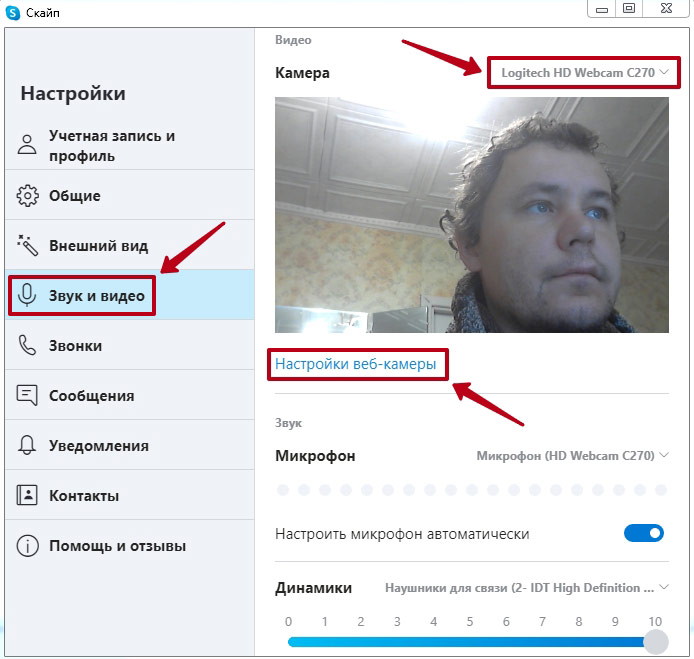
4. Перейдите в раздел «Звук и видео».
5. Если к компьютеру подключено несколько устройств, выберите нужную камеру в списке.
6. Перейдите по ссылке «Настройки веб-камеры».
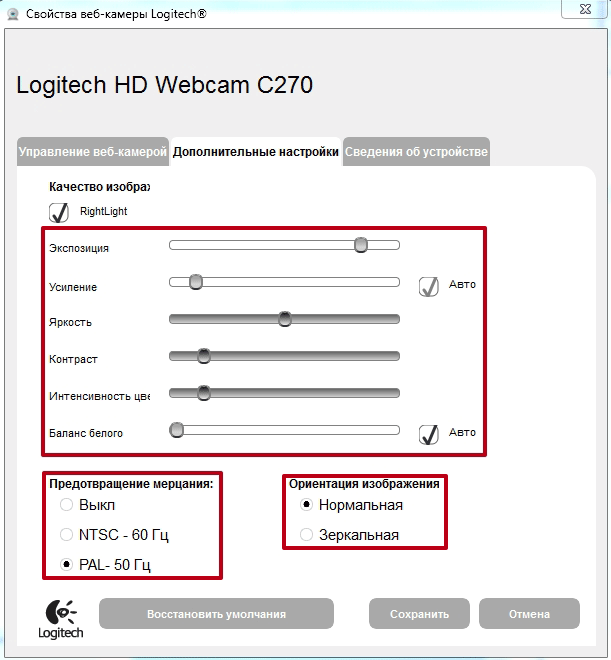
7. Откройте вкладку «Дополнительные настройки» и настройте экспозицию, усиление, яркость, контраст, интенсивность цвета, баланс белого, предотвращение мерцания и ориентацию изображения.
Проблемы с видеооборудованием на mac OS
Почему не работает камера в Зуме на MacBook? Часто, как и в случае с ПК на Windows 10, проблема связана с настройками доступа приложений к аудиооборудованию. Шесть шагов помогут проверить, видит ли клиент конференций веб-камеру макбука.
1. Щелкните по иконке с яблоком в левом верхнем углу экрана.
2. В раскрывшемся меню выберите пункт «Системные настройки».
3. Перейдите в раздел «Защита и безопасность».
4. Откройте вкладку «Конфиденциальность».
5. Кликните по пункту левого меню «Камера».
6. Убедитесь в простановке чекбокса слева от иконки Zoom.
Почему не работает камера на iOS
Иногда пользователи iPhone и iPad при первом запуске приложения не предоставляют клиенту доступ к веб-камере. В этом случае в окне предварительного просмотра видео программа выводит ошибку, как показано на скриншоте.
Чтобы разрешить Zoom доступ к видеооборудованию, пройдите три шага.
1. Щелкните по иконке «Настройки» с шестеренкой на рабочем столе.
2. В строке поиска по настройкам введите «Zoom» и перейдите к единственному результату поиска.
3. Убедитесь в том, что ползунок справа от иконки с камерой переведен во включенное положение.

Не работает трансляция видео на телефоне с Android
Камера на смартфонах с Android не работает по той же причине, что у телефонов с iOS: приложению не предоставили доступ к видеооборудованию при первом запуске. Чтобы программа «увидела» камеру, выполните набор простых действий.
1. Щелкните по пиктограмме с шестеренкой и перейдите к настройкам смартфона.
2. Скролльте экран вниз и переходите в раздел «Все приложения».
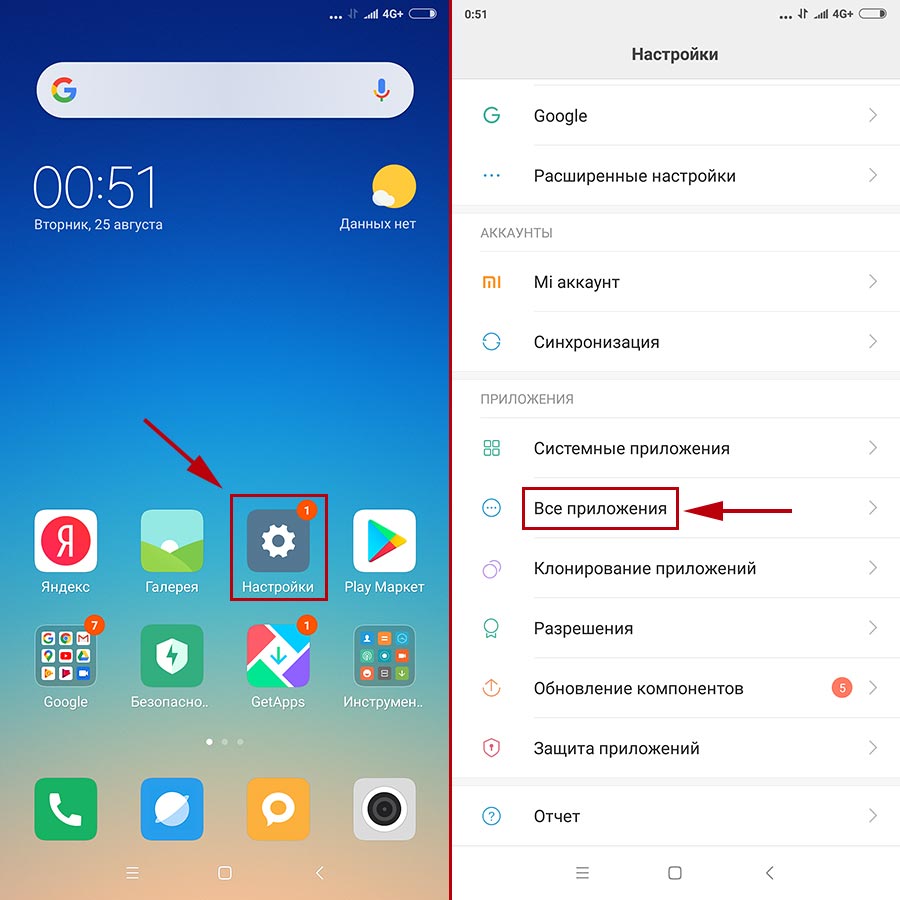
3. Напечатайте название программы в строке поиска и перейдите к настройкам приложения.
4. Кликните по ссылке «Разрешения приложений».
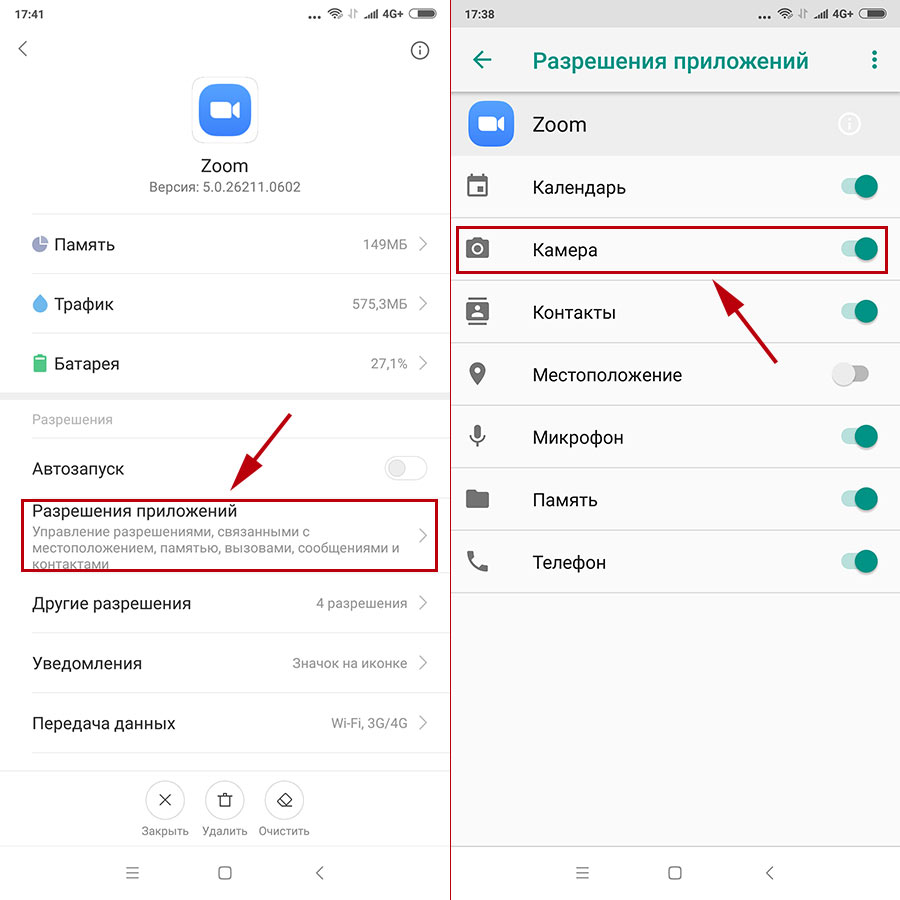
5. Удостоверьтесь в том, что программе предоставлен доступ к камере.