
NVIDIA is the most popular choice among users when opting for a dedicated GPU. The graphics it offers are top-class, and the customization it brings along is also unbeatable. With extended features like the GeForce Experience and NVIDIA Control Panel, the GPU makes it super easy for users to interact with it. However, sometimes, issues like the NVIDIA control panel crashing/not opening take over the experience.
Users have shared that the utility keeps crashing out of nowhere, especially when clicking on the manage 3D option in the NVIDIA Control Panel. Several have also pointed out the issue of the NVIDIA control center not opening, which is again a concern.
So what can be done? Well, there are a few ways to resolve the NVIDIA control panel not opening or crashing out of nowhere. In this post, we will discuss all of them, so stay tuned!
What is the NVIDIA Control Panel?
As the name suggests, It is a utility tool that allows a user to control both basic and advanced configurations for the GPU. No matter what NVIDIA hardware you use, you can make the most of it by fine-tuning the settings available in the control panel. Some of the crucial things that can be configured using the same are –
- Graphics Settings – Allows you to manage the basic usage settings of the GPU.
- Display Configuration – Everything from supported aspect ratio to regular display settings are available.
- 3D Settings – The ability of a GPU to handle 3D objects and how it renders them can be configured using the 3D settings in the NVIDIA control panel.
- Refresh Rate – If you have a monitor that supports a higher refresh rate than the usual (40-60Hz.), the control panel allows you to monitor and maintain the same as per usage.
- G-Sync – It is an advanced feature that allows you to sync both the GPU and the monitor’s refresh rate together. This way, all the lags and screen tears are resolved.
Other features are available in the utility. However, these are some of the most common and useful ones. It is a useful tool. However, issues related to the NVIDIA control panel crashing when changing resolution or not opening at all cause problems that can be irritating.
Read Also : Fix – NVIDIA GeForce Experience Not Working or Missing
Why Do These Problems Appear on the NVIDIA Control Panel?
Before starting with the fixes, we must explore the possible reasons that may be responsible for the NVIDIA control panel crashing on Windows. Multiple factors may cause the issues. These include –
- Outdated NVIDIA Drivers
- Conflicting Software on PC
- Startup Issues
- Existing Display Container Process Error
These are the known issues; other problems may be causing the sudden crashing of the NVIDIA control panel on your PC. Fortunately, all these issues are fixable. Check out the next section, where we have shared fixes to help you resolve the NVIDIA control panel not opening issues.
Ways to Fix NVIDIA Control Panel Crashing/Not Opening
Fix 1 – Restart the NVIDIA Services in the Background
There are times when you have double-clicked on the NVIDIA application icon, but it won’t open. That is because sometimes there is a process already running in the background. It usually happens when you impatiently try to launch the application by clicking on it multiple times.
The best way to deal with such issues is to close all the initiated processes before trying again. Here’s what you should do –
Step 1 – Press Ctrl+Shift+Esc to open the Task Manager.

Step 2 – Head to the Processes tab in the application
Step 3 – Look for the NVIDIA Control Panel.

Step 4 – Select the process and click on End task.
Step 5 – Once the process is removed from the list, go to the launcher and start the process again.
This should help you resolve the NVIDIA control panel not opening error. However, if it did not, simply move to the next fix.
Tip : You can also try closing the NVIDIA Container process from the list, as it is often a disturbing element that stops the NVIDIA control panel from opening in the background.
Fix 2 – Try Launching the NVIDIA Control Panel as Administrator
Sometimes, the not opening issue can result from a lack of permissions. The ideal way to handle the permissions issues while launching an application is to try and open it with Admin privileges. Simply find the NVIDIA control panel source and launch it as administrator. Here’s how you can do so –
Step 1 – Go to the start menu and search for the NVIDIA control panel.

Step 2 – In the search results, you may find the Run as Administrator option. Click on it to launch.
If you used to open the application using the right-click on the desktop shortcut, we recommend you use the Run as administrator option via the start menu. That is because it will open the application faster and with better performance.
Fix 3 – Update NVIDIA Drivers on Your PC
Another reason why the NVIDIA control panel keeps crashing on your PC may be the outdated drivers on your PC.
Finding outdated drivers on your PC is fine, as there’s no direct way to update them regularly. Sure, you can manually go to the Device Manager and search for driver updates. However, it is not at all feasible. This is also why you may face NVIDIA control panel compatibility issues.
The easiest way to keep your drivers updated and skip such issues is to use the Advanced Driver Updater. It is one of the most popular choices among users for updating the drivers due to its vast driver database and instant processing method. The best part is that it breaks down the entire driver update process into 3 simple steps –
Step 1 – Download and Install the application on your PC.
Step 2 – Run a scan using the Start Scan Now button on the application’s home screen.

Step 3 – Once the scan results are fetched, click Update All to finish the process.
Once you have updated the driver, you can check if the NVIDIA control panel not opening error still exists on your PC. It should be resolved after updating the drivers on your PC. However, if not, do not worry; we have other fixes too!
Want to more in-depth about the tool – Visit here
Fix 4 – Check Installed Programs for Conflicts
If the NVIDIA Control Panel was working fine a while ago, and the crashing/not opening issues have recently started. In that case, there are chances that a conflicting application is causing the error. It may be a third-party app you recently added to your PC or the antivirus program that received recent updates.
There are two things you can do to fix the issue –
1. Uninstall recently installed third-party applications.
Step 1 – Press Windows + R to open the Run search on your computer
Step 2 – In the Run search, use the command Control appwiz.cpl to open the program manager on your computer.

Step 3 – In the program manager window, click on Installed On to sort the apps based on their installation.
Note : Remember that the latest updates are also shown as recently installed applications, so do not get confused if you see an older application at the top of the list

Step 4 – Uninstall the recently installed third-party applications by selecting the app and clicking the uninstall button on the top bar.
2. Deactivate Antivirus Before Launching the NVIDIA Control Panel
If the application was not the issue, the firewall of your third-party antivirus may be causing the error. The best way is to open and deactivate the application until the next restart. Try launching the control panel again, and it should work properly.
You may find the deactivate option in the antivirus application easily. Check the quick access menu for the same.
Fix 5 – Remove Corrupt Bin Files
The NVIDIA Control Panel also has dedicated core files that allow it to function properly. There are bin files that serve as the system files for the same. If you cannot launch the NVIDIA control panel, chances of bin files going corrupt are there.
The easiest way to handle the situation is to remove the existing files and restart using the control panel so that it creates the new ones automatically. Here’s what you should do –
Step 1 – Press Windows + R to open the Run Search Utility
Step 2 – In the Run Search, use the address
C:\ProgramData\NVIDIA Corporation\Drs

Step 3 – After opening the address, find the – nvdrsdb0.bin and nvdrsdb1.bin files and delete them.

Step 4 – After you have deleted these files, restart your computer.
Step 5 – Once the PC is back on, launch the NVIDIA control panel, which should launch properly.
NVIDIA Control Panel Not Opening – FIXED!
Other than these fixes, you can also uninstall and reinstall the NVIDIA Control Panel, but it may not work if the above factors are improper. Hence, it is better to use the shared 5 fixes and ensure the proper functioning of the tools available.
If you have any doubt about the steps shared, feel free to connect with us via the comments section or our social handles. That’ll be all for this post. Thanks for reading, good luck!
Recommended :
Solved – Nvidia Graphics Driver Not Compatible With This Version of Windows
NVIDIA Driver Keeps Uninstalling Itself? Try These Fixes
Nvidia Control Panel is the only tool for adjusting the graphical settings of all Nvidia cards. Not only it lets you set the preferred graphics processor for every app separately, but it enables antialiasing for that app also.
So when the application keeps closing on startup or during 3D-settings editing, the situation becomes a pain in the neck.
But don’t worry; after many trials and errors, I’ve found the 4 quickest methods to solve the issue. It’s time to fix yours!
Usually, the Nvidia Control Panel keeps closing due to a bug in Nvdrsdb0 & Nvdrsdb1 Bin files or a conflict between the graphics software. You can quickly solve this issue by deleting these two Bin files, updating the GPU drivers, or moving everything from your desktop.
If any of these fixes don’t work, resetting Windows to its default settings is the only option.
Go through the following section to know the steps for every available fix for Nvidia Control Panel closing on startup or during Manage 3D option.
Here are the 4 methods to fix Nvidia Control Panel that keeps shutting down or not opening:
1. Rename/Delete Nvdrsdb0 & Nvdrsdb1 Bin Files
The Nvdrsdb0 & Nvdrsdb1 are two bin files that maintain the runtime of the Nvidia Graphics control panel. But those files easily get data corruption, and the app becomes unusable when that happens.
But if you rename or remove those Bat files, your PC automatically restores the files, and the app becomes stable.
Follow the steps to rename/delete Nvdrsdb0 & Nvdrsdb1 bin files:
As you can see, the app is running smoothly after completing the steps. But if you can’t tweak the settings in the app, jump to the next solution.
Check out our separate post on how to enable RTX Nvidia GPU.
2. Move Everything on Your Desktop
You can solve the unresponsive Nvidia Control Panel issue by moving all your desktop contents to other drives. Sounds hilarious, right?
But even if the solution is laughable, it works. Many users solved their Nvidia Control Panel problem using this method and posted in different recognized tech forms.
To move everything from your desktop:
If you can easily tweak the graphics settings, the application runs smoothly. But in case the problem remains, follow the next solution.
Read more on does freeSync work with Nvidia.
3. Reinstall Geforce Drivers
If the unresponsive Nvidia Control Panel issue happens for drives conflicts re-installing the Geforce Drivers will solve your issue.
Go through the steps to reinstall the Geforce drivers:
After completing the steps, the GPU driver will start installing automatically.
You can also use the Nvidia driver download website to update the GPU drivers.
Use the following steps to do so:
After completing the steps, the problem will disappear completely.
Follow our guide to fix Nvidia Graphics Card not detected in Windows 10.
4. Reset Your Windows
When the above solutions don’t solve your issue, you must reset your Windows to factory settings. But remember resetting the Windows will remove all the applications and change all the settings to default.
So backup the settings before resetting the Windows on your computer.
Follow the steps to reset your Windows PC:
After completing the steps, your PC will become as good as new, and the Nvidia Control Panel app will start working again.
Why does your Nvidia Control Panel Close on Startup?
Usually, the Nvidia control panel application won’t open or exit on 3D settings for driver conflicts or data corruption. Also, old software bugs, administrative permission issues, or damaged files can cause similar problems. You can solve this issue by deleting the Nvdrsdb0 & Nvdrsdb1 files.
Here’s why Nvidia Control Panel closes on startup:
- The Geforce Drivers conflict with the default Windows display driver.
- The Nvdrsdb0 & Nvdrsdb1 bin files have data corruption.
- For using the old/outdated version of the Nvidia driver.
- The NVIDIA Control Panel isn’t getting administrative permission.
- Your PC has some damaged files in the Nvidia DRS folder.
These are the core reasons that cause errors in the NVIDIA Control Panel application.
You may also like to read about fix Nvidia Graphics Card not detected in Windows 11.
FAQs
Is the Nvidia control panel necessary?
Yes, the Nvidia control panel is required to tweak any settings of your Nvidia graphics card. But when you are using the other manufacturer’s graphics card (e,g; Intel, AMD), installing the Nvidia control panel is unnecessary.
Can I uninstall the NVIDIA Control Panel?
Yes, you can uninstall the NVIDIA Control Panel software using the control panel. But I don’t recommend you to do so. Because uninstalling the software will make your OS switch to the default display, you won’t be able to maintain your graphics card use.
Is Nvidia GeForce Experience free?
Yes, the Nvidia GeForce Experience software is free for all Nvidia card users. Using this app, you can now optimize your game more effectively.
Conclusion
In short, Diver conflicts or data corruption are the two main culprits causing errors in the Nvidia Control Panel. You can quickly solve this issue by deleting the Nvdrsdb0 & Nvdrsdb1 Bin files, updating the GPU drives, or moving everything from your desktop.
If that won’t solve the problem, reset your Windows version. But make sure to back up everything before doing so.
After applying the fixes, I’m sure your Nvidia Control Panel works perfectly. Comment if you need any other guide on Nvidia driver. And for everything else, stick with 10Scopes.
It is common to see many Windows users complaining about NVIDIA Control Panel Crashing. This can become quite annoying for users who frequently use the control panel to manage graphic drivers settings and part game-specific preferences.
If you are looking for solutions to fix the error of NVIDIA Control Panel crashing or not opening, check out the following post and learn how to easily but completely fix the error with 12 methods.
Why Does the NVIDIA Control Panel Keep Closing
We often see many Windows users complaining about NVIDIA Control Panel Crashing. And the reasons for this problem are bizarre. But the main cause of this problem seems to be corrupt or outdated drivers, so in some cases, updating the driver seems to fix the problem. But sometimes this method doesn’t work for everyone.
Here are a few reasons why the NVIDIA Control Panel closes on its own.
- Outdated NVIDIA Control Panel
- Conflicting application/driver
- Corrupted NVIDIA Control Panel application file
- Outdated Windows system
- Limited output dynamic range, disturbing the integrity of the graphics card power configuration, etc.
Method 1: Uninstall and Reinstall NVIDIA Control Panel
The most direct and efficient way to solve this problem is to uninstall the NVIDIA Control Panel and reinstall it. This issue can happen when the entire NVIDIA Control Panel application file is corrupted or missing, or when it encounters an installation interruption or some malware application.
Step 1: Press the Windows + I key to open Settings.
Step 2: Go to Apps > Apps and Features.
Step 3: Click on three vertical dots on NVIDIA Control Panel and select Uninstall.
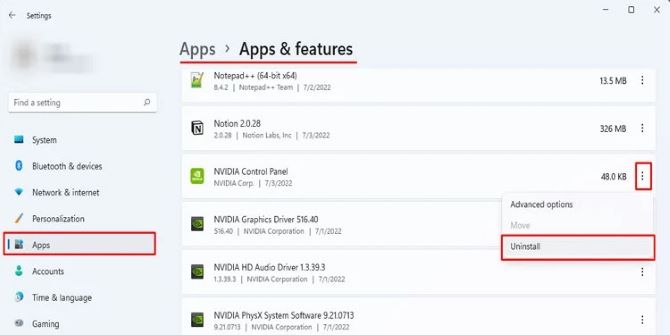
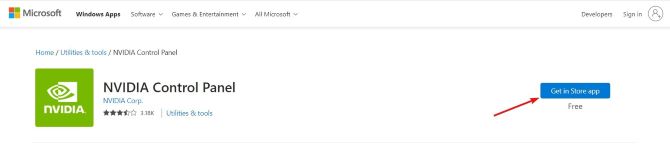
Step 4: After uninstalling, go to Microsoft Store to download the NVIDIA Control Panel again.
Method 2: Run NVIDIA Control Panel as Administrator
Sometimes, it might just be a permissions issue. To test if it works for you, you can try running the NVIDIA Control Panel as administrator. When you run the NVIDIA control panel as administrator, the OS sets its process to high priority and prioritizes all system resources for it.
The caveat is that you must launch the NVIDIA Control Panel from the installation folder, not from a desktop shortcut. Follow the necessary steps.
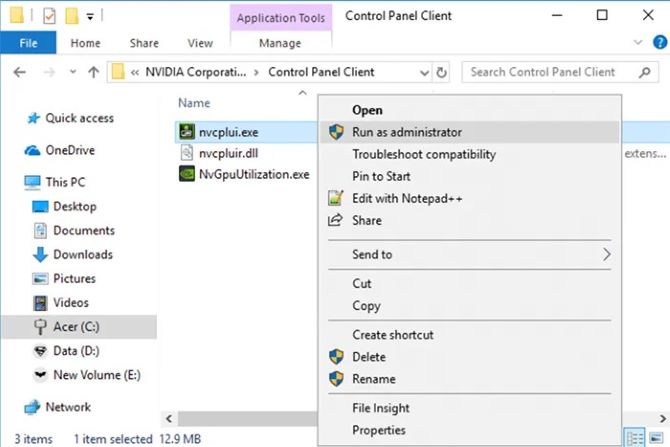
Step 1: Press Win+R to open the Run panel.
Step 2: Type C:\Program Files\NVIDIA Corporation\Control Panel Client into the box and then press Enter.
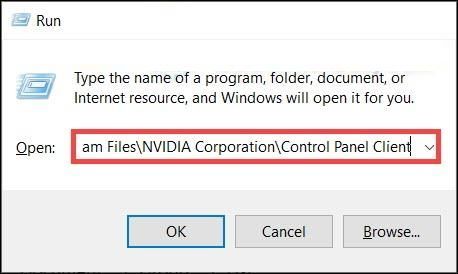
Step 3: Right-click the nvcplui.exe folder and select Run as administrator.
Method 3: Update Your Windows System
Another reason for NVIDIA Control Panel crashing can also be due to an outdated version of Windows system. If your system is missing some important updates, Windows may not be able to communicate with its drivers more efficiently, causing the device itself to malfunction. To fix this problem, you need to update your Windows system.
Step 1: Open Settings by right-clicking the Start icon.
Step 2: Click on Update & Security > Windows Update > Check for updates.
Method 4: Remove Conflicting Programs
According to some users, programs that use the same resources as the NVIDIA Control Panel may cause the NVIDIA Control Panel to crash.
Conflicting programs include applications such as Opera Browser, OCAT, or graphics card companion applications such as EVGA Precision X1 and ASUS GPU Tweak III. You can start by checking your computer for recent changes, or perform a clean boot to identify the culprit.
Step 1: On your keyboard, press Win+R simultaneously to open the Run box.
Step 2: Type msconfig in the box and click OK.
Step 3: In the pop-up window, go to the Services tab and check the box next to Hide all Microsoft services.
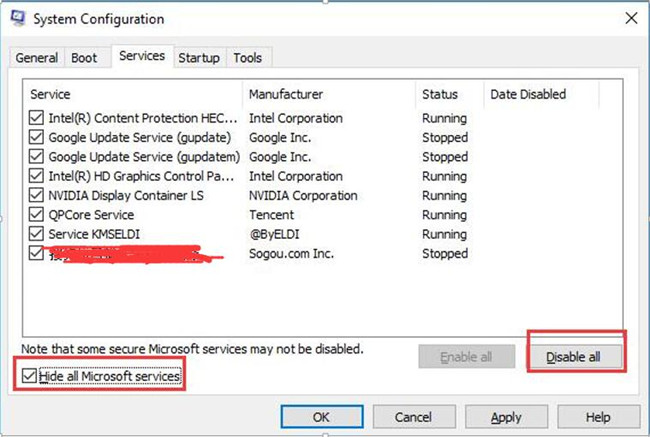
Step 4: Uncheck all the services EXCEPT those that belong to your hardware manufacturers, such as Realtek, AMD, NVIDIA, Logitech, and Intel. Then click OK to apply the changes.
Step 5: On your keyboard, press Ctrl+Shift+Esc simultaneously to open Task Manager, then go to the Startup tab.
Step 6: Select each program you believe is interfering one at a time, then click Disable.
Step 7: Restart your computer.
Method 5: Delete Nvdrsdb0 and Nvdrsdb1 Binary Files to Solve NVIDIA Control Panel Not Working
Constant NVIDIA Control Panel crashes can be caused by corrupted files. Deleting these files should remove any damage. Once you re-open the application, the PC will automatically restore these files.
However, deleting these files will remove all settings changes you made to the NVIDIA Control Panel. If this is the case, you can rebuild critical components using the steps below:
Step 1: Open the Run box by pressing Windows + R key.
Step 2: Now, paste C:\ProgramData\NVIDIA Corporation\Drs in the box and click OK.
Step 3: Delete nvdrsdb0.bin and nvdrsdb1.bin files.
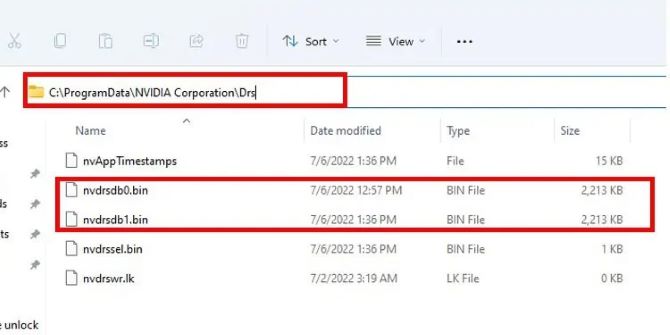
Step 4: Reboot your PC.
Method 6: Turn Off GPU Virtualization
GPU virtualization refers to technology that allows the use of GPUs to accelerate graphics or GPGPU applications running on virtual machines. GPU Virtualization is a mode in VirtuMVP that can cause issues with the NVIDIA Control Panel constantly closing, so use the steps below to disable it. By disabling it, the problem you are having can be solved.
Step 1: Open the VirtuMVP control panel. You can find it right beside the clock on your Task Bar.
Step 2: Go to the Main tab, there should be a GPU Virtualization option. Just turn it off.
Step 3: Save your settings, reboot your PC, and check if it has fixed your NVIDIA Control Panel issues.
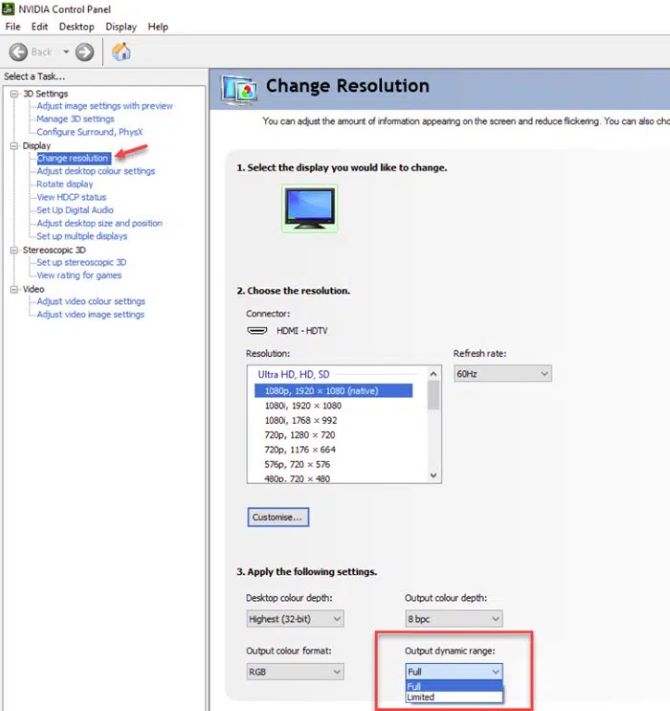
Method 7: Change the Output Dynamic Range
Dynamic range refers to the difference in the color values of the output video on the screen. If the settings are incorrect, you may end up seeing the NVIDIA Control Panel crashing on your PC. Some users say that switching the Output Dynamic Range setting to Full instead of limited can effectively solve this problem. Here’s how to do it:
Step 1: Open the NVIDIA Control panel.
Step 2: Go to the following path: Display > Change resolution.
Step 3: On the right panel, scroll down and click on the Output Dynamic Range option.
Step 4: Select Full and apply the changes.
Method 8: Restart NVIDIA Display Container Service
NVIDIA Display Container, also known as nvcontainer.exe, is a necessary process for the controller and is mainly used to store other NVIDIA processes or other tasks. You may notice that when multiple NVIDIA processes and services are running on your PC, NVIDIA containers are taking a high CPU load in the Task Manager.
So it also causes this error of NVIDIA Control Panel crashing. So if this is the case, you have to restart the NVIDIA Display Container service.
Step 1: Open Run dialogue by hitting Windows and R keys.
Step 2: Now, type services.msc in the box and click OK.
Step 3: Find out NVIDIA Display Container LS and NVIDIA LocalSystem Container service on the left panel.
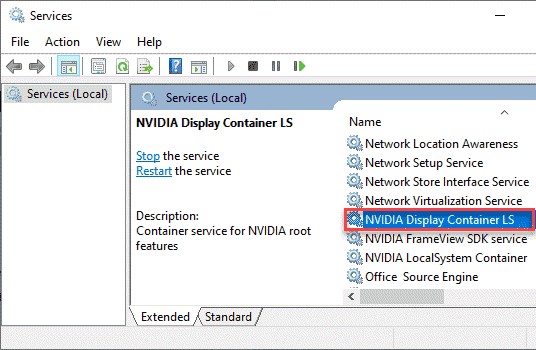
Step 4: Right-click and choose restart for both services.
Method 9: Turn Off Fast Startup to Avoid NVIDIA Control Panel Crashing
Fast Startup allows your system to boot faster than previous versions. It does not allow your system to shut down completely, thus speeding up the restart process. But this often leads to issues like NVIDIA Control Panel not opening on your PC. Turning off this feature may solve your problem.
Step 1: Press the Windows key + R to open the Run dialogue.
Step 2: Input powercfg.cpl into the box and click OK.
Step 3: On the Power Options page, select Choose what the power buttons do from the left panel.

Step 4: Click on Change settings that are currently unavailable.
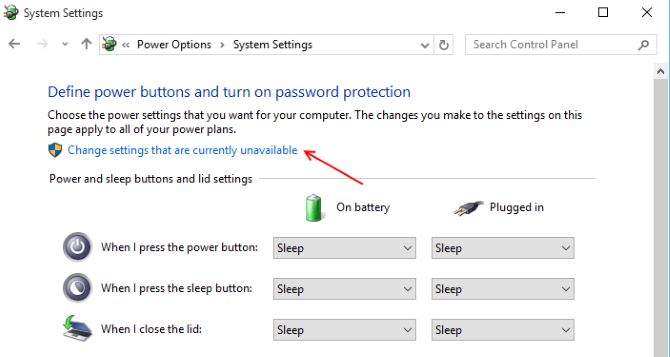
Step 5: Uncheck the box beside Turn on fast Startup and then click Save Changes.
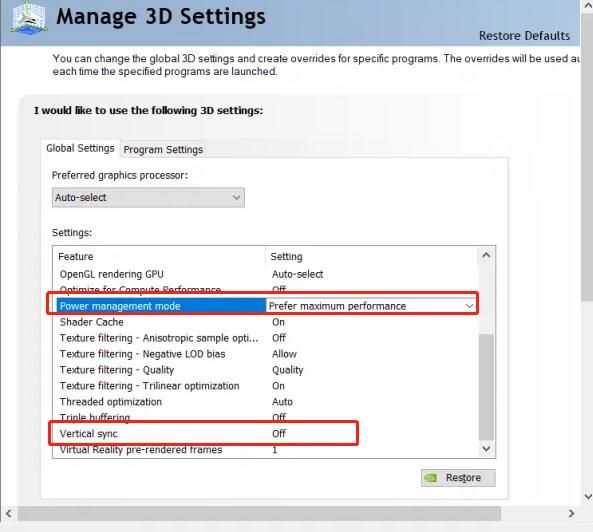
Method 10: Change the Power Management Settings and Vertical Sync Settings
Sometimes, some settings on the NVIDIA Control Panel cause the NVIDIA drivers to be incompatible with your Windows, causing the NVIDIA Control Panel to keep crashing on your device.
In this section, we recommend that you change Power Management and turn off Vertical Sync. Adjusting these settings should help you get better device performance.
Step 1: Open the NVIDIA Control Panel.
Step 2: Go to the following path: 3D Settings > Manage 3D Settings.
Step 3: On the right panel, set the Power Management to Prefer Maximum Performance. And for Vertical Sync, set it to be Off.
Method 11: Update NVIDIA Driver
Although the NVIDIA graphic driver package no longer includes the NVIDIA Control Panel, it may still be one of the reasons for various problems with the control panel. Therefore, if the above solutions do not work, you can try to update the NVIDIA driver or uninstall and reinstall the graphics driver.
Unfortunately, if all the above methods fail, you can only try to contact NVIDIA Support through their website, which is your last resort for this issue. They might suggest reinstalling the drivers and other simple methods already mentioned before, and if that fails, they’ll say you should contact the manufacturer for warranty service.
FAQ about NVIDIA Control Panel Crashing:
Q1: How do I fix the missing NVIDIA Control Panel?
Step 1: Open Control Panel by pressing the Windows key + R and typing in control panel in the search box.
Step 2: Once the Control Panel opens, go to the upper-right corner and change View to Large icons. Alternatively, you can choose Small icons.
Step 3: Double-click the NVIDIA Control Panel.
Step 4: Select the Desktop option from the top menu and then tick both Add Desktop Context Menu and Show Notification Tray Icon.
Q2: What causes the frequent crashes in my NVIDIA control panel?
If this driver is outdated, the NVIDIA Control Panel may experience communication issues with the graphics driver, causing it to crash every time the Control Panel is launched.
Q3: How do I manually open NVIDIA Control Panel?
Right-click on the Start menu bar to launch the context menu and select NVIDIA Control Panel. You can also manually open it from the Start menu via Control Panel.
Q4: Is it safe to uninstall the NVIDIA control panel?
Yes. As third-party proprietary software, you can of course uninstall the NVIDIA Control Panel because it’s mostly used for custom gaming, recording, etc, not a real display driver. However, using the NVIDIA Control Panel, you can access various settings that are not normally accessible through Windows Settings. When you uninstall the NVIDIA Control Panel, you will not be able to use these settings.
Q5: How do I reset my NVIDIA control panel?
Right-click on your desktop and select NVIDIA Control Panel. Click Manage 3D Settings. In the upper-right corner, click Restore Defaults.
More Articles:
Solved: NVIDIA Control Panel Missing on Windows 10/11
How to Download NVIDIA Control Panel for Windows 10/11
Fixed: NVIDIA G-Sync Not Working On Windows 10
Brian Peng
Brian Peng is a PC technician and network engineer with over 13 years of IT experience. He has worked in the IT industry for a long time, providing IT support and network service support for various companies. Currently, he has written over 1000 articles about computers, games, and mobile.
Download Article
Troubleshoot the NVIDIA Control Panel and get it up and running again
Download Article
Is the NVIDIA Control Panel not opening for you? This is a frustrating issue, especially if nothing seems to be working. In this article, we’ve gathered the best ways to get the NVIDIA Control Panel working again. Keep reading to learn more.
Top 7 Ways to Fix the NVIDIA Control Panel Not Opening
- Run the NVIDIA Control Panel as an administrator.
- Force quit the NVIDIA Control Panel before restarting it.
- Enable NVIDIA services in System Configuration.
- Restart NVIDIA’s services via the Services menu.
- Update your NVIDIA drivers.
- Try opening the Control Panel with Windows PowerShell.
- Update Windows for further driver updates.
-

This can sometimes fix problems where the NVIDIA Control Panel won’t open. To do this, simply search for the NVIDIA Control Panel in the taskbar search bar, right-click it, and click Run as administrator.

Advertisement
-
To do this, simply right-click on the taskbar, select Task Manager, then click on the NVIDIA Control Panel and click End Task. Then, restart the NVIDIA Control Panel to see if it opens normally.

-
If NVIDIA’s services are disabled, the NVIDIA Control Panel will not open. To check if these services are enabled and enable them if not:
- Type msconfig in the taskbar search bar, then click on System Configuration.
- Click on the Services tab.
- Click on the Service column to sort the services alphabetically.
- Scroll down to find the NVIDIA services.
- If any of the NVIDIA services (NVIDIA Display Container LS, NVIDIA FrameView SDK service, or NVIDIA LocalSystem Container) are disabled, click the box next to them to enable them.
- Click Apply then OK to save your changes.

Advertisement
-
Even if NVIDIA’s services are active, they may need to be restarted to start working properly. To restart these services:
- Press ⊞ Win+R to open the Run dialogue.
- Type services.msc and press ↵ Enter.
- Locate the NVIDIA services on the list.
- Right-click the NVIDIA service and click Restart.
- If Restart is grayed out, click Properties instead. Change the Startup type to «Automatic», then click Start.

-
While the NVIDIA drivers are mainly for the function of your GPU, these drivers can also include updates to the NVIDIA Control Panel. If there’s a bug affecting the Control Panel that keeps it from opening, a driver update can fix those issues.
- Download and install the latest driver for your GPU from NVIDIA’s website. Use the manual driver search to look up the latest driver for your GPU.

Advertisement
-
If NVIDIA Control Panel won’t open no matter what you try, try opening it with a PowerShell command. This command will copy the NVIDIA Control Panel’s parent folder to the desktop and then open it. Note that once you run this command, you don’t need to run it again; simply open the NVIDIA folder on your desktop and run the nvcplui.exe file instead.
- Open Windows PowerShell as an admin. To do this, right-click on the Windows icon in the lower-left corner of your screen, then click Windows PowerShell (Admin).
- Run the following command:
Get-AppxPackage 'NVIDIACorp.NVIDIAControlPanel' | % { Copy-Item -LiteralPath $_.InstallLocation -Destination $Env:USERPROFILE\Desktop -Recurse -Force; Invoke-Item "$Env:USERPROFILE\Desktop\NVIDIACorp.NVIDIAControlPanel_*\nvcplui.exe" }- This command will automatically open the NVIDIA Control Panel after moving the folder to your desktop.[1]
- This command will automatically open the NVIDIA Control Panel after moving the folder to your desktop.[1]

-
Windows Update will also update drivers for the .NET Framework and VC++ Redistributable. If either of these is outdated, the NVIDIA Control Panel will not work properly.
- To check for a Windows update, type «Windows update» in the taskbar search bar, then click Check for updates. If an update is available, install it from this window, then check to see if the issue is still occurring.

Advertisement
-
However, it may cause issues with the NVIDIA Control Panel. You can easily disable Fast Startup to see if this is the problem.
- Open up the Control Panel.
- Navigate to Hardware and Sound. Click the Power Options heading.
- On the left-hand side, select «Choose what the power buttons do».
- Select «Change settings that are currently unavailable» near the top. As this is an administrator function it may prompt you to put in an administrator password.
- Uncheck «Turn on fast startup (recommended)». This option should be midway down the page. Save your changes once you’ve unchecked this option.

-
You can do this from the Apps & Features menu on Windows 10, or the Installed Apps menu on Windows 11.
- Right-click the Windows button, then click Apps & Features on Windows 10 or Installed Apps on Windows 11.
- Scroll down to find the NVIDIA Control Panel.
- Click on the NVIDIA Control Panel, then click Advanced options.
- Scroll down and click Repair. Follow any on-screen instructions to complete this task.

Advertisement
-
If repairing the app doesn’t fix this problem, try resetting it. However, note that this will delete all of the app’s data (like any saved settings).
- Right-click the Windows button, then click Apps & Features on Windows 10 or Installed Apps on Windows 11.
- Scroll down to find the NVIDIA Control Panel.
- Click on the NVIDIA Control Panel, then click Advanced options.
- Scroll down and click Reset. Follow any on-screen instructions to complete this task.

-
Contact NVIDIA if nothing fixes your problem. NVIDIA support may be able to help you identify the issue and walk you through how to fix it if nothing else works. To contact NVIDIA, go to their consumer contact page and select Ask us a question to open a ticket, or Live chat to chat to an online support agent.
Advertisement
Ask a Question
200 characters left
Include your email address to get a message when this question is answered.
Submit
Advertisement
Video
Thanks for submitting a tip for review!
References
About This Article
Thanks to all authors for creating a page that has been read 2,643 times.
Is this article up to date?
This post helps to solve NVIDIA Control Panel Manage 3D settings crashing problem on a Windows 11/10 system. Some users have complained that when they try to access the Manage 3D settings section in the NVIDIA Control Panel, it crashes the entire application instantly and this is repeated every time. While all other sections work fine, users are not able to change or customize Global Settings like Shader Cache, Low Latency Mode, Max Frame Rate, etc., and Program Settings as the Manage 3D settings section is crashing the application. If you also face this issue, then the fixes covered in this post will surely help you.

Why does my NVIDIA Control Panel keep crashing?
If the NVIDIA Control Panel keeps crashing while accessing the Manage 3D settings, then this could happen because the data files of Global settings and Program specific settings are corrupted. In addition, large paths or file names present on the desktop, and corrupt or outdated graphics card drivers can also cause NVIDIA Control Panel to keep crashing.
Why is my NVIDIA driver causing crashing?
If your NVIDIA driver keeps crashing on Windows 11/10, then check if your NVIDIA graphics card is enabled. For this, open the Device Manager, expand Display adapters, and open the right-click menu for your NVIDIA graphics card. If the device is disabled, then use the Enable device option to re-enable it. Also, use the Maximum Performance option for Power Management mode, and turn off Vsync using the Manage 3D settings section of the NVIDIA Control Panel to fix the issue.
If NVIDIA Control Panel crashes when you access the Manage 3D settings section, then use the following solutions to fix this problem:
- Rename or delete nvdrsdb0.bin or nvdrsdb1.bin files
- Use the Process Monitor tool
- Update the NVIDIA graphics card driver
- Clean install NVIDIA Control Panel.
Let’s check these fixes one by one.
1] Rename or delete nvdrsdb0.bin or nvdrsdb1.bin files

This is the most helpful solution to fix this problem. Here, nvdrsdb0.bin and nvdrsdb1.bin are data files associated with Global settings and Program specific settings. These files are stored under the Drs folder. If these files are corrupted, then it may result in crashing NVIDIA Control Panel on selecting the Manage 3D settings section. So, you need to rename or delete both of these files to rebuild Global settings and Program specific settings. Here are the steps:
- Press the Win+R hotkey to open the Run Command box
- Type
%programdata%\NVIDIA Corporation\Drsand press the Enter key - Under the Drs folder, you will see the nvdrsdb0.bin and nvdrsdb1.bin files. Copy and paste both files to some other location in case you need those files later
- Now rename both files one by one with any other name or delete them.
Launch NVIDIA Control Panel and select the Manage 3D settings section. Change any setting available there if needed. It shouldn’t crash the application anymore.
Related: NVIDIA Control Panel only shows 3D Settings
2] Use the Process Monitor tool
This is another handy solution that worked for some users. When you launch NVIDIA Control Panel, the nvcplui.exe (the main executable file) reads desktop items. And, when you switch to Manage 3D settings, if there are files and/or folders with large paths or names on the desktop, then it may crash. So, you need to identify those file(s) and/or folder(s) available on your desktop and take the necessary action. For that, you can use the Process Monitor tool. Here are the steps:
- Grab the ZIP archive of this tool from the official website and extract it
- Run its EXE file to open its interface. It will show running processes, time, path, and other information
- Launch NVIDIA Control Panel. Do not click on the Manage 3D settings yet
- In the Process Monitor interface, use the Filter option, and add the nvcplui.exe process to the Filter list so that you won’t see other running processes
- Now jump to the Manage 3D settings section in the NVIDIA Control Panel interface
- When the NVIDIA Control Panel crashes, look for Operation (ReadFile) column in the Process Monitor tool for the nvcplui.exe process and also check the Path column (that shows the paths of the files that the process tried to access), and the Results column to find if the process crashed while accessing a particular item. You should see a file/folder with a large path or name because of which the NVIDIA Control Panel crashed while reading that particular item
- Now either rename such file or folder, delete it from your desktop, or move it to some other location.
Repeat the above steps if needed and this should solve your problem.
3] Update the NVIDIA graphics card driver
The corrupt or outdated drivers for a device can cause trouble using it properly and the same goes for NVIDIA Control Panel. So, if this application is crashing when you access Manage 3D settings, it could be because there is some problem with the NVIDIA graphics card driver. In that case, you need to update the driver.
You can use NVIDIA GeForce Experience for automatic driver updates, manually download the driver from the official site and install it, or use the Optional updates section of Windows 11/10 in the Settings app to download and update the NVIDIA graphics card driver (if available).
4] Clean install NVIDIA Control Panel
If the above solutions don’t work, then you should clean install NVIDIA Control Panel. For this, first, uninstall NVIDIA Control Panel using the Settings app of Windows 11/10 and also manually remove leftover files after uninstall which include temporary files, Registry entries, etc. Or else, you can use Display Driver Uninstaller to uninstall the NVIDIA driver which will also remove NVIDIA Control Panel from your PC. Restart your system.
After this, download the NVIDIA driver for your graphics card from the official website. You need to select your graphics card type, product series, etc., to get the compatible driver, and install it. That will automatically install NVIDIA Control Panel.
Alternatively, you can install NVIDIA Control Panel app from the Microsoft Store. Since the standalone installer is no longer available, you have to install its Microsoft Store app.
Restart your Windows 11/10 PC after installation and open the NVIDIA Control Panel window. Access the Manage 3D settings section and it should work fine now.
Read next: How to fix NVIDIA Control Panel not opening on Windows PC.