
Если вы регулярно используете спящий режим на вашем ПК или ноутбуке и соответствующий пункт в меню завершения работы внезапно пропал, тому может быть несколько причин, как правило сравнительно легко разрешимых.
В этой пошаговой инструкции подробно о том, что делать, если нет пункта «Спящий режим» в меню Пуск и других расположениях меню завершения работы Windows 11 или Windows 10, чтобы вернуть эту опцию.
Включение опции «Спящий режим» в параметрах электропитания Панели управления
Первый и самый простой способ — использовать параметры электропитания в Панели управления. Он не всегда позволяет решить проблему, но начать следует именно с него:
- Откройте Панель управления, а затем — пункт «Электропитание». Либо нажмите правой кнопкой мыши по кнопке «Пуск», выберите пункт «Выполнить», введите powercfg.cpl и нажмите Enter.

- В панели слева выберите пункт «Действия кнопок питания».

- Вверху списка нажмите «Изменение параметров, которые сейчас недоступны». А затем, если ниже есть пункт «Спящий режим. Отображать в меню завершения работы» — включите его.


В случае, если пункт отсутствует, при этом речь идёт не о виртуальной машине, а об обычном компьютере или ноутбуке, прежде чем продолжать, вручную скачайте с сайта производителя материнской платы (для ПК) или ноутбука оригинальные драйверы:
- Чипсета
- управления электропитанием или ATK/ACPI, при наличии
- Intel ME (Management Engine), в случае если ваше устройство — с процессором Intel
После загрузки установите их: даже если на официальном сайте представлены лишь драйверы для предыдущих версий ОС, они должны исправно работать для Windows 11 и Windows 10.
Если пункт «Спящий режим» есть в списке, но опция не активна даже после нажатия «Изменение параметров, которые сейчас недоступны», используйте один из далее описанных вариантов для решения проблемы.
Если опция «Спящий режим» есть в параметрах электропитания, но её нельзя включить
Возможен вариант, когда при использовании предыдущего способа, опция «Спящий режим» есть в списке, но не активна. Это может говорить о том, что пункт «Спящий режим» отключен с помощью локальных групповых политик.
Чтобы исправить это в Pro и Enterprise версиях Windows 11/10, используйте следующие шаги:
- Нажмите правой кнопкой мыши по кнопке «Пуск», выберите пункт «Выполнить», введите gpedit.msc и нажмите Enter.
- Перейдите в раздел Конфигурация компьютера — Административные шаблоны — Компоненты Windows — Проводник.

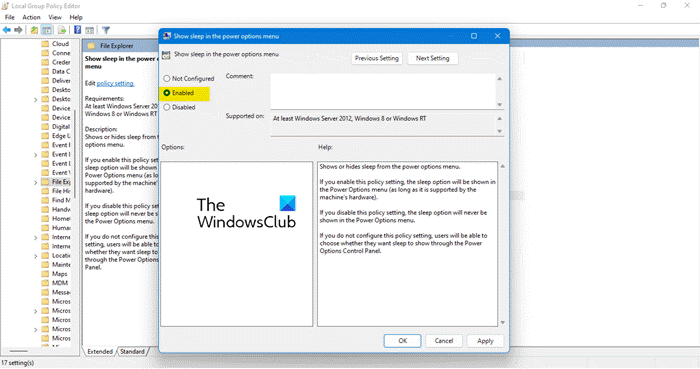
- В правой панели редактора локальной групповой политики найдите пункт «Показывать режим сна в меню электропитания», дважды нажмите по нему, установите значение «Включено» или «Не задано» и примените настройки.


Если на вашем компьютере установлена Домашняя редакция Windows, используем редактор реестра:
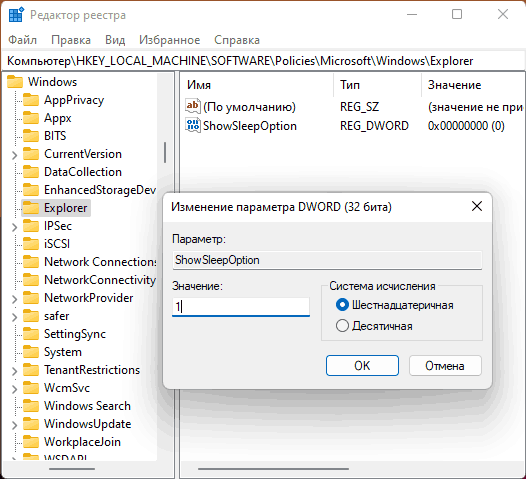
- Нажмите правой кнопкой мыши по кнопке «Пуск», выберите пункт «Выполнить», введите regedit и нажмите Enter.
- Перейдите в раздел реестра
HKEY_LOCAL_MACHINE\SOFTWARE\Policies\Microsoft\Windows\Explorer
- Если в правой панели редактора реестра вы увидите параметр с именем ShowSleepOption, либо удалите его (правый клик — удалить), либо дважды нажмите по нему и измените значение с 0 на 1.

В обоих случаях, если вы установили значение «Не задано» или удалили параметр ShowSleepOption может потребоваться использование шагов из первого способа, чтобы вернуть опцию «Спящий режим». Если же установить значение «Включено» или значение 1 для параметра, опция будет отображаться всегда (при условии, что на компьютере установлены необходимые драйверы управления электропитанием) и настроить её в параметрах электропитания не получится.
Если предыдущие способы не помогли, вы можете:
- Запустить средство устранения неполадок питания, для этого нажмите клавиши Win+R на клавиатуре, введите
msdt.exe /id PowerDiagnostic
и нажмите Enter.
- Использовать команду
powercfg /restoredefaultschemes
в командной строке, запущенной от имени администратора для сброса схем электропитания к состоянию по умолчанию — в некоторых случаях это может помочь.
- Открыть редактор реестра (Win+R — regedit), перейти к разделу
HKEY_LOCAL_MACHINE\SYSTEM\CurrentControlSet\Control\Power
и установить значение параметра PlatformAoAcOverride равным 1.
- Попробовать отключить Modern Standby.
Как правило, один из предложенных способов решает проблему и пункт «Спящий режим» снова отображается в меню Пуск. Если же остаются вопросы — задавайте их в комментариях.
When you open Windows 10’s Power Menu, you usually see the Shut down, Restart, and Sleep options. However, if you have recently performed an upgrade or set up a new PC, you may notice the Sleep option is missing from the Power menu.
For most laptop users, a missing sleep option is highly annoying, as it means they cannot put their laptop to sleep and save on battery. Fortunately, you can restore the sleep option in Windows 10 with a few tweaks.
Usually, the sleep option disappears from the Power menu after performing an upgrade or installing Windows feature updates. However, if the problem cropped up after performing a clean install, this could be a driver-related issue. Irrespective of the reason, we’ll go over some quick and complex tweaks to fix this issue.
1. Enable the Sleep Option via Control Panel
On some PCs, Windows 10 may have disabled the sleep option by default depending on the driver availability or system configuration. The first thing you should do to fix the missing sleep option is to check your Power options configuration in the Control Panel.
To enable sleep mode on Windows 10:
- Press Win + R to open the Run dialog box. Type control and click OK to open the Control Panel.
- In the Control Panel, go to System and Security > Power Options.
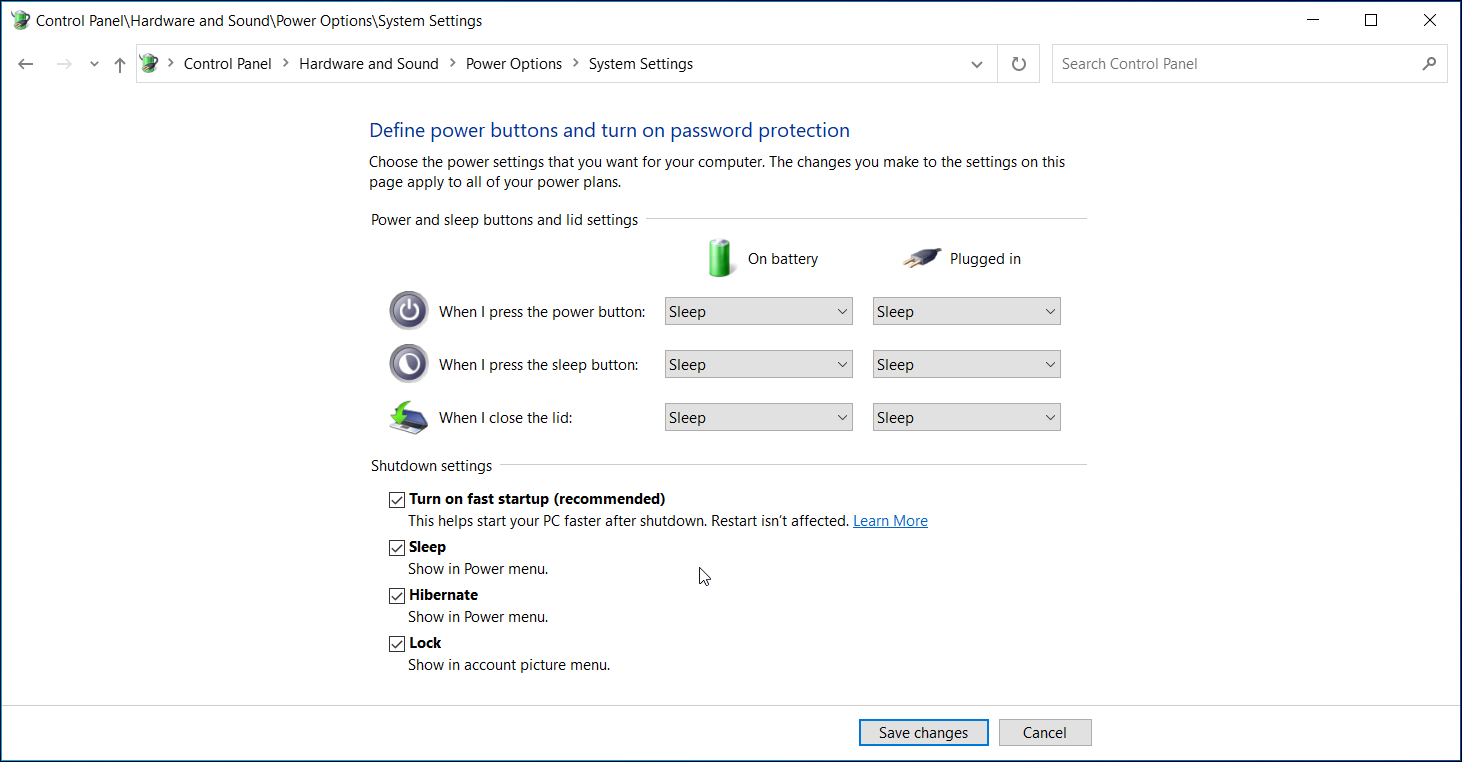
- Click on Choose what the power buttons do in the right pane.
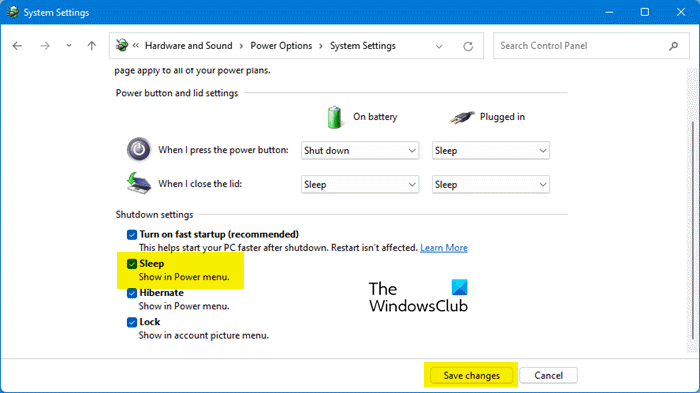
- Next, click on Change settings that are currently unavailable.
- Under Shutdown settings, locate and check the Sleep option. Click Save changes to add the sleep option to Power Menu.
- Close the Control Panel and open the Power menu. You should now see the Sleep option with other power modes.
If you can’t find the Sleep option under Power Option in the Control Panel, you will have to enable it by other methods listed. If the sleep option is greyed out, you will need to update your display driver.
2. Restore Power Option to Default in Command Prompt
Windows 10 allows you to customize power plans to best meet your needs. However, an incorrectly configured power scheme can cause power options to malfunction. You can restore the default power schemes using a command through the Command Prompt.
To restore the default power schemes:
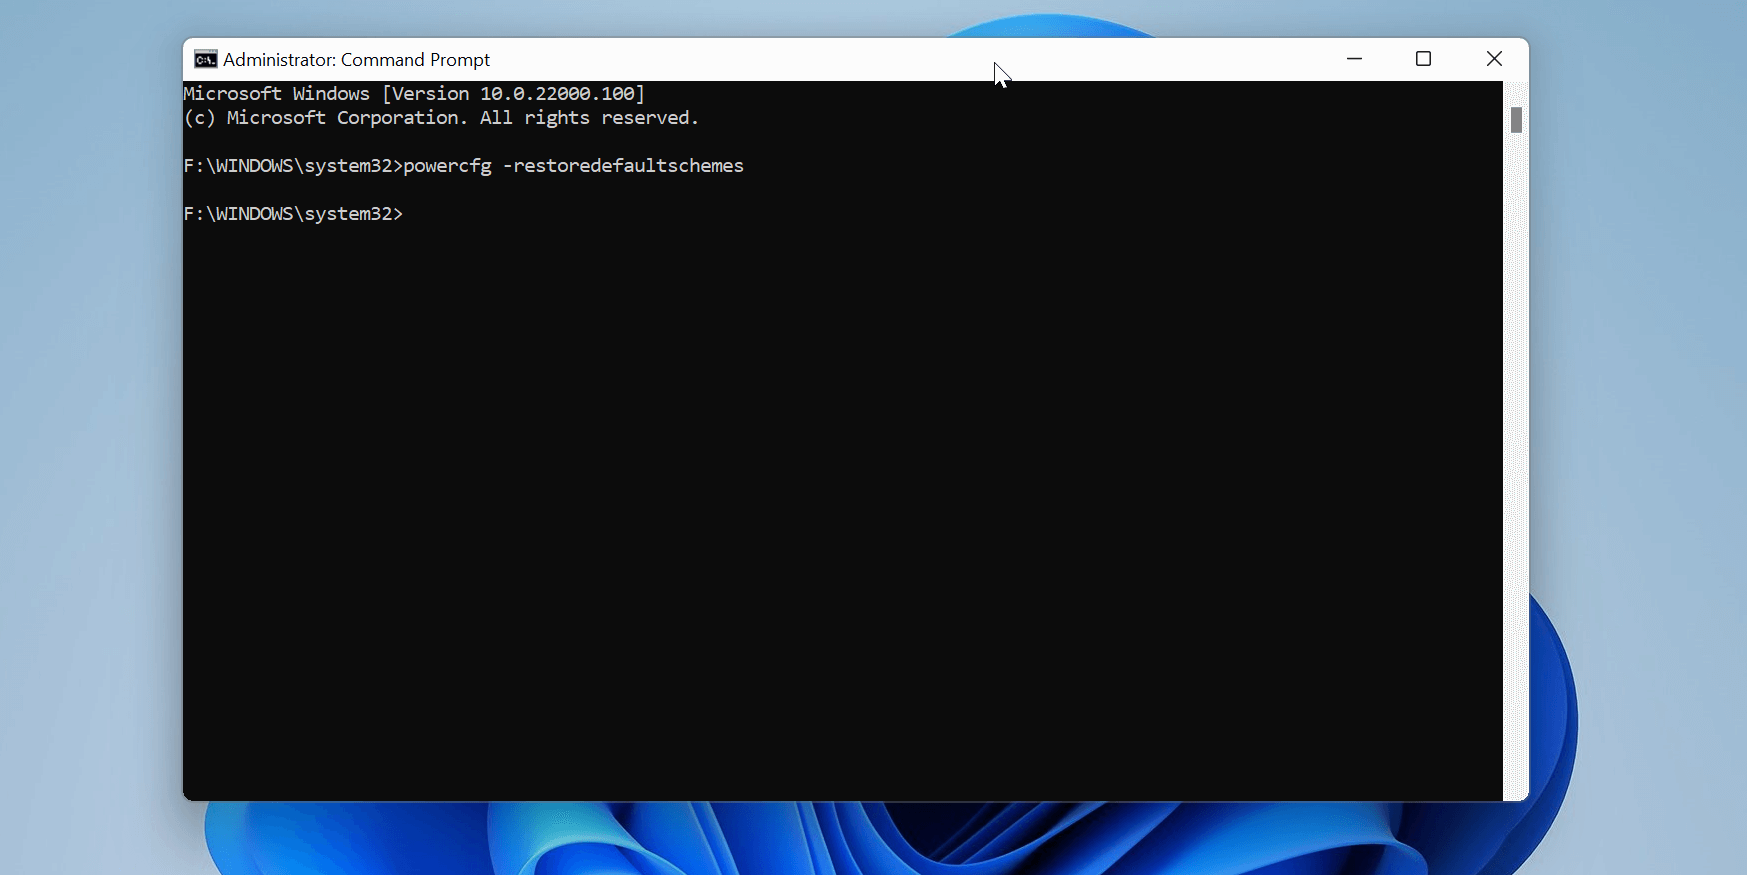
- Click on the Start button and type cmd. Windows 10 will automatically open up the search bar and look for your term. Right-click on Command Prompt when it appears and select Run as administrator.
-
In the Command Prompt window, type the following command and hit Enter to execute:
powercfg -restoredefaultschemes - On successful execution, you will not see any success message.
- Close the Command Prompt. Next, open the Power menu to see if the Sleep mode is accessible.
3. Enable the Sleep Mode via Local Group Policy Editor
Group policy allows you to configure your computer and user settings for a local computer using the Group Policy Editor. For example, you can edit the Show sleep in power options menu policy in the editor to enable Sleep mode on your system.
Group Policy Editor is only available on Windows 10 Pro and above versions. If you are not using the Pro version, follow our guide to enable Group Policy Editor on Windows 10 Home. Once you have Group Policy Editor enabled, you’re good to go.
To enable sleep option in the Power menu:
- Press Win + R to open Run. Type gpedit.msc and click OK to open the Group Policy Editor.
-

Next, in the Group Policy Editor, navigate to the following location:
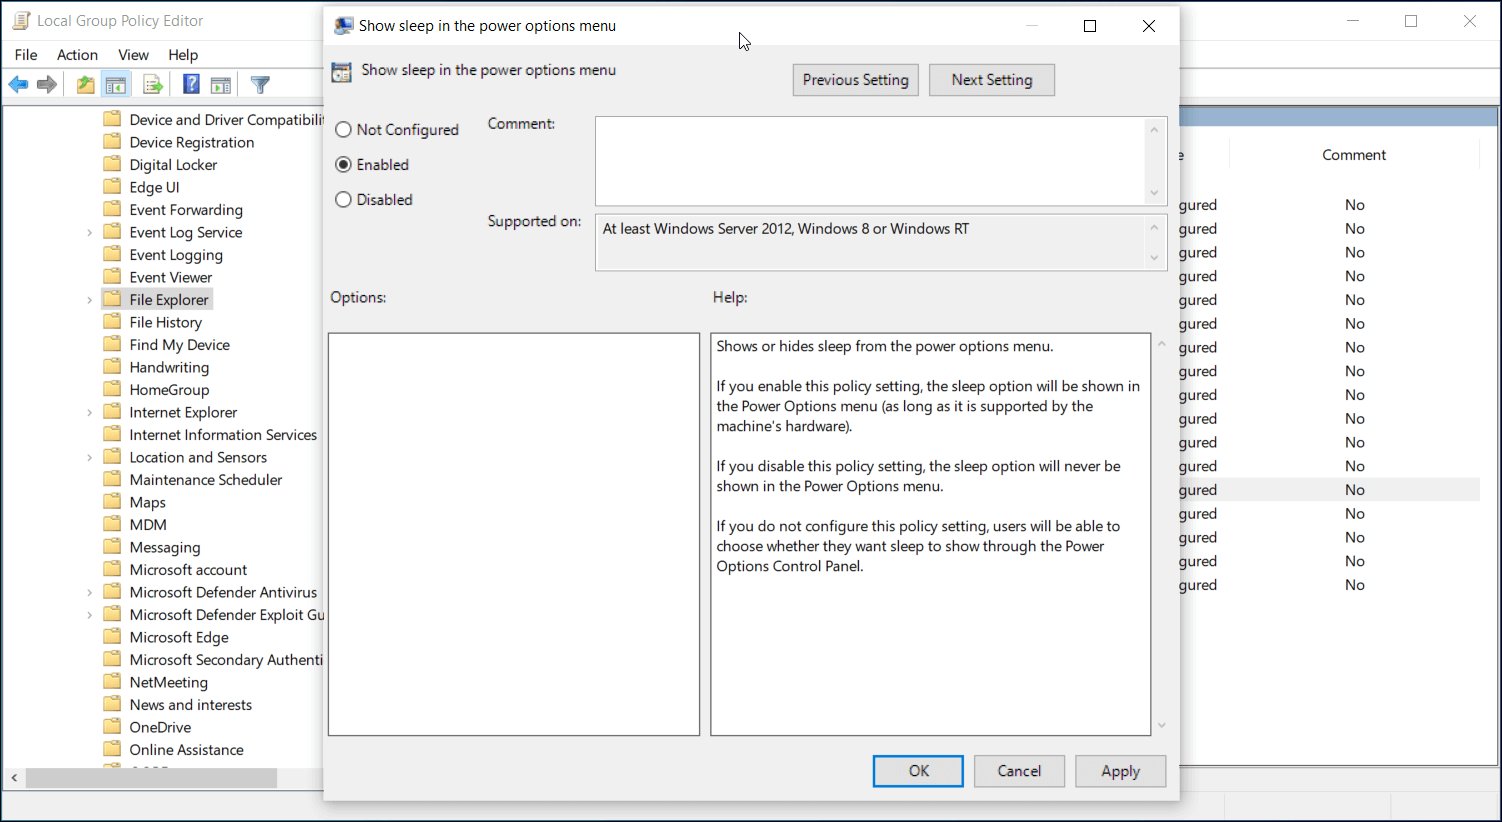
Computer Configuration > Administrative Templates > Windows Components > File Explorer -
In the pane on the right, locate and right-click on the Show sleep in the power options menu policy and choose Edit.
- Select Enabled and click Apply and OK to save the changes.
That should restore the sleep option to the Power menu in Windows 10. If you don’t see the changes right away, restart your computer and check again.
If that didn’t work, try to tweak the Sleep Settings policy in the Group Policy Editor. To do this, open the Group Policy Editor and navigate to Computer Configuration > Administrative Template > System > Power Management > Sleep Settings.
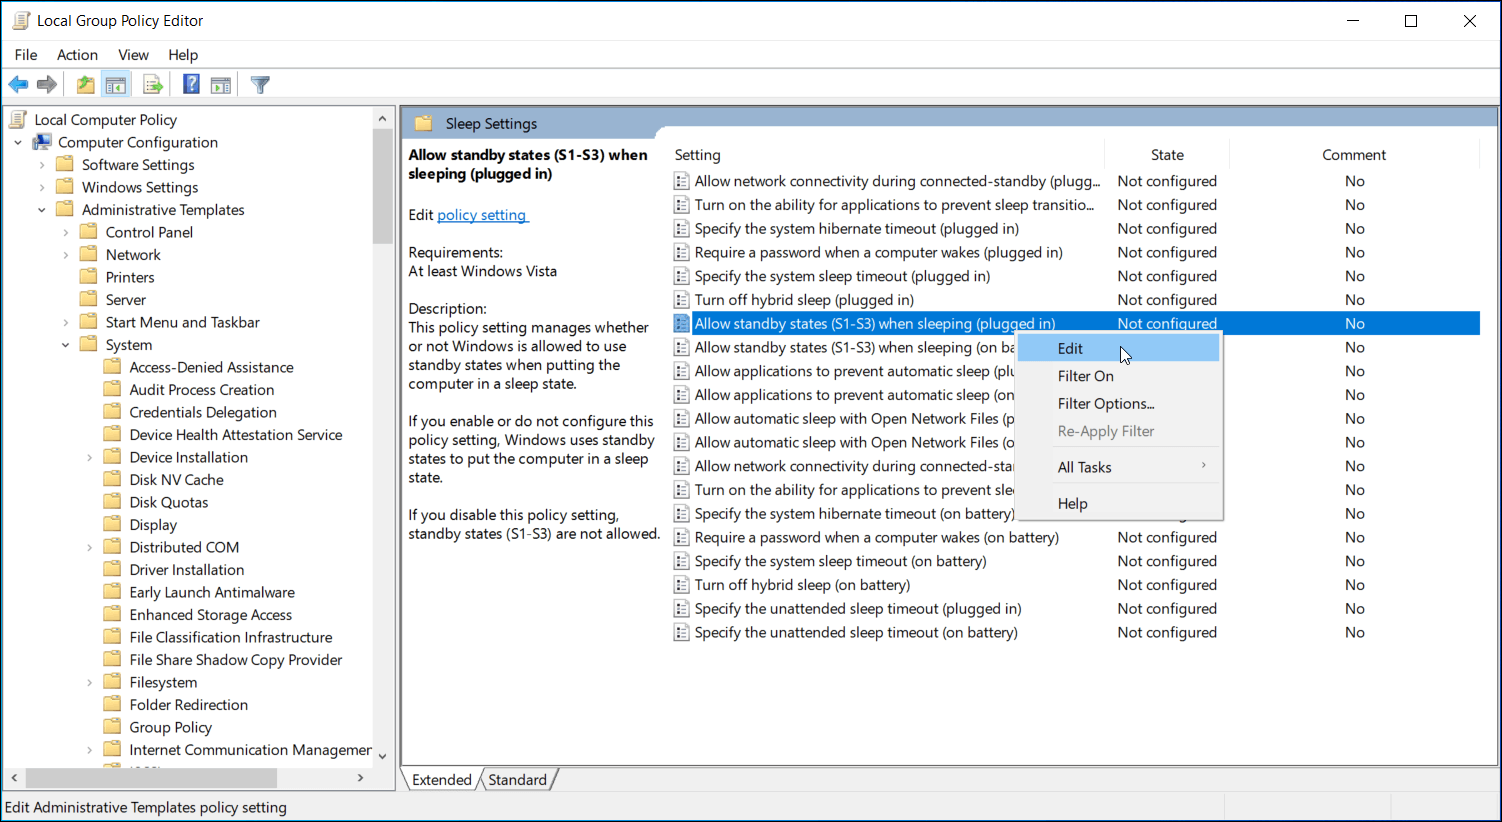
In the right pane, locate and right-click on Allow standby states (S1-S3) when sleeping (plugged-in) and select Edit. Set it to Enabled/Not Configured and click Save changes.
Open the Power menu again and check to see if your sleep button is back.
4. Run the Power Troubleshooter
Windows 10 has built-in troubleshooters that can help you find and fix problems for system-related hardware and settings. The Power troubleshooter is one such tool and can help you fix issues with your computer’s power settings. Here’s how to use it.
- Press Win + I to open Settings.
- Next, go to Update and Security and click on Troubleshoot in the left pane.
- If you don’t see troubleshoot options, click on Additional troubleshooters.
- Scroll down to Find and fix other problems and click on Power.
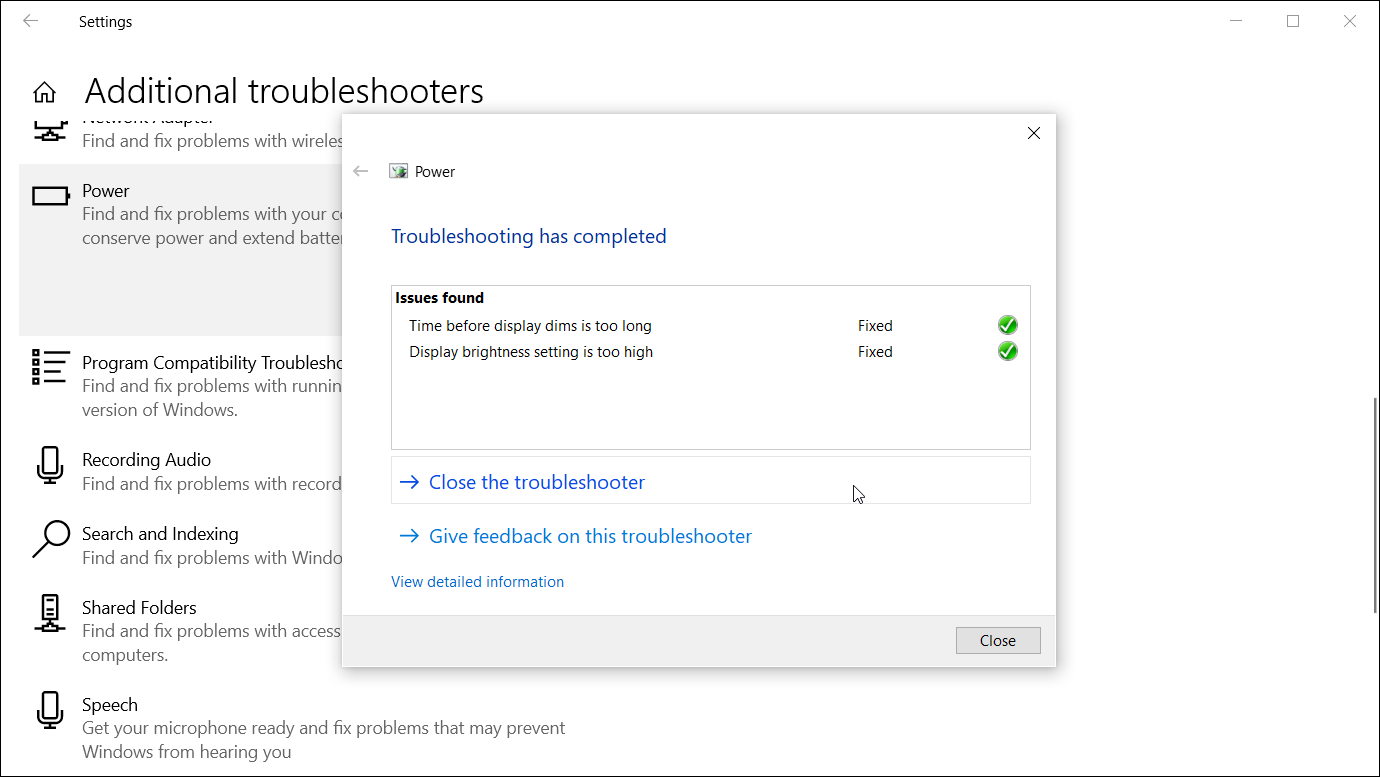
- Next, click Run the troubleshooter. It will scan the system for power schemes related issues and fix them automatically.
- Close the troubleshooter and open the Power option to see if the sleep option is now available.
You can also run the Power troubleshooter from the Run dialog box. To do this, press the Windows key + R, type msdt.exe /id PowerDiagnostic and hit Enter. Then, in the Power troubleshooter window that appears, click Next to run it.
Run Power Troubleshooter in Windows 11
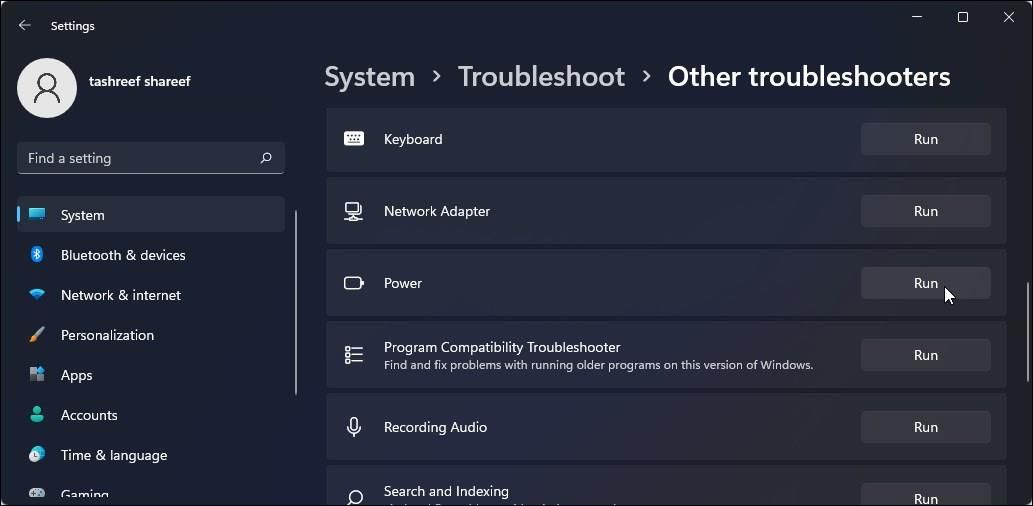
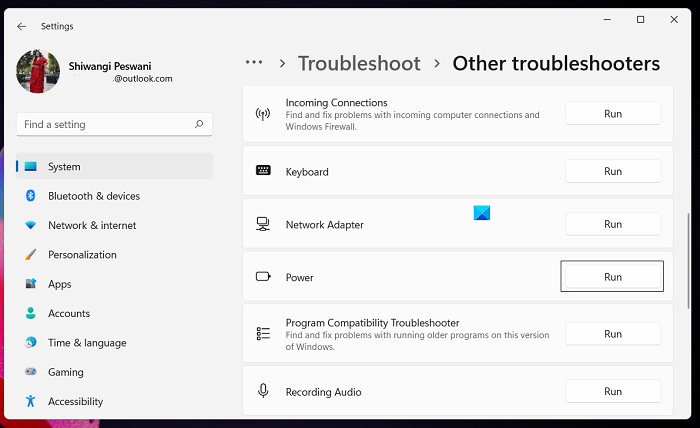
If you are using Windows 11, follow these steps to run the Power troubleshooter instead:
- Press Win + I to open Settings.
- Open the System tab in the left pane.
- In the right pane, scroll down and click on Troubleshoot.
- Next, click on Other troubleshooters.
- Scroll down to the Other section and locate the Power option.
- Click the Run button for Power to initiate the troubleshooter. The troubleshooter will scan for potential issues and recommend fixes that you can apply.
5. How to Enable a Grayed Out Sleep Option in Control Panel
Sometimes you can physically see the sleep option on your computer, but you can’t actually click on it because it’s grayed out. Fortunately, if this happens to you, there is an easy way to fix it.
If you just bought a Windows 10 laptop with the sleep option grayed out, the system is likely using older drivers installed on the production line. As such, the best thing you can do after setting up your new PC is to install all pending driver and Windows updates.
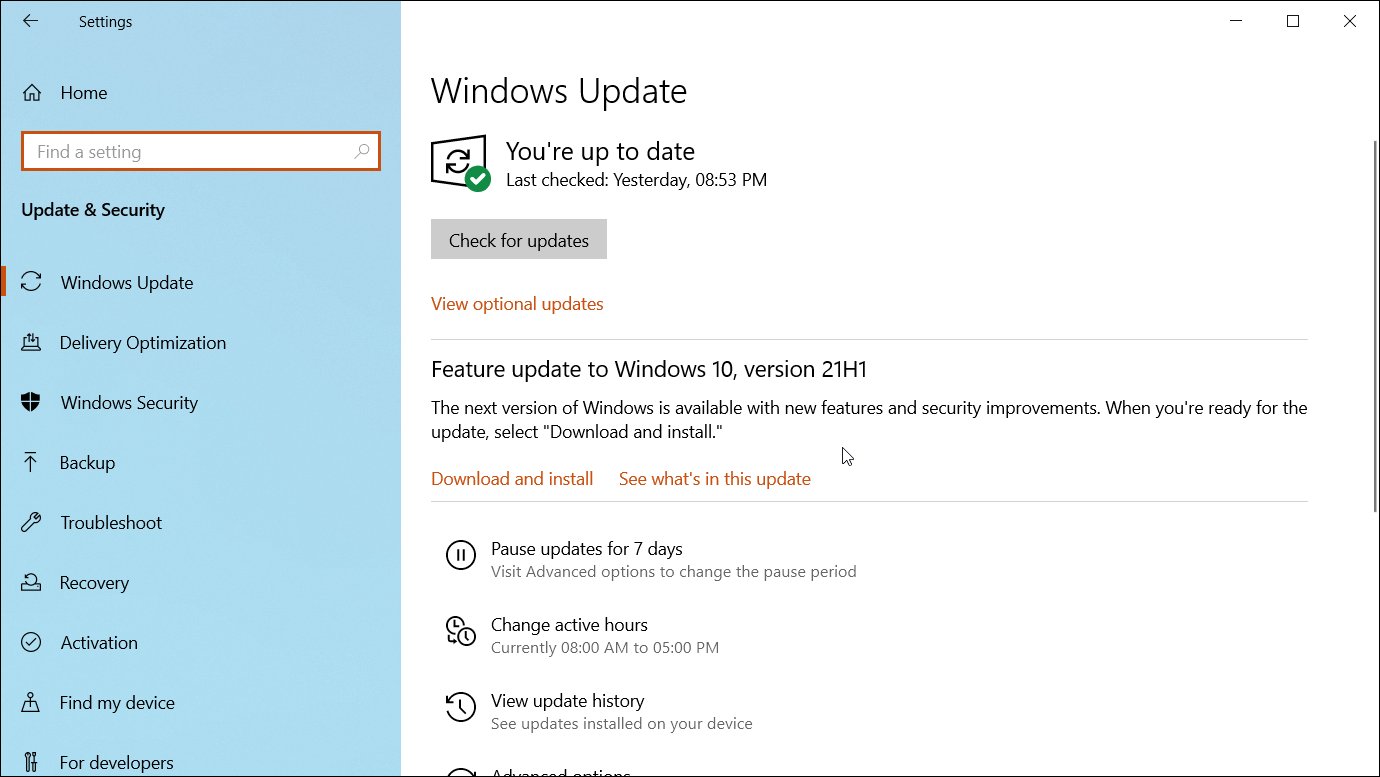
To do this, go to Settings > Update & Security > Windows Updates and check for available Windows updates.
You can also install the latest display drivers manually from the laptop/GPU vendors’ website, Windows device manager, or use the proprietary tool such as GeForce Experience or AMD Radeon Software if you have a discrete graphics unit.
We have a detailed guide on how to update graphics drivers in Windows 10 that you can follow for more details.
6. Enable InstantGo on Compatible Systems Using Registry Editor
Some laptop manufacturers equip their computers with the InstantGo feature to optimize power usage on Windows computers. It is a hardware feature different from the regular Standby (S3) sleep option available on most computers.
If you have InstantGo available but disabled, you may not see the Sleep option. To fix this, you can enable InstantGo using Registry Editor.
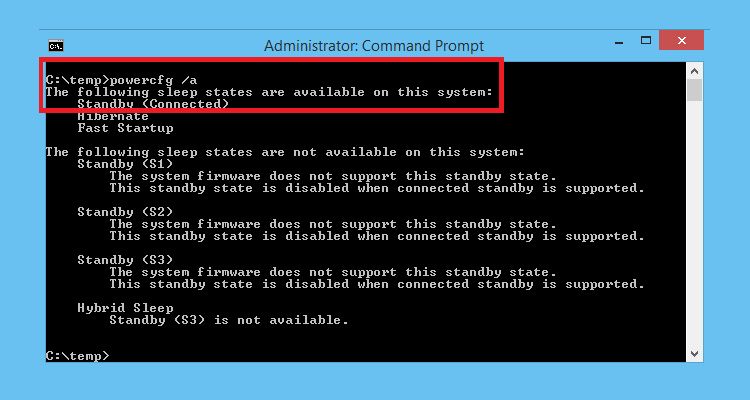
Additionally, you can check if your system is InstantGo compatible using a Command Prompt command. Here’s how to do it.
- Press Win + R to open Run.
- Type cmd, press and hold Ctrl + Shift, and click OK to open the Command Prompt as administrator.
-
In the Command Prompt window, type the following command and hit Enter:
powercfg /a
- Check the output text to see if it mentions Standby (Connected). If yes, then your system InstantGo compatible, and you can enable it from the registry editor.
To enable InstantGo using Registry Editor:
- Press Win + R to open Run.
-
Type regedit and click OK to open Registry Editor.

-
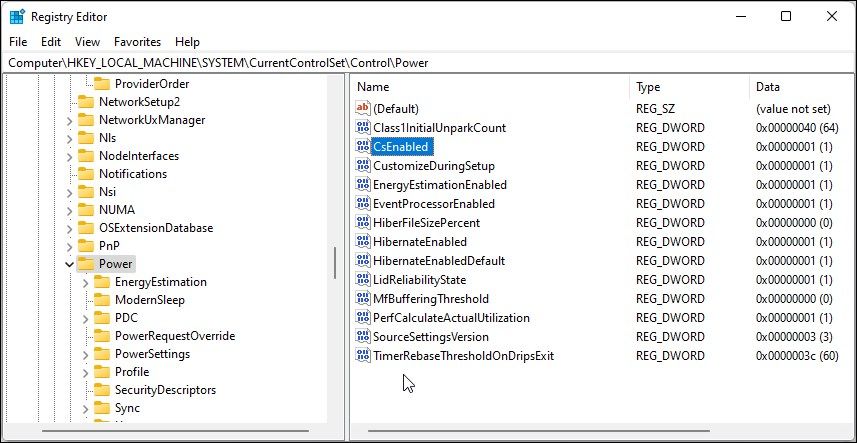
In Registry Editor, navigate to the following location. You can copy and paste the following path for quick navigation:
HKEY_LOCAL_MACHINE\SYSTEM\CurrentControlSet\Control\Power
- On the right-pane, locate the CsEnabled value.
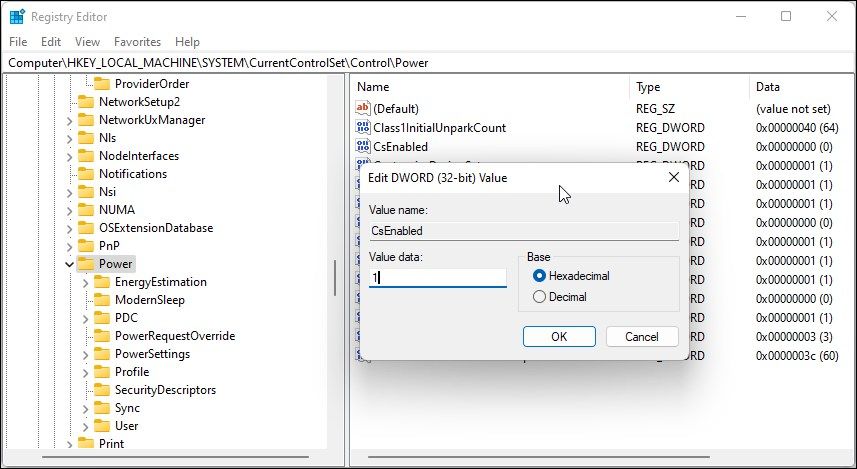
-
Right-click on CsEnabled, and select Modify.

- Type 1 in the Value data field and click OK to save the changes.
- If you don’t see the CsEnabled value, your system does not support InstantGo.
- Once done, close the Registry Editor and reboot your PC.
The additional power modes such as Sleep and Hibernate allow you to conserve power without completely shutting down your system. If you don’t find the sleep option after performing an upgrade, install all the pending updates for your system. Since Windows installs a generic Microsoft display driver by default, it can be inefficient when you want to access advanced system settings.
In addition, custom Windows power plans can help you extend battery life and conserve power when the system is idle. If you don’t have a custom power plan configured yet, it is the right time to do it.
When we don’t want to shut down our system because we are leaving the system for a short period, the best option is to put your computer to Sleep. However, the Sleep option is missing for some users on their Windows 11/10 computers, and if you are one of them, then in this article, we will give you some easy solutions to get your Sleep back.

Why is there no Sleep option in Windows 11?
There is a Sleep option in Windows 11, but you may not be able to see the option in the Start Menu or other places due to misconfiguration. In this article, we have mentioned all the solutions you need to get the configuration right and the Sleep option back.
Is the Sleep option missing on your computer? Check the following solutions to resolve the issue.
- Check if Sleep is disabled in Control Panel
- Restore Power Plans
- Edit Group Policy
- Update Windows and Drivers
- Run Power Troubleshooter
Restore or Enable missing Sleep option
1] Check if Sleep is disabled in Control Panel
First up, we need to check if the Sleep option is enabled in Control Panel. We are going to check the configuration of Power Options and see if there is some misconfiguration. Follow the given steps to do the same.
- Open Control Panel by searching it out of the Start Menu.
- Go to System and Security > Power Options.
- Select Choose what the power button does.
- If Sleep is unticked, click on Change the settings that are currently unavailable.
- Tick Sleep and click on Save changes.
Now, check if you can the Sleep in the Power Option.
Read: Hibernate option is missing in Control Panel in Windows
2] Restore Power Plans
Another method to resolve any misconfiguration is by restoring the Power Plan settings. All you have to do is run a command and your issue will be resolved. So, open Command Prompt as an administrator and run the following command.
powercfg -restoredefaultschemes
Once you have successfully executed the command, restart your system and see if the issue persists.
3] Edit Group Policy
Now, we are going to edit Group Policy and make sure that the option to disable the Sleep is not turned on. One thing you should know is that Group Policy is unavailable on Windows 11/10 Home, so, check our guide and see how to enable Group Policy Editor on Windows Home.
Now, open Group Policy Editor by searching it out of the Start Menu. Now, navigate to the following location.
Computer Configuration > Administrative Templates > Windows Components > File Explorer
Look for Show sleep in the power options menu, double-click on it to open, select Enable, and click Apply > Ok.
Restart your system and check if the issue persists. If you are still not able to find the Sleep option in the Power menu, open Group Policy Editor and go to the following location:
Computer Configuration > Administrative Template > System > Power Management > Sleep Settings.
Look for Allow standby states (S1-S3) when sleeping (plugged-in) and Enable it.
Related: Difference between Sleep, Hybrid Sleep, Hibernation
4] Update Windows and Drivers
If the Sleep option is greyed out, chances are either the Operating System or drivers are not up-to-date. You should first check for updates and install them if available. Then, update all your drivers. The following are some of the methods to update drivers on Windows computers.
- Check for Windows Optional and Driver updates.
- Download the latest version of all the drivers from their respective manufacturer’s websites.
5] Run Power Troubleshooter
Last but not least, we are going to run the Power Troubleshooter. It is a built-in utility that will scan and repair the cause. Follow the given steps to run Power Troubleshooter.
Windows 11
- Open Settings.
- Go to System > Troubleshoot > Other troubleshooters.
- Click Run associated with Power.
Windows 10
- Open Settings.
- Go to Update & Security > Troubleshoot > Additional troubleshooter.
- Select Power, and click Run the troubleshooter.
Hopefully, this will do the job for you.
Related: No sound after waking from Sleep mode or Hibernate
Standby (S3): The current Device Guard configuration has disabled this standby state
No Sleep option? If the Sleep option is missing from the Power Menu as well as the Power Options, in Control Panel and running powercfg /availablesleepstates gives the following output:
Standby (S3): The current Device Guard configuration has disabled this standby state
Then open Windows Security > Device security > Core isolation details and Turn off Firmware protection or Microsoft Defender System Guard. Reboot your computer and see if you can see the Sleep option now.
Where is Sleep option in Windows 11?
Sleep can be accessed by the Power button, just click on the button and you will see the Sleep option there. Or, hit Alt + F4, and from the drop-down menu, select Sleep. However, if you want to access Sleep settings, you need to use the Windows Settings. Just hit Win + I to open Settings, go to System > Power & battery. Now, expand Sleep and Screen and make amendments.
Read Next:
- How to change Sleep settings on Windows
- How to set up Windows Sleep Timer Shutdown.
Реализация DI в PHP
Jason-Webb 13.05.2025
Когда я начинал писать свой первый крупный PHP-проект, моя архитектура напоминала запутаный клубок спагетти. Классы создавали другие классы внутри себя, зависимости жостко прописывались в коде, а о. . .
Обработка изображений в реальном времени на C# с OpenCV
stackOverflow 13.05.2025
Объединение библиотеки компьютерного зрения OpenCV с современным языком программирования C# создаёт симбиоз, который открывает доступ к впечатляющему набору возможностей. Ключевое преимущество этого. . .
POCO, ACE, Loki и другие продвинутые C++ библиотеки
NullReferenced 13.05.2025
В C++ разработки существует такое обилие библиотек, что порой кажется, будто ты заблудился в дремучем лесу. И среди этого многообразия POCO (Portable Components) – как маяк для тех, кто ищет. . .
Паттерны проектирования GoF на C#
UnmanagedCoder 13.05.2025
Вы наверняка сталкивались с ситуациями, когда код разрастается до неприличных размеров, а его поддержка становится настоящим испытанием. Именно в такие моменты на помощь приходят паттерны Gang of. . .
Создаем CLI приложение на Python с Prompt Toolkit
py-thonny 13.05.2025
Современные командные интерфейсы давно перестали быть черно-белыми текстовыми программами, которые многие помнят по старым операционным системам. CLI сегодня – это мощные, интуитивные и даже. . .
Конвейеры ETL с Apache Airflow и Python
AI_Generated 13.05.2025
ETL-конвейеры – это набор процессов, отвечающих за извлечение данных из различных источников (Extract), их преобразование в нужный формат (Transform) и загрузку в целевое хранилище (Load). . . .
Выполнение асинхронных задач в Python с asyncio
py-thonny 12.05.2025
Современный мир программирования похож на оживлённый мегаполис – тысячи процессов одновременно требуют внимания, ресурсов и времени. В этих джунглях операций возникают ситуации, когда программа. . .
Работа с gRPC сервисами на C#
UnmanagedCoder 12.05.2025
gRPC (Google Remote Procedure Call) — открытый высокопроизводительный RPC-фреймворк, изначально разработанный компанией Google. Он отличается от традиционых REST-сервисов как минимум тем, что. . .
CQRS (Command Query Responsibility Segregation) на Java
Javaican 12.05.2025
CQRS — Command Query Responsibility Segregation, или разделение ответственности команд и запросов. Суть этого архитектурного паттерна проста: операции чтения данных (запросы) отделяются от операций. . .
Шаблоны и приёмы реализации DDD на C#
stackOverflow 12.05.2025
Когда я впервые погрузился в мир Domain-Driven Design, мне показалось, что это очередная модная методология, которая скоро канет в лету. Однако годы практики убедили меня в обратном. DDD — не просто. . .