
Причины появления этой ошибки не ясны, но у нас есть способы, как ее исправить.
Основные выводы
«Ошибка службы Steam» возникает тогда, когда клиент службы Steam сталкивается с проблемой, не позволяющей ему работать должным образом.
Чтобы устранить ошибку, вы можете попробовать переустановить службу Steam, запустить Steam от имени администратора, настроить автоматический запуск клиента службы Steam, восстановить клиент службы Steam, добавить Steam в белый список брандмауэра, обновить версию Windows или удалить и переустановить Steam.
Выполнив эти шаги, вы сможете исправить «Ошибку службы Steam» и сможете использовать Steam на компьютере с Windows. Приятной игры!
Пытаетесь получить доступ к Steam и получаете сообщение «Ошибка службы Steam»? Возможно, у вашего клиента Steam или на вашем компьютере с Windows 11 или 10 возникли проблемы. Мы покажем вам различные способы решения этой проблемы.
Что такое ошибка службы Steam и почему я ее вижу?
Причина, по которой вы видите «Ошибку службы Steam», заключается в том, что в клиенте службы Steam возникла проблема. Этот клиент помогает Steam обновлять или устанавливать игры, включать обнаружение античитов в некоторых играх и помогает выполнять другие задачи системного уровня. Если этот клиент службы не работает должным образом, Steam отображает сообщение об ошибке службы Steam.
Некоторые причины, по которым клиент службы Steam не работает должным образом, заключаются в том, что приложение работает не с полным разрешением, сам клиент службы неисправен, у вас устаревшая версия Windows и многое другое.
Как устранить ошибку службы Steam
Чтобы исправить «Ошибку службы Steam» на вашем компьютере, вам, вероятно, придется использовать несколько методов, поскольку причиной ошибки могут быть разные проблемы. Вот что вам следует сделать, чтобы избавиться от проблемы со Steam.
Переустановите службу Steam
Когда вы получаете сообщение «Ошибка службы Steam», в окне сообщения появляется опция «Установить службу». Нажмите эту опцию, чтобы переустановить клиентскую службу Steam. В большинстве случаев это решит вашу проблему.
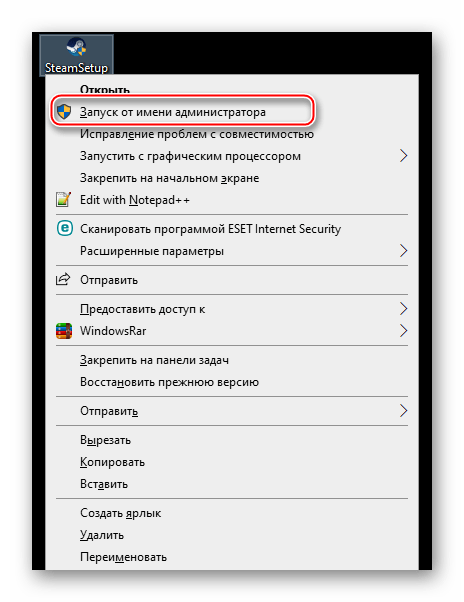
Запустите Steam от имени администратора
Еще один быстрый способ устранить ошибку — запустить Steam от имени администратора. Когда вы это сделаете, приложение получит полное разрешение на запуск на вашем компьютере, устраняя любые проблемы, вызванные отсутствием разрешения.
Для этого найдите Steam на рабочем столе или в меню «Пуск». Щелкните приложение правой кнопкой мыши и выберите «Запуск от имени администратора».
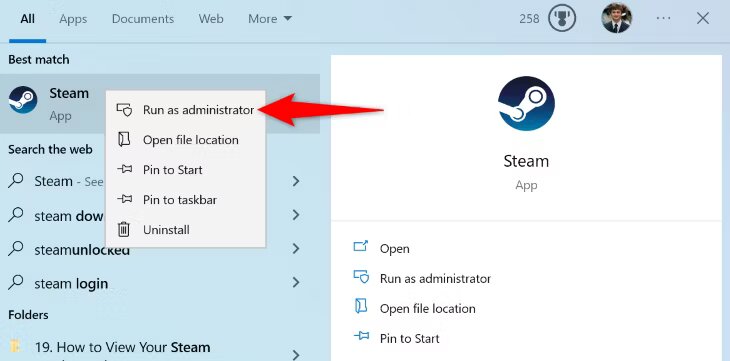
В строке «Контроль учетных записей» выберите «Да».
Теперь Steam работает с правами администратора.
Настройте автоматический запуск клиента службы Steam
Steam автоматически загружает клиент службы, когда ему это необходимо, но, если у вас возникают проблемы с клиентом, настройте Windows на автоматический запуск клиента службы при включении компьютера.
Для этого откройте окно «Выполнить», нажав Windows+R. Введите в поле следующее и нажмите Enter:
Щелкните правой кнопкой мыши «Служба клиента Steam» и выберите «Свойства». В раскрывшемся меню «Тип запуска» выберите «Автоматически».
Затем нажмите «Применить», а затем «ОК».
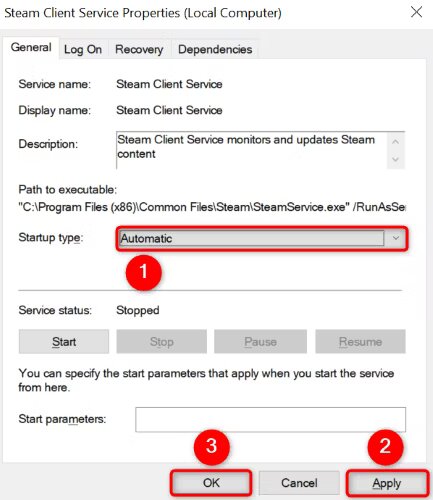
Перезагрузите компьютер с Windows 11 или Windows 10 и запустите Steam.
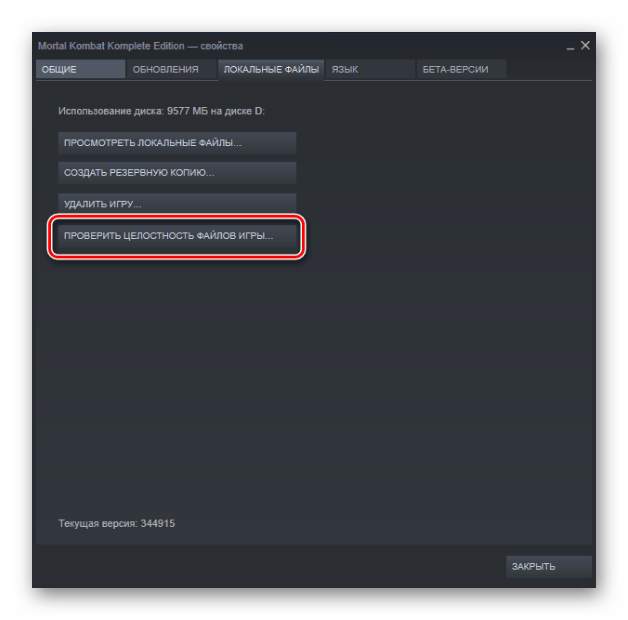
Восстановление сервисного клиента Steam
Если в самом сервисном клиенте Steam возникла проблема, воспользуйтесь встроенной функцией восстановления, чтобы восстановить утилиту. Это должно решить проблему «Ошибка службы Steam».
Для этого откройте «Пуск», найдите командную строку и выберите «Запуск от имени администратора». В окне «Контроль учетных записей» выберите «Да».
В командной строке введите следующую команду и нажмите Enter:
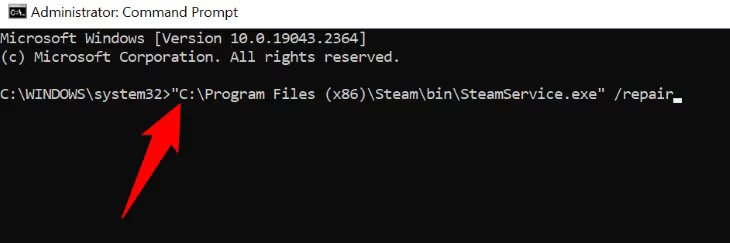
«C:\Program Files (x86)\Steam\bin\SteamService.exe» /repair
Дождитесь команды восстановления клиента службы Steam. После завершения восстановления закройте командную строку и запустите Steam.
Добавьте Steam в белый список вашего брандмауэра
Для работы Steam требуется доступ к Интернету. Если брандмауэр вашего компьютера блокирует доступ приложения к Интернету, возможно, именно поэтому вы получаете «Ошибку службы Steam». В этом случае добавьте приложение в список надежных приложений брандмауэра, чтобы брандмауэр больше не блокировал сетевые подключения вашего приложения.
То, как вы это сделаете, зависит от используемого вами брандмауэра. Если вы пользователь брандмауэра Microsoft Defender, добавьте Steam в список надежных источников, выбрав «Безопасность Windows» > «Брандмауэр и защита сети» > «Разрешить приложение через брандмауэр».
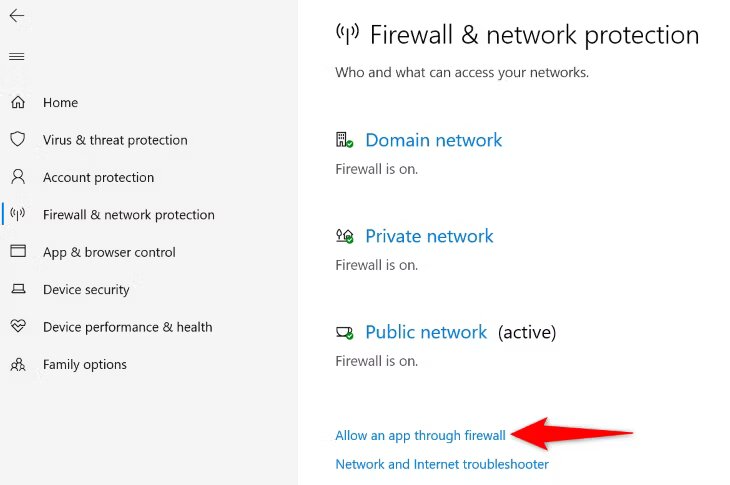
Выберите вверху «Изменить настройки». В списке приложений рядом с «Steam» и «Steam Web Helper» включите параметры «Частный» и «Общественный». Затем нажмите «ОК».
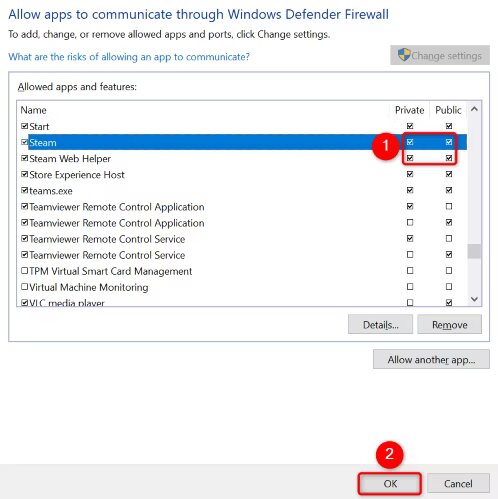
Закройте окно и запустите Steam.
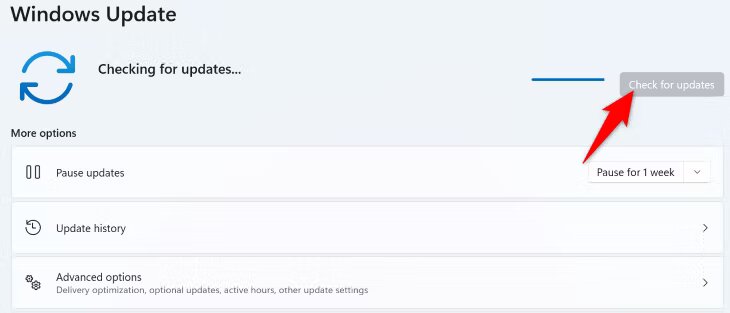
Обновите Windows 11 или Windows 10
Если ваша версия Windows устарела, это может вызвать проблемы с установленными приложениями. Steam может не работать должным образом из-за устаревшей версии Windows на вашем компьютере.
В этом случае обновите версию Windows, и ваша проблема, скорее всего, будет решена.
Чтобы обновить Windows 11, перейдите в «Настройки» > «Центр обновления Windows». На правой панели нажмите «Проверить наличие обновлений». Затем загрузите и установите доступные обновления.
В Windows 10 перейдите в «Настройки» > «Обновление и безопасность» > «Центр обновления Windows». На правом экране нажмите «Проверить наличие обновлений», загрузите и установите последние обновления.
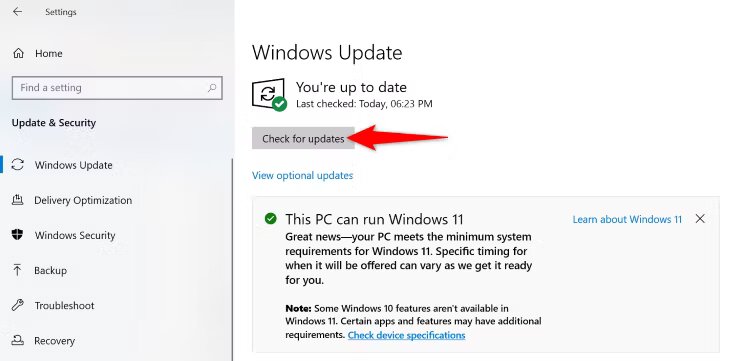
Когда Windows обновится, перезагрузите компьютер и запустите Steam.
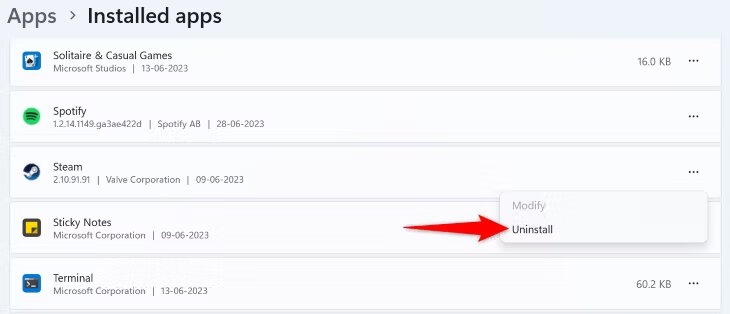
Удалите и переустановите Steam
Если вам не удалось исправить ошибку Steam с помощью вышеуказанных методов, воспользуйтесь последним методом, который заключается в удалении и переустановке приложения Steam. Это поможет удалить проблемные файлы приложения с вашего компьютера и, возможно, решит вашу проблему.
Чтобы сделать это в Windows 11, перейдите в «Настройки» > «Приложения» > «Установленные приложения». Рядом со Steam в списке нажмите три точки и выберите «Удалить». В командной строке выберите «Удалить».
В Windows 10 перейдите в «Настройки» > «Приложения». Выберите Steam, выберите и нажмите «Удалить».
Теперь, когда вы удалили Steam, переустановите приложение, зайдя на веб-сайт Steam, загрузив установщик приложения и запустив его.
Вот как можно обойти ошибку службы Steam на компьютере с Windows. Приятной игры!
If you’re having trouble opening Steam on your Windows 10 computer, you’re not alone. This guide will help you fix the problem so you can get back to playing your favorite games. We’ll show you some easy steps to try and solve the issue, making it simple for you to get Steam working again.

Table of Contents
Here are the reasons why Windows refuses OS to launch Steam client:
- Damaged installation files
- Outdated Windows update
- Server down
- Damaged system files
- Network connectivity settings
If Steam app won’t open, then firstly you should check if Steam servers are down at the moment. Go to IsItDownRightNow website and check if Steam servers are running or not.

If the servers are not down then, follow the solutions listed in this guide to fix the problem.
Note: Make sure to create a system restore point just as a backup.
Method 1: Run Steam as Administrator
Running an app as an administrator would fix many issues as this would provide all the required permissions needed for the app. Follow the below steps to open Steam as an administrator:
1. Press the Windows key and type Steam, click the Run as administrator option.

2. Click Yes in the User Account Control prompt.
Check if Steam not opening Windows 10 issue is fixed. If it is, enable this option as follows:
1. Navigate to C: > Program Files(x86) > Steam or the directory where Steam is installed.
2. Right-click steam.exe & select Properties, as depicted below.

3. Switch to the Compatibility tab and check the box marked Run this program as an administrator shown highlighted.

4. Click Apply > OK to save these changes.
Also Read: Change Compatibility Mode for Apps in Windows 10
Method 2: Troubleshoot Internet Connections
Steam allows you to play offline games even if you have no internet connection. But a few settings in network connectivity may restrict the app from opening resulting in Steam not opening on Windows 10 issue:
1. Press Windows + I keys simultaneously to launch Settings.
2. Click on the Update & Security tile, as shown.

3. Go to Troubleshoot menu from the left pane.
4. Select Internet Connections and click on the Run the troubleshooter button as highlighted below.

5. Choose the Troubleshoot my connection to the Internet option.

6. Wait for the troubleshooter to detect problems.

7. Follow on-screen instructions to fix the issue. Once the process is complete, restart your PC.
Method 3: Sync Date & Time
An incorrect configuration of date and time settings may also result in Steam app won’t open issue. Follow the below steps to correct it:
1. Right-click on the time and date section on the Taskbar.

2. Select the Adjust date/time option from the list.
3. Switch On the toggle for the given options:
- Set time automatically
- Set time zone automatically

Also Read: Fix Steam Error Code e502 l3 in Windows 10
Method 4: Restart Steam Process
Even after closing the Steam client on your computer, the app might still be running in the background. Hence, follow the given steps to disable Steam processes to fix Steam not opening on Windows 10 issue:
1. Hit the Ctrl + Shift + Esc keys simultaneously to open Task Manager.
2. Select the Steam app process and click on End task button, shown highlighted.

3. Now, restart your PC and run the Steam app as administrator.
Method 5: Allow Steam Through Windows Firewall
Any changes or conflicts with the firewall settings might also cause this issue. Thus, follow the below steps to add Steam as an exception in Windows Defender Firewall:
1. Hit the Windows key, type Control Panel in the Windows Search bar, and click Open.

2. Set View by: > Large icons and click on Windows Defender Firewall to continue.
3. Next, click on Allow an app or feature through Windows Defender Firewall.

4A. Search and allow Steam through the Firewall by ticking the checkboxes marked Private and Public.

4B. Alternatively, you can click on Change Settings, then Allow another app… button to browse and add the Steam app to the list. Then, check the boxes corresponding to it.
5. Finally, click OK to save the changes. Now, open the Steam app as administrator and check if the issue of fixed.
Also Read: How to Disable Windows 10 Firewall
Method 6: Delete AppCache Folder
This folder contains cache information about the games and applications. Deleting it will give the app a hard refresh.
Note: Once you launch the Steam app, the app cache will be created automatically.
1. Press Windows + E keys together to open File Explorer
2. Navigate to the location where you installed Steam: C:\Program Files (x86)\Steam
Note: If you are not sure, read our guide: Where are Steam Games installed? here.

3. Right-click on the appcache folder and choose the Delete option as shown.

4. Now, restart your PC and launch Steam as administrator again.
Also Read: How to Play Steam Games from Kodi
Method 7: Run SFC and DISM Scans
Corrupt operating system files may also cause Steam app won’t open issue on your device. Windows has an in-built tool to repair system files viz SFC & DISM which can be run as explained below:
1. Hit the Windows key, type Command Prompt and click on Run as administrator.

2. Click on Yes in the User Account Control prompt.
3. Type sfc /scannow and press Enter key to run System File Checker scan.

Note: A system scan will be initiated and it will take a couple of minutes to finish. Meanwhile, you can continue performing other activities but be mindful of not accidentally closing the window.
After completing the scan, it will show either of these messages:
- Windows Resource Protection did not find any integrity violations.
- Windows Resource Protection could not perform the requested operation.
- Windows Resource Protection found corrupt files and successfully repaired them.
- Windows Resource Protection found corrupt files but was unable to fix some of them.
4. Once the scan is finished, restart your PC.
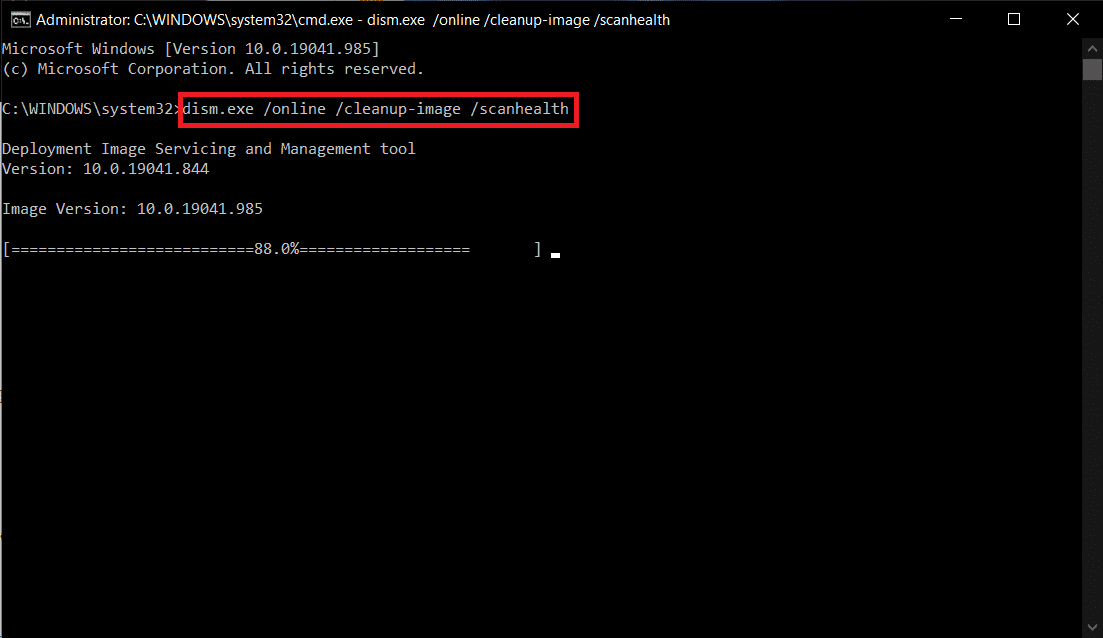
5. Again, launch Command Prompt as administrator and execute the given commands one after the other:
dism.exe /Online /cleanup-image /scanhealth
dism.exe /Online /cleanup-image /restorehealth
dism.exe /Online /cleanup-image /startcomponentcleanup
Note: You must have a working internet connection to execute DISM commands properly.
Method 8: Repair Steam Client
Alternately, use Windows PowerShell to repair Steam client as follows:
1. Press the Windows key, type windows powershell and click on Run as administrator.

2. Click Yes in the User Account Control prompt.
3. Type the following command and hit Enter key.
“C:\Program Files (x86)\Steam\bin\SteamService.exe” /repair
Note: If your Steam file is placed in another location, you need to enter that directory instead. Read our guide: Where are Steam Games installed? here.

4. Once the repair completed message is displayed, restart your PC.
Also Read: How to Change Steam Profile Picture
Method 9: Free-Up Disk Space
Since Steam is an online tool, it needs free disk space to function perfectly. You can easily free up the disk without uninstalling third-party apps and possibly, fix Steam not working issue.
1. Launch File Explorer and go to This PC.

2. Here, right-click on the drive (C:) where Steam is installed and select Properties as depicted.

3. In the General tab, click on the Disk Cleanup button.

4. A prompt will appear and The Disk Cleanup will calculate the amount of space that can be made free.

5. Check the box for all desired items under Files to delete: and click Clean up system files.

6. Once the scanning is complete, again check the boxes for all the chosen items and click on OK.

7. Finally, click on the Delete Files button in the confirmation prompt.

7. Restart your PC. To clean up additional space, read 10 Ways to Free up Hard Disk Space.
Method 10: Update Windows
Updating Windows would greatly help in fixing most issues.
1. Navigate to Windows Security > Update & Security as earlier.
2. In the Windows Update tab, click on Check for updates button.

3A. If a new update is available, then click Install Now and restart your PC.

3B. Otherwise, if the Windows is up-to-date, then it will show You’re up to date message.

Also Read: How to Add Microsoft Games to Steam
Method 11: Uninstall Conflicting Apps
A recently installed software on your device may also cause this issue. Follow the below steps to uninstall recent software that is creating the issue of Steam not opening in Windows 10:
1. Hit the Windows key, type apps and features, and click on Open.

2. Here, click on Sort by drop-down and choose Install date as depicted below.

3. Click on the recent software installed (e.g. Microsoft SQL Server Management Studio) and select Uninstall option, as depicted below.

4. Again click on Uninstall to confirm.
5. Repeat the same for all such apps and Restart your PC.
Method 12: Reinstall Steam Client
Reinstalling the Steam app might resolve the Steam not opening on Windows 10 issue if the app isn’t working normally. The latest version of the app gets installed while reinstalling, which would greatly improve its performance.
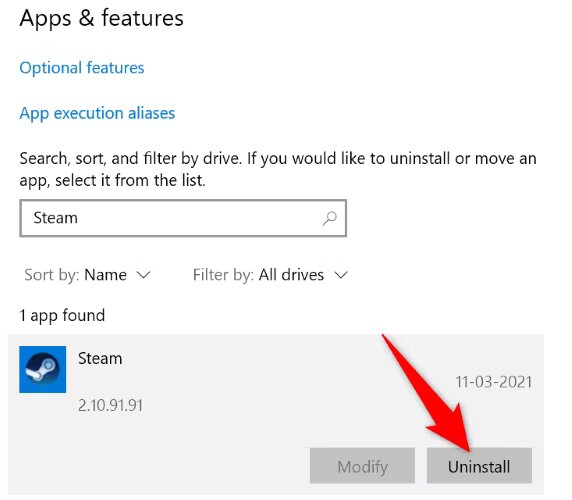
1. Launch Apps & features from the Windows search bar as shown.
2. Select Steam and click on the Uninstall button shown highlighted.

3. Again, click on Uninstall to confirm.
4. In the Steam Uninstall window, click on Uninstall to remove Steam.

5. Then, restart your Windows PC.
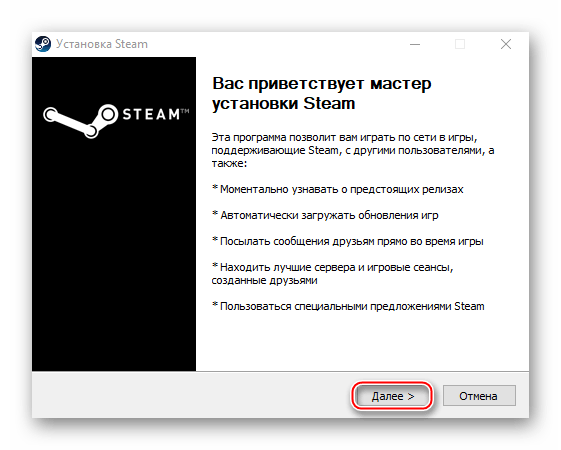
6. Download the latest version of Steam from your web browser, as shown.

7. After downloading, run the downloaded SteamSetup.exe file by double-clicking on it.
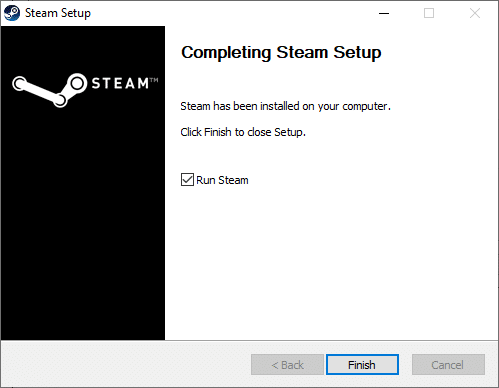
8. In the Steam Setup wizard, click on the Next button.

9. Choose the Destination folder by using the Browse… option or keep the default option. Then, click on Install, as depicted below.

10. Wait for the installation to be completed and click on Finish, as shown.
Q1. Will updating graphic drivers solve the issue of Steam app won’t open?
Ans. Yes, updating the graphic drivers may also resolve your Steam not opening Windows 10 issue.
Recommended:
- How to Disable Wakeup Password in Windows 11
- How to Fix The Audio Service is Not Running Windows 10
- How to Fix Xbox One Keeps Signing Me Out
- How to Set TF2 Launch Options Resolution
We hope that this guide would have helped you to fix Steam not opening Windows 10 issue. Let us know which method worked for you. Feel free to drop your queries and suggestions in the comment section below.
Все способы:
- Причины критических ошибок в Стиме на Виндовс 10
- Причина 1: Неверный путь установки
- Причина 2: Сбой во время обновления Steam
- Причина 3: Проблема при обновлении Steam
- Причина 4: Сбой при подключении клиента к локальному процессу
- Вопросы и ответы: 5
«Fatal error» (критическая ошибка) – одна из самых распространенных неполадок в работе игровой платформы Steam. Как правило, ее появление означает, что дальнейшее использование клиента невозможно, но есть ошибки, которые касаются только запуска конкретных игр. Рассмотрим причины появления каждой из них, а также узнаем, как устранить вызванные ими проблемы.
Причины критических ошибок в Стиме на Виндовс 10
Уведомление «fatal error» может появиться при обновлении Steam, из-за неправильного пути, выбранного для установки программы, потери сети клиентом и по другим причинам. У каждой проблемы есть решение, а у некоторых их даже несколько.
Причина 1: Неверный путь установки
Ошибка: «%Appname% cannot run from a folder path» означает, что Стим не может запуститься по указанному пути, так как он содержит символы, не входящие в таблицу ASCII. Она состоит из управляющих, десятичных символов, знаков препинания и букв латинского алфавита. Русские символы туда не входят, поэтому если они содержаться в пути, по которому установлена программа, есть риск, что она не запустится.
Чтобы решить проблему, переустановим ПО, а путь к файлам пропишем латинскими буквами. Например, если раньше он был такой:
С:\Программные файлы\Steam
то теперь папка должна будет находиться по адресу:
C:\Program Files (x86)\Steam
Лучшим вариантом считается установка Стима в корневую папку – C:\Steam. При этом буква диска значения не имеет.
Причина 2: Сбой во время обновления Steam
Бывает, что при запуске Стима он начинает обновляться, но этот процесс прерывается сообщением: «Steam needs to be online to update. Please confirm your network connection». Программа не получает обновления, так как отсутствует подключение к сети. В первую очередь открываем браузер и проверяем наличие интернет-соединения. Если проблема с сетью только у клиента, совершаем следующие действия:
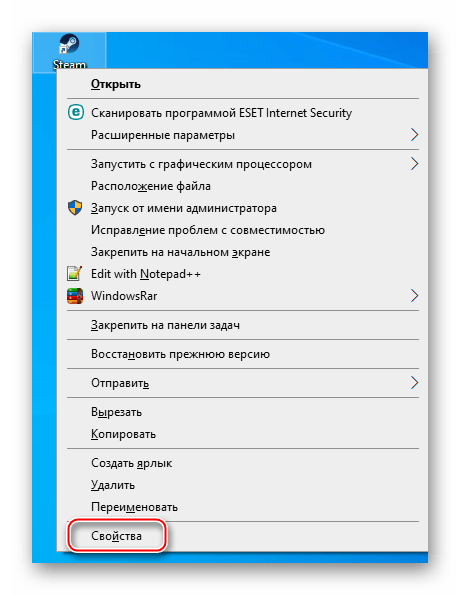
- Правой кнопкой мышки щелкаем по ярлыку программы и открываем «Свойства».
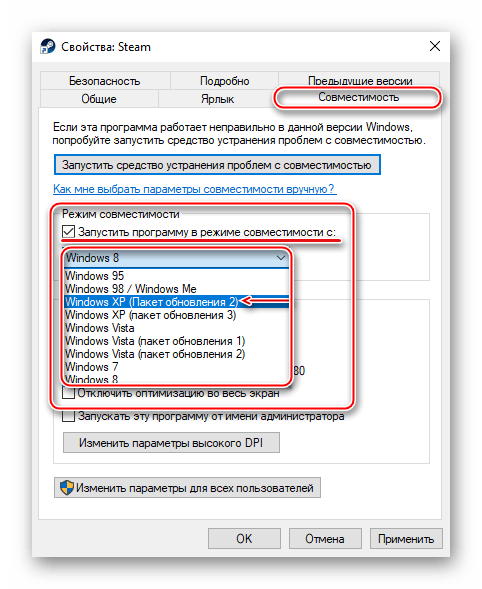
- Переходим во вкладку «Совместимость». В блоке «Режим совместимости» ставим галочку напротив пункта «Запустить программу в режиме совместимости с», ниже раскрываем список операционных систем и выбираем «Windows XP (Пакет обновления 2)».
- Ставим галочку напротив «Запускать эту программу от имени администратора», затем жмем «Применить» и «OK». Пробуем загрузить Steam.

Иногда устранить ошибку помогает просто запуск Steam от имени администратора, без изменения режима совместимости.
Если система использует прокси-сервер, он может блокировать порты, которые необходимы для нормальной работы клиента. Поэтому его отключение может устранить ошибку.
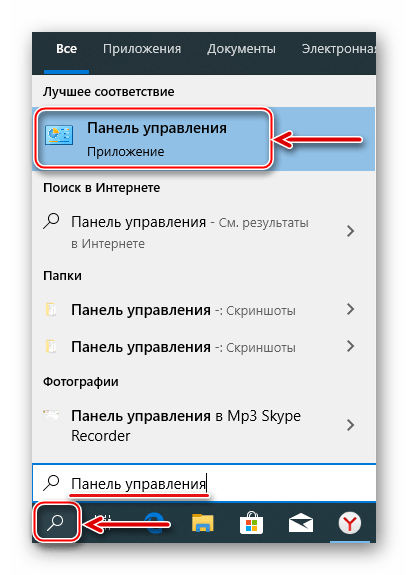
- Кликаем левой кнопкой мышки (ЛКМ) по иконке поиска, в строку вводим запрос – «Панель управления», а когда выше появится приложение, щелкаем по нему ЛКМ.

Читать также: Открытие «Панели управления» на компьютере с Windows 10
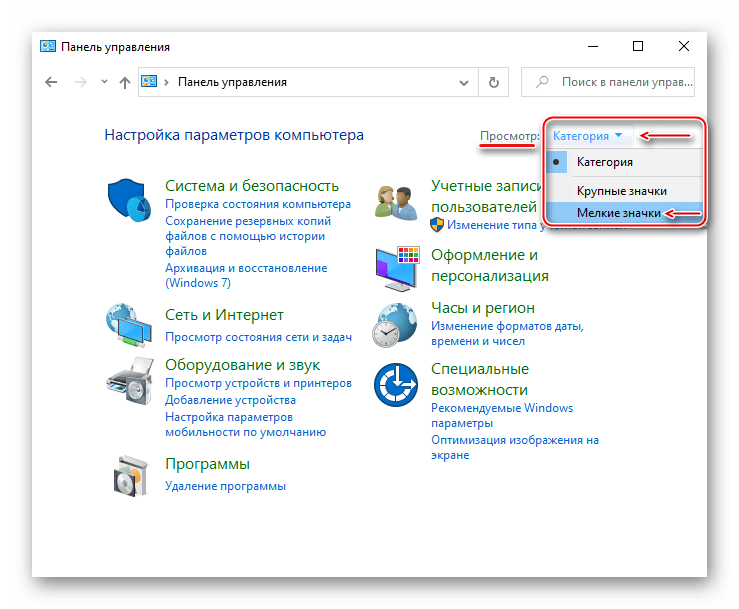
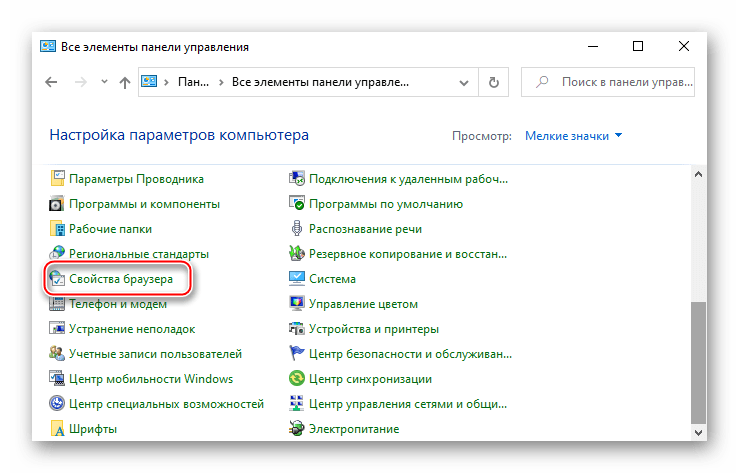
- В графе «Просмотр» нажимаем кнопку с надписью «Категория» и выбираем «Мелкие значки».
- Переходим в раздел «Свойства браузера».
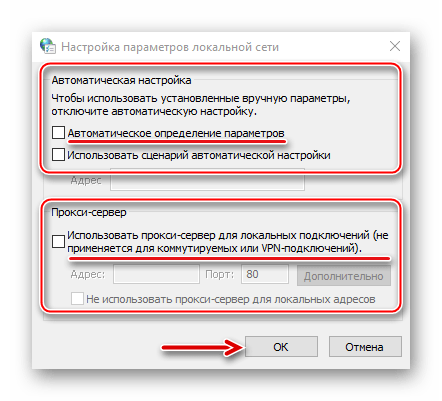
- Во вкладке «Подключения» переходим к настройкам сети.
- В блоке «Прокси-сервер» снимаем галочку рядом с «Использовать прокси-сервер для локальных подключений». Дополнительно отключаем опцию «Автоматическое определение параметров» в блоке «Автоматическая настройка», так как эта функция может привести к тому, что прокси будет использоваться даже без заданных параметров, а значит, ошибка все равно может выскакивать. Нажимаем «OK», перезагружаем компьютер и пробуем запустить клиент.

К другим методам устранения этой ошибки относится отключение Защитника Windows и антивирусного ПО, проверка системы на вирусы, изменение файла host, восстановление файлов игровой платформы.

Подробнее:
Что делать, если Steam не видит интернет
Почему Steam не подключается к сети
Причина 3: Проблема при обновлении Steam
«Failed to load steamui.dll» — ошибка, которая часто возникает при установке новой версии Стима. Она сообщает об отсутствии или повреждении файла динамически подключаемой библиотеки. Исправить ее так:
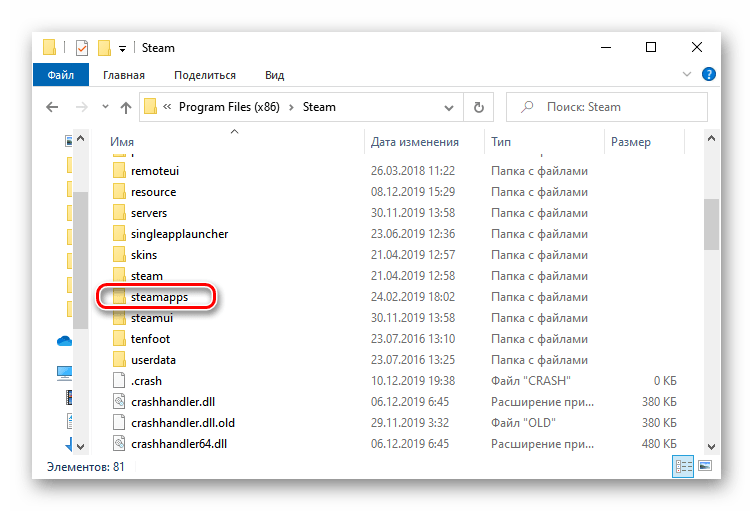
- Удаляем клиент. Чтобы заново потом не устанавливать игры, предварительно сохраняем каталог «steamapps». По умолчанию он находится в папке с клиентом. Если было выбрано другое место, он и так останется.

Подробнее:
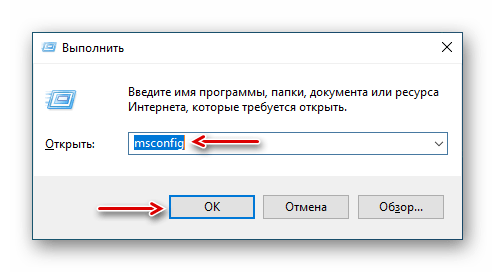
Установка и удаление программ в Windows 10 - Перезагружаем Виндовс в «Безопасном режиме». Сочетанием клавиш Win+R вызываем окно «Выполнить», вводим команду
msconfigи нажимаем «OK».
Переходим во вкладку «Загрузка», в блоке «Параметры загрузки» включаем опцию «Безопасный режим», нажимаем «Применить», а затем «OK». Перезагружаем компьютер.

Читать также: Безопасный режим в Windows 10
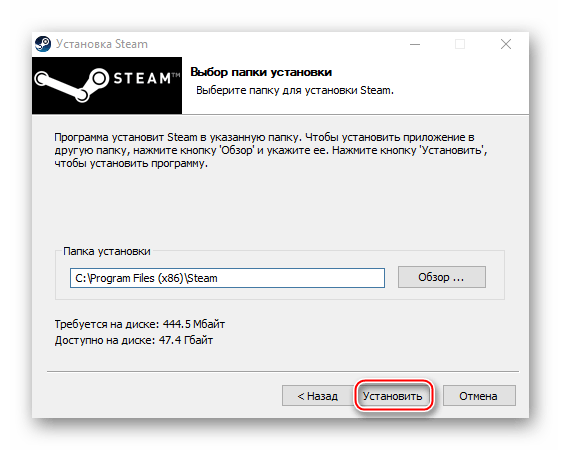
- Щелкаем правой кнопкой мышки по установочному файлу SteamSetup и запускаем его от имени администратора.
- Устанавливаем программу, следуя подсказкам установщика.

Подробнее: Установка Steam на компьютер

Если ошибка осталась, есть другие способы, которые способны помочь ее исправить.
Подробнее: Исправление ошибки загрузки SteamUI.dll
Причина 4: Сбой при подключении клиента к локальному процессу
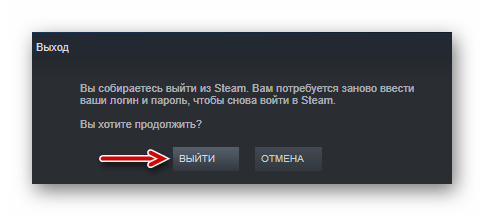
Иногда неполадки возникают только во время запуска некоторых игр. Они сопровождаются сообщением: «Failed to connect with local steam client process». Это значит, что программа не может подключиться к локальному процессу. Для решения проблемы:
- Щелкаем на имя профиля, которое находится в правом верхнем углу, и в выпадающем меню выбираем «Выйти из аккаунта».
- Подтверждаем действие.
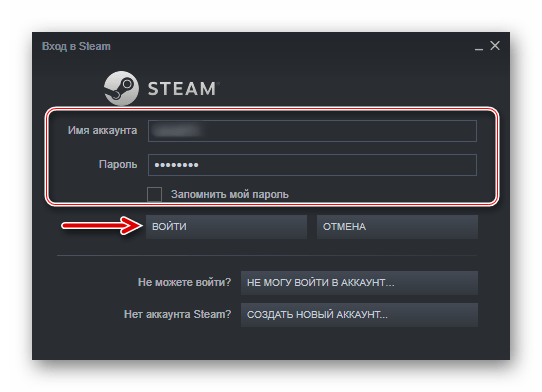
- Перезагружаем компьютер, запускаем клиент, вводим данные для входа и нажимаем «Войти». Теперь пробуем запустить игру.

Есть и другие способы устранения неисправностей, которые мешают запускать игры в Стиме. Об этом мы подробно писали в другой статье.
Подробнее: Что делать, если не запускается игра в Steam
Надеемся, что предложенные методы устранения причин появления «fatal error» в Steam на Windows 10 помогут избавиться от этой проблемы. В крайнем случае всегда можно обратится в техническую поддержку клиента, где также постараются оказать необходимую помощь.
Наша группа в TelegramПолезные советы и помощь
Readers help support Windows Report. We may get a commission if you buy through our links.
Read our disclosure page to find out how can you help Windows Report sustain the editorial team. Read more
Steam is a highly reliable application that allows users to access and buy various immersive games of different genres easily. However, despite being reliable, some users will complain that Steam won’t open on Windows 10.
This prevents users from playing Steam games on their PC. If you are also facing this issue, this guide will show you quick ways to fix it for good.
Why is Steam not opening?
Below are some of the factors that cause the Steam client not to open on your PC:
- Issues with Steam: The first thing to check in while trying to fix this issue is if the Steam client is working well. If it is not, you can refresh your Steam installation by running a few commands.
- Interference from third-party apps: Another cause of this problem is interference from a third-party app. The solution is enabling Safe Mode and checking if Steam opens normally. If a third-party app is the cause of the problem, you might need to disable or remove the app using uninstaller software.
- Outdated PC: Some users have also found this problem due to an outdated operating system. The quickest way to fix this is to update your PC to the latest version.
It is worth mentioning that the solutions presented in this guide apply to a variety of Steam error messages:
- Steam client won’t open: This happens occasionally, and a restart should be enough. Otherwise, this guide will help.
- Steam app won’t open when I click the icon: In both scenarios, double-clicking on the desktop icon or using the Start Menu, the result is the same and is fixed in this guide.
- Tera won’t open on Steam: This can happen if a game is not properly integrated with Steam.
- Steam won’t open on PC: This error might show if there’s conflicting software installed that prevents Steam from opening.
- Steam won’t open Windows 7: Steam won’t open error is encountered by users of Windows 10, Windows 8, and Windows 7 alike. There’s no difference, so the advice stays the same.
- Steam game says running but won’t open: In this case, Steam is already running, but it is not responding. You can end the process in Task Manager.
How can I fix Steam if it won’t launch on Windows 10?
Before proceeding to the fixes in this section, below are some of the troubleshooting steps you can try:
- Check if Steam is down
- Restart your PC
- Restart your network device
- Temporarily disable your antivirus and/or firewall
1. Use a command
- Press the Windows key + R to open the Run utility.
- Once the dialog is open, type in or copy this command:
steam://flushconfig
- Next, press Enter or click OK.

- Finally, click OK when the Steam dialogue appears.


The command above is used to refresh the installation of the Steam application. Therefore, it is used to fix several issues related to the gaming client, including the Steam won’t open on Windows 10 issue.
2. End Steam processes
- Press the Windows key + X and select the Task Manager option.
- Right-click all Steam processes and select End task.

- Now, restart the Steam client.

In some cases, Steam might not open on Windows 10 because it encountered minor glitches. The easiest way to fix this is to restart all instances of Steam.
3. Update PC
- Press the Windows key + I and select Update & Security.

- Click the Check for updates button.

- Now, install any available updates, including the optional ones.


The Steam client needs Windows 10 to be up-to-date to run without glitches. Hence, if your PC is outdated, you need to update it to the latest version.
4. Enter Safe Mode
- Press the Windows key + I to open the Settings app and select the Update & Security option.
- Select Recovery in the left pane and click the Restart now button under the Advanced startup section.
- When your PC restarts, select the Troubleshoot option.

- Now, choose the Advanced option.
- Select Startup Settings.

- Next, click the Restart button.
- After your PC restarts, press 5 or F5 to Enable Safe Mode with Networking.

- Finally, relaunch the Steam client.


Configuring your PC’s settings to start in Safe Mode is another method to solve the Steam won’t open on Windows 10 issue. Safe Mode only starts your PC with the minimum drivers and processes required to run it smoothly.
So, if there are third-party programs interfering with the starting of the steam application, then Safe Mode should fix the problem.
- Fix: Failed to Connect to Steam Error Code 211
- Steam Wishlist Not Loading or Working Error: 7 Ways to Fix it
- How to Fix Store_9224593_067be2186c614317 Steam Error
5. Reinstall Steam
If all else fails, there is always the option of reinstalling Steam.
If you want to avoid going through the tiring process of redownloading and reinstalling all of your games, then you can move the steamapps folder (the folder containing all of your games) from the Steam directory and save it in another place on your HDD.
Afterward, uninstall your Steam software and completely delete the remaining location of your previous installation. After you reinstall Steam you will want to copy the steamapps folder back into the new location of your Steam directory.
⇒ Get Steam [Latest version for Windows 10]
6. Perform a system restore
- Press the Windows key + R, type rstrui.exe, and click the OK button.
- Click Next in the window that pops up.

- Now, select a restore point and click the Next button.
- Finally, click the Finish button and follow the onscreen instructions to complete the process.


If Steam still won’t open on Windows 10 after applying the troubleshooting steps above, you might need to restore your PC to a point when everything is working well.
This is because you might have made some changes that are hard to trace to your PC, causing the issue. Performing a system restore will reverse these changes and restore normalcy on your PC.
The Steam won’t open on Windows 10 issue can be frustrating, as it denies you access to your games. But with the solutions in this guide, you should be able to fix them for good.
If Steam games won’t launch on Windows 10, check our detailed guide to fix it quickly.
Feel free to let us know the solution that helped you fix this issue in the comments below.
Radu Tyrsina
Radu Tyrsina has been a Windows fan ever since he got his first PC, a Pentium III (a monster at that time).
For most of the kids of his age, the Internet was an amazing way to play and communicate with others, but he was deeply impressed by the flow of information and how easily you can find anything on the web.
Prior to founding Windows Report, this particular curiosity about digital content enabled him to grow a number of sites that helped hundreds of millions reach faster the answer they’re looking for.
,
Whether you’re an avid gamer or not, it’s frustrating when the Steam app won’t open to play your game. Steam may not open for a variety of reasons, such as lack of administrator permissions, corrupted application cache files, damaged game files, and more. But, don’t worry. You are not the only one with this problem!
In this guide, you will find all available solutions to fix the STEAM not opening problem and start playing games again.
How to Fix the Steam Not Opening/Launching issue on Windows 11/10.
Suggestion: Before moving on to more advanced solutions, try the simple steps below and see if the problem is resolved.
- Restart your computer.
- Check that you have the correct date/time.
- Update Windows.
- Disconnect any external USB devices (e.g. Game controllers, USB disks, etc.)
- Disconnect from VPN/Proxies.
- Temporarily disable or uninstall third-party antivirus programs. *
* Note: I suggest keeping your Antivirus disabled while trying the other methods as well.
- Stop Background Steam Processes.
- Run Steam as Administrator.
- Update the Video Drivers.
- Clear Steam Cache.
- Remove Steam Beta version.
- Reinstall Steam.
Method 1: End Steam’s running processes.
Most of the time, when Steam won’t open it means it’s already running in the background. In this case, stop the Steam processes using Task Manager and then start Steam again.
1. Right-click on the Taskbar and select Task Manager.

2. At the Processes tab, see if a Steam process is running (e.g. Steam.exe, steamservice.exe, steambootstrapper, steamwebhelper.exe, etc.). If so, right-click on it and select End Task. *
* Important: If multiple Steam processes are running, stop them all.

3. Close Task Manager and then try to open Steam. *
* Note: If this resolves the problem, reopen task manager, go to the Startup tab, and disable the Steam application from running when Windows starts.
Method 2: Run Steam as Administrator.
Another simple method to fix the «Steam won’t open» issue, is to run Steam as administrator. To do that:
1. Right-click on Steam app and select Run as administrator. (Then click Yes at UAC warning message).

2. If Steam opens as Administrator, close the program and apply the below steps.
3. Open File Explorer and navigate at the following location on disk:
- C:\Program Files (x86)\Steam\
4a. Explore the contents of the «Steam» folder, to locate the «steam.exe» file.
4b. Then, right-click on steam.exe and select Properties.

4c. In the Properties window, select the Compatibility tab.
4d. Check the box that says Run this program as an administrator, then click Apply, and then OK to save the changes.

5. Start Steam.
Method 3: Update the Graphics Drivers
Having an unstable or outdated graphics driver on your system can also cause Steam not to open. In this case update or reinstall the graphics drivers according to the instructions below.
1a. Press Windows + R keys to load the Run dialog box.
1b. Type devmgmt.msc and press Enter to open the device manager.

2. In the Device Manager window, locate and double-click the Display adapters option to expand it.
3. Right-click on your graphics adapter and select Update driver.*
* Note: If you own a laptop with a secondary graphics adapters (discrete GPU), update the drivers on the secondary adapter.(e.g. AMD Radeon or NVidia)

4. In the «Update Drivers» window, select Search automatically for drivers.

5. Allow the system to search and install any available graphics drivers and then restart your PC. *
* Note: If Windows cannot find an updated graphics driver, visit the official support site of you Graphics adapter manufacturer (e.g. NVIDIA, AMD, or Intel), and download and install the graphics drivers from there.
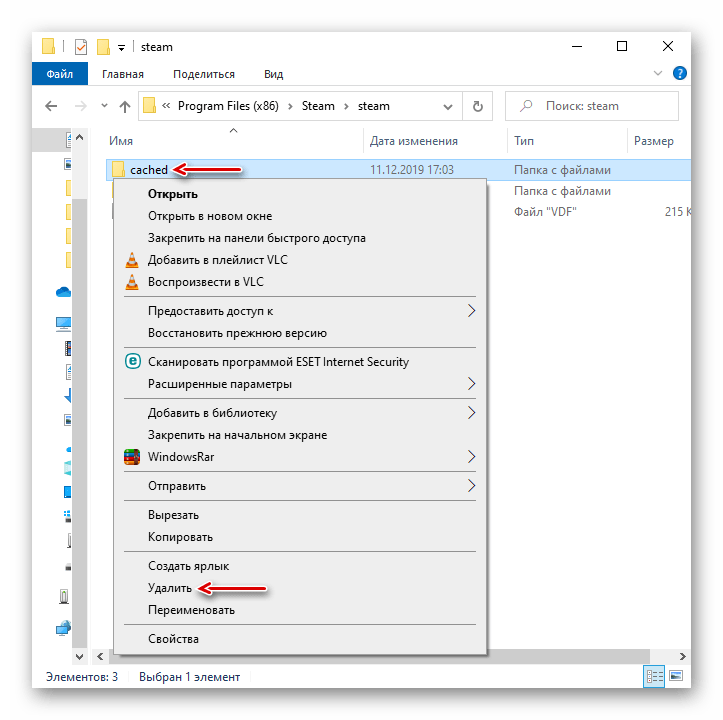
Method 4: Clear the Application Cache of Steam.
If you still cannot open Steam after applying the above methods, then proceed and delete the Stem cache.
1. Restart your computer to make sure that no Steam process is running.
2. Open Explorer and navigate to the following path:
- C:\Program Files (x86)\Steam
3. Locate and delete the appcache folder.

4. After that, copy and paste the following path into the File Explorer’s address bar and press Enter:
- %USERPROFILE%\AppData\Local\Steam

5. Delete all the contents of the «Steam» folder and then try to start Steam again.
Method 5: Delete Steam Beta file.
If you are using the beta version of Steam, it could be the cause of the problem. Sometimes, the beta version of Steam is unstable and can lead to various issues. You can easily unregister the beta version of Steam by deleting the beta file in Steam’s «package» folder.
1. Open File Explorer and navigate at the following location on disk:
- C:\Program Files (x86)\Steam\package
2. Now see if there is a file named «beta» and if so, delete it.

3. Then, try to open the Steam app again and see if Steam works without any problems.
Method 6: Uninstall and Reinstall the Steam app.
If none of the above methods fixed the Steam not opening issue, uninstalling and reinstalling the Steam app usually fixes it.
Step 1. Backup Steam Games.
As a precautionary measure, go ahead and back up your Steam games to another location. To do that:
1. Open File Explorer and navigate to the following location:
- C:\Program Files (x86)\Steam\steamapps
2. Then proceed and Copy the common folder to another location/disk.

Step 2. Remove and Reinstall Steam app.
1a. Press Windows + R keys to load the Run dialog box.
1b. Type appwiz.cpl and press Enter to open Programs and Features.

2. Find and right-click on Steam app and click Uninstall. (or alternatively select the Steam app and click Uninstall from the menu).

3. Follow the on-screen instructions to uninstall Steam and then restart your PC.
4. Finally, go to Steam webpage and click Install Steam to download and install the latest Steam client.

5. Open Steam and check if your games are there. If not, close Steam and copy the «common» folder from the backup location back to «C:\Program Files (x86)\Steam\steamapps» folder.
That’s it! Which method worked for you?
Let me know if this guide has helped you by leaving your comment about your experience. Please like and share this guide to help others.
If this article was useful for you, please consider supporting us by making a donation. Even $1 can a make a huge difference for us in our effort to continue to help others while keeping this site free:
- Author
- Recent Posts
Konstantinos is the founder and administrator of Wintips.org. Since 1995 he works and provides IT support as a computer and network expert to individuals and large companies. He is specialized in solving problems related to Windows or other Microsoft products (Windows Server, Office, Microsoft 365, etc.).