
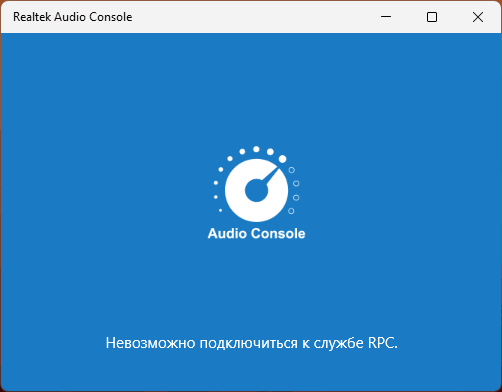
При установке современных драйверов звуковой карты в Windows 11 и Windows 10 по умолчанию автоматически скачивается приложение настроек Realtek Audio Console, иногда приходится выполнить действия, чтобы скачать приложение вручную. Однако, многие пользователи сталкиваются с тем, что после установки и запуска в окне приложения появляется сообщение «Невозможно подключиться к службе RPC» и доступа к параметрам нет.
В этой пошаговой инструкции о том, как исправить ошибку «Невозможно подключиться к службе RPC» при запуске Realtek Audio Console и дополнительная информация, которая может быть полезной. На близкую тему: Как скачать и установить Realtek Audio Console.
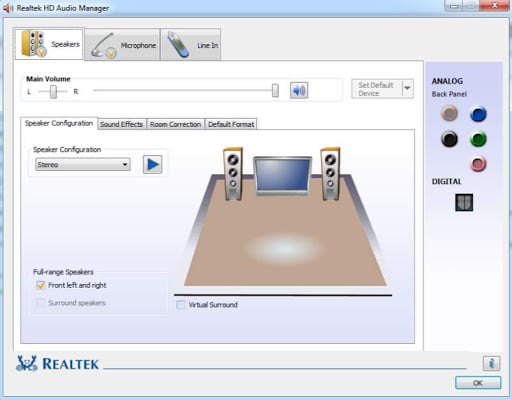
Включение автозапуска Realtek Audio Universal Service
Основная причина ошибки при подключении к службе RPC в контексте Realtek Audio Console — отключение необходимого пункта в автозагрузке Windows 11/10, а также соответствующей службы: этом может быть сделано как вручную пользователем, так и какими-либо программами для оптимизации.
Шаги для исправления ситуации будут следующими:
- Нажмите правой кнопкой мыши по кнопке «Пуск» и выберите пункт «Диспетчер задач».
- В Диспетчере задач перейдите на вкладку «Автозагрузка приложений» (в Windows 11) или «Автозагрузка» (в Windows 10).
- Найдите пункт RtkAudUService64.exe (решение при его отсутствии будет описано в следующем разделе инструкции) и убедитесь, что в столбце «Состояние» указано «Включено». Если это не так, нажмите по пункту правой кнопкой мыши и выберите пункт «Включить» в контекстном меню. Закройте диспетчер задач.

- Нажмите правой кнопкой мыши по кнопке «Пуск», выберите пункт «Выполнить», введите services.msc и нажмите Enter.
- В окне со списком служб найдите Realtek Audio Universal Service и дважды нажмите по имени службы.

- Если в поле «Тип запуска» установлено «Отключена» или «Вручную», измените значение на «Автоматически» и нажмите «Ок».

- Закройте окно «Службы» и перезагрузите компьютер.


После перезагрузки проверьте, запускается ли Realtek Audio Console теперь: с большой вероятностью ошибка «Невозможно подключиться к службе RPC» будет исправлена.
Некоторые дополнительные сведения, которые могут пригодиться, если вы столкнулись с рассматриваемой проблемой:
- Если пункты RtkAudUServcieexe или Realtek Audio Universal Service отсутствуют в автозагрузке и списке служб соответственно, при этом у вас звуковая карта Realtek, попробуйте переустановить её драйвер, скачав его с официального сайта производителя материнской платы или ноутбука. Учитывайте, что для работы приложения должен использоваться новый драйвер DCH (DCHU), который может быть недоступен для очень старых устройств. В этом случае можно попробовать использовать неофициальный Realtek Universal Audio Driver, доступный на GitHub
- Если всё необходимое было включено, при этом приложение Realtek Audio Universal Service продолжает сообщать об ошибке, причиной может быть отключение системных служб в ходе «оптимизации» системы: потребуется вернуть их запуск в состояние по умолчанию.
- В ситуации, когда до недавнего времени приложение работало, а теперь перестало, может помочь откат драйвера звуковой карты, либо использование точек восстановления системы.
Надеюсь, один из вариантов сработает в вашем случае, и проблема с работой Realtek Audio Console будет решена.
Все способы:
- Способ 1: Переустановка драйвера
- Способ 2: Добавление устаревшего оборудования
- Способ 3: Использование средства Nahimic (только ноутбуки MSI)
- Способ 4: Проверка системы на вирусы
- В «Диспетчере устройств» нет Realtek High Definition
- Вопросы и ответы: 17
В подавляющем большинстве настольных ПК и ноутбуков установлено звуковое решение от Realtek в комплекте с соответствующим ПО. Иногда последнее работает некорректно, а именно, отказывается запускаться. Сегодня мы расскажем вам о причинах такого поведения и методах его исправления.
Способ 1: Переустановка драйвера
Наиболее часто рассматриваемый сбой проявляется вследствие проблем в работе программного обеспечения Реалтек. В такой ситуации решением будет его переустановка.
- Запустите «Диспетчер устройств» любым подходящим методом – например, через средство «Выполнить» (нажатие комбинации Win+R), в котором введите запрос
devmgmt.msc, а затем нажмите «ОК». - В перечне оборудования найдите категорию «Звуковые, игровые и видеоустройства» и раскройте. Далее найдите внутри неё запись «Realtek High Definition Audio» или похожее по названию, выделите, нажмите правую кнопку мыши и выберите «Удалить устройство».

В окне предупреждения обязательно отметьте галочкой опцию «Удалить программы драйверов для этого устройства» и подтвердите удаление.
- Далее воспользуйтесь пунктами «Вид» – «Показать скрытые устройства». Снова проверьте перечень – если будут найдены записи, соответствующие устройствам Realtek, удалите их по методу из предыдущего шага.
-
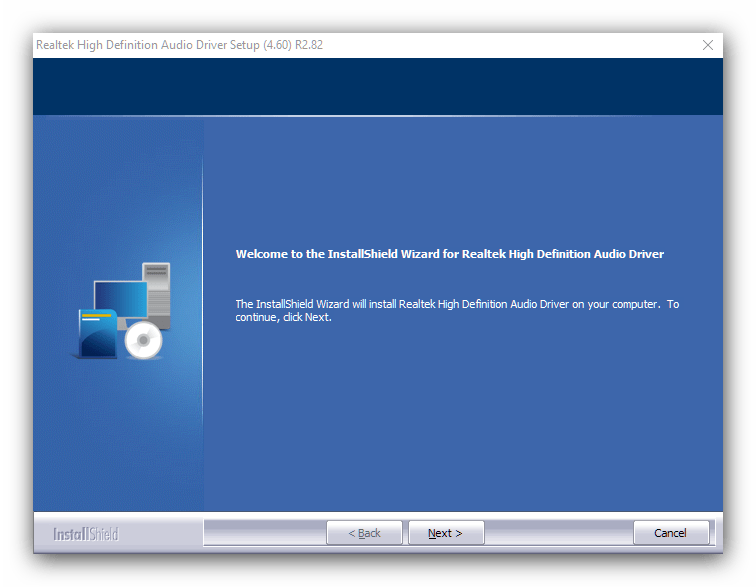
Скачайте драйвера Реалтек по ссылке ниже. Инсталлируйте его, следуя инструкциям на экране.
Скачать последнюю версию Realtek High Definition Audio Drivers
- Перезагрузите компьютер и проверьте состояние диспетчера Realtek – проблема не должна повторяться, если она заключалась в сбойных драйверах.


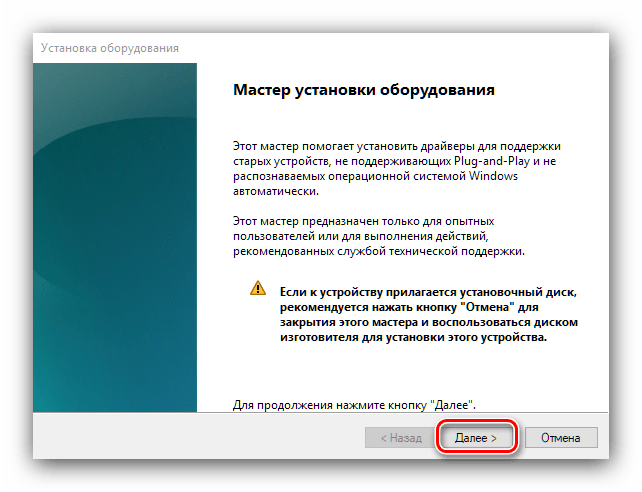
Способ 2: Добавление устаревшего оборудования
Если вы владелец ноутбука или ПК на базе материнских плат, которые были выпущены до появления Windows 10, сбой может заключаться в том, что новейшая версия ОС от Microsoft некорректно распознаёт это якобы устаревшее оборудование. Решение проблемы – использование «Мастера добавления старых устройств».
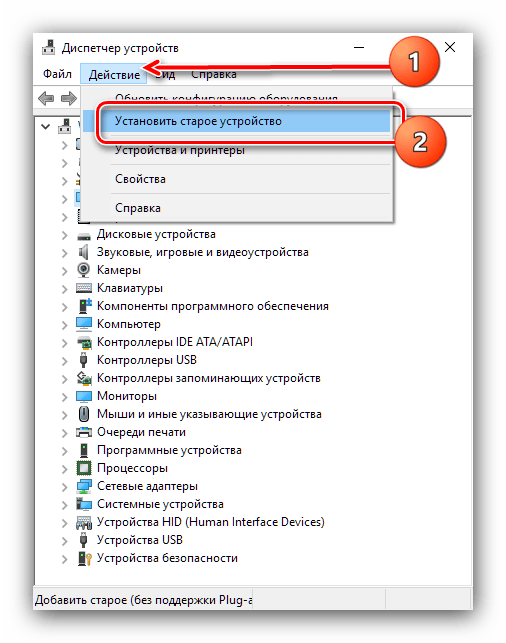
- Откройте «Диспетчер устройств» и воспользуйтесь пунктами «Действие» – «Установить старое устройство».
- В первом окне «Мастера…» нажмите «Далее».

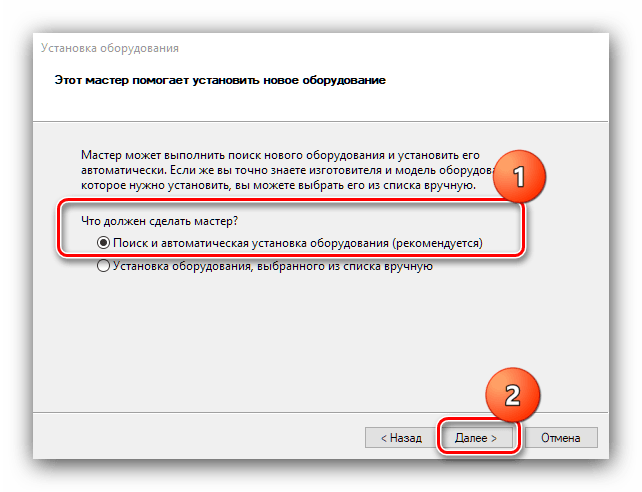
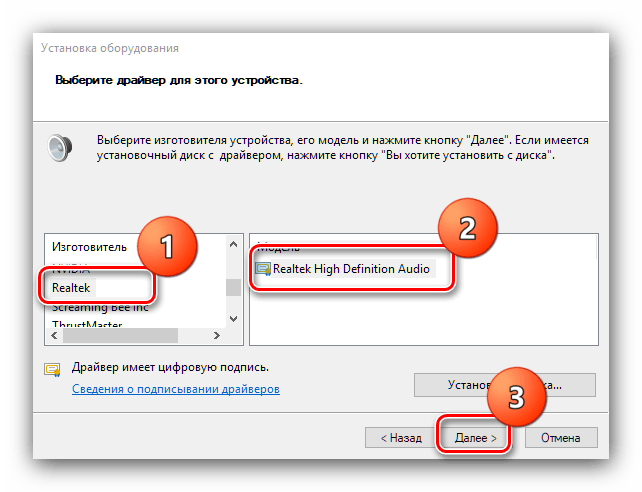
Здесь выберите вариант «Поиск и автоматическая установка оборудования», затем кликните «Далее».
- Подождите, пока произойдёт процесс сканирования. Во время этого Мастер уведомит вас, что комплектующее обнаружено, и предложит установить для него совместимые драйвера.
- По окончании операции закройте приложение.
Если этот метод вам не помог – читайте далее.
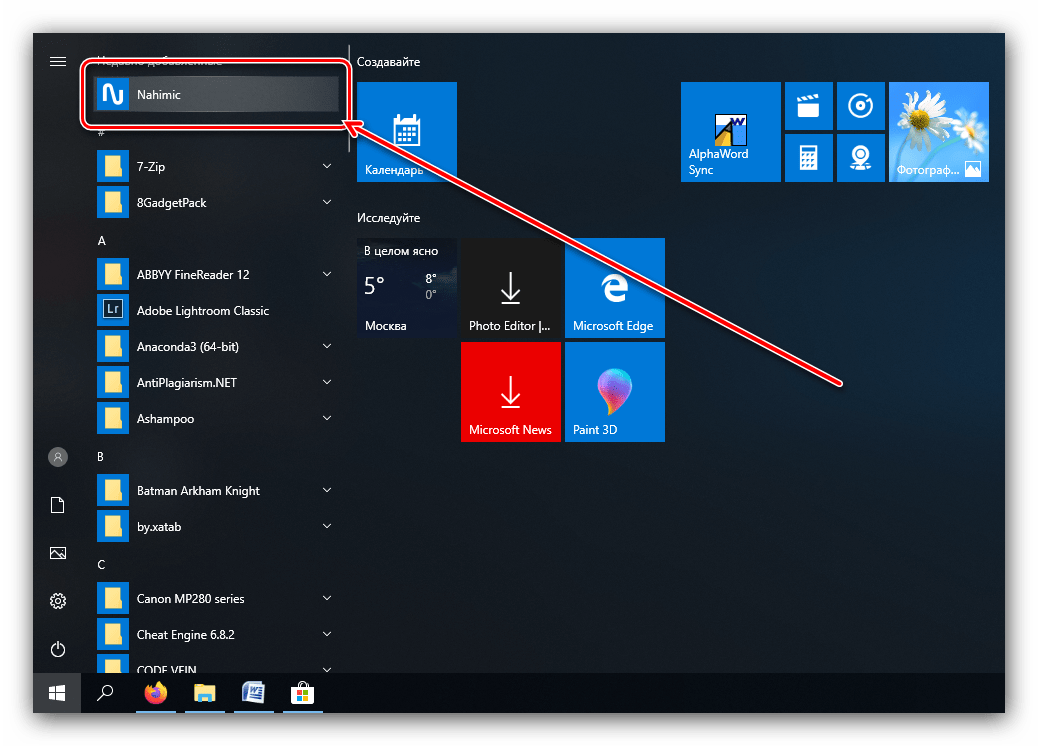
Способ 3: Использование средства Nahimic (только ноутбуки MSI)
Если вы – владелец свежего (2018 года выпуска и новее) ноутбука от компании МСИ, то ваш случай заключается в особенностях взаимодействия с «Диспетчером Realtek HD». Дело в том, что MSI в своих лэптопах переместила все звуковые настройки в приложение под названием Nahimic. Его можно запустить с ярлыка на «Рабочем столе», а если таковой отсутствует – из папки в меню «Пуск».
Если же данное приложение тоже не запускается, его рекомендуется переустановить.
Урок: Переустановка приложений в Windows 10
Способ 4: Проверка системы на вирусы
Порой рассматриваемая проблема возникает из-за заражения компьютера вредоносным ПО: зловред повредил файлы «Диспетчера Realtek HD», отчего приложение не может запуститься, либо вирус по каким-то причинам заблокировал его запуск. Обязательно проверьте систему на предмет заражения и устраните угрозу, если таковая будет обнаружена.
Урок: Борьба с компьютерными вирусами
В «Диспетчере устройств» нет Realtek High Definition
Если в системном менеджере оборудования вы не можете найти звуковую карту Реалтек, это означает, что устройство не опознано. Причин этому может быть две: отсутствуют подходящие драйвера либо девайс физически вышел из строя. Алгоритм проверки и устранения сбоя следующий:
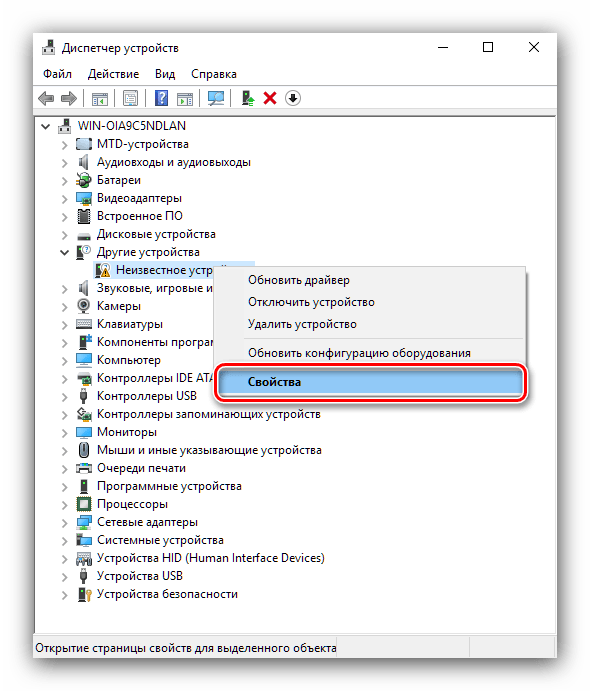
- Проверьте, нет ли в списке компонентов записей с именем «Неизвестное устройство». Если таковое будет обнаружено, кликните по нему правой кнопкой мыши и выберите «Свойства».
- В окне свойств внимательно прочитайте, какую ошибку выдаёт устройство – если это коды 43 или 39, скорее всего, компонент имеет аппаратные неполадки, устранить которые можно только заменой.
- Если кодом ошибки является 28, проблема программная и заключается именно в отсутствии необходимого ПО. Используйте инструкцию по ссылке ниже для получения требуемого пакета.

Урок: Пример установки драйверов для звуковой карты
- Дополнительно может потребоваться обновление драйверов для материнской платы: в некоторых случаях звуковая микросхема является компонентом чипсета «материнки» и работает только в комплекте с ним.

Урок: Обновление драйверов материнской платы


Мы рассказали вам о том, что нужно делать, если перестаёт открываться «Диспетчер Realtek HD» на компьютере с Виндовс 10.
Наша группа в TelegramПолезные советы и помощь
Where is Realtek Audio Manager and what is it used for? Well, the Realtek Audio Manager is used to alter the sound settings of the speakers in-built on your PC. However, you may face the Realtek Audio Manager not opening issue. The article has the methods to the question of how to find Realtek Audio Manager and fix the issues with the Audio Manager. You can use the article as the answer to the question of how to open Realtek HD Audio Manager Windows 10 and fix the issues related to the Audio Manager.

Table of Contents
The possible causes for the Realtek Audio Manager not working on your PC are listed here in this section.
- Missing Audio Manager icon- If the Realtek Audio Manager icon is missing on the Taskbar, you may not be able to use the Audio Manager.
- Conflicts with pre-installed audio drivers- If the audio drivers installed on your PC is not conflicting with the updated version of the audio driver, you may not be able to use the Audio Manager.
- Outdated Audio driver- If the Audio Driver on your PC is outdated, you may not be able to use the Audio Manager on your PC.
- Corrupted Audio Driver- If the Audio Driver is corrupted on your PC, you may not be able to use the Audio Manager and alter the settings.
- Outdated Windows- If you are using an outdated Windows, you may not be able to use the Audio Manager on your PC.
- Improper installation of the Realtek Audio Manager- If the audio drivers are not properly installed on your PC; you may not be able to use the Realtek Audio Manager.
Basic Troubleshooting Methods
The basic troubleshooting methods described in this section will help you fix the Realtek Audio Manager not opening issue on your PC.
1. Restart PC
If there are certain glitches on your PC that are not allowing you to open the Realtek Audio Manager, you can try restarting your PC. To restart your PC, press the Windows key, click on the Power button on the START menu, and click on the option Restart to restart your PC.

2. Repair Corrupt Files
You can check for the corrupted system files on your PC using the DISM and SFC scan tools to fix the issue with the Realtek Audio Manager. Read the article on how to repair system files on Windows 10 to check for the corrupted system files.

3. Update Windows
If you are using outdated Windows on your PC, you may not be able to use any of the functions on your PC. To fix the issue with the Realtek Audio Manager, you need to update the Windows to the latest version on your PC. Follow our guide to download and install latest Windows 10 updates to fix the issue.

4. Reset BIOS to Default Settings
If none of the methods work for you, you can try resetting the BIOS to default settings on your PC.
Note: The method explained in this section is based on Lenovo PC and may differ based on your manufacturer type.
1. Firstly, restart the PC and press the F1 key to enter into BIOS on your PC.

2. Press the F9 key to load the default BIOS settings on your PC and press the F10 key to save the settings.
Now, here are the advanced troubleshooting methods to fix the issue.
Method 1: Run Playing Audio Troubleshooter
You can try troubleshooting the problems in the Realtek Audio driver to fix the issue with the Realtek Audio Manager. Use the link provided here to troubleshoot the problems in the Audio Driver and fix the issue.
Note: You can also use the third-party tool or download the driver fix app using the Google Chrome app on your PC.

Also Read: Fix Zoom Audio Not Working Windows 10
Method 2: Locate Realtek Audio Manager
Sometimes, you may not have located the Realtek Audio Manager on your PC and the manager may not have functioned properly. You need to locate the application and then launch it to fix the Realtek Audio Manager not opening issue. There are 3 options to open the Audio Manager on your PC, as listed below in the section.
Option I: Through Taskbar
You can open the Audio Manager using the icons on the Taskbar which would be either located on the Taskbar or in the Show hidden icons pop-up menu. Click on the Realtek Audio Manager to launch the app window on your PC.
Option II: Through Windows Explorer
You can launch the Realtek Audio Manager using Windows Explorer on your PC by opening the source file location.
1. Press the Windows + E keys together at the same time to launch the File Explorer.
2. Go to This PC > Local Disk (C:) > Program Files > Realtek > Audio > HAD folder.

2. Double-click on the RAVCpl64 application file to open the Realtek Audio Manager.

Option III: Through Control Panel
Using the Control Panel app, you can launch the Realtek Audio Manager on your PC. Here is how to open Realtek HD Audio Manager in Windows 10.
1. Hit the Windows key, type Control Panel and click on Open.

2. Set View by > Small icons, then click on the Realtek HD Audio Manager.

Hence, this is how you can open Realtek HD Audio Manager on Windows 10.
Method 3: Enable Realtek Audio Manager Startup App
The Realtek Audio Manager may have been disabled in the Task Manager and you might not be able to open the app. You need to enable the app on the Task Manager to fix the Realtek Audio Manager not opening issue.
1. Press the Windows key, type Task Manager, and click on Open.

2. Navigate to the Startup tab, select the Realtek HD Audio Manager in the list, and click on the Enable button to enable the Realtek Audio Manager.

Also Read: How to Fix Audio Stuttering in Windows 10
Method 4: Update Realtek Audio Driver
You can try manually installing the latest version of the Realtek Audio Driver to fix the issue of the Realtek Audio Manager not opening on your PC. There are various options to install the Audio driver on your PC to fix the issue in this section.
Step I: Show Hidden Device Drivers
At most times, you may not be able to access the Realtek Audio Manager in the Device Manager if it is hidden. You can use the method described here to display the hidden devices in the Device Manager and make changes to them.
1. Hit the Windows key, type Device Manager, and click on Open.

2. Click on the View tab in the window and click on the Show hidden devices option on the menu to see all the devices in the Device Manager.
Step II: Update Driver
If your Realtek Audio Driver is outdated, you need to update it to the latest version to use the Audio Manager. Follow any one of the given methods to update driver.
Option I: Through Device Manager
Read the article provided here to know the method to update the Realtek Audio Driver on your PC.

Option II: Through Microsoft Update Catalog
You can install the Realtek Audio Drivers from the Microsoft Update Catalog to fix the Realtek Audio Manager not opening issue on your PC.
1. launch Google Chrome by typing in the Windows search bar. Click on Open.

2. Open the official website of the Microsoft Update Catalog and click on the Download button based on your Windows Specifications.

3. In the Download window, click on the link available to initiate the download process and save the file to your PC.
4. Right-click on the downloaded file and click on the option Extract files… to extract the files.
5. Finally, run the setup file and follow the on-screen instructions to install the updates.
Option III: Through OEM Manufacturers
You can install the Realtek Audio driver from the OEM Manufacturers directly on your PC and uninstall the existing drivers. Follow the steps provided in the method here to download the drivers from OEM Manufacturers on your PC.

Option IV: Install High Definition Audio Codecs
You can install the Realtek Audio Drivers by installing the High Definition Audio Codecs or the software on your PC.
1. Launch the Google Chrome browser.
2. Open the official website of the Realtek High Definition Codecs and click on the Download button in the Windows section according to your Windows specifications.

3. Run the downloaded file and follow the on-screen instructions to install the Realtek Audio driver on your PC.
Option V: Through Driver Support App
If you are not able to update or install the audio drivers frequently, you can try using an automatic recognition app to find the right driver or the Driver Support app.
1. Open Google Chrome browser.
2. Open the official website of the Driver Support app and click on the DOWNLOAD NOW button on the page.

3. Follow the on-screen instructions in the installation wizard and click on the OK button on the Install anyway window.
4. After the app scans your PC, click on the Realtek Audio Driver, and click on the Fix It! button to install the updated driver.
Also Read: Fix Windows 10 No Audio Devices are Installed
Method 5: Modify Realtek Audio Driver
You can use the methods explained in this section to modify the Realtek Audio driver and fix the Realtek Audio Manager not opening issue on your PC.
Option I: Rollback Driver Updates
If your Audio driver was functioning better in a previous version than in the updated version, you can try rolling back to the previous setting. Read the article on how to rollback drivers on Windows 10.

Option II: Add Legacy Hardware
If you cannot fix the issue with the Realtek Audio Driver, you can try adding Legacy hardware to the driver on the Device Manager. Follow these steps to add Legacy Hardware for the Realtek Audio Driver.
1. Open the Device Manager and select Sound, video and game controllers.
2. Then, click on Action > Add legacy hardware option.

3. Select Search for and install the hardware automatically (Recommended) and click on Next.

Also Read: How to Fix The Audio Service is Not Running Windows 10
Method 6: Reinstall Realtek Audio Driver
You can uninstall the Realtek Audio Driver and then the driver will get re-installed automatically. Read the article to fix audio problems Windows 10 creators Update.

Recommended:
- Fix Full Screen Not Working on Windows 10
- Fix Do Not Disturb Keeps Turning On By Itself on Android
- Fix NVIDIA Control Panel Missing in Windows 10
- Fix Windows 10 Audio Error 0xc00d4e86
The article discusses the methods to fix the issue of Realtek Audio Manager not opening in Windows 10. We hope that you got the answers to your queries like how to find Realtek Audio Manager or where is Realtek Audio Manager, and how to open Realtek HD Audio Manager in Windows 10. If you have any suggestions or queries on the topic discussed, you can leave them in the comments section below.
Realtek HD Audio Manager не открывается на вашем компьютере? Вы попали в нужное место, потому что сегодня мы расскажем вам, почему данное программное обеспечение может не запускаться и как это можно исправить в кратчайшие сроки.
Занимаемся «ремонтом» Realtek HD Audio Manager
У многих в персональных компьютерах и ноутбуках установлены звуковые карты от компании Realtek, а поэтому и такое полезное и удобное ПО, как диспетчер Realtek HD и них тоже, как правило, имеется. Зачастую данный диспетчер работает как надо, без сучка и задоринки, тем не менее некоторые пользователи утверждают, что у них он наотрез отказывается запускаться.
В чем же вся загвоздка? Диспетчер Realtek HD не открывается из-за того, что на компьютере пользователя повреждены или некорректно установлены соответствующие драйвера. Попробуйте выполнить следующий ряд шагов…
Шаг №1 Проверяем, действительно ли диспетчер Realtek HD недоступен
- Нажмите комбинацию Win+R для вызова окошка «Выполнить»;
- вставьте в пустую строку C:\Program Files\Realtek\Audio\HDA\ и нажмите Enter;
- находим исполняемый файл (.exe) Realtek HD Audio Manager и дважды нажимаем на него ЛКМ.
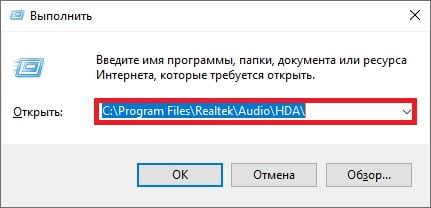
Если диспетчер Realtek HD откроется без каких-либо проблем, то вам просто не повезло наткнуться на баг в системе или ПО — теперь все должно работать нормально. Если же ничего не произошло или возникла ошибка, то переходим к следующему шагу.
Шаг №2 Используем системные средства по устранению проблем
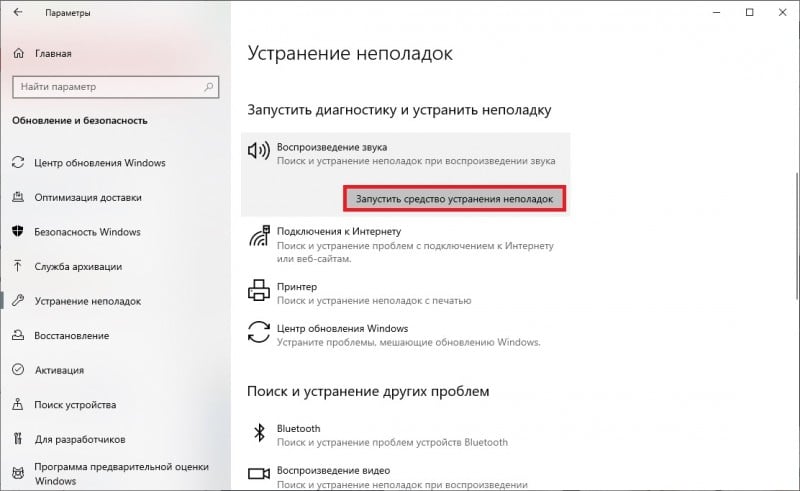
Возможно, Realtek HD Audio Manager не открывается из-за каких-то мелких неполадок в Windows. Мы рекомендуем вам воспользоваться системным средством устранения неполадок. Чтобы запустить его в работу, вам нужно сделать следующее (на Windows 10):
- нажмите ПКМ на Пуск и выберите «Параметры»;
- откройте раздел «Обновление и безопасность»;
- перейдите в подраздел «Устранение вкладок»;
- выберите пункт «Воспроизведение звука» и кликните на кнопку «Запустить средство устранения неполадок»;
- дальше следуйте указаниям на экране.
По окончанию работы средства перезагрузите свой ПК и проверьте, запустится ли диспетчер Realtek HD. Двигайтесь дальше по статье, если ничего не изменилось.
Шаг №3 Переустановка драйверов Realtek
Допустим, что с драйверами Realtek, которые в настоящий момент работаю на вашем ПК, что-то не так. Типичное решение — переустановка, которая очень легко производиться через диспетчер задач. Попробуйте сделать вот что:
- нажмите Win+R;
- пропишите значение devmgmt.msc и нажмите Enter;
- откройте раздел со звуковыми устройствами;
- нажмите ПКМ на пункт «Realtek High Definition Audio» и выберите «Удалить устройство»;
- далее перезагрузите ПК либо запустите обновление конфигурации оборудования в диспетчере устройств (значок монитора с лупой).
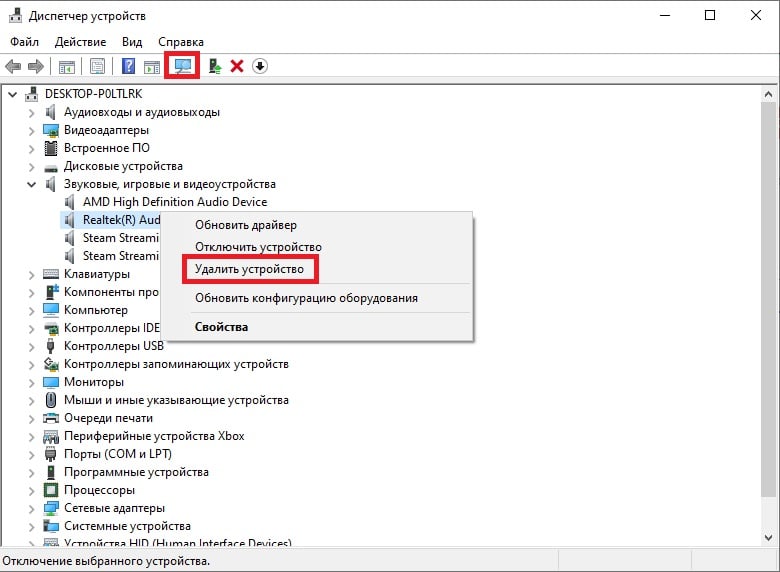
Система автоматически найдет актуальную версию драйверов в сети и установит их. Кроме того, после удаления старых драйверов вы можете попробовать установить свежие звуковые драйвера самостоятельно с официального сайта компании Realtek либо с сайта производителя вашего оборудования (например, ASUS, Acer, Gigabyte и т.д.).
Шаг №4 Откат драйверов до предыдущей версии
Realtek HD Audio Manager перестал открываться после установки последней версии звуковых драйверов? Тогда вы можете попробовать откатиться до предыдущей версии, на которой такой проблемы не наблюдалось.
- Win+R→devmgmt.msc→Enter;
- нажмите ПКМ на «Realtek High Definition Audio» и выберите «Свойства»;
- откройте «Драйвер» и кликните на кнопку «Откатить»;
- дождитесь отката и перезагрузите ПК.
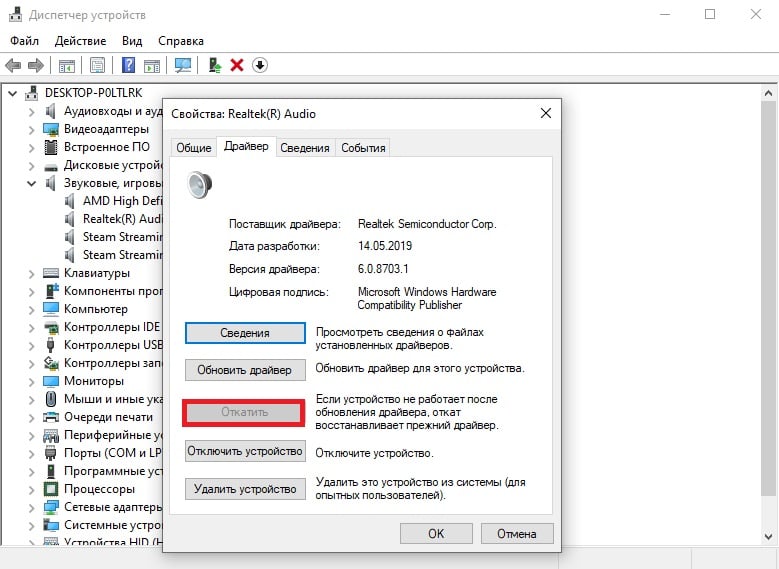
Вернувшись на предыдущую версию звуковых драйверов, попробуйте запустить диспетчер Realtek HD.
If Realtek Audio Console is opening or working due to Realtek Audio Console doesn’t support for this machine, do you know how to fix it? In this MiniTool post, we will show you some useful solutions you can try.
Realtek Audio Console is an audio device configuration tool, which is pre-installed on your Windows computer. After you connect an audio device to your PC, you can open it to set it up according to your requirements.
How to Open Realtek Audio Console?
Way 1: You can click the search icon from the taskbar and search for realtek audio console and select to open Realtek Audio Console.
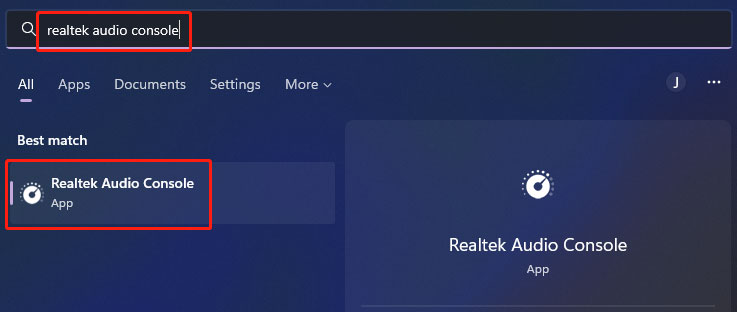
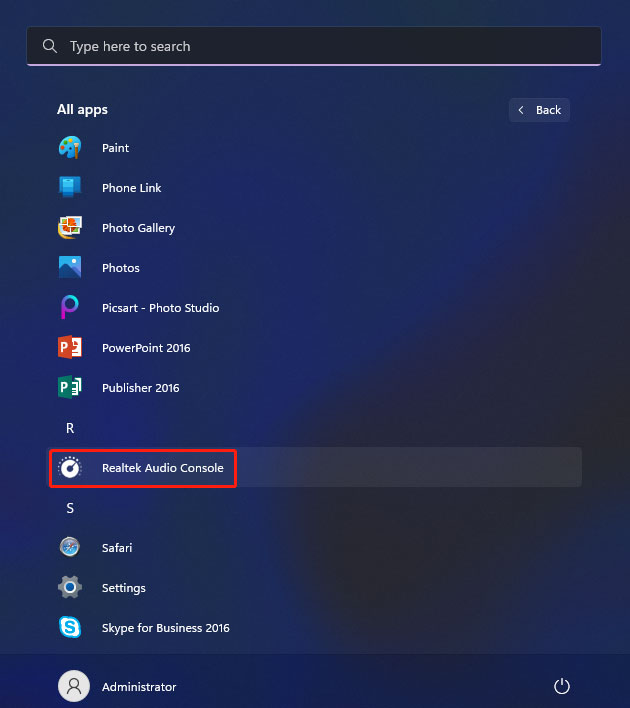
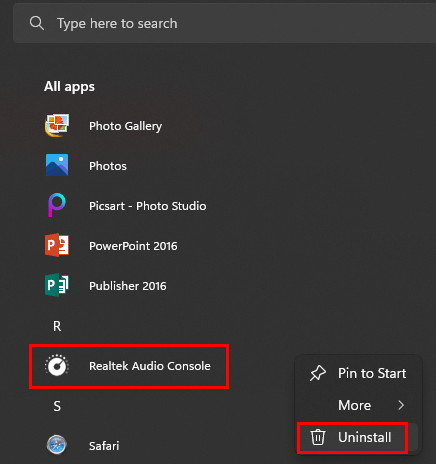
Way 2: Realtek Audio Console is an application. You can go to Start > All apps to find and click it to open it. It is under R.
Realtek Audio Console Doesn’t Support for This Machine
However, Realtek Audio Console doesn’t work well all the time. You may find that it is not opening or working, but only receive an error message saying Realtek Audio Console doesn’t support for this machine.

The main reasons for this issue include:
- The Realtek Audio Console driver is outdated or corrupt.
- Your newly installed Windows update messes up Realtek Audio Console.
- Realtek HD Audio Manager is not corrupt or not installed.
- And more….
Fortunately, it is not a serious issue. You can update or reinstall the driver, reinstall Realtek Audio Console, reinstall HD Audio Manager, or use the Windows snap-in Hardware and Device Troubleshooter to troubleshoot Realtek Audio Console.
Here, we will introduce these ways separately.
Fix 1: Update or Reinstall the Realtek Audio Driver
How to Update the Realtek Audio Driver?
This is to update the Realtek Audio Console driver:
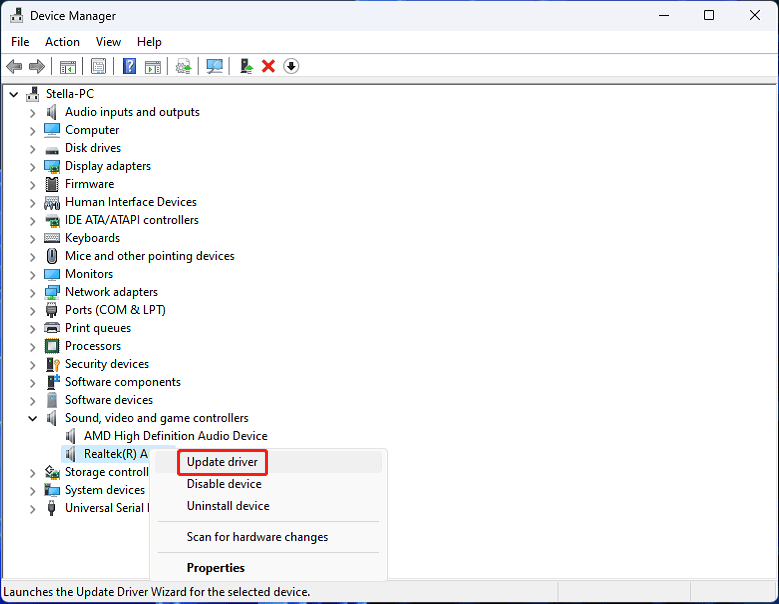
Step 1: Press Win+X to open the WinX menu, then select Device Manager to open it.
Step 2: Expand Sound, video and game controllers.
Step 3: Right-click Realtek Audio and select Update driver.
Step 4: Follow the on-screen introductions to update the Realtek Audio driver.
How to Reinstall the Realtek Audio Driver?
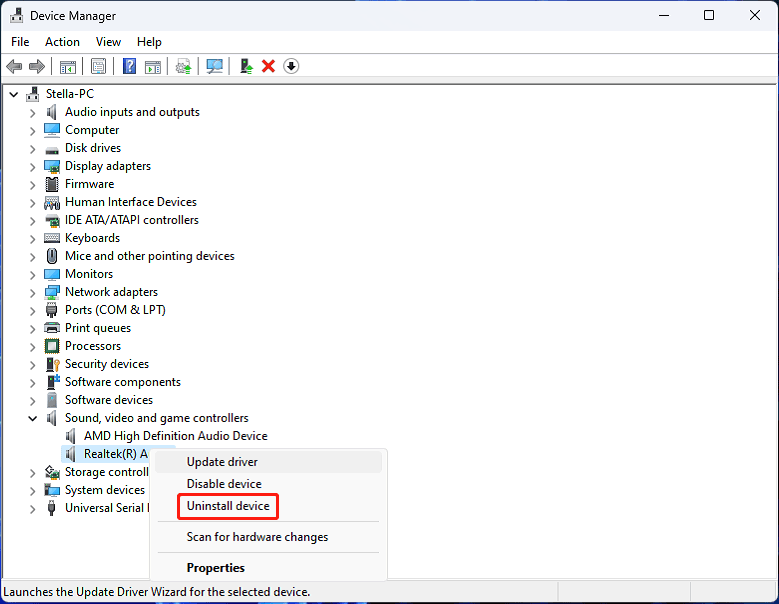
Step 1: Open Device Manager.
Step 2: Expand Sound, video and game controllers.
Step 3: Right-click Realtek Audio and select Uninstall driver.
Step 4: Click Uninstall from the pop-up interface to confirm the operation.
Step 5: Close Device Manager and restart your computer. The system will automatically reinstall the driver for Realtek Audio on your device.
Fix 2: Roll back the Realtek Audio Driver
If you see the error Realtek Audio Console doesn’t support for this machine after you install a Windows update or update the Realtek Audio driver, the new version of the driver may not be compatible. You can roll back the Realtek Audio Driver to have a try.
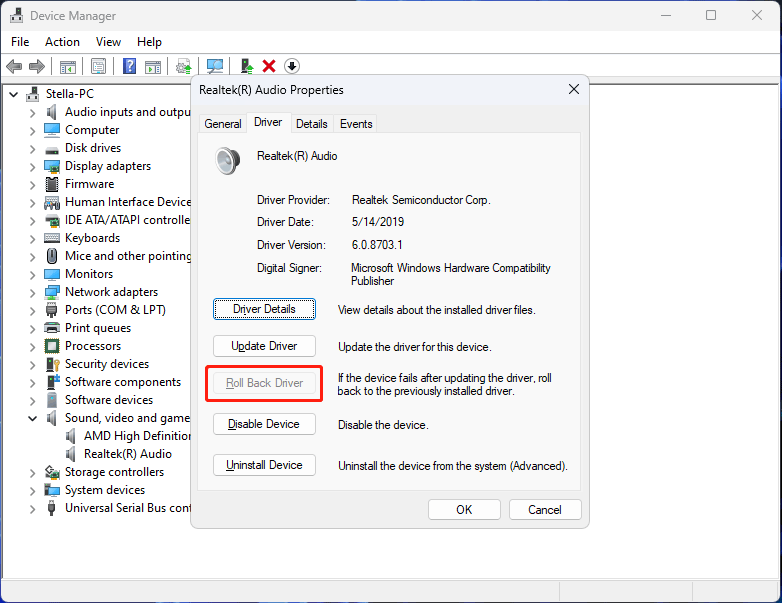
Step 1: Open Device Manager.
Step 2: Expand Sound, video and game controllers.
Step 3: Right-click Realtek Audio and select Properties.
Step 4: Switch to the Driver tab, then click the Roll Back Driver button to roll back the driver to the previously installed version.
Step 5: Restart your PC.
Fix 3: Reinstall Realtek Audio Console
If the above methods can’t help you solve the issue, you can reinstall Realtek Audio Console to have a try.
Step 1: Go to Start > All apps to find Realtek Audio Console.
Step 2: Right-click Realtek Audio Console and click Uninstall to uninstall it from your PC.
Step 3: Download and install Realtek Audio Console from Microsoft Store.
Fix 4: Reinstall Realtek HD Audio Manager
Realtek Audio Console is an advanced tool of Realtek HD Audio Manager. If Realtek HD Audio Manager is missing or not working due to some reasons, Realtek Audio Console may also encounter issues. So, you can download Realtek HD Audio Manager and reinstall it to have a try.
Fix 5: Run Hardware and Devices Troubleshooter
Some users solve the issue by using the Windows built-in Hardware and Devices Troubleshooter. You can also try this method.
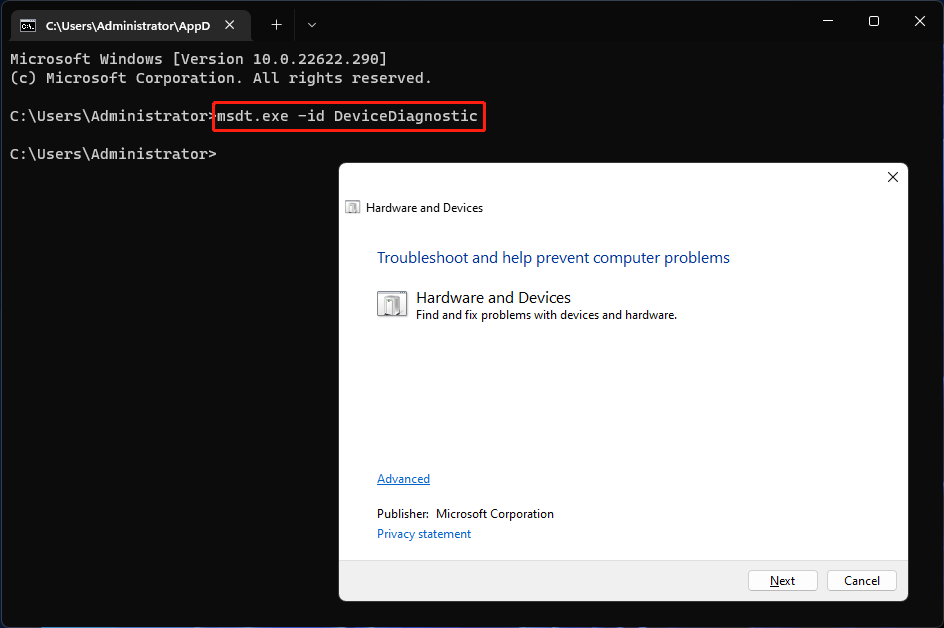
Step 1: Click the search icon from the taskbar and search for cmd.
Step 2: Click Command Prompt from the search result to open it.
Step 3: Copy and paste msdt.exe -id DeviceDiagnostic to Command Prompt and press Enter. This will open the Hardware and Devices Troubleshooter.
Step 4: Click the Next button to run Hardware and Devices Troubleshooter to detect problems and fix them.
The End
These are the methods to fix Realtek Audio Console doesn’t support for this machine. We hope you can find a suitable method here to fix your issue. Should you have other related issues, you can let us know in the comments.