
(Image credit: Windows Central)
On Windows 10, you can play high dynamic range (HDR) content on an HDR10 compatible built-in display or external monitor (or TV) connected to your computer.
HDR is a technology that has been designed to improve the contrast and color of the content you see on the screen. Unlike standard dynamic range (SDR), high dynamic range offers brighter, more vibrant, and a wide range of color details for better image quality on supported videos, games, and apps.
Although on capable smart TVs, the HDR technology just works, on desktop computers and laptops running Windows 10, it’s not that simple. You have to make sure that your device meets the minimum requirements. You have to turn on HDR on display and the OS manually, and you may come across several problems.
In this Windows 10 guide, we’ll walk you through the steps to resolve common problems using HDR displays for games and apps.
- How to fix HDR display not working on Windows 10
- How to fix HDR option not available on Windows 10
- How to fix HDR color not showing correctly on Windows 10
- How to fix HDR color problems with night light on Windows 10
- How to fix HDR brightness problems on Windows 10
- How to fix SDR brightness problems on HDR display on Windows 10
How to fix HDR display not working on Windows 10
Before you can start using your display for HDR content, you have to make sure the display is HDR-compatible, and you have to enable the feature on the external display (if applicable) and on Windows 10.
Confirm HDR compatibility
To check if the display is capable of HDR content on Windows 10, use these steps:
- Open Start.
- Search for dxdiag and click the top result to open the app.
- Click the System tab.
- Click the Save All Information button.
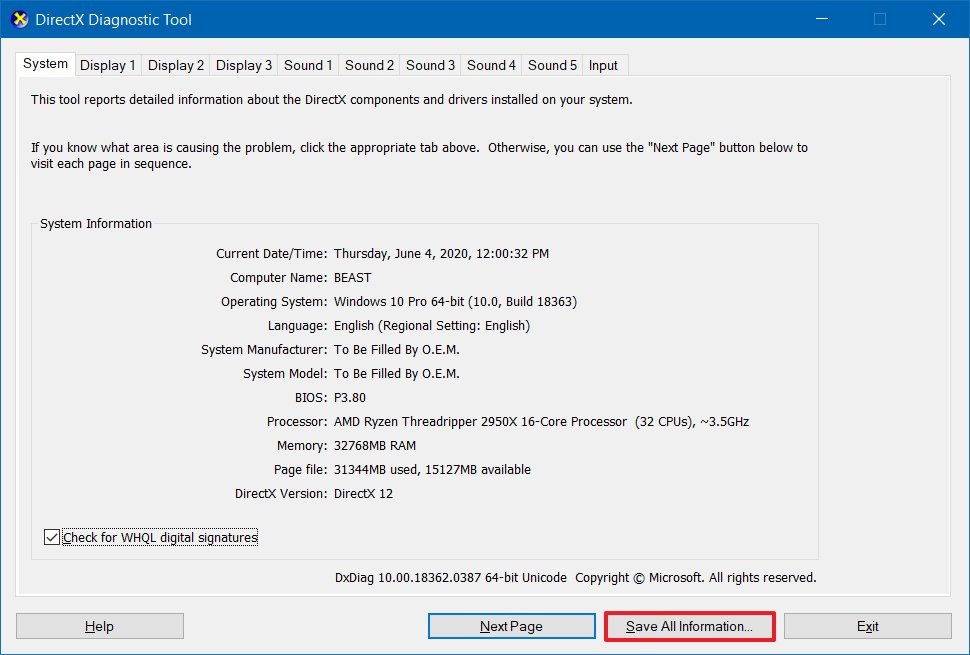
- Select a location to save the output file.
- Click the Save button.
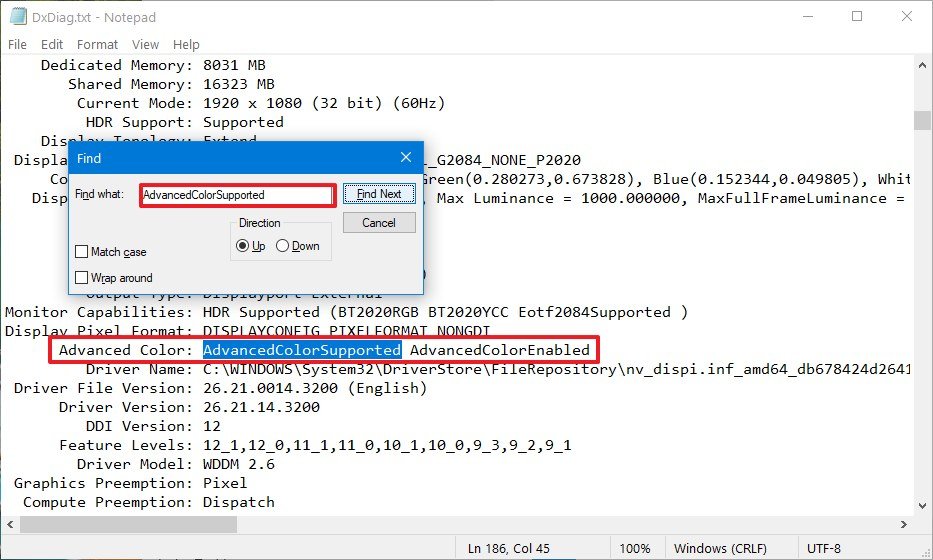
- Open the file with Notepad.
- Search for Advanced Color and determine if HDR is supported:
- AdvancedColorSupported – indicates display driver with support for HDR10 is installed.
- AdvancedColorEnabled – indicates that HDR is enabled.
Quick tip: To search on Notepad, use the Ctrl + F keyboard shortcut, type the search query in the «Find what» box, and click the Find Next button. You can also use the «Direction» option to look up or down from where you’re in the file.
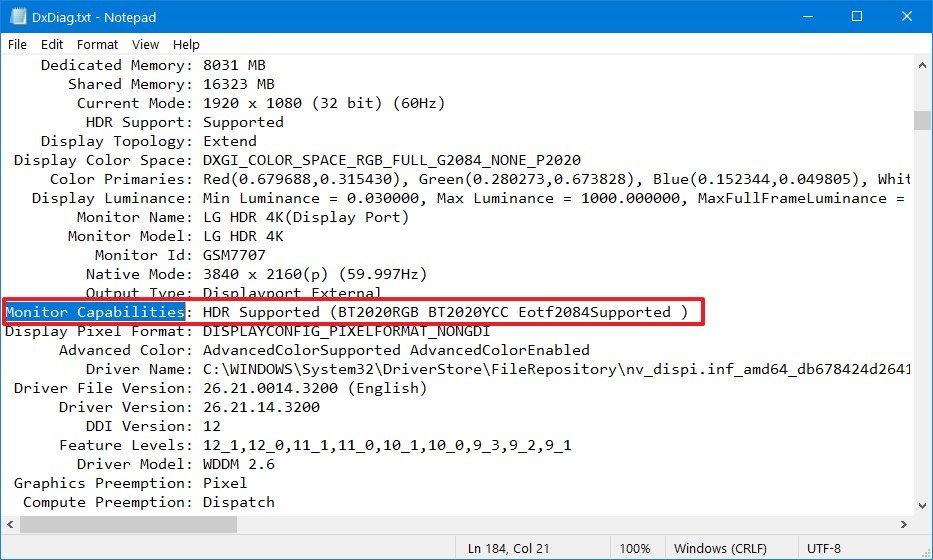
- Search for Monitor Capabilities and confirm it reads HDR Supported to determine that HDR10 is supported. If one or more requirements are missing, then you’ll see the HDR Not Supported message.Quick note: If you also see «BT2020RGB» or «BT2020YCC», then the panel is capable of HDR10, and the «Eotf2084Supported» indicates that the display is capable of HDR.
Once you complete the steps, you can check and enable high dynamic range on the screen and Windows 10.
All the latest news, reviews, and guides for Windows and Xbox diehards.
If the display isn’t ready for HDR, Microsoft recommends choosing from VESA Certified DisplayHDR displays.
Minimum requirements for HDR
The minimum requirements to stream HDR video on Windows 10 are:
On a laptop:
- The built-in display needs to have a minimum resolution of 1080p and a max brightness of 300 nits (more is better).
- The integrated graphics card has to have PlayReady support and codecs for 10-bit video decoding.
On a PC:
- The monitor has to support HDR10, and HDMI 2.0 or DisplayPort 1.4 or higher.
- The graphics card has to have PlayReady 3.0 support. For example, AMD Radeon RX 400 series or higher, NVIDIA GeForce 1000 series or higher, or Intel UHD Graphics 600 series or higher support the HDR requirements.
- Windows 10 must-have codecs for 10-bit video decoding and latest graphics drivers (WDDM) installed.
Enable HDR on display
If the panel isn’t showing HDR, then make sure to enable the feature on the peripheral.
The steps to enable HDR on a monitor is different per manufacturer and even per model. As a result, you’ll need to check your manufacturer support website for more specific details.
Enable HDR on Windows 10
In the case of Windows 10, you can enable HDR using these steps:
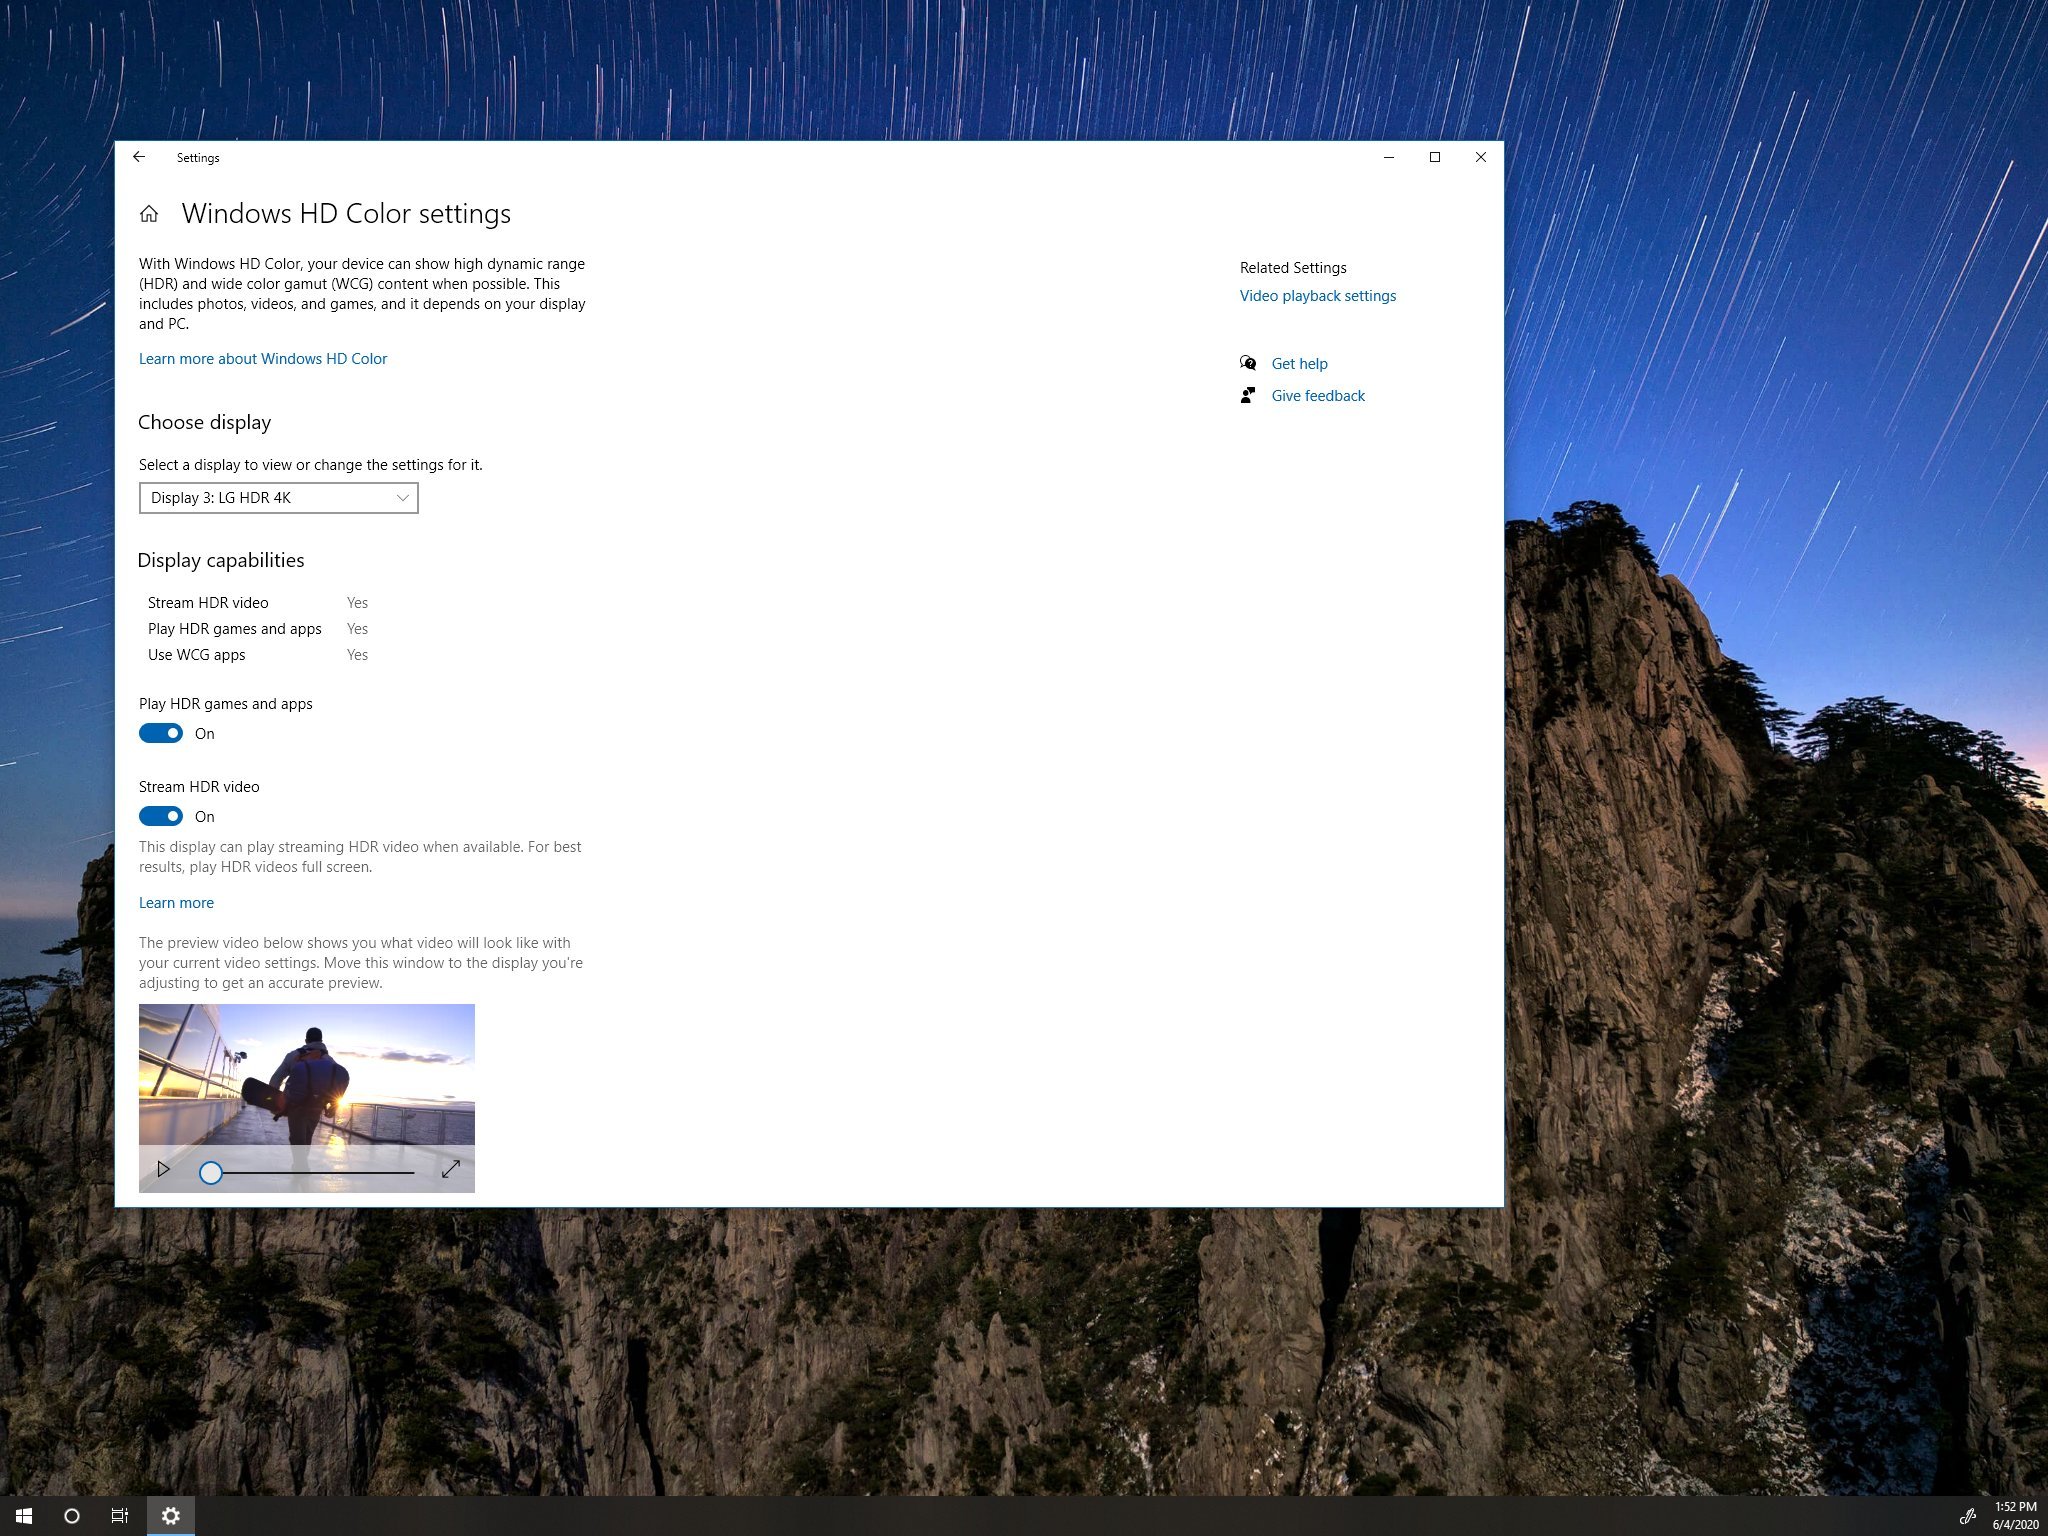
- Open Settings.
- Click on System.
- Click on Display.
- Under the «Rearrange your displays» section, select the external monitor.
- Under the «Windows HD Color» section, turn on the Play HDR games and apps toggle switch.
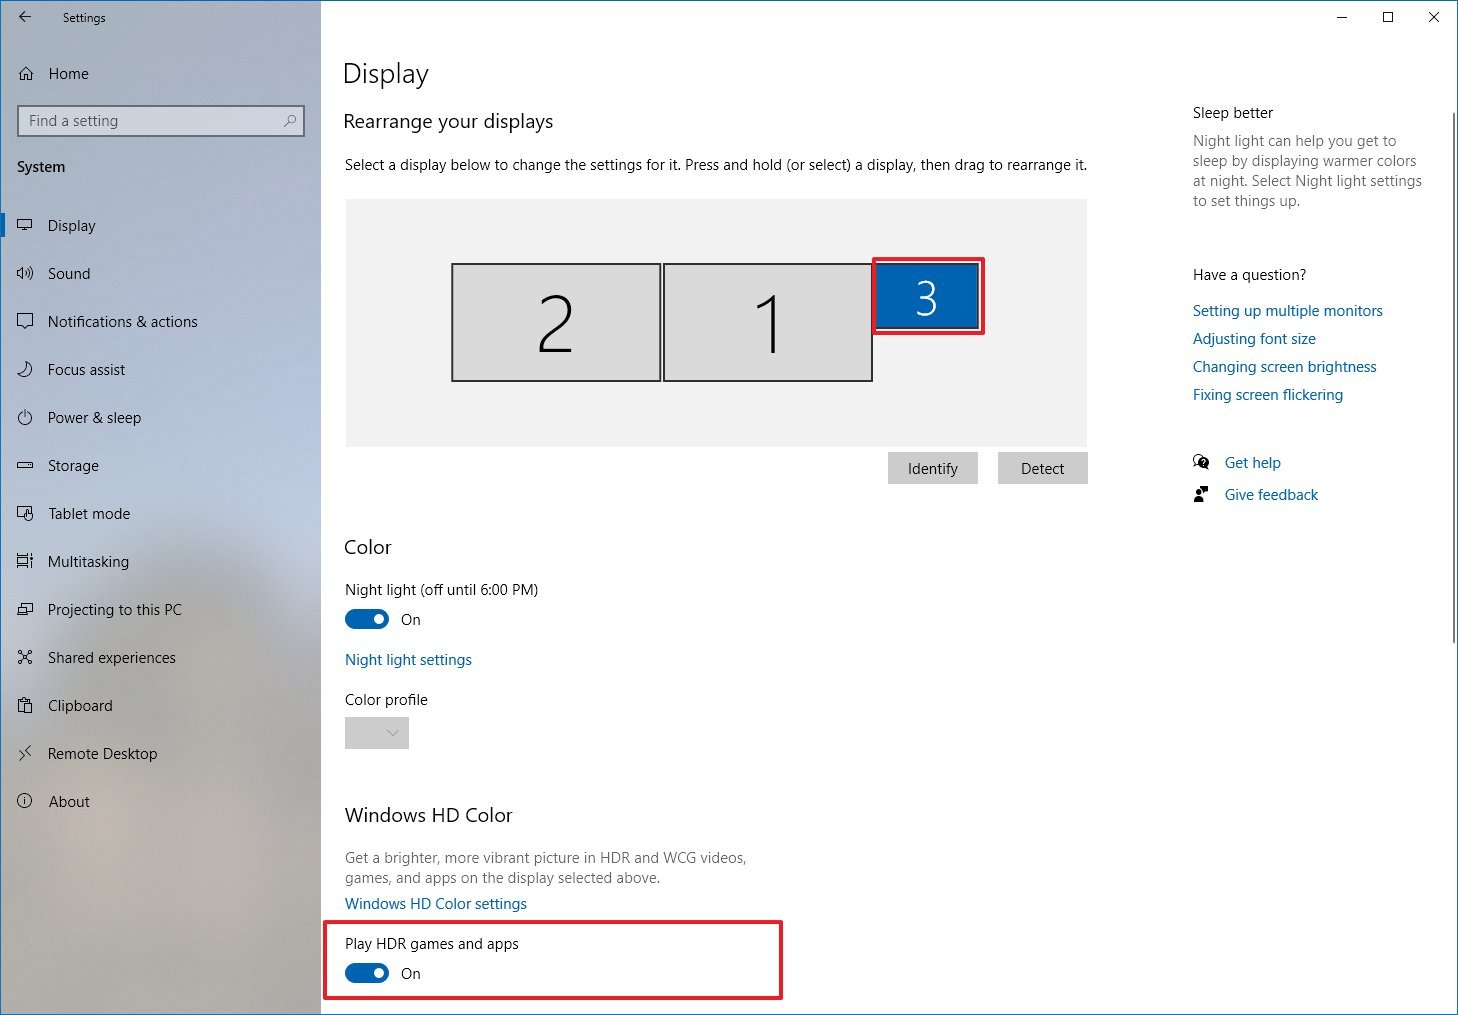
After you complete the steps, HDR will enable allowing you to play compatible games and apps.
How to fix HDR option not available on Windows 10
When trying to turn on high dynamic range from the Windows HD Color settings, you might see the option. However, it’ll appear grayed out. Or the option won’t be available after connecting an external HDR-capable monitor.
Multi-monitor setup HDR not available
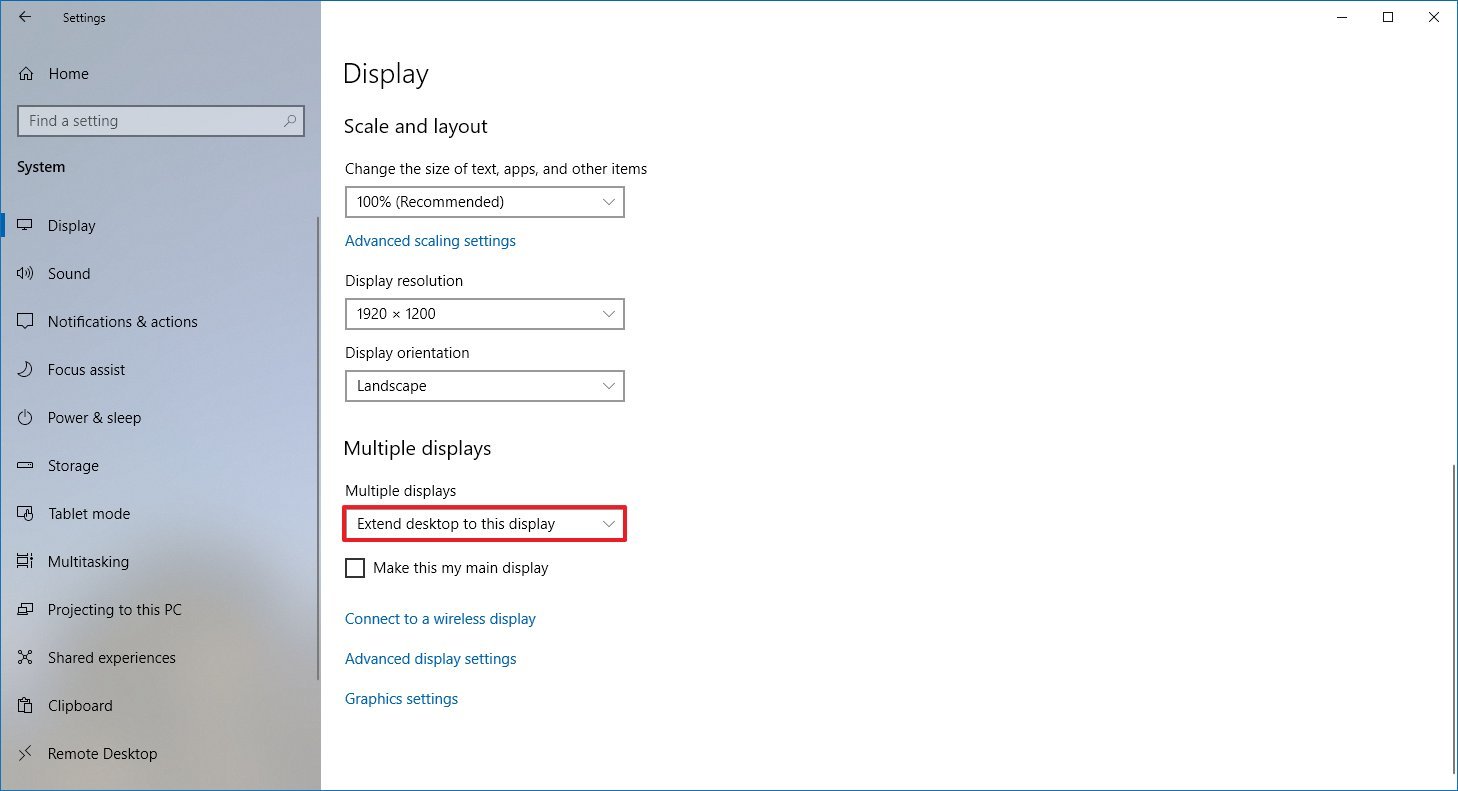
If you connected an external HDR display, and you don’t see the option to enable HDR in the Windows HD Color settings, then it is likely because Windows 10 is duplicating the desktop on both screens, which is not a supported configuration.
To play HDR content on the external monitor, use these steps:
- Open Settings.
- Click on System.
- Click on Display.
- Under the «Rearrange your displays» section, select the external monitor.
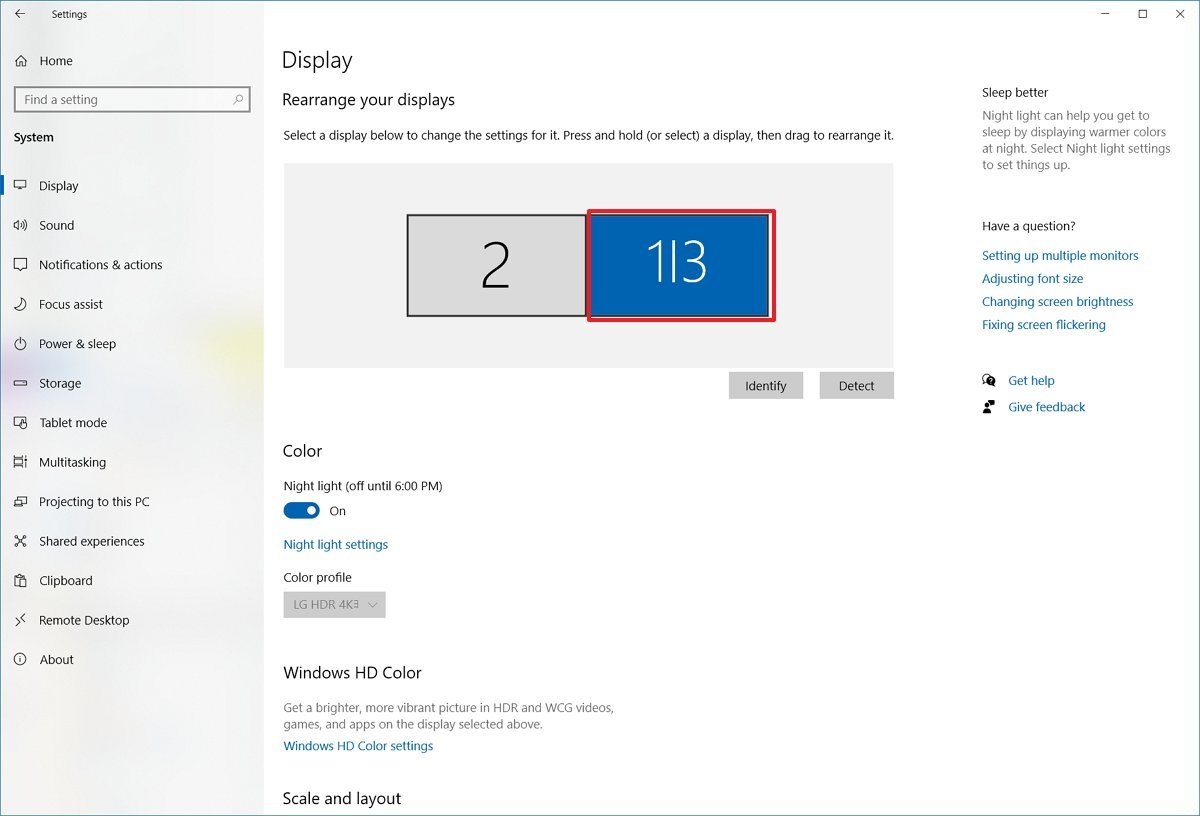
- Under the «Multiple displays» section, select the Extend these displays option.
- Click the Windows HD Color settings option.
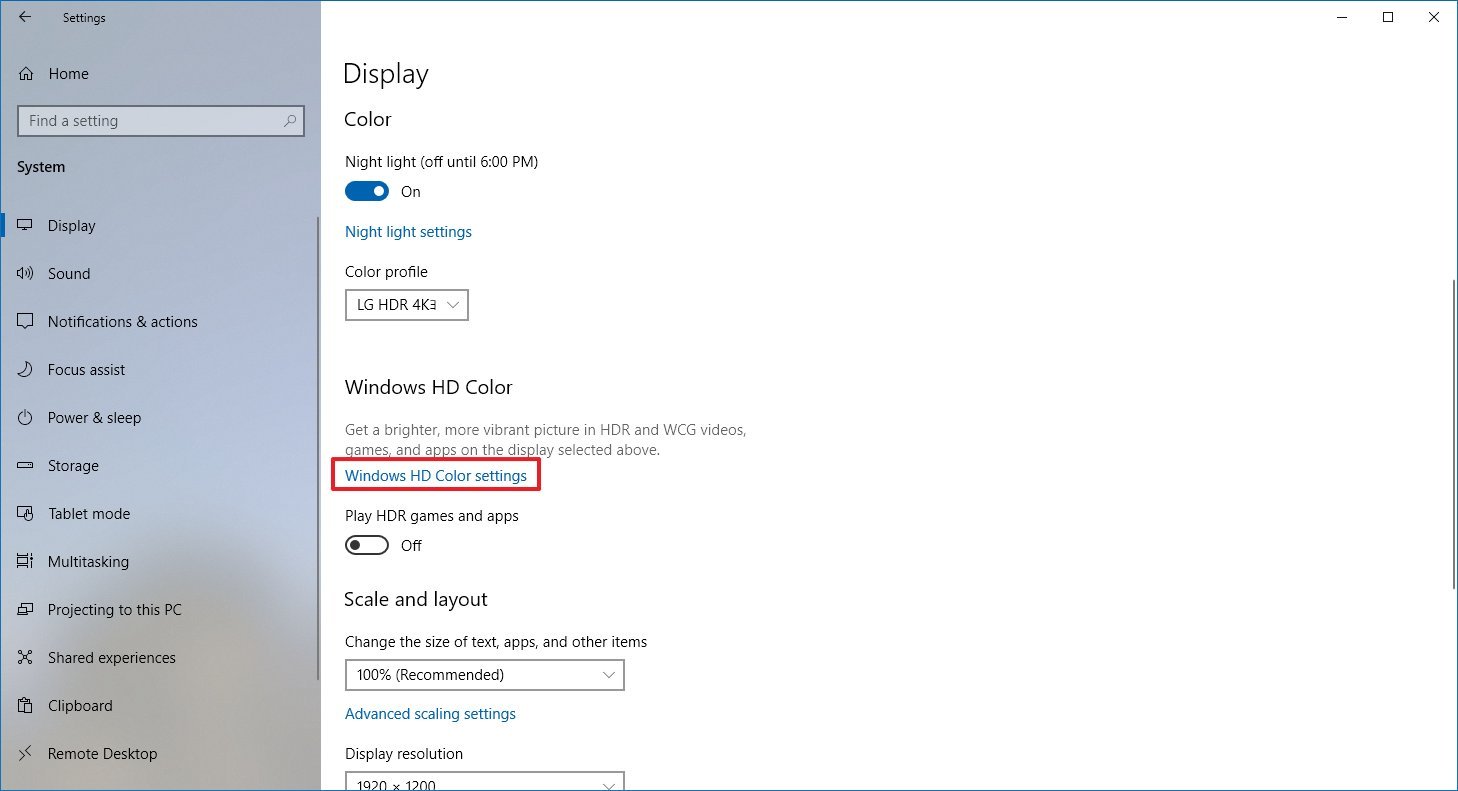
- Turn on the Play HDR games and apps toggle switch.
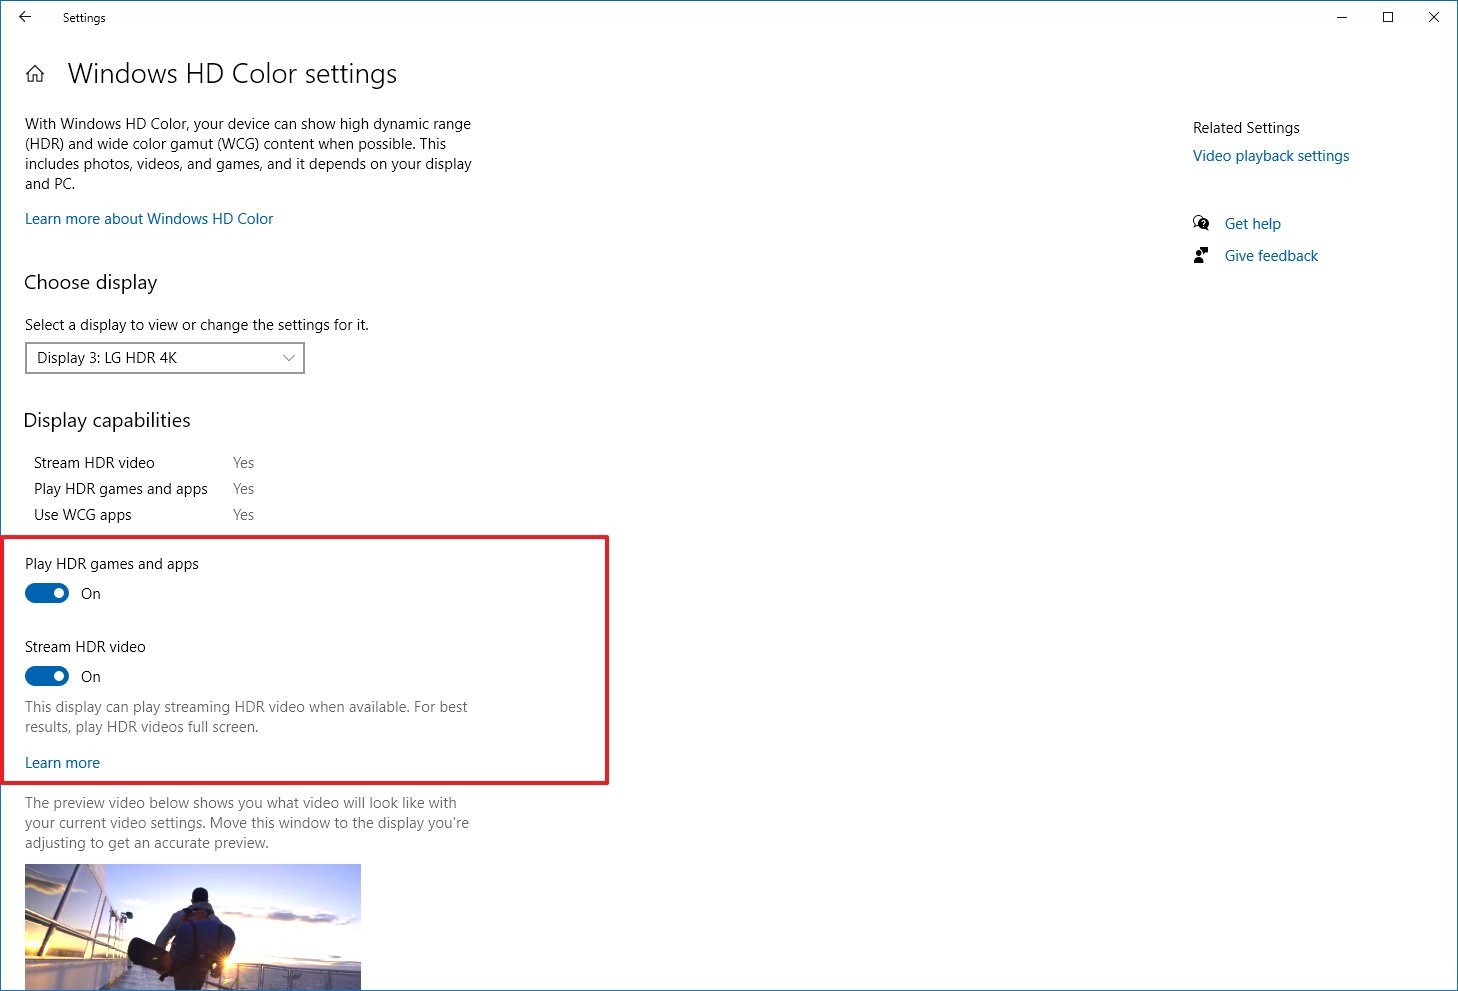
- Turn on the Stream HDR video toggle switch (if applicable).
Once you complete the steps, you should now be able to turn on the monitor’s HDR feature.
Grayed-out HDR option
If the Windows HD Color settings page shows that the built-in display of a laptop with support for HDR, but the option to enable the feature isn’t accessible, then it’s because the power default settings are disabling HDR when running on battery.
To resolve this issue, connect the laptop to a power source, or change the settings to allow HDR content to play while on battery.
To turn on HDR while a laptop is running on battery, use these steps:
- Open Settings.
- Click on System.
- Click on Display.
- Click the Windows HD Color settings option.
- Under the «Battery options» section, clear the Don’t allow HDR games and apps on battery option.Quick note: If you don’t see the option, the feature isn’t available on the device.
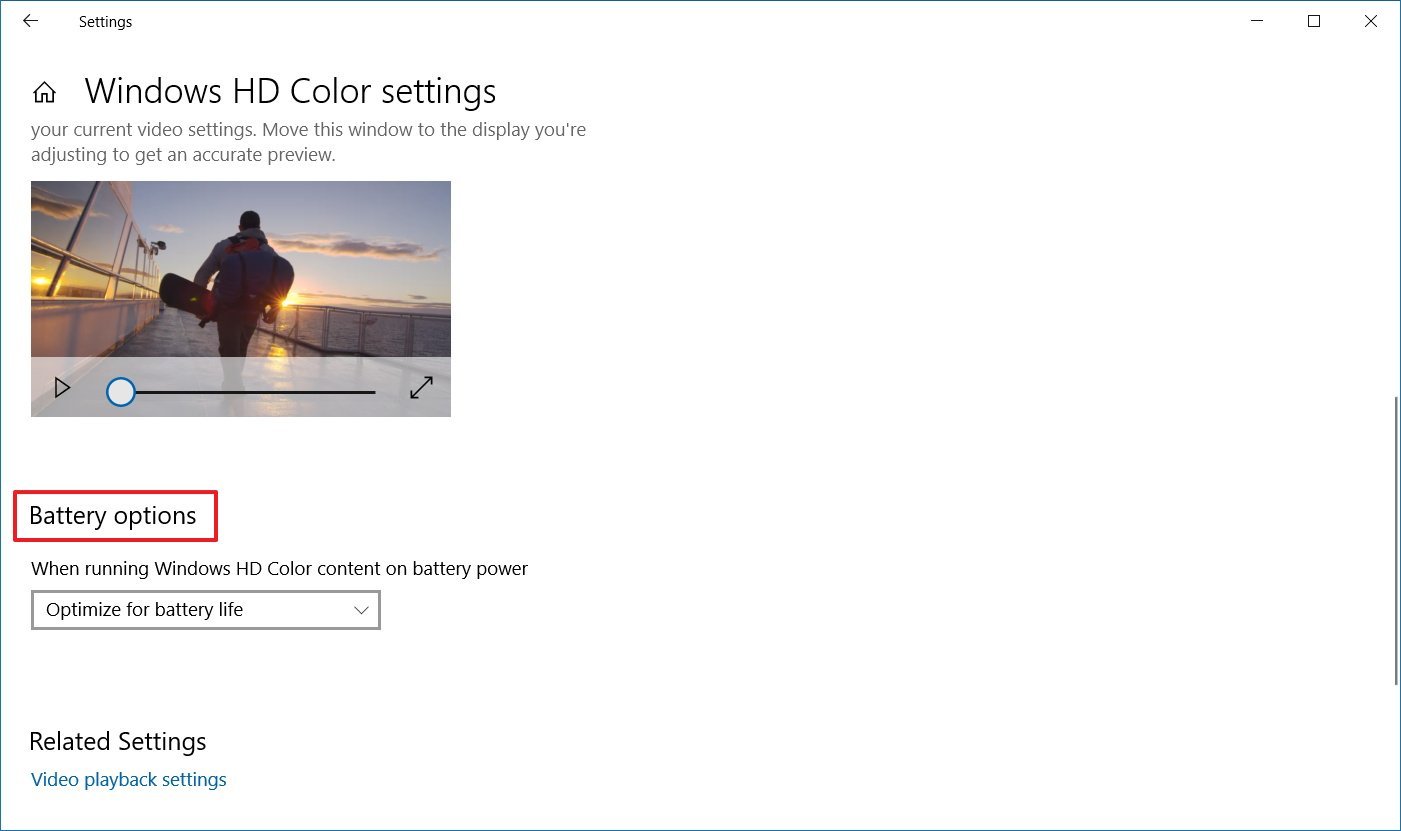
After you complete the steps, you should be able to turn on HDR on the laptop.
How to fix HDR color not showing correctly on Windows 10
When using an HDR display on a desktop computer, you may see problems displaying colors. For example, black text not rendering correctly on a white background.
If you’re experiencing color problems with an external monitor, you should check your computer to determine if the latest graphics driver is installed. If you need assistance updating the video driver, you can use these steps.
It’s always recommended to use a DisplayPort connection to connect an HDR monitor instead of an HDMI connection.
If you’re stuck with an HDMI connection, you can reduce the frame rate to 30Hz with these steps:
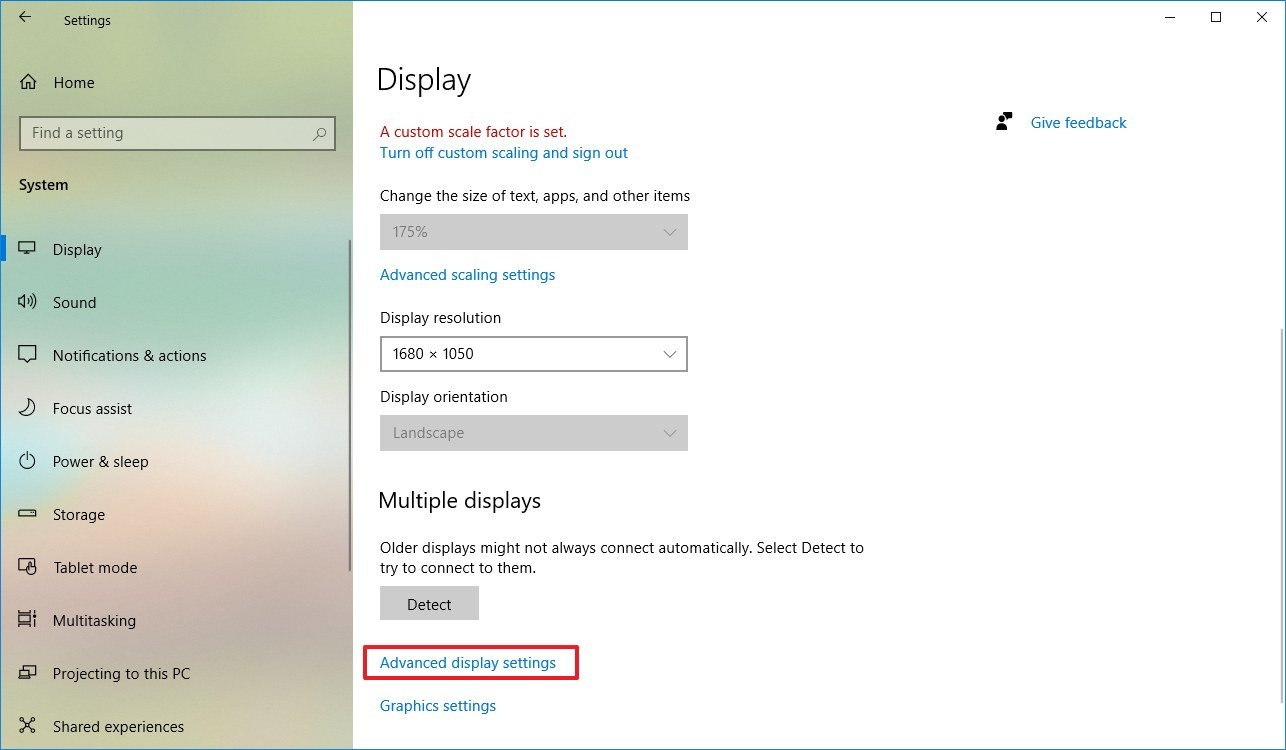
- Open Settings.
- Click on System.
- Click on Display.
- Click the Advanced display settings option.
- Click the Display adapter properties option.
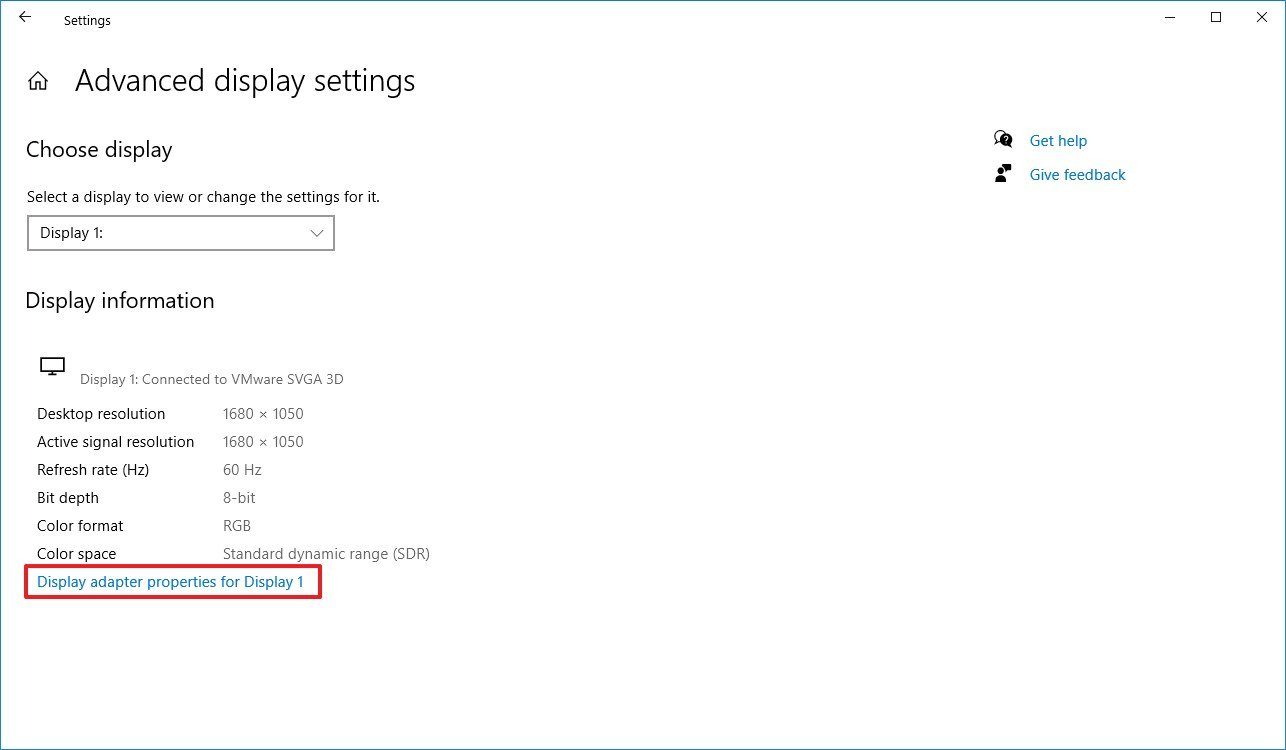
- Click the Monitor tab.
- Use the «Screen refresh rate» drop-down menu and select the 30 Hertz option (if available).
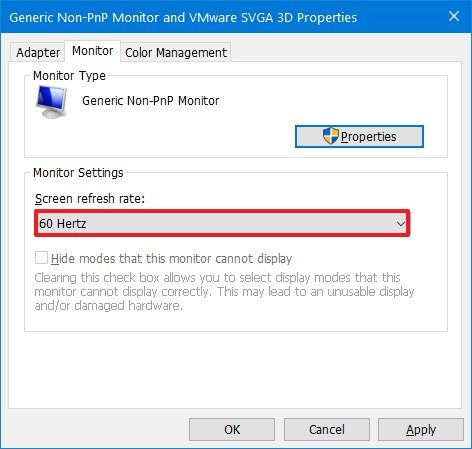
- Click the Apply button.
- Click the OK button.
Once you complete the steps, the HDR display will start rendering colors more accurately.
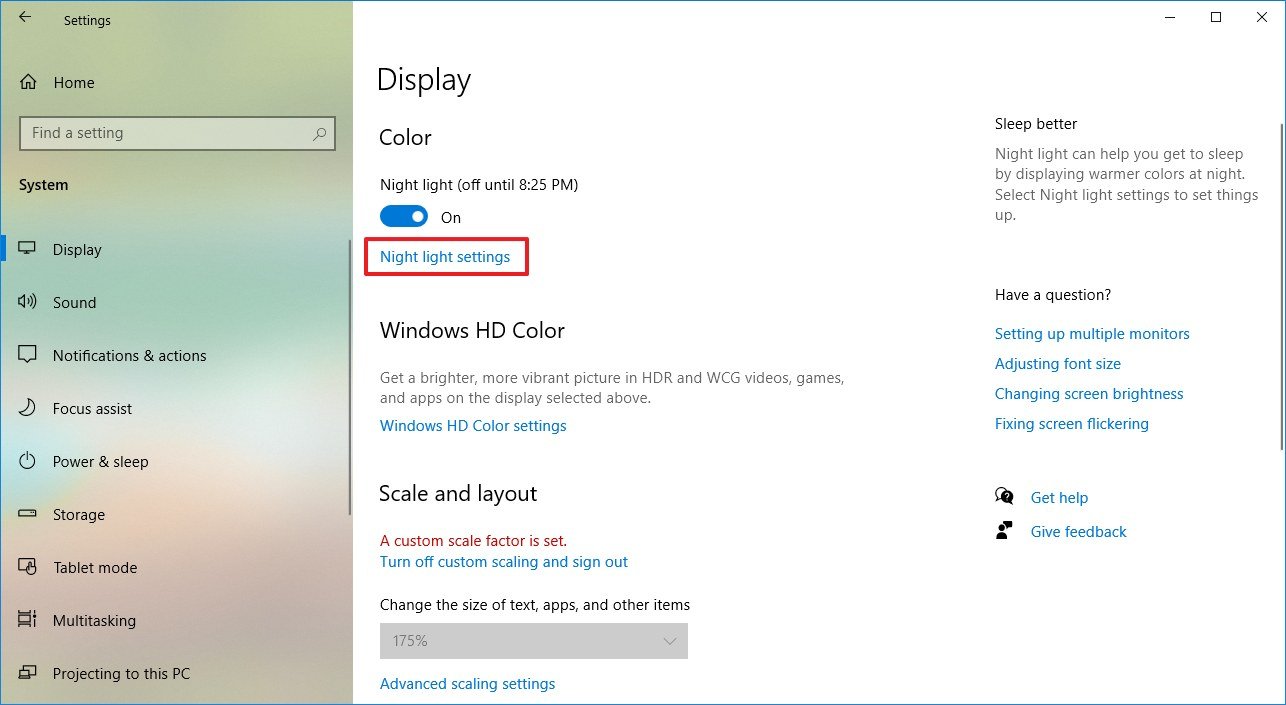
How to fix HDR color problems with night light on Windows 10
On Windows 10, if the night light feature is enabled, colors on the screen may look red tint making content unreadable.
The solution is to adjust the night light strength or disable the feature when using HDR content with these steps:
- Open Settings.
- Click on System.
- Click on Display.
- Click the Night light settings option.
- Use the slider to minimize the strength of night light to improve HDR on Windows 10.
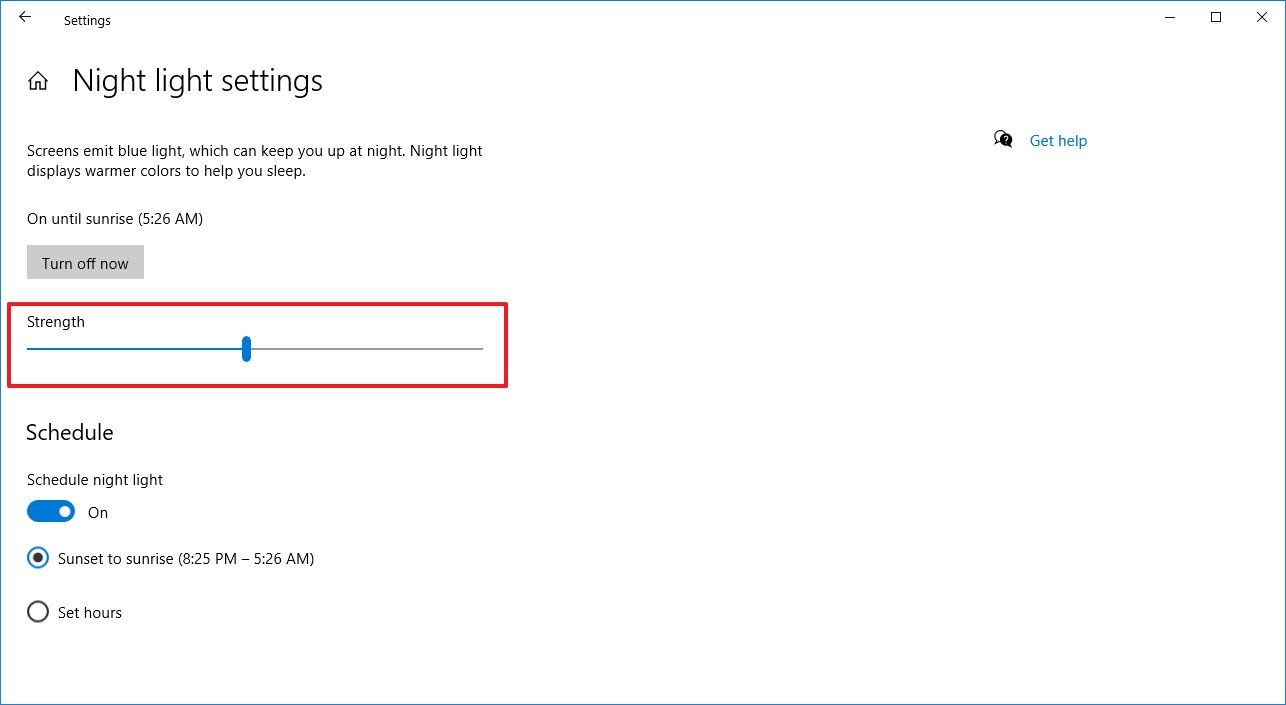
- (Optional) Click the Turn off now button.
After you complete the steps, content in the HDR display will not be readable, and without red tint, depending on the resolution you applied.
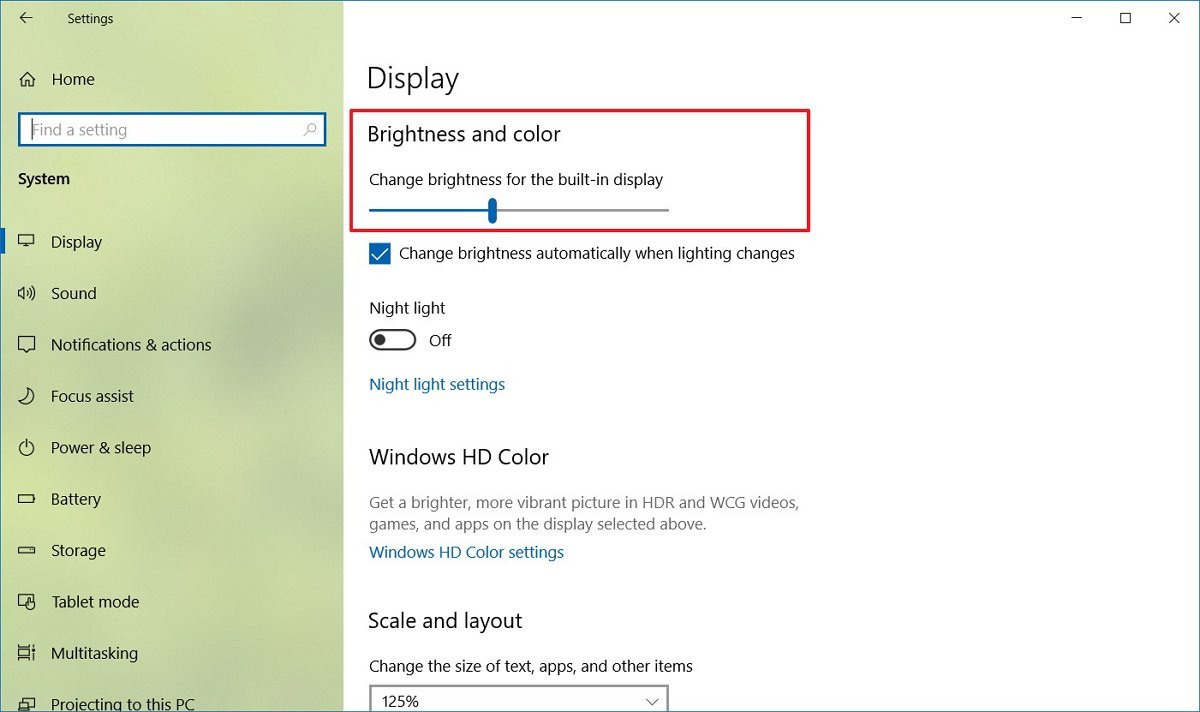
How to fix HDR brightness problems on Windows 10
When you use a laptop with an HDR screen, you may run into several brightness issues depending on how the system is configured and whether it’s plugged into a power source or running on battery.
Laptop with battery saver on
In the case that the battery saver feature is enabled and brightness changes unexpectedly on a laptop, for example, a screen turns brighter or brightness level changes on wake when running on battery, then you’ll need to adjust the brightness settings manually.
To mitigate these issues, use these steps:
- Open Settings.
- Click on System.
- Click on Display.
- Use the «Brightness and color» slider to lower the brightness on the HDR screen.
Or if you see a sudden change of brightness level, you can disable battery saver feature on Windows 10 using these steps:
- Open Settings.
- Click on System.
- Click on Battery.
- Clear the Turn battery saver on automatically if my battery falls below option.
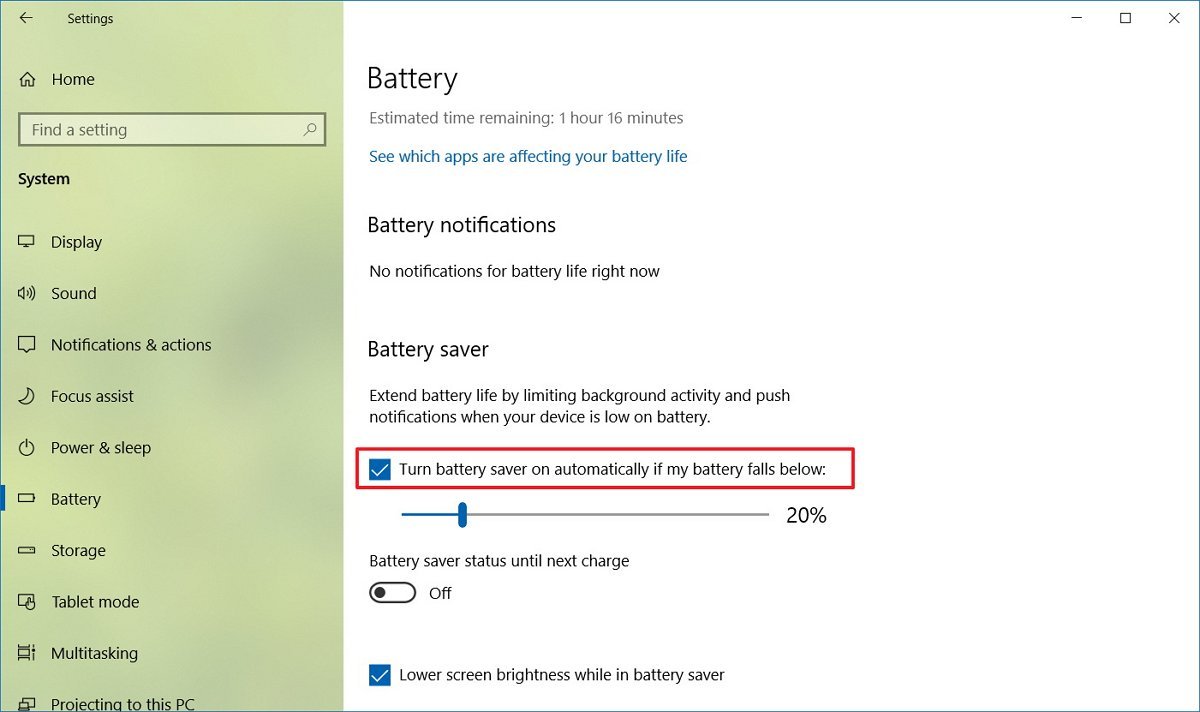
Once you complete the steps, the brightness problem due to the battery saver option should now be resolved.
Laptop with do nothing when closing lid
If you have the option to close the lid on a laptop to «Do nothing,» then you may experience lower brightness on the built-in HDR screen while the brightness setting still showing the level unchanged.
To resolve this issue set a different option for closing the lid with these steps:
- Open Settings.
- Click on System.
- Click on Power & sleep.
- Under the «Related settings» section, click the Additional power settings option.
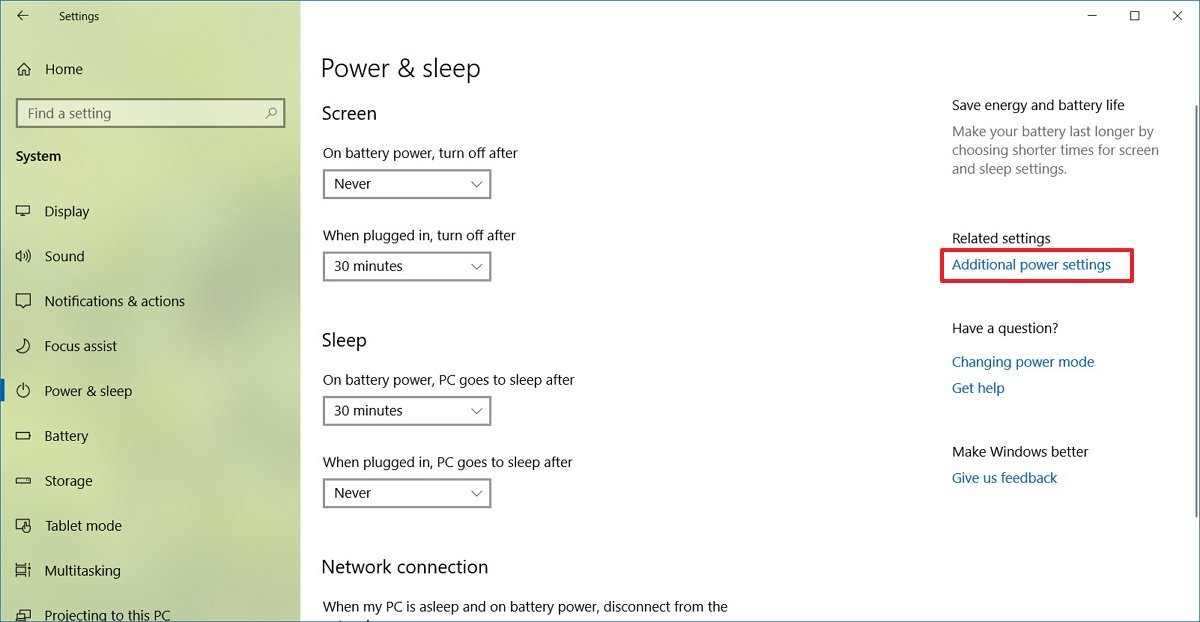
- Click the Choose what closing the lid does option from the left pane.

- Use the When I close the lid drop-down menus and select another option other than «Do nothing.»
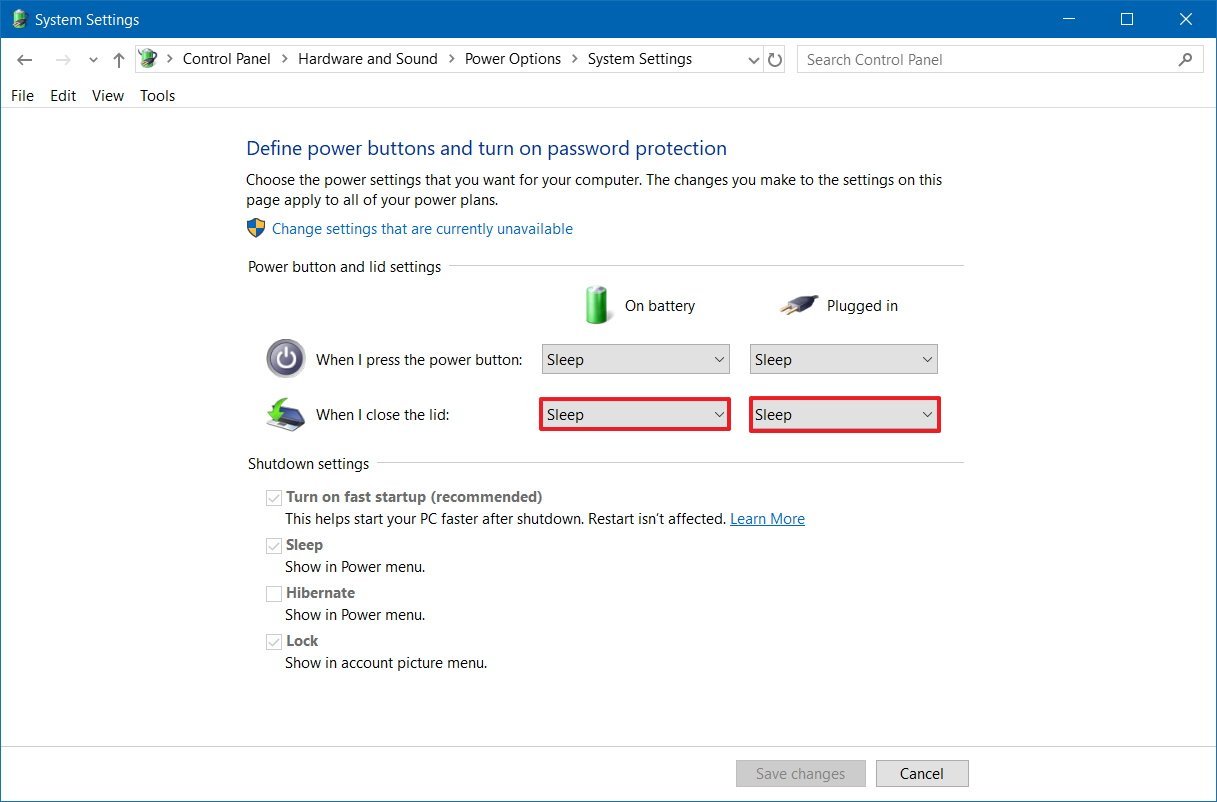
- Click the Save changes button.
Also, to correct the screen brightness, use these steps:
- Open Settings.
- Click on System.
- Click on Display.
- Use the «Brightness and color» slider to adjust the brightness to the desired level.
After you complete the steps, the brightness should no longer change when closing the laptop lid.
Laptop with switch from DC to AC power
On an HDR display, the brightness can suddenly change when switching from battery power to outlet power.
To resolve this issue simply adjust the brightness manually:
- Open Settings.
- Click on System.
- Click on Display.
- Use the «Brightness and color» slider to adjust the brightness on the HDR screen to the desired level.
Once you complete the steps, you may need to repeat the steps in the future, if you run into the same situation.
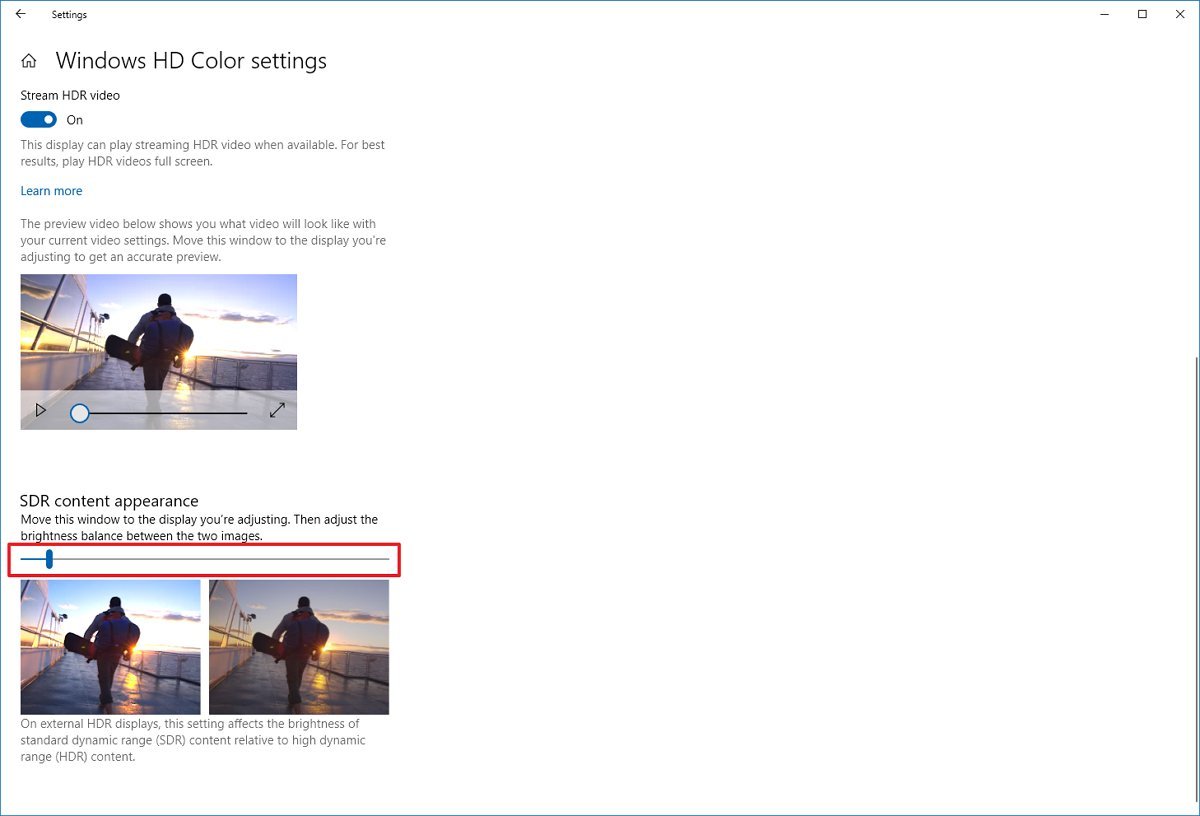
How to fix SDR brightness problems on HDR display on Windows 10
When you use an HDR display, standard dynamic range (SDR) content may appear with very low or very high brightness. This happens because displays identify SDR and HDR signals differently, which can cause brightness problems.
All SDR content and apps
To resolve this problem, you need to adjust the relative brightness with these steps:
- Open Settings.
- Click on System.
- Click on Display.
- Click the Windows HD Color settings option.
- Under the «Windows HD Color» section, use the SDR content appearance slider to adjust the brightness until you find the right balance.
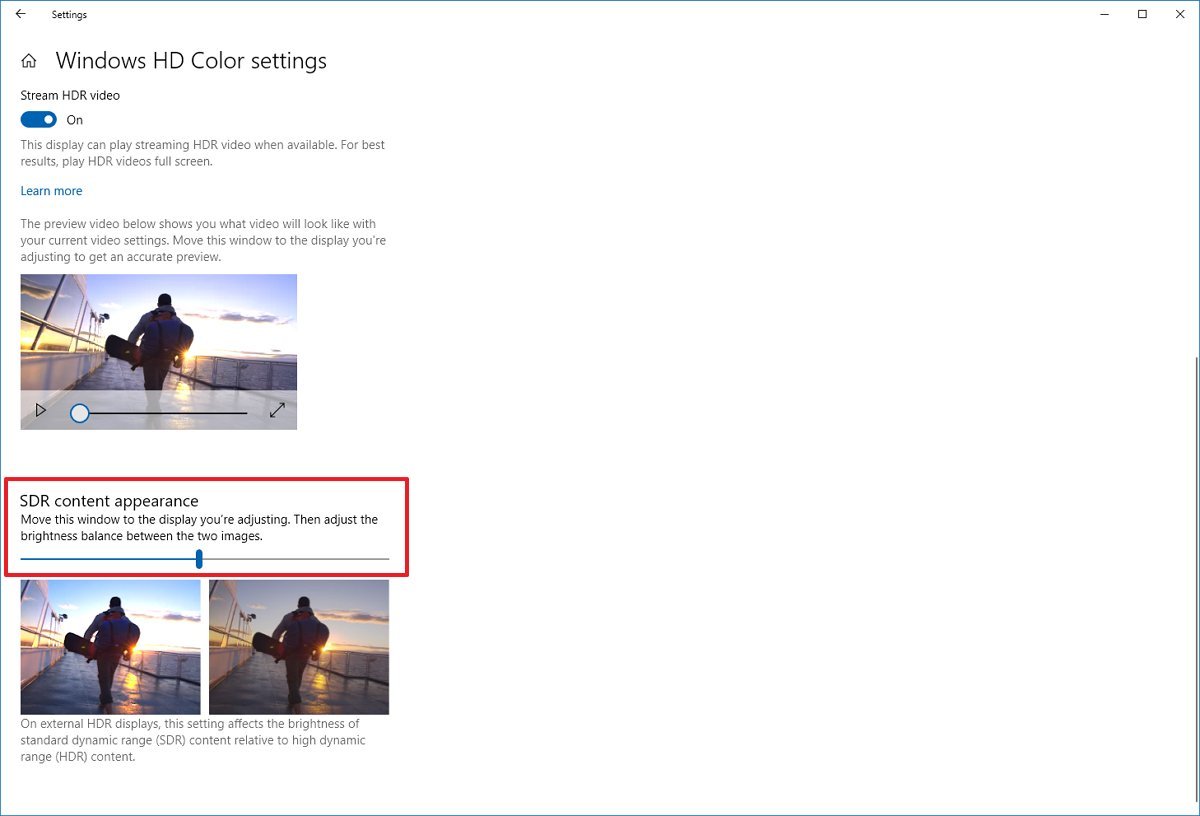
Once you complete the steps, SDR content should appear with an improved brightness level.
Some SDR apps appear darker
Sometimes, apps that haven’t been designed to work with the HDR brightness settings will cause them to appear darker on HDR displays.
One solution to this problem is to run the SDR apps on an SDR display. If you have a multi-monitor setup, you can disable HDR on one of the displays to make apps brighter.
If you have an HDR-compatible display, you can try lowering the SDR content appearance brightness level using these steps:
- Open Settings.
- Click on System.
- Click on Display.
- Click the Windows HD Color settings option.
- Under the «Windows HD Color» section, use the SDR content appearance slider to lower the brightness until the SDR content looks brighter.
- (Optional) Use the monitor’s on-screen settings to increase the brightness to the preferred level.
After you complete the steps, apps should no longer look dimmed.
Mauro Huculak has been a Windows How-To Expert contributor for WindowsCentral.com for nearly a decade and has over 15 years of experience writing comprehensive guides. He also has an IT background and has achieved different professional certifications from Microsoft, Cisco, VMware, and CompTIA. He has been recognized as a Microsoft MVP for many years.
С помощью HDR в Windows 11 можно добиться наилучших результатов при использовании режима HDR на телевизоре или мониторе компьютера. При подключении телевизора или дисплея с поддержкой HDR10 к компьютеру с Windows, который поддерживает режимы HDR и WCG, можно получить более яркое, насыщенное и детализированное изображение по сравнению с дисплеем в стандартном динамическом диапазоне (SDR).
В Microsoft Store появляется все больше HDR-приложений и игр. Чтобы найти игры с поддержкой HDR, посетите веб-магазин Microsoft Store. Для просмотра фильмов и видео в режиме HDR в Интернете вам может понадобиться изменить некоторые параметры. Чтобы вы могли играть в HDR-игры и пользоваться HDR-приложениями, ваши компьютер и дисплей должны соответствовать определенным аппаратным требованиям. Подробные сведения см. в разделе Требования к отображению видео в формате HDR.
Если компьютер и дисплей поддерживают режим HDR, включите его, чтобы начать работу.
-
Нажмите кнопку Пуск и введите параметры. Выберите Параметры > Системный > Дисплей .
-
Если к вашему компьютеру подключено несколько экранов, выберите экран с поддержкой HDR в верхней части страницы.
-
Включите параметр Использовать HDR.
Параметры электропитания мониторов с поддержкой HDR
Воспроизведение содержимого в формате HDR при работе ноутбука от батареи может уменьшить время ее работы. Поэтому производитель вашего компьютера мог по умолчанию отключить режим HDR при питании от батареи.
Если при подключении к ноутбуку включен режим HDR, функция HDR будет отключена, чтобы сэкономить заряд аккумулятора при его отключении. Если вы снова подключите ноутбук к электросети, режим HDR включается автоматически.
Примечание: Экран может временно стать черным при включении и отключении HDR или после подключения или отключения ноутбука от электросети.
-
Нажмите кнопку Пуск и введите параметры. Выберите Параметры > Системный > Дисплей .
-
Выберите дисплей с поддержкой HDR в верхней части экрана.
-
Выберите HDR.
-
Выберите раздел Использование HDR, чтобы развернуть его, а затем снимите флажок Отключить HDR с компьютером, работающим от батареи проверка или Отключить потоковую передачу видео в ФОРМАТЕ HDR, когда мой компьютер работает от аккумулятора проверка.
Если режим HDR уже был включен, когда ноутбук подключен к электросети, режим HDR останется включенным, если вы отключите компьютер от электросети и он будет работать от батареи.
Устранение распространенных проблем
Многие современные HDR-дисплеи предназначены в основном для просмотра фильмов и видео в режиме HDR. Поэтому иногда нужно выполнить некоторые действия, чтобы добиться максимального результата при использовании дисплея HDR в Windows. Если вы собираетесь приобрести новый дисплей HDR, рекомендуется выбрать дисплей с сертификатом HDR. Эти дисплеи разработаны и протестированы для всесторонней работы в режиме HDR на компьютере, включая HDR-игры и HDR-приложения.
Если у вас возникли проблемы с отображением содержимого в формате HDR на компьютере, вы можете попытаться устранить их с помощью приведенных здесь инструкций. Выберите любой элемент, и он откроется для отображения дополнительных сведений:
-
Убедитесь, что на вашем мониторе или телевизоре включен режим HDR. Способ доступа к экранному меню на телевизоре HDR или дисплее зависит от модели и модели. Посетите веб-сайт производителя вашего монитора или телевизора, чтобы ознакомиться с документацией.
-
Перейдите в раздел Параметры > Система > Дисплей и убедитесь, что параметр Потоковое видео в режиме HDR включен.
-
Убедитесь, что компьютер с Windows соответствует требованиям, предъявляемым к аппаратному обеспечению для отображения содержимого в формате HDR, и узнайте, поддерживает ли ваш дисплей формат HDR10. Ниже описано, как это сделать.
-
Нажмите клавишу Windows + R, введите dxdiag и выберите OK.
-
Нажмите Да в окне запроса.
-
В средстве диагностики DirectX на вкладке Система просмотрите область Сведения о системе.
-
Чтобы сохранить данные в файл, нажмите Сохранить все сведения, а затем укажите имя текстового файла и сохраните его.
-
Откройте текстовый файл и найдите значение параметра Дополнительные цвета. Здесь содержатся сведения о конфигурации и состоянии HDR вашего экрана. Вам нужно найти следующие значения.
-
AdvancedColorSupported. Это означает, что ваш дисплей и установленный драйвер дисплея поддерживают HDR10.
-
AdvancedColorEnabled. Это означает, что режим HDR для вашего экрана в настоящее время включен.
-
-
Проверьте значение параметра Возможности монитора. Там содержатся более подробные сведения о возможностях вашего экрана.
-
Если значением является HDR поддерживается, это означает, что ваш экран поддерживает HDR10. Дополнительные значения могут быть заключены в скобки.
-
BT2020RGB или BT2020YCC. Одно из этих цветовых пространств должно отображаться для дисплея, который считается дисплеем с поддержкой HDR10.
-
Eotf2084Supported. Экран может считаться совместимым с HDR только в случае, если присутствует это значение.
-
-
Если значением является HDR не поддерживается, это означает, что экран не соответствует требованиям для HDR10.
-
-
На ноутбуках с поддержкой HDR параметры управления питанием по умолчанию отключают HDR при питании от батареи. Чтобы включить HDR, выполните одно из следующих действий.
-
Подключите свой ноутбук к сети питания (рекомендуется).
-
Разрешите потоковую передачу видео в формате HDR, если компьютер работает от аккумулятора.
Обратите внимание, что если разрешить HDR при работе от батареи, уровень заряда будет расходоваться быстрее.
При первом подключении внешнего монитора к ноутбуку, Windows по умолчанию дублирует рабочий стол на обоих мониторах. Однако режим HDR в этой конфигурации не поддерживается. Для просмотра содержимого HDR на внешнем мониторе или телевизоре с поддержкой HDR расширьте рабочий стол на оба монитора.
-
Нажмите кнопку Пуск и введите параметры. Выберите Параметры > Система > Дисплей.
-
В верхней части экрана выберите Расширить эти экраны.
Может потребоваться настроить относительный уровень яркости содержимого в режимах SDR и HDR для вашего дисплея с поддержкой HDR. Это связано с тем, что дисплей по-разному интерпретирует сигнал HDR и SDR, и эти результаты будут отличаться в зависимости от производителя и модели.
-
Нажмите кнопку Пуск и введите «параметры». Выберите Параметры > Система > Дисплей.
-
Если к вашему компьютеру подключены несколько дисплеев, выберите дисплей с поддержкой HDR в верхней части экрана и переместите окно приложения «Параметры» на HDR-дисплей, который вы настраиваете.
-
На экране параметров Дисплей выберите Потоковое видео в режиме HDR.
-
В разделе Яркость SDR-содержимого или Яркость HDR-содержимого перетащите ползунок, чтобы добиться правильного баланса яркости между содержимым в режимах HDR и SDR.
Примечания.
-
При изменении параметра Яркость SDR-содержимого для внешнего дисплея с поддержкой HDR или параметра Яркость HDR-содержимого для встроенного дисплея с поддержкой HDR эффект, оказываемый им на SDR-содержимое, зависит от того, какой дисплей используется — внешний или встроенный дисплей с поддержкой HDR.
-
На внешнем дисплее с поддержкой HDR этот параметр будет изменять уровень яркости SDR-содержимого относительно HDR-содержимого.
-
На встроенном дисплее с поддержкой HDR за контроль уровня яркости SDR-содержимого отвечает отдельный параметр яркости либо он может контролироваться автоматически. (Дополнительные сведения см. в разделе Изменение яркости экрана в Windows 10.) Так как уровень яркости SDR-содержимого уже задан, параметр Яркость HDR-содержимого будет изменять яркость HDR-содержимого относительно яркости SDR-содержимого.
-
-
Для встроенных HDR-дисплеев, например на ноутбуках, поддерживающих HDR, на внешний вид HDR-содержимого влияют и параметр яркости, и параметр Яркость HDR-содержимого.
-
Параметр яркости. При просмотре HDR-содержимого при ярком свете может потребоваться увеличить уровень яркости для просмотра изображения на дисплее. Однако это сократит как эффективный динамический диапазон для HDR-содержимого в приложениях, так и общий контраст, поскольку темные пиксели будут ярче. Для улучшения отображения HDR-содержимого просматривайте HDR-содержимое при слабом освещении и используйте довольно низкие настройки яркости. Если выбран очень низкий уровень яркости, это увеличивает общую контрастность между яркими и темными участками содержимого. Однако это приводит к меньшей детализации темных участков изображений. Например, если в фильме есть сцена, в которой показана тускло освещенная комната ночью, в этой сцене, возможно, будет видно меньше деталей.
-
Параметр Яркость SDR-содержимого или Яркость HDR-содержимого. В большинстве случаев использование параметра яркости SDR- или HDR-содержимого по умолчанию либо близких к ним настроек дает хороший результат. Вы можете повысить параметр яркости SDR- или HDR-содержимого, чтобы улучшить общую контрастность между яркими и темными участками изображений. Однако это снизит детализацию темных участков содержимого, например сцены в темном помещении ночью.
-
Некоторые приложения в SDR выглядят темнее на дисплее с поддержкой HDR по сравнению с другими приложениями в SDR, отображаемыми на том же дисплее. Это может происходить с приложениями, которые не поддерживают параметр Яркость SDR-содержимого или Яркость HDR-содержимого. Вот несколько способов решения этой проблемы:
-
Если у вас одновременно настроены несколько дисплеев для работы с дисплеями с поддержкой SDR и HDR, переместите приложение на дисплей с поддержкой SDR.
-
Если вы используете внешний дисплей с поддержкой HDR, переместите ползунок Яркость SDR-содержимого в сторону уменьшения. Это приведет к тому, что более яркое содержимое SDR будет выглядеть темнее, чтобы у всего содержимого SDR был одинаковый уровень яркости. После этого используйте экранное меню на телевизоре или дисплее с поддержкой HDR, чтобы увеличить яркость до нужного уровня.
Примечание. Если вы настроили параметр яркости SDR- или HDR-содержимого, но яркость содержимого SDR в некоторых приложениях не изменилась, попробуйте перезапустить приложение.
-
Если вы используете ноутбук со встроенным дисплеем с поддержкой HDR, переместите ползунок Яркость HDR-содержимого в сторону уменьшения. Это приведет к тому, что приложения, которые выглядели слишком темными, будут выглядеть светлее, чтобы у всех приложений SDR был одинаковый уровень яркости.
Примечание. Если вы изменили параметр Яркость SDR-содержимого или Яркость HDR-содержимого, но яркость некоторых приложений не изменилась, или если содержимое SDR выглядит слишком ярким и с минимальным уровнем насыщенности, попробуйте перезапустить приложение.
-
Убедитесь, что установлены последние графические драйверы (WDDM). Чтобы получить последние версии драйверов, перейдите в Центр обновления Windows в разделе Параметры или посетите веб-сайт изготовителя компьютера.
-
Если вы используете подключение через HDMI, а ваш дисплей поддерживает HDR через DisplayPort, соедините компьютер и дисплей через DisplayPort.
-
Если единственным вариантом подключения является HDMI, используйте его, а затем выполните одно из следующих действий:
Уменьшите частоту обновления
-
В приложении «Параметры» выберите Система > Дисплей > Дополнительный дисплей.
-
В параметрах Дополнительный дисплей в разделе Выберите частоту обновления выберите 30 Гц (если доступно).
— ИЛИ —
Уменьшите разрешение
-
В разделе Параметры выберите Системный > Дисплей > Дополнительно, а затем выберите Свойства адаптера отображения.
-
На вкладке Адаптер выберите Список всех режимов.
-
В разделе Список всех режимов выберите параметр с разрешением 1920 x 1080, 60 Гц, а затем нажмите кнопку OK.
На ноутбуках с поддержкой HDR параметры управления питанием по умолчанию отключают HDR при питании от батареи. Это может привести к недостаточно насыщенным цветам после перезагрузки компьютера. Чтобы избежать этого, подключите ноутбук перед его перезапуском или измените параметры питания, чтобы обеспечить включение HDR при работе от аккумулятора.
Если ночной свет включен, цвета на экране могут иметь красный оттенок, а содержимое может быть нечитаемым. Это зависит от уровня ночного света. Вот как можно обойти эту проблему.
Возможное решение:
-
Перейдите в раздел Параметры > Система > Дисплей > Ночной свет.
-
В параметрах Ночной свет выполните одно из следующих действий.
-
Если ночной свет включен, перетащите ползунок Интенсивность влево, чтобы уменьшить затемнение красного цвета на дисплее.
-
Выберите Выключить сейчас, чтобы выключить ночной свет.
-
Дополнительные сведения о ночном свете см. в разделе Настройка ночного света для дисплея в Windows.
Многие дисплеи с поддержкой HDR поддерживают более широкую цветовую палитру, чем sRGB. Если функция HDR включена, дисплей HDR должен правильно воспроизводить цвета sRGB, используемые в классических приложениях. Однако некоторые дисплеи с поддержкой HDR делают это неправильно. При покупке дисплея с поддержкой HDR выбирайте дисплей с сертификатом HDR и предварительно ознакомьтесь с отзывами о точности передачи цвета этим дисплеем.
Мы внимательно отслеживаем отзывы клиентов, связанные с HDR, и знаем о отчетах о новых мониторах, которые поддерживают как VESA DisplayHDR, так и DolbyVision, но, по-видимому, предоставляют различные возможности воспроизведения цвета, что не ожидается. DolbyVision можно считать надмножеством гарантий сертификации, предоставляемых DisplayHDR, и это основная причина, по которой Windows автоматически выбирает DolbyVision, когда он доступен.
Содержимое HDR10 в Windows должно отображаться точно независимо от того, настроен ли монитор компьютера в сертифицированном режиме DisplayHDR или DolbyVision. В обоих режимах монитора сопоставление тонов происходит на GPU с использованием цветовой информации, полученной с монитора, перед составлением окончательного изображения рабочего стола, которое может объединять содержимое нескольких окон приложений, отображаемых в разных цветовых пространствах. Windows использует GPU для применения этого сопоставления тонов с использованием связанных метаданных содержимого. Это сопоставление тонов всегда выполняется для исходного содержимого перед композицией, и от монитора в режиме DisplayHDR или DolbyVision не ожидается дополнительного сопоставления тон на основе содержимого. Это верно независимо от того, отображается ли содержимое в развернутом окне. Обратите внимание, что на платформах, отличных от Windows, сопоставление тонов может быть реализовано по-разному и может полагаться на монитор для выполнения сопоставления тонов на основе содержимого.
Мы знаем о мониторах, которые могут ограничить максимальную яркость около 450 нит в режимах DolbyVision и DisplayHDR, но в некоторых случаях может существовать параметр конфигурации, доступный в меню экранного дисплея монитора (OSD), чтобы включить не сертифицированный режим HDR10, который разблокирует максимальные уровни яркости до 1000 нит.
You can use your computer to play HDR content as long as your display supports it. However, after your upgrade your Windows 10 to the latest version, you may find that Windows 10 HDR won’t turn on. In this post, MiniTool Software will show you how to fix Windows 10 HDR disabled and enable Windows 10 HDR successfully.
Windows 10 HDR Won’t Turn on
The full name of HDR is high-dynamic-range. As long as your computer display supports HDR, you can play HDR content using your PC. However, you may discover that your Windows 10 HDR won’t turn on for some reason.
Why is Windows 10 HDR disabled? This issue always happens after you upgrade your Windows 10. When your computer is trying to enable the HDR streaming settings, the HDR option is not turned on successfully. Besides, an incompatible HDMI connection can also cause this problem.
How to enable Windows 210 HDR? Now we will show you some methods in this post.
How to Fix Windows 10 HDR Won’t Turn on?
- Use Registry Editor to Enable Windows 10 HDR
- Use Command Prompt to Enable Windows 10 HDR
- Restore Your Windows to the Previous Version
- Check the Display and HDMI Port on Your Device
Method 1: Use Registry Editor to Enable Windows 10 HDR
If Windows 10 HDR is not enabled successfully, you can follow this guide to enable it using Registry Editor:
1. Press Win+R to open Run.
2. Type regedit and press Enter to open Registry Editor.
3. Go to the following path:
Computer\HKEY_CURRENT_USER\SOFTWARE\Microsoft\Windows\CurrentVersion\VideoSettings
4. Find the EnableHDRForPlayback option from the right panel and right-click it. Then, select Modify from the pop-up menu.
5. Modify the number in the Data value box to 1 and click OK to save the changes.
6. Go to Start > Settings > System to open Display. Then, you can try to enable HDR streaming to see whether it can work.
Method 2: Use Command Prompt to Enable Windows 10 HDR
If you can’t use the above method to enable Windows 10 HDR, you can use Command Prompt to have a try:
1. Use Windows Search to search for cmd.
2. Select Run as administrator for the first search result.
3. Type the following command in Command Prompt and press Enter:
reg add “HKCU\Software\Microsoft\Windows\CurrentVersion\VideoSettings” /v EnableHDRForPlayback /t REG_DWORD /d 1
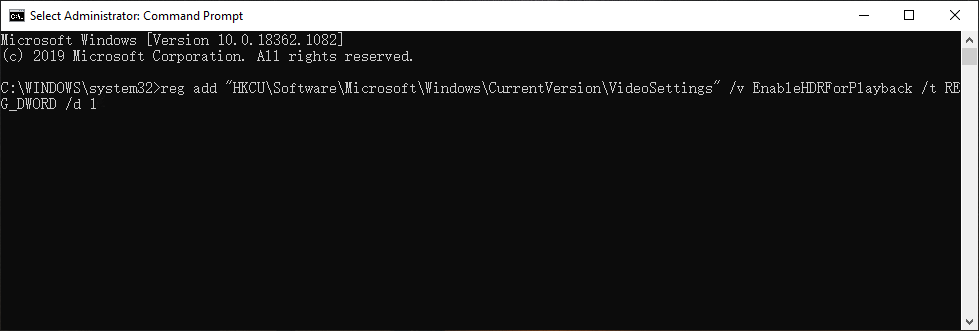
4. When the command is executed successfully, you can exit Command Prompt and reboot your computer. Next, you need to check whether your Windows 10 HDR is enabled successfully.
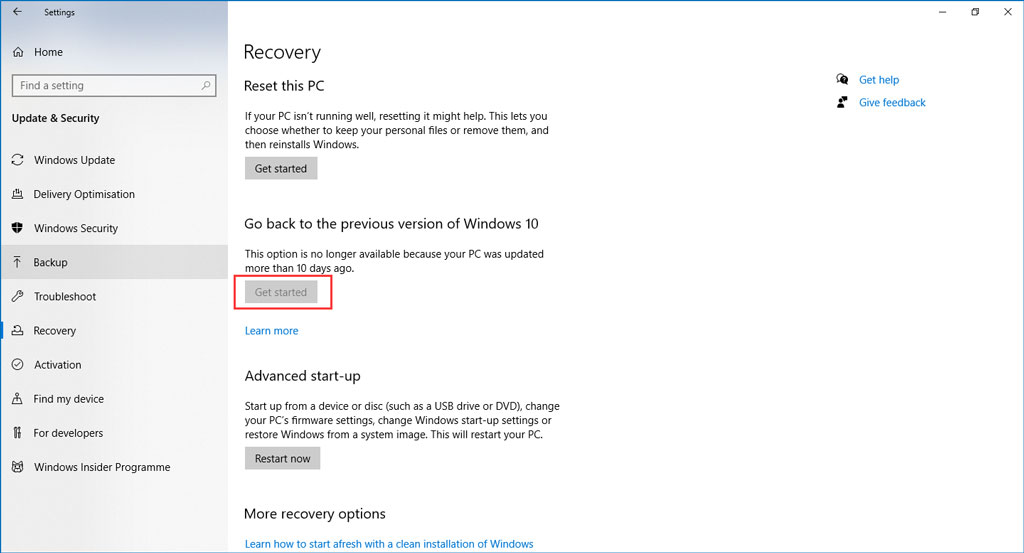
Method 3: Restore Your Windows to the Previous Version
As mentioned in the beginning, Windows 10 HDR won’t turn on always happens after upgrading Windows 10. You can restore your computer to the previous version to see whether the issue disappears.
You can go to Start > Settings > Update & Security > Recovery and click Get Started under Go back to the previous version of Windows 10 to restore your Windows 10.
But this method only works when you upgrade your Windows 10 within 10 days. When the update period exceeds 10 days, the Get started button will be greyed out. If so, you can refer to this post to solve go back to an earlier build not available: 3 Fixes for Go Back to an Earlier Build Not Available Windows 10.
Method 4: Check the Display and HDMI Port on Your Device
If you are using multiple HDR-enabled displays, you need to make sure that the multi-monitor setup is correct. If you are using a monitor plus TV setup, you need to turn on the HDR stream when your TV is connected to your PC.
An incompatible HDMI cable can also lead to Windows 10 HDR won’t turn on. In this case, you need to use an HDMI 2.0b cable to transmit the signal. So, please make sure that you are using the right cable.
Moreover, if you can’t find the HDR Streaming option, it is likely that your monitor or TV doesn’t support HDR.
Bonus: How to Recover Your Lost Data?
If you delete or lose your data by mistake, you can use MiniTool Power Data Recovery, a free file recovery tool, to get it back.
This software is specially designed to recover data from different kinds of data storage devices like internal hard drives, external hard drives, SD cards, memory cards, and more. With the trial edition, you can scan the drive and then check whether this software can find your needed files. If yes, you can use a full edition to restore them to a suitable location.
MiniTool Power Data Recovery TrialClick to Download100%Clean & Safe
After reading this post, you should know how to fix Windows 10 HDR won’t turn on. Should you have any related issues, you can let us know in the comment.
Some Windows 10 users like you disable Stream HDR feature before upgrading the device to its next immediate versions. But unfortunately, they find that the setting won’t turn on after updating to version 1903 or 1909. Sum is, you encounter Switching off this High Dynamic Range fails to get activated upon upgradation.
Microsoft experts suggest two solutions to make the streaming of HDR videos working again. One is to restore the device to the previous version, toggle On Stream HDR video setting, and then install the next version. Secondly, to modify a registry entry through Command Prompt which will automatically enable HDR functionality. Explore the below section of this article to see both the methods in detail. Let’s begin –
HDR won’t turn on in Windows 10
Here is How to Fix HDR won’t turn on in Windows 10 –
1] Enable HDR video switch through Registry
- Open taskbar search by using Win+S shortcut.
- Type cmd and when Command Prompt and select Run as administrator from the right flyout.
- Click Yes button on the prompt of User Account Control (UAC) dialog.
- On the command prompt, copy-paste the following text on a single line and hit Enter.
reg add “HKCU\Software\Microsoft\Windows\CurrentVersion\VideoSettings” /v EnableHDRForPlayback /t REG_DWORD /d 1
- Once you successfully execute the above command, exit Command Prompt and Restart Windows 10 PC.
2] Restore device to the previous version
Remember that restoring to the earlier version is needed because you have to enable Stream HDR video setting. Once you have enabled, update Windows 10 to the subsequent edition v1903 or v1909 to fix the problem.
To roll back to the previous version, go through these series of steps –
- Press Win Logo+I.
- Click Update & Security.
- Choose Recovery subsection from the left pane.
- Switch to the adjacent side and click Get started button underneath Go back to the previous version of Windows 10.
You can also follow – How to Restore Earlier Build in Windows 10.
Note – This option will be available only for a limited time, so you need to roll back within 10 days of upgradation. Choosing this method will upkeep the personal files; whereas the apps and drivers that you installed after the upgrade will be removed. Moreover, rolling back to the previous version will also remove the settings you made earlier.
After successfully enabling the “Stream HDR” video switch in Win 10, v1809, do check for updates and grab the next version 1903 or 1909.
Methods:
1] Enable HDR video switch through Registry
2] Restore device to the previous version
That’s all!!
Windows provide several display settings, which makes it easy to enjoy media-rich graphics. But what if you are not able to use it? There can be several problems or reasons due to which HDR display might have stopped working on Windows. In this post, we are going to discuss all the common problems with HDR displays on Windows 10.
Fixes For Common Problems With HDR Display On Windows 10
HDR or high dynamic range provides you with an enhanced colour range than SDR ( Standard Definition range). HDR enables you to enjoy the games, videos in better quality. This comes naturally with smart TVs, but with computers, you have to adjust the Windows HDR settings.
What to do if HDR Display is not working on Windows 10?
Suppose you want to find out if your Windows HDR settings is enabled or not. Start with the easy steps to locate the HDR display settings on your computer.
Step 1: Open Start Menu and type dxdiag on the search bar.

Step 2: Click on the Open, and the DirectX Diagnostic Tool opens.

Step 3: Go to the System Tab and click on the Save All Information.
Step 4: Now, all you need to do is find a location to save it on your computer.
Step 5: Now open this file with the Notepad and search for Advanced Color.
Step 6: Check if the Advanced Color says Not Supported, this might be the reason why HDR is not working on your computer.

Step 7: If it does support, you have to locate AdvancedColorSupported. This will also show you the driver support available or not.
Step 8: Now look for AdvancedColorEnabled which will confirm whether HDR settings are enabled or not.
Step 9: Next check for Monitor Capabilities which must say HDR is supported. If any of the required things (Advanced Color Enabled and AdvancedColorSupported) are missing, then you will see HDR not supported message.
How To Enable HDR on Windows 10
Step 1: Open Start Menu, go to the Settings icon and click on it.
Step 2: Go to System.
Step 3: Go to Display from the left panel.
Step 4: Select the monitor from the Rearrange your displays section. This is undoubtedly a great help when you have a separate screen connected to your computer.
Step 5: Locate Play HDR games and apps under the Windows HD Color Click on the toggle button to turn it on.
What to do if Windows 10 HDR night light is not working?
Something which is commonly seen as a problem with Windows HDR is that night light makes it hard to read the screen in the dark. The red tint appears on the screen, which must be turned off to avoid HDR problems on your computer. Here’s how you can quickly fix the issue.
Step 1: Open Start Menu, go to the Settings icon and click on it.
Step 2: Go to System.
Step 3: Go to Display from the left panel.
Step 4: Click on Night Light Settings under the Color section.

Step 5: Here, you can see that the slider is shown to improve the strength of the Night Light. Use it to adjust the screen settings for your Display.

Additionally, you can turn it off to avoid any Windows HDR issues.
How To fix HDR brightness problems?
The computer has HDR brightness issues when it is set on the battery saver. This disrupts the screen resolution to minimize power. If you are facing any such problems, one must go through the settings with the following steps.
Step 1: Open Start Menu, go to the Settings icon and click on it.
Step 2: Go to System.
Step 3: Go to Display from the left panel.
Step 4: Under the section Brightness and color, decrease the brightness using the slider.
If you wish to turn off the battery saver for the time being, you can go through the process with the steps given below.
Step 1: Open Start Menu, go to the Settings icon and click on it.
Step 2: Go to System.
Step 3: Go to Battery from the right panel.
Step 4: Under the Battery Saver section, uncheck the box in front of the Turn battery saver on automatically if my battery falls below.
This will solve the problem for you for Windows HDR not working optimally.
Another thing to remember is that when you plug the battery on your laptop, the screen brightness might change. So always make sure you follow the steps to adjust it to your level.
What to do if Windows 10 HDR is still not working?
When you have tried the above methods, and none of them helps you with HDR display not working on Windows 10. Another reason might be that a display driver failed in that case you can use this solution. It can be an issue with the device drivers; therefore, we suggest you get a driver updater for your system.
Smart Driver Care is one of the best for driver care on Windows. This will automatically keep updating all device drivers on your computer. It has an extensive database which enables it to update multiple drivers at once. It is easy to use a third-party tool, which starts with a system scan and provides you with a one-click solution.
To update drivers, you must follow these steps:
- Download Smart Driver Care and install it.

- Launch the application and click on Start Scan.
- Once the scan is complete, you will see a list of outdated drivers.

- Click on Update beside the display driver’s name to update it and resolve the HDR display not working


If you have pro version of the app, then click Update All to update all outdated drivers.
Conclusion
With all sorts of issues on your display, HDR Windows might be fixed with the solutions mentioned above. If you have faced any other issues, write to us in the comments section, and we would like to find you a solution.
We hope this article will be helpful to understand how to fix common problems with HDR displays on Windows 10. We would like to know your views on this post to make it more useful. Your suggestions and comments are welcome in the comment section below. Share the information with your friends and others by sharing the article on social media.
We love to hear from you!
For any queries or suggestions, please let us know in the comments section below. We love to get back to you with a solution. We regularly post tips and tricks, along with solutions to common issues related to technology. Turn on the alerts for the website to get regular updates on the latest published articles.
Related Topics:
7 Best HDR Software For Mac In 2020
Best HDR Software For Windows 10
10 Best Game Recorder Software For Windows