
Загрузить PDF
Загрузить PDF
Проигрыватель Windows Media — это стандартный аудио- и видеопроигрыватель для всех устройств, работающих под управлением Windows. И хотя его более чем достаточно для воспроизведения всех основных аудио- и видеоформатов, процесс подключения внешних субтитров не так уж прост. Вам придется либо изменить файл с внешними субтитрами, либо вставить субтитры в проигрыватель Windows Media через стороннюю программу.
-

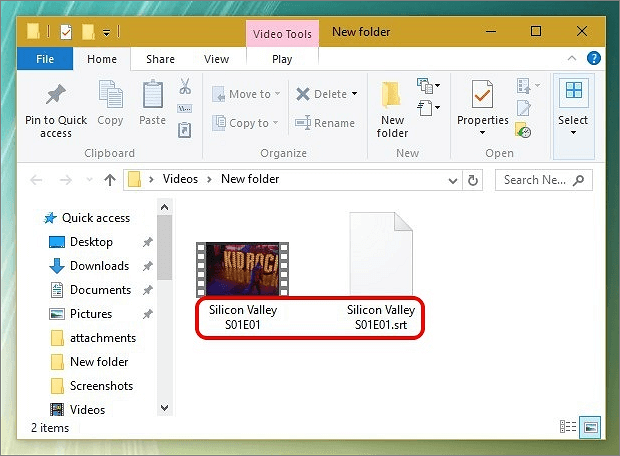
Переместите или скопируйте файл с внешними субтитрами и вставьте его в папку с видео, к которому нужно добавить субтитры.
-

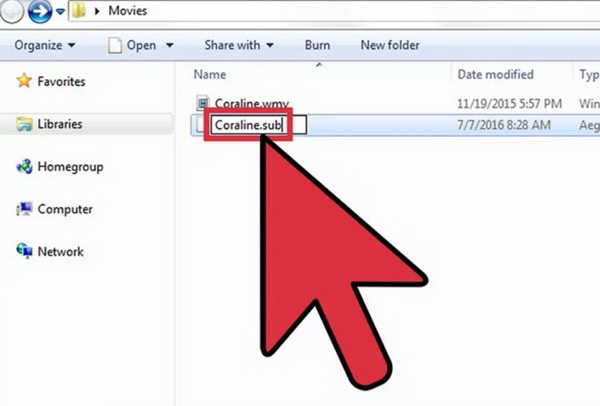
Переименуйте файл с субтитрами, чтобы его имя соответствовало имени видео. Нажмите на субтитры правой кнопкой мыши и выберите опцию «Переименовать». Введите название, которое было присвоено видеофайлу, и нажмите Enter.
-
Нажмите на видео правой кнопкой мыши и выберите «Открыть с помощью» > «Проигрыватель Windows Media». Если же проигрыватель Windows Media является аудио- и видеопроигрывателем по умолчанию, дважды нажмите на видеофайл.
-

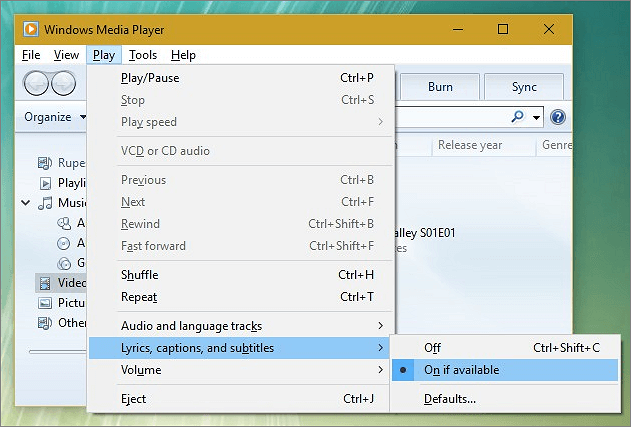
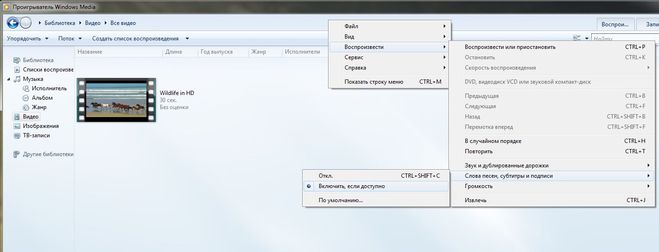
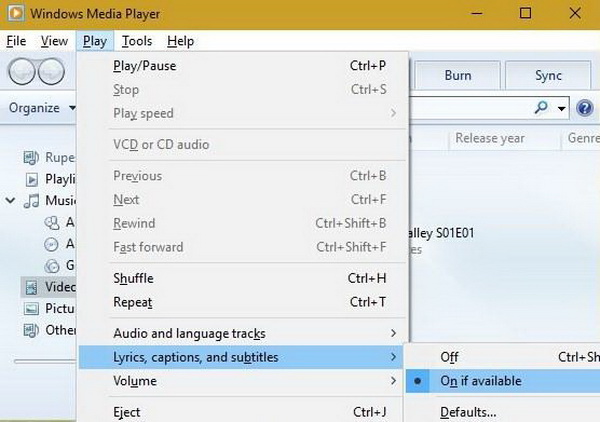
Убедитесь, что в проигрывателе Windows Media включено отображение субтитров. Нажмите правой кнопкой мыши на панель вверху проигрывателя, переместите курсор на опцию «Слова песен, субтитры и подписи» и выберите «Включить, если доступно». Закройте проигрыватель, а затем перезапустите его, чтобы включить видео с субтитрами.[1]
Реклама


-
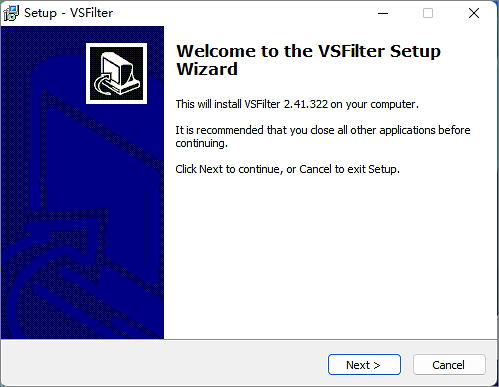
DirectVobSub — это популярная общедоступная программа для Windows, которая исправляет проблему с отображением субтитров в проигрывателе Windows Media.
- Скачайте и установите DirectVobSub с официальной страницы загрузки. Программа доступна как для 32-, так и для 64-разрядной версии Windows, так что скачайте ту версию, которая поддерживается операционной системой.
- Просканируйте DirectVobSub, если скачали его из другого источника. Так вы узнаете, не содержит ли файл вирусы или вредоносные программы.
-

Скачав установочный файл, дважды нажмите на него левой кнопкой мыши, чтобы запустить процесс установки. Когда установка будет завершена, проигрыватель Windows Media сможет без каких-либо проблем отобразить внешние субтитры.
-
Если проигрыватель Windows Media не распознает субтитры даже после установки DirectVobSub, возможно, вам стоит изменить формат файла субтитров. Нажмите на файл с субтитрами правой кнопкой мыши, выберите «Переименовать» и измените «.srt» в конце файла на «.sub».
Реклама


Советы
- Проигрыватель Windows Media может не отобразить субтитры даже после смены имени файла с субтитрами, его формата и установки DirectVobSub. Попробуйте скачать другой медиапроигрыватеь, например, VLC Player или KMPlayer, которые предоставляют больше опций для аннотаций и субтитров.
Реклама
Об этой статье
Эту страницу просматривали 38 674 раза.
Была ли эта статья полезной?
Today, many users are still used to playing all kinds of video files with Windows Media Player. Sometimes you may find the movie has no subtitles. This time you need to add subtitles on Windows Media Player. This article will detail how to add subtitles on a Windows Media Player.
Part 1. Prepare Your Moive and Subtitle Files
Before we go into detail on how to add subtitles in Windows Media Player, you will need to download the latest version of Windows Media Player to your computer and make sure that your movie and the corresponding subtitle file have been downloaded to your device. You cannot manually add subtitles to Windows Media Player, but the player can detect files with the same name, so make sure you complete the following steps.
Step 1. Go to «File Explore» and create a new folder.
Step 2. Move your video and .srt file to the new folder.
Step 3. Give the video and subtitle file the same name, for example, «Movie» and the subtitle is «Movie.srt».
Step 4. Add subtitles in Windows Media Player.
Part 2. 4 Steps to Add Subtitles in Windows Media Player
Once the video and subtitle files are ready, follow the 4-step tutorial below to configure Windows Media Player.
Step 1. Enable Subtitles
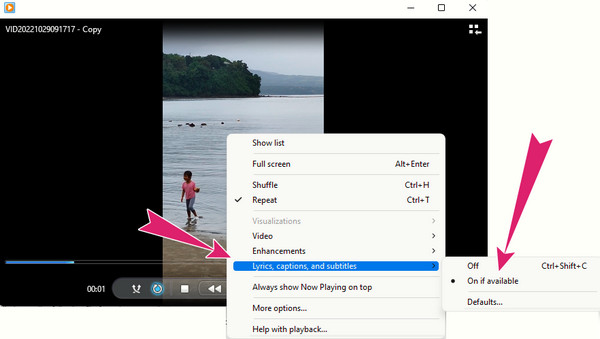
Begin by launching your Windows Media Player and accessing the library mode. Switch to the play mode and navigate to «Lyrics, captions, and subtitles.» Below this menu, select «On if available.»
Step 2. Install the DirectVobSub (VSFilter) Codec
Download the third-party codec called DirectVobSub (VSFilter) and install it on your computer. VSFilter is an add-on software for Microsoft Windows that reads external subtitle files and overlays them on the playing video. No additional configuration is necessary.
After that, Windows Media Player should display subtitles when playing videos. Confirm that subtitles function correctly in Windows Media Player. If not, proceed with the steps below.
Step 3. Download Shark007’s Advanced Codec
Launch it with administrator rights by clicking on the application and «Run as Administrator.»

Step 4. Adjust Codec Settings
Navigate to the tabs for different video file types. Check the box labeled «disable Media Foundation for MP4.» Also, go to the «Swap» tab and check «disable Windows Media Foundation.»

Finally, you can open a video file in Windows Media Player and see the subtitles working fine. If these steps still don’t work with it, there might be some problem with the subtitle file. You could try the file name .srt to .sub.
Part 3. Bonus: Add Permanent Caption into Video
Whether you add subtitles manually or turn on the player’s automatic subtitle-adding function requires users to familiarize themselves with the settings of different players. Is there a way to do it once and for all? The answer is, of course, there is, and that is embedding subtitles into the video. By permanently adding subtitles to videos, you can ensure smooth playback of the movie on any player.
EaseUS VideoKit is a tool that precisely accomplishes this. It auto-generates subtitles and hardcodes them into the audio file. Moreover, it allows users to edit SRT and TXT files. You can export various subtitle formats if you prefer separate subtitle files.
Key Features of EaseUS VideoKit:
- Remove vocals without losing quality
- Edit audio and video without a watermark
- Add subtitles to videos automatically and permanently
- Adjust the caption’s fonts, size, and opacity with attractive styles
Give EaseUS VideoKit a try and permanently embed your subtitles into your audio files.
You could follow the below steps to embed your subtitles into videos permanently.
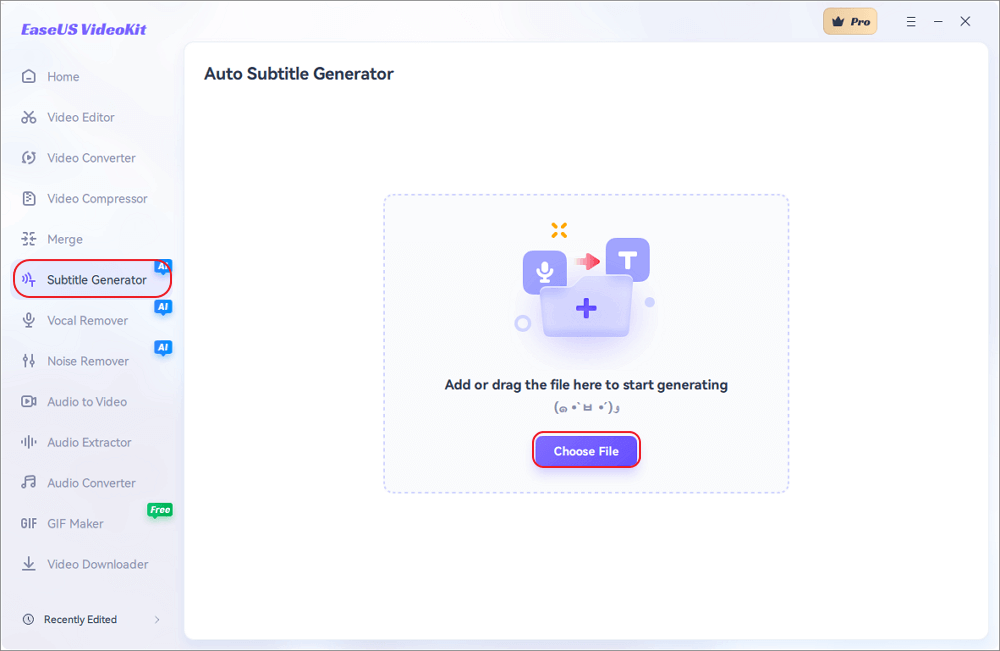
Step 1. Open EaseUS VideoKit and find the «Subtitle Generator» panel.
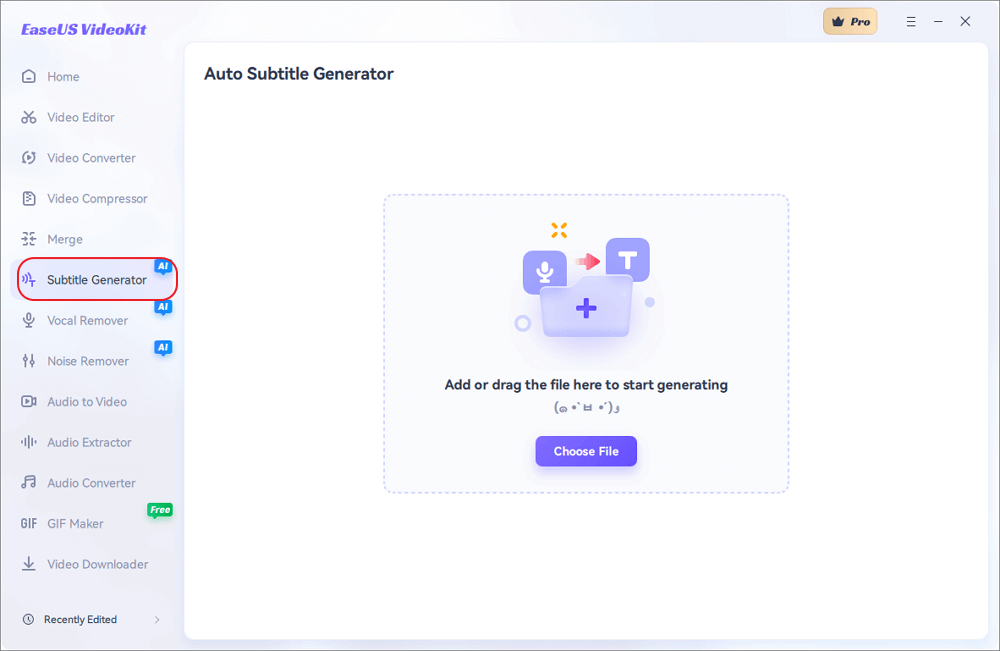
Step 2. Click «Choose File» or drag the YouTube video file to the interface.
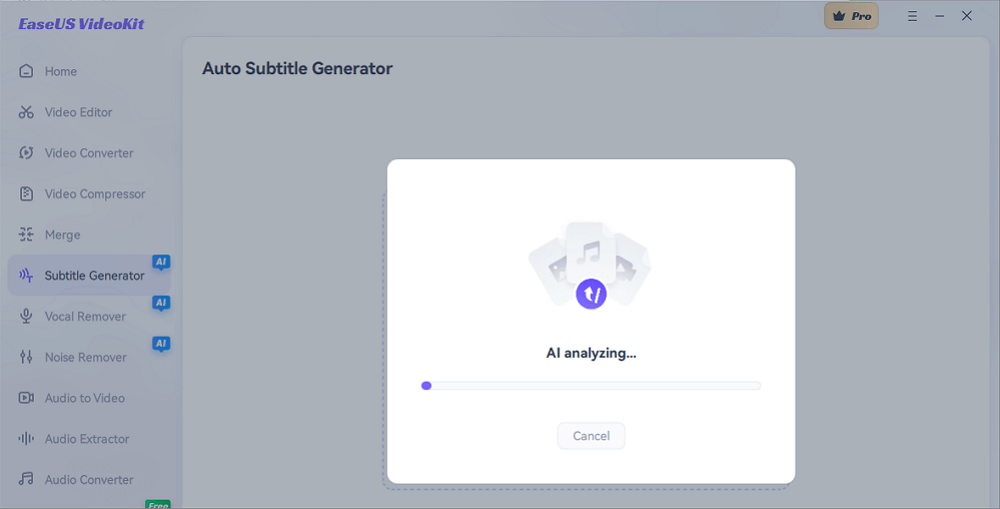
Step 3. Wait for the AI analyzing.
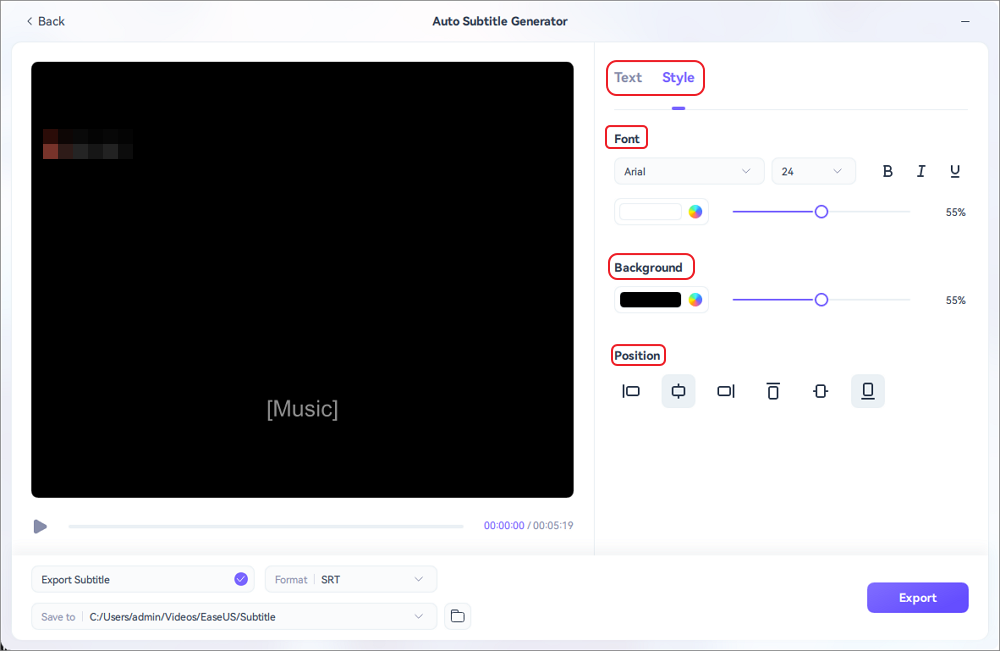
Step 4. Click the «Text» button to change the text, or customize font, background, and position under «Style» menu.
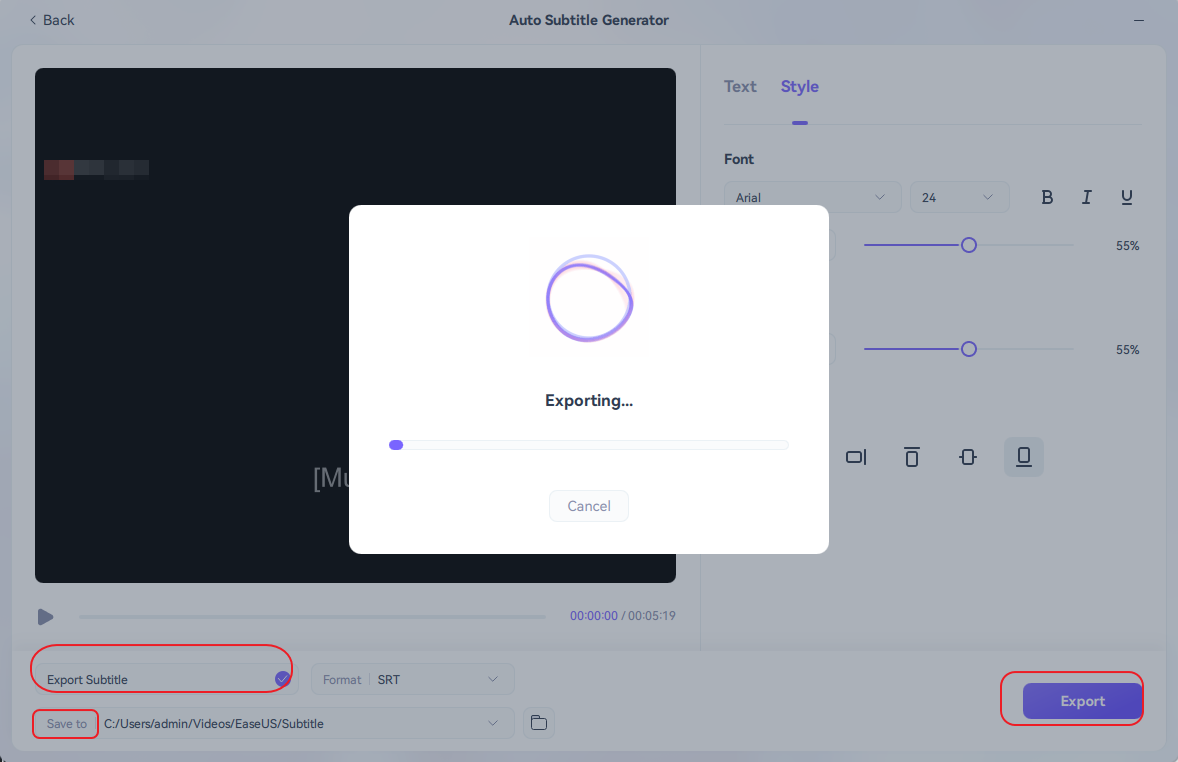
Step 5. Click «Export Subtitle» to select exported subtitle format, «Save to» to change location, and press «Export» to export the video with subtitles.
In Closing
The above article thoroughly explained how to add subtitles to Windows Media Player. We also provided a more efficient tool, EaseUS VideoKit, to offer a comprehensive solution. Use it to embed subtitles into your videos or to remove background noise with ease!
Found this guide helpful? Share it with your friends who love using Windows Media Player for videos!
FAQs on Adding Subtitles in Windows Media Player
If you still need clarification on this topic, this section addresses some frequently asked questions for clarity.
1. How do I add subtitles to a video player?
To add subtitles to a video player, you typically need subtitle files in a compatible format (such as .srt, .sub, .vtt) containing the subtitles’ text and timing information. Here’s a general process:
Step 1. Open your video file in the chosen video player
Step 2. Adjust sync
Step 3. Customize the appearance of the subtitles, such as font, size, color, and background.
2. Can Windows Video Editor add subtitles?
Up to now, the answer is no. You would typically have to use third-party software or services to add subtitles to videos.
3. How do I permanently add subtitles to a video in Windows?
Take Windows Movie Maker as an example, and there is a general guide:
Step 1. Import video and subtitles.
Step 2. Position subtitles.
Step 3. Adjust timing.
Step 4. Export the video.
4. Why are subtitles not working in Windows Media Player?
There might be various reasons, including codec issues, subtitle file naming, incorrect subtitle format, or corrupted subtitle files.
Для того, чтобы заставить «Проигрыватель Windows Media» читать внешние субтитры, необходимо для начала файл с субтитрами STR и файл самого фильма поместить в одну папку. Затем переименовать файл с субтитрами так, чтобы название файла было точно таким же, как и у файла с фильмом (само собой, что к расширению файлов это не относится)!
Кроме того, в самом проигрывателе необходимо проверить, что отображение субтитров включено! Для этого щёлкните правой кнопкой мыши на верхней панели в свободном месте, затем выберите Воспроизвести -> Слова песен, субтитры и подписи и убедитесь, что опция Включить, если доступно активирована.
По идее, теперь при воспроизведения того или иного видео с субтитрами, субтитры должны отображаться! Однако, если положительного результата нет, то уверен на 95%, что вам может помочь установка бесплатного программного модуля «[DirectVobSub][
Если после всех этих манипуляций ваш проигрыватель продолжает упрямиться, выход один — установить другой проигрыватель! Что, в принципе, можно было сделать с самого начала…
Лично я уже очень давно отказался от встроенного в Windows проигрывателя от Microsoft. Довольно долго и много, как говорится, «юзал» различные плееры, последние лет 6-7 пользуюсь мультимедийным проигрывателем «Daum PotPlayer«, очень нравится! Основные его достоинства: многофункциональный, совершенно бесплатный, огромное количество настроек, скинов и есть встроенные кодеки! Более подробно можете ознакомиться на сайте данного проигрывателя…
Вот так включаются/присоедин

А ещё мне очень нравится такая функция плеера, как добавление закладки! Например смотрю я на работе в обеденное время какой-нибудь фильм, понятно, что за обед я не успею его просмотреть полностью, поэтому просто создаю закладку и при следующем запуске фильма он начинается с момента остановки. Это можно сделать через меню, кликнув на видео правой кнопкой мыши, а затем перейти Воспроизведение -> Закладки -> Добавить закладку, либо просто нажав на клавиатуре на английскую Р.

В любом случае выбирать вам…
Windows Media Player — это видеопроигрыватель, который позволяет воспроизводить видео, фильмы и аудиофайлы на настольных компьютерах. Это программное обеспечение, разработанное Microsoft только для компьютеров под управлением Windows. Кроме того, он имеет достаточно хорошие функции, включая отображение субтитров. Поддерживаемый Субтитры проигрывателя Windows Media — SRT., SSA, SUB и ASS. Это означает, что вам понадобятся файлы этих типов, чтобы успешно синхронизировать субтитры с вашим видео.
Предположим, у вас уже есть эти форматы субтитров, и ваша единственная задача — знать, как добавить, изменить или просто отключить субтитры в вашем видео. В этом случае эта статья может вам очень помочь. См. приведенные ниже инструкции, которые научат вас, как решить вышеупомянутую проблему.

- Часть 1. Как добавить субтитры к видео в проигрывателе Windows Media
- Часть 2. Как изменить цвет субтитров с помощью проигрывателя Windows Media
- Часть 3. Как отключить субтитры в проигрывателе Windows Media
- Часть 4. Лучшая альтернатива использованию субтитров проигрывателя Windows Media
- Часть 5. Часто задаваемые вопросы о субтитрах в проигрывателе Windows Media
Прежде чем пытаться добавить субтитры к видео в проигрывателе Windows Media, необходимо подготовить видео и файл субтитров, в котором используется следующее имя формата файла: .srt, .ass, .ssa, .sub. Таким образом, если они уже организованы, вы можете перейти к следующим шагам.
Шаг 1.В рамках подготовки убедитесь, что файлы видео и субтитров имеют одно и то же имя и находятся в одной папке. Это заставит ваш медиаплеер обнаружить файл субтитров, что важно для добавления субтитров вручную.
Шаг 2.Затем начните импортировать видео, найдя его на своем устройстве. Когда вы дойдете до видеофайла, щелкните его правой кнопкой мыши и выберите Открыть с предложит выбрать проигрыватель Windows Media.
Шаг 3.Поскольку вы подготовили файлы видео и субтитров, содержащие одно и то же имя, проигрыватель Windows Media автоматически откроет и отобразит субтитры. В противном случае щелкните правой кнопкой мыши воспроизводимое видео и выберите Тексты, подписи и субтитры диалог. Затем нажмите кнопку Включено, если доступно вкладка опций.
Часть 2. Как изменить цвет субтитров с помощью проигрывателя Windows Media
Теперь давайте изучим кое-что техническое и узнаем, как изменить цвет субтитров в проигрывателе Windows Media. Но сначала давайте выясним, может ли это сделать проигрыватель Windows Media. К сожалению, в WMP нет встроенной опции для изменения цвета субтитров, но она может определять стиль и дизайн файла субтитров. Однако вы можете попробовать следующие методы обхода проблемы, пытаясь изменить цвет субтитров.
Шаг 1.Найдите файл субтитров и откройте его в выбранном вами текстовом редакторе. После открытия перейдите к настройке цвета.
Шаг 2.Теперь измените цветовой код, заменив цветовое оформление субтитров, отрегулировав вкладку цвета шрифта.
Шаг 3.После завершения не забудьте сохранить файл.

Часть 3. Как отключить субтитры в проигрывателе Windows Media
Хотите знать, как отключить субтитры в проигрывателе Windows Media? В этом случае мы подготовили подробные инструкции, которые вы можете выполнить ниже.
Шаг 1.Запустите видео с помощью проигрывателя Windows Media. Теперь вы видите, что субтитры воспроизводятся вместе с видео.
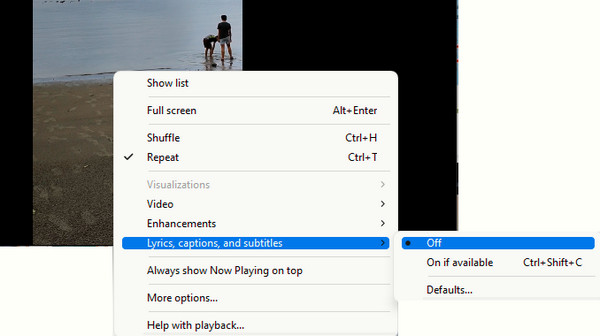
Шаг 2.Переместите курсор в любое место воспроизводимого видео и щелкните правой кнопкой мыши. Затем нажмите кнопку Тексты, подписи и субтитры опция в контекстном меню.
Шаг 3.Затем нажмите кнопку Выключенный вариант в показанной подписи сбоку.
Часть 4.Лучшая альтернатива использованию субтитров проигрывателя Windows Media
Вы хотите воспроизводить видео намного лучше, но не хотите портить субтитры проигрывателя Windows Media? Тогда вот Блю-рей проигрыватель. Лучшая альтернатива проигрывателю Windows Media — синхронизация субтитров. Как можно отказаться от медиаплеера, поддерживающего все типы цифрового видео, включая Blu-ray и DVD? Более того, Blu-ray Player предоставляет вам аккуратный, элегантный и полный контроль над воспроизведением, с помощью которого вы можете легко воспроизводить, приостанавливать, останавливать, пересылать вперед, к следующему, назад и назад к отснятому материалу. Удивительно, но он также поставляется с инструментом создания снимков и местом назначения файла сбоку, что позволяет вам быстро получить к нему доступ в любое время. Вы будете удивлены, узнав, насколько высоким является качество вывода каждой снятой вами сцены.
Еще одна причина выбора этого медиаплеера — обширный набор лент. Из этой опции ленты происходит настройка видео, в которой находится навигация по субтитрам. При этом вы можете легко добавлять и синхронизировать субтитры к видео и легко играть. Если хотите, вы также можете добавить дорожки с субтитрами в свой плейлист!
Основные характеристики
- Профессионально выглядящий интерфейс с простой навигацией.
- Полноценный контроль воспроизведения, включающий инструмент создания снимков.
- Создание плейлистов в один клик.
- Поддержка высококачественного видеоконтента.
Как использовать субтитры в альтернативе проигрывателю Windows Media
Шаг 1.Начните с получения версии программного обеспечения Windows на рабочем столе, щелкнув доступную версию. Скачать кнопки выше. Когда вы уже закрепили программное обеспечение на своем компьютере, запустите его.
Шаг 2.Затем нажмите Открыть файл кнопку в центре интерфейса и выберите видео, которое хотите воспроизвести.
Шаг 3.Во время воспроизведения видео дотроньтесь до видео вкладка на ленте. И нажмите кнопку Дорожка субтитров вариант, за которым следует Добавить субтитры диалоговое окно. Затем загрузите файл субтитров, который есть на вашем устройстве.
Шаг 1.После загрузки он автоматически синхронизируется с воспроизводимым видео. После этого смело переходите к элементу управления воспроизведением, отображаемому на экране.
Дальнейшее чтение
Лучший способ обрезать видео в проигрывателе Windows Media [решено]
Как использовать проигрыватель Windows Media для изменения скорости воспроизведения
Часть 4.Часто задаваемые вопросы о субтитрах в проигрывателе Windows Media
-
Как поставить субтитры в проигрывателе Windows Media?
Для размещения субтитров в проигрывателе Windows Media вам потребуется всего лишь сохранить отдельный файл с тем же именем, что и у видео. При воспроизведении видео проигрыватель Windows Media автоматически воспроизводит субтитры.
-
Можно ли использовать проигрыватель Windows Media для загрузки субтитров?
Нет. К сожалению, проигрыватель Windows Media не предоставляет возможности загрузки субтитров или даже других медиафайлов.
-
Почему мои субтитры в формате BUP не воспроизводятся в проигрывателе Windows Media?
Это связано с тем, что проигрыватель Windows Media не поддерживает файлы BUP, а поддерживает только SRT, ASS и SSA.
Подведение итогов
Вот как можно добавлять, изменять и отключать подписи в WMP. Для добавления субтитров к видео в проигрывателе Windows Media необходимо использовать только поддерживаемые форматы файлов, особенно SRT. Поэтому вам необходимо заранее убедиться, что файлы титров сохраняются именно в этом типе. С другой стороны, если вы не настолько увлечены Субтитры проигрывателя Windows Media и вы не уверены, что сможете воспроизвести ваши видеофайлы, тогда у вас все еще есть другой вариант — Блю-рей проигрыватель.
Выберите рейтинг статьи:
Рейтинг: 4.9/5 (на основе 398 голосов)
10,649 views
As the key factor to obtain the best viewing experiences, the subtitle is playing an important role for a movie. What is your preferred way to play all kinds of multimedia players with subtitles? Windows Media Player, as the default media player for Windows, can easily provide various playback solutions with ease and accuracy.
However, some movies with embedded subtitles could not be played properly on Windows Media Player. Among various subtitle files, SRT files are commonly seen. Today, we are going to discuss how to use SRT file in Windows Media Player and figure out the exact reasons for the failure.
- Part 1: How to Add and Play SRT File on Windows Media Player
- Part 2: Why Can’t I Play SRT Subtitle on Windows Media Player
- Part 3: How to Solve SRT Playback Problem on Windows Media Player
- Part 4: Free Alternative for SRT Subtitle Playback
- Part 5: How to Play and Set SRT Subtitle
Part 1: How to Add and Play SRT File on Windows Media Player
For majority of movies, the subtitles are inserted ahead of time. In most cases, the SRT file is embedded accordingly. If you are not provided with the SRT file of the movie, then you can manually add and play SRT file on Windows Media Player. SRT file is a subtitle file saved in the SubRip subtitle file , which can be edited by any text editor. SRT files generally contain subtitle information, with the sequential number of subtitles, start and end time code, subtitle texts included, and they are commonly used in video playback, so as you can see they do not contain any video data. Instead, you can set SRT subtitle to your desired movie or video file as long as it is supported by the media player such as Windows Media Player. Next, I will show
Step 1. Download an additional subtitle program which is called DirectVobSub. This program is used to show subtitles while playing all kinds of movies. Once you have downloaded, then follow the on-screen instructions to complete the installation process.
Step 2. Download the SRT file from the specific websites. Here, please make sure that the SRT file and the video file are kept in the same folder so that the subtitle could automatically appear during the playback. Then rename the SRT file with .srt extension.
Step 3. Open Windows Media Player on the computer and go to the “Play” menu > “Lyrics, Captions and Subtitles” and click on “On if Available” option to turn on the Subtitles.
Step 4. Restart Windows Media Player. Load the video to WMP, then the SRT subtitle would show up beneath the screen of the video automatically.
Part 2: Why Can’t I Play SRT Subtitle on Windows Media Player
However, according to the user feedback, some complained that they failed to add SRT subtitles in Windows Media Player. And all common reasons are listed as below:
1. Turned subtitles, captions or lyrics off. Sometimes, users don’t notice that the subtitle has not been notified and turned correctly. As a result, the subtitle file could not be shown up immediately.
2. Videos with damaged subtitles. If the video is equipped with the damaged subtitles, the users would not watch the exact subtitle files on the media player. If you are unsure about the downloaded subtitles, you can refer to the other subtitle websites for another try.
3. Videos without subtitles at all. If you are not sure about exact reasons for the failure of SRT subtitle, then a possible reason may be that the videos don’t have any subtitles at all. In order to solve the problem, the only way to figure it out is to download the related subtitle files.
So to solve these problems, you can firstly check the Subtitles settings, though generally the Subtitles is turned on by default. If it still fails, just check whether the subtitles are damaged or whether the subtitles are available. And if the file is damaged, you are suggested to load a new .srt file.
But actually to easily and smoothly add SRT subtitles to your wanted videos, the best way for you is to choose an alternative to Windows Media Player, ensuring that SRT subtitles can always work under any circumstances as long as they are complete.
Part 3: How to Solve SRT Playback Problem on Windows Media Player
In order to play the SRT file correctly on Windows Media Player, you can follow the steps below to set the files one more time.
Solution 1. Set the Windows Media Player again.
Once you have opened the movie on Windows Media Player, right click on the screen to select “More options” >> “Security” >> “Content” to locate the “show local captions when present” option. Please make sure the present video name and subtitle name are the same. Then you can play the SRT playback in the right way.
Solution 2. Install the decoding package.
Step 1. First install the third-party decoding package, here you can select ADVANCED Codecs (windows 10 codecs);
Step 2. Then delete:
C: msmpegadec.dll, MSMPEG2ENC.DLL, msmpeg2vdec.dll in the \ Windows \ SysWOW64 \ folder. Before deletion, you can back up these files.
Step 3. Restart Windows Media Player and load the file again. Usually this would be played properly.
Part 4: Free Alternative for SRT Subtitle Playback
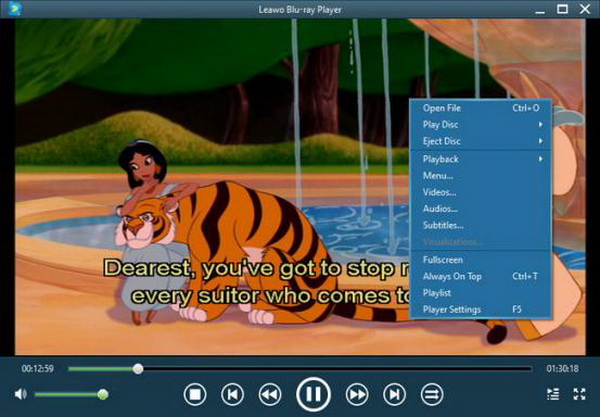
No. 1 Leawo Blu-ray Player
To get the best alternative to Windows Media Player, this Free Leawo Blu-ray Player is surely your top choice. With it, you can freely select your wanted subtitles to match the videos that you plan to play on the computer or you can load your desired subtitles from external location. With this player, you can easily play all common and uncommon files including AVI, MPEG, WMV, MP4, FLV, RMVB, MOV, Xvid, 3GP, etc. and up to 1080P HD videos in HD MP4, HD AVI, HD MOV, HD TS, etc. In addition, you can also change other audio or video settings as desired and control the playback process totally to your preference, so as to have your customized visual experience. It can even enable you to back up your Blu-ray movies by converting Blu-ray to MKV files without quality loss. And best of all, this software has a simple user interface, enabling you to enjoy a fabulous and personalized visual experience by adding your wanted subtitles and adjusting other settings.
Leawo Free Blu-ray Player
☉ 100% free movie player for Windows & Mac users to play Ultra HD 4K, 1080P and 720P videos.
☉ Free Blu-ray/DVD player to play 4K disc, folder and ISO file, regardless of disc protection and region code.
☉ Support multiple audio decoding systems like Dolby, DTS, AAC, TrueHD, DTS-HD, etc.
☉ Adjust subtitles, video and audio during media playback.
☉ Serves as a powerful Blu-ray/DVD to MKV converter to convert Blu-ray/DVD disc, folder and ISO image to MKV with lossless quality and high speed.
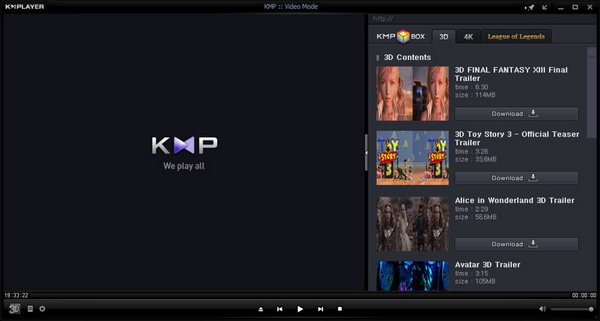
No. 2 KMPlayer
KMPlayer is an all-round audio and video player from South Korea. Like Mplayer, KMPlayer (referred to as KMP) ported from the Linux platform can play almost all audio and video files on your system. KMPlayer extends KMP through various plug-ins to support endless new formats. KMPlaye’s powerful plug-in function, the plug-in function inherited directly from Winamp, can directly use winamp’s audio, input, visual effects plug-in, and through unique expansion capabilities.
No. 3 Media Player Classic Home Cinema
Media Player Classic Home Cinema is a modified MOD based on the media player classic (mpc player). It is very compact and requires only a main program. The appearance is similar to WMP6.4, but its function is far beyond the latter. MPC can not only play all the formats supported by WMP, not even GIF animations, and the effect is very good. He not only retained all the functions of MPC, but also added some special services, such as: jitter test, anti-tearing, shuttle pn31, subtitle synchronization, remote control support, osd screen display, vista ready and so on. The SRT subtitle file can be easily played on this player software.
Part 5: How to Play and Set SRT Subtitle
In order to play the SRT subtitle file, you need to download the correct SRT file from the Internet and load the file correctly. Now I will strongly recommend you to play and set SRT subtitle with Leawo Blu-ray Player. Below is the step-by-step user guide:
Step 1. Download and install Leawo Blu-ray Player on your computer.
Step 2. Load the movie file from the computer and open the installed software on the computer and then load the wanted files to the main interface.

Step 3. After that, right click on the main interface and then specify the Subtitles option to select the SRT subtitle as the desired one. The the subtitles would show up beneath the screen.
Most importantly, the newest version of this Leawo Blu-ray Player has been updated greatly especially in terms of subtitle-related function. In the previous versions, users can add external subtitles in style by choosing subtitle text font from teletext.ttf or arial.ttf, and edit subtitle size, style, color, character set and location with many available options out there to choose from.
Now, the latest version makes it possible to automatically load the internal subtitle by right clicking the main interface and choose the desired subtitle. More importantly, as long as the subtitle has been played once, the player will automatically load the subtitle and display it the next time when the same disc is inserted and played.
Any 3rd-party product names, trademarks, logos and images occasionally mentioned on this site belong to their owners. These might include but not be limited to YouTube, Apple, Amazon, Adobe, Netflix, etc. Leawo Software is independent of all of these property owners.