
PAGE CONTENT:
- An Overview of Windows 10 Screen Recorder — Xbox Game Bar
- Why Is Xbox Game Bar Not Working on Windows 10
- How to Fix Xbox Game Bar Not Working on Windows 10
- Wrapping Up
- FAQs
Are you facing trouble while trying to screen record on your Windows 10 computer? You’re not alone. Many users are finding that their screen recording tools have stopped working or malfunctions, resulting in poor-quality recordings.
While this can be extremely frustrating, it’s important to understand why your screen recording might not be working and where you can find the right solutions to get back up and running again. In this blog post, we’ll provide a comprehensive guide for resolving issues related to screen recording on Windows 10 computers. Read on to learn more!
| Methods | Effectiveness | Time Cost | Difficulty |
| Check and Enable Xbox Game Bar | High | 1 Min | ⭐ |
| Enable the Microphone Device | High | 1 Min | ⭐ |
| Spare More Space for Recordings with the Task Manager | Medium | 2 Min | ⭐⭐ |
| Update the Graphics Driver with Device Manager | Medium | 3-5 Min | ⭐⭐⭐ |
| Restart Your Windows 10 Computer | High | 1 Min | ⭐ |
| Try Xbox Game Bar Alternative ❤ | Super High | 1 Min | ⭐ |
An Overview of Windows 10 Screen Recorder — Xbox Game Bar
Xbox Game Bar is the built-in Windows 10 screen recorder that allows its users to capture screen activities, like game processes, online meetings, streaming videos, etc.
The Xbox Game Bar offers a wide range of features and settings that allow users to customize their screen recording experience and get high-quality results. The easy-to-use and powerful feature makes the Xbox Game Bar the first choice to record screen for Windows 10 users.
Why Is Xbox Game Bar Not Working on Windows 10
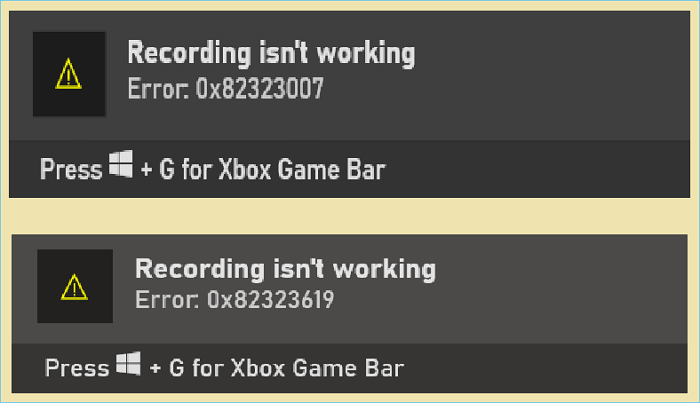
Why is my screen recording not working? Well, although Xbox Game Bar does bring great convenience for screen recording on Windows 10, it doesn’t mean that the utility works each time perfectly. There are still some issues that may occur when you use the Xbox Game Bar screen recorder, and «Screen Recording Not Working in Windows 10» is the most common one.
According to users’ feedback, while recording, they will receive a notice showing that «Recording isn’t working error. 0x82323007» or «Recording isn’t working error. 0x82323619», etc.
The reason why these errors appear may be caused:
- The permission for screen recording or microphone isn’t enabled
- The microphone level isn’t adjusted correctly
- The microphone is disabled
- There isn’t enough storage space on your computer
- The copyright issues
- ……
Whatever the reason, you can refer to the following solutions to fix screen recording not working on Windows 10.
You may be interested:
How to Fix Xbox Game Bar Not Working on Windows 10
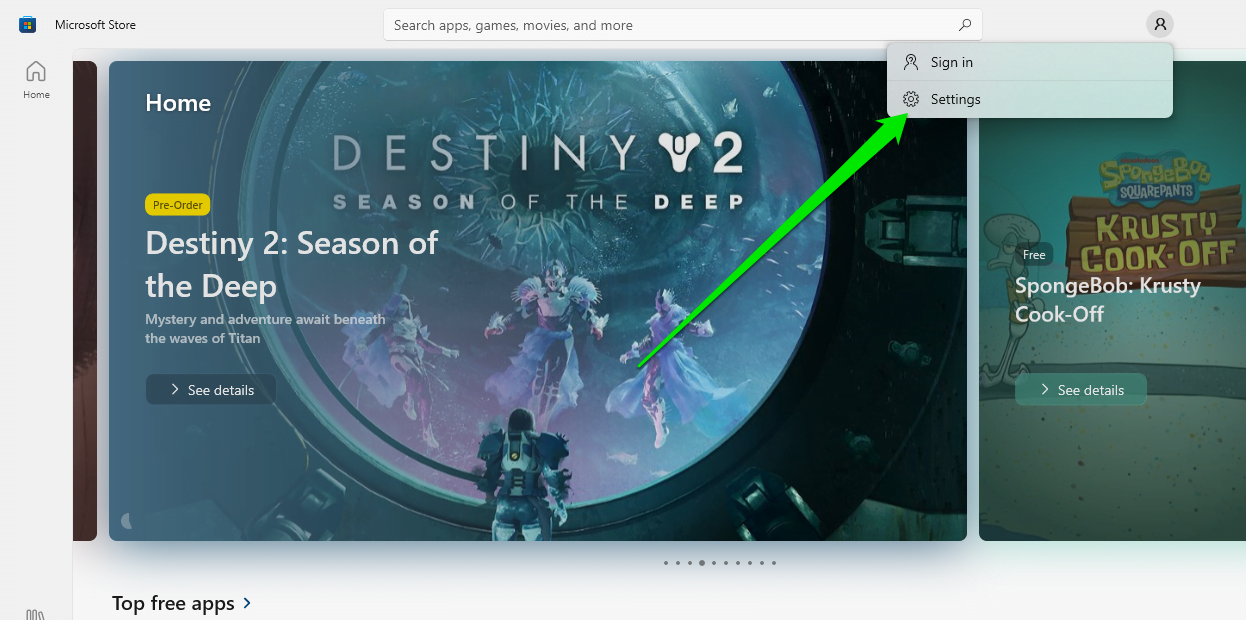
Fix 1. Check and Enable Xbox Game Bar
Screen Recording is not working on Windows 10 may be because the Xbox Game Bar isn’t enabled on your Windows computer.
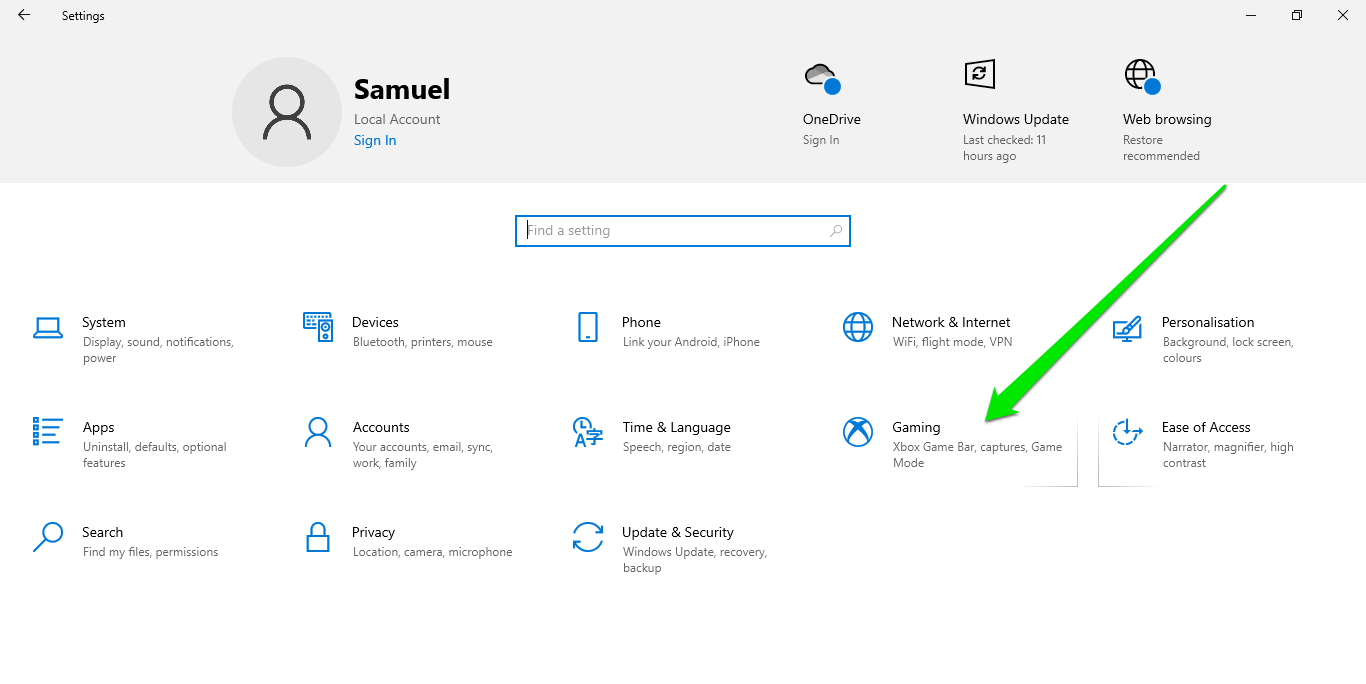
Step 1. Follow the path to enable the Xbox Game Bar recording settings: Start — Settings — Gaming — Xbox Game Bar.
Step 2. There is a button under the text «Enable Xbox Game Bar for things like recording game clips, chatting with friends, and receiving game invites. (Some games require Xbox Game Bar for receiving).»
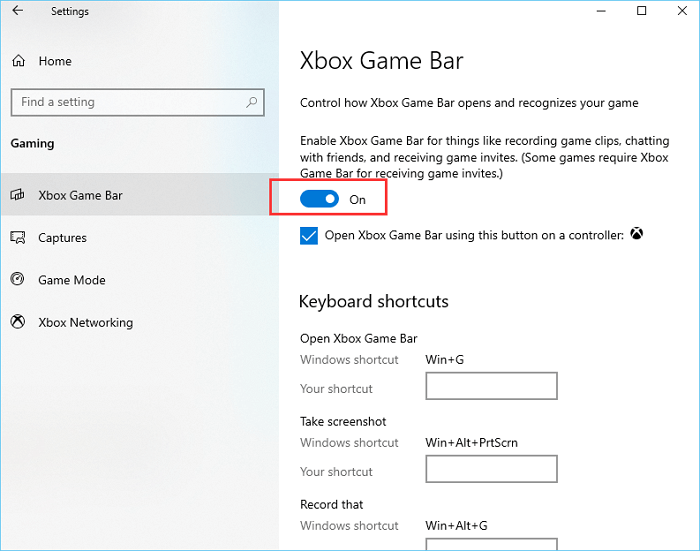
If it shows «Off«, you should slide the button to ensure it shows «On«. If it shows «On», you need to try the following solutions.
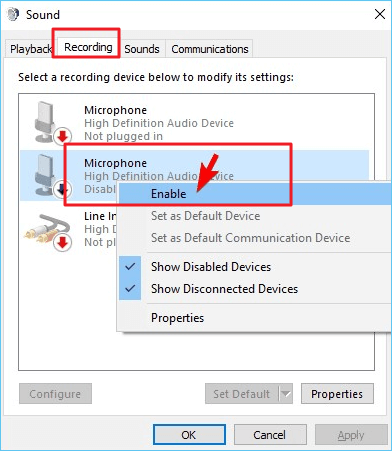
Fix 2. Enable the Microphone Device
The screen recording may not work due to the disabled microphone.
Step 1. Right-click the Volume icon at the Windows taskbar in the bottom-right corner, and select the «Recording» option.
Step 2. Find the Microphone device, and check if it is enabled. If not, right-click it and click «Enable«, then click «OK» to save the settings.
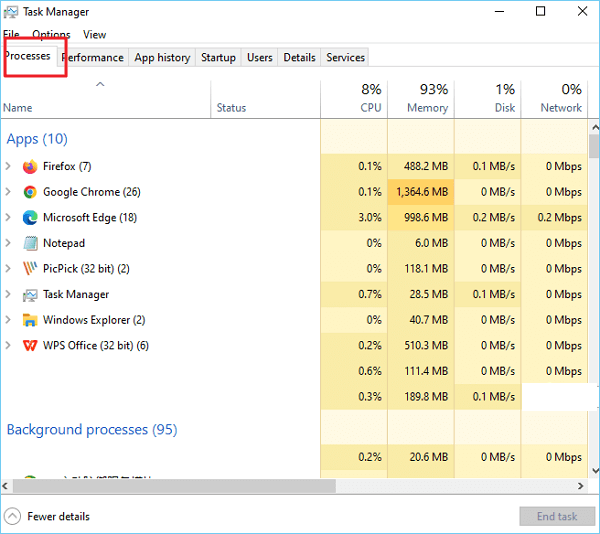
Fix 3. Spare More Space for Recordings with the Task Manager
Too many programs running in the background of your computer may affect screen recording.
Step 1. Open the Task Manager by right-clicking the Taskbar, then select «Task Manager«.
Step 2. Click the «Processes» tab and check if there are too many processes running in the background. If so, end them to free up more space for screen recordings.
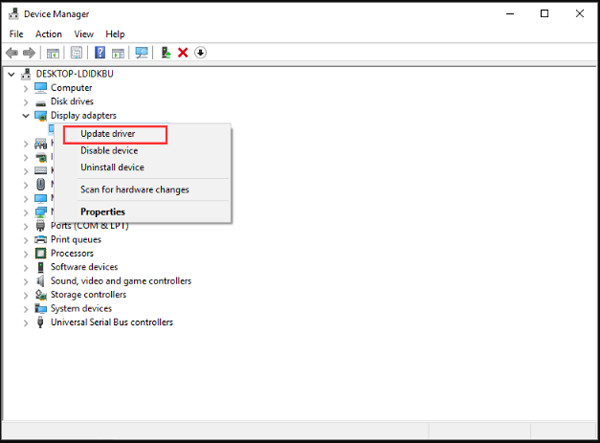
Fix 4. Update the Graphics Driver with Device Manager
The screen recording may not work because of the outdated graphics driver. Updating the graphics driver will solve most Windows utilities not working issues.
Step 1. Press the «Windows + R» simultaneously to open the Run box, type in «devmgmt.msc» and click «OK» to open Device Manager.
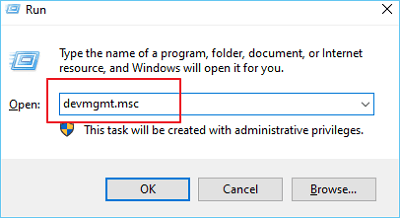
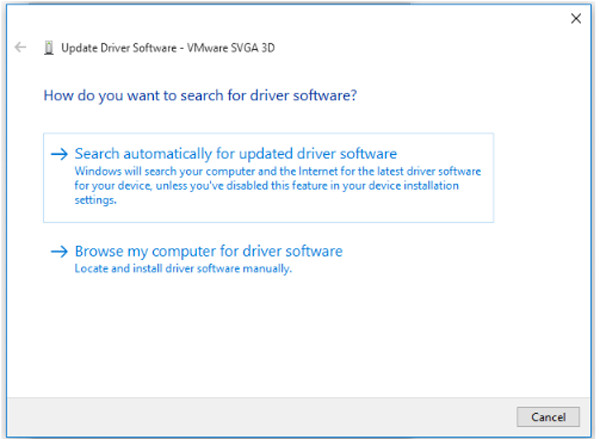
Step 2. Find and click «Display Adapter«, find your graphics adapter device, and right-click it > select «Update Driver«.

Step 3. Select «Search automatically for updated driver software«.
Fix 5. Restart Your Windows 10 Computer
If all the above solutions cannot solve screen recording not working on Windows 10, you can try restarting your computer.
Step 1. Press «Ctrl + Alt + Delete» to open the Security options window.
Step 2. Select «Restart» and wait for it to restart, then try the Xbox Game Bar again.
Fix 6. Try Xboc Game Bar Alternative — Hot
Suppose the screen recording still doesn’t work after the restart. In that case, you may need to try an alternative screen recorder like EaseUS RecExperts, which is a Mac and Windows screen recorder with powerful screen recording and editing functions.
With an intuitive and straightforward interface, EaseUS RecExperts is capable of screen recording for multiple displays and screen capture, screencasting webcam feed, and making screen recordings with customized hotkeys or mouse click effects.
Follow the steps below to record screen with EaseUS RecExperts:
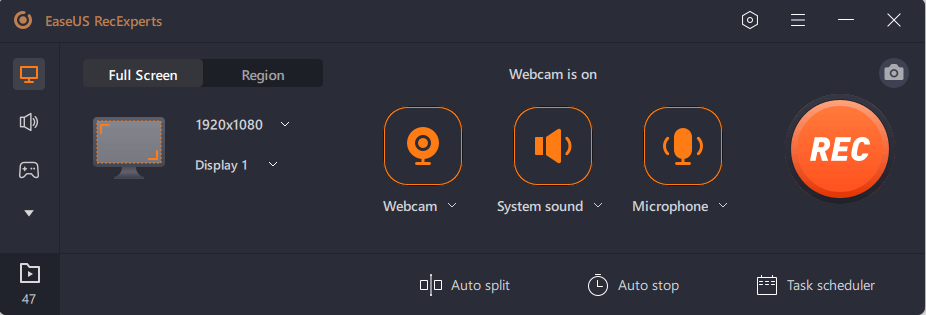
Step 1. Launch EaseUS RecExperts. There are two modes for screen recording. Choose «Full Screen», this tool will capture the whole screen; choose «Region», you will need to select the recording area manually.

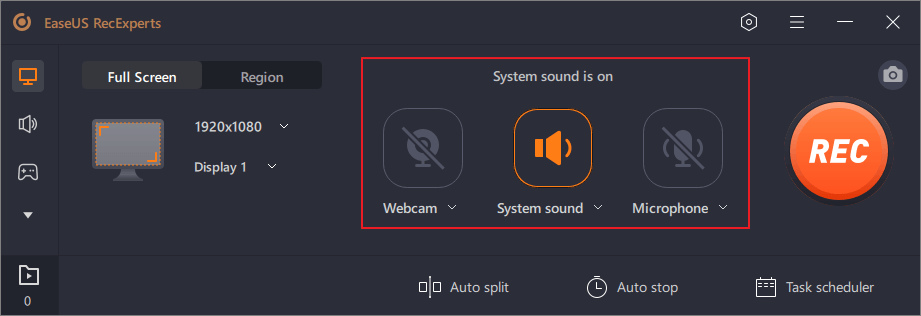
Step 2. After that, you can choose to record the webcam, system sound, or microphone as you like. Of course, you can turn them off if you only need to record the silent screen.
Step 3. Then, you can click the red «REC» button to start recording. Now you will see a menu bar on your screen. If you want to pause the recording, click on the white «Pause» button; to end the recording, click on the red «Stop» button.
Step 4. After recording, you will be led to the recording list interface. Here you can view or edit your recordings easily.

Wrapping Up
Various issues may cause screen recording not to work on Windows 10, and it can be fixed by following the above solutions. I hope these fixes are helpful.
If none of them works, you may need to try an alternative screen recorder like EaseUS RecExperts, with powerful screen capturing and editing functions.
FAQs
1. Why is screen recording not working in Windows 10?
Xbox Game Bar not working in Windows 10 may be caused by various issues, such as the disabled microphone device, disabled application, outdated graphics driver, or too many programs running in the background.
2. How do I enable screen recording in Windows 10?
To enable screen recording in Windows 10, you can follow the path to find and enable it: Start — Settings — Gaming — Xbox Game Bar — slide the button On.
3. Where are the screen recording settings?
The screen recording settings are located in the Xbox Game Bar. You can open the Xbox Game Bar by pressing the «Windows + G» keys, and then you can access the screen recording settings.
Download Article
Simple fixes for screen recoding errors on Windows and iOS
Download Article
- Windows 10 and 11
- iPhone
- Tips
|
|
Is your Screen Record button greyed out or otherwise not working for you? Whether you’re having trouble recording the screen in Windows 10 or 11 with Xbox Game Bar or on your iPhone, there’s usually an easy fix. This wikiHow article will help you figure out why you can’t screen record on your PC or iPhone, and teach you how to fix the most common problems.
Things You Should Know
- Certain apps with copyrighted content may not allow you to screen record while that app is open.
- If you’re using Windows Xbox Game Bar, make sure it is enabled first.
- If you’re using an iPhone, the most common reason that you can’t screen record is because of restrictions set in Screen Time.
-

Some services, like Netflix and Disney Plus, won’t allow you to screen record to prevent copyright infringement. For example, if you’re trying to screen record Netflix on Windows, you’ll see an error like, «Screen recording failed to save due to 5823,» or the screen will freeze. It may also look like it’s recording, but you wind up with a black screen in your resulting video.
- Many web browsers now prevent you from screen recording DRM-protected content. If you’re trying to screen record a movie or TV show on a streaming platform, you can try playing it in Google Chrome with hardware acceleration disabled. To disable this feature, open Chrome, go to ⋮ > Settings > System and uncheck «Use hardware acceleration when available.»
- You can also take screenshots using some workarounds and plugins.
-
If Game Bar is disabled, you can press the keyboard shortcut Win + Alt + R to record your screen, but you won’t find the recorded file afterwards. To enable Game Bar, press Win + i to open Settings, go to Gaming > Xbox Game Bar, and toggle on the feature.[1]
Advertisement
-
If you see the error 0x82323007, you may need to enable Xbox App Services. Here’s how:
- Press Ctrl + Shift + Esc to open Task Manager.
- Click the Startup or Startup apps tab.
- If you see «Disabled» next to «Xbox App Services,» right-click it, then click Enable.
- You can also try disabling and re-enabling «Record in background while I’m playing a game» if the error pops up when you’re attempting to screen record your gameplay.
- If you have lots of previous captures in the Captures folder, clear it out and see if that gets rid of the error.
-
If you don’t have enough space on your hard drive for your screen recording, the recording will fail. Free up space by uninstalling programs that you don’t use and using Storage Sense.
- Error 0x82323619 will pop up if Xbox Game Bar determines that you don’t have enough room to store a recording.
-
You may find that you can record video, but everything you’re saying is missing from the recording. If you’re trying to add your own voice to the screen recording, make sure your microphone is enabled.
- On Windows 10, right-click the sound icon in your taskbar, then select Sound > Recording. If your microphone isn’t on, right-click it and click Enable. Click Ok to save your changes, then you can close the window.
- On Windows 11, right-click the sound icon, select Volume mixer, and make sure the correct microphone is selected under «Input.»
-
Too many processes running may adversely affect your recording, so make sure you don’t have any unused apps open. To close any open apps, press Ctrl + Shift + Esc to open Task Manager, click Processes, then end any tasks you don’t need.
-
If you notice that your screen recording is wonky, black, or missing frames, you may have an outdated graphics driver. Update it by opening Device Manager and locating your graphics driver under «Display Adapter.» Right-click it and click Update driver > Search automatically for updated driver software.
-
Sometimes, refreshment is all your computer needs to work properly. Restart your PC, then try screen recording again.


Advertisement
-
If Content Restrictions are enabled for , you won’t be able to record the screen.
- Open your iPhone’s Settings app and go to Screen Time > Content & Privacy Restrictions > Content Restrictions. Scroll down and make sure it says «Allow» next to «Screen Recording.» If it doesn’t, tap Screen Recording, then tap Allow.[2]
- Once you do this, the icon in Control Center will be darker so you can tap it.
- If you don’t have the PIN for Screen Time, such as if you’re using a child account on an iPhone, you can’t remove this restriction.
- Open your iPhone’s Settings app and go to Screen Time > Content & Privacy Restrictions > Content Restrictions. Scroll down and make sure it says «Allow» next to «Screen Recording.» If it doesn’t, tap Screen Recording, then tap Allow.[2]
-
If you don’t have enough storage, the screen record will fail. To check your storage, go to Settings > General > iPhone Storage.
- You can free up space using iCloud or by optimizing your photo storage.
-
While this battery-saving feature is active, screen recording may fail. To turn off Low Power Mode, tap the battery icon in Control Center, or go to Settings > Battery and make sure the toggle is off.
-
Operating system updates usually provide bug and glitch fixes, so if you’re running an older iOS version, you may be having issues. To update your iPhone, go to Settings > General > Software Updates.
-
Some services, like Netflix and Disney Plus, won’t allow you to screen record to prevent copyright infringement. For example, if you’re trying to screen record Netflix on an iPhone, you’ll see an error like, «Screen recording failed to save due to 5823» or the screen will freeze. In this case, you won’t be able to screen record your iPhone while these copyrighted videos are playing.


Advertisement
Ask a Question
200 characters left
Include your email address to get a message when this question is answered.
Submit
Advertisement
Thanks for submitting a tip for review!
Advertisement
References
About This Article
Thanks to all authors for creating a page that has been read 30,024 times.
Is this article up to date?
Table of contents
- What Does the “Can’t Record Right Now, Try Again Later” Notification Mean?
- How to Remove the “Can’t Record Right Now, Try Again Later” Error Message on Windows 10
- Use Another Shortcut for Recording
- Turn off Background Recording
- Erase the Microsoft Store Cache
- Run the Windows Apps Troubleshooter
- Update the Microsoft Store
- Change the Captures Folder
- Fix Windows Update and Restore Your PC
- Reinstall the Xbox App and Xbox Game Bar
- Remove Temporary Files
- Repair Your Game Files or Reinstall Your Game
- Conclusion
- FAQ
Have you been getting the “Can’t record right now, try again later” bug while trying to record a session of Minecraft or another game? If so, you don’t need to fret too much. This article was written with your problem in mind.
What Does the “Can’t Record Right Now, Try Again Later” Notification Mean?
The “Can’t record right now, try again later” error on Windows 10 is related to the Xbox Game Bar feature. After sounding out the preferences of PC gamers, Microsoft added the feature to Windows 10. Gamers use it to create, edit, and share gameplay sequences with others. This feature is built into the Xbox Game Bar app on Windows and automatically works in the background, no matter which game is being played. The best thing about it is that you don’t need to pause your game and activate a key combination to start recording your game session. Just pressing Windows Key+Alt+R will make Game DVR automatically start recording your gameplay. Pressing the same combination again will stop the recording. However, this feature has been known to work better on PCs with better specs. Game Bar uses a lot of system resources and causes high CPU usage, so it can cause some lag while it’s working in the background. Generally, a lot of gamers treated it as a necessary evil and didn’t mind too much.
Helpful Read: Winning Strategies: How to Optimize Your PC for High-Performance Gaming
Instead, what has got them annoyed is the “Can’t record right now, try again later” pop-up, which Game Bar often displays over a running game. Apart from being an annoying distraction, this notification also stops gamers from using the background recording feature. The unusual thing about this bug is that it seems to be related to a specific game. Most users who encountered it reported that it happened while playing Minecraft
.
Also Read: How to Fix the Minecraft Connection Timed Out Error
Still, the “ Can’t record right now” Windows 10 issue is considered really irritating since it means gamers will miss the opportunity to record rare gaming sequences.
How to Remove the “Can’t Record Right Now, Try Again Later” Error Message on Windows 10
The Xbox Game Bar “We can’t record right now, try again later” problem can be the result of various misconfigurations and system glitches. The cause of the error message on one computer will likely be different on another PC. That said, issues known to trigger the error include:
- Problematic shortcuts
- Background recording
- Captures location
- Corrupt Microsoft Store cache
- Outdated Microsoft Store
- Xbox Game Bar malfunction
- Broken temporary and junk files
- Malware
- Game Files
The methods that follow will show you how to get rid of these underlying problems to eliminate the ” Xbox Game Bar not recording ” issue.
Use Another Shortcut for Recording
For some reason, using the default Windows+Alt+R keyboard shortcut to start and stop game recordings often results in the “ Can’t record right now, try again later” Windows 10 issue . Apart from being an inconvenience, this bug can also slow down gameplay. Some users reported that changing the shortcut stopped the error message from showing up again. If it can work for them, it can work for you as well. Here’s how to change the shortcut:
- Press the
Windows Logo key, typesettings, and open the Settings app. - Click Gaming after the Settings window appears.

- Make sure you’re on the Xbox Game Bar page when the Gaming window opens.
- Scroll down to the Keyboard Shortcuts section and tap the box beside Your shortcut under the control you want to change to activate the cursor.
- Once the cursor is activated, tap the combination you want to use. You have to simultaneously press your keyboard combo just like you would in-game. For example,
Ctrl + H.
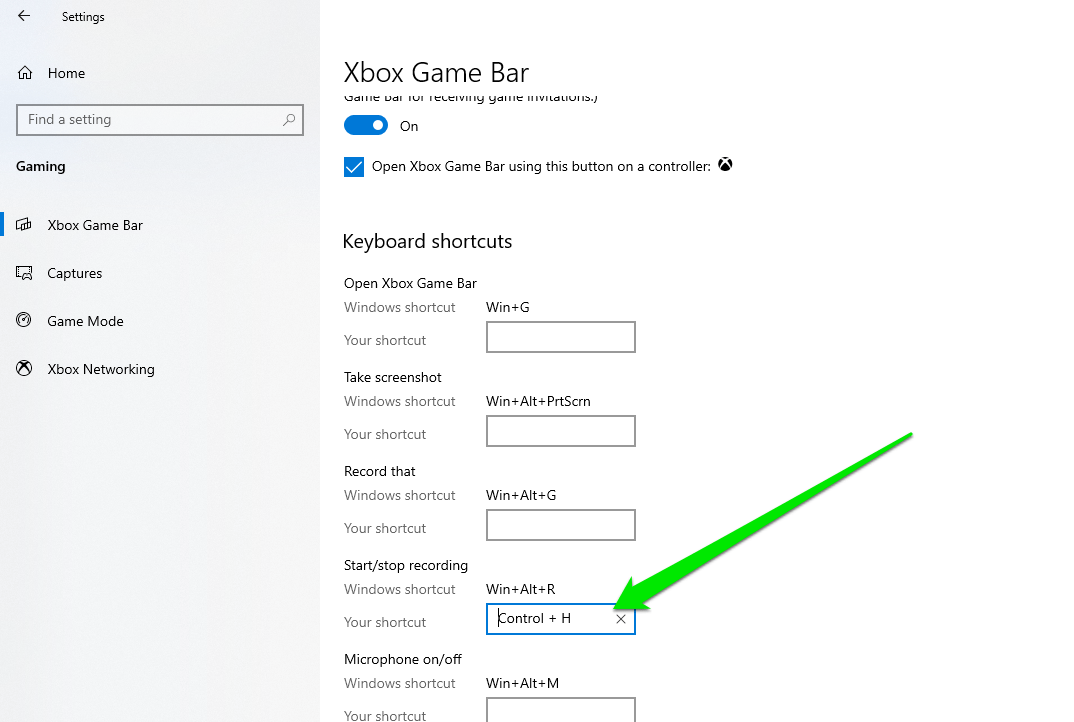
Next time you’re playing a game and want to record a sequence, use the shortcut you’ve created rather than the default shortcut. This fix should stop the ” Xbox Game Bar shortcut not working ” error from showing up again.
Turn off Background Recording
The background recording feature is part of Game Bar’s Capture settings and acts as a rewind assistant. It allows you to capture what happened in the game a few moments ago. If the feature is turned on, it temporarily saves gameplay in the system memory so that you can save already-played sequences that are worth keeping. Background recording can take up a chunk of your system resources and affect your gameplay. It could also impact how you record live game footage. So, turn it off and see if the problem is resolved. Here’s how to do that:
- Press the
Windows Logo key, typesettings, and open the Settings app. - Click Gaming after the Settings window appears.
- Go to the left sidebar and select Captures under Gaming.
- Toggle off the switch under Background Recording.
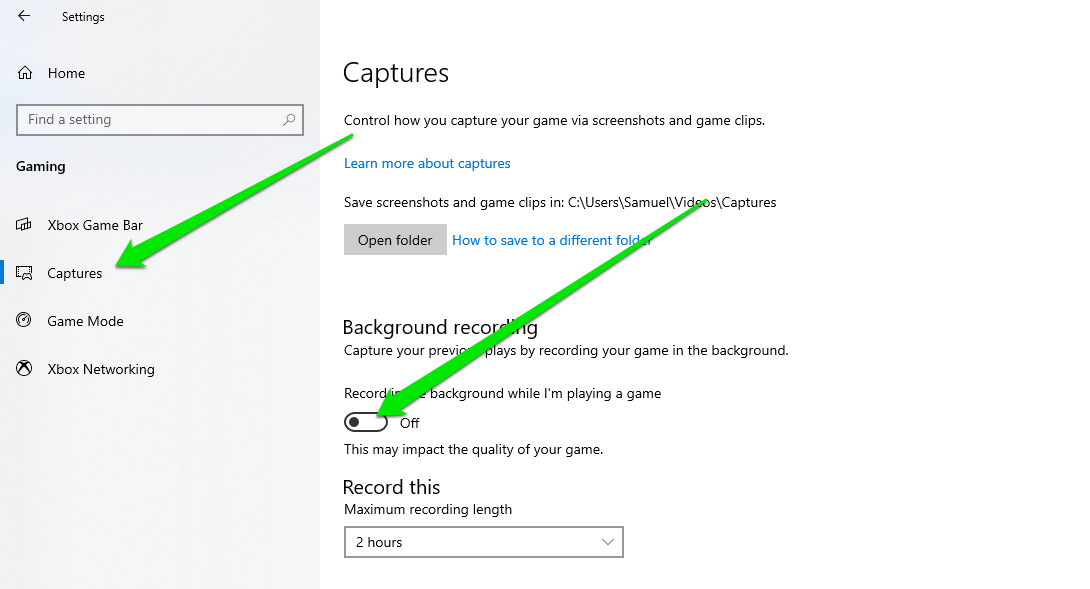
Note
Consider reducing the video frame rate to 30 fps and check if that resolves the issue.
Erase the Microsoft Store Cache
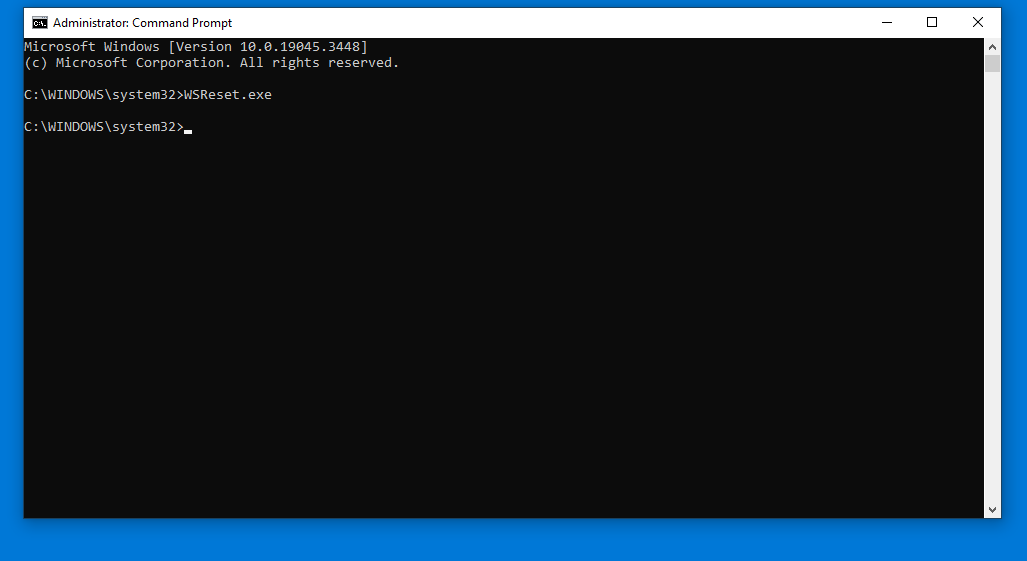
Several default programs like the Windows Update, Microsoft Store (formerly Windows Store), and Xbox Game Bar are somehow connected together on the operating system. Some of them share dependencies and component services. Hence, a corruption or issue in one can affect other programs. Take the Microsoft Store and Xbox Game Bar, for example. Its issues can affect your PC’s Xbox Game Bar, causing the ” Xbox won’t record ” problem to mess up your gaming experience. Resetting the Microsoft Store application can fix this error. When you reset the app, Windows will reinstall its files and preferences, clearing any error that may be affecting the dependencies it shares with Xbox Game Bar. Follow these steps:
- Press the
Windows Keyand typeCMD. - Select the Run as Administrator option for Command Prompt in the result pane.
- Click Yes in the UAC pop-up.
- After the elevated CMD window opens, type the following command and hit the
Enter key:
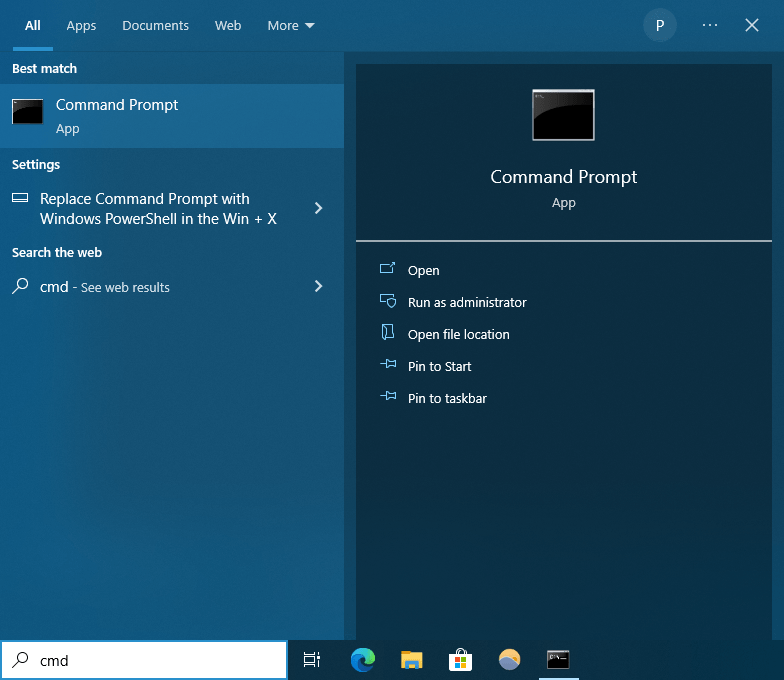
WSReset.exe
Related: Windows Command Prompt: 28 Most Useful CMD Commands [with Examples]
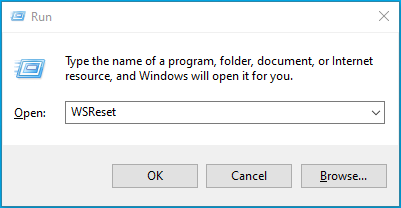
Instead of opening an elevated Command Prompt window, you can use the Run tool to reset the Microsoft Store:
- Press
Windows Key+Ron your keyboard. - Type
WSReset.exeinside the Run dialog box, then click OK.
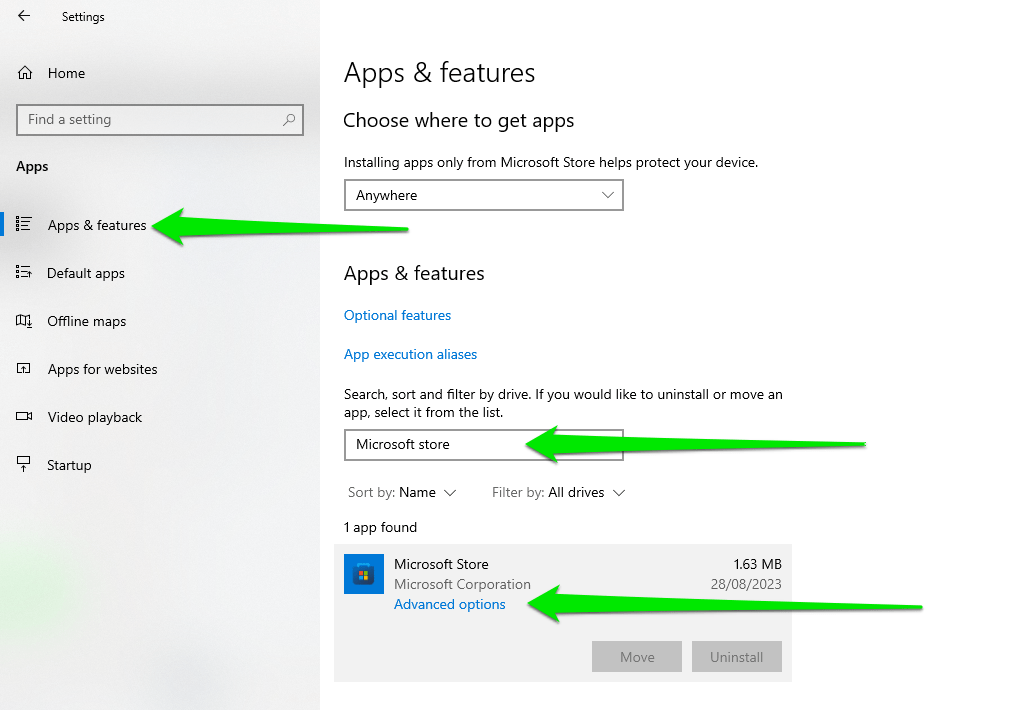
A Command Prompt window will open and carry out the reset operation. The Microsoft Store will open soon after. A third method involves clearing the store from the Settings app. This method performs a more thorough reset operation, as it practically reinstalls the entire application. Follow these steps:
- Right-click the Start button and select Settings.
- Navigate to Apps.
- Go to the search box and type
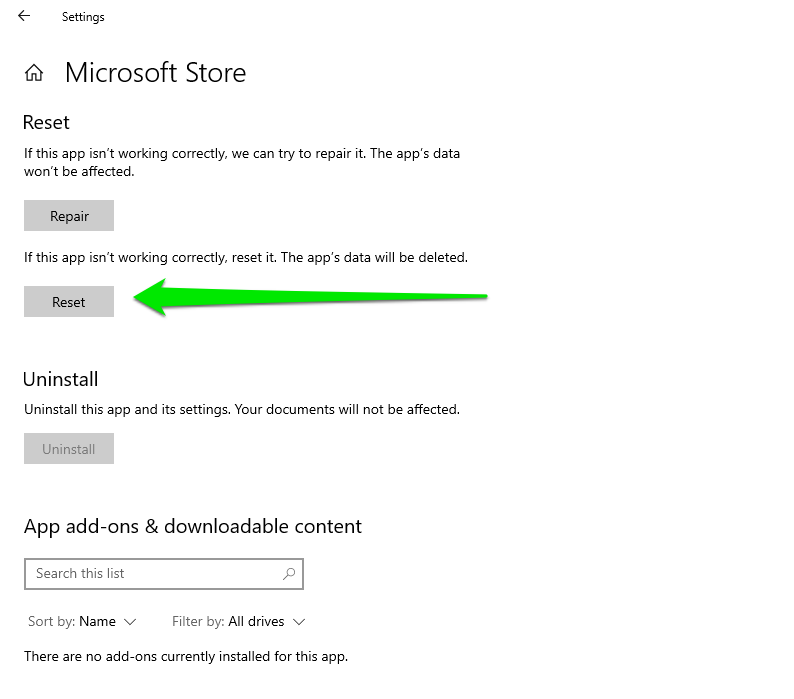
Microsoft Store. - Once the app shows up in the results, click it once and select the Advanced button.
- Scroll down to the Reset section and click the Reset button.
- Click the Reset button again in the confirmation pop-up.
- Note that you will have to sign in again and apply your preferences.

You can now open your game and check if it works.
Run the Windows Apps Troubleshooter
Running the Windows app Troubleshooter is another possible fix. It’s a built-in tool designed to diagnose and resolve common problems that affect applications installed from the Microsoft Store. It can identify issues related to software conflicts and malfunctioning services that may be causing the “ Game DVR not working ” Windows 10 problem. It then goes on to automatically fix these problems or provide you with instructions on how to resolve them manually. Follow these steps to run the troubleshooter:
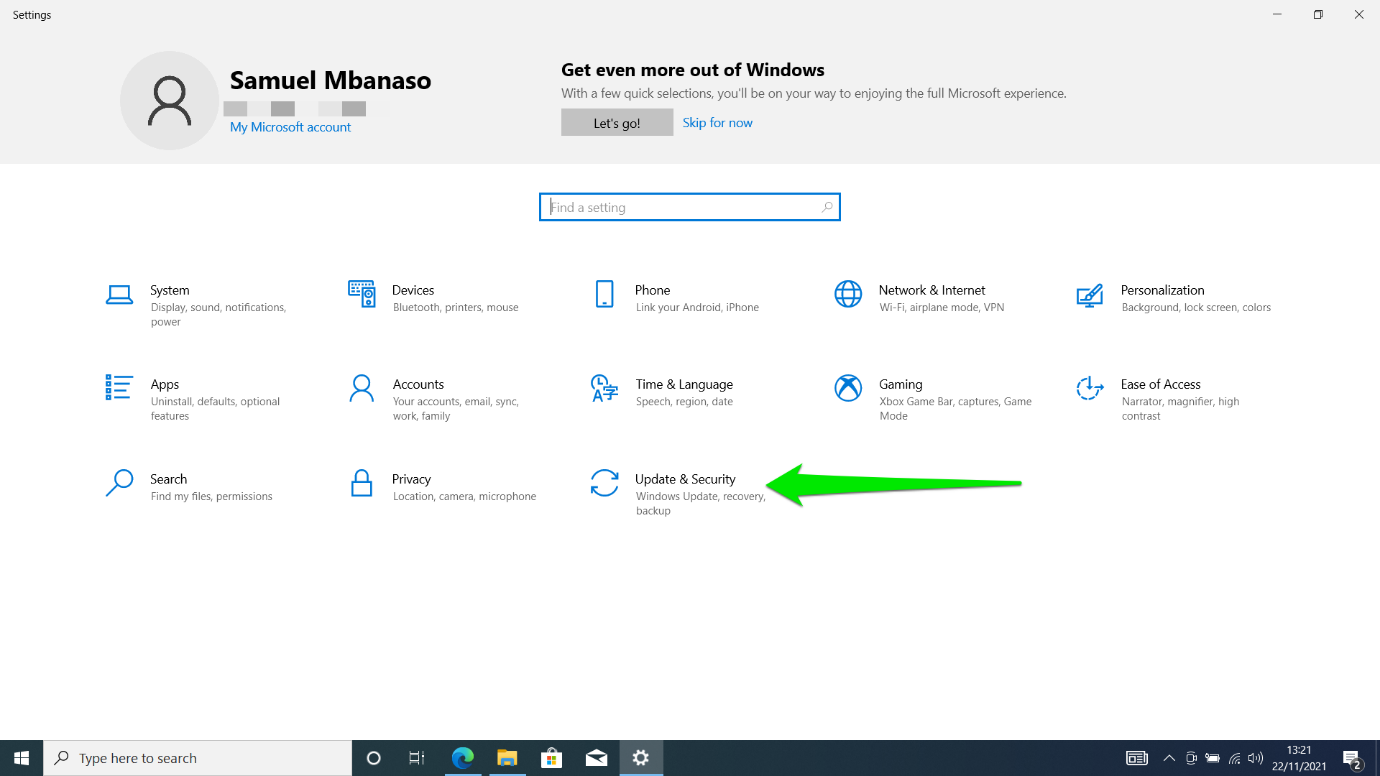
- Open the Settings application by holding down the
Windows key + Ion the keyboard. - Select Update & Security after Settings appears.
- Click the Troubleshoot entry in the left menu.
- Go to the Troubleshoot page and select Additional Troubleshooters.
- The tool will now check for issues with every app installed from the store, including the Xbox App, and attempt to fix them.
- If it suggests any fix, follow the instructions.

Update the Microsoft Store
Updating the Microsoft Store allows you to get the latest support features for every application downloaded through the platform. It will be able to track app updates better, detect faults, and implement hotfixes. By default, the store is configured to update apps automatically. That way, it receives updates in the background without you knowing. That said, there’s a switch that can turn it off. So, follow these steps to ensure that Automatic Updates is turned on:
- Launch the Start menu and type
Store. - Click Microsoft Store on the results page.
- After the store opens, click the profile icon and select Settings.
- Next, go to the right side of App Updates and toggle the switch on.
Change the Captures Folder
The recording feature may not be working due to its save folder’s current location. You may have altered the Capture folder’s path because you want to save your game footage directly to an external drive. If the drive isn’t connected or its drive letter is changed, you will continue dealing with the ” Game DVR not working” Windows 10 problem. It’s also possible that the current location is on a drive with low available storage.
Also Read: How to Get More Disk Space on a PC or Laptop
So, change the path and check if that resolves the problem. Follow these steps:
- Press the
Windows Logo key, typesettings, and open the Settings app. - Click Gaming after the Settings window appears.
- Go to the left sidebar and select Captures under Gaming.
- Right under Captures, click the Open Folder button.
- Now, return to the folder where the Captures Folder is located. Select the folder and press
Win+X. - Go to the folder where you want to save your recordings and press
Win+Vto move the Captures folder there.
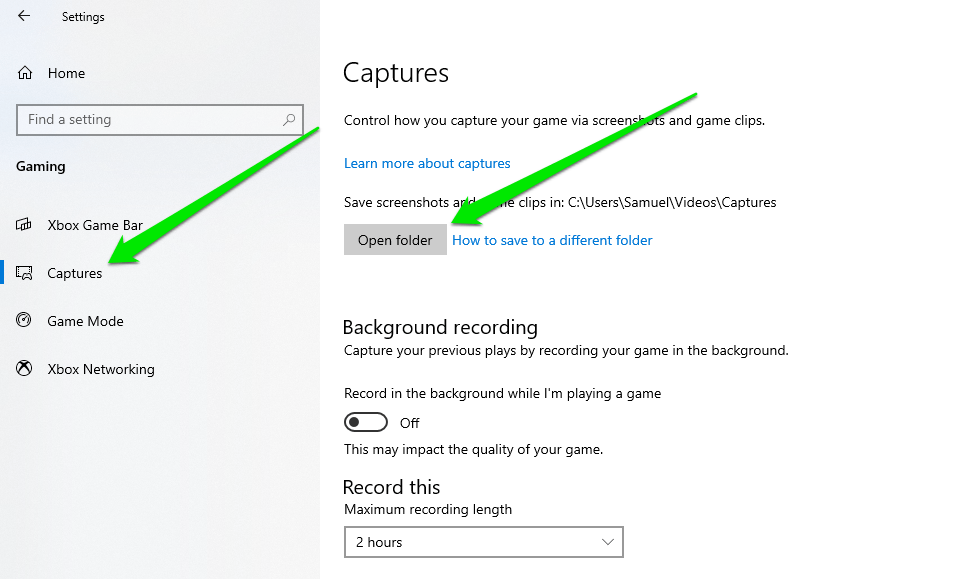
Now check if the issue has been resolved.
Fix Windows Update and Restore Your PC
Windows Updates are important to Game Bar. Microsoft deploys improvements and fixes to components that support the application through updates. Sometimes, those updates can also break Xbox Game Bar. So, if you started noticing the problem right after you updated Windows, there’s a chance that the update is responsible. While uninstalling the update can fix the issue, you should first confirm that there are no pending updates. That’s because Microsoft may have released another update that fixes the issue since you installed the defective update. So, type updates in the Start menu and click Check for Updates to open the Windows Update client. Allow it to install every update that is available, including the optional ones, and then check for the problem again.
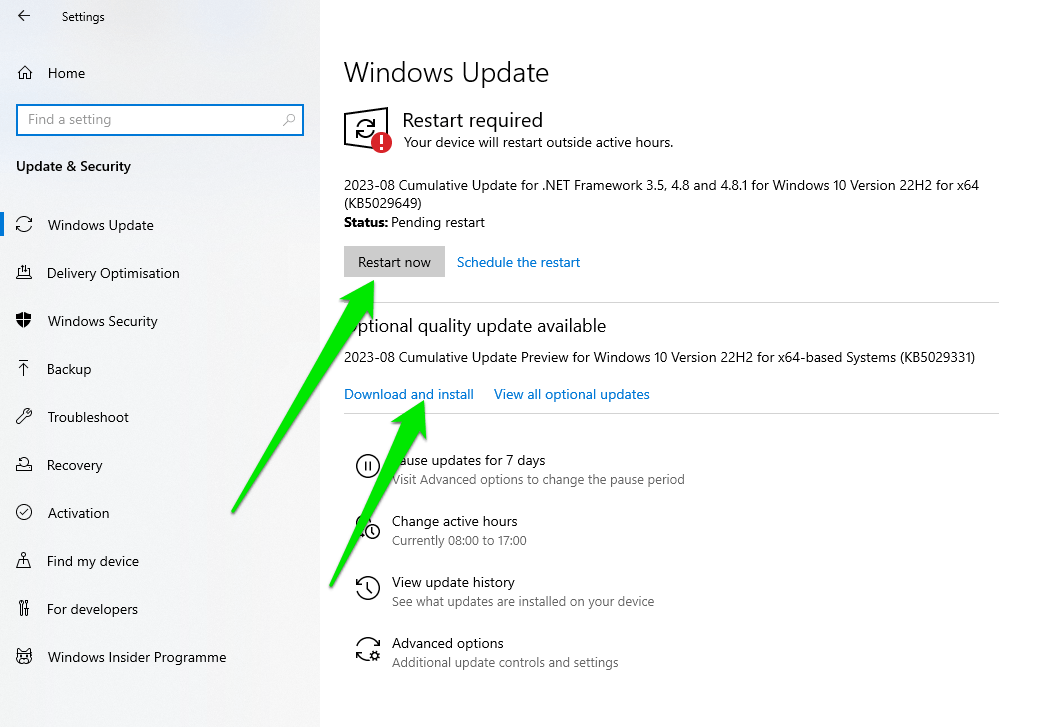
Read More: Ultimate Guide: How to Manually Check and Install Windows Updates
If your PC is up to date, uninstall the previous update and wait till Microsoft fixes the problem. Follow these steps:
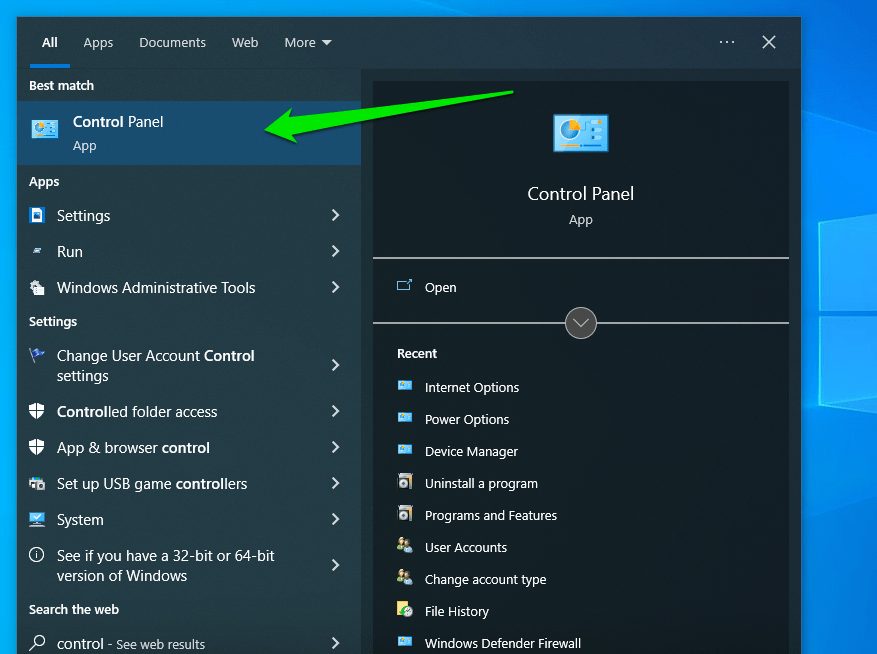
- Launch the Control Panel by typing
controlin the Start menu and clicking the first option.
- After the Control Panel window opens, click Uninstall a Program under Programs.
- Go to the left pane and select View Installed Updates.
- Now, click the last update you installed (you will see the dates on the right) and select Uninstall.

Open your game and try recording.
Reinstall the Xbox App and Xbox Game Bar
If the “Can’t record right now, try again later” error continues to affect your in-game recording, perhaps reinstalling the Xbox app could fix the issue.
You can install the Xbox app through the Microsoft Store and uninstall it whenever you wish through the Settings app. On the other hand, you can only reset Xbox Game Bar through the Settings app. That’s because the latter is a native Windows feature pre-installed alongside the operating system, just like the Microsoft Store.
However, you can remove the app via the Windows PowerShell.
It will be a good idea to reinstall both applications as Microsoft designed them to work together.
So, if you have the Xbox app, follow these steps to remove it:
- Launch the Settings app by right-clicking the Start icon and selecting Settings in the hidden menu.
- Click Apps.
- Type
Xboxin the search box under Apps and Features. - Now, click the Xbox app and select Uninstall.
- Allow Windows to remove the program.
You can now return to the Microsoft Store to reinstall the application. As for Xbox Game Bar, you can reset the app using the Settings app or completely remove it using a command in Windows PowerShell
.
First, let’s show you how to reset the application.
Resetting the Xbox app through the Settings application is just like reinstalling it. When you choose the reset option, windows will completely reinstall the program, removing your preferences and erasing any file it created.
Follow these steps:
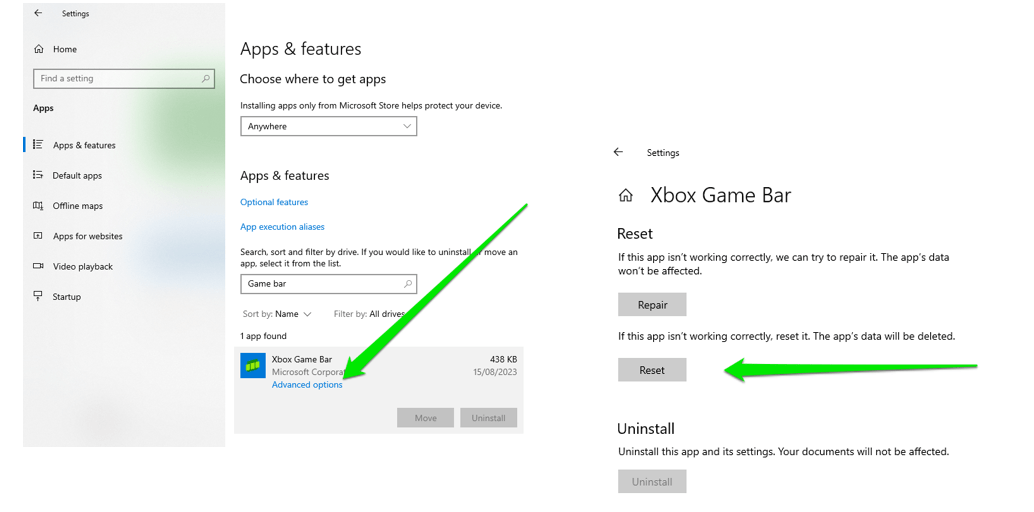
- Simultaneously tap the
Windows +Ikeyboard buttons. - Click the Apps entry after the Settings homepage shows up.
- Use the search box under Apps & Features to find the Xbox Game Bar app.
- Click the app and select Advanced Options.
- Scroll through the page that opens to the Reset section and click the Reset button.
- Click the Reset button again and allow Windows to reinstall the app.
Launch your game and press the Game Bar shortcut to start recording to confirm whether the “Can’t record right now, try again later” notification still appears. If the issue persists, use the Windows PowerShell command to completely remove the app, then reinstall it from the Microsoft Store. Follow these steps:
- Simultaneously press the
Windows Logo + Xkeys to bring up the Power User Windows menu. - Select Windows PowerShell (Admin) to launch PowerShell with elevated privileges. If PowerShell isn’t there, search for it in the Start menu and select Run as Administrator.
- Copy the command below and paste it into the elevated PowerShell window. After doing that, press the
Enterkey:

get-appxpackage *Microsoft.XboxGamingOverlay* | remove-appxpackage
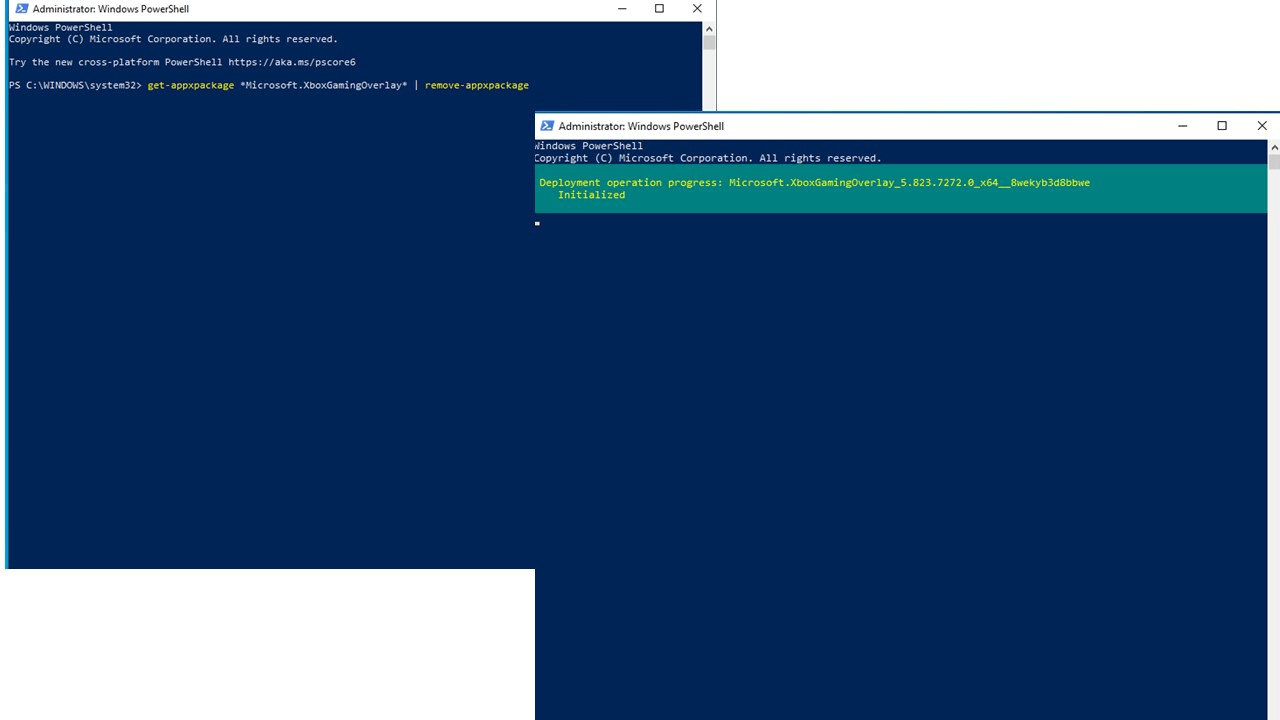
Xbox Game Bar has been removed from your computer. You can verify this by going into Programs & Features in the Settings app to look for it.
After you uninstall Xbox Game Bar, Windows 10 will remove all its files and settings. Now, open the Microsoft Store application and reinstall it.
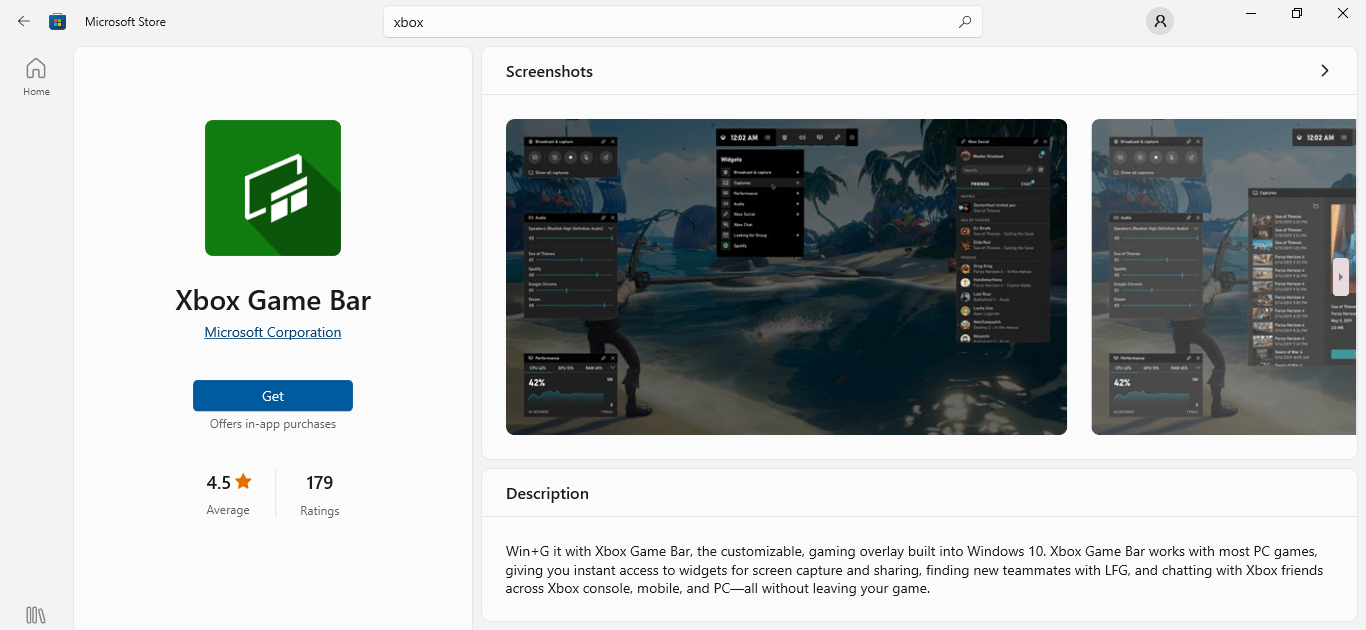
You can also enter another command in PowerShell to reinstall the app. Here’s how:
- Launch the elevated Windows PowerShell.
- Type or copy and paste the following command and press
Enter:
Get-AppXPackage *Microsoft.XboxGamingOverlay* -AllUsers | Foreach {Add-AppxPackage -DisableDevelopmentMode -Register "$($_.InstallLocation)\AppXManifest.xml"}
Launch your game — whether Minecraft or something else. The error will likely be gone.
Remove Temporary Files
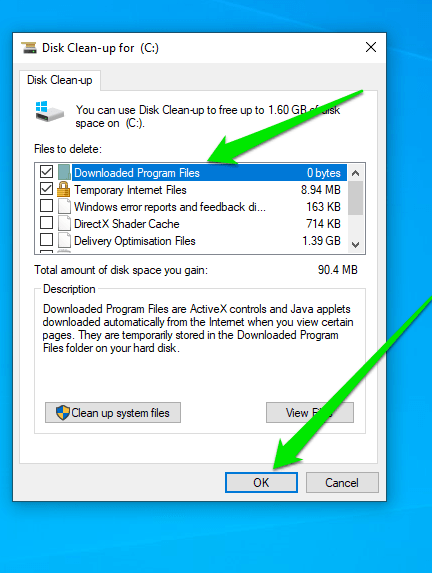
Third-party applications, especially web browsers and games, and Windows programs and services create temporary files that they use for a short while. Most of these files are not discarded after and tend to occupy a lot of storage. Apart from occupying space, they can become corrupt and cause all sorts of problems. The “Can’t record right now” error can also be the result of too many or corrupt temporary files. Try clearing them and check if that helps. There are different ways to clear temporary files. You can use the Disk Cleanup tool, the Settings app, or a specialized third-party tool. Let’s start with the Disk Cleanup Tool:
- Type
Clean-upin the Start menu and click Disk Clean-Up in the search result. - Choose the drive where the temporary files are located once the Drive Selection page opens and click OK.
- The tool will now calculate and compile the temporary files on the drive and open the full Disk Cleanup dialog.
- You’ll see different categories of temporary files under Files to Delete. Select the type of files you want to remove and click OK.
- Return to the dialog and click the Clean Up System Files to find and delete temporary files created by Windows applications.
- Run your game and try running the Xbox game bar to check for the problem.

Read More: How to Free Up Space on PC With Windows Disk Cleanup
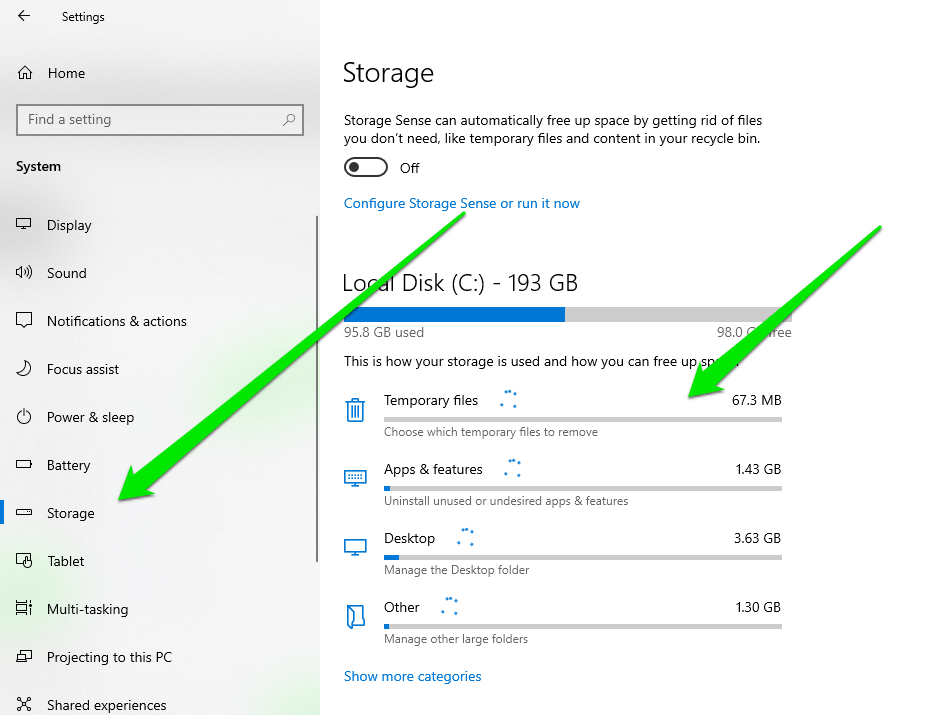
Follow these steps to use the Settings app:
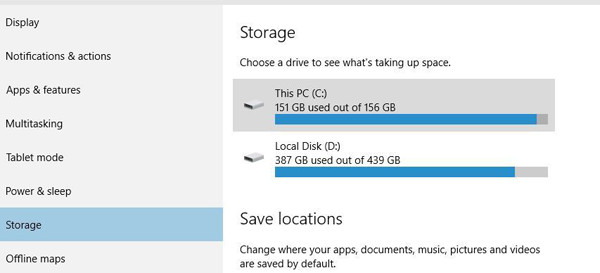
- Launch the Settings application and select System from the first screen.
- Go to the left menu of the System page and click Storage.
- The system will now calculate different file types and show you how much disk space is taken up by temporary files.
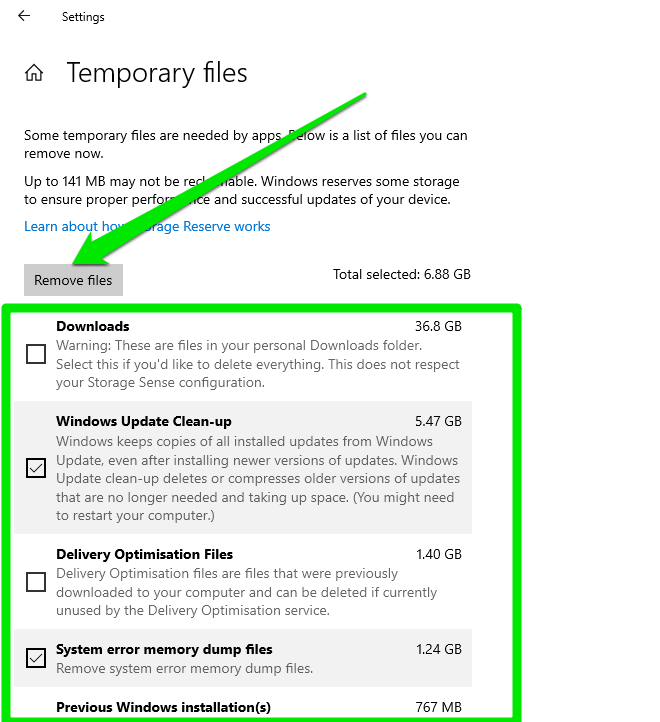
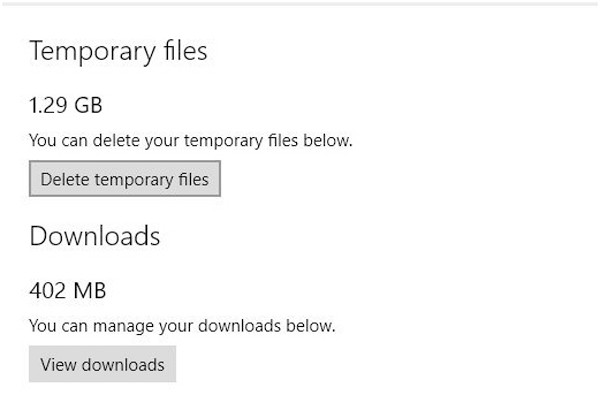
- Click Temporary Files and select the types of files you want to remove.
- Click the Remove files button.
Using a Specialized Third-Party ToolYou can also use Auslogics BoostSpeed to make sure your CPU never has to deal with the burden of temporary files. The tool will also make sure these files never take up too much space. It can automatically delete them when they’re no longer in use.
Download Auslogics BoostSpeed
Your one-stop PC maintenance and optimization tool, this program will clean, speed up, repair and tweak your system to ensure maximum speed and efficiency.
The good thing is that the program offers other system optimization tools that can help you do things like maintain your system’s health, delete duplicate files, and protect your hard drive from spyware.
Repair Your Game Files or Reinstall Your Game
If you’re only experiencing the problem within one game, then its files may be the problem. Minecraft seems to be the main problem for many users. However, others have complained about experiencing it exclusively on other games. The “Xbox Game Bar not recording” problem is one of the symptoms of corrupt or missing game files. You can repair those files using your game launcher or completely reinstall the game.
Also Read: [FIXED] New Games Don’t Start or Are Not Working on Windows 10
Conclusion
You should now be able to record any game footage without problems. Remember to always keep your PC up to date and run the required maintenance. You can rely on Auslogics BoostSpeed since regularly cleaning up junk files and temporary files can be quite stressful.
FAQ
You cannot leisurely uninstall the Xbox Game Bar application because it is a native Windows program. That is why its uninstall button is always grayed out in the Apps & Features window. The most you can do through the Settings application is reset it. That said, you can remove it through the elevated Windows PowerShell window.
While your game is running, press the Xbox Game Bar shortcut for the record command. The default shortcut is Win+Alt+R. But you can always go to the Settings app to create custom shortcuts for Game Bar commands.
Game DVR is an Xbox feature that allows gamers to take screenshots, record game footage, edit media, and share content. It is now known as Xbox Game Bar on Windows and is available as a separate program.
Turn on Minecraft and tap the Game Bar shortcut during the gameplay session that you want to record.
The problem is caused by different system and software glitches, such as corrupt Game Bar files, outdated Windows components, Captures folder location, and problematic temporary files.
To enable recording, you must turn on Game Bar. Go to the Settings app, click Gaming, and then turn on the switch under Xbox Game Bar.
Xbox Game Bar helps gamers record gameplay, connect with other players, and stream it online. This is why gamers face issues when the Game Bar is buggy or stops recording. Luckily, there are different ways to troubleshoot the Xbox Game Bar’s inability to record, and we will discuss them in this post.
Query – I used the Xbox Game Bar to record the game, and I was pretty happy with it until today when it just stopped recording. I tried freeing up space, updating Windows and the Game Bar App, and using Alt+ R + Windows key and Windows + G to record. Also, I have reset and repaired the app, but nothing is working. I have even watched YouTube videos but have had no luck; it would be great if someone could help me.
Resolution – We understand finding Game Bar is refusing to open can be frustrating. However, as you mentioned, you have already tried some fixes, but nothing has worked. We suggest you close the game, relaunch it, and try to record it. To do so, follow these steps:
- Press Ctrl + Shift + Esc to open the Task Manager.
- Click the Processes tab > look for Broadcast bar sever (bcastdvr.exe) process.
- Select it > End Task.
- Restart your game and try to use Game Bar to record it.
In addition to this, ensure that you set up the Game Bar correctly. However, if nothing works, we have mentioned several other ways below to fix the Xbox game bar not working. Please follow them and see if it works.
Why Does The Xbox Game Bar Video Capture Not Working Error Occur?

As Game Bar’s new addition to Windows 10/11 pin, pinpointing the exact reason is difficult. However, the error usually appears due to incorrect Game Bar settings, full-screen recording, registry settings, and:
- The Xbox game bar Settings might have been misconfigured.
- There might be a conflict within the registry Settings.
- Corrupt or missing system files related to the Xbox app.
- Outdated drivers.
- Incompatible hardware
- Unsupported games.
- The shortcut key Windows + G is changed or is not working.
- Game Bar does not support recording games in full screen.
- Third-party software running in the background or Windows updates might have disabled the game bar.
Note : The steps will be same for both Windows 10 and Windows 11, only some settings can be different
There are a few expert-recommended troubleshooting steps that can help fix Xbox game bar video capture not working on Windows. Let’s implement them to fix the issue.
- Before trying the fixes, ensure you are running the latest version of Windows and all Windows updates are installed.
- The game is not running in full-screen mode, as the Game Bar won’t open. However, press the Win + Alt + R keys if you want to record in full screen.
- The system meets hardware requirements. This means the PC video card must support:
- Intel Quick Sync H.264 or later
- NVIDIA NVENC
- AMD VCE
- You may need to download additional software if you are a Windows N edition user. To download it, click – Media Feature Pack list for Windows N editions.
Method 1: Enable Xbox Game Bar
- Press Windows + I to open Windows settings.
- On Windows 11, in the left pane, you will find the Gaming option.
- Click on it and go to Xbox Game Bar settings.
- Windows 11 users can see the “Open Xbox Game Bar using this button on a controller” option. Enable it by sliding the toggle bar to the right.

- Now, use the Windows + G shortcut key or the highlighted button on the Xbox controller to bring up the Game Bar and record games.

Method 2 – Enable Gaming Captures
If gaming capture is disabled, then you will not be able to record games. Hence, the first step is to ensure that the feature is enabled. To do so, follow these steps:
1. Press Windows + I to open Windows settings.
2. Click Gaming > Captures > Look for the Record what happened option and enable it. You will find it under Recording Preferences.

Method 3: Update Windows and Game Bar
If your system meets minimum hardware requirements for Game Bar and you still face Game Bar greyed recording problem, update Windows and Game Bar and ensure that the graphics driver is up to date.
Read the post to learn how to update graphics drivers.
To check for Windows updates, press Windows + I > Windows Update > Check for updates.
If an update is available, it will be automatically downloaded.

You will get the Download and Install button. Click on it and follow the on-screen instructions to update Windows.
Method 4 – Verify The Xbox App Settings
One of the main causes of the problems with Game Bar is a change in the Xbox app’s settings. Let’s check and make the required changes to the Xbox app settings.
Step 1: Launch the Xbox app and click on the menu on the left to open Settings.
Step 2: Click on the Game DVR tab.

Step 3: Locate Visit Windows Settings to adjust Game DVR settings and click on it.
Step 4: Next, select the Game bar and ensure the options to record games and take screenshots are enabled.
Step 5: Check the box labeled Open Game Bar using this button on a controller.
Read Also: How to Take Scrolling Screenshot in Windows 11, 10
Method 5 – Check Background Apps and Permissions
When the settings are misconfigured, or their access is restricted, encountering Xbox Game Bar can’t record is common. To fix it, run Xbox Game Bar as an admin or check for background running applications that might interfere.
To close unnecessary apps, press Ctrl + Shift + Esc, look for the processes running, and close the ones that are not required.

Next, check for Camera and Microphone permission.
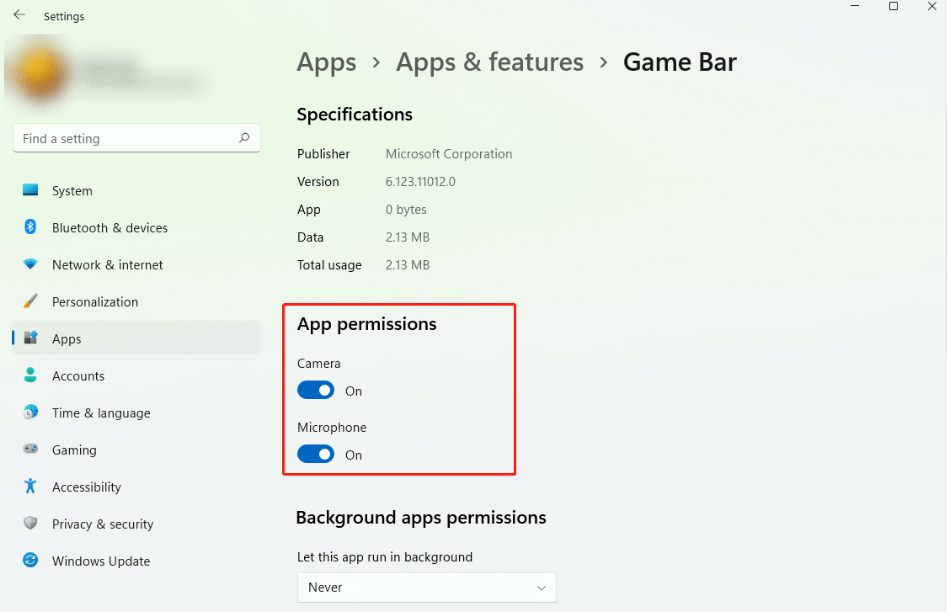
Go to Windows Settings > Apps > Apps & features > Game Bar > App permissions.
Method 6: Make Changes In The Windows Registry
The next method to fix the Xbox game bar screen recording not working is to make some changes in the Windows Registry. Make sure to follow every step as mentioned below:
Step 1: Press Win + R to open the RUN box.
Step 2: Type “regedit” and click on the OK button.
Step 3: Copy the following path and paste it into the address bar of your Windows Registry.
HKEY_CURRENT_USER\SOFTWARE\Microsoft\Windows\CurrentVersion\GameDVR
Step 4: Locate AppCaptureEnabled DWORD and right-click on it to select Modify. Change the value to “0”.

Step 5: Copy the following path and paste it into the Xbox app.
HKEY_CURRENT_USER\System\GameConfigStore

Step 6: Locate the registry key GameDVR_Enabled and right-click on it to choose Modify. Change the value to “1”.
Step 7: Exit the Registry Editor and restart your computer.
Method 7: Check Game Bar Storage
If the storage space to save the recording is insufficient, where will the recording be saved? Go to the default address where Game Bar saved recordings C:\Users\user name\Videos\Captures and see if there is sufficient space available.
Method 8: Repair the ieframe.dll file
1. Run Command Prompt as an administrator.
2. Type the following commands. Ensure you press Enter after entering each command:
sfc /scanfile=c:\windows\system32\ieframe.dll

sfc /verifyfile=c:\windows\system32\ieframe.dll

assoc

sfc /scannow
3. Restart your PC, and the Xbox Game Bar should work now.
Method 9: Use Local Group Policy Editor to Enable the Xbox Game Bar
1. Press Win + R to open the Run window > type gpedit.msc and press Enter.
2. Go to Local Computer Policy > Administrative Templates > Windows Components > Windows Game Recording and Broadcasting.
3. Double-click on Windows Game Recording and Broadcasting in the right pane and select Enabled.
4. Click Apply > OK to save changes.
Read Also: How to Record Xbox One Gameplay for YouTube
Method 10: Repair And Reset The Xbox Game Bar App
Moving forward, to fix the Xbox Game Bar not working, we suggest you first repair and then reset the Xbox Game Bar app. Here is how to do just that:
Step 1: Press Windows + I to open Windows Settings, then click on the Apps tab in the left panel.
Step 2: Next, click on Installed Apps in the right section.

Step 3: Your screen will be populated with a list of apps installed on your PC. Type Xbox in the search bar at the top and locate the Xbox app among the search results.
Step 4: Click on the three dots next to the Xbox app to reveal the context menu and choose Advanced Options.

Step 5: Scroll down until you reach the reset section. Click on the Repair button first and check if the issue has been resolved.

Step 6: If not, click the Reset button. The Xbox app will be restored to its default settings, causing you to lose all your customized settings.
Method 11: Reinstall The Xbox App
The next step in fixing the game bar screen recorder’s failure is reinstalling the Xbox app using the Powershell tool.
Step 1: Press Win + X to open the Power Menu.
Step 2: Select Terminal (admin), and the PowerShell window will open in admin mode.
Step 3: Copy and paste the following command and hit Enter to execute it.
get-appxpackage -allusers *xboxapp* | Remove-AppxPackage

Step 4: The Xbox app is now completely uninstalled from your PC.
Step 5: Press Win + S to open the Windows Search box and type Microsoft Store.
Step 6: Click on the relevant result under best match to launch the Microsoft Store.
Step 7: Type Xbox in the search bar on the very top to find the Xbox app and click on the install button.
Step 8: Follow the onscreen instructions to install the Xbox app on your PC.
Writer’s Tip – If Nothing Works, Use An Alternative App to Record Game
If the Xbox game bar screen recording is still not working, we recommend using an alternative screen recorder, Advanced Screen Recorder, to record your gaming sessions and capture screenshots. We have been using this one of the best screen recorders for Windows for quite some time now and find it to be a fantastic tool. You can judge all about the tool just by looking at the features it offers to its users.
| Record in 4k resolution in .mp4, flv, and other formats. | Record full screen, selected region, or active window. | Record with or without audio. |
| Create and add a personalized watermark. | Reform footage from the webcam. | Capture a full or partial screenshot, including scrolling ones. |
| Use a microphone to record the voiceover. | Auto Stop & Auto Split recording based on time and size | Broadcast your captures to a live audience over YouTube and Facebook. |
| Automatically Schedule Recording to capture webinars, online classes, and more. | Upload your recorded content to Dropbox, Google Drive, and One Drive. | Does not consume many resources as it is a lightweight tool. |
| Denoise your recorded video to remove unwanted sounds. | Compress recorded video to reduce size. | Annotate videos while recording. |
Here are the steps to use this tool:
Step 1: Download and install Advanced Screen Recorder using the below button.
Step 2: Launch the software and click on the mode you wish to record.
Step 3: Click on the Record button.

Step 4: You will be able to see an audio customization window. Choose the relevant options and click on the Start Recording button.
Step 5: A three-second timer will be displayed, after which your screen capture will begin. The floating bar with a pen icon can annotate text while recording.
Step 6: The relevant buttons on the small menu bar allow you to pause and stop recording anytime. Whenever necessary, click the camera icon on the bar to take screenshots.
Step 7: The recording will be saved automatically after the user hits the red square (Stop) button. You can navigate to the recording section to view all the recorded content.

Did You Fix the Xbox Game Bar Not Working On Windows?
The Xbox game bar screen recording not working on Windows can be very frustrating, especially for gamers who regularly record gaming sessions to create content for their YouTube channels. We hope the above fixes will help you resolve this issue. As a quick fix, we recommend using Advanced Screen Recorder, which offers more features than the Xbox Game Bar. Moreover, we suggest re-registering the Xbox Game Bar and reverting to Windows Update if the issue starts after updating Windows.
Note – The above fixes will help resolve –
- The Xbox Game Bar shortcut is not working
- The Xbox Game Bar keeps turning off.
- Game DVR stopped working for Windows 10 users.
- Game Bar is unable to open up on Steam.
- Game Bar is not recording anything and is not working on Windows 10/11.
- The Xbox Game Bar is not opening with the controller and working properly.
- The recording isn’t working Error: 2147942523
Q. How do I restore my Xbox game bar?
Press the Win + G to restore the Xbox game bar after configuring all the settings and completing the above troubleshooting steps.
I am trying to record my desktop with Xbox Game Bar, but the recording is greyed out or unavailable. How can I solve the problem?
Please note that the Xbox Game Bar does not support recording on desktops or File Explorer. Therefore, you see it greyed out.
Исправлено: больше нечего записывать, играть в Windows 10.
«Нечего записывать. Сыграй еще и попробуй еще раз». всплывает в вашей Windows, когда вы записываете основные моменты Overwatch, LoL, Genshin и любого другого игрового процесса через Game Bar. Это будет очень раздражающей и разочаровывающей проблемой, когда вы погрузитесь в радость от игры. Хотя встроенная программа записи экрана в Windows 10 проста в использовании, она всегда выдает ошибки игровой панели, вызванные несколькими причинами. Таким образом, в этой статье будут представлены 5 эффективных решений, которые помогут вам исправить ошибку «Нет ничего, что нужно записать, воспроизвести еще». Более того, вы также можете узнать об окончательном методе предотвращения повторения этой проблемы, который обеспечит вам наилучшие впечатления от записи игр.
5 простых решений: больше нечего записывать
#SРешение 1. Обновите или переустановите драйверы видеокарты
Это основная проблема, которая отключает все программное обеспечение, включая Game Bar в вашей Windows. Так что вы должны проверить это в первую очередь.
Шаг 1.Нажмите кнопки «Windows + X» на клавиатуре и нажмите кнопку «Диспетчер устройств». Во всплывающем окне вы найдете приложение «Адаптеры дисплея». Затем щелкните правой кнопкой мыши «Драйверы видеокарты» в раскрывающемся меню и нажмите кнопку «Обновить драйвер».
Шаг 2.В новом окне нажмите кнопку «Автоматический поиск обновленного программного обеспечения драйвера», чтобы обновить драйвер видеокарты. Вам просто нужно следовать руководству, чтобы установить его. Затем перезапустите игровую панель, чтобы проверить, решена ли проблема «Больше нечего записывать игру».
#Solution 2: запускайте игровой процесс в полноэкранном режиме
Если игровой процесс не распознается игровой панелью, также появится сообщение «Больше нечего записывать». Прямое решение — установить полноэкранный режим в вашем игровом процессе. Если игровой процесс, который вы хотите записать, поддерживает полноэкранный режим, вы можете просто нажать кнопки «Alt + Enter». Конечно, вы также можете найти настройки во внутриигровом меню.
#SSolution 3: Обеспечьте достаточно места для записи
Если для хранения записей игрового процесса недостаточно места для хранения, также появится ошибка игровой панели «Нет ничего для записи, поиграйте еще». Изучите простые шаги, чтобы очистить некоторые временные файлы.
Шаг 1.Нажмите кнопку «Windows» и выберите приложение «Настройки». Затем перейдите в Система меню и выберите Место хранения вариант. После этого нажмите кнопку «Этот компьютер» и выберите Временные файлы вариант.
Шаг 2.Нажмите кнопку «Удалить временные файлы», и процесс завершится через несколько минут. Затем вам необходимо перезагрузить компьютер, чтобы устранить проблему «Нечего записывать, играйте еще».
#SSolution 4: Используйте горячие клавиши для записи игрового процесса
Чтобы обеспечить распознавание игрового процесса, вы можете просто щелкнуть окно игрового процесса и использовать горячие клавиши для его записи. Вы можете нажать кнопку Windows + G, чтобы начать запись в полноэкранном режиме, или нажать кнопки «Win + Alt + R», чтобы сделать 30-секундный снимок экрана.
#SРешение 5. Воспользуйтесь средством устранения неполадок по умолчанию
Когда вы сможете найти причины, вызывающие проблему «Нет ничего, что можно было бы записать и воспроизвести», вы можете использовать средство устранения неполадок, чтобы выполнить общую проверку.
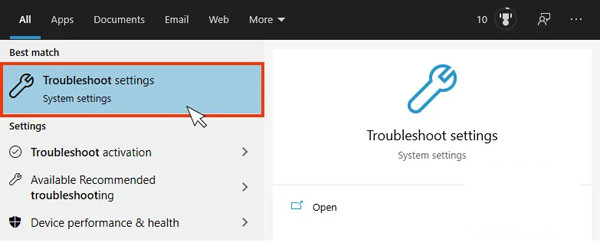
Шаг 1.Нажмите кнопки «Win + S» на клавиатуре и найдите Устранение неполадок в строке поиска. Нажмите «Настройки устранения неполадок», а затем нажмите кнопку «Дополнительное средство устранения неполадок».
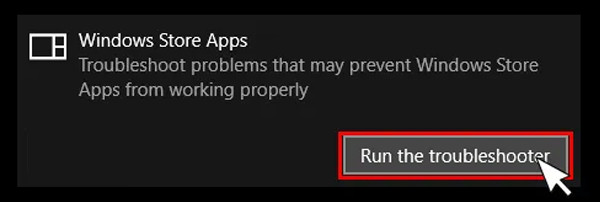
Шаг 2.В появившемся окне следует нажать кнопку «Запустить средство устранения неполадок». Затем он автоматически обнаружит проблемы и устранит их.
Выше приведены все возможные решения проблемы «Нечего больше записывать и воспроизводить». Если это все еще не работает, вы должны попробовать последний и работоспособный способ 100% в следующей части. Это также предотвратит повторение этой проблемы.
Лучший способ исправить: нечего записывать. Играйте еще немного.
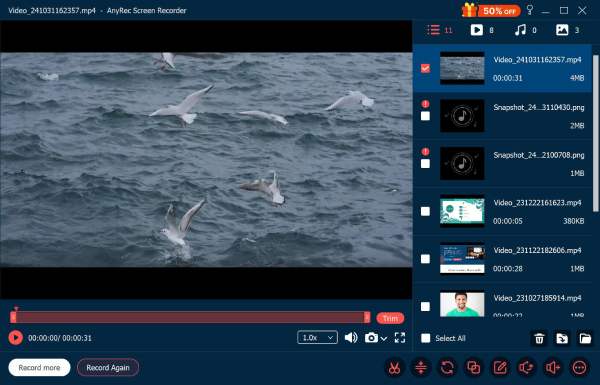
Чтобы навсегда решить проблему «Нет ничего, что можно было бы записать, поиграйте еще», вы можете положиться на профессиональный захват видео и игр — AnyRec Screen Recorder. Это универсальный экранный рекордер, который поддерживает запись видео, аудио и игрового процесса в трех различных режимах. Без сбоев или зависаний вы можете легко и плавно записывать игровой процесс на Windows/Mac.

Лучший рекордер экрана для замены игровой панели
Запишите свой экран в полноэкранном режиме, в выбранных областях или в определенном окне.
Возможность настроить формат записи, качество и частоту кадров.
Несколько дополнительных функций, таких как шумоподавление, расписание задач и т. д.
Свободно редактируйте, просматривайте и обрезайте записи перед экспортом.
Шаг 1.Запустите AnyRec Screen Recorder на вашем Windows/Mac. Затем вы можете выбрать Видеомагнитофон или спроектированный Регистратор игр в соответствии с вашими потребностями. Вы можете записать геймплей или любую другую вещь на вашем экране.
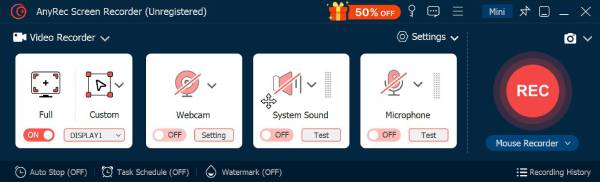
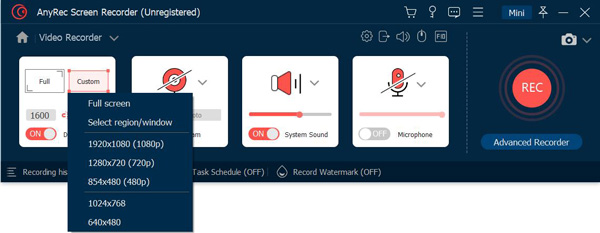
Шаг 2.Нажмите кнопку «Полный» или «Пользовательский» для выбранных регионов, чтобы захватить экран или игровой процесс так, как вам нравится. Вы также можете включить микрофон и системный звук на отдельной громкости. Затем нажмите кнопку «ЗАПИСЬ», чтобы начать запись без проблемы «Записывать больше нечего».
Шаг 3.Наконец, нажмите кнопку «Стоп» в любое время. Затем вы можете вырезать лишние части и нажать кнопку «Сохранить», чтобы экспортировать записи.
Часто задаваемые вопросы о «Нечего записывать» «Play Some More Error»
-
1.Как включить игровую панель в Windows 10?
Нажмите кнопки Win+I на клавиатуре. Затем перейдите к Настройки приложение и нажмите кнопку «Игровая панель». Затем включите кнопку под игровой панелью.
-
2.Можно ли исправить «Больше нечего записывать, поиграй», перезапустив игру?
Да, вы можете попробовать этот метод. Если ты запись геймплея Steam, вы можете попробовать снова открыть приложение Steam. И вы должны убедиться, что игровой процесс находится в полноэкранном режиме.
-
3. К какому коду ошибки относится «Нечего больше записывать и воспроизводить»?
Эта проблема относится к коду ошибки 2147942403. Вы можете напрямую найти эту ошибку в сообществе Microsoft, чтобы исправить ее.
Заключение
В этой статье представлены 6 эффективных способов решения проблемы «Нечего больше записывать, играть». Вы можете обновить диски видеокарты, обновить игровую панель и т. д. А с помощью AnyRec Screen Recorder вы рекорд фортнайт, LoL и даже Switch без каких-либо ошибок игровой панели. Добро пожаловать, чтобы связаться с нами и задать ваши вопросы.