
Если браузер Google Chrome работает с паузами и сбоями или не запускается совсем, могут появляться сообщения, описанные ниже.
- Ошибка прокси-сервера в Google Chrome:
-
err_connection_reset_chrome
-
- Веб-страница недоступна:
err_connection_closederr_connection_failed
Примечание. Если страница загружается слишком медленно или не открывается, воспользуйтесь советами по устранению неполадок.
Общие рекомендации
Закройте другие вкладки, расширения и приложения
Возможно, приложения, расширения и программы, запущенные на компьютере, используют слишком много оперативной памяти, поэтому сайт не загружается.
Чтобы освободить память:
- Закройте все вкладки кроме той, в которой вы получили сообщение об ошибке.
- Выйдите из запущенных программ и приложений.
- Остановите скачивание контента.
- Удалите ненужные расширения. Подробнее об удалении расширений…
Совет. Попробуйте обновить вкладку, на которой появилось сообщение об ошибке.
Перезапустите компьютер
Иногда веб-страницы не загружаются из-за других программ или приложений.
- Перезагрузите компьютер.
- Попробуйте загрузить страницу ещё раз.
Устранение неполадок
Откройте страницу в другом браузере
Чтобы выяснить, где возникла проблема – на веб-странице или в Chrome, попробуйте другой браузер, например Firefox или Safari.
Если все работает, попробуйте эти способы:
Если страница также не открывается в другом браузере, проблема может быть связана с сетевым подключением или самим сайтом. Об этом можно прочитать ниже.
Что делать, если Chrome не запускается
Убедитесь, что Chrome не запущен в фоновом режиме
Чтобы узнать, какие программы запущены в фоновом режиме и как принудительно закрыть Chrome, следуйте инструкциям ниже.
Windows
- Нажмите Ctrl + Alt + Delete.
- Выберите Диспетчер задач.
- На вкладке «Процессы» выберите Google Chrome или chrome.exe.
- Нажмите Завершить задачу.
macOS
- Нажмите + Option + Esc.
- Выберите Google Chrome Завершить.
Перезапустите компьютер
Ошибки в Chrome могут возникать из-за других работающих программ или процессов. Попробуйте перезапустить компьютер, чтобы решить проблему.
Переустановите Chrome
Если эти советы не помогли, удалите и снова установите Chrome. Переустановка может решить проблемы с поисковой системой, всплывающими окнами и обновлениями, а также устранить неполадки, из-за которых Chrome не открывается.
Ничего не помогло? Включите отправку отчетов о сбоях, чтобы мы могли изучить проблему. Также рекомендуем посетить справочный форум Chrome.
Эта информация оказалась полезной?
Как можно улучшить эту статью?
Как и любое программное обеспечение, Google Chrome иногда сбоит: не загружает страницы, не открывает новые вкладки или вылетает. Разбираемся, почему не работает браузер и как это исправить.
Причины
На компьютере
На телефоне
Причины
На компьютере
На телефоне

Даже самый надежный браузер может тормозить, не отображать содержимое страниц или самопроизвольно закрываться. Редакция Hi-Tech Mail разобралась, почему не работает Google Chrome на телефоне или компьютере. Делимся списком причин и способами решения проблемы.
Причины, почему может не работать или не открываться Google Chrome
Google Chrome может не открываться вообще, «вылетать», загружать содержимое вкладок очень медленно или не показывать текст, видео и фото на странице вовсе. Есть несколько распространенных причин, почему браузер не запускается или функционирует некорректно.
-
Открыто слишком много вкладок, что приводит к высокой нагрузке на оперативную память и снижает скорость работы браузера.
-
Расширения Google Chrome работают некорректно. Из-за блокировщиков рекламы и других дополнений могут быть сбои в загрузке страниц.
-
Переполнен кэш. Из-за большого объема временных файлов страницы могут медленнее грузиться.
-
Слишком много программ запущено одновременно. Они занимают весь ресурс оперативной памяти — браузер вылетает или зависает.
-
Неверные настройки брандмауэра блокируют сетевые подключения Google Chrome, из-за чего браузер не загружает страницы.
-
Вредоносное ПО может изменять настройки Google Chrome или блокировать сетевые подключения. Браузер не запускается, не открывает сайты или вылетает.
-
Антивирус блокирует работу отдельных сайтов, из-за чего Chrome не отображает страницы или не скачивает файлы.
С большинством проблем можно справиться самостоятельно. Разберем варианты устранения неисправности для компьютеров и мобильных устройств.
Что делать, если браузер Google Chrome не работает на компьютере
Прежде чем выполнять каждый шаг инструкции, перезагрузите компьютер. Возможно, это позволит исправить случайный сбой системы — и другие действия не понадобятся.
1. Закройте лишние вкладки
Открыть новости и статьи на любимом сайте, страницы интересных товаров на маркетплейсах, соцсети, диалог с ChatGPT, запустить на фоне стрим — такой сценарий использования браузера знаком многим. Удобно, когда все сразу под рукой.

Из-за десятков открытых сайтов начинают тормозить даже самые мощные машины. Каждая вкладка занимает часть оперативной памяти. Если одновременно запущено 30—40 страниц, браузер может работать нестабильно.

Проверьте и закройте вкладки, которые не нужны вам прямо сейчас. Если не хотите терять важные страницы, добавьте их в закладки или список для чтения.

Ненужные программы тоже можно закрыть — особенно если они ресурсоемкие, как приложения для монтажа видео или игры. С помощью диспетчера задач можно проверить, какие загружают компьютер сильнее всего.
2. Отключите лишние расширения
Расширения — это программы, которые дополняют функционал браузера. Они позволяют блокировать рекламу, быстро проверять электронную почту, находить грамматические ошибки в документах. Сейчас в них даже встраивают ИИ-помощников.

Сбои в работе расширений и конфликты между ними влияют на браузер. Если Google Chrome тормозит или вылетает, попробуйте следующее.
-
Вспомните, какие подпрограммы вы устанавливали недавно.
-
Нажмите на три точки в правом верхнем углу веб-обозревателя. Откройте «Расширения» → «Управление расширениями».

-
Отключите или удалите последнее добавленное расширение.

-
Перезапустите браузер и проверьте, помогла ли манипуляция.
-
Если проблема сохранилась, отключите следующее дополнение — и так до победного.
3. Очистите кэш
Кэш — это временные файлы, которые браузер сохраняет, чтобы легче и быстрее загружать открытые ранее страницы. Обычно кэшируются картинки, видео, части текста, элементы кода.
Если загружено слишком много временных файлов, могут возникать проблемы — например, на открытых вкладках с новостями не обновляется информация, хотя должна.
Попробуйте очистить кэш вручную. Браузер будет работать быстрее.
-
Нажмите на три точки в правом верхнем углу Google Chrome.
-
Выберите в меню «Удалить данные о работе в браузере» или воспользуйтесь сочетанием клавиш Ctrl + Shift + Del.

-
В появившемся окне отметьте пункт «Изображения и другие файлы, сохраненные в кэше». Обратите внимание на временной диапазон: можно очистить кэш за последний час, сутки, семь дней, четыре недели или за все время использования.
-
Подтвердите действие.

4. Проверьте настройки брандмауэра
Брандмауэр — это система фильтрации сетевых подключений, которая защищает компьютер от несанкционированного доступа и вредоносных программ. Иногда он может блокировать интернет-доступ для отдельных приложений, в том числе для Google Chrome.
Причины блокировки могут быть разными: обновление браузера, случайно выставленные ошибочные настройки и правила брандмауэра или конфликт с антивирусом.
Чтобы программа работала корректно, можно добавить Chrome в исключения.
-
Нажмите Win + I или откройте «Пуск» → «Параметры».
-
Перейдите в раздел «Обновление и безопасность». В некоторых версиях он может называться «Конфиденциальность и защита».

-
Откройте вкладку «Безопасность Windows» → «Брандмауэр и защита сети».

-
Нажмите на кнопку «Разрешить работу с приложением через брандмауэр».

-
Найдите в списке Google Chrome. Если браузера нет в перечне, нажмите «Разрешить другое приложение» и укажите путь к файлу chrome.exe. Обычно это C:\Program Files\Google\Chrome\Application\chrome.exe. Но путь может быть и иным — зависит от того, на какой диск вы установили программу.
-
Поставьте галочки в колонках «Частные» и «Общие» сети. Подтвердите сохранение, нажав OK.

Когда вы добавляете Google Chrome в исключения, вы разрешаете браузеру свободно подключаться к интернету через брандмауэр. Поэтому важно соблюдать разумную осторожность. Убедитесь, что на компьютере есть антивирус, он работает. Проведите сканирование системы. Устанавливайте только официальный веб-обозреватель с сайта разработчика.
Не отключайте брандмауэр полностью — такое действие оставит ПК без защиты.
5. Проверьте компьютер на вирусы
Вредоносные программы способны повредить системные файлы. Из-за этого программы, в том числе и Google Chrome, могут не запускаться, вылетать, тормозить или выдавать ошибки.
Проверьте компьютер на вирусы с помощью «Защитника Windows» или другого специального приложения. Перед сканированием желательно обновить базы антивирусного ПО. Если обнаружите вредоносные программы, удалите их, перезагрузите устройство и запустите браузер снова.
Важно: выбирайте не быстрое, а полное сканирование. Оно занимает больше времени, но способно обнаружить угрозы, которые пропустит экспресс-версия.

6. Проверьте настройки антивируса
Иногда антивирусы могут блокировать доступ Chrome в интернет. Такое случается из-за обновления браузера или программы-защитника, подозрения на вредоносную активность или изменения настроек безопасности.
Чтобы проверить, блокирует ли антивирус браузер, временно отключите его. Запустите Chrome и попробуйте открыть несколько проверенных сайтов — например, Mail или VK.
Если страницы загружаются быстро, Google Chrome не тормозит, вероятно, проблема связана именно с антишпионским ПО. Выключать его насовсем небезопасно. Лучше добавить браузер в исключения. На примере «Защитника Windows» показываем, как это сделать.
-
Нажмите Win + I или откройте «Пуск» → «Параметры».
-
Перейдите в раздел «Обновление и безопасность». В некоторых версиях он может называться «Конфиденциальность и защита».
-
Откройте «Безопасность Windows» → «Защита от вирусов и угроз» → «Параметры защиты от вирусов и других угроз».
-
Нажмите на «Управление настройками».

-
Пролистайте открывшееся окно вниз. Найдите пункт «Исключения». Нажмите «Добавление или удаление исключений».

-
Кликните на кнопку «Добавить исключение». В выпадающем списке выберите «Процесс».

-
В открывшемся окне пропишите chrome.exe и подтвердите действие. Расширение .exe нужно, потому что процесс браузера в диспетчере задач и системных настройках обозначается именно так. Если ввести просто Chrome, исключение может не сработать, так как Windows не сможет связать его с конкретным процессом.

-
Перезапустите браузер и проверьте, заработал ли интернет.
Важно: добавление chrome.exe в исключения через процесс гарантирует, что любой запущенный экземпляр браузера не будет блокироваться антивирусом. Если Chrome заразится вредоносным ПО, антивирус не сможет его проверить и обезопасить — это делает систему уязвимой к атакам. Поэтому будьте осторожны при интернет-серфинге, не посещайте подозрительные сайты.
Для других антивирусов алгоритм аналогичный. Найдите в настройках подраздел «Исключения» или «Безопасные приложения» и добавьте в него Google Chrome.
7. Откатите браузер к предыдущей версии
Если вчера Chrome работал нормально, а сегодня обновился, перезапустился и тормозит, возможно, проблема в апдейте — с ним что-то не так или он некорректно установился. Попробуйте откатиться к предыдущей версии.
-
Откройте папку, где хранится Chrome. Ее можно найти через проводник или поиск в Windows.

-
Кликните по иконке браузера правой кнопкой мыши.
-
В выпадающем меню выберите «Показать дополнительные параметры» → «Восстановить прежнюю версию».
-
Выберите нужный вариант и сохраните изменения.

Важно: если раньше вы переустанавливали веб-обозреватель, откатить версию не получится.
8. Восстановите поврежденные системные файлы
Неполадки в работе браузера могут быть вызваны повреждением системных файлов. Если недавно Windows обновлялась или показывала синий экран смерти, а другие приложения тоже работают некорректно, попробуйте найти и восстановить пострадавшие данные.
-
Кликните правой кнопкой мыши по «Пуску».
-
Запустите командную строку (терминал) от имени Администратора.
-
Введите запрос sfc /scannow, нажмите Enter и дождитесь результатов.

Команда запускает утилиту по проверке системных файлов. Она анализирует их целостность и восстанавливает поврежденные из кэша.
9. Сбросьте пользовательские настройки
Способ может помочь, если юзер пользуется браузером давно. В нем накопилось много настроек, расширений, вкладок, которые долго и утомительно чистить по отдельности. Сброс настроек поможет вернуть Google Chrome к исходному состоянию.
-
Нажмите на три точки в правом верхнем углу веб-обозревателя. Выберите «Настройки».

-
Найдите в меню раздел «Сбросить настройки» → «Восстановить настройки по умолчанию.
-
Подтвердите изменения.

10. Удалите профиль браузера
Профиль пользователя в Google Chrome — это совокупность всех данных, настроек и личной информации, связанных с учетной записью. Из-за ошибок обновления или проблем с правами доступа он может быть поврежден.
Попробуйте создать новый профиль в Chrome. Старый не удаляйте — пусть останется как резервная копия с закладками и другими данными.
-
Нажмите Win + R.
-
В появившемся окне введите запрос %LOCALAPPDATA%\Google\Chrome\User Data. Нажмите OK.

-
В открывшемся каталоге найдите папку Default.

-
Переименуйте ее — например, в Default_backup.
-
Откройте Chrome. Браузер создаст новый чистый профиль пользователя.
-
Если проблема решена, можно перенести нужные данные из старого профиля.
11. Переустановите браузер
Если ни один из вышеперечисленных способов не помог, переустановите браузер.
-
Скачайте установочный файл Google Chrome с официального сайта.
-
Закройте браузер.
-
Удалите предыдущую версию через «Панель управления» → «Программы и компоненты».
-
Перезагрузите компьютер и установите веб-обозреватель заново.

Чтобы сохраненные настройки, пароли и данные не пропали, включите синхронизацию в настройках профиля перед переустановкой браузера. Так вы сможете быстро восстановить нужную информацию на любом устройстве.
Что делать, если Google Chrome не работает на телефоне
Сбой в работе браузера на смартфоне может вызвать несколько причин. Разберемся с каждой.
1. Проверьте подключение к интернету
Самый очевидный вариант. Браузер открывается, но страницы не загружаются. Появляется сообщение об отсутствии подключения.

-
Переключите интернет с Wi-Fi на мобильные данные и наоборот.
-
Проверьте подключение через другое приложение — например, VK.
-
Перезагрузите маршрутизатор, если используете Wi-Fi.
-
Включите и выключите режим полета на телефоне.
-
Перезагрузите телефон.
-
Выключите VPN и проверьте, грузятся ли страницы.
Свяжитесь с мобильным оператором или провайдером, если вышеописанные меры не помогли. Возможно, проблема на стороне поставщика услуги.
2. Закройте лишние приложения
Если на телефоне одновременно запущены три мессенджера, столько же приложений маркетплейсов, два почтовых клиента, пять разных соцсетей, мобильная игра и браузер с двадцатью вкладками, тормозить может не только Chrome, но и все устройство — занято слишком много оперативной памяти. Попробуйте закрыть лишнее.
Вот как сделать это на iPhone.
-
Проведите вверх от нижнего края экрана и удерживайте в центре. Если у вас iPhone с кнопкой «Домой», нажмите на нее дважды.
-
Появится список запущенных приложений.
-
Проведите по каждому приложению вверх, чтобы закрыть.
Для Android алгоритм действий отличается.
-
Нажмите на экранную кнопку «Недавние приложения». Обычно это квадрат или три полоски. Если устройство без кнопок, проведите вверх от нижнего края экрана и удерживайте.
-
Выберите «Закрыть все», аналогичную по смыслу иконку или проведите по каждому приложению вверх.

Ненужные вкладки тоже можно закрыть: чем меньше открытых страниц, тем меньше ресурсов памяти расходует браузер.
3. Проверьте наличие обновлений
Если Chrome или операционная система обновились недавно, возможны конфликты и сбои в работе приложений.
-
Проверьте актуальность версии Chrome через Google Play или App Store.
-
Проверьте наличие обновлений ОС через Настройки → Обновления ПО.
-
Установите обновления, перезагрузите девайс и откройте браузер.
Проблема должна решиться. Если она сохраняется, удалите Chrome полностью и установите заново из магазина приложений.
4. Очистите кэш и данные приложения
Если Chrome не открывается, вылетает при запуске или зависает, возможно, проблема в том, что данные приложения повреждены. Или кэш занимает слишком большой объем: это мешает нормальной загрузке.
-
Зайдите в Настройки → Приложения → Chrome → Хранилище.
-
Выберите «Очистить кэш». Если не помогло — «Удалить данные».
-
Перезапустите Chrome.

Last Updated :
21 Oct, 2024
Experiencing issues with Google Chrome on Windows 10 can be frustrating, especially when it affects your browsing experience. Whether Chrome is crashing frequently or you notice slow performance, this guide will help you troubleshoot Google Chrome on Windows 10 effectively. From simple fixes like clearing your cache to advanced solutions such as resetting Chrome, we’ll explore the best methods to resolve Chrome issues and get your browser running smoothly again.
Table of Content
- Troubleshooting Google Chrome on Windows 10
- Method 1: Check Chrome’s Latest Version
- Method 2: Clear History and Browser Cache
- Method 3: Disable all Chrome Extensions
- Method 4: Using the no-sandbox flag for Google Chrome
- Method 5: Change Chrome Default Profile
- Method 6: Check for and remove incompatible programs
- Method 7: Switch to a new user profile
- Method 8: Clear DNS Cache on System
- Method 9: Run System File Checker (Checks corrupt system files)
- Method 10: Run the DISM Tool to restore corrupted files
- Method 11: Reinstall the Google Chrome
- Method 12: Change DNS Server
- Troubleshooting Google Chrome on Windows 10 — FAQs
Troubleshooting Google Chrome on Windows 10
Let’s dive into it and look at the 12 best possible methods of troubleshooting the crashing Google Chrome issue:
Method 1: Check Chrome’s Latest Version
- Open your Google Chrome browser.
- Go to the Settings icon on the extreme right.
- Then click on the Help option followed by the About Google Chrome option.
- Make sure that you have the latest version of Google Chrome installed on your system.
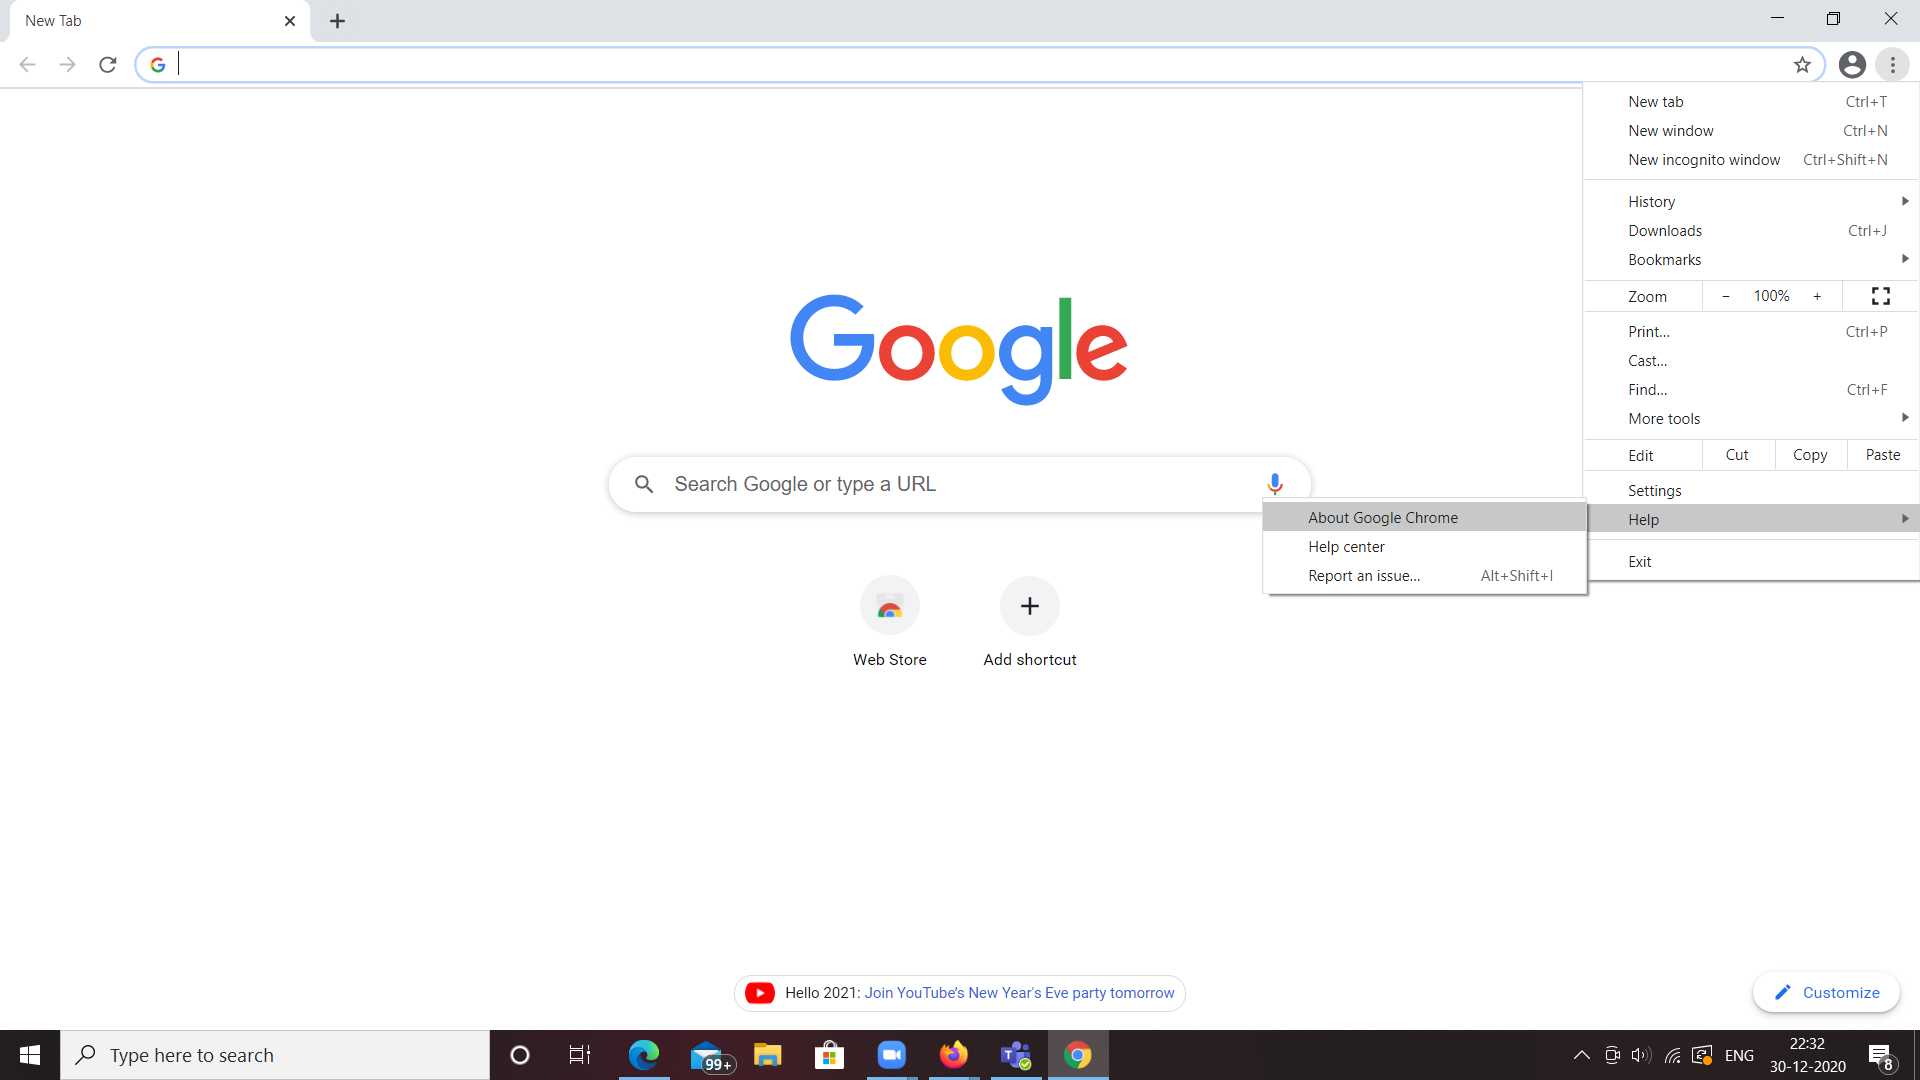
- Check whether Google Chrome is up to date or not as shown below. If not update it.

Method 2: Clear History and Browser Cache
- Go to the Settings icon on the extreme right.
- Go to History followed by the History option.
- A new screen pops up as shown below.

- Click on the Clear Browsing data on the left side. Then a screen pops up as shown below.

- Click on the Advanced tab. Select the time range to all time. Select all the data and click on the clear data button.

- Relaunch the web browser and see if it works.
Method 3: Disable all Chrome Extensions
- Go to the address bar and type chrome://extensions. Here you will be shown all the extensions installed in your web browser.
- Disable all the extensions and see if Google Chrome becomes more stable.
- Relaunch your web browser.

- Try browsing in Google Chrome and check if it fixes your problem. If yes, it means some extensions are causing a crash on your web browser.
- So try manually enabling all the extensions one by one and observe whether that particular extension is the one that is causing the issue.
Method 4: Using the no-sandbox flag for Google Chrome
- Go to your desktop.
- Right-click on the Google Chrome shortcut.
- Click on the Properties option.
- Before proceeding any further make sure you have a shortcut icon on the Desktop. If not, simply drag the Google Chrome icon from your Start menu to the Desktop.
- Locate the Target line.
- Type -no-sandbox at the end of the input field
- Click on the Apply button
- Relaunch Google Chrome

Method 5: Change Chrome Default Profile
- Close the web browser and ensure that all the instances of Google Chrome are closed by going to the Task Manager’s Details tab.
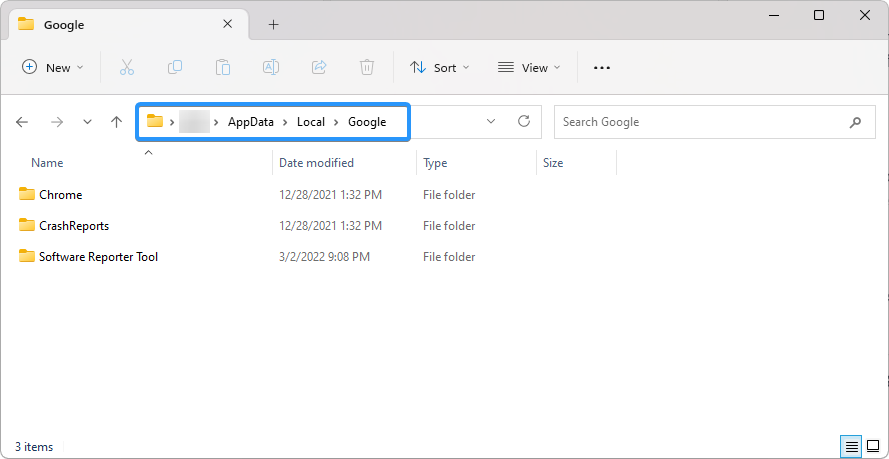
- Once done go to the file explorer and type %appdata% in the address bar.

- Click on the AppData followed by the Local folder.
- Look for the Google folder followed by the Chrome folder. Open the User Data folder inside Chrome.
- Rename the Default folder to Default. Old and see if this solves your problem.
Method 6: Check for and remove incompatible programs
- Open your Google Chrome browser.
- Navigate to the settings page by typing chrome://settings in the address bar.
- Scroll to the bottom of the page.
- Click on the Advanced link.
- Locate the Reset and Clean-up section.
- Click on Clean up computer.
- A new page pops up with the option to Find harmful software.
- Click on the Find button.
- Choose to remove any incompatible applications on your device.
- Restart Google Chrome.

Method 7: Switch to a new user profile
- Open your Google Chrome browser.
- Click on the Profile icon on the extreme right of the browser window.
- Click on Manage People in the context menu
- A new window pops up, click on the Add Person button.
- After typing your name and selecting a profile picture, click on the Add button.
- To switch to a new user profile visit the Profile icon in the extreme right of the browser.

Method 8: Clear DNS Cache on System
- Close the Google Chrome browser.
- Go to the start menu and open the command prompt.
- Type ipconfig /flushdns.
- Then type netsh winsock reset.

- It clears the DNS Cache on your System.
- See if this works and solves your problem.
Method 9: Run System File Checker (Checks corrupt system files)
- Stay on the command prompt and type sfc /scannow.
- It runs the system file checker and checks if any of our files get corrupted in shutdown, reboot, or update.
- It will try to check the crucial system files that would probably be the cause of the crash.

Method 10: Run the DISM Tool to restore corrupted files
- After the System file checker is done. Go ahead and try typing the command as shown below.

- It checks and repairs the found corrupt files on your system by looking at the Windows or rather the deployment image servicing and management tool image and trying and copying those corrupted files and replacing them with a fresh copy so once done hopefully that would fix your problem.
Method 11: Reinstall the Google Chrome
- Close your Google Chrome.
- Go to the Start menu.
- Click on the Settings.
- Go to the apps option.
- You will be shown the list of all the apps that are currently installed on your system go ahead and look for Google Chrome then make sure to uninstall it.
- After it is uninstalled go ahead and download a fresh copy of Google Chrome.

Method 12: Change DNS Server
- Navigate to Control Panel.
- Click on Network and Internet.
- Click on Network and Sharing Center.
- On the left-hand side you can see Change Adapter Settings Click on it.
- You can see your connected network, right-click on it, and navigate to properties.
- In the middle it shows connection items, click Internet Connection Version 4(TCP/IPv4) and click on properties.
- Click Use the following IP Address.
- Enter 8.8.8.8 in the Preferred DNS server box and 8.8.4.4 in the Alternate DNS Server box and hit OK.
- Wait for some minutes and the Site Can’t be Reached problem solved.
Conclusion
By following these troubleshooting steps, you can quickly fix Google Chrome issues on Windows 10 and enjoy a seamless browsing experience. Whether Chrome is freezing or refusing to open, these tips will help you diagnose and repair the problem. Keep this Chrome troubleshooting guide handy to ensure that you can tackle any future issues with ease.
What if your favorite browser stops working on the computer and you are unable to open it? The same thing is happening with many Chrome users on Windows 10 computers. That is, clicking the Chrome icon doesn’t open it for them. Are you facing the same issue? Check out 8 fixes for Chrome won’t open on Windows 10 issue.

The solutions range from reinstalling and renaming Chrome to changing Chrome’s compatibility settings. Sometimes, even Windows 10 is responsible for the issue, and that’s why the last two fixes focus on that.
Let’s check all the solutions in detail.
1. Restart Computer
If this is the first time that Chrome didn’t open on your computer, don’t worry. Just restart your PC. Hopefully, Chrome will open after rebooting your computer.
2. Set Correct Date and Time
Take a look at your computer’s date and time. Is your PC showing the correct date and time? If you notice that the date or time is wrong, you should immediately correct it.
Tip: Are the date and time missing from Taskbar? Find out how to show the missing date and time on your Windows 10 PC.
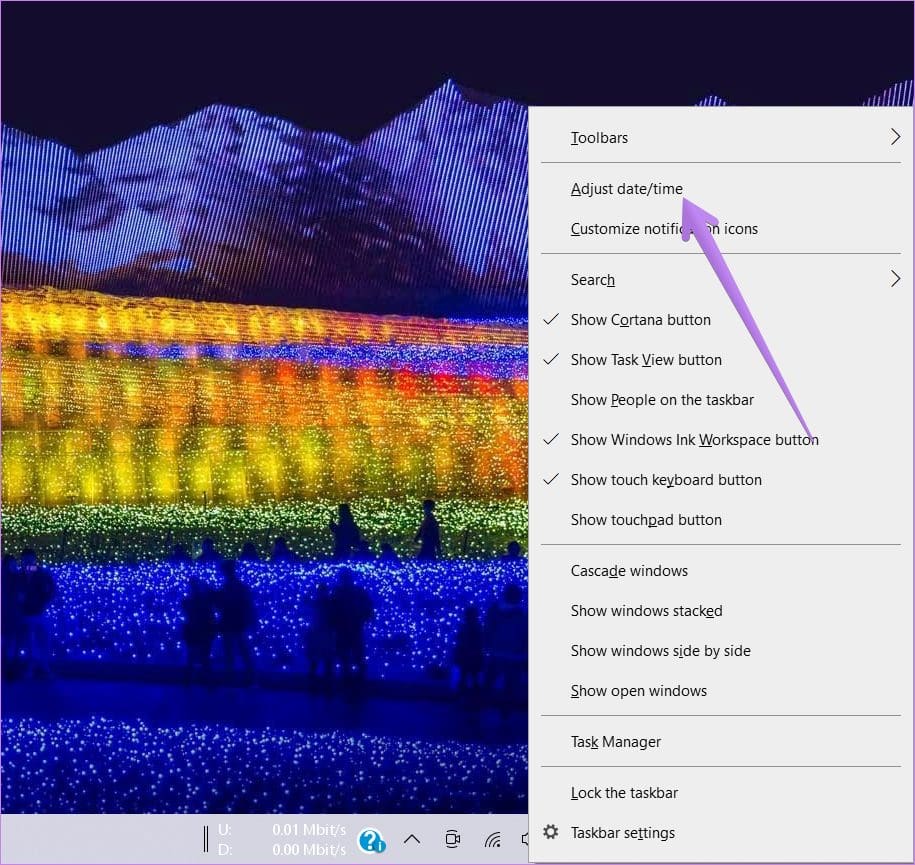
For that, right-click on time in the taskbar and select Adjust date/time.
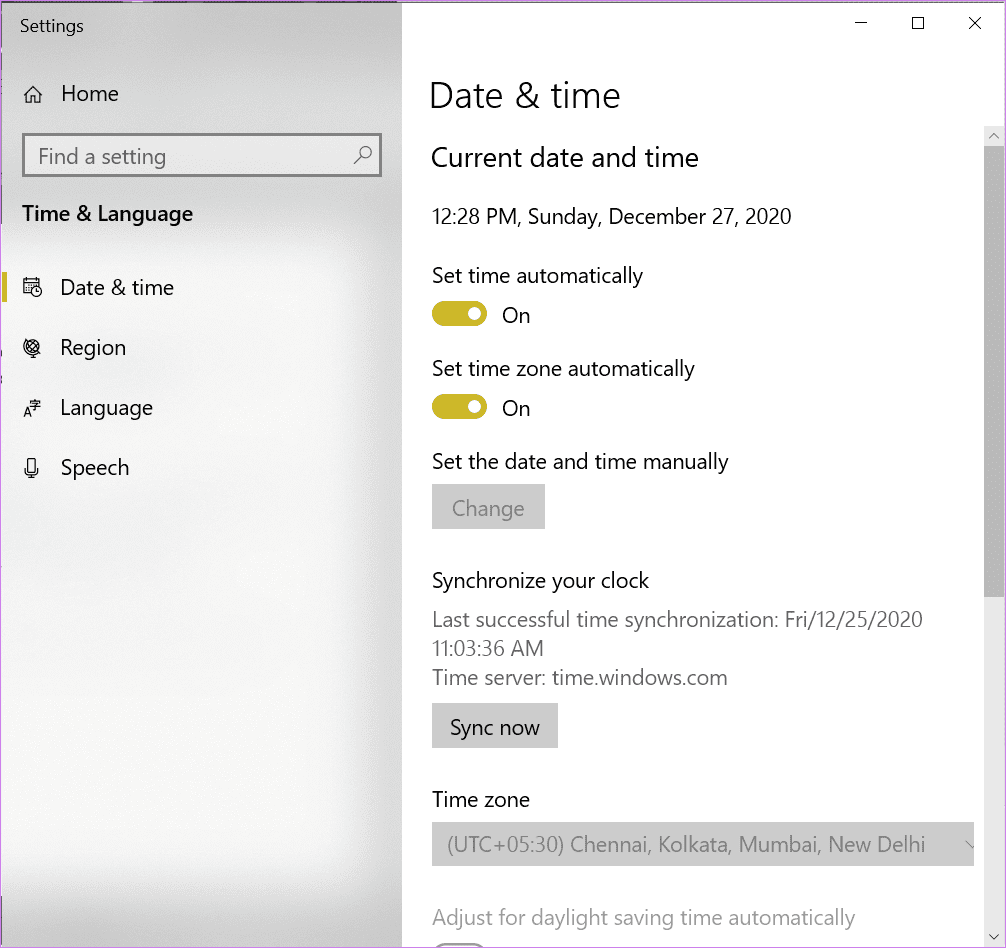
Enable the toggles next to Set time automatically and Set time zone automatically. Also, click on Sync now.
3. Reinstall Chrome
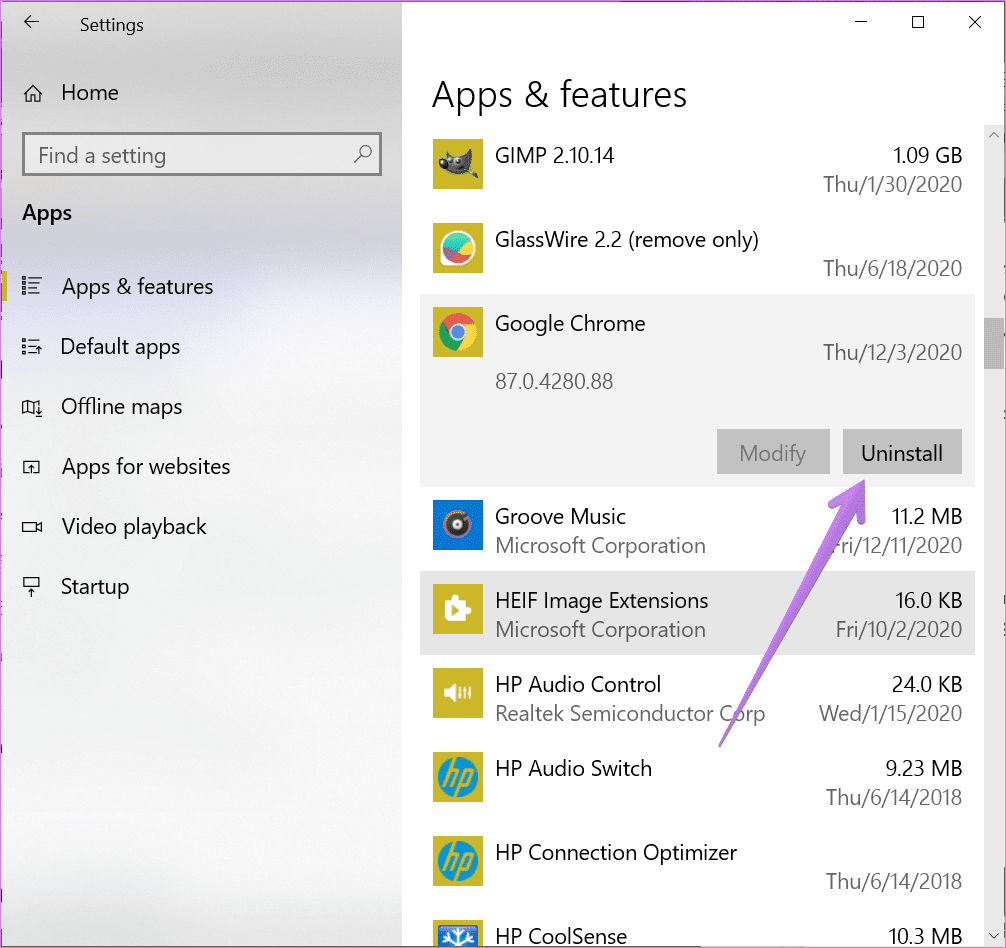
Next, you should uninstall Chrome from your computer and install it again. To uninstall Chrome, open Settings > Apps. Click on Google Chrome and hit the Uninstall button. Once uninstalled, restart the computer and then reinstall Chrome from the official website.
If Chrome still doesn’t work, uninstall it again. Then open Windows Explorer and navigate to C:\Users\{username}\AppData\Local\ where username is your own username. Inside the Local folder, right-click on the Google folder and delete it. Restart the computer and then install Chrome.
Note: If you don’t see any of the above-mentioned folders, click on the View tab in the top bar of explorer and check the box next to Hidden items.

Tip: Find out how to check and update the Chrome browser.
4. Rename Chrome Icon
This fix might sound weird but it has helped many Windows 10 users when their Chrome browser didn’t open. Here are the steps:
Step 1: Open the Windows Explorer window. Use Windows key + E keyboard shortcut to open the window.
Step 2: Navigate to C:\Program Files (x86)\Google\Chrome\Application.
Step 3: Inside the Application folder, you will find the Chrome.exe icon. Right-click on it and select Rename. Type a new name. It can be anything. Let’s say Chrome2. Press the Enter key to save it.
Tip: If you find the ‘New Chrome’ icon inside the Application folder, click on it. Chrome should open. Create its shortcut on the desktop for faster access.

Note: If you don’t find any Chrome icon, then search for Chrome from Windows search. Right-click on the icon and select Open File location. You will reach Chrome’s directory, where you will find the Chrome.exe file.
Step 4: Right-click on the new Chrome2 icon in the same folder and select Send to > Desktop (create shortcut).
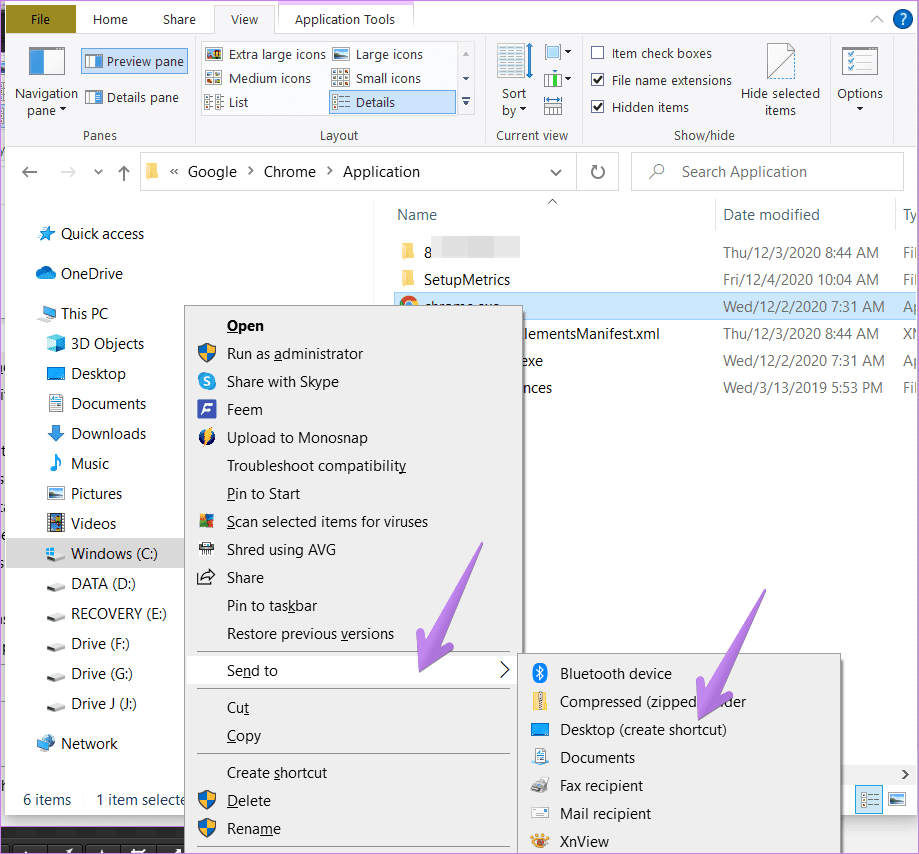
Step 5: Now go to your desktop, and you will have the new Chrome2 shortcut. Delete the old shortcut, if available. Right-click on the new Chrome2 shortcut and select Rename. Change the name to Chrome and save it.
Step 6: Restart PC. Then double-click on the Chrome icon to open it. Hopefully, Chrome should open without any issue.
Tip: Open Task Manager and end tasks for Google Crash Handler and Google Crash Handler (32-bit) before restarting your computer.
If Chrome works fine now, you might want to replace Chrome’s icon in the taskbar too. In case the Chrome icon is added to Taskbar, right-click on it and select Unpin from Taskbar. Then drag the new Chrome icon to the taskbar to pin it.
5. Change Compatibility Settings
In this fix, you need to change a few compatibility settings for Chrome. Here’s how to go about it.
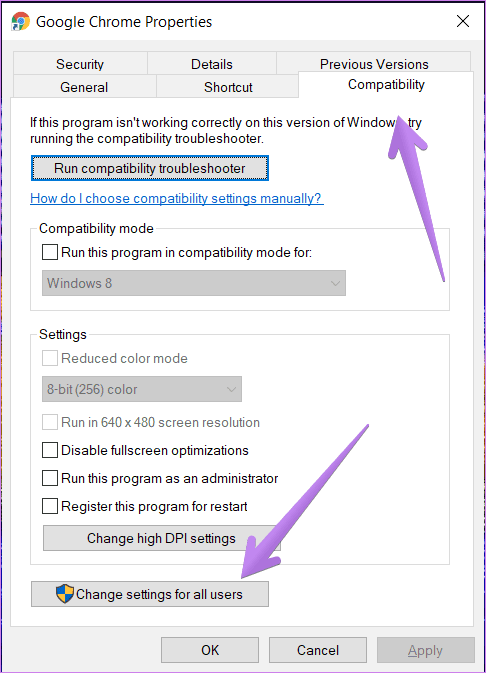
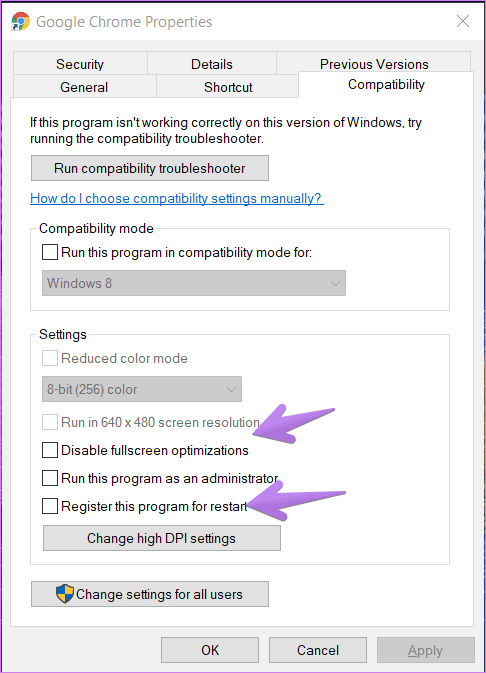
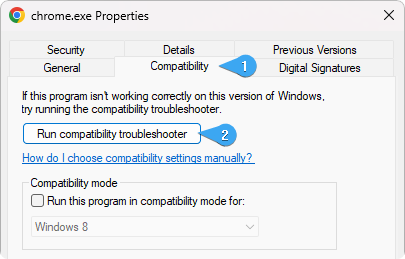
Step 1: Right-click on Chrome’s icon and select Properties.

Step 2: Click on the Compatibility tab from the Properties window. Click on Change settings for all users.
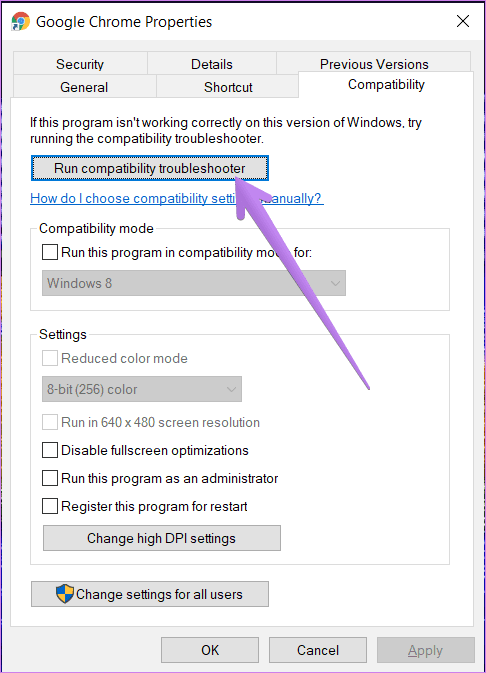
Step 3: Click on Run compatibility troubleshooter. See if you are able to run Chrome properly.
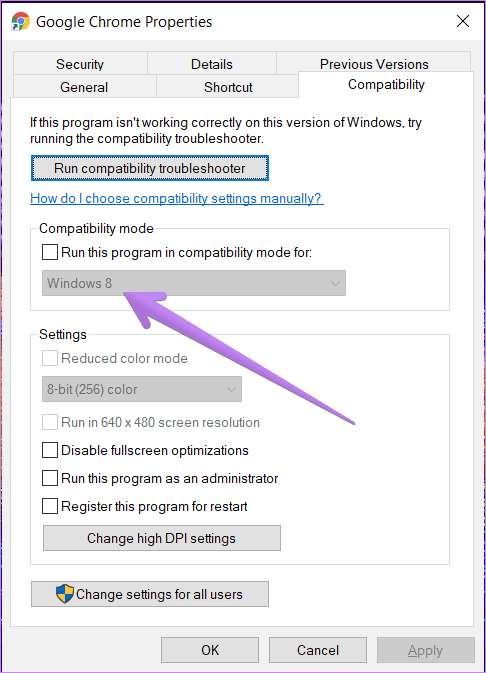
Step 4: If the issue persists, select Windows 8 under Run this program in compatibility mode. Hit Ok. Then try again.
Step 5: Check the boxes next to Disable fullscreen optimization and Register this program for restart if steps 3 and 4 didn’t work.
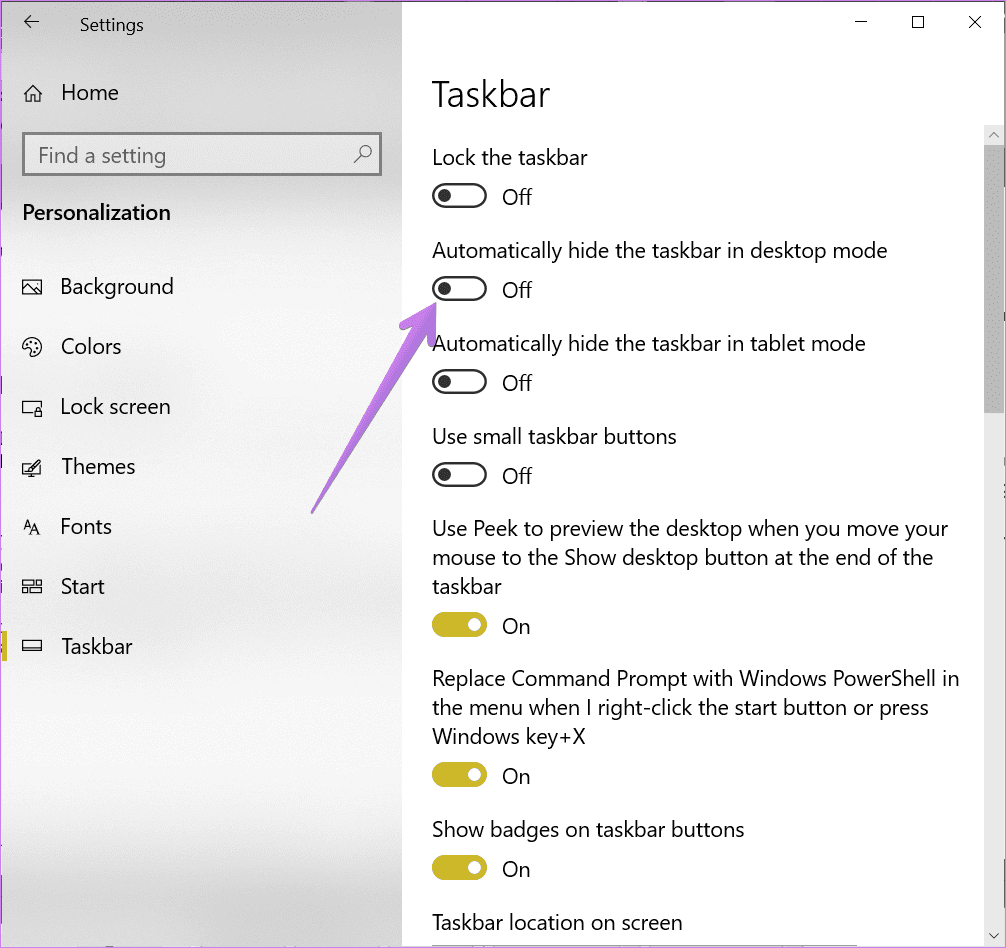
6. Disable Autohide Taskbar
Many Windows 10 users have pointed out that enabling the Autohide taskbar setting stopped Chrome from opening normally. Disabling this setting fixed the issue for them. To do so, go to Windows 10 Settings > Personalization > Taskbar. Turn off the toggle next to Automatically hide the taskbar in desktop mode.
7. Run Network Commands
You should also manually reset the TCP/IP stack and DNS on your Windows 10 computer. Here’s how to go about it.
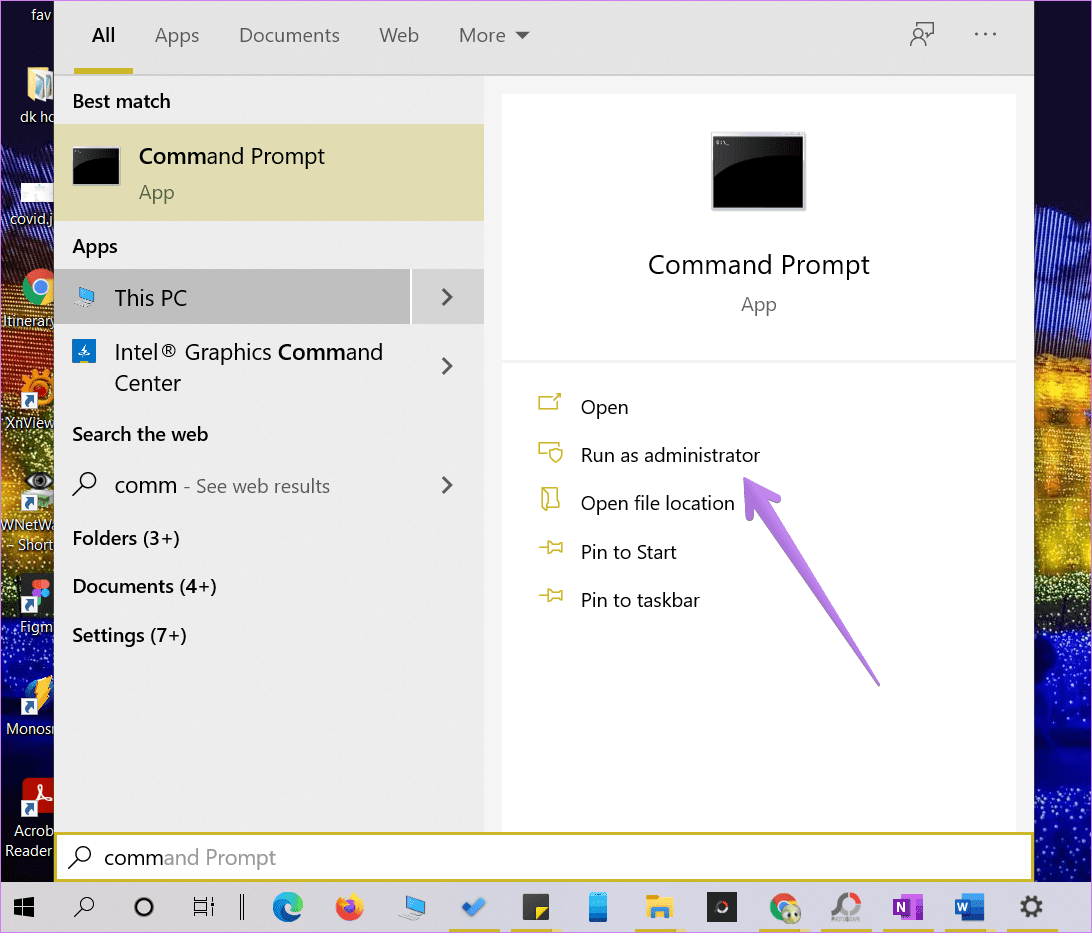
Step 1: In your Windows 10 search, type Command Prompt. Right-click on Command Prompt and select Run as administrator. Select Yes when asked.
Step 2: In the Command Prompt window, type netsh int ip reset C:\RESETLOG.TXT and press Enter. Wait till the command executes.
Step 3: Then type netsh winsock reset and press the Enter key. Wait again.
Step 4: Type ipconfig /flushdns and press Enter.
Step 5: Type exit and press Enter.
Step 6: Restart your computer.
After restarting, hopefully, Chrome will run normally.
8. Reset Network Settings
You should also try resetting the Windows 10 network settings. For that, go to Settings > Network & internet. Under Status, you will find Network reset. Click on it. Confirm when asked. Find out in detail what happens when you reset network settings on Windows 10.

Change Not Required
A browser is our entry to the world wide web and if it stops working, hell is going to break out lose. Of course, we can use another browser such as Edge instead of Chrome, but once we get used to something, replacing it doesn’t seem a good idea. We hope we helped you in fixing the problem of Chrome not opening on your Windows 10 PC.
Next up: Tabs are the building blocks of a browser. Check out 21 useful tips to manage Google Chrome tabs from the next link.
Was this helpful?
Thanks for your feedback!
The article above may contain affiliate links which help support Guiding Tech. The content remains unbiased and authentic and will never affect our editorial integrity.
Rick Akura
Is Google Chrome not opening or launching for you? Learn how to fix your browser not opening on Windows 11 or 10 devices.
Google Chrome is one of the most popular web browsers worldwide. It provides users with a smooth and seamless browsing experience. Thanks to its user-friendly interface, speed, and reliability, millions of people rely on it daily. However, sometimes even the best software can run into issues, and users may find that Chrome won’t open or launch on Windows 11/10.
If you’re one of the many users experiencing this problem, don’t worry. In this article, we’ll provide a comprehensive guide to help you fix the issue and get Chrome up and running again.
Table of Contents
- Why Is Chrome Not Opening on Windows 11/10?
- How to Fix Chrome Won’t Open or Launch on Windows 11/10
- Restart Your Computer
- Close All Chrome Processes
- Disable Windows Firewall
- Temporarily Disable Your Antivirus
- Use the Compatibility Troubleshooter
- Delete Your Chrome User Profile
- Uninstall and Reinstall Google Chrome
- Frequently Asked Questions
Why Is Chrome Not Opening on Windows 11/10?
It can be frustrating when you want to browse the web and your go-to browser won’t launch. However, it’s important to remember that there are multiple reasons why Chrome might be having issues. Understanding these possible causes is useful in identifying the underlying problem(s) and fixing the issue.
Here are some common reasons why Google Chrome may not be opening on your Windows 11 or Windows 10 device:
- Outdated version of Chrome: If you use an outdated version, it may not be compatible with the latest Windows updates. This could cause the browser to crash or not launch at all.
- Corrupted user profile: Chrome stores user data and settings in a user profile. If this profile becomes corrupted, it can cause issues with opening Chrome.
- Conflicting software: Sometimes, third-party software can interfere with Chrome’s ability to launch. This could be due to a conflict with an antivirus program or other software installed on your device.
By identifying the underlying cause of the issue, you can take the necessary steps to fix it and get back to browsing the web with Google Chrome on your Windows device.
How to Fix Chrome Won’t Open or Launch on Windows 11/10
After identifying the source of the issue, you can take steps to fix it:
1. Restart Your Computer
The first thing you should do when troubleshooting any Chrome issue is to restart your computer. This can help clear out glitches that may interfere with the browser’s functioning. Restarting Windows is easy and can be done in just a few steps:
- Open the Start menu from your taskbar or by pressing the Windows key on your keyboard.
-
Click on the “Power” button. Here, select “Restart” from the available options.

- If prompted, close any open applications and allow your computer to restart. Make sure to save any unsaved progress before you proceed!

After restarting your system, try relaunching Chrome. If the issue persists, move on to the next troubleshooting step.
2. Close All Chrome Processes
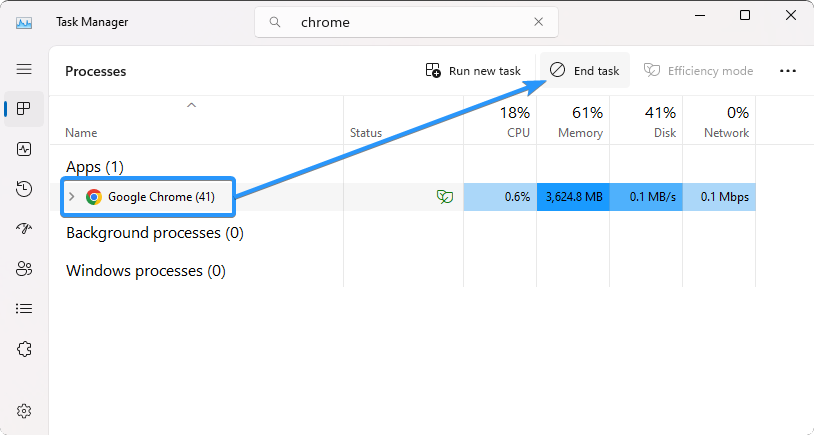
It’s possible that a Google Chrome process is running in the background, but it didn’t start properly. In this case, the process will continue to hang in the background and won’t allow you to launch a new Google Chrome window. Luckily, all you have to do is end all Chrome-related tasks in the Task Manager by following these steps:
-
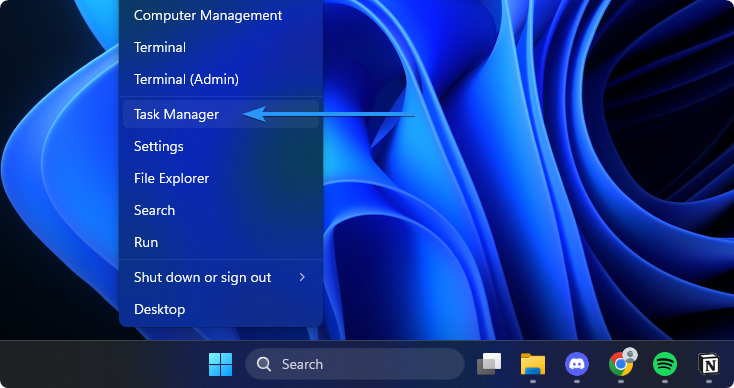
Open the Task Manager by pressing the Windows + X keyboard shortcut and then selecting it from the context menu.
-
Stay on the “Processes” tab, and look for any Chrome-related tasks. If you find one, click on it to select it, then click the “End Task” button.
- Repeat this for all Chrome processes. After all Chrome processes have been stopped, try relaunching the browser. If it still doesn’t open, move on to the next step.
3. Disable Windows Firewall
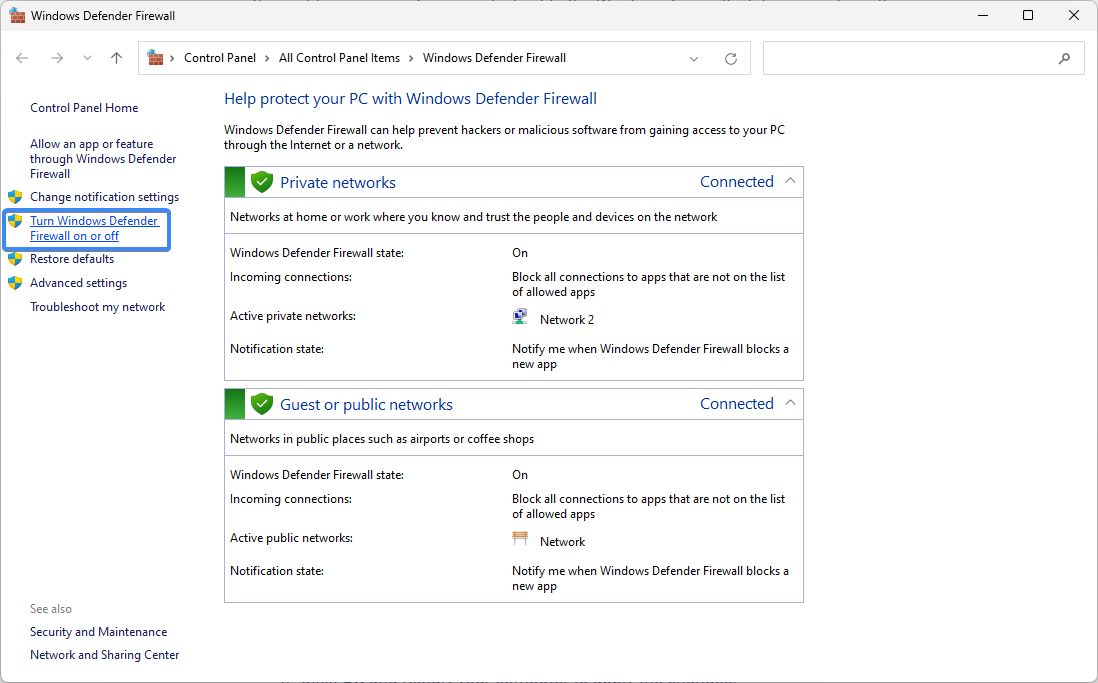
The Windows Firewall is a built-in security feature that helps protect your network and device from malicious attacks. However, it can also interfere with Chrome’s functioning if the firewall isn’t set up correctly. Try disabling Windows Firewall by following these steps:
-
Open the Run utility by pressing your keyboard’s Windows + R keys. Type «firewall.cpl» (without the quotes) in the text field and click OK.
-
On the window’s left side, click the «Turn Windows Defender Firewall on or off» link.
-
In the «Customize Settings» section, select «Turn off Windows Defender Firewall» for both the private and public network settings.
- Click OK and restart your computer to apply the changes.

Once you have disabled Windows Firewall, try launching Chrome again to see if the issue has been resolved. If Chrome can launch, you might have to adjust the firewall settings to keep your device secure.
4. Temporarily Disable Your Antivirus
If you’re using a third-party antivirus program, it could be interfering with Chrome’s opening. Try disabling your antivirus temporarily and see if this helps. If it does, you can adjust the antivirus settings or switch to a different program that won’t interfere with Chrome’s functioning.
5. Use the Compatibility Troubleshooter
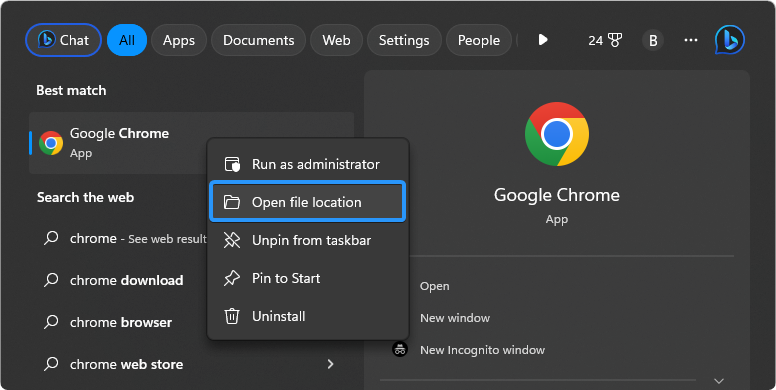
Windows has various troubleshooters to help you diagnose and fix any issues with your device. The Compatibility Troubleshooter can check for potential conflicts between Chrome and other programs installed on your machine. To use this feature, follow these steps:
-
Open your Start menu and search for “Google Chrome.” Right-click on the application from the search results and select “Open file location.”
-
Right-click on the “Google Chrome” shortcut again, and select “Open file location.” This will take you directly to the Chrome executable file.
-
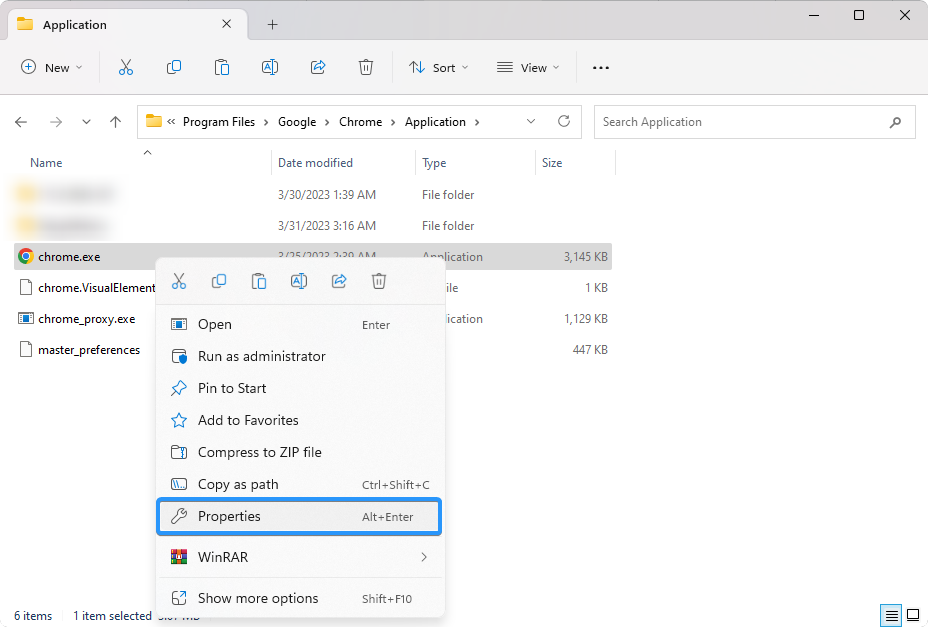
Right-click on “chrome.exe” and select “Properties” from the context menu.
-
Switch to the “Compatibility” tab using the menu on top of the window. Next, click on the “Run compatibility troubleshooter” button.
- Wait for the troubleshooter to diagnose any issues with your app. Once the troubleshooting process is finished, try relaunching Chrome to see if the issue has been resolved.

6. Delete Your Chrome User Profile
Your Chrome user profile contains all your data and settings, including bookmarks, passwords, and extensions. If this profile becomes corrupted, it can cause issues with opening Chrome. You can try deleting this corrupt profile and generating a new one. To delete your Chrome user profile:
- Open File Explorer from your taskbar or by pressing the Windows + E keys on the keyboard.
-
Navigate to the following folder. Make sure to replace “username” with your own local Windows username: C:\Users\%username%\AppData\Local\Google
-
Right-click on the “Chrome” folder, and select “Delete” from the context menu. This folder contains your user profile; deleting it will force Google Chrome to create a new, fresh one.
- Try launching Google Chrome and see if this fixes the issue.
7. Uninstall and Reinstall Google Chrome
If none of the above solutions worked, you could try uninstalling and reinstalling Chrome. This will remove the browser from your device and reset it to its factory settings. To uninstall Chrome, follow these steps:
- Open Settings from your Start menu or by pressing the Windows + I keyboard shortcut.
- Select “Apps” from the menu on the left, and then click on “Installed apps” from the available options on the right.
- Find Google Chrome from the list of installed apps on your device. Click on the three-dot menu next to the app, and then click the “Uninstall” button.
- Allow Windows to uninstall the browser. Once you have uninstalled Chrome, install a fresh browser copy on your device. This should help resolve any issues with opening the browser.
FAQ
Does Google Chrome work on Windows 11?
Yes, Google Chrome is compatible with Windows 11.
Is Google Chrome the best browser to use on Windows 11?
Google Chrome is a fast and secure browser that works well on Windows 11. However, it’s important to note that other browsers are also available, such as Firefox and Microsoft Edge. You should choose the one that best suits your needs.
Why is Google Chrome so slow on Windows 11?
There are several reasons why Chrome might be running slowly on Windows 11. It could be due to a large amount of data stored in your browser’s cache, an outdated version of Chrome, or an incompatible extension.
Conclusion
In conclusion, experiencing issues with Google Chrome not opening on your Windows device can be frustrating, but there are multiple reasons why this may be happening. By identifying the underlying cause of the problem, you can take the necessary steps to resolve it and get back to browsing the web with Chrome.
We hope this article has provided valuable insights and helped you better understand the potential causes of this issue.