
По умолчанию Windows 11 и Windows 10 умеет автоматически подключать ISO-образы как обычный оптический диск в системе: для этого достаточно либо дважды кликнуть по файлу образа мышью, либо нажать по нему правой кнопкой мыши и выбрать пункт «Подключить». Однако, иногда можно столкнуться с тем, что пункт «Подключить» отсутствует в контекстном меню, а открытие образов выполняется либо в сторонней программе: архиваторе или другой, либо не выполняется совсем.
В этой инструкции подробно о том, как вернуть пункт «Подключить» и функции по умолчанию для ISO образов в Windows, а также о монтировании образа средствами системы без возврата этого пункта контекстного меню.
Возврат приложения «Проводник» в качестве используемого по умолчанию для файлов ISO

Рассматриваемая проблема обычно возникает после установки каких-либо сторонних программ, которые меняют ассоциации для файлов ISO — архиваторов, ПО для работы с оптическими дисками и других.
Всё, что требуется сделать, чтобы вернуть пункт «Подключить» в контекстное меню и восстановить стандартное монтирование образов средствами Windows 11 или Windows 10 — вернуть соответствующие ассоциации для ISO-файлов:
- Нажмите правой кнопкой мыши по файлу образа ISO и выберите пункт «Открыть с помощью» — «Выбрать другое приложение».
- В окне выбора приложения выберите пункт «Проводник» и нажмите кнопку «Всегда» (в Windows 11) или установите отметку «Всегда использовать это приложение для открытия .ISO файлов» (в Windows 10).

- После открытия образа с помощью «Проводника» и установки его в качестве всегда используемого приложения, пункт «Подключить» снова появится в контекстном меню в качестве используемого по умолчанию (после двойного клика по файлу образа).


Вы можете использовать и другие способы, чтобы сделать Проводник приложением по умолчанию для ISO-образов, например:
- Нажать правой кнопкой мыши по файлу образа и выбрать пункт «Свойства».
- Перейти на вкладку «Общие».
- В пункте «Приложение» нажать кнопку «Изменить», выбрать «Проводник» и применить настройки».


Подробнее о способах в статьях: Настройка приложений по умолчанию в Windows 11, Приложения по умолчанию в Windows 10.
Монтирование образа ISO средствами Проводника без назначения по умолчанию
Использование средств Проводника Windows для подключения ISO образов возможно и без назначения этого приложения по умолчанию:
- После выбора файла ISO в Проводнике Windows 11 в строке действий или в меню будет доступен пункт «Подключить».

- В Windows 10 при выборе файла образа в Проводнике появится вкладка «Средства работы с образами диска», где также есть кнопка «Подключить».


Надеюсь, информация был полезной и помогла решить проблему. Если же остались вопросы — готов ответить на них в комментариях.
Table of contents
- Mounting ISO Files on Windows 10
- Using the Windows Explorer
- Using PowerShell
- Troubleshooting Common “Mount ISO Windows 10” Errors
- Method 1: Updating Your Windows And Device Drivers
- Method 2: Make Windows Explorer the Default Program for Opening ISO Files in Windows 10
- Method 3: Unmounting All Drives
- Method 4: Change the Drive Letter of a Removable or Virtual Drive
- Method 5: Investigate Third-party Software
- Method 6: Use System Restore
- Conclusion
- FAQ
One of the great features of later versions of the Windows operating system is that they can mount ISO files without the need for a third-party application. This is quite useful, especially when you’re dealing with large software downloads. These days, a lot of files are available for download in the .iso format. It is basically the easier option over burning the files to a disk. However, several users have reported issues when they tried mounting ISO files. If you’re one of the people who encountered such errors and you want to know how to fix ISO issues on Windows 10, then you’ve come to the right place. We will show you the steps to take to ensure you don’t encounter errors when mounting your ISO files.
Mounting ISO Files on Windows 10
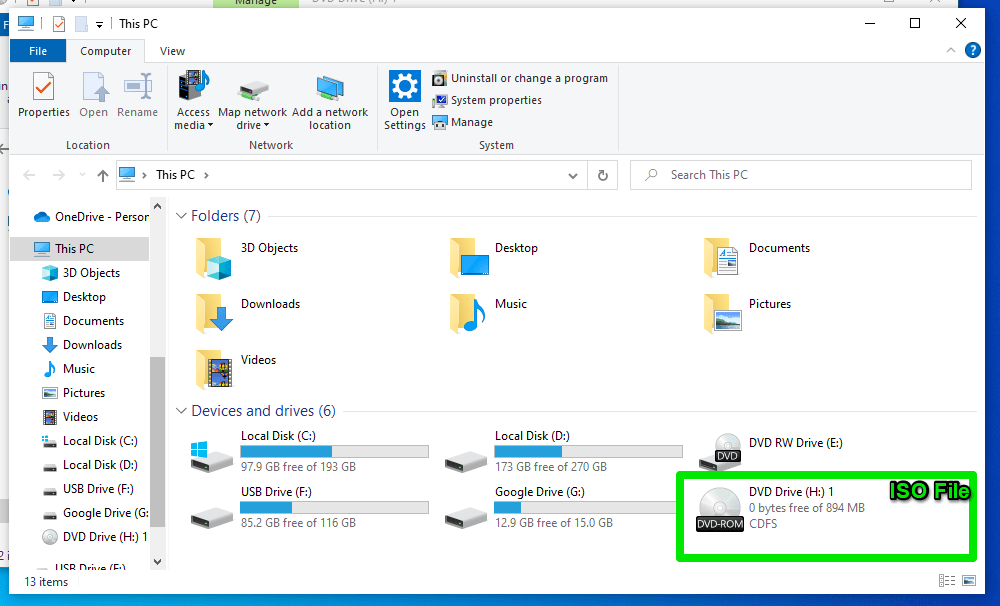
When you mount an ISO file, Windows 10 treats it as a virtual drive. You’ll see it as a DVD ROM on This PC, allowing you to view and use its files and burn them to a physical DVD.
Microsoft made sure mounting ISO files on Windows 10 wouldn’t be a technical process, although there are advanced methods. Now, let’s show you the basic and geeky techniques of mounting ISO files.
Using the Windows Explorer
There are different ways to mount the file within Windows’ native File Explorer. You can do the following after opening the File Explorer window and navigating to the ISO file:
- Right-click the file and select Mount.
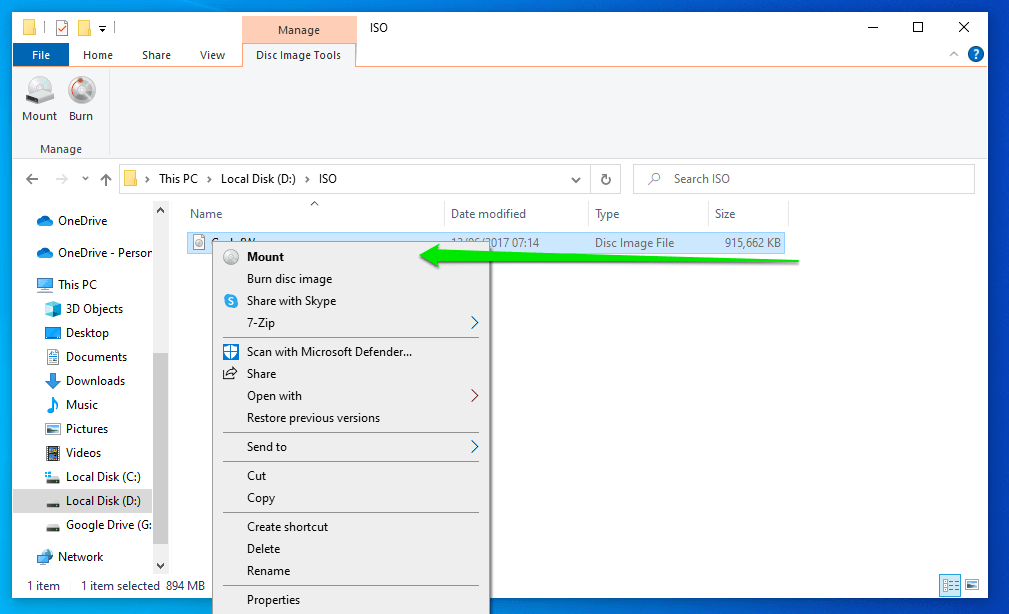
- Click the file once, go to the ribbon menu of the File Explorer window, select Disc Image Tools under Manage, and then click Mount.

- Double-click the ISO file.
Note that the last method may not work if an ISO mounting software application is currently the default program for opening ISO files.
Using PowerShell
You can also enter the Windows PowerShell mount ISO command line to create the virtual drive. Follow these steps:
- Right-click your Start button, or press
Win+X, and click Windows PowerShell (Admin) in the Power User menu.

- Click Yes in the User Account Control prompt.
- Now, type this command and hit the
Enterkey (follow explanations):
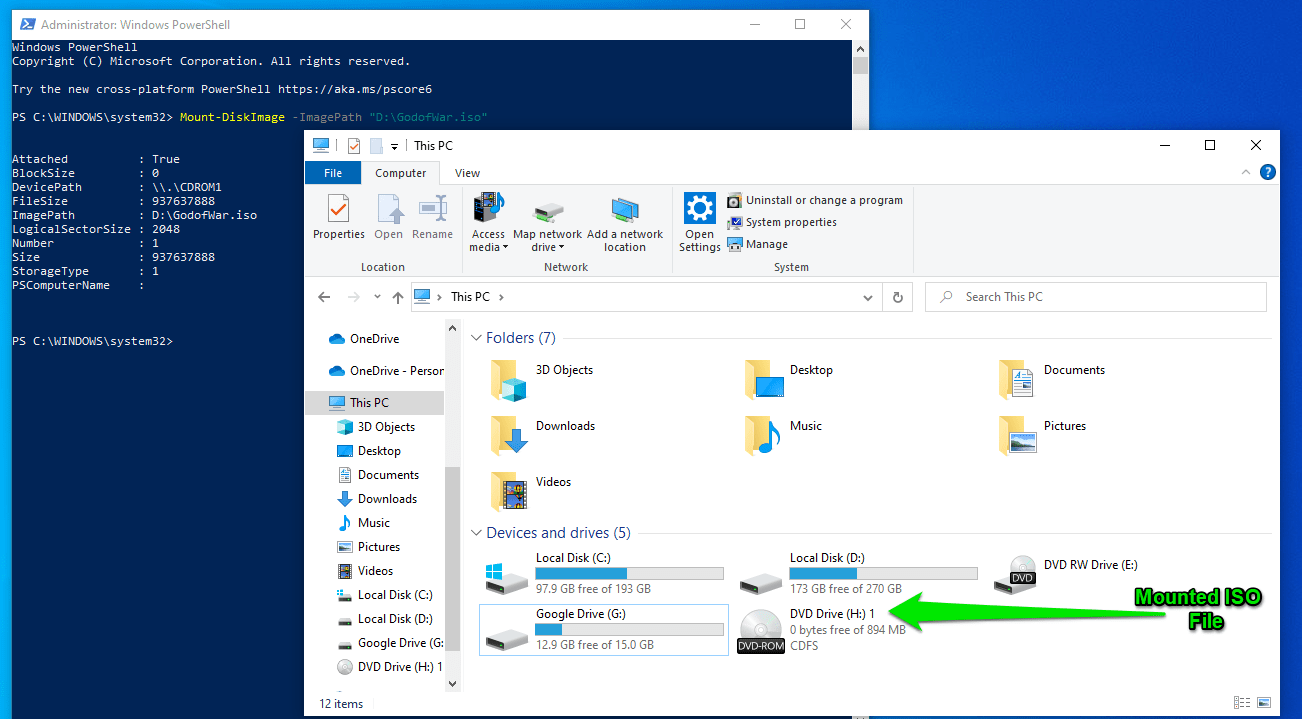
Mount-DiskImage -ImagePath "ISO/FILE/LOCATION"
- Replace
ISO/FILE/LOCATIONwith the path to the file you want to mount. So, the command should look like this when we try to mount a God of War ISO file:
Mount-DiskImage -ImagePath "D:\GodofWar.iso"
- After hitting
Enter, the command may take a few seconds to a minute to execute, so do not panic.

- Once you use the command to successfully mount the ISO file, Windows 10 will display the new virtual DVD drive in This PC.
That’s how to mount your ISO file!
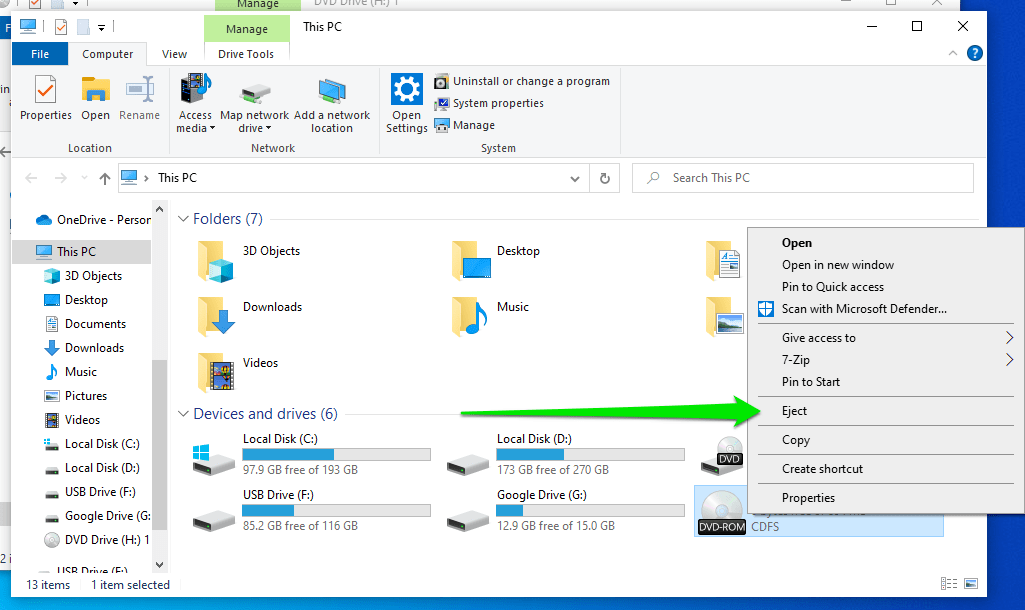
If you want to unmount it, go to This PC, right-click the virtual DVD Drive, and select Eject from the context menu.
Troubleshooting Common “Mount ISO Windows 10” Errors
If you’re encountering any problem, such as “Couldn’t mount the file,” the steps that follow will help you get rid of it.
Method 1: Updating Your Windows And Device Drivers
Updating your operating system and your computer’s drivers is one of the best ways to ensure you can mount ISO files without problems.
Windows 10 updates are designed to enhance your user experience, improve your system’s functions, and fix bugs that occur from time to time. The issue here might be related to a glitch that an update might fix.
For example, this Windows user posted a message on a Microsoft Forums thread narrating how they couldn’t mount ISO files after a major Windows 10 update (which they performed after mounting the installation ISO).
As it turned out, installing another update got rid of the problem for good.
Follow these steps to update your OS and drivers using the Windows Update Client:
- Punch the
Windows keyto open the Start menu. - Type
updateand click Check for Updates.
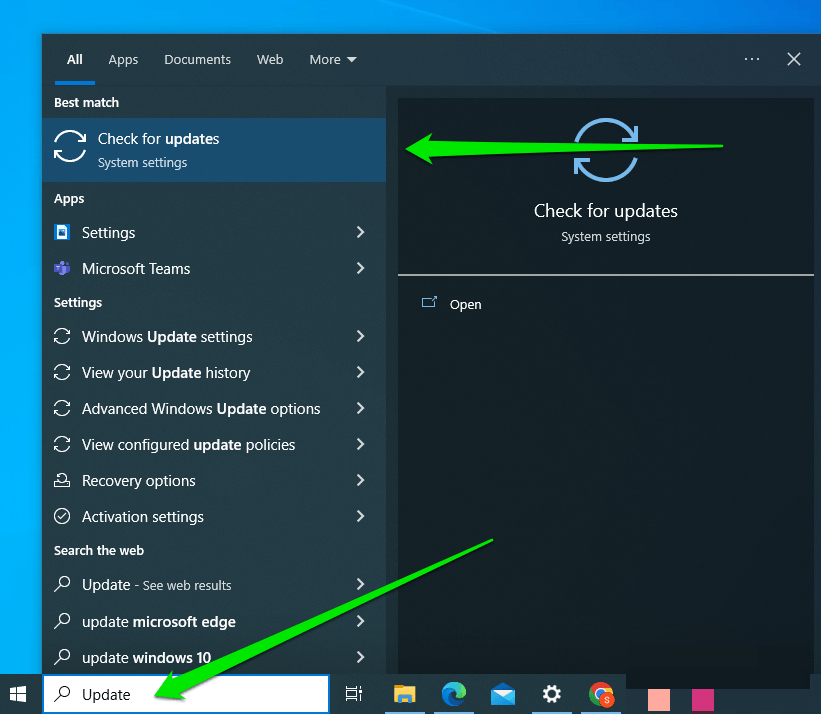
- The Windows Update Client will now open and begin to check for available updates.
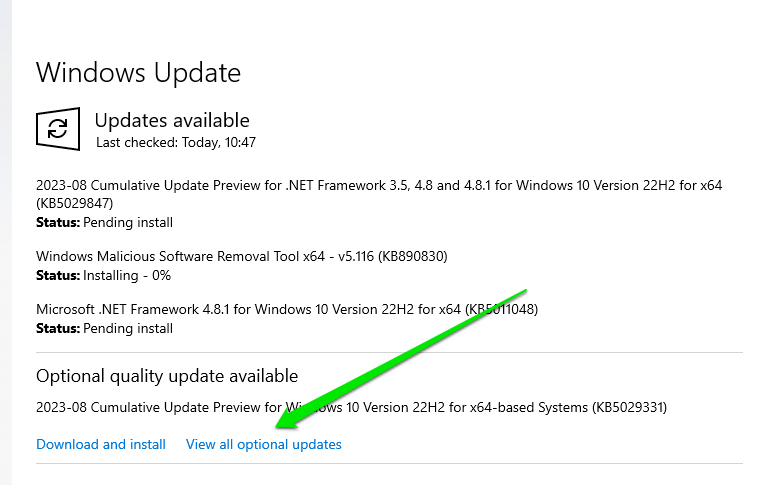
- Allow it to download the updates it finds and restart your PC when required.
- Next, go to View all Optional Updates, expand the Driver Updates section, and install available driver updates.
PRO TIP
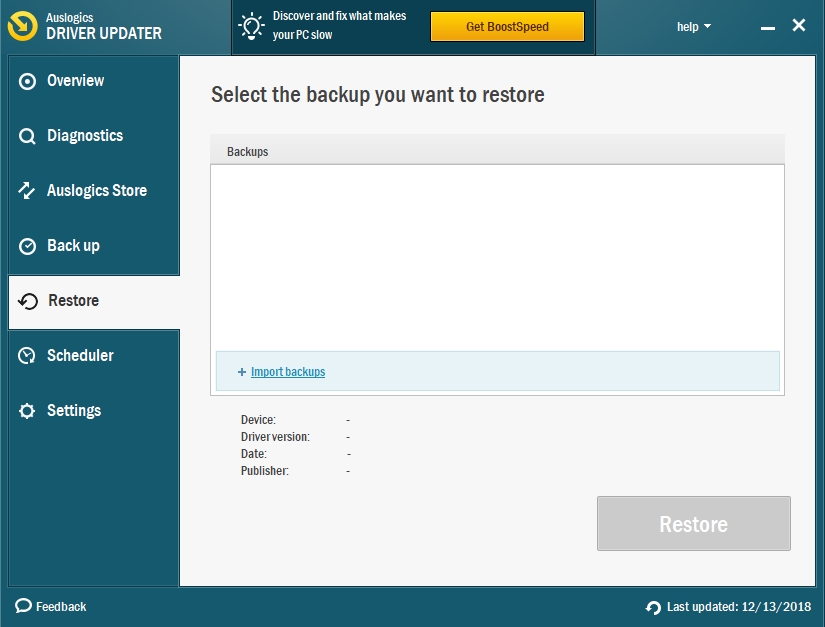
You can automate the driver-updating process using Auslogics Driver Updater. We always recommend this method for many good reasons.
For instance, if you manually update your drivers, you’d have to spend a significant amount of time searching for compatible and updated versions on the manufacturer’s website.
On the other hand, when you use Auslogics Driver Updater, you only have to click a button, and you can update all your drivers to their latest manufacturer-recommended versions.
You do not have to worry about installing incorrect drivers because this reliable tool can automatically recognize your system! Once the process is complete, you can now mount ISO files from a DVD or CD.
What’s more, you will notice a significant improvement in your computer’s speed and performance.
Method 2: Make Windows Explorer the Default Program for Opening ISO Files in Windows 10
As we’ve mentioned, Windows 10 allows users to open ISO or Image (IMG) files without the help of a third-party application.
In some cases, a bug from a recent update can affect file association features on a Windows operating system. It is also possible that your system is having trouble recognizing ISO files.
Consequently, it does not automatically set a default application for mounting or accessing the files. You can make sure Windows’ File Explorer is the default application for mounting ISO files before you start. Follow these steps:
- Go to the ISO file you want to open.
- Right-click the file, then select Open With.
- Another menu will show up. Select Windows Explorer.

This process allows you to mount the file by double-clicking it if all goes well.
Method 3: Unmounting All Drives
Please unmount any ISO you may have mounted on a virtual drive. Because of the auto-replace function, you might be prevented from mounting the new ISO file over the existing one.
Follow the instructions below:
- On your keyboard, press
Windows Key+E. This should open File Explorer. - Go to the left bar menu and click This PC.
- Right-click a virtual drive, then click Eject. Do this for every virtual drive available on your computer.
- Restart your computer.
- Try mounting the ISO file on any available slot.
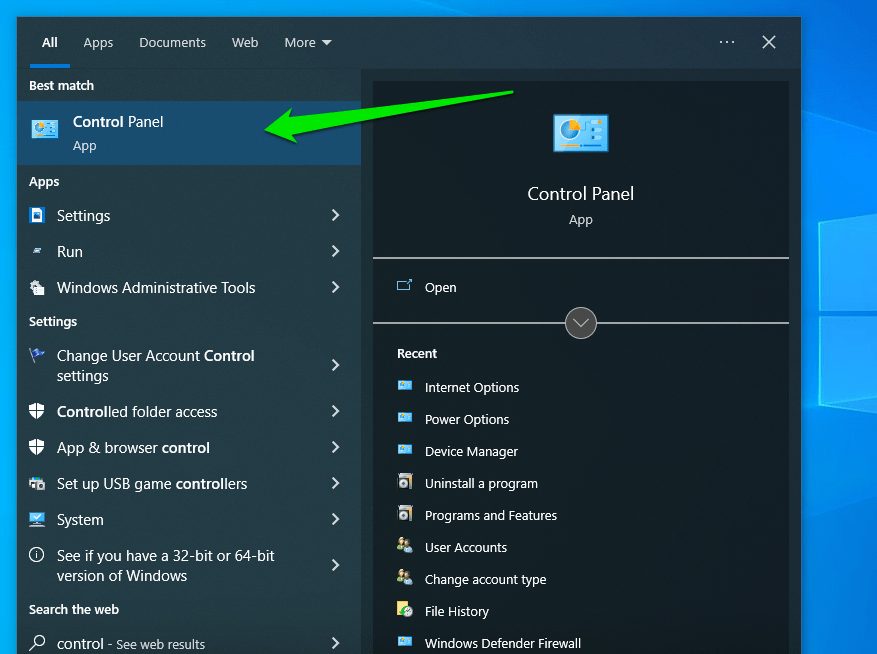
- Click Uninstall a Program under Programs after the Control Panel window opens.

- Now, search for the unwanted ISO application, click it, and select Uninstall at the top of the window.
- Follow the subsequent prompts to complete removing the program.
If you’ve already uninstalled the third-party virtual drive program and the error persists, it is possible that its entries are still in the registry. You can resolve this problem by cleaning the registry and removing entries related to the ISO file association.
PRO TIP
You can manually roam through the Registry Editor, but we strongly advise that you use a reliable tool like Auslogics Registry Cleaner instead.
It is worth noting that the registry is a sensitive database. Just misplacing a comma can prevent you from properly booting your computer! So, before you decide to clean your registry, you have to be certain that you can perform the changes correctly. Here are the steps you should follow:
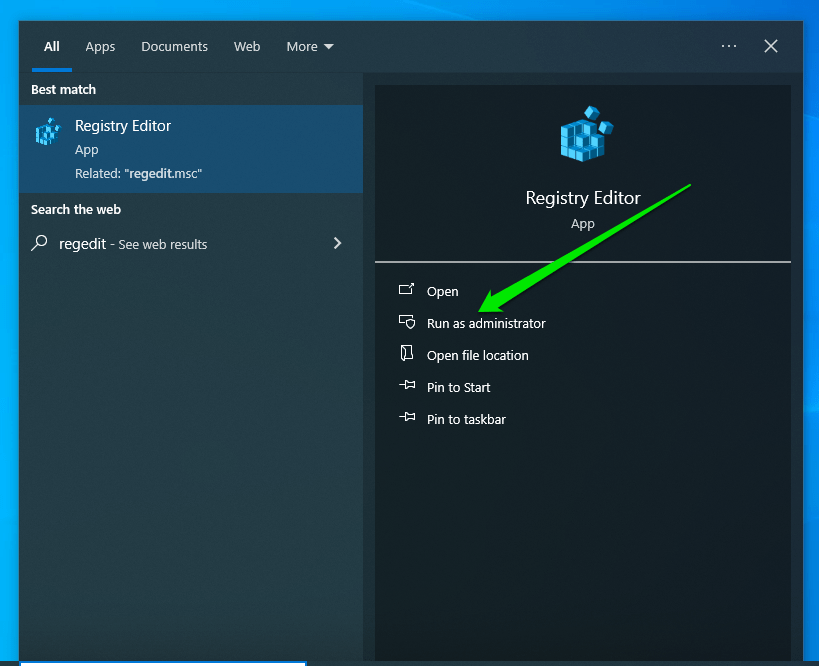
- Click the Search icon.
- Type
regedit. - Select Run as Administrator on the right side.
- Navigate to the following path: Computer\HKEY_CLASSES_ROOT\.iso.
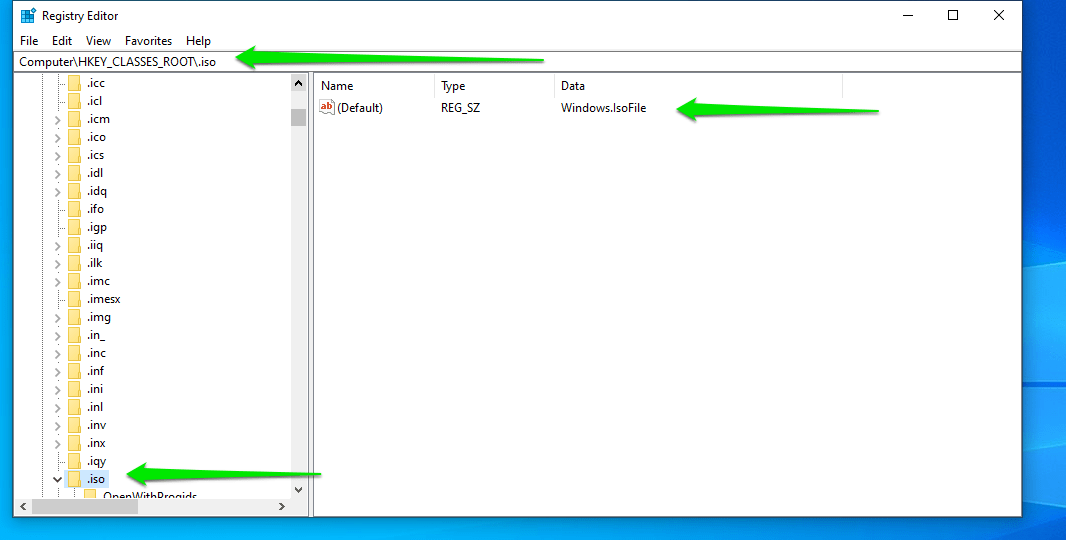
- Create a backup of your registry.
- Check if a third-party ISO tool is still associated with your ISO extension. If so, right-click the Default entry and click Modify.
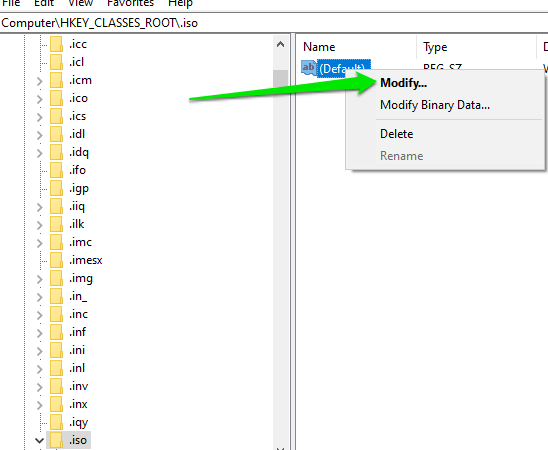
- Replace the entry under Value Data with
Windows.IsoFile, then click OK.
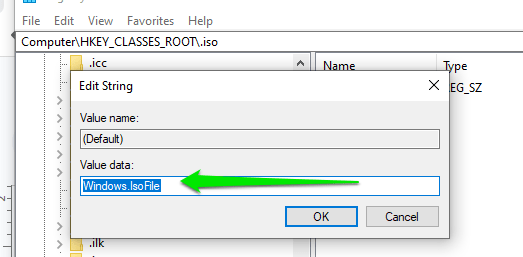
- Restart your computer and check if this resolves the issue.
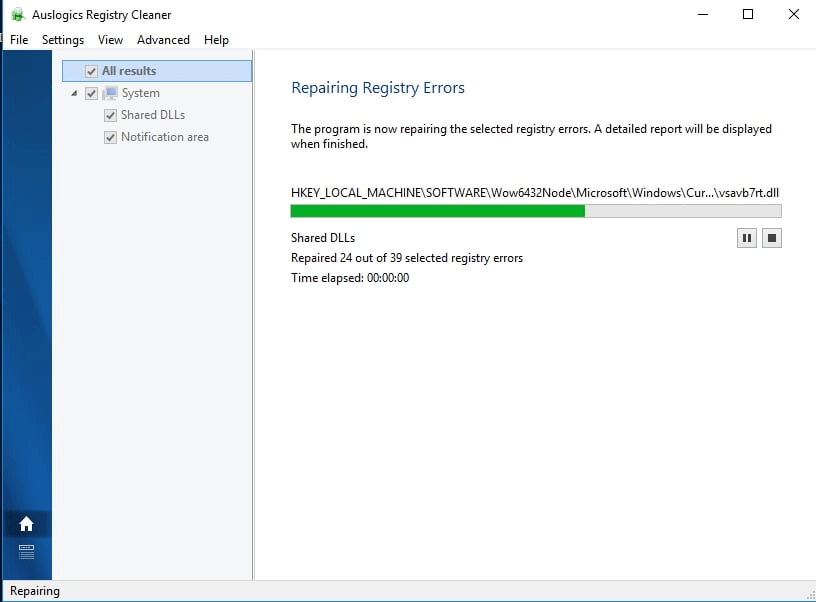
Learning how to fix ISO issues on Windows 10 is easier when you opt to use Auslogics Registry Cleaner
.
This tool automatically scans corrupted, duplicate, and outdated registry entries. With a click of a button, you can remove old ISO-related entries and resolve the issue. The best part is this tool is absolutely free!
Method 4: Change the Drive Letter of a Removable or Virtual Drive
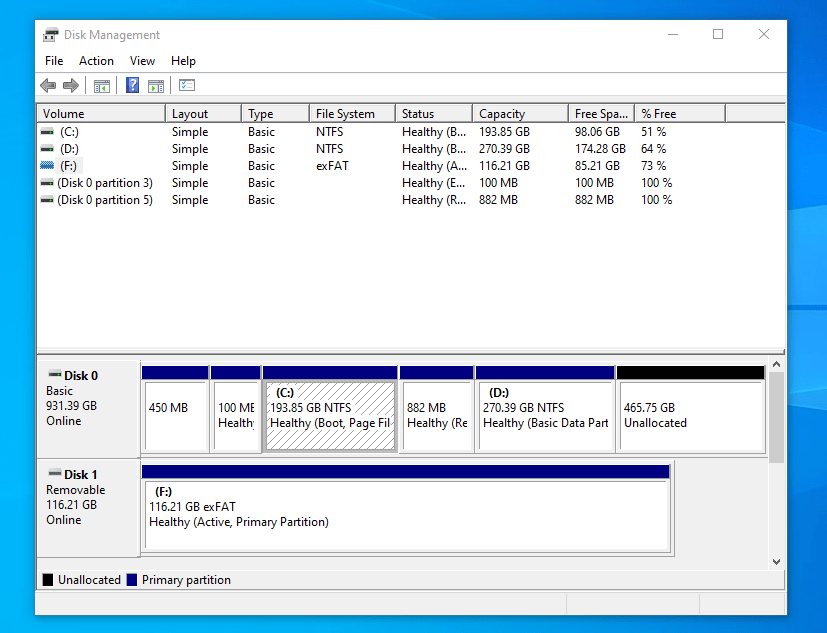
How your computer assigns drive letters may be the problem. If you check and see that the ISO shows up in This PC, but you still see the error, take a closer look at its drive letter. The error tends to occur when its driver letter serially follows that of another drive. Let’s say you have five drives: C, D, E, F, G, and the ISO is H. This arrangement could be the likely culprit.
You can resolve the matter by breaking up the serial pattern. To do that, change the drive letter of a virtual or removable media. Follow these steps:
- Connect the removable media, such as a USB flash drive or external hard drive, to your computer (if it isn’t already connected).
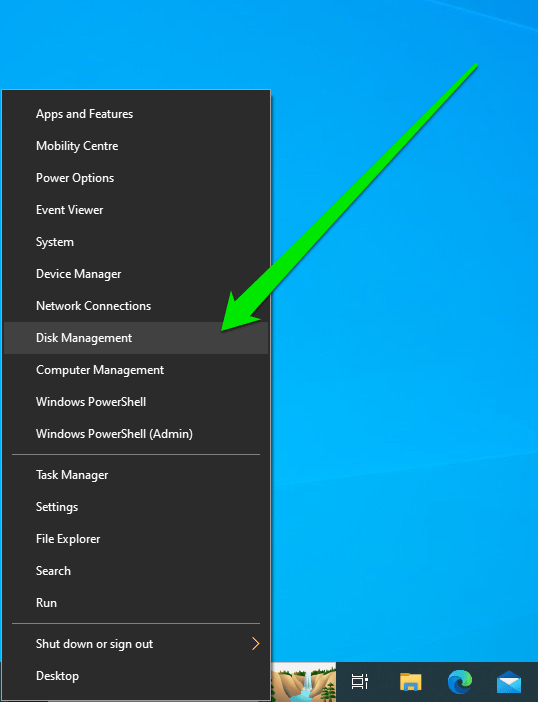
- Right-click the Start button (or press
Win+X) and select Disk Management from the Power User menu.
- After the Disk Management window opens, you will see a list of every drive connected to your PC, including the removable media.
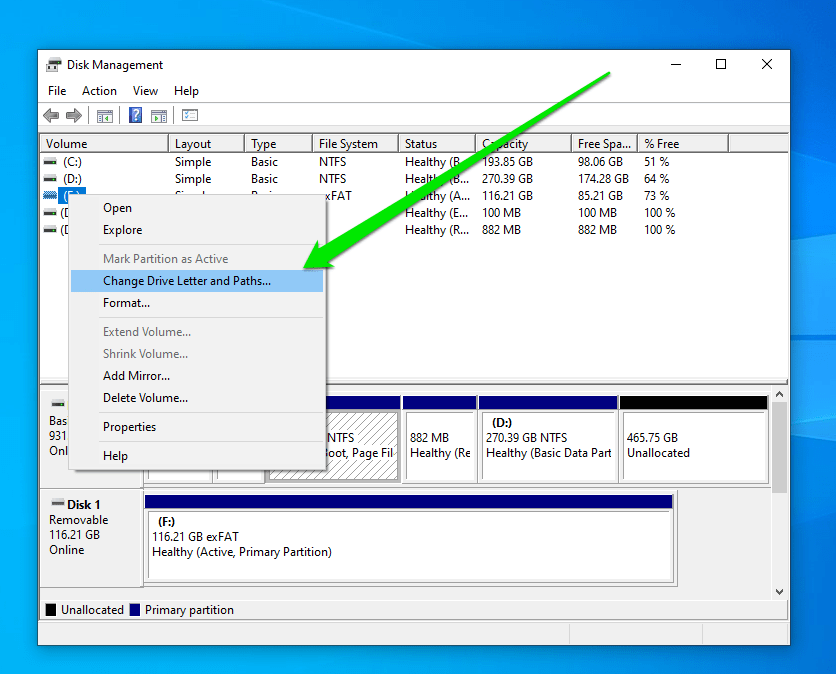
- Right-click on the partition or volume of the removable media whose drive letter you want to change.
- Click Change Drive Letter and Paths when the context menu opens.
- Click Change in the Next dialog window.
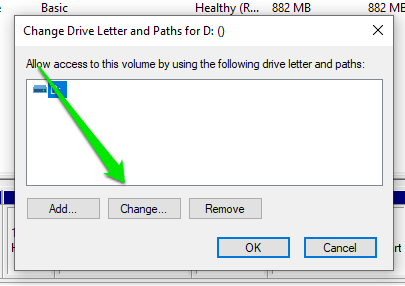
- Choose a new, available drive letter from the drop-down list.

Ensure it’s a drive letter that allows Windows to assign a preceding letter to the removable drive.
For example, if the drive’s current letter is F, assign G or H to it so that Windows will automatically assign F to the ISO.
- Click OK to confirm the change.
- A dialog box might warn that programs that rely on drive letters might not work correctly. Click Yes if you’re sure.
Now, mount the ISO again and check if reassigning drive letters did the trick.
Method 5: Investigate Third-party Software
The ISO mounting problem may be occurring due to software conflicts. You can troubleshoot this particular issue by taking some steps.
Try mounting the file in Safe Mode. Since Safe Mode runs Windows without most third-party applications, you can try running and mounting the ISO in that environment. Follow these steps to Start your PC in Safe Mode:
- Press
Win+Rto launch the Run dialog box. - After Run appears, type
msconfiginto the text box and hit theEnterkey.
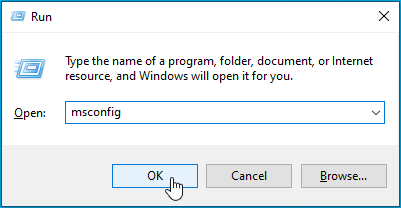
- That action will open the System Configuration dialog window.
- Go to the Boot tab.
- Head to the Boot Options area and check the box next to Safe Boot.
- Select Minimal and click OK.

- Restart your computer.
- Try mounting the ISO file after your computer boots in Safe Mode.
Move on to the next method if the error still appears. On the other hand, if you can now mount the ISO file successfully, try looking at the software applications you recently installed.
Method 6: Use System Restore
If you are suddenly seeing the error appear after being able to mount such files without any hitch in the past, restoring your OS to a previous state may be the right fix.
Thankfully, Windows often sets restore points automatically when your system goes through significant changes, such as a major driver or Windows update.
Follow these steps to restore your PC:
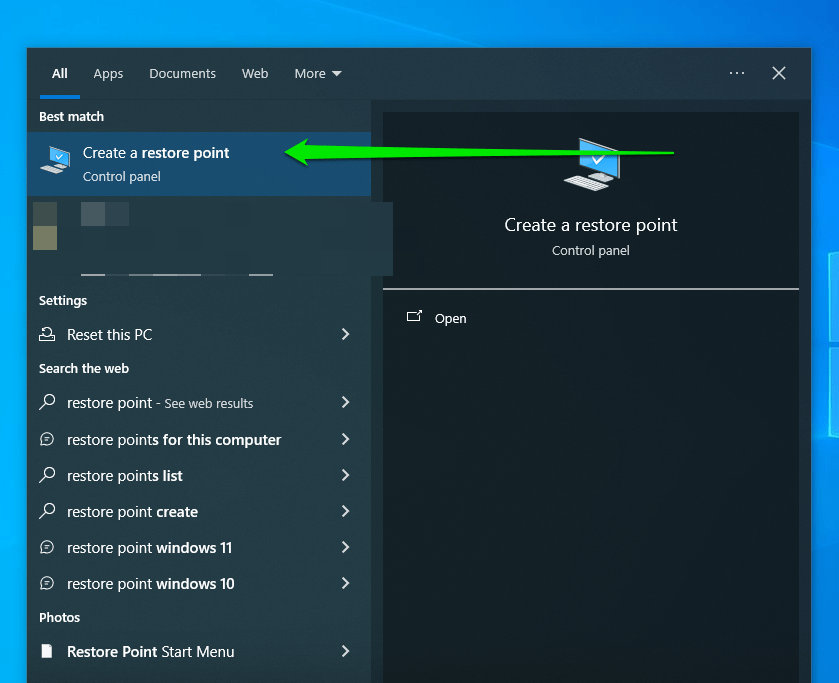
- Go to the Start menu and type
restore point. - Click Create a Restore Point in the results.
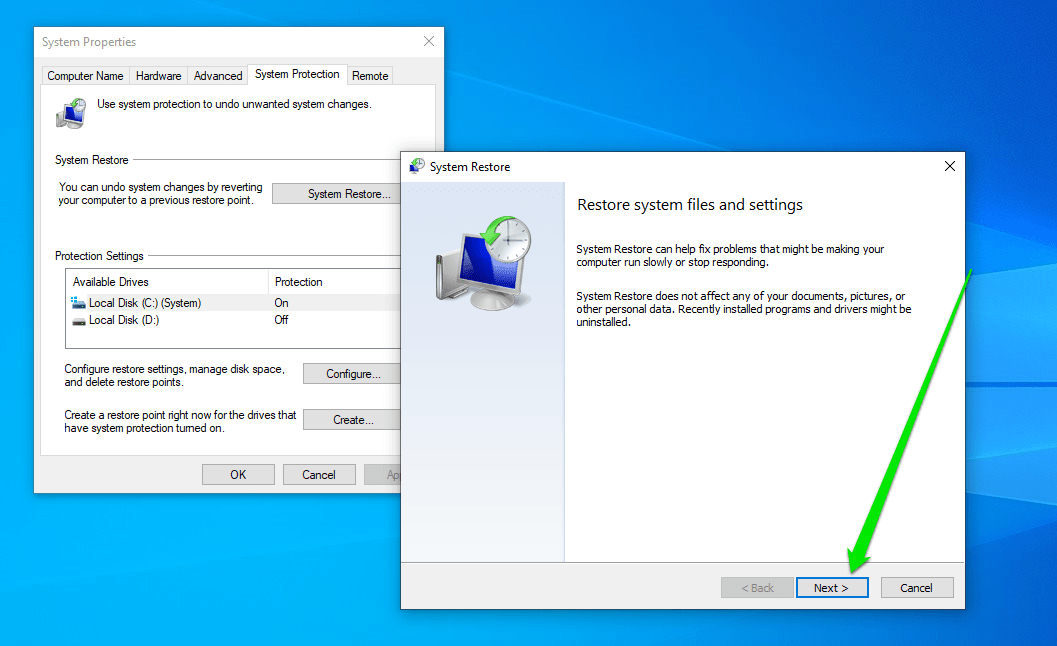
- After the System Properties window opens, click System Restore.

- Select Next in the System Restore window.
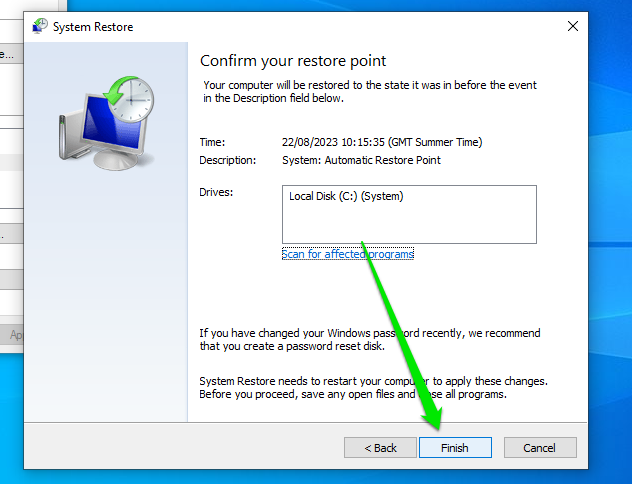
- Select a System Restore point and click Next.

- Click Finish.
Conclusion
Do you have other suggestions for mounting ISO files? We’re looking forward to hearing your ideas in the comments below!
FAQ
The .ISO extension follows the ISO 9660 standardized naming format used for CD-ROM media. The format was the natural choice since ISO image files typically contain everything in a traditional DVD or CD.
An ISO image in computers is a file that contains an exact copy of the data and structure found on optical discs, such as a CDs, DVD, and Blu-ray Discs. So, you can call it a CD or DVD, but without the physical disc.
You can open an ISO file on Windows 10 by right-clicking the file and selecting Mount in the context menu.
Open the ISO file (right-click and click Mount), then locate and run the program’s installation package.
Mounting an ISO file is Windows’ process of recognizing the data structure of the file and reading its content. Since the file is a virtual optical drive, Windows has to treat it as such.
Running an ISO file is the same as opening and “Mounting” it. All you have to do is double-click the file or right-click it and select Mount.
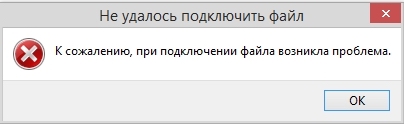
В некоторых случаях при попытке смонтировать файл с ISO образом в Windows может появится ошибка:
Не удалось подключить файл
К сожалению при подключении файла возникла проблема.
Couldn't Mount File
 Sorry, there was a problem mounting the file
В этой статье, мы рассмотрим как исправить проблему с монтированием ISO образа в виртуальный CD/DVD привод в Windows.
Совет 1. Проверьте атрибуты ISO файла
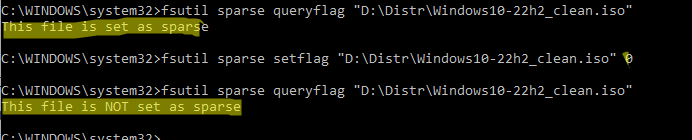
Если Windows не может смонтировать ISO, проверьте не задан ли для файла атрибут SPARSE. Откройте командную строку с правами администратора и выполните:
fsutil sparse queryflag "D:\Distr\Windows10-22h2_clean.iso"
Если команда вернула This file is set as sparse, нужно снять этот атрибут:
fsutil sparse setflag "D:\Distr\Windows10-22h2_clean.iso" 0
Еще раз проверьте состояние атрибута с помощью
fsutil sparse queryflag
. Команда вернет This file is NOT set as sparse.
Если при попытке изменить атрибут файла появится ошибка Error: Access is denied, нужно в свойствах файла отключить атрибут Только чтение

Можно отключить атрибут ReadOnly в свойствах ISO файла или с помощью команды:
attrib -r "D:\Distr\Windows10-22h2_clean.iso"
Если файл с ISO образом был недавно скачан из интернета, нужно разблокировать файл. Откройте свойства файла, На вкладке Общие (General) нажмите кнопку или установите чекбокс Разблокировать (Unblock). У полученного из интернета файла рядом с кнопкой будет указано такое предупреждение:
Осторожно: Этот файл получен с другого компьютера и, возможно, был заблокирован с целью защиты компьютера.
This file came from another computer and might be blocked to help protect this computer)
Теперь попробуйте смонтировать ваш ISO образ из проводника Windows или с помощью PoweShell.
В некоторых случаях может помочь самое простое решение – просто скопируйте ISO файл в другой каталог и смонтируйте образ. Если ISO файл хранится в сетевой папке, доступной по UNC пути, попробуйте скопировать его на локальный компьютер.
Совет 2. Сбросьте настройки CD/DVD приводов в реестре
В некоторых случаях причиной проблем с монтированием ISO файлов в Windows может быть некорректные настройки для CD/DVD приводов (как физических, так и виртуальных). Вы можете сбросить настройки CD устройств через реестр :
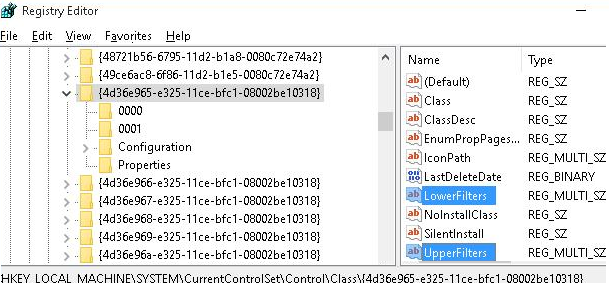
- Запустите regedit.exe
- Перейдите в раздел HKEY_LOCAL_MACHINE\SYSTEM\CurrentControlSet\Control\Class\{4D36E965-E325-11CE-BFC1-08002BE10318}
- Удалите параметры
UpperFilters
и
LowerFilters
Совет. Если в данной ветке будет присутствовать параметр UpperFilters.bak, трогать его не нужно.
- Перезагрузите компьютер. Windows сбросит настройки CD/DVD привода на стандартные.
Совет 3. Не монтируются ISO файлы из проводника Windows
Если ISO файл корректно монтируется с помощью PowerShell команды
Mount-DiskImage
, но не монтируется их проводника Windows, нужно попробовать сбросить ассоциации для файлов с расширением ISO.
- Щелкните по ISO файлу правой кнопкой и выберите Open with
- В окне выберите Windows Explorer и включите опцию Always use this app to open .iso files
Совет4. Проверьте что полный путь к ISO файлу не превышает 213 символов
Один из читателей обнаружил, что ошибка возникает, если общей длина пути к ISO файлу превышает 213 символов. Такой ISO файл удается смонтировать, но для отмонтирования придется перезагрузить Windows.
Иногда при попытке смонтировать ISO образ в Windows может возникнуть ошибка:
Не удалось подключить файл. К сожалению, при подключении файла возникла проблема.
Couldn’t Mount File. Sorry, there was a problem mounting the file.
В этой статье мы рассмотрим, как исправить проблему с монтированием ISO образа в виртуальный CD/DVD привод в Windows.
Вы также можете распаковать ISO с помощью обычного архиватора по нашей инструкции начав с пункта 2.
Приобрести оригинальные ключи активации Windows всегда можно у нас в каталоге от 1099 ₽
1. Проверьте атрибуты ISO файла
Если Windows не может смонтировать ISO, проверьте, не установлен ли для файла атрибут SPARSE. Откройте командную строку от имени администратора и выполните:
fsutil sparse queryflag "D:\Distr\Windows10-22h2_clean.iso"
Если команда вернула This file is set as sparse, снимите этот атрибут:
fsutil sparse setflag "D:\Distr\Windows10-22h2_clean.iso" 0
Проверьте состояние атрибута с помощью команды fsutil sparse queryflag. Команда должна вернуть This file is NOT set as sparse.

Если при изменении атрибута появляется ошибка Error: Access is denied

Отключите атрибут Только для чтения в свойствах файла
Или выполните команду:
attrib -r "D:\Distr\Windows10-22h2_clean.iso"
Если ISO образ был скачан из интернета, разблокируйте файл через свойства. На вкладке Общие установите чекбокс Разблокировать. Теперь попробуйте смонтировать ISO образ снова.

В некоторых случаях поможет простое решение — скопируйте ISO файл в другой каталог или на локальный диск, если он был на сетевом ресурсе.
2. Сброс настроек CD/DVD приводов в реестре
Некорректные настройки для CD/DVD приводов могут быть причиной ошибки при монтировании ISO файлов. Для сброса настроек:
1. Откройте regedit.exe.
2. Перейдите в раздел HKEY_LOCAL_MACHINE\SYSTEM\CurrentControlSet\Control\Class\{4D36E965-E325-11CE-BFC1-08002BE10318}.
3. Удалите параметры UpperFilters и LowerFilters.

4. Перезагрузите компьютер.
Если в ветке присутствует параметр UpperFilters.bak, не трогайте его.
3. Проблемы с монтированием ISO файлов из Проводника Windows
Если ISO файл монтируется через PowerShell командой:
Mount-DiskImage
но не монтируется через Проводник, сбросьте ассоциации для файлов с расширением ISO:
1. Щелкните правой кнопкой мыши по ISO файлу и выберите Открыть с помощью.
2. Выберите Проводник и установите опцию Всегда использовать это приложение для открытия iso файлов.
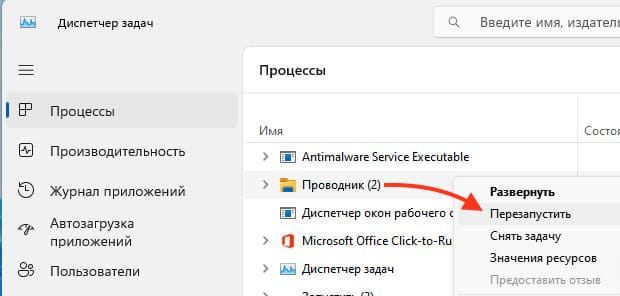
Попробуйте перезапустить Проводник через Диспетчер устройств или командой:
tskill explorer & explorer
4. Проверьте длину пути к ISO файлу
Если длина пути к ISO файлу превышает 213 символов, это может вызвать ошибку при монтировании. В таком случае удается смонтировать файл, но для отмонтирования потребуется перезагрузка Windows.
Лицензионный ключ активации Windows от
“If you can tune into your purpose and really align with it,
setting goals so that your vision is an expression of that purpose,
then life flows much more easily.”
― Jack Canfield
First of all, let us explain what an ISO file is. It is like the physical CD/DVD which is inserted inside a DVD player, a game system, or even a CD/DVD drive to start a program. A physical disk has been digitized and put inside your computer as a file. Not the files that are on the disk, but the disk itself has been converted into a file which is stored in your system. Even though this disk is now virtual, it still works the same way as the physical disk. You can’t just open the file disk with any kind of File Explorer. It also needs a CD/DVD drive which is responsible for reading disks. Therefore, your operating system will need a virtual drive to run ISO files without any issues. The reverse of converting your physical disk to an ISO file is also possible, i.e., converting an ISO file to a physical disk. If you prefer to keep your files in the physical form, then you will be using this process often.
Downloading and installing Windows 10 or any other Windows operating system has been made easy by the introduction of ISO files. This solved the problem of missing disk or even scratched or broken disks. With this method, you can download your Windows 10 operating system and keep it in a safe place.
What if Windows 10 ISO file doesn’t work?
In this article, we are going to show you how to fix Windows 10 ISO file not working. If your Windows 10 ISO file is not working, we suggest that you check the following:
- Make sure that the Windows 10 ISO file download is completed.
- Make sure that your CD/DVD drive is working normally.
- Make sure that the disk you are using to burn the Windows 10 ISO file is new and compatible.
When all that is done, we suggest that you go back to Microsoft’s official site and download the Media Creation tool from scratch.
First of all, you need to re-download the Windows 10 ISO file
- Go to Google and search for the Windows 10 ISO file and open the first link. This will redirect you to the Windows 10 official website.
- Now, under the “Do you want to install Windows 10 on your PC?” option, click Download tool now. This is a media creation tool. So, save this tool and let it finish downloading.
- After the download finishes, double-click on the tool to run it.
- Now, select Create installation media for another PC and then click Next to proceed. Choose your Language, Architecture, and Edition, then click Next.
- In this window, select ISO file as your media to use and click Next. You will be prompted to choose the location where you want the Windows 10 ISO file to be save.
- Choose the location and let the file finish downloading. This may take up some time, depending on the speed of your connection.
- Once the download is done, you can use a third-party tool to burn the Windows 10 ISO file onto a CD/ DVD.
Your Windows 10 ISO file should work fine without any issues now.
Is your computer running slow or suffering system glitches? If so, it may need maintenance. Try running a dedicated PC optimization tool to check the health of your PC and apply the necessary fixes.
Alternatively, we suggest that you use a USB bootable drive instead of trying to burn the file onto a disk
To do this, plug the USB drive into your PC, make sure that there are no important files in it because it will be formatted. Now, run the media creation tool you downloaded from Microsoft. In the process, instead of choosing ISO file as the media you want to use, select USB flash drive. While waiting for the process to complete, you can get a cup of coffee or do some other thing. Do not interrupt the process or unplug the USB drive until it is finished. Now, you have bootable media which you can use to install Windows 10 on any PC.
Pro tip: outdated or missing drivers are one of the many reasons why you encounter unknown errors in your system. Drivers play a vital function in the smooth running of your operating system, and without them, your hardware devices will not be able to communicate with Windows. To avoid this problem, we suggest that you download and install Auslogics Driver Updater. This tool is easy, fast and reliable. You will be able to install all your drivers in just one click. It will scan your system and update all the drivers to their latest versions. You do not need to be worried about downloading and installing the wrong driver.
We hope that this article has solved the Windows 10 ISO file problem. Share it with others who have similar issues.
We appreciate your ideas and comments, and we are ready to answer all your questions regarding the above topic.