
-
VBRon
- Posts: 1
- Joined: 9. Jan 2020, 17:43
USB access crashes Win10 host system
I’m running VirtualBox v 6.1.0 on a Win10 64-bit Enterprise host system. It has the extension pack 6.1.0 also installed. It has an Ubuntu guest installed. Plugging in anything on any USB port when VirtualBox is running causes the windows host to crash with a PNP_DETECTED_FATAL_ERROR, regardless of whether the guest OS is running or stopped. It doesn’t crash if VirtualBox is launched when the device is already in the USB port. Looking at Devices|USB on the running Ubuntu guest menu will show the device, but if the USB device is clicked on that will also cause the Windows host to crash and trigger a restart of the host. The crashing behavior occurs regardless of whether the ubuntu guest USB settings are for USB1.0 (default), USB2.0 or USB3.0. (and in any event, USB plug events cause the windows host to crash regardless of whether the ubuntu guest is running.) Also, windows hypervisor is disabled, this was necessary to allow ubuntu to work in VirtualBox.
Any suggestions? Thanks much!
-
scottgus1
- Site Moderator
- Posts: 20945
- Joined: 30. Dec 2009, 20:14
- Primary OS: MS Windows 10
- VBox Version: VirtualBox+Oracle ExtPack
- Guest OSses: Windows, Linux
Re: USB access crashes Win10 host system
Post
by scottgus1 »
That is weird, doesn’t happen usually. Virtualbox does install a USB driver. I’d suggest either something is wrong with Virtualbox or your host’s USB software.
Uninstall the Virtualbox Extension Pack and Virtualbox itself. You’ll probably need to run Virtualbox as Admin to uninstall the Extension Pack. Your guests will stay where they are ready for use again.
Reboot your host and try to use USB devices. If your host stays running then re-download Virtualbox and the Extension pack, fresh downloads.
Install Virtualbox by right-clicking the installer and choosing Run As Administrator. Do this even if you are already an Admin.
Try a guest with USB 1. If this works, install the Extension Pack (right-click-run-as-Admin also required). Then try the USB device with USB2 and 3.
-
tttonyyy
- Posts: 1
- Joined: 20. Mar 2020, 15:14
Re: USB access crashes Win10 host system
Post
by tttonyyy »
Came by to say that I’ve got the exact same issue with VirtualBox 6.1.4. Host is 64-bit Win10 1909 and the VM Centos 7.6 with guest additions.
Any USD device inserted into the host (mouse, USB headset) results in a BSOD with PNP_DETECTED_FATAL_ERROR.
Eventlog shows «The driver detected an internal driver error on \Device\VBoxNetLwf» which may or may not be related.
-
Craigms
- Posts: 1
- Joined: 16. Jun 2020, 23:36
Re: USB access crashes Win10 host system
Post
by Craigms »
Same issue here. Win 10 Pro host 64 bit, Ubuntu 64bit guest. In fact, the guest doesn’t seem to matter as it wasn’t running at the time.
Started windows. Inserted USB device (Arduino 33 BLE dev kit), no problem. Removed USB device.
Started Virtual Box (but didn’t start a VM). Inserted USB device, crash. BSoD.
Memory dump attached (if any use)
Windows Error Log:
Code: Select all
Fault bucket 0xCA_2_VBoxUSBMon!vboxUsbFltDevPopulate, type 0
Event Name: BlueScreen
Response: Not available
Cab Id: df1489aa-9ab6-41e4-b09a-810d0fb903cf

Problem signature:
P1: ca
P2: 2
P3: ffff88895c6db9f0
P4: 0
P5: 0
P6: 10_0_17763
P7: 0_0
P8: 256_1
P9:
P10:

Attached files:
\\?\C:\WINDOWS\Minidump\061620-10718-01.dmp
\\?\C:\WINDOWS\TEMP\WER-14375-0.sysdata.xml
\\?\C:\WINDOWS\MEMORY.DMP
\\?\C:\ProgramData\Microsoft\Windows\WER\Temp\WER4788.tmp.WERInternalMetadata.xml
\\?\C:\ProgramData\Microsoft\Windows\WER\Temp\WER4799.tmp.xml
\\?\C:\ProgramData\Microsoft\Windows\WER\Temp\WER4798.tmp.csv
\\?\C:\ProgramData\Microsoft\Windows\WER\Temp\WER47B8.tmp.txt

These files may be available here:
\\?\C:\ProgramData\Microsoft\Windows\WER\ReportArchive\Kernel_ca_67677c9a7cae4f564ef94a83d037f6b8883a75ca_00000000_cab_06208721

Analysis symbol:
Rechecking for solution: 0
Report Id: 39859ba9-bb6c-458b-965e-6365bf4a3d52
Report Status: 268435456
Hashed bucket:
Cab Guid: 0
- Attachments
-
- 061620-10718-01.xz.zip
- Memory dump (xz compression)
- (237.38 KiB) Downloaded 10 times
-
- Report.zip
- Error report
- (1.95 KiB) Downloaded 9 times
-
scottgus1
- Site Moderator
- Posts: 20945
- Joined: 30. Dec 2009, 20:14
- Primary OS: MS Windows 10
- VBox Version: VirtualBox+Oracle ExtPack
- Guest OSses: Windows, Linux
Re: USB access crashes Win10 host system
Post
by scottgus1 »
Locking for me-too-itis.
All who have posted and would have wanted to post, please go through USB basics and troubleshooting. If steps 1 through 7 cannot get your device working, please provide the troubleshooting command outputs in step 8, as text in
Code: Select all
tags. Also zip and post the requested vbox.log, using the forum's Upload Attachment tab. In a new topic, please.Один и тот же BSOD может быть вызван разными причинами, поэтому более или менее корректно установить источник неполадки можно разве что проанализировав файл дампа. Правда, подсказка даётся уже в названии ошибки, что сразу позволяет сузить круг поиска. Ошибка, которую мы сегодня рассмотрим, имеет название PNP DETECTED FATAL ERROR, отсылающее нас к Диспетчеру PNP — компоненту операционной системы, обеспечивающему взаимодействие с системными модулями, драйверами и приложениями, необходимое для подключения и работы устройств. Сама PnP же — это технология, которая позволяет автоматизировать в системе идентификацию и конфигурирование разных устройств.
Простейшим примером работы PnP может послужить автоматическое монтирование в Проводнике подключаемых по USB накопителей, эта же технология используется для идентификации устройств периферии — USB-мышек, клавиатур и так далее. Вам не нужно отдельно устанавливать для этих устройств драйвера, так как Windows сама их определяет, сама ставит их драйвера, сама их настраивает. Если драйвер подключённого PNP-устройства по какой-то причине оказывается повреждённым, удалённым или просто несовместимым, происходит системный сбой, результатом которого становится синий экран смерти PNP DETECTED FATAL ERROR. Были, однако, отмечены случаи, когда ошибка возникала вследствие неполадок в работе жёсткого диска.
Если ошибка появилась вскоре после подключения к компьютеру любого нового устройства с поддержкой технологии PnP, отключите его. Если мера кажется вам слишком радикальной, можно попробовать удалить его из Диспетчера устройств, а затем перезагрузить компьютер, чтобы устройство смогло установиться повторно с драйверами по умолчанию.
Аналогичным образом поступаем, если ошибка стала появляться после установки какого-нибудь программного обеспечения, работающего в фоновом режиме. Поскольку чаще всего источником подобных проблем становятся антивирусы, попробуйте отключить используемый на компьютере антивирус и понаблюдайте за системой. Если BSOD с указанной ошибкой перестал появляться, значит всё дело в антивирусе. Замените его.
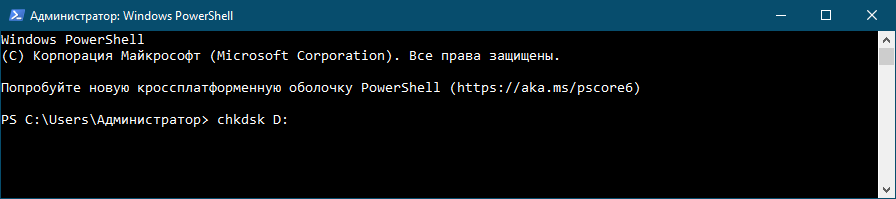
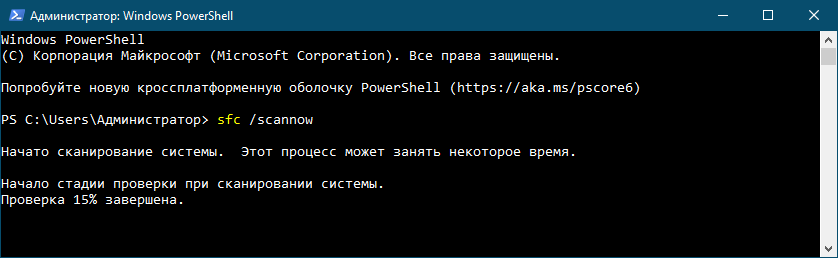
Поскольку ошибка PNP DETECTED FATAL ERROR может быть связана с неполадками в работе диска, проверьте последний встроенной утилитой chkdsk. Если есть такая возможность, снимите диск, подключите его к другому ПК, откройте на нём командную строку и выполните команду chkdsk X:, где X — буква диска. В случае обнаружения ошибок повторите команду с параметрами /f и /r. Если возможность подключения диска отсутствует, проверяем его «на месте» указывая буквы логических разделов. Заодно стоит проверить целостность системных файлов, для чего в той же командной строке необходимо выполнить команду sfc /scannow.
Мы не рекомендуем обновлять драйвера ради самого обновления, но это такой случай, когда обновиться всё же стоит. Ручное обновление драйверов — процесс долгий и утомительный, поэтому лучше всего воспользоваться какой-нибудь программой для обновления драйверов, например, Snappy Driver Installer. И наоборот, если ошибка стала появляться после установки новых версий драйверов, откатываемся к предыдущим версиям.
Некоторые пользователи сообщают, что им удалось устранить проблему отключением кэширования содержимого БИОС в кэш-память. Такое вполне возможно, если эта опция включена, чего по идее быть не должно, так как в современных версиях операционных систем она не используется. Зайдите в вашем BIOS в раздел дополнительных настроек (Advanced), найдите опцию System BIOS Cacheable (она может называться также System ROM Cacheable) и установите для неё значение Disabled.

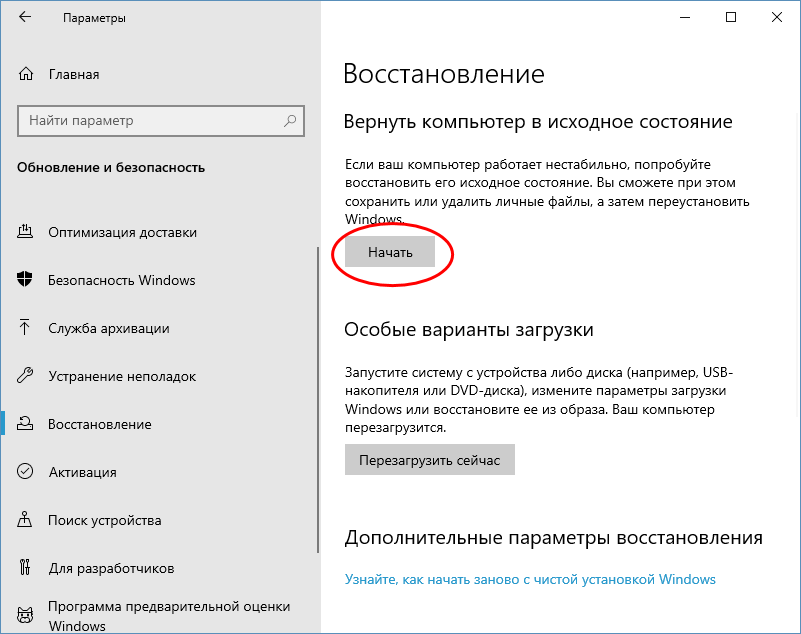
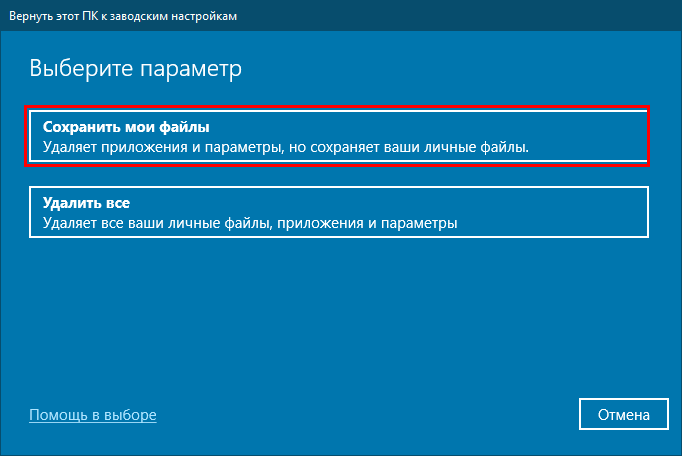
Если на компьютере включена защита дисков и имеются точки восстановления, выполните откат к предыдущей точке (для вызова мастера выполняем команду rstrui в окошке Win + R). Наконец, вы можете пойти на радикальные меры и сбросить Windows к изначальному состоянию. Для этого переходим в приложении Параметры в раздел Обновление и безопасность → Восстановление, жмём «Начать» и следуем указаниям мастера. Сброс приведёт к обнулению системных настроек и удалению всех установленных на компьютере сторонних программ, зато с немалой долей вероятности положит конец появлению BSOD с ошибкой PNP Detected Fatal Error.

The PNP Detected Fatal Error occurs with the error message saying, “Your Device Run into a problem and needs to restart ” while booting the Windows. This error can also be called BSOD (Blue Screen Of Death), which can occur due to faulty drivers and damaged hardware.

The root cause of this error is the corrupted drivers. However, disk errors, corrupted Windows updates, and system files can lead you to this error message.
BSOD errors can also be caused by the hardware issues such as faulty memory, power supply issues, and overheating of components. Therefore, it is important to understand that if this error message does not resolve, it could result from damaged hardware.
Moreover, you might be unable to boot the Windows due to this error message. In this case, you will need to start Windows in safe mode to apply the troubleshooting methods.
1. Run System Restore
If you are familiar with the system restore, you might have created a restore point to take your Windows to a previous state if something goes wrong. This utility removes all the drivers, programs, and recently installed Windows updates.
If corrupted system files, drivers, and third-party programs are behind fetching this error message, using a restore point might be a great option to start the troubleshooting. You can visit this article if you don’t know about a restore point. Follow the steps to restore the Windows to the previous system restore point:
- Turn on your computer and wait for the logo screen
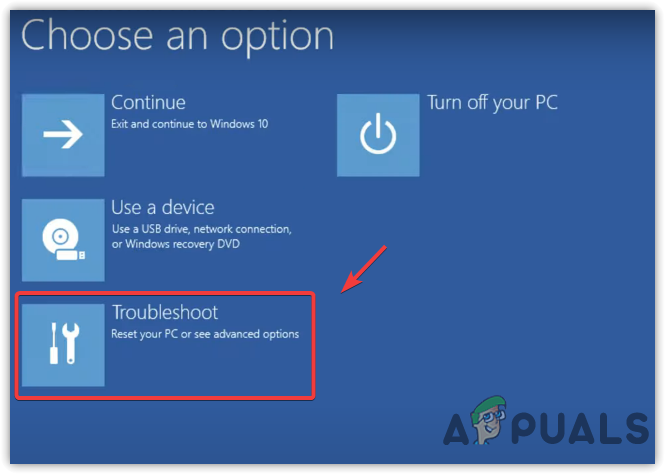
- Once you see a logo screen, turn off your computer and repeat this process three times to navigate to the options screen
- Then click Troubleshoot > Advanced Options > System Restore
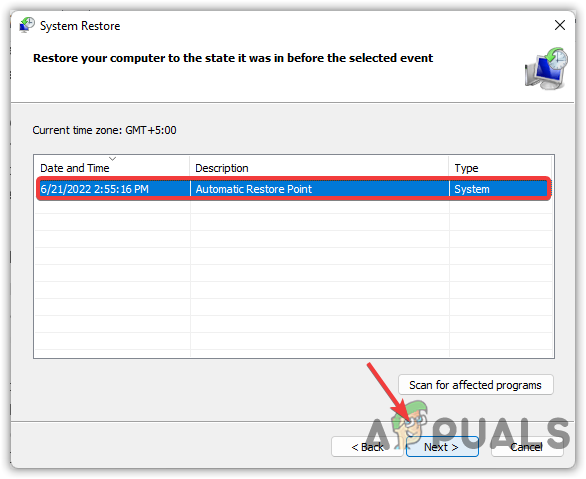
- Wait for the Windows to reboot, then click Next

Click Next to Start - Select a restore point, then click Next
Selecting Restore Point - Click Finish to start the process.

2. Boot Windows In Safe Mode
The error can also be a result of a corrupted Windows update. If you have updated your Windows to the latest version, we recommend you uninstall the recent updates and revert all the changes you have applied to your Windows, including uninstalling third-party programs.
To uninstall the Windows updates, you will need to boot the Windows in a safe mode as you might be stuck into a reboot loop. If the error does not resolve, try performing a clean boot. Below are the steps to boot Windows in safe mode to uninstall the Windows update:
- First, turn on your computer by pressing the Power button
- Wait for the logo to appear and again turn off the computer
- Repeat the above process until the preparing Windows screen appears
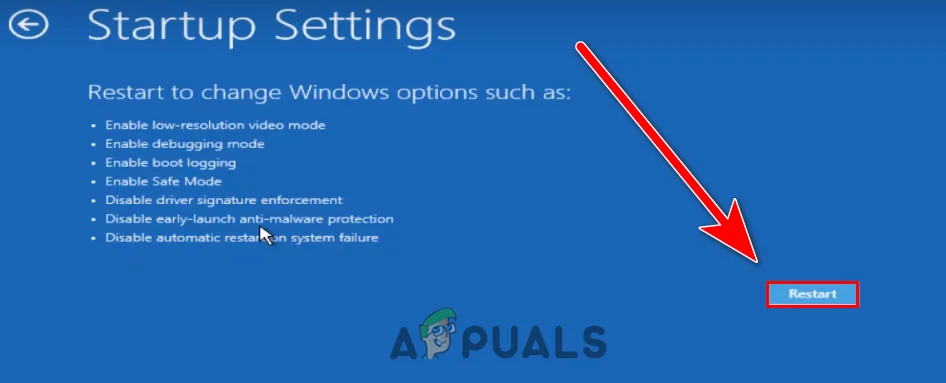
- Once it appears, navigate to Troubleshoot > Advanced Options > Startup Settings

Navigate to Troubleshoot - Click Restart and wait for the boot options to appear

Restart to Access Safe Mode - Press the F5 to boot into Safe Mode
- Once you are in Safe Mode, uninstall the Windows update and do a clean boot by following the below method.
2.1 Uninstall Windows Update
- After booting Windows into Safe Mode, open the Control Panel by typing in the Windows search bar
- Navigate to the following path
Control Panel\Programs\Programs and Features
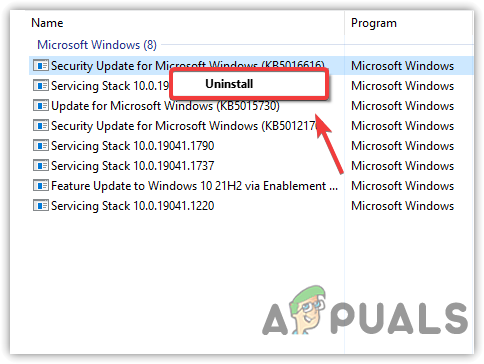
- Click View Installed Updates
Click to View Installed Updates - Now, uninstall the recently installed Windows updates by selecting and clicking Uninstall button

Uninstalling Windows Update From Control Panel - Once done, try restarting Windows to check if the error persists.
2.2. Perform a Clean Boot
A clean boot is a process that disables irrelevant services, third-party applications, and unnecessary drivers at the startup to determine the source of a problem. Hence, if the error occurs due to third-party applications, conflict of services, and drivers, then performing a clean boot will help fix this error. Here are the steps:
- Press the Windows key and type MSConfig
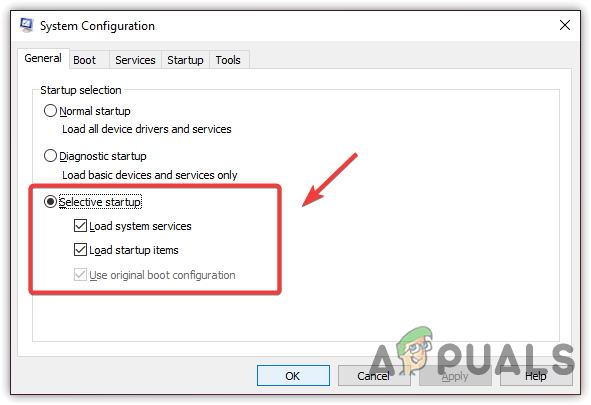
Launching System Configuration Settings - Open System Configuration and choose the Selective Startup

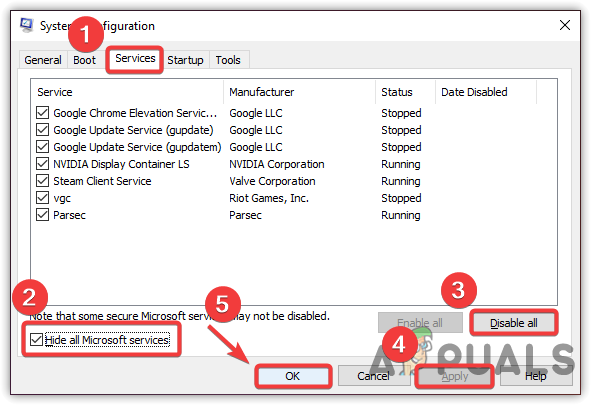
Enabling Selective Startup - Click the Services tab from the top bar
- Select Hide All Microsoft Service, then click Disable All
- Click Apply and click OK
Restarting Computer in a Clean Boot - Restart your computer and check if this method fixed the error.
3. Use Startup Repair
Startup repair is an inbuilt troubleshooting utility provided by Microsoft for the recent version of the Windows operating system. The utility fixes the common problems that can prevent Windows from booting correctly. Follow the steps to use the startup repair:
- Press the power button to turn on your computer
- Once the logo screen appears, turn off your computer
- Repeat this process three times to trigger the Advanced Troubleshooting
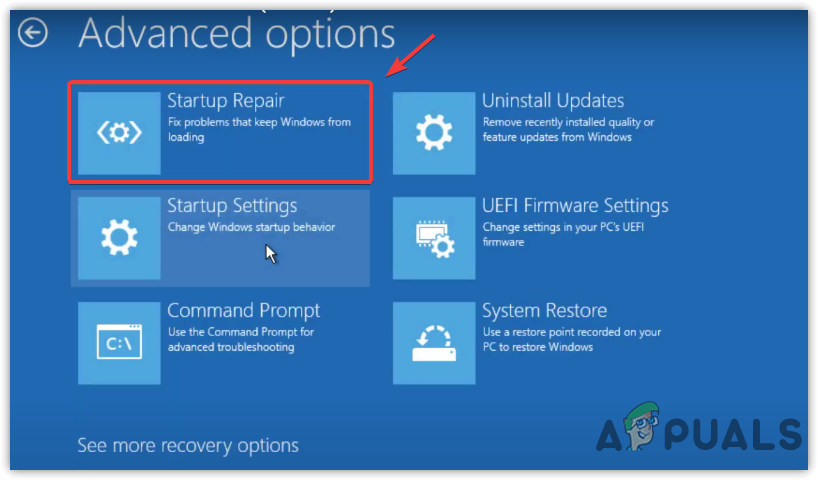
- Navigate to Troubleshoot > Advanced Options
- Click the Startup Repair and wait for the Windows to diagnose properly

Running Startup Repair - Once done, check if the issue is resolved.
4. Run CHKDSK
CHKDSK is an inbuilt utility that allows users to scan and fix disk errors. CHKDSK command displays the status of a volume as an output while the chkdsk /f /r command fixes the disk errors found in the volume. Therefore, if the error occurs due to any disk error, running CHKDSK will help fix this issue. Below are the steps to executing the CHKDSK command:
- Follow the three steps mentioned in the above method to bring the options screen
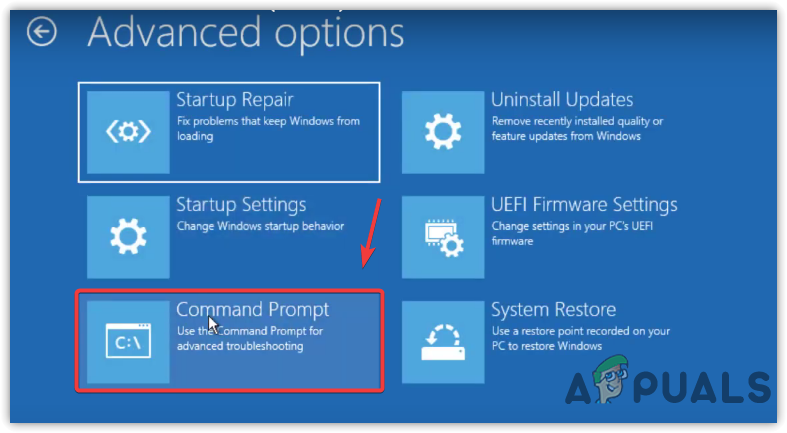
- Go to Troubleshoot > Advanced Options
- Click the Command Prompt

Launching Command Prompt - Type the following command and wait for it to complete
chkdsk C: /F /X

Running CHKDSK - Once done, restart your computer to check if the error is fixed.

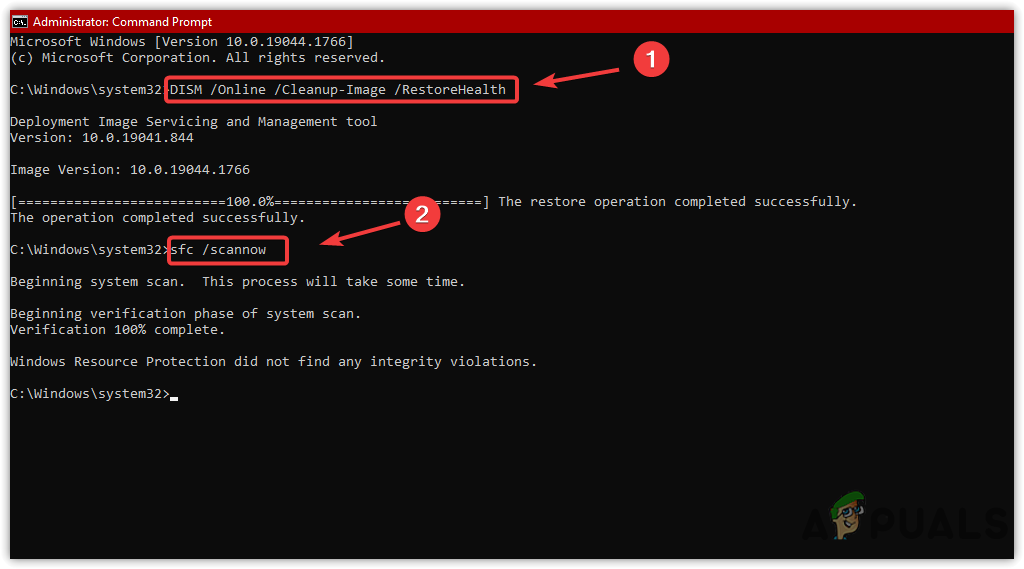
5. Run SFC And DSIM Commands
SFC or System File Checker is a command line utility used to restore corrupted system files. In comparison, the DISM or Deployment Image Servicing and Management allows the user to repair the corrupted Windows images. If you have corrupted Windows images or files in the system disk, the error will likely appear, and to avoid this, you have to execute the SFC and DSIM commands via the command prompt. To do so:
- Go to the Advanced Troubleshooting options by following the method
- Click Troubleshoot > Advanced Options > Command Prompt
Navigating to Command Prompt - Type the following commands in the terminal
DISM /Online /Cleanup-Image /RestoreHealth
sfc /scannow

Repairing System Files - Then wait for the process to be completed
- Restart your computer to check if the error is fixed.
6. Reinstall Display Driver
As we mentioned above, the error can either be caused by faulty Graphics drivers. If you have any corrupted driver that might be preventing you from booting the Windows, reinstalling Graphics drivers will help to fix this error.
6.1 Uninstall Graphics Driver Via Display Driver Uninstaller
A display driver uninstaller is an application that is used to uninstall the device drivers from the computer. This application allows the users to remove the drivers entirely along with the registry files, which prevents conflict between drivers. This is why we recommend DDU over the device manager. Follow the steps:
- Access the Safe Mode by following the 2nd method
- Then go to the following link to download Display Driver Uninstaller
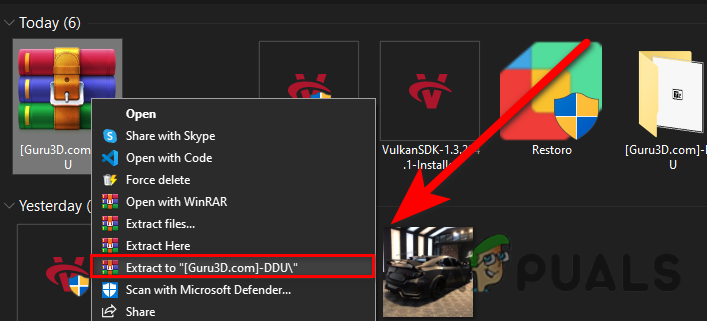
- Once the downloading is done, extract the DDU ZIP folder
Note: We recommend using WinRar for this process. - Right-click the DDU ZIP folder and click Extract to DDU

Click to Extract DDU ZIP Folder - Open the extracted folder, and double click the Display Driver Uninstaller
- Again, click the Extract button to navigate to the folder
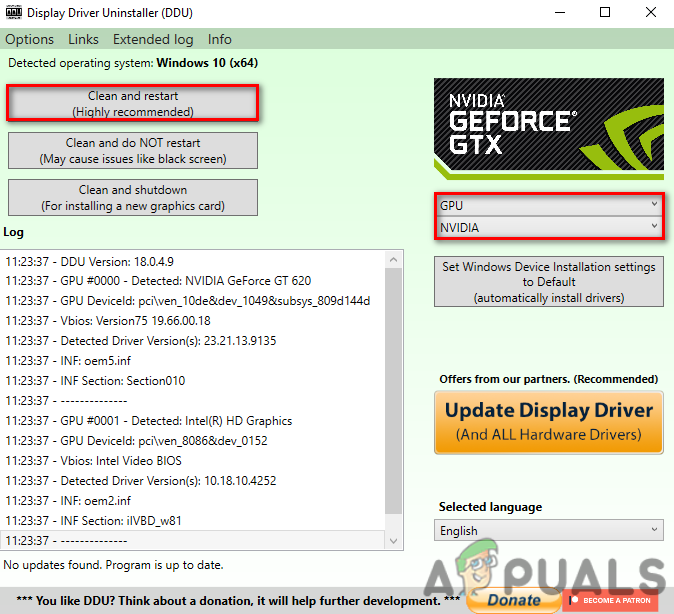
Clicking Extract - Run the Display Driver Uninstaller
- Select the device type and its vendor, then click Clean And Restart

Selecting Device Type and GPU Vendor - Once done, proceed to the next step.
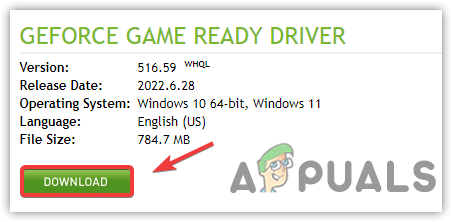
6.2 Install Graphics Driver
- To install the latest driver, go to your Graphics Card manufacturer’s website
- Select your Graphics Card to find the latest driver for your GPU
- Click the Download button, then install the driver by following the on-screen instructions.

Downloading Latest Graphics Driver - After installing the driver, check if the error is fixed.
Zainab Falak
Zainab Falak is a highly educated professional with a background in actuarial science and a strong passion for technology. Her expertise lies in the field of data analytics and she is a proficient programmer in languages such as Python and R. At Appuals, Zainab shares her extensive knowledge of Windows 8, 10, and 11, covering a broad range of topics related to these operating systems. Zainab’s ability to effectively communicate technical concepts in a clear and concise manner has earned her recognition and respect in the tech community. She is committed to staying up-to-date with the latest developments in the field and providing readers with insightful and informative content.
PNP detected Fatal is one of the common BSOD errors faced by many Windows users.
You may get this error either due to software incompatibility or hardware failure.
In this article, I will discuss the solutions to fix such BSOD errors. So, have a look!
Also read:
- Bad Pool Caller BSOD Error – How To Fix?
- Windows 10 Critical Service Failed BSOD Error – Easy Fixes
How To Fix The PNP Detected Fatal Error?
Follow the solutions given here and perform them to easily fix this BSOD error.
1. Boot Into Safe Mode
If you cannot boot into the Windows normally, then boot into Safe Mode following the process mentioned below and then perform the solutions.
Follow the instructions below to do so:
- Boot your PC with the Windows Installation media and click on the Repair My Computer option on the Install Windows 10 page to enter Startup recovery menu.
Otherwise you can restart your PC 3 times consecutively using the power button, which should make your PC boot to the Recovery menu on the third restart.
- In the Startup recovery menu, select the Troubleshoot option.
- Choose the Advanced options, and then select the Startup Settings.
- Click on the Restart option.
- After restart, press 4 or 5 (you can also press the function keys F4 or F5) from the keyboard to start Windows in Safe Mode or Safe mode with Networking.
2. Update Windows
Outdated Windows may trigger BSOD errors. So update the Windows to the latest version to fix the issue.
To update the Windows to the latest version, follow the steps given below:
- Press Windows + I hotkeys from the keyboard to open the Windows Settings.
- Select the Update & Security option from the list.
- Click on the Check for Updates button.
Windows will notify you if there are any available updates. Download and install any available updates and restart your PC.
3. Update Device Drivers
If upgrading Windows to the latest version couldn’t solve the issue, then update all the drivers one by one.
To update the drivers, follow the steps given below:
- Press Windows + X to open the Quick Link menu and select Device manager from the list.
After opening the Device Manager, you will have to find the outdated drivers and update them. Here I have shown how to update the audio drivers.
- Expand the Audio inputs, and outputs section.
- Right-click on the outdated driver and click on the Update driver option.
- Next, click on the Search automatically for drivers option.
After the driver is updated, click on Close and update the next driver following the same method.
4. Run a SFC Scan
You may also get BSOD error due to corrupted system files. An SFC scan searches and fixes these corrupted files.
To run the SFC scan, follow the steps given below:
- Type cmd in the Windows search bar and right-click on the 1st option.
- After the elevated Command Prompt window opens, type sfc /scannow command and hit the Enter key.
Wait until the scanning process is completed and then restart your PC. Check if the issue is resolved, else go to the next solution.
5. Reinstall The Problematic Software
If you are getting the BSOD error while trying to run a certain app, then try reinstalling it.
Here is how you can uninstall it:
- Type Control Panel in the Windows search bar and select the 1st option.
- Change the View by option to large or small icons.
- Click on Programs and features.
After the window opens, you will see all the installed applications on your PC.
- Right-click on the problematic application and choose the Uninstall option.
Follow the on-screen instructions to completely remove the application.
Restart the PC and check if the issue has resolved. If the issue gets fixed, reinstall the application and again check if the issue returns.
6. Perform a System Restore
If you have a system restore point created prior to this BSOD error, then you can simply revert back to it and solve the problem.
If you have not created any system restore point before the problem first appeared, then skip this solution.
To perform a system restore, follow the steps given below:
- Type System Restore on the Windows Search bar and click on the Create a restore point option.
- Select the System Restore button under the System Protection tab.
- From the next Window, click on the Choose a different restore point and click on the Next button.
- Select the Restore point you want to revert back to. Check the date and time of the Restore point to be accurate. Click on the Next button.
- Finally, click on the Finish button and wait for the process to complete.
7. Disable Your Antivirus
Your Antivirus can also trigger the PNP detected fatal error.
If you are using any third-party antivirus, then follow the 5th solution to uninstall it from the control panel.
If you don’t use any third-party tool, then temporarily disable the Windows Security.
Follow the steps below to do so:
- Type Windows Security on the Windows search bar and select the 1st option.
- Choose the Virus and threat protection option from the left panel.
- Select the Manage settings option under the Virus & threat protection settings option.
- Click on the Real-time protection and Automatic sample submission toggle button to turn off the Windows Defender as shown in the picture.
8. Reset Windows
If none of the above solutions work, try resetting your Windows.
Before following this method, make sure to backup all of your important data.
To reset Windows from the Advanced Startup menu, follow the steps given below:
- Open Advanced Startup recovery options as shown in the 1st solution.
- After the menu opens, select the Troubleshoot option.
- Choose the Reset this PC option from the next page.
- Select Remove Everything.
Follow the on-screen instructions to complete the process. Have patience and don’t interrupt the process.
The time taken to reset the PC depends upon the PC configuration.
Frequently Asked Questions [FAQs]
1. How To Fix Fatal Error?
Fatal errors or BSOD errors can easily be fixed by updating the OS and drivers or performing a system restore.
2. Why Am I Getting A Fatal Error?
The fatal error is most often caused by the outdated or corrupted system files, outdated device drivers, incompatible Windows update or hardware issues.
3. Is BSOD Error Caused Due To Virus?
BSOD error can be caused due to corrupted drivers or system files, outdated OS, hardware issues, interference of antivirus programs.
Closing Words
So, there you have it, now you know how to deal with PNP Detected Fatal Error. Let us know which solution worked for you in the comment section provided below.
Experiencing system errors on Windows can be frustrating, but understanding how to troubleshoot and resolve them is essential. One such critical error is the «PNP DETECTED FATAL ERROR,» which can cause your computer to stop working and display a blue screen. If you’re facing this issue on Windows 11 or 10, don’t panic; this article will guide you through the causes, symptoms, and various methods for fixing it.
Understanding PNP (Plug and Play)
Before diving into solutions, it’s important to understand what PNP (Plug and Play) means in the context of Windows. PNP is a technology that allows your operating system to automatically recognize and configure hardware components without requiring manual installation. When you connect a device to your computer—be it a mouse, keyboard, printer, or external hard drive—Windows detects it and installs the necessary drivers to make it functional.
However, if there are issues with the hardware or driver compatibility, Windows may encounter errors, and one of the critical errors you might see is «PNP DETECTED FATAL ERROR.»
Causes of PNP DETECTED FATAL ERROR
The «PNP DETECTED FATAL ERROR» can be triggered by various factors, including:
-
Faulty Hardware: The most common cause is malfunctioning hardware. A failing component such as RAM, the motherboard, or connected peripherals can trigger this error.
-
Driver Issues: Incorrect, corrupted, or outdated drivers can lead to compatibility problems and trigger the PNP error.
-
Windows Updates: Sometimes, newly installed Windows updates can cause conflicts with existing hardware or device drivers, resulting in fatal errors.
-
File System Corruption: Corruption in system files can lead to inconsistencies in how hardware devices are recognized, resulting in errors.
-
BIOS Settings: Incorrect settings in the BIOS related to hardware configuration can also trigger this issue.
Symptoms of PNP DETECTED FATAL ERROR
When you encounter the PNP DETECTED FATAL ERROR, you may notice several symptoms. The most prominent sign is encountering a Blue Screen of Death (BSOD), displaying a blue screen with the error message. This often leads to sudden system crashes and restarts, making it difficult to use your computer normally.
Other symptoms may include:
- Frequent system crashes.
- Inability to boot into Windows.
- Slow performance and lag.
- Issues recognizing connected devices.
Detailed Steps to Fix PNP DETECTED FATAL ERROR
If you’re dealing with the PNP DETECTED FATAL ERROR, here are several steps to help you troubleshoot and resolve the issue.
1. Restart Your Computer
Before diving into deep troubleshooting, it’s worth performing a simple restart. Often, temporary glitches result in errors that can be resolved with a restart. Simply save any work-in-progress (if possible) and reboot your computer.
2. Boot in Safe Mode
Booting your computer in Safe Mode can help isolate the problem. In Safe Mode, Windows limits itself to basic drivers and services, which can help you identify whether problems stem from third-party software or drivers.
To boot in Safe Mode:
- Press the
Windows + Rkeys. - Type
msconfigand hit Enter. - Go to the Boot tab and check «Safe boot,» then select «Minimal.»
- Click OK and restart your computer.
If your system works fine in Safe Mode, the issue could be caused by a third-party application, driver, or service.
3. Remove Recently Installed Hardware
Since the PNP error can arise due to faulty hardware, removing any recently added components may help resolve the problem. This can include peripherals such as printers, external drives, or other USB devices. Disconnect these devices and then restart your computer.
4. Update or Roll Back Drivers
Outdated or incompatible drivers are often a culprit behind the PNP DETECTED FATAL ERROR. Here’s how to manage your drivers:
Updating Drivers:
- Right-click the Start button and select «Device Manager.»
- Expand the categories to find the hardware you want to update.
- Right-click the device and select «Update driver.»
- Choose «Search automatically for updated driver software.»
Rolling Back Drivers:
If you notice that your system began exhibiting issues after a specific driver was updated, rolling back to a previous version may resolve the issue.
- In Device Manager, right-click the problematic device.
- Select «Properties» and go to the «Driver» tab.
- Click on «Roll Back Driver.»
5. Disable Automatic Restart
Disabling automatic restart can allow you to see the full error message, providing additional information to help troubleshoot the issue.
- Right-click «This PC» on your desktop or in File Explorer and select «Properties.»
- Click «Advanced system settings.»
- In the Startup and Recovery section, click «Settings.»
- Uncheck the «Automatically restart» option and click OK.
6. Check Disk for Errors
Check for disk errors that may be causing the problem. You can perform this check using the built-in Windows utility called CHKDSK.
- Open Command Prompt as an administrator (search for «cmd,» right-click, and select «Run as administrator»).
- Type
chkdsk /fand hit Enter. - Follow the prompts to schedule a disk check at the next restart.
7. System File Checker (SFC) Scan
Running an SFC scan can help repair corrupted system files.
- Open Command Prompt as an administrator.
- Type
sfc /scannowand press Enter. - Wait for the scan to complete, and follow any instructions provided.
8. Perform a System Restore
If the PNP DETECTED FATAL ERROR started appearing after specific changes to your system, performing a system restore can revert your system to an earlier point when it was functioning correctly.
- Press the
Windows + Rkeys, typerstrui.exe, and hit Enter. - Follow the prompts to select a restore point and complete the restoration process.
9. Run Windows Memory Diagnostic
Memory issues can also cause critical errors. The Windows Memory Diagnostic tool helps identify any RAM issues.
- Search for «Windows Memory Diagnostic» and open the application.
- Select «Restart now and check for problems.»
- The computer will restart and run tests on the memory.
10. Reset BIOS Settings to Default
Sometimes the problem may originate from incorrect BIOS settings. Resetting the BIOS to factory defaults can help.
- Restart your computer and enter BIOS/UEFI (commonly by pressing F2, F10, DEL, or ESC during boot, depending on your motherboard).
- Look for a «Reset to Default» option, which varies based on the motherboard manufacturer, and save your changes.
11. Check for Windows Updates
Keeping your operating system updated ensures that you have the latest patches that can fix bugs and compatibility issues.
- Go to Settings (
Windows + I). - Navigate to Update & Security > Windows Update.
- Click «Check for updates» and install any available updates.
12. Reinstall Drivers
If updating or rolling back drivers doesn’t resolve the issue, you may need to completely uninstall and then reinstall the drivers.
- Access Device Manager.
- Right-click on the device in question and select «Uninstall device.»
- Restart your computer, allowing Windows to reinstall the driver automatically.
13. Reset Windows
As a last resort, if the error persists after trying all other methods, resetting Windows may be necessary. This option can save your files while removing installed applications and restoring system settings.
- Go to Settings (
Windows + I). - Navigate to Update & Security > Recovery.
- Under «Reset this PC,» click «Get started» and choose your preferred option.
14. Seek Professional Help
If you’ve tried all of the above steps and the problem remains unresolved, it may be time to consult a professional. They can conduct hardware diagnostics and address any underlying issues.
Conclusion
The PNP DETECTED FATAL ERROR on Windows 10 and 11 can be a daunting problem, but it’s often fixable through systematic troubleshooting. By systematically checking hardware, drivers, and system settings, you can often identify and resolve the root cause of this issue. Remember to maintain regular backups of your important data and keep your operating system updated to reduce the chances of encountering critical errors like the PNP DETECTED FATAL ERROR.
By following the outlined methods, you should be able to restore your system functionality, ensuring a smoother user experience.