Один и тот же BSOD может быть вызван разными причинами, поэтому более или менее корректно установить источник неполадки можно разве что проанализировав файл дампа. Правда, подсказка даётся уже в названии ошибки, что сразу позволяет сузить круг поиска. Ошибка, которую мы сегодня рассмотрим, имеет название PNP DETECTED FATAL ERROR, отсылающее нас к Диспетчеру PNP — компоненту операционной системы, обеспечивающему взаимодействие с системными модулями, драйверами и приложениями, необходимое для подключения и работы устройств. Сама PnP же — это технология, которая позволяет автоматизировать в системе идентификацию и конфигурирование разных устройств.
Простейшим примером работы PnP может послужить автоматическое монтирование в Проводнике подключаемых по USB накопителей, эта же технология используется для идентификации устройств периферии — USB-мышек, клавиатур и так далее. Вам не нужно отдельно устанавливать для этих устройств драйвера, так как Windows сама их определяет, сама ставит их драйвера, сама их настраивает. Если драйвер подключённого PNP-устройства по какой-то причине оказывается повреждённым, удалённым или просто несовместимым, происходит системный сбой, результатом которого становится синий экран смерти PNP DETECTED FATAL ERROR. Были, однако, отмечены случаи, когда ошибка возникала вследствие неполадок в работе жёсткого диска.
Если ошибка появилась вскоре после подключения к компьютеру любого нового устройства с поддержкой технологии PnP, отключите его. Если мера кажется вам слишком радикальной, можно попробовать удалить его из Диспетчера устройств, а затем перезагрузить компьютер, чтобы устройство смогло установиться повторно с драйверами по умолчанию.
Аналогичным образом поступаем, если ошибка стала появляться после установки какого-нибудь программного обеспечения, работающего в фоновом режиме. Поскольку чаще всего источником подобных проблем становятся антивирусы, попробуйте отключить используемый на компьютере антивирус и понаблюдайте за системой. Если BSOD с указанной ошибкой перестал появляться, значит всё дело в антивирусе. Замените его.
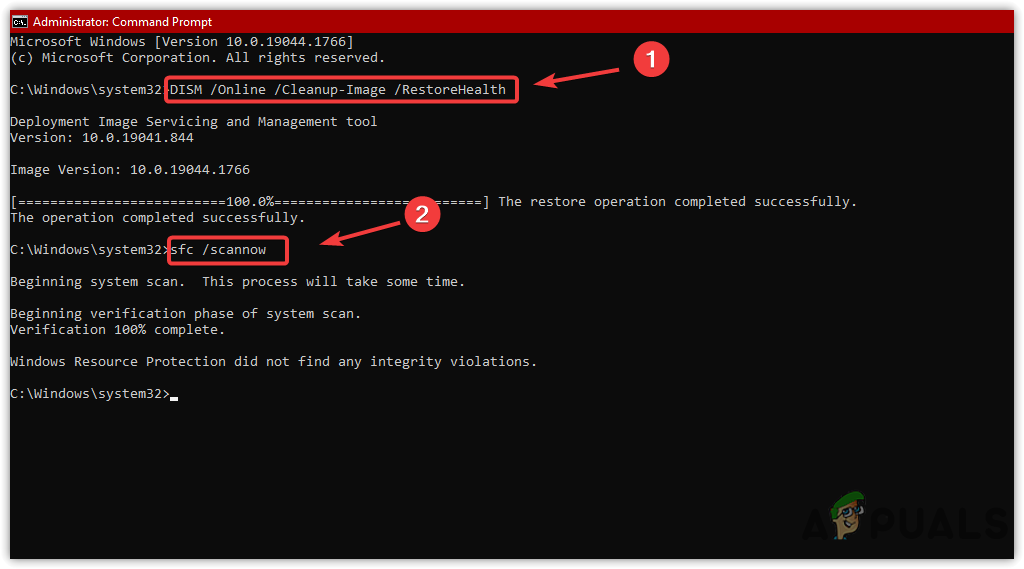
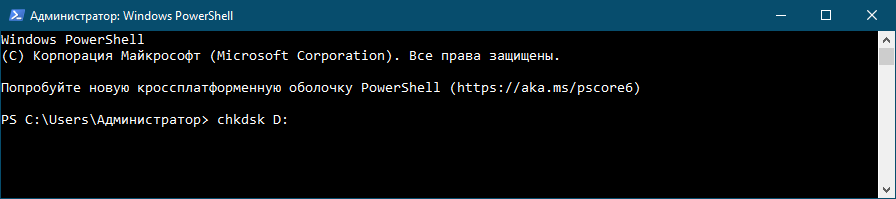
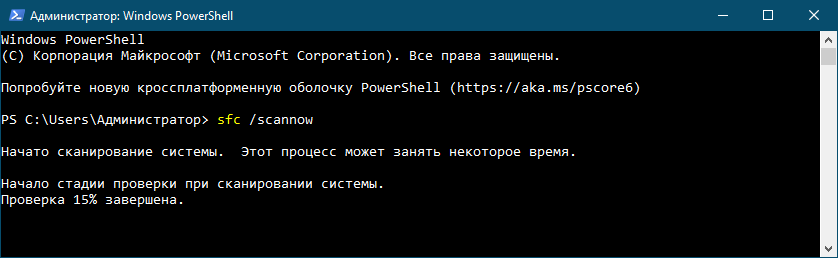
Поскольку ошибка PNP DETECTED FATAL ERROR может быть связана с неполадками в работе диска, проверьте последний встроенной утилитой chkdsk. Если есть такая возможность, снимите диск, подключите его к другому ПК, откройте на нём командную строку и выполните команду chkdsk X:, где X — буква диска. В случае обнаружения ошибок повторите команду с параметрами /f и /r. Если возможность подключения диска отсутствует, проверяем его «на месте» указывая буквы логических разделов. Заодно стоит проверить целостность системных файлов, для чего в той же командной строке необходимо выполнить команду sfc /scannow.
Мы не рекомендуем обновлять драйвера ради самого обновления, но это такой случай, когда обновиться всё же стоит. Ручное обновление драйверов — процесс долгий и утомительный, поэтому лучше всего воспользоваться какой-нибудь программой для обновления драйверов, например, Snappy Driver Installer. И наоборот, если ошибка стала появляться после установки новых версий драйверов, откатываемся к предыдущим версиям.
Некоторые пользователи сообщают, что им удалось устранить проблему отключением кэширования содержимого БИОС в кэш-память. Такое вполне возможно, если эта опция включена, чего по идее быть не должно, так как в современных версиях операционных систем она не используется. Зайдите в вашем BIOS в раздел дополнительных настроек (Advanced), найдите опцию System BIOS Cacheable (она может называться также System ROM Cacheable) и установите для неё значение Disabled.

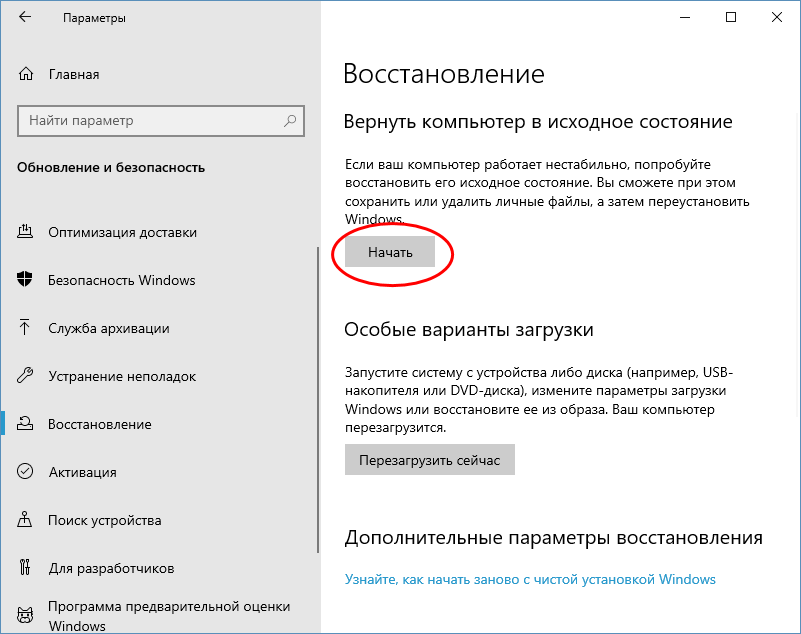
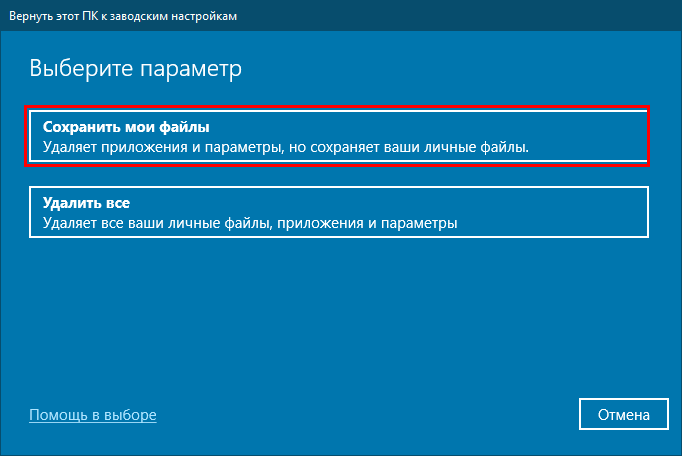
Если на компьютере включена защита дисков и имеются точки восстановления, выполните откат к предыдущей точке (для вызова мастера выполняем команду rstrui в окошке Win + R). Наконец, вы можете пойти на радикальные меры и сбросить Windows к изначальному состоянию. Для этого переходим в приложении Параметры в раздел Обновление и безопасность → Восстановление, жмём «Начать» и следуем указаниям мастера. Сброс приведёт к обнулению системных настроек и удалению всех установленных на компьютере сторонних программ, зато с немалой долей вероятности положит конец появлению BSOD с ошибкой PNP Detected Fatal Error.

How to Fix PNP DETECTED FATAL ERROR in Windows 10
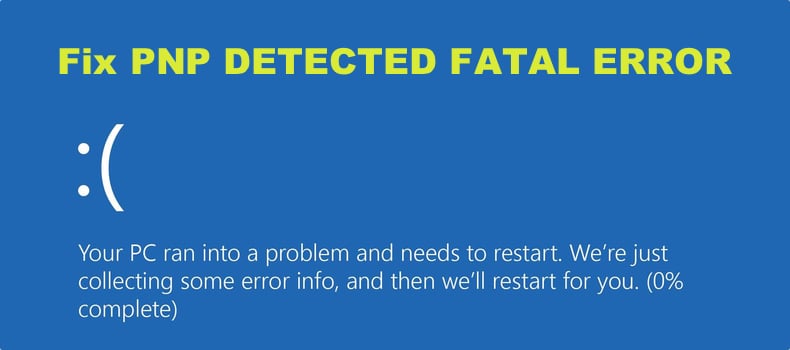
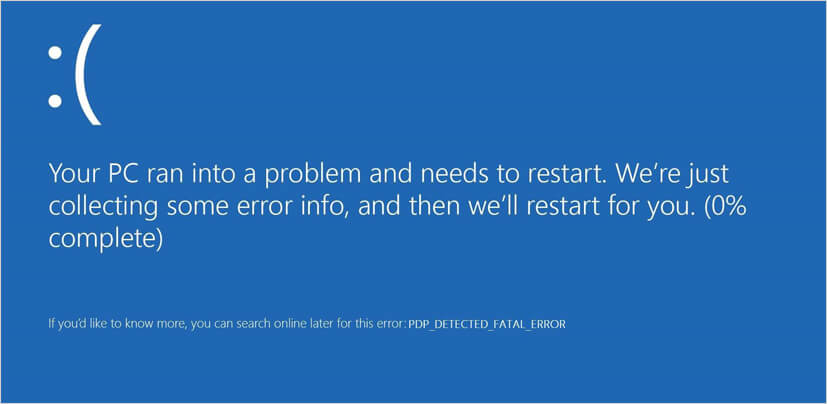
Stop code: PNP DETECTED FATAL ERROR is a Blue Screen of Death (BSOD) error code that appears after a system crash. This article contains several methods that will help you fix it.
PNP stands for Plug and Play and allows various devices such as a GPU and USB drives to work when plugged in. If you get this error after installing or connecting new hardware, it usually means that the device driver is incompatible or corrupted, but it could also mean that the hardware is faulty.
What Causes PNP DETECTED FATAL ERROR
- Corrupted Plug and Play (PNP) drivers.
- Intel DPTF Manager driver. A corrupted Intel DPTF Manager driver can trigger this error. If the driver was recently updated, you might be able to fix it by rolling back the driver.
- Corrupted system files. Running DISM and SFC scans can restore corrupted system files and fix this error. However, if the error occurs due to corrupted kernel data, you might need to repair the Windows installation or perform a clean reinstall.
- Third-party anti-virus software. The error can occur if a third-party anti-virus program (particularly Norton Antivirus) blocks a kernel file due to false-positive detection. Uninstall your anti-virus program to see if that fixes the issue.
- Other third-party software. You may start getting this error if two or more applications conflict with each other. You can identify which software causes this error by performing a Clean Boot.
- Faulty Random Access Memory (RAM). Test your RAM to ensure that no RAM sticks are defective.
In many cases, PNP DETECTED FATAL ERROR prevents users from logging into Windows. Therefore, you will need to use a Windows recovery drive in the form of a Windows 10 Bootable USB Drive or Windows 10 installation DVD disc.
Video Guide on How to Fix PNP DETECTED FATAL ERROR
Table of Contents:
- Introduction
- Insert Windows 10 Installation Media
- Method 1. Use System Restore
- Method 2. Run the System File Checker (SFC) Utility
- Method 3. Run a CHKDSK Scan
- Method 4. Run Startup Repair
- Video Guide on How to Fix PNP DETECTED FATAL ERROR
Download Computer Malware Repair Tool
It is recommended to run a free scan with Combo Cleaner — a tool to detect viruses and malware on your device. You will need to purchase the full version to remove infections. Free trial available. Combo Cleaner is owned and operated by Rcs Lt, the parent company of PCRisk.com read more.
Insert Windows 10 Installation Media
Insert a Windows 10 Bootable USB Drive or Windows 10 installation DVD into your PC.
Turn off your computer by holding down the power button for about 5 seconds. Then, press the power button again to turn it on. While in the post screen, press Del, Delete, F2 to F8, F10, or F12 (depending on the motherboard manufacturer) to enter the BIOS.
Once in the BIOS, navigate to Boot and set the bootable USB drive or CD-DVD ROM as the first boot device. Save the changes and exit the BIOS (typically by pressing F10).
Your PC will restart and boot into the Windows Installation Setup window.
[Back to Table of Contents]
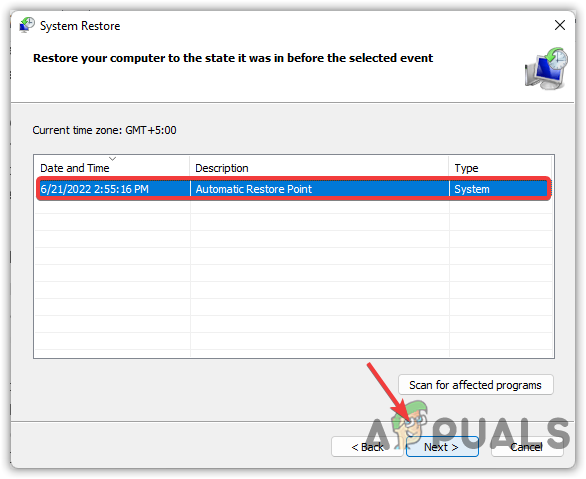
Method 1. Use System Restore

1. In the Windows Setup window, click Next.
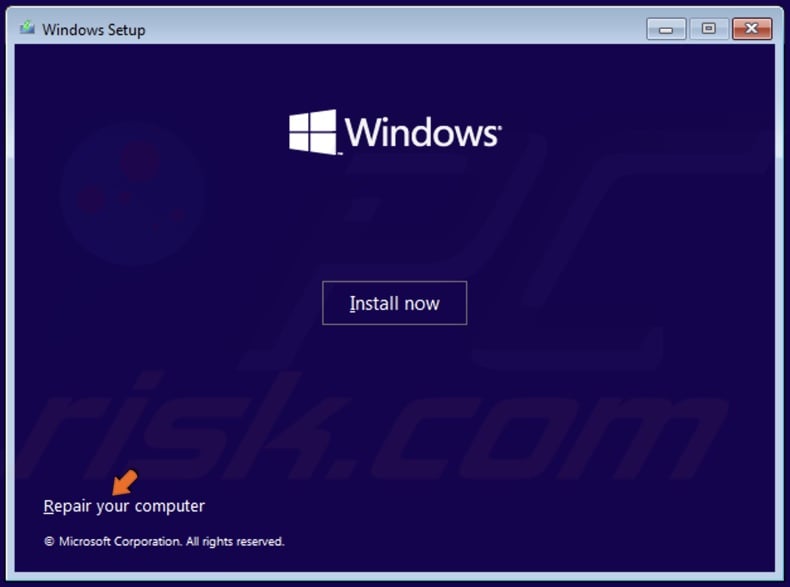
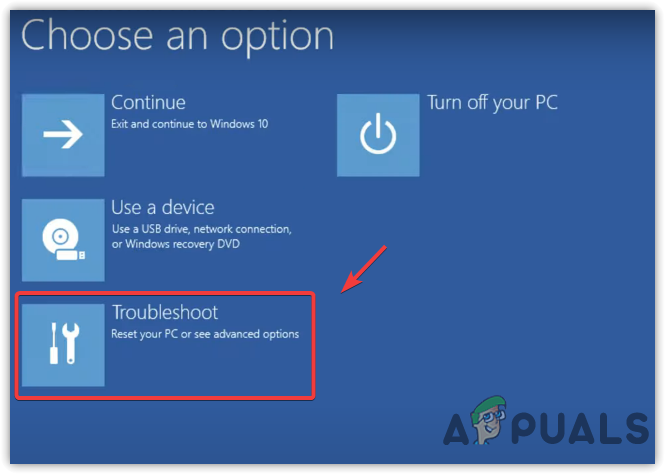
2. In the lower-left corner, click Repair your computer.
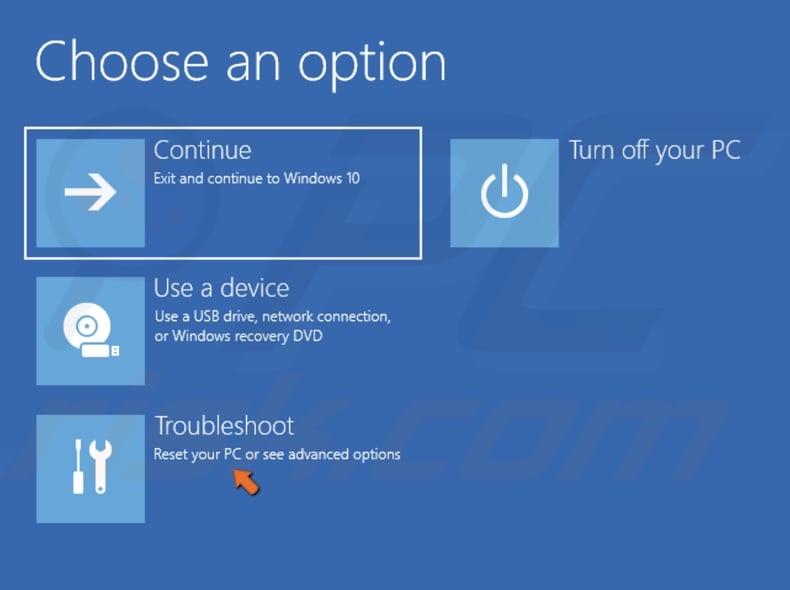
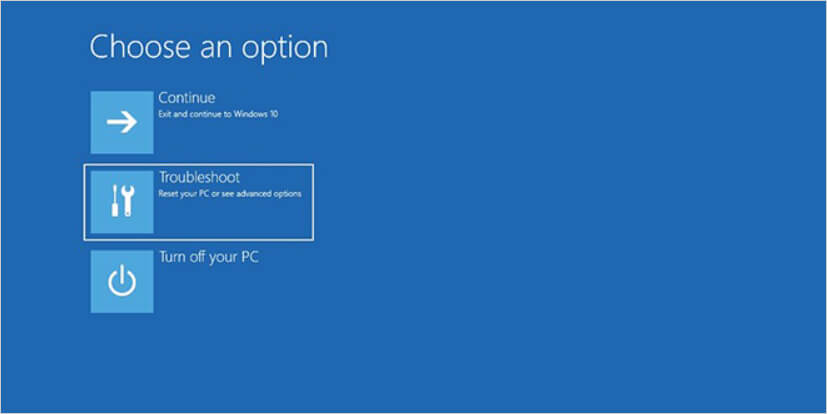
3. In the Choose an Option screen, select Troubleshoot.

4. Select System Restore.
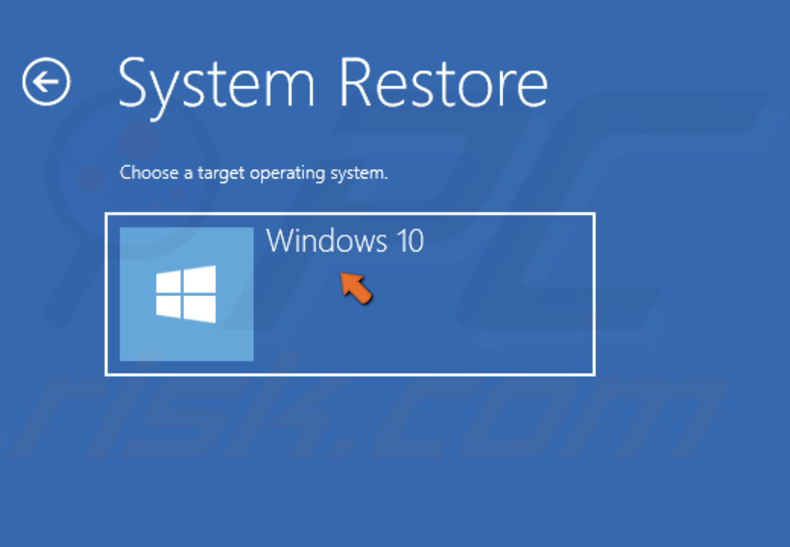
5. Select Windows 10.
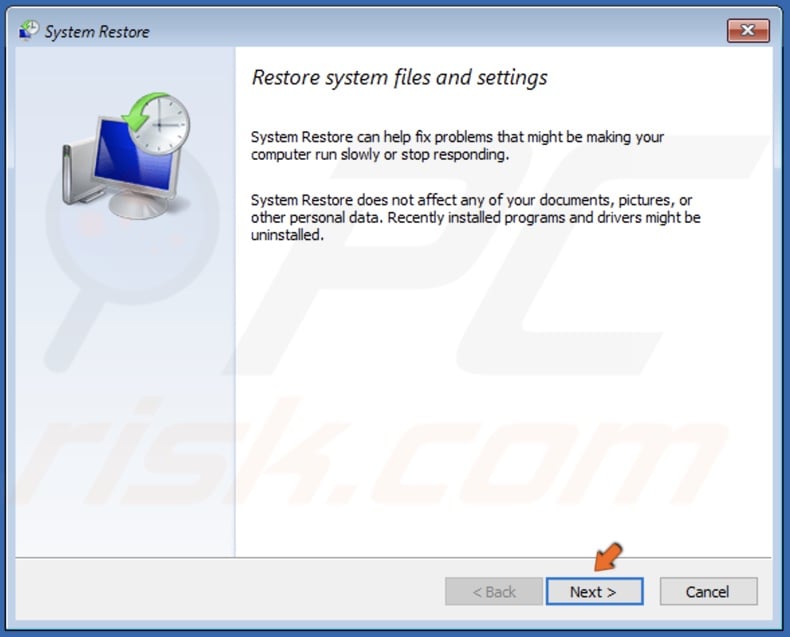
6. In the System Restore window, click Next.

7. If you have multiple restore points, select one that dates before the PNP DETECTED FATAL ERROR started occurring or select the oldest available restore point. Then, click Next.
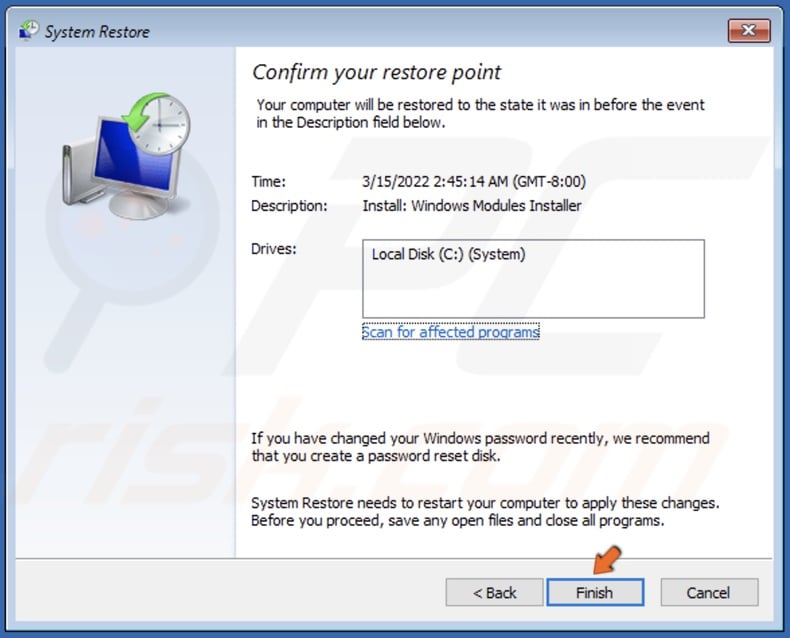
8. Click Finish to initiate the system restore. Note that restoring your system will remove any software installed after your chosen restore point. Your personal files won’t be affected.
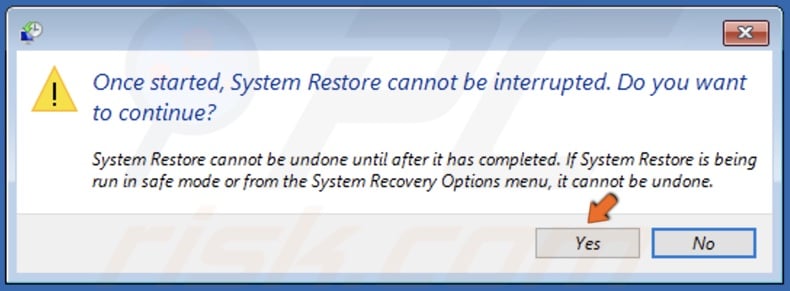
9. Click Yes.
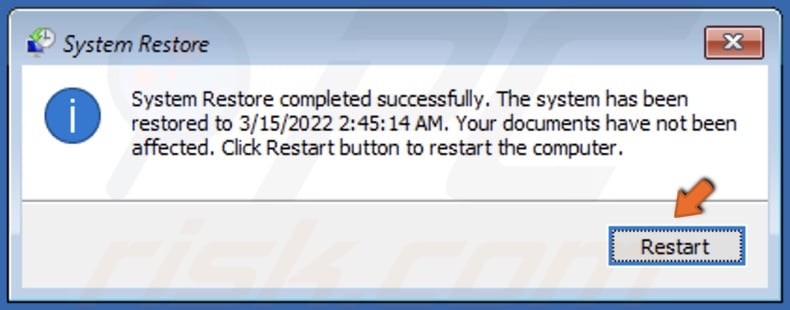
10. Click Restart once System Restore is complete.
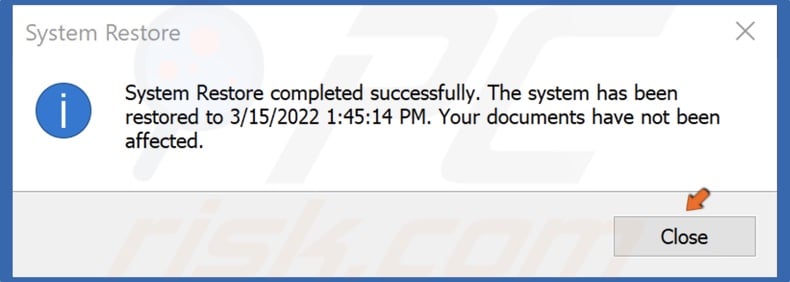
11. Click Close.
[Back to Table of Contents]
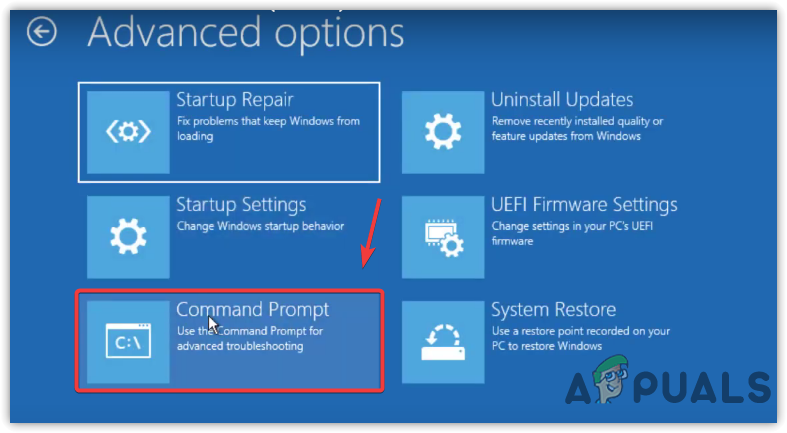
Method 2. Run the System File Checker (SFC) Utility
1. In the Windows Setup window, click Next.
2. In the lower-left corner, click Repair your computer.
3. In the Choose an Option screen, select Troubleshoot.
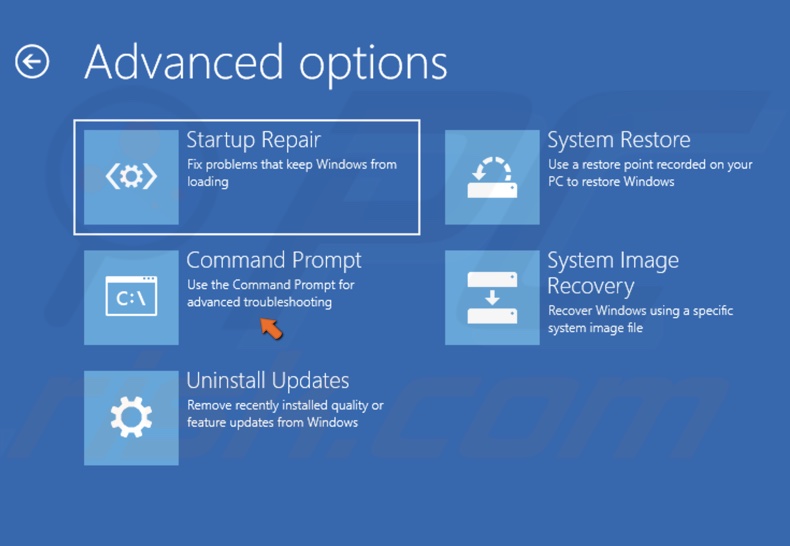
4. In the Advanced options screen, select Command Prompt.
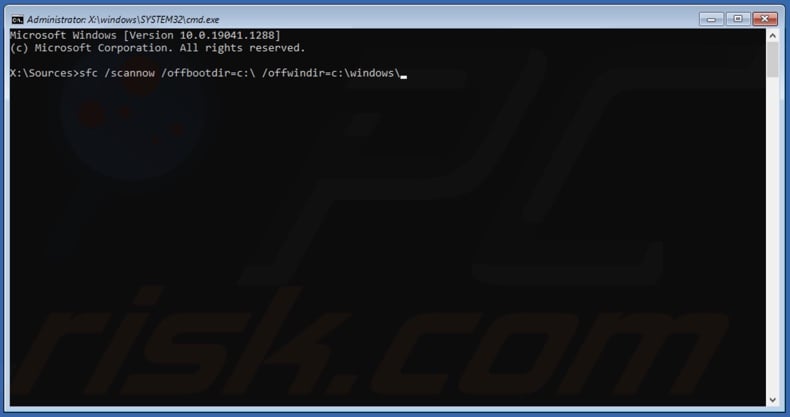
5. In the Command Prompt window, type in sfc /scannow /offbootdir=C:\ /offwindir=C:\Windows\ and press the Enter key.
Note: Replace C:\ with the letter of the drive where Windows is installed on your PC.
6. Wait for the SFC utility to scan and repair corrupted system files.
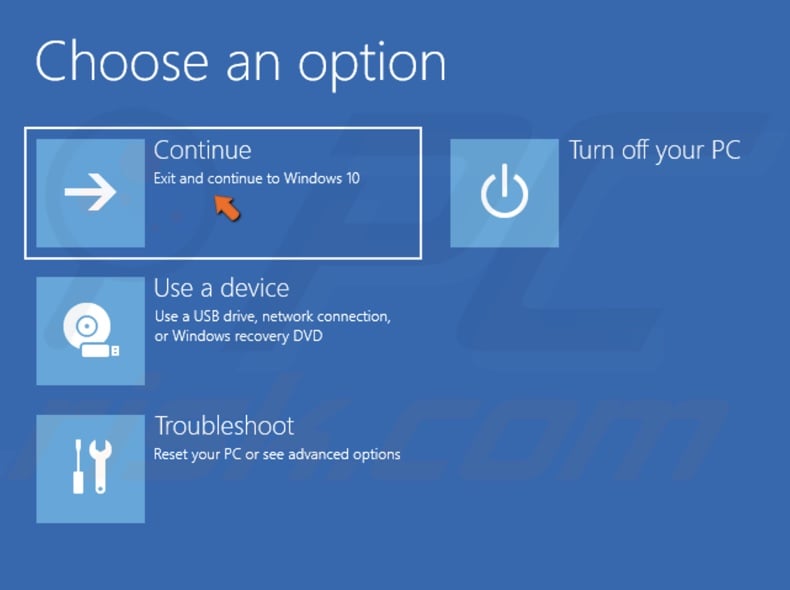
7. Close the Command Prompt and click Continue.
[Back to Table of Contents]
Method 3. Run a CHKDSK Scan
1. In the Windows Setup window, click Next.
2. In the lower-left corner, click Repair your computer.
3. In the Choose an Option screen, select Troubleshoot.
4. In the Advanced options screen, select Command Prompt.
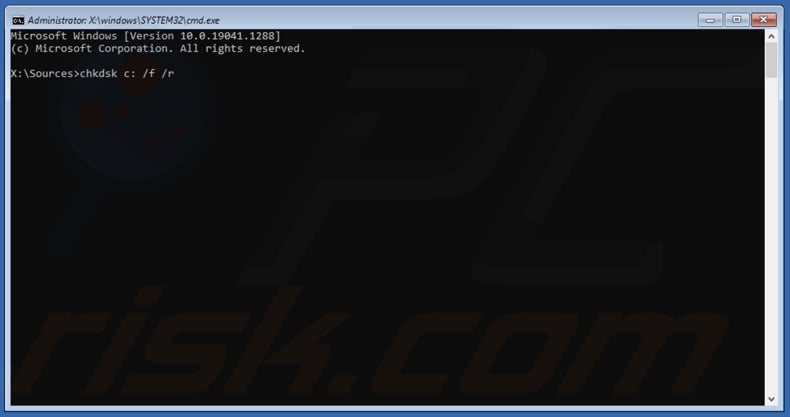
5. In the Command Prompt window, type in chkdsk C: /f /r and press the Enter key.
Note: Replace C:\ with the letter of the drive where Windows is installed on your PC.
6. Close the Command Prompt and click Continue.
[Back to Table of Contents]
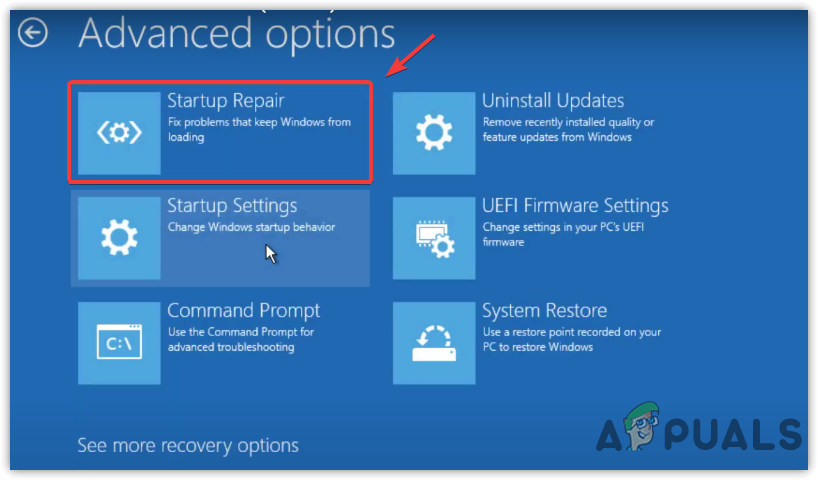
Method 4. Run Startup Repair
1. In the Windows Setup window, click Next.
2. In the lower-left corner, click Repair your computer.
3. In the Choose an Option screen, select Troubleshoot.
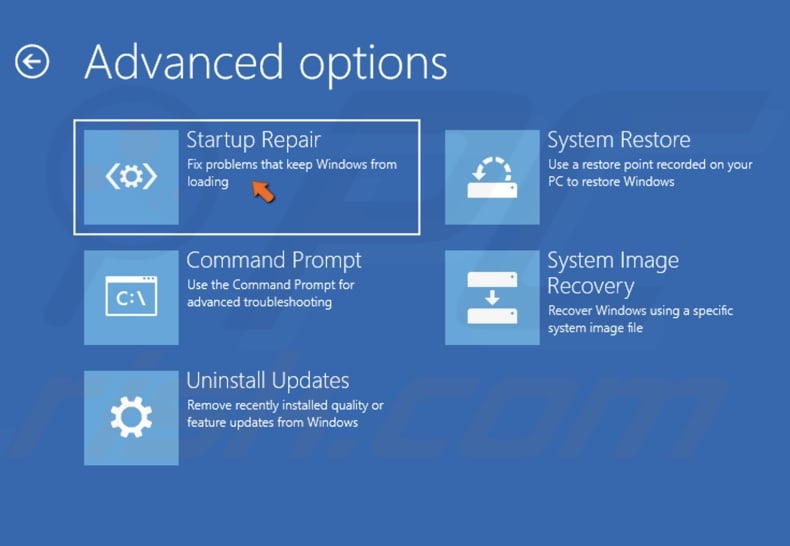
4. In the Advanced options screen, select Startup Repair.
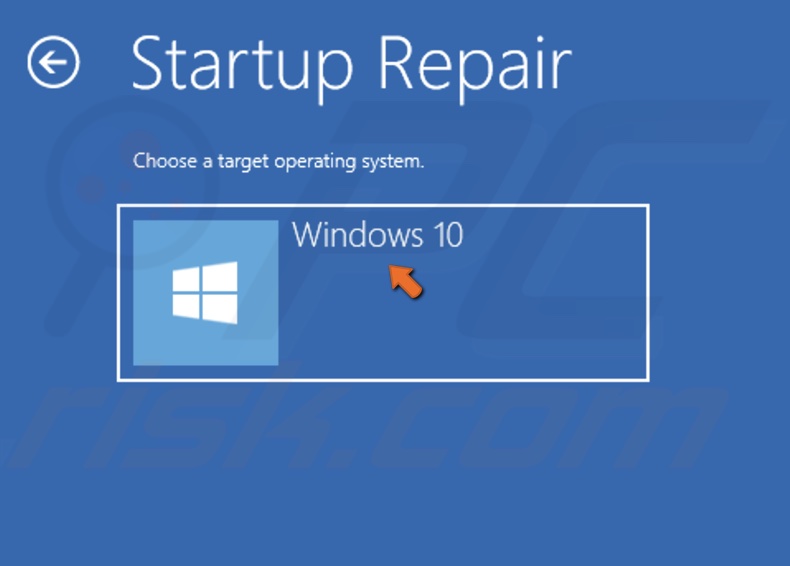
5. Select Windows 10. The repair tool will begin diagnosing and repairing your PC.
[Back to Top]
The PNP_DETECTED_FATAL_ERROR has a bug check value of 0x000000CA, which indicates that the PNP Manager has encountered a severe error. The main cause of this error must be a problematic Plug and Play driver who might have got corrupted as you know that PNP stands for Plug and Play, which is developed by Microsoft to give users the ability to plug a device into a PC and have that computer recognize the device without users telling the computer to do so.

Now if you’re facing this fatal error, then this means the Plug and Play functionality might not be working, and you may not be able to use USB devices, external hard disk, video cards etc. So without wasting any time let’s see how to actually Fix PNP Detected Fatal Error Windows 10 with the help of below-listed troubleshooting guide.
Table of Contents
Make sure to create a restore point just in case something goes wrong.
Method 1: Uninstall Drivers or Software
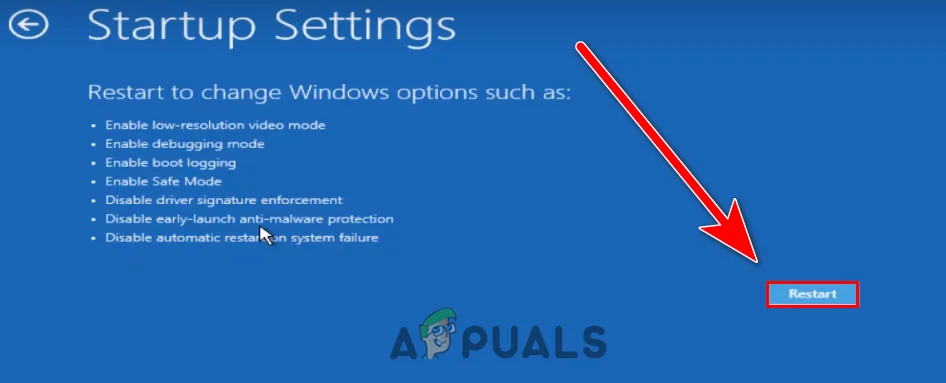
1.First, you need to boot your PC into Safe Mode using any one of the methods listed here.
2.Press Windows Key + R then type devmgmt.msc and hit Enter to open Device Manager.

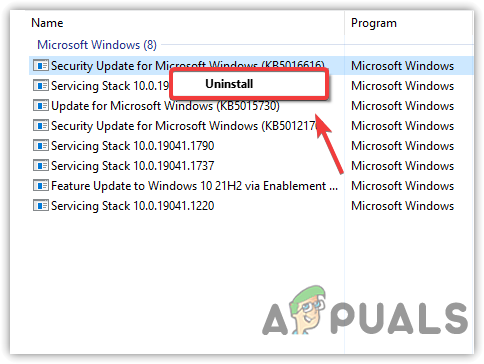
3.If you have recently updated any drivers for any devices, locate the exact device.
4.Right-click on it and select Properties.

5.Switch to Driver tab and click on Roll Back Driver.

6.Press Windows Key + R then type appwiz.cpl and hit Enter.
7.If you have recently installed any new program, make sure to uninstall it from your PC using Program and Features.
8.Reboot your PC into normal mode and see if you’re able to Fix PNP Detected Fatal Error.
Method 2: Run System Restore
1.Press Windows Key + R and type”sysdm.cpl” then hit enter.
2.Select System Protection tab and choose System Restore.

3.Click Next and choose the desired System Restore point.

4.Follow the on-screen instruction to complete system restore.
5.After reboot, you may be able to Fix PNP Detected Fatal Error Windows 10.
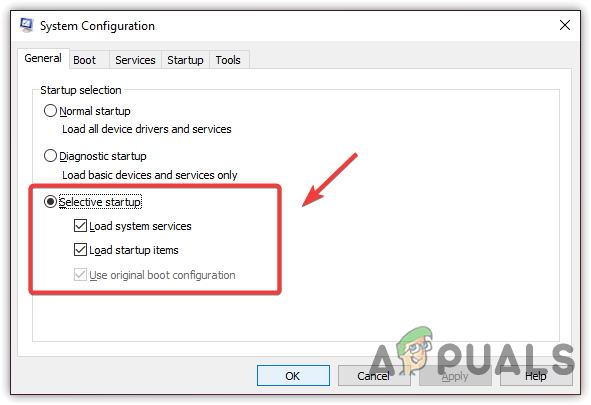
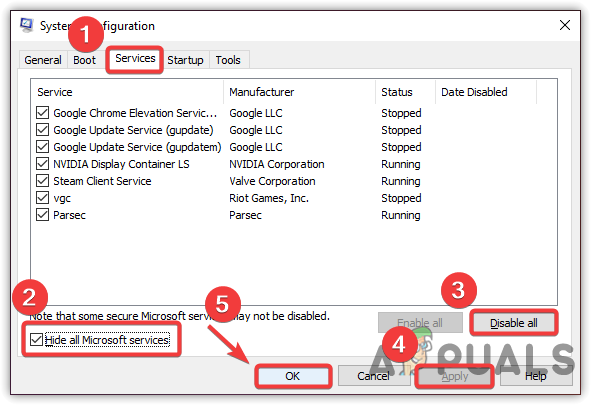
Method 3: Perform a Clean Boot
Sometimes 3rd party software can conflict with System and therefore cause this error. In order Fix PNP Detected Fatal Error Windows 10, you need to perform a clean boot on your PC and diagnose the issue step by step.

Method 4: Run SFC and DISM
1. Open Command Prompt. The user can perform this step by searching for ‘cmd’ and then press Enter.

2. Now type the following in the cmd and hit enter:
Sfc /scannow
sfc /scannow /offbootdir=c:\ /offwindir=c:\windows (If above fails then try this one)

3. Wait for the above process to finish and once done, restart your PC.
4. Again open cmd and type the following command and hit enter after each one:
Dism /Online /Cleanup-Image /CheckHealth
Dism /Online /Cleanup-Image /ScanHealth
Dism /Online /Cleanup-Image /RestoreHealth

5. Let the DISM command run and wait for it to finish.
6. If the above command doesn’t work, then try on the below:
Dism /Image:C:\offline /Cleanup-Image /RestoreHealth /Source:c:\test\mount\windows
Dism /Online /Cleanup-Image /RestoreHealth /Source:c:\test\mount\windows /LimitAccess
Note: Replace the C:\RepairSource\Windows with your repair source (Windows Installation or Recovery Disc).
7. Reboot your PC to save changes and see if you’re able to Fix PNP Detected Fatal Error Windows 10.
Method 5: Run Driver Verifier
This method is only useful if you can log into your Windows normally not in the safe mode. Next, make sure to create a System Restore point.

Method 6: Run CCleaner
1. Download and install CCleaner & Malwarebytes.
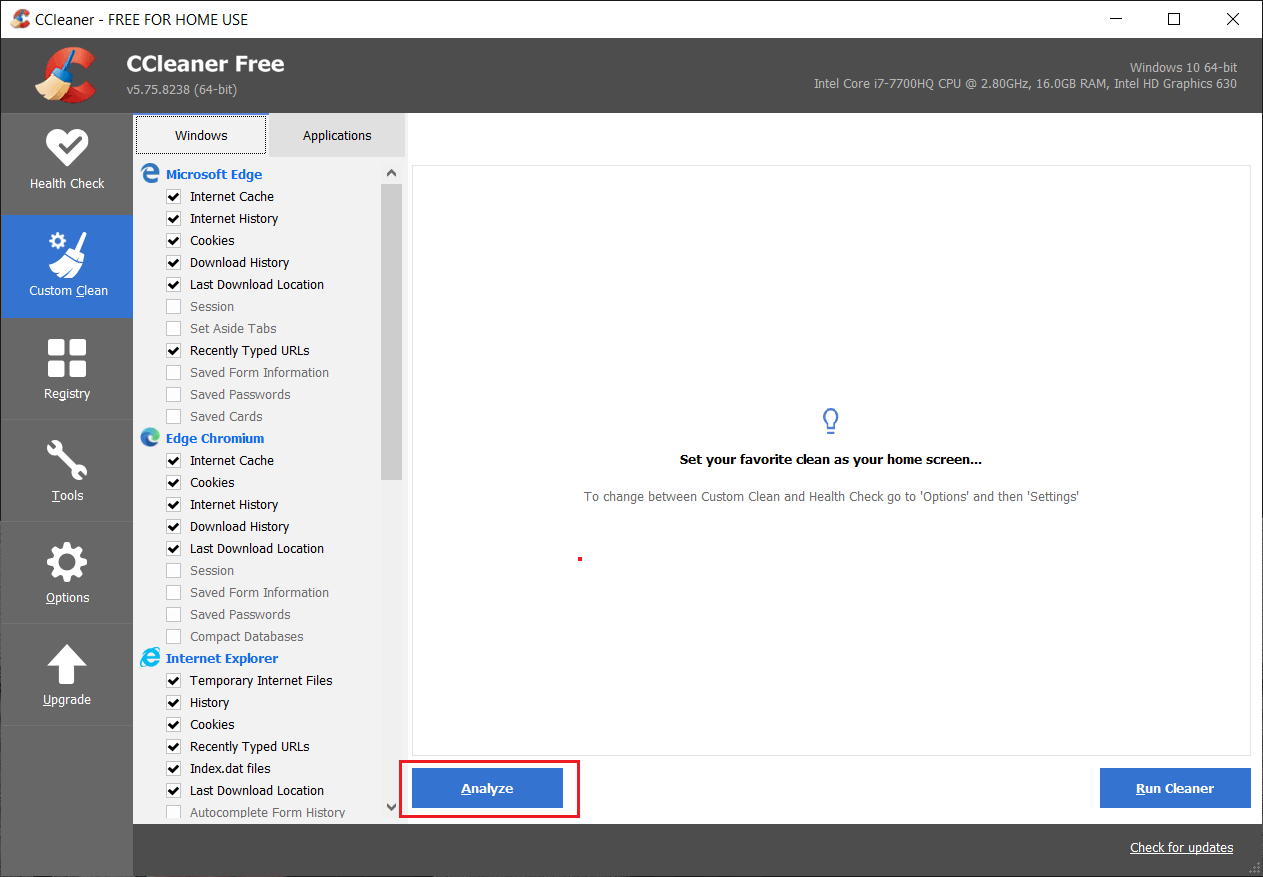
2. Now run CCleaner and select Custom Clean.
3. Under Custom Clean, select the Windows tab and checkmark defaults and click Analyze.
4. Once Analyze is complete, make sure you’re certain to remove the files to be deleted.
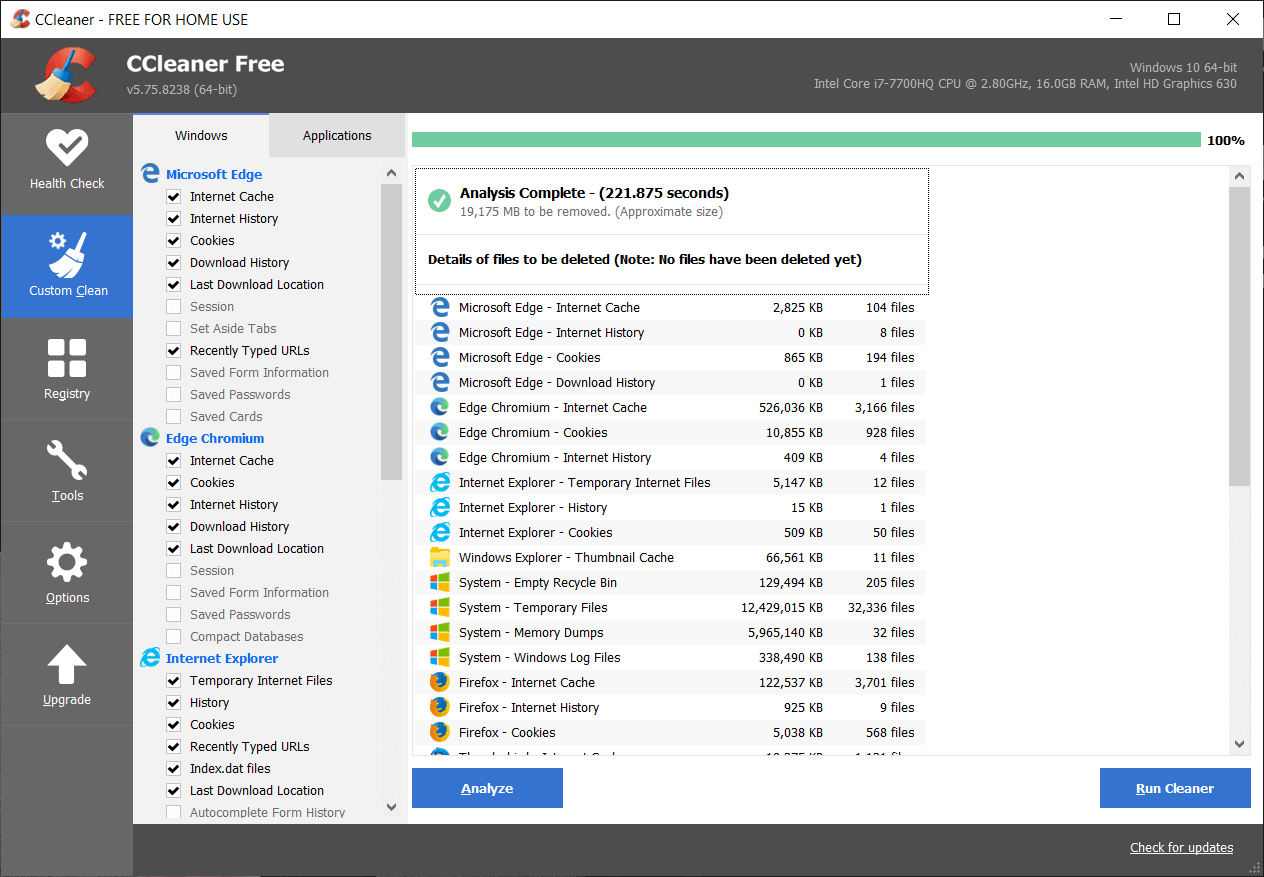
5. Finally, click on the Run Cleaner button and let CCleaner run its course.
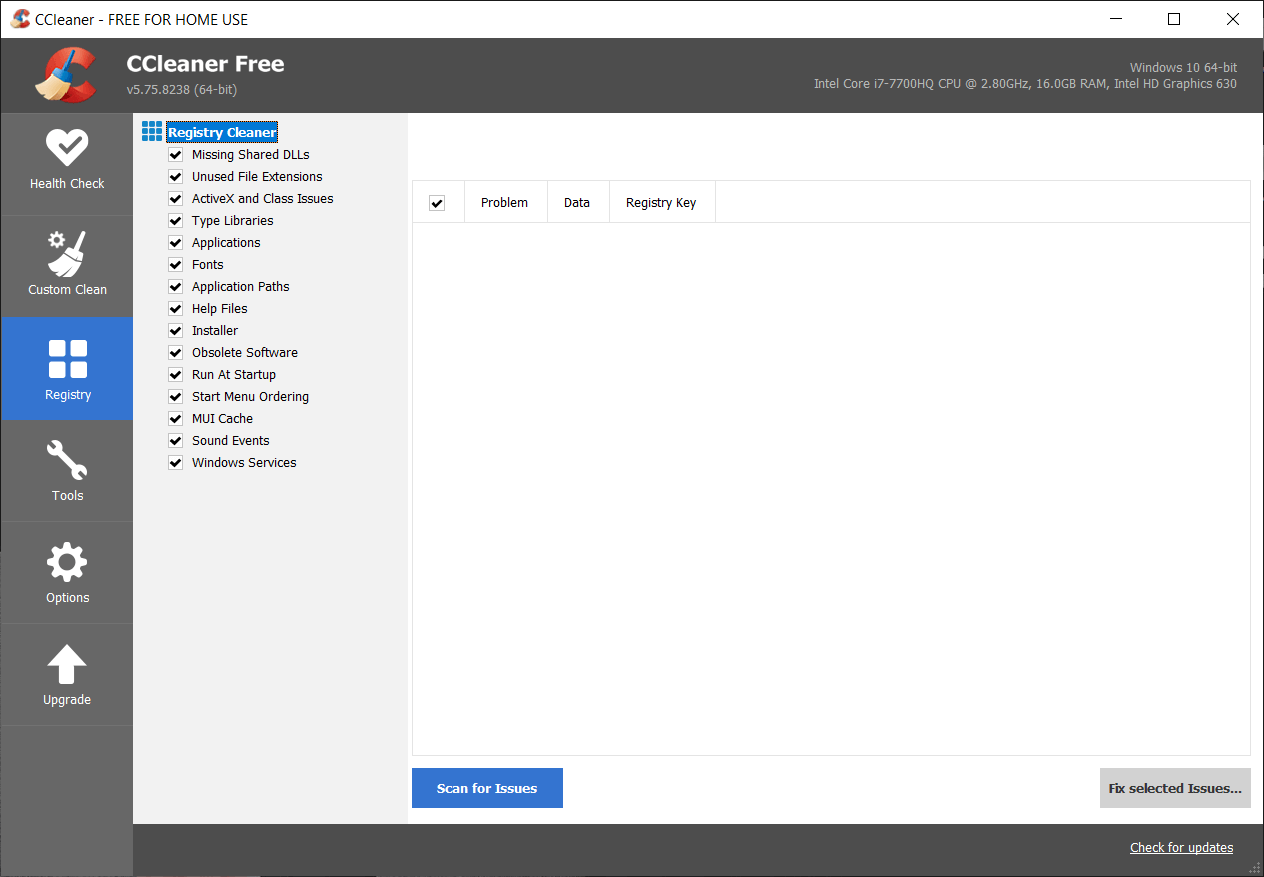
6. To further clean your system, select the Registry tab, and ensure the following are checked:
7. Click on the Scan for Issues button and allow CCleaner to scan, then click on the Fix Selected Issues button.
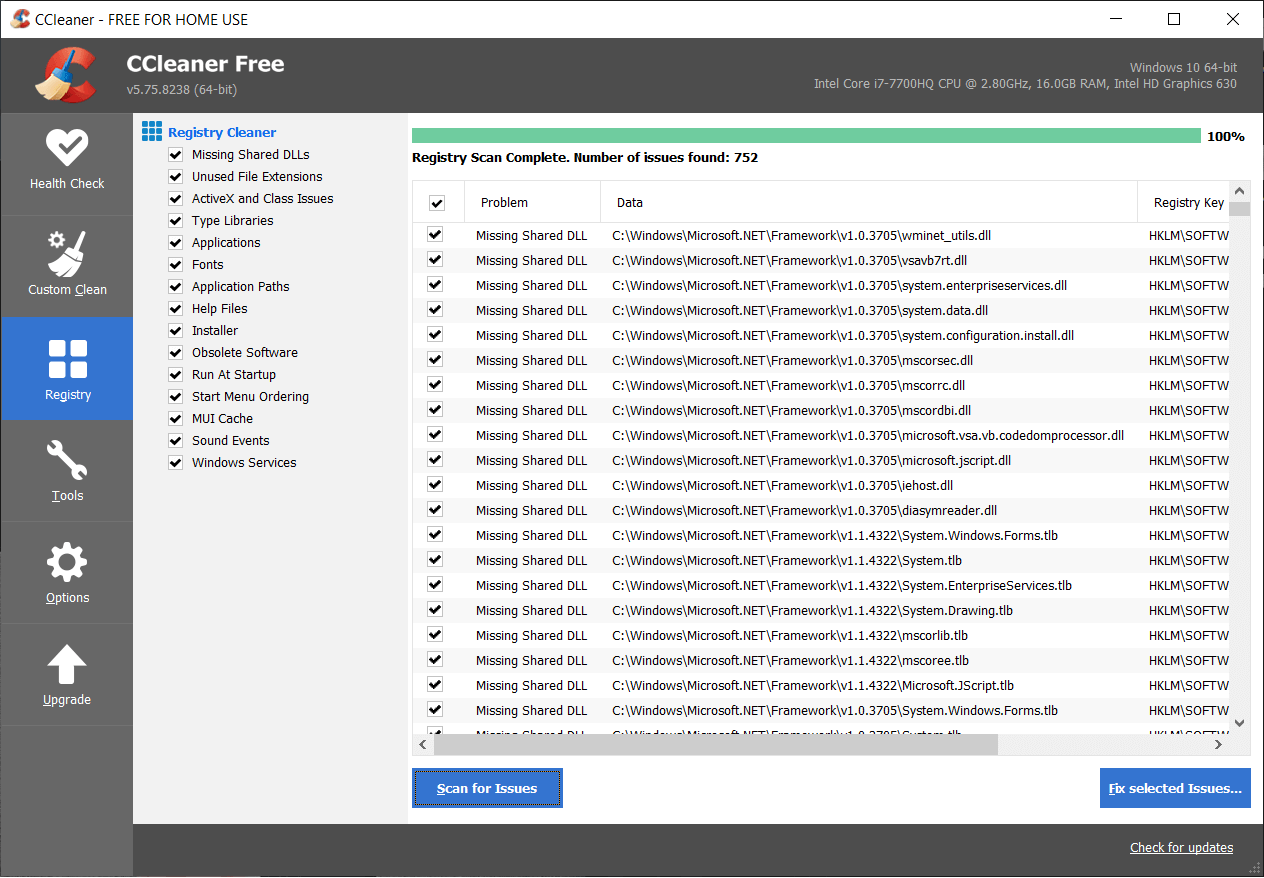
8. When CCleaner asks “Do you want backup changes to the registry?” select Yes.
9. Once your backup has completed, click on the Fix All Selected Issues button.
10. Restart your PC to save changes.
Method 7: Run Automatic Repair
1. Insert the Windows 10 bootable installation DVD and restart your PC.
2. When prompted to Press any key to boot from CD or DVD, press any key to continue.

3. Select your language preferences, and click Next. Click Repair your computer in the bottom-left.

4. On choose an option screen, click Troubleshoot.

5. On Troubleshoot screen, click the Advanced option.

6. On the Advanced options screen, click Automatic Repair or Startup Repair.

7. Wait till the Windows Automatic/Startup Repairs complete.
8. Restart and you have successfully Fix PNP Detected Fatal Error Windows 10, if not, continue.
Also Read: How to fix Automatic Repair couldn’t repair your PC.
Method 8: Temporarily Disable your Antivirus
1. Right-click on the Antivirus Program icon from the system tray and select Disable.
2. Next, select the time frame for which the Antivirus will remain disabled.

Note: Choose the smallest amount of time possible, for example, 15 minutes or 30 minutes.
3. Once done, try to navigate around and check if you’re able to Fix PNP Detected Fatal Error Windows 10.
Method 9: Make sure Windows is up to date
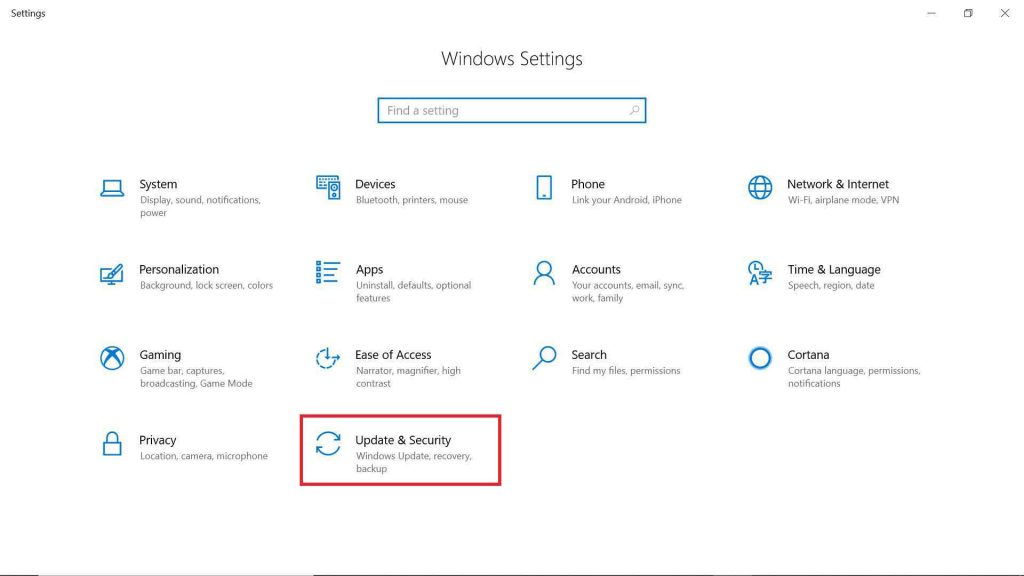
1. Press Windows Key + I to open Settings then click on Update & Security.
2. From the left-hand side, menu clicks on Windows Update.
3. Now click on the “Check for updates” button to check for any available updates.

4. If any updates are pending, then click on Download & Install updates.
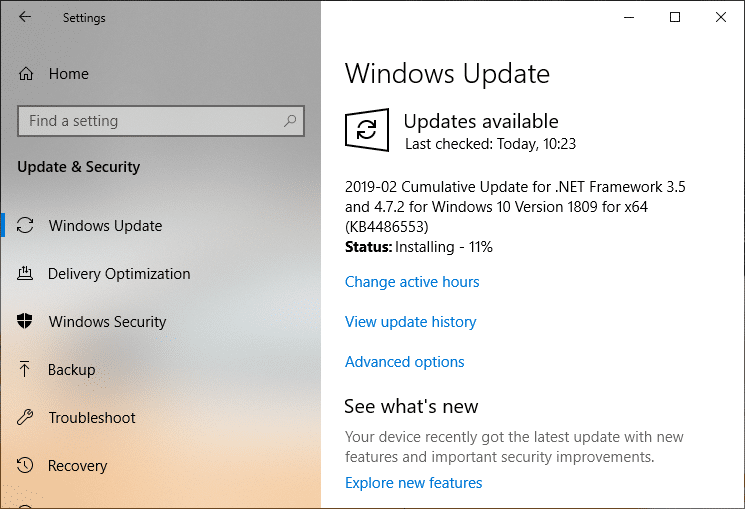
5. Once the updates are downloaded, install them, and your Windows will become up-to-date.
Method 10: Run Disk Cleanup
1. Open Command Prompt. The user can perform this step by searching for ‘cmd’ and then press Enter.
2. Type the following command into cmd and hit Enter:
cleanmgr

3. Select C: Drive first and click OK. Then follow the same step for every other drive letter.
4. Once the Disk Cleanup wizard shows up, checkmark Temporary files from the list and click OK.

5. Restart your PC to save changes.
Recommended:
- Fix BAD_SYSTEM_CONFIG_INFO Error
- How to Fix Windows Experience Index Freezing Issue
- Fix Windows cannot complete the extraction error
- Fix ERR_EMPTY_RESPONSE Google Chrome Error
That’s it you have successfully Fix PNP Detected Fatal Error Windows 10 but if you still have any questions regarding this post then feel free to ask them in the comment’s section.
Blue Screen of Death (BSOD) errors, like PNP_DETECTED_FATAL_ERROR can cause multiple issues, such as slow down your PC, make it crash or restart suddenly, and turn your system inaccessible or inoperable.
Some users have reported different problems arising due to this error. Let’s address some of these issues and explore their solutions.
1. BSOD PNP_DETECTED_FATAL_ERROR
Since this is a BSOD error, the first step should be to run the Windows 10 built-in BSOD troubleshooter on your system. Here’s how to run the program on your Windows 10 system:
- Open Settings menu and go to Update & Security.
- Select the Troubleshoot option on the left pane.
- On the right pane, select BSOD and then click on Run the troubleshooter.
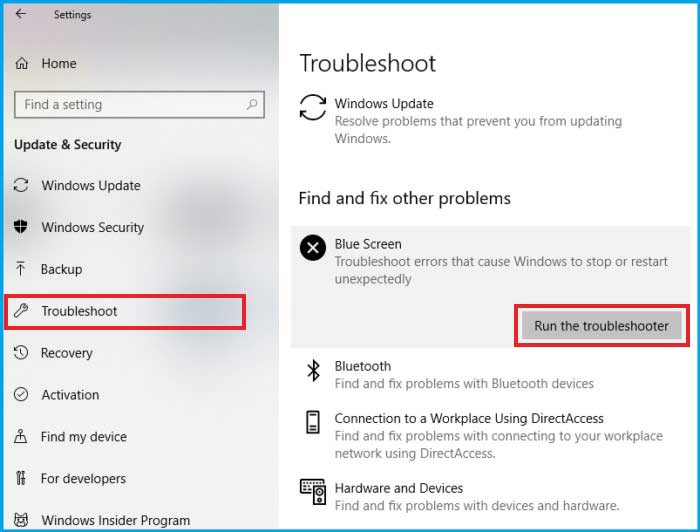
Running the BSOD troubleshooter will help to figure out the underlying cause of this error.
2. PNP Error due to Outdated Driver
The PNP_DETECTED_FATAL_ERROR may also be the result of an outdated driver. Make sure all your system drivers are updated. Follow these steps to update or install a driver. Some users have also reported that the issue is being caused by the Intel DPTF Manager driver. If this driver is causing the issue, roll back the driver to the previous version.
3. Antivirus Causing PNP_DETECTED_FATAL_ERROR
An outdated antivirus can bring about many unexpected errors on your system. Compromised antivirus security of your system should be addressed at the earliest to prevent errors, like PNP_DETECTED_FATAL_ERROR.Surprisingly,some Windows 10 users have reported that the error is being caused by antivirus tools, like Norton, Avira, and McAfee. If you’re using any of these software, try uninstalling them and then check whether the error is resolved. Here’s how to uninstall an existing antivirus or application on Windows 10.
4. Outdated Windows or an Update Error
A problematic or improper Windows update may also result in this error. You need to check first whether you’re using the latest version of Windows. Here’s how to make sure your Windows version is up-to-date.
- Press Windows + I to open the Settings menu.
- In the Windows Settings menu, go to Update & Security > Windows Update.
- Next, click the Check for updates option.

Your Windows PC will scan for updates and download them. After the updates are downloaded on the system, restart your PC. Now, check if the error still persists.
Note: Microsoft keeps releasing security patches and other updates for Windows. Make sure your Windows 10 is up-to-date.
Reset your Windows
The error may also occur if a Windows update is not installed properly. To deal with this problem, try resetting your Windows 10 altogether. Here’s what to do:
- Open the Start menu, long press the Shift key, and then click Restart.
- Now, in the Advanced Startup options, navigate to Troubleshoot.
- Click the Reset this PC button and then select Remove everything.
- Now, you can reinstall Windows 10 on your system.
- Follow the on-screen instructions to finish the reset process.
Remember that resetting your PC will lead to data loss as it reverts to a previous version. So it’s always advised to keep a backup of your important files to safeguard yourself from any type of data loss. However, if you fail to keep a backup and end up losing critical system data after a Windows Reset, use a professional data recovery software to recover the lost data.
5. Errors in a Pre-installed Software
A problematic software on your computer may also cause the PNP_DETECTED_FATAL_ERROR. So you must find and uninstall such software from your system immediately.
If you have installed any software recently or downloaded an update of an existing software, try uninstalling the software or rolling back the update from your computer. If a new application or update is causing the error, this should effectively fix the problem. You may also get help from an uninstaller software to remove all traces of a problematic app or software from your system.
6. Faulty Hardware or Storage Issues
PNP_DETECTED_FATAL_ERROR can be caused by a faulty RAM module as well. Check whether your system’s RAM is running properly. Also, check whether the motherboard, graphics card, and hard drive are showing any signs of trouble. You may run the built-in BSOD troubleshooter (as discussed above) to detect any potential problems with your RAM. You may also run the chkdsk command on your system to troubleshoot any disk-related errors.
End Note
PNP_DETECTED_FATAL_ERROR may occur due to various reasons, such as a faulty or outdated driver, a problematic Windows update, outdated antivirus, etc. You may easily fix this error by running the BSOD troubleshooter or the chkdsk scan. You can also try uninstalling a problematic Windows update or a device driver. If nothing works, simply try resetting your Windows 10. In case you lost the data, use a professional data recovery tool, such Stellar Data Recovery to recover your data.
Was this article helpful?
YES3
NO