
Привет друзья! Масштабное накопительное обновление April 2018 Update версия 1803 (Сборка ОС 17134.1) уже вышло. Если вы хотите узнать в подробностях о всех новшествах глобального апдейта, то читайте эту статью. Если вы хотите знать, где его можно скачать и как установить на ваш компьютер или ноутбук, то тогда вам сюда. Здесь же я покажу несколько способов обновления установленной на вашем ПК Windows 10 до новейшей версии 1803.
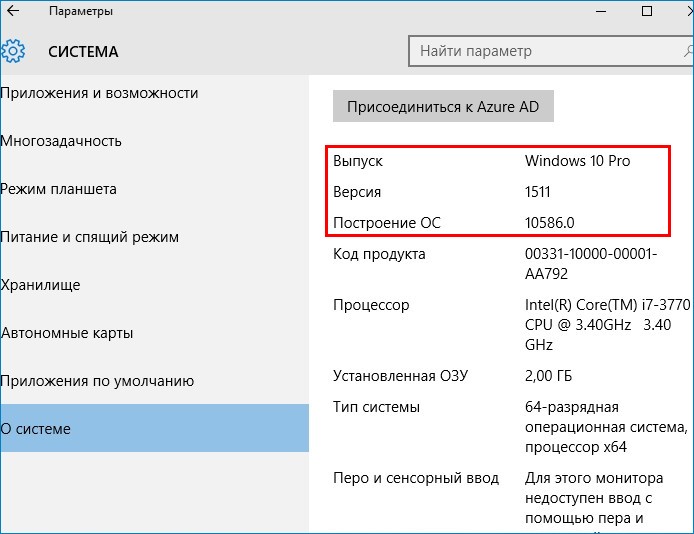
Искушённый пользователь может заметить, что винда обновится сама с помощью Центра обновления и делать ничего не нужно. Друзья, уверяю вас, обновление будет распространяться медленно и не факт, что вы увидите его завтра и даже через неделю. По традиции первыми его получат владельцы более современных компьютеров, но большая часть читающих эти строки к таковым не относятся. Вы удивитесь, но мне до сих пор приносят в сервисный центр на ремонт компьютеры со старенькой Windows 10 Версия 1511 (сборка ОС 10586.0), которая так и не обновилась автоматически до самых современных версий.
3 способа обновить Windows 10 до накопительного обновления April 2018 Update версия 1803 (Сборка ОС 17134.1)
Обновление не принесёт ущерба вашим личным данным и установленным программам. Несмотря на то, что после обновления Windows 10 позволит вам, в случае проблем, откатиться на предыдущую версию OS, всё же я настоятельно рекомендую создать резервную копию для возможности отката системы.
Итак, имеем ноутбук с древней Windows 10 Версия 1511, его и будем обновлять до 1803.
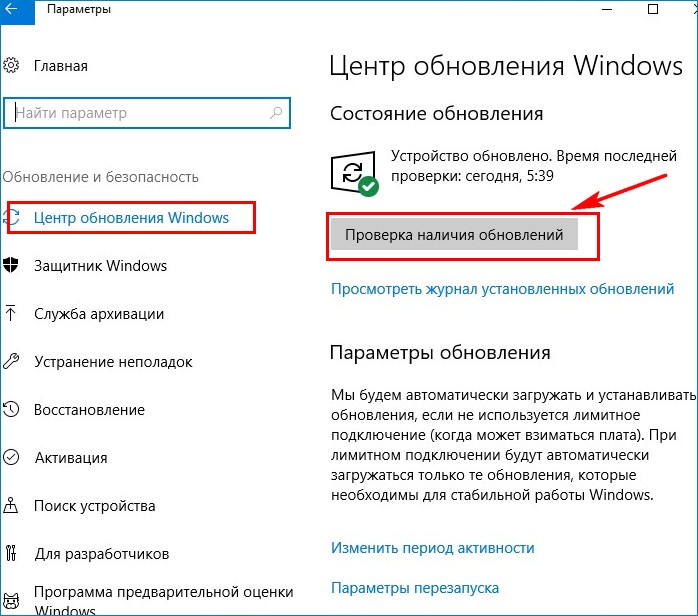
Способ №1. Центр обновления
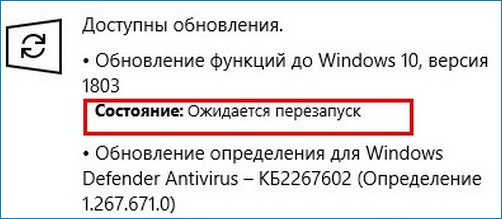
Самый простой способ — следуем в Центр обновления и запускаем проверку.
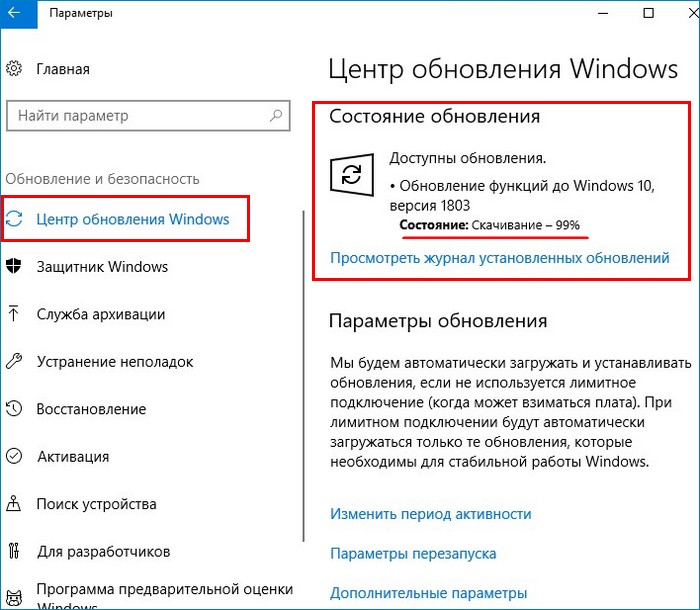
Видим, как осуществляется скачивание компонентов сборки 1803.
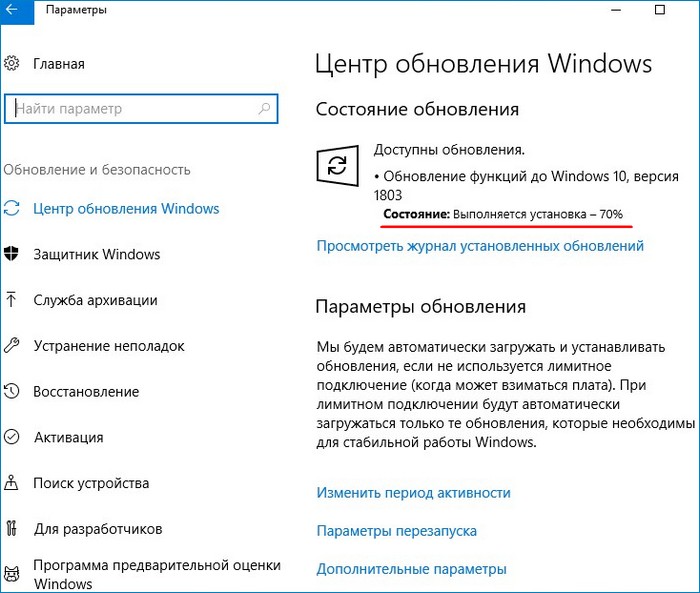
Выполняется установка.
Обновление установлено. Ожидается перезапуск. Перезагружаем компьютер.
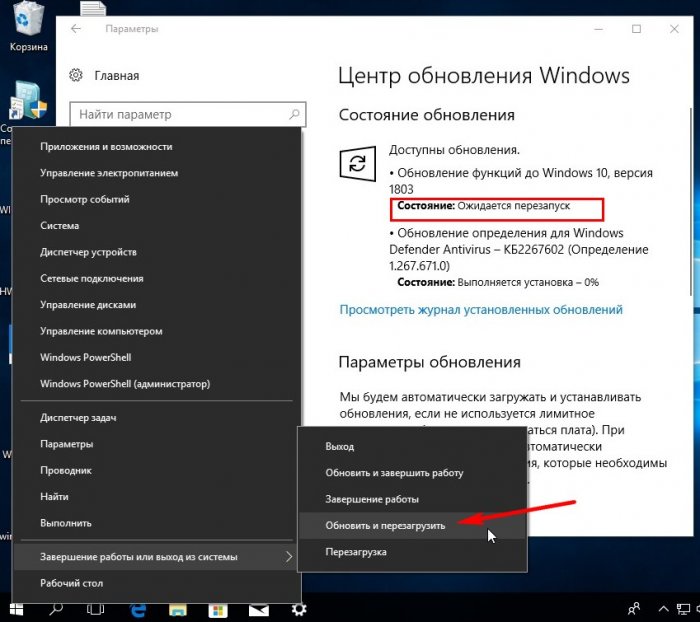
Ждём, пока компьютер обновится.

Готово.
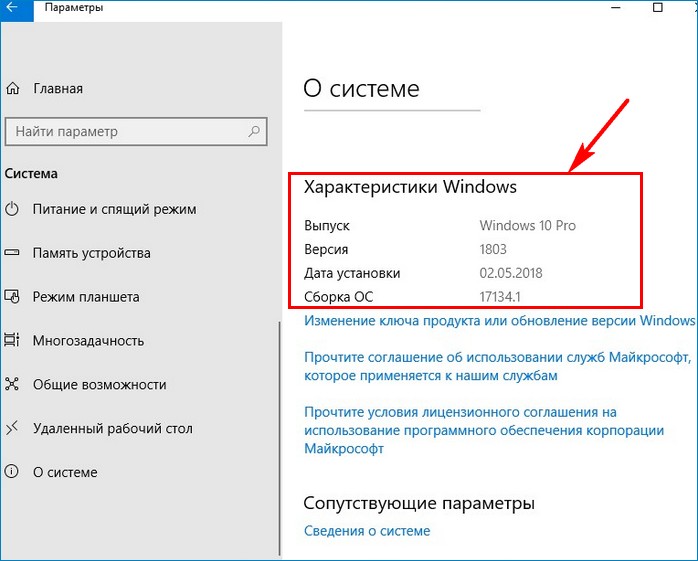
После обновления проверяем версию ОС, установленной на нашем ПК:
Параметры —> Система —> О системе.
Способ №2. Утилита MediaCreationTool1803
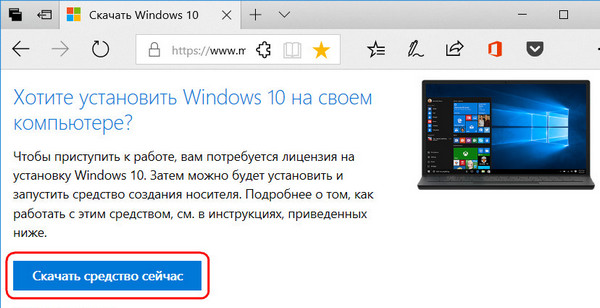
Если с Центром обновления у вас ничего не получится, то Windows 10 всегда можно обновить с помощью утилиты MediaCreationTool1803. Скачиваем её с сайта Майкрософт:
https://www.microsoft.com/ru-ru/software-download/windows10
Запускаем.
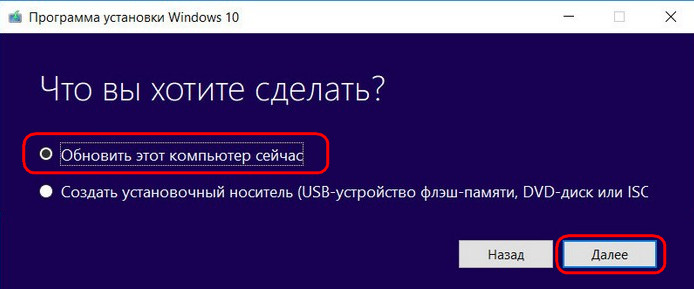
Соглашаемся с лицензией, выбираем первый пункт обновления.
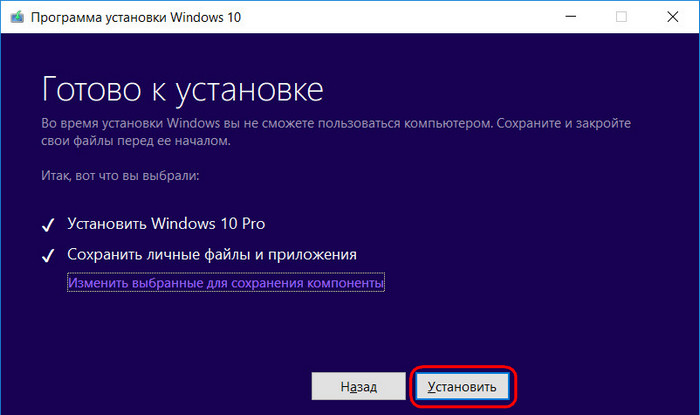
Далее будет происходить загрузка дистрибутива, создание носителя, получение обновлений,
когда всё будет готово, жмём «Установить».
Процесс обновления начался.

Затем OS войдёт в предзагрузочный режим установки обновлений и запустится уже обновлённой.
Способ №3. ISO-образ системы
Первый и второй способы имеют недостаток. На диске (C:) появляется папка «ESD» (весом несколько ГБ), где хранятся временные файлы обновления Windows.
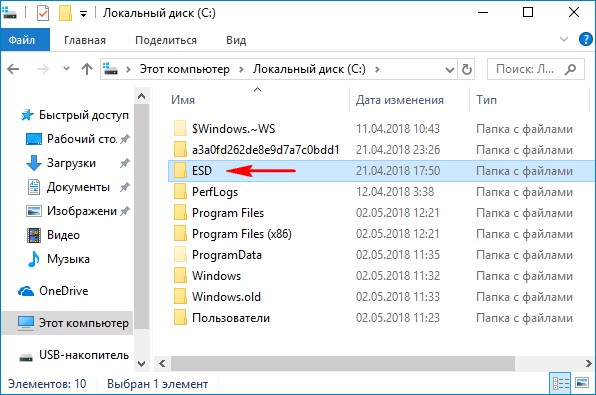
Конечно владельцы накопителей SSD будут не в восторге и именно им я бы посоветовал третий способ обновления до April 2018 Update 1803, с помощью ISO-образа с дистрибутивом новейшей Windows 10.
Запускаем утилиту MediaCreationTool1803, но в этот раз выбираем создание установочного носителя.
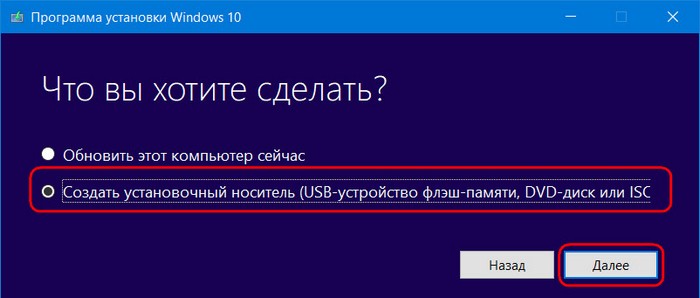
Оставляем параметры текущей системы.

Выбираем ISO-файл.

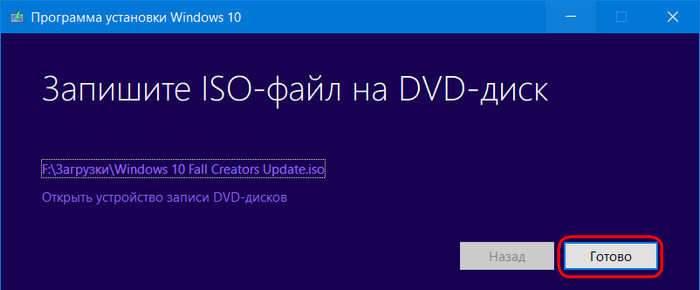
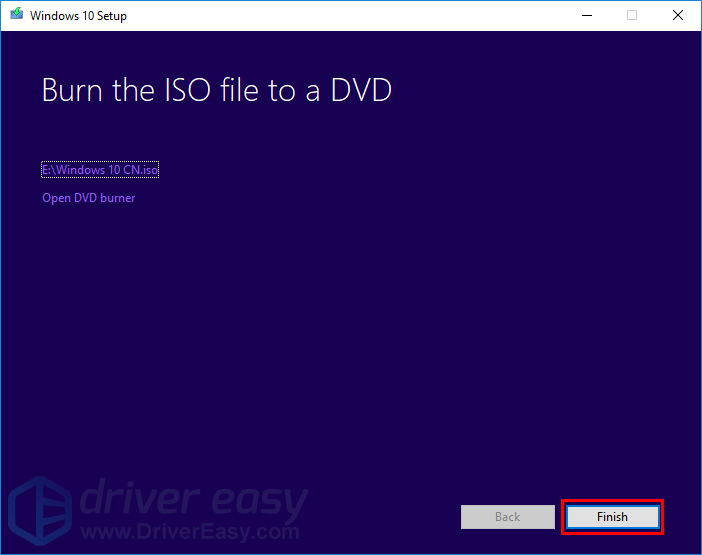
Указываем путь хранения на разделе HDD и дожидаемся его загрузки. По итогу жмём «Готово».
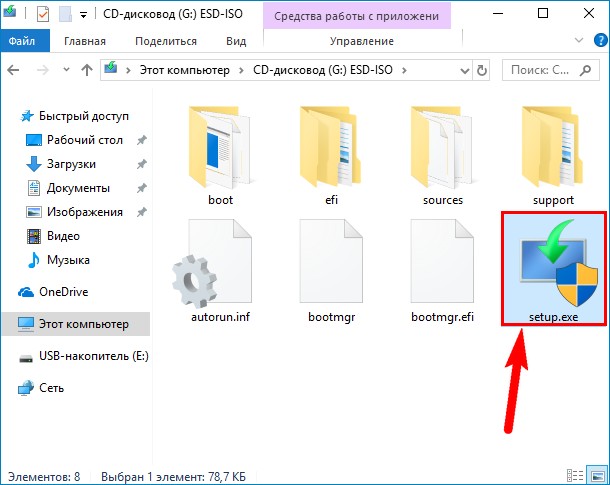
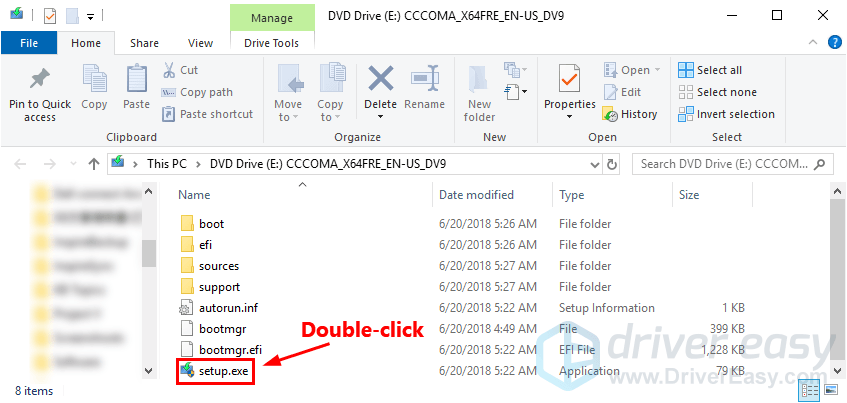
В окне проводника открываем скачанный ISO-образ и запускаем установщик «setup»
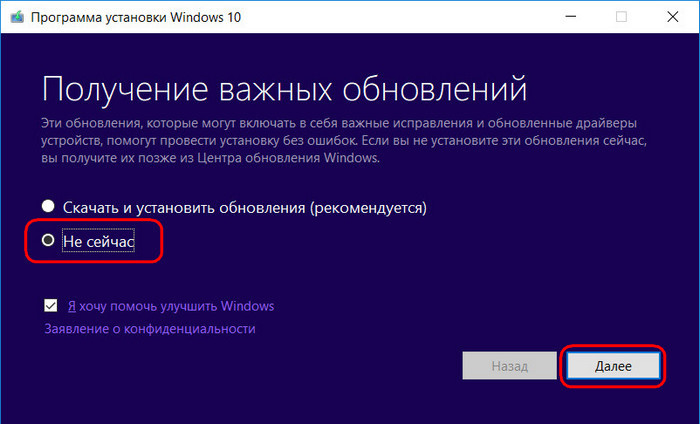
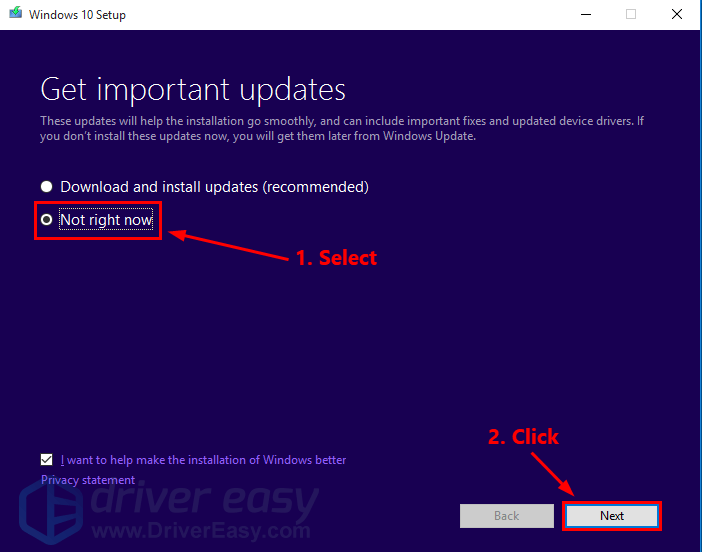
В первом окошке выбираем пункт «Не сейчас».
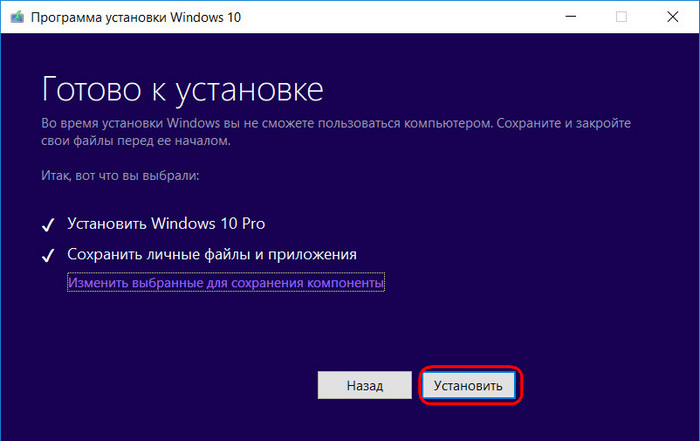
Принимаем лицензионные условия, дожидаемся завершения череды подготовительных этапов. В окошке «Готово к установке», ничего не меняя, нажимаем «Установить».
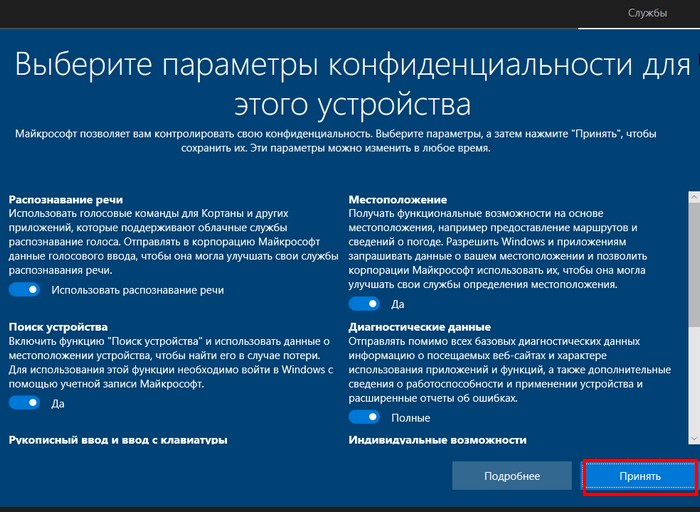
Сначала процесс обновления будет происходить в среде Windows, затем компьютер перезапустится и попросит принять параметры конфиденциальности.
После этого будет загружена April 2018 Update версия 1803.
In April 2018, Microsoft has released an updated Windows 10 new version, namely Windows 10 1803. Many users are expecting to experience this Windows update, whereas Windows 10 update 1803 fails to install.
Some people complained that even after downloading this Windows 10 new update when the update makes your PC restart, but to find the computer is stuck at Windows 10 logo in the process of Windows 10 update installation.
In this case, what they can do is to force shut down Windows 10 by pressing the power switch. Hence, feature update Windows 10 1803 version takes forever.
Others denoted that when installing this feature update, Windows 10 just goes back to the previous version, like Windows 10 1709 and 1703. In this way, Windows 10 1803 0xc1900101 pops up and you failed to install Windows 10 feature.
How to Fix Feature Update to Windows 10 Version 1803 Failed?
For some users, even if you stumbled upon Windows 10 v1803 fails to install or nothing happened after checking for updates, there are still some ways to help you get the new update you want.
Whatever the updating error is, Windows update version 1803 failed 0x8024200d or 0x80070002, attempt to fix problems completing the installation of Windows 10 with the solutions below.
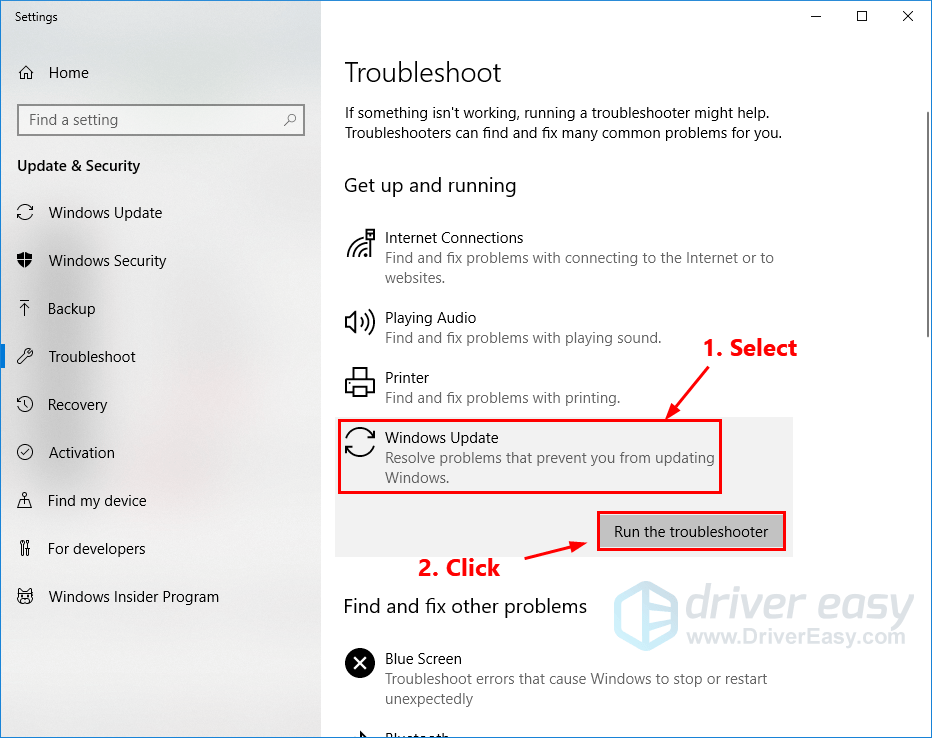
Solution 1: Run Windows 10 Update Troubleshooter
If you come into Windows 10 update won’t install, the first thing you can turn to is making use of Windows Update troubleshooter. It is an inbuilt tool which is capable of detecting the problems with Windows 10 feature update.
1. Go to Start > Settings > Update & Security.
2. Then under Windows Update, locate Windows Update and then hit Run the troubleshooter.
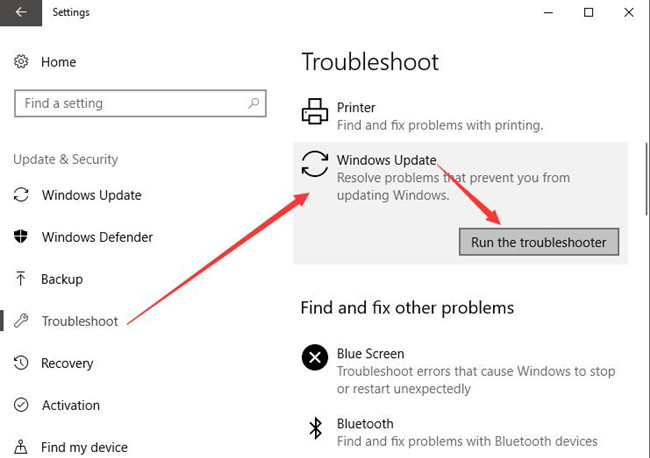
Shortly after that, Windows 10 troubleshooter for Windows Update will begin searching for issues on your PC and fix them for you if possible.
Solution 2: Delete the SoftwareDistribution Folder
Generally speaking, the downloaded Windows 10 feature update 2018 is saved in the folder of SoftwareDistribution. But when the feature update for Windows 10 has not installed correctly, the content in this folder won’t be synchronized on Windows 10.
So if you experienced Windows 10 failed to update to version 1803 due to the erroneous installation process, it is quite necessary to try to manually download it again to see if this time the 2018 Windows 10 update can be installed on your PC.
In the situation where you have got the downloaded Windows 10 v1803 before, but failed, you need to delete the previously downloaded folder and manage to re-try again.
Before you move into the folder to get rid of the Windows 10 feature update 1803, you need at first stop the Windows update service.
1. Press Windows + R to elevate the Run box and enter services.msc in the Run box. At last, hit OK to go to Services window.
2. In Services window, scroll down to find out Windows Update and then right click it to Stop it.
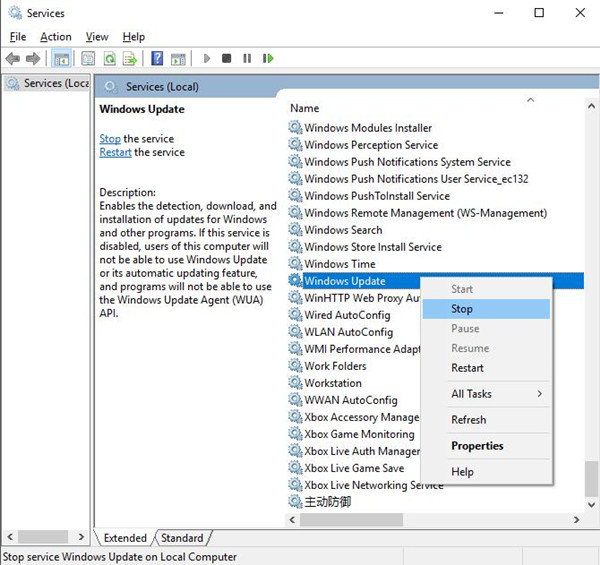
Or here you can also try to set the Startup type of Windows Update service as Disabled in order to end the service.
If you have stopped Windows Update service, it is high time that you managed to locate the delete the Windows 10 1803 setup which has not yet been installed properly.
3. In File Explorer, go to C:\Windows\Softwaredistribution.
This Softwaredistribution folder is where the Windows 10 feature update 1803 has been stored.
4. Right click the Softdistribution folder to Delete it to remove the Windows 10 v1803 package in it.
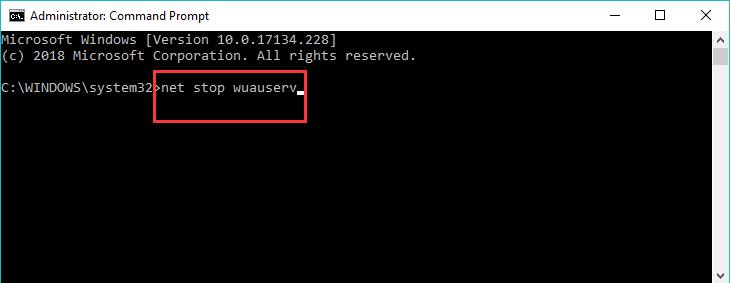
In other situations, to clear up the SoftwareDistribution folder, it is also feasible to run certain commands in Command Prompt as this folder is in the charge of Windows Update Agent (WUAgent).
In Command Prompt, enter the commands below and press Enter to run these commands one by one to delete the SoftwareDistribution folder.
net stop wuauserv
net stop bits
Once you have removed the SoftwareDistribution folder on Windows 10, you can choose to update to 2018 Windows 10 by moving ahead to update to Windows 10 April 1803.
Solution 3: Check Windows 10 Update
If failure to install Windows 10 update version 1803 happens to you and you have just deleted the folder, possibly you should check for updated to see the update v1803 works now.
Normally, after checking for update, Windows 10 April update 1803 can be successfully installed on Windows 10.
1. Go to Start > Settings > Update & Security.
2. Under Windows Update, click Check for updates.
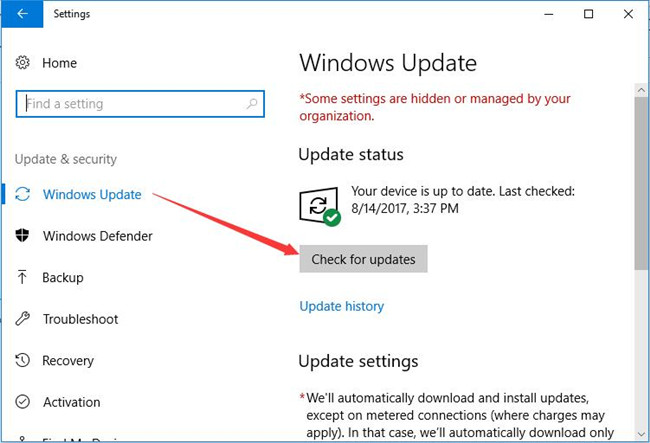
In some cases, Windows 10 will find the updates and install them for you. Therefore, Windows update 1803 fails will be fixed as well.
Solution 4: Download Windows 10 Update 1803 Manually
Lastly, it is also available for you to download the Windows 10 feature update 2018 from Microsoft official site.
For some users, you are able to refer to the following steps to get the hang of downloading feature update to Windows 10 1803.
1. Navigate to the Microsoft official site.
2. On this site, Windows 10 April 2018 Update now available will come into sight. Click Update now.
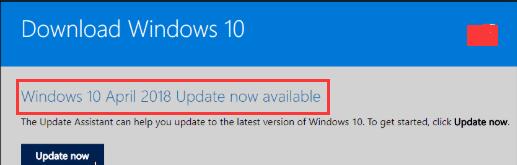
Then go with the onscreen instructions to finish installing Windows 10 update 1803 version.
3. After that, click Run and the Update Now to install the Windows 10 update version 1803.
Hence there will be no more the error that feature update to Windows 10 April 1803 failed on your PC.
To sum up, by virtue of this passage, you would be entitled to fix updating to Windows 10 version 1803 fails on Lenovo, Dell, HP, etc. By troubleshooting this upgrading error, either by the troubleshooter or re-downloading April Windows 10 1803, you can accomplish this task easily.
More Articles:
Fixed: Potential Windows Update Database Error Detected
We Couldn’t Install Some Updates Because the PC Was Turned Off
Fixed: Windows Could Not Complete The Installation Windows 10 Update
Feature update to Windows 10 version 1803 failed to install? Don’t worry… Although it’s incredibly frustrating, you’re definitely not the only person to experience this problem. Thousands of Windows 10 users have recently reported the very same issue. More importantly, you should be able to fix it pretty easily…
Here’s a list of fixes that have resolved this issue for other Windows 10 users. You don’t have to try them all. Just work your way through the list until you find the one that does the trick for you.
- Run the Windows Update Troubleshooter
- Reset Windows Update components
- Run the DISM tool
- Run System File Checker
- Update your drivers
- Update Windows from the Windows 10 ISO file
Fix 1: Run the Windows Update Troubleshooter
Windows Update troubleshooter is a built-in tool that can help you analyze and resolve issues related to Windows update. Try running Windows Update troubleshooter to see if you can resolve this issue. Here is how to do it:
1) On your keyboard, press the Windows logo key and type troubleshoot. In the list of search results, select Troubleshoot.
2) In the pop-up window, select Windows Update and click Run the troubleshooter. You’ll be prompted for permission. Click Yes to run Windows Update troubleshooter.
3) Click Apply this fix to continue.
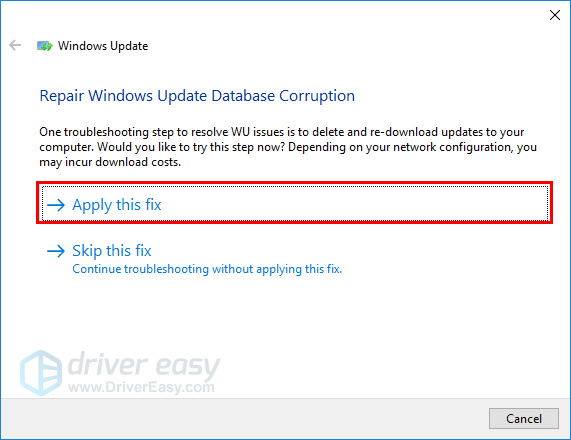
4) Follow the on-screen instructions to troubleshoot this issue.
Perform Windows update again to see if you can install the update. If not, try the next fix, below.
Fix 2: Reset Windows Update components
This issue may occur if there’s something wrong with Windows Update components. If Windows Update components corrupted, Windows Update may not work properly. In this case, try resetting Windows Update components. Here is how to do it:
1) On your keyboard, press the Windows logo key and R at the same time to open the Run dialog. Type cmd and press Ctrl, Shift and Enter at the same time to run Command Prompt as administrator. You’ll be prompted for permission. Click Yes to open Command Prompt.
2) In Command Prompt, type the command lines below and press Enter on your keyboard after typing each:
net stop bitsnet stop wuauserv
net stop appidsvc
net stop cryptsvc
The Windows Update related system services will be stopped after executing the command lines above.
3) In Command Prompt, type the following command lines and press Enter after typing each:
ren %systemroot%\SoftwareDistribution SoftwareDistribution.oldren %systemroot%\system32\catroot2 catroot2.old
You will rename the SoftwareDistribution and catroot2 folder as SoftwareDistribution.old and catroot2.old after you run these two command lines. These two folders are used by Windows Update to save temporary update files.
By renaming these two folders, Windows will think these two folders are missing, and Windows will create new ones to store Windows update files. By doing that, you can avoid many Windows Update issues caused by the old corrupted temporary files in these two folders.
4) In Command Prompt, type the following command lines and press Enter after each:
net start bitsnet start wuauserv
net start appidsvc
net start cryptsvc
After you executing the command lines above, you start the Windows Update related system services.
Check to see if this resolved your Windows Update problem. Hopefully it did. But if not, try the next fix, below.
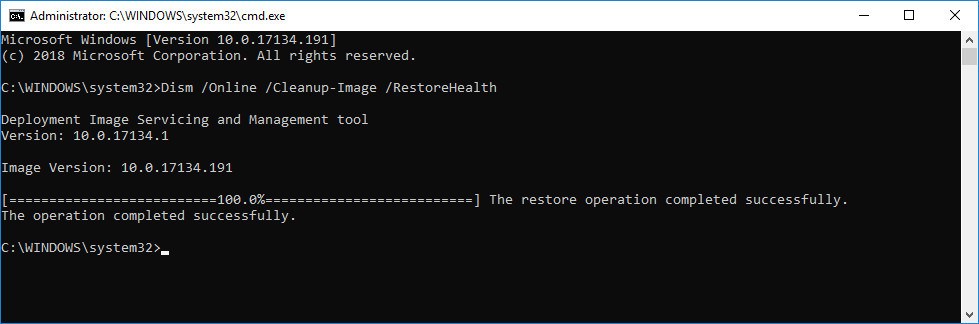
Fix 3: Run the DISM tool
This issue is probably caused by the corrupted Windows update files. In this case, running the Deployment Image Servicing and Management (DISM) tool may resolve this issue. Just follow the step-by-step instructions to run the DISM tool:
1) On your keyboard, press the Windows logo key and R at the same time to open the Run dialog. Type cmd and press Ctrl, Shift and Enter at the same time to run Command Prompt as administrator. You’ll be prompted for permission. Click Yes to open Command Prompt.
2) On your keyboard, type the command lines below one by one and press Enter.
Dism /Online /Cleanup-Image /ScanHealth
When you run the command mentioned above, the DISM tool will scan all the system files and compare them with official system files. The function of this command line is to see if the system file on your PC is consistent with its official source or not. This command line doesn’t fix the corruption.

It may take several minutes for this command operation to be completed.
Dism /Online /Cleanup-Image /CheckHealth
When you run the command line Dism /Online /Cleanup-Image /CheckHealth, the DISM tool will check whether your Windows 10 image exists corruptions or not. This command line also doesn’t repair the corrupted files.

It may take several minutes for this command operation to be completed.
Dism /Online /Cleanup-Image /RestoreHealth
The command line Dism /Online /Cleanup-Image /RestoreHealth tells the DISM tool to try to repair the corrupted files detected. It will replace the corrupted files with the files from official source online.
It may take several minutes for this command operation to be completed.
3) Close Command Prompt when the restore operation completed.
Try performing a Windows update to see if this fixes works. If this issue persists, try running the System File Checker.
Fix 4: Run System File Checker
System File Checker can scan for corruptions in Windows system files and restore corrupted files. If the feature update to Windows 10 version 1803 failed to install, it may be caused by some corruption error. In this case, running System File Checker may help you resolve this issue.
1) On your keyboard, press the Windows logo key and R at the same time to open the Run dialog. Type cmd and press Ctrl, Shift and Enter at the same time to run Command Prompt as administrator. You’ll be prompted for permission. Click Yes to open Command Prompt.
2) On your keyboard, type the following command and press Enter.
sfc /scannow
It may take some time for the command operation to be completed.
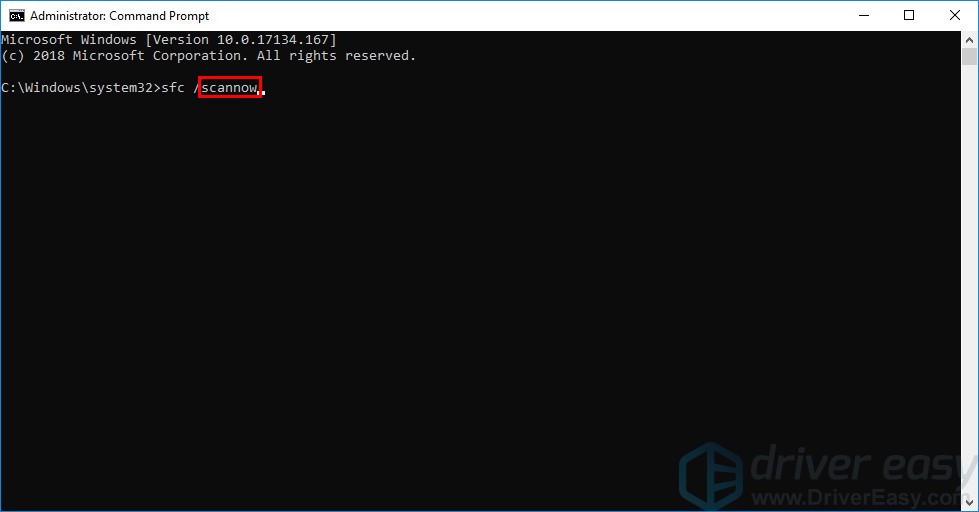
3) When this command operation is completed, close Command Prompt.
Perform a Windows update to check whether this fix works or not. If you still fail to install updates for your Windows system, try the next fix, below.
Fix 5: Update your drivers
This issue may also be triggered by some missing or outdated drivers. Some Windows users reported that this issue is resolved after they update their audio drivers. Try updating your drivers to see if you can fix this issue.
There are two ways to update your drivers: manually and automatically.
Update your drivers manually – You can update your drivers manually by going to the manufacturer’s website, and searching for the latest driver for each device on your PC.
Be sure to choose the driver that’s compatible with your PC model and your version of Windows.
Or
Update your drivers automatically – If you don’t have the time, patience or computer skills to update your drivers manually, you can, instead, do it automatically with Driver Easy. You don’t need to know exactly what system your computer is running, you don’t need to risk downloading and installing the wrong driver, and you don’t need to worry about making a mistake when installing. Driver Easy handles it all.
All the drivers in Driver Easy come straight from the manufacturer. They‘re all certified safe and secure.
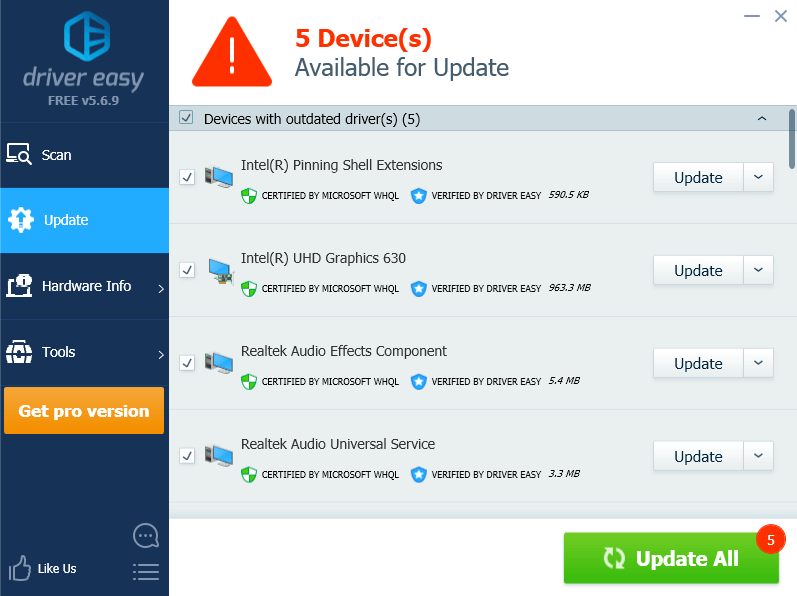
1) Download and install Driver Easy.
2) Run Driver Easy and click Scan Now. Driver Easy will then scan your computer and detect any problem drivers.

3) Click Update next to any device to automatically download the correct version of its driver, then you can install it manually. Or click Update All to automatically download and install the correct version of all the drivers that are missing or out of date on your system (This requires the Pro version – you’ll be prompted to upgrade when you click Update All. You get full support and a 30-day money back guarantee).
If you need assistance, please contact Driver Easy’s support team at support@drivereasy.com.
Fix 6: Update Windows from the Windows 10 ISO file
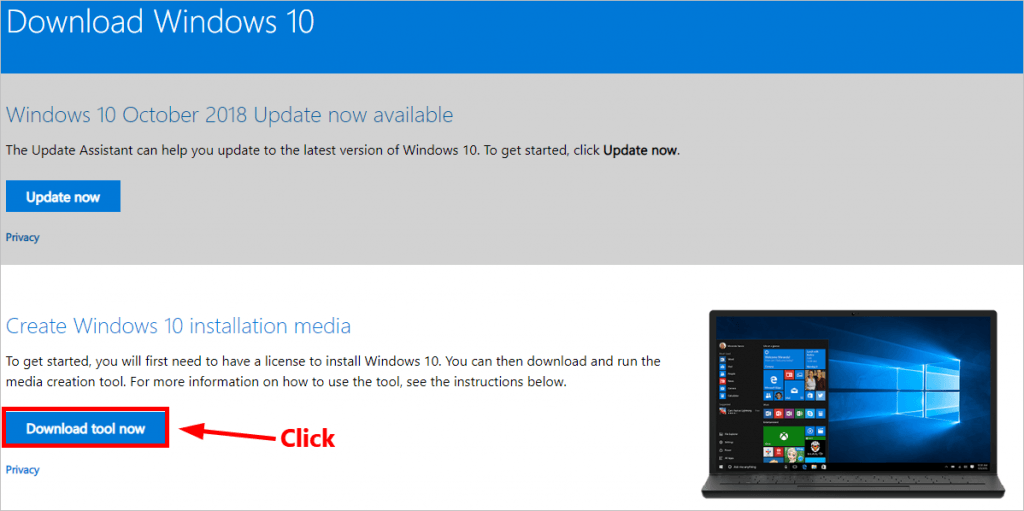
If none of the fixes above works for you, you can try updating Windows form Windows 10 ISO file. You download the ISO file from the official website of Microsoft and then perform an Offline Update. Here is how to do it:
Step 1: Download the Windows 10 ISO file from the Microsoft official website
1) Click here to visit the Microsoft official website for downloading Windows 10.
2) Click Download tool now on the web page to download the media creation tool.
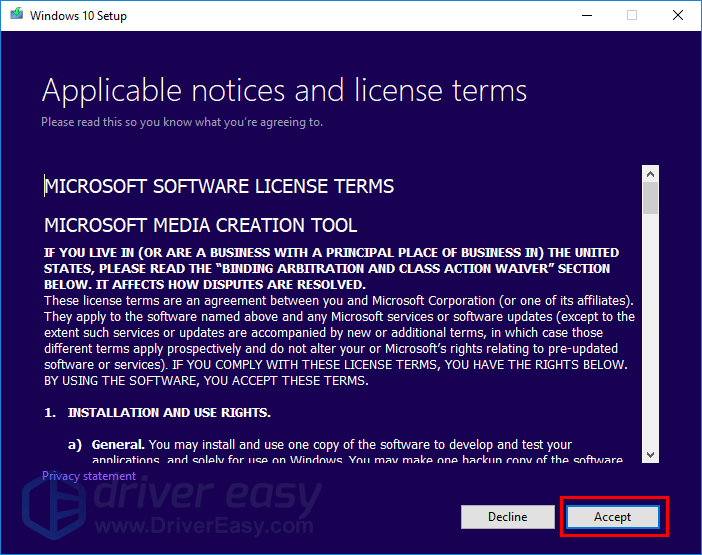
3) Double-click the downloaded file to open the media creation tool. Click Yes when you’re prompted for permission.
4) Click Accept when you see the window below.
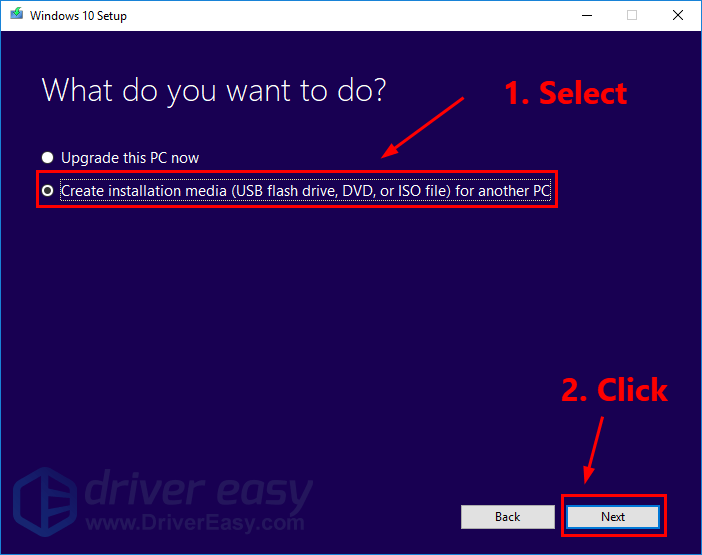
5) Select Create installation media (USB flash drive, DVD, or ISO file) for another PC and click Next.
6) Select the language and architecture of your Windows 10 ISO file and click Next.
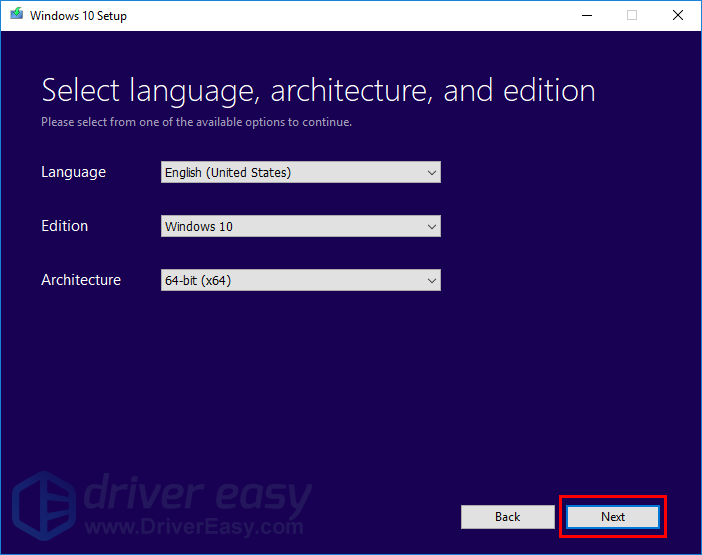
Note: If the installed memory of your PC is less than 4GB, it’s recommended that you select the 32-bit architecture.
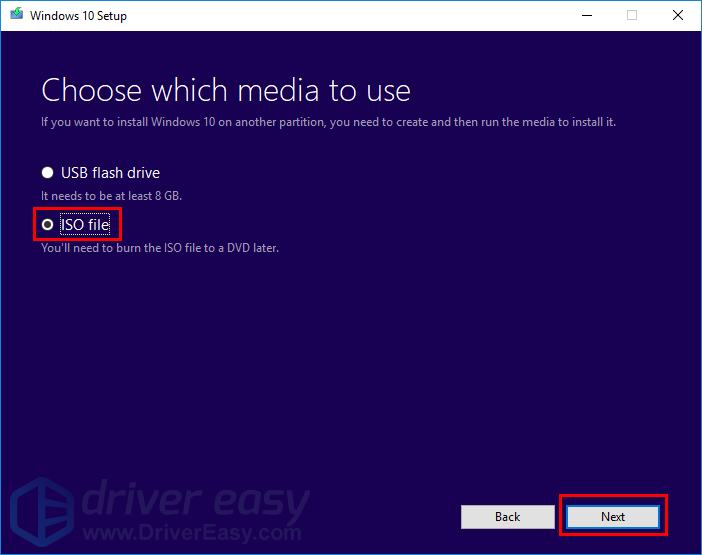
7) Select ISO file and click Next.
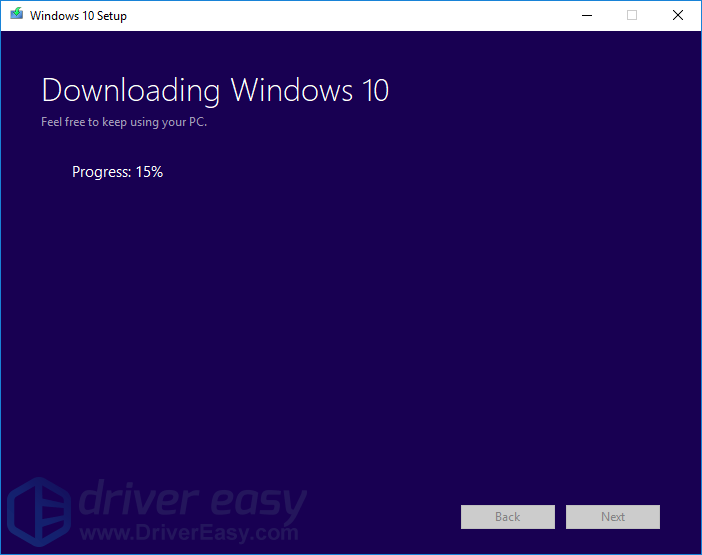
 Select the location to save the Windows 10 ISO file. After that, the media creation tool will start to download Windows 10 ISO file.
9) Click Finish to close the media creation tool.
Step 2: Start updating
1) Right-click on the downloaded ISO file then select Mount.
2) In the pop-up window, double-click the file setup.exe. You’ll be prompted for permission. Click Yes to continue.
3) When you see the following window, select Not right now then click Next.
4) Follow the on-screen instructions to update your Windows 10 OS. During the installation, your computer will restart several times.
When the Windows 10 feature update is installed, check for Windows Update for latest updates.
Hopefully, one of the fixes above resolved the feature update to Windows 10 version 1803 failed to install issue for you. If you have any questions or suggestions, please leave your comment below.
by
·
Published
· Updated
Windows 10 April 2018 update is the newest feature upgrade to Windows 10, which is available to Install for Windows 10 version 1709 and earlier versions of Windows 10. The primary method of delivery for this upgrade is through Windows update, but as it has to be delivered to millions of PCs, it might take some time to reach your device. The previous feature upgrade of version 1709 was available to all after three months of the Initial release. Installing the feature upgrade manually offers some advantages over getting it through Windows update-the most prominent ones being getting access to new features early+ Very fewer chances of updates getting failure at Install. There are a number of methods available that you can use to Install Windows 10 Fall Creators update manually. This article discusses all of them in detail.
Method 1: Using the upgrade assistant
The Redmond giant provides software which it names as Upgrade assistant which assists you in getting the most recent feature upgrade to Windows. It is available on the following page for download- Click Update now just below “We have noticed that you are using Windows 10”:
https://www.microsoft.com/en-in/software-download/windows10
Alternatively, use this direct download link:
http://go.microsoft.com/fwlink/?LinkID=799445
A program of about 6 MB in size would subsequently be downloaded and run. This shows if your PC is up to date.
If an update is available which should be, it would ask you for confirmation about Installation. Click on update now to get started.
After you click update now, you would be greeted with a download progress screen. Rest of the work would be done by Windows itself.
After the download, the PC would ask you for when to restart your computer to initiate the Install. A few restarts and you are done! When you get to the desktop for the first time you would notice the same assistant pops up and Thanks you for Installing the latest feature update to Windows 10.
Method 2-Using the Media creation tool
The Media Creation tool, as the name suggests is used for creating Installation media of Windows 10. Originally designed for upgrading Windows 7 and 8.1 to Windows 10, the tool still holds works excellently to upgrade to the latest feature upgrade. I feel that this is more efficient than the Upgrade assistant. Media creation tool offers 2 options:
- Downloading the Installation media for future purposes and doing a clean Install.
- A more automatic option to let the computer upgrade.
Download:
http://go.microsoft.com/fwlink/?LinkId=691209
A bonus thing would be to re-verify the version number of the Tool. It should be 10.0.17134. A tool having the version number of 10.0.15063 or something else would download the ISO of that corresponding build.
To use the first option, which automatically upgrades your system, choose to Upgrade this PC now. This is a more automated process and Windows should automatically upgrade your system. After some time and few restarts, you would be greeted with Windows 10 April 2018 1803 update.
It would download the Installation media first and then Install the feature upgrade.
For more advanced users
This method would allow you to keep an Installation media for future purposes if you want to do a clean Install of Windows 10 April update. Following steps are what you need to do for the upgrade.
Choose Option 2 in Media creation tool-download Installation media for another PC.
If you wish to upgrade the same PC, make sure the checkbox at the bottom which says “Use recommended option for this PC” is checked. Click on Next afterwards.
- Accept the license terms.
- Confirm your Edition to be upgraded and keeping things. Click on next.
- Then Windows starts Installing.
- After some restarts, you would be greeted with Windows 10 April 2018 update
Directly download the ISO
Downloading an ISO directly from Microsoft isn’t that easy, you need to do some effort to get the ISO from the website.
Microsoft only recommends using Media Creation tool for downloading the ISO. For systems running Windows as an OS, you would never get an option to download ISO file from your browser.(It used to be a while ago, but not.) However, you can use Adguard to download Windows 10 ISOs who fetch it from Microsoft server.
https://tb.rg-adguard.net/public.php
For Windows 10 version 1803, Choose the following menus in Dropdown:
- Windows Final
- Windows 10 version 1803
- Windows 10(For Home and Pro)
- Desired Language and Architecture.
Then follow Method 2 on how to Upgrade using ISO file.
These 3 methods can help getting Windows 10 April 2018 update. If the system afterwards is stable and you do not wish to go back, you can free up space from your system by deleting the older OS stored in Windows.old:
To remove the older windows Installation that would be removed automatically after 10 days you can see this article(the bottom section).
See also:
Upgrade to Fall Creators update manually
You may definitely want to experience the latest Windows 10 2018 April Update, a collection of new amazing features. Microsoft will deliver this as an automatic update, but to grab it at earliest, you can download it manually. So, here, in this post, we present you the instructions and steps to How to Install Version 1803 Windows 10 April 2018 Update from USB.
For its user’s convenience, the Media Creation Tool provides an option to create a USB Flash drive. For this, you need to have a minimum 8 GB USB. But also ensure to fulfill Windows 10 April 2018 Update System Requirements. Once you check the compatibility points, proceed towards the steps.
Install Version 1803 Windows 10 April 2018 Update from USB
Here is how to install version 1803 Windows 10 April 2018 update from USB –
Step-1: Launch Edge Browser by clicking its icon on the taskbar and navigate this location to open Microsoft official download page. Once you reach there, locate and hit Download tool now button. You will find this just below the section Create Windows 10 installation media.
Step-2: After the download is over, double-click the file “MediaCreationTool.exe“.
Step-3: If UAC prompts up on the PC screen, click Yes to continue. Now, wait for few seconds as the wizard will make things ready for you. So, when notices and license terms will appear, click “Accept“.
Step-4: Proceeding forward, to obtain Windows 10 2018 April Update, select “Create installation media (USB flash drive, DVD, or ISO file) for another PC” on the following window. Henceforth, click Next.
Step-5: Use the drop-downs and choose Language, Edition moreover Architecture. By default, the tool will by itself pick the right edition of your PC. Hit Next.
Step-6: Moving ahead, select the “USB flash drive” radio button when the tool asks you to Choose which media to use, click Next.
Step-8: Select your “USB drive” to write files into it.
Note – If you cannot find the drive, hit the link Refresh drive list. Also, ensure to select the correct drive as it will wipe all the existing files it contains.
Step-9: Finally, click Next and Windows 10 2018 April Update will be downloaded and written to the drive.
Now follow the guidelines from How to Clean Install Windows 10 1803 Latest April 2018 Update and perform the remaining work.
See: How to Boot Windows 10 From USB Flash Drive.
Once the tool formats and creates the installation drive, restart Windows 10 PC. Then, boot from the drive and Install the Windows 10 April 2018 Update from USB (1803).