
C:\Users\Liu.D.H>ver

Microsoft Windows [Version 10.0.19041.264]

C:\Users\Liu.D.H>bcdedit

Windows Boot Manager
--------------------
identifier              {bootmgr}
device                  partition=\Device\HarddiskVolume1
description             Windows Boot Manager
locale                  en-US
inherit                 {globalsettings}
default                 {current}
resumeobject            {8c132511-806f-11e9-8860-f798d1b7a8f1}
displayorder            {current}
                        {89f269f4-cc9f-11e6-8727-64006a16df31}
                        {8c132516-806f-11e9-8860-f798d1b7a8f1}
toolsdisplayorder       {memdiag}
timeout                 5

Windows Boot Loader
-------------------
identifier              {current}
device                  partition=C:
path                    \WINDOWS\system32\winload.exe
description             Windows 10
locale                  en-US
inherit                 {bootloadersettings}
recoverysequence        {8c132514-806f-11e9-8860-f798d1b7a8f1}
displaymessageoverride  Recovery
recoveryenabled         Yes
allowedinmemorysettings 0x15000075
osdevice                partition=C:
systemroot              \WINDOWS
resumeobject            {8c132511-806f-11e9-8860-f798d1b7a8f1}
nx                      OptIn
bootmenupolicy          Legacy
hypervisorlaunchtype    Off

Windows Boot Loader
-------------------
identifier              {89f269f4-cc9f-11e6-8727-64006a16df31}
device                  partition=\Device\HarddiskVolume1
path                    \Windows\system32\winload.exe
description             Windows 7
locale                  zh-CN
inherit                 {bootloadersettings}
osdevice                partition=\Device\HarddiskVolume1
systemroot              \Windows
resumeobject            {89f269f3-cc9f-11e6-8727-64006a16df31}
nx                      OptIn
detecthal               Yes

Windows Boot Loader
-------------------
identifier              {8c132516-806f-11e9-8860-f798d1b7a8f1}
device                  partition=C:
path                    \WINDOWS\system32\winload.exe
description             Windows10 with Hyper-V
locale                  en-US
inherit                 {bootloadersettings}
recoverysequence        {8c132514-806f-11e9-8860-f798d1b7a8f1}
displaymessageoverride  Recovery
recoveryenabled         Yes
allowedinmemorysettings 0x15000075
osdevice                partition=C:
systemroot              \WINDOWS
resumeobject            {8c132511-806f-11e9-8860-f798d1b7a8f1}
nx                      OptIn
bootmenupolicy          Legacy
hypervisorlaunchtype    Auto

C:\Users\Liu.D.H>systeminfo

Host Name:                 DESKTOP-LDH
OS Name:                   Microsoft Windows 10 Education
OS Version:                10.0.19041 N/A Build 19041
OS Manufacturer:           Microsoft Corporation
OS Configuration:          Standalone Workstation
OS Build Type:             Multiprocessor Free
Registered Owner:          Windows User
Registered Organization:
Product ID:                00328-10000-00001-AA635
Original Install Date:     2020-05-11, 22:13:14
System Boot Time:          2020-06-08, 10:12:11
System Manufacturer:       Dell Inc.
System Model:              Vostro 3900
System Type:               x64-based PC
Processor(s):              1 Processor(s) Installed.
                           [01]: Intel64 Family 6 Model 60 Stepping 3 GenuineIntel ~3601 Mhz
BIOS Version:              Dell Inc. A10, 2015-07-30
Windows Directory:         C:\WINDOWS
System Directory:          C:\WINDOWS\system32
Boot Device:               \Device\HarddiskVolume1
System Locale:             zh-cn;Chinese (China)
Input Locale:              zh-cn;Chinese (China)
Time Zone:                 (UTC+08:00) Beijing, Chongqing, Hong Kong, Urumqi
Total Physical Memory:     16,301 MB
Available Physical Memory: 9,703 MB
Virtual Memory: Max Size:  33,709 MB
Virtual Memory: Available: 26,300 MB
Virtual Memory: In Use:    7,409 MB
Page File Location(s):     C:\pagefile.sys
Domain:                    WORKGROUP
Logon Server:              \\DESKTOP-LDH
Hotfix(s):                 6 Hotfix(s) Installed.
                           [01]: KB4552925
                           [02]: KB4534170
                           [03]: KB4537759
                           [04]: KB4545706
                           [05]: KB4557968
                           [06]: KB4556803
Network Card(s):           4 NIC(s) Installed.
                           [01]: TAP-Windows Adapter V9
                                 Connection Name: 以太网
                                 Status:          Media disconnected
                           [02]: Realtek PCIe GBE Family Controller
                                 Connection Name: Ethernet_Realtek
                                 DHCP Enabled:    Yes
                                 DHCP Server:     113.55.112.1
                                 IP address(es)
                                 [01]: 113.55.127.140
                                 [02]: fe80::3d0a:ecde:2178:d77c
                                 [03]: 2001:250:2800:cc09:6600:6aff:fe16:df31
                           [03]: Realtek RTL8188CU Wireless LAN 802.11n USB 2.0 Network Adapter
                                 Connection Name: Wi-Fi 2
                                 Status:          Media disconnected
                           [04]: Microsoft KM-TEST Loopback Adapter
                                 Connection Name: Npcap Loopback Adapter
                                 DHCP Enabled:    Yes
                                 DHCP Server:     255.255.255.255
                                 IP address(es)
                                 [01]: 169.254.104.11
                                 [02]: fe80::d8bf:11ab:7b05:680b
Hyper-V Requirements:      VM Monitor Mode Extensions: Yes
                           Virtualization Enabled In Firmware: Yes
                           Second Level Address Translation: Yes
                           Data Execution Prevention Available: Yes

C:\Users\Liu.D.H>
Open Ubuntu 18.04 or 20.04.
Works as expected.
I can confirm that I have enabled Virtual Machine Platform and VT-x. But the errors when I started Ubuntu is confused.
And for some reasons I do not want to enable Hyper-V features. From the doc (https://docs.microsoft.com/en-us/windows/wsl/), it is not a requirement for WSL2.
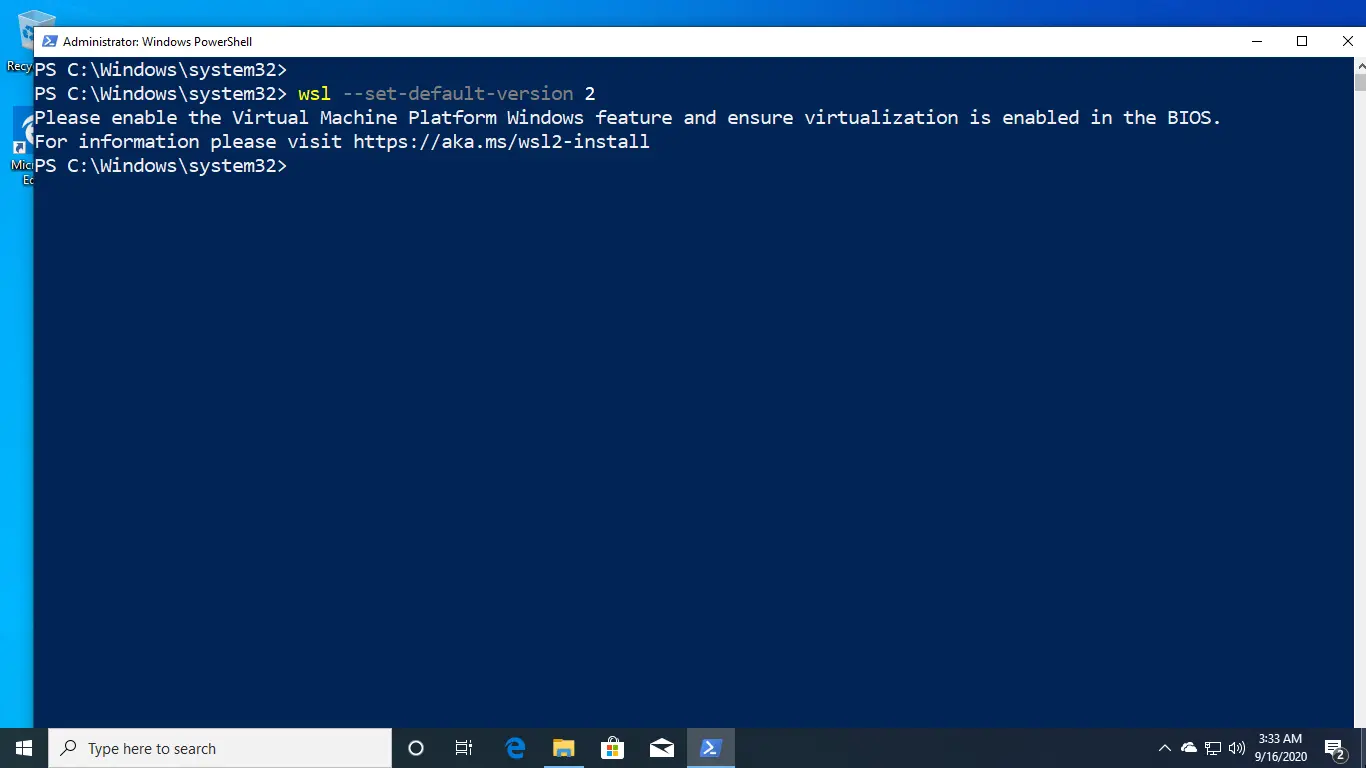
You need to enable the Virtual Machine Platform Windows feature to use WSL 2. If this is not done, then you will get the following error:
wsl --set-version kali-linux 2
Conversion in progress, this may take a few minutes...
For information on key differences with WSL 2 please visit https://aka.ms/wsl2
Please enable the Virtual Machine Platform Windows feature and ensure virtualization is enabled in the BIOS.
To enable WSL 2, Open the Windows Features window by navigating to Control Panel | Programs | Turn Windows feature on or off.

Ensure that the Virtual Machine Platform and Windows Subsystem for Linux features are selected.
After clicking on the OK button, Windows will enable WSL 2.
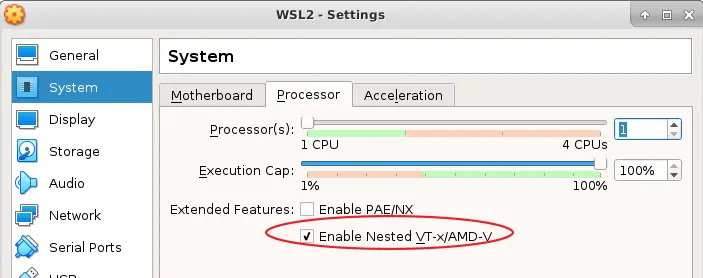
If you want to install WSL 2 on a Windows 10 virtual machine, the virtual machine should support nested virtualization.
With VirtualBox, right-click the VM and choose Settings. In the System section, under the Processor tab, check the box: Enable Nested VT-x/AMD-V.
On VMware Workstation, right-click the VM and choose Settings. In the Hardware section, under the Processor, make sure the Virtualize Intel VT-x/EPT or AMD-V/RVI checkbox is enabled.
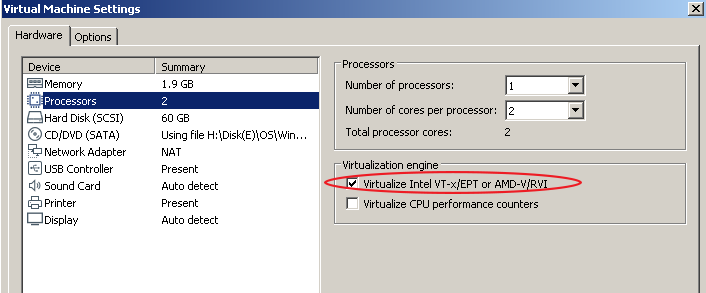
You also have to make sure virtualization is enabled in the BIOS (Intel Virtualization Technology or SVM Mode in AMD).
Windows 10: How to fix «Please enable the Virtual Machine Platform Windows feature and ensure…
Discus and support How to fix «Please enable the Virtual Machine Platform Windows feature and ensure… in Windows 10 Customization to solve the problem; While attempting to install Ubuntu on Terminal, I encountered the following error:Installing, this may take a few minutes…WslRegisterDistribution…
Discussion in ‘Windows 10 Customization’ started by wcndave2, Nov 26, 2024.
-
How to fix «Please enable the Virtual Machine Platform Windows feature and ensure…
While attempting to install Ubuntu on Terminal, I encountered the following error:Installing, this may take a few minutes…WslRegisterDistribution failed with error: 0x80370102Please enable the Virtual Machine Platform Windows feature and ensure virtualization is enabled in the BIOS. For information please visit https://aka.ms/enablevirtualization Press any key to continue…I have already enabled virtualisation svm in biosI have already active Hyper V and Virtual Machine Platform in Turn Windows feature on or offyet I cannot install, I get the above error.I have seen a similar post that sa

-
How to fix «Please enable the Virtual Machine Platform Windows feature and ensure virtualization is enabled in the BIOS.»
While attempting to install Ubuntu on Terminal, I encountered the following error:
Installing, this may take a few minutes…
WslRegisterDistribution failed with error: 0x80370102
Please enable the Virtual Machine Platform Windows feature and ensure virtualization is enabled in the BIOS. For information please visit https://aka.ms/enablevirtualization Press any key to continue…
I have already run Hyper V in bios: Intel Virtualization Technology, and VT-d
I have already active Hyper V and Virtual Machine Platform in Turn Windows feature on or off
I use MSI mainboard and intel CPU.
Despite these efforts, the issue persists. Could you please provide guidance on resolving this problem?
Thank you for your assistance.
-
How to fix «Please enable the Virtual Machine Platform Windows feature and ensure virtualization is enabled in the BIOS.»
Hi, Ken,
Sorry to hear you’re experiencing this issue.
Usually, this problem is caused by a corruption of the Hyper-V. Uninstalling and reinstalling the Hyper-V would fix this problem.
Step 1: Uninstall
1-Click on Start, search for «Turn Windows features on or off» and click on that
2-Uncheck «Hyper-V» and «Virtual Machine Platform»
3-Then click on OK to uninstall and reboot your PC
Step 2:Re-install
1-Click on Start, search for «Turn Windows features on or off» and click on that
2-Check «Hyper-V» and «Virtual Machine Platform»
3-Then click on OK to install and reboot your PC
Step 3: Set Hyper-V to start automatically with Windows.
1-Click on Start, search for Command Prompt
2-Right-click on that and select «Run as Administrator»
3-Paste this command and press Enter:
bcdedit /set hypervisorlaunchtype Auto
4-Reboot your PC and try to install Ubuntu again
I hope this information helps. If you have any questions or the problem persists, please let me know and I’ll be glad to assist you further.
-
How to fix «Please enable the Virtual Machine Platform Windows feature and ensure…
Unable to enable virtual machine platform.
I’m sorry that the issue still persists. Yes, it’s possible that having VMware and VirtualBox installed on your computer is causing conflicts with the virtualization features in Windows. You can try uninstalling both programs, then restarting your computer and attempting to enable the virtual machine platform again. If this works, you may need to choose between using the virtual machine platform or using VMware and VirtualBox. Alternatively, you can try enabling the Hypervisor Platform feature instead of Hyper-V, which allows for coexistence between Hyper-V and other virtualization programs.

How to fix «Please enable the Virtual Machine Platform Windows feature and ensure…
-
How to fix «Please enable the Virtual Machine Platform Windows feature and ensure… — Similar Threads — fix Please enable
-
Enable Virtual Machine Platform
in Windows 10 Gaming
Enable Virtual Machine Platform: When I try to install Virtual Machine Platform via Turn Windows Features on or off, during the restart to finish install I go into automatic recovery, whereby the changes have to be undone in order to reboot.win 11 pro x64, HP elitedesk 800 g5fresh install of windowslatest… -
Enable Virtual Machine Platform
in Windows 10 Software and Apps
Enable Virtual Machine Platform: When I try to install Virtual Machine Platform via Turn Windows Features on or off, during the restart to finish install I go into automatic recovery, whereby the changes have to be undone in order to reboot.win 11 pro x64, HP elitedesk 800 g5fresh install of windowslatest… -
How to fix «Please enable the Virtual Machine Platform Windows feature and ensure…
in Windows 10 Gaming
How to fix «Please enable the Virtual Machine Platform Windows feature and ensure…: While attempting to install Ubuntu on Terminal, I encountered the following error:Installing, this may take a few minutes…WslRegisterDistribution failed with error: 0x80370102Please enable the Virtual Machine Platform Windows feature and ensure virtualization is enabled in… -
How to fix «Please enable the Virtual Machine Platform Windows feature and ensure…
in Windows 10 Software and Apps
How to fix «Please enable the Virtual Machine Platform Windows feature and ensure…: While attempting to install Ubuntu on Terminal, I encountered the following error:Installing, this may take a few minutes…WslRegisterDistribution failed with error: 0x80370102Please enable the Virtual Machine Platform Windows feature and ensure virtualization is enabled in… -
How to fix «Please enable the Virtual Machine Platform Windows feature and ensure…
in Windows 10 Gaming
How to fix «Please enable the Virtual Machine Platform Windows feature and ensure…: While attempting to install Ubuntu on Terminal, I encountered the following error:Installing, this may take a few minutes… WslRegisterDistribution failed with error: 0x80370102Please enable the Virtual Machine Platform Windows feature and ensure virtualization is enabled in… -
How to fix «Please enable the Virtual Machine Platform Windows feature and ensure…
in Windows 10 Software and Apps
How to fix «Please enable the Virtual Machine Platform Windows feature and ensure…: While attempting to install Ubuntu on Terminal, I encountered the following error:Installing, this may take a few minutes… WslRegisterDistribution failed with error: 0x80370102Please enable the Virtual Machine Platform Windows feature and ensure virtualization is enabled in… -
BSOD when enabling Virtual Machine Platform feature
in Windows 10 BSOD Crashes and Debugging
BSOD when enabling Virtual Machine Platform feature: Hi,
I’ve recently bought a new laptop with a Ryzen 7 4700u and I’ve been trying to install WSL2 but with no success so far.
Following the guide from the Microsoft Docs, I get a BSOD with the following error SYSTEM_THREAD_EXCEPTION_NOT_HANDLED after enabling the Virtual… -
Can’t enable»Virtual Machine Platform»
in Windows 10 BSOD Crashes and Debugging
Can’t enable»Virtual Machine Platform»: I’m running Windows 10 on ASUS FX705DY AU072T.Windows doesn’t boot after enabling «Virtual Machine Platform» and just shows a black screen after showing the windows 10 logo during boot.
I’ve tried it on updated version 1909 and also after updating to version 19041.264 I…
-
[Windows Features] Virtual Machine Platform
in Windows 10 Customization
[Windows Features] Virtual Machine Platform: In what case would I need to install the Virtual Machine Platform (found in — Turn Windows features on or off)? What is it good for?https://answers.microsoft.com/en-us/windows/forum/all/windows-features-virtual-machine-platform/9a31aa63-36bc-4e6c-a054-e8dc47af3c0e
После установки VMware Workstations на десктопе с Windows 10 или 11, можно столкнуться с крайне низкой производительностью и нестабильной работы гостевых Windows ОС в виртуальных машинах. Что интересно, виртуальные машины с Windows 10/11 обычно работают удовлетворительно, но ВМ с гостевыми Windows Server 2019/2022 сильно тормозят при любых операциях. Простая установка гостевой Windows Server в ВМ может занимать несколько часов.
Проблемы с низкой производительностью гостевых Windows в VMware Workstation могут быть вызваны несколькими факторами.
Для анализа плохой производительности виртуальной машины в среде VMware нужно сначала изучить файл vmware.log, который хранится в каталоге ВМ.
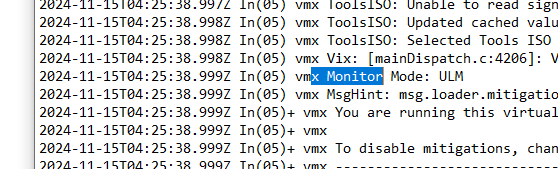
В первую очередь можно обратить внимание на такие строки в логе ВМ:
2024-11-15T04:25:38.999Z In(05) vmx MsgHint: msg.loader.mitigations.wsAndFusion
2024-11-15T04:25:38.999Z In(05)+ vmx You are running this virtual machine with side channel mitigations enabled. Side channel mitigations provide enhanced security but also lower performance.
2024-11-15T04:25:38.999Z In(05)+ vmx
2024-11-15T04:25:38.999Z In(05)+ vmx To disable mitigations, change the side channel mitigations setting in the advanced panel of the virtual machine settings. Refer to VMware KB article 79832 at https://kb.vmware.com/s/article/79832 for more details.
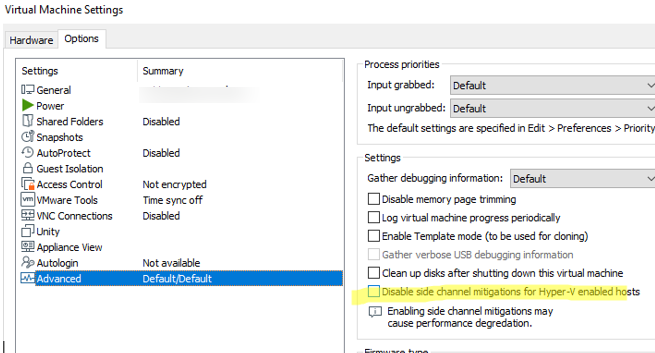
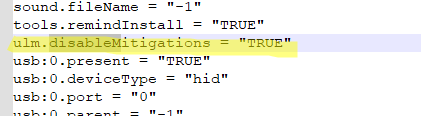
Это указывает, что для ВМ включена защита от атак класса side channel (типовые уязвимости этого класса это Spectre и Meltdown), которая ограничивают доступ к защищенной памяти ядра (хоста) из сторонних процессов (в том числе из виртуальных машин). Защита Side Channel mitigation включена по умолчанию для всех ВМ на хостах Windows с включенной функцией Virtualization Based Security (VBS). Отключить эту защиту можно в графическом интерфейсе VMware Workstation (свойства ВМ -> Options -> Advanced -> включить опцию Disable side channel mitigations for Hyper-V enabled hosts) или в VMX конфигурационном файле ВМ, добавив параметр:
ulm.disableMitigations="TRUE"
Если это не исправило проблему плохой производительности виртуальной машины, обратите внимание на другую строку в vmware.log:
2024-11-15T04:25:38.999Z In(05) vmx Monitor Mode: ULM
Это указывает на то, что VMware Workstation запущен в режиме User Level Mode (ULM). Режим ULM указывает что ВМ в гипервизоре запускаются в пользовательском режиме, а не режиме ядра. При таком режиме запуска ВМ на VMware Workstations производительность ОС в виртуальной машина будет сильно деградировать, и почти при любых действиях сильно тормозить. Если на хосте Windows установлены компоненты гипервизора Hyper-V, VMware workstation автоматически будет запускать ВМ в режиме ULM.
В этом случае решить проблему поможет только отключение компонентов виртуализации Hyper-V в хостовой ОС. Это позволить компоненту Virtual Machine Monitor (VMM) напрямую обращаться к набору инструкции виртуализации физического процессора, минуя дополнительной слой Windows Hypervisor Platform API
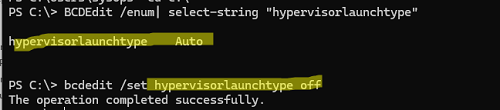
Проверьте, что на хосте разрешено запускать компоненты Hyper-V:
BCDEdit /enum| select-string "hypervisorlaunchtype"
Строка
hypervisorlaunchtype auto
указывает, что загрузчику Windows разрешено запускать компоненты платформы виртуализации при загрузке.
Чтобы запретить запуск компонентов Hyper-V при загрузке, выполните команду:
bcdedit /set hypervisorlaunchtype off
Перезагрузите компьютер.
Перезагрузите компьютер и проверьте, улучшилась ли производительность ВМ с Windows Server в VMware.
Обратите внимание, что этим вы отключите возможность запускать на хосте ряд дополнительных возможностей, которые основаны на компонентах Virtual Machine Platform, включая:
- Виртуальные машины Hyper-V
- Подсистему WSL2
- Windows Sandbox
- Credential Guard и Device Guard
WSL2 is not supported with your current machine configuration.
Please enable the "Virtual Machine Platform" optional component and ensure virtualization is enabled in the BIOS.
Enable "Virtual Machine Platform" by running: wsl.exe --install --no-distribution
Error code: Wsl/Service/CreateInstance/CreateVm/HCS/HCS_E_HYPERV_NOT_INSTALLED

Чтобы вернуть возможность запуска компонентов Hyper-V, выполните команду:
bcdedit /set hypervisorlaunchtype auto
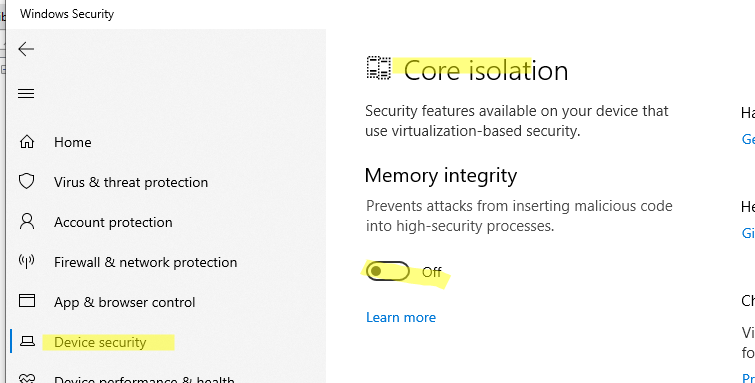
Также в некоторых случаях улучшить производительность ВМ может помочь отключение изоляции ядра в настройках Windows (Windows Security -> Device Security -> Core Isolation details -> Memory Integrity). Конечно, это снижает защиту Windows.
Большинство современных процессоров поддерживают режим Power Throttling. Идея которого в том, что ОС для фоновых процессов может ограничивать использование CPU (переводить в фоновый режим) для экономии энергии и увеличения времени автономной работы. Режиме Power Throttling может быть причиной медленной работы процессов VMware на компьютерах с CPU Intel 12, 13, 14 поколений на компьютерах с Windows 11 24H2.
Чтобы запретить Windows самостоятельно ограничивать использование CPU через механизм Power Throttling для основного процесса VMware Workstation (используется для запуска ВМ), выполните команду:
powercfg /powerthrottling disable /path “C:\Program Files (x86)\VMware\VMware Workstation\x64\vmware-vmx.exe”
Проверьте, что процесс
vmware-vmx.exe
был добавлен в список исключений.
powercfg /powerthrottling list

Для указанных процессов Windows не будет пытаться управлять электропитанием. В этом случае нагрузки VMware Workstation будут всегда выполняться в режиме максимальной производительности.
If you’re trying to set up Ubuntu on WSL but keep encountering virtualization errors, read on. We’ll explore practical solutions for enabling Virtual Machine Platform in Windows and BIOS settings, so you can get your Ubuntu WSL environment up and running seamlessly.
TOC
Understanding the Importance of Virtualization for WSL
Windows Subsystem for Linux (WSL) is a powerful way to run Linux distributions, such as Ubuntu, directly within Windows. By leveraging virtualization features, WSL 2 runs a lightweight virtual machine (VM) under the hood to provide near-native Linux performance. However, if virtualization is not properly enabled at both the hardware (BIOS) and software (Windows) levels, you may see errors like:
“WslRegisterDistribution failed with error: 0x80370102. Please enable the Virtual Machine Platform Windows feature and ensure virtualization is enabled in the BIOS.”
This notification typically indicates an issue with the hypervisor or hardware virtualization layer. Despite enabling settings like Hyper-V and Virtual Machine Platform, some users continue to face this error. Below, we’ll explore detailed troubleshooting steps and additional insights to help you resolve these issues more confidently.
How Virtualization Powers WSL
Virtualization lets your computer create and manage isolated environments where different operating systems or OS-level subsystems (like WSL) can run simultaneously. Intel’s Virtualization Technology (VT-x) or AMD’s AMD-V technology must be enabled at the BIOS/UEFI level for WSL 2 to function. Meanwhile, Windows features like Hyper-V and Virtual Machine Platform give the operating system the necessary services to manage these virtual environments.
Why the 0x80370102 Error Appears
In many cases, Windows is informing you that it cannot launch the virtual machine for WSL because it detects virtualization as disabled, either due to BIOS settings, conflicting software, or a misconfiguration in Windows features. The system may have partial virtualization support enabled, but not enough for a full Hyper-V environment to start. Double-checking every layer (BIOS settings, Windows features, third-party software) ensures all components are aligned for WSL to work properly.
Primary Steps to Fix the “Please enable the Virtual Machine Platform” Error
Below are the core steps many have followed to resolve the issue. Be sure to back up any critical data before making substantial changes to your system.
1. Uninstall and Reinstall Hyper-V and Virtual Machine Platform
Even if Hyper-V and Virtual Machine Platform are already turned on, sometimes toggling them off and back on can refresh underlying system configurations.
- Press Win + R and type optionalfeatures.exe to open Turn Windows features on or off.
- Uncheck both Hyper-V and Virtual Machine Platform, then click OK.
- Reboot your computer when prompted.
- After the reboot, open Turn Windows features on or off again.
- Check both Hyper-V and Virtual Machine Platform to re-enable them.
- Restart your PC once more to finalize the changes.
This process often corrects any misconfigurations or registry inconsistencies that might prevent Hyper-V from working correctly.
2. Enable Hypervisor to Launch Automatically
For the virtual machine that runs WSL 2, Hyper-V’s hypervisor must be active on boot. By default, this should be set automatically, but if it’s disabled or set to manual, you’ll need to reactivate it.
- Open Command Prompt as an Administrator.
- Enter the following command:
bcdedit /set hypervisorlaunchtype auto
- Reboot your PC to apply the change.
After this step, Hyper-V should launch automatically on every startup, allowing WSL 2 to initialize without encountering the 0x80370102 error.
Additional Checks If the Error Persists
If you’ve followed the primary steps but still encounter the same error message, there may be deeper system issues or overlooked settings causing the conflict. Here are some further checks and techniques you can apply.
1. Revisit BIOS or UEFI Settings
Different motherboard manufacturers label virtualization settings uniquely. Look for terms like Intel VT-x, AMD-V, SVM, or Virtualization Technology. Confirm that each relevant entry is enabled. Some systems also have an IOMMU or Intel VT-d setting that needs activation. A quick overview:
| Manufacturer | Possible Virtualization Settings |
|---|---|
| Intel-Based Motherboards | VT-x, VT-d, Intel Virtualization Technology |
| AMD-Based Motherboards | AMD-V, SVM, IOMMU |
| Other Terminology | Hardware Virtualization, Virtualization Extensions |
Sometimes, there are multiple options nested under advanced CPU configurations or security sections. Consult your motherboard’s manual for precise instructions on where to find these settings.
2. Disable Conflicting Software
Certain third-party applications can block access to hardware virtualization resources. Examples include:
- Anti-virus suites that employ deep virtualization or scanning hooks
- Third-party hypervisors like VirtualBox, VMware Workstation, or Docker Desktop (if configured to use its own hypervisor instead of WSL integration)
- System security tools that sandbox processes at a low level
If you suspect a conflict, try disabling or uninstalling these applications temporarily. If the WSL error disappears, you’ll know the interfering program was preventing Hyper-V from launching.
3. Check for Windows Updates
Microsoft periodically updates the WSL ecosystem, Hyper-V components, and virtualization architecture through Windows Updates. Make sure your system is fully up to date:
- Click Start, then Settings.
- Navigate to Update & Security.
- Check for available updates and install them.
- Reboot as required.
Applying the latest cumulative updates can sometimes resolve obscure issues, especially if a known Hyper-V bug or conflict was addressed in a recent patch.
4. Run WSL Troubleshooting Commands
You can use the built-in WSL command-line tools for diagnostic purposes. In an elevated PowerShell or Command Prompt, try the following:
- wsl –list –verbose: Lists all registered distributions and shows their current state. If Ubuntu is registered but not running, you’ll see additional details about its status.
- wsl –unregister <distribution>: Completely removes the specified distribution from WSL. If Ubuntu was partially installed or corrupted, unregister it and reinstall from the Microsoft Store.
Deep Dive: Potential Edge Cases
Even with all the correct BIOS and Windows configurations, some users still face roadblocks. Here are a few more nuanced issues and their possible solutions.
1. Multiple Reboots Are Often Necessary
Switching virtualization features on or off often requires multiple reboots to fully apply. One reboot may handle the initial uninstall of Hyper-V, while a second finalizes the reinstallation. Don’t be surprised if you need to reboot at least twice in some cases.
2. Nested Virtualization Scenarios
If you’re running Windows inside another hypervisor (for instance, Windows as a virtual machine in VMware Workstation), enabling nested virtualization is typically more complex. Unless specifically supported by your hypervisor, WSL 2 might not function correctly in nested environments.
3. CPU Compatibility Considerations
Older CPUs may lack full virtualization support. If you’re on an older Intel or AMD processor, verify it includes VT-x or AMD-V. In some rare instances, a BIOS update might add or fix virtualization support. Checking your CPU’s specifications on the manufacturer’s site can confirm whether virtualization is officially supported.
Verifying CPU Support via the Command Line
On Windows, you can open Command Prompt and use the following:
systeminfo
Scroll through the output for lines referencing “Hyper-V Requirements.” If it says “A hypervisor has been detected” or “VM Monitor Mode Extensions: Yes,” that suggests your system can support Hyper-V.
Comprehensive Troubleshooting Steps in a Table
Below is a summarized guide to help you systematically diagnose and resolve the error:
| Step | Action | Rationale |
|---|---|---|
| 1 | Check BIOS for VT-x/AMD-V, VT-d, etc. | Ensures hardware support for virtualization. |
| 2 | Disable and re-enable Hyper-V & Virtual Machine Platform. | Refreshes Windows virtualization features and registry. |
| 3 | Run bcdedit /set hypervisorlaunchtype auto. |
Forces Hyper-V to start at boot. |
| 4 | Update Windows fully. | Ensures you have the latest WSL and Hyper-V improvements. |
| 5 | Temporarily remove conflicting third-party hypervisors or antivirus. | Resolves conflicts with other virtualization or deep scan features. |
| 6 | Use wsl --list --verbose and wsl --unregister if needed. |
Checks WSL status and reinitializes broken installations. |
| 7 | Reboot (multiple times if needed). | Applies changes in stages; finalize all modifications. |
Practical Tips for a Smooth Ubuntu Installation on WSL
Once your system is fully configured for virtualization, you can install Ubuntu directly from the Microsoft Store (on Windows 10 or Windows 11) or using other deployment methods. Here are a few tips to keep things running smoothly:
1. Install or Upgrade to WSL 2
Use the following commands in an elevated PowerShell session:
wsl --install
wsl --set-default-version 2
If you already have WSL 1 installed, convert distributions to WSL 2 with:
wsl --set-version <distributionName> 2
For example:
wsl --set-version Ubuntu 2
This ensures you benefit from the improved performance and full system call compatibility WSL 2 provides.
2. Update Your Linux Distribution Frequently
After installing Ubuntu, run:
sudo apt update && sudo apt upgrade -y
This keeps the distribution’s packages current and reduces the chance of conflicts.
3. Configure Shared Folders and Drives Correctly
With WSL 2, Windows drives are typically mounted at /mnt/c, /mnt/d, and so on. While you can edit files in these shared folders from both Windows and Linux, sometimes performance or file-permission quirks arise. Keep important development files in the Linux filesystem for best results and speed.
4. Consider Memory and CPU Adjustments
By default, WSL 2 dynamically allocates memory based on available system resources. If you need fine-grained control, create or edit a .wslconfig file in your user’s home directory (e.g., C:\Users\YourName\.wslconfig):
[wsl2]
memory=4GB # Limits VM memory
processors=2 # Limits CPU cores
This ensures the WSL VM doesn’t consume too many resources, especially on lower-spec systems.
FAQ: Commonly Asked Questions
1. Is WSL 1 Still an Option if I Can’t Enable Virtualization?
Yes, if you can’t enable virtualization, you could opt for WSL 1. However, WSL 1 uses a different architecture that translates Linux calls into Windows calls, and it lacks full system call compatibility. For more advanced tasks (like Docker containers), WSL 2 is recommended.
2. Do I Need Windows 10 Pro or Enterprise for Hyper-V?
Historically, Hyper-V was exclusive to Windows 10 Pro, Enterprise, and Education editions. However, with WSL 2, Microsoft has provided a specialized subset of Hyper-V that works on Windows 10 Home (as well as Windows 11 Home). You only need to ensure you’re on an updated version of Windows 10 or Windows 11.
3. Why Am I Still Seeing the Error After Enabling Everything?
In rare cases, a bug or firmware issue might prevent changes from sticking. You might:
- Update your BIOS to the latest version.
- Check if your CPU or motherboard has known virtualization bugs.
- Try different steps in a different order (disable everything, reboot, enable everything, reboot).
- Look for corporate or organizational policies if you’re on a managed system that restrict virtualization.
4. Can Dual-Boot or Another OS Setup Interfere with Hyper-V?
Simply having another operating system installed (in a dual-boot setup) won’t usually affect Hyper-V. But if you’re using a boot manager or special partitioning, it might conflict. Typically, dual-boot environments have separate partitions that won’t impede virtualization on Windows.
Key Takeaways and Final Thoughts
Enabling Hyper-V and Virtual Machine Platform is essential for a robust and fully functional WSL 2 environment. While the process sounds straightforward, a variety of issues can arise: incomplete BIOS settings, Windows feature toggles not “sticking,” or external software conflicts. Working through each layer—from the BIOS to Windows features—ensures the best chance of error-free performance.
If you still see the “WslRegisterDistribution failed with error: 0x80370102” message, try revisiting each solution step thoroughly. Check if your hardware truly supports virtualization, ensure no third-party tool is causing hidden conflicts, and confirm your system is fully updated. Ultimately, most users discover that once Hyper-V is fully enabled and configured, Ubuntu (and other Linux distros) install with minimal fuss.
Once you get Ubuntu running on WSL, you’ll find a flexible, high-performance development or experimentation environment that merges seamlessly with your Windows workflow. From quickly spinning up Docker containers to exploring server applications locally, WSL 2 can dramatically streamline how you work with Linux tools on a day-to-day basis.