
-
Jeff2
- Posts: 1
- Joined: Wed Apr 20, 2016 12:57 pm
Error on Windows 10
Hi,
when I try to write a image with USBimage Tool on Windows 10 I get this error message (device mode):
—————————
Error!
—————————
Could not access the USB device (Code: 32)!
Please close all open explorer windows for this device.
Der Prozess kann nicht auf die Datei zugreifen, da sie von einem anderen Prozess verwendet wird.
—————————
OK
—————————
Volume mode results in a similar message. However, I can format the drive as well as use ImageUSB by PassMark (http://www.osforensics.com/tools/write-usb-images.html) without error.
But I’d like to use USB Image tool — favorites, not too many confirmation dialogs. How could I find the reason for the error?
Thanks
-
Alex
- Site Admin
- Posts: 285
- Joined: Fri Jul 29, 2011 11:59 pm
Re: Error on Windows 10
Post
by Alex »
Another Process is locking the device. This can be an open Windows explorer, anti-virus or something else. It’s not Windows 10 specific. I’m using it myself.
-
jeff_
- Posts: 2
- Joined: Fri Apr 29, 2016 9:36 am
Re: Error on Windows 10
Post
by jeff_ »
Hi,
how can I know which process this could be?
I rebooted the machine, still the same error. I use ImageUSB and it works.
Yes, I believe that USB image tool works for you — but it doesn’t for me. Other, similar tools do work. So how can I determine, what’s the matter with USB image tool? Is there a hidden logging facility?
Thanks!
PS: BTW, I needed to reregister because somehow, forgotten or not, my password didn’t work anymore. Unfortunately, sending the password didn’t work either. My previous user names were jeff and jeff2. Sorry for the inconvenience.
-
Alex
- Site Admin
- Posts: 285
- Joined: Fri Jul 29, 2011 11:59 pm
Re: Error on Windows 10
Post
by Alex »
Are you running your Windows with a user with limited rights? Can you login as admin user?
-
jeff_
- Posts: 2
- Joined: Fri Apr 29, 2016 9:36 am
Re: Error on Windows 10
Post
by jeff_ »
Hi,
I’m running as admin, having started USBit elevated through UAC.
Thinking further about it — maybe it’s important: the device does not contain any readable drive data. I try to write raw data (more or less arbitrary text data) in device mode. This used to work with Windows 7 at least. I believe I haven’t tried it since I installed Win10 in august last year.
Edit: Tried it on another win10 PC — works without issue. If I only knew what’s blocking the device.
Edit2: After uninstalling «Paragon ExtFS für Windows» USBit is working again. It’s strange, however, that the other image writer doesn’t have such a problem. Maybe you would want to check whether you could find a problem. Unfortunately I cannot post a link because my message would be rejected as spam. Nevertheless you’ll find the free download by searching for «Paragon ExtFS für Windows».
-
skol84
- Posts: 1
- Joined: Fri Mar 15, 2019 10:39 am
Re: Error on Windows 10
Post
by skol84 »
Hello all,
I have extra registred on this page to confirm that I had same problem and could solve it only after process stoping of «Paragon Linux File System for Windows». It looks that this program locked the write access to the SD-card.
Windows 10: I can read, but not write to or format SD memory cards, File Explorer keeps saying the…
Discus and support I can read, but not write to or format SD memory cards, File Explorer keeps saying the… in Windows 10 Network and Sharing to solve the problem; I can read, but not write to or format SD memory cards, File Explorer keeps saying the cards are locked….
Discussion in ‘Windows 10 Network and Sharing’ started by Jerry Chinn, Apr 30, 2023.
-
I can read, but not write to or format SD memory cards, File Explorer keeps saying the…
I can read, but not write to or format SD memory cards, File Explorer keeps saying the cards are locked.

-
Writing to SD Cards You know, there is a forum for Alex Page’s USB Image Tool, and this code has been reported before. Suggestions from Alex are that you may have inadvertently left a file open from the card, or that your AV may be blocking access. If you use no other AV besides Defender, then check if turning off Controlled Folder Access helps.
Enable or Disable Controlled Folder Access in Windows 10
I use USB Image Tool too, mostly for making images of USBs, but it works equally well for SD cards. The .img file it creates (and restores) is a sector for sector copy of the source, and when restored the USB/SD it makes should be identical to the original. That does sound the most likely explanation in this case. Though a trivial possibility exists, SD cards have a write-lock slider that may have accidentally been moved. Properly low-level formatting an SD card is not possible with the tools in Windows. The SD Association provides an SD Formatter that does it correctly. SD Memory Card Formatter — SD Association
If that fails, then the SD card is almost certainly dead/dying.
-
formatting sd card f drive
Hi Richard,
You can format your SD card in File Explorer. To do this, follow these steps:
- Insert your SD card.
- Open File Explorer.
- On the left pane, right-click your SD card and choose Format.
- If you want to change the File system of your SD card, click the drop-down menu below it and choose one of the options there.
- Click Start, and then click OK on the prompt.
- After formatting your SD card, click OK again on the prompt.
If you have additional queries, kindly reply to this thread.
-
I can read, but not write to or format SD memory cards, File Explorer keeps saying the…
How to disable write-protection for SD-Card ?
I don’t think you understand the problem. It doesn’t make any difference if I use a cheap 2 or 4 gb sd-card or the one that I’m using now. If I format say an old 2gb IN THE camera as requested for the firmware upgrade, Win10 will not let me write on it. It’s not the card. It’s Win10 seeing it as «Read Only State:yes» in diskpart, no matter what I do. I will simply put the firmware file on a usb stick, and boot my old desktop machine with windows XP, that I don’t use anymore, and then I will transfer the firmware file from the stick to the SD-Card. In XP there is no problem, reading and writing to these cards formatted in the camera. But I was wondering what exactly is going on with my Win10 laptop preventing me to write on some SD-cards like those formated in my Nikon D500.

I can read, but not write to or format SD memory cards, File Explorer keeps saying the…
-
I can read, but not write to or format SD memory cards, File Explorer keeps saying the… — Similar Threads — read write format
-
Can a SD card memory reader also successfully read a sdhc card ?
in Windows 10 Gaming
Can a SD card memory reader also successfully read a sdhc card ?: Hey there, if anyone can answer me it would be greatly appreciated.Can a SD card memory reader also successfully read a sdhc card ?https://answers.microsoft.com/en-us/windows/forum/all/can-a-sd-card-memory-reader-also-successfully-read/b47399a7-4ab3-4304-8749-20598f4a5814
-
Can a SD card memory reader also successfully read a sdhc card ?
in Windows 10 Software and Apps
Can a SD card memory reader also successfully read a sdhc card ?: Hey there, if anyone can answer me it would be greatly appreciated.Can a SD card memory reader also successfully read a sdhc card ?https://answers.microsoft.com/en-us/windows/forum/all/can-a-sd-card-memory-reader-also-successfully-read/b47399a7-4ab3-4304-8749-20598f4a5814
-
I can read, but not write to or format SD memory cards, File Explorer keeps saying the…
in Windows 10 Gaming
I can read, but not write to or format SD memory cards, File Explorer keeps saying the…: I can read, but not write to or format SD memory cards, File Explorer keeps saying the cards are locked.https://answers.microsoft.com/en-us/windows/forum/all/i-can-read-but-not-write-to-or-format-sd-memory/19c7f73b-1fda-49f6-8502-57a3cacdf2c6
-
I can read, but not write to or format SD memory cards, File Explorer keeps saying the…
in Windows 10 Software and Apps
I can read, but not write to or format SD memory cards, File Explorer keeps saying the…: I can read, but not write to or format SD memory cards, File Explorer keeps saying the cards are locked.https://answers.microsoft.com/en-us/windows/forum/all/i-can-read-but-not-write-to-or-format-sd-memory/19c7f73b-1fda-49f6-8502-57a3cacdf2c6
-
when i try to format an sd card it says windows cannot format and then says to unlock read…
in Windows 10 Gaming
when i try to format an sd card it says windows cannot format and then says to unlock read…: when i try to format an sd card it says windows cannot format and then says to unlock read onlyhttps://answers.microsoft.com/en-us/windows/forum/all/when-i-try-to-format-an-sd-card-it-says-windows/e44fc8fd-0e9f-44e1-885f-e01a8d23f6b1
-
when i try to format an sd card it says windows cannot format and then says to unlock read…
in Windows 10 Software and Apps
when i try to format an sd card it says windows cannot format and then says to unlock read…: when i try to format an sd card it says windows cannot format and then says to unlock read onlyhttps://answers.microsoft.com/en-us/windows/forum/all/when-i-try-to-format-an-sd-card-it-says-windows/e44fc8fd-0e9f-44e1-885f-e01a8d23f6b1
-
when i try to format an sd card it says windows cannot format and then says to unlock read…
in Windows 10 Drivers and Hardware
when i try to format an sd card it says windows cannot format and then says to unlock read…: when i try to format an sd card it says windows cannot format and then says to unlock read onlyhttps://answers.microsoft.com/en-us/windows/forum/all/when-i-try-to-format-an-sd-card-it-says-windows/e44fc8fd-0e9f-44e1-885f-e01a8d23f6b1
-
Writing to SD Cards
in Windows 10 Software and Apps
Writing to SD Cards: in order to backup and restore an SD card (32GB) I use «USB Image Tool» on my Windows 10 computer.
Worked fine until a month ago but now I get following error message while trying to restore a .img file to my SD Card:«Could not write to the USB device (code:5)!
Please close… -
Cannot read SD memory card
in Windows 10 Ask Insider
Cannot read SD memory card: Hello. I have a refurbished Dell laptop running Windows 10. This laptop is equipped with a variety of ports and should be a huge asset.
today I shot some photos on my Nikon D5100 SLR. once done, I removed the SD card and put it into the SD card reader on the side of the…
,
This tutorial contains instructions to fix the error «The device has either stopped responding or disconnected», after unplugging a mobile phone (Android or iPhone), or a camera in Windows 10
The error «device has stopped responding or disconnected», usually occurs when disconnecting a removable storage device (e.g. a USB disk), without having safely removing it first within Windows. But when you want to unplug your iPhone or Android phone, there is no such option, and after disconnecting it, Windows displays the mentioned error several times, which is annoying.
* Note: To safely remove an external hard drive or other USB storage devices in Windows, is to click on the image with the upward-pointing arrow on the system tray and, after clicking on USB connected devices icon , click to Eject the device you want to disconnect. Wait a few seconds and then remove the device from your computer.

Problem in details: After unplugging the phone from the PC, Windows displays many pop-up windows with the error «Device has either stopped responding or has been disconnected». After closing all the pop ups, Windows repeatedly displays the same error at random times and for no apparent reason.

How to fix error «Device has stopped responding or disconnected» after unplugging an Android or iPhone mobile device on Windows 10/11.*
Notes:
1. Some users reported, that after connecting their phone with another USB cable the problem was solved.
2. If you receive the mentioned error when the device is plugged, try another USB cable or connect your device to another USB port.
Method 1. Restart Windows Explorer.
The easy solution to remove the annoying error «Device has stopped responding or disconnected» after unplugging your phone, is to restart Explorer or to restart your PC..
1. Press CTRL + SHIFT + ESC to open Task Manager.
2. Click on Windows Explorer process and click Restart.

Method 2. Clear File Explorer History.
Windows Explorer keeps a history of connected storage devices, but sometimes doesn’t delete it after removing them.
1. Open File Explorer and select This PC.
2. From the File menu choose Options.

3. On General tab, click Clear and click OK.
Method 2. Reconnect Phone and Remove it from Windows.
Another method to fix the error message «device stopped or disconnected, after unplugging your phone or your camera from Windows 10/11, is the following:
1. Reconnect your phone to your PC.
2. Click OK at all open popups with the error «Device has stopped responding or disconnected».
3. Close all open Explorer windows and also close all other applications that accessing your phone.
4. Now, open and close the PHOTOS app once. *
* Note: Since this error commonly appears after viewing a photo from the phone with the PHOTOS app, ensure that the PHOTOS app is closed before unplugging your phone.
5. Now press the Windows + I keys to open Settings and go to Devices.

6. Select Bluetooth & other devices on the left and then on the right, click on your mobile device and click Remove Device.

7. Now unplug your Phone from your PC. Normally the annoying error will not appear anymore.
Final words: If after following the above instructions you still face the stupid error «device has either stopped responding or disconnected» after you unplug your phone, I suggest the following:
1. Disable USB Debugging on your phone. In one of my tests I realized that with USB Debugging enabled, Windows kept bugging me with the annoying popup message.
2. Restart your PC and always remove the phone from Windows before unplugging it. (see steps 5 & 6 in method-3 above).
That’s all folks! Did it work for you?
Please leave a comment in the comment section below or even better: like and share this blog post in the social networks to help spread the word about this solution.
If this article was useful for you, please consider supporting us by making a donation. Even $1 can a make a huge difference for us.
- Author
- Recent Posts
Konstantinos is the founder and administrator of Repairwin.com. Since 1995 he works and provides IT support as a computer and network expert to individuals and large companies. He is specialized in solving problems related to Windows or other Microsoft products (Windows Server, Office, Microsoft 365, etc.).
If you are facing “Windows Explorer has stopped working” Error while you try to open “Windows Explorer” application in your computer to access files & folders, then you are in right place for the solution. Here, we are discussing on “How to Fix Windows Explorer Keeps Crashing on Windows 10/8.1/8/7” in details and providing easy & recommended steps to do so. Let’s starts the discussion.
What is Windows Explorer Keeps Crashing Problem?
“Windows Explorer” is also known as “File Explorer”. It is essential components of Microsoft Windows Operating System that provides a Graphical User Interface (GUI) for accessing files & folders in your computer. “Windows Explorer” application allows you to access any files & folders located in any location of your computer hard drive. You can use & press “Windows + E” keys together to open “Windows Explorer” or “File Explorer”.
In case if Windows Explorer Keeps Crashing, you will have problems accessing files & folders on your computer. It is common error reported by numerous Windows users on various online platforms including Microsoft official forum site and popular platforms, and asked for the solution. Users explained that this issue is usually occurs in computer due to improper System settings or incompatible third parity software.
Problematic software can cause Windows Explorer to crash. Due to this problem, when you try to open a folder or file, Windows Explorer and Taskbar immediately close down and sometimes reopen after few seconds. However, Microsoft has already rolled out several cumulative updates aimed to fix Windows Explorer Keeps Crashing error.
So, you can fix this issue by installing Windows update. You can check for update in “Settings” App in Windows 10. But many users are still reporting Windows Explorer crashes. Don’t be panics, please read & follow our instructions to fix.
Some common problem related to Windows Explorer Keeps Crashing:
- Windows 10 File Explorer has stopped working
- Windows Explorer won’t open in Windows 10
- File Explorer close while right-clicking a file
- File Explorer hangs frequently
- Windows Explorer is not responding
[Tips & Tricks] How to Fix Windows Explorer Keeps Crashing on Windows 10/8.1/8/7?
Procedure 1: Reset settings for all folders using Registry Editor
“Bag Keys” store the information about each folder including its display settings. So, you can delete these keys to reset settings for all folders. To do so, follow the steps below
Step 1: Press “Windows + R” keys together from keyboard to open “Run Dialog Box”
Step 2: Type “regedit” in “Run Dialog Box” and hit “OK” button to open “Registry Editor” window
Step 3: Now, navigate to “HKEY_CURRENT_USER\Software\Classes\Local Settings\Software\Microsoft\Windows\Shell”
Step 4: Expand the “Shell” and delete “BagMRU” and “Bag” keys by right-click on that folder and choose “Delete”
Step 5: Once done, reboot your computer to save the changes and please check if Windows Explorer has stopped working problem is resolved.
Procedure 2: Clear File Explorer History
Step 1: Click on “Start” button and type “File Explorer” in Windows Search
Step 2: Choose “File Explorer Options” from searched result.
Step 3: In the opened “File Explorer Options” window, click on “Clear” under “Privacy” section
Step 4: After that, click on “OK” button and please check if the trouble is resolved.
Procedure 3: Set Open File Explorer to “This PC” and Disable Quick Access
Quick Access enables you to open a folder you frequently visited faster. This option can cause Window Explorer crashes in Windows 10. So, you need to disable it and set open File Explorer to This PC
Step 1: Open “File Explorer Options” window using ‘step 1 to step 2’ of ‘procedure 2’
Step 2: In the opened “File Explorer Options” window, Select “This PC” from dropdown under “Open File Explorer to:” section
Step 3: Uncheck “Show recently used files in Quick Access” and “Show frequently used folders in Quick Access” checkboxes under “Privacy” section
Step 4: Finally, click on “Apply” and “OK” to save the changes. Please check if Windows Explorer stopped working issue is resolved.
Procedure 4: Change the Display Settings
Sometimes, this problem can occur due to improper display settings like size of text, apps and other items is not in range of 100% to 200%. So, you need check for it.
Step 1: Click on “Start” button and type “Display” in Windows Search
Step 2: Select “Change Display Settings” from searched result
Step 3: Now, navigate to “Scale and Layout” section
Step 4: Set the size to be 100% or 200% recommended settings.
Step 5: Once done, please check if the Windows Explorer won’t open in Windows 10 problem is resolved
Procedure 5: Enable the “Launch Folder windows in separate process” option in “File Explorer Options”
To improve the stability of File Explorer or Windows Explorer, you can enable “Launch Folder Windows in Separate process”. To do so, follow the steps below.
Step 1: Using ‘step 1 to step 2’ of ‘procedure 2’ to open “File Explorer Options”
Step 2: In the opened “File Explorer Options” window, click on “View” tab and check the “Launch folder windows in separate process” checkbox under “Advanced Settings” section
Step 3: Finally, click on “Apply” and “Ok” to save the changes
Procedure 6: Check Account Permission
You should check whether you have “Full Permission” over the folder you want to access.
Step 1: Locate the file or folder you want to access
Step 2: Right-click on it and select “Properties”
Step 3: Click on “Security” tab in “Properties” window and select “Advanced” at the bottom
Step 4: Now, click on “Change” link to “Owner”
Step 5: Input Everyone and hit “Ok” button
Step 6: Back to “Security” tab and click on “Edit” to change the permission
Step 7: Choose “Allow” for all permission under “Permissions for System” section
Step 8: Finally, click on “Apply” and “Ok” to save the changes
Procedure 7: Update or reinstall graphics card driver
Outdated graphics card driver can cause several issue in your computer like Windows Explorer won’t open error. So, you need to update it
Step 1: Press “Windows + X” keys together from keyboard and select “Device Manager”
Step 2: In the opened “Device Manager” window, locate “Display Adapters” category in the list and expand it
Step 3: Right-click on your graphics card driver and select “Update Driver Software…”
Step 4: In the next window, select “Search automatically for updated driver software”
Step 5: Follow the rest of instructions to finish the update process. Once done, restart your computer to save the changes
Procedure 8: Update or reinstall graphics card driver [Automatically]
Download software for drivers update
If you don’t have enough time, patience or skills to update the driver manually, then you can update it automatically. You can use “Automatic Driver Update Software” to update display driver with just few clicks. To get this software, click on above link.
Procedure 9: Check for Windows Update
Step 1: Press “Windows + I” keys together from keyboard to open “Settings” App
Step 2: Go to “Update & Security > Windows update”
Step 3: Click on “Check for update” under “Windows update” section
Step 4: This process will automatically install the available Windows update in your computer. Once updated, restart your computer to save the changes
You may also read: How to fix file explorer not responding Windows 10 issue
Conclusion
I am sure this article helped you to “How to fix Windows Explorer Keeps Crashing on Windows 10/8.1/8/7”, “How to fix Windows Explorer has stopped working Error” with several easy methods. You can read & follow our instructions mentioned above to fix. If you have any suggestions or queries regarding this, please write on comment box given below.
Is Your PC Behaving Abnormal & Needs Instant Optimization?
We recommend you to choose Advanced System Repair Suite which is dedicated to offer complete options to optimize a PC, fix any Windows error, and remove malware threats in easy. The software is award winning and suggested as the best malware fix application supporting all Windows versions including XP/Vista/7/8/8.1/10. Just 3 steps to avail error free PC.
- Download Advanced System Repair and install on your PC. (Follow all on screen instructions when installer is executed)
- Click “Scan Your PC” button to scan all present issues, errors, junk files, and malware threats.
- Finally, click “Start Repair” to fix all detected problems in next few minutes.
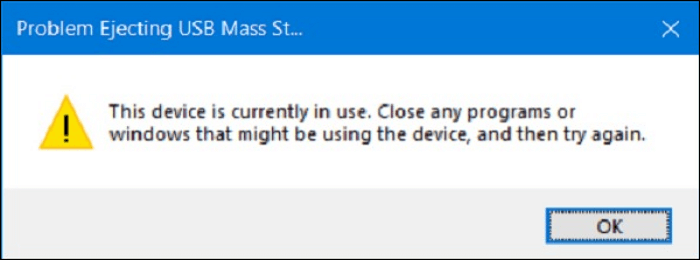
What Causes the «This Device Is Currently in Use» Issue
Why do you get the error notification «This device is currently in use» on your PC when you want to eject the USB device?
The above message may seem familiar to every Windows user. However, as with many error messages and other technical problems, there can usually be many different causes.
Here are a few general reasons and possibilities for the error this device is currently in use:
- Some files are not properly closed when attempting to remove your USB from your PC/Laptop.
- Your computer programs use some files from the USB storage.
- A few programs or software access your USB device in the background, such as antivirus software, Windows security or back software, etc.
Here we want to describe we also faced the same problem and how we fixed it. We will show 10 different solutions with detailed steps and screenshots to fix this error «This device is currently in use» on your own, even if you’re a non-technical person and don’t know much about technology, specifically Windows issues and solutions.
10 Solutions to Fix «This Device Is Currently in Use» Error
There are many solutions to resolve the «this device is currently in use» error when ejecting a USB drive. We sorted out the most convenient and easy ways for you, and we are here with ten different and straightforward solutions to help you out quickly so you can get rid of this problem easily.
Read the article to find ten methods to fix the problem and eject your USB drive safely without losing or damaging anything.
- Fix 1. Using This PC to Eject USB Drive
- Fix 2. Close All Open Files and Programs
- Fix 3. Using Diskpart
- Fix 4. Using Windows Task Manager
- Fix 5. Using Disk Management
- Fix 6. Using Device Manager
- Fix 7. Disable Computer Security Software
- Fix 8. Run Anti-Virus Software
- Fix 9. Using Process Explorer
- Fix 10. Log Off and On the Computer
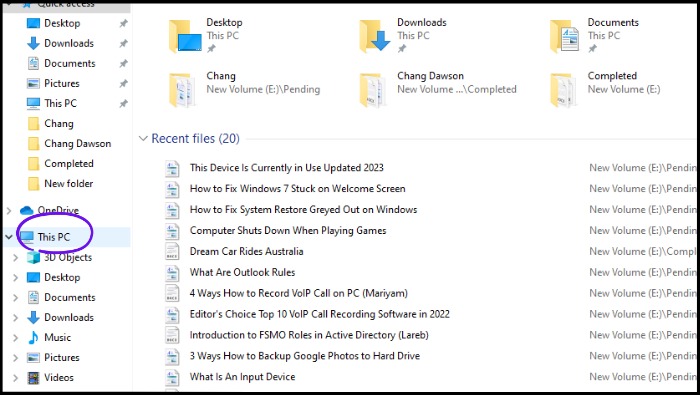
Fix 1. Using This PC to Eject USB Drive
This is a pretty cool method to fix «This device is currently in use» please follow the steps:
Step 1. Open «File explorer», locate «This PC» in the left side menu, and click on it to open it.
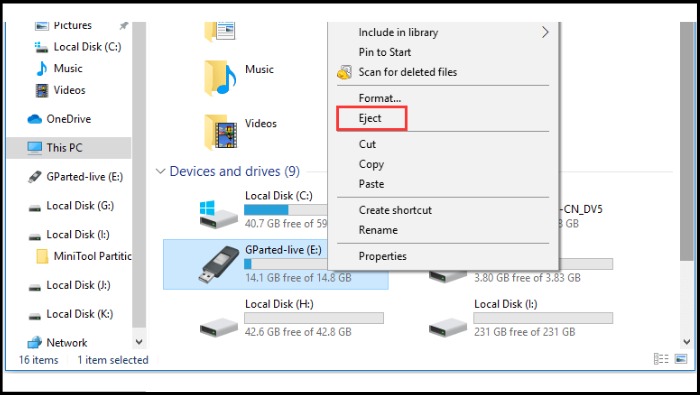
Step 2. Locate the targeted USB device, right-click on it and click «Eject» from the drop-down menu.
Now check if you’re facing the same issue again. Try other methods discussed below.
Fix 2. Close All Open Files and Programs
Make sure to close all opened programs or files because if you opened several files and programs, the «This device is currently in use» issue could occur. So, try to close all opened programs and files and eject the USB safely without damaging anything, whether in your USB or Computer/Laptop.
Fix 3. Using Diskpart
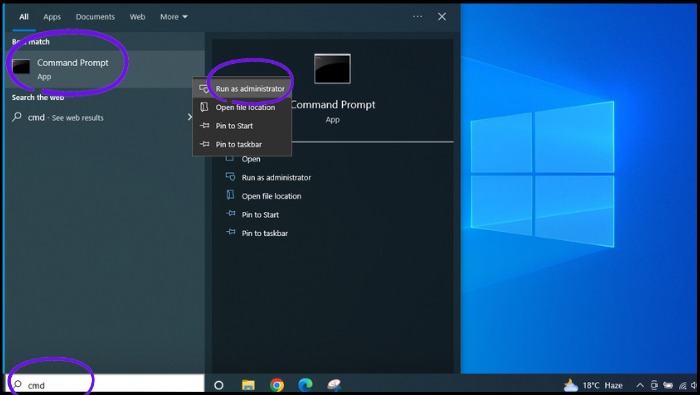
This device is currently in use. Fix this error with this most effective method. You can understand and use Diskpart commands with the guide below. The detailed steps are as follows:
Step 1. Open the Command Prompt. You just need to write CMD in the taskbar search box; when it appears, right-click on it and click «Run as administrator» from the drop-down menu to open it.
Step 2. In the Command Prompt, write list disk, hit the Enter button, and then write select disk X («X» must be the removable device you should go to offline), and again hit the Enter button after writing this.
Step 3. Write offline disk so the selected removable device will be offline.
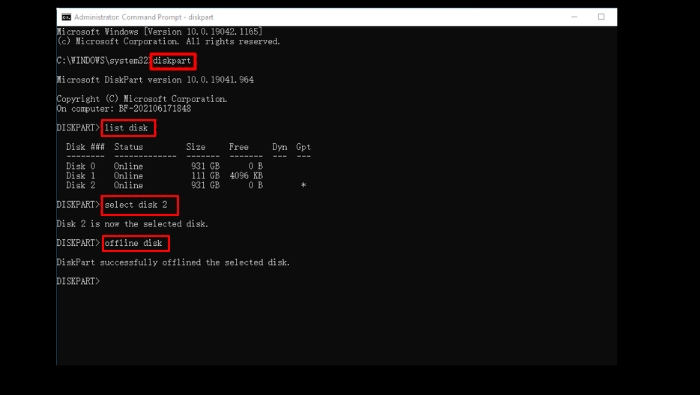
Step 4. Finally, after performing the above steps, you should try again to check if you can eject the removable device.
- Notice:
- After doing that. Occasionally, if you want to connect your removable device, USB or a pen drive, etc. again, first you need to make it online because the last time you made it offline using this method to get rid of the (This device is currently in). Now you should perform a few steps to make it online, press «Win+R» to open the dialogue box «Run», write diskmgmt.msc, and press «Enter» to open Disk Management and locate your removable device. Right-click on the left side of the device and select «Online».
Fix 4. Using Windows Task Manager
You should check through Task Manager to know if certain programs are running in the background, so you need to close them from the Task Manager to fix this device currently in use issue. Follow the below steps:
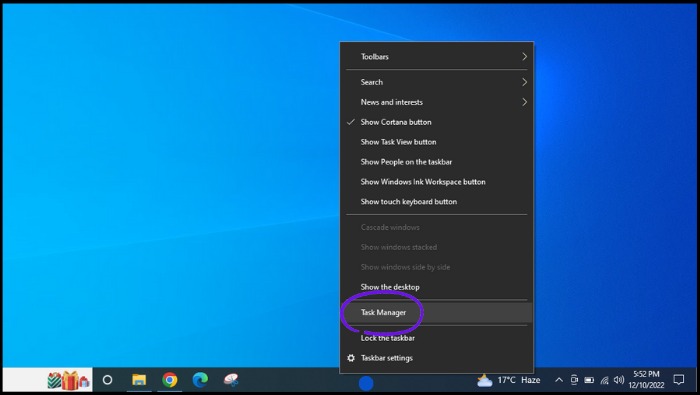
Step 1. Open Task Manager; simply right-click on the «Taskbar», and you’ll see a pop-up list. Choose «Task Manager».
Step 2. Under the Process tab, you’ll see all running programs. Suppose the Process tab is not shown, you have to click «More details» to access the tab.
Step 3. Finally, you need to right-click any program you think uses your USB and click «End Task» to close it.
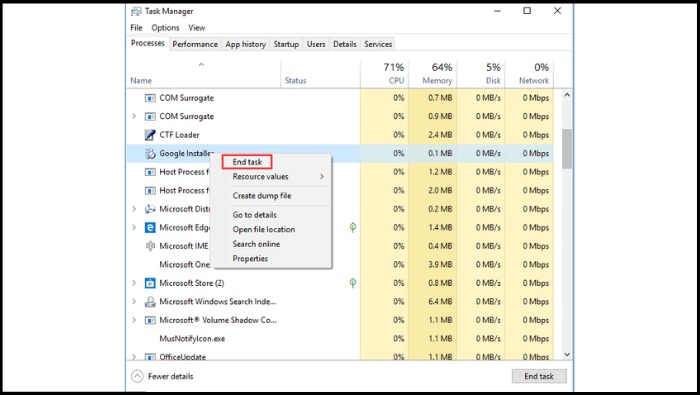
After performing the above steps, you have to safely eject the USB drive and check if the issue has been resolved.
Fix 5. Using Disk Management
You can solve the issue of this device that is currently in use through Windows Disk management. It enables you to manage your computer’s internal hard disk, external drive, USB flash drive, pen drive, etc. You have the option to eject the USB from Disk Management. Please follow the necessary steps:
Step 1. Press the «Windows+R» buttons together, write diskmgmt.msc in the «Run» dialogue box, and press «Enter».
Step 2. Here is the list you’re seeing. Locate the USB that is showing an error and is not removing. Right-click on that USB and select «Eject» from the drop-down menu.

Now, you need to physically remove your USB from your PC/Laptop and check if this device is currently in use issue has been solved.
Fix 6. Using Device Manager
Try to fix this issue «This device is currently in use» using Windows Device Manager. The detailed steps are as follows:
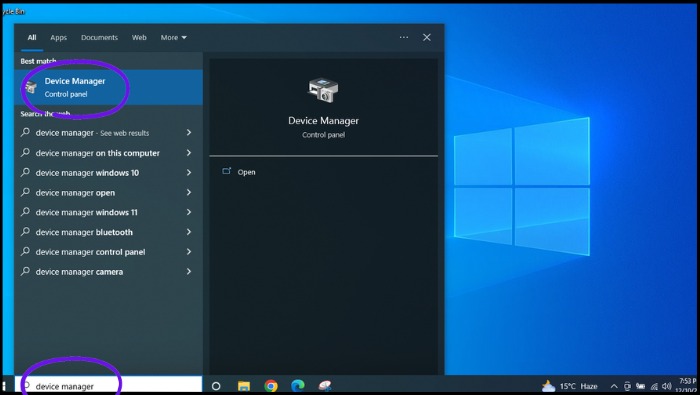
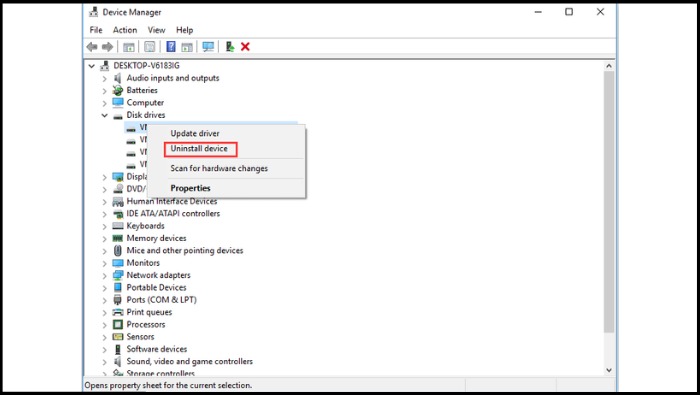
Step 1. Write Device Manager in the search box of the taskbar. Then, click on it to open it.
Step 2. Locate the «Disk Drives», and click «equal to sign (>)» to expand it, and you’ll see USB drives.
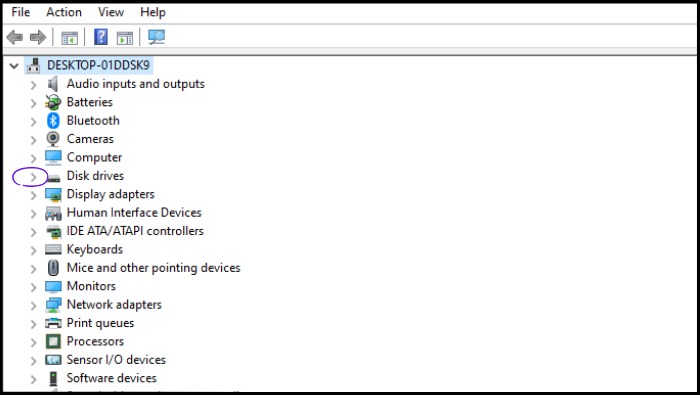
Step 3. Locate the USB device that is not ejecting, right-click on it, select «Uninstall device» from the drop-down menu, and click «OK».
Fix 7. Disable Computer Security Software
Maybe you’ve installed any security software that could cause this error «This device is currently in use», which doesn’t let it eject the USB drive successfully. So that security software may run in the background. You should disable it temporarily until you solve the problem «This device is currently in use», and eject your USB device safely.
Fix 8. Run Anti-Virus Software
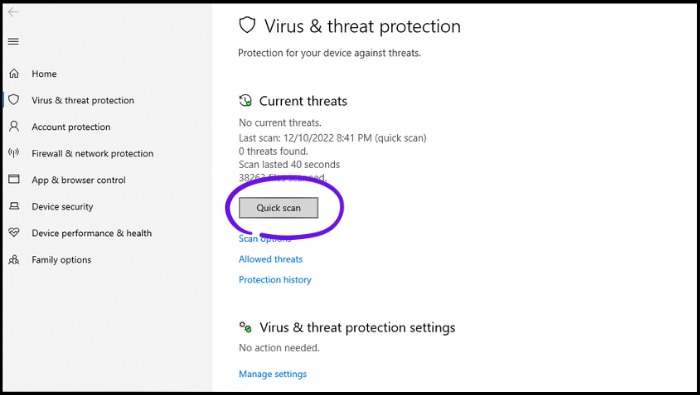
You need to run Anti-virus software to clean your system if it’s affected by a virus. For example, suppose your system is affected by viruses that could access your USB drive in the background, and as a result, viruses prevent you from ejecting the USB device. In Windows 10, you have an, by default, installed program that protects your PC from viruses. If you have installed any reliable and one of the best antivirus software, you should run it instantly to clean the virus in your system. In my case, I’m running Windows 10 tool (Virus & threat protection). The detailed steps are as follows:
Step 1. Type Virus & threat protection in the taskbar search box. Once it appears, click on it.
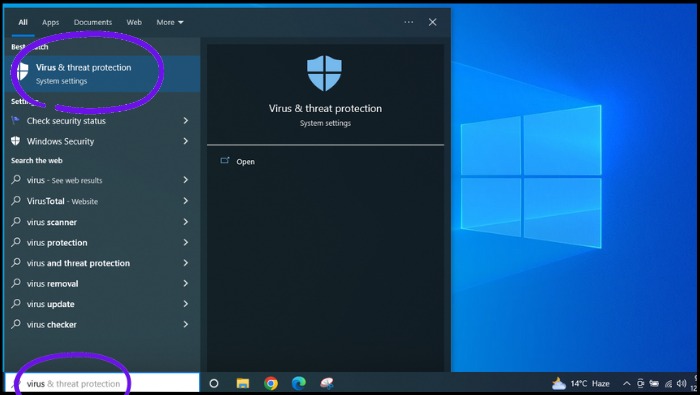
Step 2. Click «Quick scan», and wait a few minutes until it completes the processing.
Fix 9. Using Process Explorer
You can get relief regarding the issue «This device is currently in use» with the help of process explorer. Follow the below steps:
Step 1. Download and install the «Process explorer», and open it.
Step 2. Click «Find» from the menu, choose «Find Handle or DLL» from the drop-down menu, and you’ll see a «Process Explorer Search» Popup.
Step 3. Type the drive in the search panel for the USB drive you want to be ejected and click «Search».
Step 4. Now, kill the processes for using your drive, and you have to try to eject your device/drive normally.
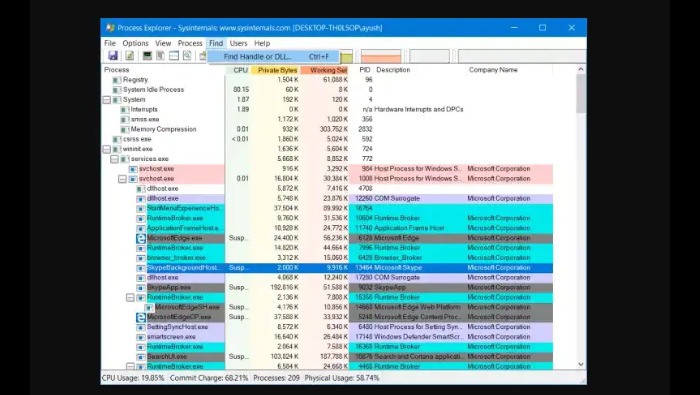
With the help of Process Explorer, you can kill all the processes using your drive and disengage your drive from any operations on your system. And you’ll be able to eject the USB Mass Storage Device safely without damaging anything and get rid of the issue «This device is currently in use».
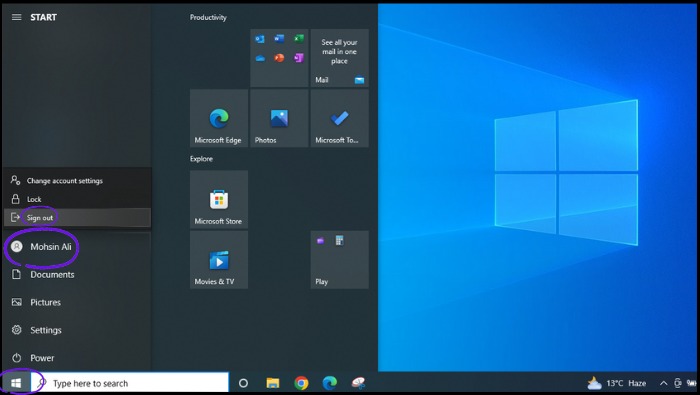
Fix 10. Log Off and On the Computer
Logging off and on, your system could fix the issue «This device is currently in use». Because when your sign out then, all programs/applications, including external USB drives, will be closed. Hopefully, your case will be resolved in this way. Please follow a few simple steps:
Step 1. Click on the «Windows icon» from the bottom left corner.
Step 2. Next, click the «Administrator icon» and finally, click on «Sign out».
Here are a few alternative ways and shortcuts using your keyboard buttons to sign out quickly.
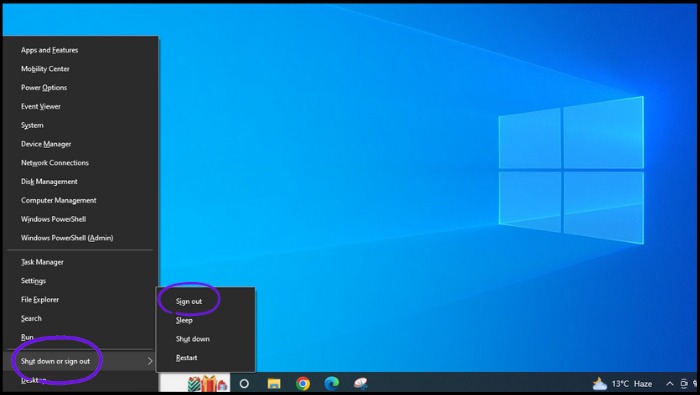
Alternatives and shortcuts:
1. Press «Windows + X» and a drop-down menu will appear. Next, move your mouse cursor or up-arrow button from your keyboard to «Shut down or sign out», and select «Sign out».
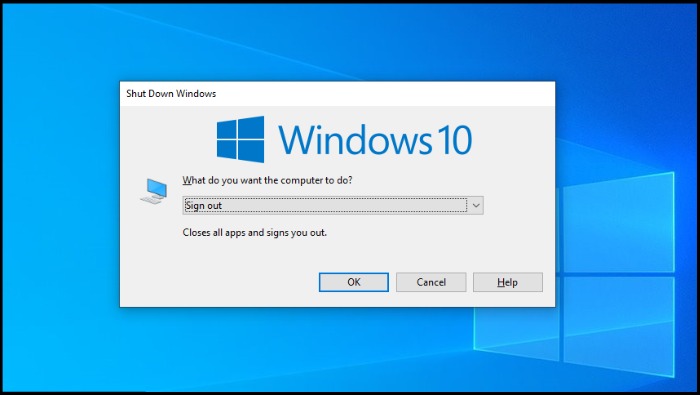
2. Press the «Ctrl + Alt + Delete» buttons together and select «Sign out».
3. Press «Alt + F4», use the down-arrow button from your keyboard and choose «Sign out».
A few minutes later, you need to log in again to check if the issue «This device is currently in use» has been solved.
Additional Guide: How to Backup USB or External Devices
USB and external hard drive are the more frequently used external storage devices to save our data. Therefore, making backup copies is especially important. And we are here to provide the best-ever solutions to make a safe backup with the best backup software — EaseUS Todo Backup Home. We just kept all facts, so you should be aware of any possible disaster. Make an entire backup of your USB, other external devices/drives, or hard drives with EaseUS Todo Backup. Suppose some of these situations occur with your PC/laptop, external device, or USB. In that case, you’ll be able to bring back all of your valuable data quickly.
EaseUS Todo Backup Home is a multi-purpose backup utility for Windows 11/10/8/7. It allows you to back up files, disks, partitions, and operating systems. It lets you back up your favorite games and backs up the PC game saves. You can also use it to create an iso image from a hard drive and clone a hard drive. Most importantly, this backup tool offers you 250G free cloud and security zone to protect your data.
Here are the guiding steps to use this nice program:
Step 1. Start with selecting the backup contents.

Step 2. There are four backup categories, File, Disk, OS, and Mail, click Disk.

Step 3. It is available to back up a whole disk or a certain partition. Choose the one you need and click OK.
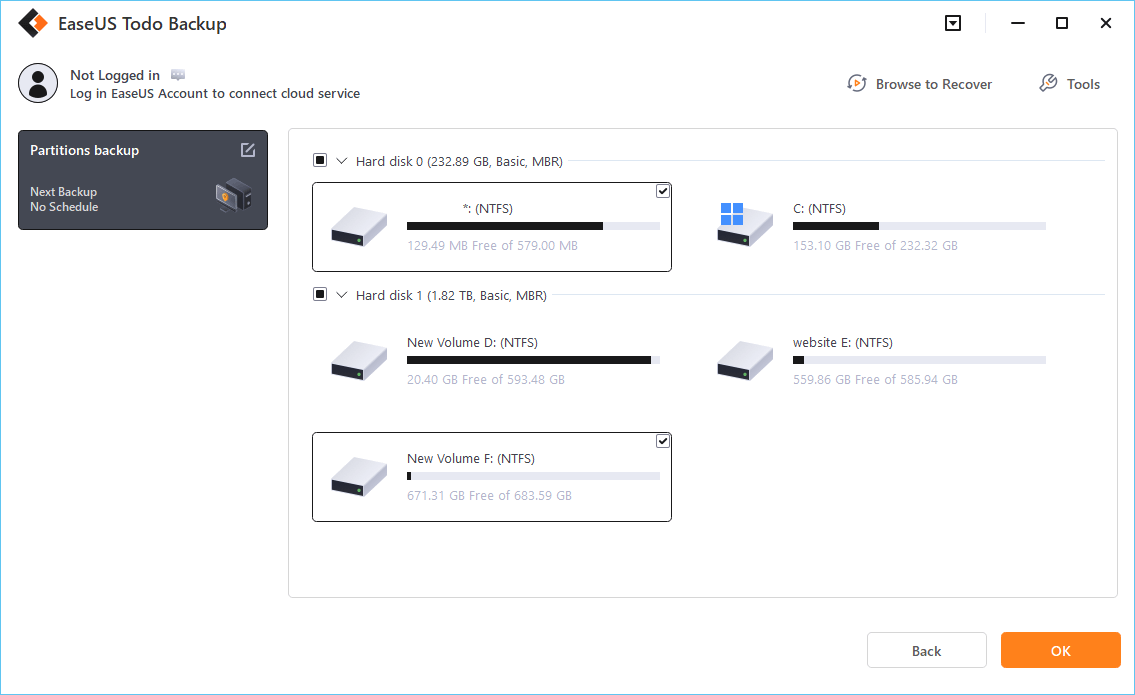
Step 4. Select the destination where you want to save the backup.
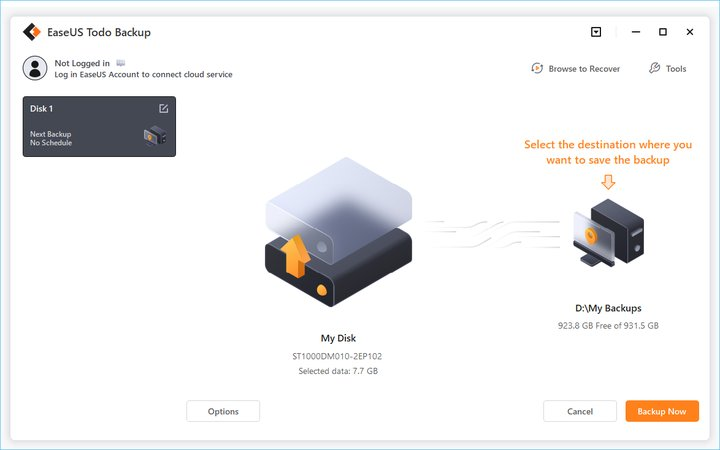
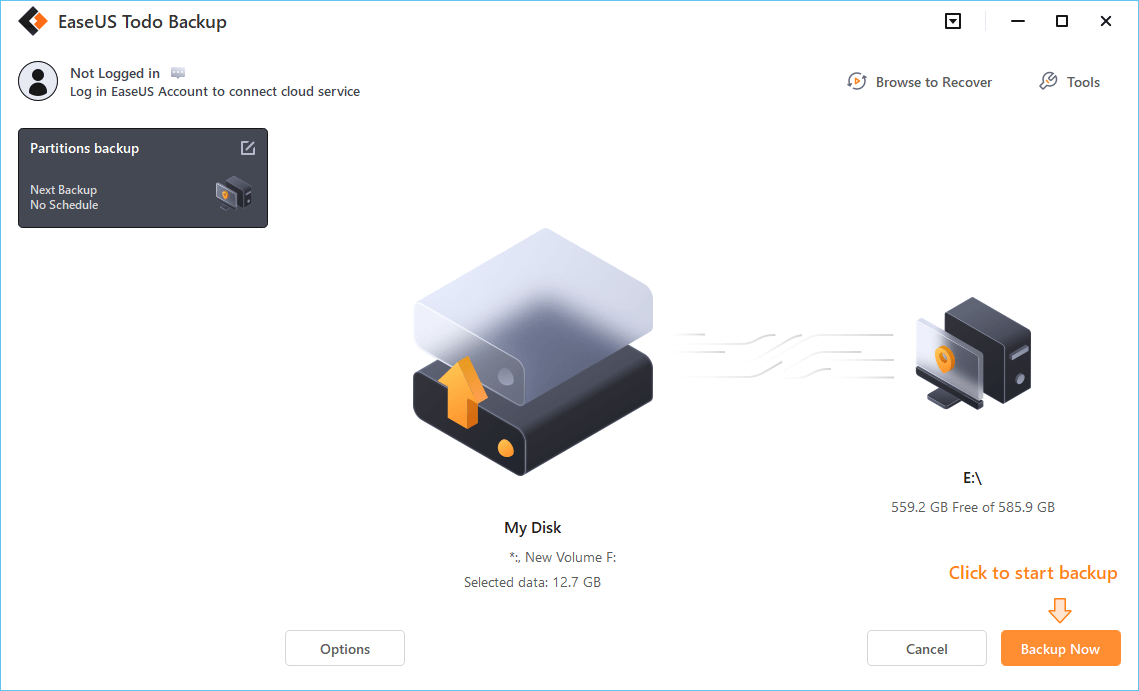
Step 5. For disk/partition backup, you can choose to save the backup to local drive or to NAS.

Step 6. After the backup process is completed, your task will be displayed at the left. Right-click any one of the task, you can further manage your backup such as recover it, create incremental backup, etc.
The Final Say
Now you have all solutions available to get relief from the issue «This device is currently in use«, preventing you from ejecting your USB devices or drives. Try any solution from the above-discussed. One of them will work and provide you relief. It’s a great way, and you don’t have to spend valuable time searching and troubleshooting. Just try any of the above solutions, and kindly let us know which solution has resolved your issue. Or which one proved a very convenient and easy method for you? Please write your valuable feedback in the comment box. We read your comments, and we always love to learn from you.
Enjoy solutions. Thanks for reading!
Even though we tried to cover everything related to This Device Is Currently in Use, if you still have questions, please see the FAQs listed below.
1. Is it safe to unplug the USB without ejecting it?
That can’t be a good decision to unplug your USB without ejecting it because you’ll get terrifying results if you directly unplug your USB without removing it. You can lose your data from both devices, like computers or USB devices, which could be damaged and affected. So before unplugging your USB, ensure that you have ejected it safely.
2. What happens if you force eject a USB?
If you forcefully eject a USB, you’ll get the error repeatedly «This device is currently in use», which could be reasons for your device’s damage and loss of your data. If you safely remove the USB, it can clear the cache and remaining data and stop any process in the background. Because a few programs or files run in the background when you connect a USB, but you don’t know about them, you need to remove your USB safely to stop all processing and avoid any loss.
3. What is the safest practice to remove a USB?
Any methods or ways to safely remove your USB would be considered the safest practice. We’re showing you the most convenient method. As described above methods, go to Windows File Explorer, locate your USB, right-click on it and click «Eject». This is the most common, easy, and safe practice to remove your USB devices. However, due to any reason, if that doesn’t work, try other methods discussed above with detailed steps and screenshots. Whatever happens, you need to ensure before unplugging your USB that it should be ejected from your system first, just for your data and device security.