
null
Huawei eNSP (Enterprise Network Simulation Platform) — эмулятор сети передачи данных, выпущенный в публичную бету 16 Августа 2012 года компанией Huawei Technologies. Позволяет делать работоспособные модели сети, настраивать маршрутизаторы и коммутаторы, взаимодействовать с реальными сетями, отслеживать трейсы пакетов с помощью Wireshark.
В данной статье используется ПО следующих версий:
Wireshark - 3.2.1 WinPcap - 4.1.3 VirtualBox- 5.2.32 eNSP - 1.3
Расположение логов eNSP при диагностике проблем с запуском:
C:\Users\username\AppData\Local\eNSP\Log
Отключённая виртуализация в BIOS
eNSP использует VirtualBox, размещая свои виртуальные машины, которые являются основным компонентом при симуляции различного оборудования.
Необходимо зайти в BIOS/UEFI комьютера и найти пункт связанный с виртуализацией.
Для процессоров Intel: Intel Virtualization Technology / Intel VT-x
Для процессоров AMD: AMD-V
Необходимо переставить данные пункты в режим Enabled или Yes.
Параллельная работа с Hyper-V
VirtualBox не может работать в среде Windows с включённым гипервизром Hyper-V. Для начала необходимо отключить Hyper-V с использованием стандартного графического окружения Windows.
Необходимо открыть стандартную панель управления Windows (нажать сочетание клавишь Windows + R и ввести «control»).
Далее необходимо открыть: Программы > Программы и компоненты > Включение и отключение компонентов Windows, откроется окно в котором нужно убрать галку с пункта Hyper-V, после чего произойдёт деинсталляция гипервизора.
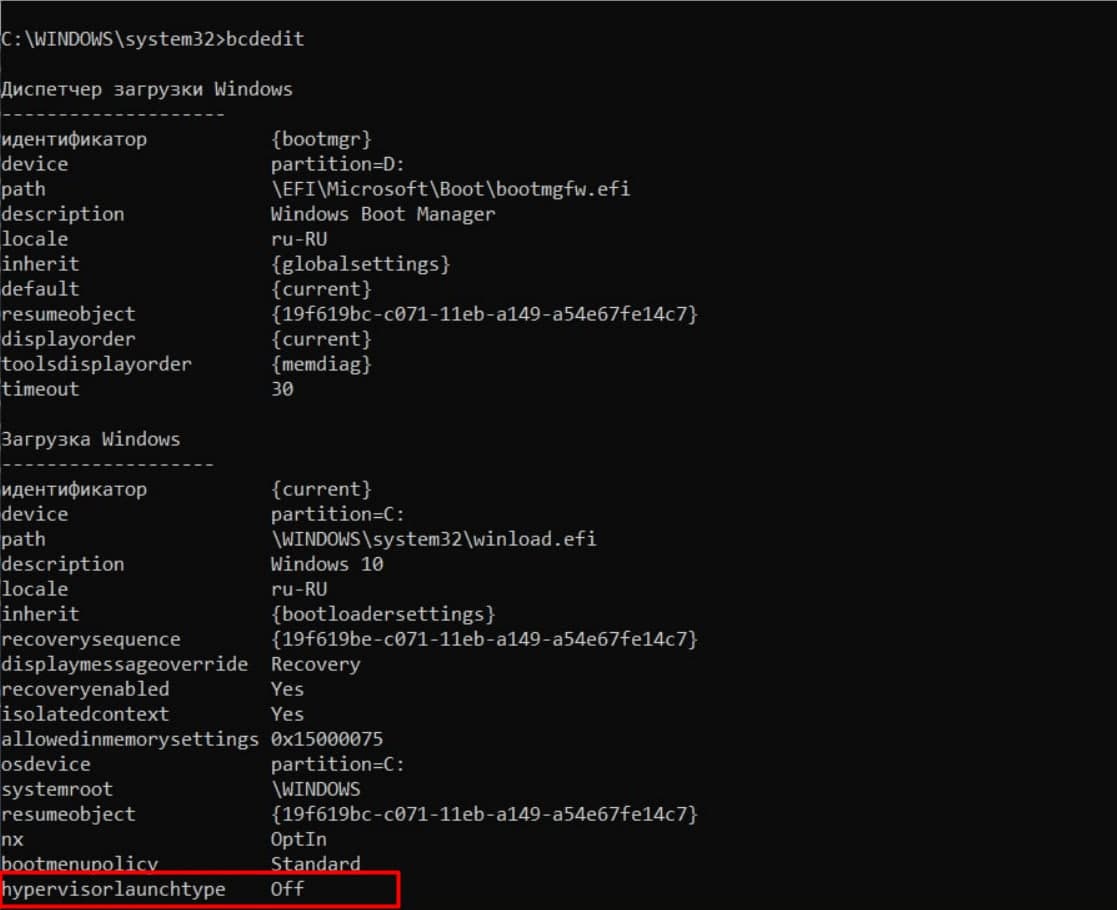
Также необходимо открыть командную строку Windows (cmd) от администратора и ввести команду «bcdedit» и найти строчку «hypervisorlaucnhtype«. Если рядом с данной строчкой стоит режим Auto, то необходимо переключить в режим off следующей командой:
bcdedit /set hypervisorlaunchtype off
Неправильные настройки сетевого интерфейса VirtualBox
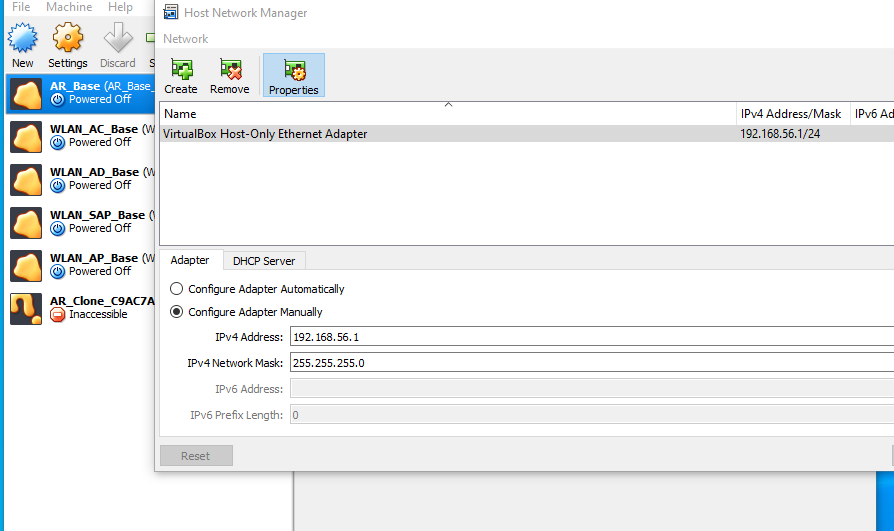
Проверить сущетсвует ли в системе сетевой интерфейс VirtualBox и проверить правильность его сегмента IP адреса, обычно это: 192.168.56.0/255.255.255.0:
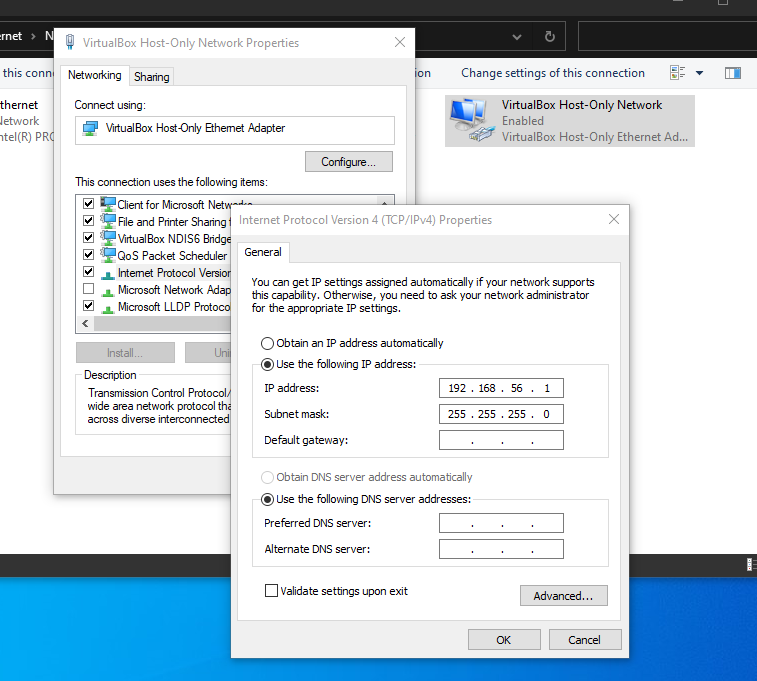
Также необходимо проверить, что данные настройки установленны для всех виртаульных машин, связанных с eNSP:
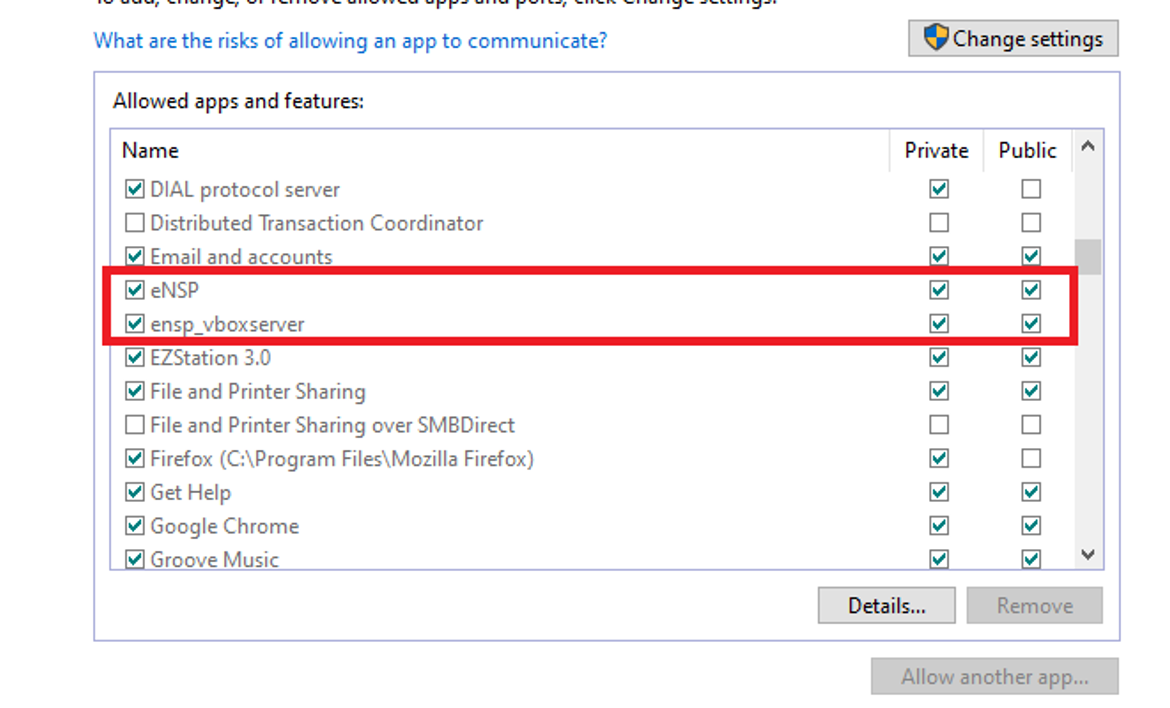
Откройте панель управления и выберите «Защитник Windows» в разделе «Система и безопасность«. Откройте раздел «Разрешение взаимодействия с приложением или компонентом в брандмауэре» и нажмите «Изменить параметры» — «Разрешить другие приложения«, где нужно будет найти eNSP и поставить галку в чекбоксе:
Publication Date: 2020-12-31 |
Views: 4554 |
Downloads: 0 |
Author: m84152756 |
Document ID: EKB1100064012
Contents
Issue Description
i want to test some extensive designing topologies but i am unable to execute AR router on my ENSP and have tried every thing available on forum. Need assistance regarding the issue. AR keeps on showing these hashes.
Handling Process
AR Base VM is also running
AR Base registration is successful.
disable the windows firewall on the laptop and test again :
issue was resolved
Root Cause
eNsp applications should be added to the Windows firewall
Solution
add eNsp applicationsin the firewall allow list byt following the below method or disable the firewall and test again
Software installed before installation:
- WinPcap
- Wireshark
- VirtualBox (Official recommendation 5.2.X)
It is recommended to install WinPcap first, otherwise it may not be installed.
After the above installation is complete, install ensp, and then it will be stuck at the 100% position. It will be the same after reinstalling several times.
Later, I found that VirtualBox could not start. I thought that the version was wrong and tried several other versions, but the results were the same.
Look at the vbox process in the task manager, and check Baidu that the cpu is not enabled for virtualization, and the Hyper-V function must be turned off. After virtualization is turned on, it is still useless and the Hyper-V function is not enabled.
Later, I tried to remove the space of the default installation path [Program Files], and the installation started successfully.
Then install ensp successfully.
Then enter the ensp interface, drag a few routers, switches, and firewalls out to start
According to my previous installation experience, it should not be able to start, because the firewall through win10 is not running. What I did not expect is that I don’t know the reason for the new computer system or what, the firewall of win10 actually prompts ensp to pass the firewall. OK, start successfully
I have activated these routers, firewalls, and switches temporarily. I don’t know if there are any others.
Record it here, lest you have to toss for a long time next time
Конфигурация межсетевого экрана Ensp
Соответствующую конфигурацию небольшой локальной сети можно проверить в моем блоге: https://blog.csdn.net/miss_miss6/article/details/105608443
Нет необходимости завершать предыдущую конфигурацию LAN, только соответствующую конфигурацию FW1 и AR3
Топология
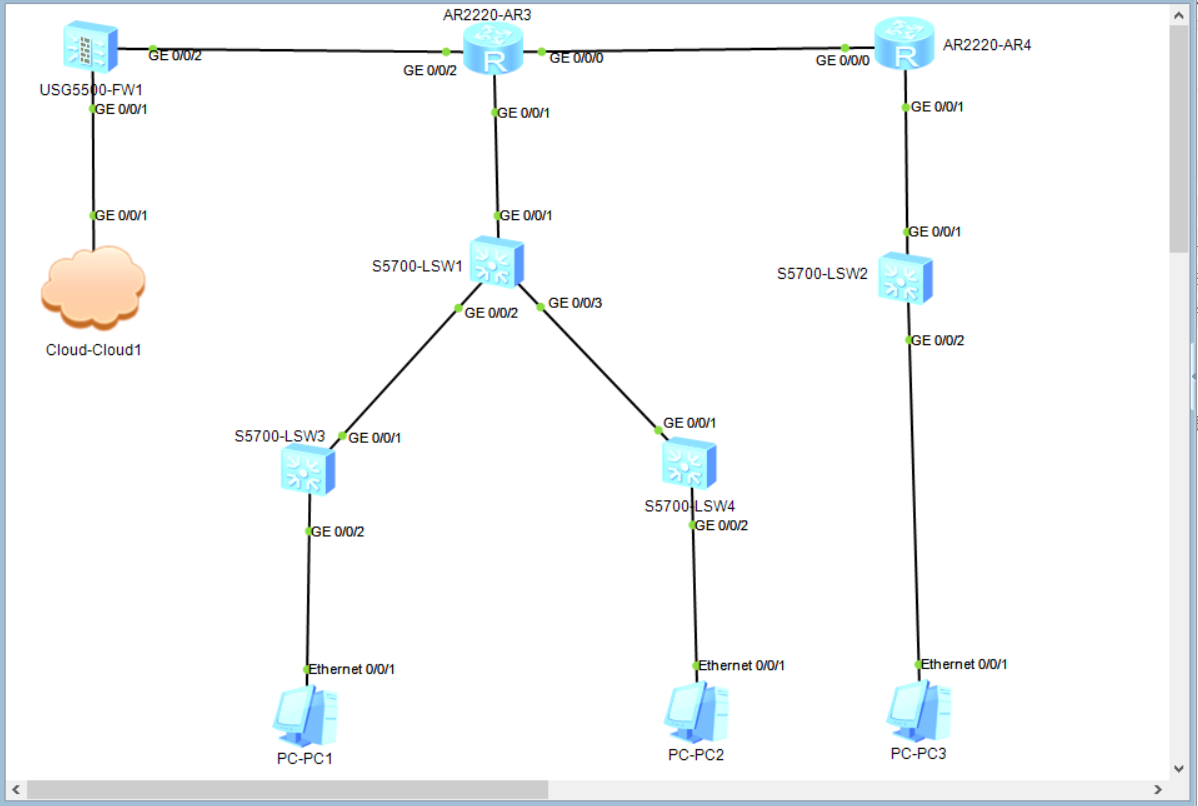
cloud

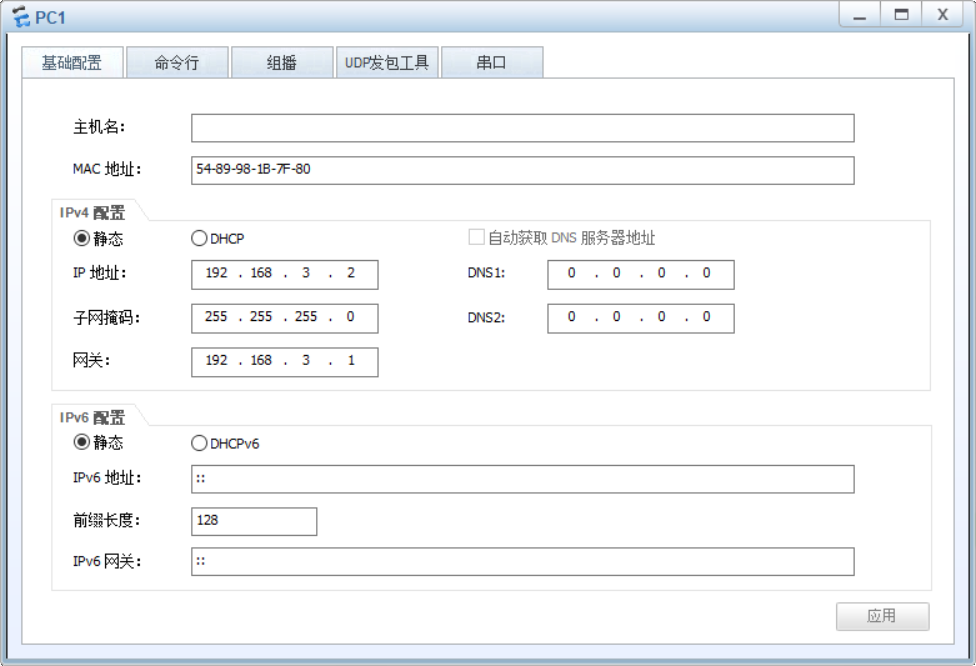
pc1
Конфигурация FW1
<SRG>system-view
[SRG]firewall zone trust
[SRG-zone-trust]add interface GigabitEthernet 0/0/2
[SRG-zone-trust]quit
[SRG]firewall zone untrust
[SRG-zone-untrust]add interface GigabitEthernet 0/0/1
[SRG-zone-untrust]quit
[SRG]int G 0/0/2
[SRG-GigabitEthernet0/0/2]ip address 192.168.5.1 24
[SRG]interface GigabitEthernet 0/0/1
[SRG-GigabitEthernet0/0/1]ip address 192.168.10.9 24
[SRG-GigabitEthernet0/0/1]quit
[SRG]ip route-static 0.0.0.0 0 192.168.10.1
[SRG]policy interzone trust untrust outbound
[SRG-policy-interzone-trust-untrust-outbound]policy 0
[SRG-policy-interzone-trust-untrust-outbound-0]action permit
[SRG-policy-interzone-trust-untrust-outbound-0] источник политики 192.168.0.0 0.0.255.255 ## Разрешить сетевому сегменту 192.168.0.0 выходить из Интернета
[SRG-policy-interzone-trust-untrust-outbound-0]quit
[SRG-policy-interzone-trust-untrust-outbound]quit
[SRG]nat-policy interzone trust untrust outbound
[SRG-nat-policy-interzone-trust-untrust-outbound]policy 1
[SRG-nat-policy-interzone-trust-untrust-outbound-1]action source-nat
[SRG-nat-policy-interzone-trust-untrust-outbound-1]policy source 192.168.0.0 0.0.255.255
[SRG-nat-policy-interzone-trust-untrust-outbound-1]easy-ip GigabitEthernet 0/0/1
[SRG-nat-policy-interzone-trust-untrust-outbound-1]quit
[SRG-nat-policy-interzone-trust-untrust-outbound]quit
[SRG]ospf 1
[SRG-ospf-1]default-route-advertise always cost 200 type 1
[SRG-ospf-1]area 0
[SRG-ospf-1-area-0.0.0.0]network 192.168.5.0 0.0.0.255
До блога по настройке AR3
<Huawei>system-view
[Huawei]int G 0/0/2
[Huawei-GigabitEthernet0/0/2]ip address 192.168.5.2 24
[Huawei-GigabitEthernet0/0/2]quit
[Huawei]ospf 1
[Huawei-ospf-1]area 0
[Huawei-ospf-1-area-0.0.0.0]network 192.168.5.0 0.0.0.255
Вид
[Huawei-ospf-1-area-0.0.0.0]display ip routing-table
Route Flags: R - relay, D - download to fib
------------------------------------------------------------------------------
Routing Tables: Public
         Destinations : 18       Routes : 18

Destination/Mask    Proto   Pre  Cost      Flags NextHop         Interface

        0.0.0.0/0   O_ASE   150  201         D   192.168.5.1     GigabitEthernet
0/0/2
       10.0.5.0/24  OSPF    10   3           D   172.16.3.1      GigabitEthernet
0/0/0
      127.0.0.0/8   Direct  0    0           D   127.0.0.1       InLoopBack0
      127.0.0.1/32  Direct  0    0           D   127.0.0.1       InLoopBack0
127.255.255.255/32  Direct  0    0           D   127.0.0.1       InLoopBack0
     172.16.2.0/24  Direct  0    0           D   172.16.2.2      GigabitEthernet
0/0/1
     172.16.2.2/32  Direct  0    0           D   127.0.0.1       GigabitEthernet
0/0/1
   172.16.2.255/32  Direct  0    0           D   127.0.0.1       GigabitEthernet
0/0/1
     172.16.3.0/24  Direct  0    0           D   172.16.3.2      GigabitEthernet
0/0/0
     172.16.3.2/32  Direct  0    0           D   127.0.0.1       GigabitEthernet
0/0/0
   172.16.3.255/32  Direct  0    0           D   127.0.0.1       GigabitEthernet
0/0/0
     172.16.4.0/24  OSPF    10   2           D   172.16.3.1      GigabitEthernet
0/0/0
    192.168.3.0/24  OSPF    10   2           D   172.16.2.1      GigabitEthernet
0/0/1
    192.168.5.0/24  Direct  0    0           D   192.168.5.2     GigabitEthernet
0/0/2
    192.168.5.2/32  Direct  0    0           D   127.0.0.1       GigabitEthernet
0/0/2
  192.168.5.255/32  Direct  0    0           D   127.0.0.1       GigabitEthernet
0/0/2
    192.168.9.0/24  OSPF    10   2           D   172.16.2.1      GigabitEthernet
0/0/1
255.255.255.255/32  Direct  0    0           D   127.0.0.1       InLoopBack0
Также добавляем ему маршрутизацию на хосте
C:\WINDOWS\system32>route add 192.168.3.0 mask 255.255.255.0 192.168.10.9
   Операция завершена!

C:\WINDOWS\system32>route add 192.168.9.0 mask 255.255.255.0 192.168.10.9
   Операция завершена!

C:\WINDOWS\system32>route add 10.0.5.0 mask 255.255.255.0 192.168.10.9
   Операция завершена!
Используйте ПК и AR3 для проверки связи с внешней сетью
ПК можно проверить, AR3 не может быть завершен немедленно
PC
PC>ping 192.168.10.1

Ping 192.168.10.1: 32 data bytes, Press Ctrl_C to break
From 192.168.10.1: bytes=32 seq=1 ttl=125 time=109 ms
From 192.168.10.1: bytes=32 seq=2 ttl=125 time=78 ms
From 192.168.10.1: bytes=32 seq=3 ttl=125 time=78 ms

--- 192.168.10.1 ping statistics ---
  3 packet(s) transmitted
  3 packet(s) received
  0.00% packet loss
  round-trip min/avg/max = 78/88/109 ms
AR3
[Huawei]ping 192.168.10.1
  PING 192.168.10.1: 56  data bytes, press CTRL_C to break
    Request time out
    Request time out
    Request time out
    Request time out
    Request time out

  --- 192.168.10.1 ping statistics ---
    5 packet(s) transmitted
    0 packet(s) received
    100.00% packet loss
Use ENSP to connect USG6000V firewall
First, open ENSP
-
Drag out a cloud.
-
Drag out a USG6000V firewall.
Second, establish a connection
-
Use VirualBox or VMware in the list of local network cards, create a 192.168.0.x paragraph virtual network card, assume it IP is: 192.168.0.2
-
Double-click Cloud2, in the configuration, add a UDP binding, and change the binding of the created virtual network card with a total of 2 bindings, in the [Port Mapping Settings], select the port number 2, and check [two-way channel 】, Click the [Add] button.
-
Drag a Copper connection, connect the USG6000V GE0 / 0/0 port and Cloud2’s Ethernet / 0/0/1.
-
Start 2 devices
Third, configure usg6000V web access
-
Double-click the console window to view the USG6000V, use the username: admin password: admin @ 123 login.
-
After logging in, if you prompt to change your password, you can modify the new password, assume the new password: Password001!
-
Perform the following command:
sys
interface GigabitEthernet0/0/0
 undo shutdown
 ip binding vpn-instance default
 ip address 192.168.0.3 255.255.255.0
 service-manage http permit
 service-manage https permit
 service-manage ping permit
 service-manage ssh permit
 service-manage snmp permit
 service-manage telnet permit
# ctrl + Z back to the sharp view
 # Press Enter Save Save.
Fourth, access test
-
After the landing interface is pop-up, enter your username: admin Enter the password: password001! Login device.
Другие наши интересноые статьи:
null
Huawei eNSP (Enterprise Network Simulation Platform) — эмулятор сети передачи данных, выпущенный в публичную бету 16 Августа 2012 года компанией Huawei Technologies. Позволяет делать работоспособные модели сети, настраивать маршрутизаторы и коммутаторы, взаимодействовать с реальными сетями, отслеживать трейсы пакетов с помощью Wireshark.
В данной статье используется ПО следующих версий:
Wireshark - 3.2.1 WinPcap - 4.1.3 VirtualBox- 5.2.32 eNSP - 1.3
Расположение логов eNSP при диагностике проблем с запуском:
C:\Users\username\AppData\Local\eNSP\Log
Отключённая виртуализация в BIOS
eNSP использует VirtualBox, размещая свои виртуальные машины, которые являются основным компонентом при симуляции различного оборудования.
Необходимо зайти в BIOS/UEFI комьютера и найти пункт связанный с виртуализацией.
Для процессоров Intel: Intel Virtualization Technology / Intel VT-x
Для процессоров AMD: AMD-V
Необходимо переставить данные пункты в режим Enabled или Yes.
Параллельная работа с Hyper-V
VirtualBox не может работать в среде Windows с включённым гипервизром Hyper-V. Для начала необходимо отключить Hyper-V с использованием стандартного графического окружения Windows.
Необходимо открыть стандартную панель управления Windows (нажать сочетание клавишь Windows + R и ввести «control»).
Далее необходимо открыть: Программы > Программы и компоненты > Включение и отключение компонентов Windows, откроется окно в котором нужно убрать галку с пункта Hyper-V, после чего произойдёт деинсталляция гипервизора.
Также необходимо открыть командную строку Windows (cmd) от администратора и ввести команду «bcdedit» и найти строчку «hypervisorlaucnhtype«. Если рядом с данной строчкой стоит режим Auto, то необходимо переключить в режим off следующей командой:
bcdedit /set hypervisorlaunchtype off
Выключить core isolation
windows security -> device security -> core isolation
Memory integrity перевести в off
или в regedit перевести ключ Computer\HKEY_LOCAL_MACHINE\SYSTEM\CurrentControlSet\Control\DeviceGuard\Scenarios\HypervisorEnforcedCodeIntegrity
enabled в значение 0
Неправильные настройки сетевого интерфейса VirtualBox
Проверить сущетсвует ли в системе сетевой интерфейс VirtualBox и проверить правильность его сегмента IP адреса, обычно это: 192.168.56.0/255.255.255.0:
Также необходимо проверить, что данные настройки установленны для всех виртаульных машин, связанных с eNSP:
Добавить eNSP в исключения FireWall
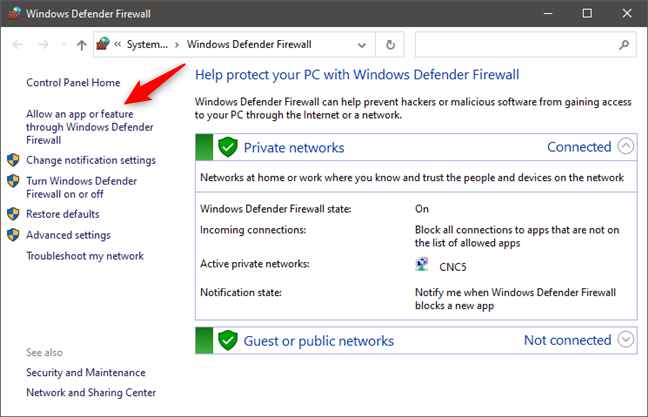
Откройте панель управления и выберите «Защитник Windows» в разделе «Система и безопасность«. Откройте раздел «Разрешение взаимодействия с приложением или компонентом в брандмауэре» и нажмите «Изменить параметры» — «Разрешить другие приложения«, где нужно будет найти eNSP и поставить галку в чекбоксе:
Friday, June 7, 2024
add ensp to windows firewall
Choose Start > Control Panel > Windows Firewall.
Select Allow a program or feature through Windows Firewall on the Windows Firewall page.
Check whether Public in eNSP_VBoxServer is selected on the Allowed Programs page.
If Public is not selected, select it, click OK.
Posted by
The ultimate moron
at
5:52 PM
Labels:
add ensp to windows firewall
No comments:
Post a Comment
Newer Post
Older Post
Home
Subscribe to:
Post Comments (Atom)
In Windows 10, the old Windows Firewall has been rebranded by Microsoft to Windows Defender Firewall. It is a security feature built into the operating system that helps block unauthorized access to your computer, while permitting authorized communications. This tool can filter both inbound and outbound traffic or set rules and exceptions, depending on the type of network to which you’re connected. In this article, we’re going to show you how to allow apps through Windows Defender Firewall, as well as how to block them from going online. You’re going to learn to edit existing connection rules, add new apps to the list of exceptions, and remove them from it. Let’s get started:
Where to find the list of allowed apps (Windows Firewall)
First, open Windows Defender Firewall and, in the main window, click or tap «Allow an app or feature through Windows Defender Firewall.»
You can now see a list of all the apps that are allowed to communicate through the Windows Firewall. The list is pretty long, and the active rules are only those with a checkmark near their name. All the rules can be enabled either for one type of network location (private or public) or both.
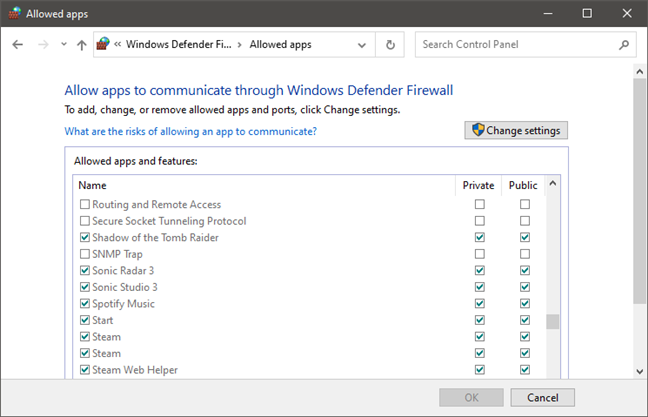
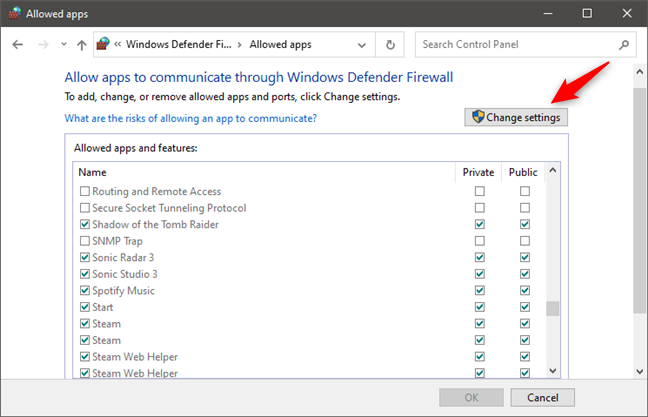
To change the list of active communication rules, you need to first click or tap the «Change settings» button.
Now you can enable or disable any of the already present Windows Firewall rules by placing a checkmark in the checkboxes found on their right sides. You can also change the type of network location the rule applies to by checking the appropriate column: private, public, or both.
Next, let’s see how to allow apps to communicate through Windows Firewall, and then how to block a program in the firewall from Windows 10:
How to allow apps to communicate through Windows Defender Firewall
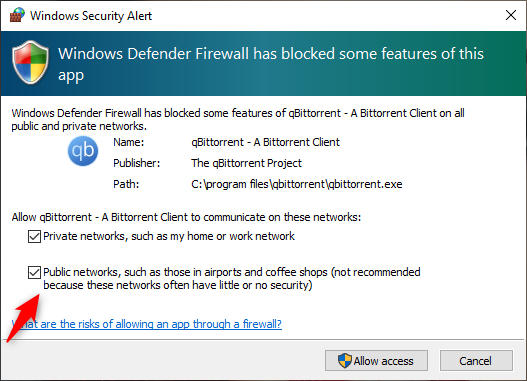
The easiest way to allow an app through Windows Firewall is to do so when running it for the first time. When that happens, Windows Defender Firewall asks whether you want to let it go online or not. Check the network types on which you want to allow the program to access the internet, and then press Allow access.
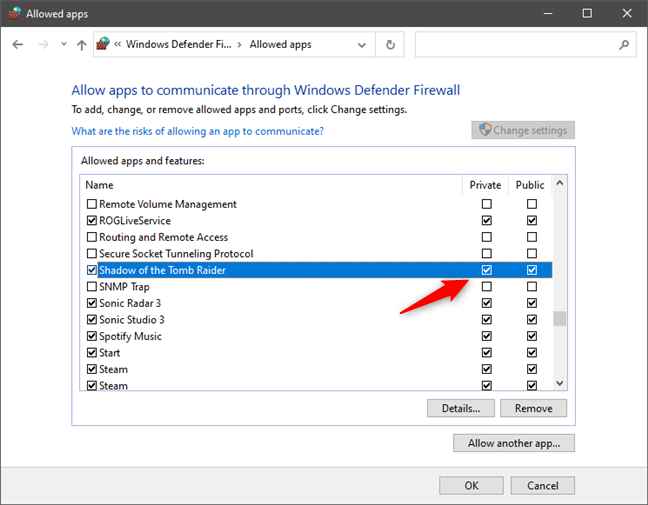
An alternative method to allow apps through Windows Firewall is to look for them in the list of «Allowed apps and features» to which you can get as we’ve shown you in the first section of this guide. When you find them, mark the Private and/or Public options on the right, depending on which types of networks you want to allow that app to communicate.
If you want to know more about a rule before allowing a particular app through Windows Defender Firewall, first select it and then click or tap on Details.
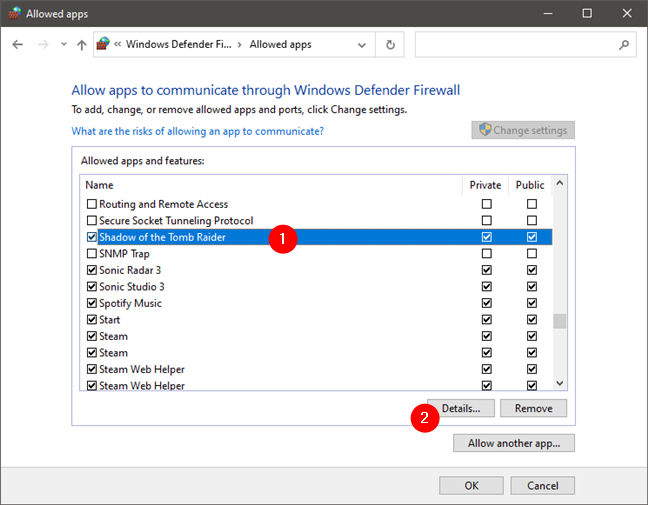
Then, you see a small window, giving you an additional description of the selected app. When you’re done reading it, click or tap OK.
If you cannot find an app in the list of allowed items, you can click or tap the «Allow another app» button to add it.
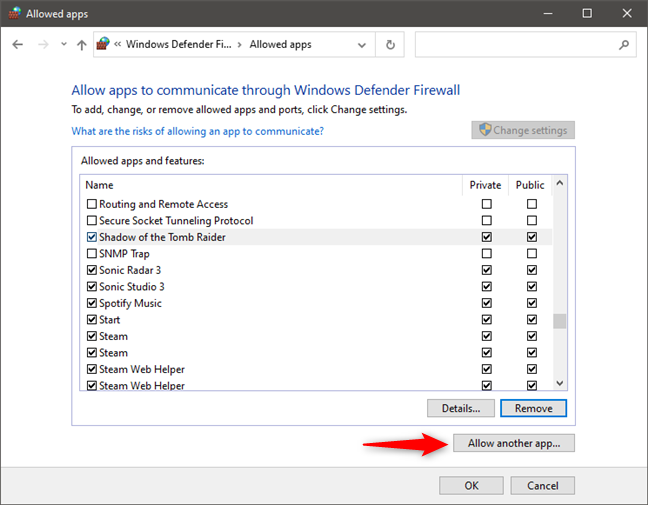
In the «Add an app» window, you can see the list of all apps installed on your computer. Select the one you desire. If you cannot find it, press Browse and select its main executable file.
You can set up which location type the exception is applied to. To do this, click or tap «Network types.»
Then, you can check any of the location types: private or public. When done, press OK.
Next, press Add.
The app is now added to the list of allowed connections and should start functioning correctly.
How to block a program in Windows Defender Firewall
To block a program in the firewall from Windows 10, there are two easy paths that you can follow. The best and the one that we recommend is to manually create a firewall block rule by following the steps in this tutorial: Block apps and games from accessing the internet with Windows Defender Firewall.
The second path is somewhat unorthodox, but it works. 🙂 By default, Windows Defender Firewall is set to «block all connections to apps that are not on the list of allowed apps.» This means that if you remove an app from the list, its internet access is automatically blocked.
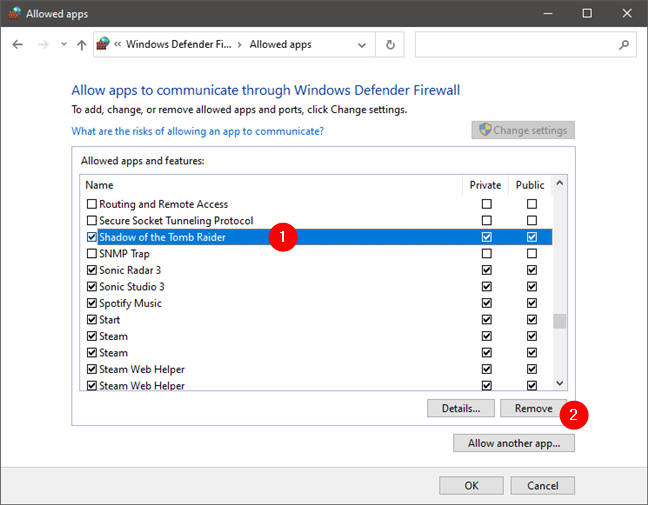
Follow exactly the same steps as in the first section of this guide to get to the list of allowed apps. Then, when you get to it, locate the app that you want to block in the firewall, select it, and remove it from the list. You can do that by pressing the Remove button.
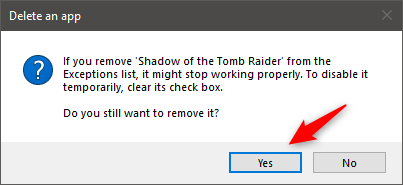
When you’re asked to confirm, click or tap on Yes and the app is deleted from the Windows Defender Firewall rules list.
This doesn’t automatically block that app from communicating over the internet. However, the next time you open it, and it tries to go online, Windows Defender Firewall should ask you whether to allow it or not. Choose not to let it go online so that the app is blocked.
Are you comfortable using Windows Defender Firewall?
Working with Windows Firewall is not that complicated, even if you may feel intimidated by it. As you can see, adding or removing apps from the list of allowed connections is reasonably easy. If you have questions about this topic, don’t hesitate to leave a comment. Also, to find out more about this tool, check out the articles recommended below.
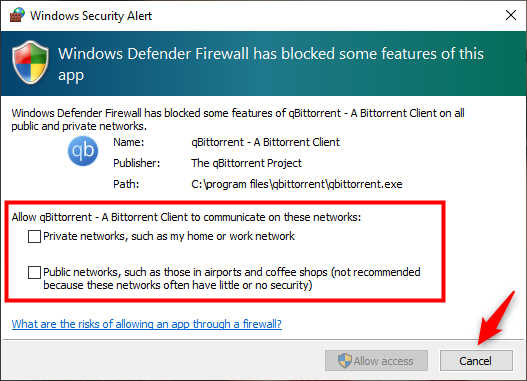
You will encounter the Windows Defender Firewall has blocked some features of this app security alert when you try to launch a program on a Windows computer. While you can click Allow access and proceed to launch the program, the pop-up can get annoying if it appears frequently.
Fortunately, you can configure Windows Firewall to stop this message from appearing. Below we discuss why this message appears and how to deal with this security alert in the Windows operating system.
What Triggers the «Windows Defender Firewall has Blocked Some Features of this App» Alert?
Windows Defender Firewall keeps track of all the applications trying to connect to the Internet and accepts incoming connections on your PC. When it detects an app trying to connect to the Internet for the first time, it will block access and show the above message.
If you trust the application, you can click Allow access. If not, click Cancel, and the application will stay on the blocked list until you allow it the next time.
This is a preventative measure to block sneaky apps and threat actors from gaining access to your computer. On the flip side, this security measure can be infuriating if the Windows Defender Firewall starts blocking apps frequently.
If this message repeatedly appears with the apps you have previously allowed, it is better to take a few minutes and investigate the application for issues.
In the case of a web browser, you may have a dubious plugin trying to access the Internet, triggering a security alert. In other instances, VPN clients are known to trigger this security alert quite frequently.
Here are a few things you can try to stop the Windows Firewall security alert message on your PC.
1. Run the Windows Firewall Troubleshooter
Let’s start with troubleshooting the Windows Defender Firewall for the incoming connection issues. Windows 10 and 11 come with a built-in Incoming Connection troubleshooter. It lets you find and fix problems with incoming connections and Windows Firewall.
To run the Windows Firewall troubleshooter:
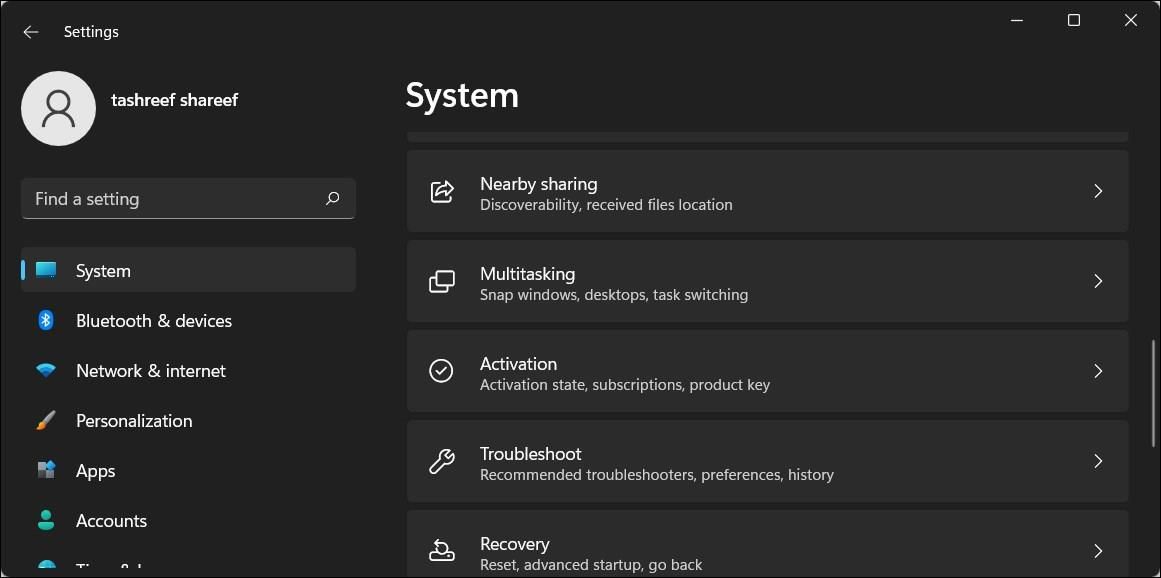
- Press Win + I to open Settings.
- Open the System tab in the left pane.
-
Next, scroll down and click on Troubleshooter.

- Click on Other troubleshooters.
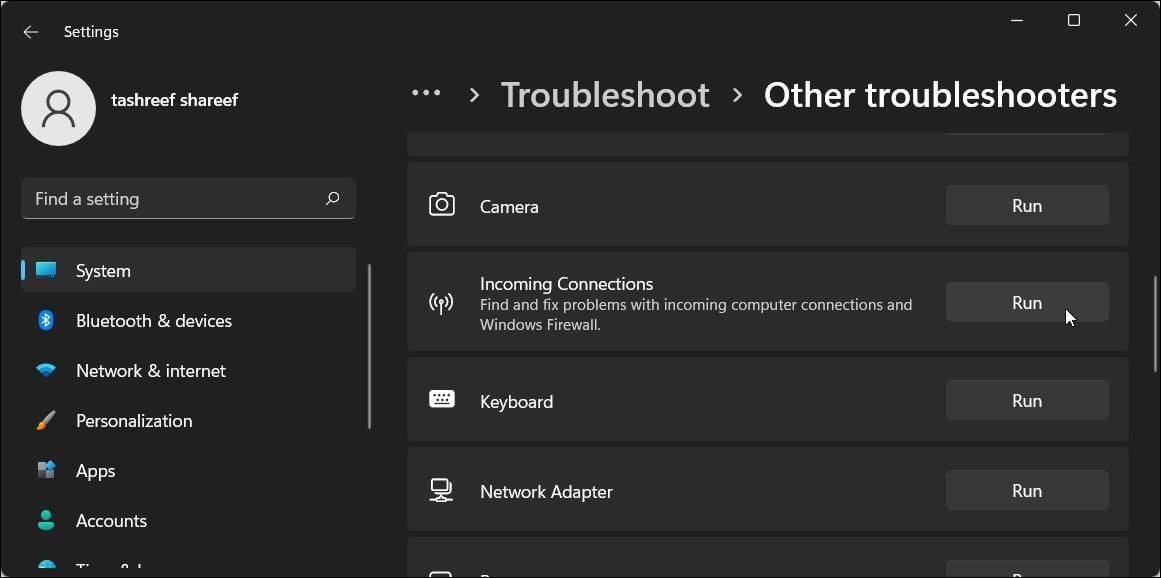
- Next, scroll down to the Other section.
-
Locate and click the Run the button for Incoming Connection.
- The troubleshooter will try to detect the problem and require some input from you.
- Select one of the options and click Next. The troubleshooter will now look for problems in the selected area and apply a fix if required.
- Once done, click Close and look for any improvements.
2. Scan Your System for a Malware Issue
If the security alert repeatedly appears randomly for a specific app or all the apps, it is better to check your system for malware issues. If you have a third-party antivirus, perform a complete scan to find any malware infection.
To perform a Scan using Windows Security:
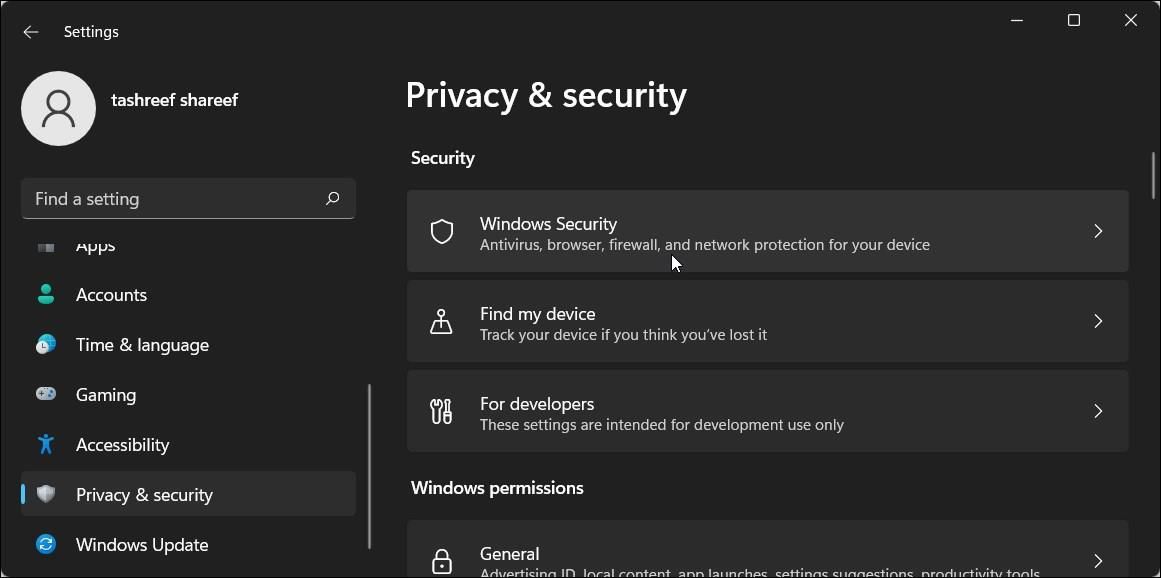
- Press Win + I to open Settings.
- Open the Privacy & security tab from the left pane.
-
Click on Windows Security.
-
Click on Virus and Threat protection under the Protection areas section.

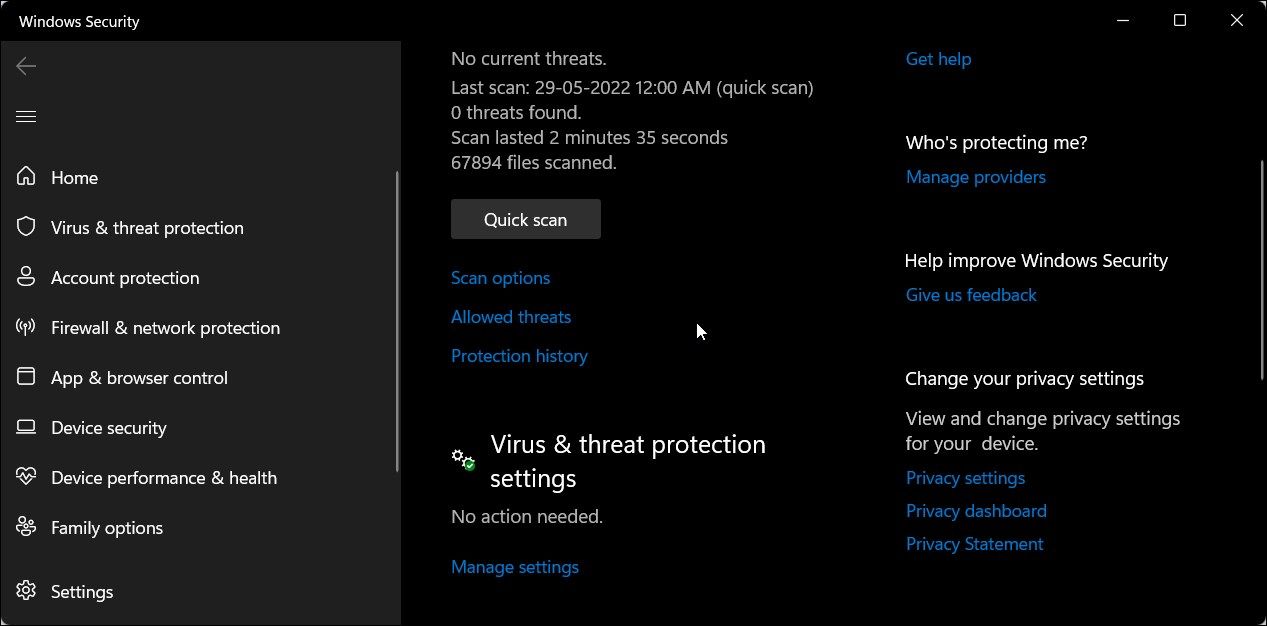
- In the new Windows Security window, click on Scan options under Quick Scan.
-
Under Scan Options, select Full Scan.
- Next, click the Scan now button to initiate the scan. This will check all files and running programs on your hard disk.
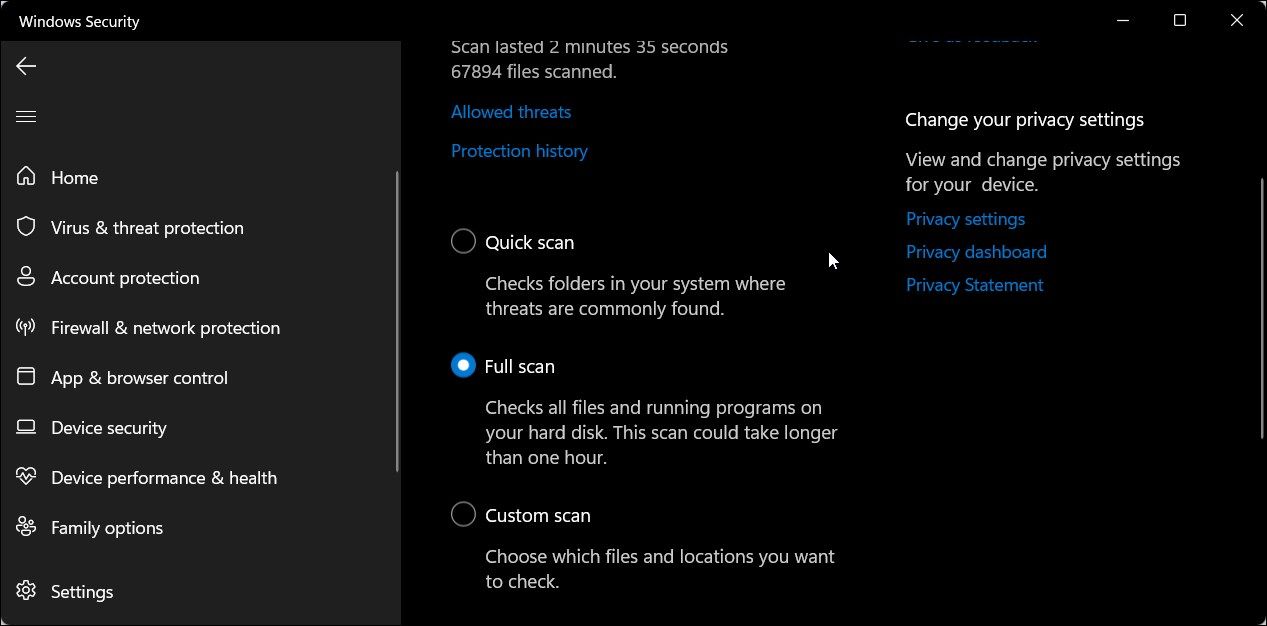
A full scan often takes a long time to complete depending on the data stored on your hard disk.
3. Disable Your VPN Client
Windows Defender Firewall can block incoming and outgoing connections from a VPN client. If you have a VPN client running, close it and exit the app completely.
To exit the VPN app, click the up-arrow icon in the system tray (bottom right corner of your desktop), right-click on the VPN app icon, and select Exit.
If the issue persists, try to disable the VPN network adapter in the Device Manager. Here’s how to do it.
- Press Win + R to open the Run dialog.
- Type devmgmt.msc and click OK to open Device Manager.
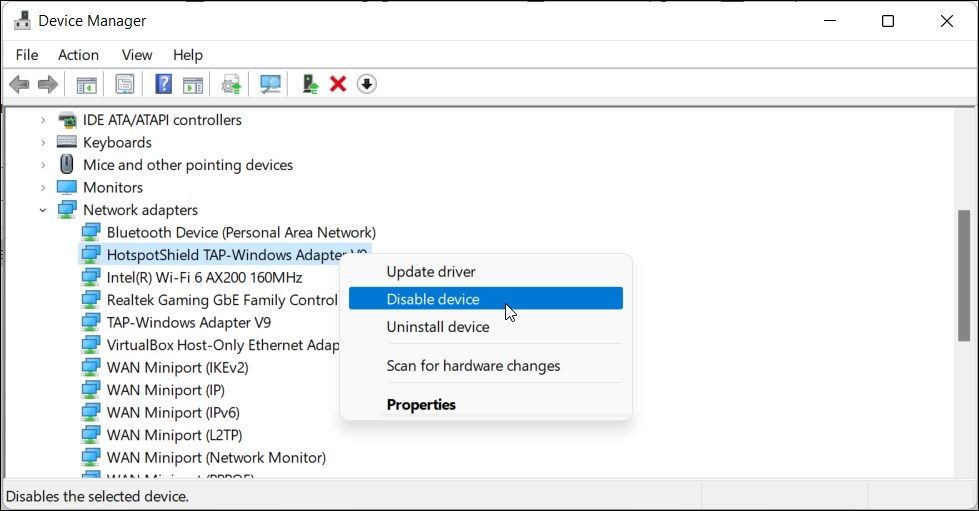
- In Device Manager, expand the Network adapters section.
- You can identify the VPN network adapter by the VPN client name. For example, if you use Hotspot Shield VPN, the adapter will have a similar name.
- Right-click on the VPN network adapter and select Disable device.
- Click Yes to confirm the action.
Once disabled, check if the issue is resolved. If not, look for other VPN network adapters and disable them via the Device Manager.
4. Allow the App Through Windows Defender Firewall
You can click on Allow access to add the blocked application to the allowed list in Windows Defender Firewall. However, if the app continues to ask for permission, you can manually allow the app through the Defender Firewall.
To add the program to the Windows Firewall whitelist:
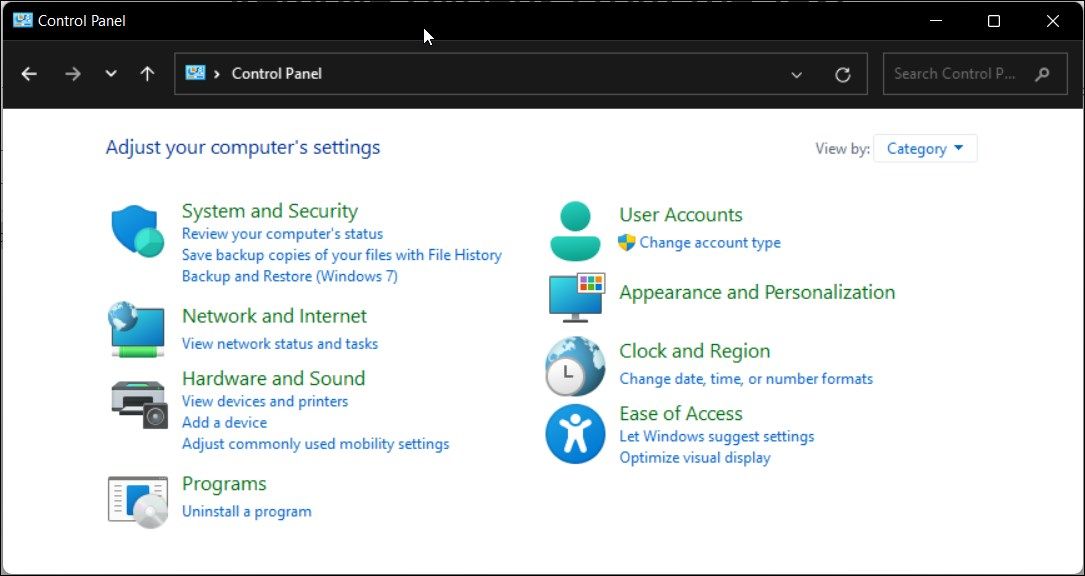
- Press Win + R to open Run.
- Type control and click OK to open the Control Panel.
-
In Control Panel, click on System and Security.

-
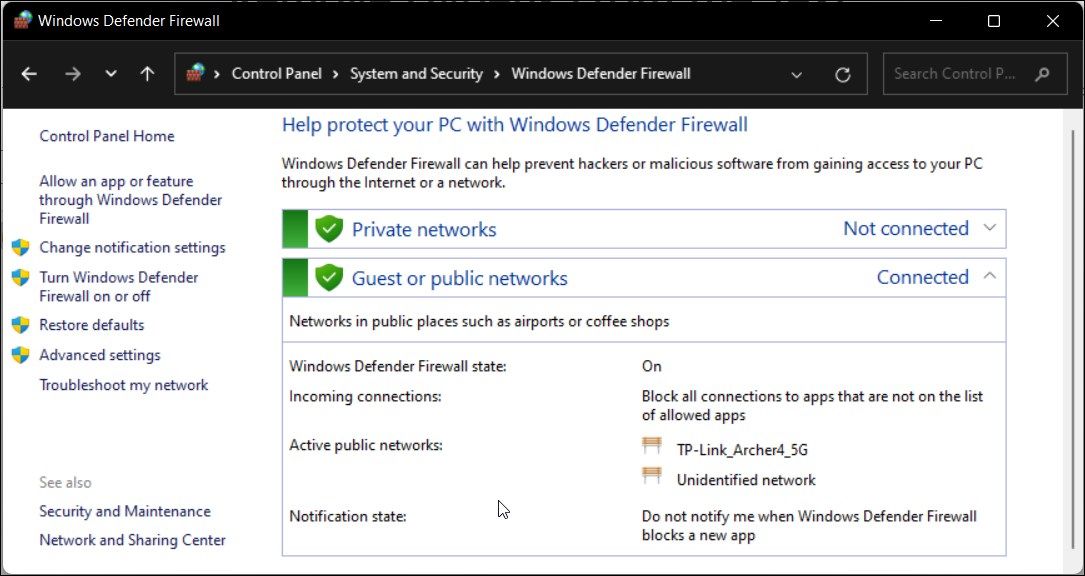
Next, click on Windows Defender Firewall.
-
In the left pane, click on Allow an app or feature through Windows Defender Firewall.
- Click on Change settings to enable the option.
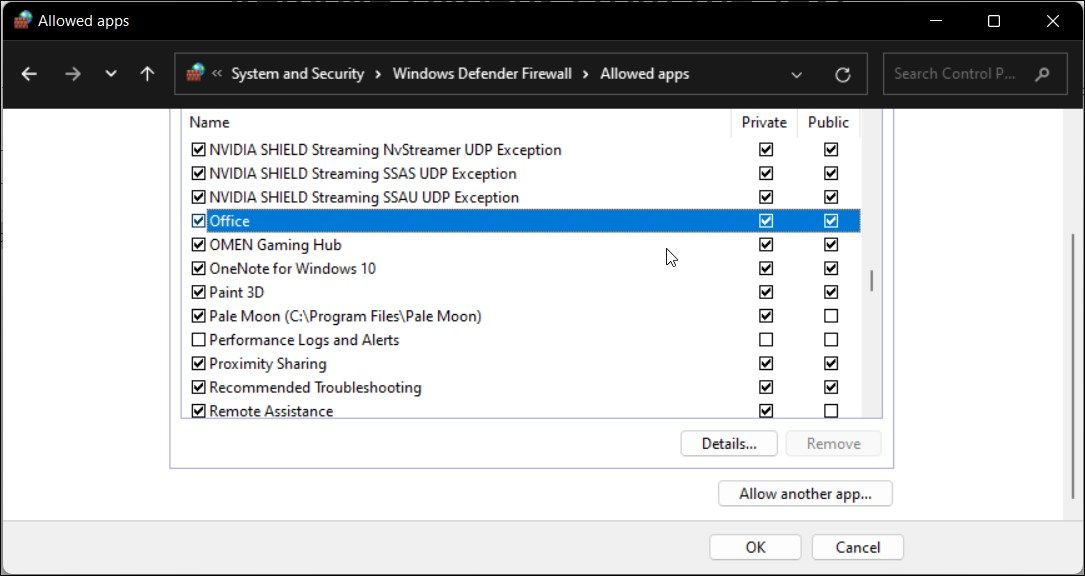
-
Next, scroll through the list of apps and features and locate the program you want to allow through the firewall.
- Check both the Private and Public boxes to add the app to the Windows Defender Firewall whitelist.
- Click OK to save the changes and exit the Control Panel.

If the program you want to allow is not on the list, click on Allow another app, browse the app’s installation directory, and select the executable. Then, click Add and save the changes.
5. Restore Windows Defender Firewall Settings to Default
An incorrectly configured Firewall can act erratic and block genuine apps. If you have recently made any changes to the Firewall but are unsure of the exact details, you can restore the default settings.
Restoring the default will remove all the third-party modifications and reset the Firewall to factory default.
To restore default for Windows Defender Firewall:
- Press Win + X and click on Run.
-
Type control and click OK to open the Control Panel.
- Next, go to System and Security > Windows Defender Firewall.
-
In the left pane, click on Restore defaults.
- Click the Restore defaults button.
- Read the description and click Yes to confirm the action.
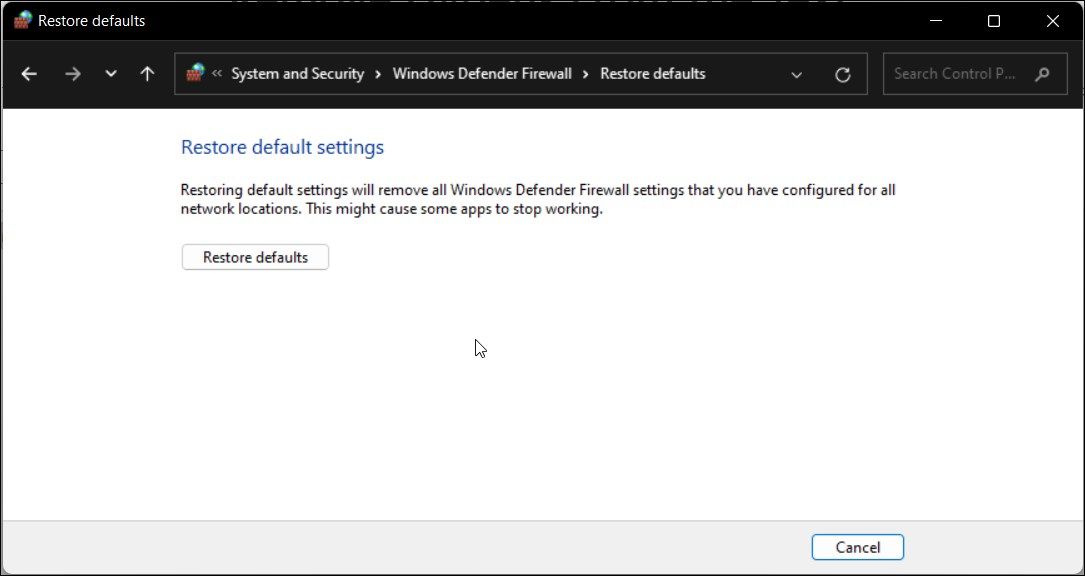
Note that restoring default will reset all the changes you have made to your Windows Defender Firewall since Windows was installed. As a result, you’ll need to reconfigure the firewall if necessary.
Fixing the Intrusive Windows Defender Firewall Security Alert
The Windows Defender Firewall security alert is a common sight when using a Windows computer. It is a harmless alert that often occurs only once for any program. If you trust the app, click Allow access, and the message will never appear for the same app.
In case of a repeated occurrence, troubleshoot your system for potential issues, including malware infection and VPN conflict. If the issue persists and you trust the service/program to be genuine, consider turning off Windows Defender temporarily.