
-
Home
-
News
- How to Fix Windows 11 Mouse Stuttering and Lagging?
By Vera | Follow |
Last Updated
If you are running a Windows 11 PC and you may encounter a common Windows 11 mouse bug – the mouse stutters when moving fast or the mouse lags. How can you fix the mouse problem? Try to look for solutions to Windows 11 stuttering/lagging from the post written by MiniTool.
Mouse Stuttering/Lagging on PC Windows 11
Mouse lag or stutter is a common issue when you using a computer and it can always happen on Windows 10. In our previous post – How to Fix Mouse Lag in Windows 10? Try These Simple Methods, we have mentioned this issue.
However, this issue happens not only in Windows 10 but also on Windows 11. If you have upgraded to Windows 11 from an old operating system, you may be running into a mouse bug. This issue seems to happen when you play high-definition and resource-hogging games, watch a video, edit an image, or even sometimes when you open File Explorer.
The reasons for Windows 11 mouse lagging on PC or stuttering when moving fast could be the issue with the old device, poor connectivity, worn-out batteries, outdated drivers, and more.
To fix this annoying problem so that you can use the computer as normal, move to the next part and try the solutions mentioned.
Windows 11 Mouse Stuttering/Lagging Fixes
Fast Tips for Troubleshooting Windows 11 Mouse Bug
- Restart your computer
- Try to connect your mouse using another USB port
- Change the battery of your Bluetooth mouse
Upgrade Windows 11 to the Latest Version
If you are using Windows 11 preview build 22000.100 and the mouse stutters or lags only when the desktop is visible, perhaps this is because of a bug in Dev Channel. To fix your mouse issue, upgrade Windows 11 to a new version and Microsoft may patch in the new update.
To do this work, press Win + I to open Windows 11 Settings, go to Windows Update > Check for updates. Then, Windows will start downloading the update if an available one is detected. Then, click the Install now button to install the update on your PC.
After the update, check if the mouse issue is removed from your computer. If not, try other methods.
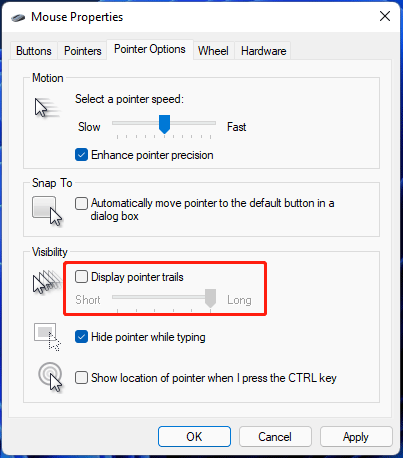
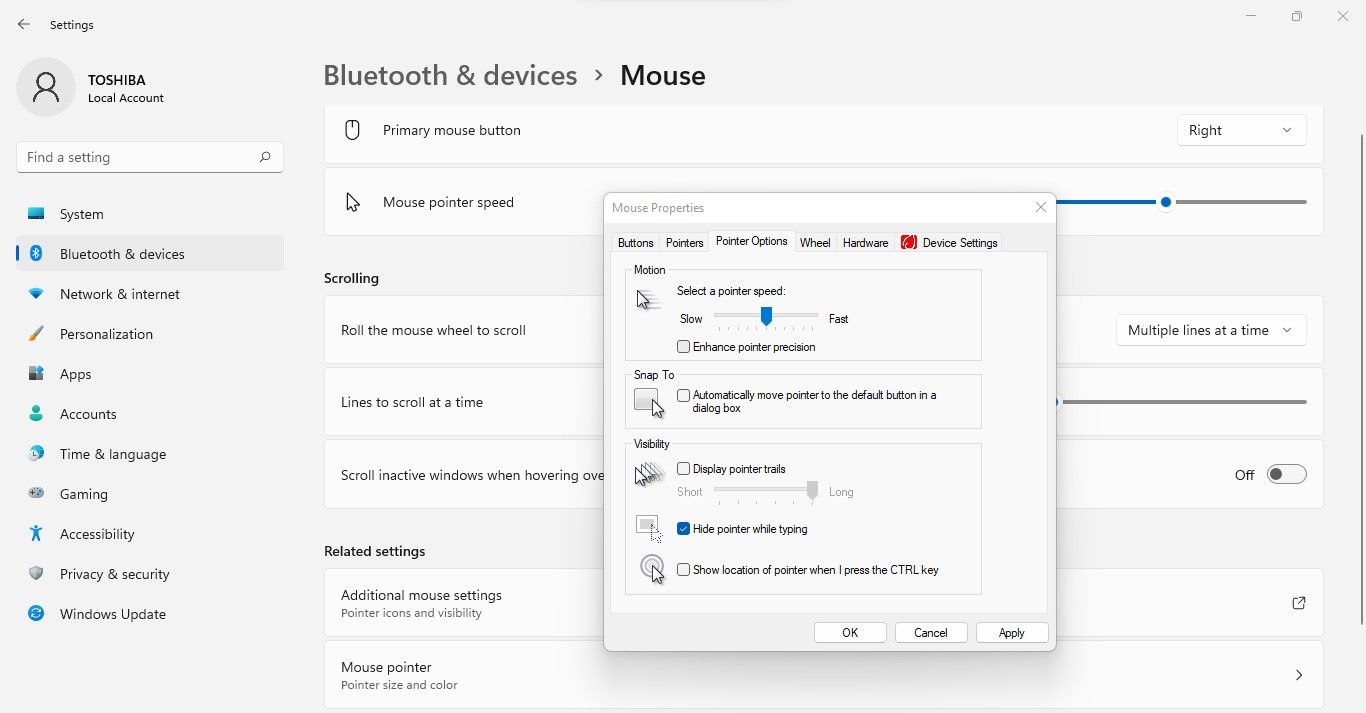
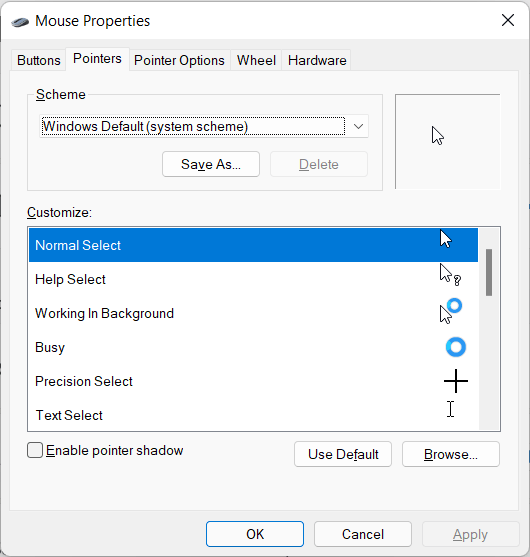
Disable Mouse Trails
Sometimes mouse trails can lead to Windows 11 mouse stuttering. So, you should disable them to fix the issue.
- Press Win and R to get the Run dialogue.
- Type main.cpl and click OK to open the mouse properties.
- Under the Pointer Options tab, uncheck the box of Display pointer trails.
- Click Apply and OK to save the change.
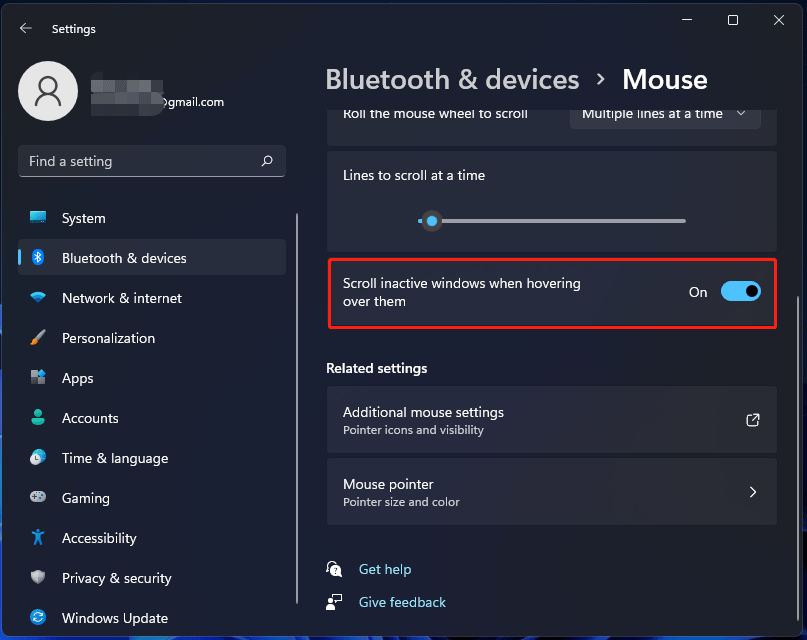
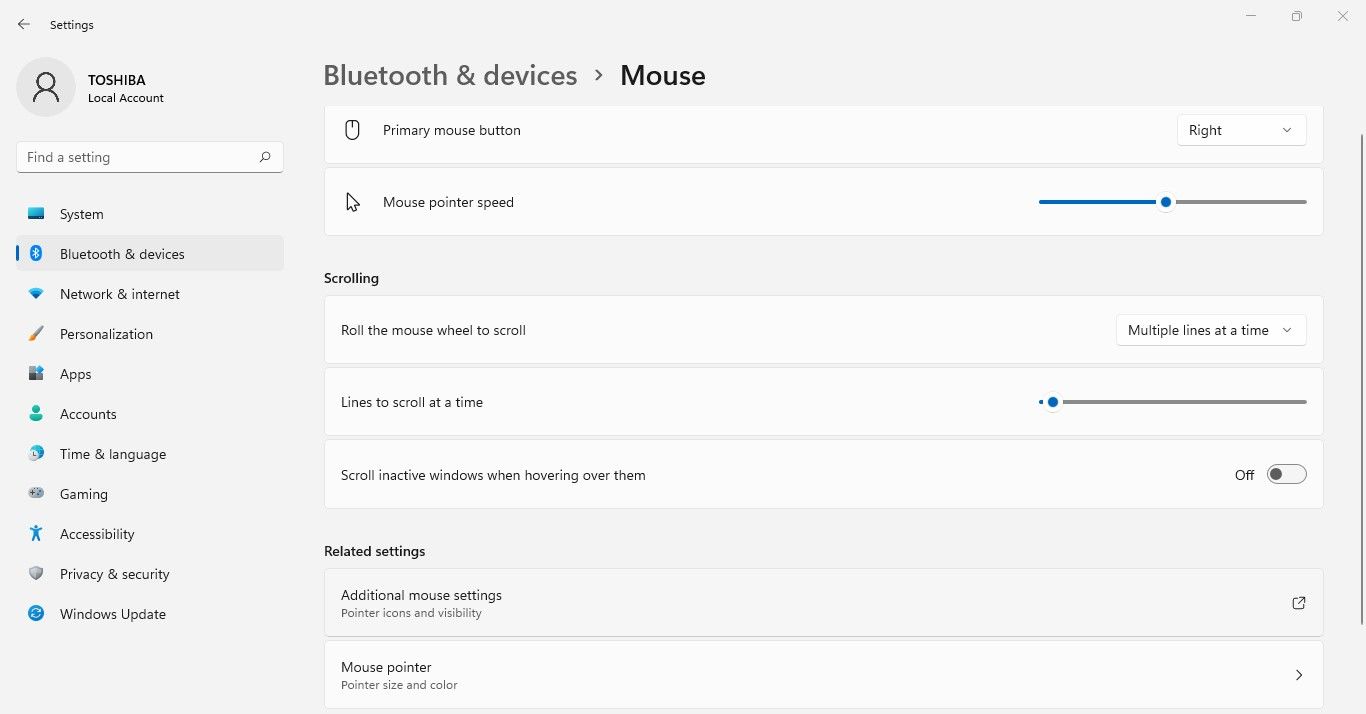
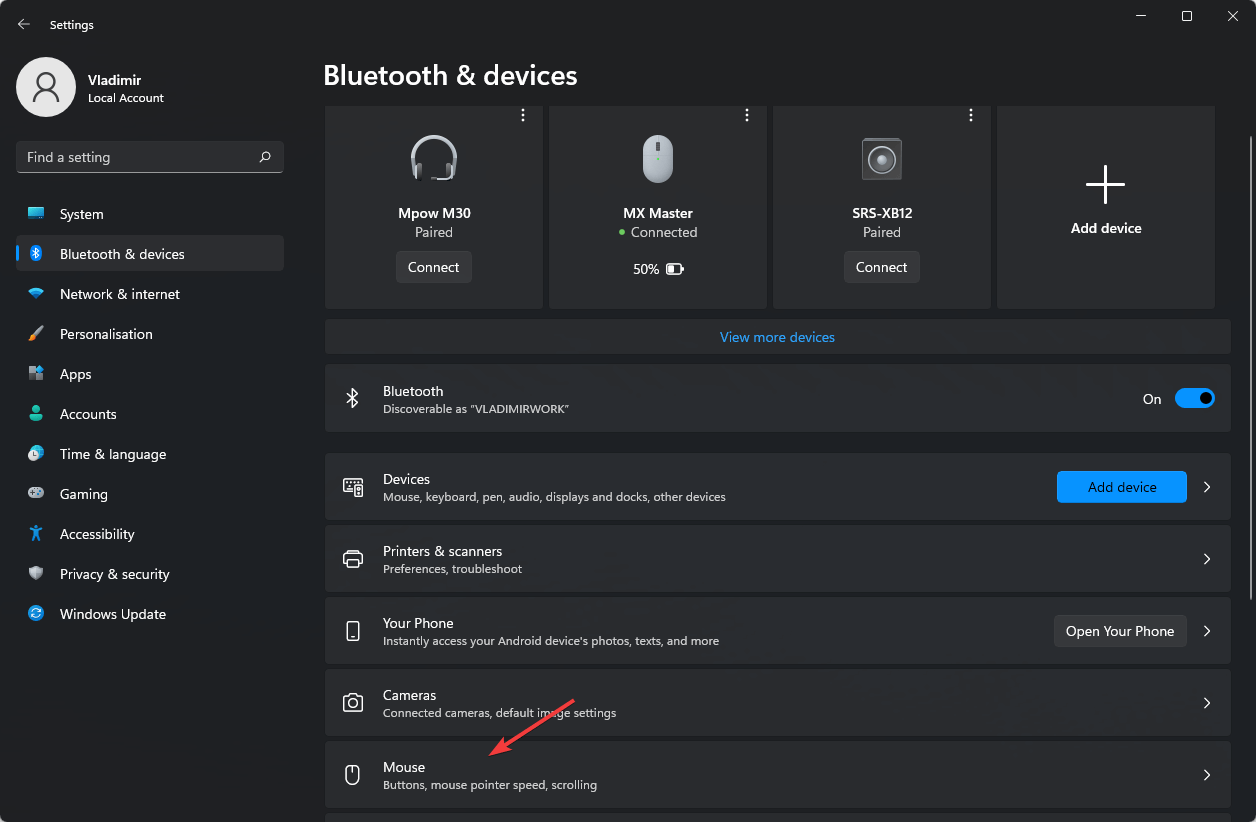
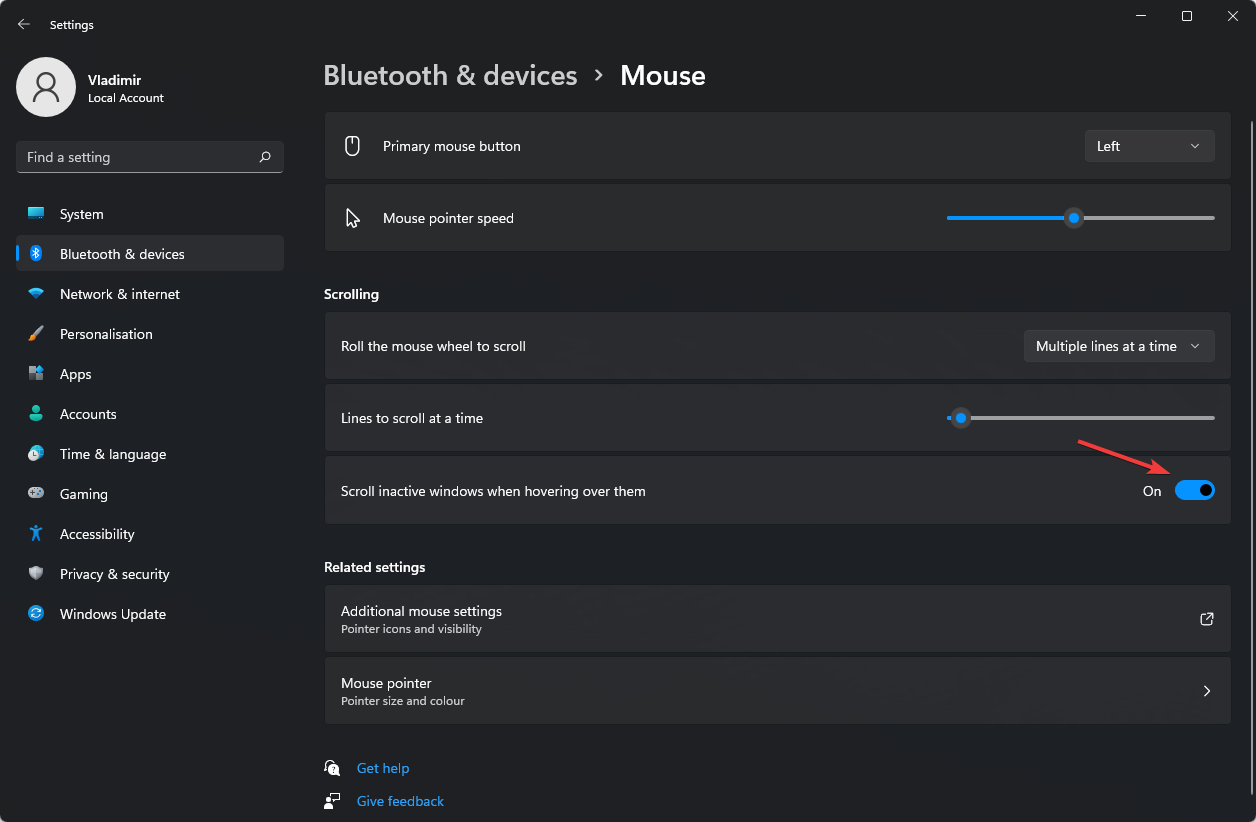
Enable and Disable the Scroll Inactive Option
Follow these steps to do this work:
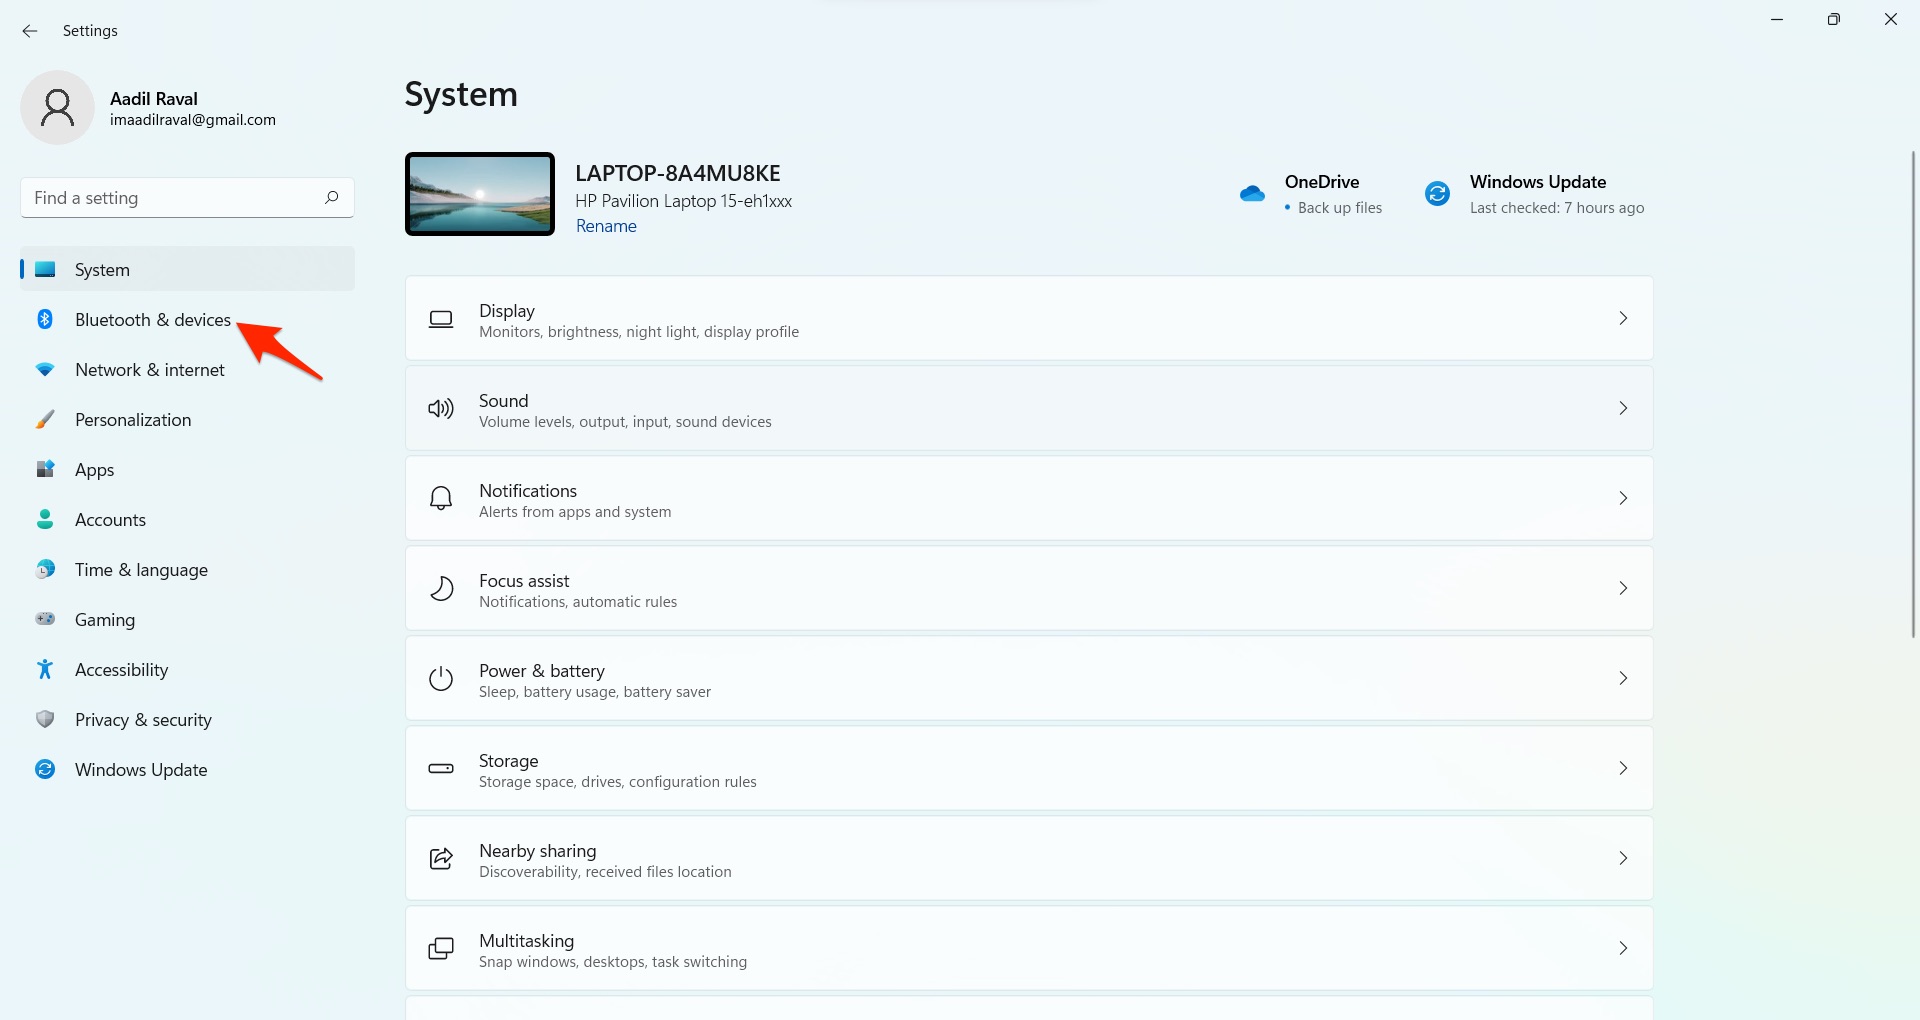
- Open Windows 11 Settings.
- Go to Bluetooth & devices, click Mouse and switch the option of Scroll inactive windows when hovering over them several times to check if you have fixed the issue of mouse stuttering Windows 11.
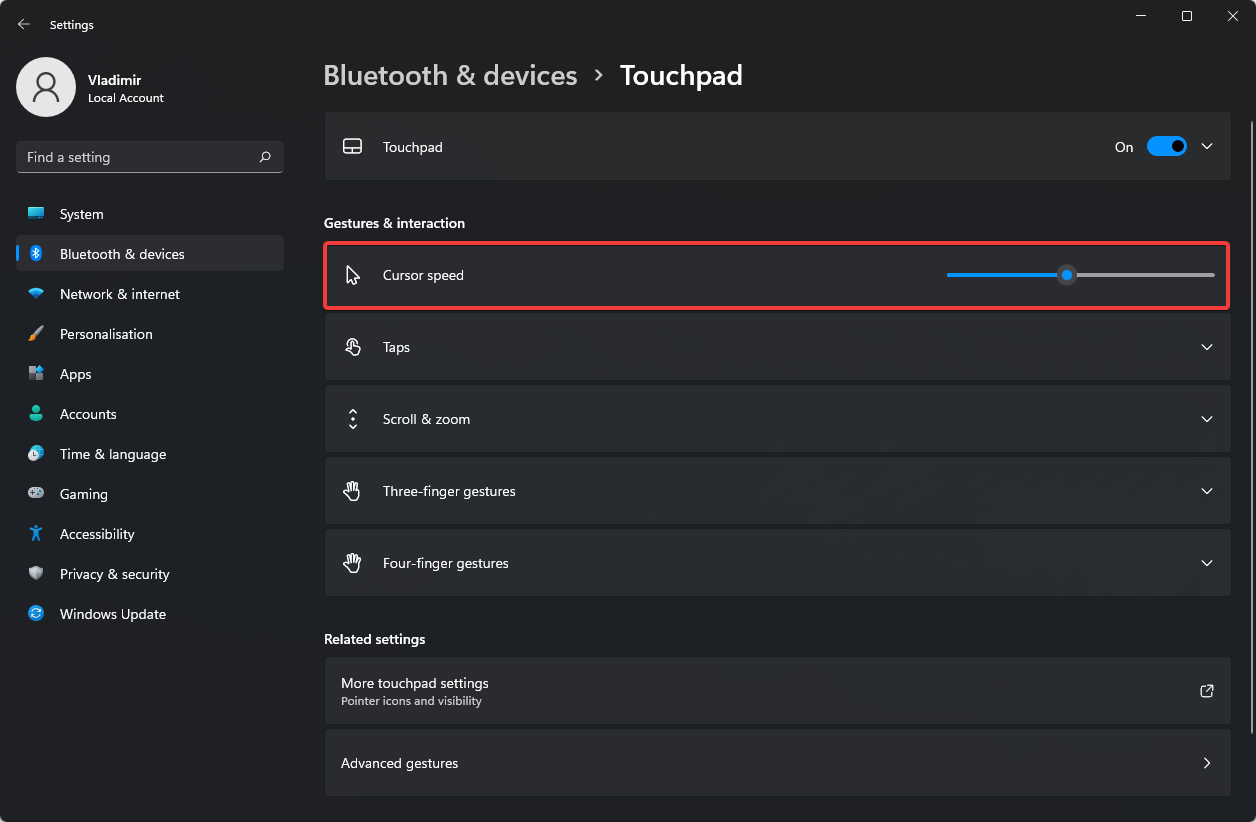
Set the Touchpad Sensitivity
This way applies to laptops and if your mouse stutters when moving fast on your laptop, you can try this solution.
- Launch Settings in Windows 11.
- Under Bluetooth & devices, go to Gestures & interaction and move the Cursor speed to change the mouse sensitivity.
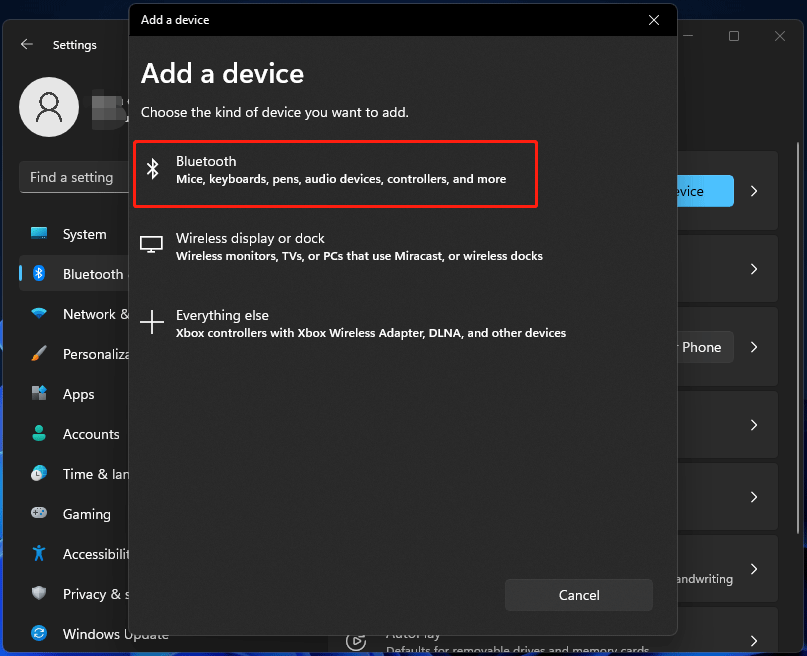
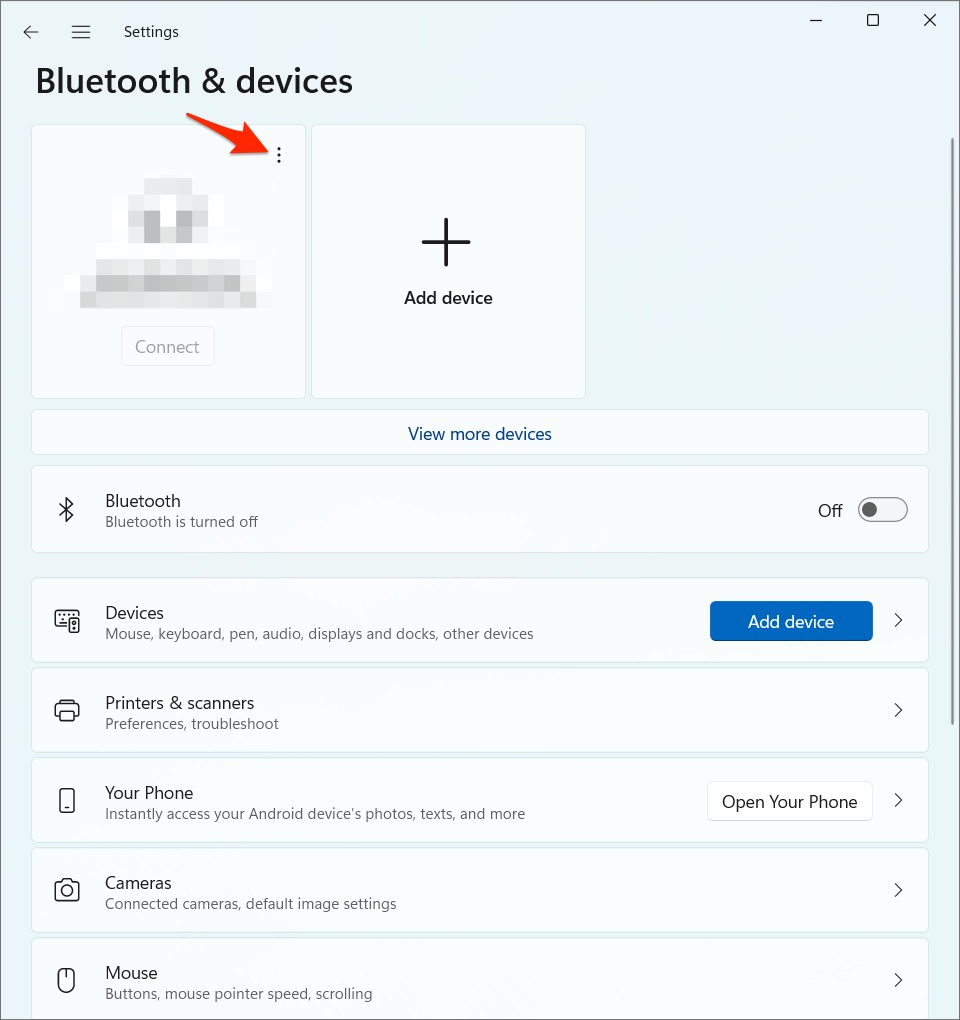
Remove and Reconnect Your Bluetooth Mouse
If you are using a Bluetooth mouse, you can remove and reconnect it to your PC to see if Windows 11 mouse stuttering/lagging is fixed.
- Under the Bluetooth & devices settings page, you can all your connected devices.
- Click the three-bar menu and choose Remove device. Click Yes to confirm the operation.
- Then, click Add device and choose Bluetooth to re-add it by following the on-screen wizards.
Reinstall Mouse Driver
To fix the issue of mouse lagging on PC in Windows 11, you can try to uninstall and reinstall the mouse driver if the problem is caused by the mouse driver.
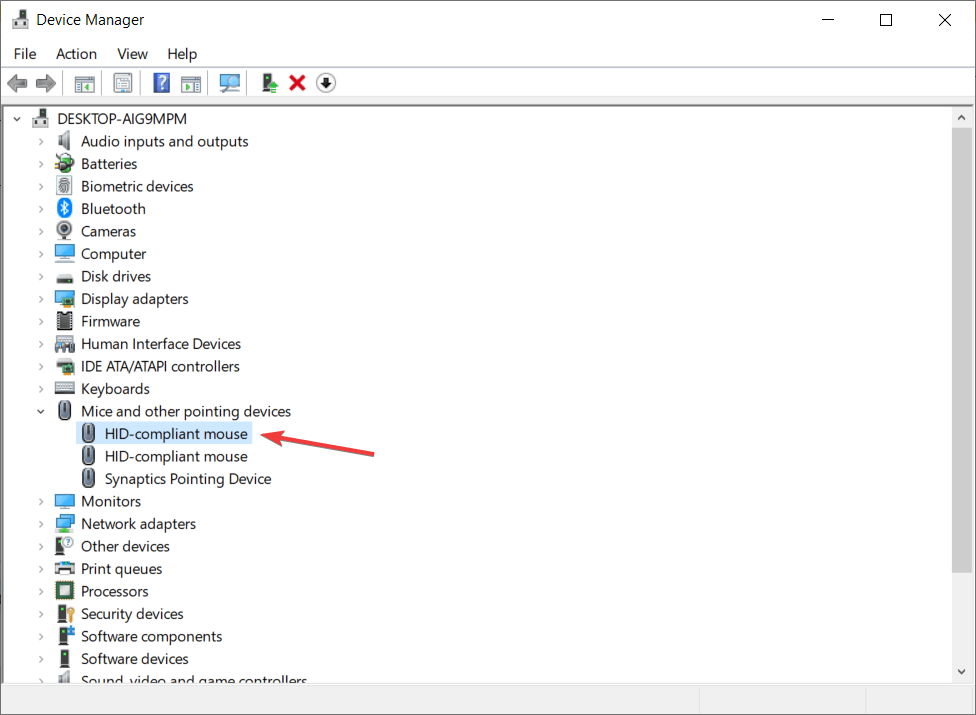
1. Right-click on the Windows icon and choose Device Manager.
2. Expand Mice and other pointing devices, right-click on your mouse and choose Uninstall device.
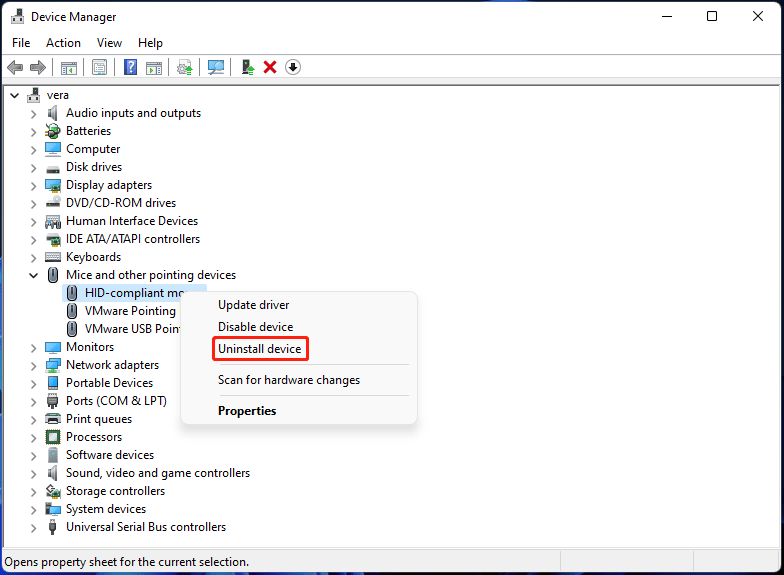
3. Click Uninstall to confirm the operation.
4. Restart your PC and Windows will install one mouse driver for your system.
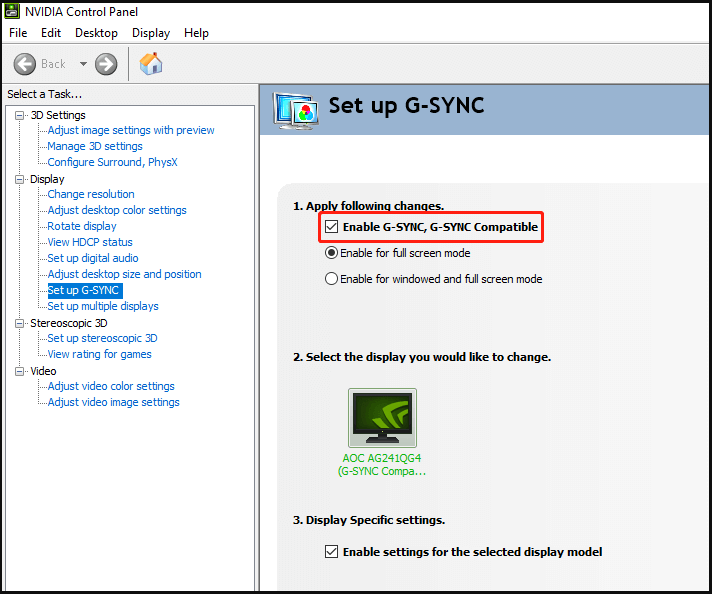
Disable Adaptive Sync Settings
According to users, disabling adaptive sync is helpful to fix Windows 11 stuttering mouse. This fix applies to the situation – you have a monitor that supports NVIDIA Adaptive Sync (Freesync).
- Type in NVIDIA Control Panel to the search box and click the result.
- Under the Display tab, click Set up G-SYNC and uncheck the box of Enable G-Sync, G-Sync Compatible.
- Reboot the PC and let the change take effect.
Final Words
That’s all the common solutions to fix the Windows 11 mouse bug issue. If your mouse stutters when moving fast or the mouse lags due to some reason, try these solutions and you can easily get rid of the trouble.
About The Author
Position: Columnist
Vera is an editor of the MiniTool Team since 2016 who has more than 7 years’ writing experiences in the field of technical articles. Her articles mainly focus on disk & partition management, PC data recovery, video conversion, as well as PC backup & restore, helping users to solve some errors and issues when using their computers. In her spare times, she likes shopping, playing games and reading some articles.
Windows users occasionally run into issues with their mouse. One common problem is when their cursor wanders on the screen without moving the mouse a little. It is often simply a speck of dust on the table or a loose mouse connection, but sometimes the issue lies in the operating system.
If your mouse has also stopped obeying your orders and is roaming on its own, you will find different solutions in this article to regain control.
1. Perform Some Preliminary Checks
Start the troubleshooting process by applying the following fixes and see if they resolve the issue:
- Disconnect your mouse and reconnect it again. Doing this will rule out any temporary problems with your device.
- Mouse and keyboard automation software can also interfere with the operation of your mouse. If you use such software, turn it off.
- If you have a Bluetooth-enabled mouse, remove any objects in the vicinity, especially microwave ovens, Wi-Fi speakers, and wireless security cameras, since they can interfere with signal transmission.
- If your mouse has a physical button to turn on, switch it off and back on again to give it a fresh start.
If the above preliminary checks do not solve the problem, keep applying the remaining fixes.
2. Clean the Desk Surface or Mouse Pad

Start troubleshooting by cleaning the surface where you use the mouse. Wipe the desk and scrub the mousepad to remove dust and debris. If the problem persists after cleaning the desk surface or mousepad, thoroughly clean the lower surface of the mouse itself.
If cleaning the desk and mouse surface doesn’t work, hold the mouse in your hand and watch its movements. Observing the same behavior suggests that dust on the table or bumps on the surface have nothing to do with the issue. In such a case, continue implementing the fixes mentioned below.
3. Physically Check the Mouse and Its Connection
Once you’ve ensured that the dirty surface isn’t causing the mouse cursor to go crazy, physically inspect the mouse. Ensure there is no physical damage to the mouse or its cable. Make sure the connection is not loose and the port you’re connecting your mouse to isn’t faulty.
If the mouse starts working correctly after a port change, the problem is likely with the port itself. Thus, ditch the old port and switch to the new one. However, if changing the port does not solve the issue, it could be a hardware issue, and it is imperative to rule it out.
4. Check for Hardware Issues
Your cursor could be roaming everywhere without your permission due to a hardware problem. Hence, before you apply other fixes discussed in this article, make sure the problem is not with your mouse. An easy way to check that is to connect your mouse to a different device and see whether it works there.
If the mouse behaves abnormally on another device as well, the issue is likely hardware-related. In this case, you should have your mouse inspected by a technician. However, if the mouse works fine when connected to another device, that suggests the problem lies elsewhere, not with your mouse.
5. Turn Off the Touchpad When Using an External Mouse
Laptop users commonly encounter the issue under discussion due to the touchpad’s interference. Follow the below steps to rule out this possibility:
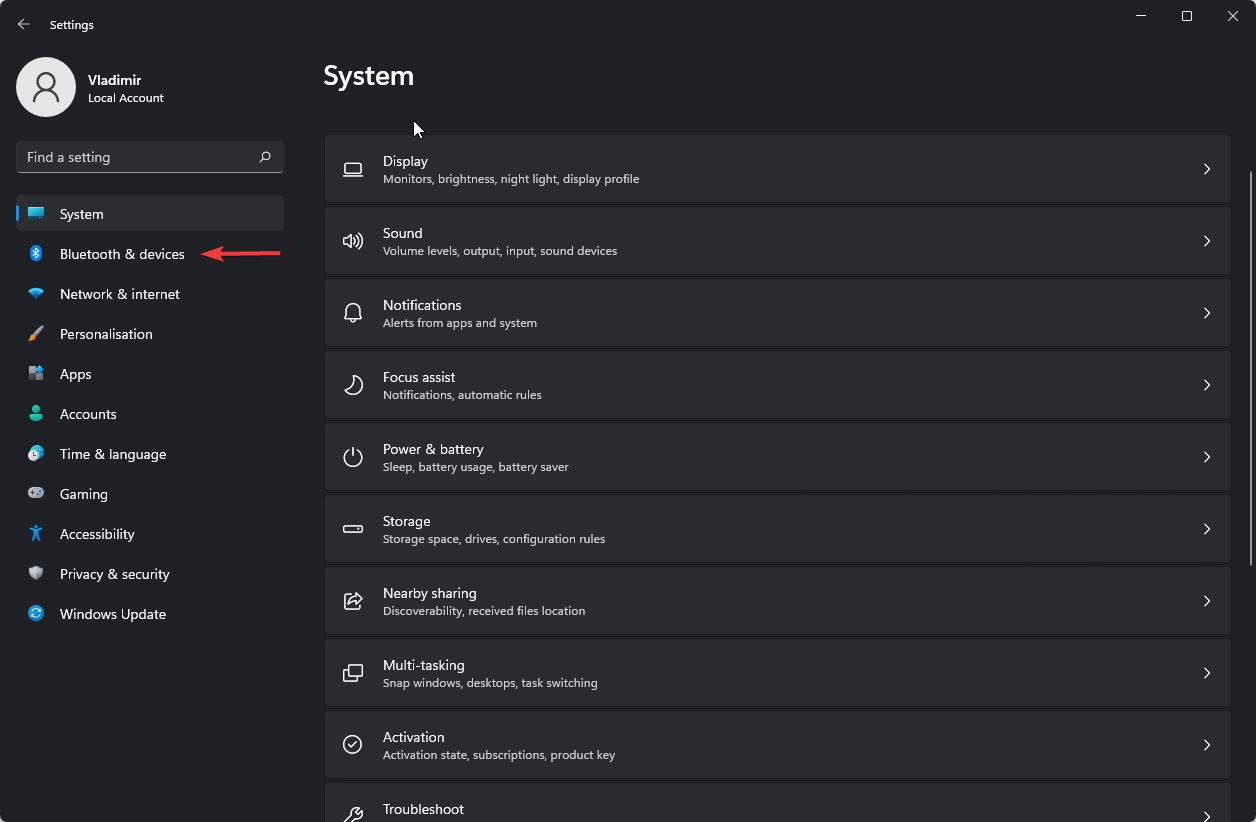
- Right-click the Start button and select Settings.
- In the left sidebar, select Bluetooth & devices.
- In the right-hand pane, click Touchpad.
-
To turn off the Touchpad, turn the toggle next to it to the left.


After disabling the touchpad, check if the issue has been resolved. If not, proceed to the next fix.
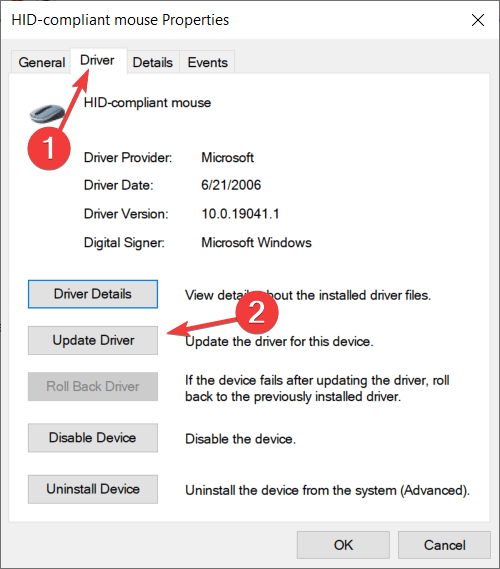
6. Update the Mouse Driver
A corrupt or outdated driver can cause your mouse cursor to go crazy. It’s, therefore, imperative to update the driver to ensure that’s not the case before moving forward. To do so, follow the below steps:
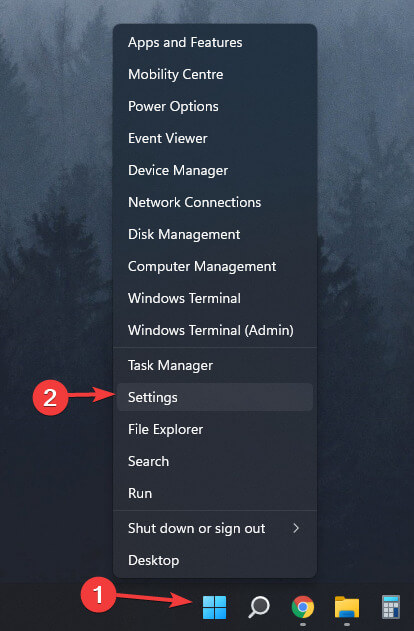
- Right-click the Windows Start button and select Device Manager.
- Expand the category for Mice and other pointing devices.
-
Right-click the relevant driver and select Update driver.


After that, follow the on-screen instructions to fully update the driver. If updating the driver makes no difference, disable inactive scrolling in the settings.
When inactive scrolling is enabled, Windows users can scroll the inactive window up and down by hovering over it instead of making it active. While it’s handy for multitasking, it can sometimes cause unusual issues, notably when many windows are open simultaneously. For this reason, it’s best to disable this feature.
To do that, follow these steps:
- Right-click the Windows Start button and select Settings.
- From the left sidebar, select Bluetooth and devices.
- In the right-hand pane, select Mouse.
-
Turn the toggle next to Scroll inactive windows when hovering over them off to disable inactive scrolling.


8. Disable Mouse Acceleration
Mouse acceleration is a feature that lets the user control the pointer’s movement by how fast they move the mouse, not by how far the mouse travels. In most cases, it gives gamers better control over their aim, but sometimes it does the opposite. You should disable mouse acceleration to see if that is the problem.
Follow these steps to continue:
- Right-click the Windows Start button and select Settings.
- In the left sidebar, navigate to Bluetooth and devices.
- In the right-hand pane, click Mouse.
-
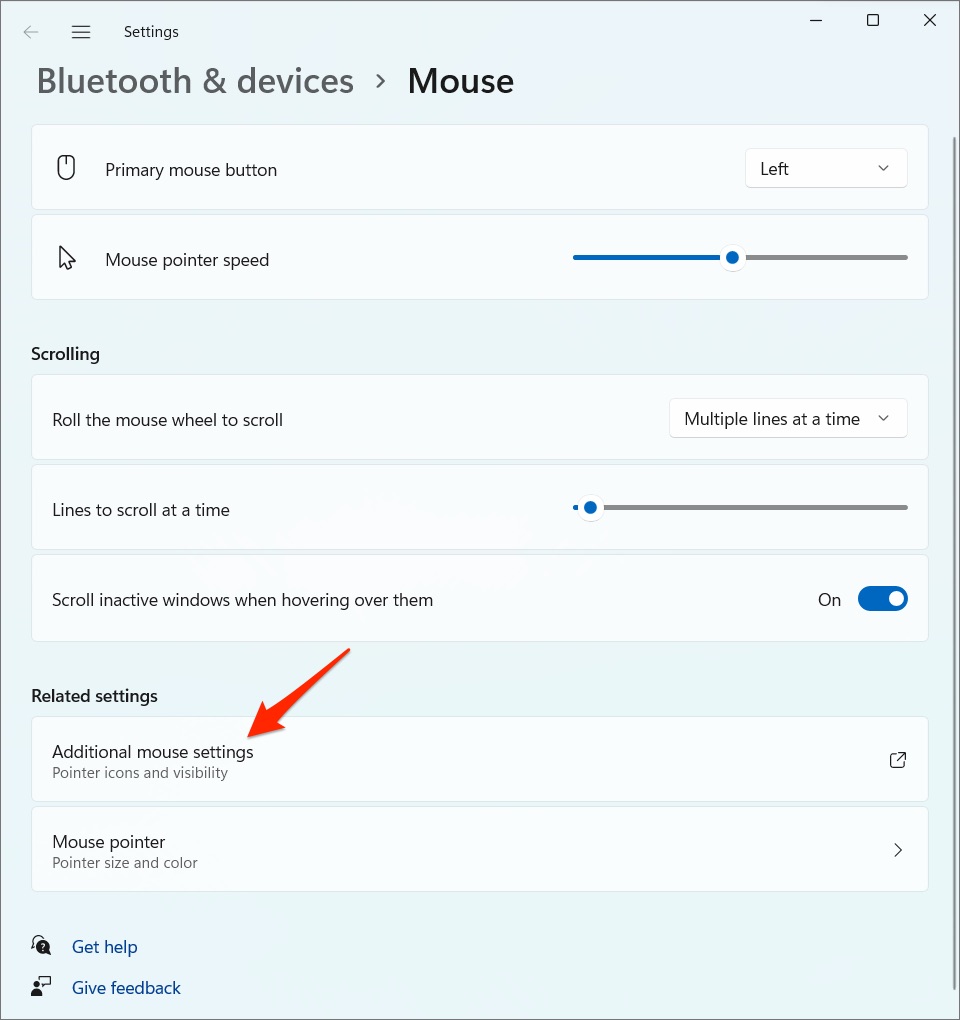
Go to Additional mouse settings.

- Navigate to the Pointer Options tab in Mouse Properties.
-
Uncheck the box for Enhanced pointer precision.

Disabling it should relax your mouse pointer. If the mouse continues to roam on its own, ensure there aren’t any other peripherals connected to your computer that might interfere with it.
9. Disconnect Interfering Peripherals
If none of the fixes have worked, ensure it’s not interference from another pointing device connected to your computer. If you have a joystick, track point, or any other input device currently connected to your computer, you should turn them off.
Also, if you are using a touch-enabled device or a tablet, consider turning off the touch screen and disconnecting the tablet for the time being to rule out interference from them.
To filter out the culprit easily, you should unplug one device at a time and check the mouse cursor before unplugging the next. If disconnecting the other peripherals doesn’t work, run a malware scan to rule out potential damage due to malware.
10. Run a Malware Scan
Windows users make countless careless mistakes that lead to viruses entering their computers. If you fail to run malware scans periodically, this malware can wreak havoc on your computer. That may explain why the mouse cursor moves randomly. Therefore, it’s crucial to rule this out.
Follow these steps to run a malware scan:
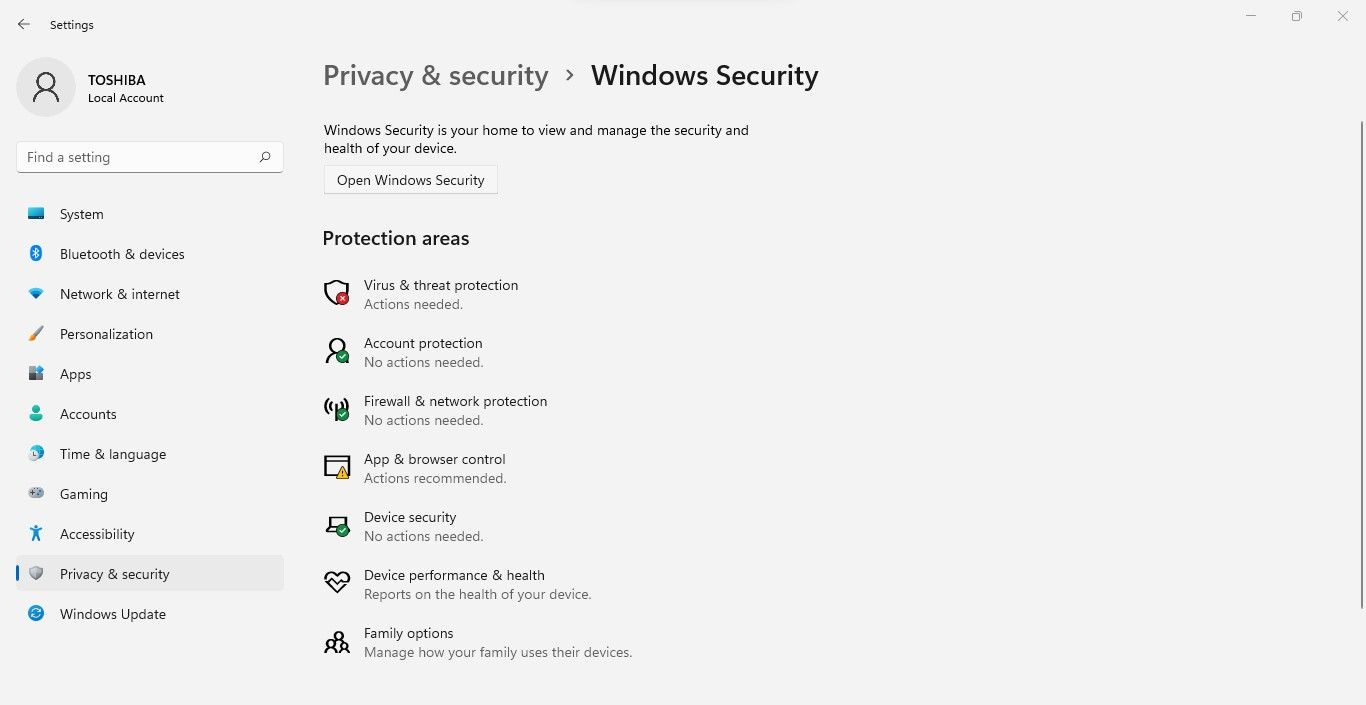
- Right-click the Windows Start button and select Settings.
- In the left-sidebar, select Privacy & security.
- In the right-hand pane, click Windows Security.
-
Then click on Open Windows Security.

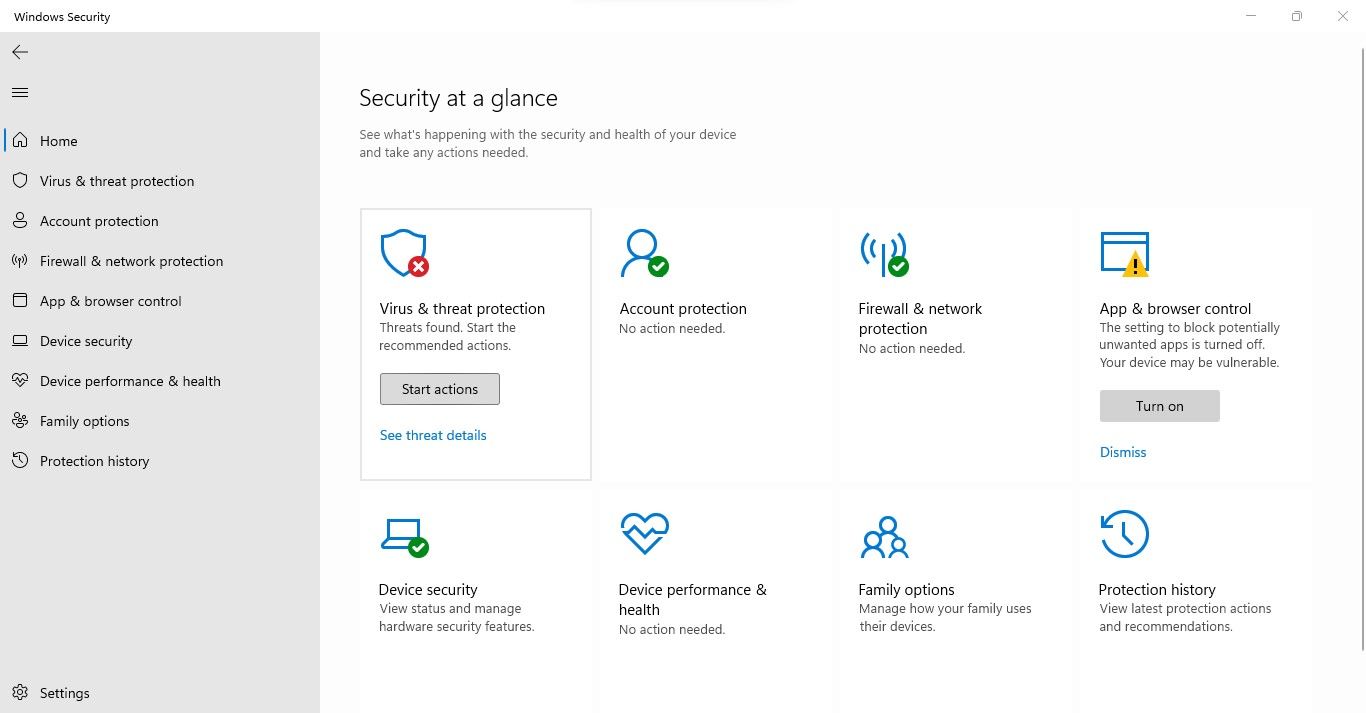
-
In the Windows Security window, select Virus and threat protection.
- Under the Quick scan, click Scan options.
-
Choose your preferred scan and click Scan now.

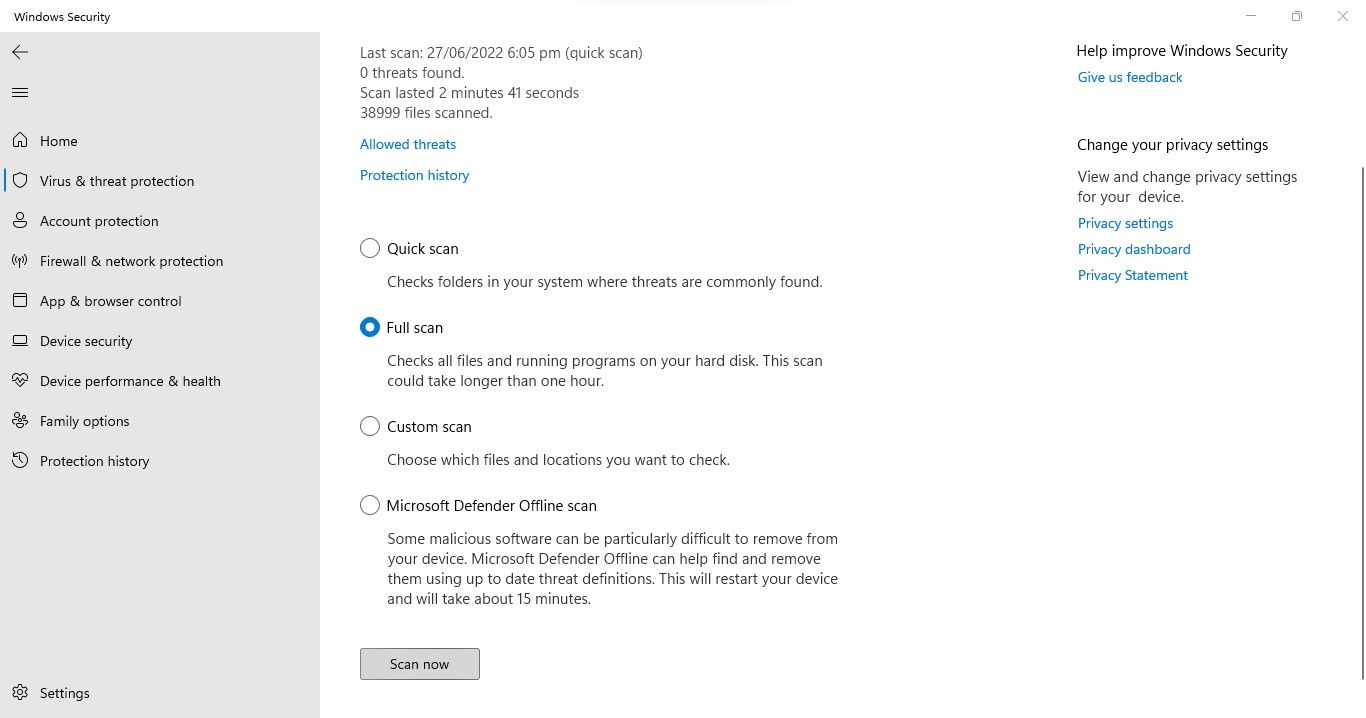
That’s it. By scanning your system, Windows will find any malware hidden in your system and remove it from your system. When removing malware fails to put your mouse pointer to rest, you may want to consider resetting your Windows PC as a last resort.
Discipline Your Mouse to Stay Static
By following the above fixes, you should be able to fix the mouse that moves around unconsciously on the screen. If not, it’s likely a hardware issue, which is more likely to occur if you use a cheap, low-quality mouse.
If you find out the problem is hardware-related, try buying a mouse from a reputed company. Check out mice from Microsoft, Logitech, and Seenda—three of the most popular brands.
I’m on the latest build 22000.65 and whenever I open up Windows explorer my mouse is borderline unusable like it’s swimming through quicksand. Anybody else experiencing this issue?
Originally posted on Reddit.
Mouse lagging, stuttering, or freezing is a random bug encountered and reported by Windows 11 users.
Like Windows 10, this latest Windows 11 OS is not free from bugs and issues. And now, one of the major hindrances is mouse lagging and stuttering; it seemingly occurs while playing high-definition, resource-hogging games, videos, or sometimes simply while opening a Windows Explorer.
Well, explaining the mouse lags is inclusive, as it can be due to the old device issue, poor connectivity, outdated driver, and worn-out batteries.
The best way to fix Windows 11 mouse lag, stutter, or freeze is to install every pending update available. Microsoft releases various updates, builds, and cumulative updates as a hotfix directly related to performance, security, technical issues, and other errors in the OS.
Recently, it was confirmed by the Windows Insiders, that the latest Windows 11 Insider Preview Build 22000.132 has been released for everyone in the Dev and Beta Channels.
So check and install the available updates to solve most of the Windows 11 bugs and issues.
Moreover, if you don’t know how to check for Windows 11 updates, continue reading this guide and follow the steps listed to check and install Windows 11 updates.
Also, feel free to try other workable fixes tested and tried by the experts to fix Mouse lagging and stuttering in Windows 11.
To fix Windows 11 problems, we recommend Advanced System Repair:
This software is your one stop solution to fix Windows errors, protect you from malware, clean junks and optimize your PC for maximum performance in 3 easy steps:
- Download Advanaced System Repair rated Excellent on Trustpilot.
- Click Install & Scan Now to install & scan issues causing the PC problems.
- Next, click on Click Here to Fix All Issues Now to fix, clean, protect and optimize your PC effectively.
How to Check and Install Updates in Windows 11?
- Hit Windows + R keys > and in the Run dialog box that appears, type or paste ‘ms-settings:windowsupdate’ > hit Enter.
- If UAC (User Account Control) prompt appears, then click Yes for granting administrative access.
- And as the Windows Update screen appears, head and click on Check for Updates on the right-hand side.

- If the latest updates are available, then click on Download Now button. It won’t start downloading automatically.
- Once the download is complete, the pending update installation starts to begin automatically (*but make sure your Windows Update preferences are set to default.)
- But if it won’t start installing automatically, install manually by clicking Install Now.
Please Note: You might get prompted to restart your system before installing the pending updates. In this case, simply reboot your PC and complete the pending update installation by following the steps.
Now, as the entire updates and builds are installed, check if the Windows 11 mouse lag and stutter problem are fixed or not.
If your mouse is still lagging, stuttering, or swimming on the desktop, try the fixes given one by one.
Before starting with the solutions, restarting a file explorer is a good option if you face a problem when the desktop appears or your file explorer opens up. Follow the steps to open file explorer (explorer.exe)
Solution 1– Update your Mouse Driver
The first solution I will suggest you update your mouse driver. Updated mouse drive can fix Mouse lagging and stuttering in Windows 11. So, follow the given below instruction to update your mouse drive:
- First, you must select Device Manager from the list by right-clicking on Device Manager.
- Now, Select Mice and other pointing devices.
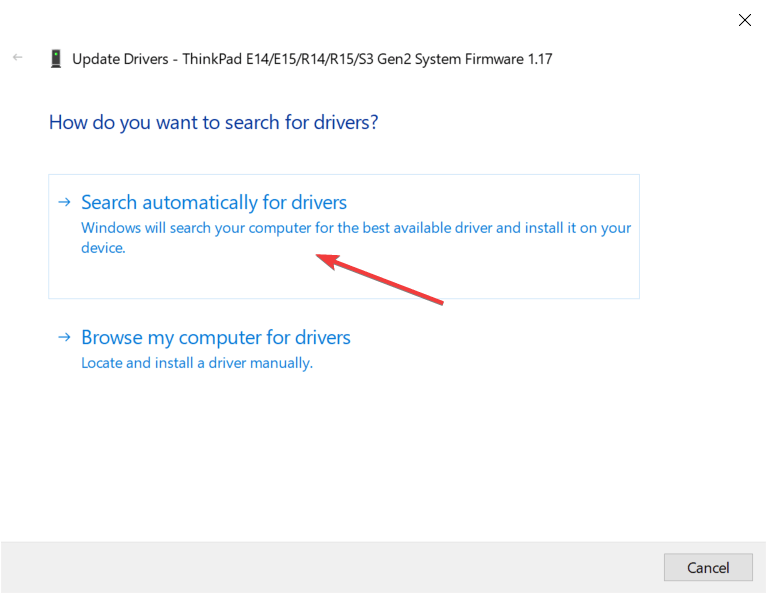
- Click on Update driver by opening the Driver menu.
- In the windows, select Search automatically for driver options.
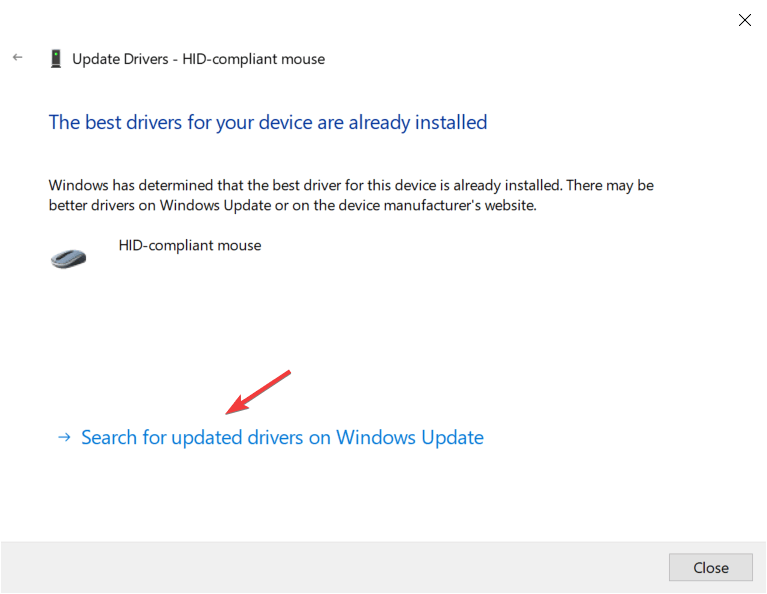
- The system will install if there are any new updates for your drivers, and then you have to restart the PC to see the changes.
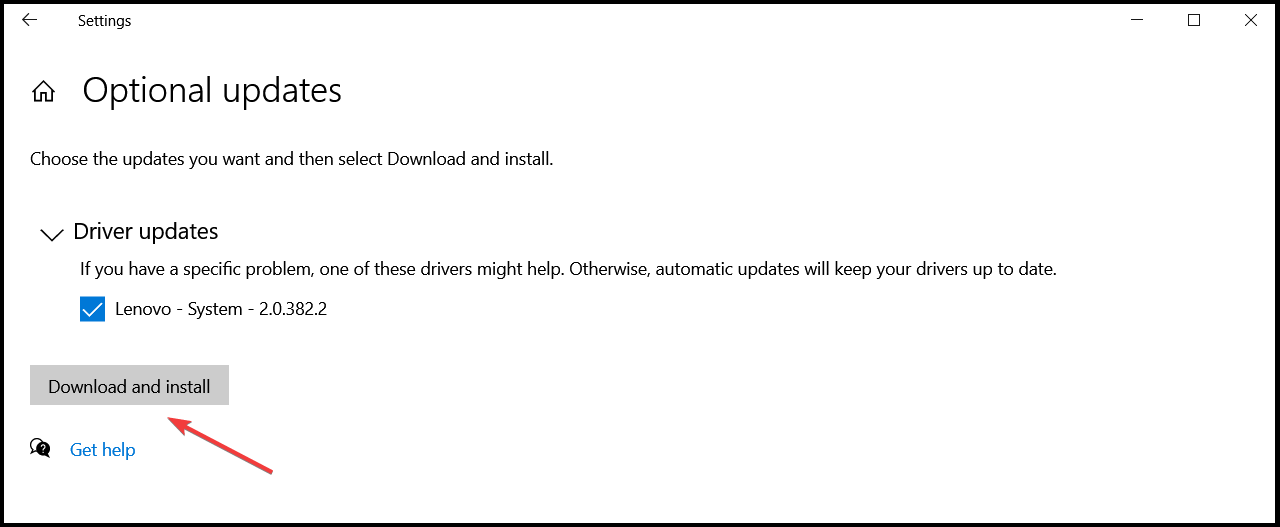
- If you get any message like you already have the best drivers, then you have to click on the search for updated drivers on Windows updates.
- A windows Update section will be opened. Then select View Optional Updates.

- Now, click on the driver updates, and look for mouse driver.
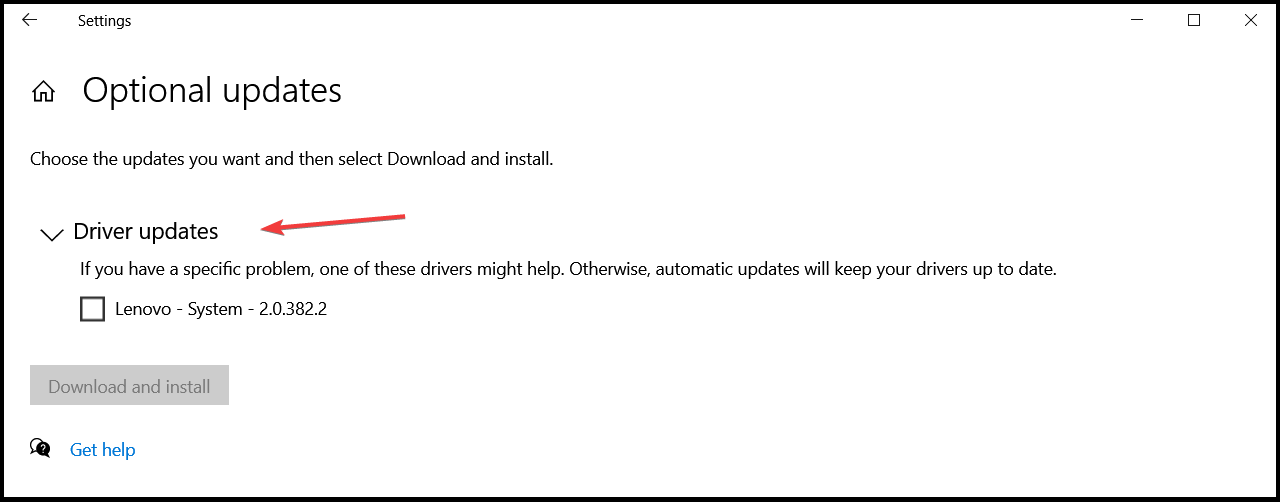
- If you get a mouse driver, check the box on the left; after that, click on the Download and install button.
Many users said that the issue is fixed by installing the official driver of the mouse, but in some cases, Windows (10/11) automatically installs the default version of the mouse driver.
If you are using a branded mouse, you should download the latest drivers from the manufacturer’s website of your mouse model. Or else, you can update the Microsoft mouse drivers automatically with the automatic Driver Updater tool.
Get Driver Updater to Update Driver Automatically
Solution 2 – Disable Mouse Trails
In this solution, you have to disable mouse trails on your PC. To fix the trails, follow the given below instructions:
- First, press the Windows + R button
- Now, type main.cpl and press Enter. A Mouse Options will get opened.
- Then, Move to Pointer Options.
- A Visibility section will be seen. Uncheck the box Display pointer trails
- Click Apply and OK to save all the changes.
Now, restart you’re Windows PC. After that, it will disable mouse pointer trails and check if the Windows 11 stuttering problem is fixed.
Solution 3 – Disable and Enable Windows Scroll Inactive option
Here try to enable and then disable the Windows Scroll Inactive option. Follow the Instruction for Windows 11 PC:
- First, click on the Win key + X key together.
- Now, click on Settings.
- Select Bluetooth and devices.
- Then, select the Mouse option.
- Now, drag on and off the Scroll inactive windows when hovering over them option for few times.
After that, check mouse keeps stuttering issue on Windows 11 is fixed or not.
Solution 4 – Set Touchpad Sensitivity
You can also set the sensitivity of the touchpad to fix touchpad lagging Windows 11. But this solution is not applicable to desktop users.
If you are using Windows 11 on your laptop and facing extreme mouse lag on Windows 11 then try the steps given:
- First, on the Windows Start button
- Now click on the Settings option

- Then, click on the Bluetooth and devices option.

- Under the Gestures and interaction section
- Move the Cursor speed slider to change the sensitivity of the mouse
Solution 5 – Reconnect your Bluetooth Mouse
This solution is for you if you use a Bluetooth mouse on your Windows 11 PC. First, you have to remove the mouse and then reconnect it back,
To do so, follow the instruction below:
- Press Windows+I
- Move to Bluetooth & Devices, which is on the left side.
- Here you will see all the devices connected. Then click on the three-bar menu of the mouse, and then click on remove device.
- Now click on Yes to remove. Then this will remove the Bluetooth device from the system.
- Once the mouse is removed, click on Add device on the right side to add a Bluetooth mouse again.
- After adding the Bluetooth device, you have to click on the Bluetooth device and re-add it to your PC.
- Now, wait till the device gets connected and then press Done.
After reconnecting your Bluetooth mouse, check whether the mouse lagging Windows 11 is fixed or not.
Solution 6 – Reinstall Mouse Drivers
Try to uninstall and reinstall mouse drivers to fix Windows 11 mouse lag issue. Reinstalling of Mouse driver can fix any type of Mouse related issue. Follow the given below instruction to uninstall and reinstall mouse drivers:
- Press Windows + R.
- On the Run command, type devmgmt.msc and press Enter.
- After the Device Manager opens, expand Mice and other pointing devices” section.

- On the mouth device, right-click on Uninstall Device.
- Then click on Yes to uninstall the mouse driver.
After completing the process restart your PC.
Solution 7 – Disable Fast Startup
You can disable the Startup feature if your mouse lagging and stuttering Windows 11. This Startup feature is very useful. To fix this problem, you have to follow the below-given instructions:
- Click on the Windows + S key together
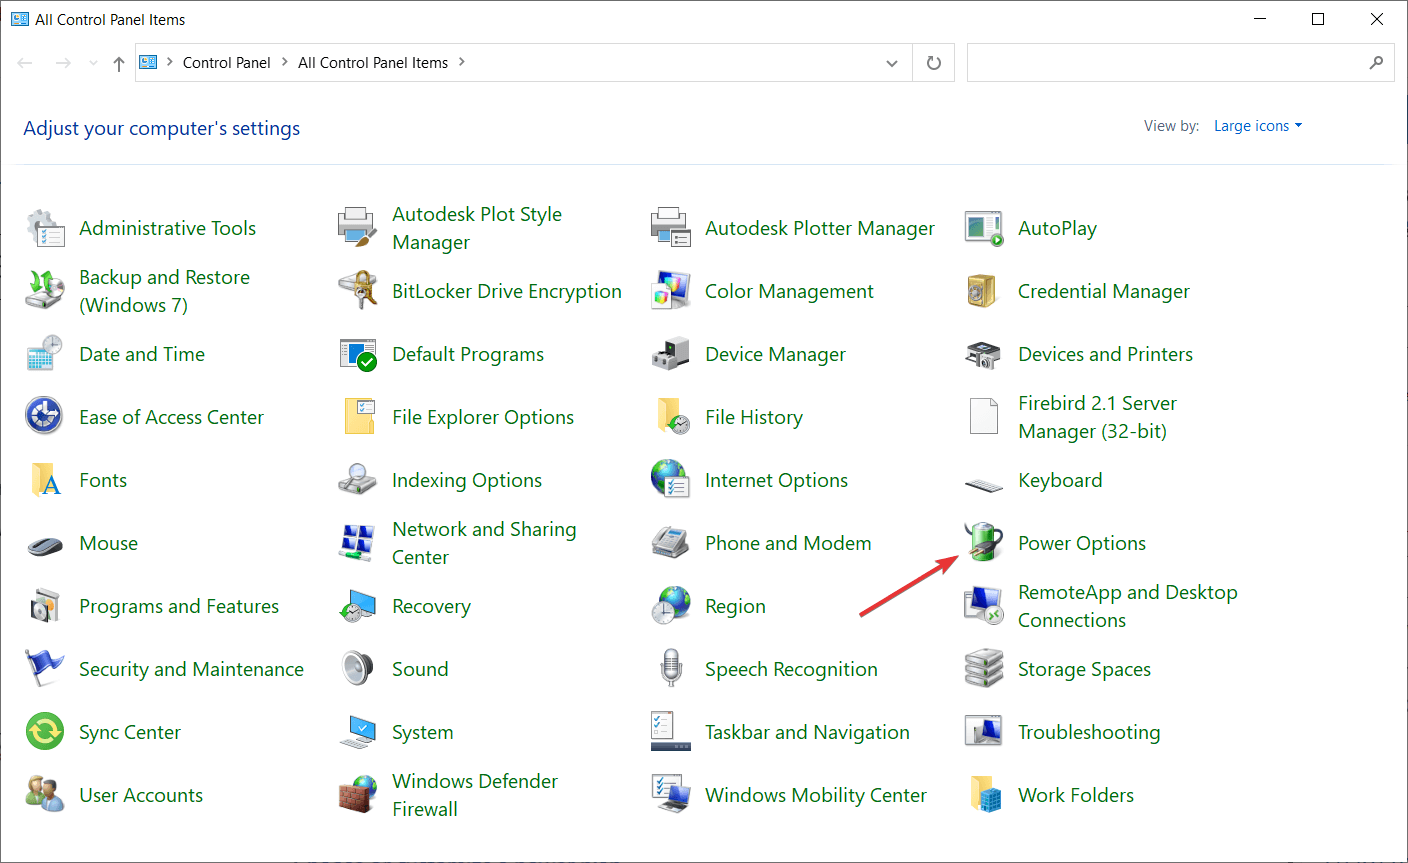
- In the search box, type control panel, and then a list will appear; now select Control Panel.
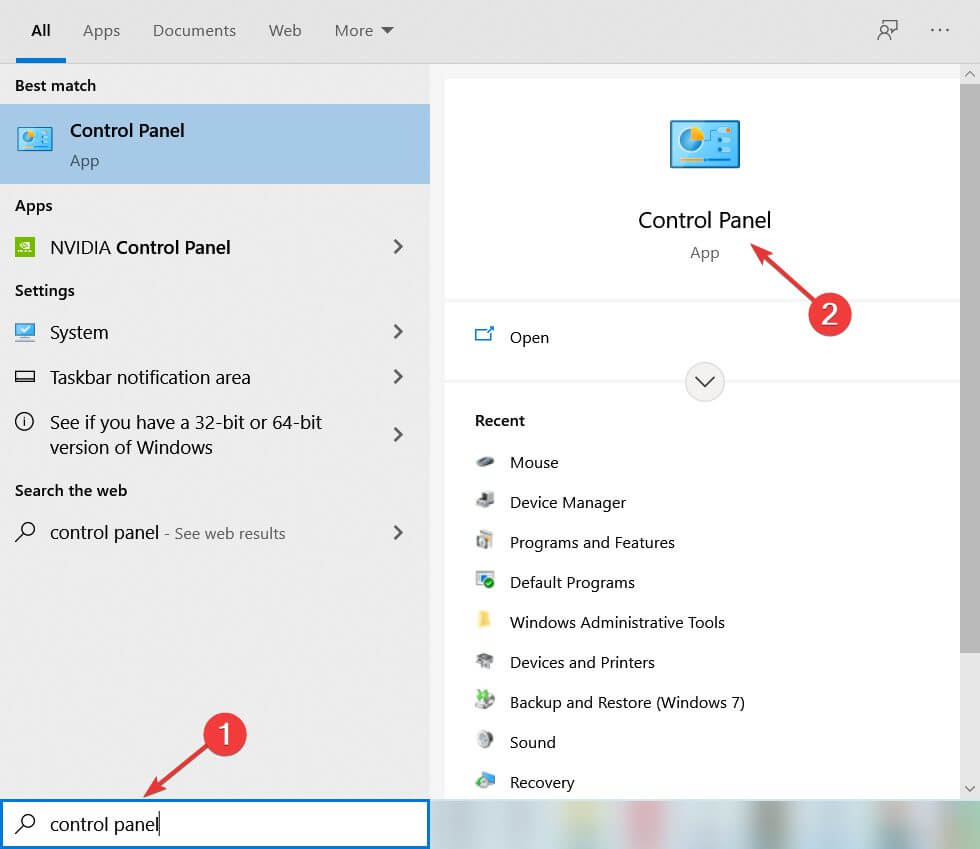
- Now select Power Options.
- Then click on Choose what the power button does.
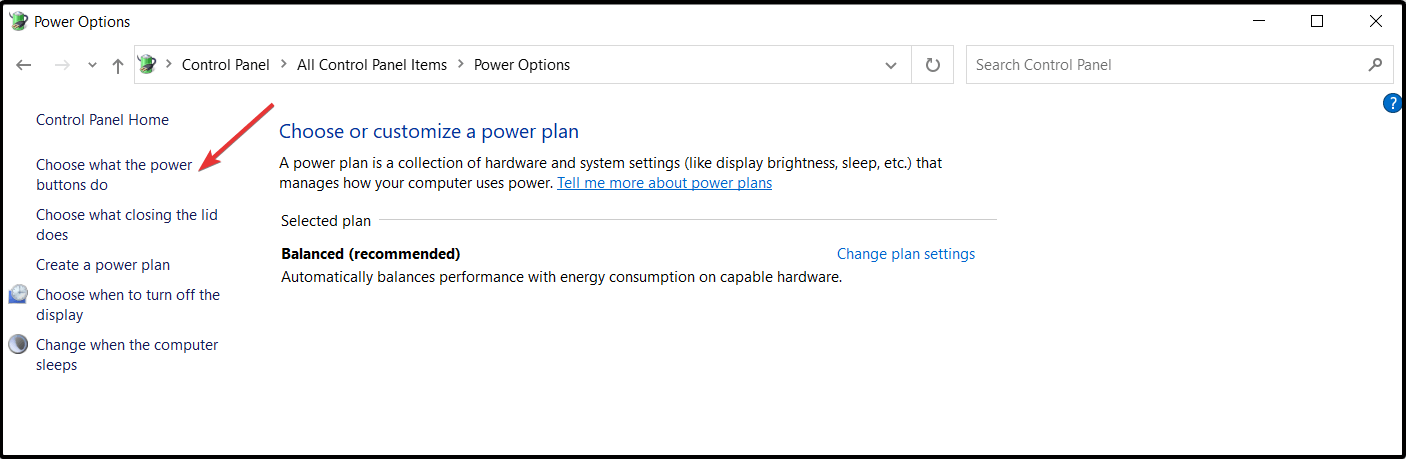
- Click on Change settings that are currently unavailable.
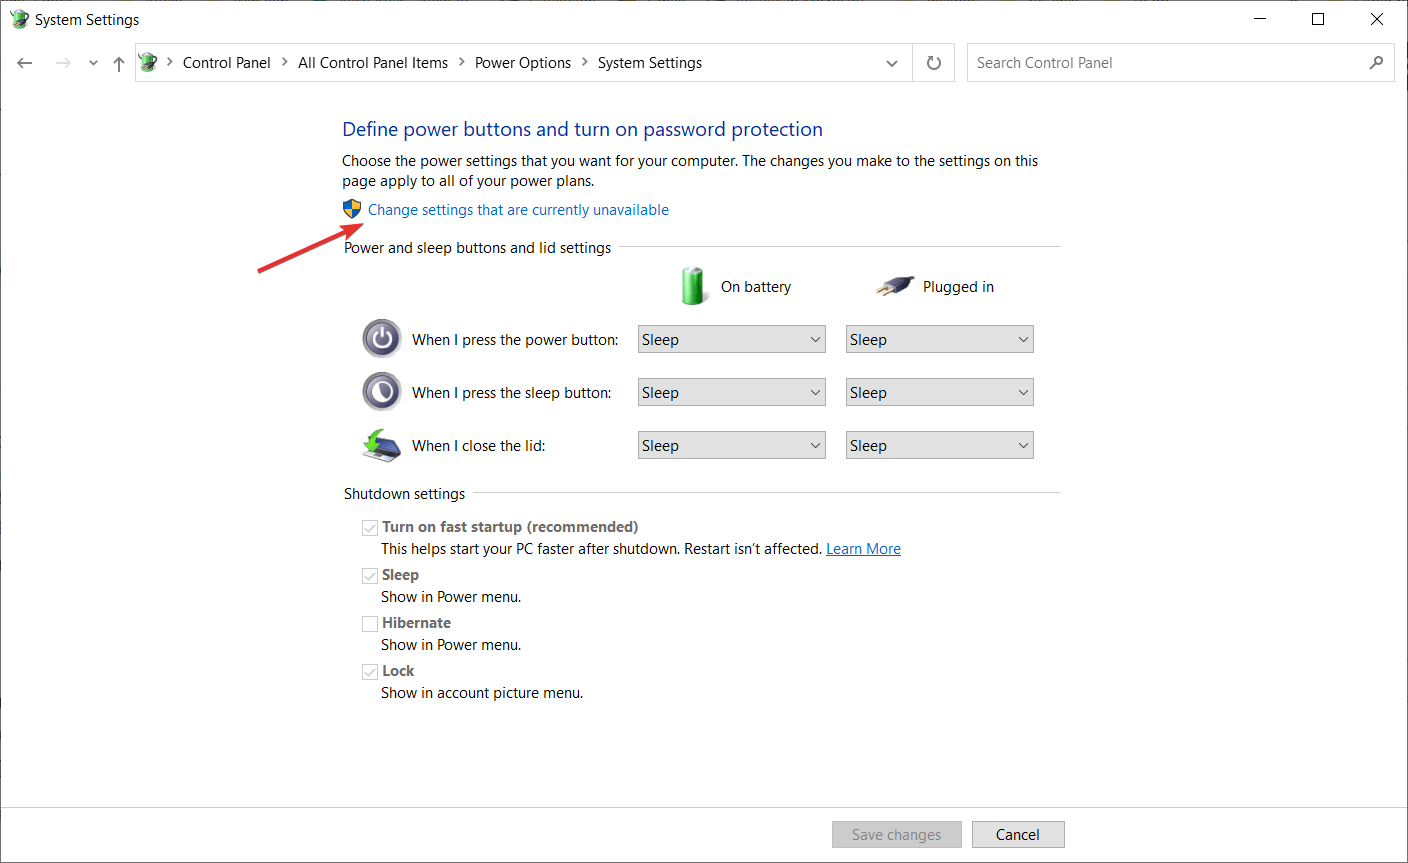
- Now, unclick the Turn on fast startup (recommended)
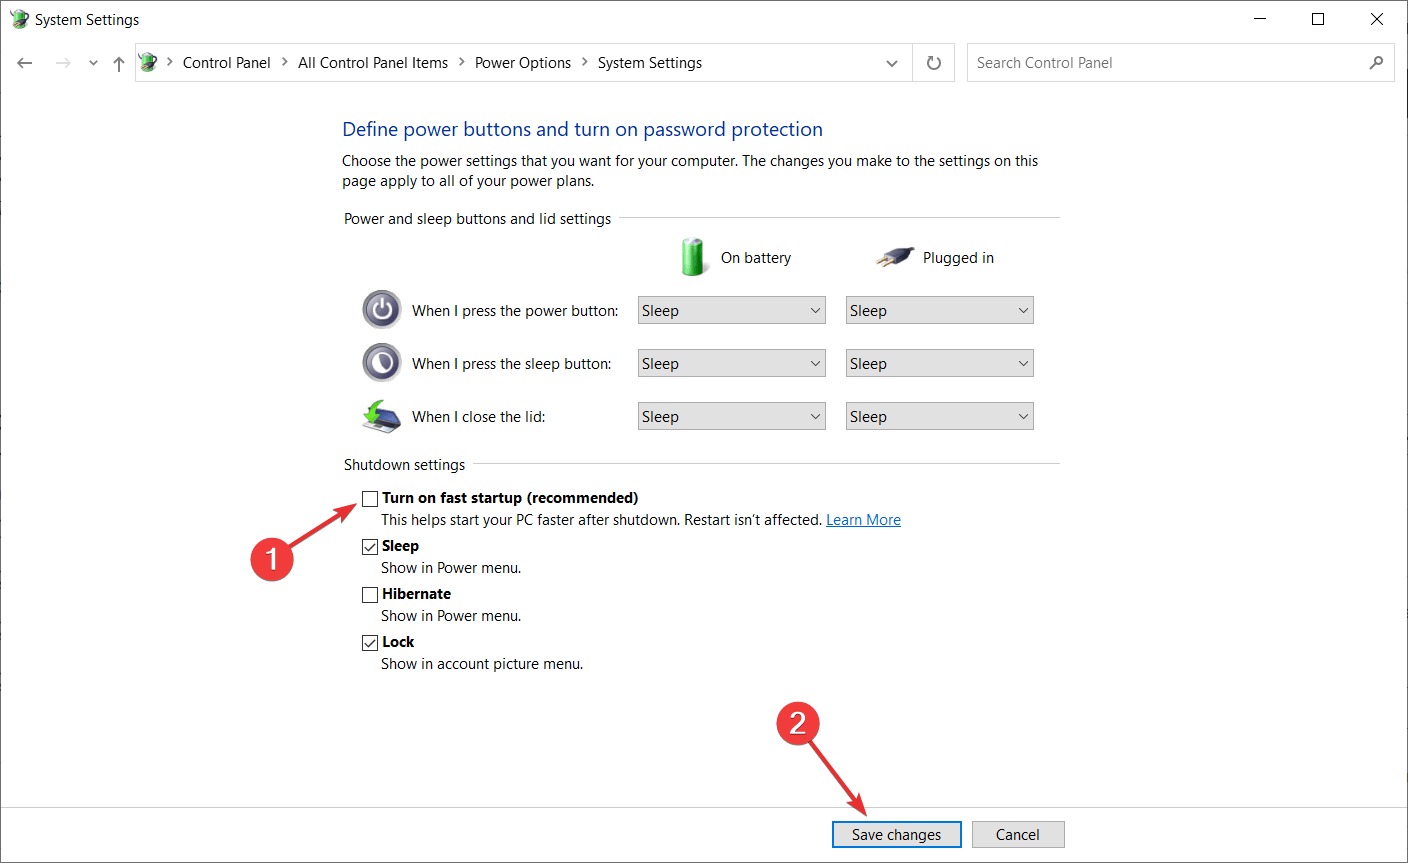
- After that, click on the Save button to save all the changes.
After completing the process, you can now use Mouse without any problem.
Solution 8 – Connect your Mouse Receiver to a USB 2.0 Port
The Mouse lagging and stuttering in Windows 11 issue can also happen with a wireless mouse. You can connect your mouse receiver to a USB 2.0 port to fix this problem.
Several users reported that after using this solution, they were able to get rid of the problem.
Solution 9 – Disable Adaptive Sync Settings
If your monitor supports NVIDIA Adaptive-Sync (Free sync), you can face Mouse freezes Windows 11 problems.
And to fix this problem, try disabling it. Follow the instruction given below:
- Click on the Windows icon and write “NVIDIA Control Panel”.
- In the search results, click on NVIDIA Control Panel.
- Under the Display Section, Look for Set up G-Sync.
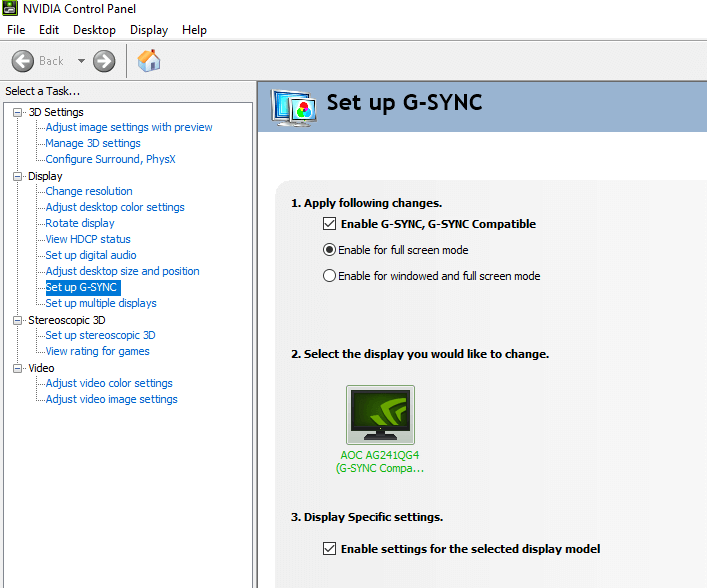
- Now, uncheck the box “Enable G-Sync, G-Sync Compatible” option.
- Close the NVIDIA Control Panel. And this will stop the mouse lagging and skipping problem.
If you cannot open the NVIDIA Control Panel on your PC, you can also read our step-by-step guide on – How to fix NVIDIA Control Panel not showing a problem?
Solution 10 – Change the Clickpad Settings
Try changing your Clickpad settings if you can still not use the mouse properly on Windows 10.
To do so, follow the given below instructions.
- Open Control Panel and move to the Mouse section.
- Navigate to Mouse Section > Clickpad Settings.
- Click on Advanced > select smart sense and set the Filter to 0.
Your problem will be resolved after following the above instructions.
Solution 11 – Decrease the Pooling Rate
If the mouse has a pooling rate above 500Hz, the mouse will lag while operating. Well, there are many tools available online that help you to decrease the pooling rate.
Moreover, you can use the Mouse Rate Checker tool to check the mouse pooling rate and solve the mouse lagging Windows 11 problem.
Follow these steps to check the mouse pooling rate –
- First, Extract the “mouserate” zip.
- Double click on the tool mouserate to run it.
- Now, Move your mouse to the box that says Move your mouse!
- In the average Box, check the average pooling rate and then click on OK.
- Then close the Mouse Rate Checker tool.
- Next, click on OK.
Now, close the Mouse Rate Checker tool.
If the average pooling rate is above 500, it must be reduced manually using a utility tool provided by the mouse manufacturer. You must opt for the pooling rate under 500 Hz to fix the Windows 11 mouse lag bug.
Solution 12 – Rollback Your Mouse Drivers to fix Mouse Lagging Problem
Try to roll back your mouse drivers, as this worked for users to get rid of the mouse problem. Once you roll back to its previous state, your issue will be resolved. Follow the below steps to roll back your drivers:
- First, click on the Windows + X Key together.
- Then select Device Manager from the list that appears.
- Find your mouse driver and then double-click on it.
- Now, click on the Driver tab.
- Then click on the Roll Back Driver button.

(Note: If your role back driver button is greyed out, then this solution does not apply to you)
After finishing the process, check whether mouse lagging Windows 11 is fixed or not.
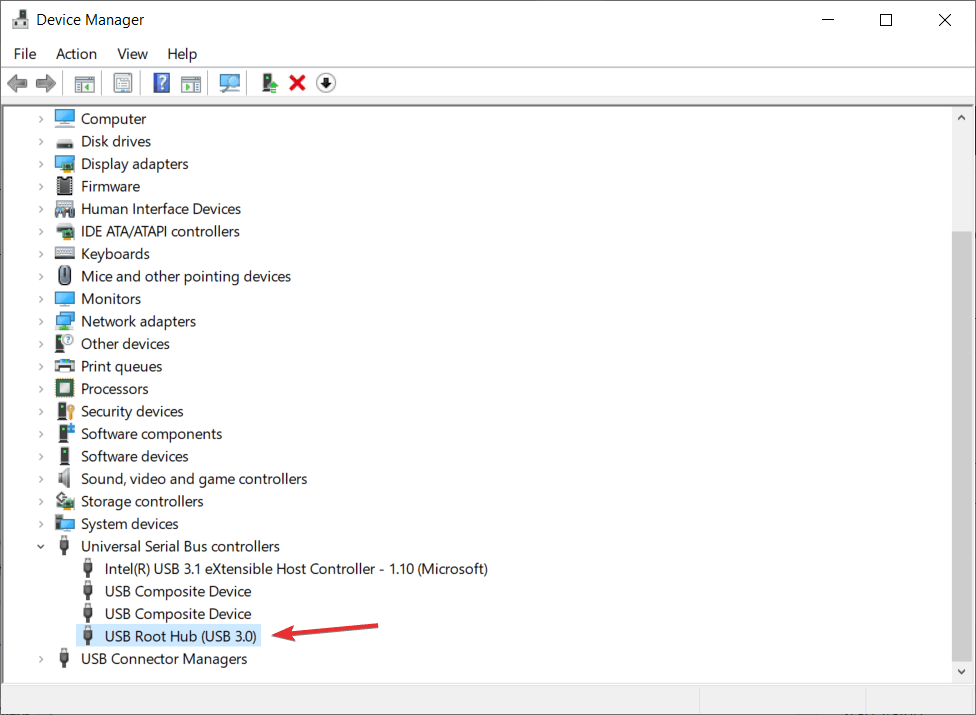
Solution 13 – Make Changes in the USB Hub Power Management Options
Changes in the power management option might work for you to fix mouse stuttering Windows 11 issues. Follow the below-given instructions:
- First click on the Windows Start button
- A list will appear; select the Device Manager from the list.
- Click the USB Hub device to open the properties
- Click on the power management option.
- Now, Uncheck the “Allow the computer to turn off this device to save power” option.
- And click on OK to save all the changes.
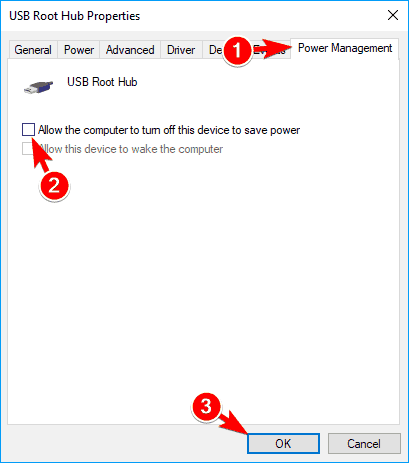
After saving the changes, you are now able to fix the problems. But, remember you have to follow the instructions given for all USB Hub devices on your PC. And the mouse-related bugs on Windows 11 are fixed.
FAQ Related to Mouse lagging, Freezing Windows 11 Problem
1: Why is My Wireless Mouse so Laggy?
The main reason responsible for the Wireless mouse lagging problem is the connection issues that usually occur when there is a long distance between mouse and the Bluetooth receiver, Bluetooth or WIFI interference.
2: Why is my touchpad lagging on Windows 11?
The Touchpad lagging problem usually occur when the operating system lags or stop responding. Despite this, the outdated drivers or some defective hardware can also cause the touchpad lagging Windows 11 problem.
3: Why does my Mouse keep Freezing Windows 11?
The corrupted mouse driver is most likely to cause mouse freezing or lagging problem. Despite this, tangled cables and the USB port or cables issues, loose cables, corrupted Windows system files, and low batteries can also result in mouse freezing problems on Windows 11.
Fix Common Windows Errors & Improve PC Performance
Scanning your system with the professional and multifunctional PC Repair Tool is suggested to fix various Windows issues and errors. This advanced tool scans your computer, detects issues, and solves them automatically.
It fixes common PC errors and bugs like preventing file loss, protecting your system from viruses and malware, repairing corrupted system files, repairing registry entries, and much more.
So, download and install the tool to quickly fix typical Windows problems and optimize the PC performance.
Get PC Repair Tool to Make Your Windows PC Error-Free
Conclusion
This article will teach you how to troubleshoot Mouse lagging and stuttering Windows 11.
The solutions listed are the most effective and work for many users to solve Windows 11 mouse freezing issues. Follow all the solutions one by one until you eliminate this problem.
I hope you find the article helpful and that it managed to circumvent mouse lags, stutter, or freeze issues altogether.
If you have any questions or suggestions regarding this article, you can share them with us on our Facebook page.
Good Luck..!
Hardeep has always been a Windows lover ever since she got her hands on her first Windows XP PC. She has always been enthusiastic about technological stuff, especially Artificial Intelligence (AI) computing. Before joining PC Error Fix, she worked as a freelancer and worked on numerous technical projects.
Многие пользователи ПК и ноутбуков сталкиваются с тем, что указатель мыши «тормозит» — двигается рывками или замирает в определенные моменты, что мешает удобной работе с компьютером. Причины такого поведения могут отличаться, но обычно проблема решаема.
В этой инструкции о том, что делать, если тормозит мышь в Windows 11 или Windows 10, чем это может быть вызвано и дополнительная информация, которая может быть полезной.
Активность USB-контроллера
Первая из возможных причин — работа других устройств на том же USB-контроллере, к которому подключена мышь или её приёмник. Подробнее по пунктам:
- На ПК/ноутбуках обычно присутствует несколько USB-контроллеров, увидеть их можно в соответствующем разделе диспетчера устройств.
- Каждый контроллер обычно обслуживает несколько USB-разъемов.
- Если мышь и другое USB-устройство подключены к одному контроллеру, при этом ведется активный обмен данными с USB-устройством, указатель мыши может начать двигаться рывками.
- То же самое актуально для случая подключения мыши к USB-хабу (в том числе на мониторе) или какому-либо переходнику: если к нему же подключены другие устройства, это может влиять на работу мыши.
Распространенным симптомом для этой причины является усугубление проблем с лагами мыши при работе с другими USB-устройствами: накопителями, внешними звуковыми картами или микрофонами, веб-камерами.
Решение для этой ситуации — подключение мыши (или её приемника) к другому разъему USB:
- В случае ПК — к отдельной, не используемой другими устройствами, группе разъемов. На многих материнских платах производителем предполагается, что мышь и клавиатура будут подключены к верхним разъемам.
- Если у вас ноутбук, можно попробовать подключение на другой стороне корпуса или к порту с другой версией USB.
- Во всех случаях рекомендую использовать прямое подключение, без каких-либо адаптеров.
Проблемы радиосигнала
Для беспроводных мышек, работающих по радиоканалу, приемник которых подключается к USB-разъему, «тормоза», помимо описанной выше причины, могут быть вызваны слабой мощностью сигнала и помехами на его пути.
Например, когда грузный металлический системный блок расположен под столом, примыкающим к железобетонной стене, а приёмник мыши подключен к его задней панели, это может приводить к неуверенному соединению мыши с приёмником.
Если же поставить на системный блок Wi-Fi роутер, проблема может усугубиться: мышь и роутер могут использовать пересекающиеся частоты. Потенциально, на частоте 2.4 ГГц могут одновременно несколько различных устройств, не мешая друг другу, но у некоторых пользователей проблемы с мышью бывают вызваны именно этим.
Решение: попробовать другие варианты подключения и расположение приемника мыши, исключить наличие помех.
Энергосбережение
В случае беспроводной или Bluetooth мыши причиной замирания указателя мыши, особенно после некоторого периода неиспользования могут быть параметры энергосбережения. Возможные действия для решения проблемы:
- Откройте диспетчер устройств, в Windows 11 и Windows 10 для этого можно нажать правой кнопкой мыши по кнопке «Пуск» и выбрать нужный пункт контекстного меню.
- Откройте свойства вашей мыши в разделе «Bluetooth», «Мыши и иные указывающие устройства» или «Устройства HID».
- Проверьте наличие вкладки «Энергосбережение» и отметки «Разрешить отключение этого устройства для экономии энергии». При наличии — снимите отметку и примените настройки.

- Для Bluetooth мыши выполните то же самое для Bluetooth-адаптера.
- Для беспроводной мыши, приемник которой подключается по USB, может помочь отключение экономии энергии для USB-контроллера.


В случае появления проблемы с мышью на ноутбуке, проверьте, меняется ли ситуация, если переключить схему электропитания на «Максимальная производительность».
Некоторые мыши могут иметь собственные, не зависящие от настроек системы, функции энергосбережения и «засыпать» после некоторого периода неиспользования.
Высокая нагрузка на процессор
Ещё одна возможная причина того, что мышь тормозит — загруженный процессор: например, при задачах рендеринга, архивации, установке обновлений. Проблема в большей степени актуальна для старых версий ОС, но изредка может наблюдаться и на Windows 11/10, особенно когда нагрузка вызвана неправильной работой драйверов и пунктом «Системные прерывания», подробнее об этом — в этой статье.

В некоторых случаях высокая нагрузка на процессор может быть вызвана наличием вредоносных программ, майнеров на компьютере: если вы подозреваете что-то подобное, имеет смысл проверить компьютер на наличие соответствующих угроз.
Аппаратные проблемы
В некоторых случаях причиной происходящего могут быть те или иные аппаратные проблемы, среди которых:
- Повреждение кабеля проводной мыши.
- Загрязненный сенсор мыши, работа на стеклянной или другой отражающей поверхности.
- Севшая батарейка/аккумулятор мыши.
- Статика на корпусе ПК, отсутствие заземления.
- Иногда к остановке указателя мыши могут приводить аппаратные проблемы других устройств: например, неисправность какого-либо другого USB-устройства, жесткого диска может приводить к тому, что Windows «зависает» на какое-то время в попытке обратиться к устройству.
В завершение — несколько дополнительных вариантов, которые могут оказаться полезными при решении проблемы:
- Если вы каким-либо образом настраивали чувствительность и другие параметры мыши, и лишь после этого возникли рассматриваемые проблемы, попробуйте вернуть настройки на значения по умолчанию.
- Проверьте частоту обновления монитора в дополнительных параметрах экрана: эффект задержек при движении указателя мыши может быть вызван сниженной частотой обновления.
- Если проблема возникла недавно, и вы предполагаете, что причина — в системе, попробуйте использовать точки восстановления системы на дату, когда проблема не наблюдалась.
Возможно, вам есть что добавить к списку? Буду рад вашему комментарию к статье.
Is your Mouse Pointer Moving Slow, Freezing or Lagging in Windows PC. Here are the Best Methods to Fix Mouse Cursor Stuttering on Windows 11 PC.
A mouse is a crucial part of any computer, and the ones running on Windows 11 are no exceptions. Unlike Linux, the mouse on Windows 11 lets you do a bunch of tasks by simply hovering the mouse and clicking the buttons. Whether photo or video editing or scrolling through the internet, a mouse is indispensable. So what would you do if the mouse cursor is stuttering on Windows 11 PV? I know it is a big hurdle, and here are some of the troubleshooting methods you should use to fix cursor freezing or moving slow.
1. Clean the mouse
Unless keeping hardware clean is something you pay a lot of attention to, the majority of people tend to keep the mouse dirty. With months of continuous usage, there’s no doubt dirt and dust collected can cause a mouse to stop working. Perhaps, cleaning the mouse and the mouse pad can resolve the problem. Proceed to the following method.
2. Change the USB port
This method is pretty basic. Since you are struggling with a mouse freezing issue on your computer whilst using one USB port, try using another USB port. In case if the mouse starts working properly, the first port has gone rogue. If not and the mouse is still behaving abnormally, find out other methods listed here that might be able to help you.
3. Update mouse driver
This seems logical since a driver aids in providing communication between the OS and the hardware component, i.e., mouse, in this case. Outdated drivers can put you off rails. Although Windows usually updates drivers automatically, there’s a possibility that either the system ignored a driver update or you denied updating the OS for XYZ reasons. Here’s how you can update the mouse driver.
4. Reconnect
Be it a wired mouse or a Bluetooth tethered mouse; temporary glitches can trigger mouse freezes issue. A simple reconnect should be able to help.
The process for a wired mouse is pretty simple. You just have to remove the USB cable and wait for a few minutes before reconnecting.
For Bluetooth mouses, you will have to disconnect them from the device. Here’s how it goes.
- First up, go to Settings via Windows + I on the keyboard.
- Click Bluetooth & devices.

- Check out the mouse connected to the system on the topmost section.
- Tap on the three-dotted menu and select “Remove Device”.
- Confirm the actions by selecting “Yes”.

- Now that you have disconnected the mouse, it’s time to reconnect. Go to Bluetooth & devices and select “Add device”.
- You should be able to locate your mouse and add it for use. Tap on “Done” to confirm pairing.
5. Change Touchpad Sensitivity
Do you know that you can fix mouse lag issues on Windows 11 by altering the sensitivity of the mouse? Here’s how you can do it.
6. Resort to Default Settings
We usually change settings on everything we use on a computer to suit our needs. However, changing settings can introduce issues, and mouse freezing is one of the many.
- First up, go to Settings on your PC and navigate to Bluetooth & Devices.
- Proceed to “Mouse” and scroll to find “Additional mouse settings”.
- Navigate to “Pointers” and tap on “Use Default”.

This will reset all the settings you have related to the mouse and should fix the mouse freezes issue on Windows 11 in case this was because of incorrect or faulty settings for some reason.
7. Check out USB Root Hub
It’s quite possible that the power management system on your laptop running Windows 11 is actually preventing peripherals from running to save power. It happens with USB devices, and your mouse is tethered to the PC using USB; check if toggling the option makes any difference.
Conclusion
The mouse pointer or cursor has a handy function if your cursor is lagging, moving slow, or freezing, then above are some of the best troubleshooting methods that you can deploy to fix mouse cursor stuttering on the Windows 11 problem.
If you’ve any thoughts on How to Fix Mouse Pointer or Cursor Freezes on Windows 11?, then feel free to drop in below comment box. Also, please subscribe to our DigitBin YouTube channel for videos tutorials. Cheers!