
Desktop virtualization is a straightforward concept — a desktop is hosted in one place and a user interacts with it from another — but administrators should understand the many ways to deploy this technology.
Different use cases can demand different types of desktop virtualization, specific approaches to hosting, and certain licensed software to manage and deploy these environments. For example, Microsoft Hyper-V can do everything from hosting a few virtual machines — also known as VMs — to test new updates, to delivering fully-fledged Windows desktops to end users.
IT administrators should learn how Hyper-V fits into the bigger picture of virtualization technologies so they can make the most of this versatile technology.
Understanding different types of virtualization
There are many types of virtualization, and as an administrator, you can deploy these in different use cases for your end users. For example, VDI runs VMs on a central server in a data center. From there, you can deliver these highly customizable machines as virtual desktops. Cloud-based virtual desktops operate as a fully managed service that you can subscribe to for fully functioning virtual desktops and applications.
The type of virtualization that you choose should function around the business requirements:
|
Business requirement |
Virtualization type |
|
Full desktop |
VDI or DaaS |
|
Applications only |
Application virtualization |
|
Cost effective |
RDS or session-based virtualization |
|
Offline VMs |
Client hypervisors |
What is Hyper-V?
Hyper-V is a built-in virtualization platform in Windows 11, available in Pro, Enterprise, and Education edition, which allows you to create and run VMs on your computer. A VM is like a separate computer running inside your actual computer, with its own operating system and settings.
Hyper-V is a type-1 hypervisor and runs directly on the hardware, also known as a bare-metal hypervisor — rather than on top of an existing OS — which is type-2 hypervisors. It creates isolated environments that function like separate computers. The VMs share system resources such as CPU, memory, storage and networking, but remain independent from one another.
Architecture of Hyper-V
Hyper-V’s architecture is designed to provide efficient virtualization, isolation, and resource management while maintaining high performance and security. It is made up of several key components:
|
Component |
Description |
|
Hypervisor |
Directly manages hardware resources and VM execution. |
|
Root partition or parent VM |
Hosts the Windows OS, manages hardware access, and provides virtualization services. |
|
Child Partitions or guest VMs |
Isolated virtual machines that rely on the root partition for hardware access. |
|
Virtualization service provider (VSP) |
Provides hardware resources from the root partition to child partitions. |
|
Virtualization service client (VSC) |
Runs in guest VMs, requesting resources from VSP. |
|
VMBus |
High-speed communication channel between VMs and the root partition. |
|
Virtual switch |
Manages networking for virtual machines. |
|
Virtual hard disks (VHD/VHDX) |
Storage options for VMs, supporting dynamic resizing and snapshotting. |
Learning the components of Hyper-V
The following are the key components of Hyper-V:
- VMs. The isolated environments where you install different OSes.
- Hyper-V manager. A graphical interface to create and manage VMs.
- Hyper-V virtual switch. A software-defined networking component for VM connectivity.
- Checkpoints. Save the state of a VM for easy rollback. Checkpoints are also known as snapshots.
- Dynamic memory. Automatically adjusts RAM allocation for VMs.
Hyper-V manager
VM Management allows you to create, configure, and manage multiple VMs on a single physical system. Windows, Linux and other OSes are supported as guest VMs. You can use Hyper-V Manager — the GUI — or PowerShell for automation and scripting. There are tools to monitor the health and performance of VMs, including CPU and memory usage and uptime.
Hyper-V virtual switch
This component enables networking between the host system and external networks. There are three types of virtual switches:
- External. Connects VMs to the internet or LAN.
- Internal. Allows communication between the host and VMs.
- Private. Isolated network between VMs only.
Checkpoints
Taking a snapshot of a VM’s current state allows you to revert to this state if you need to roll back changes. Snapshot functionality also enables you to test updates or software configurations.
Dynamic memory allocation
RAM usage is automatically adjusted by Hyper-V for VMs, based on workload demands. Memory is optimized, and overall system efficiency is improved.
Other notable Hyper-V features
- Hyper-V replica. This disaster recovery feature replicates a VM to another system for failover and disaster recovery. It supports asynchronous replication between primary and secondary servers.
- Virtual hard disks. Hyper-V supports VHDX files up to 64 TB in size. These disks have built-in protection against corruption.
- Enhanced session mode (ESM). VMs can use the host’s local resources through the ESM. This lets Hyper-V connect to the virtual machines using RDP, allowing seamless clipboard, file sharing and display scaling between the host and VM. It also supports audio redirection and high-resolution displays.
How to enable Hyper-V on Windows 11
To enable Hyper-V, follow this simple process.
- Open Settings > Apps > Optional Features > More Windows Features.
- Check Hyper-V and click OK.
- Restart your PC when prompted.
Once enabled, you can open Hyper-V Manager to start creating virtual machines.
Why would IT need to use Hyper-V?
There are numerous use cases for Hyper-V in the enterprise, and you should learn each of them to make the most of this flexible virtualization technology.
Testing and development lab
One of the biggest reasons to use Hyper-V is to create isolated test lab environments for software developers. Software development and testing will not impact production, and developers can create isolated environments to test applications, updates, or system changes without affecting their main system. Hyper-V supports running multiple OS versions for cross-platform compatibility testing.
Secure and isolated environment
Although all devices should have a supported and up-to-date OS, realistically, businesses still need to run legacy software that does not run on modern OSes. Hyper-V allows you to run legacy applications securely in a VM and in a controlled environment without affecting the host OS. This is particularly useful for IT professionals managing legacy systems in corporate environments.
Hyper-V allows you to run legacy applications securely in a VM and in a controlled environment without affecting the host OS.
Administrators can also use Hyper-V to create a private cloud for on-demand deployments of IT services.
VDI
Enabling remote working is vital for businesses, and Hyper-V lets administrators deploy virtual desktops for employees while keeping data centralized and secure.
Server consolidation and cost reduction
Computing infrastructure is expensive to build and maintain, and optimizing resources is key to keeping business overheads low. Instead of maintaining multiple physical machines, IT teams can run multiple virtual servers or desktops on a single system. Running multiple virtual servers on a single physical machine reduces hardware costs and the number of underused physical servers while maintaining performance and flexibility.
Disaster Recovery and Business Continuity
Administrators can mitigate critical production VM failure with the disaster recovery functionality, and you can incorporate Hyper-V into your business continuity plan. VM failover and restoration of VM snapshots are quick, providing a short Recovery Time Objective and Recovery Point Objective — also known as RTO and RPO.
Cloud integration
Extending your on-premises infrastructure to the cloud also helps keep business costs down as you need less computing power at your premises.
Helen Searle-Jones holds a group head of IT position in the manufacturing sector. She draws on 30 years of experience in enterprise and end-user computing, utilizing cloud and on-premise technologies to enhance IT performance.
Microsoft выпустила Windows 11 Insider Preview — публичную тестовую версию своей новой операционной системы, которая уже успела собрать массу различных отзывов. Если есть желание попробовать самое масштабное за последние годы обновление самостоятельно, лучший способ сделать это — использовать Hyper-V. Речь про особенную дополнительную функцию Windows, которая даёт возможность попробовать сборку Windows для разработчиков, различные дистрибутивы Linux и так далее. Windows 11 Insider Preview можно также свободно установить через Windows 10 с помощью Hyper-V.
- В тему: Всё о Windows 11 — секреты, инструкции, лайфхаки и полезные статьи
Для чего нужен Hyper-V, и безопасна ли технология
Hyper-V представляет собой виртуальную среду для установки дополнительной операционной системы. При использовании данной возможности могут полноценно задействоваться все физические ресурсы компьютера. Hyper-V отличается максимальной безопасностью для основной системы, поэтому функцию есть смысл использовать для тестирования неизвестного софта и не только. Hyper-V запускается из-под Windows, поэтому установка Windows 11 Insider Preview с помощью данной фичи исключает необходимость использования двойной загрузки и других не самых удобных штук. Сравнивать особенности Windows 10 и Windows 11 вместе с Hyper-V также получится буквально параллельно.
Как проверить наличие Hyper-V или установить компонент
Проверяем наличие Hyper-V
Для начала нужно убедиться, что компоненты Hyper-V установлены на текущий компьютер. Для этого достаточно написать «Hyper-V» в поисковой строке. Если никакого релевантного данному запросу результата нет, сначала функцию в операционную систему придётся добавить. Если есть, данный пункт статьи можно пропустить.
Устанавливаем Hyper-V
Шаг 1. Откройте меню «Пуск».
Шаг 2. Запустите «Панель управления».
Шаг 3. Перейдите в раздел «Программы».
Шаг 4. Разверните меню «Включение или отключение компонентов Windows».
Шаг 5. Найдите каталог Hyper-V и переведите в активное положение переключатели напротив двух подкаталогов:
- «Платформа Hyper-V» (он включает «Низкоуровневую оболочку Hyper-V» и «Службы Hyper-V»);
- «Средства управления Hyper-V» (он включает «Модуль Hyper-V для Windows PowerShell» и «Средства управления Hyper-V с графическим интерфейсом»).

Шаг 6. Подтвердите инсталляцию с помощью кнопки «ОК».
В ходе установки операционная система Windows будет перезагружена один раз. Убедитесь, что это произошло. Если нет, проведите операцию вручную.
Как установить Windows 11 через Hyper-V в Windows 10
Шаг 1. Загрузите ISO-файл Window 10 (или ISO-файл Window 11, если вы читаете данный материал, когда он уже доступен) по ссылке.
Шаг 2. Запустите приложение Hyper-V Manager через меню «Пуск» (достаточно ввести запрос «Hyper-V» в поисковой строке).
Шаг 3. Нажмите на кнопку «Создать» и выберите вариант «Виртуальная машина».
Шаг 4. Нажмите на кнопку «Далее» и установите имя для виртуальной машины — к примеру, «Тестовая Window 11».
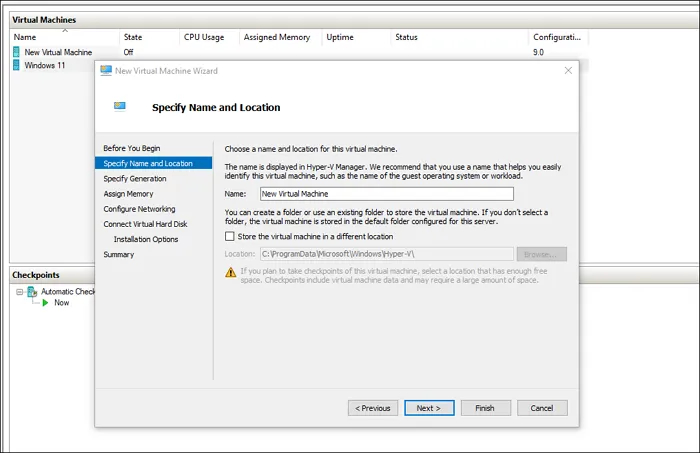
Шаг 5. Если на основном диске недостаточно места, выберите какой-то другой по своему желанию.
Шаг 6. Если используете компьютер с системой на базе UEFI, выберите второе поколение. Если не уверены в этом, остановитесь на первом.
Шаг 7. Определите объём оперативной памяти, который будет использоваться для виртуальной машины. Имейте ввиду, что он должен превышать 4 ГБ.
Шаг 8. Используйте параметры по умолчанию в разделе настройки сети.
Шаг 9. В разделе подключения виртуального жёсткого диска выберите имя для него, а также его местоположение и размер.

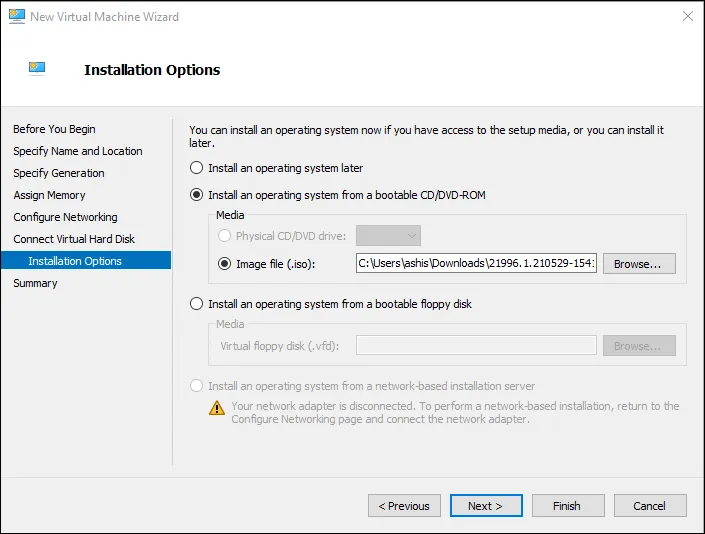
Шаг 10. В параметрах инсталляции операционной системы выберите возможность её установки из загрузочного диска и определите файл ISO, который был загружен на первом шаге этого раздела инструкции.
Шаг 11. Нажмите на кнопку «Далее», чтобы начать установку системы, а потом дождитесь окончания данной операции.
Если использовали готовый образ ISO для Windows 11, можете переходить к следующему разделу данного материала. Если установили систему из файла ISO для Windows 10, потребуется зарегистрироваться в программе тестирования и обновиться до Windows 11.
Шаг 12. Откройте «Параметры».
Шаг 13. Перейдите в раздел «Обновление и безопасность».
Шаг 14. Разверните меню «Программа предварительной оценки Windows».
Шаг 15. Зарегистрируйтесь в тестовой программе, нажав на кнопку «Начать», если ещё не сделали этого, а потом пройдите аутентификацию в своей учётной записи и выберите один из каналов для получения тестовых сборок Windows 11 Insider Preview:
- «Канал Dev» — для профессиональных технических специалистов;
- «Бета-канал» — для большинства обычных пользователей;
- «Канал предварительного выпуска» — для максимально стабильных обновлений системы.
Шаг 16. Проверьте обновление, дождитесь окончания скачивания необходимых файлов и перезагрузки. Если обновление до Windows 11 не появилось, воспользуйтесь этой инструкцией.
Шаг 17. Когда увидите чёрный экран, нажмите на него, чтобы выбрать установку системы из файла ISO.
Шаг 18. Следуйте инструкциям на экране до окончания установки Windows 11 Insider Preview.
Также имейте ввиду, что использование Windows 11, за исключением домашней версии, невозможно без действительной учётной записи Microsoft. Придётся использовать уже имеющуюся или создать новую.
Нюансы использования тестовой Windows 11 через Hyper-V
Использование Hyper-V не требует каких-то специфических знаний, поэтому с ним справится даже достаточно далёкий от современных технологий пользователь. Забегая вперёд, главный вопрос, который связан с данной системой, касается технологии Windows Hello. В остальном всё просто. Для запуска виртуальной машины с тестовой Windows 11 на борту нужно дважды нажать на неё в приложении, а потом установить разрешение для используемого экрана.

Hyper-V предлагает два типа режимов сеансов:
- «Базовый»;
- «Расширенный».
Второй даёт возможность дополнительно использовать локальные ресурсы компьютера, включая принтеры, дисковые драйверы, дополнительные разрешения для экрана, копирование и вставку между базовой операционной системой, а также системой на виртуальной машине и так далее.
Если во время первоначальной настройки Windows 11 была выбрана аутентификация с использованием PIN-кода, «Расширенный» режим может не работать. В данном случае следует переключиться в «Базовый» и отключить вход по PIN-коду. После этого «Расширенный» должен завестись.
Управление настройками виртуальной машины Hyper-V
Чтобы перейти в настройки виртуальной машины Hyper-V, выберите её, а затем нажмите на кнопку «Параметры Hyper-V» в меню справа. Здесь доступны следующие возможности:
- «Виртуальные жёсткие диски» — настройка расположения жёсткого диска;
- «Виртуальные машины» — настройка расположения виртуальной машины;
- «Охват NUMA» — расширение используемой памяти и других ресурсов;
- «Миграция хранилища» — расширение хранилища;
- «Политика режима расширенного доступа» — переключение базового и расширенного сеансов;
- «Клавиатура» — параметры использования клавиатуры;
- «Сочетание клавиш для переключения» — выбор клавиши-модификатора для использования традиционных клавиатурных сокращений;
- «Снять флажки» — сброс выбора первоначальных параметров виртуальной машины.
Это перевод статьи от TheWindowsClub.
If you’re looking to run virtual machines directly from your Windows 11 PC, Hyper-V is a great built-in tool from Microsoft. It allows you to run multiple operating systems on the same hardware, ideal for testing, development, and sandboxing. In this guide, we’ll walk you through how to enable Hyper-V on Windows 11 in just a few steps.
Table of Contents
Be sure to read our previous blog post on how to install and configure the Hyper-V Role on Windows Server 2025.
What is Hyper-V?
Hyper-V is a hardware virtualization technology developed by Microsoft that allows you to create and manage virtual machines (VMs) on a physical computer. It allows you to run multiple operating systems simultaneously on a single device, each in its own isolated environment. Hyper-V is commonly used for testing, development, server management, and creating virtualized environments, making it a powerful tool for developers and IT professionals. It is included in the Pro, Enterprise, and Education editions of Windows 10 and 11.
System Requirements
Before enabling Hyper-V on your Windows 11 device, it’s important to verify that your system meets the necessary requirements. Below are the prerequisites for running Hyper-V on Windows 11:
- Windows 11 Pro, Enterprise, or Education edition
- A 64-bit processor with Second Level Address Translation (SLAT)
- Virtualization enabled in BIOS or UEFI
- At least 4 GB of RAM (8 GB recommended, more is better for VM performance)
Note: Windows 11 Home doesn’t officially support Hyper-V, though workarounds exist.
Step-by-Step: How to Enable Hyper-V on Windows 11
There are three methods available to enable the Hyper-V feature on a Windows 11 system: through Windows Features, using Windows PowerShell, and via the DISM command. In this guide, I will cover all three methods to enable Hyper-V on Windows 11.
Method 1: Enable Hyper-V on Windows 11 using Windows Features
To enable Hyper-V on Windows 11 using Windows Features, follow these steps:
Click on the Start menu, then select Settings to open the Settings app.

Click on Systems, scroll down and then click Optional features.

Under the Related settings section, click on More Windows features setting.

In the Windows Features window, scroll down to Hyper-V and check the box next to it.
Make sure the Hyper-V Management Tools and Hyper-V Platform checkboxes are selected.
Click OK and wait for the installation process to complete.

Once the installation is complete, click Restart Now to restart your Windows 11 computer and enable the Hyper-V feature.

That’s it! You have successfully enabled the Hyper-V feature on your Windows 11 device.
Method 2: Enable Hyper-V on Windows 11 Using PowerShell
On the Windows 11 desktop, right-click the Start button and select Windows PowerShell (Admin) to launch Windows PowerShell with administrative privileges.

In the PowerShell window, type the following cmdlet and hit Enter:
Enable-WindowsOptionalFeature -Online -FeatureName Microsoft-Hyper-V-AllPowerShell will execute the cmdlet and begin the process of enabling the Hyper-V feature.
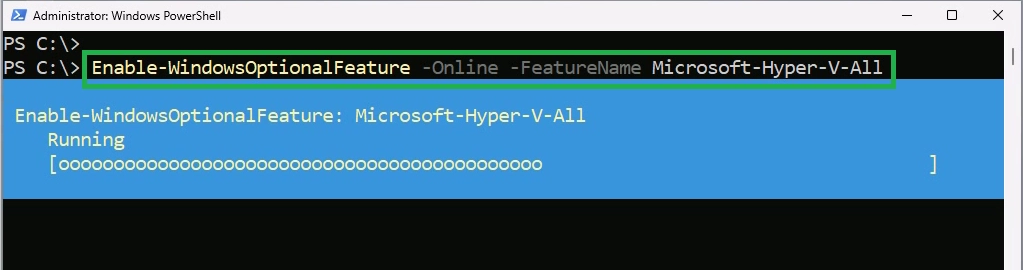
If successful, you will be prompted to restart your Windows 11 device. Type “Y” and press Enter to restart the Windows 11 device.

Method 3: Enable Using Command Prompt (DISM)
Open Command Prompt as Administrator.

In the command prompt window, type the following command and hit Enter:
DISM /Online /Enable-Feature /FeatureName:Microsoft-Hyper-V /All
Once the command completes successfully, restart your Windows 11 device.

How to Configure Hyper-V Settings
After enabling the Hyper-V feature on your Windows 11 device, you can adjust settings to optimize your virtual machines for maximum performance.
Hyper-V Settings: You can change the default locations of your virtual hard disk and virtual machine configuration files, configure NUMA spanning for storage migration, and enable enhanced session mode.

Virtual switch Manager: Hyper-V uses a virtual switch to connect virtual machines to your physical network, allowing you to create External, Internal, or Private switches.

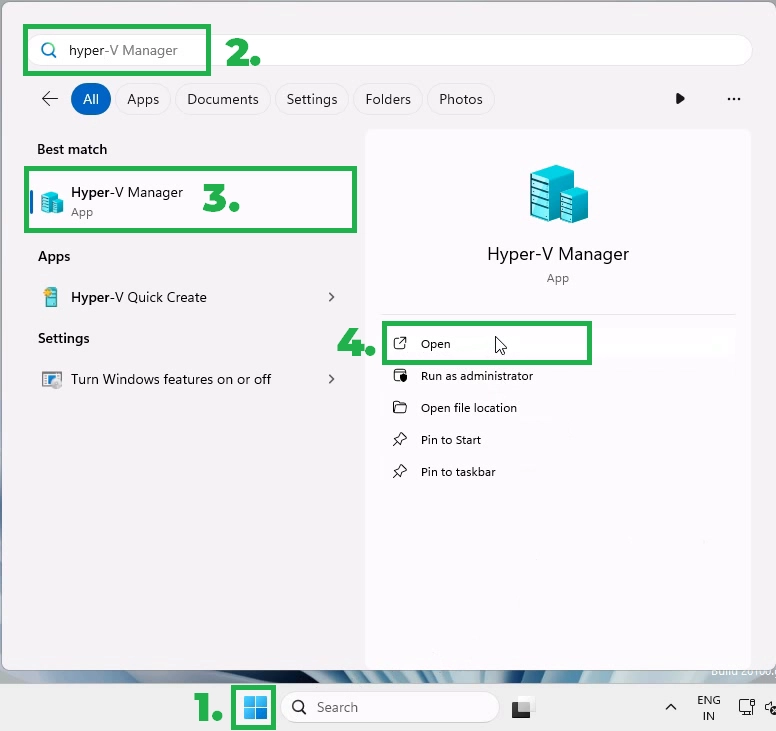
Open the Start menu, type Hyper-V Manager, and click on it to open the Hyper-V Manager console.
From the Hyper-V Manager console, you can start creating and managing virtual machines.

Conclusion:
Enabling Hyper-V on Windows 11 is quick and straightforward—provided your system is compatible. Whether you’re testing software, exploring different operating systems, or building development environments, Hyper-V offers a fast and flexible virtualization platform with native Windows support. You can now easily test various OS environments, create development sandboxes, or isolate risky tasks within virtual machines.
Have questions or run into any issues? Feel free to leave them in the comments below!
Want to learn how to create your first VM with Hyper-V on Windows 11? Stay tuned for our upcoming tutorial!
Post Views: 15

The Windows Hypervisor Platform in Windows 11 is a fundamental component of virtualization in Windows 11, allowing users to run virtual machines with enhanced performance and compatibility. Enabling the Windows Hypervisor Platform unlocks many features, including support for Hyper-V and other virtualization technologies. In this guide, we’ll walk you through the simple steps to enable the Windows Hypervisor Platform on your Windows 11 system, empowering you to harness the full potential of virtualization.
How to Turn on Windows Hypervisor Platform in Windows 11?
- Click on the Start Menu and open the Control Panel.
- Switch the Control Panel view to Category.

Category View
- Now, Click on Programs.

Programs
- Under Programs and Features, click on Turn Windows Features on or off.

Turn Windows Features on or off
- Windows Features dialog box will open now.
- Search and locate the Windows Hypervisor Platform from the list of services available .

Enable Windows Hypervisor Platform in Windows 11
- Click on the checkbox next to it and then click on OK.
- The system will prompt for a restart. Click Close. Continue with Restart if prompted. It is recommended that changes made to the system reflect while using the environment.

Close
- That is it, Windows Hypervisor Platform is now enabled on your Windows 11 laptop or PC. Enjoy Seamless Connectivity.
The Windows Hypervisor Platform serves as the foundation for running virtual machines on Windows 11. It provides a robust and secure environment for hosting virtualized workloads, enabling efficient resource utilization and seamless integration with other Windows features.
Check System Compatibility:
- Press Windows + R to open the Run dialog box.
- Type msinfo32 and press Enter to open the System Information window.
- Look for the “ Hyper-V Requirements ” section and verify that all requirements are met, including CPU support for virtualization technology and hardware-assisted virtualization.
Enable Virtualization in BIOS/UEFI:
- Restart your computer and access the BIOS/UEFI settings by pressing the designated key during startup (often Del, F2, or Esc ).
- Navigate to the virtualization settings (usually located under CPU or Advanced settings ).
- Enable Intel VT-x or AMD-V (depending on your processor) and any other relevant virtualization features.
Save the changes and exit the BIOS/UEFI settings. - Once virtualization support is enabled in the BIOS/UEFI settings, you can proceed to enable the Windows Hypervisor Platform in Windows 11 using the above-mentioned steps.
Take away:
By following the steps outlined in this guide, you can ensure compatibility with virtualization technologies and unlock a world of possibilities for development, testing, and productivity. Explore the potential of virtualization with the Windows Hypervisor Platform and elevate your Windows 11 experience today. Happy Coding! Peace out!
Windows 11 has multiple virtualization features with similar names. This short post explains when to enable each one.
It’s not immediately clear which features need to be enabled on Windows 11 for local virtualisation support. The following features appear to overlap:
- Hyper-V
- Virtual Machine Platform
- Windows Hypervisor Platform
Firstly, where do you see these optional features on Windows 11?
- Settings > Apps > Optional Features > More Windows Features
- PowerShell
Get-WindowsOptionalFeature -online | Out-Gridview
Purpose
| Feature | Purpose |
|---|---|
| Hyper-V | Host local VMs using client Hyper-V |
| Virtual Machine Platform | Pre-req for Windows Subsystem for Linux* |
| Windows Hypervisor Platform | API for 3rd party virtualisation e.g. Docker, VirtualBox |
*NOTE Virtual Machine Platform is automatically enabled if you use the command wsl –install
Enable
You can enable the features you need as follows:
# Hyper-V
Enable-WindowsOptionalFeature -Online -FeatureName Microsoft-Hyper-V -All

# Virtual Machine Platform
Enable-WindowsOptionalFeature -Online -FeatureName VirtualMachinePlatform

# Windows Hypervisor Platform
Enable-WindowsOptionalFeature -Online -FeatureName HypervisorPlatform
This article was originally posted on Write-Verbose.com