Download Article
A step-by-step guide to get your PC into safe mode
Download Article
- From Windows Settings (Windows 10 & 11)
- From the Login Screen (Windows 11, 10, &

- From a Blank Screen (Windows 11 & 10)
- From the Charm Bar (Windows
- Using a Startup Key (Windows 7)
- Always Boot Into Safe Mode
- Video
- Q&A
|

|
|
|
|
|
|
Windows Safe Mode is an excellent tool for troubleshooting, as it prevents startup programs from running and loads only the bare minimum software and drivers. Whether you want to boot in Safe Mode to scan for and remove malware, uninstall problematic apps, or troubleshoot other software problems, this wikiHow guide will teach you all the ways you can start any version of Windows in Safe Mode.
Quick Steps
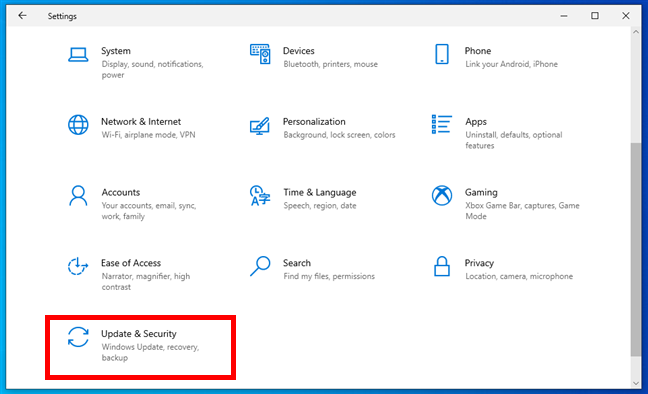
- Press the Windows key and click Settings.
- Click Update & Security (Windows 10) or System (Windows 11).
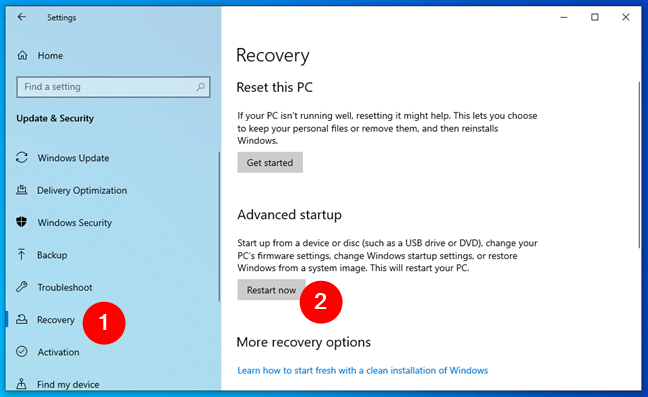
- Click Restart Now.
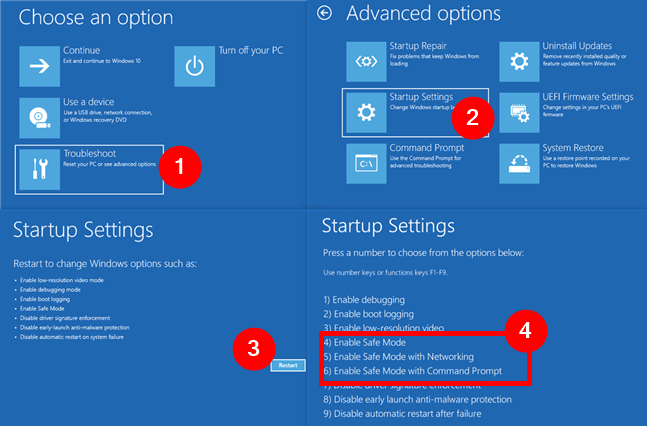
- Go to Troubleshoot > Advanced options > Startup Settings.
- Click Restart.
- Select 4 to boot in Safe Mode, or 5 for Safe Mode with Networking.
-

To do this, press the Windows key on your keyboard (or click the Start menu), then click Settings.
- You can also open Settings by pressing Windows key + i at the same time.
- If you use BitLocker, consider disabling it before booting into Safe Mode. If you do not suspend BitLocker protection, then you will be asked for your recovery key to continue booting into Safe Mode.[1]
-
Advertisement
-
You’ll see this option under «Advanced startup.» Your Windows PC will now reboot to a blue screen.
-
Additional options will appear.
-
This opens several options for booting and repairing Windows.
-
It’s the option with a gear icon.
-
Windows will now reboot to a list of Safe Mode options.
-
If you want to use Safe Mode without an internet connection, select 4 or press the F4 key on your keyboard. If you need internet access in Safe Mode, select 5 or press F5 to start Safe Mode with Networking.[2]
- To exit Safe Mode, restart your computer normally.


Advertisement
-
If you want to boot into Safe Mode without logging in to Windows first, you can do so from the login screen. If your computer is frozen, press and hold the power button to reboot it to the login screen.
- Note that if you use BitLocker, you will be prompted for your recovery key to restart into Safe Mode.[3]
- Note that if you use BitLocker, you will be prompted for your recovery key to restart into Safe Mode.[3]
-
This icon, which is in the bottom-right corner of the screen, looks like a circle with a line through its top.
-
This will restart your computer and open the Advanced Options page.
- You may need to click Restart anyway after clicking Restart. If so, keep holding ⇧ Shift while you do.
-
It should be the middle option on the Advanced Options page, which is a light-blue screen with white text.[4]
-
It’s the bottom option on this page.[5]
-
This option is on the right side of the page, just below the Command Prompt option.[6]
-
It’s in the bottom-right corner of the screen. Clicking it will restart your computer to the Startup Settings menu.[7]
-
If you want to use Safe Mode without an internet connection, select 4 or press the F4 key on your keyboard. If you need internet access in Safe Mode, select 5 or press F5 to start Safe Mode with Networking.[8]
- To exit Safe Mode, restart your computer normally.


Advertisement
-
-
Pressing this again will prompt your computer to turn on.
-
You can prompt your computer to turn off as soon as you see the startup logo.
-
This will turn your computer back on.
-
You can prompt your computer to turn off as soon as you see the startup logo.
-
This will turn your computer back on in winRE (Windows Recovery Environment).
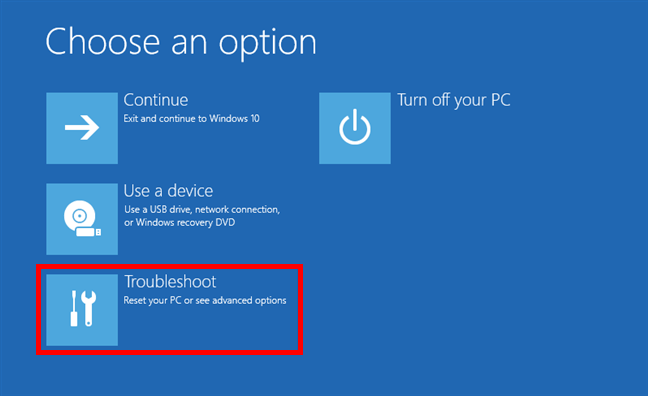
-
The Troubleshoot tile is the last option in the list next to an icon of some tools. Once you click that, you’ll need to click Advanced Options to see more.[10]
-
Your computer will restart and show you a blue screen with more options.
- If you use BitLocker, you will be prompted for your recovery key to restart into Safe Mode.[11]
- If you use BitLocker, you will be prompted for your recovery key to restart into Safe Mode.[11]
-
If you want to use Safe Mode without an internet connection, select 4 or press the F4 key on your keyboard. If you need internet access in Safe Mode, select 5 or press F5 to start Safe Mode with Networking.[12]
- To exit Safe Mode, restart your computer normally.


Advertisement
-
To do this, press Windows key + i, or swipe your mouse across the right side of your desktop.
-
This opens the Power menu.
-
This reboots your PC into the Advanced Boot Options menu.
-
Additional options will appear.
-
This opens several options for booting and repairing Windows.
-
It’s the option with a gear icon.
-
Windows will now reboot to a list of Safe Mode options.
-
If you want to use Safe Mode without an internet connection, select 4 or press the F4 key on your keyboard. If you need internet access in Safe Mode, select 5 or press F5 to start Safe Mode with Networking.[13]
- To exit Safe Mode, restart your computer normally.


Advertisement
-
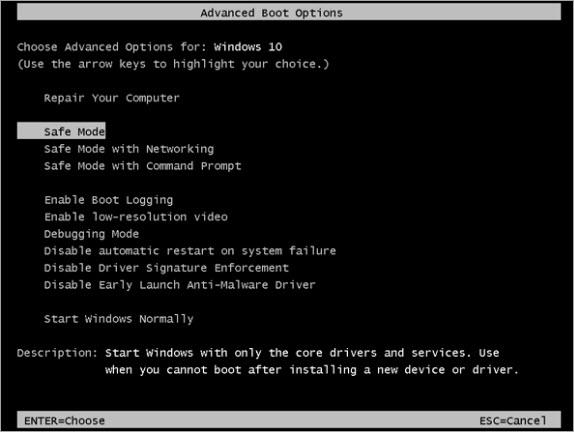
It’s in the top row of keys on your computer’s keyboard. To access the Safe Mode option in Windows 7, you’ll have to press F8 while restarting your computer.
-
Do so by pressing your computer’s power button. If your computer is already on but malfunctioning, first press and hold the power button to turn it off, then press it again to turn it back on.
- You can also restart your computer by clicking the Windows logo in the bottom-left corner of the screen, clicking the power icon, and clicking Restart.
-
Do so immediately after your computer begins to turn on. This action will launch the boot menu, which is a black screen with white text.[14]
- The goal here is to press F8 before you see the «Starting Windows» screen.
- If nothing happens while pressing F8, you may need to hold the Fn key while pressing F8.
-
This key should be on the right side of your keyboard. When «Safe Mode» has a white bar over it, you’ve successfully selected it.[15]
-
Doing so will both select Safe Mode as your restart option and continue the start-up process.[16]
-
Once it finishes restarting, your computer will be in Safe Mode.
- To exit Safe Mode, restart your computer normally.


Advertisement
-
If you want to make your computer boot into Safe Mode automatically each time you restart, you can do so using this tool. To open it:
- Press the Windows key.
- Type msconfig and press Enter.
-
You’ll see it at the top of the window.
-
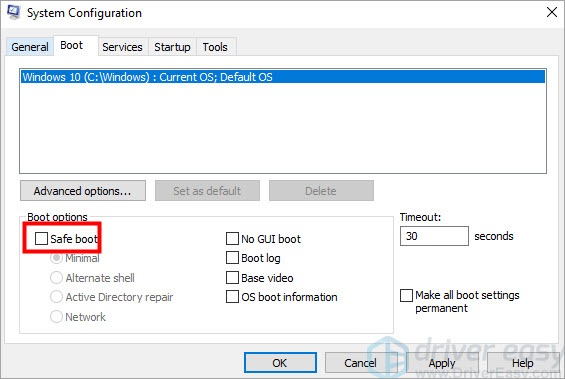
This is under «Boot options» in the bottom-left corner.
-
This saves your changes and reboots your Windows PC into Safe Mode.
- When you’re ready for your computer to boot normally again, just return to the System Configuration panel, remove the checkmark from «Safe boot,» and restart your PC.


Advertisement
Add New Question
-
Question
My PC audio didn’t work after I did safe mode. Why?
In safe mode, Windows will only boot with core drivers. Your audio may have not booted up in safe mode.
-
Question
What is safe mode and how does it work?
Safe mode is a stripped down version of Windows. Most people use it to remove viruses. For example, if a virus locked your computer, you could start it up in safe mode to safely remove the virus.
-
Question
What should I do if my hard drive is corrupted and cannot open even in safe mode?
You need to use a bootable disk or storage stick with emergency startup and repair software.
See more answers
Ask a Question
200 characters left
Include your email address to get a message when this question is answered.
Submit
Advertisement
Video
Thanks for submitting a tip for review!
References
About This Article
Article SummaryX
1. Restart the computer.
2. Click the power icon.
3. Hold the Shift key as you click Restart.
4. Click Troubleshoot.
5. Click Advanced options.
6. Click Startup settings.
7. Click Restart.
8. Press the 4 key.
Did this summary help you?
Thanks to all authors for creating a page that has been read 1,656,389 times.
Reader Success Stories
-
Rahat Yusufi
Jul 22, 2016
«I know about the tapping F8 and all the options appearing. My machine is facing the start-up problem. Unless it is…» more
Is this article up to date?
One of the best ways to troubleshoot Windows 10 issues is to use Safe Mode, a minimal environment that allows you to run the operating system with only the essential drivers and services. However, the old methods of pressing F8 or SHIFT + F8 during boot are no longer effective because Windows 10 boots too fast, and Microsoft disabled them. Instead, you have to use other ways to boot into Safe Mode in Windows 10. Here are eight methods you can try:
How to start Windows 10 in Safe Mode (video tutorial)
Safe Mode is a Windows feature that allows you to start the operating system with minimal functionality, only running the essential services and drivers. This helps to isolate and fix problems, as it prevents Windows from loading anything that could cause it to crash. For more details on what you can do with Safe Mode, read this separate article we published some time ago: What is Safe Mode?

A Windows 10 computer in Safe Mode
So, do you want to know how to start Windows 10 in Safe Mode? You’ve come to the right place. In this tutorial, I’ll show you all the tips and tricks you can use to boot into Safe Mode. However, it all depends on whether you can log in to Windows 10 or not.
If you need to enter Safe Mode without logging in, try methods 1 to 4. If you can boot Windows 10 and sign in with a user account, try methods 5 to 8.
Oh, and for those who prefer a visual guide over text, we have a video that shows four of these ways to boot a Windows 10 computer into Safe Mode:
And now, without further ado, here’s…
1. How to boot in Safe Mode without logging into Windows 10 (Shift + Restart)
If you can’t log into Windows 10, but you can get to the sign-in screen, press and hold the SHIFT key on the keyboard. With this key still pressed, click or tap the Power button and, in the menu that opens, click Restart.

How to boot Windows 10 in Safe Mode without login
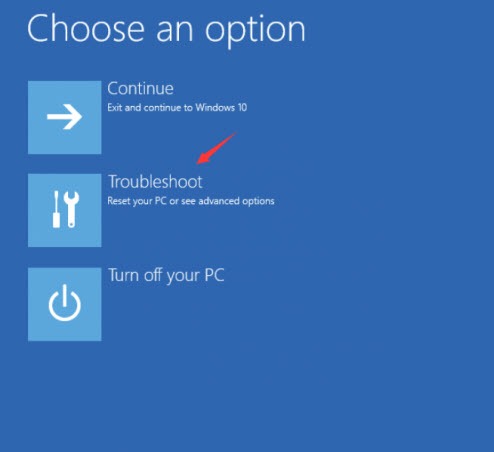
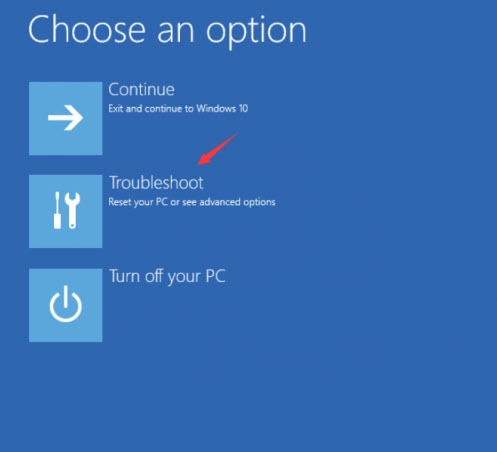
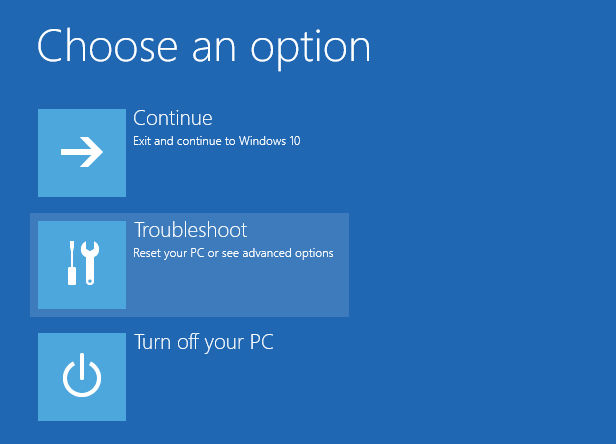
Windows 10 restarts and asks you to select an option. Choose Troubleshoot.
Click Troubleshoot (Reset your PC or see advanced options)
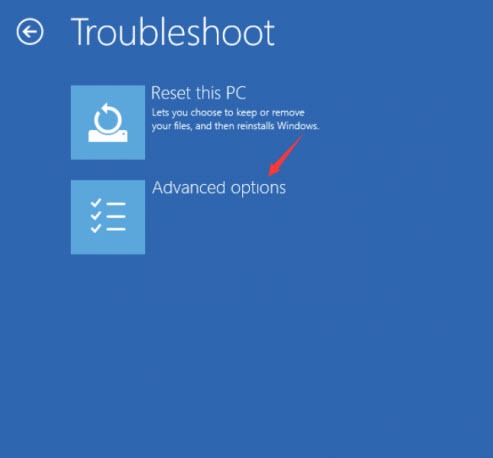
On the Troubleshoot screen, go to Advanced options.
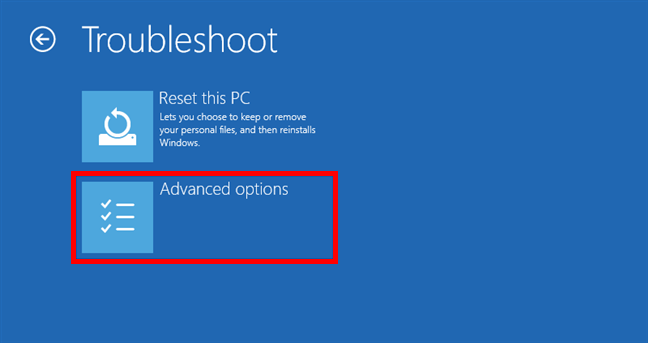
Accessing the advanced troubleshooting options
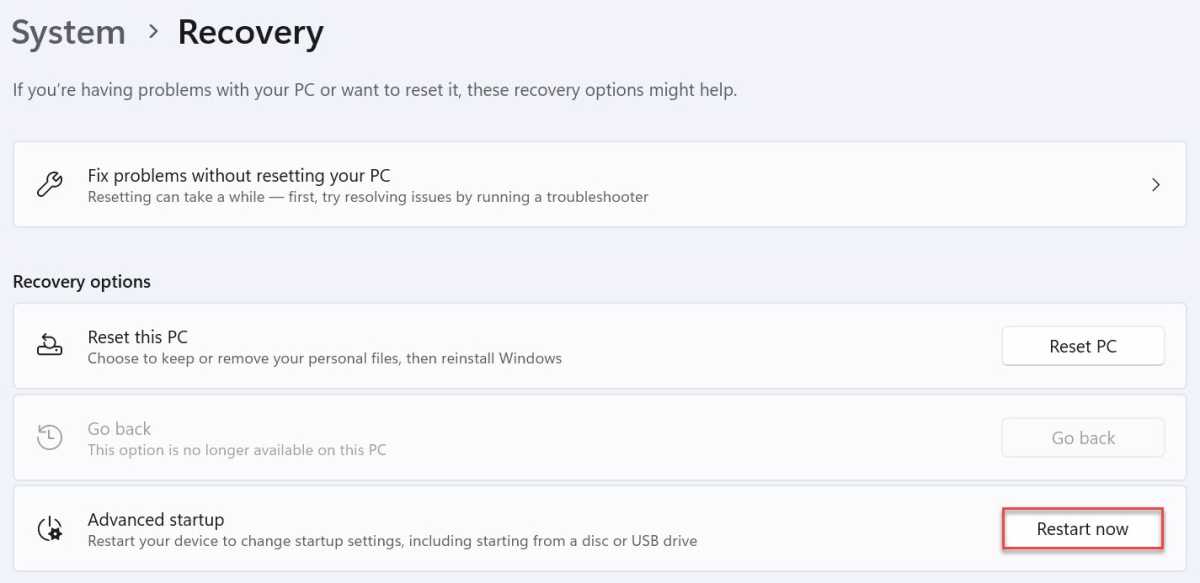
On the Advanced options screen, choose Startup Settings. Depending on your Windows 10 computer, you may not see this option at first. If you do not, click or tap the “See more recovery options” link and then on the Startup Settings option.
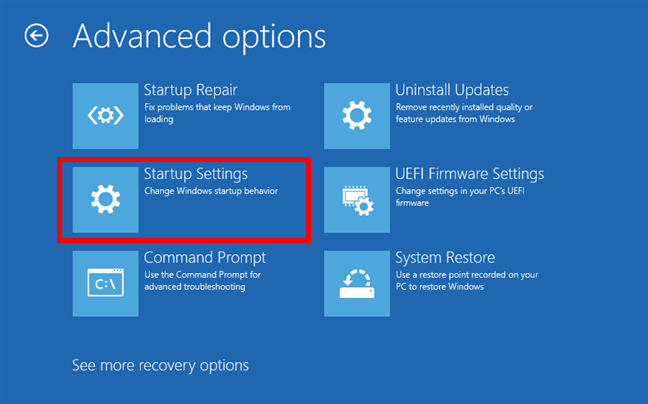
Click the Startup Settings option
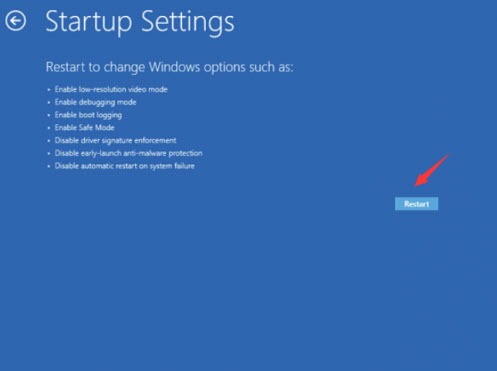
Windows 10 says that you can restart your device to change advanced boot options, including enabling Safe Mode. Press Restart.
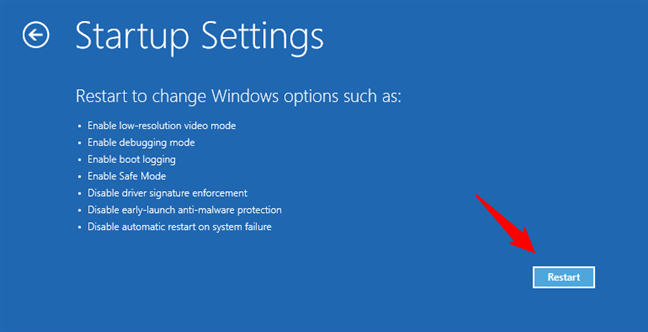
Startup Settings: Choose Restart for Windows 10 Safe Mode options
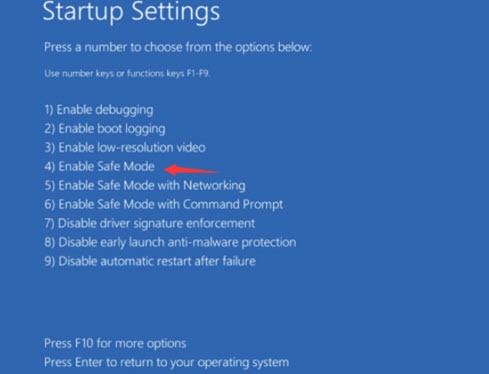
After Windows 10 restarts one more time, you can choose which boot options you want to enable. You have three different options to get into Safe Mode:
- Standard Safe Mode — press the 4 or the F4 key on your keyboard to start it
- Safe Mode with Networking — press 5 or F5
- Safe Mode with Command Prompt — press either 6 or F6
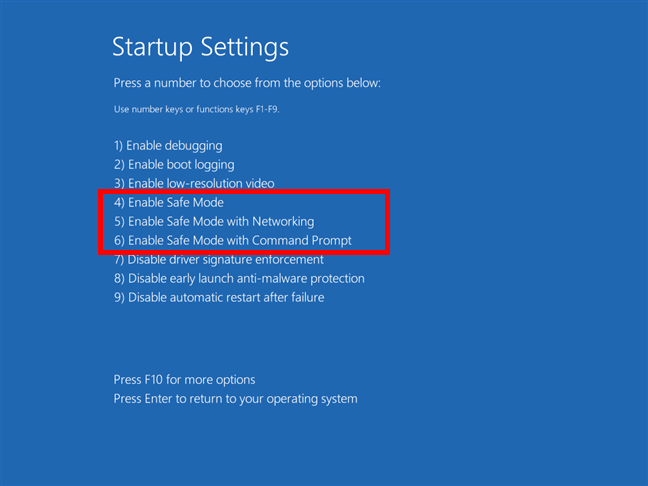
How to boot in Safe Mode on a Windows 10 computer
Log into Windows 10 Safe Mode with a user account that has administrator permissions, and perform the changes you want.
2. How to start Windows 10 in Safe Mode from a black screen by interrupting the boot sequence
If Windows 10 fails to boot normally three times over, it enters by default in an Automatic Repair mode the fourth time. Using this mode, you can boot into Safe Mode.
To trigger the Automatic Repair mode, you must interrupt the normal boot process three consecutive times: use the Restart or the Power button on your Windows 10 PC or laptop to stop it during boot before it finishes loading the operating system. If you use the Power button, you might have to keep it pressed for at least 4 seconds to force the power off. When Windows 10 enters the Automatic Repair mode, the first thing you see is a screen that tells you that the operating system is Preparing Automatic Repair. You’re on the right path!
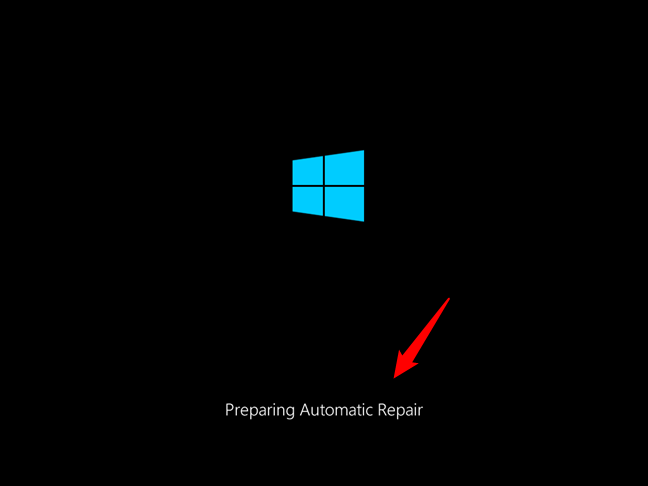
How to boot into Safe Mode from a black screen
Wait for Windows 10 to try to make an automatic diagnosis of your PC.
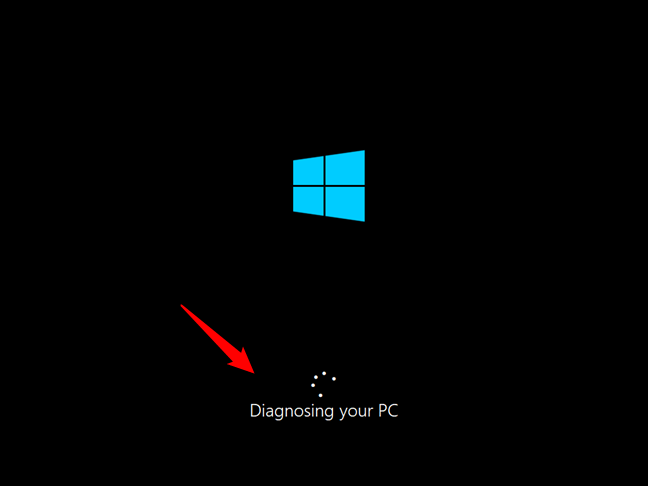
Diagnosing your Windows 10 PC
On the Automatic Repair screen, press the Advanced options button.
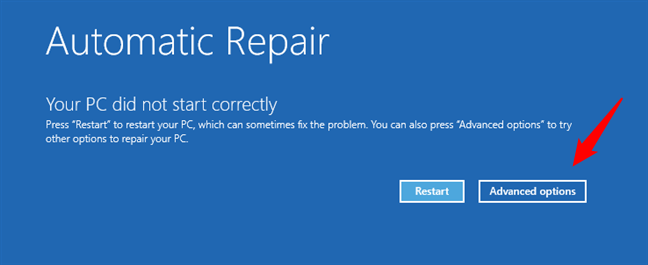
Accessing the advanced troubleshooting options
From here on, the steps you have to take are the same as those shown in the first method from this guide. Follow the path Troubleshoot > Advanced options > Startup Settings > Restart. Then, press the 4 or the F4 key on your keyboard to boot into Safe Mode, press 5 or F5 to boot into Safe Mode with Networking, or press 6 or F6 to go into Safe Mode with Command Prompt.

Go to Troubleshoot > Advanced options > Startup Settings > Restart > Enable Safe Mode
3. How to boot in Safe Mode using a Windows 10 installation media and the Command Prompt
If you have a Windows 10 setup DVD or USB memory stick lying around, or if you can create one right now, you can use it to start your Windows 10 PC into Safe Mode. Boot your broken computer from the installation media and wait for the Windows 10 install wizard to load. Choose the language and keyboard layout you prefer and click or tap Next.
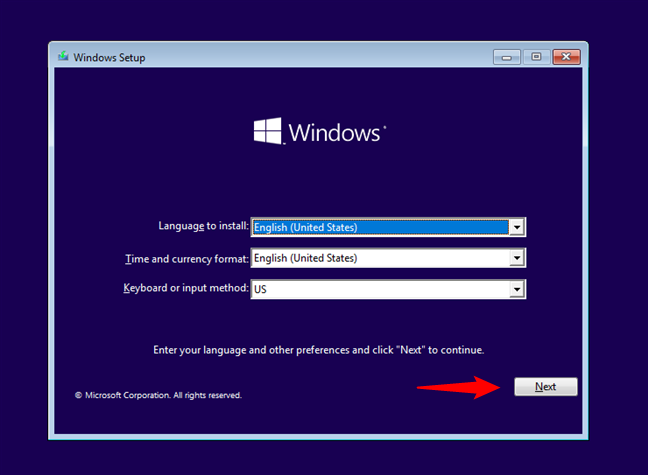
The Windows 10 Setup
Click or tap on the Repair your computer link, found in the bottom left corner of the screen.
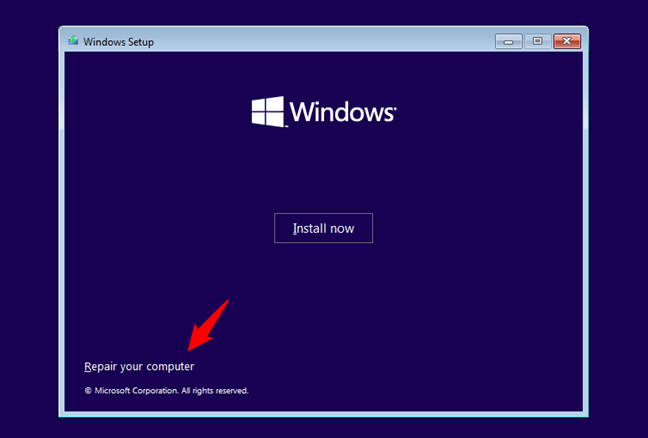
Click on Repair your computer
When asked what option you prefer, choose Troubleshoot.
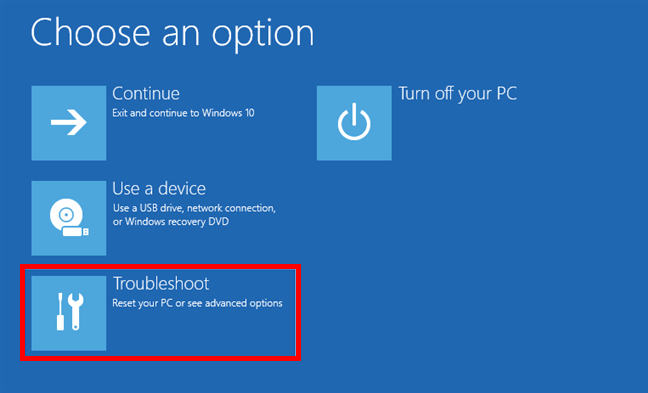
Select Troubleshoot to get to Windows 10 Safe Mode
On the Advanced options screen, click or tap Command Prompt (Use the Command Prompt for advanced troubleshooting).
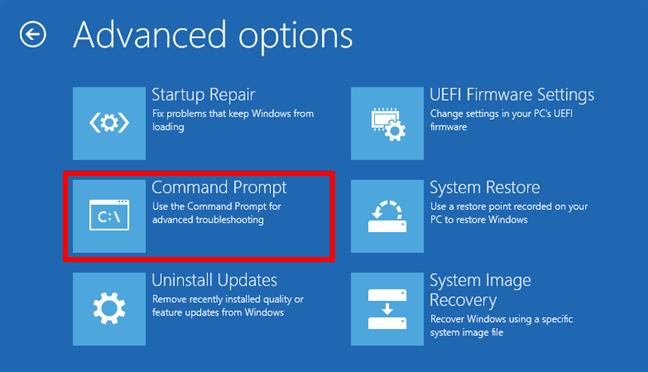
Starting the Command Prompt
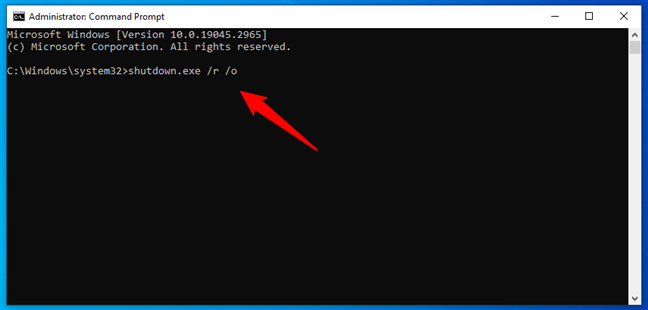
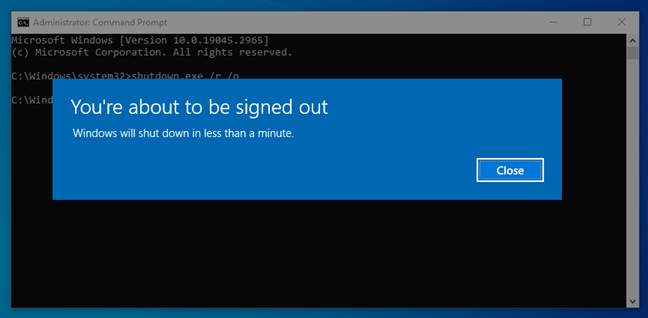
Inside the Command Prompt window, type the command:
bcdedit /set {default} safeboot minimal
Then, press Enter on your keyboard, and after a moment, it will tell you that “The operation completed successfully.”
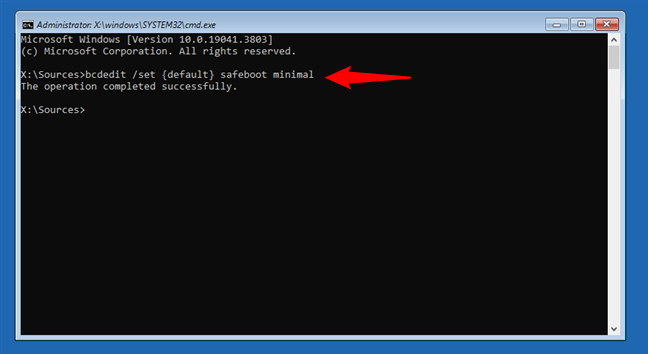
How to boot in Safe Mode from the Command Prompt
Close the Command Prompt and choose to Continue on the next screen.
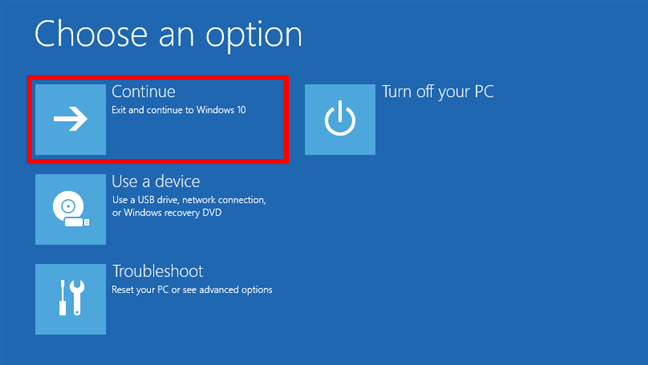
Choose Continue to start Windows 10 in Safe Mode
After your PC reboots, Windows 10 starts into Safe Mode. Log in with a user account that has administrator permissions, and perform the changes you want.
IMPORTANT: The problem with this method is that it tells Windows 10 to enter Safe Mode automatically every time you start it and will continue to do so until instructed otherwise. To disable this setting and get Windows 10 to boot normally again, run the same procedure one more time and type the command:
bcdedit /deletevalue {default} safeboot
4. How to start Windows 10 in Safe Mode with a recovery drive
In Windows 10, you can create a system recovery USB drive. Since your PC may not be working, create this USB recovery drive on another computer with Windows 10.
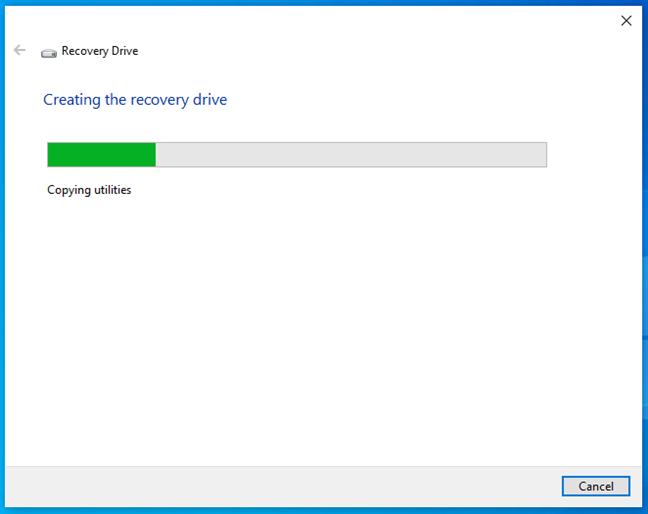
Creating a Windows 10 Recovery Drive
Once you have created a USB recovery drive, use it to boot your Windows 10 PC or device, and when you are asked to load its content, do so. The first screen asks you to choose the layout for the keyboard. Select the one you want to use, or if you do not see it listed, click or tap the “See more keyboard layouts” link to get the complete list of available layouts.

Choose the keyboard layout for the recovery drive
After choosing the keyboard layout that you want to use, click or tap on Troubleshoot and follow the same steps shown in the first method of this guide to boot into Safe Mode. In short, follow this path: Advanced options > Startup Settings > Restart. Then, press the 4 or the F4 key on your keyboard to boot into Safe Mode, press 5 or F5 to boot into Safe Mode with Networking, or press 6 or F6 to go into Safe Mode with Command Prompt.

Go to Troubleshoot > Advanced options > Startup Settings > Restart > Enable Safe Mode
5. How to use msconfig to boot into Safe Mode on Windows 10
If you can log in to Windows 10, one of the easiest methods to boot into Safe Mode is to use the System Configuration tool, which users know by its file name:
msconfig.exe
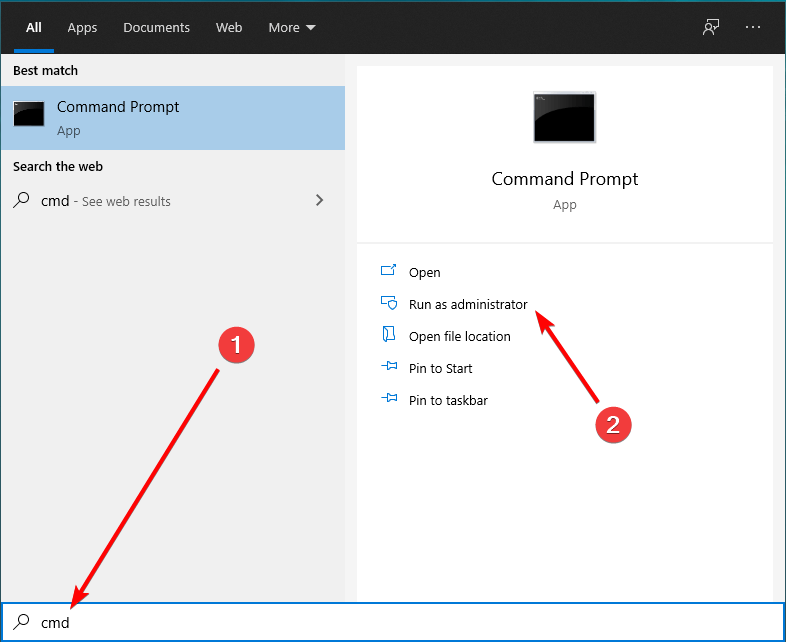
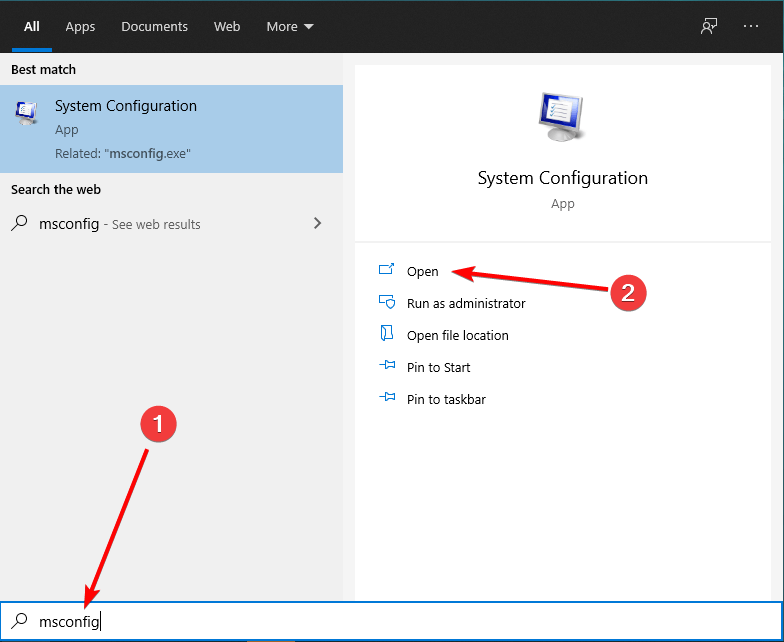
Open System Configuration: a quick way to do that is to enter the words “system configuration” in the taskbar search field and then click or tap the System Configuration shortcut.
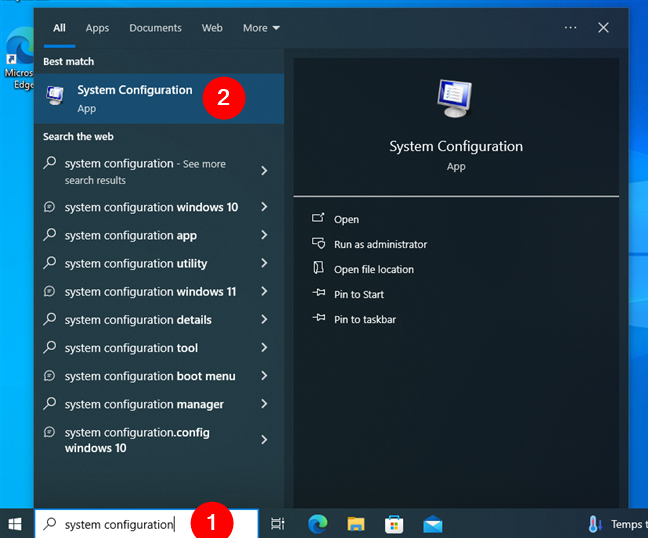
Open System Configuration (msconfig)
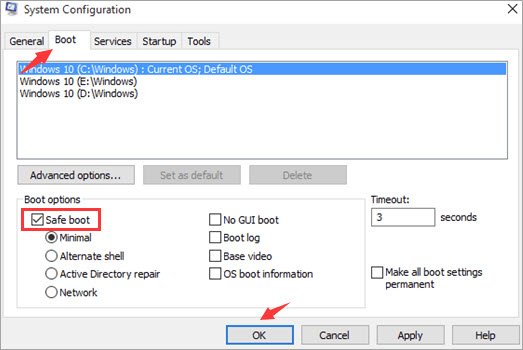
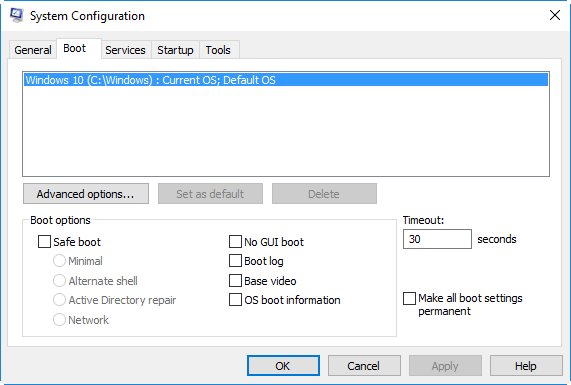
In the System Configuration window, click or tap the Boot tab. In the Boot options section, select the Safe boot option. Finally, click or tap OK.
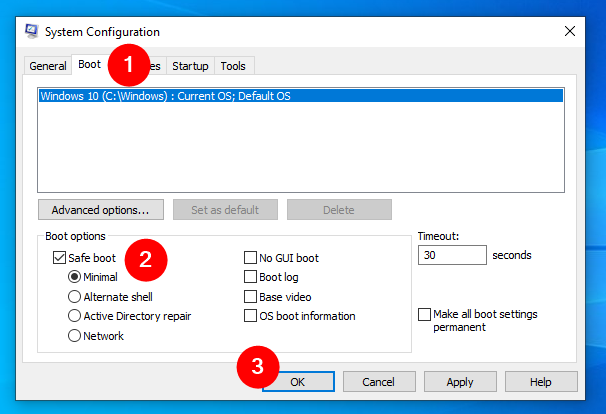
How to boot Windows 10 in Safe Mode using System Configuration (msconfig)
Windows 10 tells you that you need to restart your computer for the new setting to take effect. If you still have work to do, you can choose to Exit without restart. If not, click or tap Restart to reboot Windows 10 in Safe Mode.
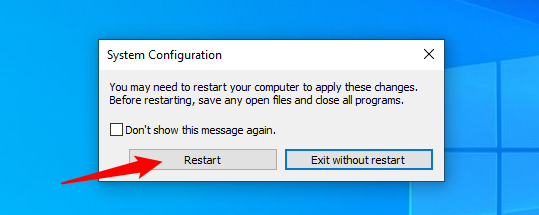
Restart Windows 10 in Safe Mode
Then, you get straight into Windows 10 Safe Mode.
6. How to start Windows 10 in Safe Mode from the Start Menu (Shift + Restart)
Another way of booting into Safe Mode in Windows 10 is to use the Start Menu. First, press and hold the SHIFT key on the keyboard. With the key still pressed, click the Start button, then Power, followed by Restart.

How to start Windows 10 in Safe Mode from the Start Menu
Wait for Windows 10 to reboot. When it starts again, it will ask you to select an option. Choose Troubleshoot and then follow the same steps shown in this guide’s first method. In short, go to Advanced options > Startup Settings > Restart. Then, press 4 or F4 on your keyboard to start Windows 10 in Safe Mode, press 5 or F5 to boot into Safe Mode with Networking, or press 6 or F6 to go into Safe Mode with Command Prompt.