
Download Article
Get to the Task Scheduler in no time with these easy shortcuts
Download Article
- Using the Run Dialog
- Using Windows Search
- Using Command Prompt
- Using the Start Menu
- Using Control Panel
- Video
|
|
|
|
|
Task Scheduler is a system tool available in all versions of Windows. It helps you schedule automated tasks that run programs or scripts at specific times. For example, you can schedule your computer to automatically shut down in the middle of the night. In this tutorial, you’ll learn all the methods of opening Task Scheduler in Windows 10.
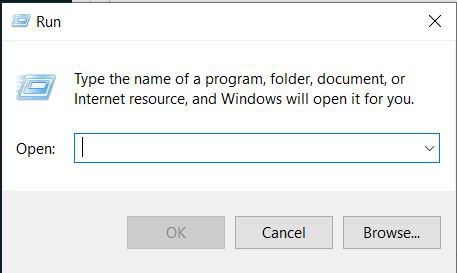
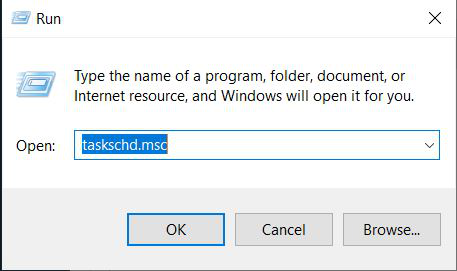
First, press Windows key + R at the same time. Then, type taskschd.msc Finally, press Enter or click OK.
-

This opens the Run dialog.
-

Advertisement
-

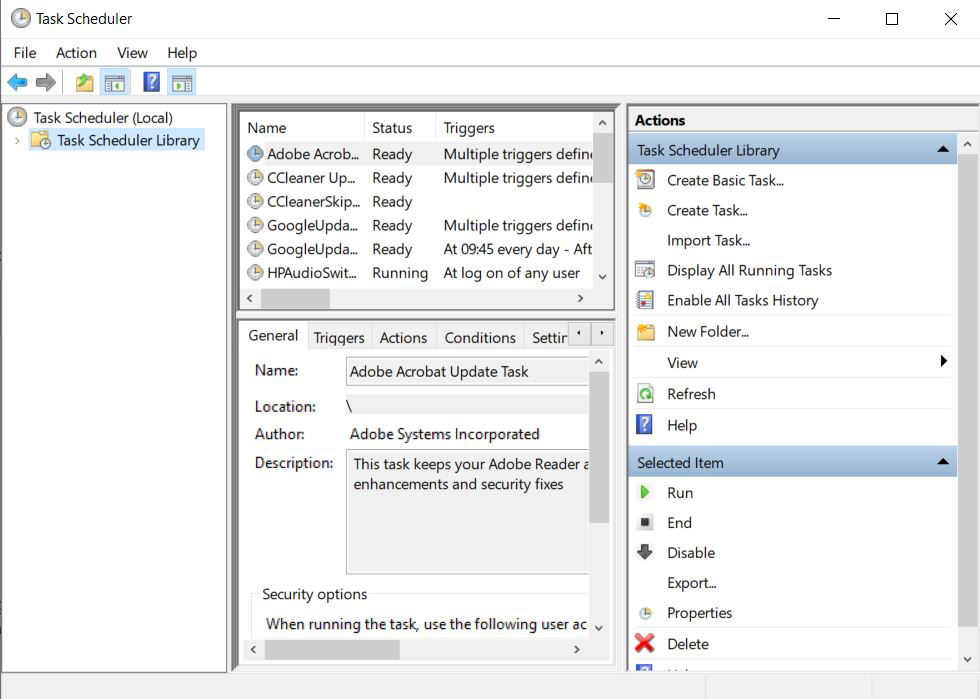
This opens Task Scheduler in a new window.


Advertisement
-

If you don’t see the search bar, press the Windows key on your keyboard to activate it, or press Windows key + S.
-

Windows will now search for the application.
-

-


Advertisement
-
-
This opens Task Scheduler in a separate window.
- Alternatively, you can type taskschd.msc and press Enter.[1]
- Alternatively, you can type taskschd.msc and press Enter.[1]


Advertisement
-
Alternatively, you can press the Windows key on your keyboard to open it.
-
-

This displays programs you can use to take care of administrative tasks, including Task Scheduler.
-
It’ll be near the bottom of the menu.


Advertisement
-
Press ⊞ Win+R on your keyboard. This opens the Run dialog.
-
This opens the administrative tools area of Control Panel.
-


Advertisement
Ask a Question
200 characters left
Include your email address to get a message when this question is answered.
Submit
Advertisement
Video
Thanks for submitting a tip for review!
References
About This Article
Thanks to all authors for creating a page that has been read 220,734 times.
Is this article up to date?
wikiHow Tech Help Pro:
Level up your tech skills and stay ahead of the curve
Let’s go!
—
—
Task Scheduler is vital component of Microsoft Windows that gives its users capacity to plan initiation of projects or programs at the user’s discretion or after indicated time spans. This was firstly introduced in “Microsoft Plus” for Windows-95 as “System Agent” however, it was renamed to “Task Scheduler”. Windows Event Log administration must be running before Task Scheduler starts up. This administration ought not to be mistaken with scheduler, which is central part of OS kernel that assigns CPU assets to measures previously running.
Task Scheduler administration works by controlling Tasks. Task alludes to activity (or activities) taken because of trigger(s). A task is collectively characterized by lot of activities, which can incorporate initiating an application or making some exclusively characterized move, to lot of triggers, which can either be time sensitive or occasion-based.
Moreover, task additionally can contain metadata that characterizes how activities will be executed. Example – security setting task will run in. Tasks are serialized to “.job” records and are put away in the exceptional organizer named Task Folder, composed in sub-directories. Implicitly, task organizer is made accessible by utilizing the ITaskFolder interface or Task-folder scripting object and individual tasks utilizing IRegisteredTask interface or Registered-task object.
Now, Before using Task Scheduler for automation of tasks, we need to have basic understanding of following points –
Triggers :
- Trigger will execute specific program consequently when some already defined occasions will happen.
- Task scheduler has two sorts of triggers: “time-sensitive trigger”, and “event-based trigger”.
- Time-sensitive occasion-based trigger is utilized to play out the tasks at a specific time.
- Occasion-based trigger is utilized to play out task when any system-event happens.
Actions :
- The “action” is cycle, that happens when triggers are executed in system, for example, to start program, send letters and show message, etc.
Procedure for Scheduling Basic Task :
Step-1 : Right-click on Windows logo being displayed on bottom-left corner of your screen. Then, click on “Run” option, and run-prompt opens up.
Step-2 : Type in left pane following command in Run dialog box already opened, then click on “Ok” for executing the command.
taskschd.msc
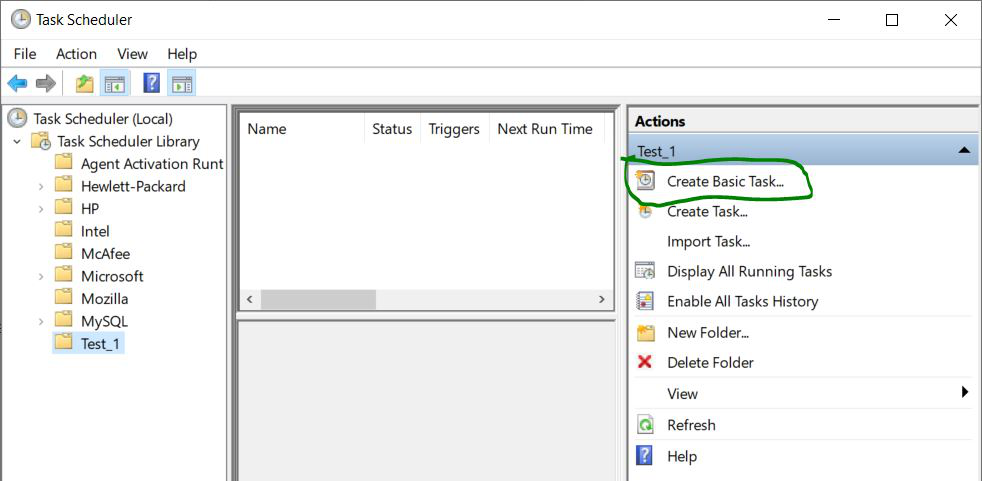
Step-3 : “Task-Scheduler” dialog-box is opened now. On left pane of window, click on “Task Scheduler Library” in order to select folder, then right-click on that folder, and choose “New folder” option.
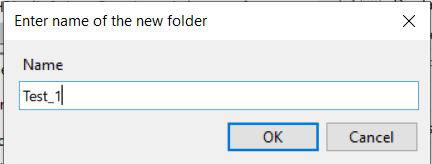
Step-4 : Enter desired name of folder, then click on “Ok” button.
Step-5 : Now, navigate to new folder created under “Task Scheduler Library” directory, and select folder you created, then click on “Create Basic Task…” option on right pane of the window.
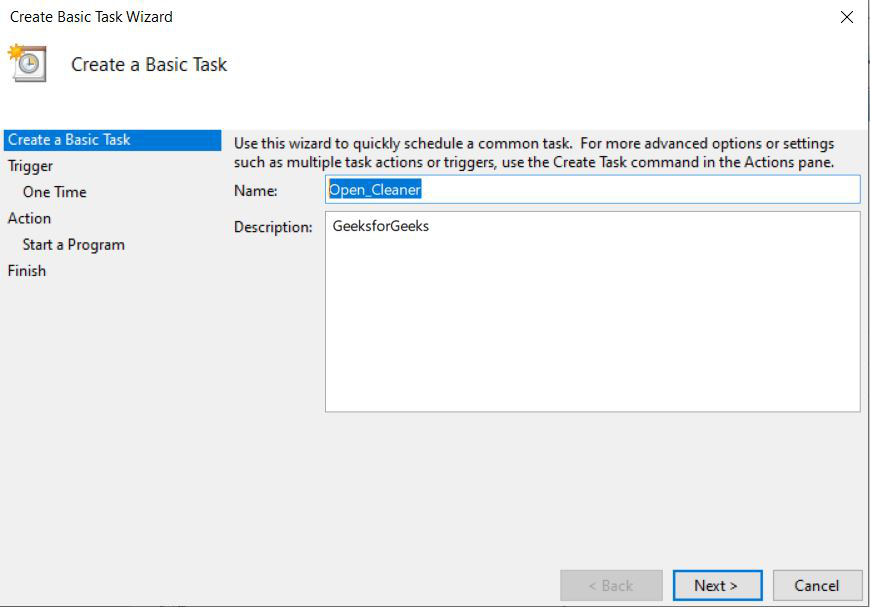
Step-6 : After clicking on the previous option mentioned in step-5, you have to name your task, and it is suggested that name should always be similar to task being performed by it as it reduces ambiguity, you can also provide description for your task, then click on “Next” button.
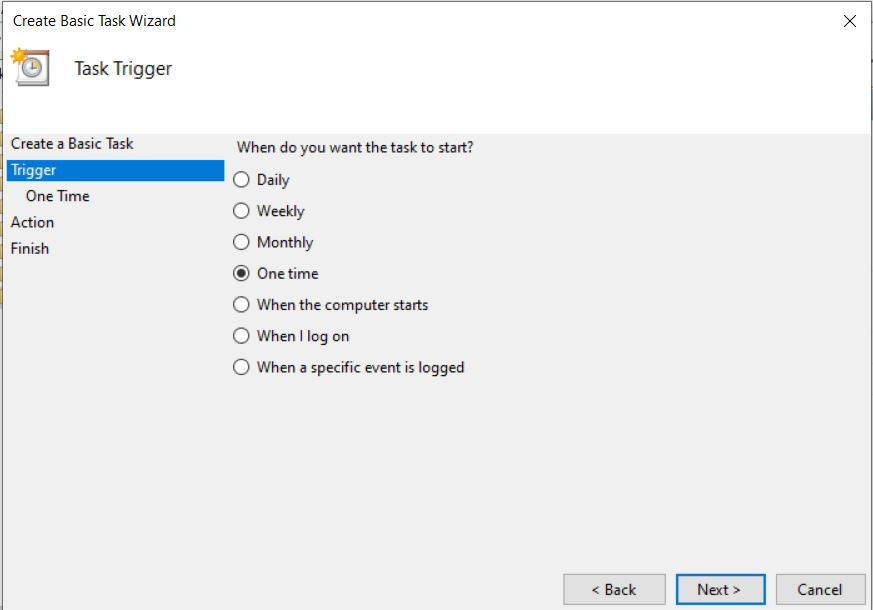
Step-7 : The next dialog box that appears is of “Trigger” option, here you can select any option according to your preferences, then click on the “Next” button.
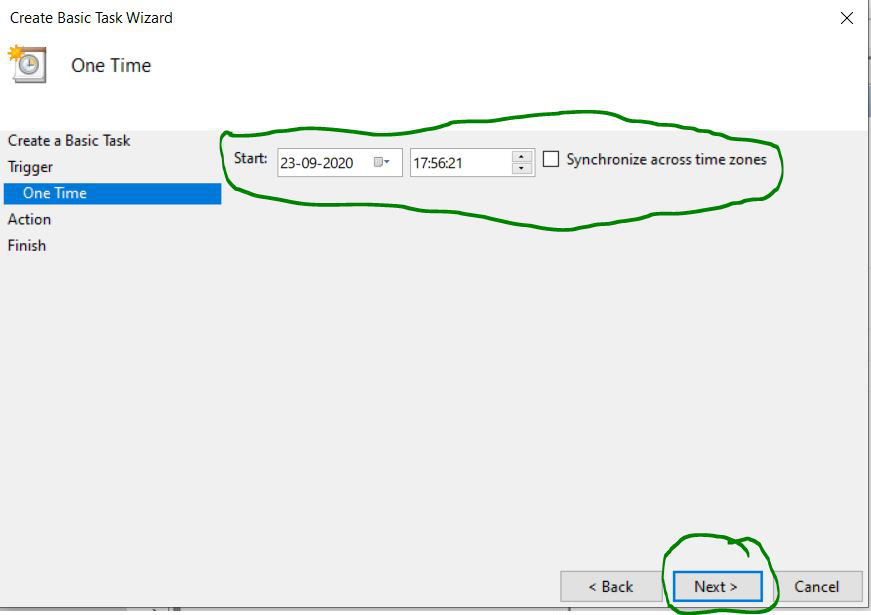
Step-8 : Based on your option you will see options appeared on your screen, so thereafter set-up starting Date and Time of task, and then click on “Next” button.
Step-9 : Now, choose “Start Program” option from three options appearing, but any option can be chosen according to your task.
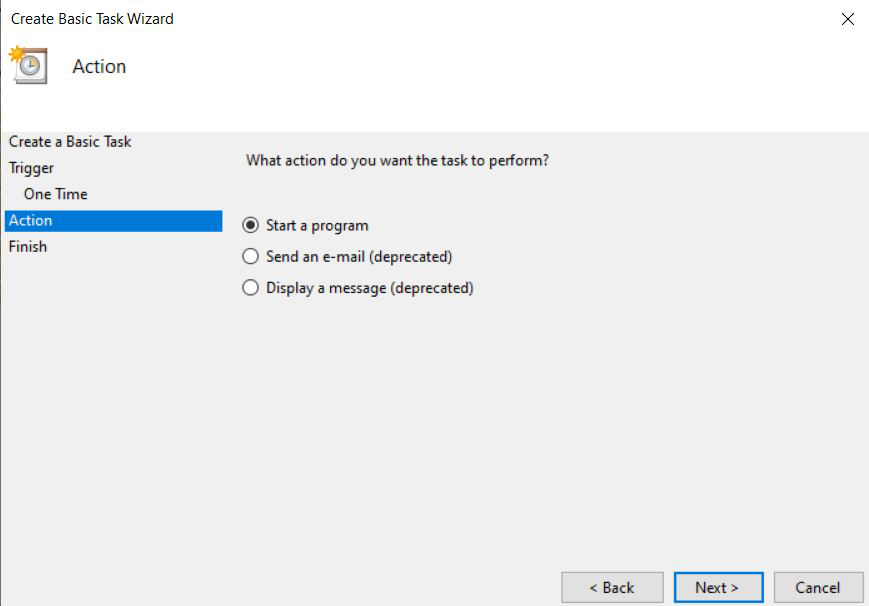
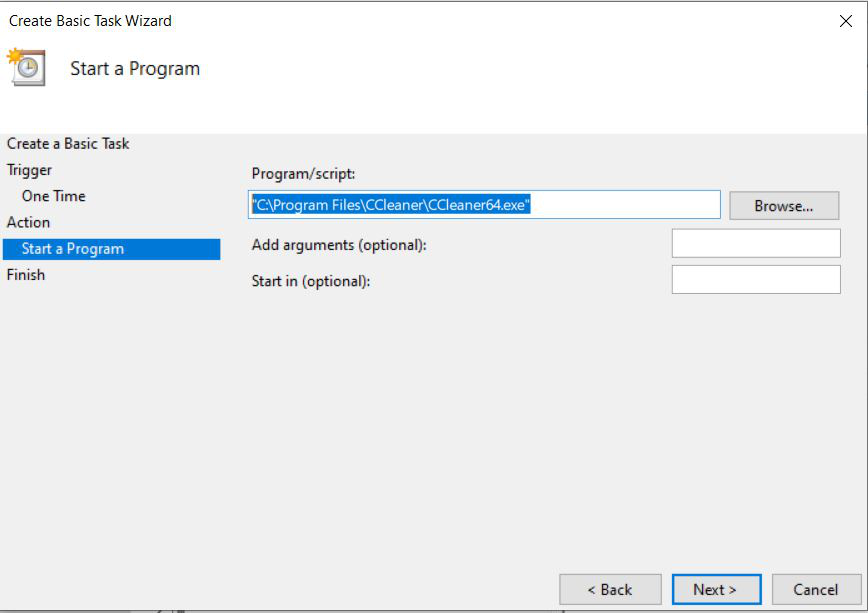
Step-10 : Choose desired program that you want to run on already assigned time by clicking on “Browse” button, then click on “Next” option.
Step-11 : After clicking on “Next” option, we will get last dialog box showing us all information already filled, and then we have to acknowledge by clicking on “finish” button, and then our task would be successfully created.
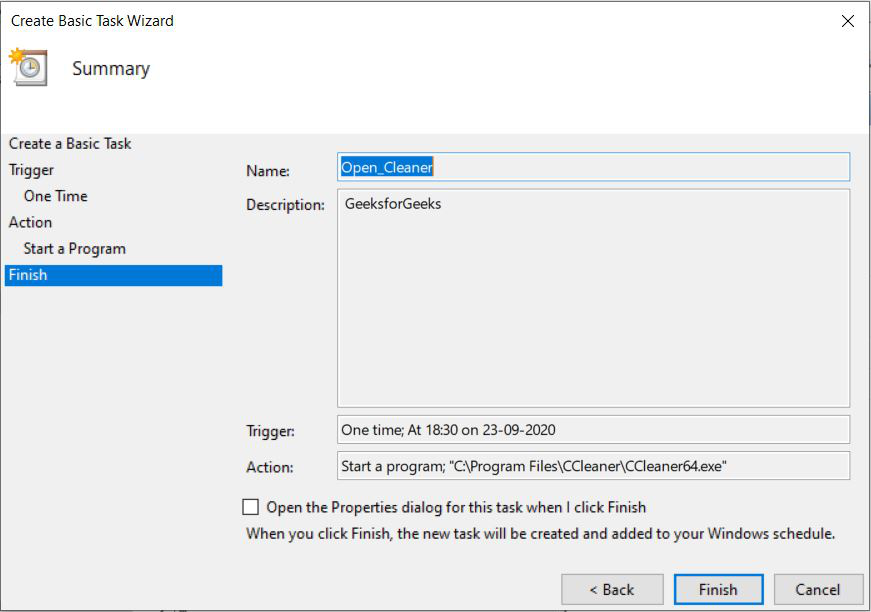
Now, the assigned task will be initiated at the decided time.
Procedure for Automating an Advanced Task :
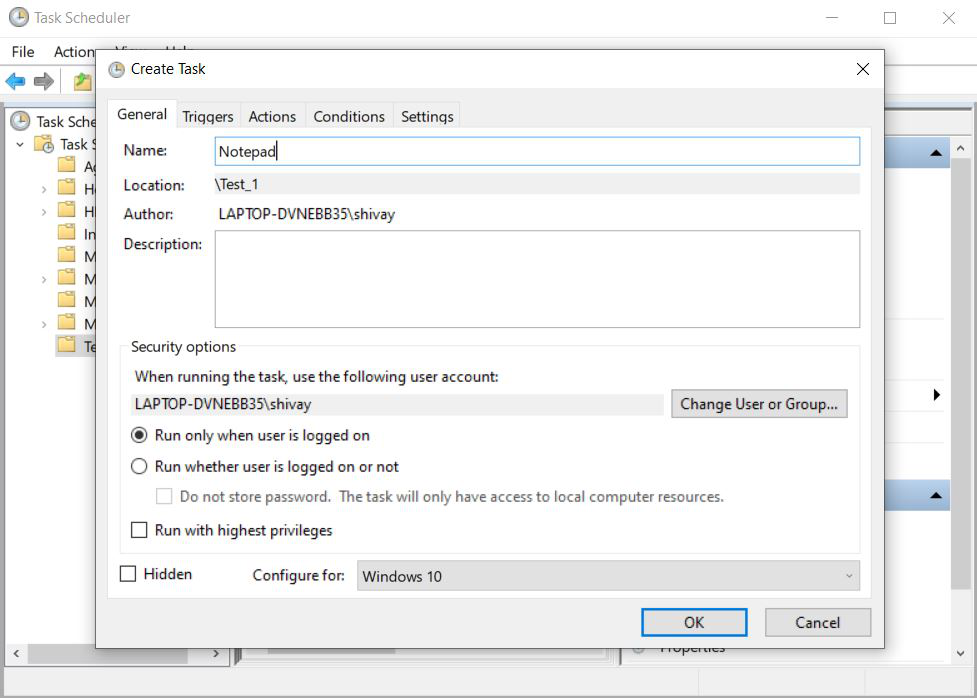
Step-1 : Follow earlier step-1 to step-4 as it is, and create folder accordingly, then click on that folder and choose “Create Task” option on right window pane. Also, once the dialog box appears fill-up name-field on top with your desired task, that is going to be performed and under “Security Options” choose preferred choice according to your need.
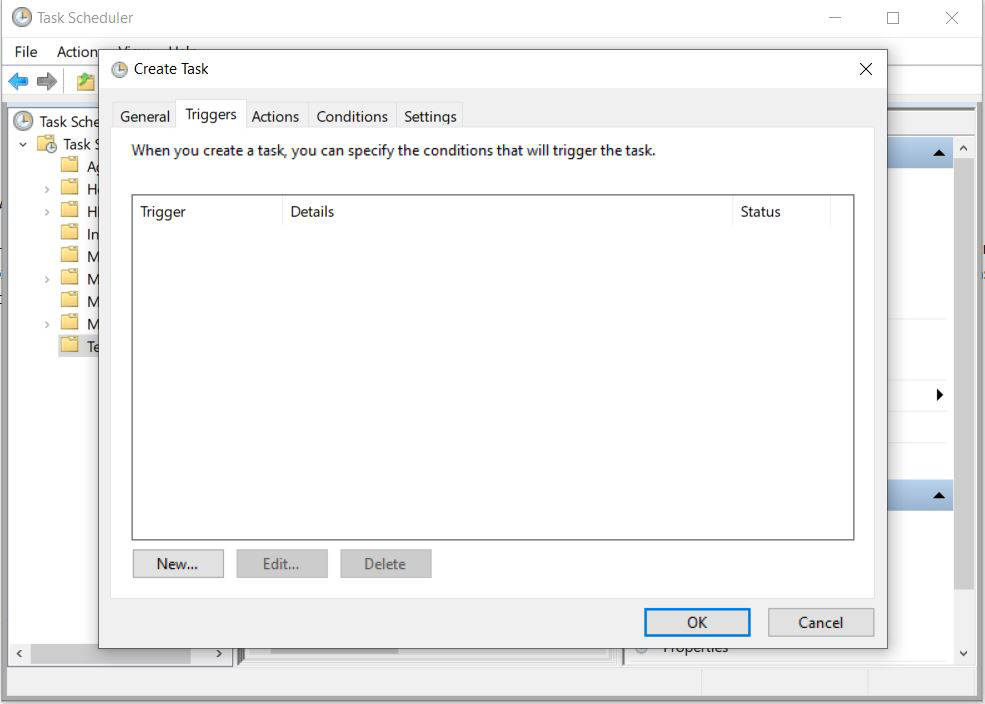
Step-2 : Click on “Triggers” tab on top, then click on the “New” button.
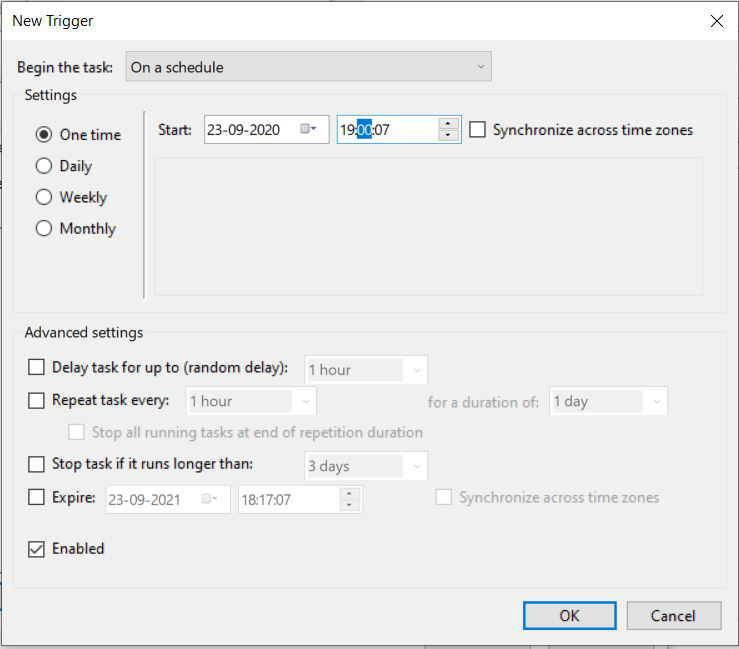
Step-3 : In the New options dialog box, select all options according to your need and set-up timing schedule for execution of the program, you can also choose options from advanced options, then click on “Ok” button.
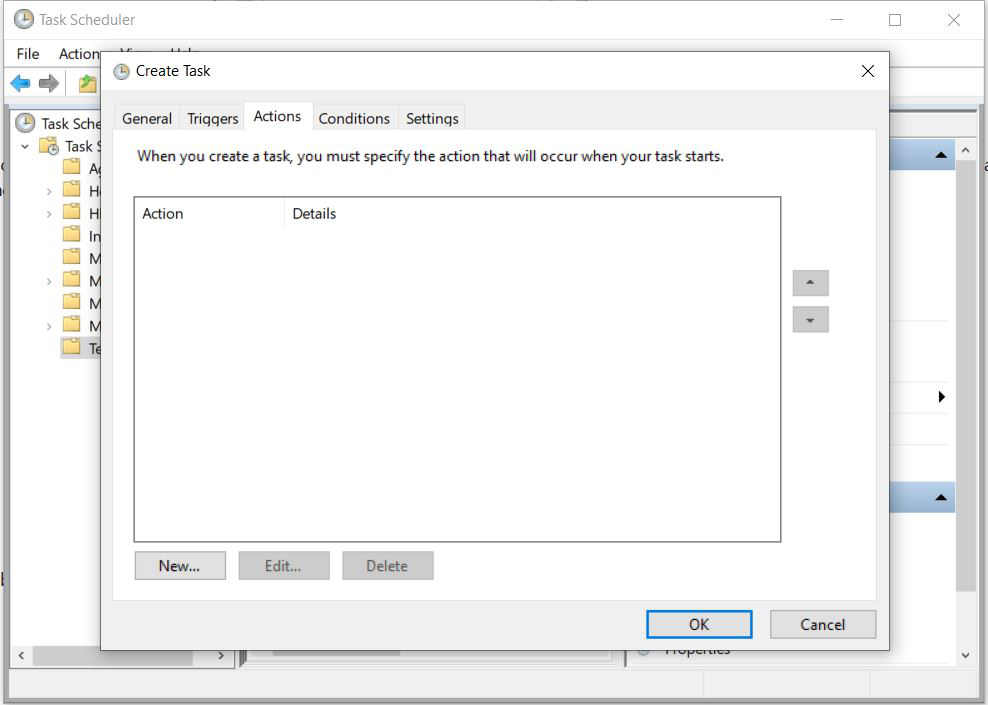
Step-4 : Click on Action” tab on top, and click on “New” option at bottom.
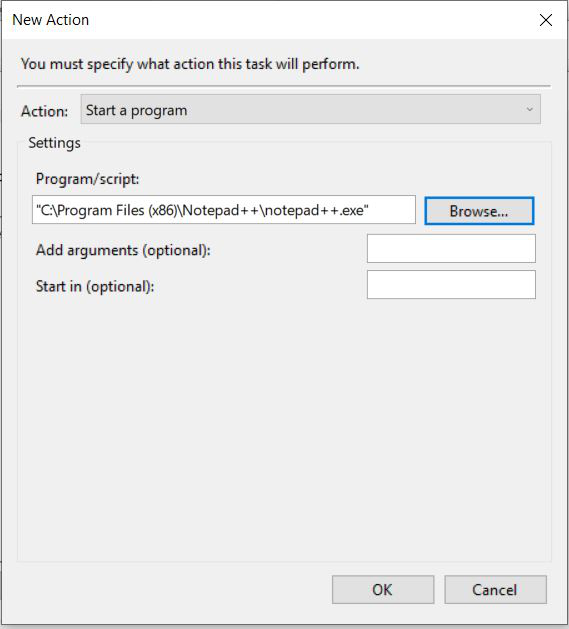
Step-5 : Choose path of application you want to make it run automatically by clicking on “browse” button and then click on “Ok” option.
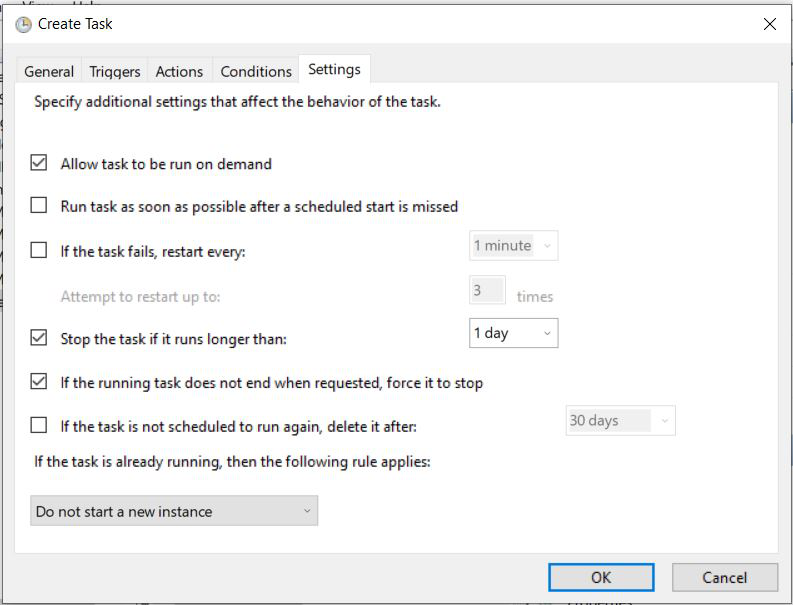
Step-6 : You can similarly go to “Conditions” and “Settings” tab, and configure all your desired settings for automated task accordingly.
Step-7 : After you have configured all settings for program, then you can click on “Ok” option and the task will be created in the folder specified already and it will be successfully initiated on the already assigned time.
Conclusion : We have successfully assigned or created task to be completed automatically on thedeclared time in Windows 10.
From Wikipedia, the free encyclopedia
Windows Task Scheduler
|
Management console for Task Scheduler 3.0 in Windows 11 |
|
| Other names | taskschd.msc |
|---|---|
| Developer(s) | Microsoft |
| Initial release | 1995; 30 years ago |
| Written in | C++ |
| Included with |
|
| Predecessor | System Agent |
| Service name | Task Scheduler (Schedule) |
| Type | Windows service |
| Website | docs |
Task Scheduler (formerly Scheduled Tasks)[1] is a job scheduler in Microsoft Windows that launches computer programs or scripts at pre-defined times or after specified time intervals.[2][3] Microsoft introduced this component in the Microsoft Plus! for Windows 95 as System Agent.[4] Its core component is an eponymous Windows service.[5] The Windows Task Scheduler infrastructure is the basis for the Windows PowerShell scheduled jobs feature introduced with PowerShell v3.[6]
Task Scheduler can be compared to cron or anacron on Unix-like operating systems. This service should not be confused with the scheduler, which is a core component of the OS kernel that allocates CPU resources to processes already running.
Task Scheduler 1.0 is included with Windows NT 4.0[7] (with Internet Explorer 4.0 or later), Windows 2000,[7] Windows XP[8] and Windows Server 2003.[9] It runs as a Windows Service, and the task definitions and schedules are stored in binary .job files. Tasks are manipulated directly by manipulating the .job files. Each task corresponds to single action. On Windows 95 (with Internet Explorer 4.0 or later), Windows 98 and Windows Me, the Task Scheduler runs as an ordinary program, mstask.exe. It also displays a status icon in the notification area on Windows 95 and Windows 98 and runs as a hidden service on Windows Me, but can be made to show a tray icon.[1] Computer programs and scripts can access the service through six COM interfaces.[10] Microsoft provides a scheduling agent DLL, a sample VBScript and a configuration file to automate Task Scheduler.[11]
In addition to the graphical user interface for Task Scheduler in Control Panel, Windows provides two command-line tools for managing scheduled task: at.exe (deprecated)[12] and schtasks.exe.[5][13][14] However, at.exe cannot access tasks created or modified by Control Panel or schtasks.exe.[15] Also, tasks created with at.exe are not interactive by default; interactivity needs to be explicitly requested. The binary «.job» files which the AT command produces are stored in the %WINDIR%\Tasks directory.[16][17]
Task Scheduler 2.0 was introduced with Windows Vista[18] and included in Windows Server 2008 as well.[19][9] The redesigned Task Scheduler user interface is now based on Management Console. In addition to running tasks on scheduled times or specified intervals, Task Scheduler 2.0 also supports calendar and event-based triggers, such as starting a task when a particular event is logged to the event log, or when a combination of events has occurred. Also, several tasks that are triggered by the same event can be configured to run either simultaneously or in a pre-determined chained sequence of a series of actions, instead of having to create multiple scheduled tasks. Tasks can also be configured to run based on system status such as being idle for a pre-configured amount of time, on startup,[20] logoff, or only during or for a specified time. XPath expressions can be used to filter events from the Windows Event Log. Tasks can also be delayed for a specified time after the triggering event has occurred, or repeat until some other event occurs. Actions that need to be done if a task fails can also be configured. The actions that can be taken in response to triggers, both event-based as well as time-based, not only include launching applications but also take a number of custom actions. Task Scheduler includes a number of actions built-in, spanning a number of applications; including send an e-mail, show a message box, or fire a COM handler when it is triggered. Custom actions can also be specified using the Task Scheduler API. Task Scheduler keeps a history log of all execution details of all the tasks.[21] Windows Vista uses Task Scheduler 2.0 to run various system-level tasks;[22] consequently, the Task Scheduler service can no longer be disabled (except with a simple registry tweak).
Task Scheduler 2.0 exposes an API to allow computer programs and scripts create tasks.[19][23] It consists of 42 COM interfaces.[24] The Windows API does not, however, include a managed wrapper for Task Scheduler though an open source implementation exists.[25] The job files for Task Scheduler 2.0 are XML-based, and are human-readable, conforming to the Task Scheduler Schema.[19][23]
- New security features, including using Credential Manager to passwords for tasks on workgroup computers and using Active Directory for task credentials on domain-joined computers so that they cannot be retrieved easily. Also, scheduled tasks are executed in their own session, instead of the same session as system services or the current user.
- Ability to wake up a machine remotely or using BIOS timer from sleep or hibernation to execute a scheduled task or run a previously scheduled task after a machine gets turned on.
- Ability to attach tasks to events directly from the Event Viewer.
The Task Scheduler service works by managing Tasks; Task refers to the action (or actions) taken in response to trigger(s). A task is defined by associating a set of actions, which can include launching an application or taking some custom-defined action, to a set of triggers, which can either be time-based or event-based. In addition, a task also can contain metadata that defines how the actions will be executed, such as the security context the task will run in. Tasks are serialized to .job files and are stored in the special folder titled Task Folder, organized in subdirectories. Programmatically, the task folder is accessed using the ITaskFolder interface or the TaskFolder scripting object and individual tasks using the IRegisteredTask interface or RegisteredTask object.[26]
Column ‘Last Result’
[edit]
The Last Result column displays a completion code. The common codes for scheduled tasks are:[27][28]
- 0 or 0x0: The operation completed successfully.
- 1 or 0x1: Incorrect function called or unknown function called.
- 2 or 0x2: File not found.
- 10 or 0xa: The environment is incorrect.
- 0x00041300: Task is ready to run at its next scheduled time.
- 0x00041301: The task is currently running.
- 0x00041302: The task has been disabled.
- 0x00041303: The task has not yet run.
- 0x00041304: There are no more runs scheduled for this task.
- 0x00041305: One or more of the properties that are needed to run this task have not been set.
- 0x00041306: The last run of the task was terminated by the user.
- 0x00041307: Either the task has no triggers or the existing triggers are disabled or not set.
- 0x00041308: Event triggers do not have set run times.
- 0x80010002: Call was canceled by the message filter
- 0x80041309: A task’s trigger is not found.
- 0x8004130A: One or more of the properties required to run this task have not been set.
- 0x8004130B: There is no running instance of the task.
- 0x8004130C: The Task Scheduler service is not installed on this computer.
- 0x8004130D: The task object could not be opened.
- 0x8004130E: The object is either an invalid task object or is not a task object.
- 0x8004130F: No account information could be found in the Task Scheduler security database for the task indicated.
- 0x80041310: Unable to establish existence of the account specified.
- 0x80041311: Corruption was detected in the Task Scheduler security database
- 0x80041312: Task Scheduler security services are available only on Windows NT.
- 0x80041313: The task object version is either unsupported or invalid.
- 0x80041314: The task has been configured with an unsupported combination of account settings and run time options.
- 0x80041315: The Task Scheduler Service is not running.
- 0x80041316: The task XML contains an unexpected node.
- 0x80041317: The task XML contains an element or attribute from an unexpected namespace.
- 0x80041318: The task XML contains a value which is incorrectly formatted or out of range.
- 0x80041319: The task XML is missing a required element or attribute.
- 0x8004131A: The task XML is malformed.
- 0x0004131B: The task is registered, but not all specified triggers will start the task.
- 0x0004131C: The task is registered, but may fail to start. Batch logon privilege needs to be enabled for the task principal.
- 0x8004131D: The task XML contains too many nodes of the same type.
- 0x8004131E: The task cannot be started after the trigger end boundary.
- 0x8004131F: An instance of this task is already running.
- 0x80041320: The task will not run because the user is not logged on.
- 0x80041321: The task image is corrupt or has been tampered with.
- 0x80041322: The Task Scheduler service is not available.
- 0x80041323: The Task Scheduler service is too busy to handle your request. Please try again later.
- 0x80041324: The Task Scheduler service attempted to run the task, but the task did not run due to one of the constraints in the task definition.
- 0x00041325: The Task Scheduler service has asked the task to run.
- 0x80041326: The task is disabled.
- 0x80041327: The task has properties that are not compatible with earlier versions of Windows.
- 0x80041328: The task settings do not allow the task to start on demand.
- 0x80070002: The Task Scheduler cannot find the file.
- 0x800710E0: The operator or administrator has refused the request.
- 0xC000013A: The application terminated as a result of a CTRL+C.
- 0xC0000142: The application failed to initialize properly.
On Windows 2000 and Windows XP, when a computer is prepared for disk imaging with the sysprep utility, it cannot run tasks configured to run in the context of the SYSTEM account. Sysprep changes the security identifier (SID) to avoid duplication but does not update scheduled tasks to use the new SID. Consequently, the affected tasks fail to run. There is no solution for this problem but one may reschedule the affected tasks to work around the issue.[29]
On Windows Vista or Windows Server 2008, the next execution time displayed in Task Scheduler may be wrong. Microsoft issued a hotfix to remedy this issue.[30]
- cron, job scheduler for Unix-like operating systems
- ^ a b «How to Enable the Scheduled Tasks Icon in Windows Me». Support. Microsoft. January 29, 2007. Archived from the original on January 30, 2008.
- ^ «Keep your Windows desktop in shape with Task Scheduler». TechRepublic. January 4, 2002.
- ^ «What is Task Scheduler?». Computer Hope. November 30, 2020.
- ^ Al Fasoltd (March 29, 1998). «Windows 98: Stable and fast, as well as ‘new and improved’«. The Syracuse Newspapers. Retrieved October 6, 2007.
- ^ a b Mueller, John Paul (2010). Windows Command Line Administration Instant Reference. John Wiley & Sons. ISBN 978-0470930908.
- ^ Warner, Timothy L. (2015). Sams Teach Yourself Windows PowerShell in 24 Hours. Sams Publishing. ISBN 978-0134049359.
- ^ a b Burnett, Mark; Amaris, Chris; Doyle, Chris; Locher, L. J.; Morimoto, Rand (2002). Maximum Windows 2000 Security. Sams Publishing. ISBN 978-0672319655.
- ^ Mueller, John Paul (2001). Sams Teach Yourself Microsoft Windows XP in 21 Days. Sams Publishing. ISBN 978-0132715539.
- ^ a b «About the Task Scheduler». MSDN. Microsoft. Retrieved October 6, 2007.
- ^ «Task Scheduler 1.0 Interfaces». MSDN. Microsoft. Retrieved May 30, 2014.
- ^ «Task Scheduler Using VBScript». Download Center. Microsoft. March 22, 2004. Archived from the original on May 4, 2006.
- ^ «MS-DOS and Windows command line at command». Computer Hope. Retrieved March 7, 2021.
- ^ «Schtasks». Microsoft TechNet. Microsoft. Retrieved May 18, 2014.
- ^ «At». Microsoft TechNet. Microsoft. Retrieved May 18, 2014.
- ^ «How To Use the AT Command to Schedule Tasks». Support. Microsoft. October 30, 2006.
- ^ Kleiman, Dave; Hunter, Laura E (2006). Winternals Defragmentation, Recovery, and Administration Field Guide. Elsevier. ISBN 978-0080489872.
- ^ «Applications Started with AT Are Not Interactive». Support. Microsoft. February 20, 2007. Archived from the original on October 29, 2004.
- ^ Cowart, Robert; Knittel, Brian (2008). Special Edition Using Microsoft Windows Vista. Que Publishing. ISBN 978-0789737816.
- ^ a b c Kingsley-Hughes, Adrian; Kingsley-Hughes, Kathie; Read, Daniel (2011). VBScript Programmer’s Reference. John Wiley & Sons. ISBN 978-1118058695.
- ^ Paul, Ian (September 5, 2014). «Automate your morning programs with Windows Task Scheduler». PCWorld. Retrieved March 15, 2021.
- ^ «Windows Vista Task Scheduler». Microsoft TechNet. Microsoft. March 3, 2006. Archived from the original on April 12, 2006. Retrieved April 24, 2006.
- ^ «Description of the scheduled tasks in Windows Vista». August 24, 2007. Archived from the original on October 22, 2007.
- ^ a b Kenny Kerr (October 2007). «Task Scheduler 2.0». MSDN. Microsoft. Archived from the original on December 26, 2007. Retrieved October 6, 2007.
- ^ «Task Scheduler 2.0 Interfaces». MSDN. Microsoft. Retrieved May 30, 2014.
- ^ «C# API for Task Scheduler 2.0». Stack Overflow. Retrieved July 24, 2019.
- ^ «Tasks (Windows)». MSDN. Microsoft. Retrieved October 6, 2007.
- ^ «How to troubleshoot scheduled tasks in Windows XP and in Windows Server 2003». Support. Microsoft. May 22, 2013. Retrieved September 3, 2013.
- ^ «Task Scheduler Error and Success Constants». MSDN. Microsoft.
- ^ «Scheduled tasks may not start if you used a System Preparation image to install Windows XP or Windows 2000». Support. Microsoft. July 1, 2004. Archived from the original on September 26, 2008. Retrieved May 19, 2012.
- ^ «The value in the Next Run Time field in Task Scheduler is incorrect in Windows Vista and in Windows Server 2008». Support. Microsoft. October 15, 2008. Archived from the original on December 11, 2008.
- Leonhard, Woody; Rusen, Ciprian (2021). Windows 10 All-in-One For Dummies. John Wiley & Sons. ISBN 978-1119680574.
- Knittel, Brian; McFedries, Paul (2014). Windows 8.1 in Depth. Que Publishing. ISBN 978-0789752819.
- Bott, Ed; Siechert, Carl; Stinson, Craig (2009). Windows 7 Inside Out. Pearson Education. ISBN 978-0735636842.
- Ruest, Danielle; Ruest, Nelson (2008). Microsoft Windows Server 2008: The Complete Reference. McGraw-Hill Education. ISBN 978-0071596466.
- Cowart, Robert; Knittel, Brian (2008). Special Edition Using Microsoft Windows Vista. Que. ISBN 978-0789737816.
- Task Scheduler on MSDN
- The Log File in the Task Scheduler May Be Incorrectly Formatted and Difficult to Read — Archived October 16, 2007, at the Wayback Machine
- Unable to Delete Text in the Task Scheduler Log File
- Task Scheduler Service Does Not Start
- Scheduled Program Does Not Start in Task Scheduler — Archived August 21, 2006, at the Wayback Machine
- Cannot Disable Task Scheduler
Task Scheduler is a powerful tool in Windows that allows you to schedule or automate various tasks and improve your workflow. Whether you’re a power user or want to automate repetitive tasks, Task Scheduler can increase productivity. However, accessing Task Scheduler can be tricky. So, this article outlines 12 ways to open Task Scheduler in Windows.
Knowing different ways to open Task Scheduler in Windows allows you to access the tool and meet your specific needs efficiently. It can be particularly useful if you frequently use Task Scheduler. With that said, let’s begin with the methods.
1. Open Task Scheduler Using Windows Search
Whether on Windows 10 or 11, a quick search gets your desired installed app in front of you. It is one of the easiest and most common ways to open a Task Scheduler. Here’s how to.
Step 1: Press the Windows key on your keyboard or click the on-screen Windows icon.
Note: You may also click on the on-screen Search icon.

Step 2: Type Task Scheduler.

Step 3: Click ‘Run as administrator.’

In the prompt, select Yes.
That’s it. You have successfully opened Task Scheduler. Now that you have accessed Task Scheduled, you may also want to learn how to schedule tasks in Windows 10.
2. Run Task Scheduler Using Cortana
This method is much easier; you can open Task Scheduler without touching your Windows PC, provided you have turned on Cortana on Windows. Simply activate Cortana by saying ‘Hey Cortana’ (wait for it to open and start listening) and then say, ‘open Task Scheduler.’
It will process and open it for you. If you don’t find Cortana on your PC or you don’t use it, move to the next method.
3. Run Task Scheduler Using Windows Tools
Windows Tools is a collection of system tools and utilities built into the Windows operating system to help you manage, troubleshoot, and diagnose various computer problems.
It includes several built-in features, including Disk Cleanup, Disk Defragmenter, and System Configuration. One of the tools included in Windows Tools is the Task Scheduler.
If you are on Windows 10, follow the instructions carefully.
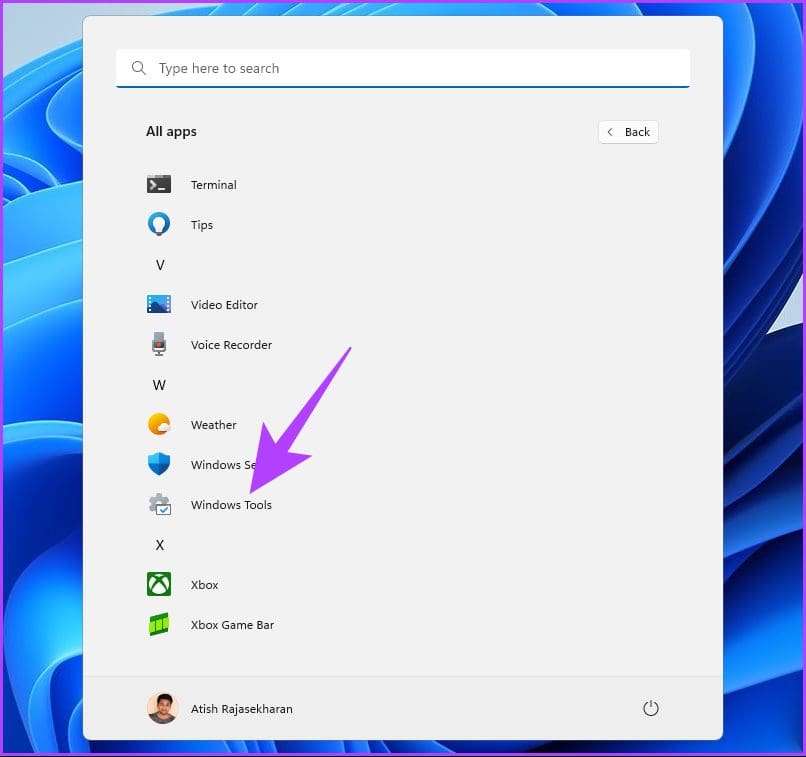
Step 1: Press the Windows key on the keyboard or click the Windows icon on the taskbar and select All apps.

Step 2: From the list of programs, scroll down to find Windows Tools and click on it.
Note: If you are on Windows 10, you will find Windows Administrative Tool. Click on the folder and select Task Scheduler.
Step 3: Under the Windows Tools folder, click on the Task Scheduler.
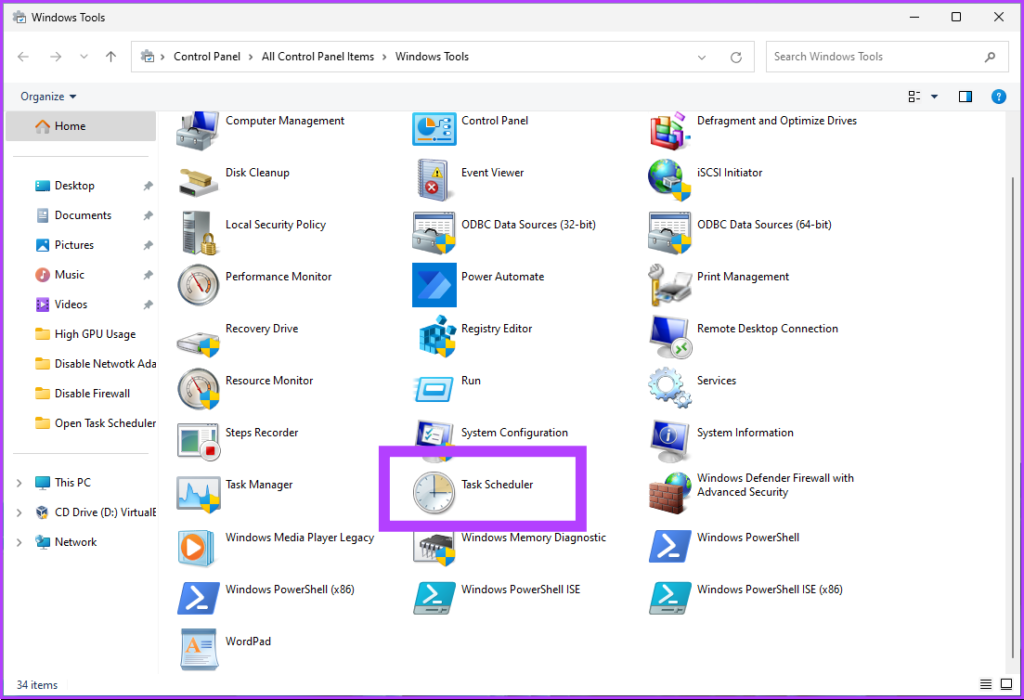
There you have it. You have successfully opened Task Scheduler on your Windows PC. Check out the next method if you are looking for a familiar way of opening the Task Scheduler.
4. How to Open Task Scheduler Using File Explorer
This method enables you to open Task Scheduler from File Explorer. Irrespective of whether you are on Windows 10 or Windows 11, it is easy to execute the below steps.
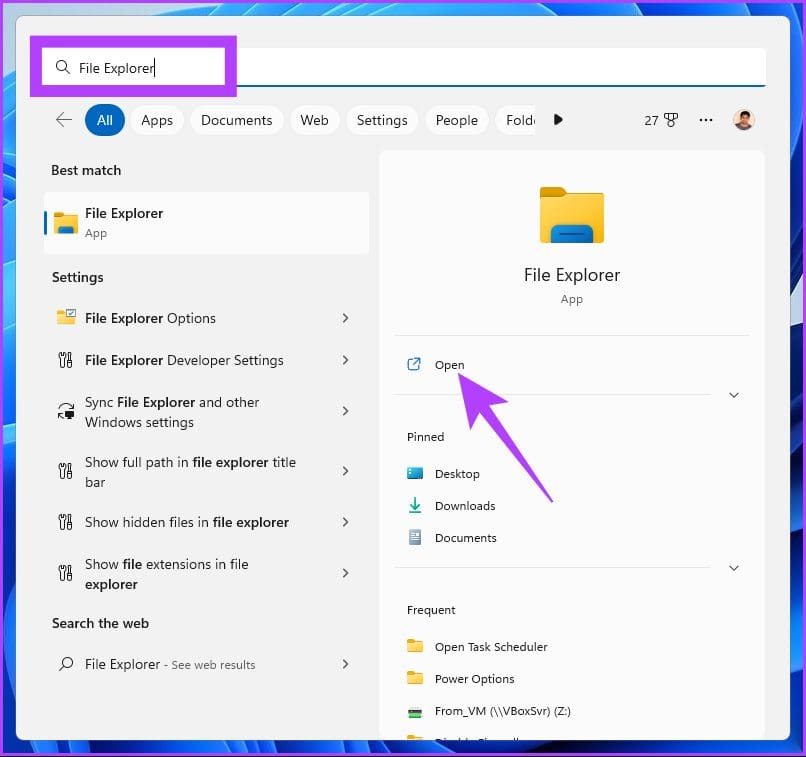
Step 1: Press the Windows key on your keyboard, type File Explorer, and click Open.
Note: Alternatively, press the ‘Windows key + E’ on your keyboard to open Windows Explorer.
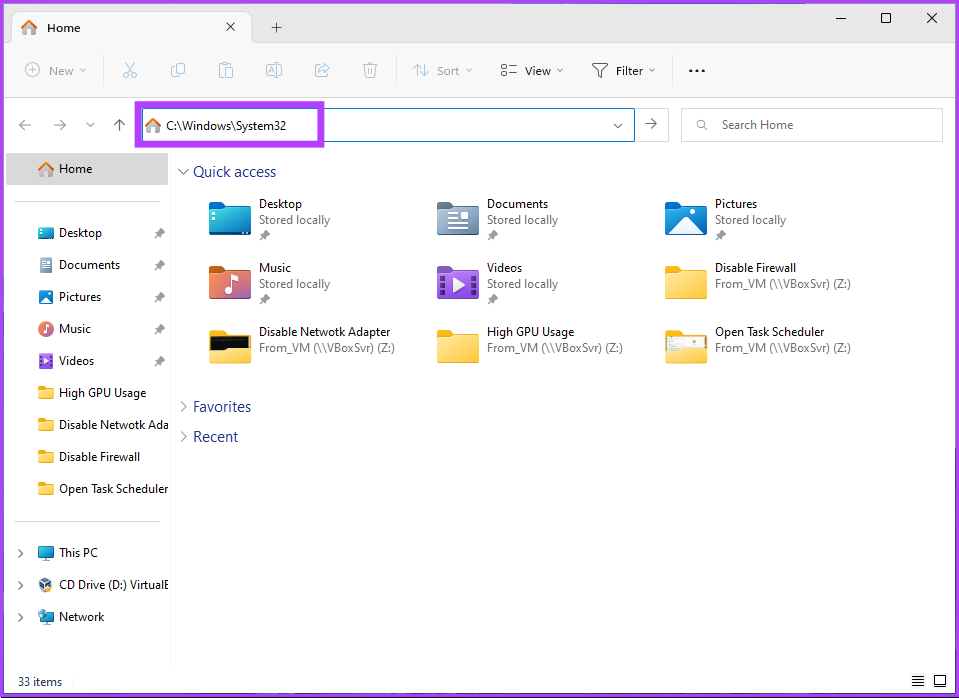
Step 2: Navigate to the address bar, type the below address, and hit Enter.
C:\Windows\System32
Step 3: Scroll down and double-click on taskschd.
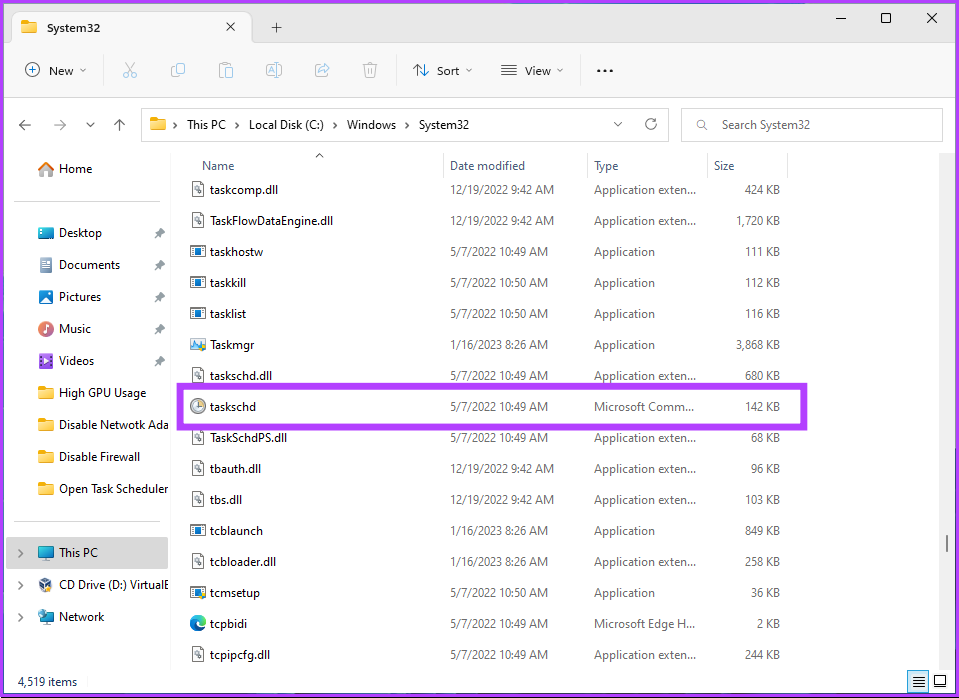
There you go. A few simple steps will get you started with Task Scheduler. You can also create a shortcut and place it anywhere you prefer on your Windows PC. Let’s understand how.
5. How to Create a Task Scheduler Shortcut
Creating a Task Scheduler shortcut is a one-time process that allows you to open the tool with one click every time. This is one of the quickest ways to open Task Scheduler in Windows. Here’s how to do so.
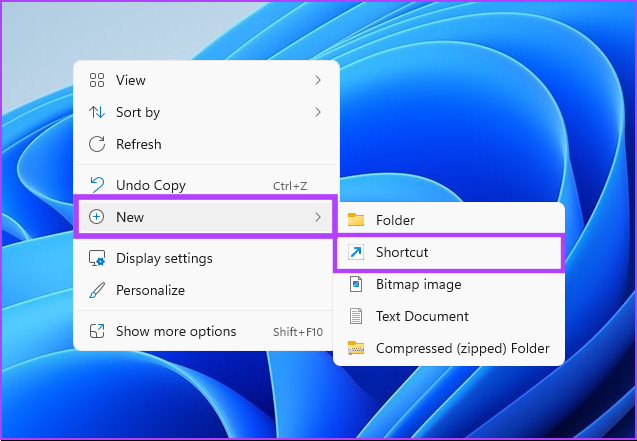
Step 1: Right-click on the empty space on your desktop, go to New, and select Shortcut.
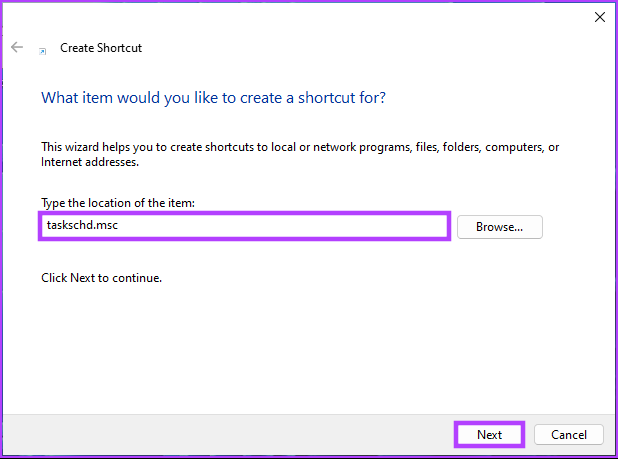
Step 2: In the Create Shortcut wizard, under ‘Type the location for the item,’ type taskschd.msc and click Next.
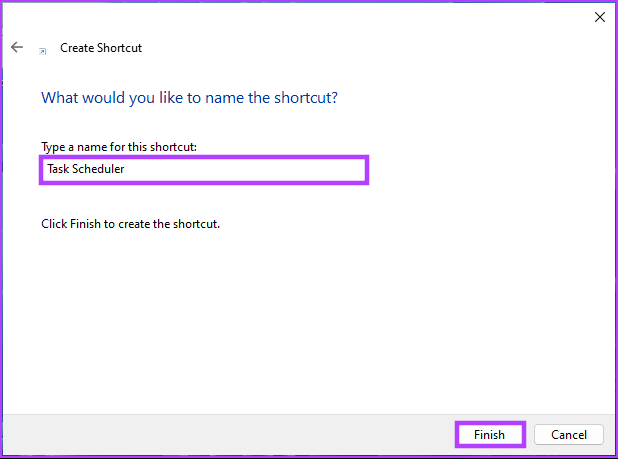
Step 3: Enter a name for your shortcut and click Finish.
Eg: Task Scheduler
With this, you can open Task Scheduler with a button anytime. You can also set a hotkey to open it. Continue reading.
6. How to Open Windows Task Scheduler with a Hotkey
You already know how to create a Task Scheduler shortcut. However, setting a hotkey to open it will make opening Task Scheduler in Windows frictionless. Follow the steps below.
Step 1: First, add a Task Scheduler shortcut to your desktop as shown in the previous section.

Step 2: Right-click the Task Scheduler desktop shortcut and select Properties.
Note: Alternatively, you can press ‘Alt + Enter’ on your keyboard.
Step 3: In the Task Scheduler Properties window, under the Shortcut key box, press T (or any letter you prefer) to establish a Ctrl + Alt key combination. Finally, click Apply and then OK.
With this, all you have to do is press the key combination to open Task Scheduler. As the key combination is tied to the desktop shortcut, deleting it will also erase the hotkey. If the shortcut is too much for you, there are other options too.
7. Run Windows Task Scheduler Using Control Panel
There are many options that you may find under Control Panel; one of them is Task Scheduler. Here’s how you can open it.
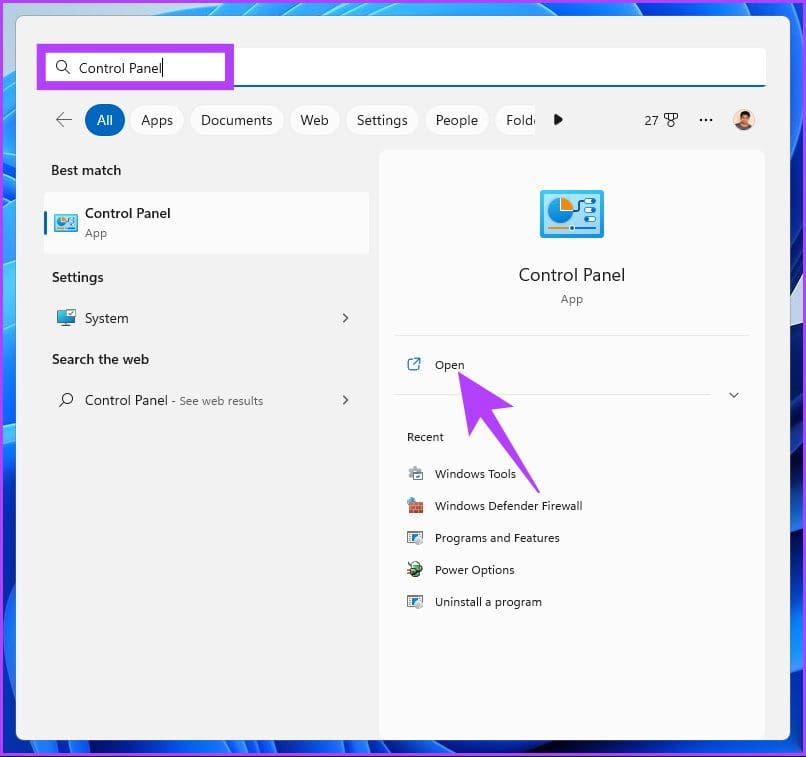
Step 1: Press the Windows key on your keyboard, type Control Panel, and click on Open.
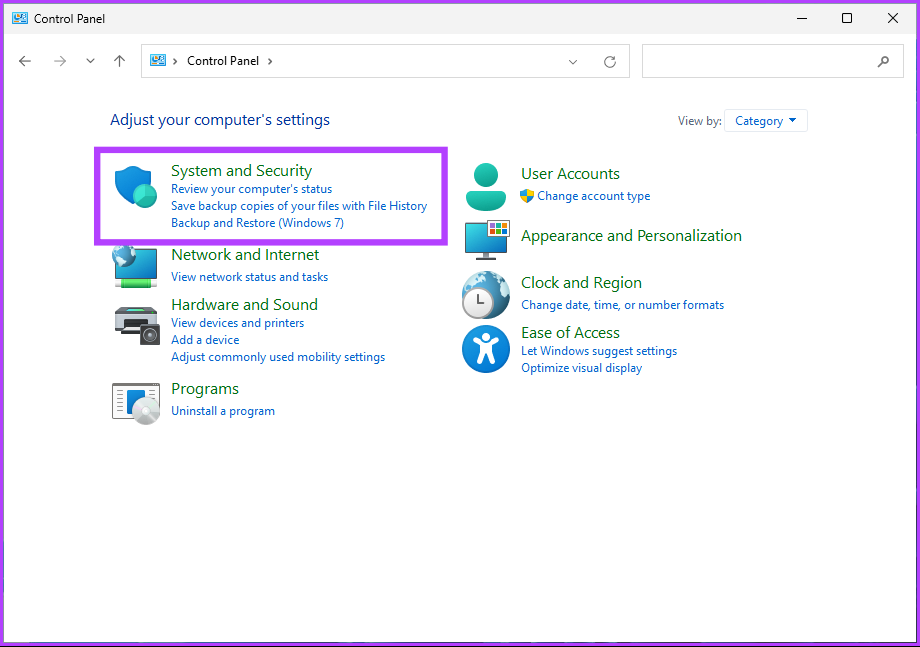
Step 2: Under Control Panel, go to ‘System and Security.’
Step 3: Go to the Schedule tasks option to open Task Scheduler.

If the option is not available or visible, continue with the below steps.
Step 4: Click on Administrative Tools (Windows 10) or Windows Tools (Windows 11).
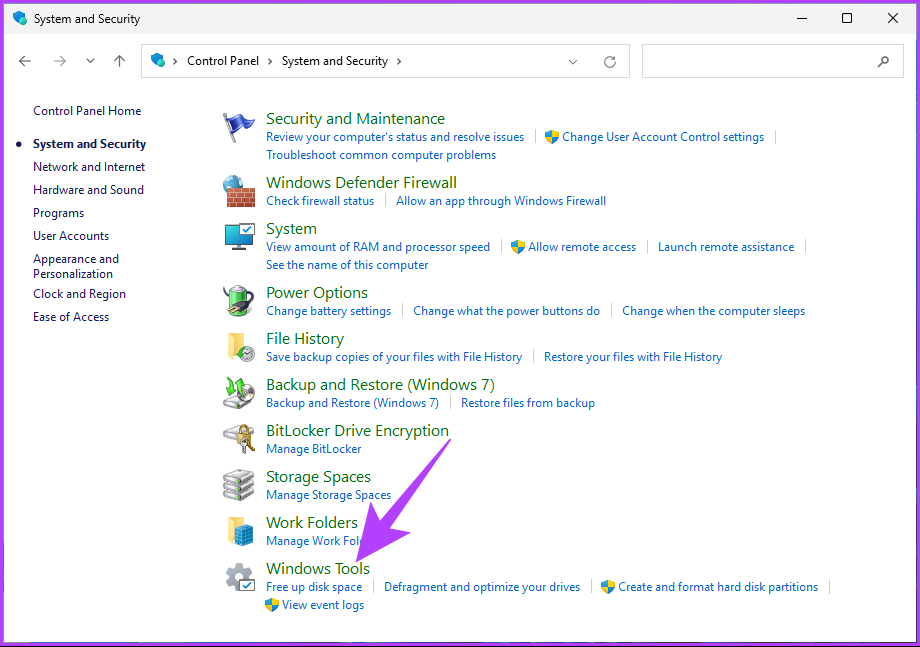
Step 5: Scroll down to find Task Scheduler and double-click on it to open it.
There you go. You have successfully opened Task Scheduler from Control Panel. If you are looking for a more straightforward way to open Task Scheduler, move to the next method.
8. Open Task Scheduler Using Computer Management
Windows Computer Management provides a centralized interface for managing various aspects of a computer system. The Computer Management tool allows access to different system management functions, including a Task Scheduler. Follow the below-mentioned steps.
Step 1: Press the ‘Windows key + X’ on your keyboard to open the context menu.
Note: Alternatively, you can right-click the Windows icon on the taskbar.
Step 2: In the WinX menu, select Computer Management.
Step 3: Go to Task Scheduler from the left pane under the Computer Management window.

There you have it. You know now another way to schedule your tasks on Windows PC. However, if you are in Task Manager and want to schedule a task, it is much easier to open it from there than going full circle.
9. Run Windows Task Scheduler Using Task Manager
It is fairly simple to open Task Scheduler from the Task Manager. All you need to do is follow the instructions below.
Step 1: Press the Windows key on your keyboard, type Task Manager, and click ‘Run as administrator.’
Note: Alternatively, press ‘Windows key + Shift + Esc’ to open Task Manager.

Step 2: Click on ‘Run new task.’
Note: If you are on Windows 10, click on File and select ‘Run new task.’

Step 3: In the ‘Create new task’ window, type taskschd.msc in the text field, and click OK.

You have successfully opened Task Scheduler on your Windows PC using Task Manager. Keep reading if you want to do the same thing using the Run command box.
10. Open Task Scheduler Using Run Command Box
This method is relatively easy, considering you already know how to open Task Scheduler using Task Manager (above). Follow the below steps.
Step 1: Press the ‘Windows key + R’ to open the Run command box.
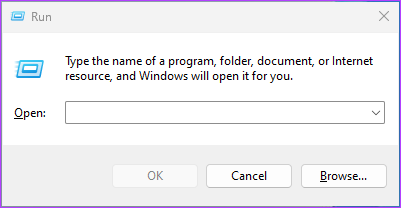
Step 2: Type the below command and click OK.
taskschd.msc

There you have it. This method is the quickest way to open the Task Scheduler. However, if you want another way to open it, check out the next method.
11. Run Task Scheduler Using Command Prompt, PowerShell, or Windows Terminal
You can launch Task Scheduler using command-line interpreters. All you have to do is enter a command to open it. Follow the below steps.
Step 1: Press the Windows key on your keyboard, type Command Prompt or PowerShell or Windows Terminal, and click ‘Run as administrator.’
Note: For the sake of demonstration, we will open Command Prompt and use it to access Task Scheduler.
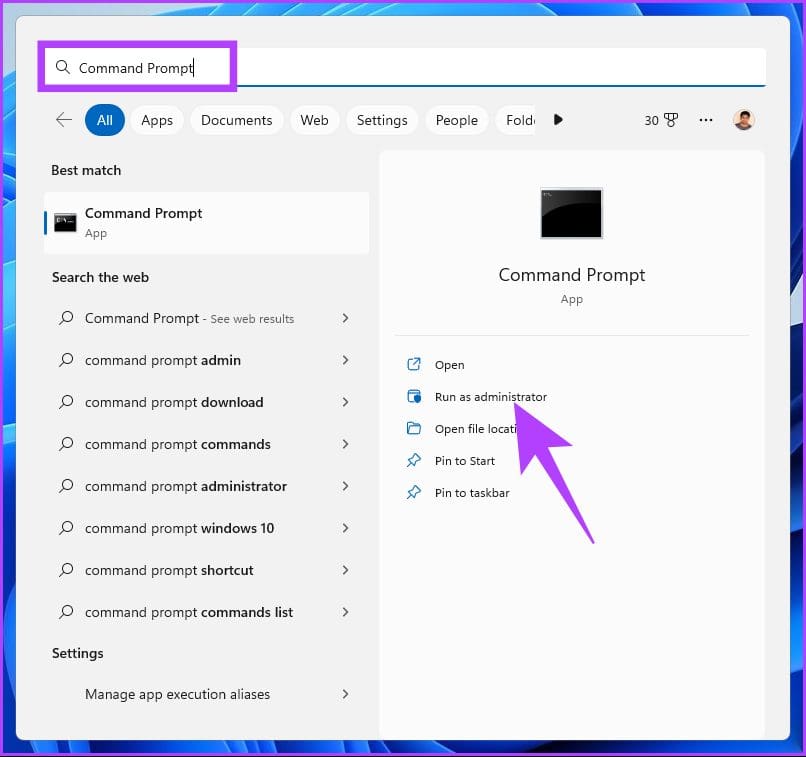
In the prompt, select Yes.
Step 2: Type the below command and hit Enter.
taskschd

That’s it. It will open Task Scheduler with ease. If you are an avid user of Task Scheduler and want it included in the context menu, move to the next method.
12. How to Open Task Scheduler From the Desktop Context Menu
If you are not a fan of keeping desktop shortcuts but prefer a cleaner view, this method will help. It isn’t as straightforward as the above ones, but the steps are reasonably simple to follow and execute.
However, because we will be using Registry Editor, we strongly advise you to back up the Windows Registry before proceeding with the steps below.
Step 1: Press the Windows key on your keyboard, type Registry Editor, and click ‘Run as administrator.’
Note: You can also press ‘Windows key + R’ to open the Run dialog box, type regedit.exe, and click OK to open Registry Editor.

In the prompt, select Yes.
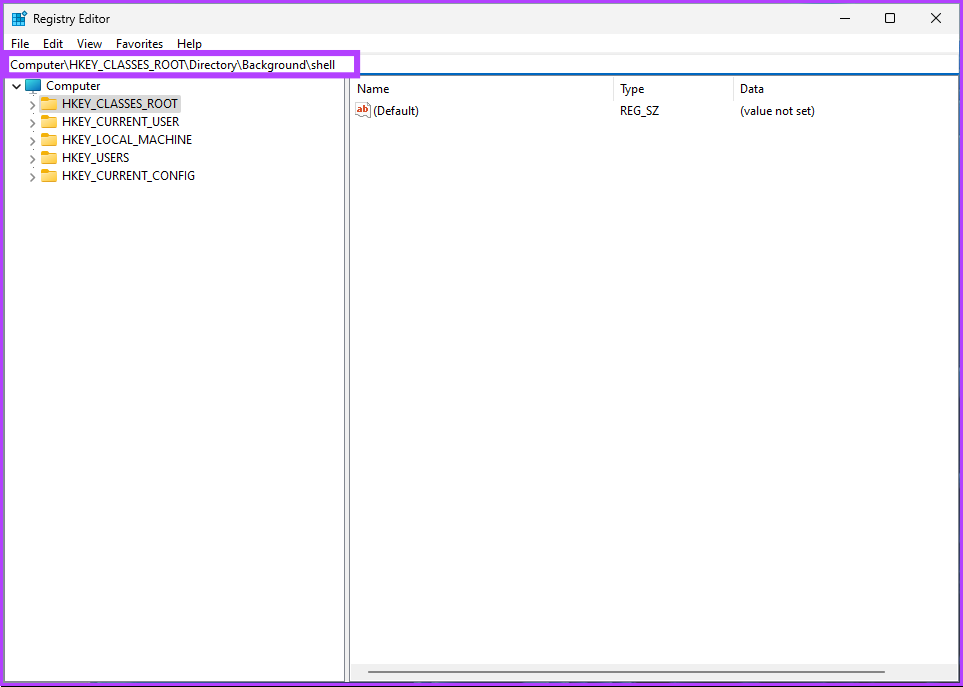
Step 2: In the address bar, enter the below-mentioned address.
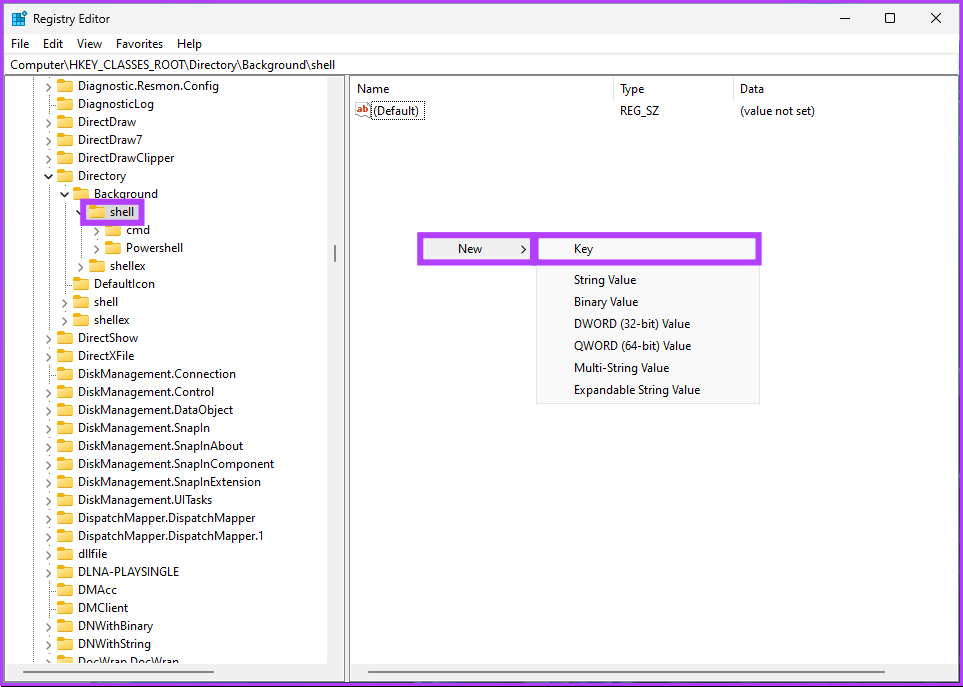
HKEY_CLASSES_ROOT\Directory\Background\Shell
Note: You can manually navigate to the section too.
Step 3: Under the Shell folder, right-click, select New, and choose Key.
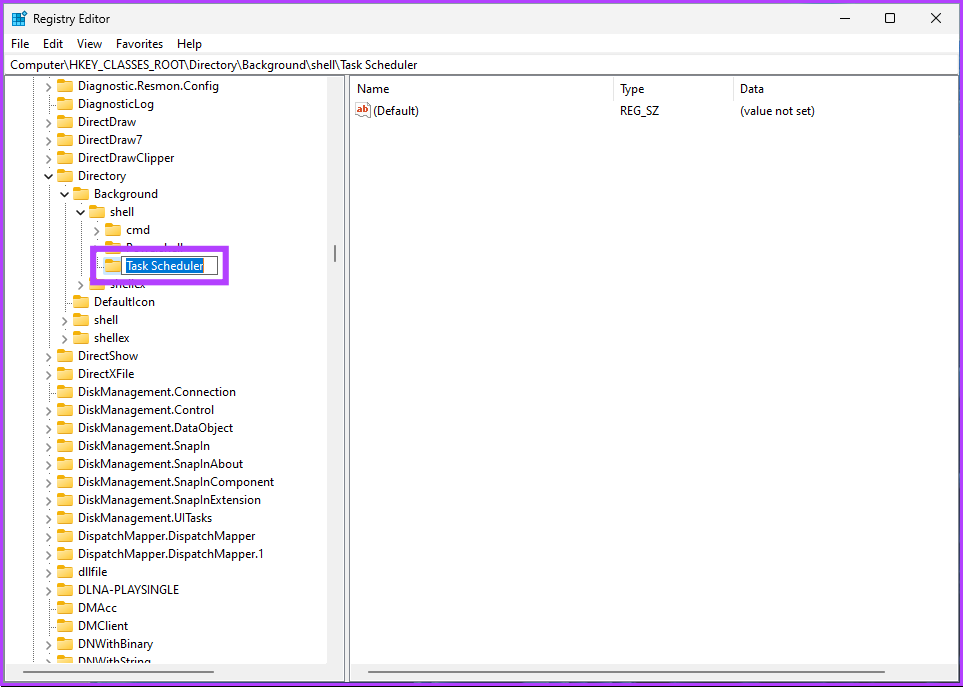
Step 4: Type Task Scheduler in the name field.
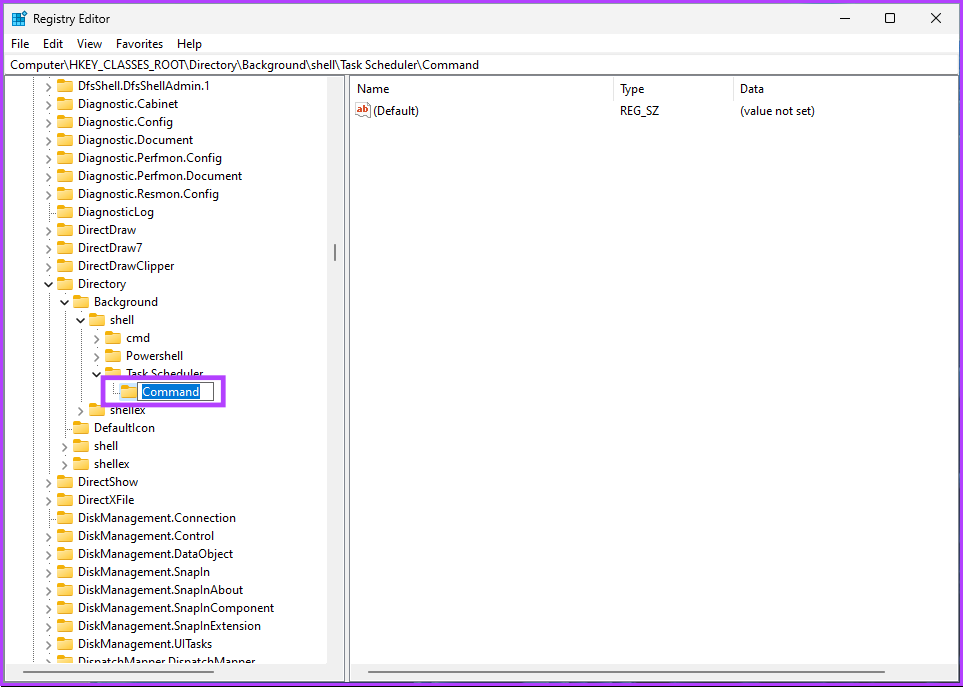
Step 5: Under the Task Scheduler folder, right-click, select New, and choose Key.

Step 6: Type Command in the name field.
Step 7: Under the Command folder, double-click the default registry file, under Value data, type Control schedtasks, and click OK.
Finally, reboot the system to implement the changes. And that’s it! You will find Task Scheduler under the desktop context menu when the system boots back. If you have any queries, check out the FAQ section below.
1. Does Windows Task Scheduler work when the computer is sleeping?
Windows Task Scheduler does not run when the computer is in sleep mode by default. However, in the task properties, select the “Wake the computer to run this task” option to configure the task to run regardless of the sleep status of the computer.
2. Is it okay to disable Task Scheduler?
It depends on what tasks you have set up in the Task Scheduler. Disabling the Task Scheduler could interfere with essential tasks that need to run regularly, such as backups, system maintenance, or software updates. You may not notice a significant impact after disabling the Task Scheduler if you do not have any critical tasks set up.
Quickly Schedule Tasks in Windows
Whether you prefer to use the traditional method, like the Control Panel, or the more modern way, like the Windows Search bar, multiple options are available to access the Task Scheduler. By familiarizing yourself with them all, you can quickly access the Task Scheduler. You may also want to read how to use Windows Task Scheduler to schedule Disk Cleanup.
Was this helpful?
Thanks for your feedback!
The article above may contain affiliate links which help support Guiding Tech. The content remains unbiased and authentic and will never affect our editorial integrity.
Task Scheduler is one of the most practical preset Windows applications because it can streamline your work.
The main idea of this application is to trigger the running of different scripts and programs at a specific time or a certain event.
It has a library where all the tasks loaded are indexed, and it organizes them according to the time that must be done and their importance.
Let’s discover together in the lines below what Task Scheduler contains and how we can use this useful application.
How do I schedule tasks in Windows 10 using Task Scheduler?
- Types of triggers
- Types of actions
- Types of Task Conditions
- Task settings
- Task security context
- How to use the Task Scheduler
1. Types of triggers
The first step of creating a task is to determine what will cause it to run, so the trigger is a set of conditions that when fulfilled, starts the task.
The triggers can be found in the Trigger tab from the Task Properties and the Create Task menu. From the Create Task menu, you can create new triggers for your needs.
There are two types of triggers: the time-based trigger and the event-based trigger.
- The time-based trigger is used for tasks that start at a certain time or tasks that starts periodically, depending on your schedule.
- The event-based trigger is used for actions that start at a specific system event.
For example, let’s suppose that on this day you want to recover a few hours of work, and you want to have the same productivity, even though you know you will work more than usual.
You can set a task to be triggered every time your computer is entering an idle state.
NOTE
1.1. Triggers for a schedule
This kind of trigger causes the task to run after a well-determined schedule configured by you. From the trigger settings, you can choose if the task will be repeated once, daily, weekly, or monthly.
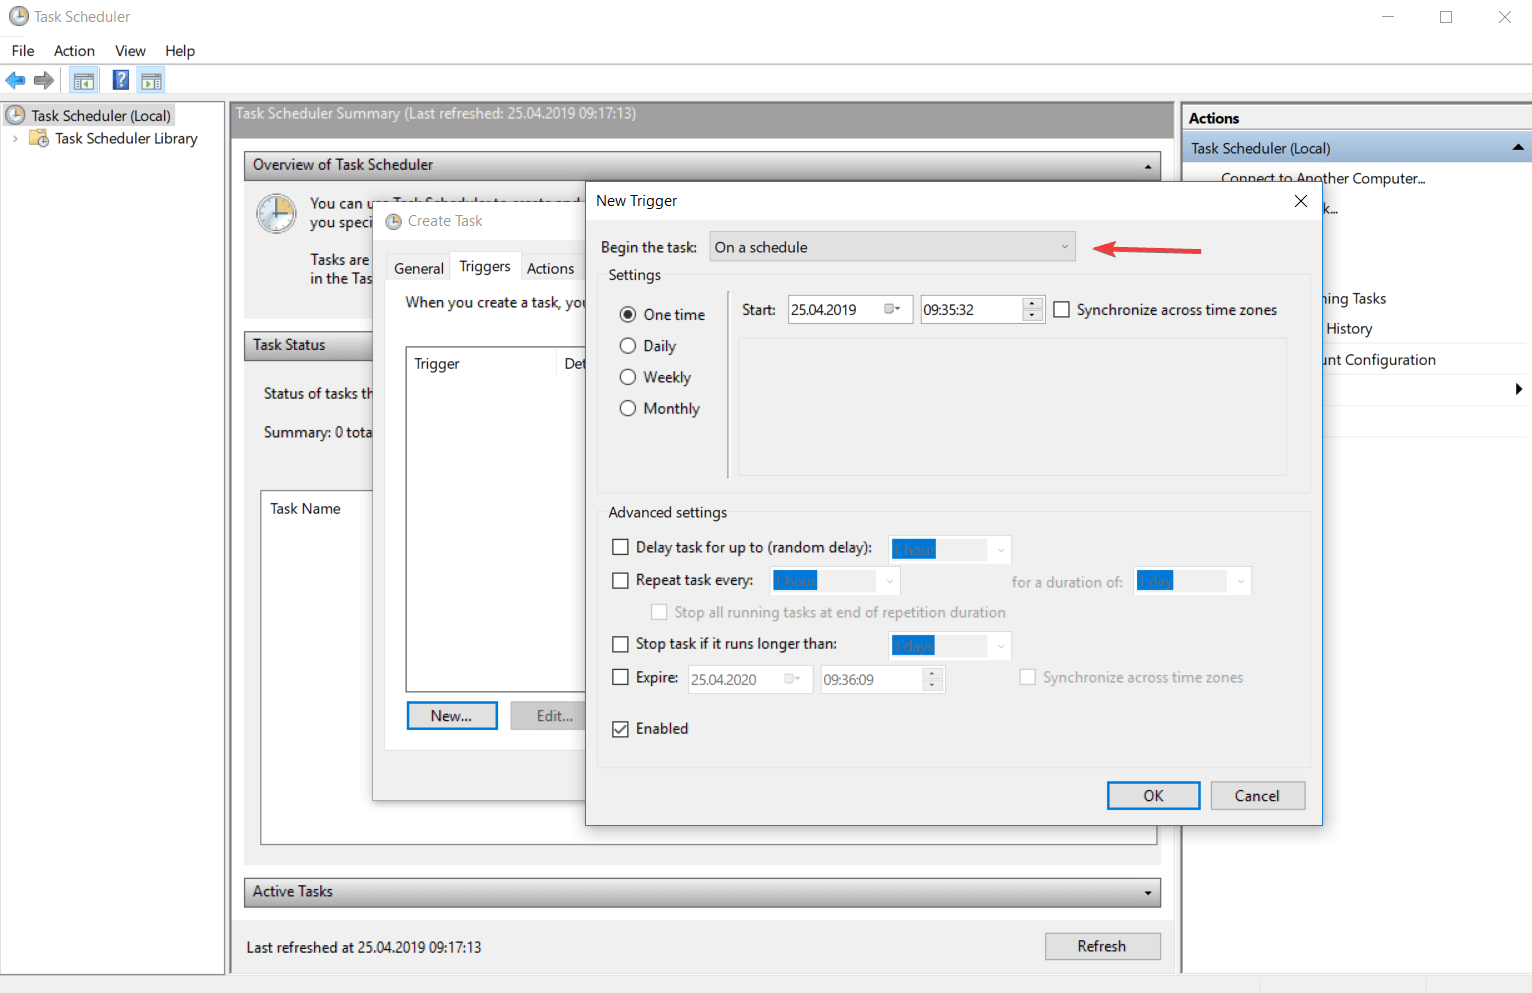
This time interval is guided by the computer’s date and time. You can check the Universal box for making the time interval relative and synchronize it with UTC (Coordinated Universal Time).
This feature allows you to coordinate multiple tasks to run independently in different time zones.
- The One time trigger is the easiest to set up. All you have to do is enter the day and time you want the action to take place.
- The Daily trigger is based on a recurrent system and the date and time you want to start using this kind of trigger.
The interval of 1 is producing a daily schedule, the interval of 2 is producing an every other day schedule, and so on.
- If you opt for a Weekly trigger you must enter the date and time you want to start this schedule, the days when you want to take place and how often to repeat. Recursion of this trigger is similar to the daily one.
For the interval of 1, the task will be repeated weekly, for the interval of 2, the task will be repeated every two weeks, and so on.
- The Monthly trigger does not have many differences from the others, you only need to select the week and the day that you want to activate your task.
The recursion system is the same, the only difference being that the minimum interval of repetition is one month.
1.2. Triggers for logging on
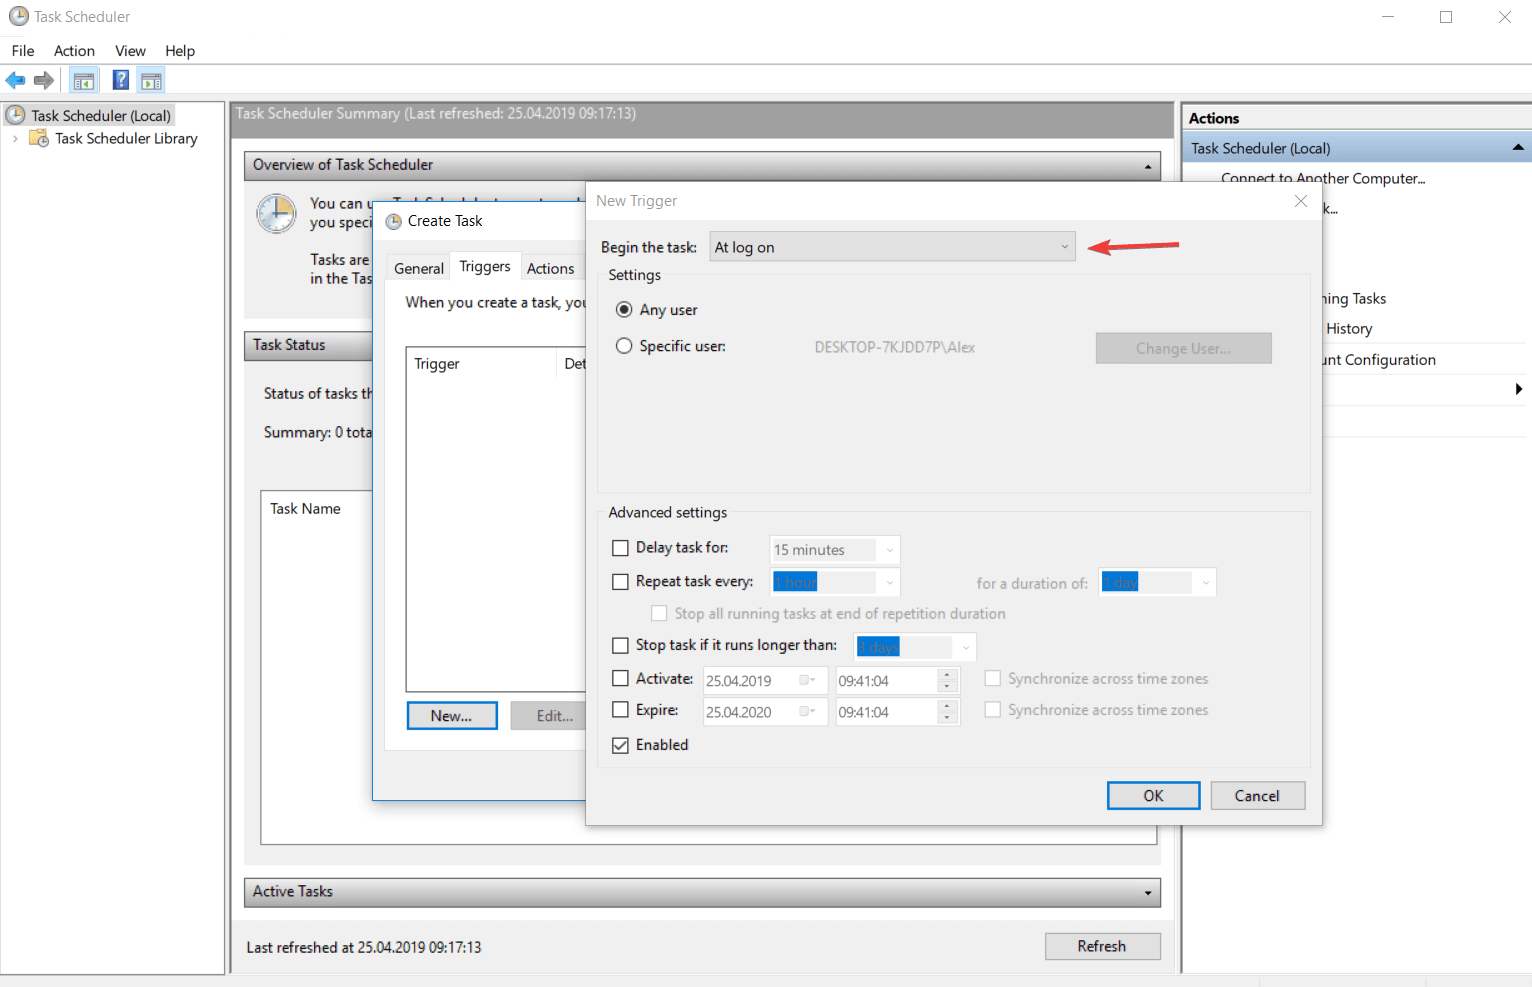
This type of trigger runs an action when a user logs onto the computer. It has a customization feature that allows you to set the action to occur for all users or only for certain users.
1.3. Triggers for idle state
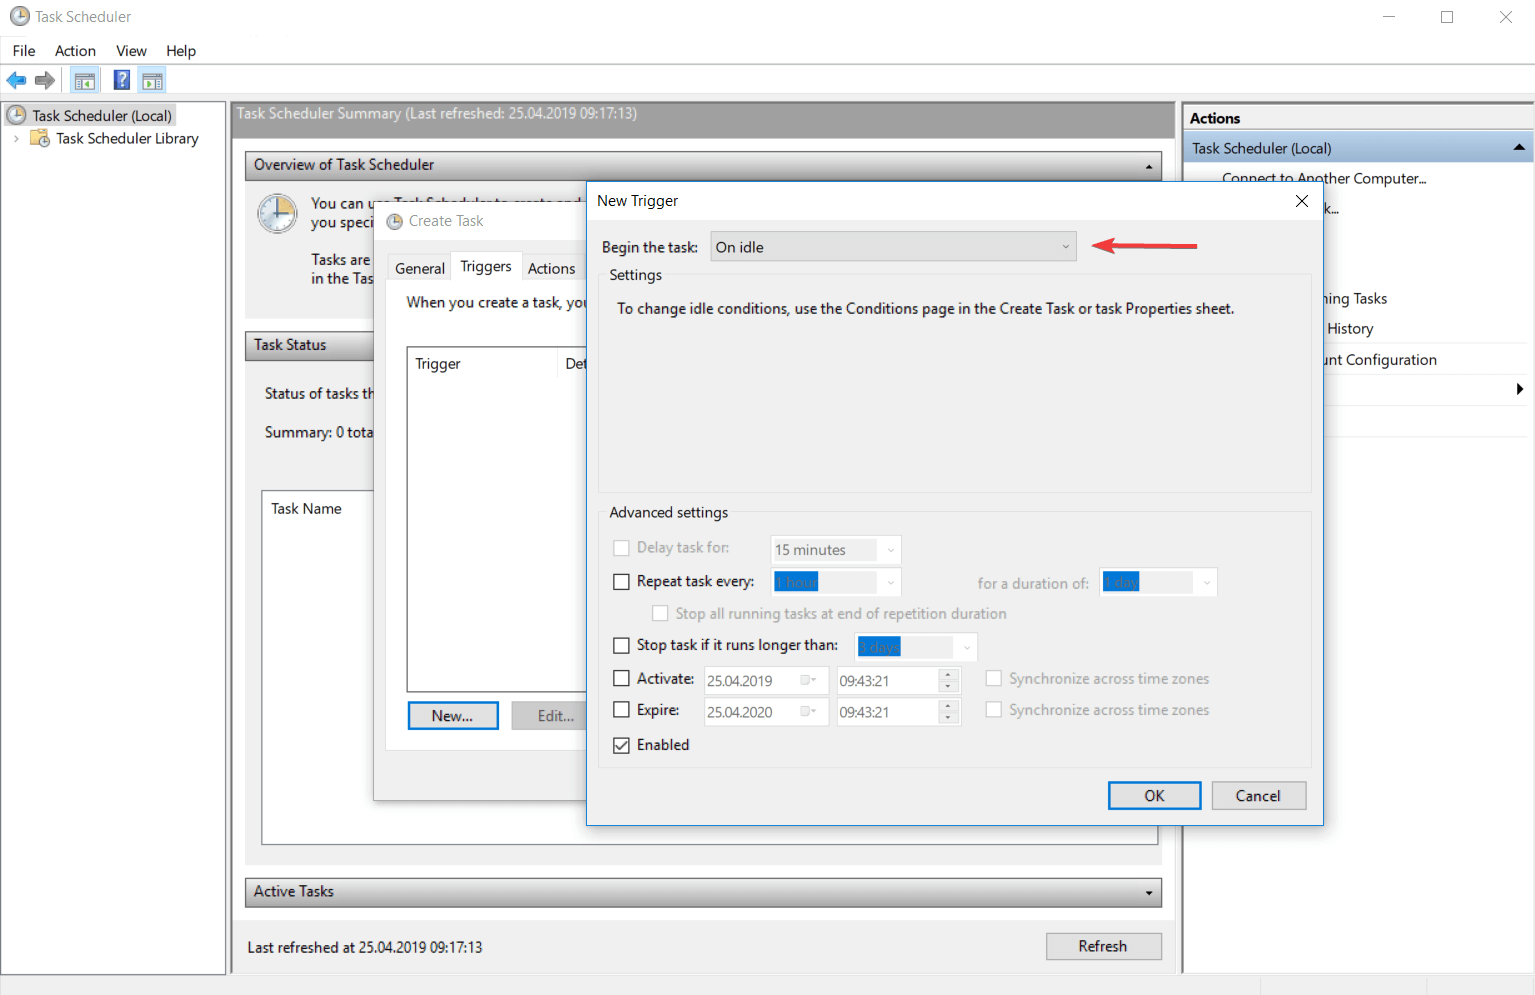
This trigger determines the action to run after entering the computer in the idle state. The trigger conditions can be configured from the Conditions tab of the Create Task menu or from the Task Properties window.
1.4. Triggers for an event
The event-based trigger determines the action to run after an event occurs. You can choose from a predefined list of events but you can also set a specific event.
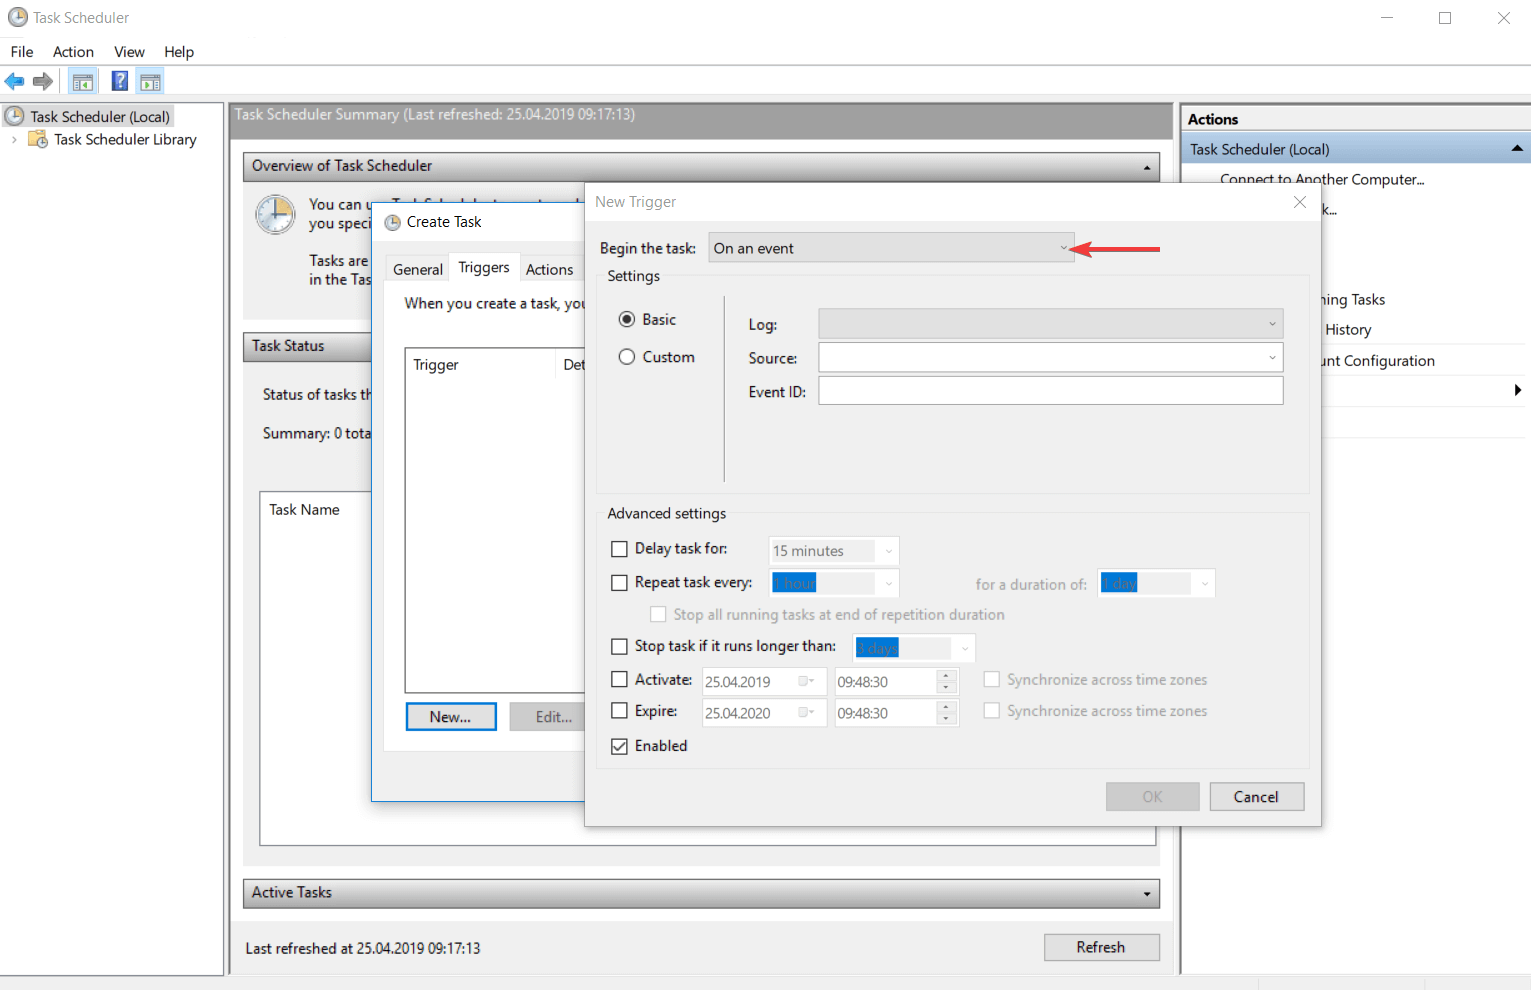
If you are choosing the Basic trigger settings, only one event from the specific event log will run the task.
If you choose the Custom trigger settings you can enter the XML event query or a custom filter for the events that can run the task.
1.5. Triggers on workstation lock
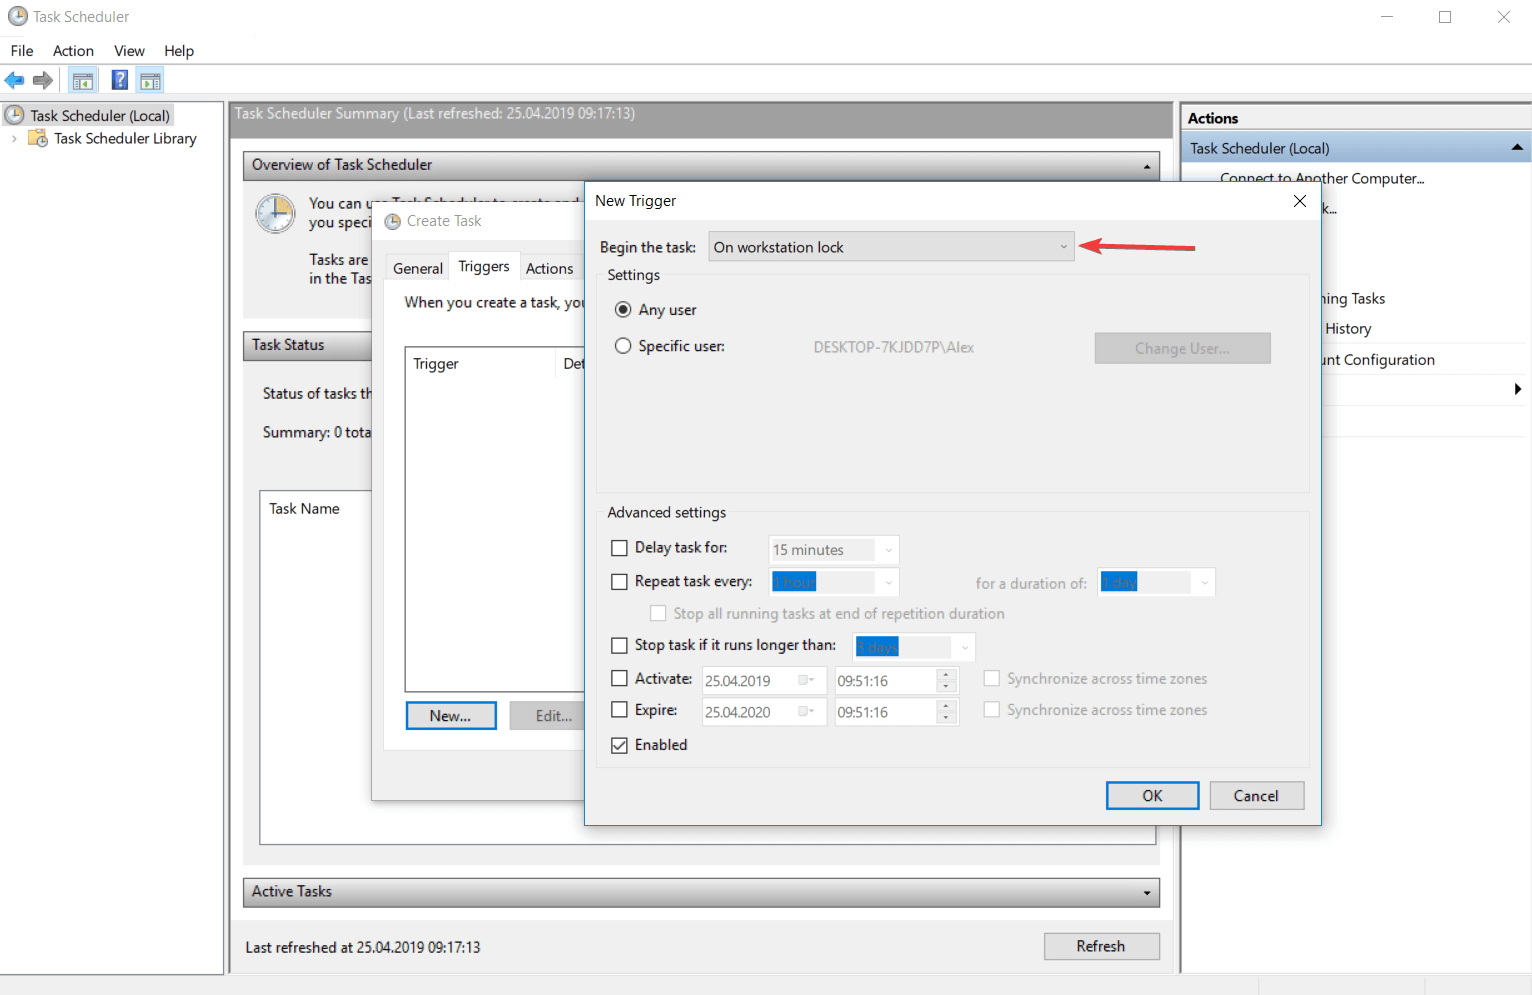
This type of trigger runs the task when the computer is locked. You can configure from the settings if this action will be available for any user or for a specific user. You can do the same thing for the unlocking station process.
1.6. Advanced settings of triggers
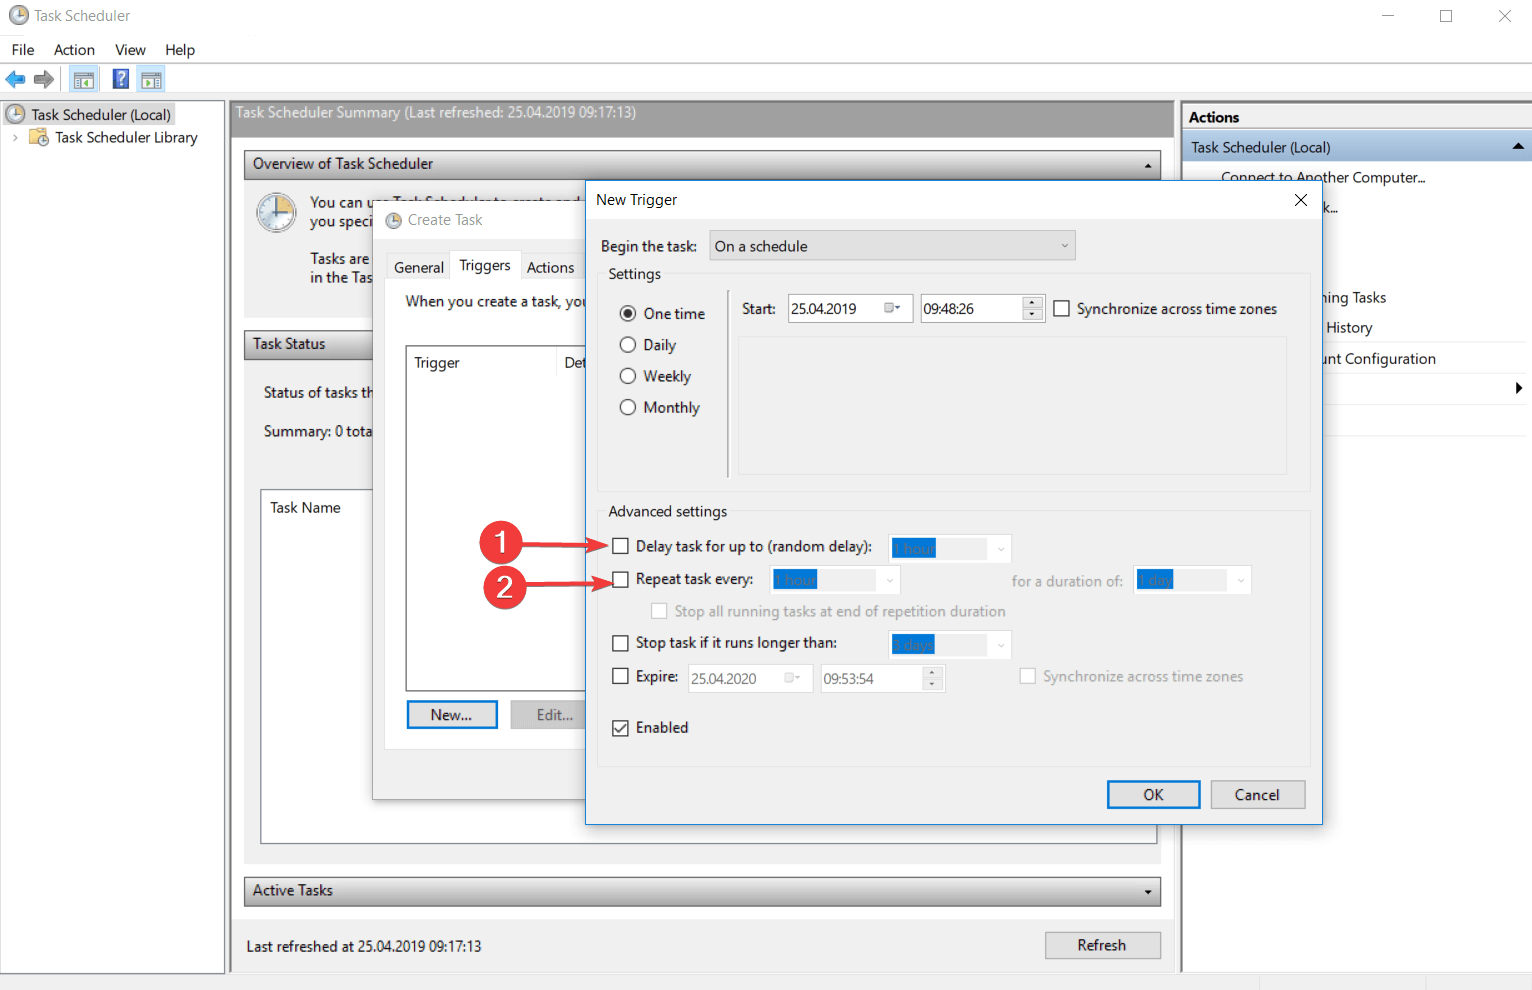
- Delay task for up to (random delay)
This feature allows you to insert a delay between the moment when the task was triggered and the moment when the task will take place.
For example, if you have a time based trigger, the task is scheduled to be triggered at 3:00 PM and you set the Delay task for up to (random delay) to 30 minutes, your task will be triggered in between 3:00 PM and 3:30 PM.
- Repeat task every:
Here you can set a repeating time for your task. So, after the task will be triggered, it will wait the amount of time specified and after that, it will be triggered again. This entire process will continue until the period allocated is done.
2. Types of actions
The action is the process or a part of the process that is performed when the task is running. A task can have up to 32 actions. Every action has some settings that determine how the task is performed.
You can find and edit the task‘s actions from the Actions tab of the Task Properties menu or from Create Task window.
When the list contains more than one action, they will be executed consecutively starting with the action from the top of the Actions tab and ending with the action from the bottom of the list.
If you want to change the actions order all you have to do is to click on the action that you want to move and then use the arrow keys to move it above or below.
2.1. Action that activates a program
This kind of action is used for starting a program or a script.
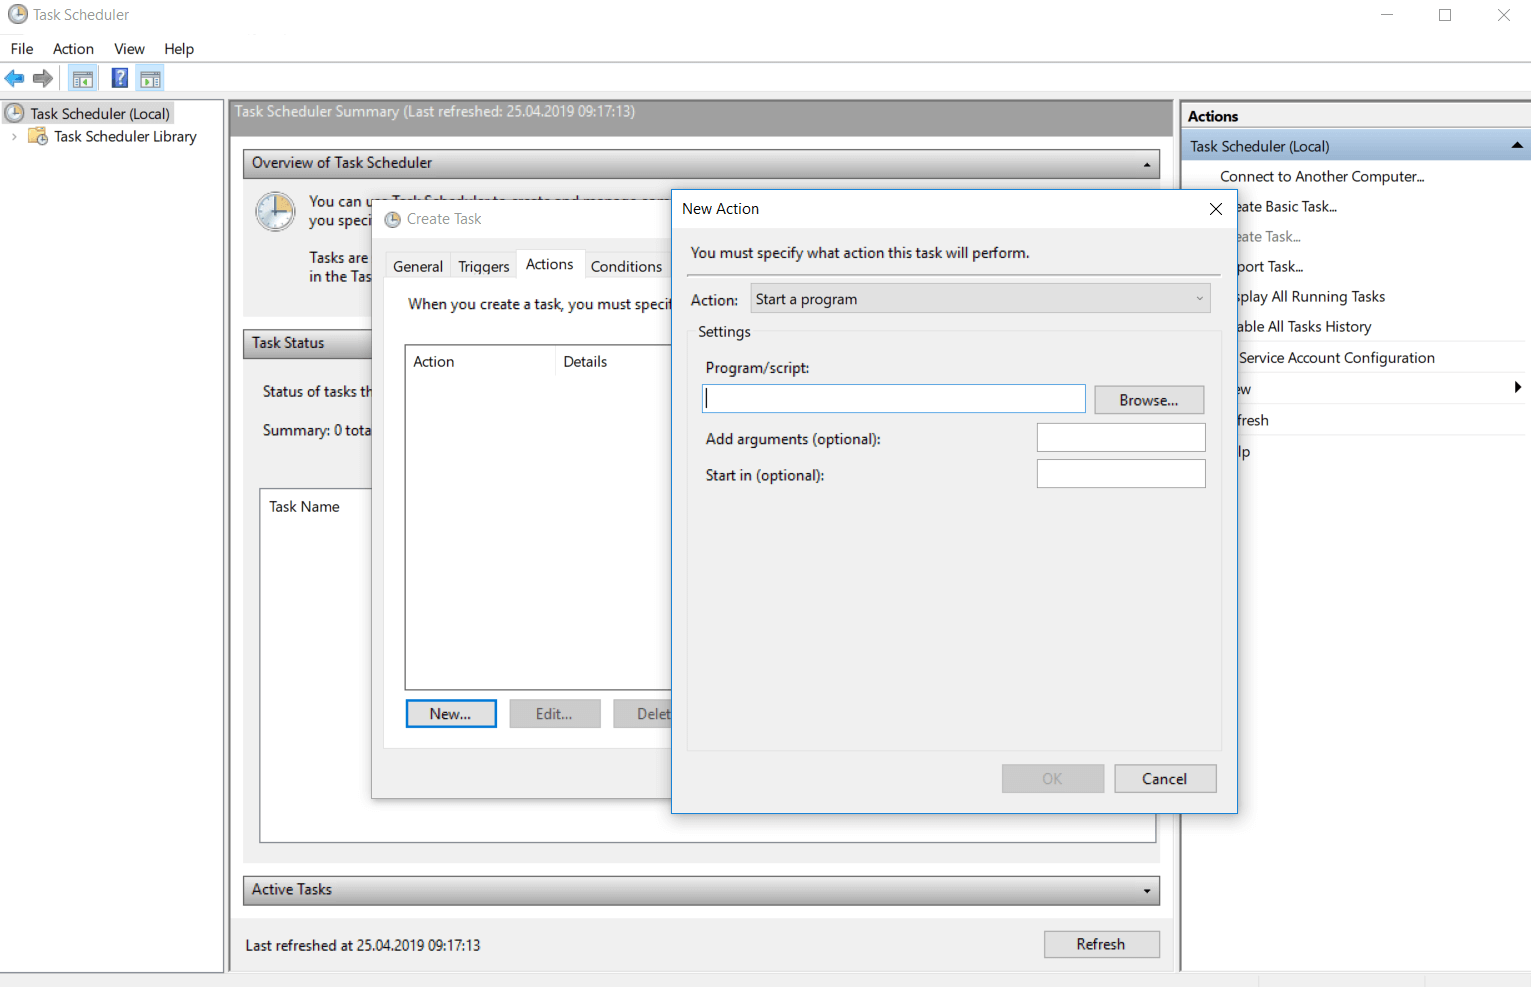
In the Settings menu of the Actions tab, you enter the name of the script or the program you want to start.
If one of those sequences takes command line arguments you can add, delete and edit them in the Add arguments (optional) text box.
The Start In (optional) is the place where you can specify the directory for the command line that will execute your script or your program.
This should be either the path to the program or the script file that leads to the files that are used by the executable file.
2.2. Action that sends an e-mail
This action is particularly useful for people who communicate a lot via email.

In the settings of this action, you have to enter your e-mail address, the e-mail address of the person who will receive the mail, the title of the e-mail, the message you want to be sent, and you have also an optional feature to attach different files to the mail.
You must also specify the SMTP server of your e-mail.
2.3. Action that displays a message
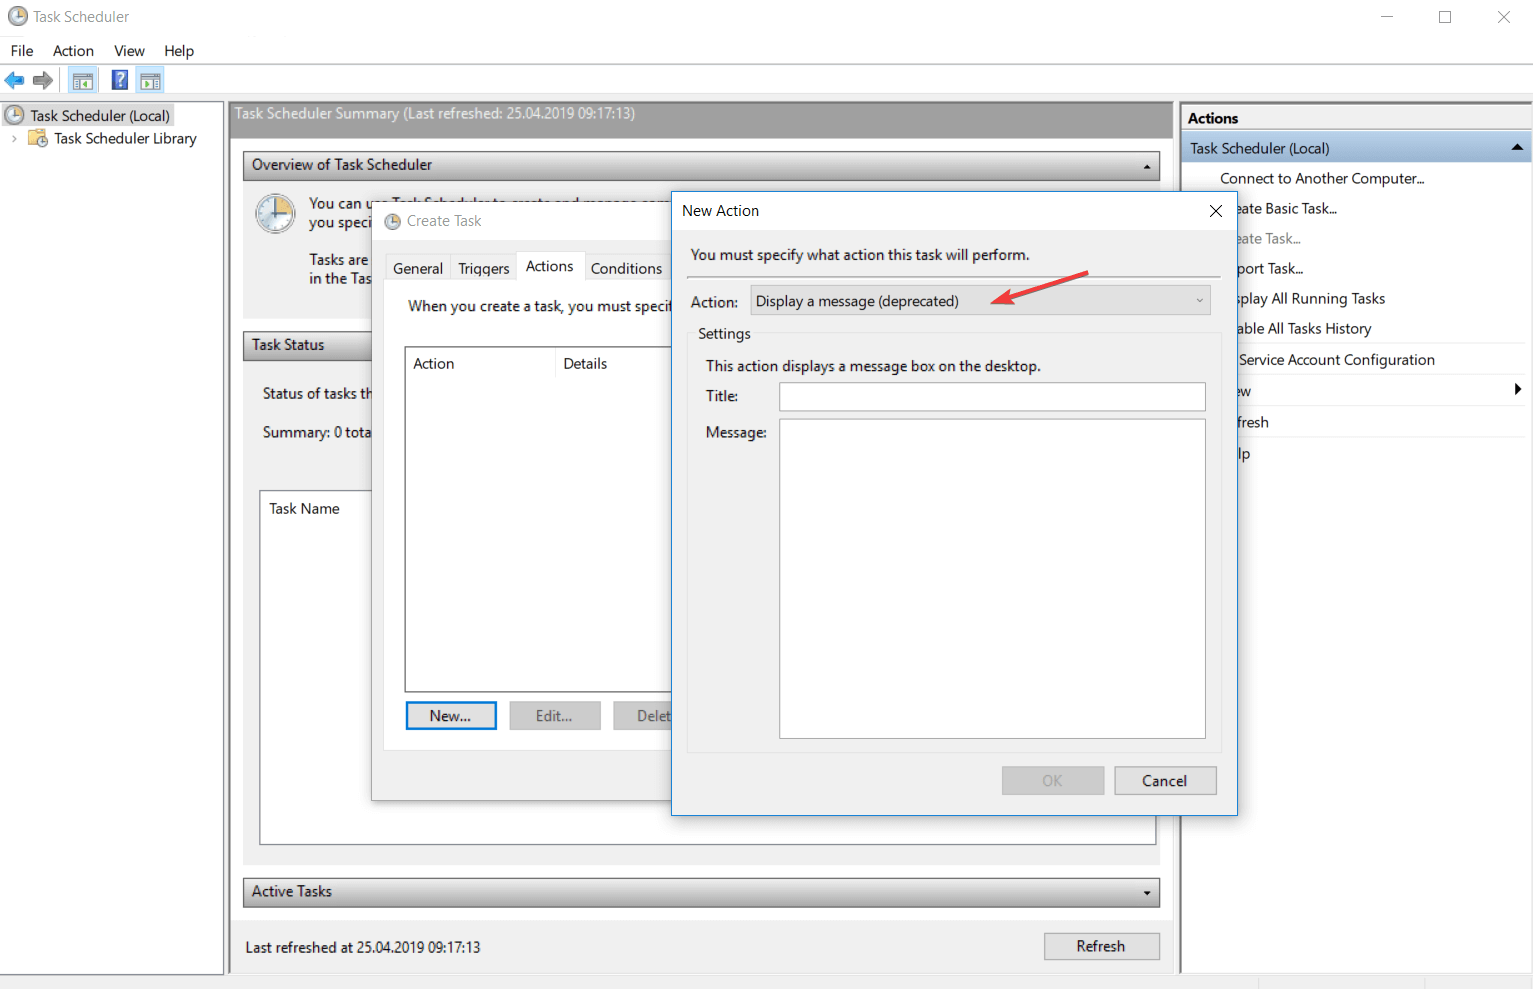
This action is used more like a reminder because it displays on your screen a text with a title. Select the Display a message category from the Actions menu and type the title and the message of the reminder.
If you are facing Task Scheduler failed to launch an action issue, we recommend you check out this detailed guide for solutions.
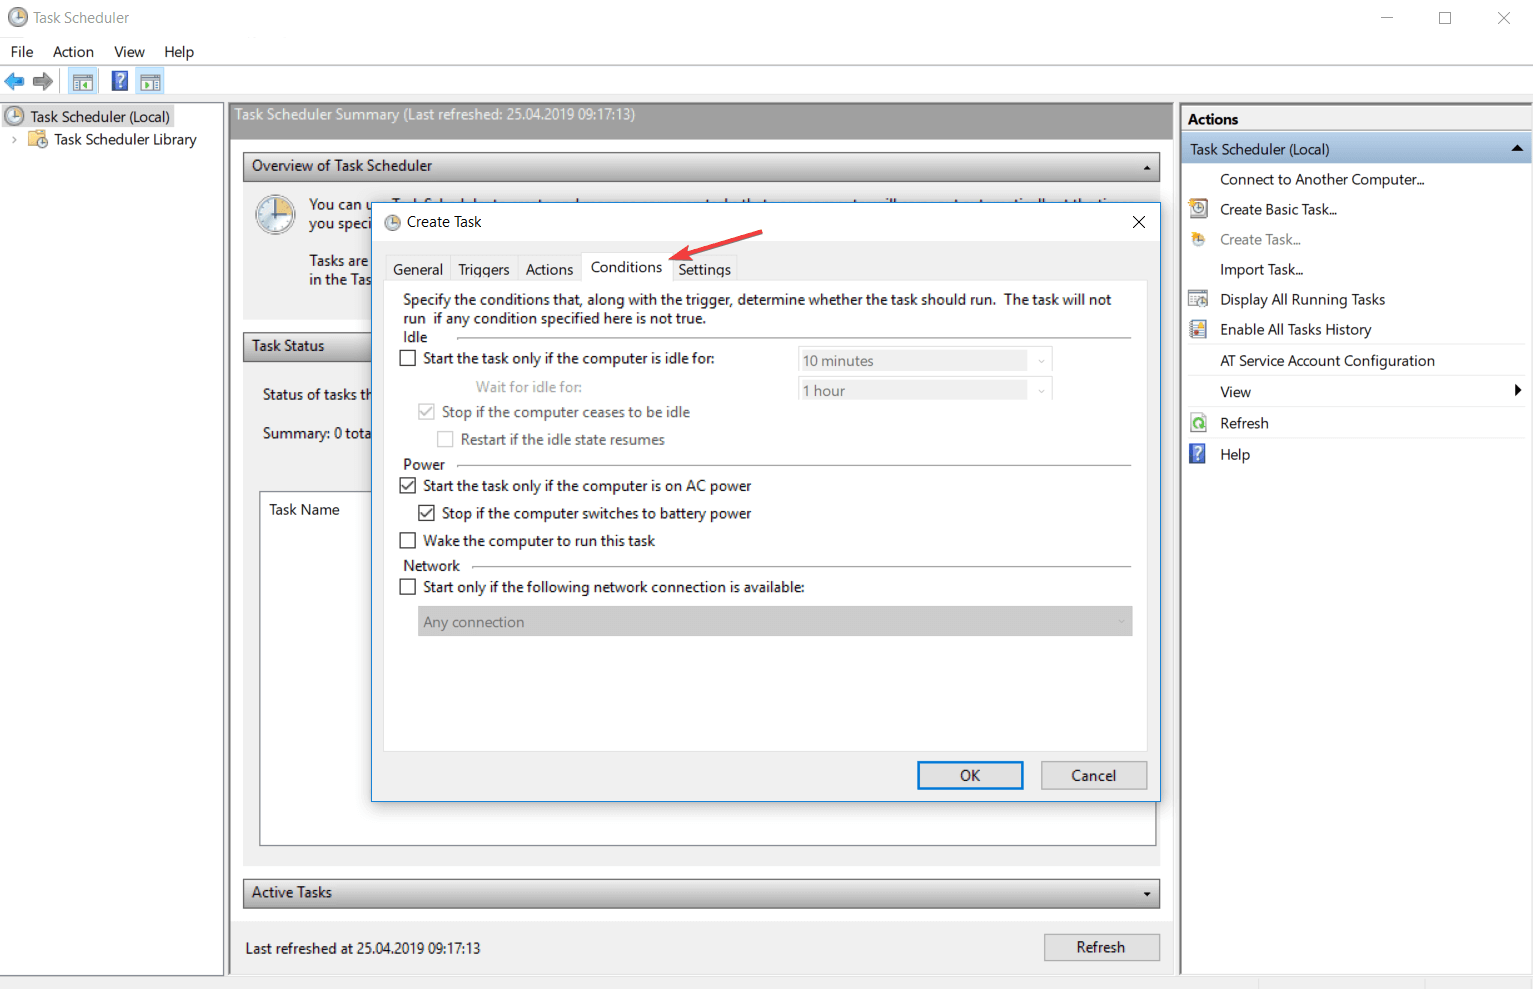
3. Types of Task Conditions
Task conditions decide if a task can run after it was triggered. Conditions are optional and their main role is to help you accomplish a more accurate task reported to the operating situation.
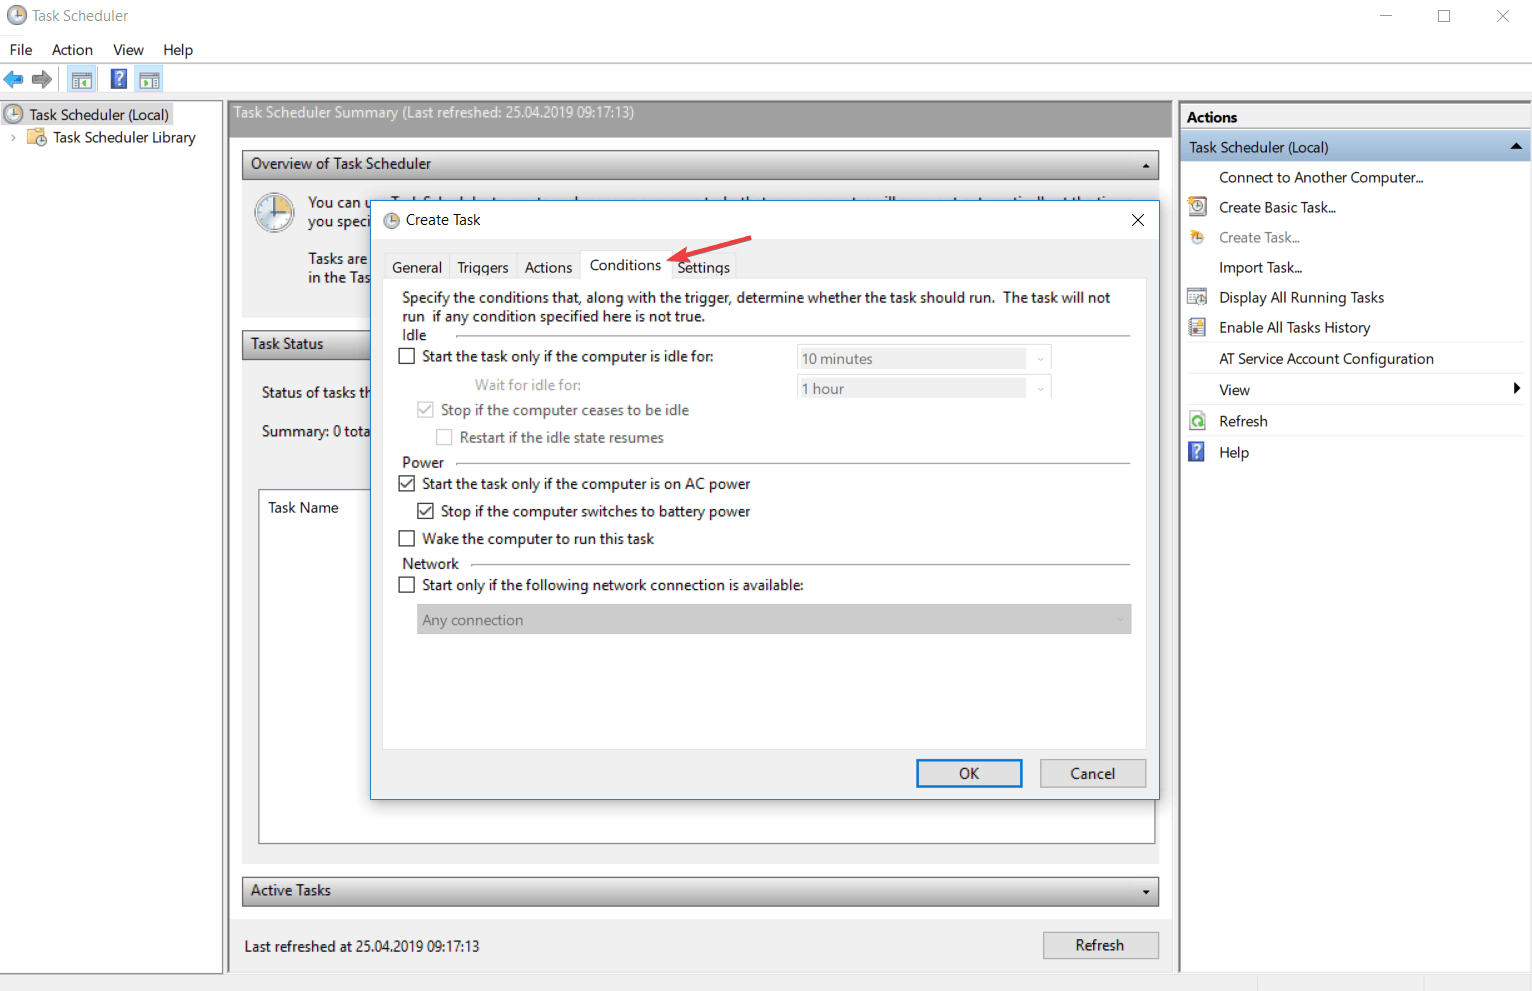
You can find them in the Conditions tab of the Task Properties or Create Task menu. Conditions are divided into 3 categories: idle conditions, network conditions, and network conditions.
3.1. Idle conditions
With this condition, you can tell the task to run only if your computer is an idle for a certain amount of time. Every 15 minutes, Task Scheduler is checking your activity to find out if your PC has entered into an idle state.
It is considered that your computer is in an idle state if the screensaver is on or if the percentage of CPU and memory operation is 0%.
As soon as the Task Scheduler has detected that your computer is in an idle state, it will begin the countdown of the length of time that has been set.
If you come back at this time and continue your work, the application will reset the task.
You can also set the time condition to 0 and in this case, the task will run when the application will detect that your computer has entered the idle state.
If the Stop if the computer ceases to be the idle condition is on, the task will stop running after the computer gets out from the idle state. Normally, this task will run just one time.
To run every time the computer remains inactive you have to check the Restart if the idle state resumes.
3.2. Power conditions
This condition is dedicated to laptop users because it follows the power method of the device.
While a computer receives a current flow of energy from a source, the laptop can run on a battery when you do not have a stable source of power.
With this condition, you can set a task to run when the computer is connected to a stable and continuous source of energy after the trigger was activated. You can also set a condition.
You can also configure the condition so as not to allow the task to run if the device goes on the battery power.
From these conditions, you can also create a task that will tell the computer to start from sleep mode and run the actions after it was triggered. Consider that this can happen during hours of rest and may create trouble.
To avoid this, make sure the device is at a distance where it cannot bother you or turn it off when you rest.
NOTE
3.3. Network conditions
With this condition, you can configure a task to run if a specific named network is available or if any connection is available when the task is triggered.
If you consider that your task will need network conditions to run, you can also set this in the conditions.
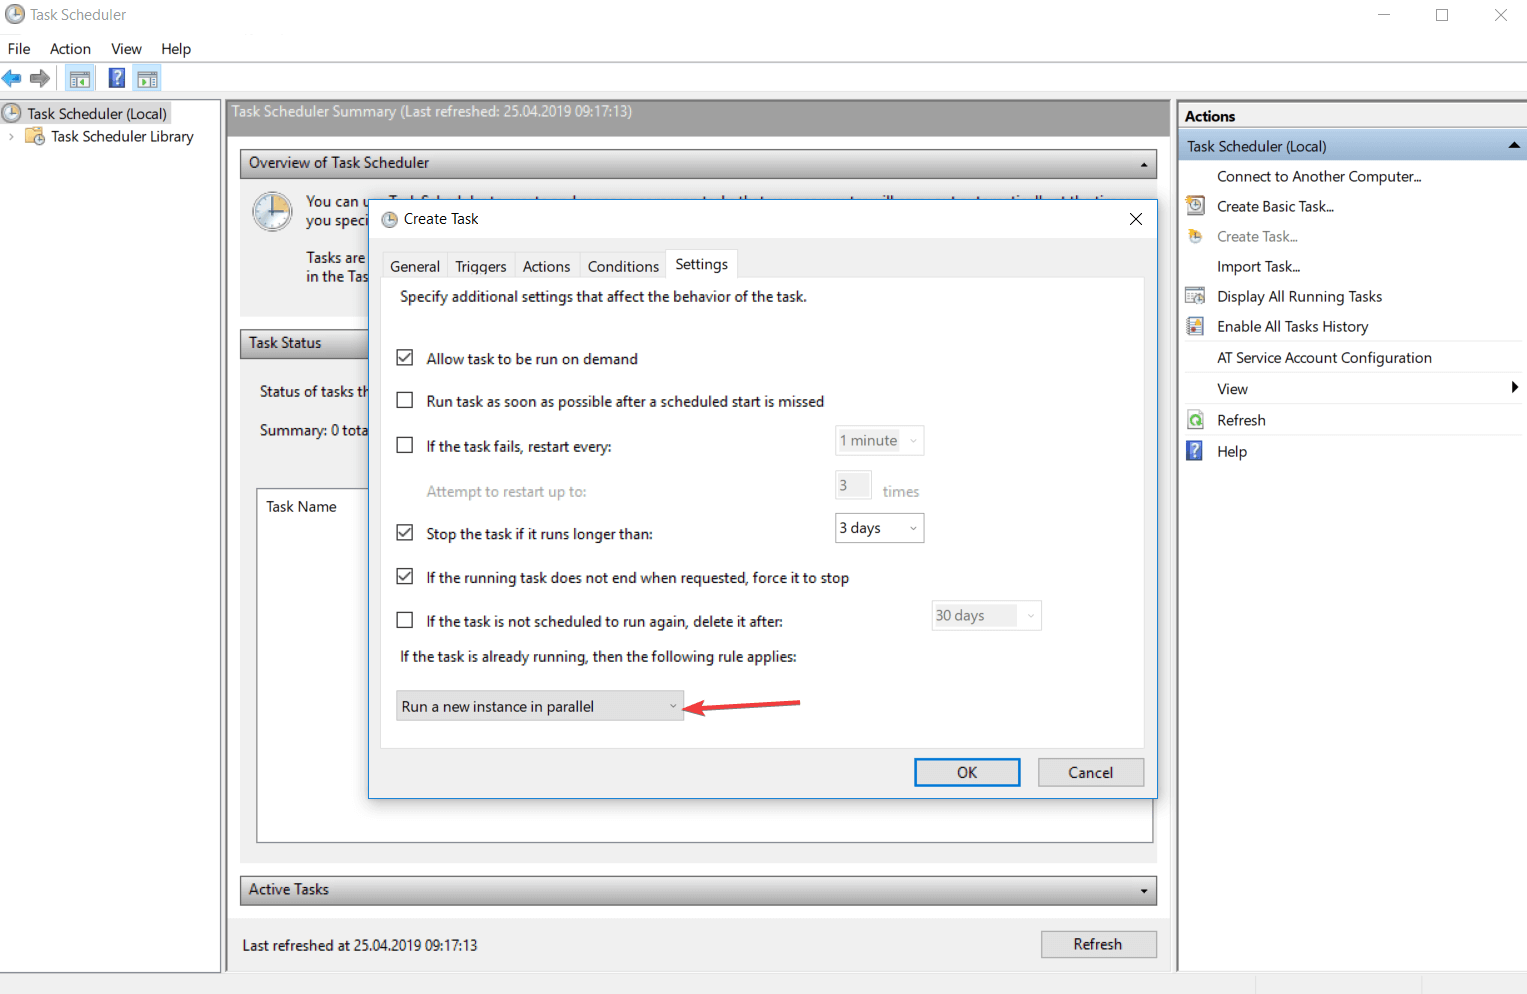
4. Task settings
Task settings are indicating how a task run, is deleted, or is stopped. You can find the panel with all the available settings in the Settings tab from the Task Properties or from the Create Task menu.

The following list contains a description of all the available settings.
4.1. Allow tasks to run on demand
Here you can specify if the task can be run manually before or after it is scheduled by allowing it to run on demand. You can set a task to run at any time on demand.
You find more information about the demand configuration in the How to run a task on demand topic of this article.
4.2. Run a task as soon as possible after a scheduled start is missed
This setting will assure you that a task will start running even if it could not run when it was scheduled from different reasons (the device was turned off, Task Scheduler was busy).
In the default settings, the Task Scheduler will not start the task immediately when the service is available. It will wait 10 minutes and then immediately start the process.
4.3. If the task fails, restart every time period
This setting will force the Task Scheduler to restart the task if the previous attempt was thwarted by an error.
You have to add the time interval between the running attempts and the number of attempts to achieve.
4.4. Stop a task if it runs longer than the time period
With this setting you can establish a time limit in which the task can run.
This setting is used for limiting the number of tasks that need a long period of time to execute and in this way you can save resources for your computer.
4.5. If the task is not scheduled to run again, delete if after a time period
This feature replaces an action that you should do it manually.
If you schedule a task to run only once means that you will not need it in the future and not unnecessarily load the list of tasks you should delete after you have used it.
This setting will delete automatically the task after a period of time set by the user after it was activated.
Remember, your task must include at least one trigger with an expiration date in order to select this setting.
4.6. If a task is already running you must know a few things
You must configure the Task Scheduler to know how to run the task in case another instance of the current task is already running.
- Do not try to start a new instance because the application will not run the new instance and either stop the current instance from running.
- You can run a new instance in parallel. Task Scheduler is able to run different instances in parallel, so if you want to run a new instance, it will run it at the same time as the instance that is already running.
- You can queue a new instance. You can set an instance to start as soon as the current task ends the activity. The Task Scheduler will add your add the new instance in a queue and the service will not stop the current task from running.
- Stop the current instance. After you stop the current instance, the service will try to run on the next one.
- You can run a new instance in parallel. Task Scheduler is able to run different instances in parallel, so if you want to run a new instance, it will run at the same time as the instance that is already running.
- You can queue a new instance. You can set an instance to start as soon as the current task ends the activity. The Task Scheduler will add your add the new instance in a queue and the service will not stop the current task from running.
- Stop the current instance. After you stop the current instance, the service will try to run on the next one.
- You can run a new instance in parallel. Task Scheduler is able to run different instances in parallel, so if you want to run a new instance, it will run it at the same time as the instance that is already running.
- You can queue a new instance. You can set an instance to start as soon as the current task ends the activity. The Task Scheduler will add your add the new instance in a queue and the service will not stop the current task from running.
- Stop the current instance. After you stop the current instance, the service will try to run on the next one.
If you are looking for ways to enable Task Scheduler History, check out this guide.
5. Task security context
By default, the Task Scheduler runs the tasks in order with the security context of every user logged on when the task is triggered.
You can modify these settings from the Security options sections of the General tab after you have selected the task that you want to modify.
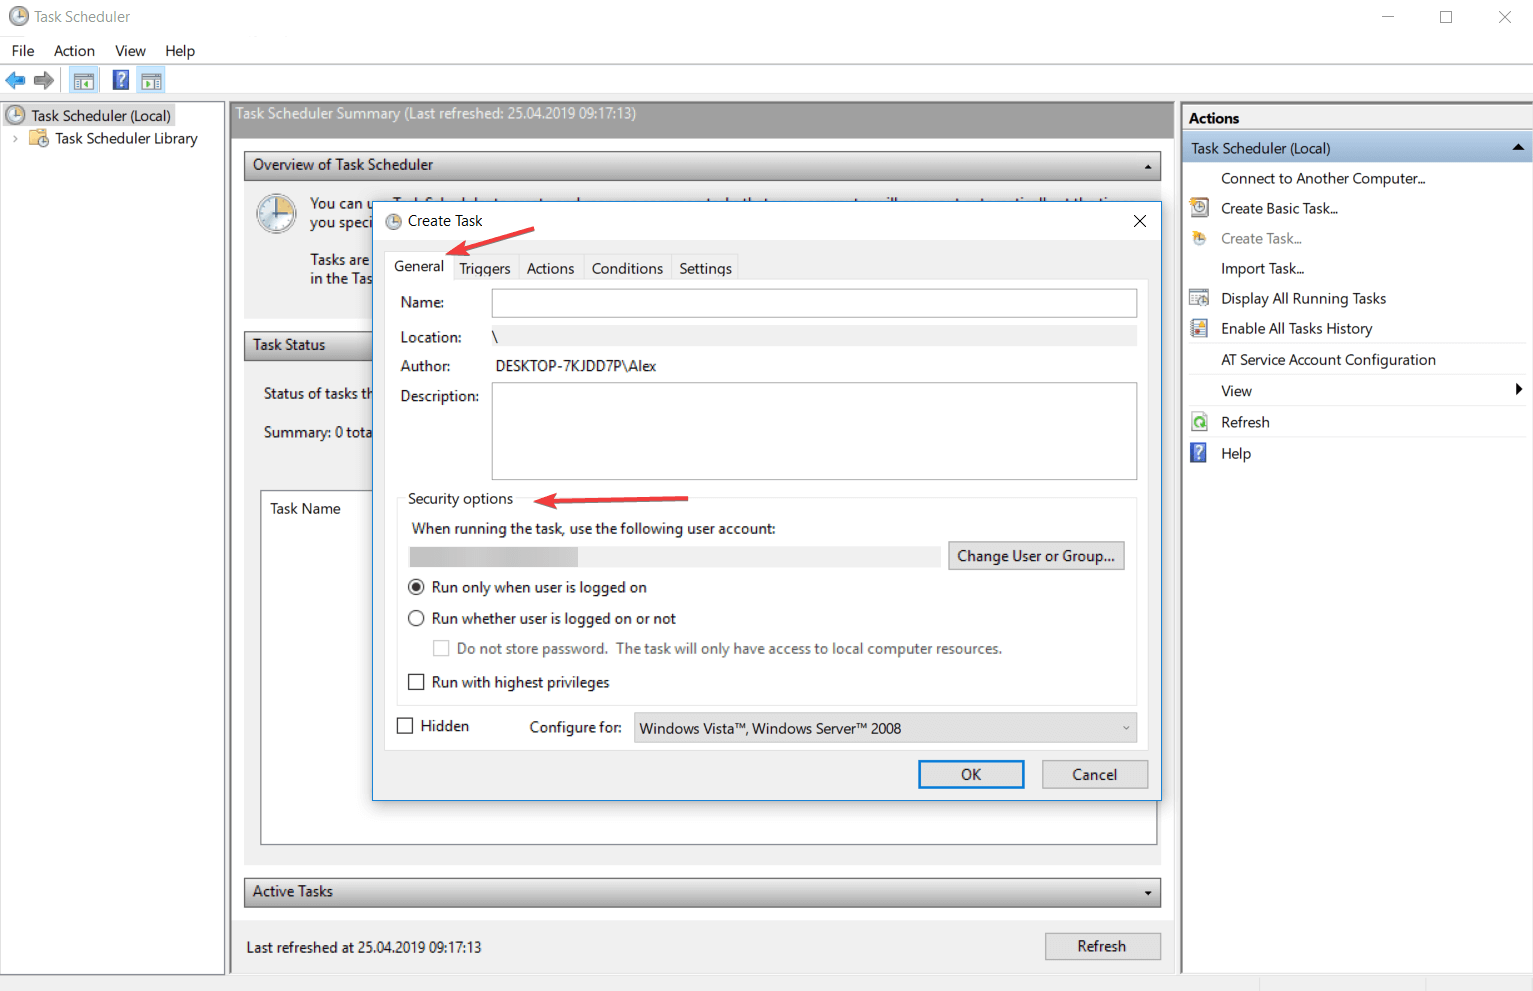
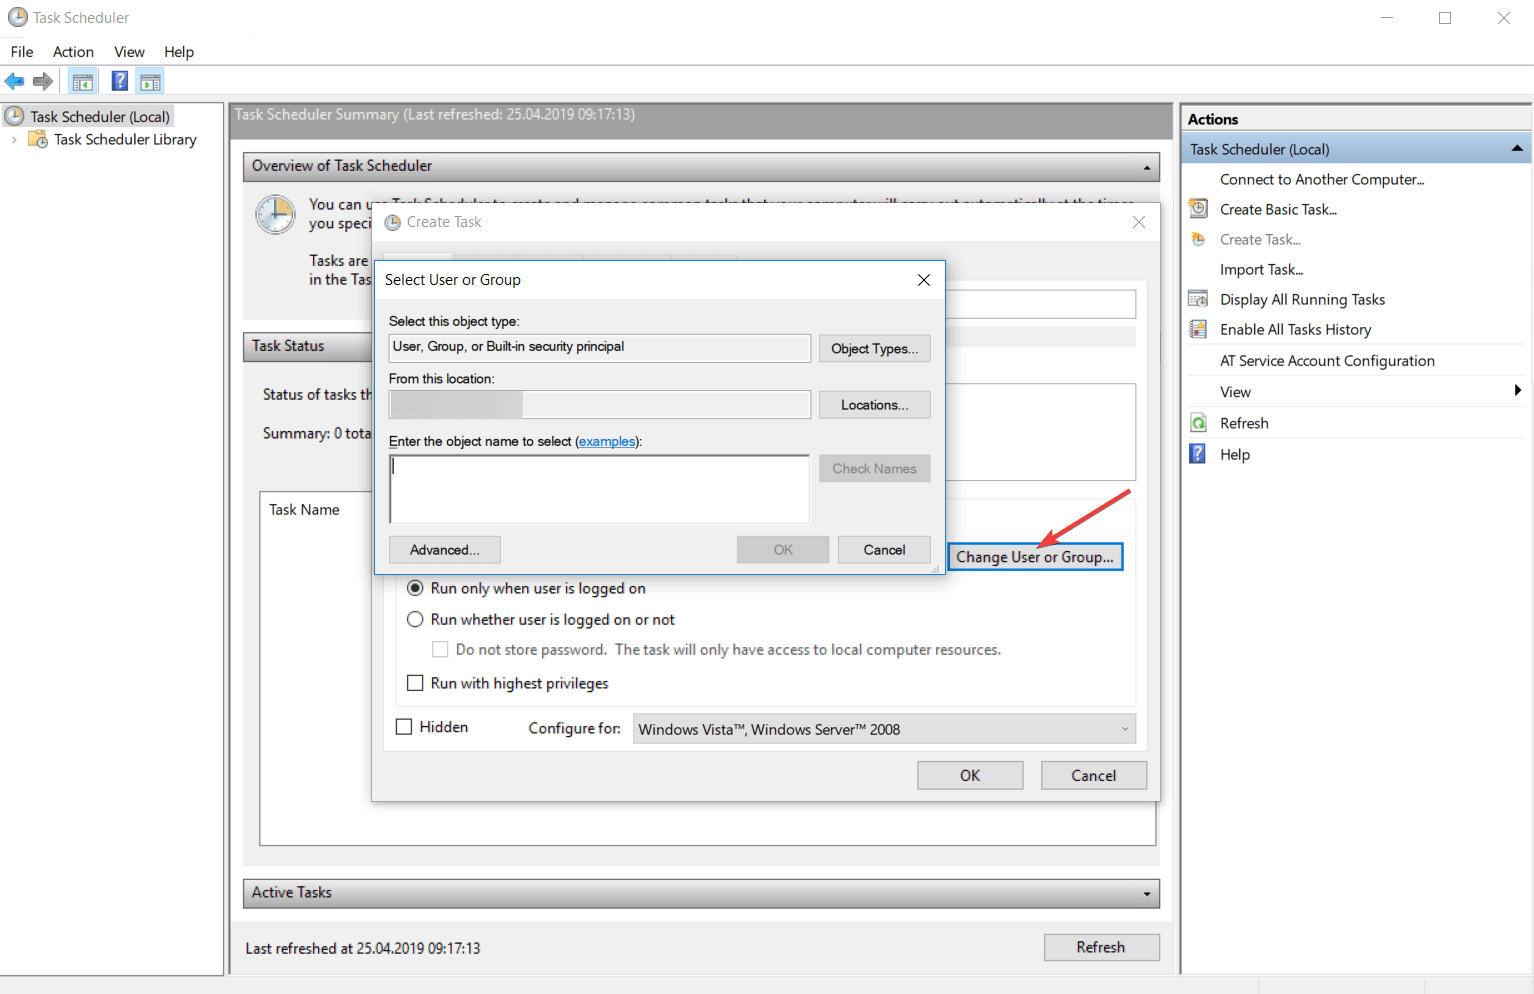
For a better organization of your tasks, you can group them on users or on groups of users by clicking on the Change User or Group category.
If your user does not have administrator rights the button will be called Change User and your account will not be able to enter the Administrators group.
The Run whether the user is logged on or not feature allows you to run tasks even if the specific user is not logged on.
The feature is used for tasks that need to be run on any user of the system. If this setting is checked, the tasks will not run interactively.
To make a task run only when a user is logged on, select the Run only when the user is logged on radio button.
If the Run whether the user is logged on or not feature is used, you should supply the credentials of the account no matter if you check the Do not store password or not.
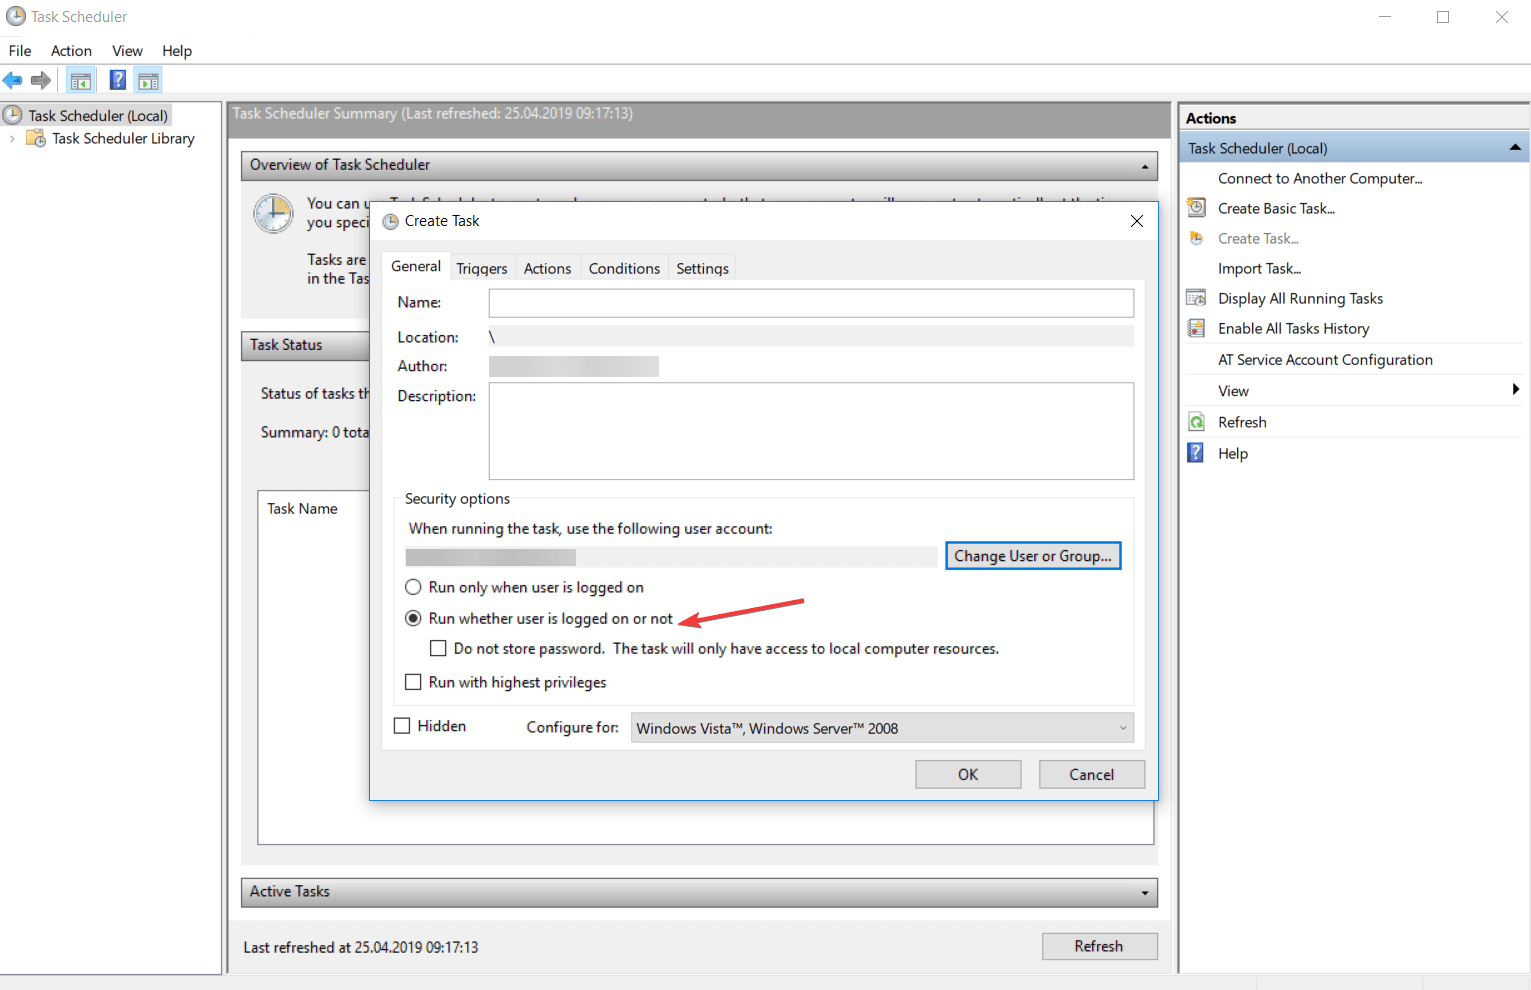
In the account is not logged on, the Task Scheduler will use the saved credentials in order to run the task.
When you select the Do not store password, the application will not save the credentials when you are creating a task but will discard them after the user properly authenticates.
When the service requires running a task, it will use the Service-for-user (S4U) extensions to the logging protocol to retrieve the user’s token.
In other words, the main purpose of the Service-for-user is to secure the context of the account.
- Microsoft Office Lens: A Powerful Tool for Capturing and Organizing Information
- Swap Left/Right Speaker in Realtek Audio Console [How to]
- How to Get DirectX 12 End-User Runtime and Fix Installation Issues
- Overclocking in OMEN Gaming Hub: How to Use it
6. How to use the Task Scheduler
6.1. Start Task Scheduler
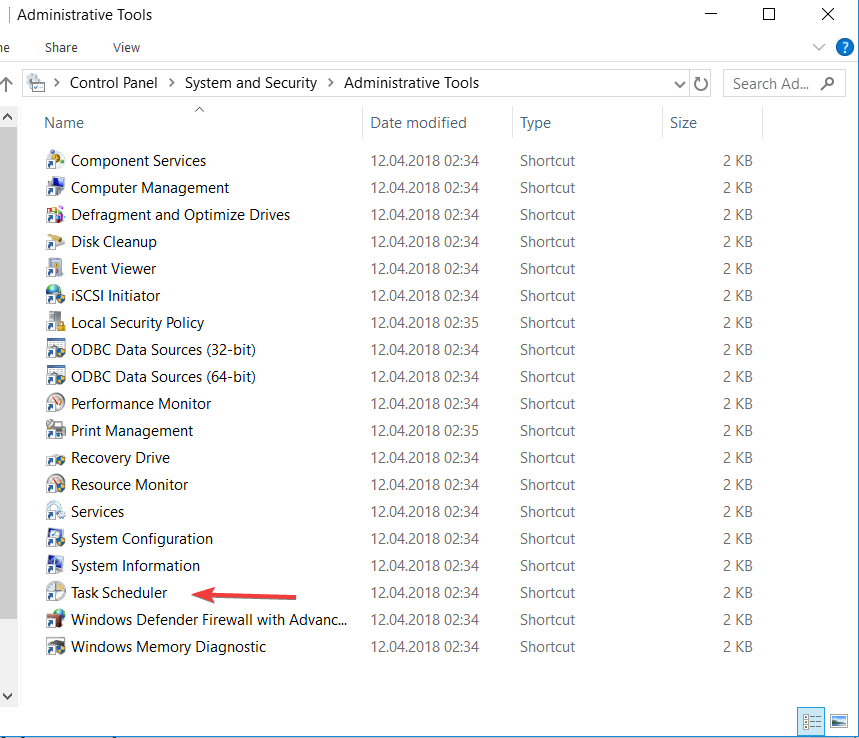
- Using Windows interface
- Type Control Panel in the search bar from the bottom left corner of your screen.
- Click on the System and Security, and select Administrative Tools.
- This will open you a list with different applications and in that list, you will find Task Scheduler.

- Double-click on it and the application will open.
- Using Command Prompt
- Type cmd in the search bar from the bottom left corner of your screen, and select Command Prompt.
- Type msd command in the console, and you will open the application.
There are several ways you can get to access this application. You find above two of them that will work on any version of Windows that you have.
6.2. Create a task
-
1. Press the Start button on your taskbar.
-
2. Type task scheduler in the search box that opens and click on the first result.
-
3. When the Task Scheduler app opens, navigate to the Library section from the left pane.
-
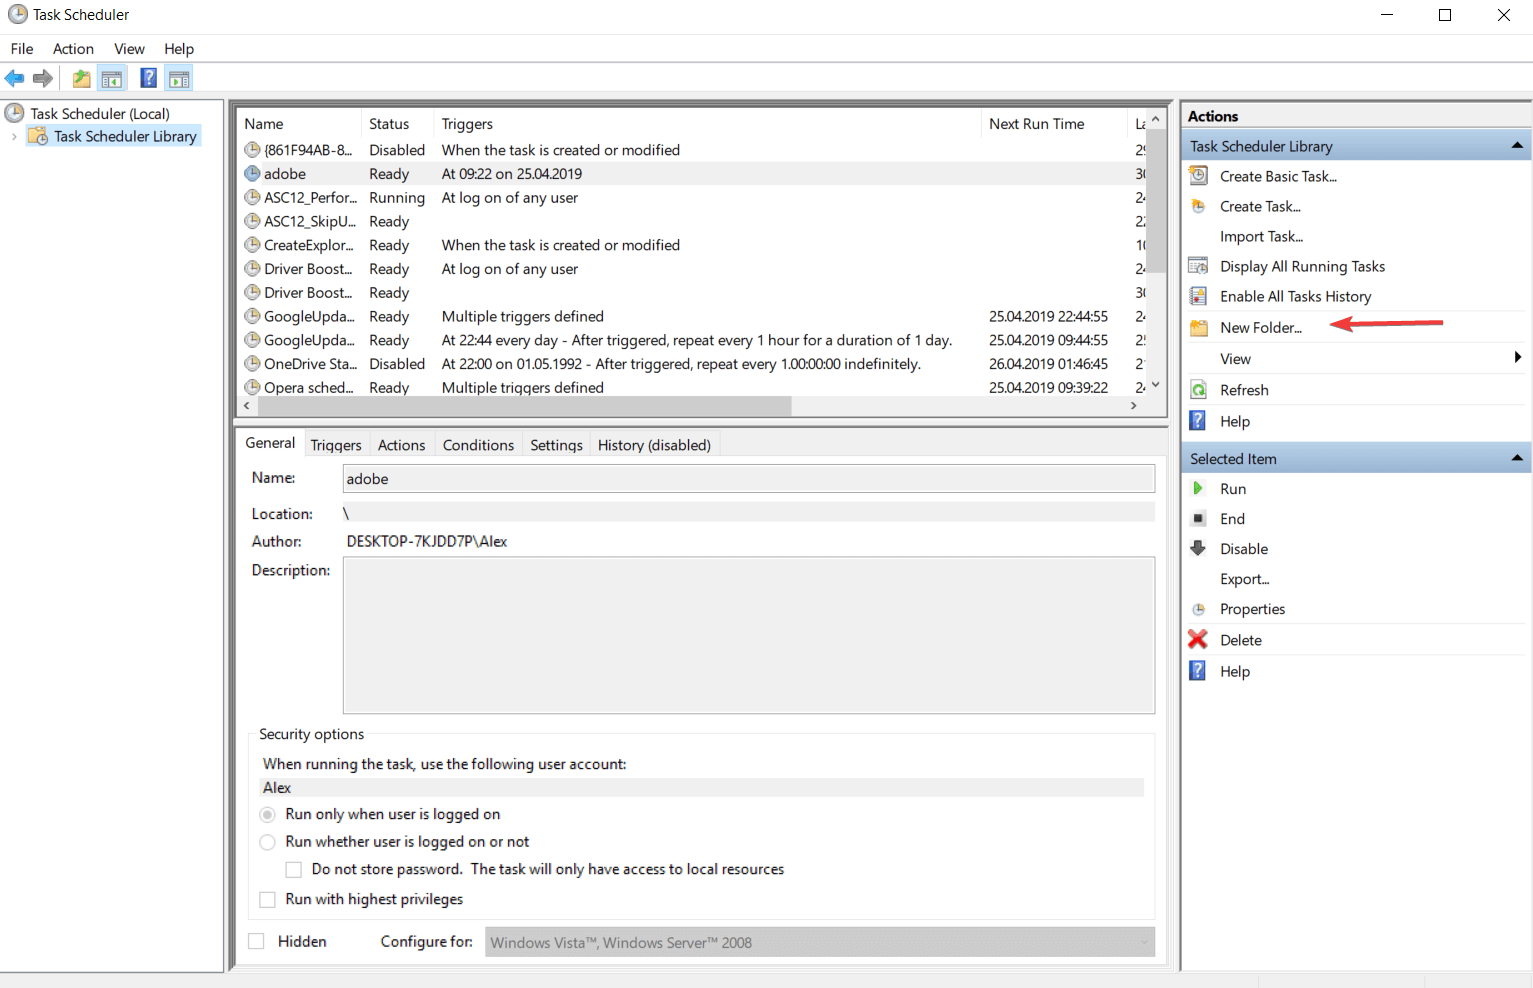
4. Select the folder where you want to create a task. If you have not already a created folder, from the Actions tab, click on the New folder… button and name your new folder.

-
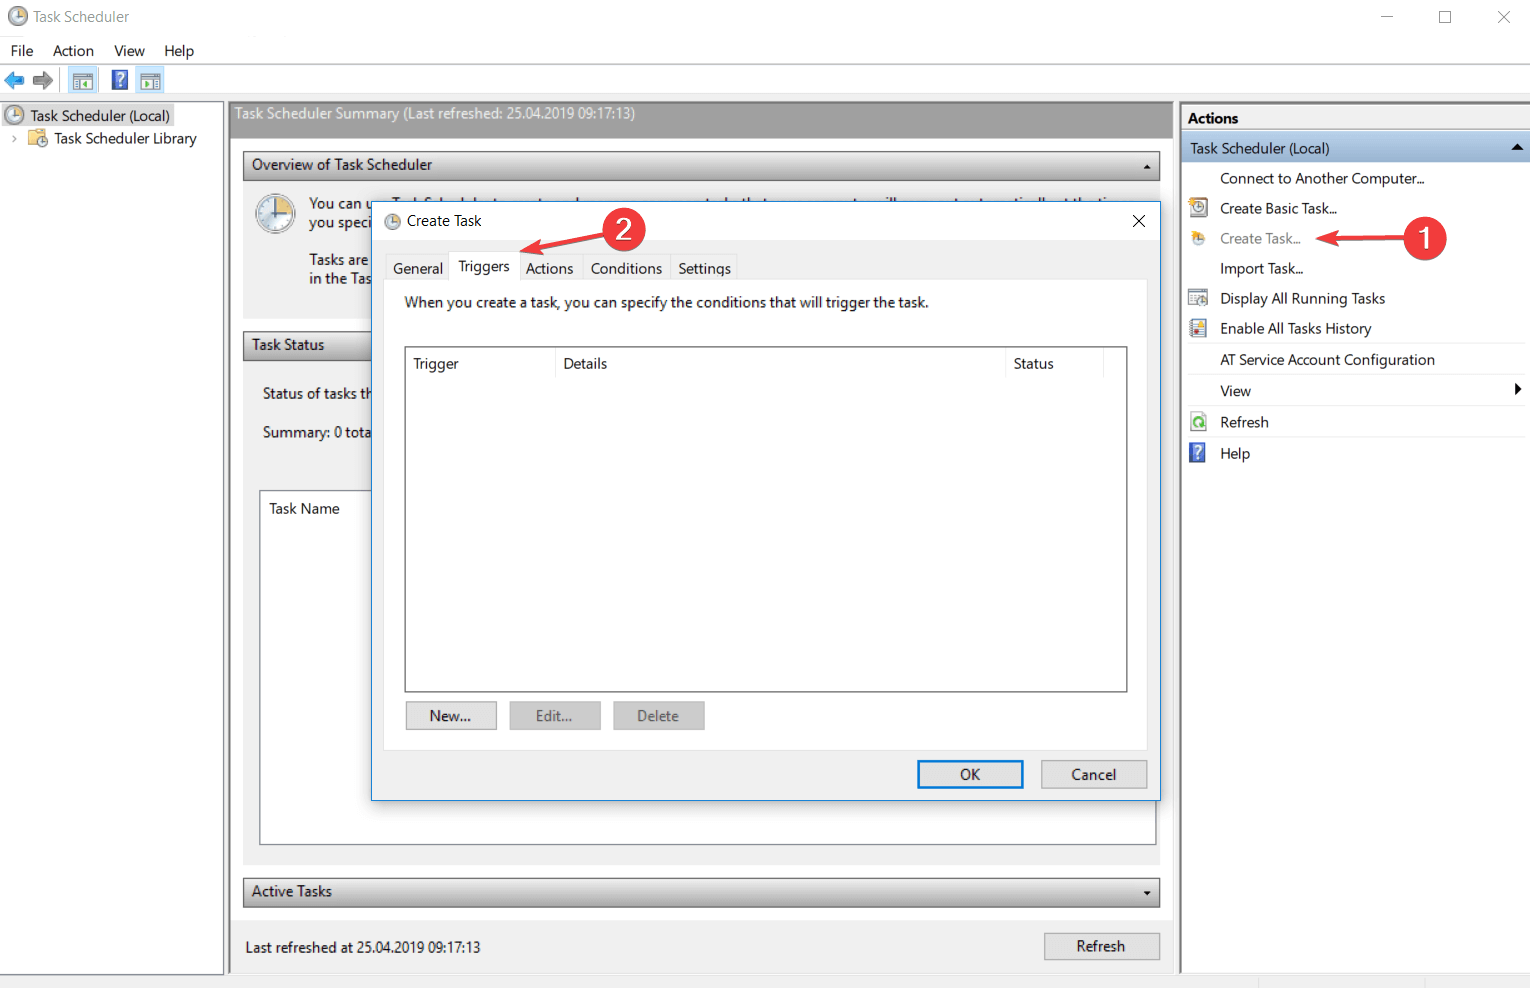
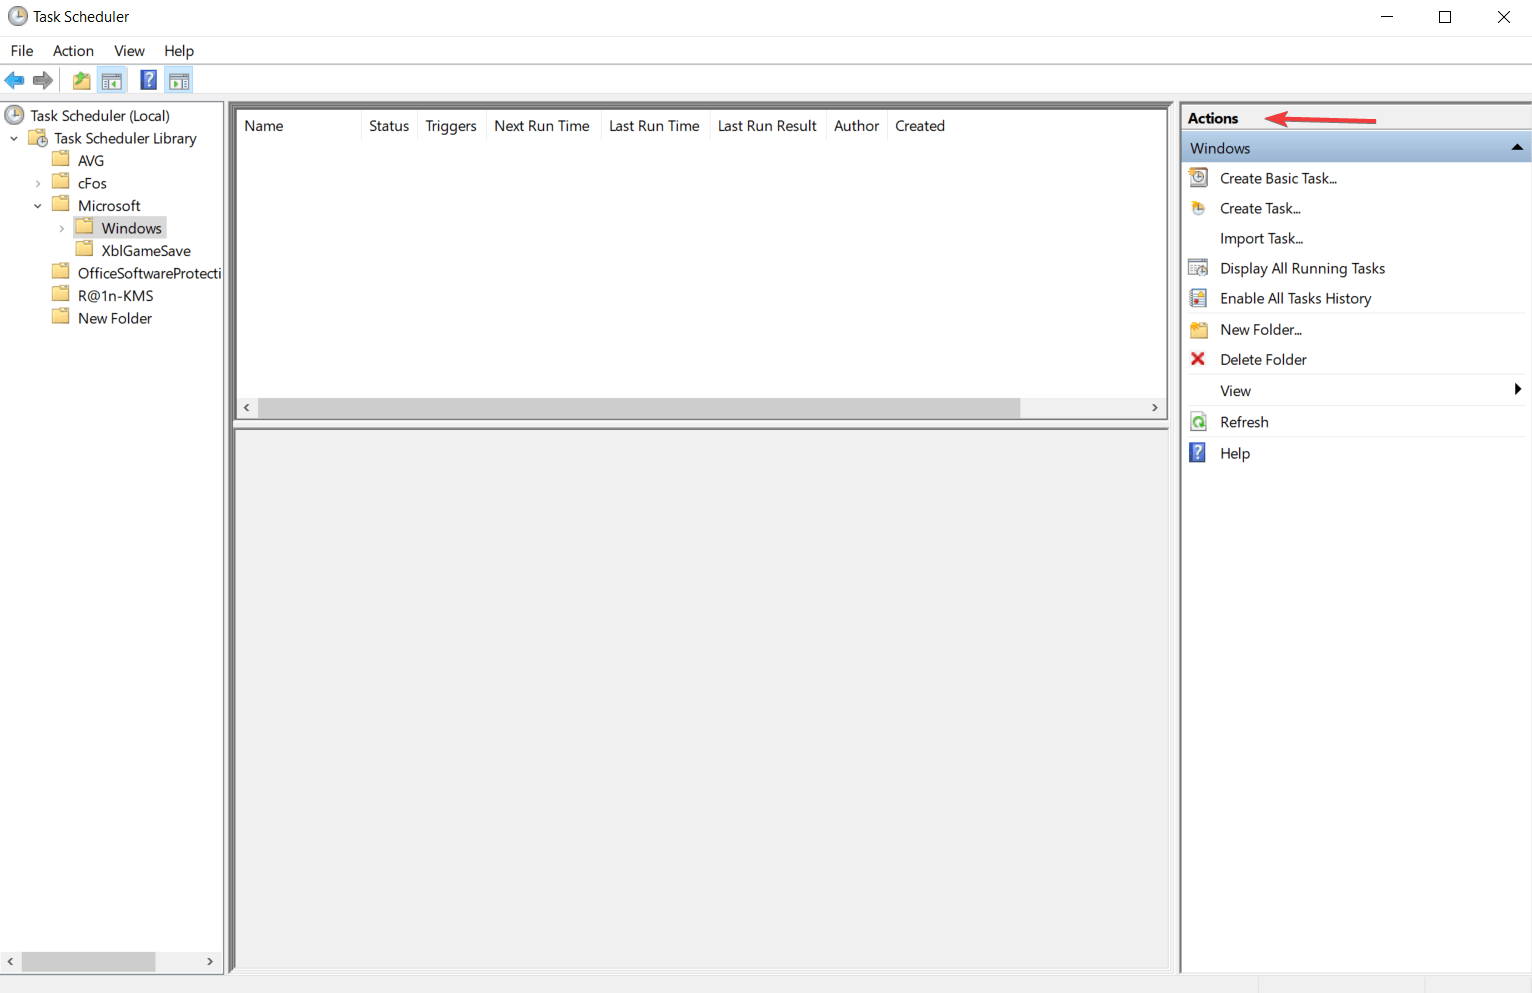
5. Click on the Create Task button from the Actions section.
-
6. You must enter a name for your task in the General tab of the Create Task dialog box.
-
7. Select what type of trigger you want to be attached to this action. To do this, open the Triggers tab, and click on the … button.
-
8. Choose the action or the set of actions which will be found in the task. Enter the Actions menu of the Create Task, and click on the .. button and configure your action settings.
-
9. Take a look at the Conditions and Settings tab to better customize the task for your needs.
-
10. Click on the OK button from the Create Task dialog box to finish the task creation process.
The process of creating an automated task via Task Scheduler in Windows 10 is simple and fast. The app allows you to configure every setting, such as the task’s name, its triggers and conditions.
6.3. How to change an already created task
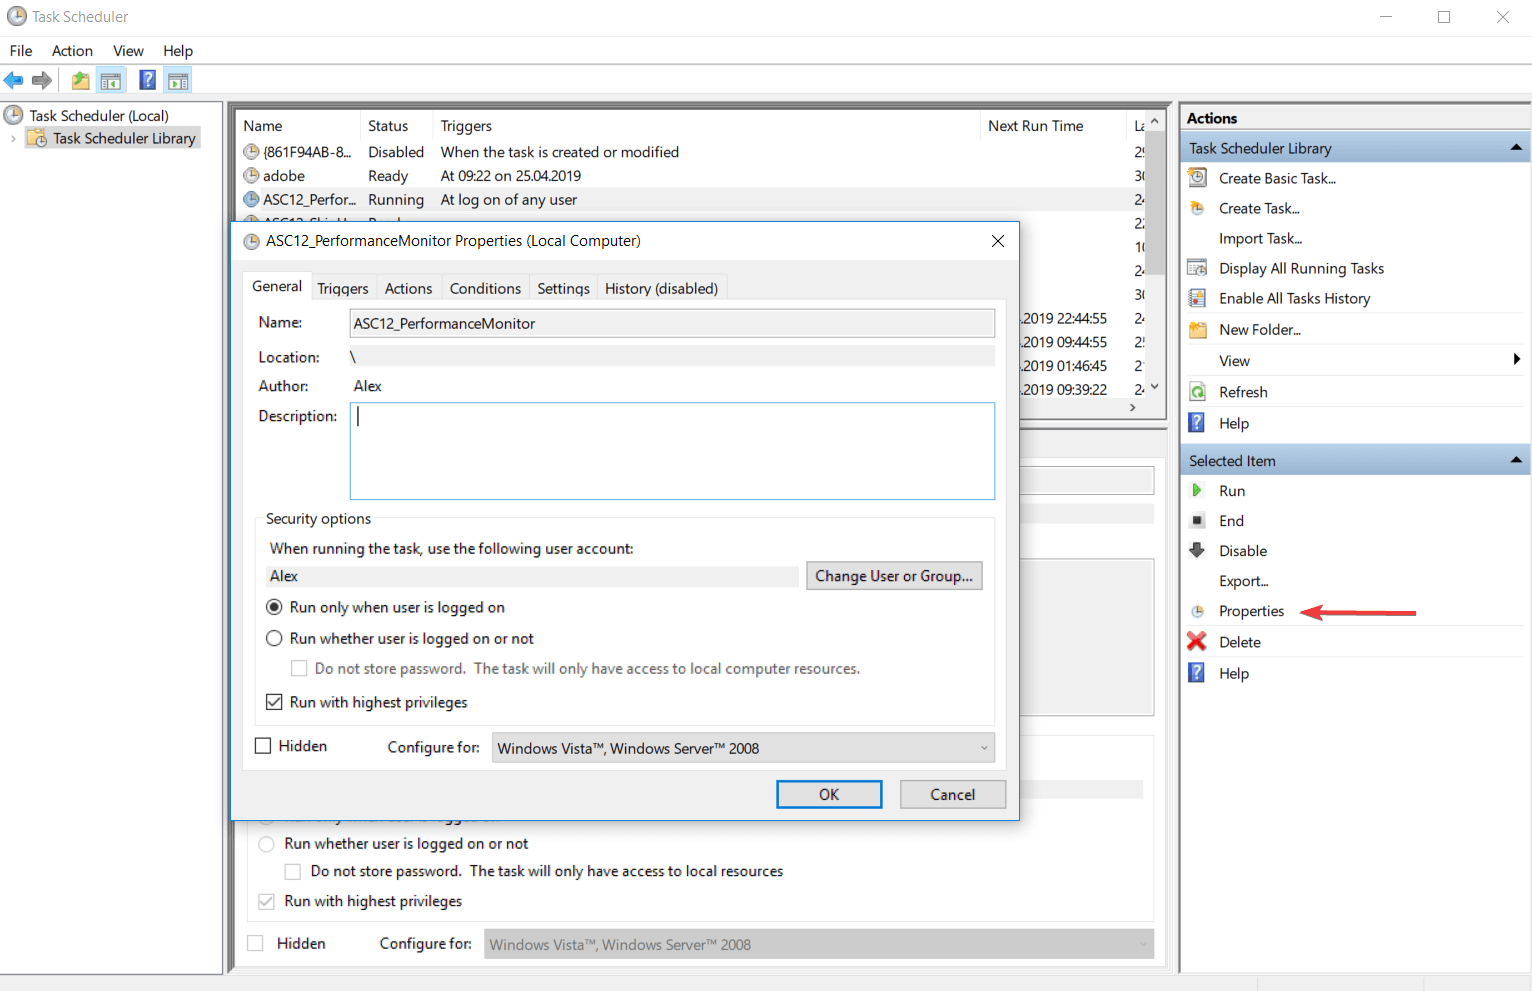
- Open Task Scheduler, and select the task that you want to change.
- Click on the Properties tab from the Action menu to open the Task Properties dialog box.

- Click on the General tab to view the task‘s general settings that you can modify.
- To finish the process click on the OK button of the Task Properties dialog box, and the new task will be registered.
- If you have already created a task that activates when you register another task, it will enable it.
6.4. How to delete a task
- Using Windows interface
- Open Task Scheduler, and click on the Task Scheduler Library folder.
- Right-click on the task that you want to remove and select Delete Folder.
- Using Command Prompt
- Type Command Prompt in the search bar, and open it.
- Paste the following command:
schtasks /Delete [/S <system> [/U <username> [/P [<password>]]]] /TN <taskname> [/F] - To find more information about the command from above, type: schtasks /Delete /?
6.5. How to create a Task Folder
- Open Task Scheduler, and select the task folder under which you want to create a new task folder.
- Press on the New Folder button from the Actions, and enter the name of the new folder.
- Click on the OK button to finish the process.
To organize better the scheduled tasks we recommend you to share them in different folders depending on their role.
NOTE
6.6. How to delete a Task Folder
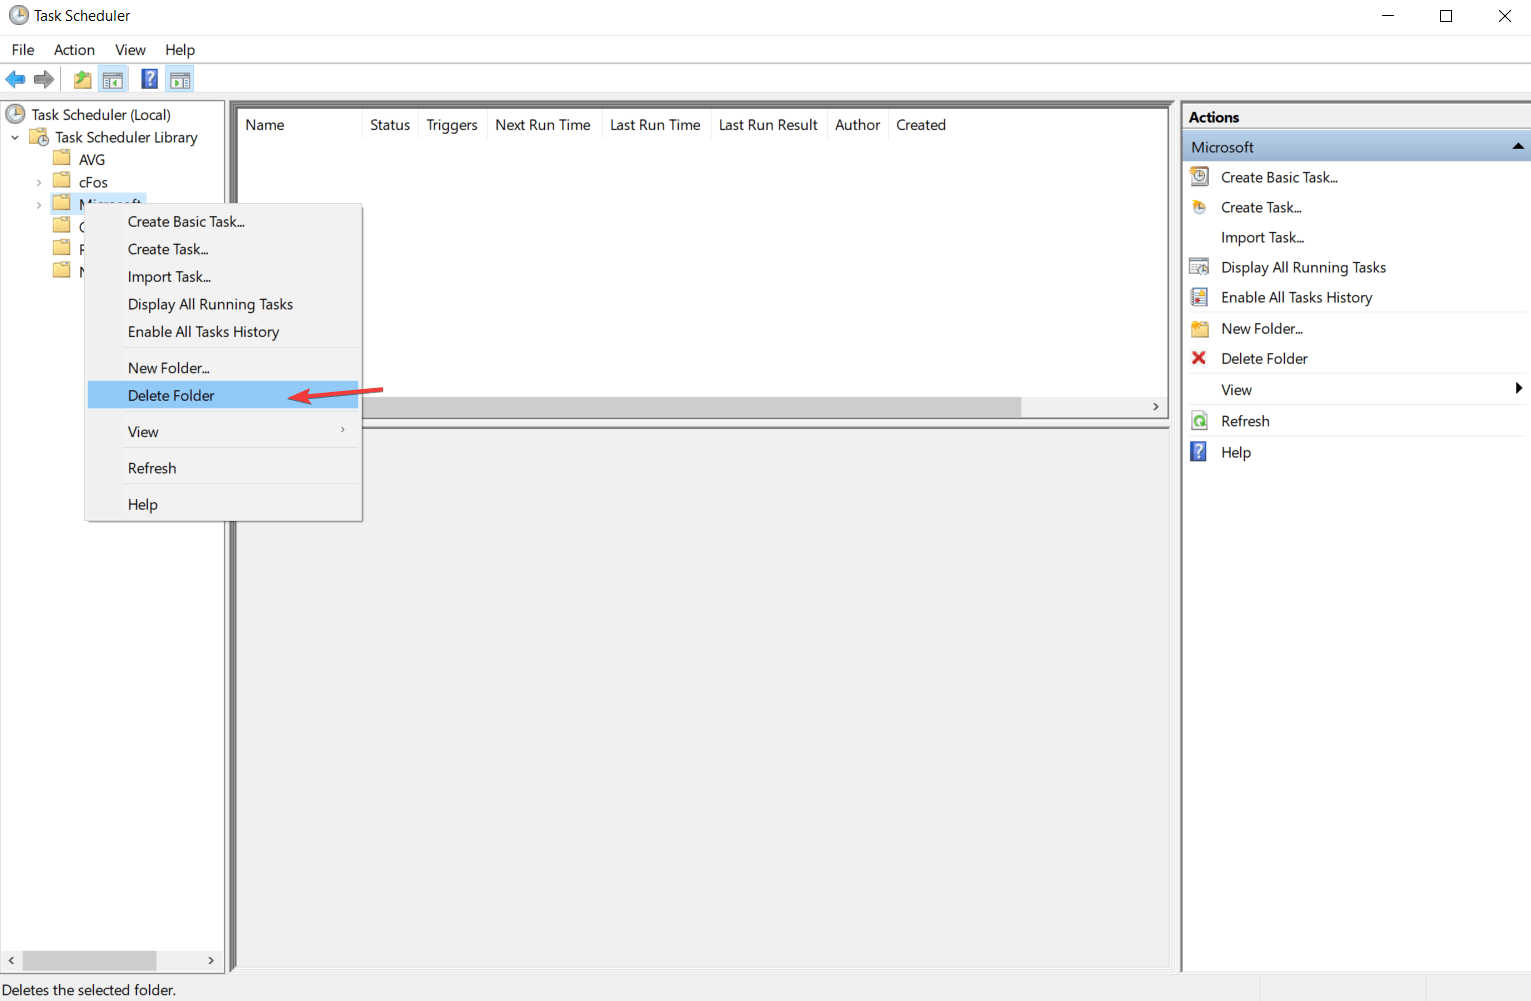
- Start Task Scheduler, and select the task folder from the left table of the application interface.
- You will notice that in the Action panel you have the Delete folder.

- Click on that option and choose the Yes option to complete the process.

If you want to delete a folder to better organize your tasks, you must ensure that it is empty, so be sure to delete all the tasks and the subfolder tasks before you delete the task folder.
NOTE
6.7. How to import a task
- Using Windows interface
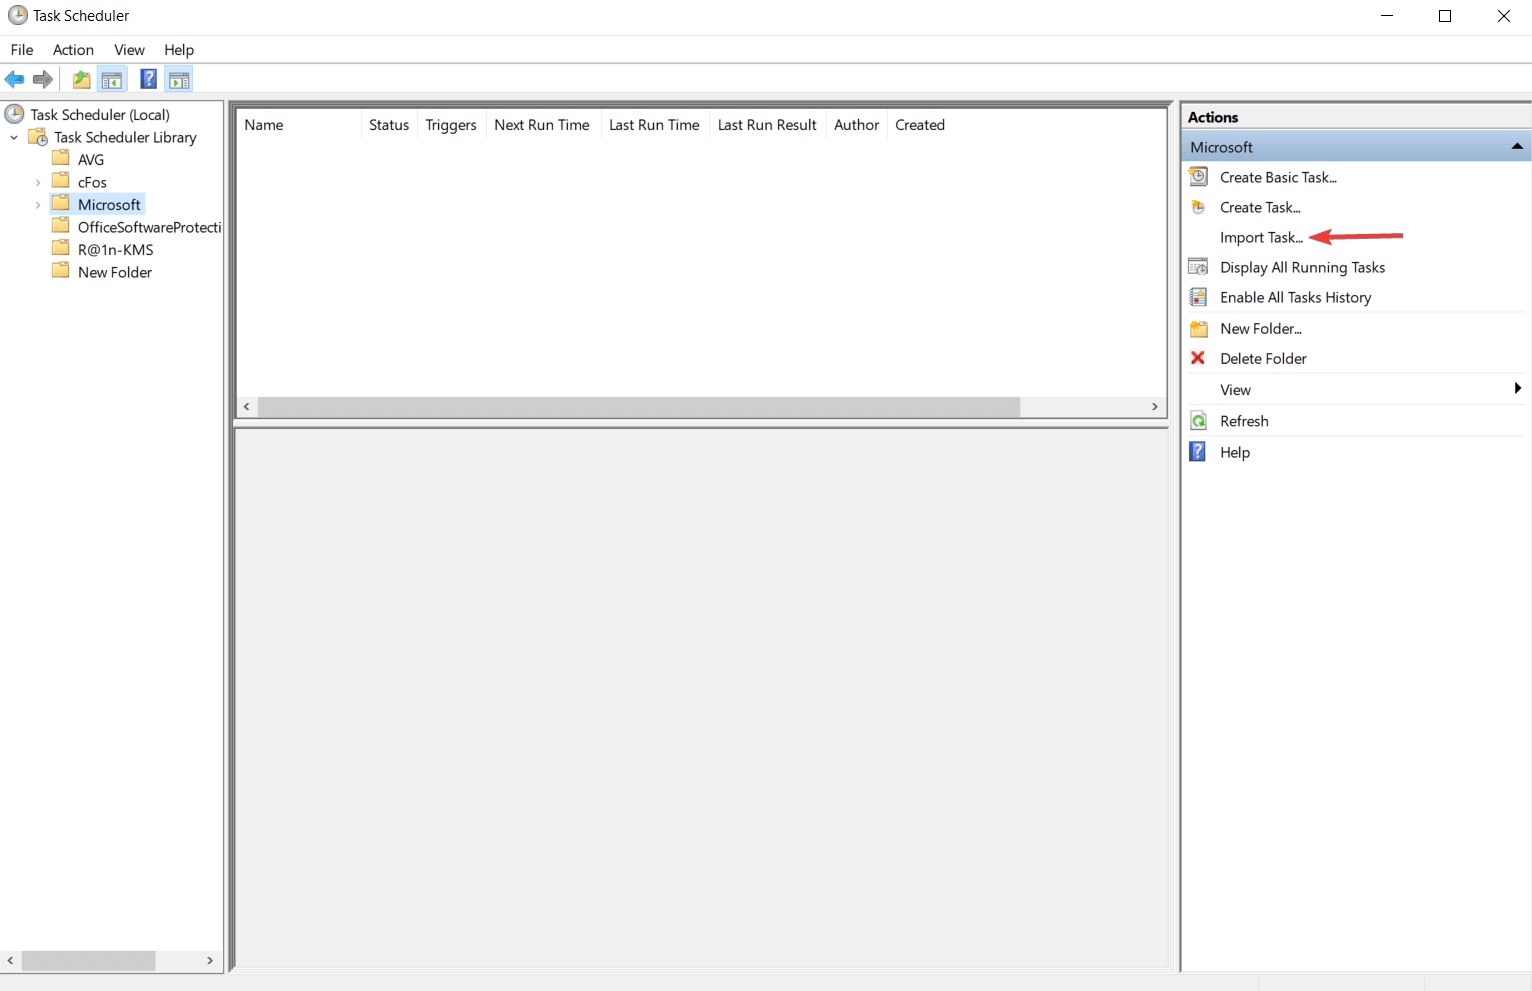
- Open Task Scheduler, and select the folder where you want to import the new task.
- Click on the Import Task button from the Action, and select the path to the XML file of the task.
- After you entered the path to the task, the app will open the Create Task dialog box where you can find all the information about the imported task.
- Click on the OK button to finish the importing process.
- Using Command Prompt
- Open Command Prompt. To do that, type cmd in the Windows search bar.
- Edit and paste the following command:
schtasks /Create [/S <system> [/U <username> [/P [<password>]]]] /XML <xmlfile> /TN <taskname> - For more information about the command from above, type the following command:
schtasks /Create /?
Task Scheduler has a feature that allows you to import tasks, which will be added to a folder chosen by you. All the task characteristics can be found in an XML file.
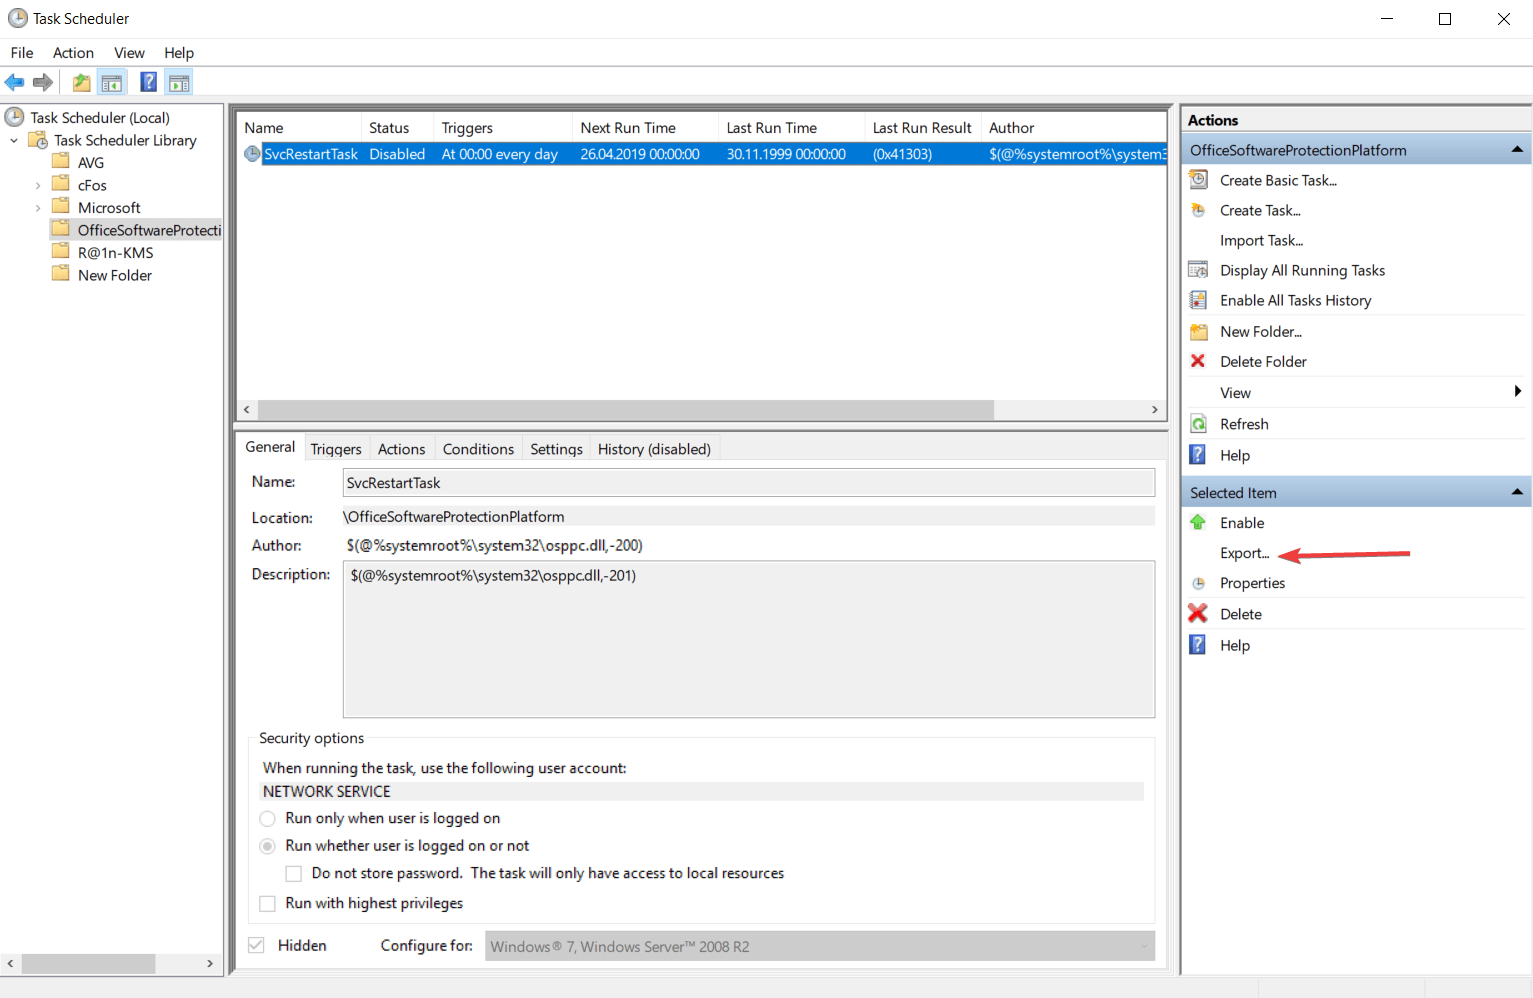
6.8. How to export a task
- Export a task using Windows interface
- Open Task Scheduler, and select the task folder which contains the task that you want to export.
- Right-click on the task that you want to export and select the Export option.

- If you select the task, you can find this option in the Action panel.
- This action will open a dialog box where you must browse the location where you want to save the task.
- Using Command Prompt
- Open Command Prompt by typing cmd in the Windows search bar.
- Edit and paste the following command: schtasks /Query [/S <system> [/P <password>]]]] /XML /TN <taskname>
- To find more information about the command tag, type the following command:
schtasks /Query /? - Your XML file is shown in the console. Copy the task XML and paste it into a blank XML file.
- After the XML file is saved, it will contain all the characteristics of your task.
Task Scheduler has also an integrated feature that allows you to export your task to different users. The task will be saved in an XML format that can be shared like a usual file.
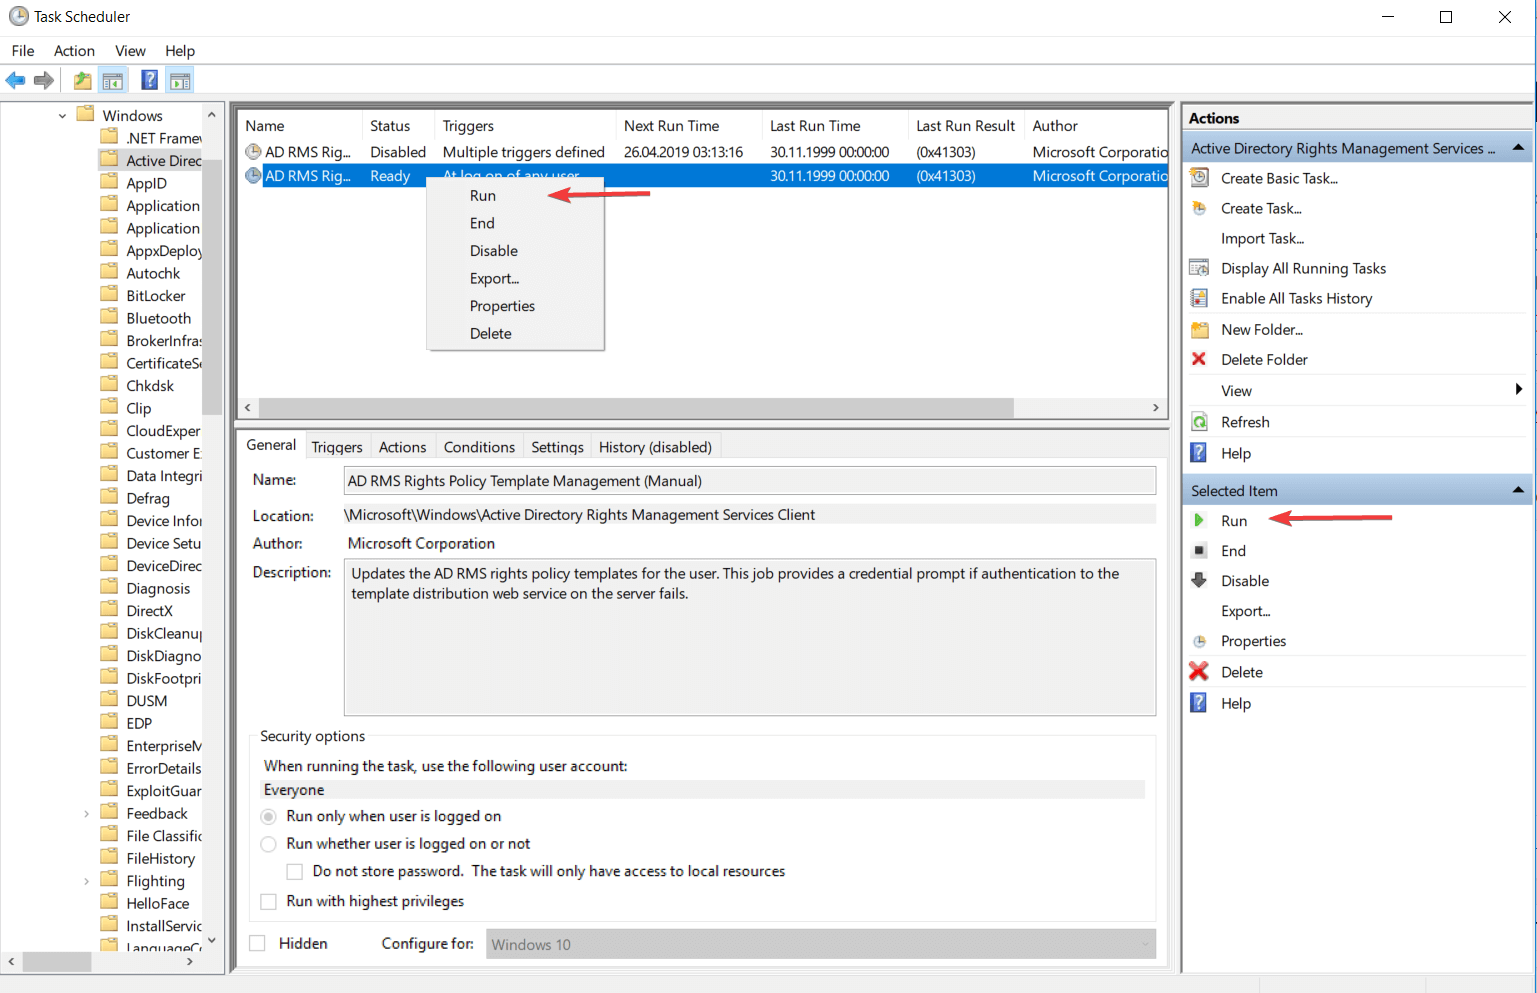
6.9. How to run a task on demand
- Using Windows interface
- Open the Task Scheduler, and select the folder that contains the task you want to run.
- Right-click on your task and select Run.

- If you select the task you can find this option in the Action panel.
- Using Command Prompt
- Right-click on the Windows icon from the bottom left corner of your screen, and select the Command Prompt (Admin) section.
- Edit and type this command:
schtasks /Run [/S <system> [/U <username> [/P [<password>]]]] /TN <taskname> - For more information about the command lines from above, type in the console
schtasks /Run /?
This feature helps you to run a task after or before it was scheduled to run. This is possible only if the task is not disabled and the Allow task to be run on demand setting is selected for your task.
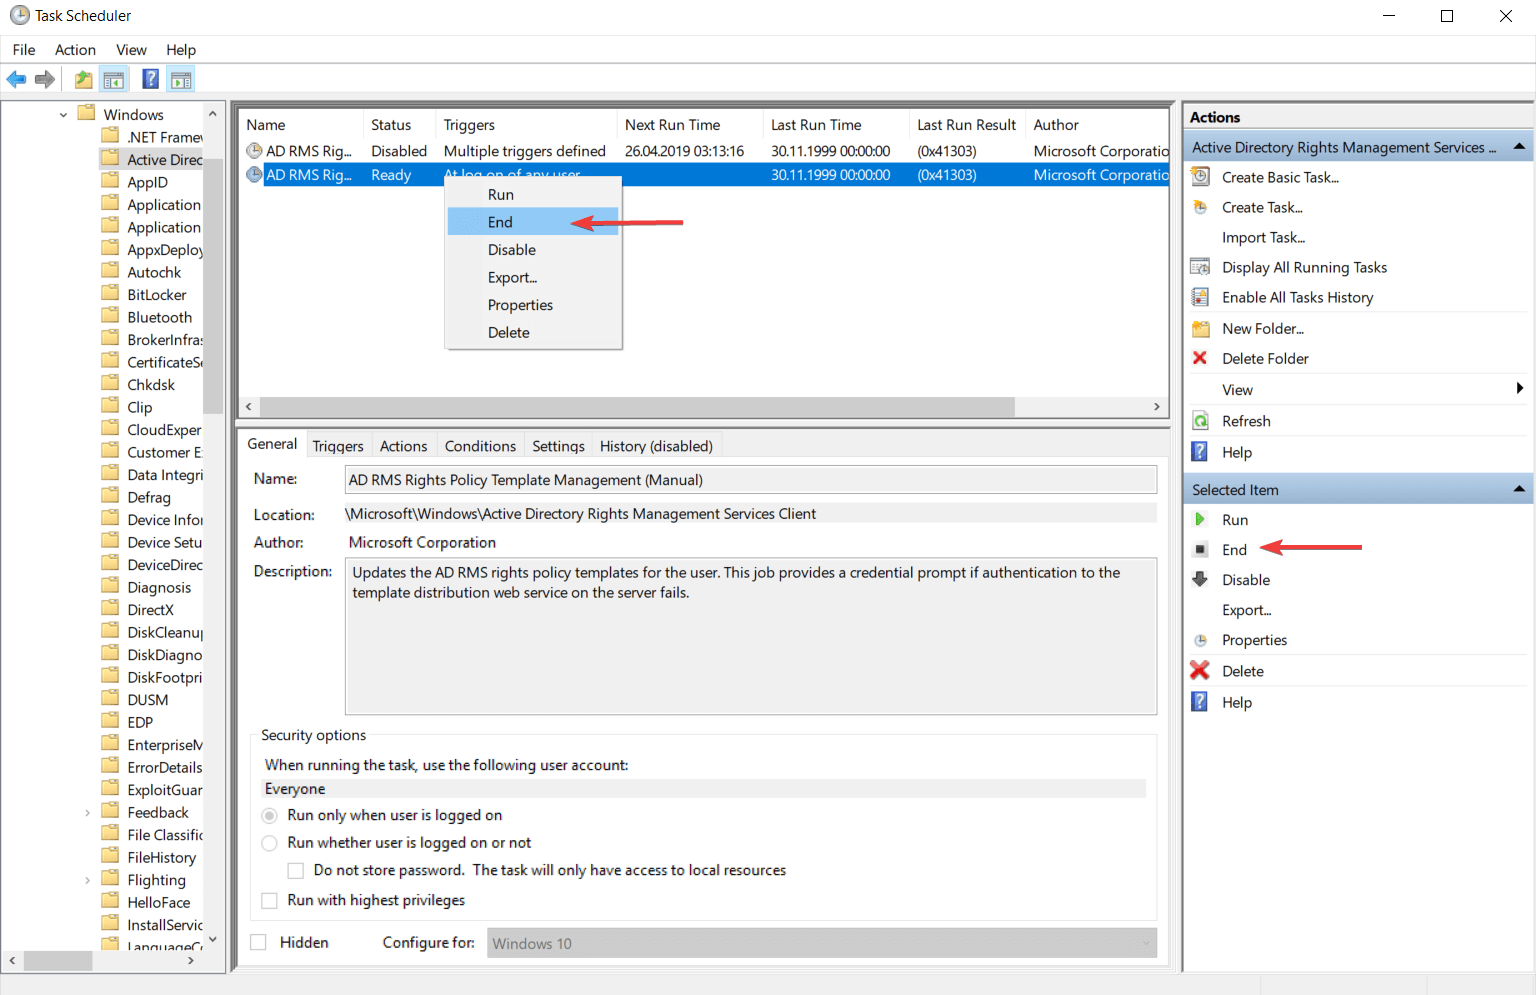
6.10. How to stop a running task
- Using Windows interface
- Open Task Scheduler, and select the folder which contains the task that you want to close.
- Right-click on your task, and select the End If you select the task.

- It will be displayed a dialog box where you will be asked if you want to end all instances of this task. Click on the Yes button to end stop the task.
- Using Command Prompt
- Use the Windows Key + R combination to open the Command Prompt.
- Edit and type this command to end the activity of your task:
schtasks /End [/S <system> [/U <username> [/P [<password>]]]] /TN taskname - To see the role of each sequence you can enter the following command in the console to get all the information you need:
schtasks /End /?
Task Scheduler is offering a feature that allows you to end the activity of a task even if it is already running.
To do that, the running task must have the If the running task does not stop when requested, force it to stop setting activated.
This feature is commonly used when a task does not finish its activity when you finish the ending process.
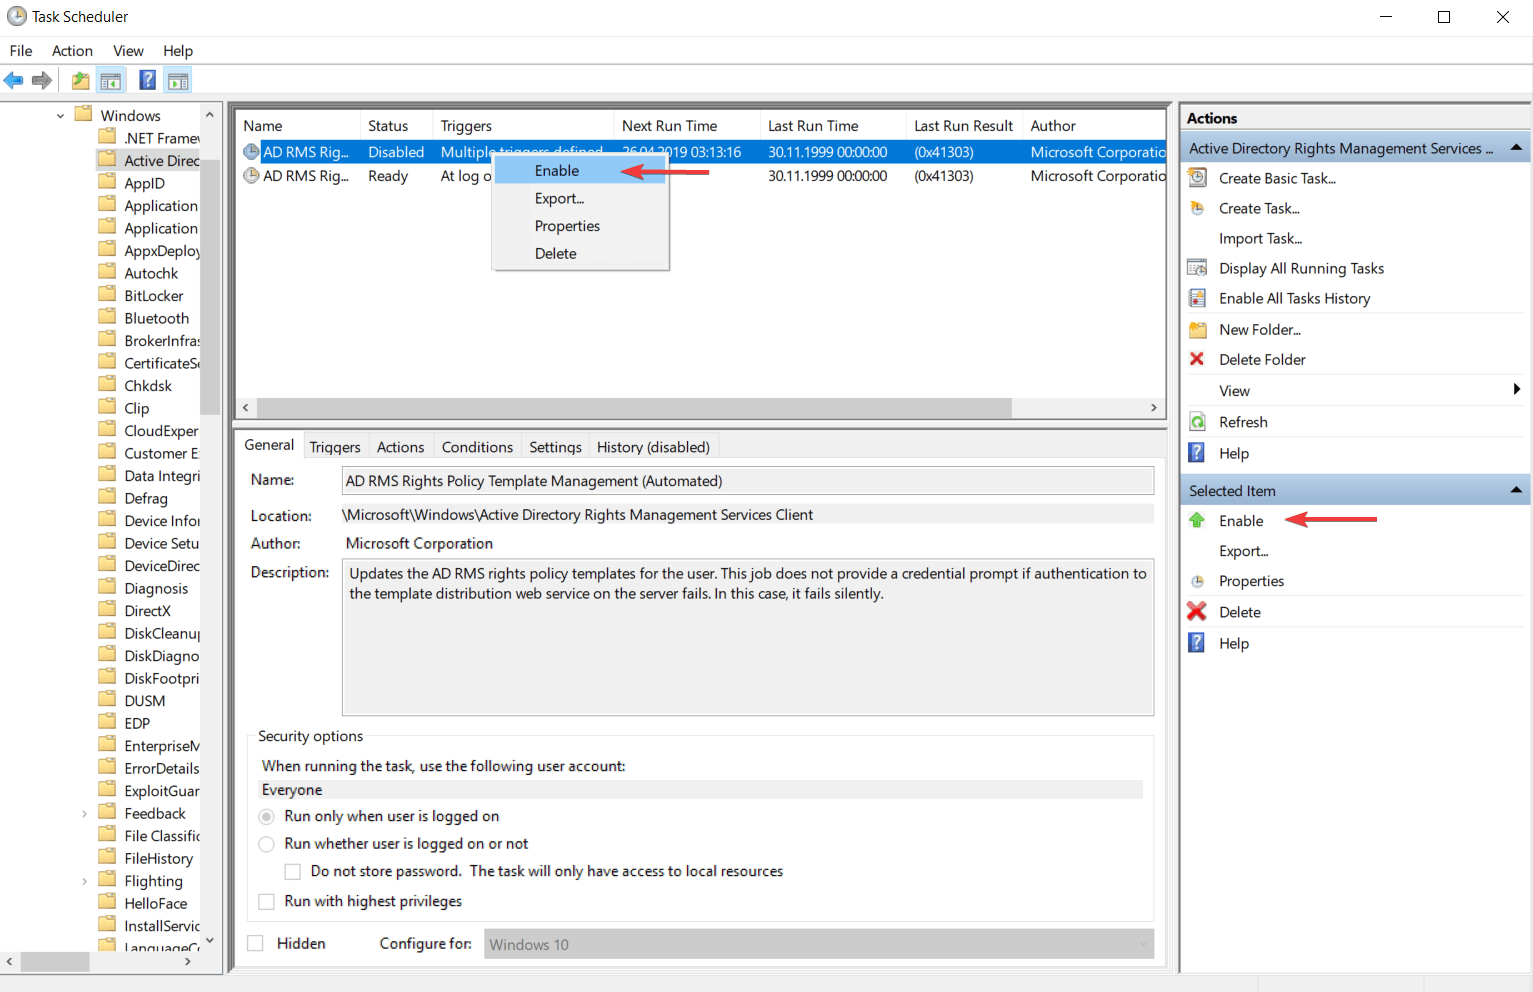
6.11. How to enable a task to run
- Using Windows interface
- Open Task Scheduler, and select the task folder which contains the task you want to enable.
- Right-click on your task, and select the Enable option.

- You can also select your task and run it from the Actions panel.
- Using Command Prompt
- Use the Windows Key + R key combination to open Command Prompt.
- Edit the following command and paste it in the console dialog box:
schtasks /Change [/S <system> [/U <username> [/P [<password>]]]] /TN <taskname> [/ENABLE] - Enter this command to obtain more information about the command from above:
schtasks /Change /?
When a task is disabled it can execute the actions. You can create a task and leave it off until the moment you want to use it. Here are two ways to activate a task that any kind of user can implement.
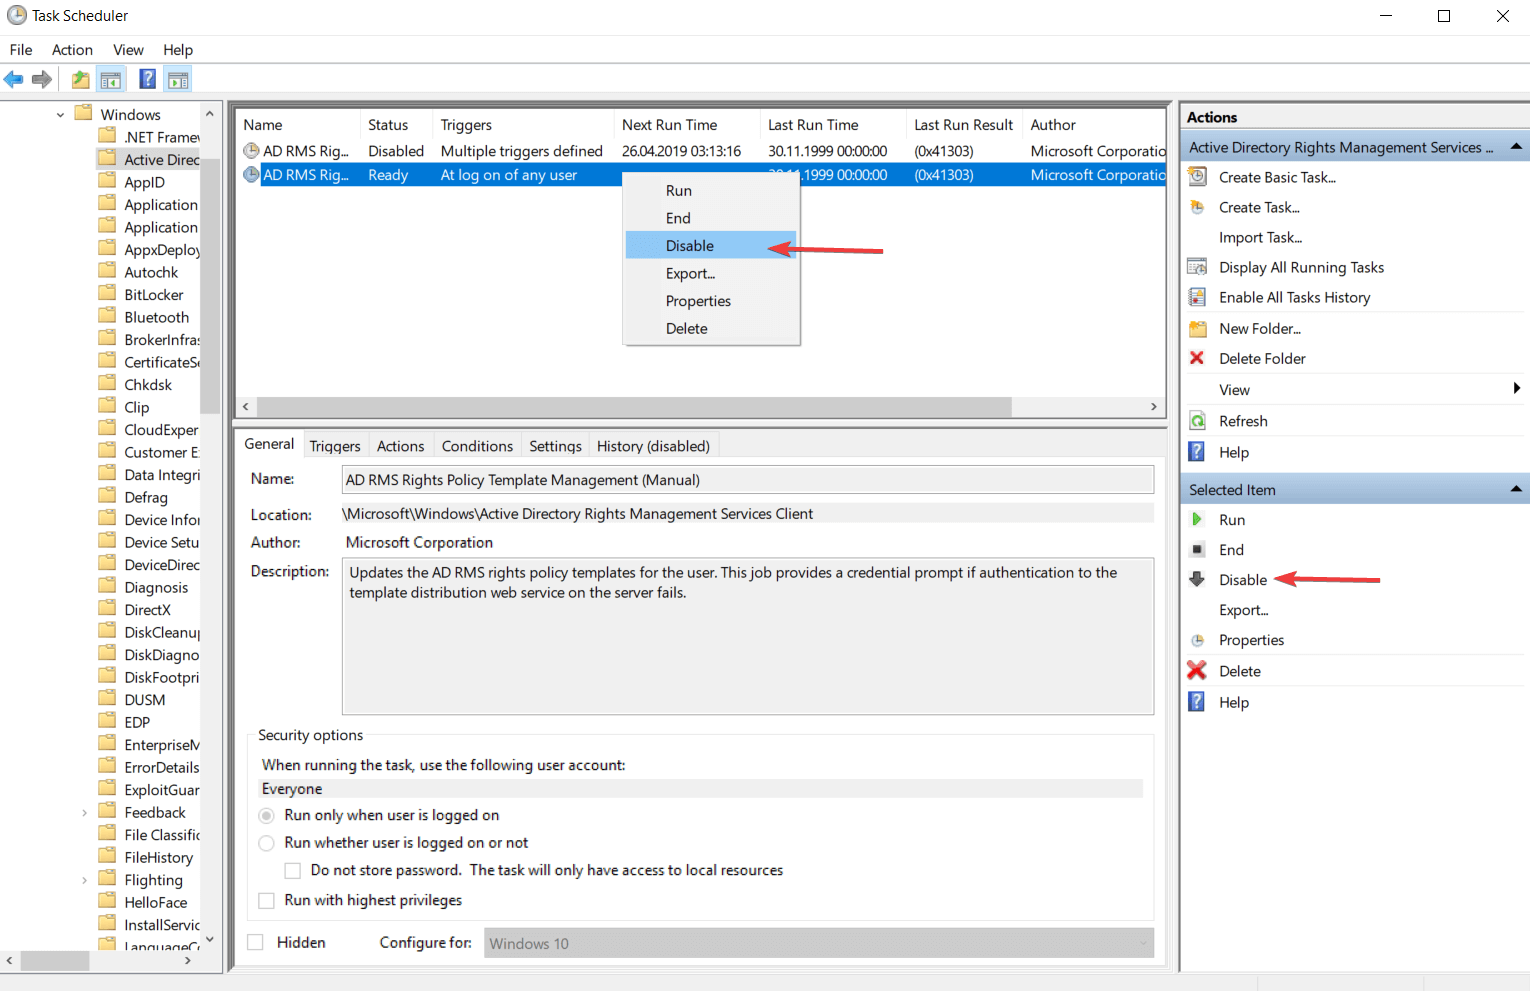
6.12. How to disable a task for running
- Using Windows interface
- Open the Task Scheduler, and select the folder where you have the task.
- This action will display in the console panel all tasks from that folder.
- Search the task that you want to disable and then right-click on it.
- It will display a list with some actions, but in this case, we are only interested in one. Click on the Disable option to stop your task activity.

- Using Command Prompt
- To open Command Prompt, right-click on the Windows icon from the bottom left corner of your screen.
- Click on the Command Prompt (Admin) to open the console as an administrator.
- Edit with your information the following command and paste it in the Command Prompt dialog box:
schtasks /Change [/S <system> [/U <username> [/P [<password>]]]] /TN <taskname> /DISABLE - You can find more information about this command line by pasting the following command in the console:
schtasks /Change /?
Task Scheduler has a feature that allows you to disable the activity of a task for a certain period of time. You can enable the task again at any time when you will need it.
6.13. How to view task properties and history
- Using Windows interface
- Open Task Scheduler, and select the folder that contains the task you want to view.
- Right-click your task and select Properties.
- In the Task Properties dialog box, you will find the General, Triggers, Actions, Conditions, and Settings.
- Click on any of these tabs to see the properties.
- Click on the History tab to view the task‘s history.
The task history option can be enabled and also disabled from the Action panel. There you will find the Disable All Task History / Enable All Task History buttons, and depending on your wish, you can configure the task’s history.
Also, you can view the description of an event from the events list by clicking on the History tab.
- Using Command Prompt
- Right-click on the Windows icon next to the Windows search bar, and select Command prompt (Admin).
- Paste the following command:
Schtasks /Query /FO LIST /V - For more information about the command line from above, type:
schtasks /Query /?
The task properties contain everything we must know about every task (name, description, actions, triggers, security options, conditions, and settings).
The task history is a list with all the tasks created until that moment and can be viewed along with the properties. This list is based on the events tracked by Microsoft Windows Task Scheduler event log.
Every action related to a task is considered an event, so every time when a task runs is building a line in the event log.
We hope that our detailed guide to Tasks Scheduler has given you a broad overview of this application and that you will be able to successfully schedule your tasks in Windows going forward.
Also, if you own a business and want to make sure you have everything under control, then check out our list of the best scheduling software for employees.
For any questions and more suggestions, please access the comments section below.