
В параметрах графики Windows 11 и Windows 10 (начиная с обновления в мае 2020) присутствует функция «Планирование графического процессора с аппаратным ускорением», призванная снизить задержки в играх и других графически интенсивных приложениях.
В этом материале о том, что делает функция планирования GPU, включать ли её и как включить планирование графического процессора с аппаратным ускорением.
Что делает функция и стоит ли включать её
Планирование графического процессора с аппаратным ускорением призвано снять часть нагрузки с центрального процессора, что, в некоторых случаях, может улучшить общую производительность в играх, а главное — снизить инпут-лаг (задержку при вводе).
Стандартно (без использования функции) планирование команд и их отправка для GPU (видеокарты) выполняется процессором с помощью планировщика WDDM, при этом команды отправляются не по одной, а пакетами (буферизация кадров). Это позволяет улучшить частоту кадров, но может приводить к задержкам ввода в играх: то есть отклик на действие пользователя происходит при отправке следующего пакета.
Планирование графического процессора с аппаратным ускорением снимает часть выполняемых процессором задач и передает их на обработку планировщику видеокарты. В случае, если узкое место вашего компьютера — это процессор, либо какие-то из игр нагружают его на 100%, включение рассматриваемой функции может быть полезным: но для каждого конкретного случая изменения будут заметными. Это лучше проверить самостоятельно, результат может отличаться в зависимости от игры и конкретной системы: например, тесты показывают, что результат тем лучше, чем мощнее используемая видеокарта.
Эффект от включения функции может проявиться не только в снижении инпут-лага и производительности в играх: в некоторых случаях этого можно и не наблюдать, но получить снижение нагрузки на процессор и его температуры в играх.
Как включить планирование графического процессора с аппаратным ускорением в Windows 11 и Windows 10
Для того, чтобы функция была доступна для включения, должны выполняться следующие условия:
- Установлена Windows 11 или Windows 10 с обновлением компонентов от мая 2020 года.
- Компьютер оборудован видеокартой NVIDIA GeForce 10-й или более новой серии, AMD Radeon RX 5600 или более новой.
- Установлены драйверы видеокарты, желательно — новые.
Параметры
Для того, чтобы включить планирование графического процессора с аппаратным ускорением в Параметрах, достаточно выполнить следующие шаги:
- Нажмите правой кнопкой мыши по рабочему столу и выберите пункт «Параметры экрана».
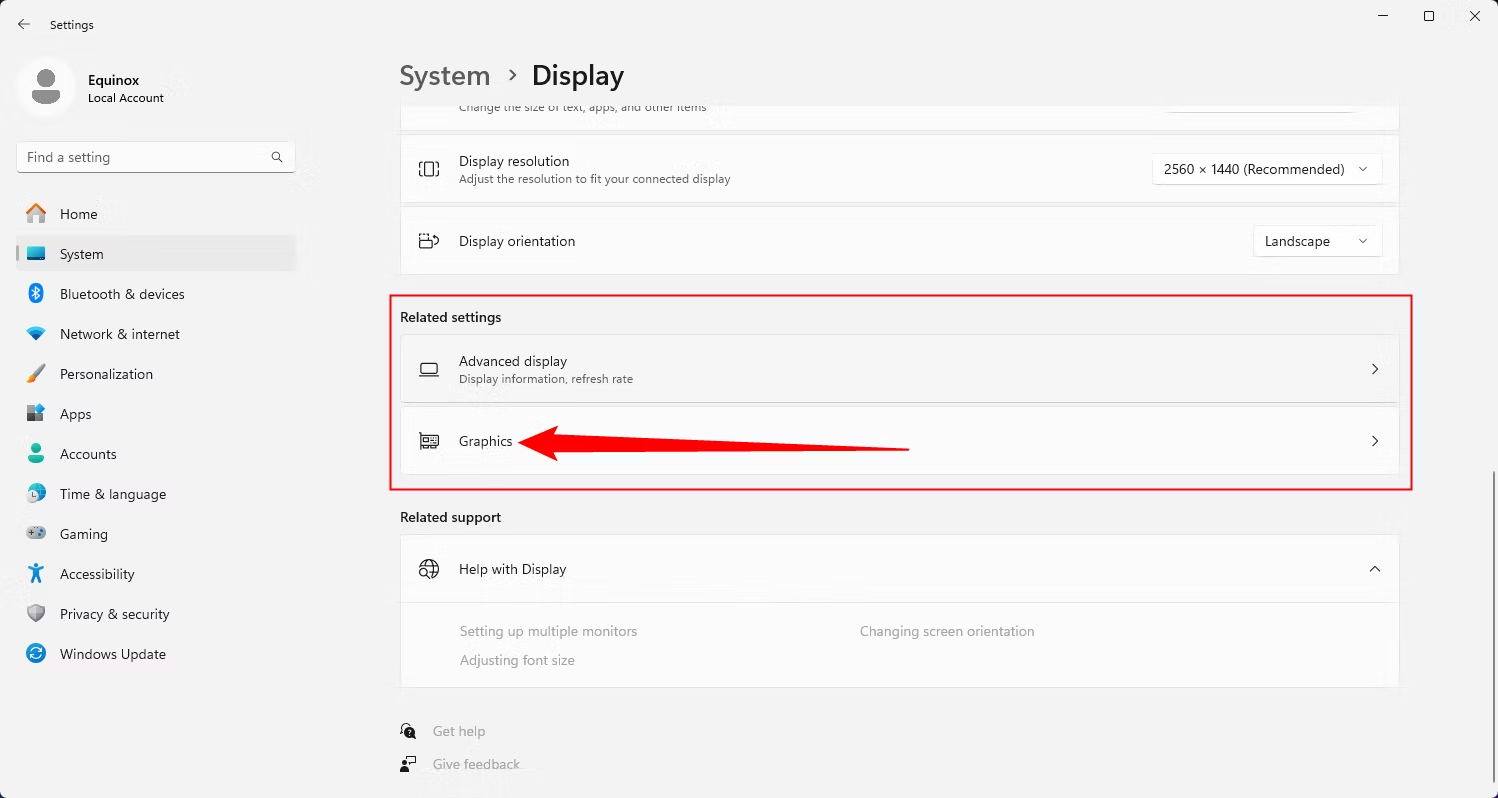
- В Windows 11 нажмите «Графика» в разделе «Сопутствующие параметры», а в Windows 10 — «Настройки графики» ниже раздела «Несколько дисплеев».

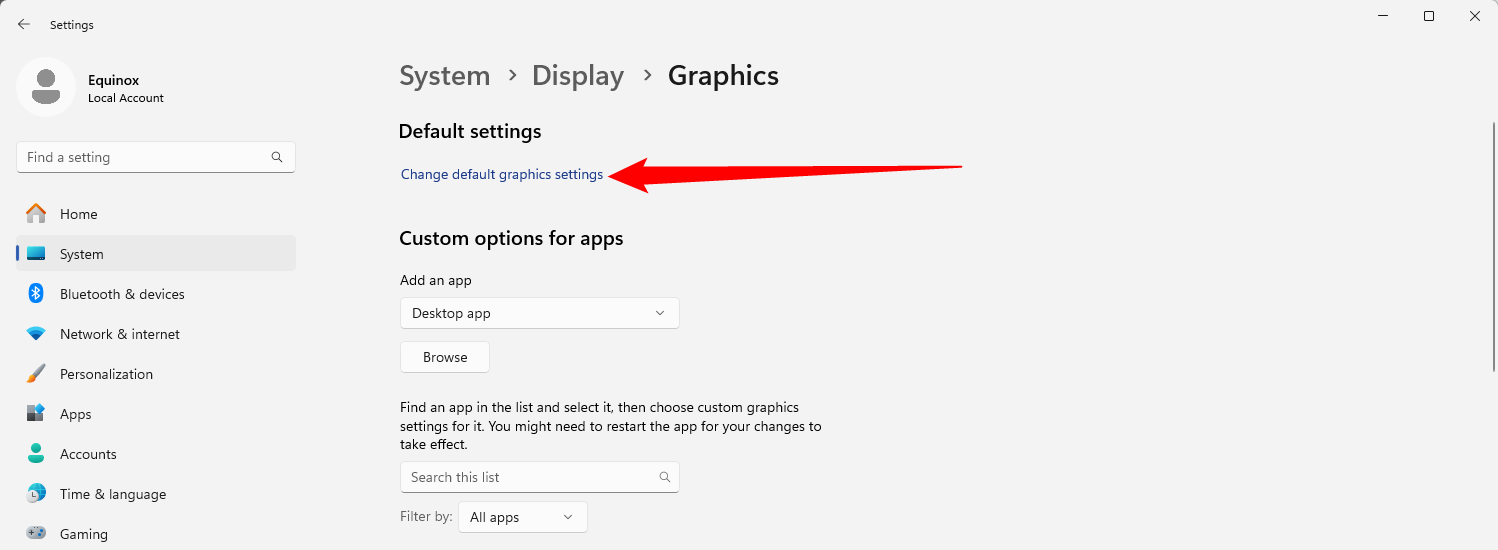
- В Windows 11 дополнительно перейдите в раздел «Изменение стандартных параметров».
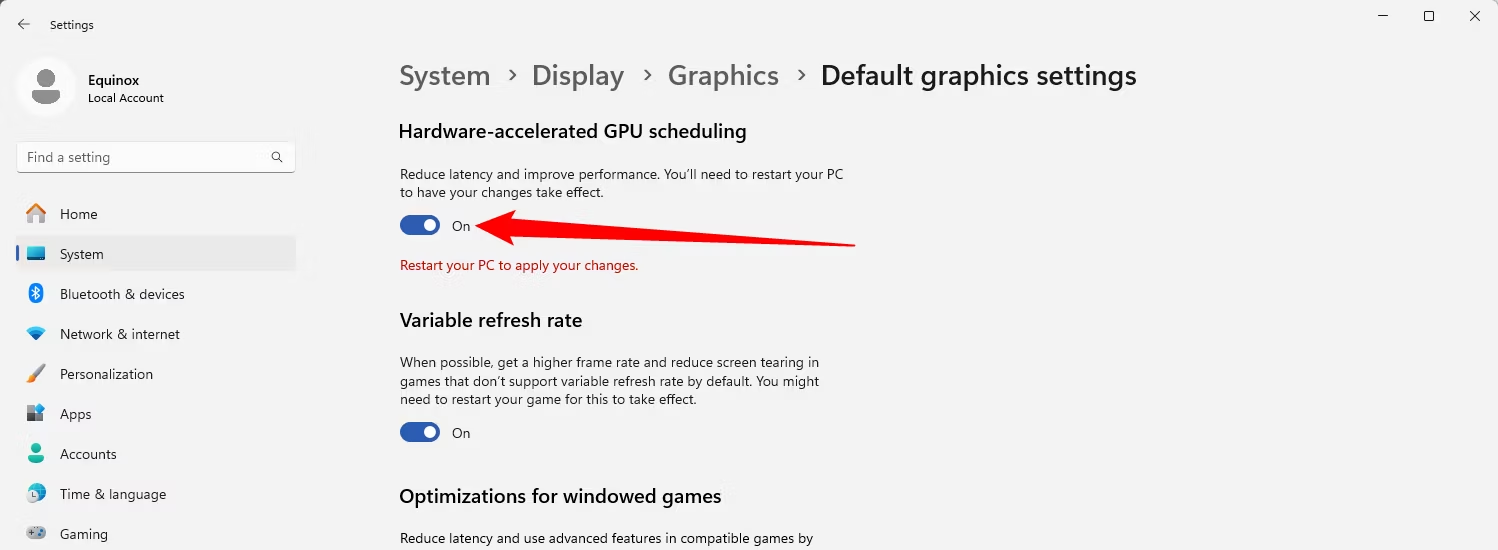
- Включите опцию «Планирование графического процессора с аппаратным ускорением».


Если переключатель для включения функции отсутствует, это может говорить о том, что на компьютере отсутствует подходящее оборудование с её поддержкой, либо не установлены актуальные драйверы дискретной видеокарты NVIDIA или AMD.
Редактор реестра
Ещё одна возможность включить функцию — реестр Windows:
- Нажмите клавиши Win+R на клавиатуре, введите regedit и нажмите Enter.
- В открывшемся редакторе реестра перейдите к разделу
HKEY_LOCAL_MACHINE\SYSTEM\CurrentControlSet\Control\GraphicsDrivers
- Нажмите правой кнопкой мыши в правой панели редактора реестра и создайте новый параметр DWORD (32-бит) с именем HwSchMode
- Дважды нажмите по параметру и задайте значение 2 для него, сохраните изменения.
- Закройте редактор реестра и перезагрузите компьютер.
Подводя итог: если вы не знаете, стоит ли включать планирование GPU с аппаратным ускорением в Windows, лучший способ определить это — попробовать включить и посмотреть, как изменится отзывчивость игры на ввод, а также нагрузка на процессор и его температура. Если окажется, что выгоды от включения заметны, стоит оставить функцию включенной. Кроме этого, следует учитывать, что в разных играх результат может отличаться.
With Windows 10 update for May 2020 v2004, Microsoft introduced a new feature in the Settings app, known as “Hardware-Accelerated GPU Scheduling.” This feature has also been introduced to Windows 11.
When enabled, you can refine and enhance your gaming experience using the same hardware by increasing the GPU’s working capacity. By default, this feature is disabled.
Note that this option is only available if both your hardware and driver support it. Let’s see what benefits this feature brings to your gaming experience, and how you can enable it.
Table of Contents
What is Hardware-Accelerated GPU Scheduling and How it Works
Hardware-Accelerated GPU Scheduling allows you to optimize the speed of your dedicated GPU and enhance your overall gaming experience. Enabling it would drastically reduce latency, improve FPS, and generally improve your system’s performance.
Windows will automatically prioritize graphics-intensive tasks that require greater resources and execute such tasks on the dedicated GPU, which will be optimized after enabling Hardware-Accelerated GPU Scheduling.
However, Hardware-Accelerated GPU Scheduling allows the GPU to manage its own Virtual RAM (vRAM), rather than having it managed by the operating system.
Since the GPU will now manage its own vRAM, it eliminates the overhead time of communication with the OS, resulting in faster response rates from the GPU.
Read Microsoft’s blog post to learn more about the feature.
Prerequisites and Requirements
As we mentioned earlier, both the hardware and the drivers need to support the function to use it. Moreover, the operating system also needs to be Windows 10 v2004 (May 2020 update) or later.
Additionally, you must have a dedicated GPU on your PC. Your computer needs to have Nvidia GTX 1000 or later GPU, or AMD 5600 series or later GPU.
If you have the hardware, then you must also have the latest drivers for that hardware.
If you are using an NVIDIA dedicated GPU, then you must have a supported driver as well, which is 451.48, or later. Here is a guide on how to download the latest NVIDIA drivers.
If you are using an AMD GPU, you must have the Adrenalin 2020 Edition 20.5.1 Beta version of the driver or higher. As the name suggests, AMD is still working on the beta version for its support of hardware acceleration.
If you don’t have a high-grade GPU, you can still play graphics-intensive games using Cloud gaming services.
How to Enable Hardware-Accelerated GPU Scheduling in Windows
Once you have ensured that you have the supported hardware, its driver, and the supported OS version, you can now continue to enable the feature on your Windows device. Here are 2 ways to do so.
Enable Hardware-Accelerated GPU Scheduling using Settings App
Enabling the feature through the Settings application on a Windows PC is relatively easy, and literally just clicking a button. Follow the steps below:
-
Navigate to:
Settings app >> System >> Display
-
Click Graphics.

Open graphics settings -
Click “Change default graphics settings.”
Change default graphics settings -
Toggle the slider below “Hardware-accelerated GPU scheduling” into the On position.

Enable Hardware-Accelerated GPU Scheduling


You can now play games on your PC with optimal performance. However, note that this would consume more power.
If you wish to switch it off in the future, all you need to do is toggle the same slider again.
Enable Hardware-Accelerated GPU Scheduling using Registry Editor
Another way to switch on the feature in Windows is through the Windows Registry. Here is how:
Note: Misconfiguration of critical values in the system’s registry could be fatal for your operating system. Therefore, we insist that you create a system restore point before proceeding forward with the process.
You can also use our top selection of disk imaging and backup software so you never lose your data or operating system again.
-
Open the Registry Editor by typing in “regedit” in the Run Command box.
Open Registry Editor -
Paste the following location in the address bar for quick navigation:
Computer\HKEY_LOCAL_MACHINE\SYSTEM\CurrentControlSet\Control\GraphicsDrivers

Navigate to GraphicsDrivers key -
Double-click the “HwSchMode” value.
Edit HwSchMode value -
Change its value data to “2”.
Change Value Data to enable GPU hardware acceleration -
Restart the computer for the changes to take effect.


After the computer reboots, you will find that Hardware-Accelerated GPU Scheduling has been enabled.
In case you need to turn it off in the future, return to the same location within the Registry Editor and change the Value Data of “HwSchMode” to 1. This, too, will require a reboot.
Closing Words
Hardware acceleration is a neat trick to increase the performance of your PC. Since Microsoft has introduced it as a built-in feature in Windows 10, it does not require you to overclock your hardware. Thus, the GPU is not overburdened with the added load.
Unlike overclocking, your hardware is safe from over-utilization and unnecessary heat dissipation while using the Hardware-Accelerated GPU Scheduling feature.
What are the minimum requirements to enable Hardware-Accelerated GPU Scheduling?
Your computer must meet the minim requirements in terms of hardware, driver, and OS version to enable Hardware-Accelerated GPU Scheduling:
-Nvidia GTX 1000 or later GPU/AMD 5600 series or later GPU
-Nvidia driver version 451.48 later/ AMD Adrenalin edition 20.5.1 or later
-Windows 10 version 2004 or later
Is it safe to enable Hardware-Accelerated GPU Scheduling?
The short answer is Yes, it is safe to enable Hardware-Accelerated GPU Scheduling. This is because, unlike overclocking, GPU hardware acceleration does not put a significant load on the GPU. Instead, Hardware-Accelerated GPU Scheduling allows the GPU to manage its own vRAM, eliminating the overhead time of communication with the OS, resulting in faster response rates from the GPU.
Quick Links
-
What Is Hardware-Accelerated GPU Scheduling?
-
Should You Enable Hardware-Accelerated GPU Scheduling?
-
What You’ll Need to Make This Feature Work
-
Turn On Hardware-Accelerated GPU Scheduling in Windows 10
-
Enable Hardware-Accelerated GPU Scheduling in Windows 11
Summary
- Hardware-Accelerated Scheduling reduces the load on your CPU and can improve your PC’s performance.
- To enable it on Windows 10, head into Settings > System > Display > Graphics Settings and toggle on «Hardware-Accelerated GPU Scheduling.»
- On Windows 11, navigate to Settings > System > Display > Graphics > Change Default Graphics Settings and enable «Hardware-Accelerated GPU Scheduling.»
Windows 10 and Windows 11 come with an advanced setting, called Hardware-Accelerated GPU Scheduling, which can boost gaming and video performance using your PC’s GPU. We’ll show you how to enable the feature and thereby potentially get a performance increase.
What Is Hardware-Accelerated GPU Scheduling?
Usually, your computer’s processor offloads some visual and graphics-intensive data to the GPU to render so that games, multimedia, and other apps run smoothly. The CPU gathers the frame data, assigns commands, and prioritizes them one by one so that the GPU can render the frame.
With the Hardware-Accelerated GPU Scheduling feature, the GPU’s scheduling processor and memory (VRAM) take over the same work and runs it in batches to render the frames. This allows your GPU to reduce the load on your CPU and improve latency, potentially making your PC run better.
Should You Enable Hardware-Accelerated GPU Scheduling?
If you have a supported graphics card, it’s a good idea to enable GPU scheduling as it helps improve your computer’s overall performance. You’ll likely see performance improvements when you’re running resource-intensive tasks, such as video editing or gaming.
The only reason you shouldn’t use this feature is if you experience any issues after enabling it. If your apps suddenly stop working or you have graphics-related problems after turning it on, then GPU scheduling is best left disabled. Fortunately, disabling the feature after testing it is as easy as turning it on.
What You’ll Need to Make This Feature Work
Though this feature debuted with Windows 10 May 2020 Update, it still comes disabled in Windows 10 and Windows 11. Also, your computer needs to have an NVIDIA (GTX 10-series and later) or AMD (5600 series or later) graphics card with the latest graphics driver.
Unfortunately, there is not yet any specific hardware combination (CPU and GPU) known to eke out the best performance using the feature. So, your mileage may vary depending on the CPU, GPU, and graphics drivers on your PC.
Here’s how you can enable it on your Windows 10 and 11 PC. It’s a good idea to update the graphics drivers on your PC before you begin.
Turn On Hardware-Accelerated GPU Scheduling in Windows 10
There are two ways to enable Hardware-Accelerated GPU Scheduling on Windows 10: use the Settings app or the Registry Editor. Both accomplish the same thing, though the Settings app is much easier.
Using Settings
Start by launching the Settings app on your PC. You can do this by pressing Windows+i.
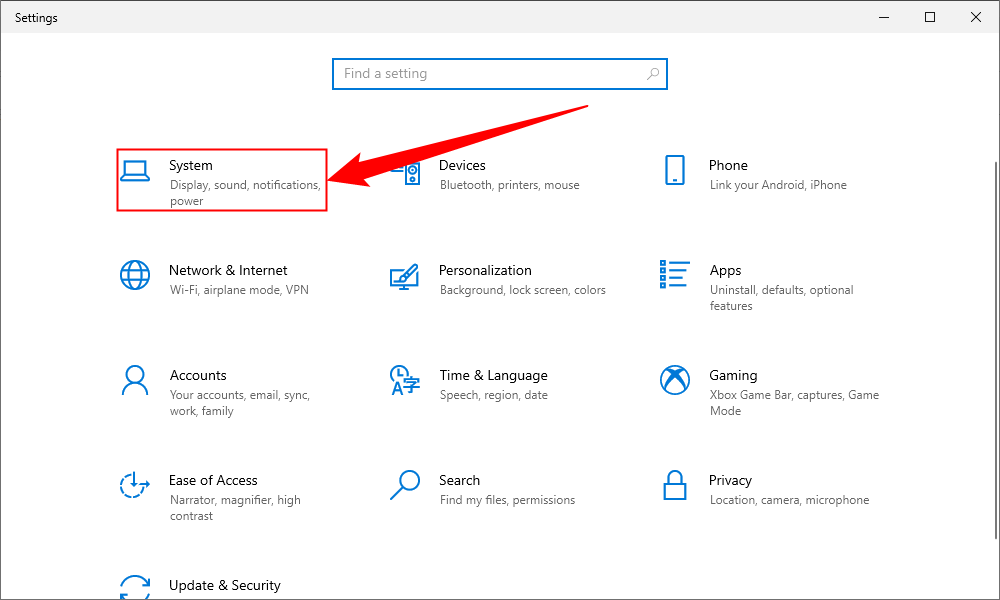
In Settings, select «System.»
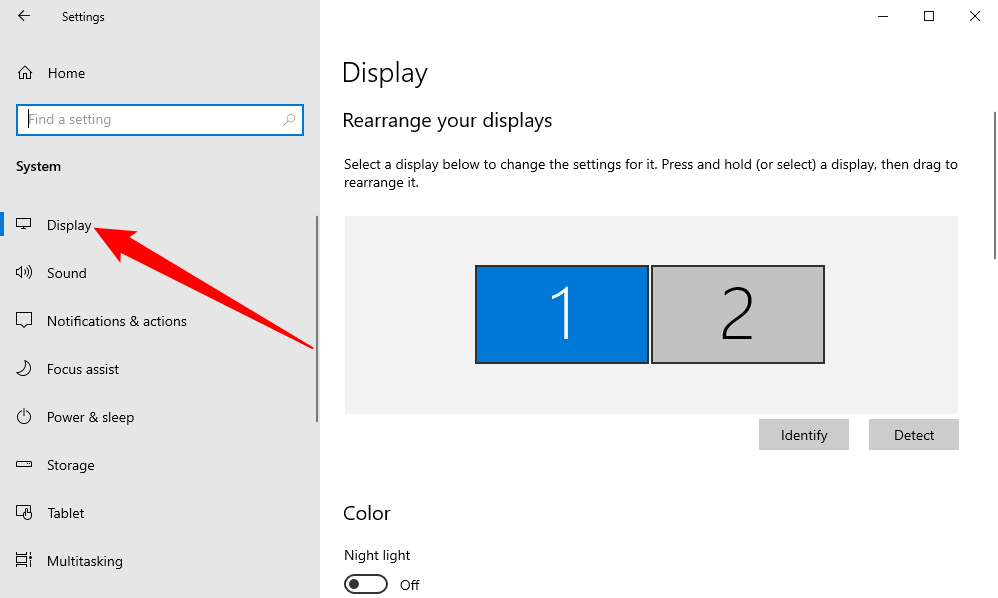
In the sidebar on the left, click «Display.»
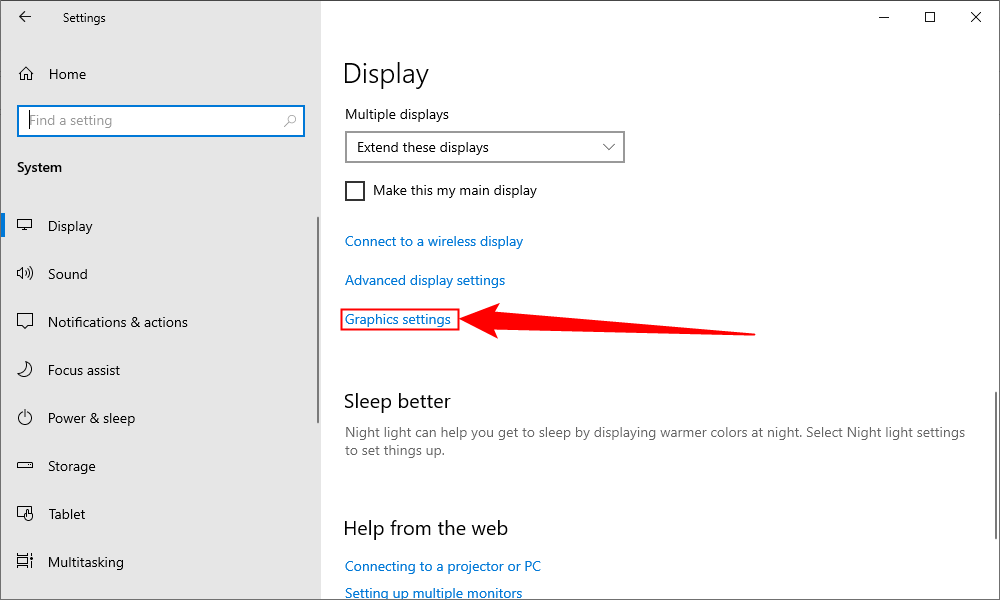
On the right pane, at the bottom, choose «Graphics Settings.»
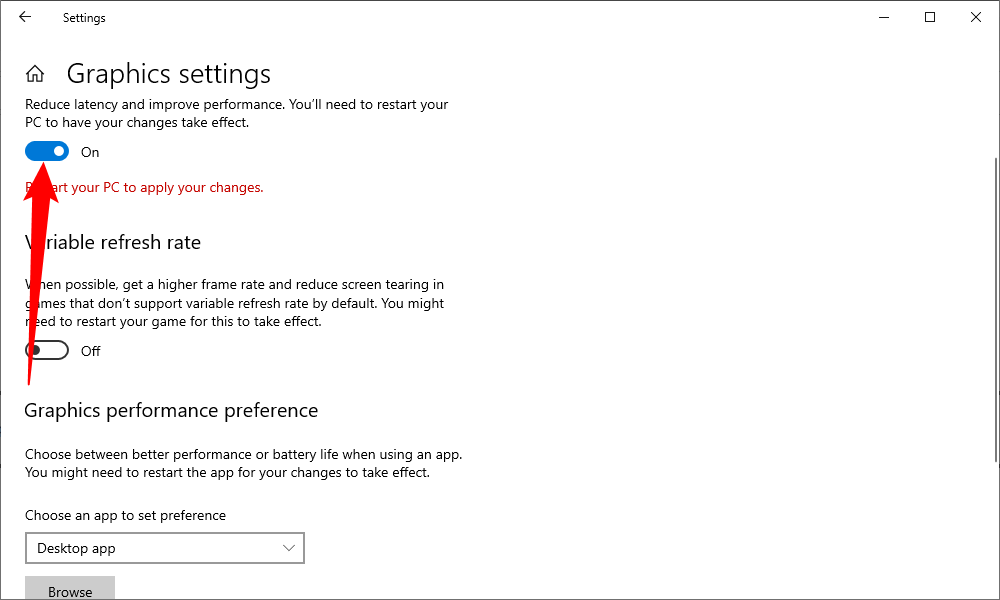
On the following screen, toggle on the «Hardware-Accelerated GPU Scheduling» option.
To disable the feature in the future, simply toggle off the «Hardware-Accelerated GPU Scheduling» option again.
Close the Settings app and reboot your PC to bring your changes into effect.
Using the Registry Editor
To enable Hardware-Accelerated GPU Scheduling via the Registry Editor, open the Run box by pressing Windows+R, then type the following and press Enter:
regedit
In the User Account Control prompt that opens, select «Yes,» since it’s necessary to make changes to the registry.
When the Registry Editor opens, in the path box at the top, type the following and press Enter:
Computer\HKEY_LOCAL_MACHINE\SYSTEM\CurrentControlSet\Control\GraphicsDrivers
In the pane on the right, double-click «HwSchMode.»
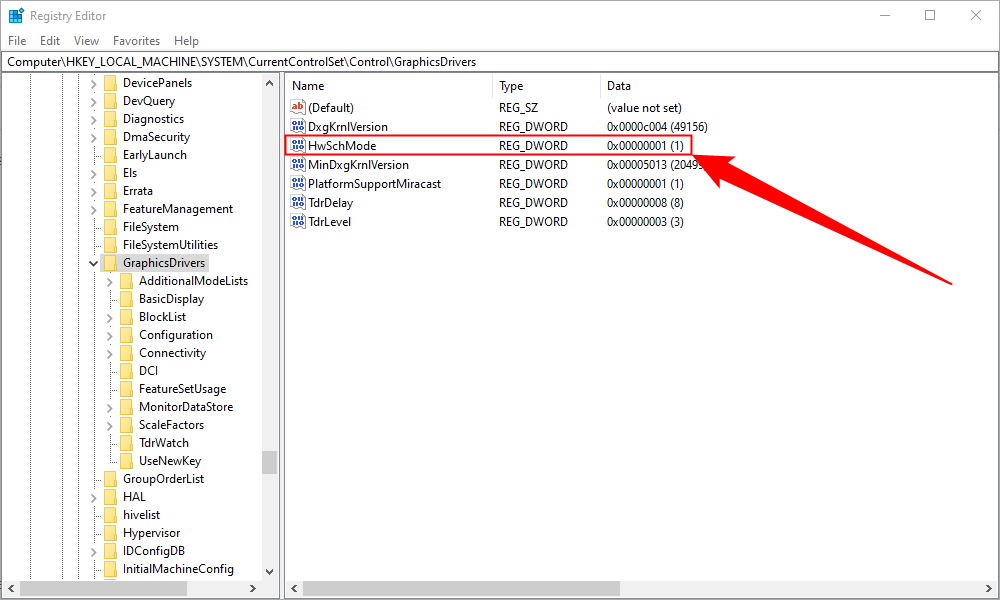
On the entry edit box, select the «Value Data» field and enter 2. In the «Base» section, choose «Hexadecimal.» Then, select «OK.»

In the future, to disable the feature, enter 1 in the «Value Data» field, choose «Hexadecimal,» and select «OK.»
Close Registry Editor, restart your PC, and you have Hardware-Accelerated GPU Scheduling enabled on your computer. Enjoy!
Enable Hardware-Accelerated GPU Scheduling in Windows 11
To enable the GPU scheduling in Windows 11, press Windows+i to open the Settings app. Go to the «System» section, then select the «Display» option from the right-hand side.

From the «Related Settings» section, select «Graphics.»
Choose «Change Default Graphics Settings.»
Then, toggle on the switch under «Hardware-Accelerated GPU Scheduling» and select «Yes» from the User Access Control prompt that shows up.
If you decide you want to disable GPU scheduling later, simply toggle off the «Hardware-Accelerated GPU Scheduling» option.
After that, you can close the «Settings» app and restart your PC to apply the change.
Microsoft states that you may not witness any significant changes immediately. However, if this feature hinders your PC’s performance instead of improving, you can disable it.
That’s it! You can check if it improves the games and apps experience on your Windows 11 PC.

Windows 11 comes with Hardware-Accelerated GPU Scheduling, a feature that helps to reduce latency and improve performance by allowing the graphics card to manage its memory. However, since this is still a new feature, you must be running the latest graphics driver from the manufacturer, and only certain cards are supported.
Nvidia supports Hardware-Accelerated GPU Scheduling, starting with its driver version 451.48 and higher releases. If you have Intel integrated graphics, the feature is available since driver version 27.20.100.8190. If you have an AMD card, you will need a 56000 series or later card.
In this guide, you will learn the steps to enable Hardware-Accelerated GPU Scheduling on Windows 11.
- Enable Hardware-Accelerated GPU Scheduling on Windows 11
- Enable Hardware-Accelerated GPU Scheduling from Registry
To turn on hardware scheduling on Windows 11, use these steps:
-
Open Settings on Windows 11.
-
Click on System.
-
Click the Display page on the right side.
-
Under the “Related settings” section, click the Graphics settings option.

-
Click the Change Default Graphics Settings option.
-
Turn on the Hardware-Accelerated GPU Scheduling toggle switch to enable the feature on Windows 11.
-
Restart your computer.

Once you complete the steps, the new option should apply, and you should be able to see better latency and performance playing games.
Enable Hardware-Accelerated GPU Scheduling from Registry
To enable Hardware-Accelerated GPU Scheduling with the Registry, use these steps:
Warning: It’s important to note that modifying the Windows Registry can cause serious problems if not used properly. It’s assumed you know what you’re doing and that you have created a full backup of your system before proceeding.
-
Open Start.
-
Search for regedit and click the top result to open the Registry Editor.
-
Browse the following path:
HKEY_LOCAL_MACHINE\SYSTEM\CurrentControlSet\Control\GraphicsDrivers
-
Right-click the GraphicsDrivers (folder) key, select the New submenu and click on DWORD (32-bit) value.

-
Name the key HwSchMode and press Enter.
-
Double-click the newly created key and sets its value from 0 to 2.
-
Click the OK button.
-
Restart your computer.


After you complete the steps, Hardware-Accelerated GPU Scheduling should now be enabled on the computer.
If you want to revert the changes, you can use the same instructions, but on step No. 4, right-click the HwSchMode key and select the Delete option. If the key was already available, you could change its value from 2 to 1 to disable Hardware-Accelerated GPU Scheduling.
Mauro Huculak is a
Windows How-To Expert and founder of
Pureinfotech
(est. 2010). With over 21 years as a technology writer and IT Specialist,
Mauro specializes in Windows, software, and cross-platform systems such as Linux, Android, and macOS.
Certifications:
Microsoft Certified Solutions Associate (MCSA),
Cisco Certified Network Professional (CCNP),
VMware Certified Professional (VCP),
and
CompTIA A+ and Network+.
Mauro is a recognized Microsoft MVP and has also been a long-time contributor to Windows Central.
You can follow him on
YouTube,
Threads,
BlueSky,
X (Twitter),
LinkedIn and
About.me.
Email him at [email protected].
-
Home
-
News
- How to Enable Hardware-Accelerated GPU Scheduling Windows 10/11?
By Aurelie | Follow |
Last Updated
This post mainly introduces you to what Hardware-Accelerated GPU Scheduling Windows 10/11 is and two ways to enable it. For more hot IT information and solutions, you can visit MiniTool Website to keep up with the happenings.
Hardware-Accelerated GPU Scheduling Windows 10/11
Hardware-Accelerated GPU Scheduling is a utility in Windows 10/11 which enables you to enjoy better performance when gaming. It works by managing its own VRAM rather than the OS.
At the same time, the Hardware-Accelerated GPU Scheduling feature passes most GPU scheduling tasks to a dedicated GPU-based scheduling processor. In that way, your GPU will relieve the processor from heavy work and reduce latency.
In the following content, we will show you two ways to enable Hardware-Accelerated GPU Scheduling Windows 10 and Windows 11.
How to Enable Hardware-Accelerated GPU Scheduling Windows 10/11?
Way 1: Enable Hardware-Accelerated GPU Scheduling via Settings
If your device supports Hardware-Accelerated GPU Scheduling Windows 10, you can directly find this feature through Settings.
Step 1. Open Windows Start and click the gear icon to launch Settings.
Step 2. Click on System > Display.
Step 3. Hit Graphics settings under Multiple Displays.
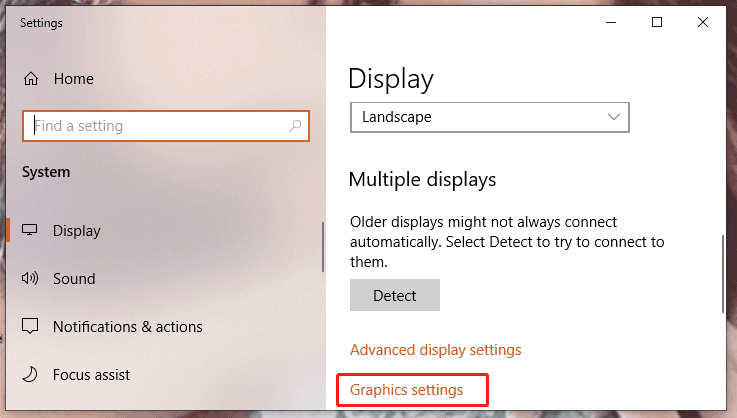
Step 4. Turn on Hardware-Accelerated GPU scheduling.
Warning: This tool is only available for GeForce 10, Radon 5600 or Radeon 5700 users to improve their system performance and reduce latency. If experiencing Hardware-Accelerated GPU Scheduling not showing, the only reason is that your hardware doesn’t support it at this moment.
Way 2: Enable Hardware-Accelerated GPU Scheduling via Registry Editor
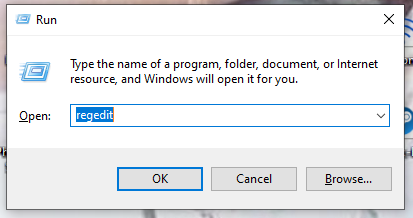
Step 1. Press Win + R to open the Run dialog.
Step 2. Type regedit and hit Enter to launch Registry Editor.
Step 3. Navigate to the following path:
HKEY_LOCAL_MACHINE\SYSTEM\CurrentControlSet\Control\GraphicsDrivers
Step 4. In the right pane, do a right-click on HwSchMode.
Step 5. In the drop-down menu, select Modify.
Step 6. Set the Value Data to 2 and click OK.
Step 7. Restart your PC to apply the changes.
Warning: It is noting although this feature allows you to play games on your PC with the best performance, it is very power-consuming when it is open for a long time. Therefore, you had better turn it off when stopping playing the game.
Final Words
By now, do you take a full picture of Hardware-Accelerated GPU Scheduling Windows 10/11? Do you have an idea about how to enable Hardware-Accelerated GPU Scheduling? Since we provide you with 2 ways to enable it, you can choose either of them. If you still have queries about it, please feel free to share them in the comment area below.
About The Author
Position: Columnist
Aurelie is a passionate soul who always enjoys researching & writing articles and solutions to help others. Her posts mainly cover topics related to games, data backup & recovery, file sync and so on. Apart from writing, her primary interests include reading novels and poems, travelling and listening to country music.