
View this page
Toggle table of contents sidebar
pip allows a user to change its behaviour via 3 mechanisms:
-
command line options
-
environment variables
-
configuration files
This page explains how the configuration files and environment variables work,
and how they are related to pip’s various command line options.
See also
pip config command, which helps manage pip’s configuration.
Configuration Files
Configuration files can change the default values for command line options.
The files are written using standard INI format.
pip has 3 “levels” of configuration files:
-
global: system-wide configuration file, shared across users. -
user: per-user configuration file. -
site: per-environment configuration file; i.e. per-virtualenv.
Additionally, environment variables can be specified which will override any of the above.
Location
pip’s configuration files are located in fairly standard locations. This
location is different on different operating systems, and has some additional
complexity for backwards compatibility reasons. Note that if user config files
exist in both the legacy and current locations, values in the current file
will override values in the legacy file.
Unix
- Global
-
In a “pip” subdirectory of any of the paths set in the environment variable
XDG_CONFIG_DIRS(if it exists), for example/etc/xdg/pip/pip.conf.This will be followed by loading
/etc/pip.conf. - User
-
$HOME/.config/pip/pip.conf, which respects theXDG_CONFIG_HOMEenvironment variable.The legacy “per-user” configuration file is also loaded, if it exists:
$HOME/.pip/pip.conf. - Site
-
$VIRTUAL_ENV/pip.conf
MacOS
- Global
-
/Library/Application Support/pip/pip.conf - User
-
$HOME/Library/Application Support/pip/pip.conf
if directory$HOME/Library/Application Support/pipexists
else$HOME/.config/pip/pip.confThe legacy “per-user” configuration file is also loaded, if it exists:
$HOME/.pip/pip.conf. - Site
-
$VIRTUAL_ENV/pip.conf
Windows
- Global
-
-
On Windows 7 and later:
C:\ProgramData\pip\pip.ini
(hidden but writeable) -
On Windows Vista: Global configuration is not supported.
-
On Windows XP:
C:\Documents and Settings\All Users\Application Data\pip\pip.ini
-
- User
-
%APPDATA%\pip\pip.iniThe legacy “per-user” configuration file is also loaded, if it exists:
%HOME%\pip\pip.ini - Site
-
%VIRTUAL_ENV%\pip.ini
PIP_CONFIG_FILE
Additionally, the environment variable PIP_CONFIG_FILE can be used to specify
a configuration file that’s loaded last, and whose values override the values
set in the aforementioned files. Setting this to os.devnull
disables the loading of all configuration files. Note that if a file exists
at the location that this is set to, the user config file will not be loaded.
Loading order
When multiple configuration files are found, pip combines them in the following
order:
-
Global
-
User
-
Site
-
PIP_CONFIG_FILE, if given.
Each file read overrides any values read from previous files, so if the
global timeout is specified in both the global file and the per-user file
then the latter value will be used.
Naming
The names of the settings are derived from the long command line option.
As an example, if you want to use a different package index (--index-url) and
set the HTTP timeout (--timeout) to 60 seconds, your config file would
look like this:
[global]
timeout = 60
index-url = https://download.zope.org/ppix
Per-command section
Each subcommand can be configured optionally in its own section. This overrides
the global setting with the same name.
As an example, if you want to decrease the timeout to 10 seconds when
running the pip freeze, and use 60 seconds for all other commands:
[global]
timeout = 60

[freeze]
timeout = 10
Boolean options
Boolean options like --ignore-installed or --no-dependencies can be set
like this:
[install]
ignore-installed = true
no-dependencies = yes
To enable the boolean options --no-compile, --no-warn-script-location and
--no-cache-dir, falsy values have to be used:
[global]
no-cache-dir = false

[install]
no-compile = no
no-warn-script-location = false
Repeatable options
For options which can be repeated like --verbose and --quiet, a
non-negative integer can be used to represent the level to be specified:
[global]
quiet = 0
verbose = 2
It is possible to append values to a section within a configuration file. This
is applicable to appending options like --find-links or --trusted-host,
which can be written on multiple lines:
[global]
find-links =
    http://download.example.com

[install]
find-links =
    http://mirror1.example.com
    http://mirror2.example.com

trusted-host =
    mirror1.example.com
    mirror2.example.com
This enables users to add additional values in the order of entry for such
command line arguments.
Environment Variables
pip’s command line options can be set with environment variables using the
format PIP_<UPPER_LONG_NAME> . Dashes (-) have to be replaced with
underscores (_).
-
PIP_TIMEOUT=60is the same as--timeout=60 -
PIP_FIND_LINKS="http://mirror1.example.com http://mirror2.example.com"
is the same as
--find-links=http://mirror1.example.com --find-links=http://mirror2.example.com
Repeatable options that do not take a value (such as --verbose) can be
specified using the number of repetitions:
-
PIP_VERBOSE=3is the same aspip install -vvv
Note
Environment variables set to an empty string (like with export X= on Unix) will not be treated as false.
Use no, false or 0 instead.
Precedence / Override order
Command line options override environment variables, which override the
values in a configuration file. Within the configuration file, values in
command-specific sections override values in the global section.
Examples:
-
--host=foooverridesPIP_HOST=foo -
PIP_HOST=foooverrides a config file with[global] host = foo -
A command specific section in the config file
[<command>] host = bar
overrides the option with same name in the[global]config file section.

Money and Business
I updated pip to 9.0.1 and now I get a warning message in the pip list command.
DEPRECATION: The default format will switch to columns in the future. You can use –format=(legacy|columns) (or define a format=(legacy|columns) in your pip.conf under the [list] section) to disable this warning.
As the message says, if you add the option to specify the format as follows, there will be no warning.pip list --format=columns
However, it is too much trouble to add it every time, so add it to the following configuration file.
pip.conf(Unix, macOS)pip.ini(Windows)
- Location of the pip configuration file
pip.conf,pip.ini pip.conf,pip.iniWhat to add to the file
Table of Contents
- Location of the pip.conf and pip.ini configuration files
- What to add to pip.conf and pip.ini
- legacy
- columns
- freeze
- json
Location of the pip.conf and pip.ini configuration files
The location of the pip configuration file pip.conf (pip.ini on Windows) is as follows. If the configuration file does not exist, create a new one.
- User Guide — pip 9.0.1 documentation
It depends on Unix, macOS, and Windows.
- Unix
$HOME/.config/pip/pip.conf- legacy:
$HOME/.pip/pip.conf - virtualenv:
$VIRTUAL_ENV/pip.conf
- macOS
$HOME/Library/Application Support/pip/pip.conf- legacy:
$HOME/.pip/pip.conf - virtualenv:
$VIRTUAL_ENV/pip.conf
- Windows
%APPDATA%\pip\pip.ini- legacy:
%HOME%\pip\pip.ini - virtualenv:
%VIRTUAL_ENV%\pip.ini
What to add to pip.conf and pip.ini
Add the following to the configuration file.
[list]
format = <list_format>
There are four choices for <list_format>.
legacycolumnsfreezejson
Choose the one you like.
legacy
Display as before.
colorama (0.3.7)
docopt (0.6.2)
idlex (1.13)
jedi (0.9.0)
columns
Package Version
--------- -------
colorama  0.3.7
docopt    0.6.2
idlex     1.13
jedi      0.9.0
freeze
colorama==0.3.7
docopt==0.6.2
idlex==1.13
jedi==0.9.0
json
[{'name': 'colorama', 'version': '0.3.7'}, {'name': 'docopt', 'version': '0.6.2'}, ...
Create pip.conf and remove the pip list warning
When working with Python packages, the Python Package Index (PyPI) is the default repository for downloading and installing packages. However, there may be cases where you need to use a private PyPI repository to access packages that are not available on the public PyPI. In such cases, you will need to configure your pip.conf file with the necessary credentials to access the private repository.
What is pip.conf?
The pip.conf file is a configuration file used by pip, the package installer for Python, to customize its behavior. It allows you to specify various settings, such as the location of the package index, the default version of Python to use, and the credentials for accessing private repositories.
To create a pip.conf file, you can either create a new file named “pip.conf” in the appropriate location or modify the existing pip.conf file if it already exists. The location of the pip.conf file depends on your operating system:
Unix/Mac: ~/.config/pip/pip.conf
Windows: %APPDATA%\pip\pip.ini
Adding Credentials to pip.conf
To add credentials for accessing a private PyPI repository, you need to include a section in the pip.conf file that specifies the repository URL and the corresponding username and password or token. Here is an example of how the section should be structured:
[global]
index-url = https://your-private-pypi-url/simple

[install]
extra-index-url = https://your-private-pypi-url/simple

[credentials]
username = your-username
password = your-password-or-token
Replace “https://your-private-pypi-url/simple” with the actual URL of your private PyPI repository. The “index-url” and “extra-index-url” options specify the primary and additional package indexes to use, respectively.
In the “credentials” section, replace “your-username” with your username for the private repository and “your-password-or-token” with your corresponding password or authentication token.
Using Environment Variables
Alternatively, you can use environment variables to specify the credentials instead of hardcoding them in the pip.conf file. This approach is useful when you want to keep the credentials separate from the configuration file, especially in scenarios where multiple users or machines need access to the private repository.
To use environment variables, modify the pip.conf file as follows:
[global]
index-url = https://your-private-pypi-url/simple

[install]
extra-index-url = https://your-private-pypi-url/simple

[credentials]
username = $YOUR_USERNAME_ENV_VARIABLE
password = $YOUR_PASSWORD_ENV_VARIABLE
Replace “$YOUR_USERNAME_ENV_VARIABLE” and “$YOUR_PASSWORD_ENV_VARIABLE” with the names of the environment variables that store your username and password or token, respectively.
Configuring the pip.conf file with the necessary credentials is essential for accessing private PyPI repositories. By following the steps outlined in this article, you can ensure that your Python packages can be downloaded and installed from your private repository seamlessly.
Examples of using credentials in pip.conf for private PyPI:
Example 1: Basic authentication
[global]
index-url = https://privatepypi.example.com/simple/
username = myusername
password = mypassword
Example 2: Token authentication
[global]

index-url = https://privatepypi.example.com/simple/

[privatepypi.example.com]

username = __token__

password = pypi-AgEIcHlwaS5vcmcCJGFiZjU5ZjFhLWJmZjgtNGQxYS1hMzU0LWEwZjYzYjYyMzQ3YgACMjIzZjFjZjMtZDc3Ni00YmY4LWJjZjAtYjM2YmE4ZjQ1ZTYzAAAzIgACZmQwZDg3ZmQtMzg2ZC00ZDQ1LWEwNzUtZjRiN2Y4NzU0YzYwAAAzIgACZmQwZDg3ZmQtMzg2ZC00ZDQ1LWEwNzUtZjRiN2Y4NzU0YzYwAAAzIgACZmQwZDg3ZmQtMzg2ZC00ZDQ1LWEwNzUtZjRiN2Y4NzU0YzYwAAAzIgACZmQwZDg3ZmQtMzg2ZC00ZDQ1LWEwNzUtZjRiN2Y4NzU0YzYwAAAzIgACZmQwZDg3ZmQtMzg2ZC00ZDQ1LWEwNzUtZjRiN2Y4NzU0YzYwAAAzIgACZmQwZDg3ZmQtMzg2ZC00ZDQ1LWEwNzUtZjRiN2Y4NzU0YzYwAAAzIgACZmQwZDg3ZmQtMzg2ZC00ZDQ1LWEwNzUtZjRiN2Y4NzU0YzYwAAAzIgACZmQwZDg3ZmQtMzg2ZC00ZDQ1LWEwNzUtZjRiN2Y4NzU0YzYwAAAzIgACZmQwZDg3ZmQtMzg2ZC00ZDQ1LWEwNzUtZjRiN2Y4NzU0YzYwAAAzIgACZmQwZDg3ZmQtMzg2ZC00ZDQ1LWEwNzUtZjRiN2Y4NzU0YzYwAAAzIgACZmQwZDg3ZmQtMzg2ZC00ZDQ1LWEwNzUtZjRiN2Y4NzU0YzYwAAAzIgACZmQwZDg3ZmQtMzg2ZC00ZDQ1LWEwNzUtZjRiN2Y4NzU0YzYwAAAzIgACZmQwZDg3ZmQtMzg2ZC00ZDQ1LWEwNzUtZjRiN2Y4NzU0YzYwAAAzIgACZmQwZDg3ZmQtMzg2ZC00ZDQ1LWEwNzUtZjRiN2Y4NzU0YzYwAAAzIgACZmQwZDg3ZmQtMzg2ZC00ZDQ1LWEwNzUtZjRiN2Y4NzU0YzYwAAAzIgACZmQwZDg3ZmQtMzg2ZC00ZDQ1LWEwNzUtZjRiN2Y4NzU0YzYwAAAzIgACZmQwZDg3ZmQtMzg2ZC00ZDQ1LWEwNzUtZjRiN2Y4NzU0YzYwAAAzIgACZmQwZDg3ZmQtMzg2ZC00ZDQ1LWEwNzUtZjRiN2Y4NzU0YzYwAAAzIgACZmQwZDg3ZmQtMzg2ZC00ZDQ1LWEwNzUtZjRiN2Y4NzU0YzYwAAAzIgACZmQwZDg3ZmQtMzg2ZC00ZDQ1LWEwNzUtZjRiN2Y4NzU0YzYwAAAzIgACZmQwZDg3ZmQtMzg2ZC00ZDQ1LWEwNzUtZjRiN2Y4NzU0YzYwAAAzIgACZmQwZDg3ZmQtMzg2ZC00ZDQ1LWEwNzUtZjRiN2Y4NzU0YzYwAAAzIgACZmQwZDg3ZmQtMzg2ZC00ZDQ1LWEwNzUtZjRiN2Y4NzU0YzYwAAAzIgACZmQwZDg3ZmQtMzg2ZC00ZDQ1LWEwNzUtZjRiN2Y4NzU0YzYwAAAzIgACZmQwZDg3ZmQtMzg2ZC00ZDQ1LWEwNzUtZjRiN2Y4NzU0YzYwAAAzIgACZmQwZDg3ZmQtMzg2ZC00ZDQ1LWEwNzUtZjRiN2Y4NzU0YzYwAAAzIgACZmQwZDg3ZmQtMzg2ZC00ZDQ1LWEwNzUtZjRiN2Y4NzU0YzYwAAAzIgACZmQwZDg3ZmQtMzg2ZC00ZDQ1LWEwNzUtZjRiN2Y4NzU0YzYwAAAzIgACZmQwZDg3ZmQtMzg2ZC00ZDQ1LWEwNzUtZjRiN2Y4NzU0YzYwAAAzIgACZmQwZDg3ZmQtMzg2ZC00ZDQ1LWEwNzUtZjRiN2Y4NzU0YzYwAAAzIgACZmQwZDg3ZmQtMzg2ZC00ZDQ1LWEwNzUtZjRiN2Y4NzU0YzYwAAAzIgACZmQwZDg3ZmQtMzg2ZC00ZDQ1LWEwNzUtZjRiN2Y4NzU0YzYwAAAzIgACZmQwZDg3ZmQtMzg2ZC00ZDQ1LWEwNzUtZjRiN2Y4NzU0YzYwAAAzIgACZmQwZDg3ZmQtMzg2ZC00ZDQ1LWEwNzUtZjRiN2Y4NzU0YzYwAAAzIgACZmQwZDg3ZmQtMzg2ZC00ZDQ1LWEwNzUtZjRiN2Y4NzU0YzYwAAAzIgACZmQwZDg3ZmQtMzg2ZC00ZDQ1LWEwNzUtZjRiN2Y4NzU0YzYwAAAzIgACZmQwZDg3ZmQtMzg2ZC00ZDQ1LWEwNzUtZjRiN2Y4NzU0YzYwAAAzIgACZmQwZDg3ZmQtMzg2ZC00ZDQ1LWEwNzUtZjRiN2Y4NzU0YzYwAAAzIgACZmQwZDg3ZmQtMzg2ZC00ZDQ1LWEwNzUtZjRiN2Y4NzU0YzYwAAAzIgACZmQwZDg3ZmQtMzg2ZC00ZDQ1LWEwNzUtZjRiN2Y4NzU0YzYwAAAzIgACZmQwZDg3ZmQtMzg2ZC00ZDQ1LWEwNzUtZjRiN2Y4NzU0YzYwAAAzIgACZmQwZDg3ZmQtMzg2ZC00ZDQ1LWEwNzUtZjRiN2Y4NzU0YzYwAAAzIgACZmQwZDg3ZmQtMzg2ZC00ZDQ1LWEwNzUtZjRiN2Y4NzU0YzYwAAAzIgACZmQwZDg3ZmQtMzg2ZC00ZDQ1LWEwNzUtZjRiN2Y4NzU0YzYwAAAzIgACZmQwZDg3ZmQtMzg2ZC00ZDQ1LWEwNzUtZjRiN2Y4NzU0YzYwAAAzIgACZmQwZDg3ZmQtMzg2ZC00ZDQ1LWEwNzUtZjRiN2Y4NzU0YzYwAAAzIgACZmQwZDg3ZmQtMzg2ZC00ZDQ1LWEwNzUtZjRiN2Y4NzU0YzYwAAAzIgACZmQwZDg3ZmQtMzg2ZC00ZDQ1LWEwNzUtZjRiN2Y4NzU0YzYwAAAzIgACZmQwZDg3ZmQtMzg2ZC00ZDQ1LWEwNzUtZjRiN2Y4NzU0YzYwAAAzIgACZmQwZDg3ZmQtMzg2ZC00ZDQ1LWEwNzUtZjRiN2Y4NzU0YzYwAAAzIgACZmQwZDg3ZmQtMzg2ZC00ZDQ1LWEwNzUtZjRiN2Y4NzU0YzYwAAAzIgACZmQwZDg3ZmQtMzg2ZC00ZDQ1LWEwNzUtZjRiN2Y4NzU0YzYwAAAzIgACZmQwZDg3ZmQtMzg2ZC00ZDQ1LWEwNzUtZjRiN2Y4NzU0YzYwAAAzIgACZmQwZDg3ZmQtMzg2ZC00ZDQ1LWEwNzUtZjRiN2Y4NzU0YzYwAAAzIgACZmQwZDg3ZmQtMzg2ZC00ZDQ1LWEwNzUtZjRiN2Y4NzU0YzYwAAAzIgACZmQwZDg3ZmQtMzg2ZC00ZDQ1LWEwNzUtZjRiN2Y4NzU0YzYwAAAzIgACZmQwZDg3ZmQtMzg2ZC00ZDQ1LWEwNzUtZjRiN2Y4NzU0YzYwAAAzIgACZmQwZDg3ZmQtMzg2ZC00ZDQ1LWEwNzUtZjRiN2Y4NzU0YzYwAAAzIgACZmQwZDg3ZmQtMzg2ZC00ZDQ1LWEwNzUtZjRiN2Y4NzU0YzYwAAAzIgACZmQwZDg3ZmQtMzg2ZC00ZDQ1LWEwNzUtZjRiN2Y4NzU0YzYwAAAzIgACZmQwZDg3ZmQtMzg2ZC00ZDQ1LWEwNzUtZjRiN2Y4NzU0YzYwAAAzIgACZmQwZDg3ZmQtMzg2ZC00ZDQ1LWEwNzUtZjRiN2Y4NzU0YzYwAAAzIgACZmQwZDg3ZmQtMzg2ZC00ZDQ1LWEwNzUtZjRiN2Y4NzU0YzYwAAAzIgACZmQwZDg3ZmQtMzg2ZC00ZDQ1LWEwNzUtZjRiN2Y4NzU0YzYwAAAzIgACZmQwZDg3ZmQtMzg2ZC00ZDQ1LWEwNzUtZjRiN2Y4NzU0YzYwAAAzIgACZmQwZDg3ZmQtMzg2ZC00ZDQ1LWEwNzUtZjRiN2Y4NzU0YzYwAAAzIgACZmQwZDg3ZmQtMzg2ZC00ZDQ1LWEwNzUtZjRiN2Y4NzU0YzYwAAAzIgACZmQwZDg3ZmQtMzg2ZC00ZDQ1LWEwNzUtZjRiN2Y4NzU0YzYwAAAzIgACZmQwZDg3ZmQtMzg2ZC00ZDQ1LWEwNzUtZjRiN2Y4NzU0YzYwAAAzIgACZmQwZDg3ZmQtMzg2ZC00ZDQ1LWEwNzUtZjRiN2Y4NzU0YzYwAAAzIgACZmQwZDg3ZmQtMzg2ZC00ZDQ1LWEwNzUtZjR

Requiring an active virtual environment for pip
By now it should be clear that using virtual environments is a great way to
keep your development environment clean and keeping different projects’
requirements separate.
When you start working on many different projects, it can be hard to remember to
activate the related virtual environment when you come back to a specific
project. As a result of this, it is very easy to install packages globally
while thinking that you are actually installing the package for the virtual
environment of the project. Over time this can result in a messy global package
list.
In order to make sure that you install packages to your active virtual
environment when you use pip install, consider adding the following
line to your ~/.bashrc file:
export PIP_REQUIRE_VIRTUALENV=true
After saving this change and sourcing the ~/.bashrc file with
source ~/.bashrc, pip will no longer let you install packages if you are not
in a virtual environment. If you try to use pip install outside of a
virtual environment pip will gently remind you that an activated virtual
environment is needed to install packages.
$ pip install requests
Could not find an activated virtualenv (required).
You can also do this configuration by editing your pip.conf or
pip.ini file. pip.conf is used by Unix and Mac OS X operating
systems and it can be found at:
Similarly, the pip.ini file is used by Windows operating systems and it
can be found at:
%USERPROFILE%\pip\pip.ini
If you don’t have a pip.conf or pip.ini file at these locations,
you can create a new file with the correct name for your operating system.
If you already have a configuration file, just add the following line under the
[global] settings to require an active virtual environment:
require-virtualenv = true
If you did not have a configuration file, you will need to create a new one and
add the following lines to this new file:
[global]
require-virtualenv = true
You will of course need to install some packages globally (usually ones that
you use across different projects consistently) and this can be accomplished by
adding the following to your ~/.bashrc file:
gpip() {
    PIP_REQUIRE_VIRTUALENV=false pip "$@"
}
After saving the changes and sourcing your ~/.bashrc file you can now
install packages globally by running gpip install. You can change the name
of the function to anything you like, just keep in mind that you will have to
use that name when trying to install packages globally with pip.
Caching packages for future use
Every developer has preferred libraries and when you are working on a lot of
different projects, you are bound to have some overlap between the libraries
that you use. For example, you may be using the requests library in a lot
of different projects.
It is surely unnecessary to re-download the same packages/libraries each time
you start working on a new project (and in a new virtual environment as a
result). Fortunately, starting with version 6.0, pip provides an on-by-default
caching mechanism that doesn’t
need any configuration.
When using older versions, you can configure pip in such a way that it tries to
reuse already installed packages, too.
On Unix systems, you can add the following line to your .bashrc or
.bash_profile file.
export PIP_DOWNLOAD_CACHE=$HOME/.pip/cache
You can set the path to anywhere you like (as long as you have write
access). After adding this line, source your .bashrc
(or .bash_profile) file and you will be all set.
Another way of doing the same configuration is via the pip.conf or
pip.ini files, depending on your system. If you are on Windows, you can
add the following line to your pip.ini file under [global] settings:
download-cache = %USERPROFILE%\pip\cache
Similarly, on Unix systems you should simply add the following line to your
pip.conf file under [global] settings:
download-cache = $HOME/.pip/cache
Even though you can use any path you like to store your cache, it is recommended
that you create a new folder in the folder where your pip.conf or
pip.ini file lives. If you don’t trust yourself with all of this path
voodoo, just use the values provided here and you will be fine.
Python-pip, by default, installs packages on a global scope – for all users. In Unix-based systems, the packages are installed on /usr/local/bin/ whereas, on Windows, they are located in the Program Files directory.
This article focuses on the cases we are interested in installing Python packages in a specific folder. We will also explain how to use and remove packages installed in this manner.
There are two ways to install packages to a particular directory – through the terminal (command line) and by editing the pip configuration file.
Method 1: Through the terminal/ command line
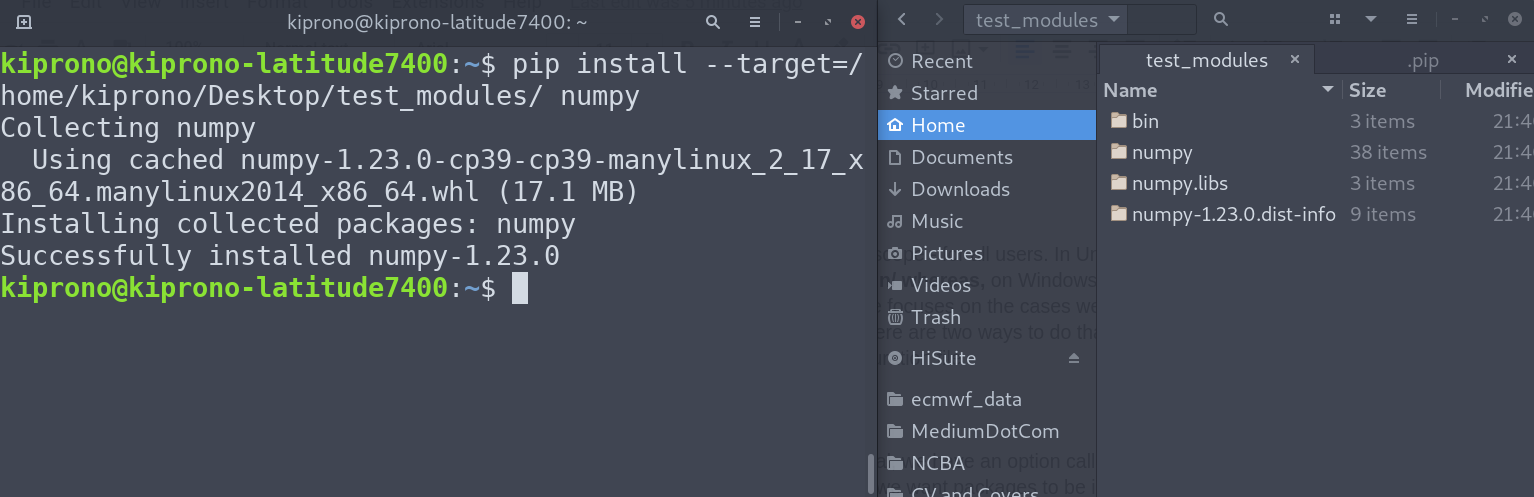
When installing the modules using pip on the terminal or Windows PowerShell, we have a “target” option or short-hand “t” that allows us to specify the directory to which we want packages to be installed. The general syntax is as shown below
pip install -target=<target_dir> <package_name>
Here is an example of how I installed NumPy to the “test_modules” folder on my Desktop,
Method 2: Editing pip Configuration file
You can also specify the default pip installation location in the configuration file, which is located in the following path based on the OS (you may have to create these paths and files):
Unix and Mac OS
$HOME/.config/pip/pip.conf
Windows
%HOME%\pip\pip.ini
$HOME is the home directory of the current user on Linux/Mac, usually located at /home/<username>. It can also be written as a tilde (~). On Windows, the home directory %HOME% is located in C:\Users\<username> for the logged-in user. Like in Linux, the ~ also means home folder when using WindowsPowerShell.
Example (Linux)
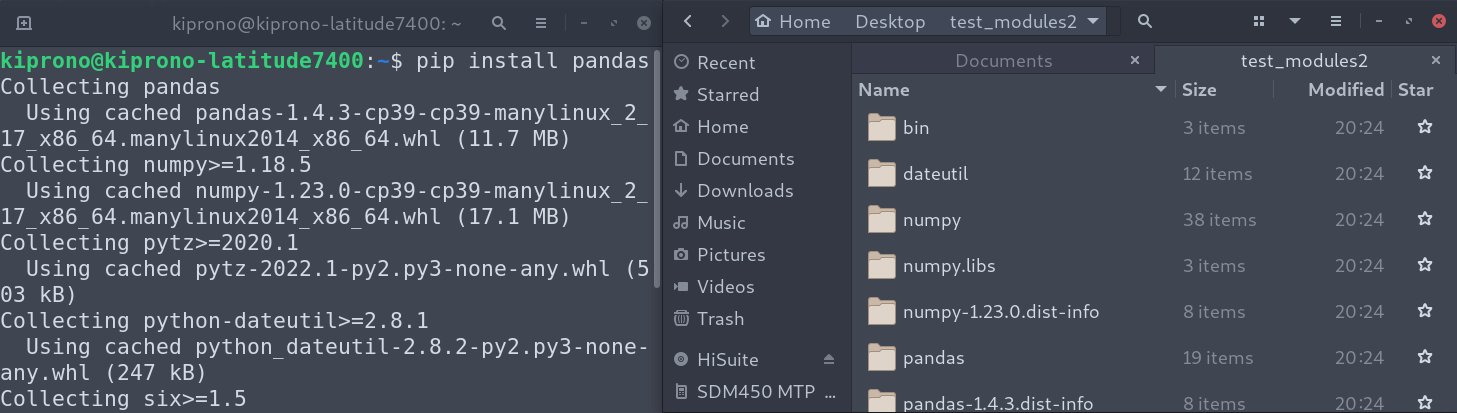
At the start, the directory does not exist, so I have to create the pip directory and add the configuration file pip.config inside it. Executed the following command on the terminal:
mkdir -p ~/.config/pip && touch ~/.config/pip/pip.conf
(“p” option allows us to create a folder within a folder if there’s a need, whereas && enables us to join two commands into one line.).
That creates an empty configuration file. On the file, we define the default installation location with the following general syntax:
[global]
target=<path/to/install/packages>
In our example, we want to install packages on the “test_modules2″ directory on the Desktop. The file ~/.config/pip/pip.config will have the following contents:
[global]
target=~/Desktop/test_modules2
On installing Python packages now, they are installed on the above directory. See below.
Example (Windows)
First of all, we need the pip.ini file. To get that, we run the following command on Windows PowerShell (of course, you can also create files and folders on the GUI):
mkdir ~\pip ; cd > ~\pip\pip.ini
The semi-colon (;) is used to combine two commands in one line, and cd > creates an empty file, that is to say, the command cd > ~\pip\pip.ini in our case creates a pip.ini file within the pip folder in the home directory (C:\Users\<username>).
Next, we need to specify the target directory in the configuration file pip.ini. For that, we add the following content to the configuration file:
[global]
target=<target_dir>
Where <target_dir> is the default directory for pip installation going forward unless you change the settings on the configuration file.
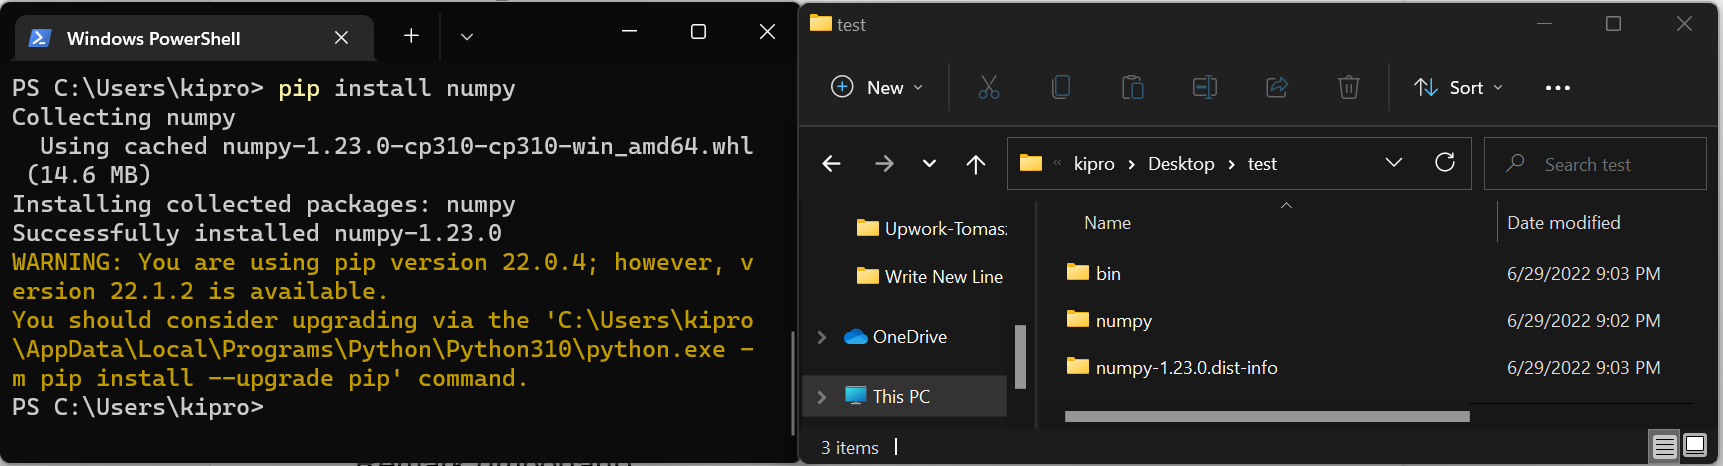
Note: If the target directory indicated on the config file does not exist, it is created. You can read more about the pip configuration file in the pip documentation.
Removing Packages Installed Using the Above Methods
To remove the packages installed in the above methods, delete the folders with the installed package(s). Remember to remove the settings on the configuration file if you no longer need them and want to go to default.
(Important) Remark on Usage of Modules Installed as Above
After setting the default pip installation location, Python may continue looking for installed modules on the default paths. If you want to learn how to import packages from the location we just created with the above methods, see this article.